Change Document for New C/R360
Gainsight NXT
Change documents help customers to learn about the changes that took place in the application.
Overview
A lot of areas in the NXT product are in the process of being redesigned and powered by Gainsight’s Horizon Experience. C/R360 is one of the most utilized areas within Gainsight and with this enhancement, the end-user experience has been improved. Gainsight always gives highest priority to the customers and their requirements or feedback while enhancing any feature.
Gainsight has redesigned the C360, powered by Gainsight Horizon Experience. The new C360 feature is simplified from its earlier version to improve the user experience. We have added new enhancements, enhanced existing functionalities to simplify creating an Activity, CTA, Person, Pinned or Unpinned sections, Inline edits, etc.
Note: The new C360 supports the Gainsight widget in Salesforce and Microsoft Dynamics but is not currently supported in Zendesk.
The areas of improvement are largely categorized into the following two sections as listed in the table below:
| Improvements for Admins | Improvements for End Users (CSMs, Execs, Sales teammates, PMs) |
|---|---|
| IMPORTANT: Activating the new 360 in the customer instance is completely admin-supervised. Refer here for more information. | |
Improvements for Admins |
Making 360 Layouts Discoverable |
In Current 360:
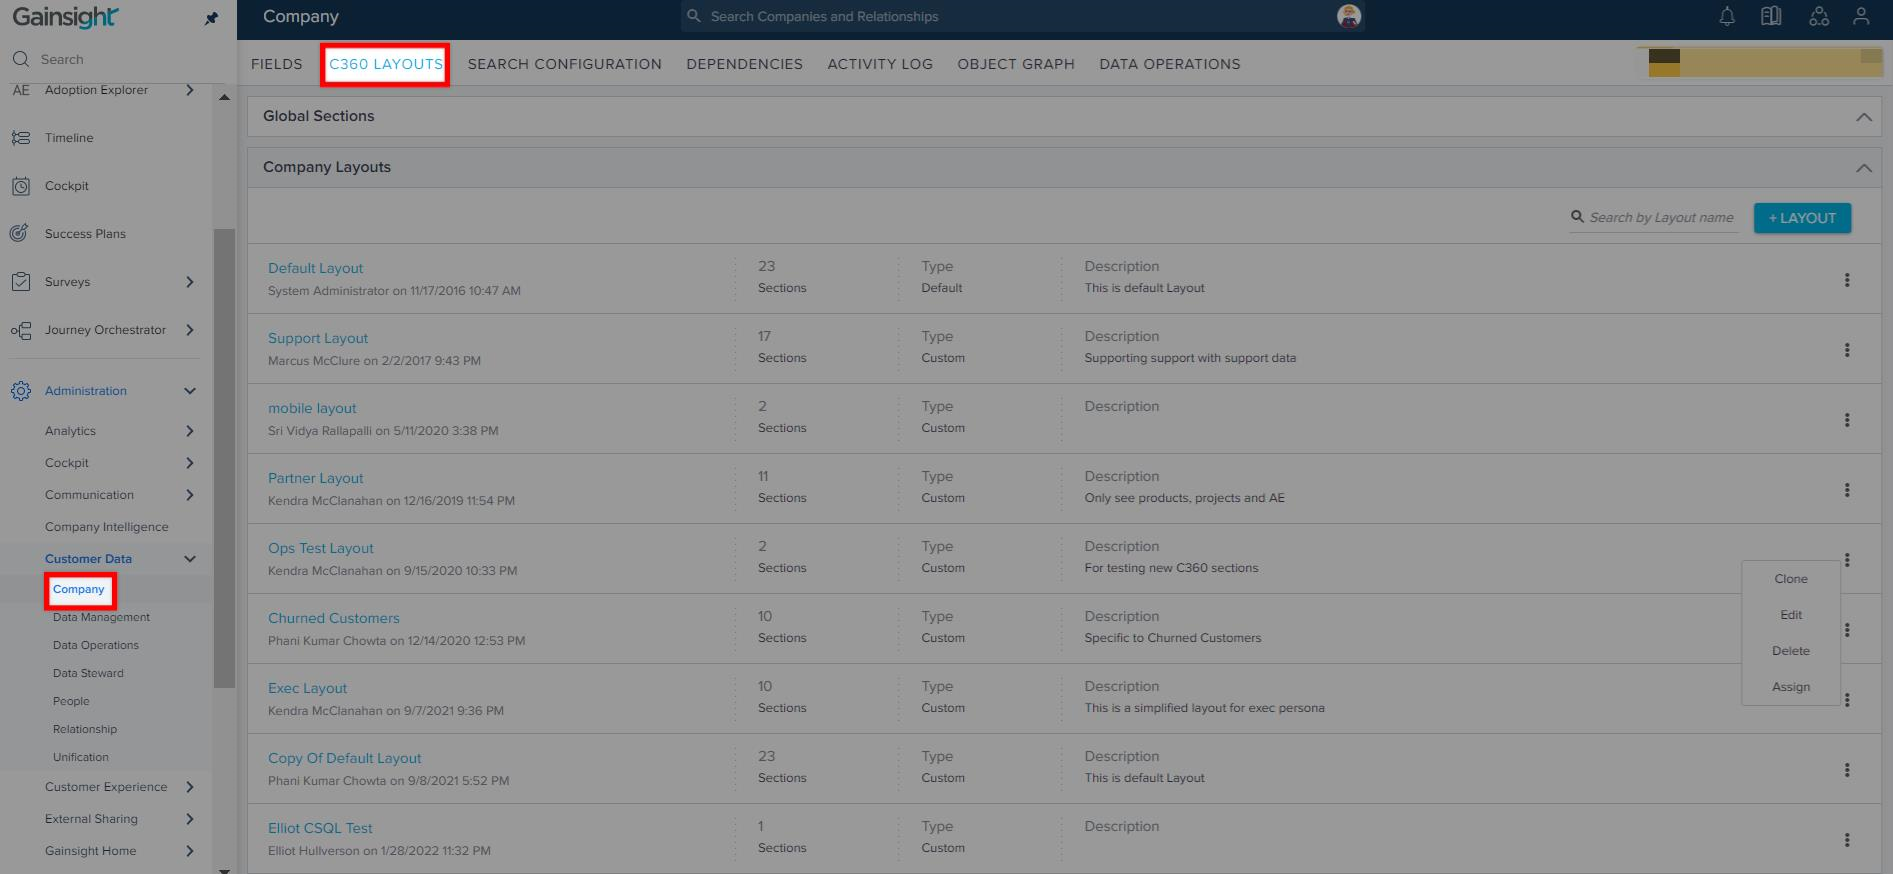
Navigating to the 360 layout administration in the current experience is not intuitive. This is because the right options aren't displayed when admins search for ‘layout’ or ‘360’ in the Navigation > Search field. Admins need to navigate to the Administration > Company > C360 LAYOUTS tab to manage C360 layouts. Similarly, admins need to navigate to Administration > Relationship > TYPES > click on a Relationship type > LAYOUTS to manage R360 layouts.
In Horizonized 360:
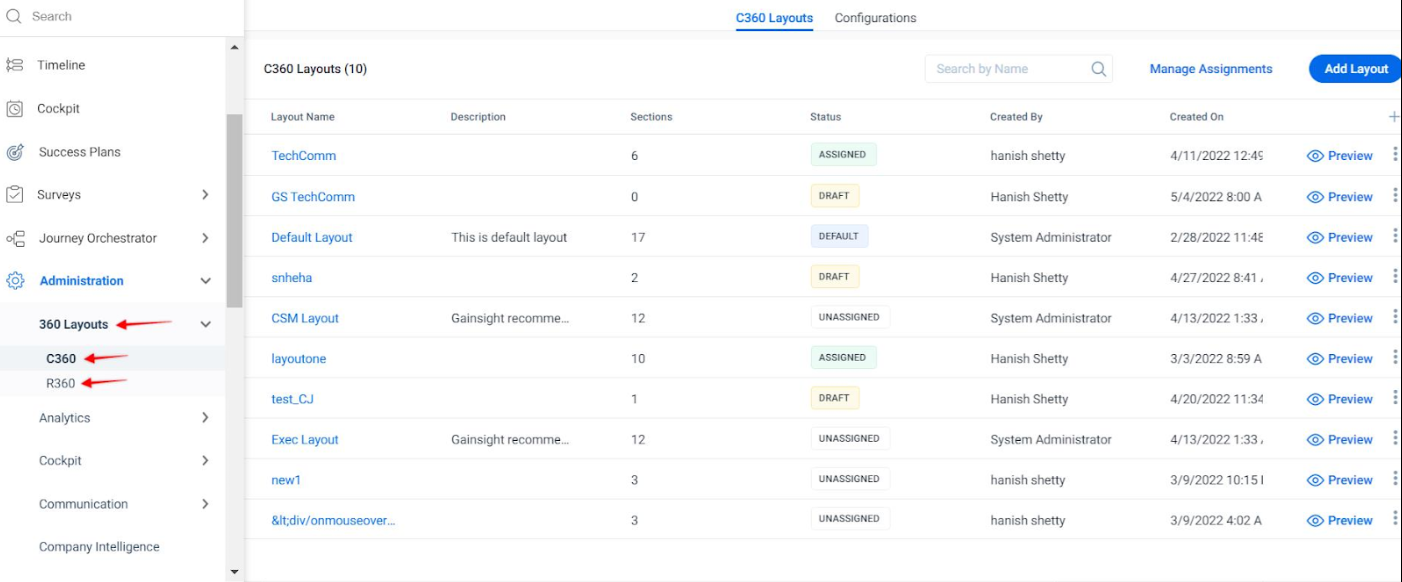
360 layout administration is now just one search away. With the new 360 in the application, a new navigation item 360 Layouts is added under Administration list in the left navigation pane.
Admins can now access C360 and R360 directly from the newly added navigation item 360 Layouts under the navigation pane. This simplifies the navigation process and saves time for admins. Gainsight has carefully designed the 360 Layouts and Configuration tabs to improve the overall experience of administrators.
Improved Layout Management Experience |
In Current 360:
The current listing screen has two sections: Global Sections and Company Layouts. Both of these sections have a few columns that do not give sufficient information to the admins from this page, they need to manually open each layout/global-section manually to learn about them.

In Horizonized 360:
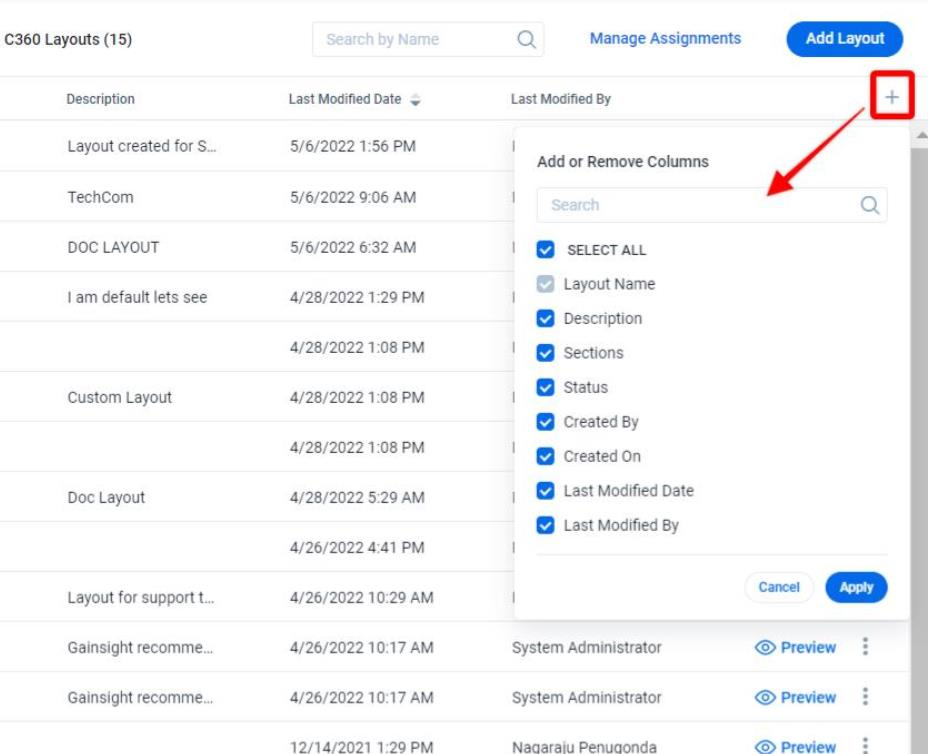
The layout management experience is completely reimagined. All the listing pages now have column headers available for the admins to easily identify the important information about each layout/section.
Admins can also decide the number of columns and which columns they want to see on all of the listing page. Admins can simply click + to access the list of columns and select/deselect the checkboxes based on their requirements.

360 layout configuration experience is completely reimagined and is made intuitive by guiding the admins at each step on what exactly needs to be done next. This experience enables `users with minimal experience` to customize the 360 views. A better organized layout management page consists of
- C360 Layouts Tab
- Add Layout
- Manage Assignments
- Configurations Tab
- Pre-built Sections (FKA GLOBAL sections)
- [Edit/Create] Basic Details (step 1)
- [Edit/Create] Configure Section (step 2)
- Assign
- Relationship Section Views
- Edit/Add Relationship Section Views
- Assign
- Configure
- Summary Ribbon
- List View
- Card View
- Edit/Add Relationship Section Views
Simplified Layout Configuration Flow |
In Current 360:
Admins must have adequate prior knowledge and experience about how layouts are configured. There are no specific sections which are contextual and help admins to perform the configuration task independently. This non-intuitive layout configuration experience is challenging especially for admins with minimal experience.
In Horizonized 360:
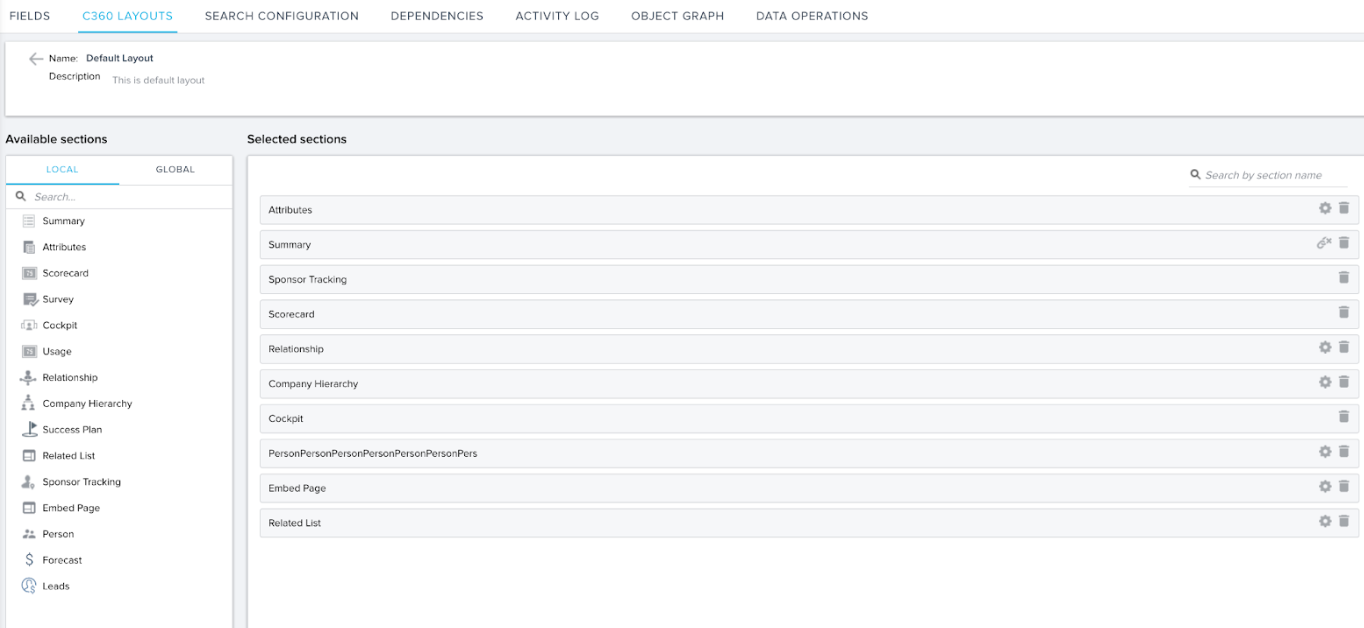
360 layout configuration experience is completely reimagined and made intuitive by guiding the admins at each step on what exactly needs to be done next. This experience enables `users with minimal experience` to configure and update the 360 views.
Note: Gainsight allows admins to save layouts in draft mode to save time during the layout creation process. For more information, refer to the Configure 360 Layouts article.
Better Ways to Organize Information Across 360 |
In Current 360:
The 360 layouts currently have some barriers/limitations around organizing customer information across 360. Many at times, this complicates the admins’ job, forcing them to rely on workarounds which lead to too many 360 sections.
In Horizonized 360:
These barriers are now removed to enable admins to create more meaningful layouts and workflows. Some examples are -
-
Reports - Admins can now group reports built on different objects under the same section. Same object reports can further be grouped together within a container. This helps admins keep the number of sections on 360 in control. For more information, refer to the Additional Resources section in this article.
-
Attributes - Attributes can now be organized into logical groups. This helps admins make the attributes more consumable for end users.
-
Summary - Summary section in the new experience is way more flexible and customizable. For example, admins can now include full fledged reports(this was limited to KPI reports earlier) in the summary section. These improvements enable admins to organize the customer information effectively within the Summary section.
New Out-Of-Box (Standard) Widgets on Summary |
In Horizonaized 360:
Standard widgets are the Out-Of-Box widgets that can be included in the Summary section. The range of Standard Widgets is now broadened. These standard widgets are designed to highlight key CS metrics and require minimal to no configuration. This reduces the admin burden significantly by making it simple to derive insights from standard data. Following are a few newly introduced widgets:
-
Attributes: An improved and much more customizable Attributes widget. The Attributes widget on the Summary section of C360/R360 allows Admins to add fields from the Company/Relationship object respectively. Admins can also add multiple instances of the Attributes widget to the Summary, and add required fields in each instance of the Attributes widget. With the improved attributes widget admins can enable end-users to edit the fields right from the Summary section.
-
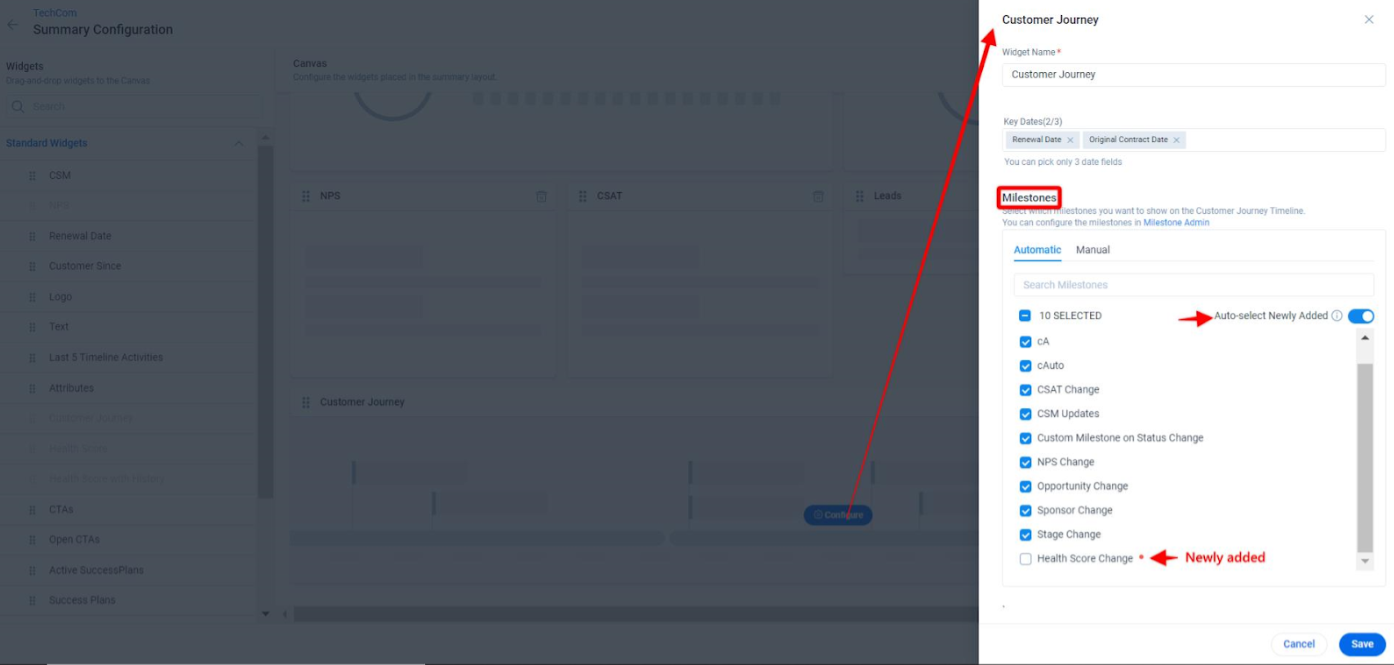
Customer journey: Customer Journey widget provides a snapshot of all the events/milestones/key activities that have happened with the Customer in the past. Data displayed on Customer Journey Widget is driven by Milestones. Admins can select which milestones to be available on the Customer Journey Timeline and the milestones can be configured from Timeline > Milestone Admin. For more information on how to create Automatic and Manual Milestones, refer to the Configure Automatic Milestone Types and Configure Manual Milestones Types articles respectively.
-
CTAs: This widget helps admins highlight some key CTA aggregated metrics, up-front. CTAs due this week, Overdue CTA's, Open CTAs are the metrics this widget supports currently.
-
Success Plans: This widget helps admins highlight some key Success Plan aggregated metrics up-front. Active Success Plans, Overdue Success Plans are the metrics this widget supports currently.
-
CSAT: This widget displays the average CSAT score for the given source data. The Responses bar displays the number of responses and when you hover, it displays the distribution of Negative, Neutral/Mixed, and Positive responses. You can check the list of CSAT surveys and also filter the time period for which you want the data to be displayed for a customer.
-
CSM: A specially designed widget to represent the CSM. This widget displays the CSM information of the respective Company or Relationship record along with the user's profile pic, helping the end-user identify the CSM quickly.
Note: Users can edit this widget when an admin provides access to the user. -
Logo: This widget helps you to include Company/Relationship logos in the Summary section. Admins can also enable end-users to upload/change logo form C360/R360. The maximum size of the Image can be 5MB. The image file formats can be .jpeg, .jpg, .gif, .png, .bmp, .svg, .webp, or .ico.
-
Renewal Date: This widget displays the renewal due date and tells how many days are remaining till next renewal. This enables end users to understand renewals in the context of health and forecast category, especially where there is misalignment.
-
Customer Since: This widget indicates how log the customer has been with the organization(Ex. 2 years 3 months) along with the ‘Original Contract Date’ of the customer.
Note: Admins can map any Date Field in the company object to the Customer Since widget as the Original Contract Date. -
Health Score with History: This Widget displays the overall health score of the customer along with a historical trend. The trend bars indicate the Score for the past weeks. To view Scorecard data, you must first configure Measures and Scorecards from the Administration > Scorecards page.
-
Health Score: This Widget displays the current overall health score of the customer without the historical trend. This is a minimal version of the ‘Health Score with History’ widget.
-
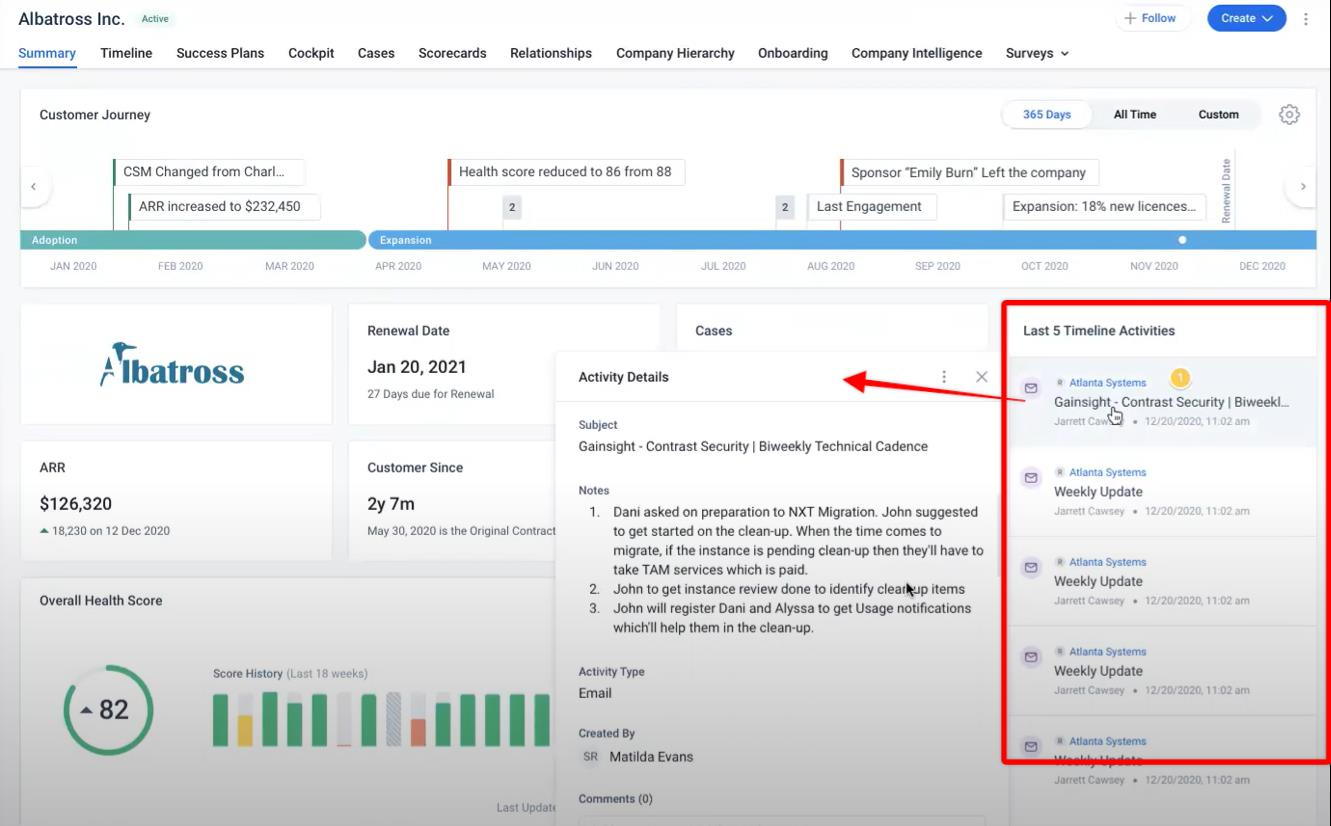
Last 5 Timeline Activities: Admins can add this widget so the end users can log, view, and edit the last five activities that help them track customer interactions and quickly gather insights from the Summary section.
- Company Intelligence: This widget summarizes the latest company news using Gainsight’s Company Intelligence feature. Please note that the ‘Company Intelligence feature needs to be enabled in your instance for this widget to function properly.
In addition to the above mentioned new widgets, the user experience of the existing widgets like Open CTAs, Open Success Plans, NPS and Text is improved. For more information on the complete list of widgets and fields, refer to the Widgets Types in Summary Section in the Configure Summary Section article.
Relationship Section Views |
In Current C360:
Customizing the ‘List View’ and ‘Relationship Card View’ on the Relationship section of C360 is not very straightforward. And, it is currently not possible to use the same configuration across Relationship types.
In Horizonized C360:
The newly introduced ‘Relationship Section Views’ list and card view customizations can be managed better. Also, it is now possible to create custom Relationship views across Relationship Types.
The Relationship Section Views help admins customize,
- List of columns displayed in the List view Relationship Section
- Layout of the Relationship cards and fields that go on it
- Data points to display on the newly introduced Relationship Summary Ribbon
For more information, refer to the Configure Relationship Section and Views in 360 article.
Overall Usability Improvements |
Preview Layouts
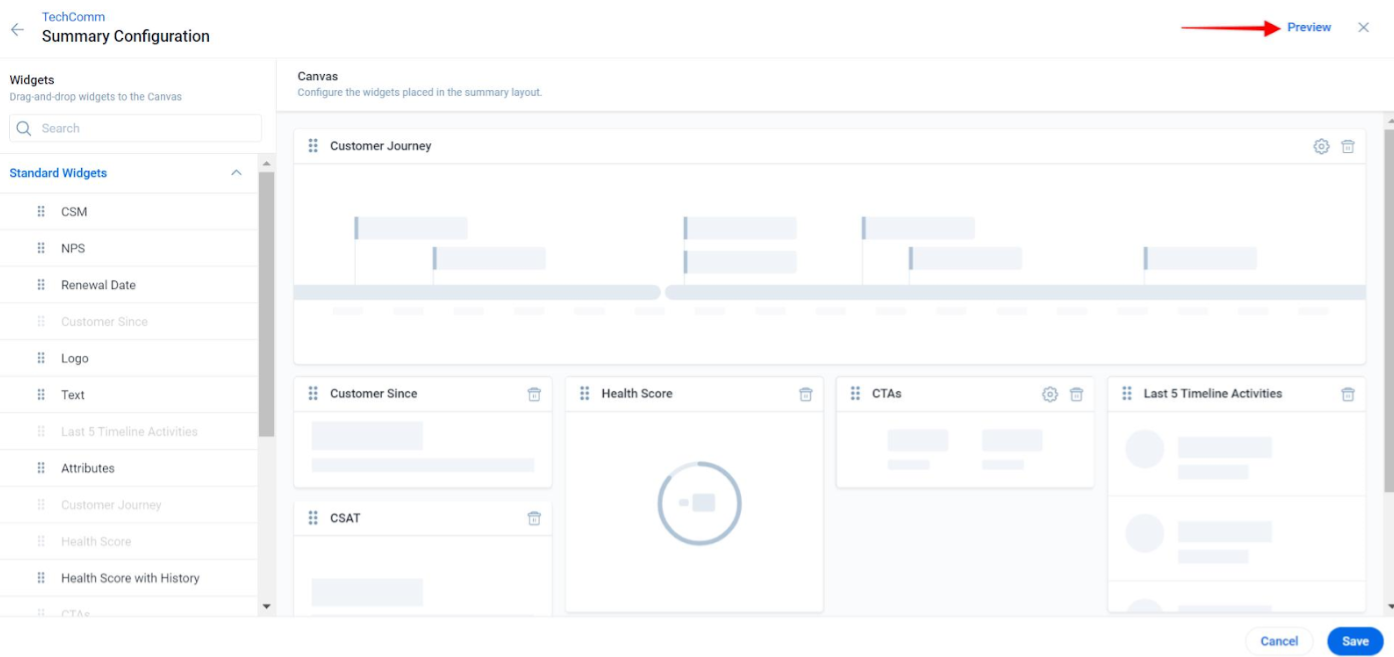
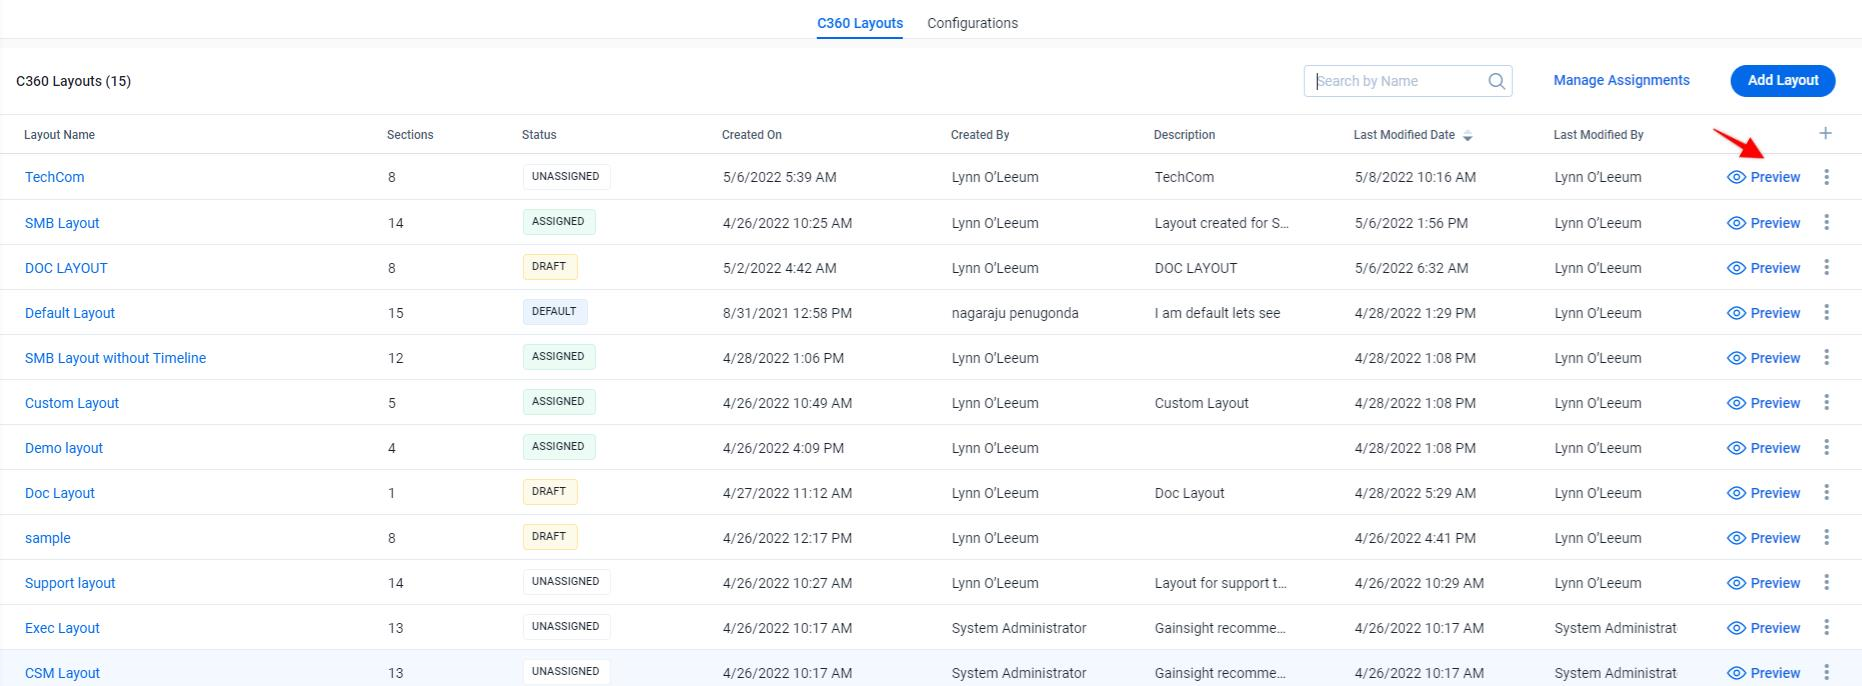
Admins can now Preview while editing or configuring a layout. As admins start configuring a layout, Gainsight recommends previewing the layout to ensure it gives the desired result when populated with Data.
- The Summary section can be previewed from within the section configuration experience.
- Admins can also preview the entire layout from the C360 Layouts listing page.
Change Default Layout
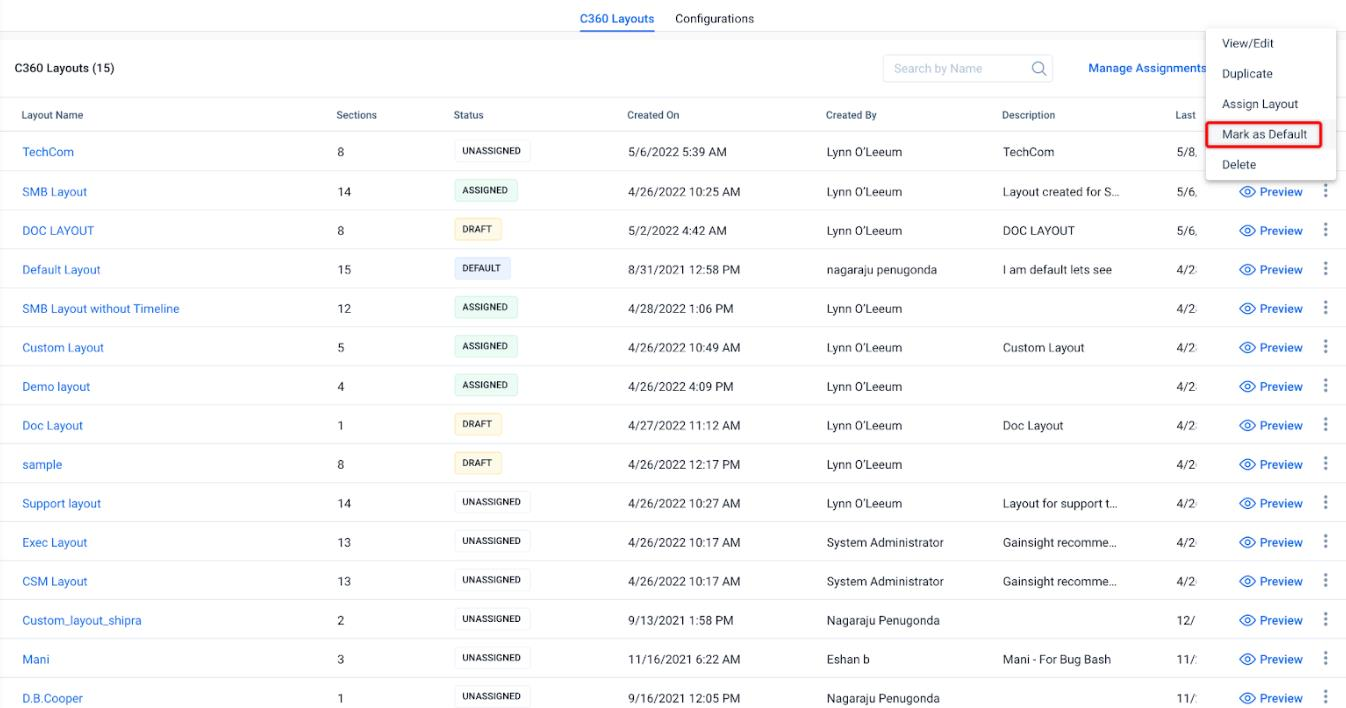
In the existing 360, it is not possible to mark a custom layout as default. Admins are hence forced to always modify the Gainsight shipped ‘Default Layout' for any changes. With the new experience, admins can mark any custom layout as the Default Layout.
Draft Layouts
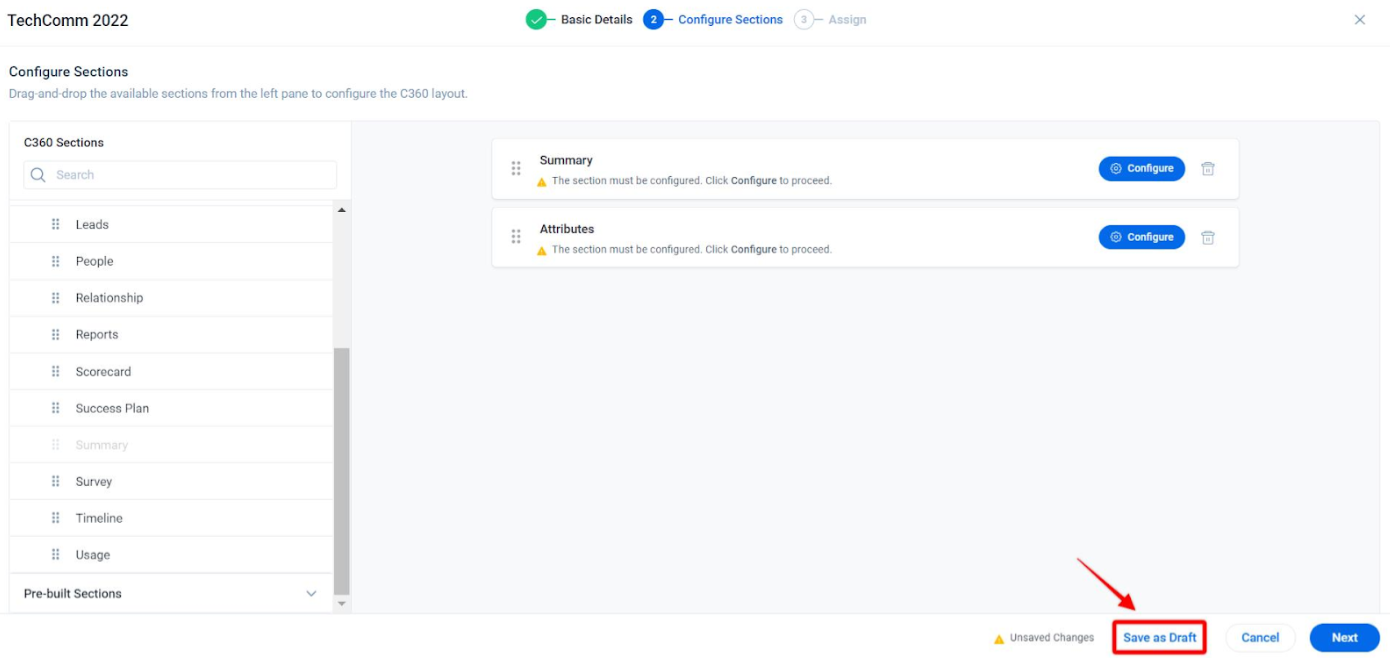
The 360 layout creation process can be time consuming, it can sometimes take multiple working days for an admin to achieve the perfect 360 experience. Admins can now save their work as a draft and pick it up later exactly from where they left it.
Manage Layout Priorities Better
Admins can now reorder the layouts to prioritize them when multiple layouts are assigned to the same User or Company. Click Manage Assignments to identify the layout assigned to the user of a Company.
Find Layout / View Assigned Layout
Identifying the 360 layout used when a specific user accesses the 360 can become very tricky in the current experience, especially when the user has multiple 360 layouts. Currently there is no simple easy way to find this out. With the new experience, admins can now quickly find out which layout is used for a given User and Company combination. Click Manage Assignments > Find Layouts to search with the name of a user or company and identify which layout is assigned to that user or company. Once you click on the assigned layout, it navigates you to the specific layout’s Configuration Sections page.
Pre-built Sections
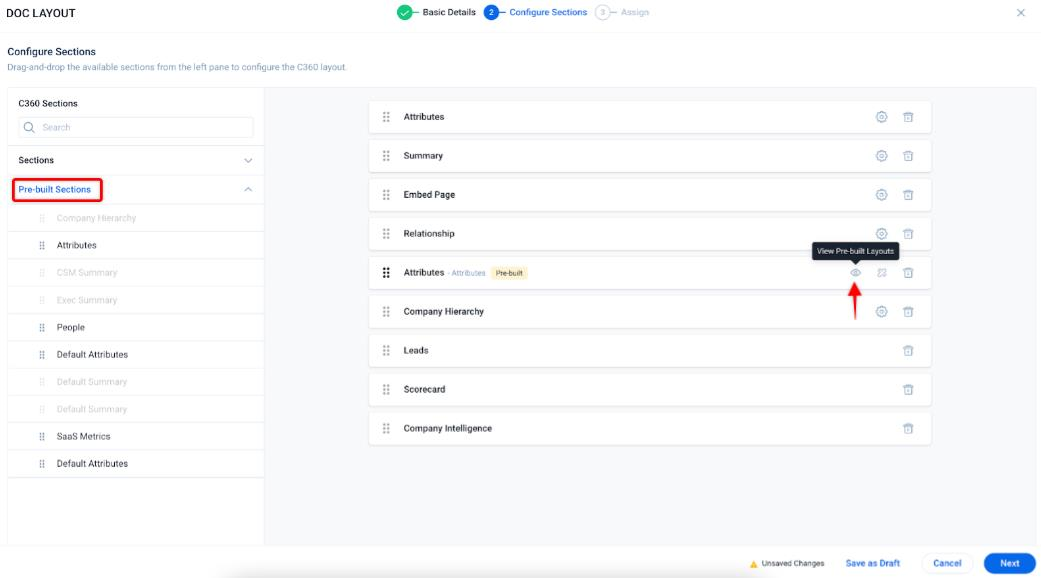
Global Sections are now re-named to Pre-built Sections. Managing and embedding pre-built sections into 360 layouts is now made simpler. Admins can create sections and re-use them across layouts. Any changes made to the pre-built sections reflect in every layout where the sections are used. Additionally, admins can now view the Pre-built section during layout configuration and convert a Pre-built section to local section(Unlink) to further customize it. For more information, refer to the Configure 360 Layouts article.
More Section Level Improvements
-
Summary - In addition to the newly added standard widgets and improved section configuration experience, it is now possible to customize the interaction on field widgets. Admins can either
- attach a 360 section to the field widget so that users are redirected to the linked section on click of the widget.
- Or mark field widgets as editable so that end users can update the fields right from Summary
-
Relationship Section - In the new experience admins can now control who can create/edit/delete Relationship records from the Relationship section of C360 at the C360 layout level.
-
Attributes - Apart from being able to organize attributes into groups and the improved user experience, it is now also possible to
-
Select another field from the child object instead of GSID to display the value for the lookup fields.
-
Include extra fields for the search criteria to make the end users' editing-attribute experience better for lookup attributes.
-
Mark multiple attributes editable in one go using the new ‘Field Editability’ option.
-
-
Reports (Previously known as Related List) - It is now possible to group reports belonging to different objects under the same 360 Section. You can also,
- Group reports belonging to same objects under one container
- Rearrange and Re-size the report containers
-
Survey Section - Admins do not need to set up the NPSⓇ and CSAT configuration for every 360 layout. This configuration is now automatically resolved from the global survey settings.
- Embed Page - It is now possible to specify the height of the external page in percentage. Specifying the height in pixels does not work for different screen sizes, this issue is now addressed with the percentage option. Also, the url parameters are now automatically recognized
- People Section: The section displays the list of people associated with the company or relationship, as well as their personal and association details, fetched from the Gainsight Person Model. For more information, refer to the Configure People Section in New 360 article.
-
Automatic Milestones - Manual Milestones: While configuring Customer Journey widget, admins select the required automatic and manual milestones. Admin can create new Milestones. Turning ON Auto-select Newly Added ensures that all the new milestones are added here automatically for the admins to select them. For more information on how to create Milestones, refer to the Configure Automatic Milestone Types and Configure Milestones Type article.
Simplified Object Association
In R360, associating objects with the Relationship object has been simplified. Admins can associate any object with the Relationship object to use its data in the context of Relationships. You can view all associations based on the Relationship Type. For more information on how to associate an object with the Relationship object, refer to the Configure Associated Objects to Relationship article.
Improvements for End Users |
You can check out the following video to learn more about the new 360 experience for the end users. You can also go through the content covered in the following sub-sections.
- Accessing and digesting customer information is now much easier
- Taking action on the customer data made simpler
- Personalize 360 experience
- Overall Improved User Experience
Accessing and digesting customer information is now much easier |
This section covers the following improvements/enhancements in the new 360 feature:
- New navigation
- Flexible, More Informative, and Interactive Summary Section
- New Out-of-Box Widgets
- Well Organized Customer Data
New Navigation |
In Current 360:
Navigation is not user friendly. There can be 20-30 sections available at times in 360 for one customer, but the end user might not use all of them on a daily basis. It becomes very time-consuming every time to search for the sections that the end user needs the most. There is no way that you can personalize the available sections.
In Horizonized 360:
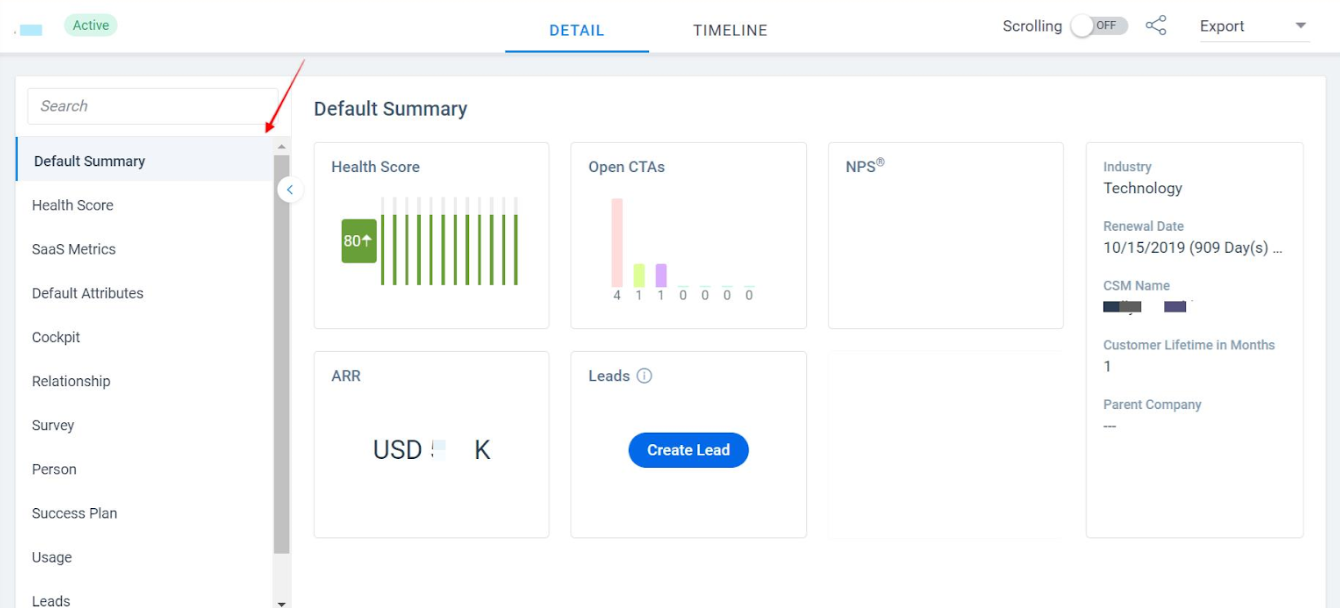
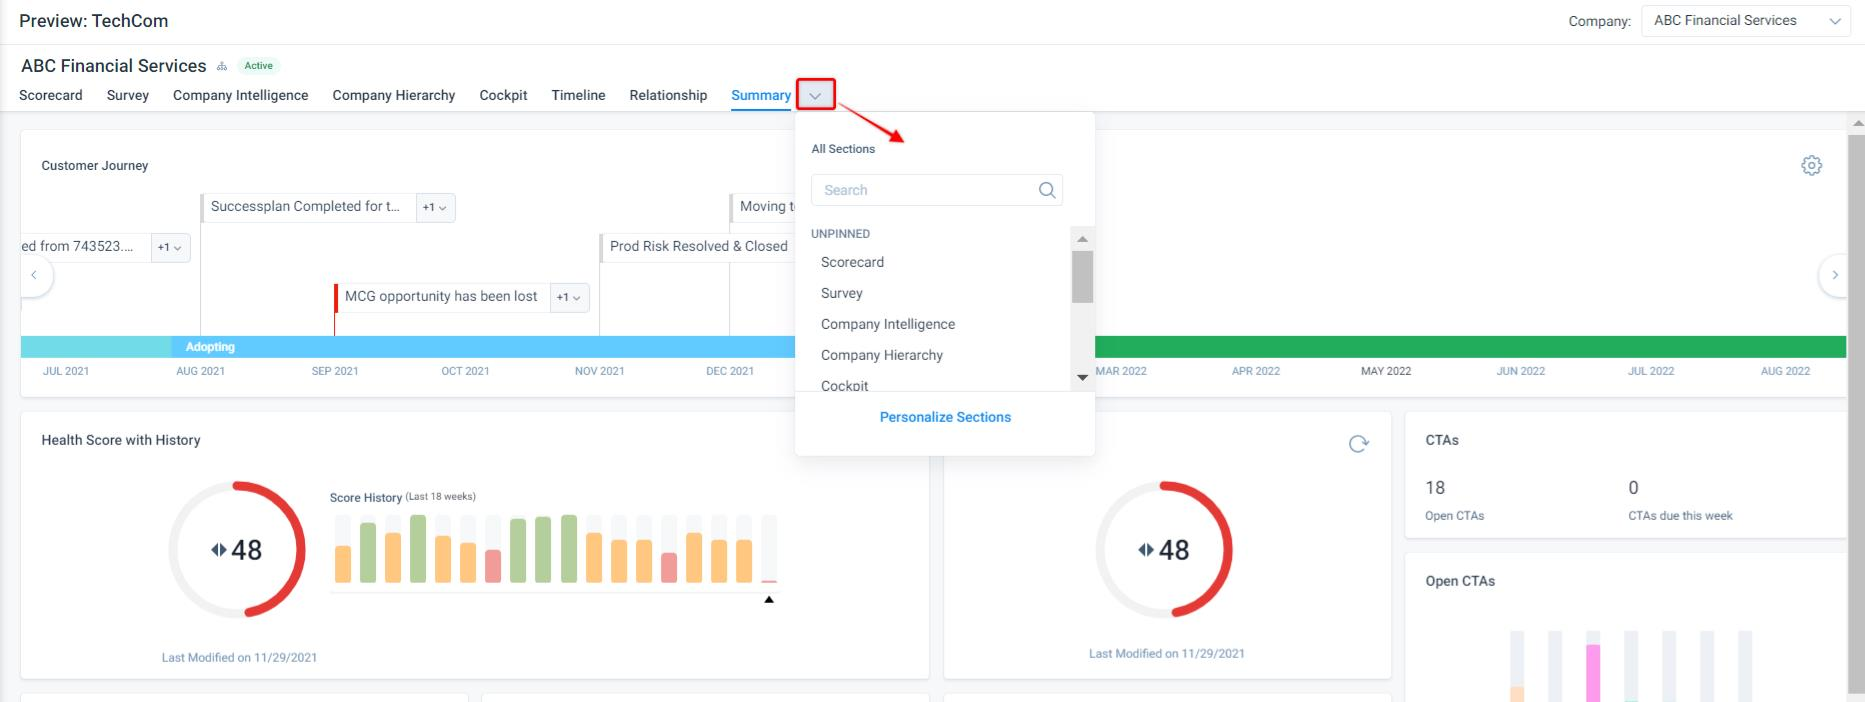
Users can now decide which are the important sections they want to see on the page for a specific customer instead of all the sections. The newly introduced option called Personalize Sections enables the end users to reorder the available sections according to their preferences. End users can even decide to pin the most frequently used sections on the page and rest can be hidden in the dropdown. This saves a lot of time and makes the users more efficient in accessing and handling their customers’ data.
Flexible, More Informative, and Interactive Summary Section |
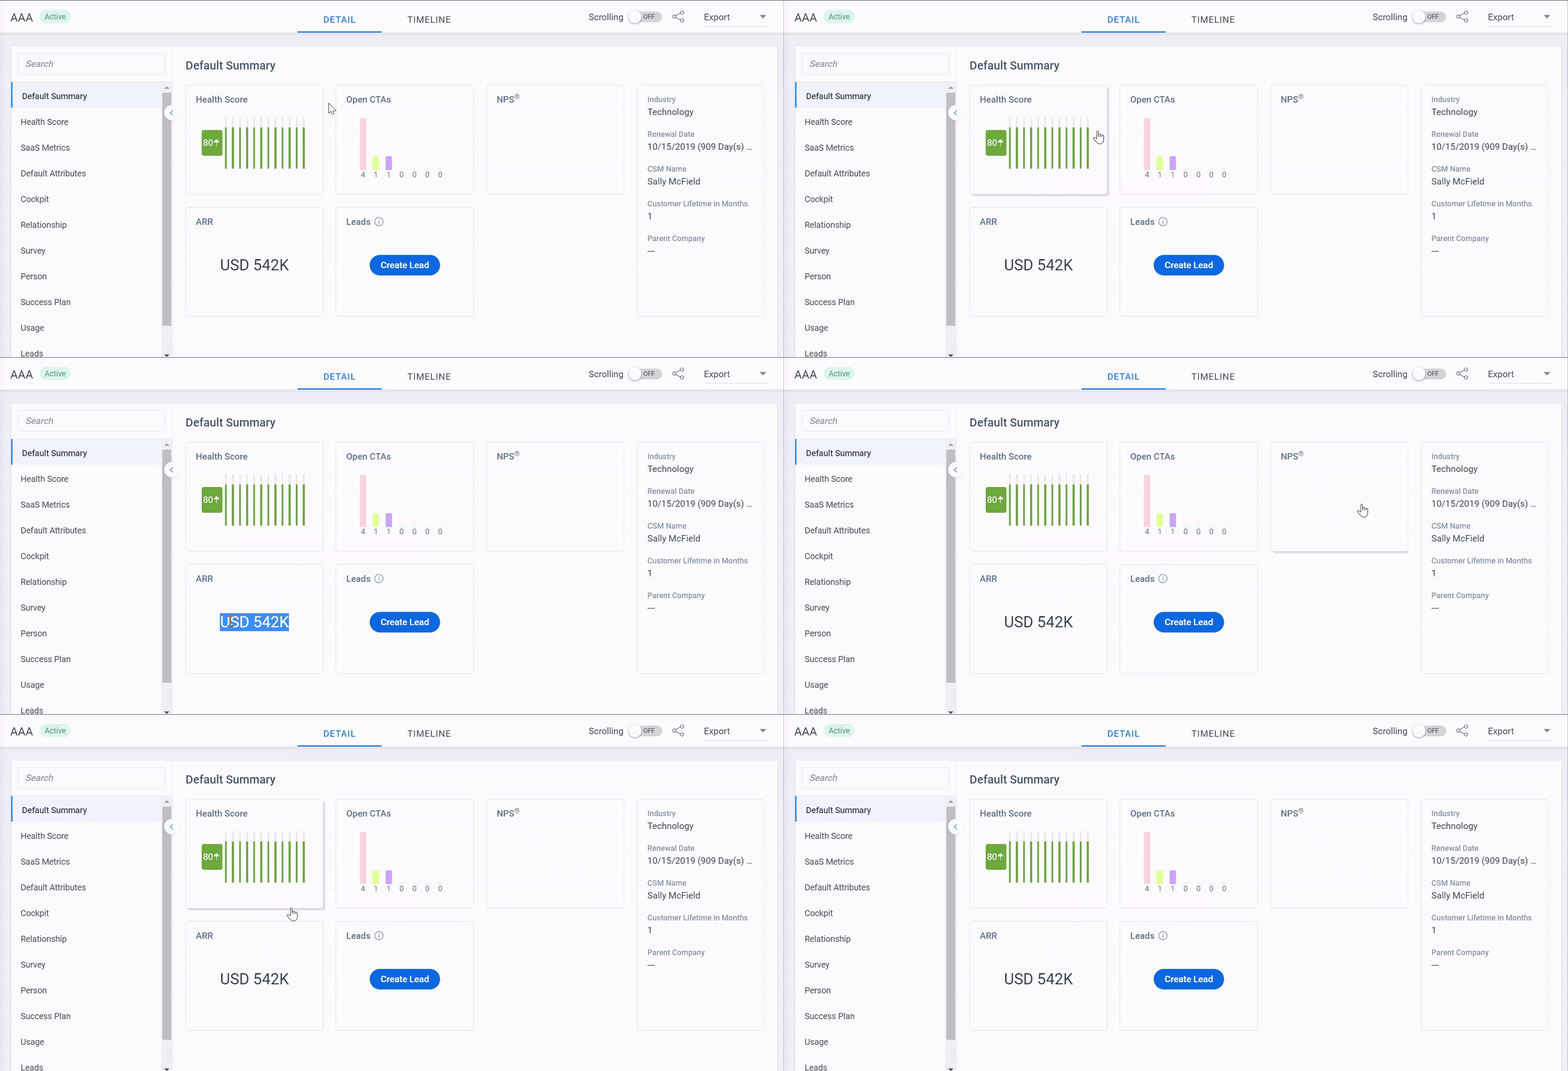
In Current 360:
The layout of the Summary section is rigid and the number of widgets it can accomodate is very less. This in-turn limits the amount of customer information that Summary section can hold.
And it is currently not possible to edit the customer information from the Summary section, users need to navigate to Attributes section to do this.
Widgets are not interactive.
In Horizonized 360:
The Summary section is completely redesigned and is no more rigid. Some of the key changes are as following
-
A completely customizable and flexible layout of the Summary section, means users can now access way more customer information right from summary
-
Users can now edit the data right from the Summary section
-
All of the summary widgets are now interactive
New Out-of-Box Widgets |
In Current 360:
You can only add specific types of widgets (KPI) to the Summary section, and these widgets are limited and less interactive.
In Horizonized 360:
Gainsight has added new widgets in the Summary section with better visualization and capabilities. All the out-of-box widgets will be available for all the new customers and for the existing customers, they need to be manually added by the admins.The following are the new widgets:.
-
Customer Journey is one of the out-of-box Standard widget that’s been added to the Summary section.

-
CSAT widget has been added in the new version of 360 feature.

-
An addition of the Timeline widget enables the end users to access the summary of recent Timeline activities on the Summary section. For information about activities, click on each item listed in the widget.
Well Organized Customer Data |
In Current 360:
The amount of information end users can include in the Summary section is very limited. End users cannot customize the Summary section. There is a lot of empty space towards the end of the section and that space cannot be used. Arranging information is quite challenging in the current 360 environment in every section. For example, the Attributes cannot be grouped, or reports with different objects cannot be added etc.

In Horizonized 360:
The design and placement of the widgets are taken care of and structured effectively in the Summary section of this improved edition of 360.The design is now considerably more flexible and contains more information.

Note: A few out-of-box widgets are included in the Summary section but the number of widgets are limited to 10-12.
Customer journey is one of the new widgets that are included in the Summary section. This widget contains the information about the customer’s journey in a timely manner. The purpose of this widget is to give a quick overview about key events or milestones that customers have achieved. For more information, refer to the New Out-Of-Box Widgets section.
The horizonized 360 enables end users to add a logo which was not there previously.
Taking action on the customer data made simpler |
This section covers the following improvements/enhancements in the new 360 feature:
Inline Editing Capability |
In Horizonized 360:
Apart from Timeline, end users can now add notes in the Rich Editable Text Editor widget that allows the end users to quickly capture any notes on the Summary section. This widget has the inline editing or formatting capability.

For more information on the complete list of Filed Widgets which are editable and non-editable, refer to the Configure 360 Layouts article.
Taking Quick Actions from 360 Page |
In Current 360:
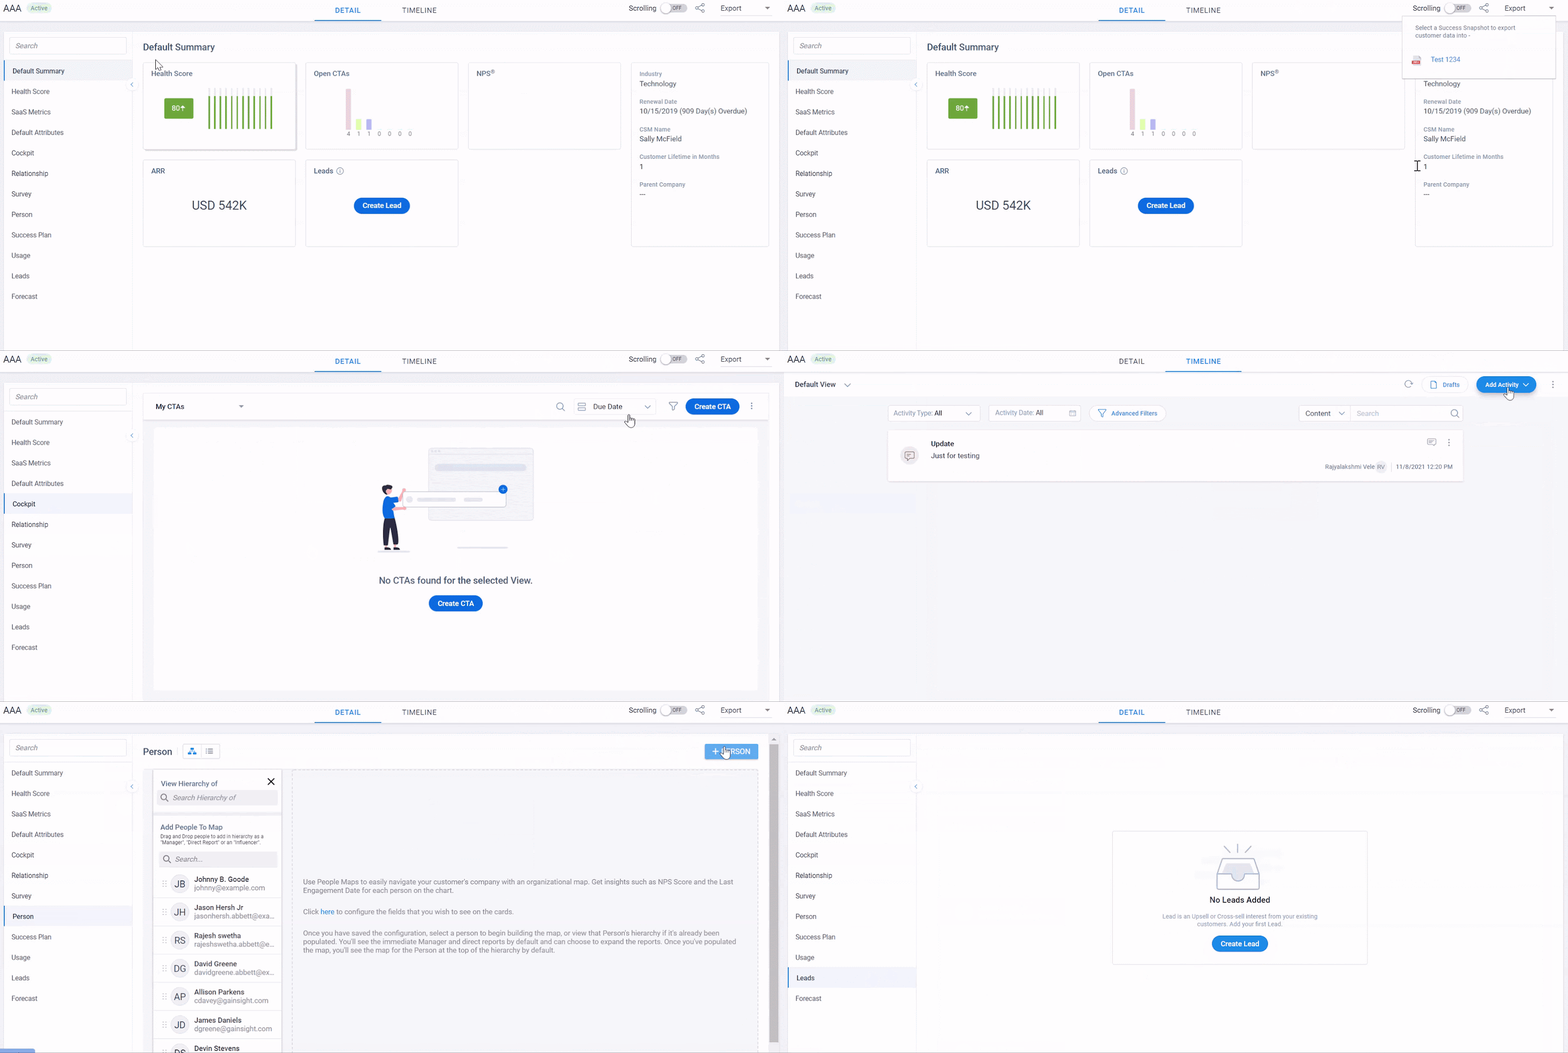
Performing several actions such as creating a CTA or logging an Activity are complex. To add an Activity or make a CTA, end users used to go to the Timeline tab or the Cockpit tab, which required them to work in multiple tabs.
In Horizonized 360:
End users can now create CTA, Add Activities, Create Leads, Add Person directly from the 360, which resolves the issue of working in multiple tabs.
Grouping Attributes |
In Horizonized 360:
Attributes can now be organized into logical groups. This helps admins make the attributes more consumable for end users.
Personalize 360 experience |
This section covers the following improvements/enhancements in the new 360 feature:
Pin/Reorder Sections |
End users can now decide which are the important sections they want to see on the page for a specific customer instead of all the sections. The newly introduced option called Personalize Sections enables the end users to reorder the available sections according to their preferences. End users can even decide to pin the most frequently used sections on the page and rest can be hidden in the dropdown. This saves a lot of time and makes the end users more efficient in handling their customers’ data.
Filter Data Further in Summary Section |
In the new C360, end users can now filter data according to their requirements. The new C360 has been redesigned to enhance its capabilities and make end users more productive.

Overall Improved User Experience |
This section covers the following improvements/enhancements in the new 360 feature:
- Personalize Column Order/Width in Company Hierarchy and Relationship Sections
- Sharing 360
- Relationships
Personalize Column Order/Width in Company Hierarchy and Relationship Sections |
In Horizonized 360:
The Company Hierarchy section contains information on the parent and child companies in the hierarchy. This is an existing section, but it’s been horizonized in the new version of 360. End users can now increase/reduce the column width based on their preference. This gives the end users the capability to read any content that holds more space and does not appear on the Company Hierarchy > List view page.
The column width can be controlled in the Relationship section also.

Along with this, Gainsight introduces a new view called Chart view. It provides a great visualization of the company’s place in the hierarchy.

Sharing 360 |
In Current 360:
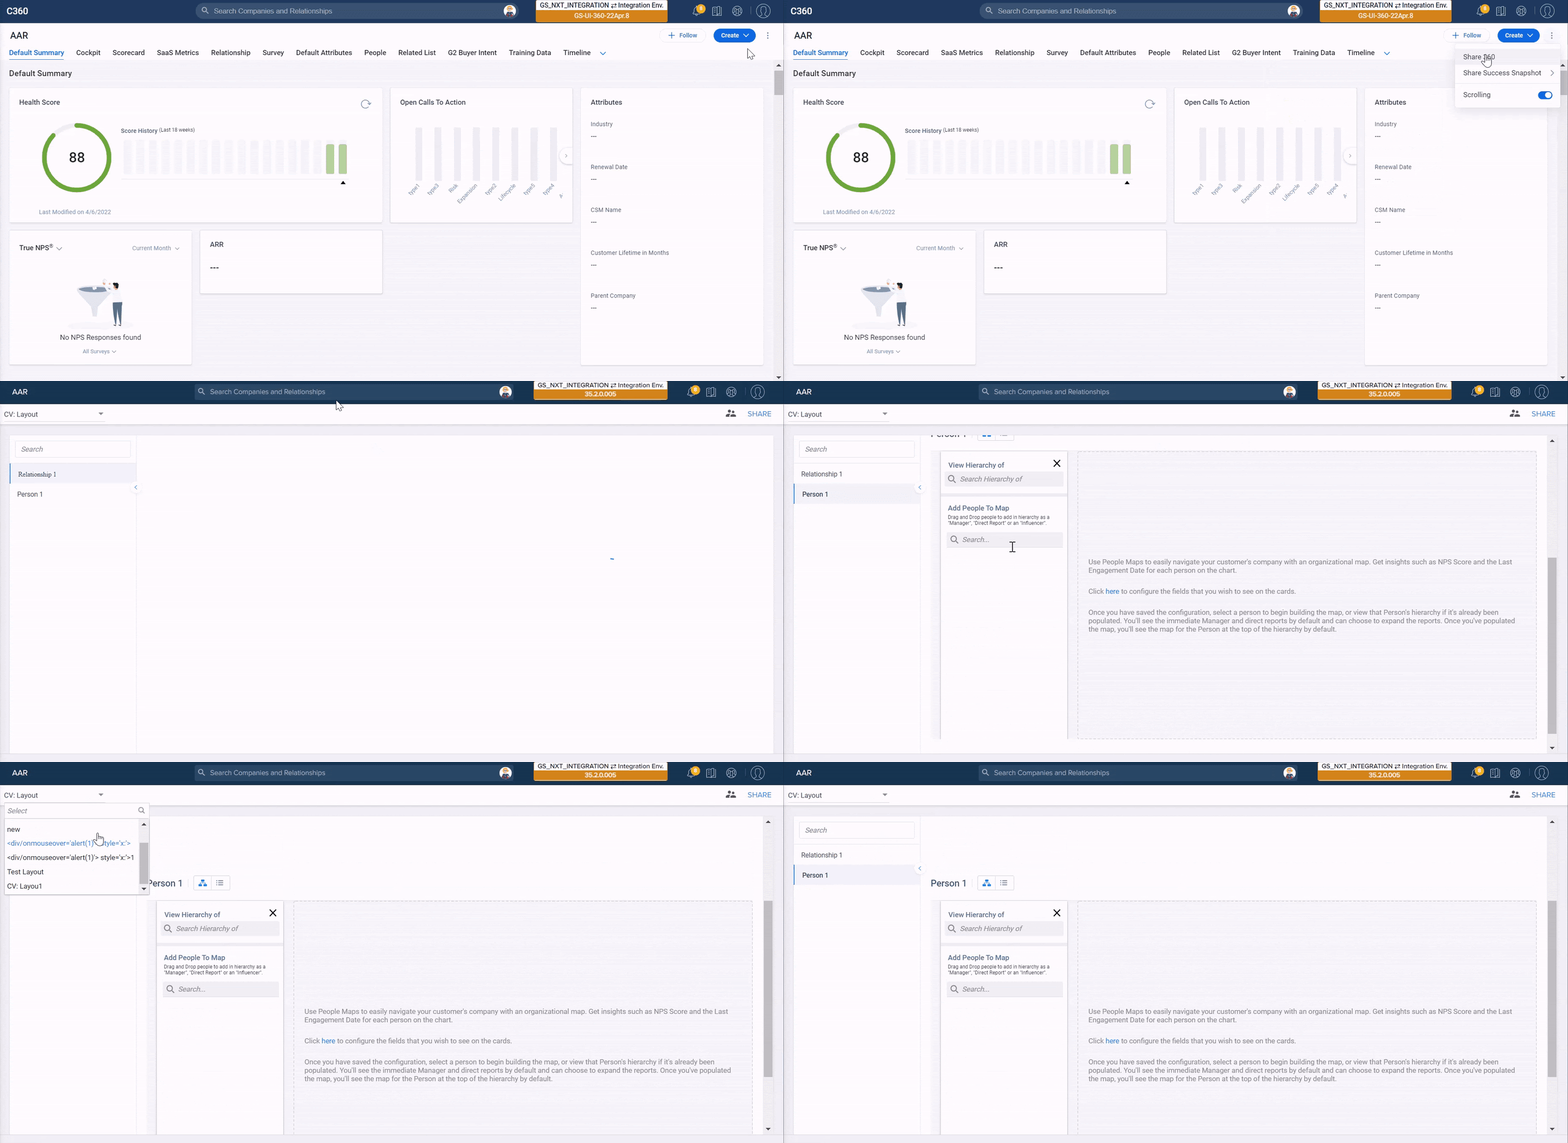
Sharing 360 layouts with customers was not intuitive. The Scrolling option was placed randomly.

In Horizonized 360:
The Share 360, Share Success Snapshots, Scrolling options are now moved under the three-vertical dots dropdown.
Relationships |
In Horizonized 360:
In the new version of 360, the Relationships section is horizonized. In the Relationship 360, end users can now see the newly introduced Summary Ribbon. CSM can have a list of relationships available in the Summary Ribbon. It is customizable. There are no other functional changes made in this area.
People |
In Horizonized 360:
In the new version of 360, the People section is horizoned. In the People section in new 360, end users can now see the following changes and an overall modified to make the user experience much better:
-
In-line edit of the People list.
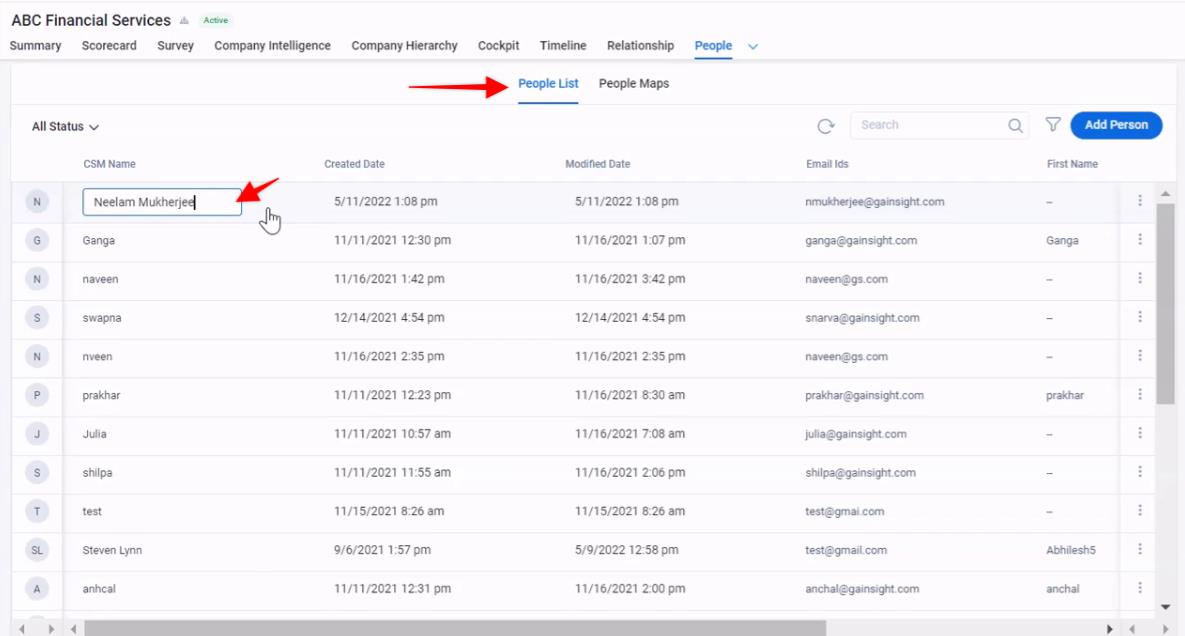
- Detail View of the People List
- Out-of-Box filters
- People Maps: Inactive records on the map greyed out.
- People Maps: Tooltip for truncated data
- Sponsor Tracking is now merged with the People List. It is now available on the list view and in the vertical three dots.
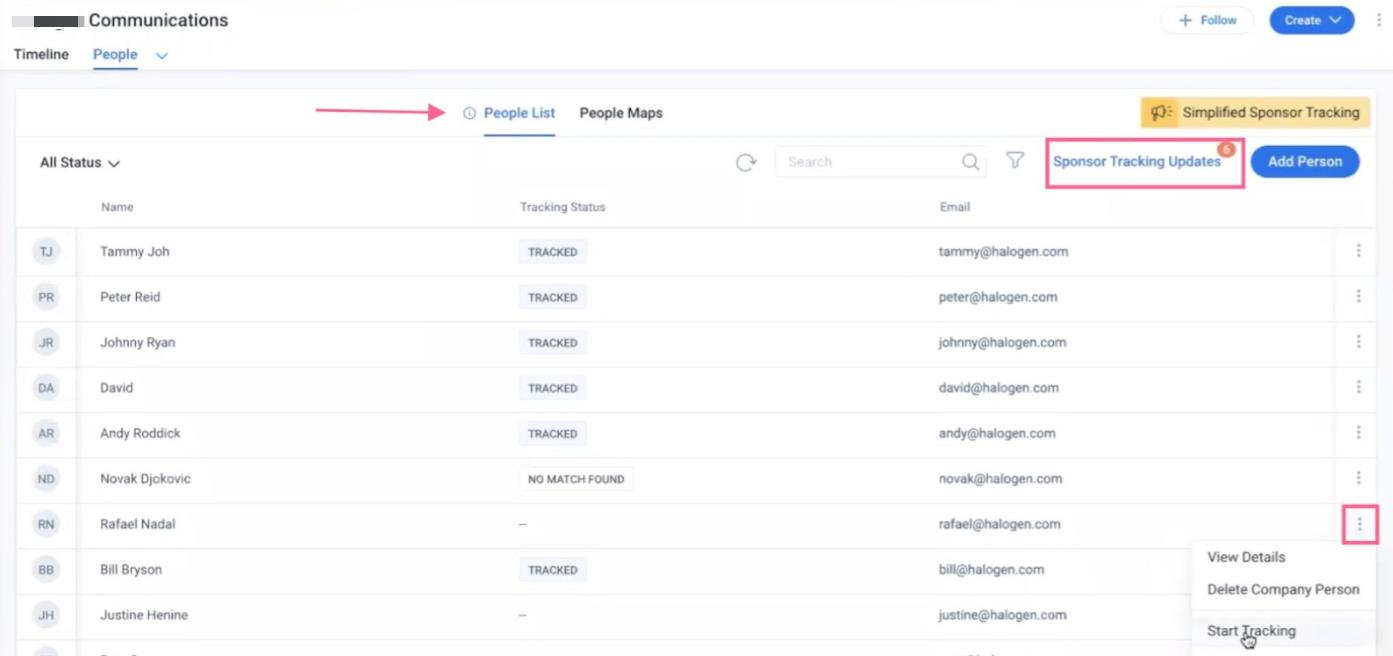
- Sponsor Tracking: Bulk accept of profile updates in a separate section.
For more information, refer to the People Section in New 360 article.
How to Enable New C360 Experience |
Activating the new 360 in the customer instance is completely admin-supervised. Admins will have the flexibility to plan the rollout for their instance until the forced migration is in effect.Admins can preview and optimize the layouts before activating the new experience for end-users.
Activating the new 360 experience involves the following four key stages:
STAGE 1
Get the new 360 enabled in your Gainsight instance (Contact your Admin for more details).
STAGE 2
Once the new experience is made available in your instance (Sandbox or Production), the new layout administration pages start appearing under Administration → 360 Layouts (only for admins).
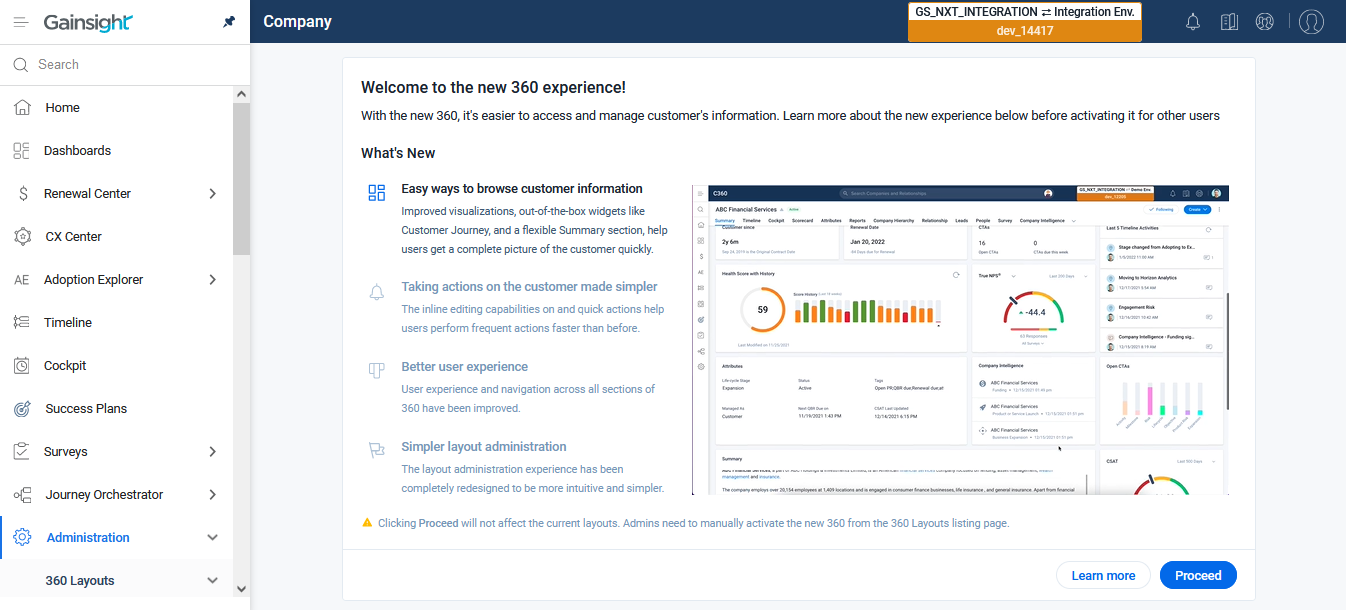
During this stage, end users do not experience any change in the C360/R360 page and the ‘Preview New 360’ button is also not displayed to them.
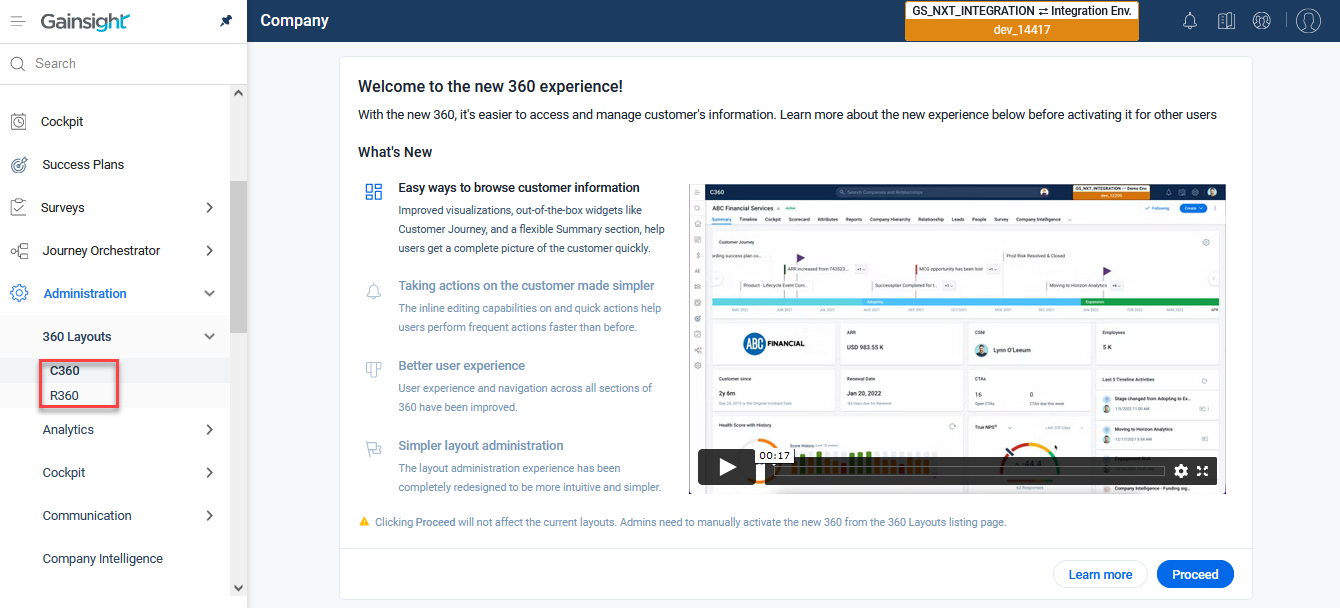
At this point, you will see the following screen on visiting these newly introduced layout admin C360/R360 pages. This screen highlights the key improvements in the new experience with the use of short write-ups and recordings of new features.
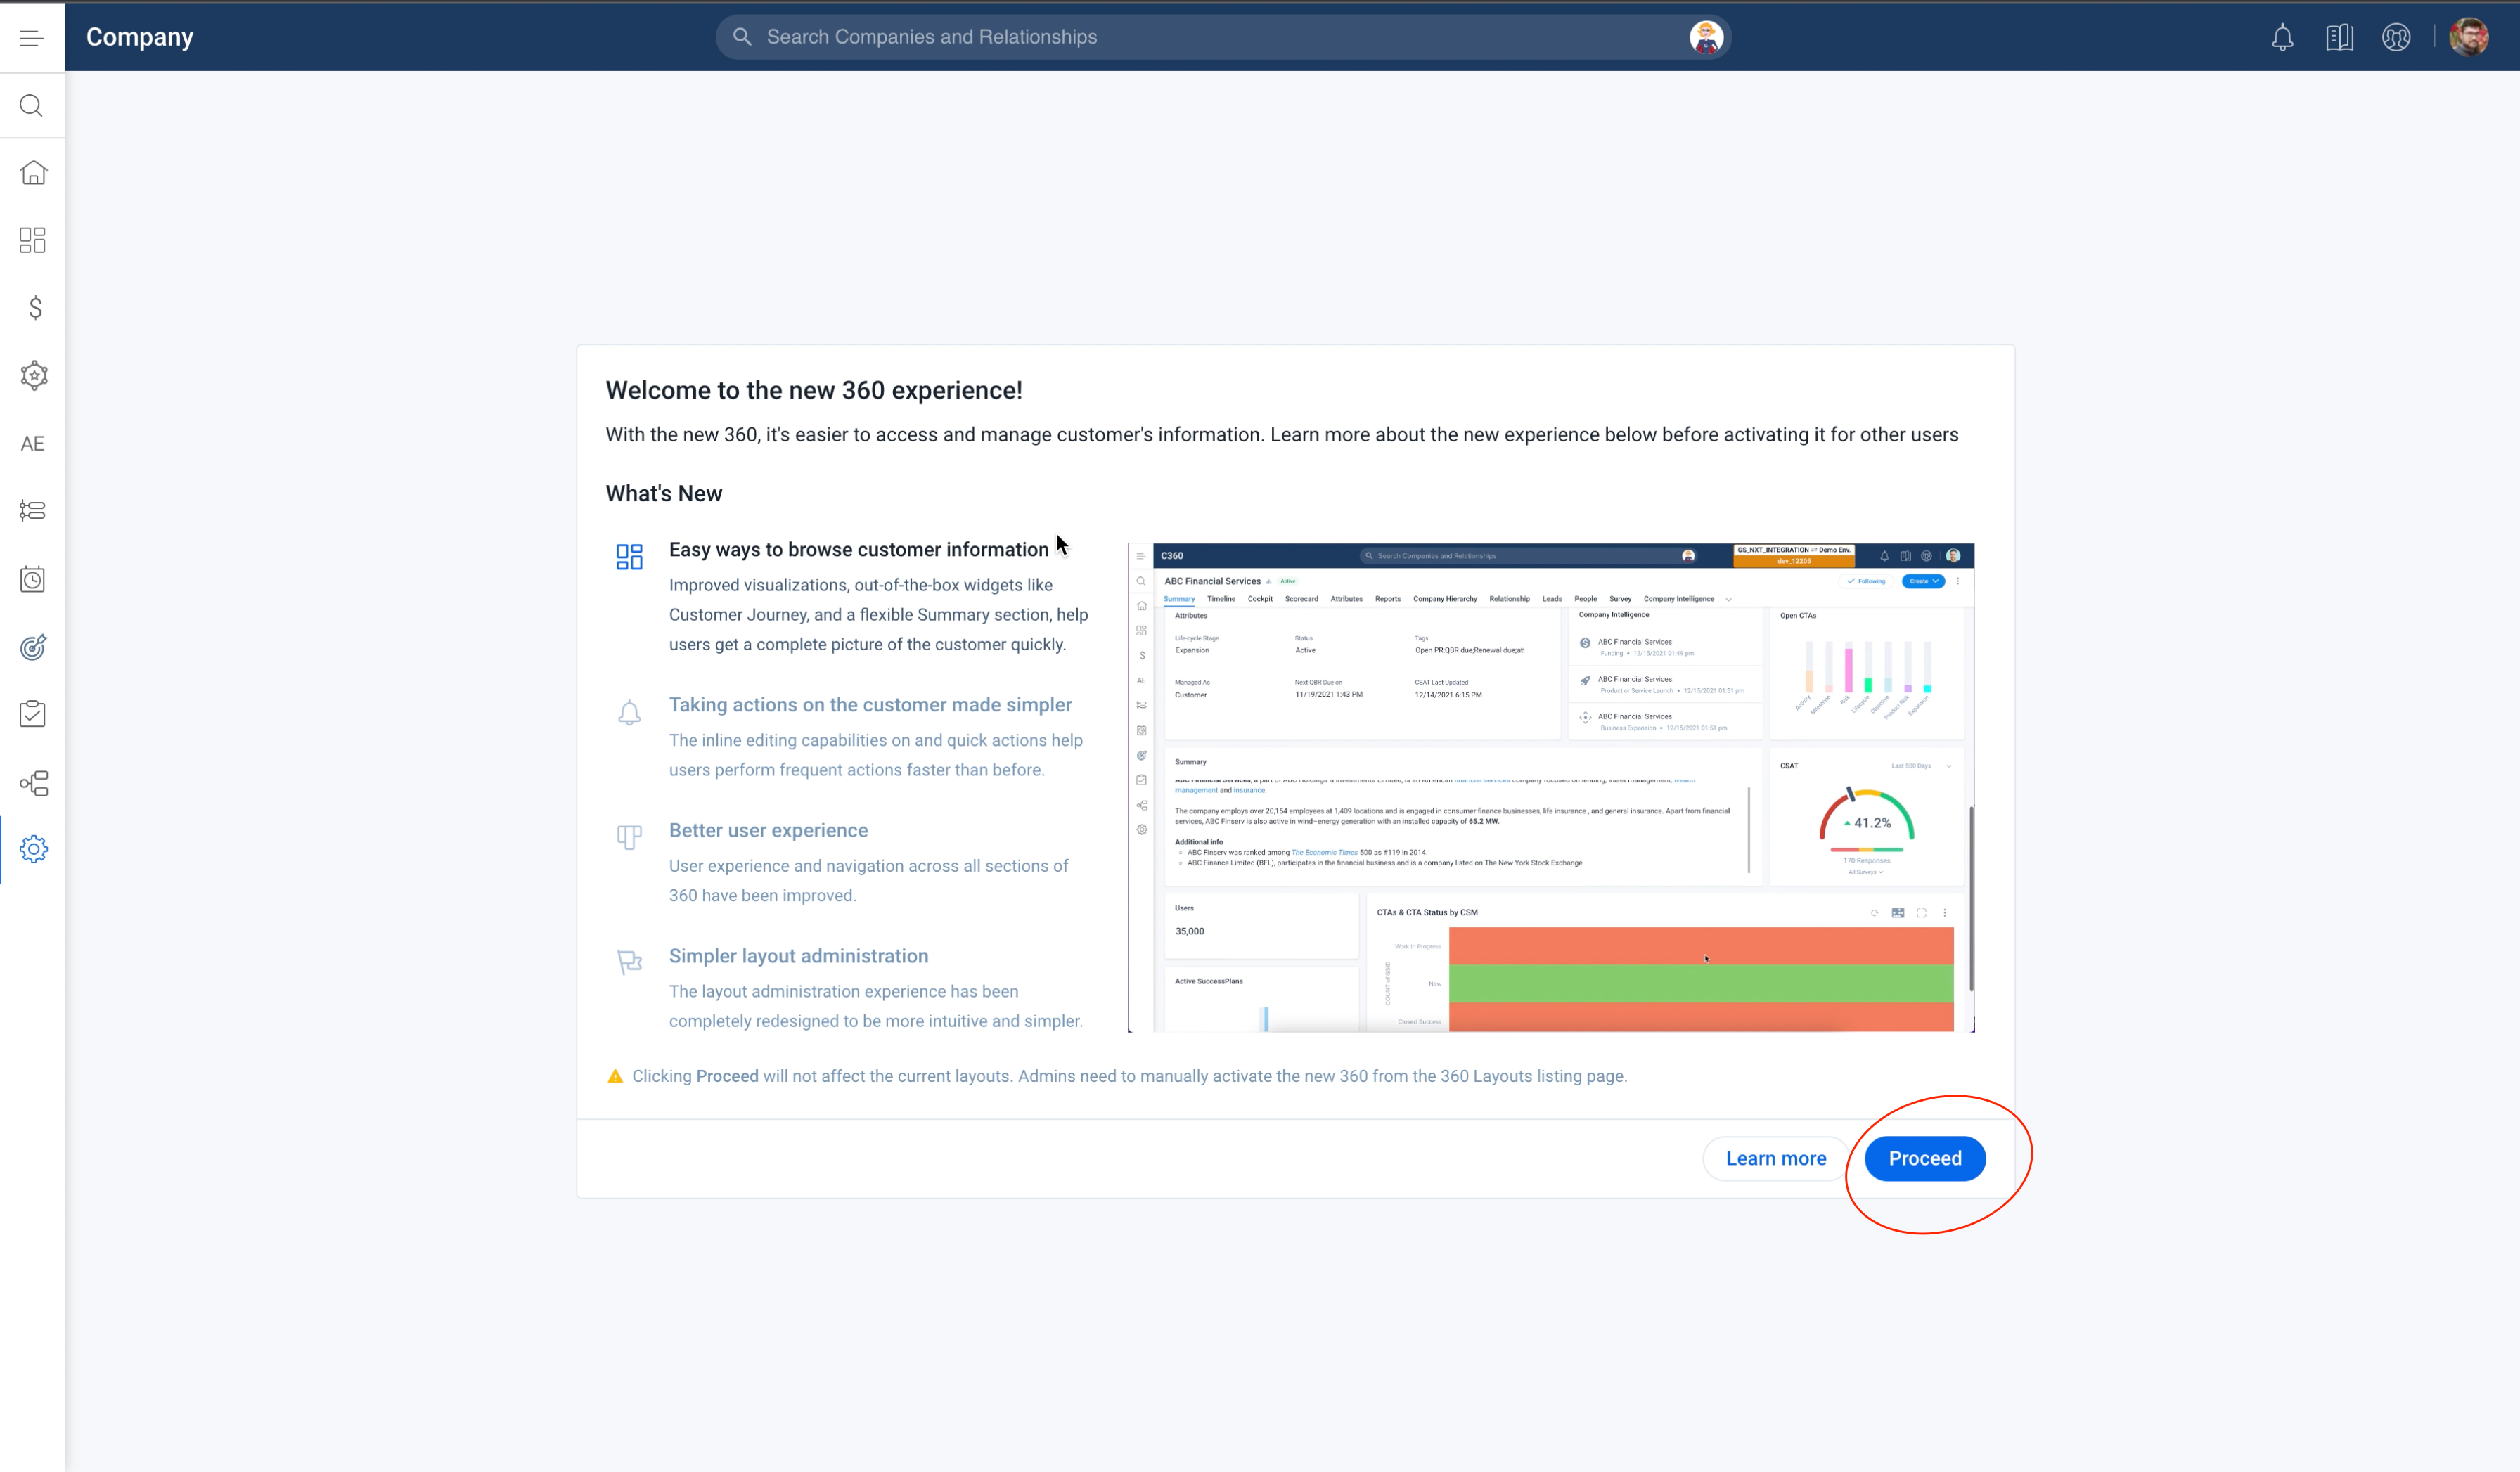
Clicking Proceed in the above screen prepares the new layout administration experience for you and takes you to the next stage.
Note: Click Learn more to view all the new admin guides for more help.
STAGE 3
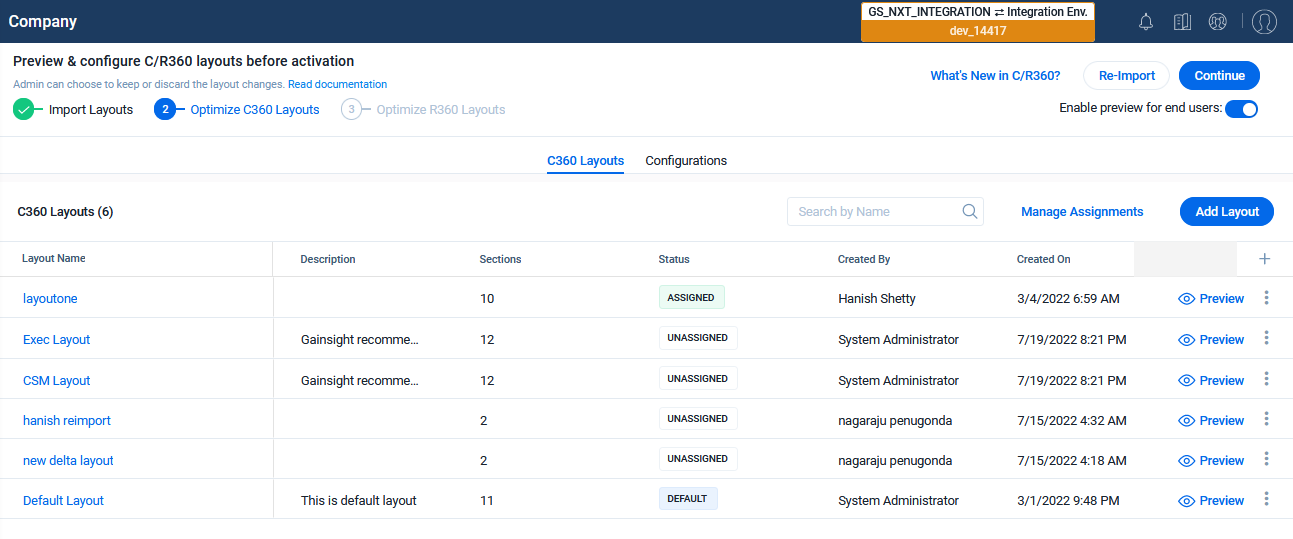
After clicking Proceed, all of the C360 and R360 layouts from the old experience are automatically copied over to the new experience. Admins can now explore the updated layout administration experience in the Administration → 360 Layouts → C360/R360 page. In this page you can perform the following activities:
- (Optional) Optimize the imported layouts for the new C360/R360 experience. If you want to reset the changes done to the imported layouts, click Re-Import. Additionally, Admins can:
- Preview the copied over C360 and R360 layouts and edit them to optimize the layouts further with the help of broadened summary widgets (later part is optional).
- Create new layouts and delete unused layouts if needed.
- Update layout priorities and assignments.
- Take feedback from end-users before switching over to the new experience.
- Choose to enable or hide the Preview New 360 button in the old C360 and R360 page. If Admins choose to enable it, end users will be able to preview the new C360/R360 experience.
STAGE 4
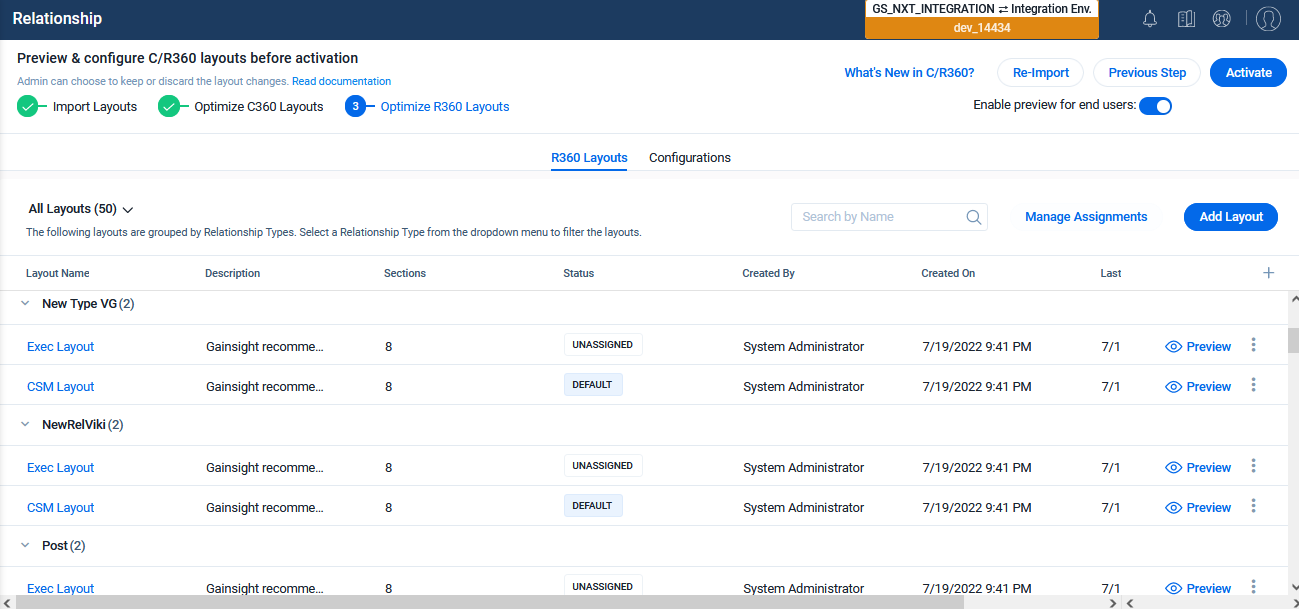
After previewing and optimizing (optional) the C360 and R360 layouts, you can activate the new experience for all users by clicking Activate in the below screen:
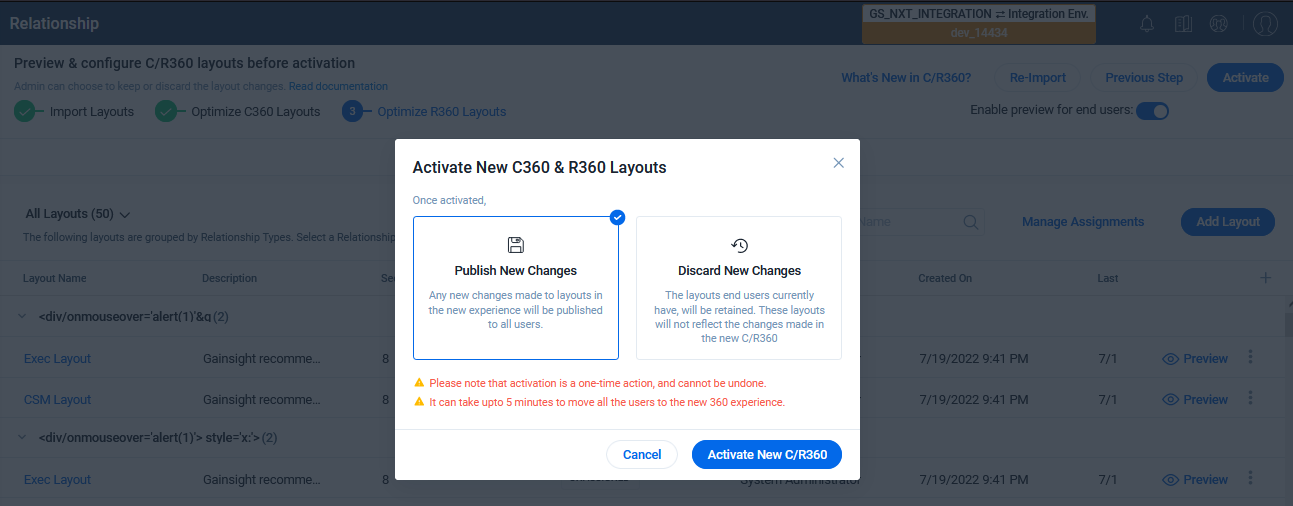
Clicking Activate brings up a confirmation popup as below. Click Activate New C/R360 to proceed.
Note: You can discard layout changes done in the previous stage, if needed (not recommended).
With this you enter Stage 5 where the new 360 becomes your organization’s default experience for all users.
Additional Resources
For more information on C360/R360, refer to the following articles:
C360 articles:
- 360 Overview
- Configure 360 Layouts
- Configure Associated Objects to Relationship
- Configure Attribute Section in 360
- Configure Embed Section in 360
- Configure Reports Section
- Configure Usage Section in 360
- Configure Company Hierarchy Section in 360
- Configure People Section in C/R360
- Configure Relationship Section and Views in 360
- Configure Summary Section in 360
- Build People Maps
- Overview of C360/R360 Sections and Widgets
- View Company Hierarchy
- Export Success Snapshot Presentations
- Sponsor Tracking Overview
- 360 FAQs
R360 articles:
- Relationships Overview
- Configure Relationships
- Configure Associated Objects to Relationship
- Define and Configure Relationship Types