Build People Maps
Gainsight NXT
This article explains the Gainsight People Maps feature.
Overview
IMPORTANT: People Maps is available as an add-on to the Gainsight CS subscription. Contact your Account Manager for pricing information.
This article explains Gainsight’s People Maps feature. After reading this article, you can configure the People Map card (admin), and build the organization chart of your customer (end user).
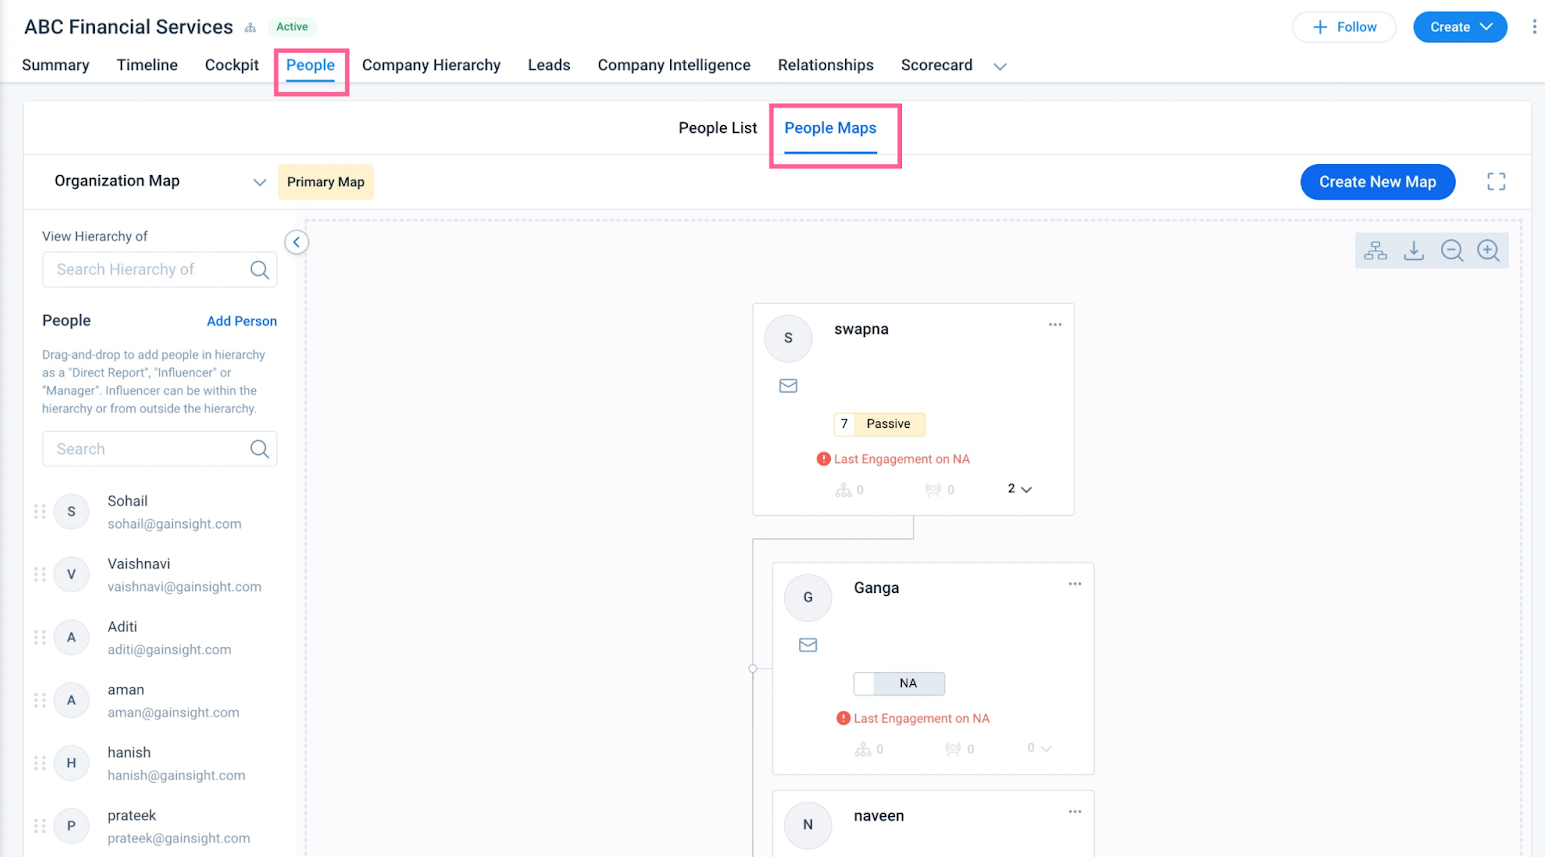
People Maps provide a graphical view of the hierarchy in an organization. Using this hierarchy, you can visualize who reports to whom, which in turn helps you to contact the right people. A Gainsight admin can configure the fields to be displayed in the People Map view. End users can view the added fields in the C360 > People > People Maps section.
Once the required fields are added, end users can then start building the People map. People maps can be built in the new Org chart view in the C360 > People > People Maps section.
Business Use Cases:
- You just sold a product to the sales head. The Sales department head reports to the marketing head. You have another product which can be sold to the support head. Knowing that the support head also reports to the Marketing head will help you increase the upsell opportunities.
- You are about to get into a meeting with a client. It's good to know the reporting structure of your client's organization so that you get first hand knowledge about the designation of the client. A visual organization chart will help you to easily understand the organization structure of your customer.
Features of People Maps
Following are the features of People Maps:
- Provides a graphical view of the customer's organizational hierarchy.
- You can easily modify the hierarchy.
- Ability to view the NPS® score provided by the Person.
- Ability to view the latest Timeline Activity type recorded with the person.
- Ability to add influencers to a People Maps. An Influencer is a Person who can impact the decision maker in an organization. This impact (known as Sentiment in People Maps) can be negative, positive, or neutral.
Build People Maps
This section explains how end users can build People maps for a Company. Before building the map, you must ensure that all of the Person records are created and associated with the Company. For more information on adding person records manually to Gainsight, refer to the People Section in 360 article.
A few key terms related to People Maps are explained below:
- Person: The person from whom you start building the map. This Person will be the starting point of our map.
- Direct Report: The Person who directly reports to the Person, from whom the map is being built (Person who is considered to be the starting point of the map).
- Manager: The Person to whom another Person reports to.
- Influencer: An Influencer is a Person who can impact the decision maker in an organization. This impact (known as Sentiment in People Maps) can be negative, positive, or neutral.
When you start building the map for a specific Person, by default the Reports and Manager of that Person are displayed. Apart from these details, you can also view the NPS® score given by a Person, the date on which the NPS® score was responded, and comments given (if any) with NPS® score. This is applicable if the person uses Surveys and has responded to an NPS® survey. You can also view the date and type of the latest Timeline activity associated with the Person.
You can view a hierarchy from the above image. Kelly Kapoor and Angela Martin report to Michael Scott. Kelly kapoor has Dwight Schrute as the Direct Report and Angela martin has Kevin Malone as the direct report. This hierarchy would now be constructed in Gainsight using the People Map feature.
To build the People map:
- Navigate to the C360 page.
- Click the People section.
- Click on People Maps.
- Search the first person in the View Hierarchy of field or drag and drop the person from the Search List.
- Click on the Three-horizontal dots menu on the card of the first person to add a Manager, Direct Report, Influencer. You can view the details of the person and replace a person.
- Once the option is selected, search for the name in the search box that pops up.
Components of People Maps
The various components of the map are explained below:
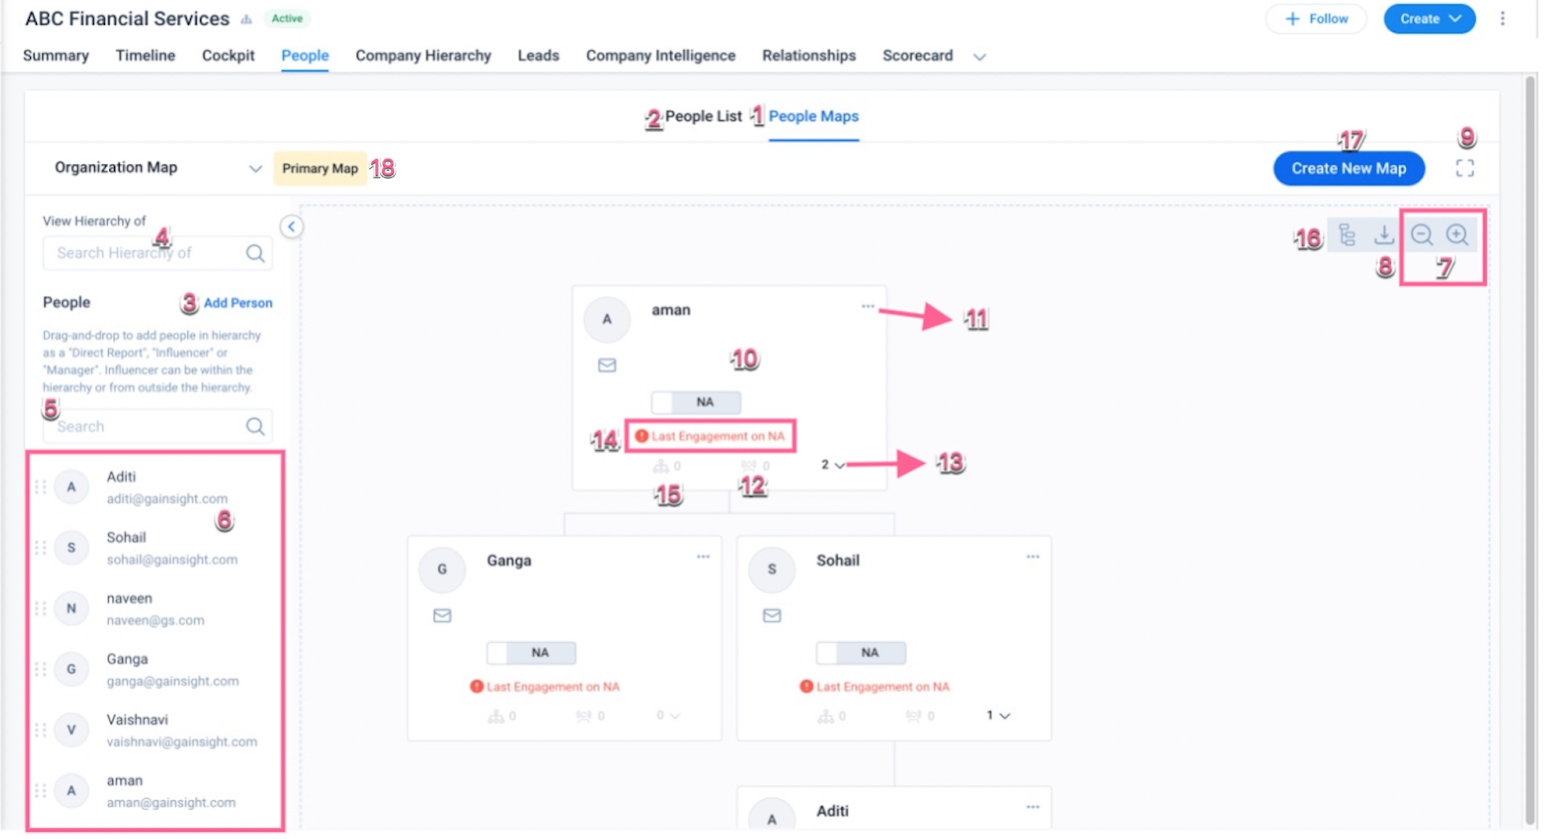
- (Default) Person Maps: Displays a map of the people in the organization.
- List view: Displays a list of people in the organization.
- Add Person: Allows you to add a person to the company.
- View Hierarchy of: Allows you to search a person and view their hierarchy.
- People: Allows you to search a person and add them to the map.
- Person List: Displays the list of persons or search results of the People field.
- Zoom In/Out: Allows you to zoom in (+) or zoom out (-) the map.
- Export: Allows you to download the map to your local system in the PNG format.
- Full Screen: Displays the map in full screen.
- Person Card: A person card which contains information such as name, email id, title, created date, etc.
- Three-horizontal dots menu: Allows you to add a Manager, Direct Report, Influencer. You can view the details of the person and replace a person.
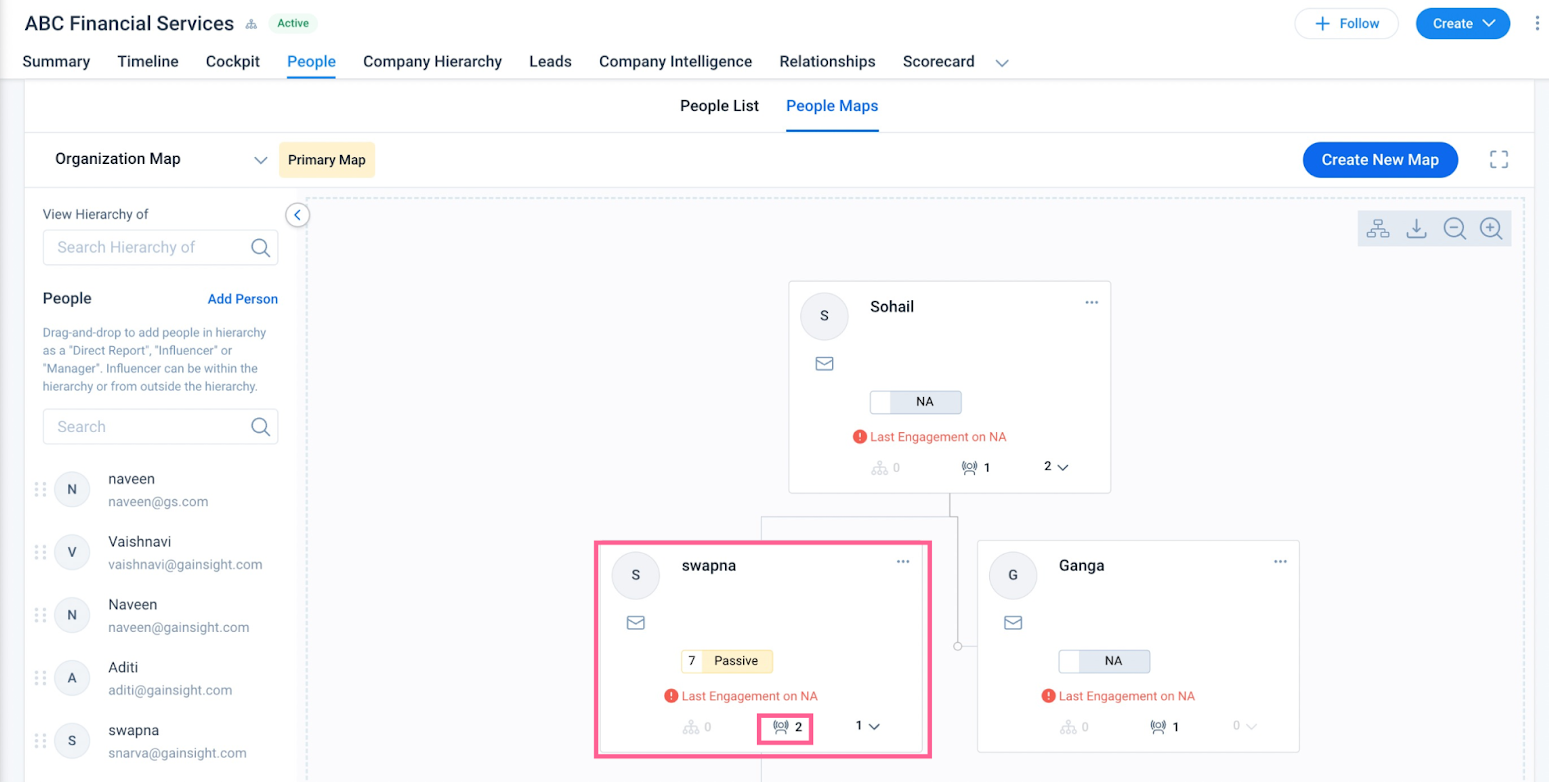
- Influencers: Indicates the number of influencers of the person. Click on the icon to view the mapping of the person with influencers.
- Direct Reports: Indicates the number of direct reports of the person. Click on the icon to view the person cards of direct reportees.
- Last Engagement on: Last Engagement is identified for the people who are added to Timeline Activities as external attendees. It is marked Red in color with an alert icon, if the last engagement date of the specific person is null or greater than 90 days. This helps remind CSMs to re-engage with the person. Gainsight recommends to either send an Email from Cockpit using Email Assist, or create a Call to Action (CTA) manually or through a Rule to facilitate the engagement.
- Named Map: Indicates the number of sub-hierarchy or custom maps to which the person is mapped.
- Map View Switch: Allows you to switch between horizontal and vertical stacked views of the map.
- Create New Map: Allows you to create a sub-hierarchy or custom map.
- Map Type: Indicates whether the selected map is sub-hierarchy or custom map.
Types of People Maps
CSMs can create multiple People Maps for a Company. This eliminates the need to navigate through large organization maps. Using separate maps helps you easily understand the department/decision-making hierarchies at your customer/prospect organization. A CSM can create the following types of maps:
Sub-Hierarchy Map
A Sub-Hierarchy Map is a part of the organization (parent) map but acts as an independent map and makes it easy and convenient for CSMs to understand the hierarchy. You can create this map by splitting the existing organization map into smaller sections, to capture hierarchies for the specific departments/business units separately.
Note: Any changes made to the hierarchy in this map modifies the parent map and other maps created based on this hierarchy.
Business Use Case: A CSM wants to renew the contract with the support business unit of a Company where they already have contacts with the sales business unit. Knowing that both the business units are led by the same chief officer increases your upsell opportunities. The sub-hierarchy map helps you identify teams without having to know who leads the team and approach the right people at the right time.
To create a Sub-Hierarchy Map:
- From the People section on the C360 page, click Create New Map.
- In the Create New Map window, enter the name of the map.
- In the Map starting with field, select the person to start creating the map.
Note: Start typing the name to select the person from the search results. - In the Map Type section, select the Sub-hierarchy map based on company/organization map option.
- Click Create. The Sub-Hierarchy Map is created.
You can view and modify this map using the type of map dropdown from the People Map view.
Custom Map
A custom map is a standalone hierarchy map that can include people from cross-functional business units who are involved in decision-making or other specific business initiatives associated with your project/deal.
Note: Any changes made to the hierarchy in this map does not impact other existing maps.
Business Use Case: You come across a decision-making group at a prospect. As a CSM, you can create a custom map for this group of people indicating the leader of the group and the members (influencers). This helps in planning your interactions accordingly.
To create a Custom Map:
- From the People section on the C360 page, click Create New Map.
- In the Create New Map window, enter the name of the map.
- In the Map starting with field, select the person to start creating the map.
Note: Start typing the name to select the person from the search results. - In the Map Type section, select the Custom Map option.
- Click Create. The Custom Map is created.
You can view and modify this map using the type of map dropdown from the People Map view.
Add a Person
This section explains how you can build on the People map by adding managers and direct reports.
To add manager and direct reports:
- Click the three-horizontal dots menu on the person card and select Add Direct Report.
- Enter the name of the direct report and press enter.
- Select the name. You can now see that the direct report is added.
IMPORTANT: If you do not see the Add Person option, contact your Gainsight Administrator to enable the Allow Add Person option for you to start adding person.
Notes:
- When you add a manager for a Person, the Manager field in the Company Person object is populated with the GSID of the manager. In the above case, the GSID of Michael Smith is added to the Manager field for Lily Jones.
- You can add a manager for the Person from the Person Details section. Click the three-horizontal icon on the person card and search for a person by name whom you want to add as manager in the Manager field.
- You can build People Maps by importing data from the Salesforce Connector (using the Reports to field). Also, use the Load to Company Person Action type and populate data into the Manager field.
Add a Person by Drag and Drop Method
You can drag and drop a person from the Add People To Map field’s search results to the Person widget, to add the person as Manager, Direct Report or Influencer in the map.
To add a person to map by drag and drop method:
- Navigate to the C360 > People > People Maps page.
- Enter the name of the required person in the People field.
- Drag and drop the person from the search results to the required Person’s widget in the map. Add <<Person name>> to map as a window is displayed.
- Select any one of the below options:
- (Default) Direct Report: Select this option to add the person as a Direct Report to the Person in the map.
- Add “<<Person name>>” as a Direct Report to: You can change the Manager of the person to be added in the map. You can enter the new Manager’s Name in the search field, and then select the Manager from the search results.
- Influencer: Select this option to add the person as an Influencer to the Person in the map. Enter the following information:
- Name: You can change the name of the Influencer, if needed.
- Sentiment: Select the sentiment of the Influencer.
- Notes: You can add any additional information about the Influencer such as contact information, working hours of Influencer, etc.
Note: You can’t add a Gainsight User as an Influencer by the drag and drop method. However, you can add a Gainsight User by the existing method.
- Manager: Select this option to add the person as a Manager to the Person in the map.
Note: This option is disabled when a person in the map already has a manager.
View Hierarchy of a Person
You can search for a person in the newly added View Hierarchy of field to view the person’s hierarchy in the map.
To view the hierarchy of a person:
- Navigate to the C360 > People > People Maps page.
- Enter the name of the required person in the View Hierarchy of field.
- Select the relevant person from the results to view hierarchy.
Note: You can click the Person Map icon on the top to view the default hierarchy.
Change Hierarchy
This section explains the process of modifying the hierarchy of a People map. You cannot drag and drop a Person from one hierarchy to another. You must first remove the Person’s association with an existing manager and then create a new association with the required manager.
To change the hierarchy:
- Click the three-horizontal dots menu on the person card to be removed and select Remove.
- Click the three-horizontal dots menu on the person card to whom you wish to add a direct report.
- Click Add Direct Report.
- Search for the person to be added as direct report.
Notes:
- When you remove the association of a Person with manager, the Manager field of that person has no values. When you associate a Person to a new manager, the Manager field of the person contains the GSID of the new manager.
- You can also add, edit, or delete People Maps from Gainsight widget pages.
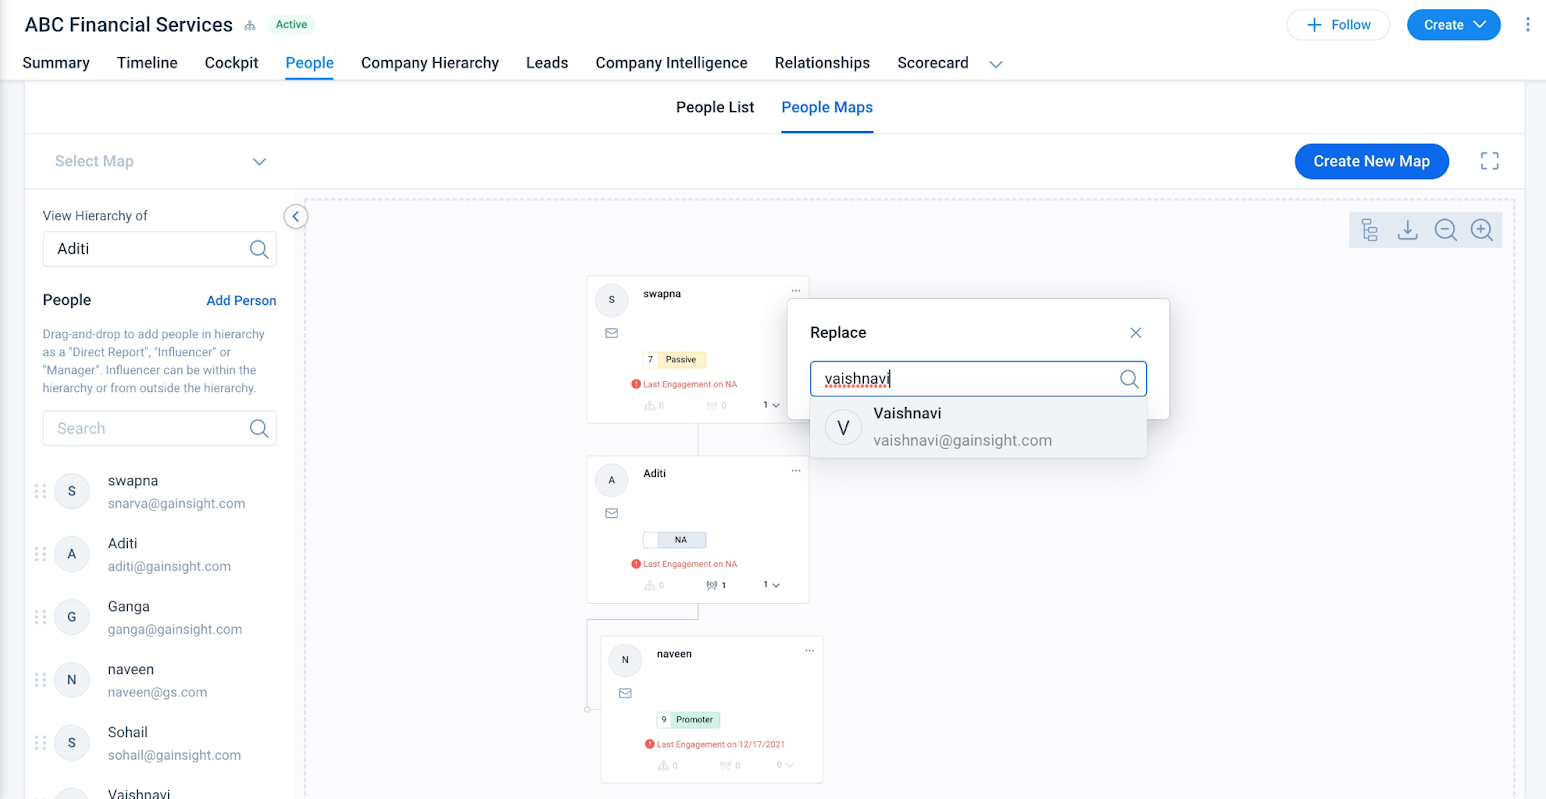
Replace a Person in People Maps
CSMs can replace a person in the People Maps. To replace a Person in the People Maps, the new Person should be already present in the Gainsight Person object and should be associated with the same company.
Business Use Case: When an employee leaves a company or moved to another role in the company, a CSM wants to replace the person in the People maps. This saves time and reduce manual efforts.
To replace a person:
- Navigate to the C360 > People > People Maps page.
- Click the three-horizontal dots menu on the person card.
- Select Replace. Search People field is displayed.
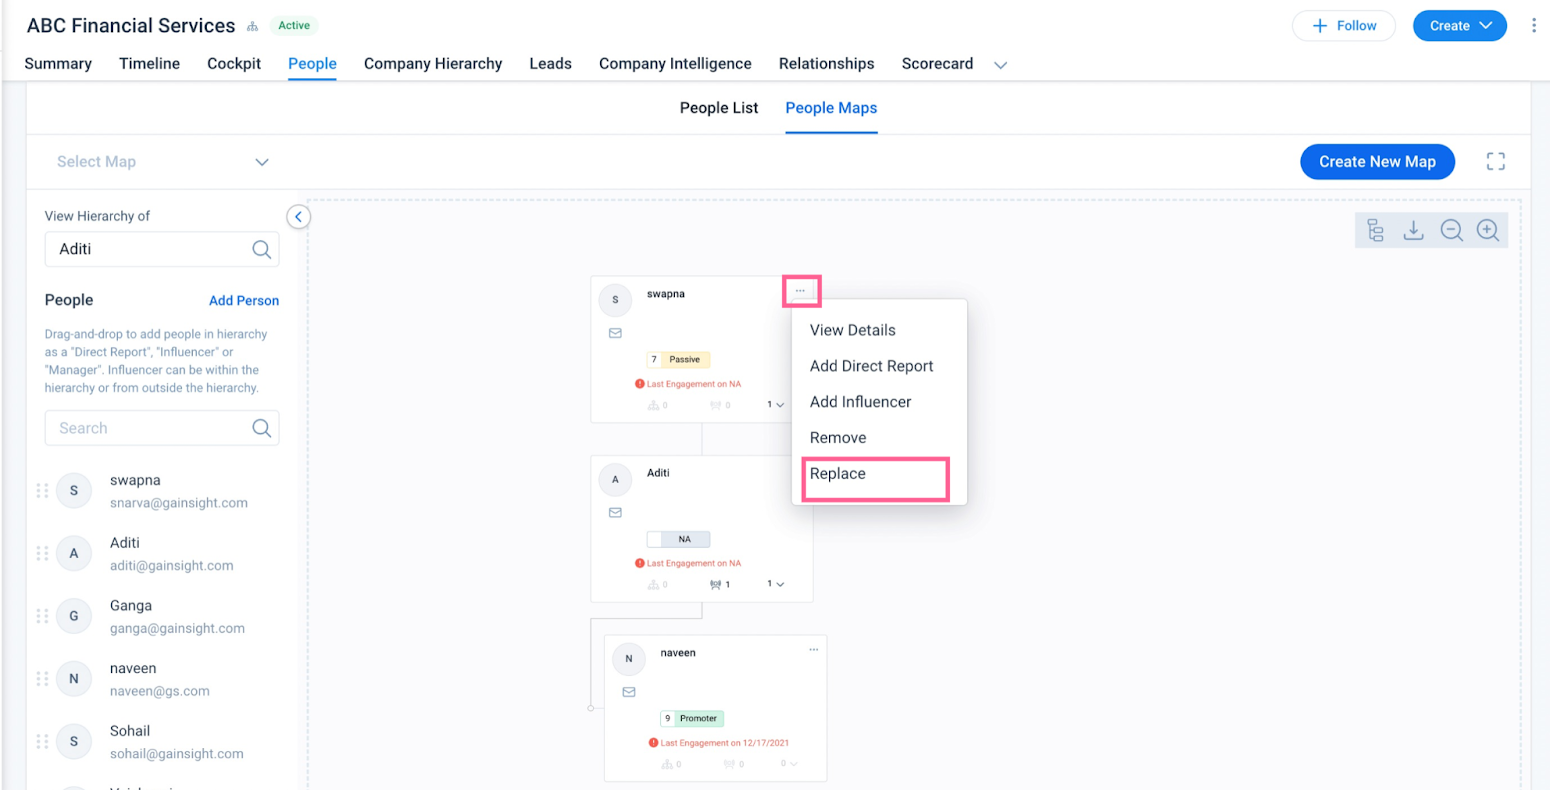
- Enter the Name of the person and press Enter.
- Select the person from the search results. The selected person on the map is replaced with the new person.
Add Influencer Relationship in People Maps
CSMs can add influencer relationships to a People Maps. An Influencer is a Person within your customer’s organization or a Gainsight user, who can impact the decision maker. This impact (known as Sentiment in People Maps) can be negative, positive, or neutral.
Example 1: if a Manager (Ex: Joan) is a decision maker, one of their direct reports can be an influencer to this manager who can either have a positive or negative impact on the manager, when you try to sell your product to Joan.
Example 2: if an employee (Ex: Robert) from your organization (Gainsight user) has a better relationship with the Manager (Ex: Joan) from your customer’s organization. You can add Robert as an influencer who can impact the Joan (decision maker), when you try to sell your product to Joan.
The hierarchical structure of an organization gives you a clear picture of the direct reports and their manager. However, the hierarchical structure does not give you a picture of the internal or external relationships that exist in every organization. This feature allows you to model and visualize these connections which exist between various stakeholders. With the ability to add influencers, you get deep insights about the decision maker, the possible opportunities (positive influencers), threats (negative influencers), the right influencer to be approached for renewal, and so on.
Note: If you add Gainsight users to People Maps, they are added from the Gainsight User object.
Business Use cases:
- A person named Chris is using your product and is very happy with your product (gave very good NPS® responses). Chris reports to Joan, who is the renewal decision maker for your product. You can create an influencer relationship from Chris to Joan. Chris would definitely recommend Joan to renew your product since Chris provided a very good NPS® score, and can be considered as a positive influencer on Joan. Similarly, if any stakeholder at your customer’s organization has given too many negative NPS® responses, you can mark them as a negative influencer on the decision maker and be better prepared to overcome the threats which could arise from this negative influencer.
- A person named Robert from your organization (Gainsight user) has better official relationships with Joan from your customer’s organization, who is the renewal decision maker for your product. You can create an influencer relationship from Robert to Joan since Robert is a positive influencer and he would definitely recommend Joan to renew your product.
Technical Aspects:
- You can create an Influencer relationship between stakeholders of any level irrespective of their position in the hierarchy.
- It is mandatory to specify the sentiment of an influence relation. This sentiment can either be positive, negative, or neutral.
- Positive influence is denoted by a green arrow, negative influence is denoted by a red arrow, and neutral influence is denoted by a grey arrow.
- If an Influencer relationship exists between a manager and a direct report, and the direct report is removed from the hierarchy, the influencers count for the manager does not decrease. However, the name of the influencer or influence arrow is not displayed.
- You can only create a 1:1 Influence relationship between any two stakeholders; Person X can influence Person Y only in either positive, negative, or neutral way. You cannot create an Influence relationship in which Person X can have a positive influence on Person Y for one product, and a negative influence on Y for another product.
Add Influencer
To add Influencer relationship in an org chart view:
Prerequisite: Ensure that the Influencer that you want to add to an existing person is already added to the Person object or Gainsight User object. Influencer should already have a record in the Person object or Gainsight User object.
- Navigate to C360 > People > People Maps Section.
- Create a Person Map chart or navigate to the existing person map.
- Click the three-horizontal dots menu for the Person to whom you wish to add an Influencer.
- Select Add Influencer. The Influencer detail view is displayed.
- Select Influencer Type.
- Within your organization: Select this option to add Influencer from your customer’s organization (Company) and another Company (People)
- Within Company: Select this option to add Influencer from your organization (Gainsight User).
- Enter the following details in the Influencer detail view:
- Influencer Name: Enter the name of the person who is the influencer and select from the recommendation.
- Sentiment: Select the Influence Sentiment (Positive/Negative/Neutral).
- (Optional) Notes: Add details of the influence relationship.
- Click SAVE.
You can see that the Influencer icon for Swapna shows 2. This is because Ananth is now an Influencer to Swapna, apart from the 1 previous influencer.
- Click the Influencers icon to view the Influencer relation arrow(s).
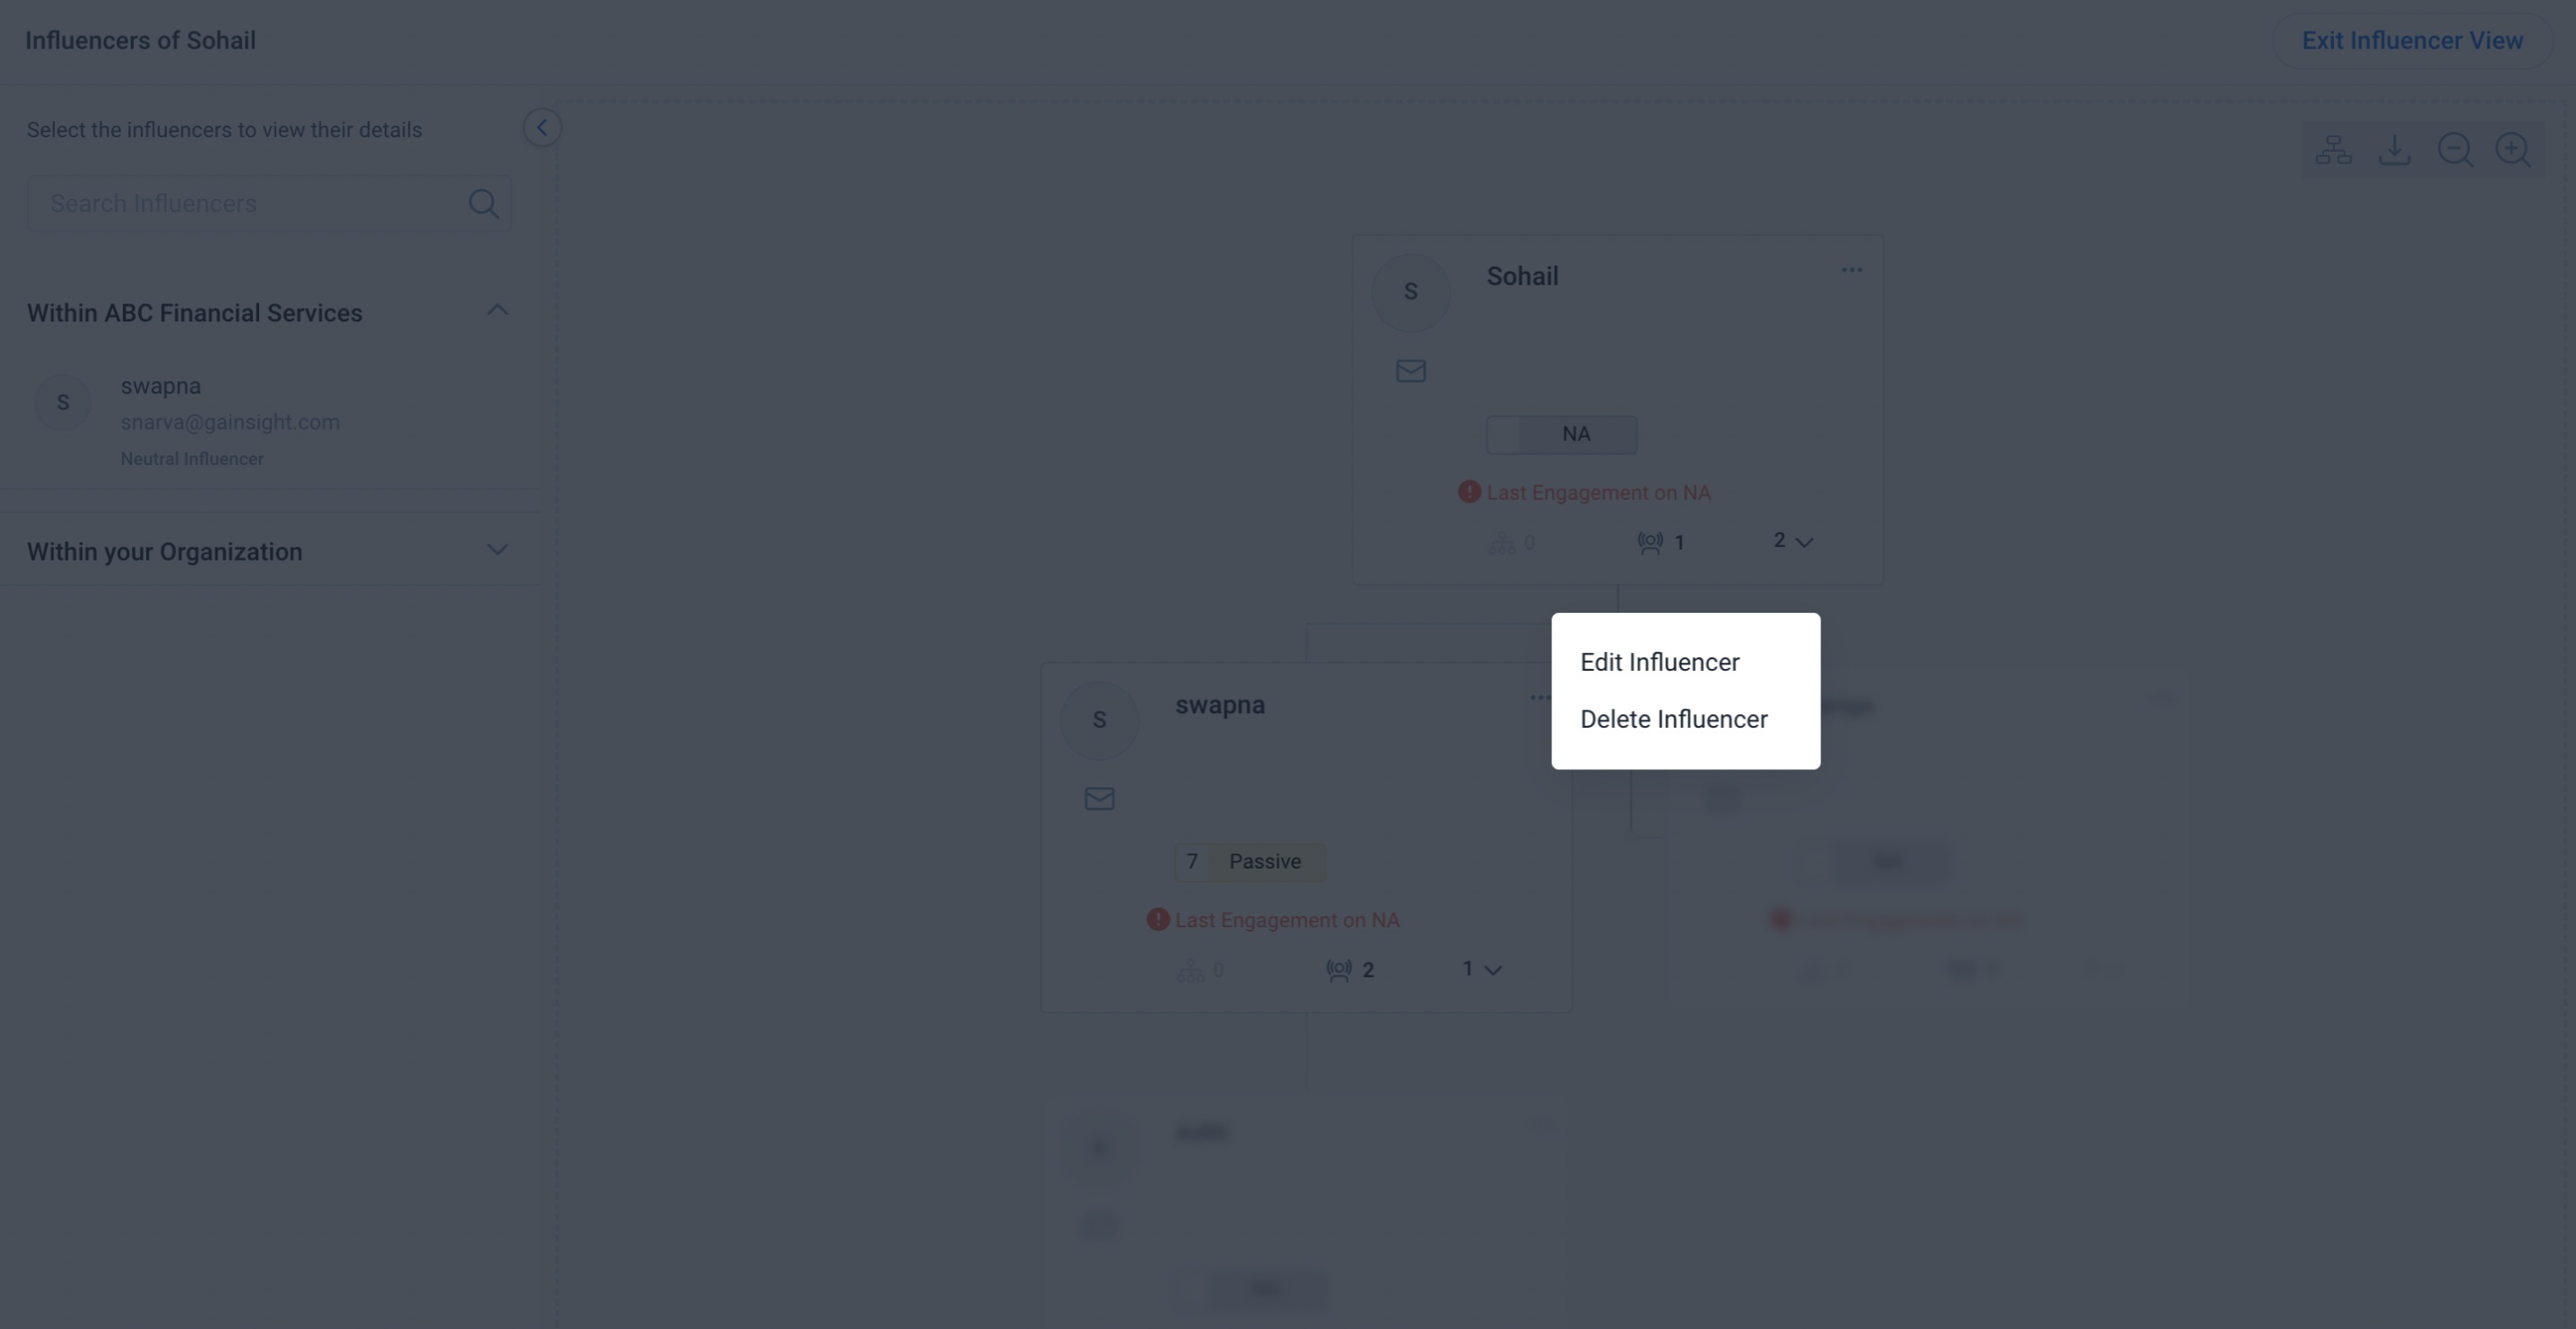
- (Optional) Click the Influencer arrow and select Edit Influencer to view the influencer detail view. You can change the sentiment or add/edit notes in the detail view.
- (Optional) Click the Influencer arrow and select Delete Influencer to delete the already created Influencers.
You can have only a 1:1 level Influence relationship. In the above example, if you attempt to create another Influence relation from Ananth to Swapna, you receive an error message as shown below:
View Influencer
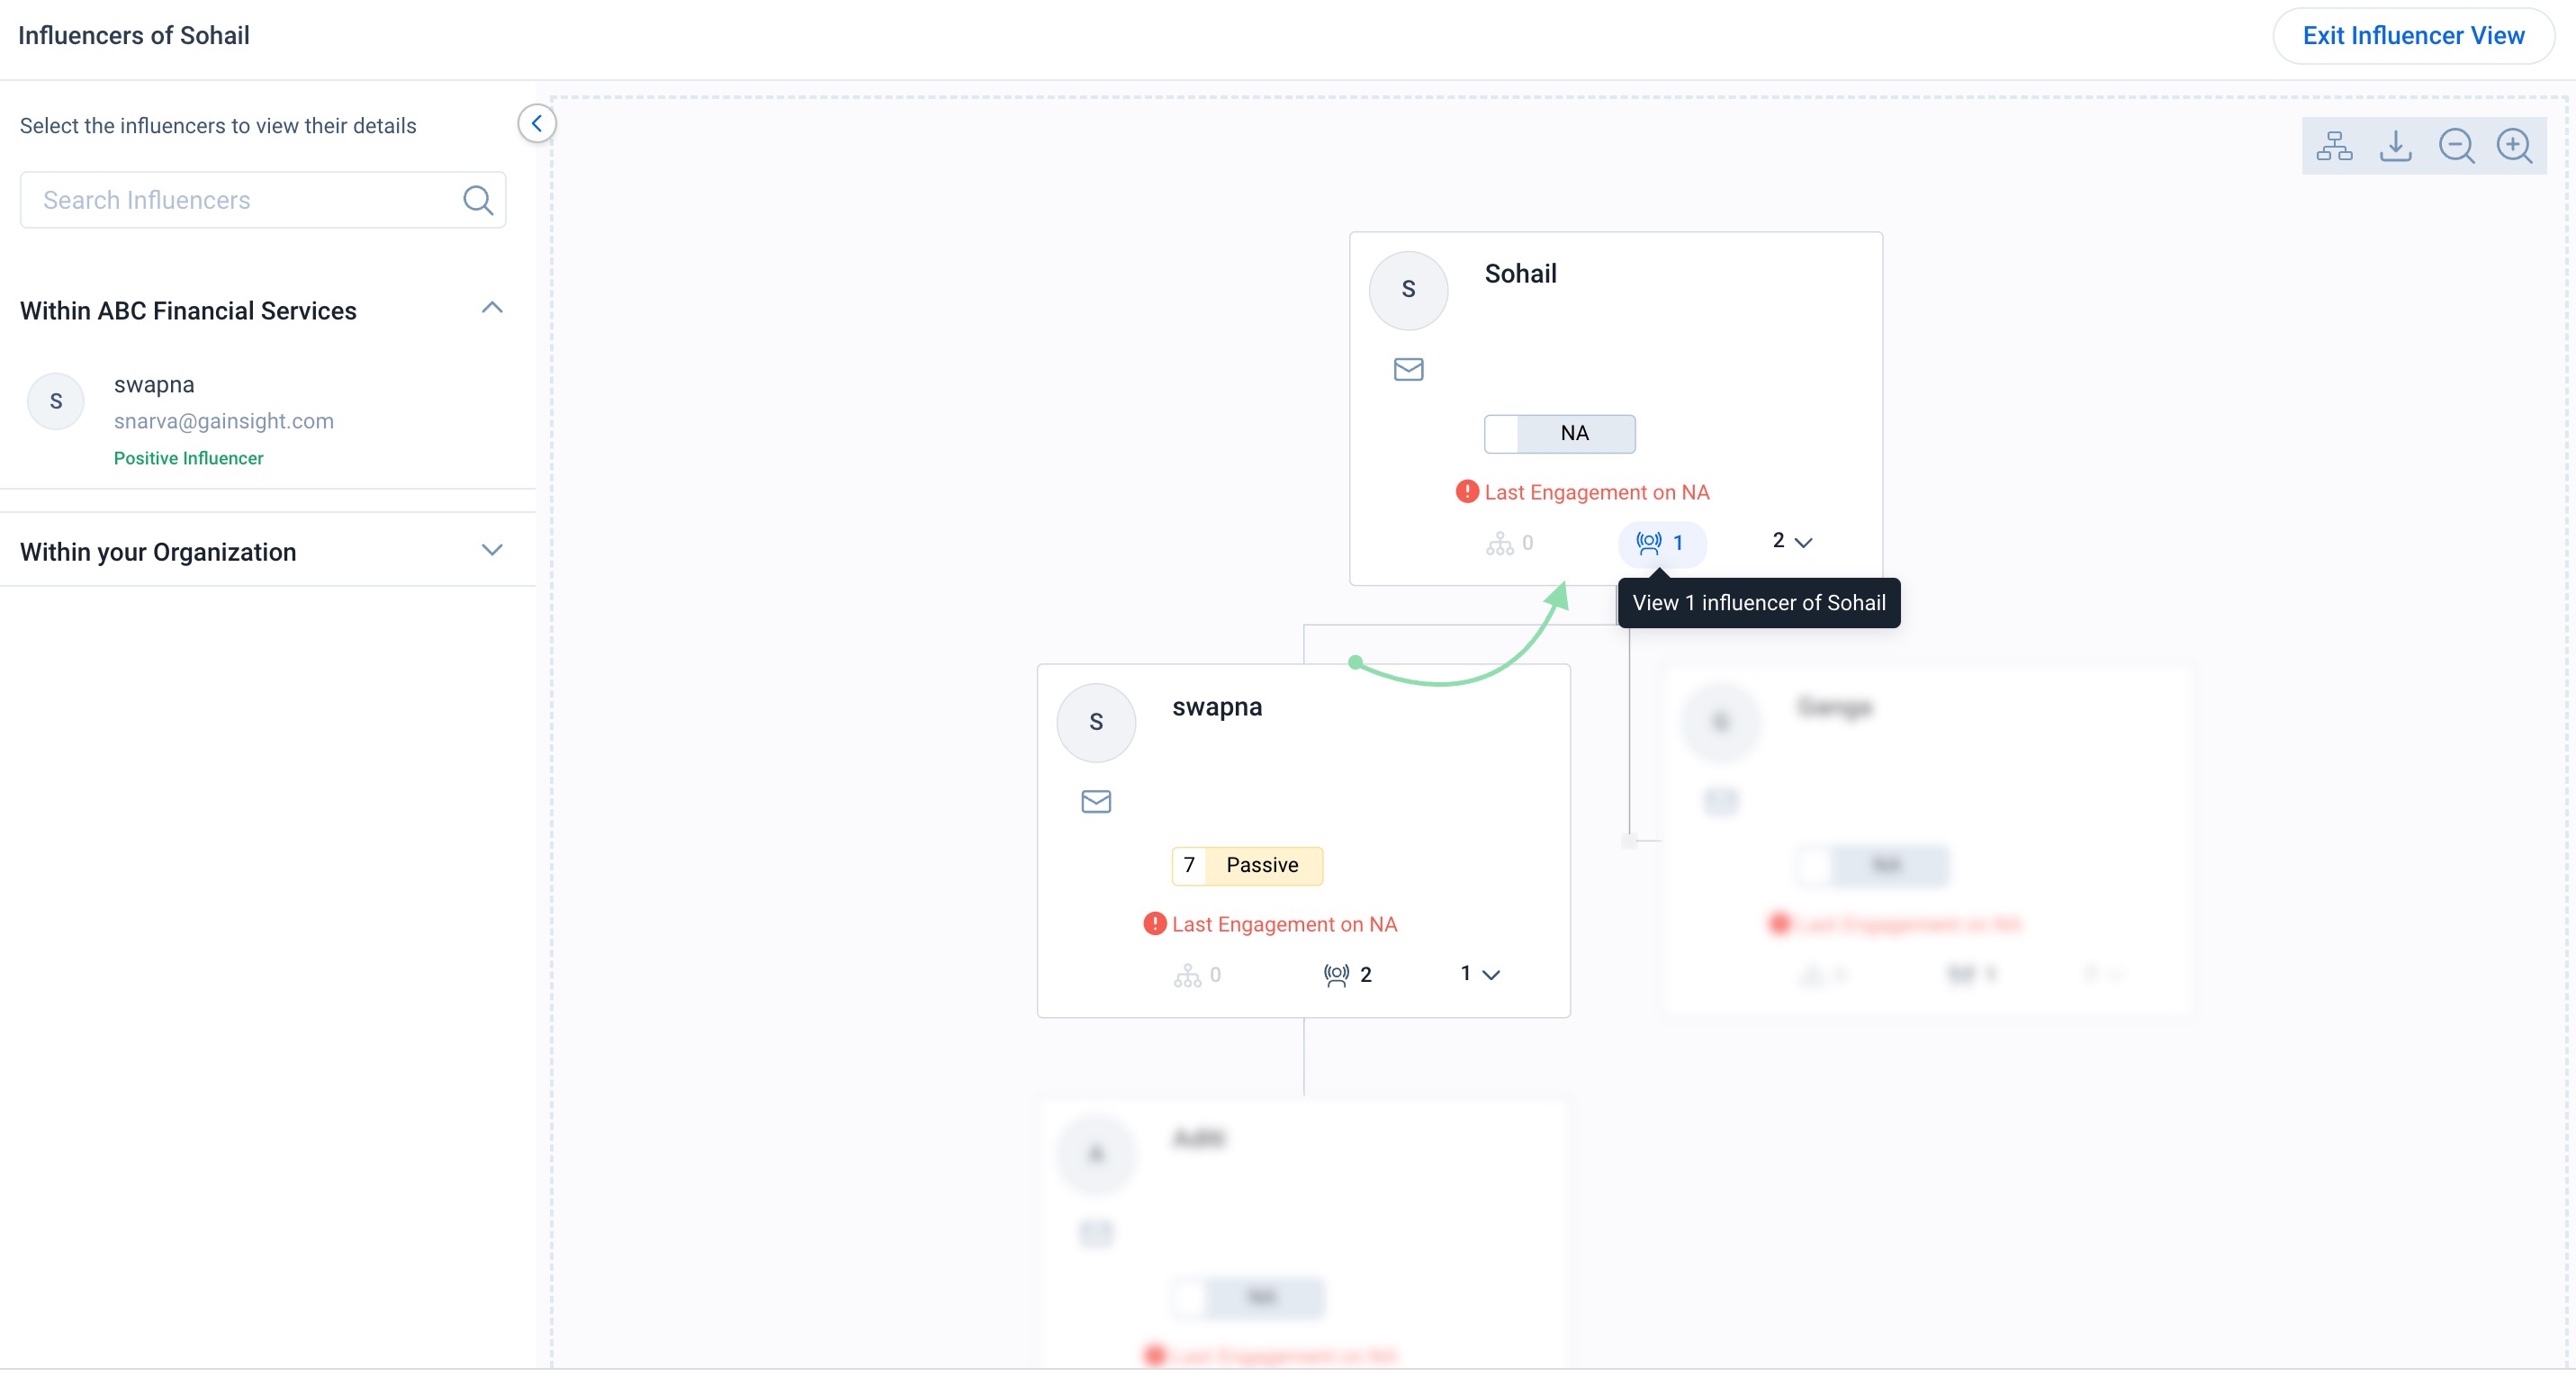
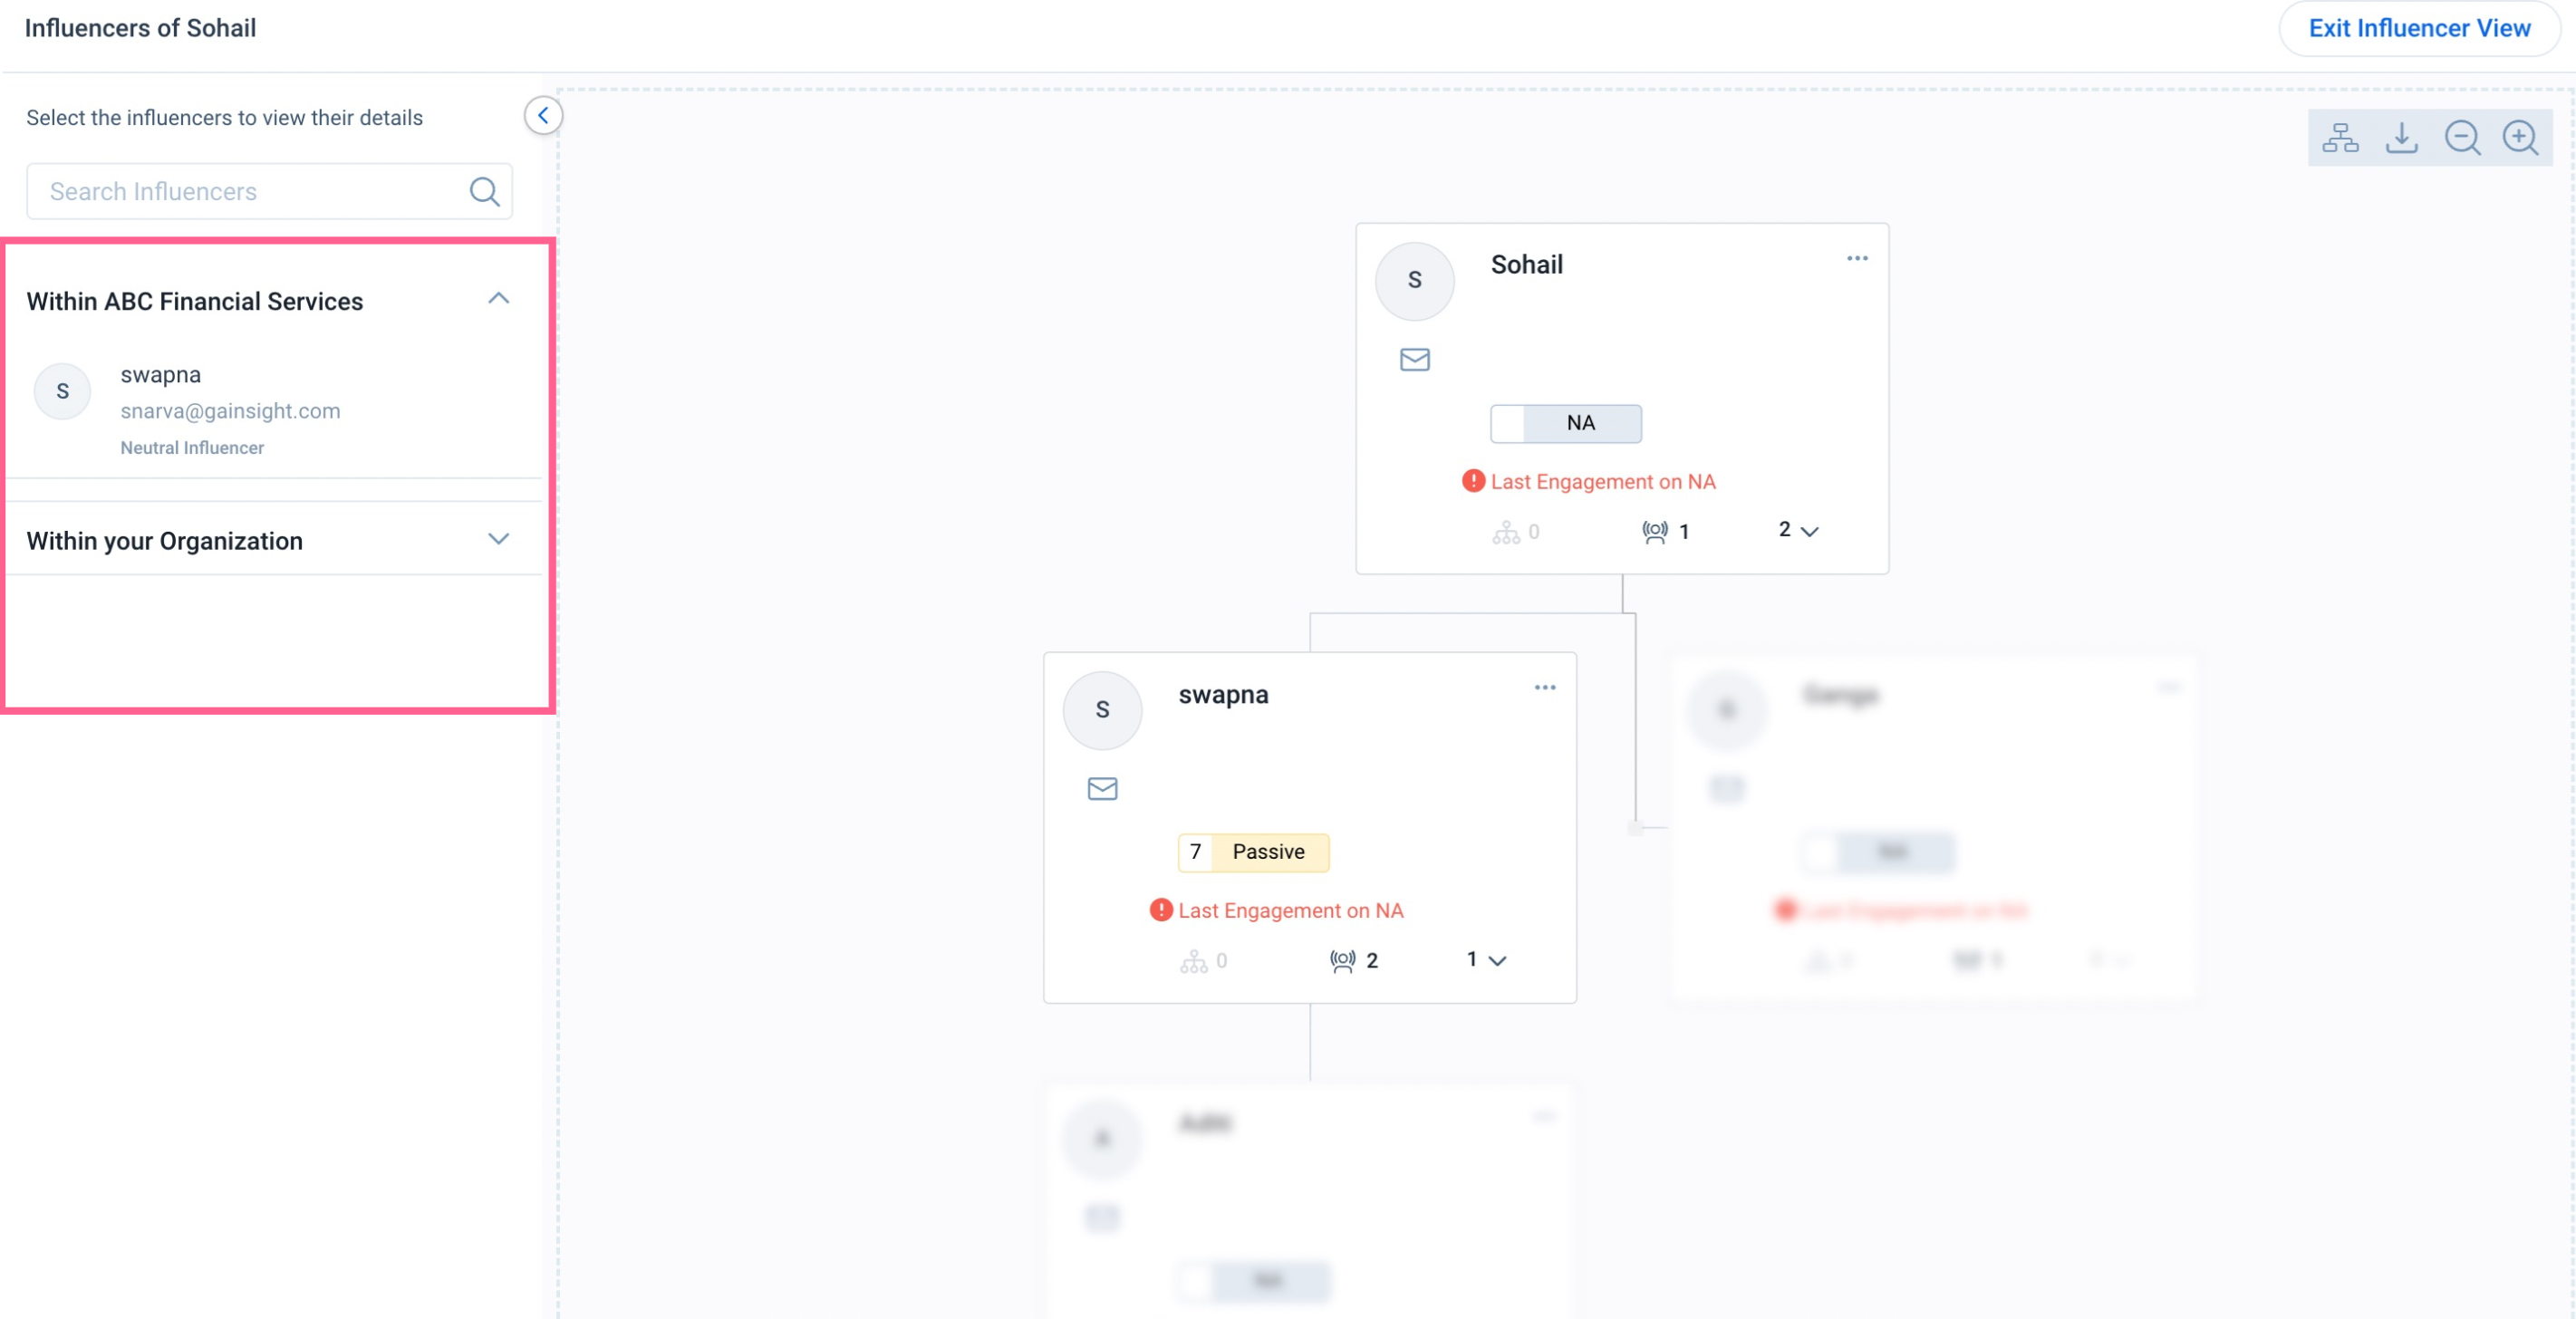
To view the list of Influencers:
- Select the Influencers icon from any person card’s menu. List of Influencers is displayed on the left pane.
- Select either Within your organization or Within Company from the dropdown to see the respective influencers, as listed above.
Note: Only the Influencers from the same People Map are shown with Influencer arrows.
Note: Gainsight users that you add to People Maps can be Active or Inactive in the User Management page.
| Net Promoter®, NPS®, NPS Prism®, and the NPS-related emoticons are registered trademarks of Bain & Company, Inc., NICE Systems, Inc., and Fred Reichheld. Net Promoter ScoreSM and Net Promoter SystemSM are service marks of Bain & Company, Inc., NICE Systems, Inc., and Fred Reichheld. |
Additional Resources
C360 articles:
- 360 Overview
- Configure 360 Layouts
- Configure Associated Objects to Relationship
- Configure Attribute Section in 360
- Configure Embed Section in 360
- Configure Reports Section
- Configure Usage Section in C360/R360
- Configure Company Hierarchy Section in 360
- Configure People Section in C/R360
- Configure Relationship Section and Views in 360
- Configure Summary Section in C360/R360
- Overview of C360/R360 Sections and Widgets
- View Company Hierarchy
- Export Success Snapshot Presentations
- Sponsor Tracking Overview
- C360 FAQs
R360 articles: