Group Send Admin Guide
This article outlines the configurations required to enable Group Send and manage associated permissions. To use this feature, the user must be mapped to the permissions on both the Company and Relationship objects.
Overview
Group Send in the new Gainsight Home allows users to create People Lists and send targeted emails, with a streamlined experience that does not require Journey Orchestrator (JO).
For more information on migrating to the new Gainsight Home, refer to the Change Document for Gainsight Home article.
To enable Group Send for users, Admins must enable the People widget, assign permission bundles, and configure email settings.
Enable Group Send
You needs to perform the following actions to ensure that users can effectively use group send:
- Enable People Widget
- Assign Permission Bundles
- Configure Email Settings
- Configure Group Send Access Control
- Set Email Limits
Enable People Widget
Follow these steps to activate the People widget in new Gainsight Home:
- Navigate to Administration > Gainsight Home > Configuration > Layouts.
- Click Create Layout to create a new layout, or Edit to modify an existing one.

- Drag and drop Portfolio from the Widgets pane. The Portfolio page appears.
- Click the three-horizontal dots menu and select the People checkbox.

- Click Apply. The People tab is added to the Portfolio widget.

Customize Fields in the People Widget
To customize fields in People widget:
- In the People tab, click the Widget Settings icon. The People slide-out panel appears.
- (Optional) Click Add Fields to add more fields in the Company Person or Relationship Person tab.
Note: By default there are six fields in both Company Person and Relationship Person tabs.- Select the checkbox next to the field name to include it in the People widget.

- Click Apply. The added field appears in the Company Person tab. Follow the same steps to add fields to the Relationship Person tab.
Note: Use the Delete icon to remove a field from the list.

- Select the checkbox next to the field name to include it in the People widget.
- (Optional) Modify the Display Name column for fields added to the Company Person and Relationship Person tabs, as needed.

- Select the Yes checkboxes in the Editable column to allow users with access to edit these fields in Gainsight Home. Fields specified as match criteria are not editable. For more information on Match Criteria, refer to the People Management article.
Note: The Name field cannot be deleted or moved. - Click Save.
- Click Save and Next. The Save Gainsight Home window appears.

- Enter the Name and Description.

- Click Save. The Assign Layout page appears.
- Assign layout to either All Users or Specific User and User Groups.

- Select All Users to grant access to users with a full license for this layout.
- Select Specific User and User Groups to grant access to particular users and user groups.
- Search for users and user groups in the search bar.
- Click Add.

- Click Publish.

Use the three-horizontal dots menu to edit, rename, assign the layout to users, unpublish, clone, or delete the layout.

Assign Permission Bundles
You must assign the appropriate permission bundles to users to activate the Group Send feature. Follow these steps to assign permission bundles for Group Send:
- Navigate to Administration > Users and Permissions > Permission Bundle.
Note: You can customize an existing permission bundle using the Edit option or create a new permission bundle altogether using the Configure Permission Bundle option.

- Click Configure Permission Bundle > Internal Permission Bundle. The New Permission Bundle page appears.
- Select a license type from the Select a License Type dropdown list.

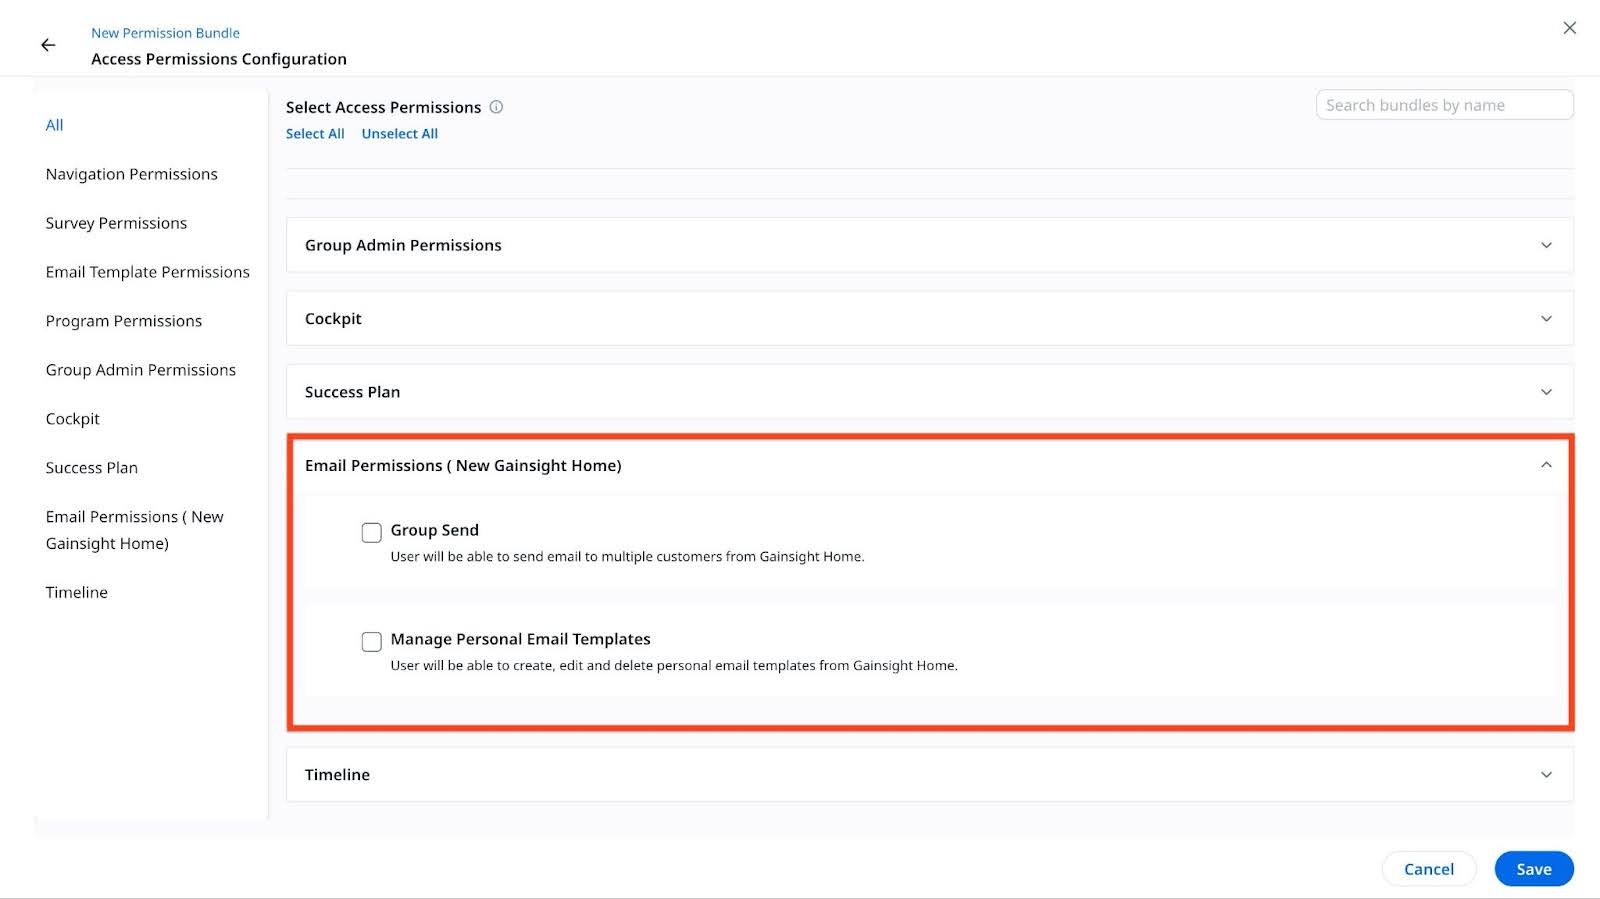
- In the Access Permissions section, click Configure. The Access Permission Configuration page appears.
- In the Email Permissions (New Gainsight Home), select the Group Send and Manage Personal Email Templates checkboxes.
Note- Group Send: Allows users to send bulk emails from the new GS Home.
- Manage Personal Email Templates: Allows users to create, edit, and delete personal email templates from the new GS Home.
- Click Save. The New Permission Bundle page appears.
- Click Next. The Assign Users tab appears. You can assign users to a bundle based on their role in the organization, either manually or automatically using rules. For more information on assigning users to a bundle, refer to the Permission Bundles article.
- Click Save to keep the changes.
Configure Email Settings
Configure email settings to enable token mapping, timeline logging, and sender address selection for users. These options support flexible and personalized email communication.
Follow these steps to configure email settings for Group Send:
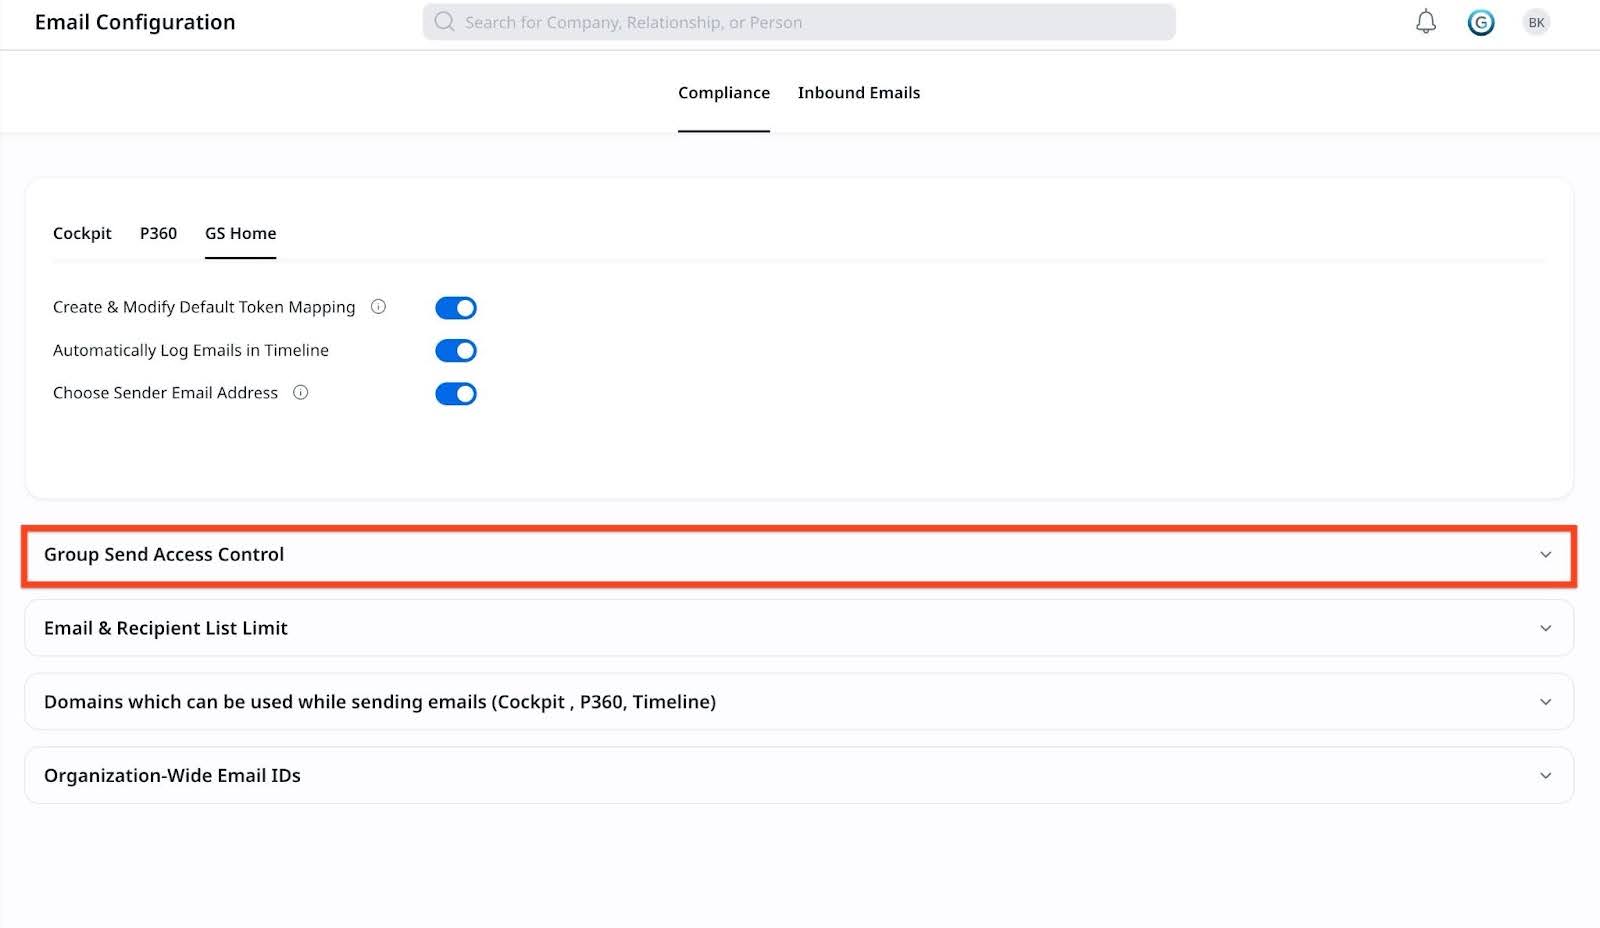
- Navigate to Administration > Communication > Email Configuration > Compliance > GS Home.
- Turn on the following three toggles:
- Create & Modify Default Token Mapping: Allows users to insert a new token or modify an existing token.
- Automatically Log Emails in Timeline: The Log to Timeline checkbox is selected by default, but users can modify this setting before sending the email.
- Choose Sender Email Address: Allows users to select a different From address when sending emails.

- Click Save to keep the changes.
Configure Group Send Access Control
You can configure which users are permitted to send emails on behalf of specific companies and relationships in Gainsight. This configuration supports pooled or shared ownership models, such as Small Business teams, where multiple users require permission to communicate with designated customer segments.
Key Capabilities
- Assign eligible user lookup fields, such as Account Manager or Regional Manager, as senders, provided these fields are of the User (lookup) type.
- Create user groups in the User Management section and apply filters based on company or relationship-level attributes, such as ARR less than $100K.
Example Business Use Case
Scenario: A team handles small accounts (< $100K ARR) without dedicated CSMs.
Solution: Create a Small Business User Group, assign ARR-based filters, and allow group members to send emails to these accounts through Group Send and People Widget.
To configure access control:
- Navigate to Administration > Communication > Email Configuration > Compliance > GS Home > Group Send Access Control.
Note: By default, the CSM is configured as a user lookup field for both companies and relationships.
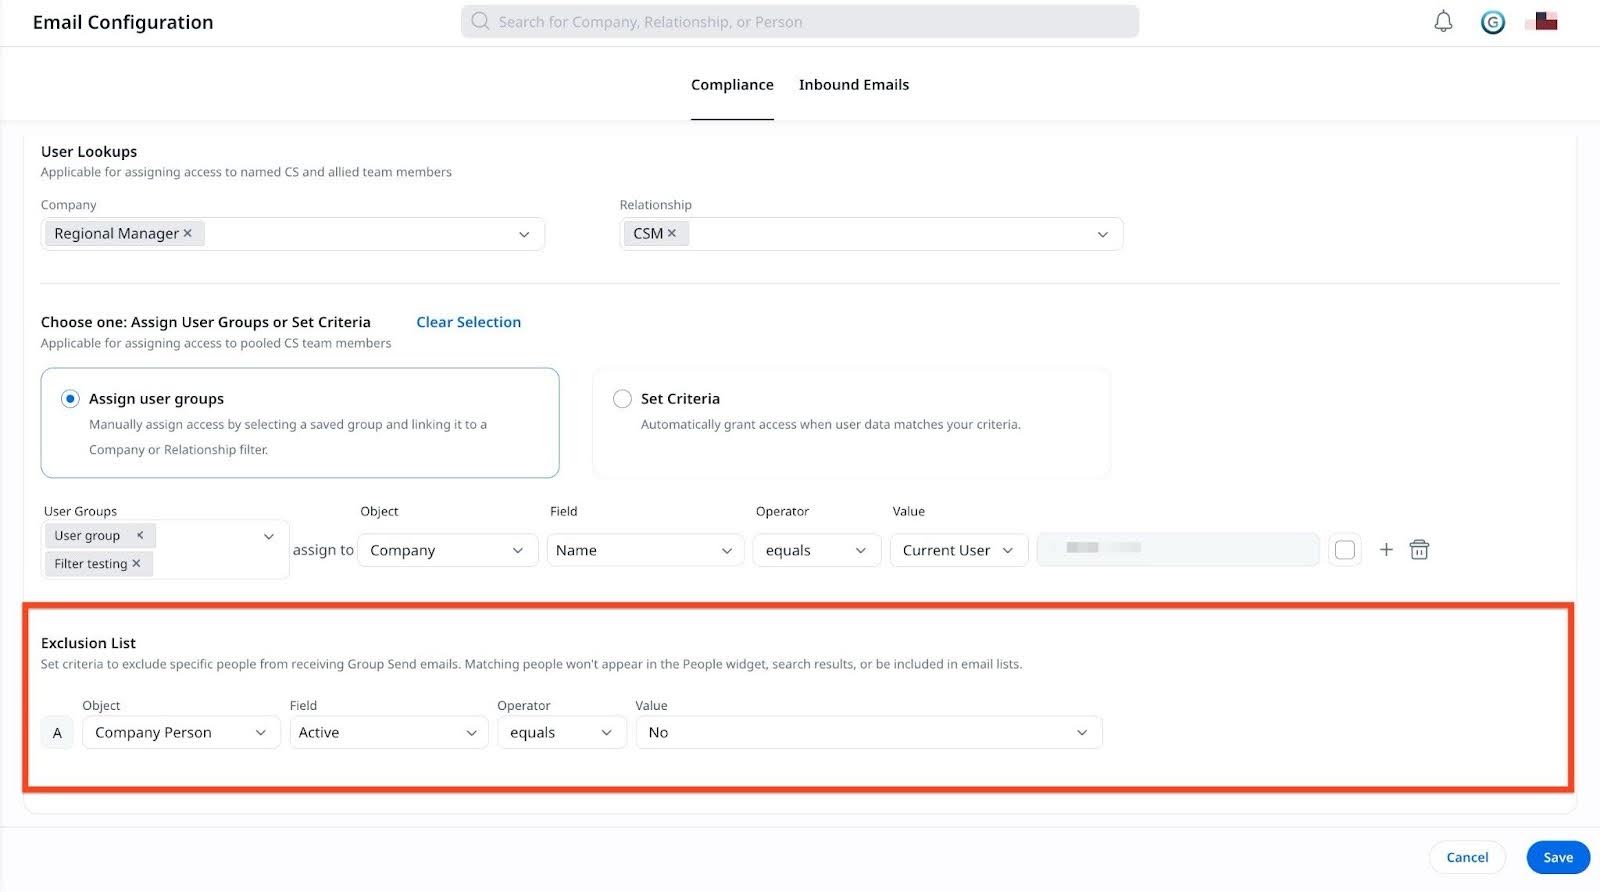
- To extend sender permissions, from the User Lookups section, add additional user personas in the Company and/or Relationship objects.
Note- If no configuration is done, the system continues to use the CSM field as the default permission control.
- A user can access up to 10 user lookup fields each in Company and Relationship objects.

- In Choose one: Assign User Groups or Set Criteria section, select the required option:
- Set Criteria: Select this option to automatically grant access when a user’s data meets the defined criteria. To set criteria:
- Click Add Criteria.
- Select a value for Source Object, Source Field, Operator, Target Object and Target Field.

- (Optional) To add another criteria, click the Plus icon.
- Click Save.
Note- A maximum of five criteria can be defined per configuration.
- The following data types are not supported in the field configuration: Rich Text Area, URL, WhoID, Multi-Select Picklist and formula fields.
- Assign user groups: Select this option to manually assign access by selecting a saved group and linking it to a Company or Relationship filter. To assign access to user group:
- Click Add User group Rule.

- Select a value for User Groups, Object, Field, Operator and Value from the respective dropdown lists. For example, a user group can be granted access to send emails to companies with ARR under $100K, ideal for pooled support models without dedicated CSMs.

- (Optional) To add another user group, click Plus icon.
Note- You must define at least one filter on Company and one on Relationship.
- A user can add a maximum of five user groups in an assignment in the Assign user group.
- The following data types are not supported in the field configuration: Rich Text Area, URL, WhoID, Multi-Select Picklist and formula fields.
- Click Add User group Rule.
- Set Criteria: Select this option to automatically grant access when a user’s data meets the defined criteria. To set criteria:
- (Optional) You can define criteria to exclude specific individuals from receiving Group Send emails. Recipients who match the defined exclusion conditions are automatically removed from the email send, both at list creation time and at the time the email is being sent. Exclusion criteria is applied to both Company and Relationship Person. To configure this:
- In the Exclusion List section, click Add Criteria.

- Select an Object, Field, Operator and Value from the dropdown list.
- To add another exclusion list, click the Plus icon. The exclusion list supports only And operator.
Example Business Use Case
An admin wants to send an email to all contacts in a dynamic list but needs to exclude inactive contacts. Without exclusion criteria, inactive contacts would receive the email even though they are no longer active. With this release, the admin can add an exclusion condition such as Status equals Inactive on the Company Person object. Any contact matching that condition is automatically excluded from the email, both during preview and at send time.
Note: Exclusion rules are enforced when searching and selecting recipients, creating email lists, and sending emails to previously created static lists. This functionality applies only to Group Send and is not supported for emails sent from Cockpit or P360 using the Send Email option. This limitation does not apply to the Super Admin persona.
- In the Exclusion List section, click Add Criteria.
- Click Save.
Set Email Limits
You can set email limits to control list size, email recipients, and daily or monthly sends. Users must contact Admins to request increases beyond these limits.
Follow these steps to set email limits for users:
- Navigate to Administration > Communication > Email Configuration > Compliance > GS Home.
- In the Email & Recipient List Limit, set limits for the following four items:
- Maximum person contact per list: Limits the number of people a user can add to a custom list. The maximum system limit is 2000.
- Maximum email recipients per email: Limits the number of recipients a user can include when sending a single email. The maximum system limit is 2000.
- Daily email limit per user: Limits the number of emails a user can send in a single day. The maximum system limit is 10000.
- Monthly email limit per user: Limits the total number of emails a user can send in a month. The maximum system limit is 10000.

- Click Save to keep the changes.
Reporting and Engagement Metrics for Emails and People Lists
Admins have the reporting capabilities for emails and People Lists sent from Gainsight Home.
Emails sent from GS Home are logged in the Email Log V2 object with Source name as GS Home-People Widget.

There are two objects in Report builder for group send:
- Person List: Provides a summary of various lists created by a user. To view the details of all created list:
- Navigate to Administration > Report Builder.
- Click Create Report.
- From the Select Object dropdown list, select Person List object.
- In the Show Me field, drag and drop fields such as Name, Context, List Type, and GS Created By Name and so on from the Fields left panel.
- Click Run Report. All created list details are shown.

- Person Associated List: Provides a set of records within a list. Person records within a list can currently be reported on only for Static Lists, through the Person Association List object. To view the details of all created list:
- Navigate to Administration > Report Builder.
- Click Create Report.
- From the Select Object dropdown list, select Person Associated List object.
- In the Show Me field, drag and drop fields such as ListID Name, ListID ListType, Person Name, Created By Name, ListID Context and so on from the Fields left panel.
- Click Run Report. All person details in a list are shown.
Note: The ListID ListType is always Static, as the current report mechanism only supports reporting for static lists.

- Use the WHOID/WHATID filter to streamline your reporting experience.
- To view the company person records in the list, select Company Person in the Who or What field.
- To view the relationship person record, select Relationship Person in the same field.
- Click Apply.

For more information on group send objects, refer to the Email Assist Objects article.