Gainsight NXT Release Notes 6.5 August 2019
| Note: For information about new functionality or fixes delivered as patch releases of version 6.5, refer to the CS (NXT) Patch Release Notes: Version 6.5.X series article. |
Short on time? Check out this 8-min. video to see what's new in this release!
New Features
Enablement Engine
Please note that Enablement Engine is available as an add-on to our Customer Success platform. For more information on how to license it, please contact your Gainsight account manager.
Gainsight Enablement Engine helps you supercharge your CSM team by streamlining onboarding, reinforcing trainings, and boosting productivity.
You can use Enablement Engine to:
- Analyze Gainsight CS feature usage to quickly and easily see what your CSMs are doing
- Launch personalized in-product engagements based on each CSMs behavior to onboard new CSMs systematically and, drive adoption of new team processes and Gainsight CS.
For more information, check our detailed Enablement Engine documentation.
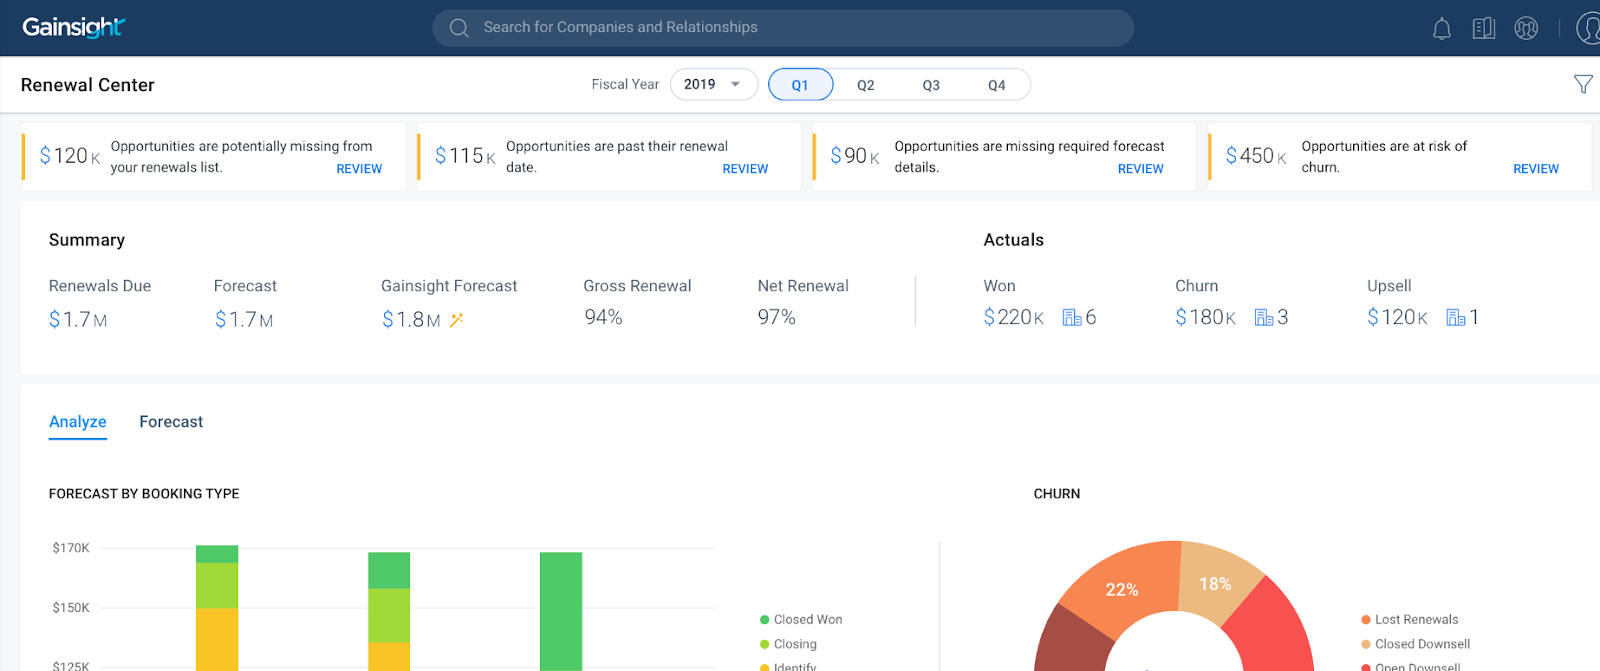
Renewal Center
Please note that Renewal Center is available as an add-on to our Customer Success platform. For more information on how to license it, please contact your Gainsight account manager.
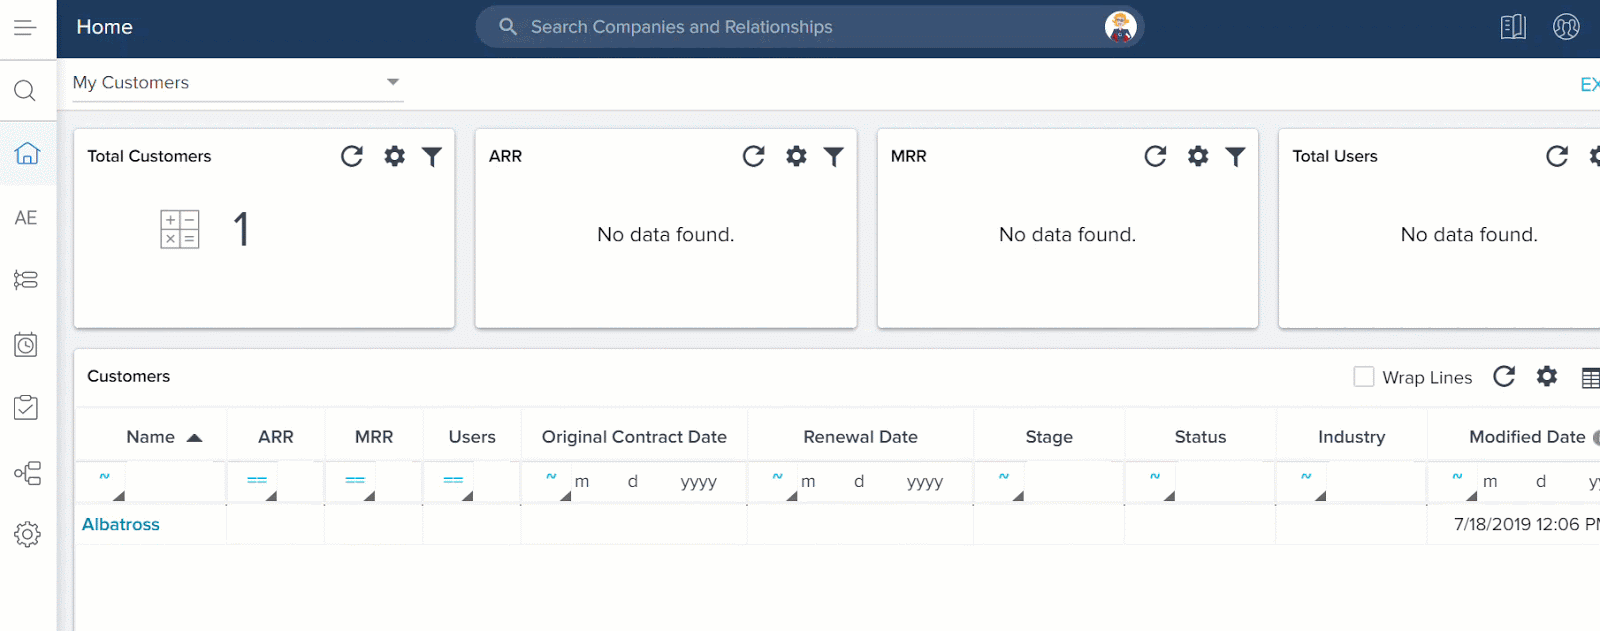
Renewal Center helps quota carrying CSMs and Renewal Managers forecast and manage their book of business. By enriching Salesforce Opportunities with Customer Success insights, as well as calculating a Likelihood to Renew score for each opportunity, Renewal Center enables your team to efficiently manage and predict renewals and related upsell, recognize risks in a timely fashion, and report on key metrics.
Renewal Center imports data from the Salesforce Opportunity object. An admin can then configure the field mappings and other parameters. Based on these configurations, end users can view the Renewal Center page as shown below. The fields may vary based on the configurations set by your administrator.
Note: To use Renewal Center, your Opportunity data must reside in Salesforce Opportunity object. You must use Gainsight Salesforce Connector to import this data into Gainsight.
Enhancements
Adoption Explorer
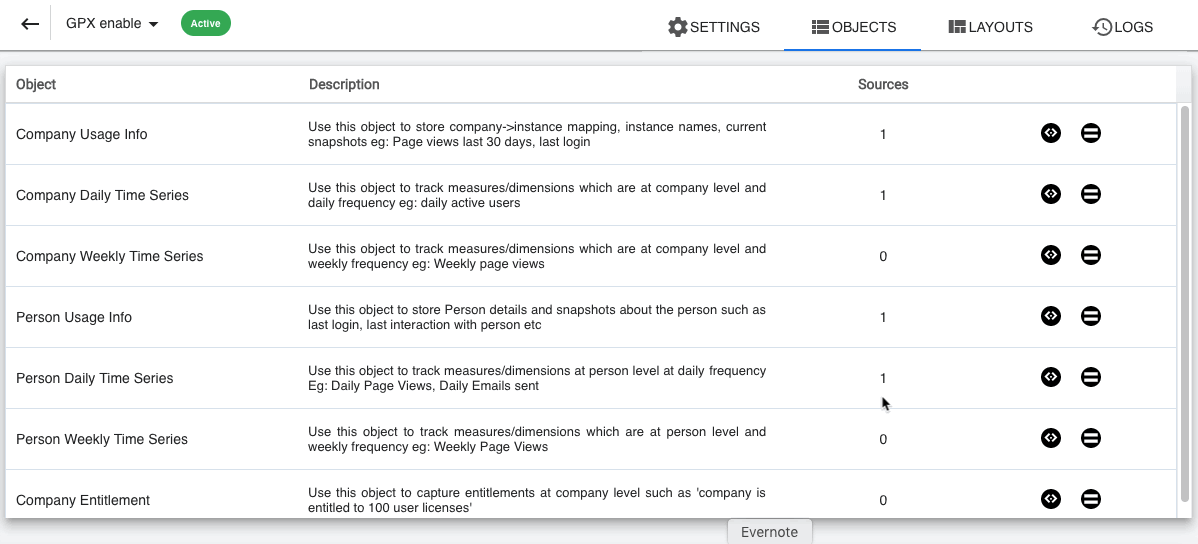
Adoption Explorer helps manage your customer’s usage data in the Gainsight environment, and quickly surface the most relevant view of usage data across your customer base. Adoption Explorer offers powerful segmentation capabilities to manage multiple product lines, more robust control of aggregations and calculations, and totally re-imagined visualizations to surface deep insights. Customer’s usage data at Company and/or Person level can be stored at both daily and weekly level along with their entitlements. Using the ingested data, admins can define new derived fields without the need of Rules Engine.
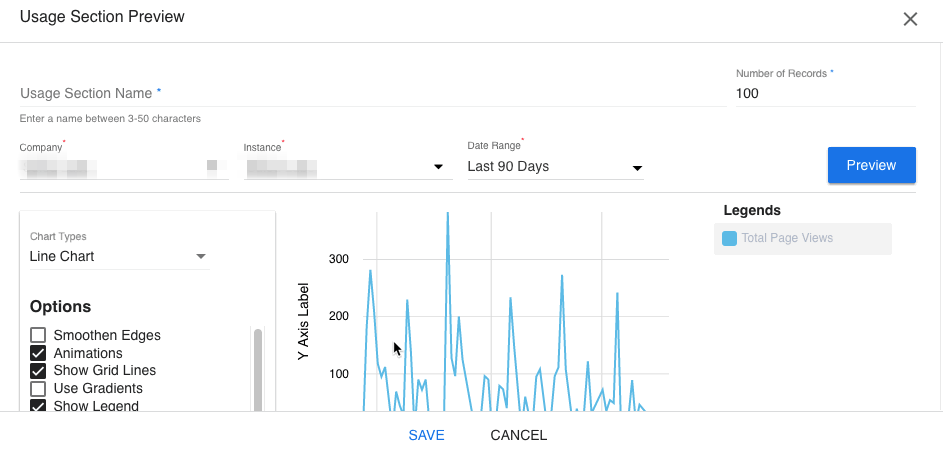
- Introducing Analytics with Gainsight Milestones Usage Section: A new usage section called Analytics with Gainsight Milestones is introduced in the Usage Section Type dropdown list.
In this usage section, all the Gainsight milestones created for the selected Company and the selected Date Range are overlaid with the configured usage data trend, which allows CSMs to derive more insights and make faster business decisions. For instance, a CSM has created a Gainsight milestone called Onboarding, and may want to check the usage adoption trends before and after the Milestone. To achieve this use case, admins must first create Analytics with Gainsight Milestones usage section and add the required fields to it, and then enable this usage section on C360 page for the CSMs to view.
Note: Analytics with Gainsight Milestones usage sections can only be built on Time Series data sources.
Additional Resources:
- For information on how to create a Usage Section, refer Create Usage Section in a Layout.
- For information on how to create Gainsight Milestones, refer Configure Milestone Types.
- For information on how to add a usage section to C360 page, refer Configure Adoption Explorer Section in C360.
To use this enhancement:
- Navigate to Adoption Explorer > Admin. Hover on the required project and click the Layouts icon.
- Select the required layout in which you want to add the Usage Section.
- In the Layout Detail view, click + at the bottom right corner of the page.
- Click the Add New Usage Section button.
- Select Analytics with Gainsight Milestones from the Usage Section Type dropdown list.
- Select the required source from the Data Sources dropdown list.
- Add the required fields to the Show Fields section.
- Click Show Preview.

- Select the required Company, Instance and Date Range, and click Preview.
The following image displays how the Gainsight Milestones are overlaid with the usage data trends:
- Introducing Weekly Snapshot: Weekly Snapshot provides an easy way to snapshot information of Company / Person data every week in the most simplistic way so that you can track the trend of this data week over week easily. The fields that are tracked for weekly snapshot are snapshotted on a weekly basis and are stored in the Company/Person Weekly Timeseries objects. Using these snapshot fields, you can build usage sections, and then add the layout to the C360 page for the CSMs to derive more insights.
Note: Admins can track the required fields from Gainsight’s Company/Person objects and Adoption Explorer’s Company/Person Usage Info objects.
To use this enhancement:- Navigate to Adoption Explorer > Admin. Hover on the required project and click the Objects icon.
- Click Snapshot on the Company/Person Weekly Timeseries objects.
- Select the fields you wish to track from the Company/Person Object and/or Company Usage Info/Person Usage Info objects.
Notes:
- Company/Person Object here means the Gainsight’s Company/Person Object.
- Fields that are tracked for weekly snapshotted on a weekly basis and are stored in the Company/Person Weekly Timeseries objects.
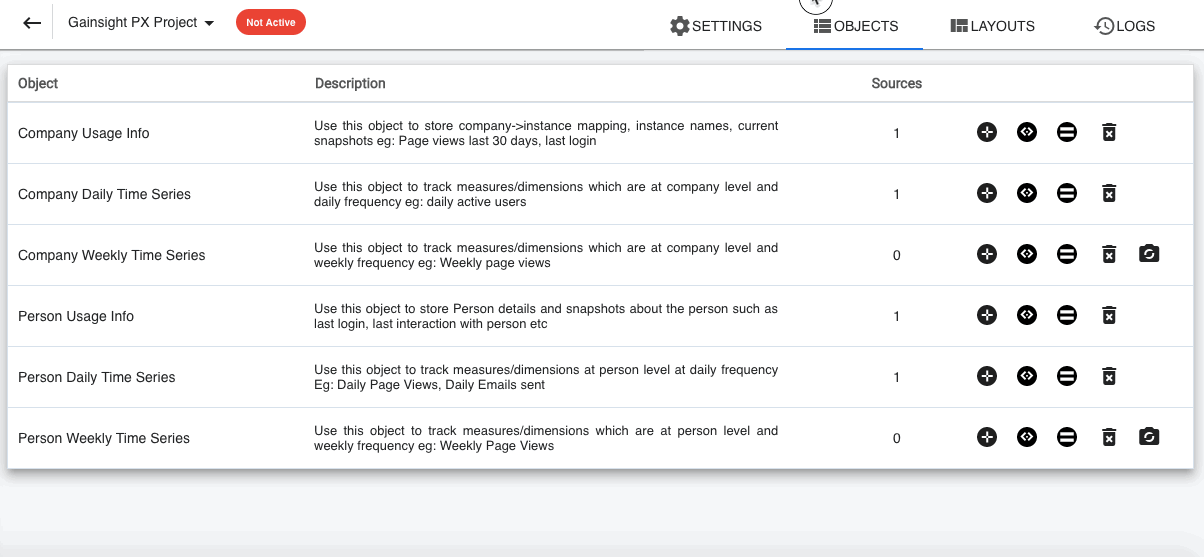
After selecting the required fields, a week after this configuration, you can see the tracked fields while creating usage sections, provided a scheduled RUN has already happened.
Additional Resources:
- For instructions on how to create a usage section, refer Create Usage Section in a Layout.
- For instructions on how to add a layout to C360 page, refer Configure Usage Section in C360.
- Creating Lookups from Adoption Explorer to Gainsight Standard/Custom Objects: Adoption Explorer is now enhanced with a new feature called Lookup, which allows admins to create lookups from the ingested fields in the Adoption Explorer projects to the fields on the Gainsight standard/custom objects.
Once the lookup is setup, when you build reports on this project from Report Builder, you can see the fields from the lookup object (Gainsight standard/custom).
Use Case: For instance, you may want to create a report on an Adoption Explorer project that includes the Feature Name and Feature ID fields. But, the Feature ID field is available in the Adoption Explorer project and Feature Name field is available in the Gainsight’s custom object. To achieve this business use case, Lookup in Adoption Explorer project helps create a lookup from Adoption Explorer project to Gainsight’s custom/standard object. With this configuration, while building reports on this project, you can now see the Feature Name field in the custom lookup object.
To use this enhancement:- Navigate to Adoption Explorer > Admin. Hover on the required project and click the Objects icon.
- Click Fields on the required object.
- Click Lookup on the required field.
- Select the required object from the Objects dropdown list.
- Select the required field from the Select Field dropdown list.
- Click SAVE.
This creates a lookup between the Adoption Explorer project and selected Gainsight object. And, while building reports on this Adoption Explorer project, you can see the fields in the custom lookup object as well.
- Introducing Toggle Weekends option in Usage Section: Toggle Weekends feature in the Usage Section allows the users to include or exclude the weekend usage information to calculate metrics. For instance, if you want to see the calculated metrics for “Total Exits by Date”, and you may want the report to include the weekend data as well, then turn ON the Toggle Weekends button.
To use this enhancement:- Navigate to Administration > Adoption Explorer > Admin. Hover on the required project and click the Layouts icon.
- Select the required layout. Create a Usage Section (or) You will see the existing usage sections, if you have already created some.
- Click Options on the required usage section.
- Switch ON the Toggle Weekends button, if you want to include the weekend data.
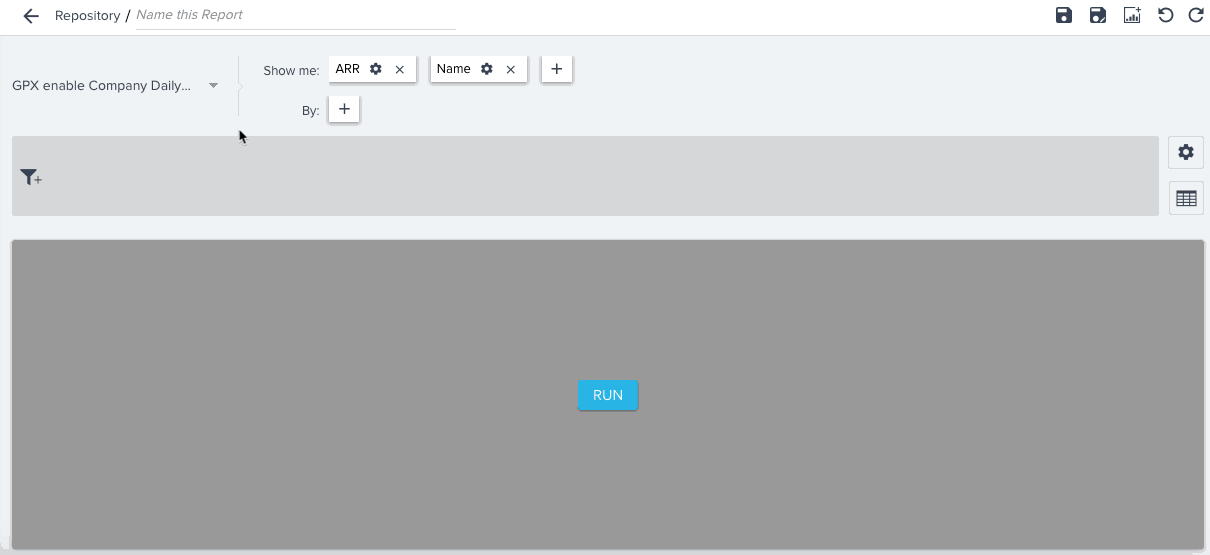
Report Builder
Gain deep customer insight with Reports and Dashboards. Gainsight’s ability to blend together multiple data sources provides a structured, holistic picture of the customer across all types of vendor/customer interactions. Using an intuitive interface and compelling visualizations, each of your customer-facing functions can build their own strategic view to get actionable insights, fast.
- Ability to view Gainsight Custom Object and Custom Field descriptions: While building reports, you can now view the description of the Gainsight Custom Objects and Custom Fields when hovered.
Note: To view the descriptions, ensure that you have already described the Objects and Fields in the Data Management page.
For instance, you are a Data Management Admin and you have described the Objects and Fields in the Data Management page, so while building reports, your Reporting Admins can view the description of the Objects and Fields if they are not familiar with the usage of correct data models for product analytics.
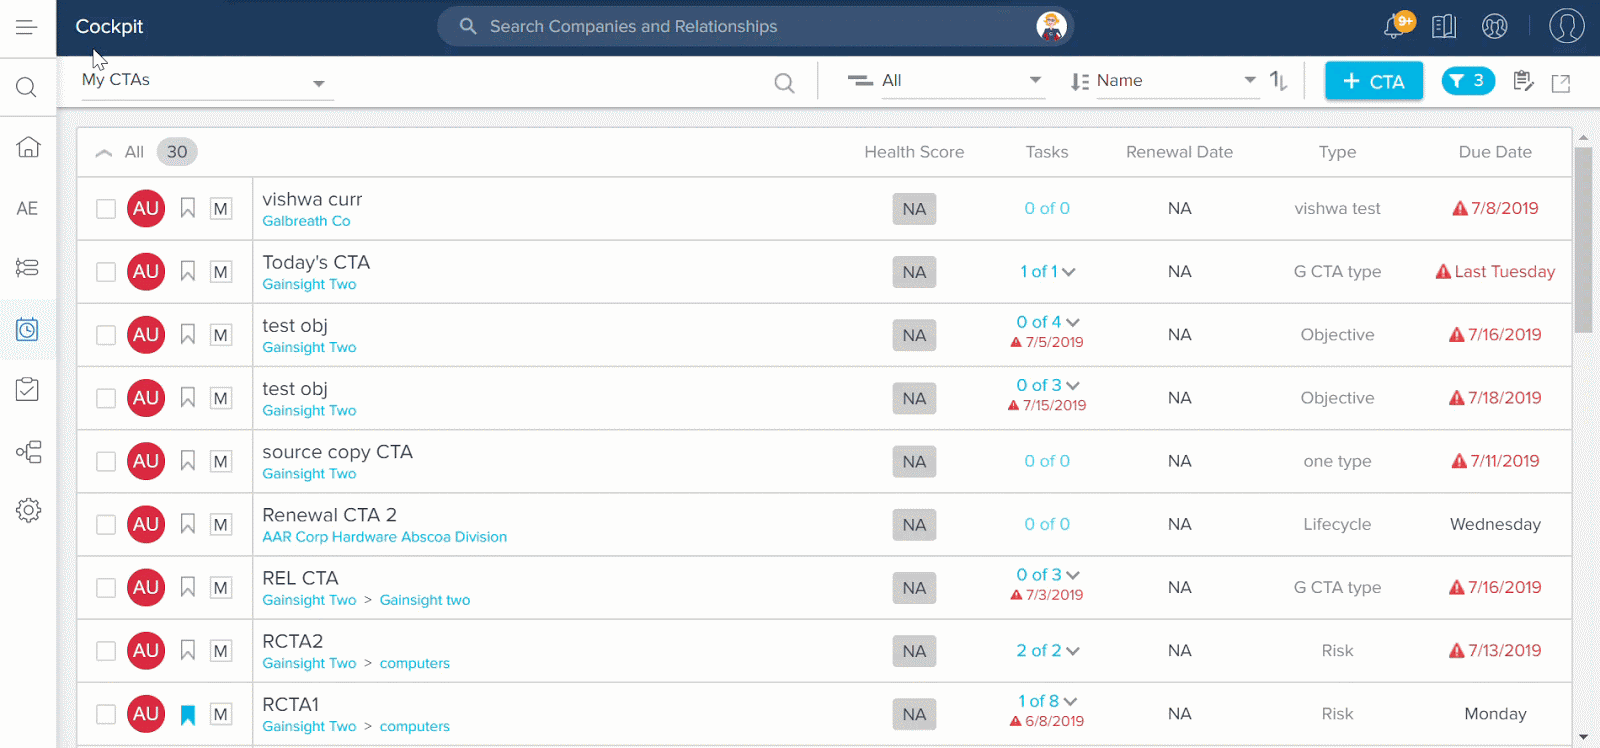
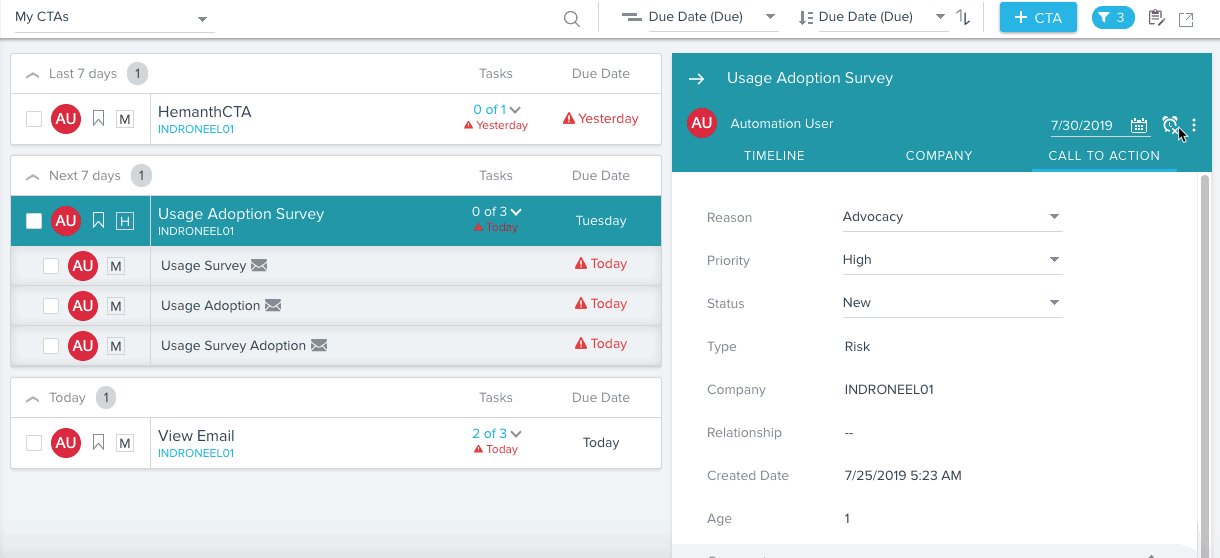
Cockpit
Cockpit is the day-to-day workspace for CSMs. As a turbo-charged “to-do list” that integrates with the rest of your system, it turns customer insights into tangible action items for your team. Calls-to-action, or CTAs, are tied to customers and are the backbone of Cockpit. CTAs can be created manually, but more often are triggered by business rules that analyze usage data. For each CTA that appears in the CSM's Cockpit, a prescribed playbook of best practice tasks can help guide the CSM through the right steps.
- Ability to Configure Custom Cockpit Views for End Users: Admins can now configure custom views for Cockpit based on Reason, Priority, etc, using the Custom Views section in the Call to Action (CTA) page. The option to create Custom Views is only available in the Global tab.
Admins can also make edits to the existing custom views or even delete them based on the requirement. If admins edit the view, the changes made are immediately reflected for all of the users for whom the view is available. End users must refresh the page to view the required modifications done to the view by admins, if they are already using the view. If deleted, the view is no longer available to users and the users are notified through in-app notifications.
The admin can select the user(s) or user-groups for whom the view must be available. The admin can choose:
- All users - Available to all users
- User Groups - Available to all users in that user group
- Individual users - Individually add users for whom this view must be available
IMPORTANT:
- The end user cannot make changes to the admin defined custom views. However, they can make changes to the filters/columns of the admin defined view to create a new custom view.
- If the custom view that is being used by the CSM is deleted or made inactive by Admin, then that view is not visible in the list and the default view is displayed for the CSM in Cockpit.
Use Case: For instance, assume that each CSM has a high number of CTAs assigned to them. With a big list, CSMs may not see the CTAs which are in a Risk state or CTAs in which the renewal date is due in the next 2 weeks. Admins can now create separate custom views for CSMs to ensure that they prioritize the most important CTAs.
To configure Custom Cockpit Views:
- Navigate to Administration > Call to Action (CTA) page.
- In the Custom Views section, Click +VIEW. The Create Custom View page appears.
- Enter the Name of the view in the Name field.
- Click +COLUMN to add the List view fields for the view.
- Click +FILTER to define the filters of the view.
- In the Defaults section, select the default sorting and grouping status.
- In the Permissions section, select Assign to All option to enable this Custom View to all users.
- Click SAVE.
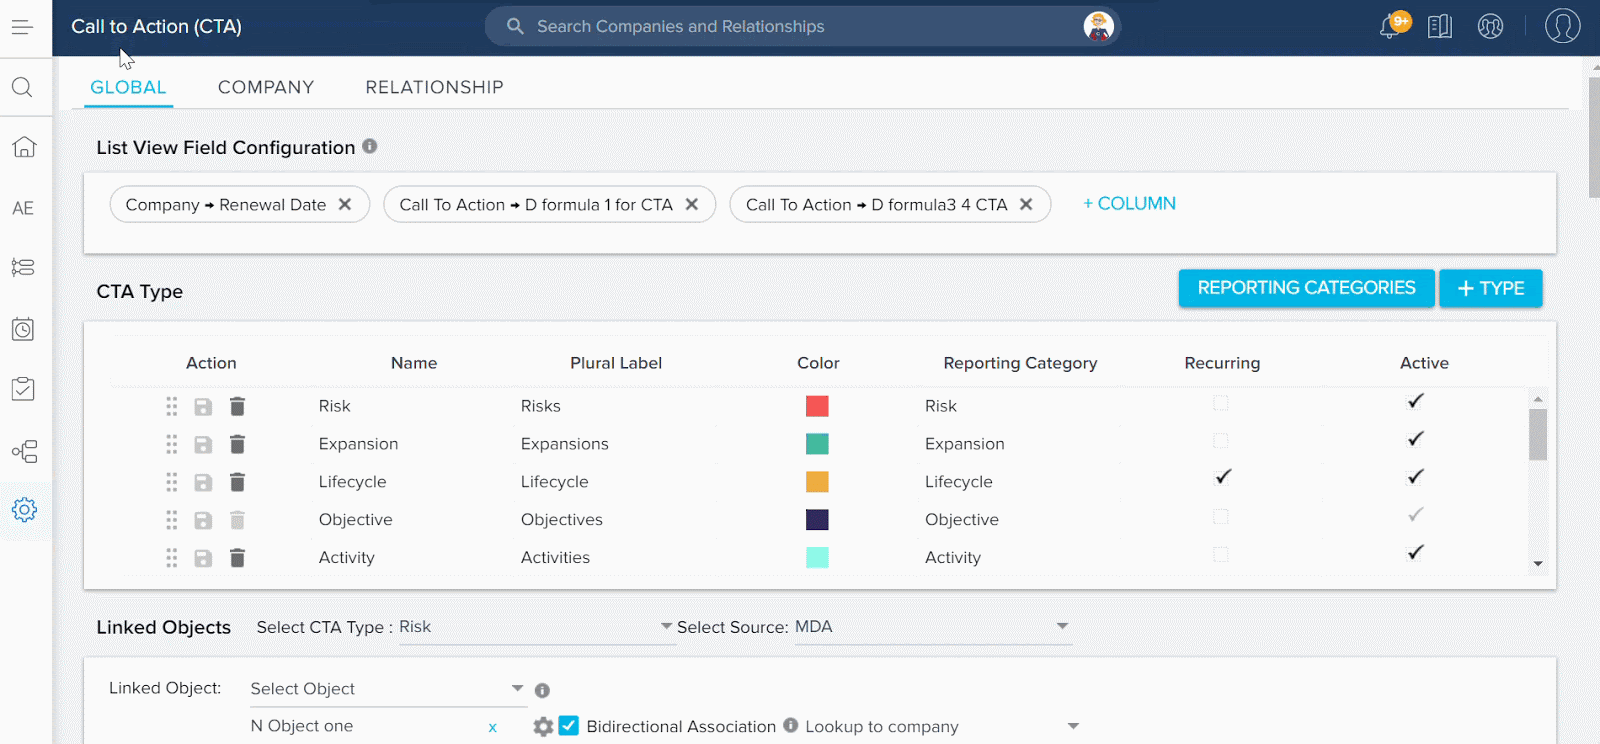
The Custom View is saved and it is displayed in the Cockpit views list in the Cockpit page for CSMs.
- Introducing String and Date Formula Functions in CTA, Task and Success Plan Objects: Gainsight now allows Admins to create Formula fields on CTA, Task and Success Plan objects, by using String and Date functions. These functions are available on the Create Calculated Field window.
Use Case: For instance, a CSM wants to see the number of days left to close an Opportunity assigned, admin can create a formula field as described below in the Date Function section, and then add it to the CTA Detail View so that CSMs can view the details from the Cockpit page.
To create a Formula Field, navigate to Administration > Workflow > Call to Action (CTA)/Task/Success Plan, enable the Calculated Field checkbox and click CREATE FORMULA.
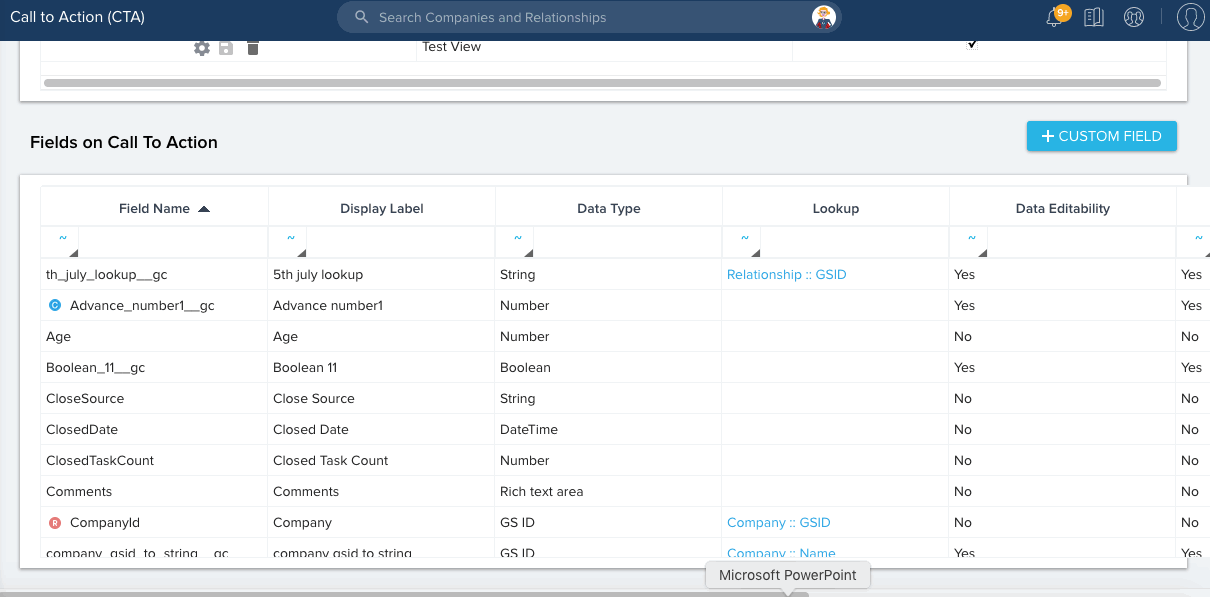
You can create a calculated field by using the existing fields in that object, as arguments of the function. Apart from the existing fields, you can also use other applicable formula functions as arguments while building a formula field.
Business Use cases:
- String Function: For instance, if you have two custom fields called CTA Name and Status, you can merge them using the Concat function to create a new field that stores the CTA Name and status. After a formula field is created, you can then add this field to the CTA Detail view so that the CSMs can view the details of the newly created formula field, from the Cockpit page.
- Date Function: For instance, the Call to Action object has a date field called Opportunity Created Date which stores the opportunity created date for the customer. Generally, opportunities which are due in the current quarter are given high priority. You can use the Date diff function to calculate the number of days left for the opportunity to close in the current quarter. After a formula field is created, you can then add this field to the CTA Detail view so that the CSMs can view the number of days left/days due for the opportunity to close, from the Cockpit page.
A step by step procedure to implement the above two use cases is demonstrated in the Create Formula Fields in CTA, Task and Success Plan Objects article.
IMPORTANT:
- In a string function, you can use any field with Data type Email, GS ID, Rich Text Area, String, and URL.
- In a Date function, you can use any field which has Date Data type.
- To use a formula function in a custom field, you must ensure that the Data type of the custom field is same as the return type of the formula function. For example, the Date Diff function returns output in Number format. To use this function, your custom field must have data type as either Number, Percentage, or Currency. Substring function returns output in String format. You cannot use it if your custom field’s data type is currency or Date.
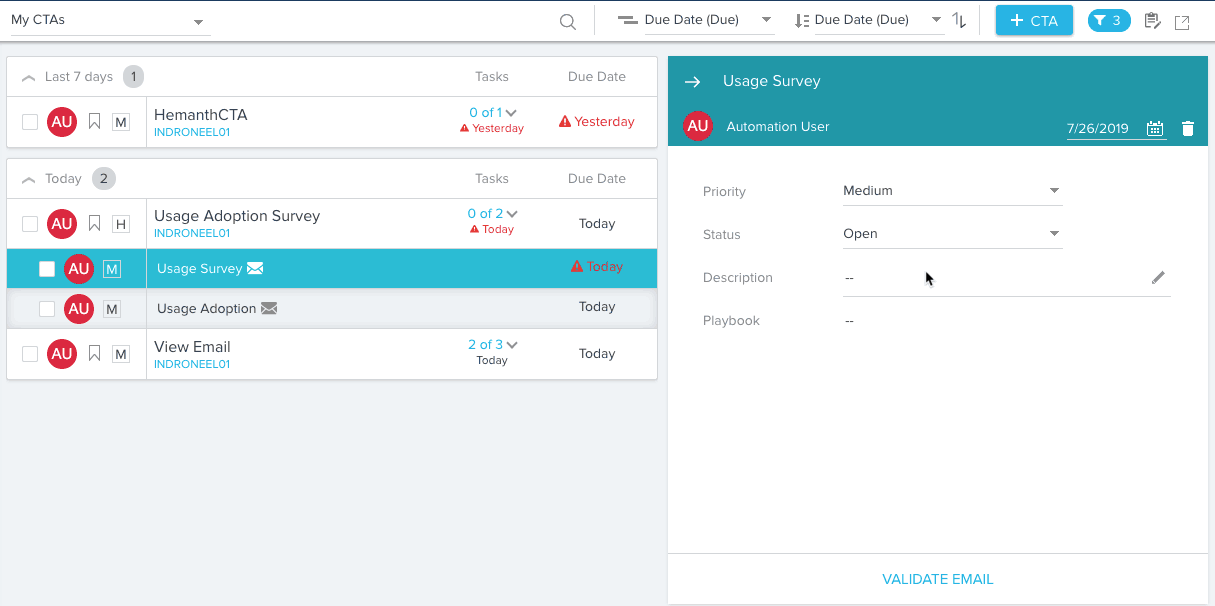
- Default Mapping of Reports and Surveys in Ad-hoc email and Playbook: Previously, if an admin wants a CSM to send an email that has a defined value in Reports and Surveys, admin has to first configure an email template with dynamic tokens in it, and then define the values for those Reports and Surveys in the Playbook. But, with this enhancement, CSMs while sending emails from Cockpit via Send Email (Ad-hoc)/Playbook can now see the Reports and Surveys tokens are automatically mapped with the values, if the selected email template has a default mapping.
For information on how to configure Default Mapping in Email Templates, refer Configure Email Templates article.
The following image shows the Default Values displayed for Surveys and Reports, when CSMs choose to send email via Send Email option.
The following image shows the Default Values displayed for Surveys and Reports, when CSMs choose to send email using Playbook.

- Edit Default Mapped Fields in Emails Sent from Cockpit: With this enhancement, CSMs while sending emails from Cockpit via Send Email (Ad-hoc email)/Playbook can now edit the value of the Default Mapped fields, for reports and surveys, if the selected email template has a default mapping.
Use Case: For instance, if an admin configures an email template with a default mapping on a field such as First Name, and while sending email from Cockpit the CSM wants to replace First Name with Name, they can just edit the default mapped field.
For information on how to configure Default Mapping in Email Templates, refer Configure Email Templates article.
Prerequisite: Admins must first enable the Edit default token mapping in cockpit toggle button, to allow CSMs to edit the default mapped fields.
To enable Edit default token mapping in cockpit button:- Navigate to Administration > Communication > Email Configuration.
- Go to the Compliance page.
- Enable the Edit default token mapping in cockpit toggle button.
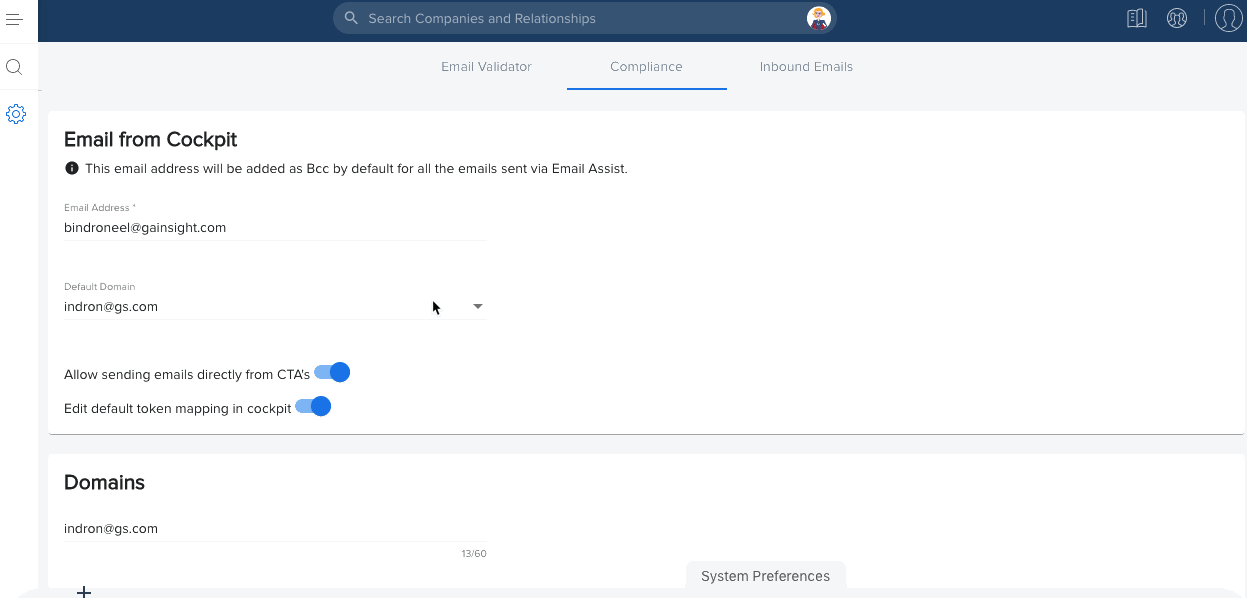
The following image shows the Edit Default Mapped fields capability when CSMs choose to send email via Send Email option.
The following image shows the Edit Default Mapped fields capability when CSMs choose to send email using Playbook.

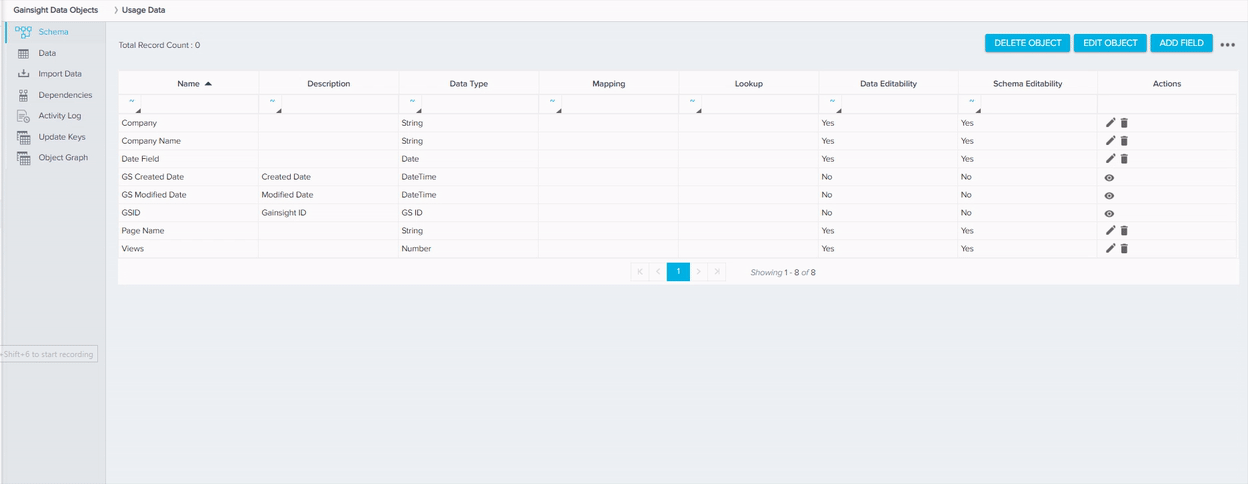
Gainsight Data Management
Gainsight Data Management offers you the flexibility and full control over your object structure, schema and data within Gainsight. Create and edit all aspects of your data design through an administrative interface to continually develop your Gainsight schema with your evolving business.
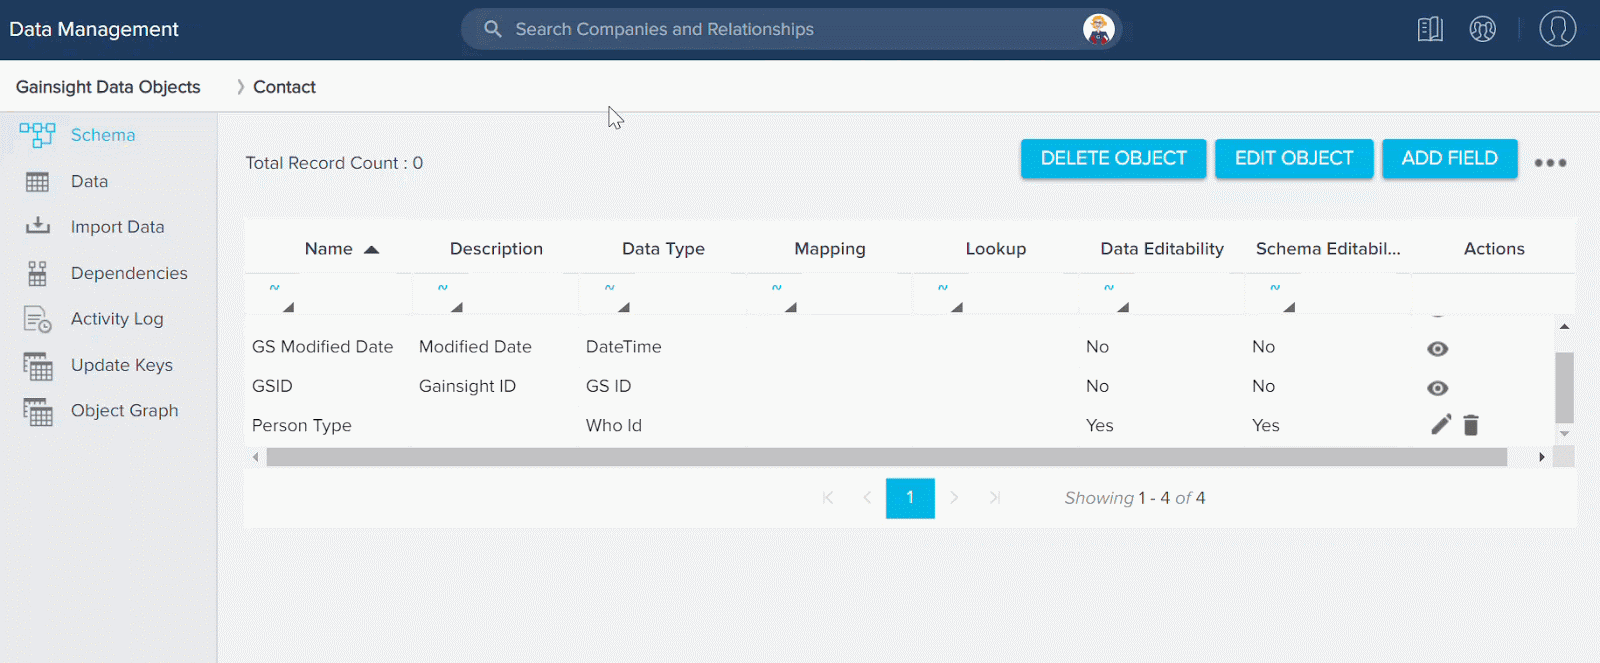
- Support for Who ID in Object Graph: Object Graph provides a graphical representation of an object and how they are connected to each other. A Who ID data type field can dynamically join a standard object or custom object to the Person object, to uniquely identify a Person from the associated custom or standard object. To learn more about Object Graph or Who ID, refer to the Gainsight Data Management article.
Previously, the Object Graph did not display the associated objects that are connected through the Who ID data type fields. As a result, you could not view them on the Object Graph of the Person object.
Now, Object Graph of the Person object displays the dependent objects connected with Who ID data type fields. This enhancement helps admins to assess the impact that the lookup object (connected with Who ID field) will have, when the respective record from the person object is deleted.
To see this enhancement:- Navigate to Administration > Operations > Data Management.
- Select the Person Object.
- From the left pane, click Object Graph. You can now view the Objects with Who ID fields, displayed as dependent object on the Person object.
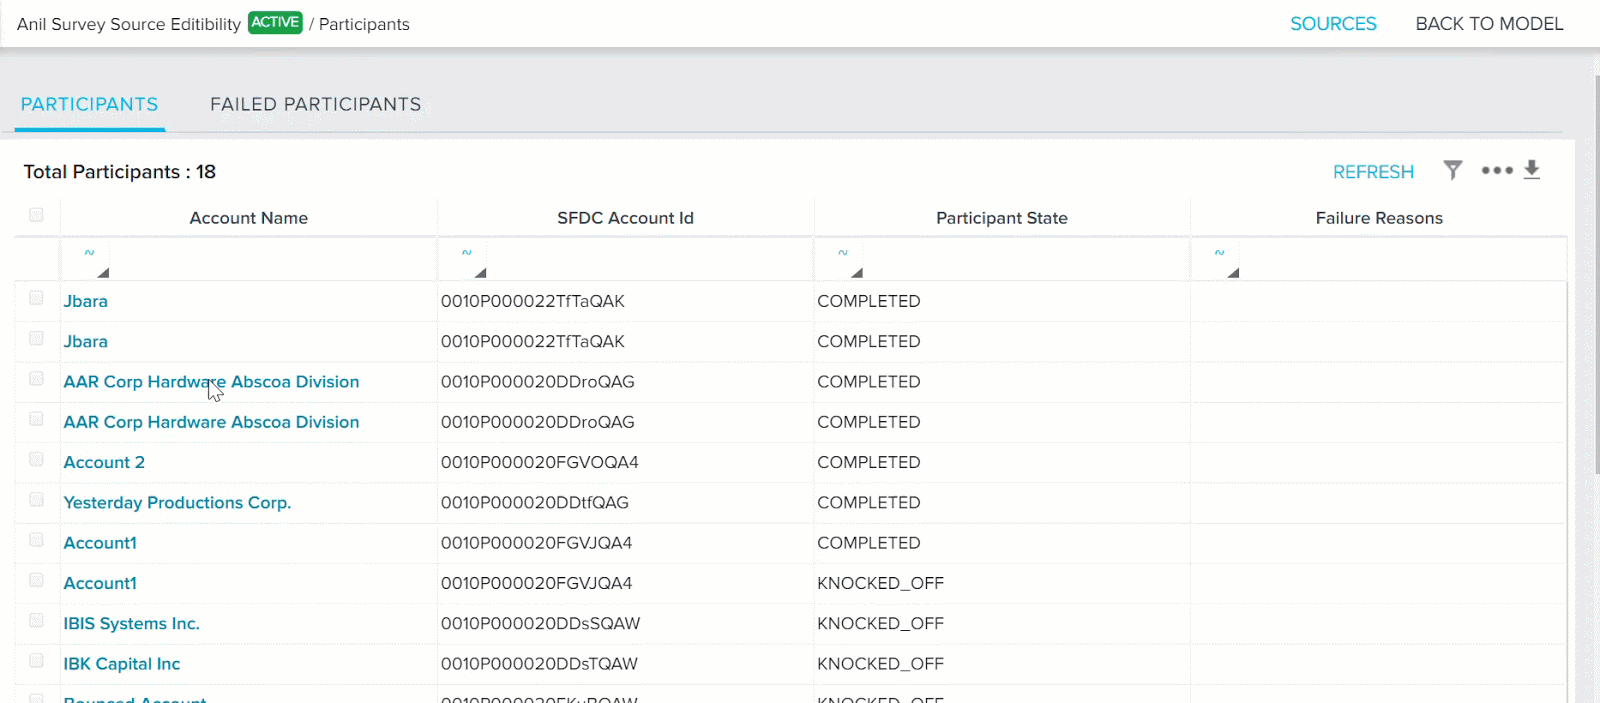
- Ability to Delete Person Records from Data Operation page: The Person object in Gainsight stores various attributes of people associated with your Company. Previously, CSMs could only remove the association of a Person with a Company or a Relationship from the C360 or R360 page respectively, but could not delete the Person record., Admins can now delete records in the Person, Company Person, Relationship Person objects from the Data Operation page, which is helpful, for example if you have duplicate records.
When you delete a Person record:
- The Person’s association is removed from all Company and Relationships.
- The Person record is deleted from Sponsor Tracking, if associated.
- In Timeline, the Person record is removed from the External Attendees field of an Activity, if included.
- In Surveys 2.0, the Person ID field is nullified from all of the survey responses, which were responded by the deleted Person. However, the other fields of the survey responses are retained.
- In JO, the Participant State field is set to KNOCKED_OFF state, if the Program is in Draft state. The Participant State field is set to DROP, if the Program is in Active state.
- The Person record is deleted from the CTA detail view, if associated.
To delete a person record:
- Navigate to Administration > Operations > Data Operations. For more information about Data Operations, refer to the Data Operation article.
- From the Select object field, select either the Person, Company Person, or Relationship Person object.
- Select the check box for the Person record(s) to be deleted.
Note: You can also select the Person records by applying a filter criteria.
- Click the delete icon.
- Ability to Select Delete behaviour for Who ID Data type fields: A field of data type Who ID in a standard or custom object can dynamically join to the Person or User Object, to uniquely identify a Person from the associated custom or standard object.
You can now view a drop-down menu called On Delete, while configuring a field of Who ID Data Type. The selected option determines the action performed on the dependent record in the current object, when its corresponding lookup record (from Person or User object) is deleted.
The On Delete drop-down menu has three options:
- Delete: When the lookup record is deleted, the corresponding record in the current object is deleted.
- Set Null: When the lookup record is deleted, the corresponding value in the current field (Who ID type) is Set to Null.
- None: When the lookup record is deleted, no action will be taken in the current object.
To learn more about the On Delete functionality, refer to the Data Management article.

Surveys
With Surveys, you can create highly customized surveys that capture customer insights and transform them into actionable next steps for your organization. You can easily create multi-page surveys with a variety of question types, including multiple choice, matrix, and a standard NPS® question type. Surveys gives admins the ability to design and distribute surveys in Gainsight without a dependency on sites or features.
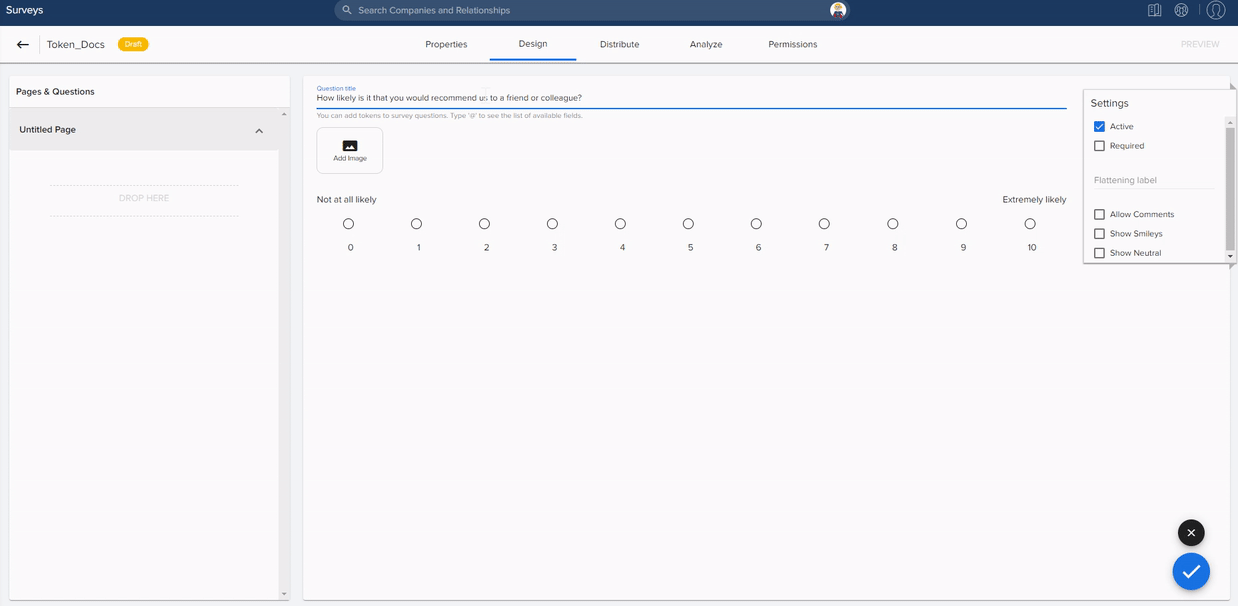
- Ability to customize Survey theme: Survey Properties page is enhanced to provide a better Admin experience by making functional and UI changes that make it easier to customize the Survey. Following are the major enhancements in the Survey Properties page:
- Visual Experience in the Additional Configuration section is now separated as new Theme section with enhanced capabilities.
- A new option named Buttons is introduced in the theme section.
- Admins can now configure the survey’s visual appearance by configuring the following settings in the Theme options:
- Logo
- Logo position
- Fonts
- Font size
- Opacity
- Styling
- Alignment
- Add Image
- Image position
- Watermark
- Watermark position
- Hide Gainsight Logo in the Footer
- Character spacing
- Shape of the Buttons (Submit, Save and Next)
Important:
- The V1 (version 1) theme of existing Surveys is still honored. Only when the admin decides to upgrade to V2 (version 2) theme, it gets applied.
For more information on how to configure the Visual appearance, refer to Survey Properties.
- Use tokens in Survey Questions: You can now add tokenized fields within survey questions. Tokens are placeholder fields derived from the Survey Participant object such as attributes from Company, Company Person, Relationship, Relationship Person and Associated Object (CSAT case). This enhancement reduces the number of redundant surveys customers previously had to create in order to personalize survey questions.
Limitation: Tokenized questions are only available for non-anonymous surveys in order to accurately populate the token field with correct data.
For more information on how to configure question tokens, refer to Survey Design.
Journey Orchestrator
Journey Orchestrator is your center for automated communications. It leverages the power of automation to make your job easier as you communicate with customers at scale. Gainsight enables customer success teams to launch automated emails based on customer attributes such as health score, product usage, survey results and lifecycle stage. Through automation, you can scale customer touches and engage with a growing list of customers often and effectively.
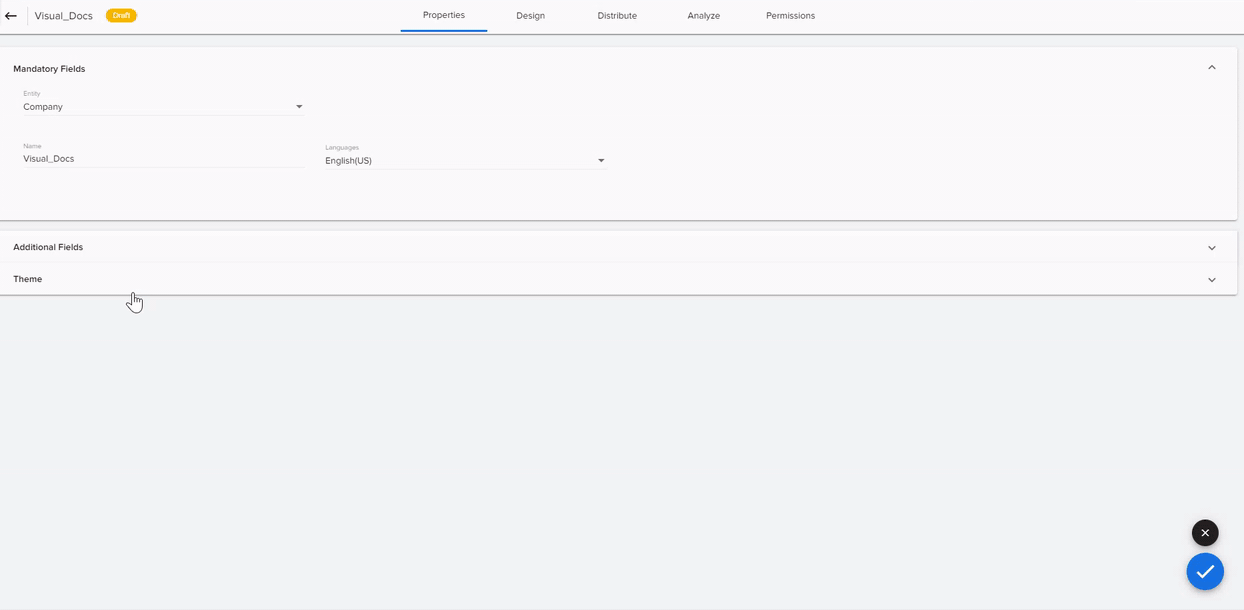
- Ability to send Shared C360 Layouts through Programs in JO: Program emails can send Shared C360 Layouts with the contacts who are loaded as internal users. It is now possible to share the links with the users of the C360 layout. You can add a link or button to an Email Template and send it to participants using a Program.
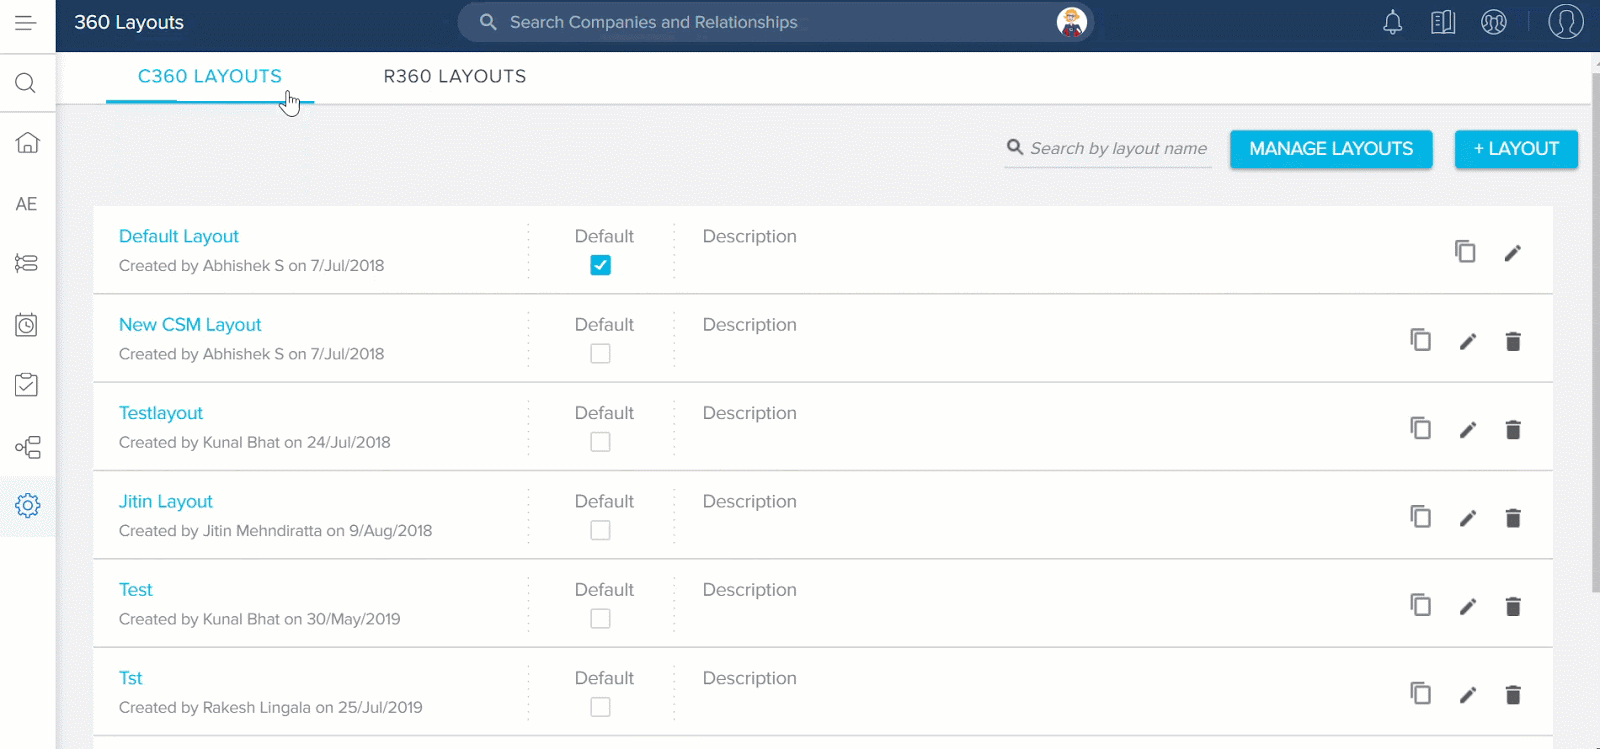
To use this functionality, users must first configure the type of C360 layout to be shared with the contacts in the 360 Layouts page.
To configure the 360 Layout:- Navigate to Administration > 360 Layouts page.
- Click +LAYOUT. The New C360 External Layout screen appears.
- Enter the required information in the Name and Description fields.
- Select to which domain this layout belongs in the Select Domain drop-down list. For more information on how to set up a Gainsight Domain, refer to Setup a Gainsight Domain article.
- Click SAVE and click the Edit icon.
- In the Section Configuration section, drag and drop the required sections to be displayed.
- In the Sharing Settings section, select the required options.
- Click SAVE.
After successfully, creating a layout, users can add this layout in Programs to send to contacts.
To add a Shared C360 Layout in Program:
- Select either a Link or Button in the Email Template builder.
- For each option you can select the display text and select Enable Link Tracking checkbox.

- Navigate to Journey Orchestrator > Program page.
- Create or edit a Program.
- In the Program model, edit an email step.
- Select an email template that contains the C360 link or button.
- Click on the Link or button in the preview. The Map Layout Token dialog appears.
- Select a layout from the list and click Update. This dialog lists all of the available Shared C360 layouts in the Gainsight Org.
- Click SAVE and schedule the Program as required.
- Ability to Export Program Participant List: Previously, there was no option for admins to download or export the list of participants in a Program. With this release, admins can now export the list of participants either by downloading the CSV file or as an attachment to email based on the report read limit. This helps an Admin, for example, who wants to download a list of failed participants and re-upload them as a participant source.
This functionality is applicable for the following participants grids in tabular formats:
- Program analytics
- Snapshot view
- Participant list view
- Failed Participants
- Summary View
- Participant Activity
Note: The export option is disabled if the participants grids has zero records.
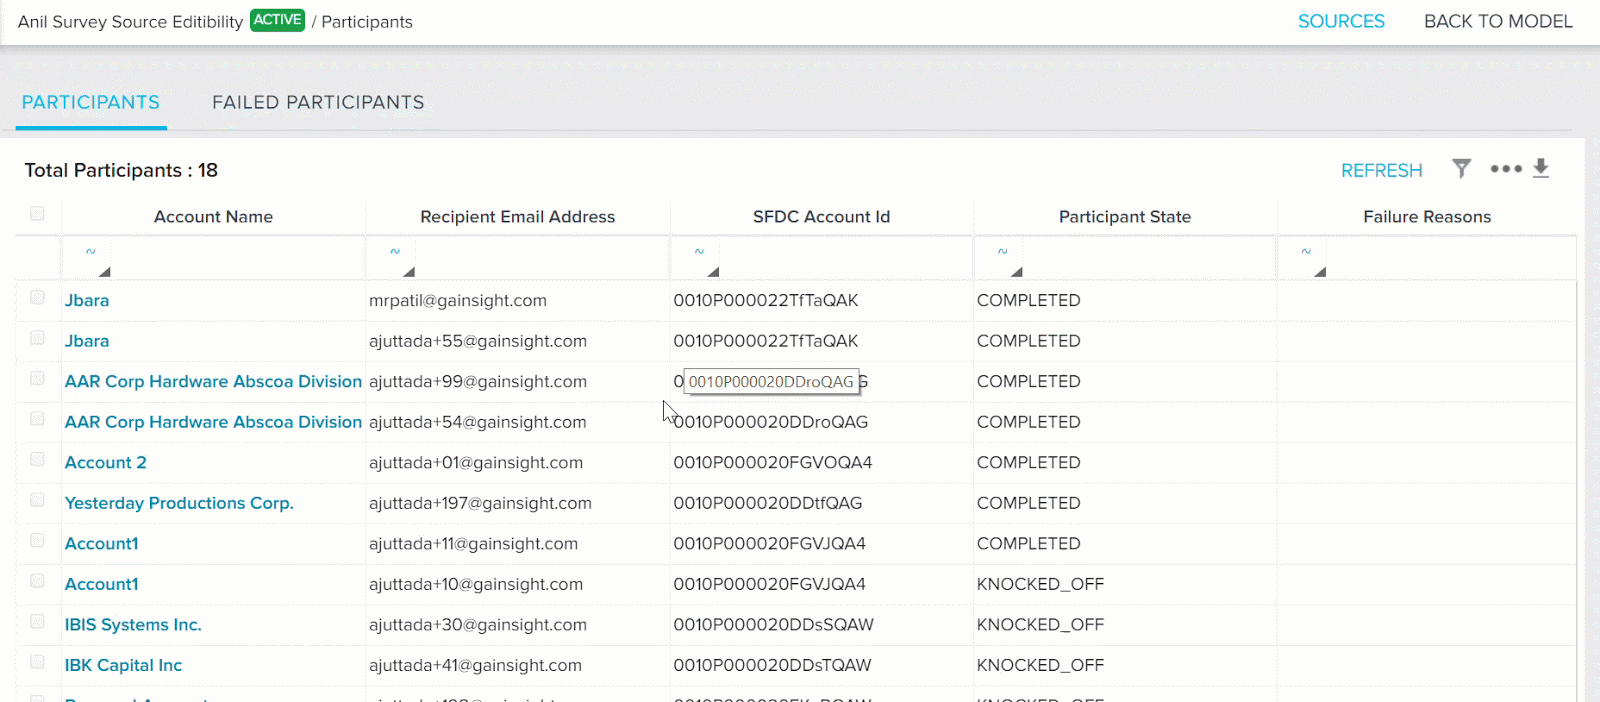
If any filters are applied to the participant grid or inline search is performed, only those list of participants applicable for the applied filters are download or exported based on the report read limit for that tenant.
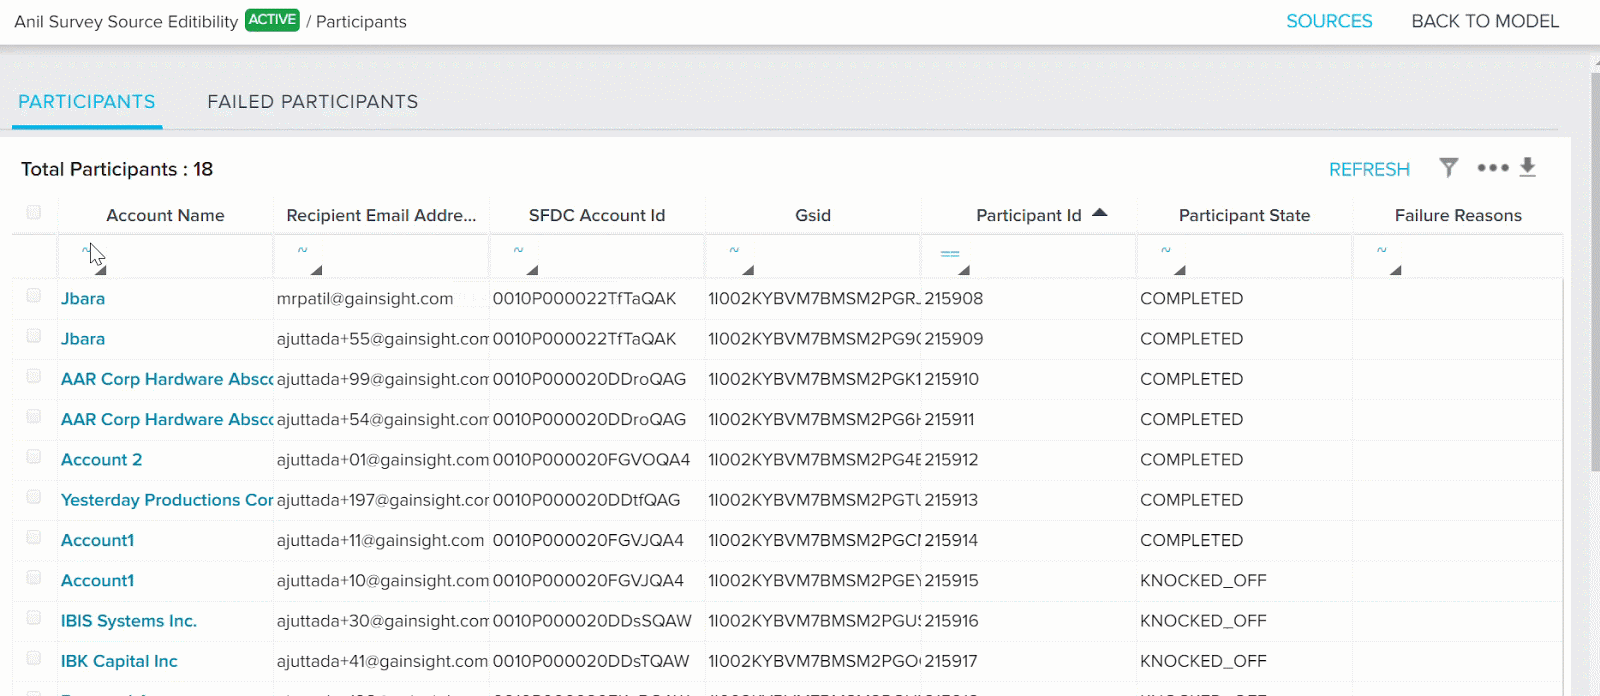
Similarly, the columns which are selected to display in the grid are download or exported based on the report read limit for that tenant.
- Person Delete Impact in JO: With this release, when a Person record is deleted, the Participant State field is set to KNOCKED_OFF if the Program is in Draft state and it is set to DROP if the Program is in Active state. The Failure Reasons field displays a message called Person record deleted. This is applicable for person id entries in JO tables, participants who are part of active or paused program, and also applicable for the Survey Participants and AO Participant records if the JO sent a survey to a person.
- Ability to Edit Default Survey/Report Mapping Tokens in JO: Admins can now add the default mappings for Surveys and Reports in the Email Templates while inserting a Survey Link/Button or Report in the email template or they can even use the Edit option for the existing templates, to insert the default mappings.
However, the default Survey/Report mapping configured in Email templates will only reflect in `Email-Assist` module. The configured mappings will not have any effect on Programs/Outreaches.
Note: This enhancement is only applicable for enabled tenants.
Note: Tabular reports are not supported in the default report token mappings.
- Survey Response Delete Impact in JO of a Participant: When a Survey response is deleted, relevant JO entries are deleted and the participants are dropped from the journey in order to ensure accurate Survey and Program Analytics statistics. It also removes participants from the participant grid view, participant activities, email logs, email events, and mapping of CTA to that participant. This not only affects the participants of an Active program, but also affects Paused programs.
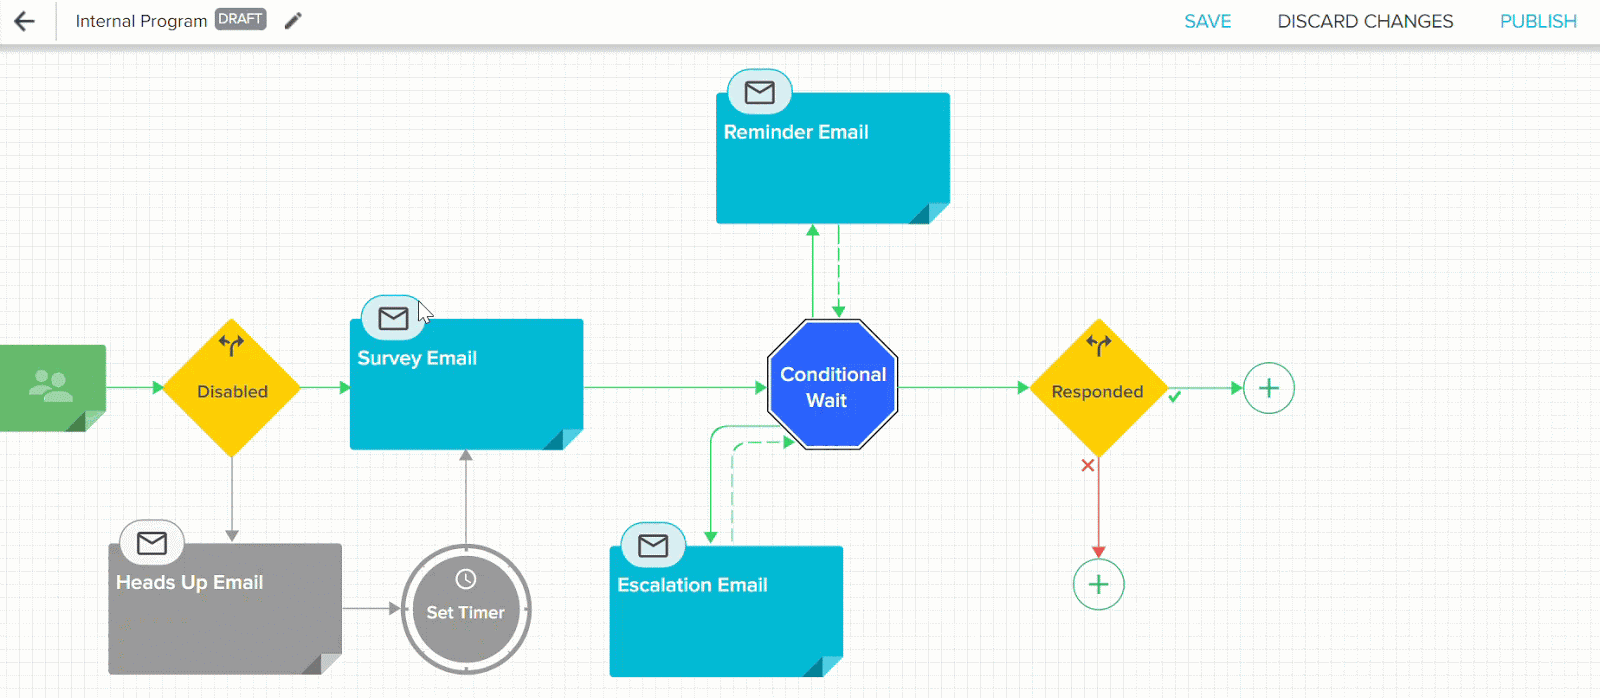
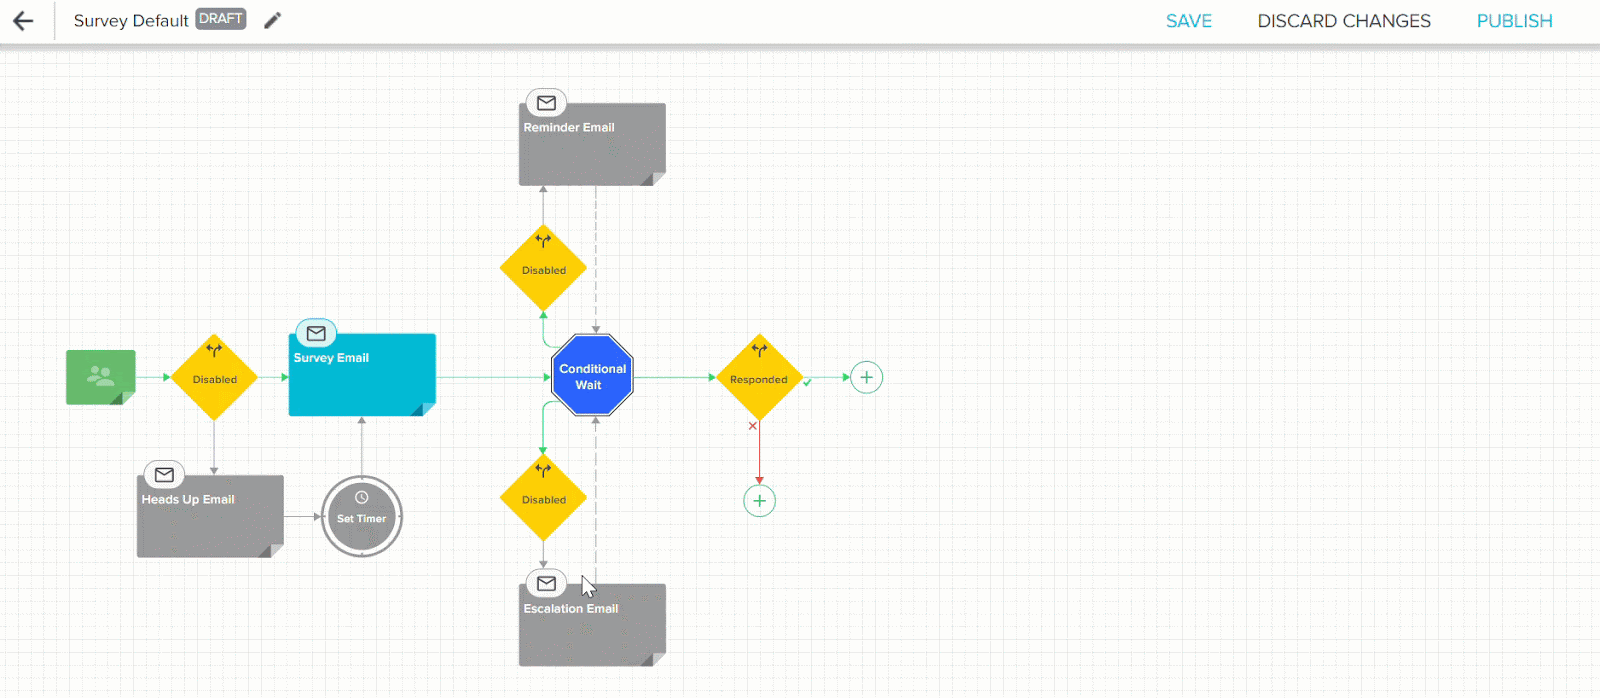
- Ability to send Escalation Emails with Survey link or Survey Button through Buttons: Users can now send escalation emails through programs with functioning Survey Links or Buttons in the templates of the escalation mails.
Use Case: For instance, assume that admins want to send an escalation mail regarding the deadline for participating in a Survey. Earlier, they could only send an escalation mail without the survey link, and it was difficult for the users to find the link for the survey to be completed. However, by allowing survey links in the Escalation mail templates, admins can now send the escalation mails along with the survey links.
Rules Engine
Rules Engine is designed to improve your underlying customer data to produce superior customer outcomes. It can perform powerful multi-step, in-memory data transformations for large datasets in Gainsight within one rule. Transformations include aggregations, multi-dataset merges, formulas and time-series calculations; helping your team to better identify meaningful data signals.
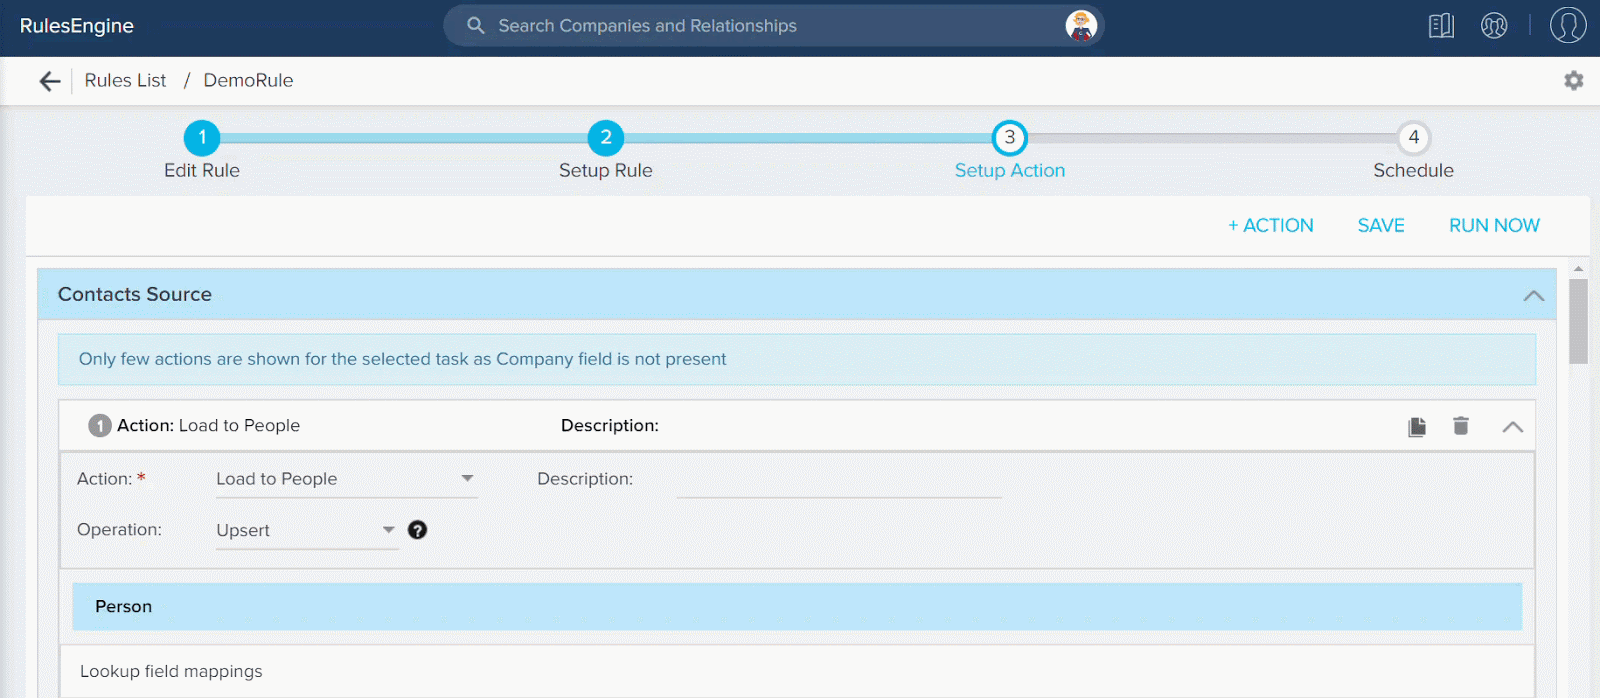
- Introducing ‘Load to People’ Action type: Admins can use the new Load to People action type to load data to the Person, Company Person or Relationship Person objects.
By introducing this Action Type, the Load to Company Person and Load to Relationship Person action types are deprecated. If you have created any rules with these action types, the rule will continue to run. However, you cannot create any new rules with these action types.
Business Use case: Previously, to load data to the Company Person and Relationship Person objects, you had to create two actions for each object. You can now create a single action, which loads People data to both the objects at the same time.
Key Configurations:
- The Load to People Action type consists of three sections; Person, Company Person, and Relationship Person. You can choose the object to which you want to load data. Data must be loaded in the following order; Person object, Company Person object, Relationship Person object.
- While loading data to the Person object, it is mandatory to map the Email field. You can also add derived mappings, if required.
- While loading data to the Company Person object, it is mandatory to map the Company Id field. You can perform this mapping by using the derived mappings.
- While loading data to the Relationship Person object, it is mandatory to map the Relationship Id field. You can perform this mapping by using the derived mappings.
For a detailed step by step instructions on how to setup Dataset for this rule, and then setup this action, refer to the Load to Person Model using Rules Engine Action Type article.
Timeline
Timeline is the official record of your customers. It allows you to log information regarding customer interactions in a way that enables you to quickly gather insights and drive action. The Timeline View in the Customer or Relationship 360 allows you to log and view activities that help you track customer interactions over the course of a customer’s life-cycle. The Timeline View in the Customer or Relationship 360 allows you to log and view activities that help you track customer interactions over the course of a customer’s life-cycle. The Timeline tab in the CTA Detail View allows you to log activities for a specific CTA. These activities will also appear in the Timeline View in the Customer 360.
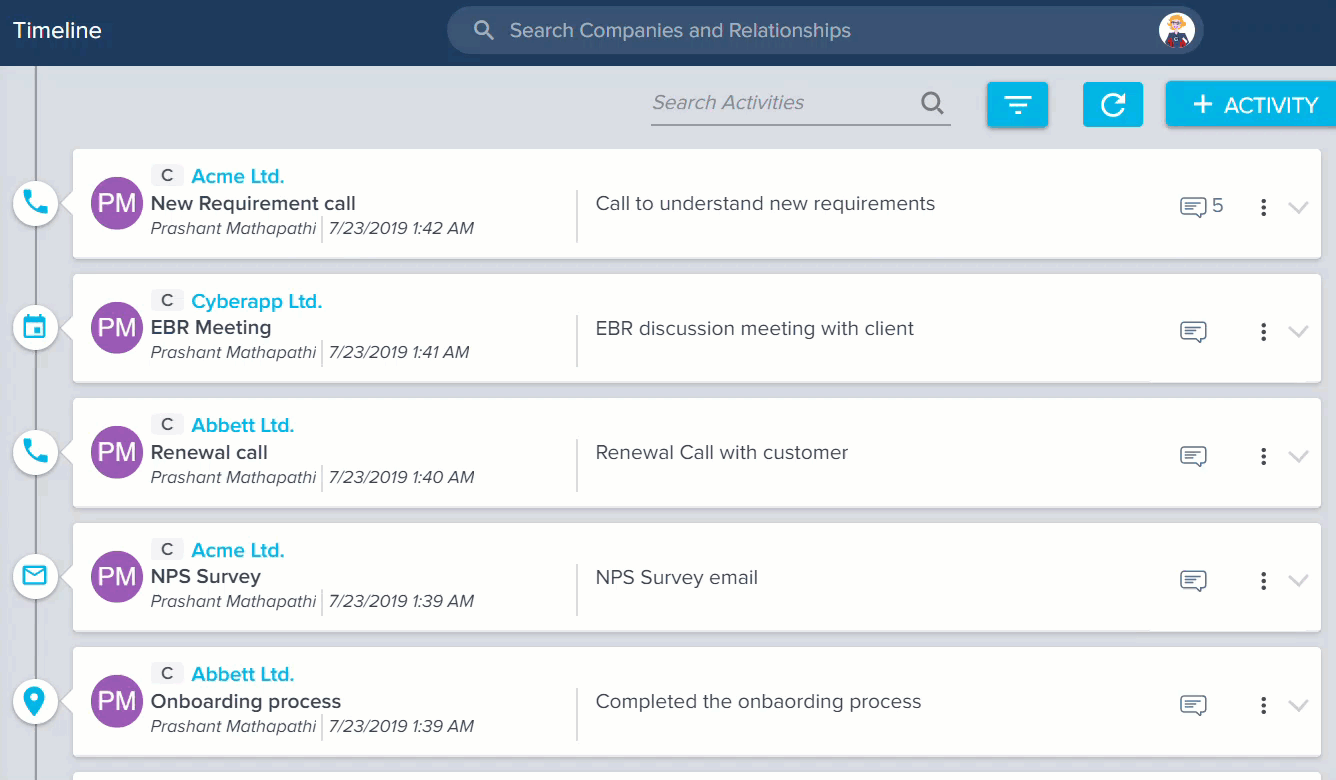
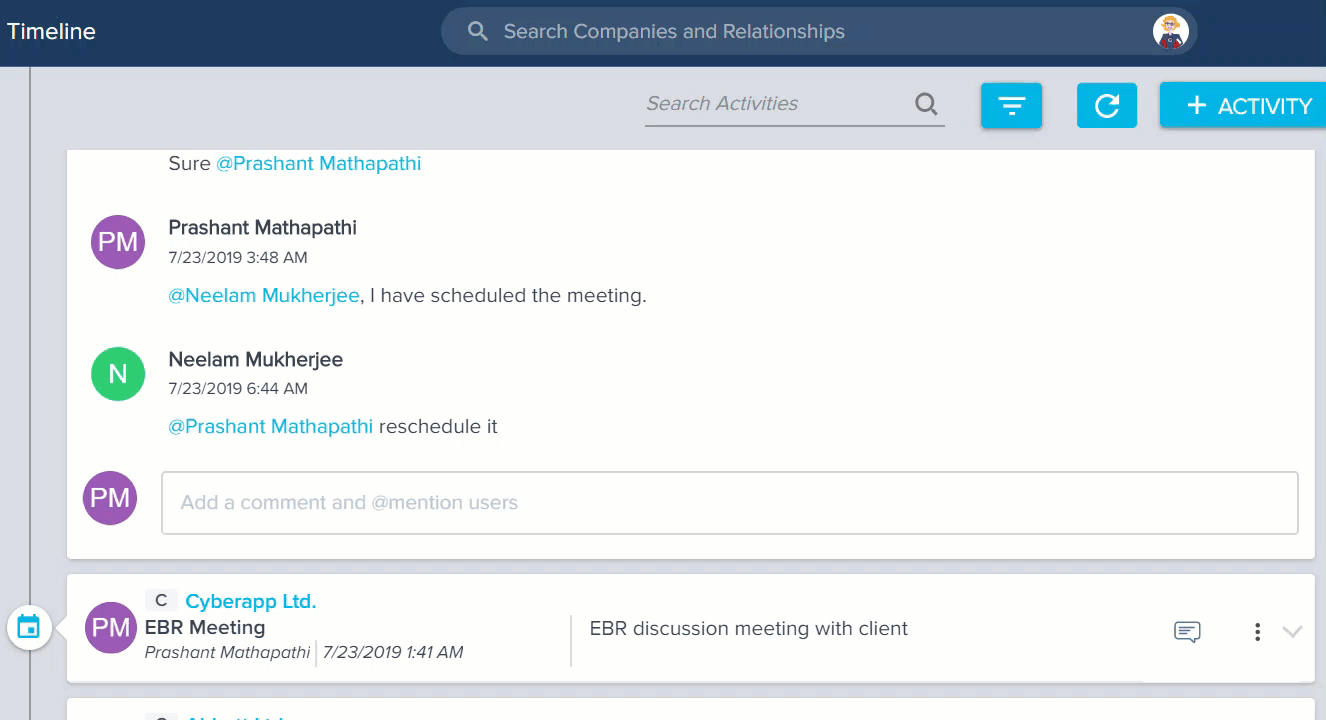
- Ability to add Comments in Timeline Activities: Users can now add comments in their own activities or other user’s activities. A new comments icon is introduced in the Activity list view which displays the number of comments recorded for an activity. You can click this icon to view the comments.
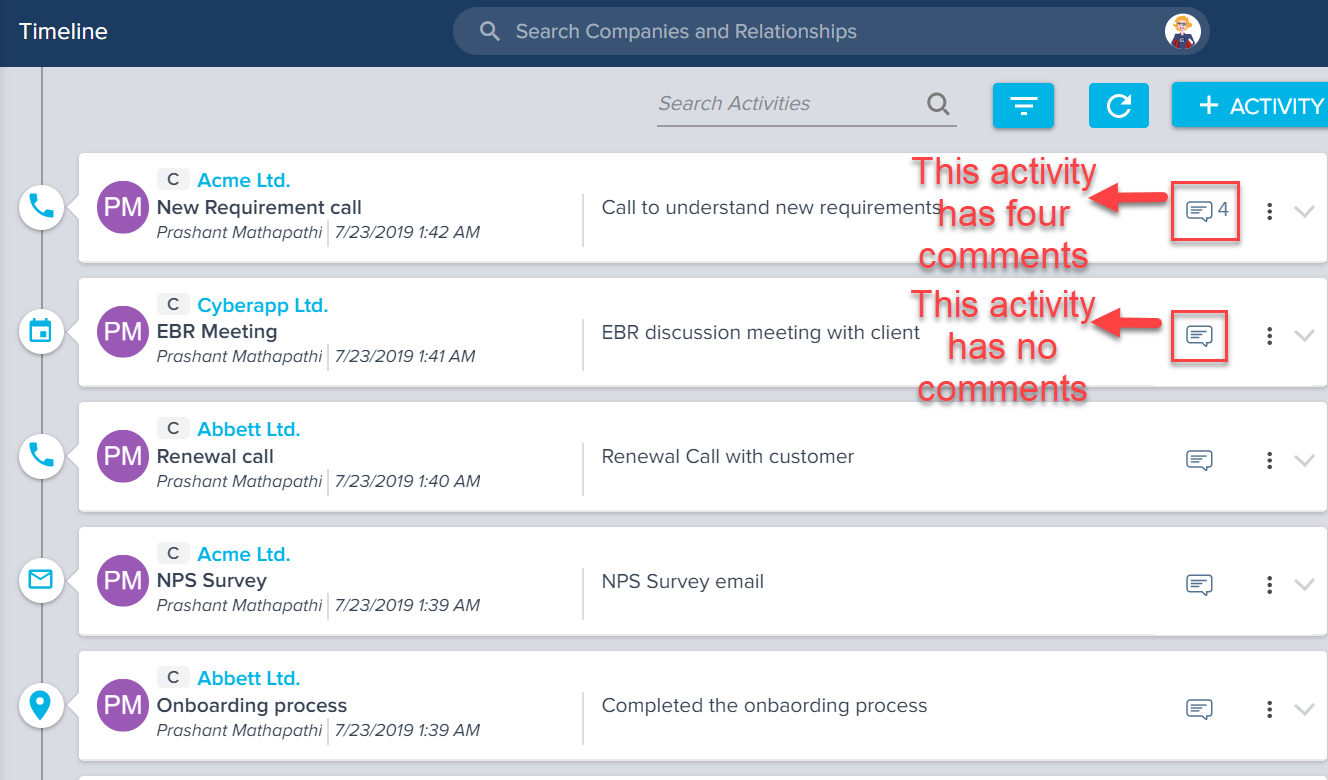
Business use case: A user who does not own an activity, can have a lot of queries regarding the activity. Previously, all these queries had to be resolved through email channels or other communication methods. With the ability to comment in Timeline activities, users can now record their queries or any clarifications about an activity as a comment. The Activity owner can respond to the queries. Any other user who has the same query can also quickly resolve their query by looking at the history of comments.
- View Comments: By default, the Activity detail view displays the first three most recent comments. To view all the comments, click View All Comments.
To view comments:- Navigate to Timeline.
- Click the Comments icon or expand an Activity and scroll down to the comments section.
- Add Comments: Users can comment on the activities they own or on the Activities owned by other users. The comment box is equipped with all the text formatting options. Users can also tag users in your comments. The tagged users and the activity owners receive an email notification. To tag users in comments, type @ followed by the first few letters of the first name of the intended user, and select a name from the suggestions. Users can tag a maximum of 10 users in a single comment. If the required user name is not displayed, the user may not have been added through the user Management page. You can add Comments by expanding and activity and navigating to Comments section. Comments can have a maximum of 4000 characters.
Note: The comments feature is not available within the mobile app.
To add Comments:- Expand the required Activity.
- Enter the Comments in the Comments section. You can also click View All Comments and enter your Comments.
- Edit and Delete Comments: Users can edit and delete only the comments they authored. To edit or delete comments, perform the following steps:
- Hover over the comment you wish to edit or delete. This displays the edit and delete icons.
- Click the edit icon to modify the text of the comment.
- Click CANCEL to undo any edits you’ve made, or click SAVE to preserve these edits.
- Click the delete icon to remove the comment. This displays a message confirming if you want to delete the comment.
- Click YES to complete the deletion. Click NO to cancel the deletion.
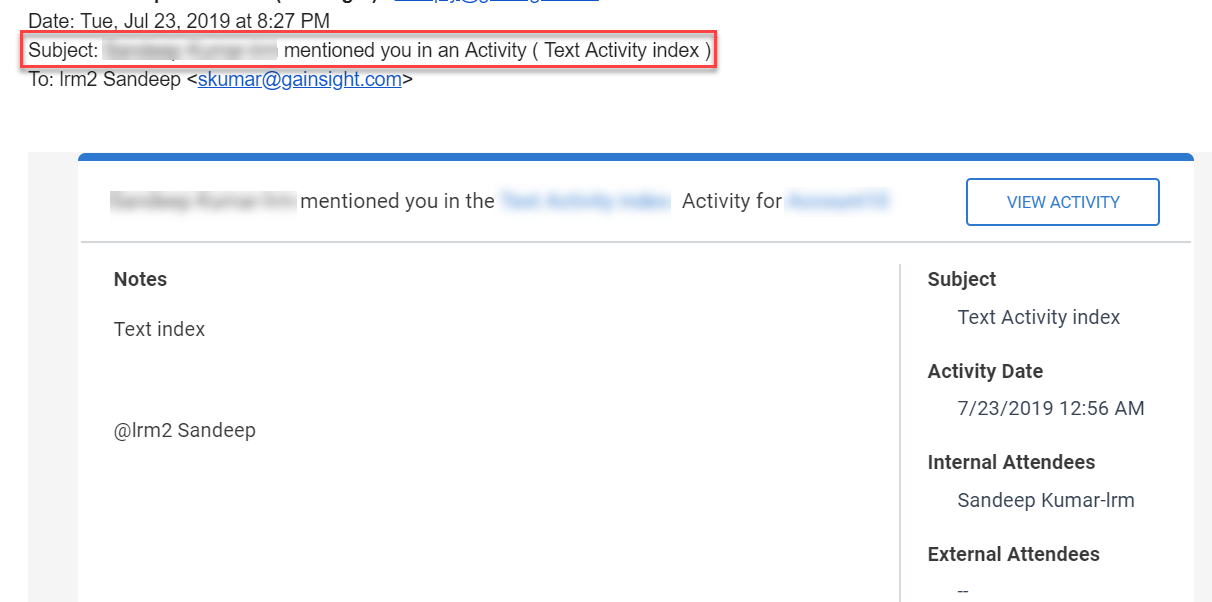
- Enhancements to the Subject Line of Email Notifications: Now, when users are tagged in a Timeline activity, they’ll receive an Email notification with the name of the activity in the subject line of the email notification. The new format is as follows:
<Activity owner> mentioned you in an Activity (activity subject line)
- Ability to remove Person record from External Attendees. Admins can now delete person records in Gainsight. Refer to the Person enhancement in People Management for more details.
If you delete a Person record which was included in the External Attendees field of an Activity, the record is automatically deleted from the External Attendees field as well.
Issues Addressed
Report Builder (BI)
- Dashboard Home doesn’t display the Asset List when you login for the first time: Gainsight Home Dashboards didn’t display the asset list when users logged in for the first time. This issue is resolved now, and all the assets in the Dashboards are displayed correctly, even if the users login for the first time.
- Drill-down Widget Report page hangs while closing: When closing out the drill-down report (Open Task Widget) on the CSM/RM/AE Dashboard, the screen hangs. This issue is resolved now.
- Area Graph displaying incorrect percentages: Previously, Area graph displayed 100% despite the values actually not 100%. This issue is resolved now, and the percentage values are shown correctly.
- SFDC Reports not honoring Date Filter “Current and Next 3 Financial Quarters”: Previously, when you report on SFDC Objects, the date filter “Current and Next 3 FQs” didn’t honor correctly. This issue is fixed now.
- Sort Operation for Related List Reports in C360 fetches all the Accounts data: Previously, when you perform Sort operation on the related list reports in C360, the report displays all the accounts data. This issue is resolved now.
- Drill-down Operation for Visualization Reports in C360 fetches all the Company data: Previously, when you perform drill-down operation on the visualization reports in C360, the report displays all the company’s data. This issue is resolved now.
- NPS® Survey Response doesn’t show data in reports: Reporting on NPS® Survey Response doesn’t show data, when you add a Score Type field to the report. This issue is now resolved, and you can now include the Score Type field to the reports.
- Unable to sort report on lookup fields: Previously, you couldn’t sort a report that has lookup fields in it, provided when the records are more than 1000. This issue is now resolved.
Surveys
- Unable to open Survey Pages in Internet Explorer 11: Previously, when you open the Survey Pages in the Internet Explorer 11 browser, the Survey Pages didn’t open. This issue is now fixed.
Issues Addressed for Gainsight NXT in Salesforce CRM
Content in this section supports Gainsight NXT customers logging in from the Salesforce. To learn more about Gainsight NXT in Salesforce, click here.
Report Builder (BI)
- Global Filter Values for Current User and Other User fields are changing to User GSID and SFDC ID: When you report on Gainsight objects, the Global Filter values for Current User and Other User fields are changing to User GSID and SFDC ID. This issue is fixed now, and you can see the correct values for Current User and Other User fields.
Cockpit
- Task Syncing issue between Gainsight to SFDC: Task syncing between Gainsight NXT and SFDC is not happening even after enabling the sync, the system displays “Sync in-progress”. This issue is resolved, and you can now successfully sync the tasks from Gainsight NXT to SFDC.
| NPS, Net Promoter, and Net Promoter Score are registered trademarks of Satmetrix Systems, Inc., Bain & Company and Fred Reichheld. |