Gainsight NXT Release Notes 6.7 October 2019
Short on time? Watch this 7-min. video for an overview of what's new in this release!
Gainsight Release Notes Version 6.7 contains the following subsections:
- Notifications section describes important changes to the application that are implemented now or will be in the near future.
- Enhancements (per module) describe improvements made in the existing product capabilities.
- New Components which are introduced and modified in every release.
- New Features in Gainsight which may require the Admin to setup new processes or re-think existing processes.
- Issues Addressed section contains issues which are fixed in this release and also issues reported by customers.
Note: V6.6 was used for a BETA release, and there are no 6.6 release notes.
Notifications
Gainsight Community Update
The Gainsight Community is moving to a new platform. All of your posts, comments, and profile information will be migrated to the new platform. You’ll still access the Community at https://community.gainsight.com.
There are two important steps you’ll need to take after the new site is live:
-
You must change your password after the new site launches. Passwords are encrypted, so we can’t migrate these to the new site.
-
Re-Subscribe to the categories you’re interested in. We're consolidating the existing categories, and Idea posts will be in separate categories from general Discussions, so you will need to select the new categories that you wish to subscribe to. We strongly recommend that everyone follows the Product News & Updates category to receive important updates on releases, webinars, etc.
Starting around October 17, the existing site will be in read-only mode while we make the switch. During this time, you will not be able to login or take any actions on the Community. After the new site is live around October 21, please visit the Community site to update your password and subscribe to relevant categories.
Improvements to support.gainsight.com
We recently made some enhancements to our product documentation site support.gainsight.com. On the new home page, you can select your Gainsight product and edition. When you search for keywords, you’ll only see results associated with that product or edition’s content. Please note, these changes do not impact Google search results. We recommend bookmarking our support site for the best search experience.
If you have any documentation questions or feedback, please email docs@gainsight.com.
New Features
 Data Designer (BETA)
Important: Data Designer is available as a BETA feature, and enabled only for selected customers to collect feedback. We will soon enable this feature for all customers.
Data Designer (BETA) is a new feature that makes it easier for you to discover richer, more meaningful insights from your customer data. It helps by simplifying the most time-consuming step of data analysis: preparing the data for analysis.
Gainsight Reporting allows you to build reports and analyze the data available in one particular object. But, the data within Gainsight is distributed across various applications like: Timeline, Success Plans, and Cockpit etc. (or) the data you might want to analyze and report on may not come from Gainsight. In order to derive the most meaningful insights, you need to merge the data from these various data sources. Data Designer (BETA) gives you the tools to do this, helping you merge and transform data from these disparate data sources to create a Dataset for your further analysis.
Once a Dataset is created in Data Designer (BETA), you can explore and analyze the data to see if it’s valuable, and then make it permanent and universally available across Gainsight. Once a dataset is permanent, it is saved as a Dataspace under MDA data source. You can then use this Data Space in other functionalities of Gainsight like, Reporting, Rules, and Journey Orchestrator (JO).
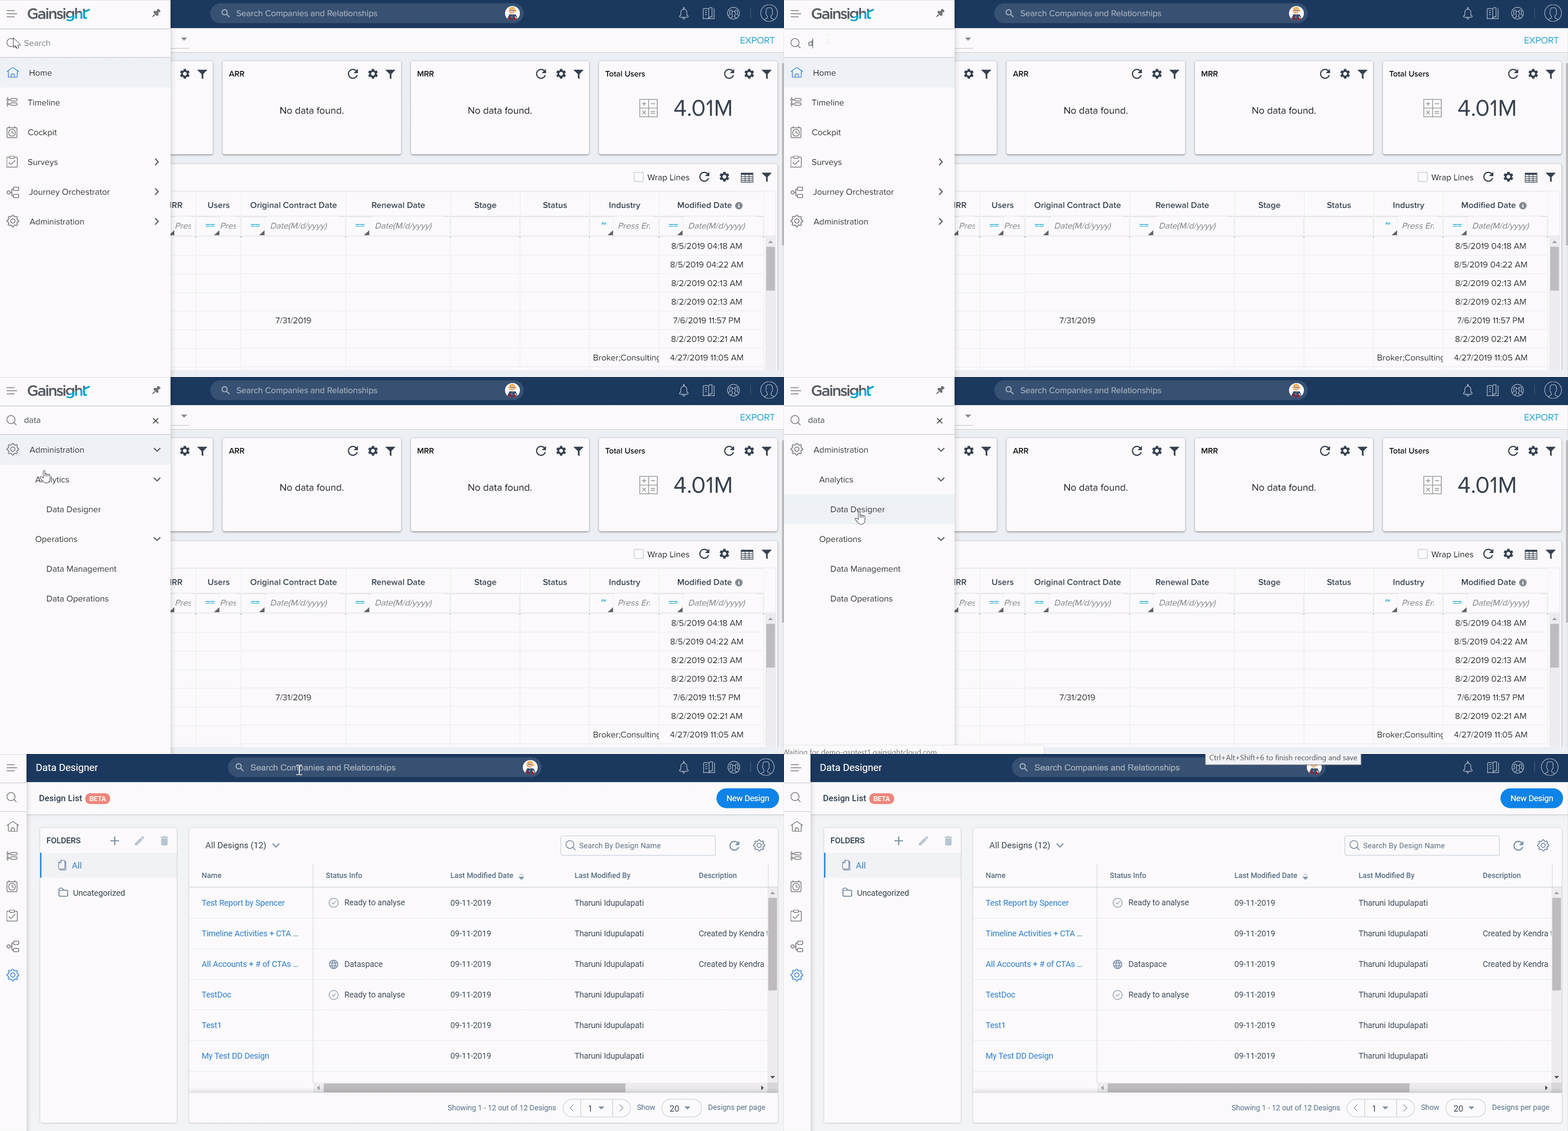
To access Data Designer (BETA), navigate to Administration > Analytics > Data Designer (BETA).
For more information on Data Designer, refer to Data Designer (BETA) Overview article.
Solutions Marketplace
(BETA) New Solutions Marketplace to simplify Gainsight CS onboarding and configuration: Solutions Marketplace contains packages of assets (reports, rules, playbooks, etc.) to support various business challenges, referred to as Elements, which can be imported to and deployed quickly and easily in your Gainsight CS org. This new feature helps customers receive value more efficiently from the data in Gainsight.
Solutions offered through this feature enable users to transform data in Gainsight into meaningful information on which they can define Actions [CTAs], Health Scoring, and Dashboards.
To learn more about Solutions Marketplace, refer to the Overview of Solutions Marketplace article.
Enablement Engine
Please note that Enablement Engine is available as an add-on to our Customer Success platform. For more information on how to license it, please contact your Gainsight account manager.
Gainsight Enablement Engine helps you supercharge your CSM team by streamlining onboarding, reinforcing training, and boosting productivity.
You can use Enablement Engine to:
- Analyze Gainsight CS feature usage to quickly and easily see what your CSMs are doing
- Launch personalized in-product engagements based on each CSMs behavior to onboard new CSMs systematically and, drive adoption of new team processes and Gainsight CS.
Enhancements
Adoption Explorer
Adoption Explorer helps manage your customer’s usage data in the Gainsight environment, and quickly surface the most relevant view of usage data across your customer base. Adoption Explorer offers powerful segmentation capabilities to manage multiple product lines, more robust control of aggregations and calculations, and totally re-imagined visualizations to surface deep insights. Customer’s usage data at Company and/or Person level can be stored at both daily and weekly level along with their entitlements. Using the ingested data, admins can define new derived fields without the need of Rules Engine.
- Ability to convert Fields in Person Timeseries to Company Timeseries objects automatically: Previously, the fields in the Person Timeseries Daily object could be rolled up to weekly and saved in Person Timeseries weekly object. But, with this enhancement, Person Timeseries fields can also be aggregated and saved automatically to Company Timeseries Daily and Weekly objects, thus allowing for greater flexibility to configure from Person to Company Objects.
Notes:
- You can convert only the source fields in Person Timeseries object to Company Timeseries objects and not the derived fields.
- By default, the source fields in Person Timeseries object with Dimension data type are converted to Company Timeseries object.
To use this enhancement:
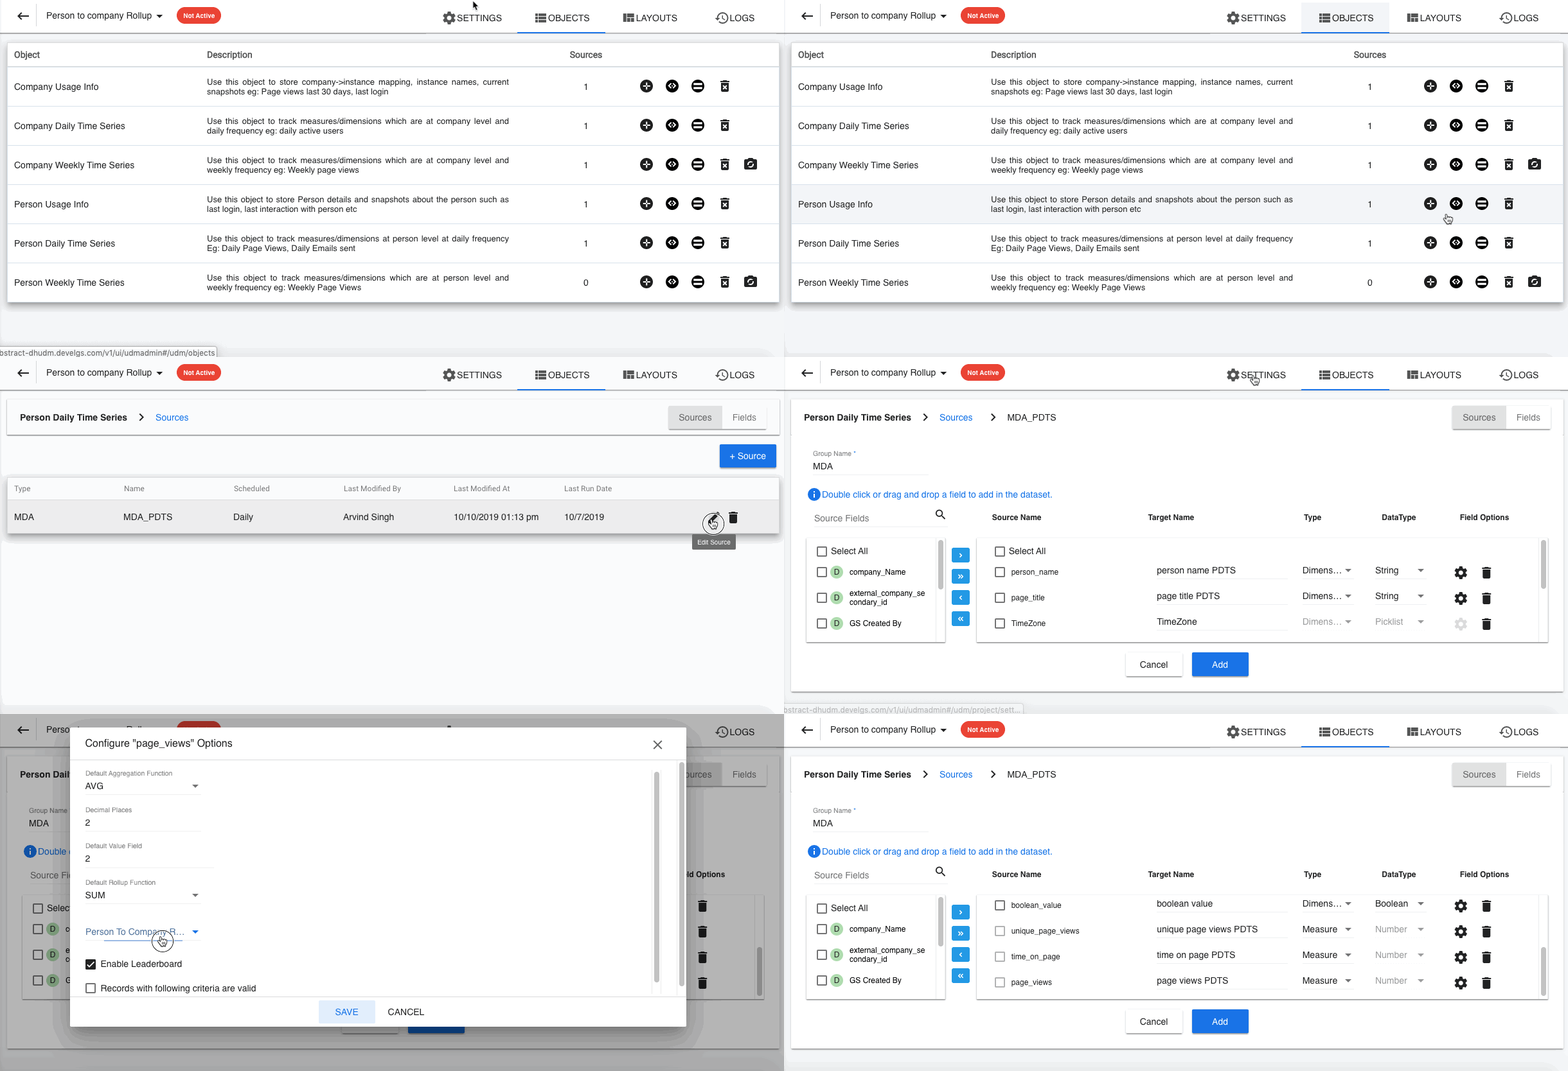
- Navigate to Adoption Explorer > Admin. Hover on the required project and click the Objects icon.
- Click Sources on the required object.
- Click Edit Source.
- Navigate to the Configured Groups section, and click Field Configurations.
- Click Settings on any of the Measure data type field.
- Select the required Function from the Person To Company Rollup Function dropdown list, to auto-roll up to Company Timeseries objects.
- Click Save.
- Click Add.
- Click Save Source.
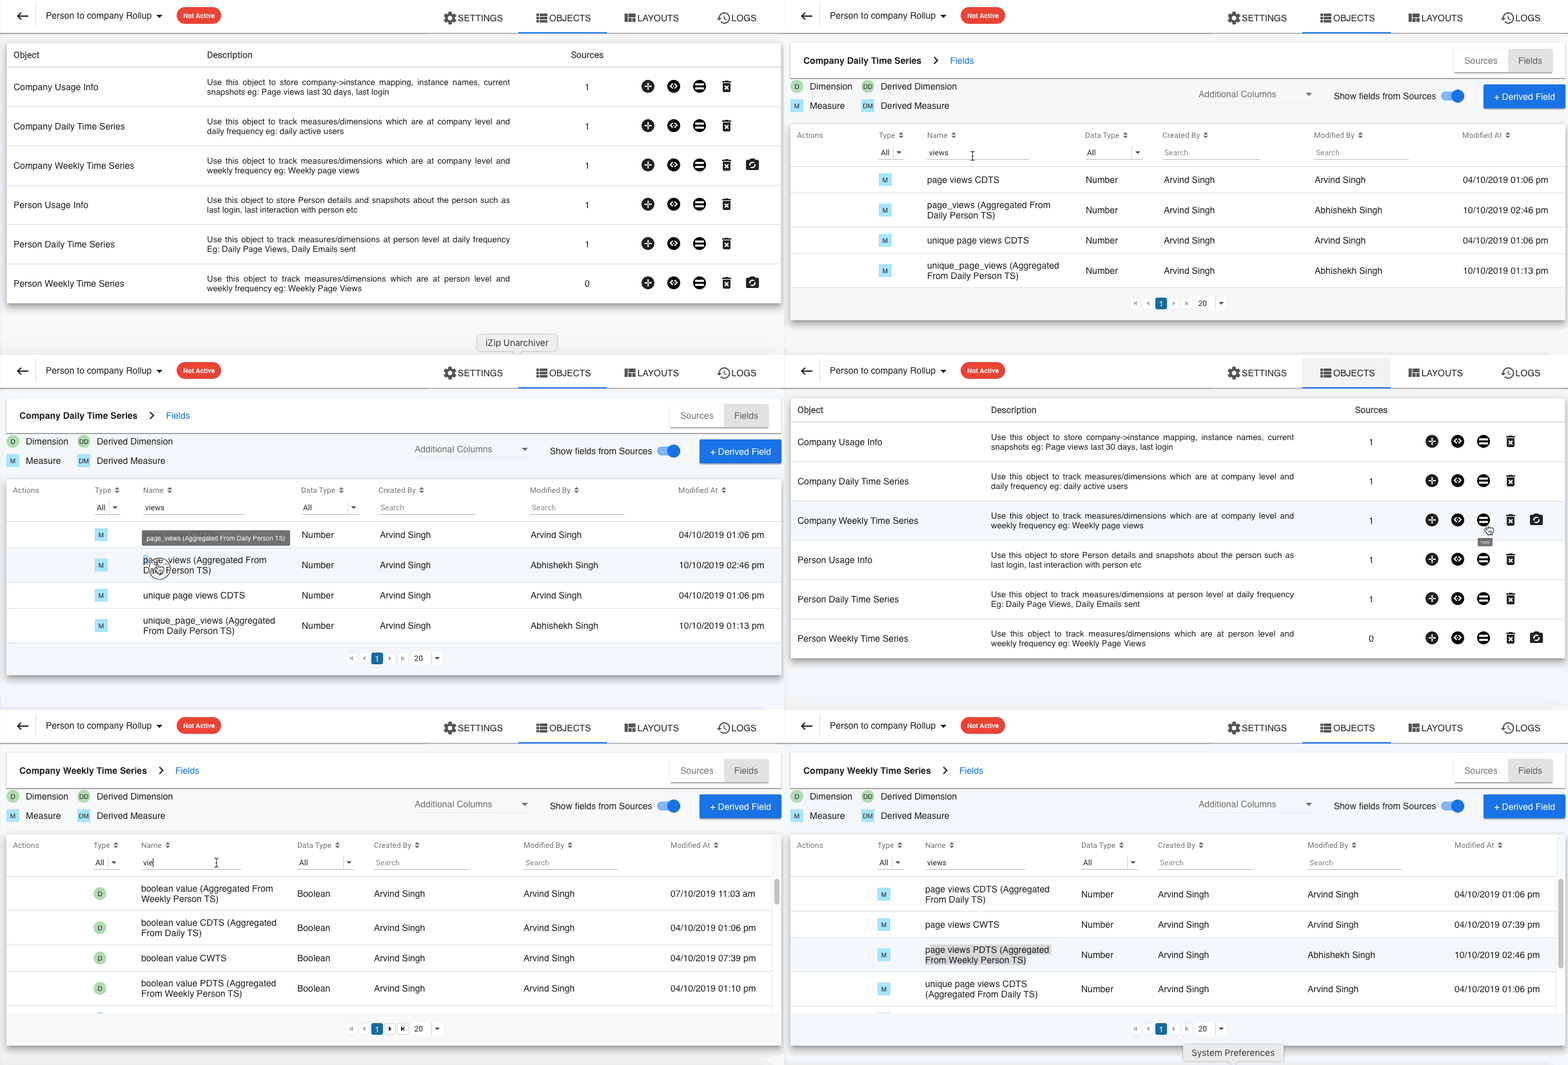
The following image shows the newly created fields that are converted from Person Timeseries Daily to Company Timeseries objects.
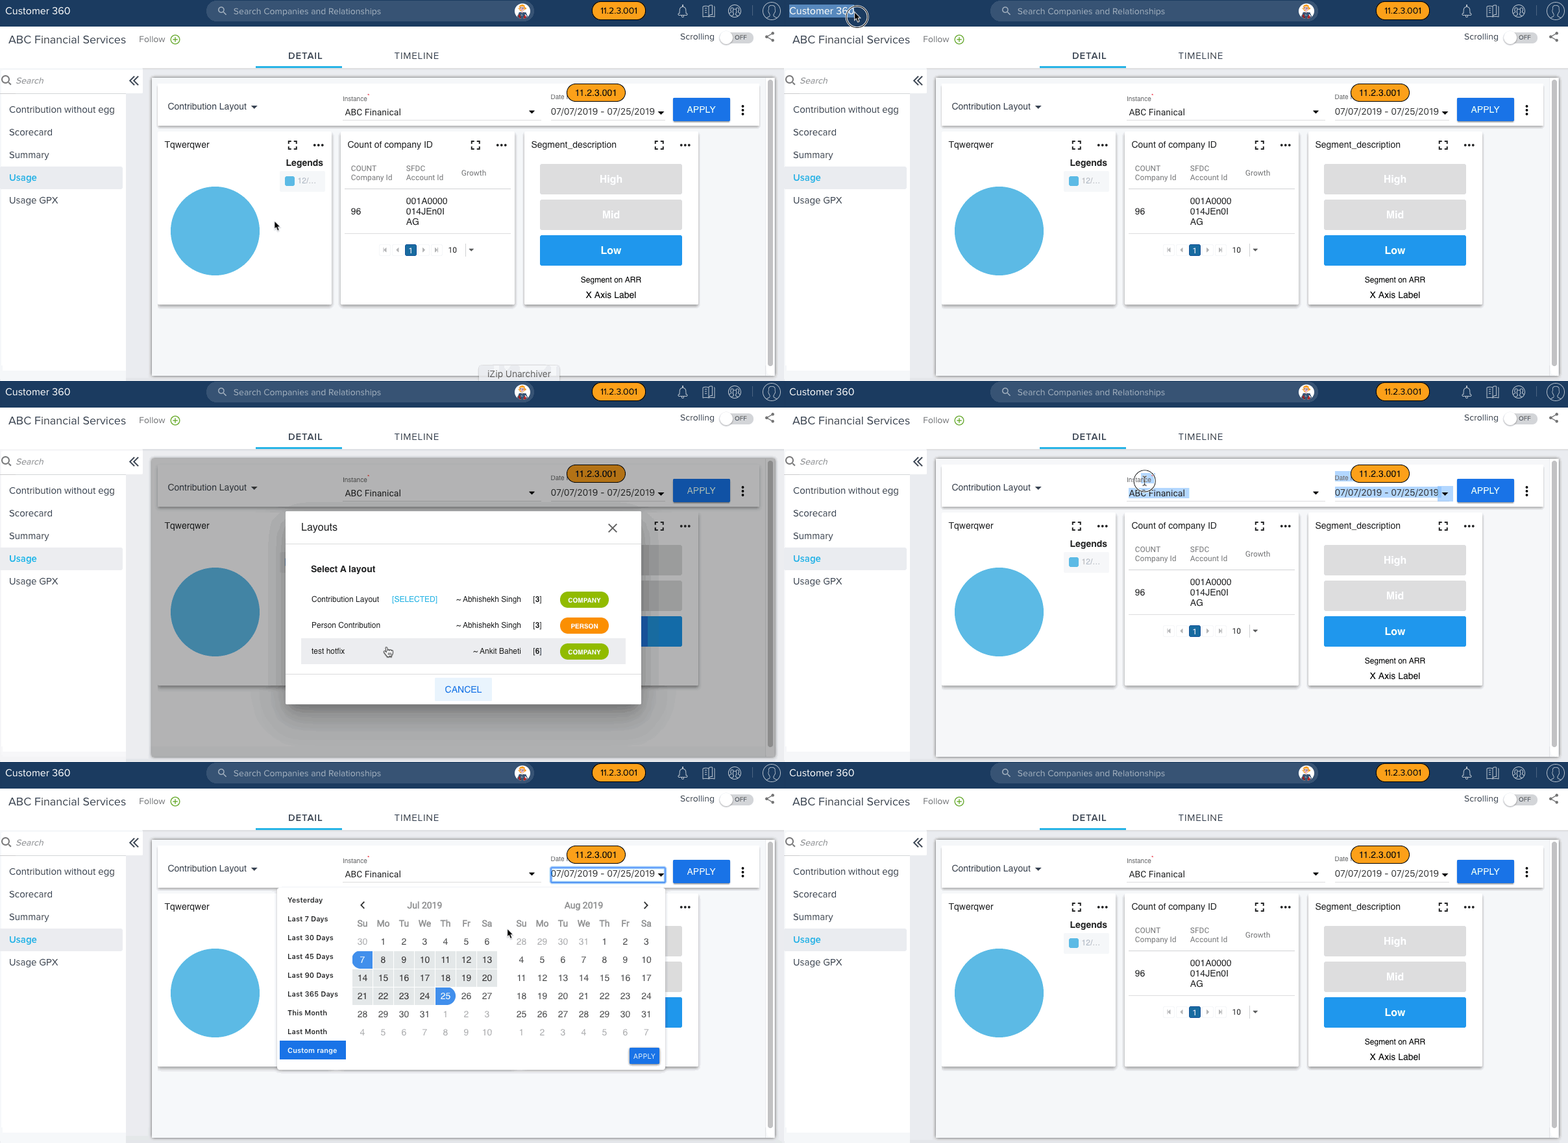
- Ability to view multiple Adoption Explorer Layouts from one C360 Usage Section: Previously, users could only see the default layout added to the C360 Usage section, but with this enhancement, users can select the required layout (Company/Person) from the C360 page.
To use this enhancement:
- Navigate to Customer 360 page.
- Click the Adoption Explorer/Usage Section.
- Select the required Layout from the Layouts dropdown list.
- Select the required Instance from the Instance dropdown list.
- Select the required Person from the Person dropdown list, if a Person Layout is selected.
- Select the Date Range.
- Click APPLY.
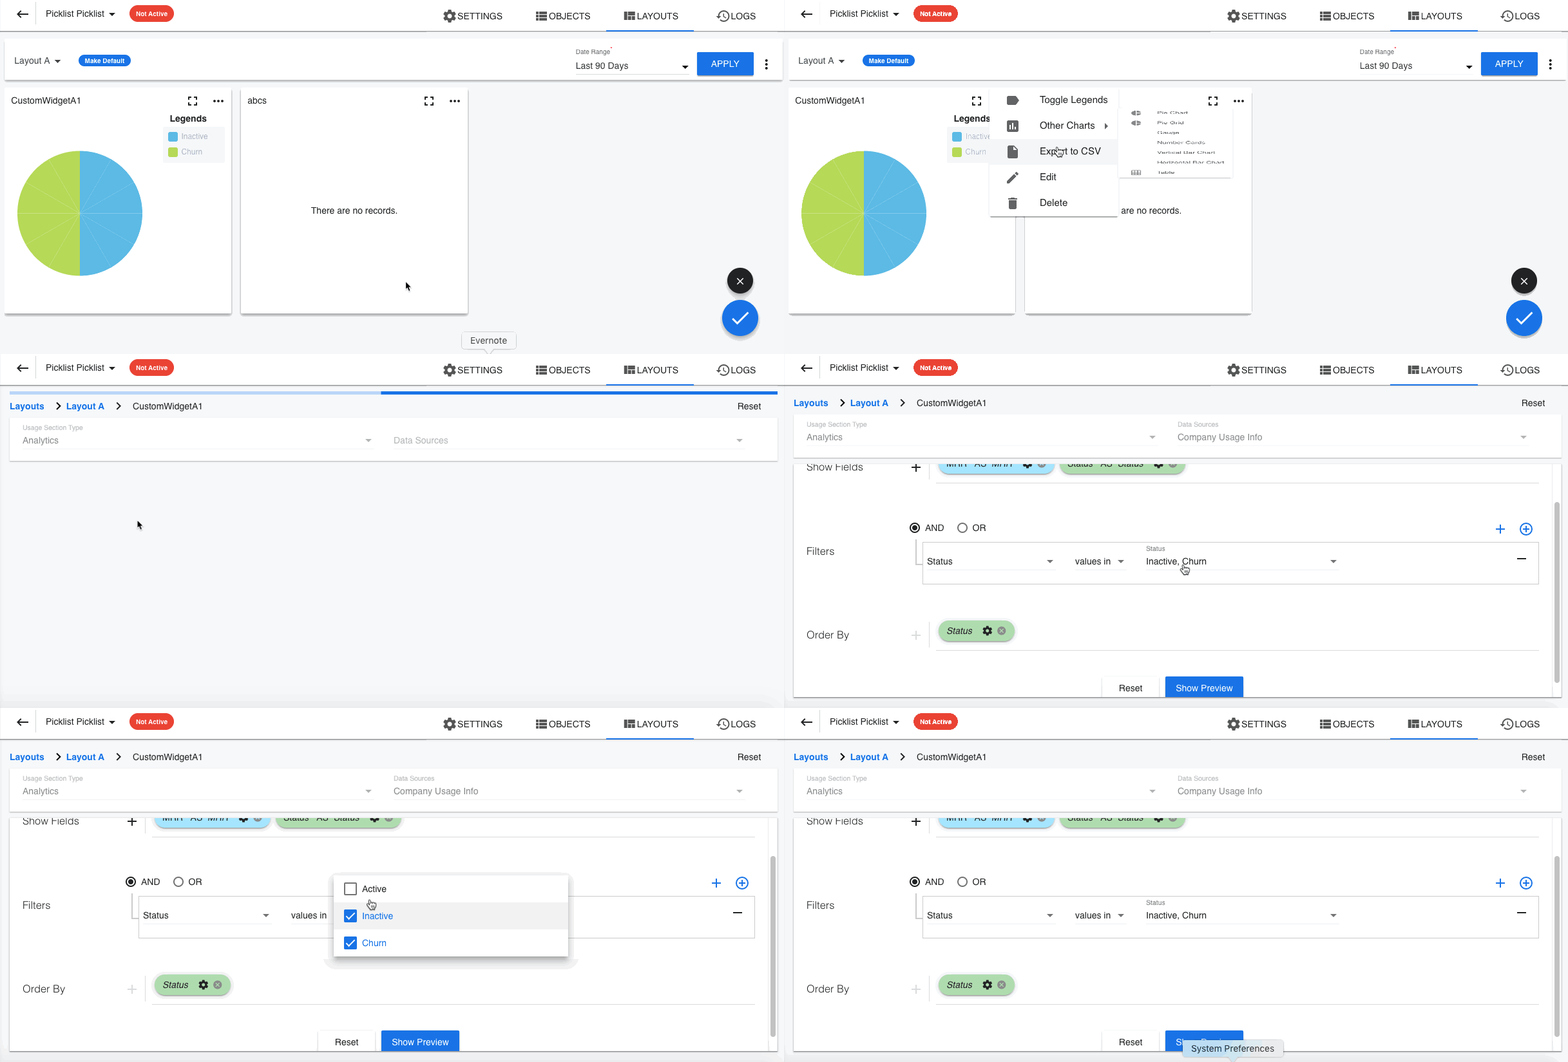
- Support to Picklist added in Adoption Explorer Filters: The Filters in Adoption Explorer is now enhanced to support Picklist data type.
The following image shows how to filter the data in a usage section using picklist values.
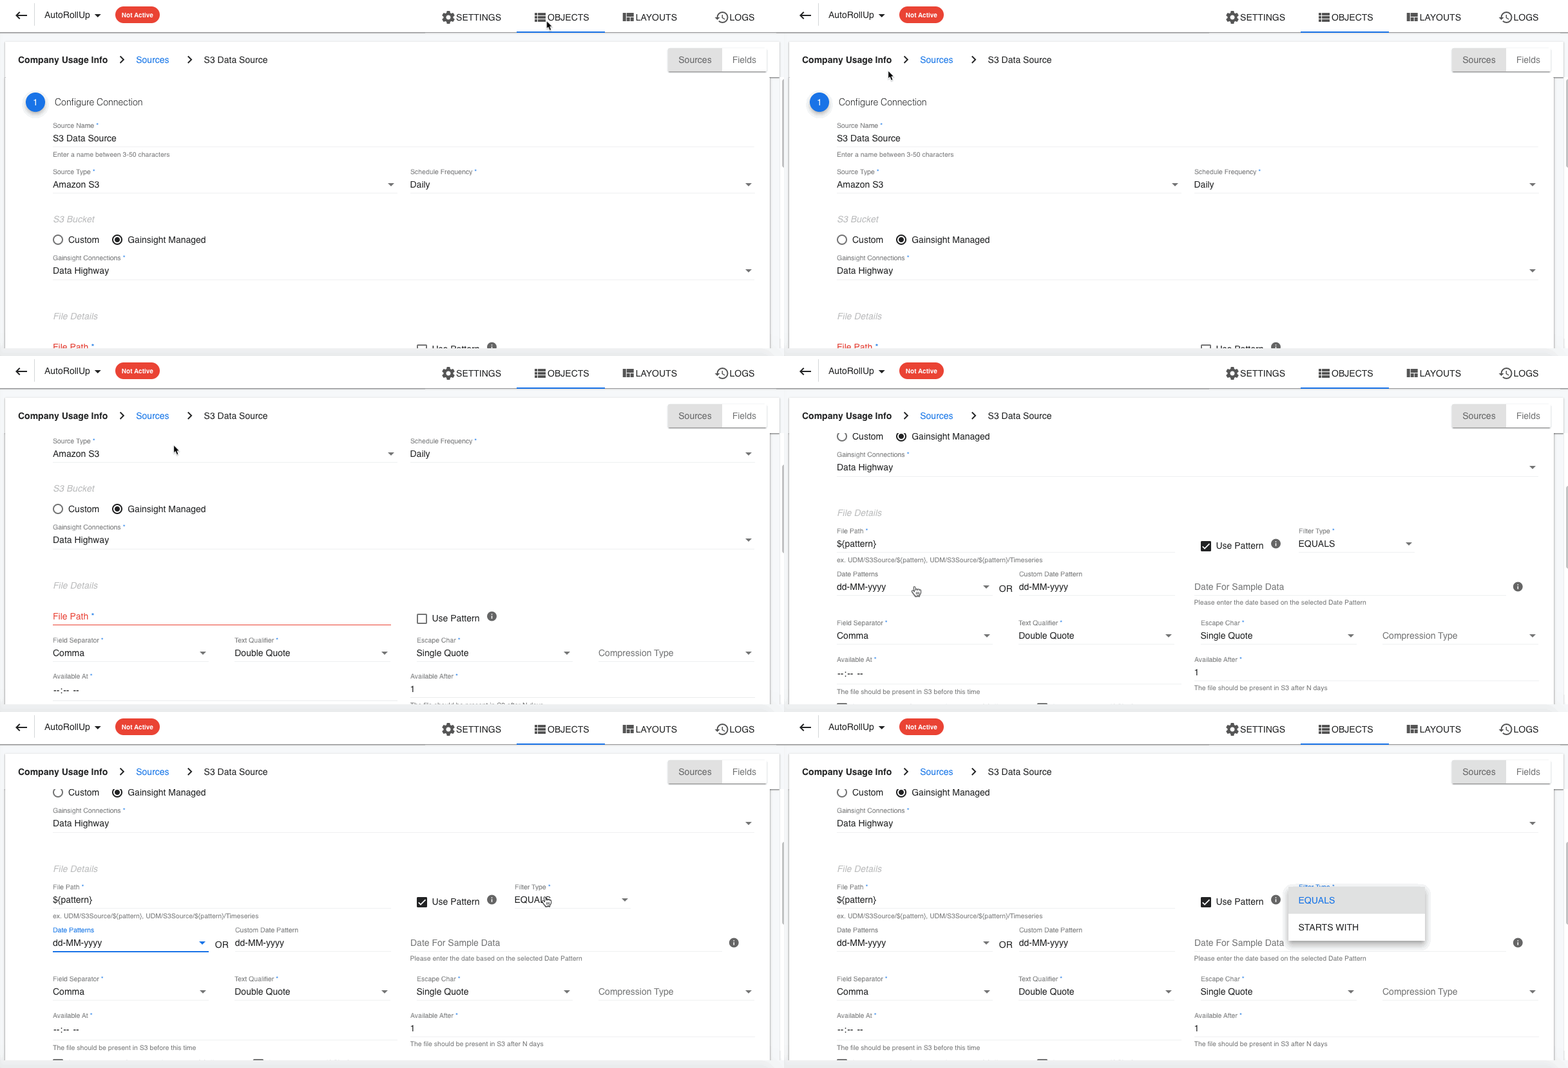
- Ability to support the S3 file pattern that ‘STARTS WITH’: Previously, you can import an S3 file into an Adoption Explorer object only when the file pattern is: file_{datepattern}.csv. But, with this release, a Filter Type is introduced in the Source Connection page that allows you to import S3 files with the date pattern that STARTS WITH.
Renewal Center
Renewal Center helps quota carrying CSMs and Renewal Managers forecast and manage their book of business. By enriching Salesforce Opportunities with Customer Success insights, as well as calculating a Likelihood to Renew score for each opportunity, Renewal Center enables your team to efficiently manage and predict renewals and related upsell, recognize risks in a timely fashion, and report on key renewal metrics.
Note: To use Renewal Center, your Opportunity data must reside in the Salesforce Opportunity object, and you must use the Gainsight Salesforce Connector 2.0 to import this data into Gainsight.
Please note that Renewal Center is available as an add-on to our Customer Success platform. For more information on how to license it, please contact your Gainsight account manager.
- Ability to Configure Your Forecast Calculation: Gainsight now allows admins to configure the calculation method of Your Forecast in Renewal Center. Previously, this value was a sum of the Forecast Amount field for all Closed Won and Open opportunities.
A new pane called Forecast is introduced in the Renewal Center admin page, which allows admins to configure the scenarios for calculating Your Forecast. You can set up multiple scenarios for the calculation of Your Forecast.
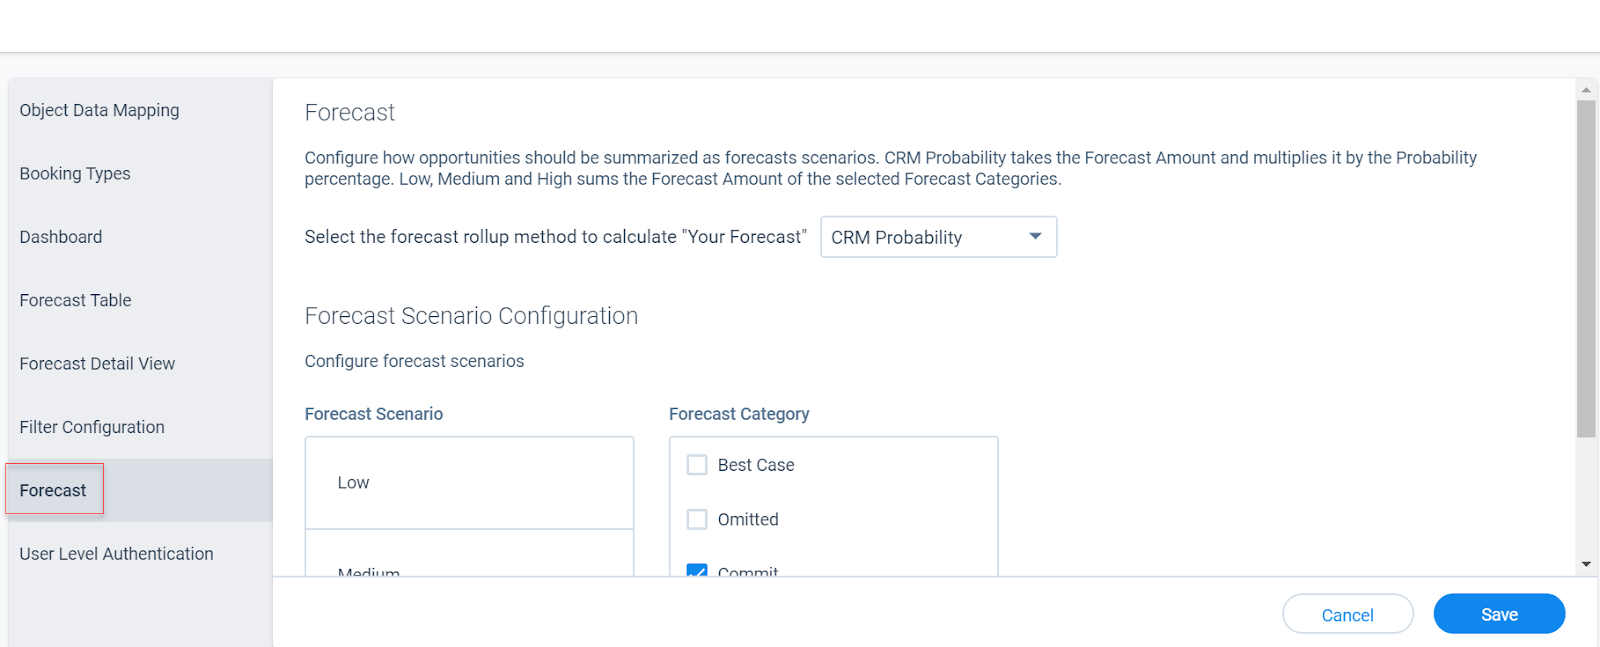
Calculation Methods for Your Forecast: Gainsight offers four methods to calculate the value of Your Forecast field. The methods are:
- CRM Probability: This option multiplies the value of the Forecast Amount field with the value in the Probability(%) field, for all the qualifying opportunities and adds up the product of all opportunities to obtain Your Forecast value.
Apart from the CRM probability method, Gainsight offers three scenarios to calculate Your Forecast value; Low, Medium, and High. These names are just for representation purpose and can be changed. For each of the three scenarios, you can configure the values from the Forecast Category fields. When you select a scenario, the Forecast Amount is added for all qualifying opportunities whose Forecast Category is one of the values configured for the selected scenario.
Note: Forecast Category is a picklist field in the GS Opportunity object. Each Opportunity has a value for this field. This value is synced from Salesforce.
In the following image, you can view the Low, Medium, and High scenarios.
Now, for the Low scenario, you can configure picklist values from the Forecast Category Picklist field. The below image shows that Forecast Category has five picklist values. Out of these five picklist values, Commit and Closed values are configured for the Low scenario.
Now, if you select the Low scenario as the calculation method for Your Forecast field, all the opportunities whose Forecast Category is either Closed and Commit, are selected for calculation. The value in the Forecast Amount field of all these opportunities is added to obtain Your Forecast value.
Apart from Low, you can also configure picklist values for the Medium and High scenarios. The scenario which is selected in the drop-down menu determines the calculation method for Your Forecast.
You can also change the name of the scenarios as shown below in the following image. You must click Save after changing the name of a scenario.
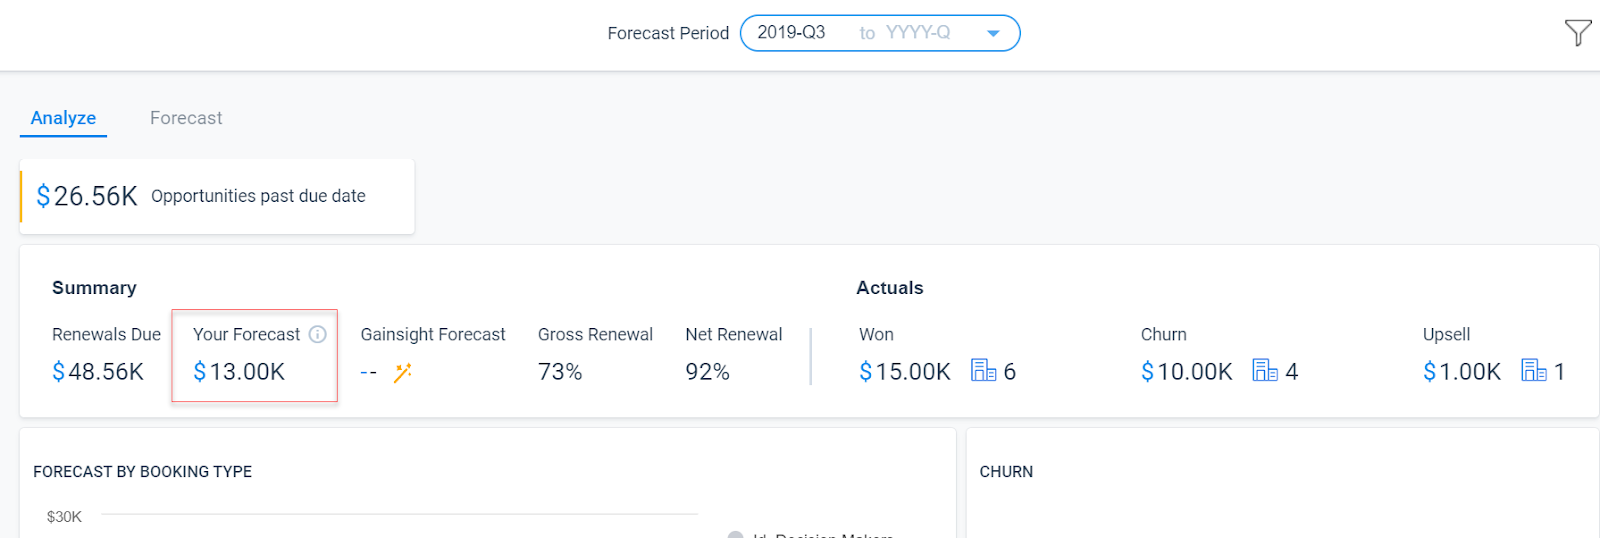
The Renewal Center user page displays the Your Forecast field after performing the calculation by using the method you selected. Users can also see the values if other calculation methods were applied, by hovering on Your Forecast.
In the following image, the Your Forecast value is $25.48K. When you hover on the tooltip, you can see the values if other calculation methods were applied.
The following table summarizes the four calculation methods for Your Forecast value:
| Calculation Method Name | Calculation Method |
|---|---|
| CRM Probability | Multiplies the Forecast Amount field with Probability (%) field for all the qualifying Opportunities and adds the product of all opportunities. |
| Low scenario (Name can vary) | Adds the Forecast Amount field of all Opportunities whose Forecast Category is configured with this scenario. |
| Medium scenario (Name can vary) | Adds the Forecast Amount field of all Opportunities whose Forecast Category is configured with this scenario. |
| High scenario (Name can vary) | Adds the Forecast Amount field of all Opportunities whose Forecast Category is configured with this scenario. |
To use this enhancement:
- Navigate to Administration > Renewal Center configuration.
- Click the Forecast pane.
- Select your calculation method.
- Configure your scenarios with Forecast Category values (applicable only if either High, Medium, or Low is selected).
- Click Save.
- New Renewal Waterfall Chart: Gainsight now provides a graphical explanation of what is happening to your renewal business through the Renewal Waterfall Chart. This chart explains:
- What is happening with Renewals Due in the selected time period
- What is available to renew
- Expected downsell
- Explains Gross and Net Renewal Rates
All the data is shown is for renewals which fall in the selected time period. The Renewal Center Waterfall chart displays both the actual and forecasted value.
Analyze the Renewal Waterfall Chart:
- Renewals Due: The sum of Target Amount of all renewals which are due to be renewed for the logged in user (or the user whose has renewals are being filtered). In this example, the Renewals Due is $48.56k.
- Lost: The total sum of renewals lost in the selected time period. This is the sum of all the opportunities which were closed with a Lost status. In this example, $7000 was lost out of a total of $48.56k, which was up for renewal.
- Downsell: The total sum of renewal opportunities which were closed won but with a downsell. Opportunities with a status of closed and whose Final Amount was less than Target Amount are shown under the Actuals section, and opportunities whose status is Open but have the target Amount less than the Forecast Amount are displayed under the Open section.
- Gross Renewal: The gross sum of opportunities renewed in the selected time period. The actual and forecasted values are shown separately.
- Upsell: This field displays the sum of opportunities whose Target Amount is greater than Forecast Amount for Open Opportunities and Final Amount was greater than Target Amount for closed opportunities.
- Net Renewal: The actual sum of opportunities renewed and forecasted to be renewed.
Ability to Drill down and Download Data in Waterfall Chart: Apart from viewing specific data, you can also drill down to view a list of opportunities which contributed to specific data. You can also download this data as a CSV file.
- Ability to Configure Fields in the Global Filter: Gainsight now allows admins to configure fields for the Global filter. The fields which are configured by the Admin are available to users in the Global filters. A new pane called Filter Configuration is introduced to accomplish this task. You can configure fields from the GS Opportunity object and those objects to which GS Opportunity has a lookup to. Renewal Center supports up to three levels of lookup. By default, two fields Opportunity Owner and Company -> CSM are always available for filtering. Admins can remove the default fields, if required.
To use this enhancement:- Navigate to Administration > Renewal Center configuration.
- Click the Filter Configuration pane.
- Add the required fields.
- Click Save.
End users can now use these fields to customize their view in Renewal Center.
- UI Improvements to Renewal Center User Page: Gainsight has improved the UI of the Renewal Center user page to provide you with a better experience. The Analyze and Forecast tab are now displayed at the top of the page rather than the middle of the page.
Connectors
Customer data is collected and stored in various data stores in any organization. Connectors are integrations that are offered out of the box to connect the varied data sources and sync information into Gainsight.
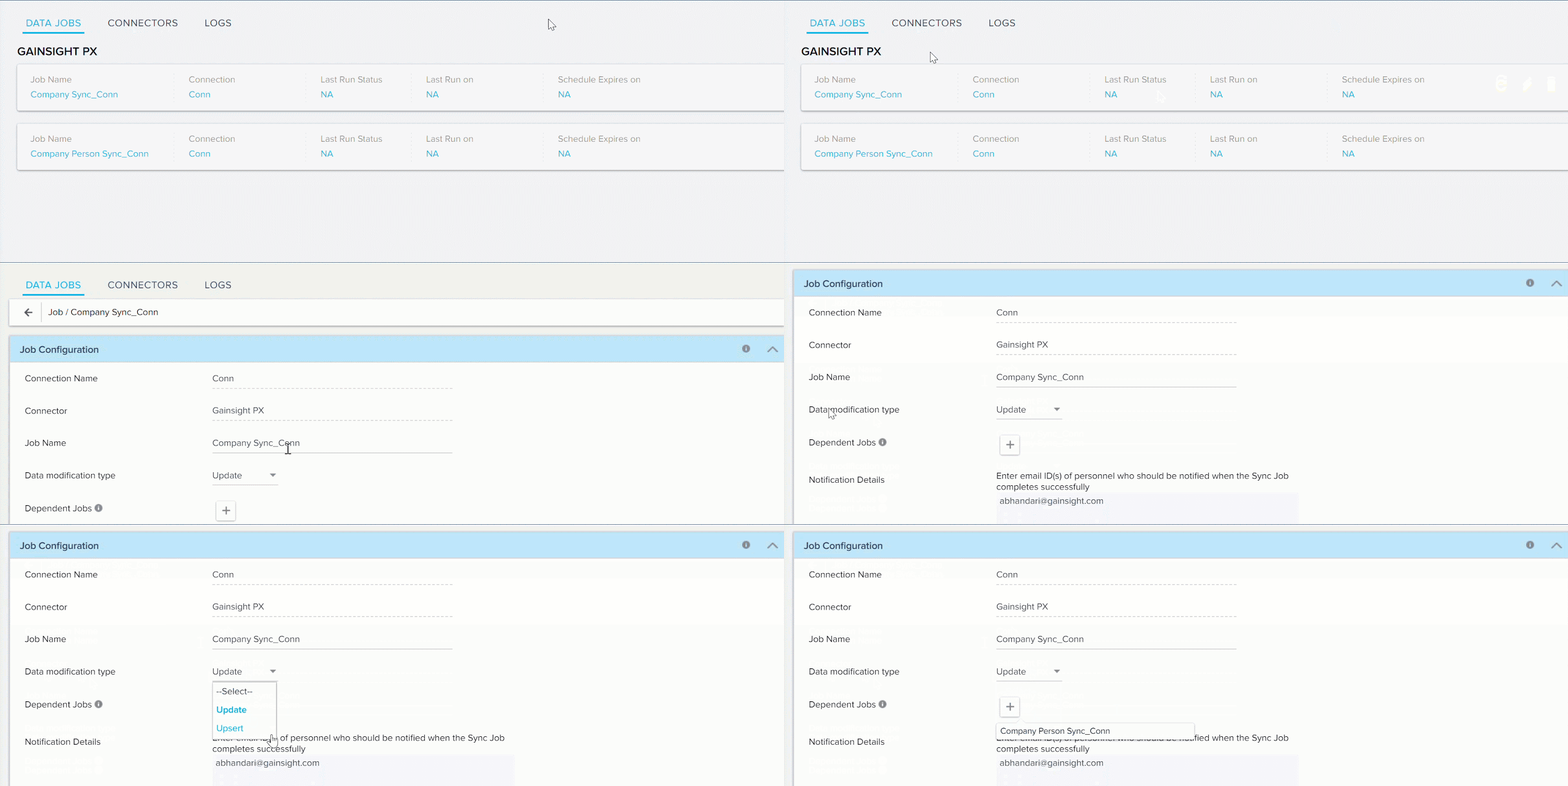
- Ability to Update or Upsert Records in PX Connector: Previously, there was no option to update or upsert records ingested to Gainsight through the PX Connector. Whenever the jobs executed, new records were created. Gainsight now allows you to choose to either insert or upsert records through the PX Connector. To accomplish this, a new drop-down field Data modification type, is introduced in both the out of the box jobs for PX connector. This drop-down menu is present in the Job Configuration section and has two options:
- Update: This option updates the existing records, if available. No new records are created.
- Upsert: This operation updates existing records, if matching records are found. Records are compared based on the Upsert Key selected. If no matching records are found for updation, new records are created.
Business use case: Let’s assume you have ingested some user records from PX and these records are now stored in the Gainsight Person object and Company person object. Now, if the designation of the User changes in PX, this change is captured in Gainsight, when you execute the company person sync job. Previously, a new record was created for the same User with the new designation. This led to redundant user records in Gainsight CS. With this option, when you execute the Company person job with the Upsert operation, new User records are not created. Instead, the existing User’s designation is updated.
To use this enhancement:
- Navigate to Administration > Operations > Connectors 2.0.
- Ensure that you have connection to PX Connector, data jobs are configured, and PX data is synced to Gainsight. Click here to learn more.
- Click the DATA JOBS tab.
- Expand the Job Configuration section of any of the data sync job.
- Select either the Update or the Upsert option from the Data modification type field. On the next job execution as per configuration, existing records are updated, instead of creating new records.
- Ability to Ingest Data from Custom PX Fields: Previously, you could ingest data into Gainsight CS only from standard PX fields. Any custom fields created in PX were not displayed in the field mapping section. Gainsight now allows you to map custom fields as well. You can now ingest data from custom PX fields to any standard or custom fields in Gainsight CS.
To use this enhancement:
- Navigate to Administration > Operations > Connectors 2.0.
- Create a new connection to the PX Connector. Click here to learn more.
- Click the DATA JOBS tab.
- Expand the Data Source and Field Mappings section of any of the data sync job.
- Click ADD.
- Select a custom field from the left drop-down menu and map it to the appropriate Gainsight field in the right drop-down menu. On the next job execution, data from PX custom fields is ingested to Gainsight fields as configured.
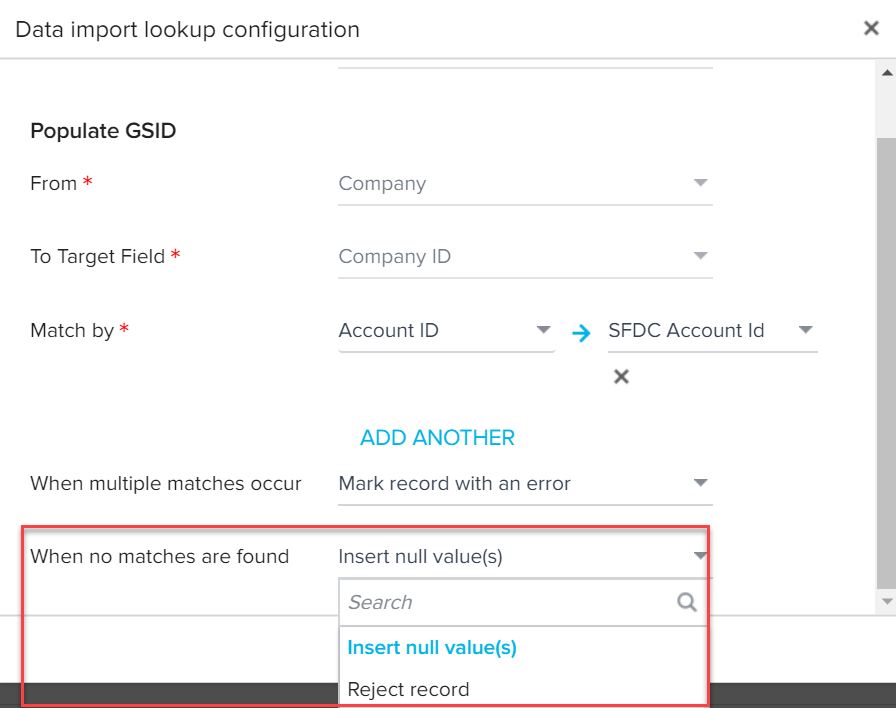
- Default Reject Record option in Company Person Derived Mappings: The Company Person sync job has a derived mappings configuration section. In this section, you must configure a setting for the “no matching records are found” scenario. The When no matches are found drop-down menu is used to configure this setting. This drop-down menu has two options:
- Insert null value(s): This option inserted null values when no matching records were found.
- Reject record: This option rejected the records for which matching records were not found.
The Insert Null value(s) option, resulted in creation of invalid records.
Gainsight has now introduced a feature which automatically changes the value of this drop-down menu to Reject record, even if the Insert null value(s) option is selected. This feature is applicable to SFDC, PX and Dynamics Connectors. This ensures that invalid records with Null values are not created in Gainsight. The records in which Null values are already created will continue to exist as is.
Scorecards
Scorecards provide a robust, comprehensive framework that accurately measures customer health. Gainsight scorecards can capture the nuances of customer health by supporting multiple scorecard models, measuring both objective and subjective inputs, calculating weighted overall health and accounting for scoring exceptions.
- Auto conversion of Mass Edit Report to Unified Mass Edit report: Every individual Scorecard (Account Scorecard or Relationship Scorecard) has a unique Fact object which holds the Scorecard data. Additionally, all Account Scorecards have a unifield fact object which stores data of all Account Scorecards, and all Relationship Scorecards have a unified fact object which stores data of all the Relationship Scorecards.
Previously, you could create a mass edit report either on an individual fact object or on the unified fact object. With this release, Gainsight automatically migrates all your Scorecard Mass edit reports created on individual Scorecard fact objects, to Unified Scorecard Mass edit reports. This migration is automatically performed by Gainsight.
When a Scorecard Mass edit report is converted to a Unified Scorecard Mass edit report:
- The name of the report is not changed. The report list view displays the same name you used while creating the report.
- The source object changes from individual fact object to Unified Fact object.
- Fields used in the Show me or By sections are not modified. No new fields are added to these sections.
- Existing filters are not modified. However, an additional filter is added to the report which filters all the data on the Scorecard for which the individual scorecard Mass edit report was created. This is done by adding the Scorecard ID filter. For example, consider that you had a Scorecard Mass Edit report for a Scorecard called “Support Health”. When this Scorecard mass Edit report is migrated to Unified Mass edit report, a filter is added to the report which filters data to include the Scorecard ID of the “Support Health” scorecard. This filter is automatically added during migration. If you had used any other filters, AND logic is applied between the filters.

Note: If you have added a Mass Edit report to a Dashboard, it will be replaced with Unified mass Edit report.
- Introduction of the “Active” Field: Previously, if you changed the Scorecard for a Company, the results in a Mass Edit Report displayed scores for both the previous and the current Scorecard.
- With this release, Gainsight has introduced a new boolean data type field called Active.
- When you use this field in the Show me section, you can view the value true, if the Scorecard is the current one. For previous Scorecards, this field displays a value false.
When you use this field as a filter, you can view scores only from the current Scorecard, or from the previous scorecard, based on the value selected in the boolean filter.
Business Use case: Previously, it was very cumbersome to view or filter scores only from the current scorecard. With this feature, you can now easily view the scores of only the active scorecard.
To use this enhancement:
- Create a Standard report on Scorecard Unified fact object.
- Select the Active field in the Show me section or Filter section, as required.
Journey Orchestrator
Journey Orchestrator is your center for automated communications. It leverages the power of automation to make your job easier as you communicate with customers at scale. Gainsight enables customer success teams to launch automated emails based on customer attributes such as health score, product usage, survey results and lifecycle stage. Through automation, you can scale customer touches and engage with a growing list of customers often and effectively.
 Improved Email Templates in JO: Email Templates are enhanced with a new UI and significant performance improvements. Changes in the feature make it more user-friendly, and also allows admins to customize the email templates to provide the best email template layout that works in various email clients.
Following are some of the modifications made to Email Templates:
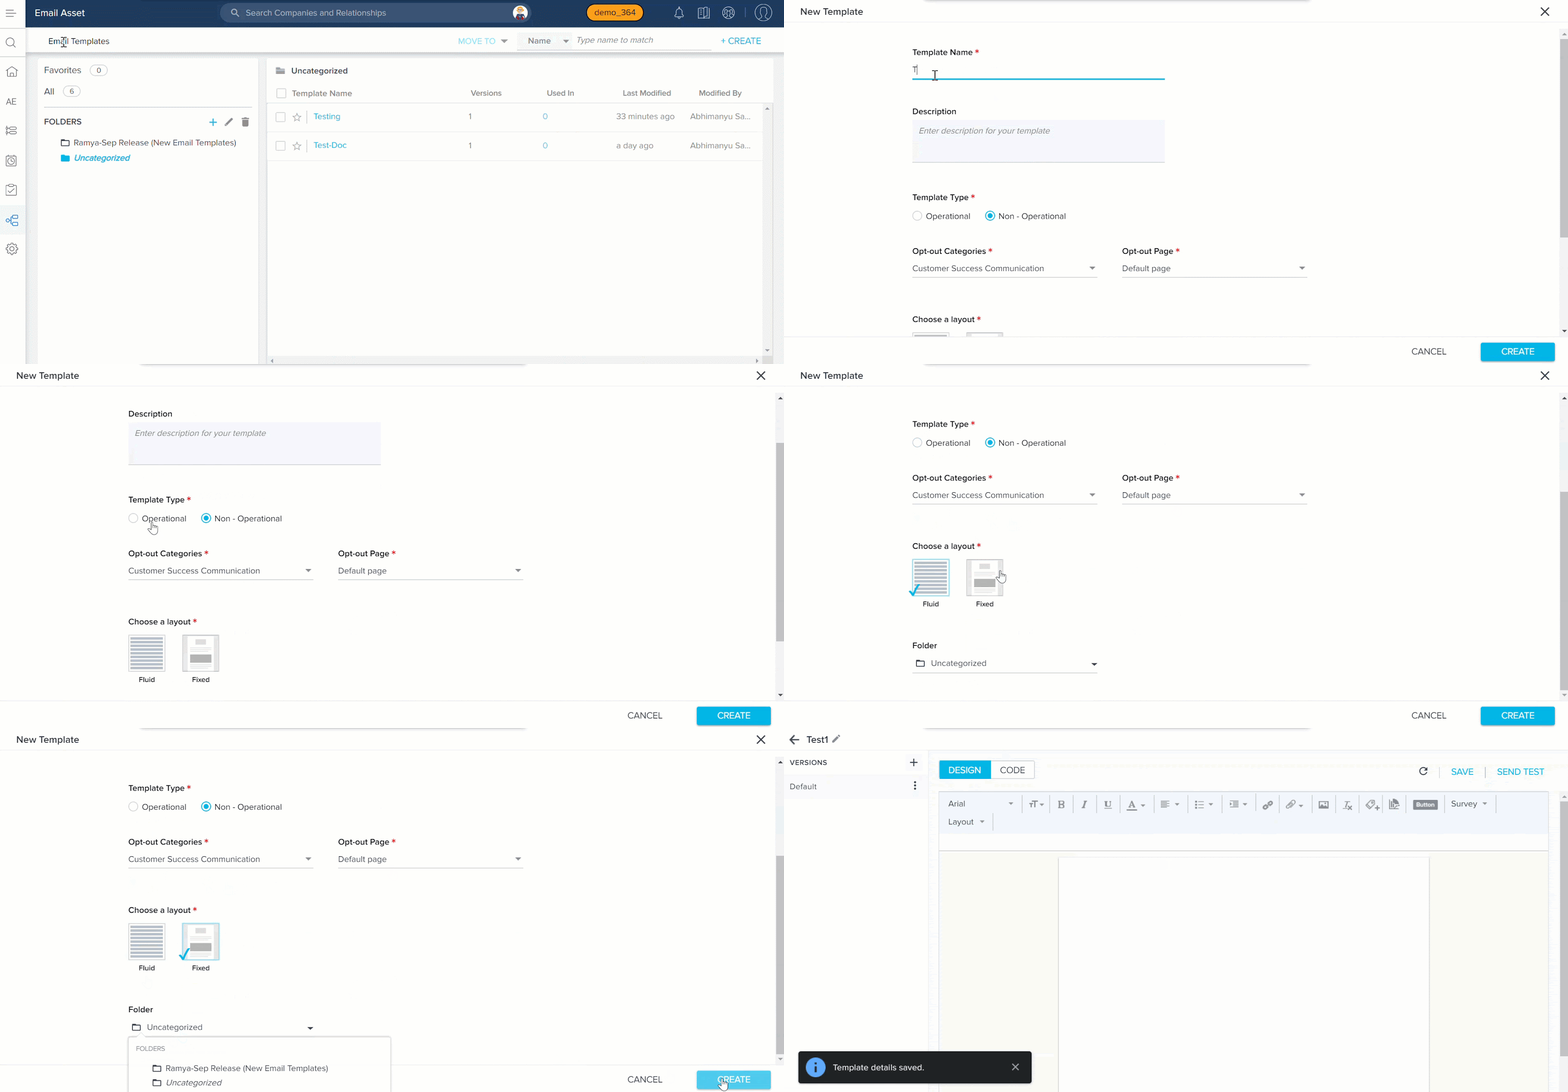
- Introduction of New Template screen: A new page called ‘New Template’ is introduced to provide details such as template name & description, selection of template type, opt-out categories & page, layout, and folders.
Admins can edit the above-mentioned details later, except for layout type.
To create a new email template:
- Navigate to Journey Orchestrator > Email Templates.
- Click +CREATE. The New Template screen appears.
- In the Template Name and Description (Optional) fields, enter the name of the template and description for the template.
- In the Template Type section, select either Operational or Non-Operational options. For more information, refer to the Operational Emails section.
- Select the Opt-out Categories and Opt-out Page options, if Non-Operational option is selected in the Template Type section. For more information, refer to the Opt-Out Settings section.
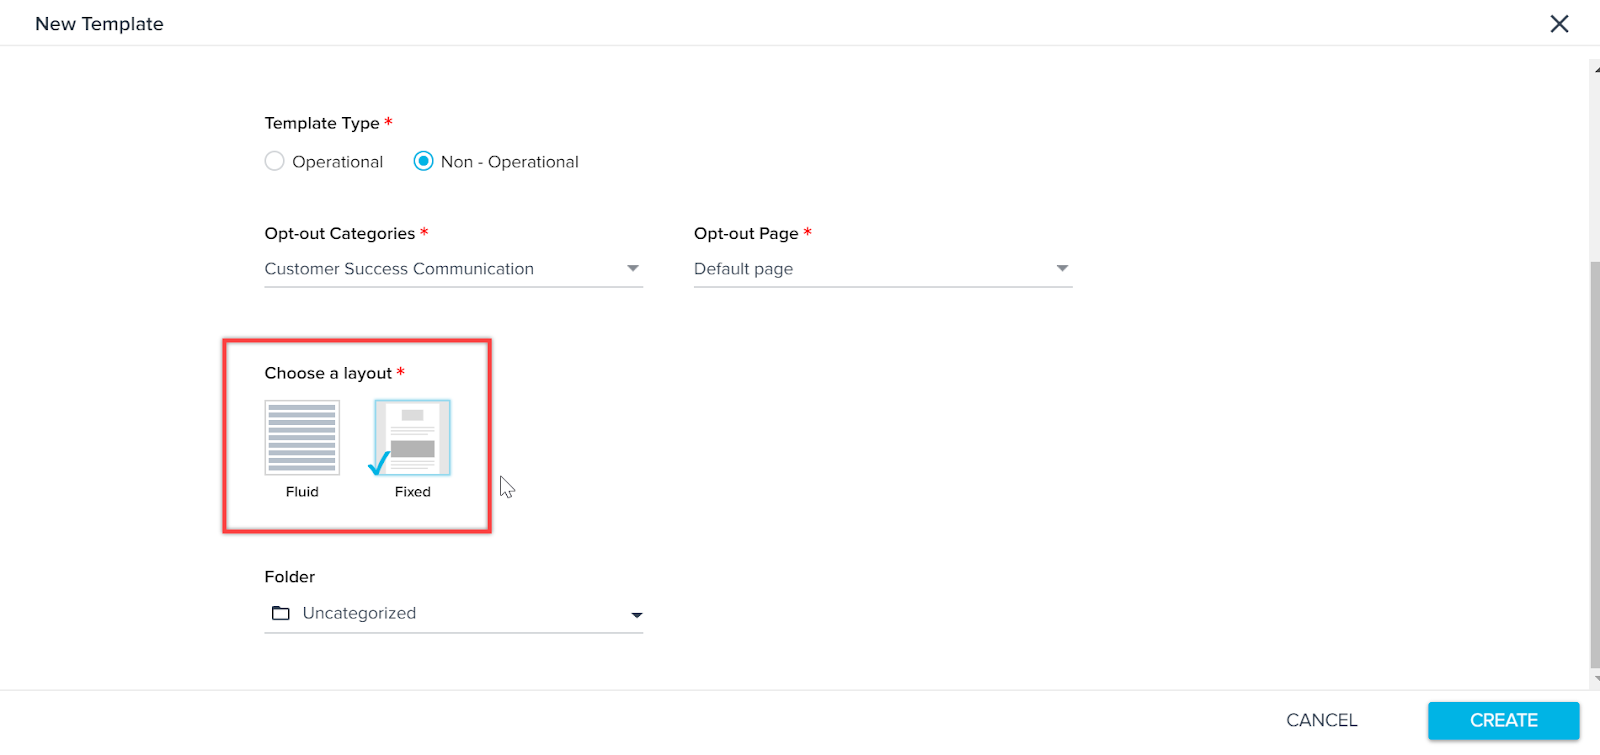
- In the Choose a layout section, select the type of layout you want to use in the email template.
Fluid and Fixed type Layouts: Fluid layouts are blank templates that are completely customizable, and Fixed layouts are typically used for marketing emails with white space on either side of the body of content.
Admins can now select either Fluid or Fixed type layouts to design email templates as per customer requirements. For more information, refer to Email Template Layouts article.
- In the Folder section, select the folder name the user wants to place the template. For more information, refer to the Folders in Email Templates section.
- Click Create.
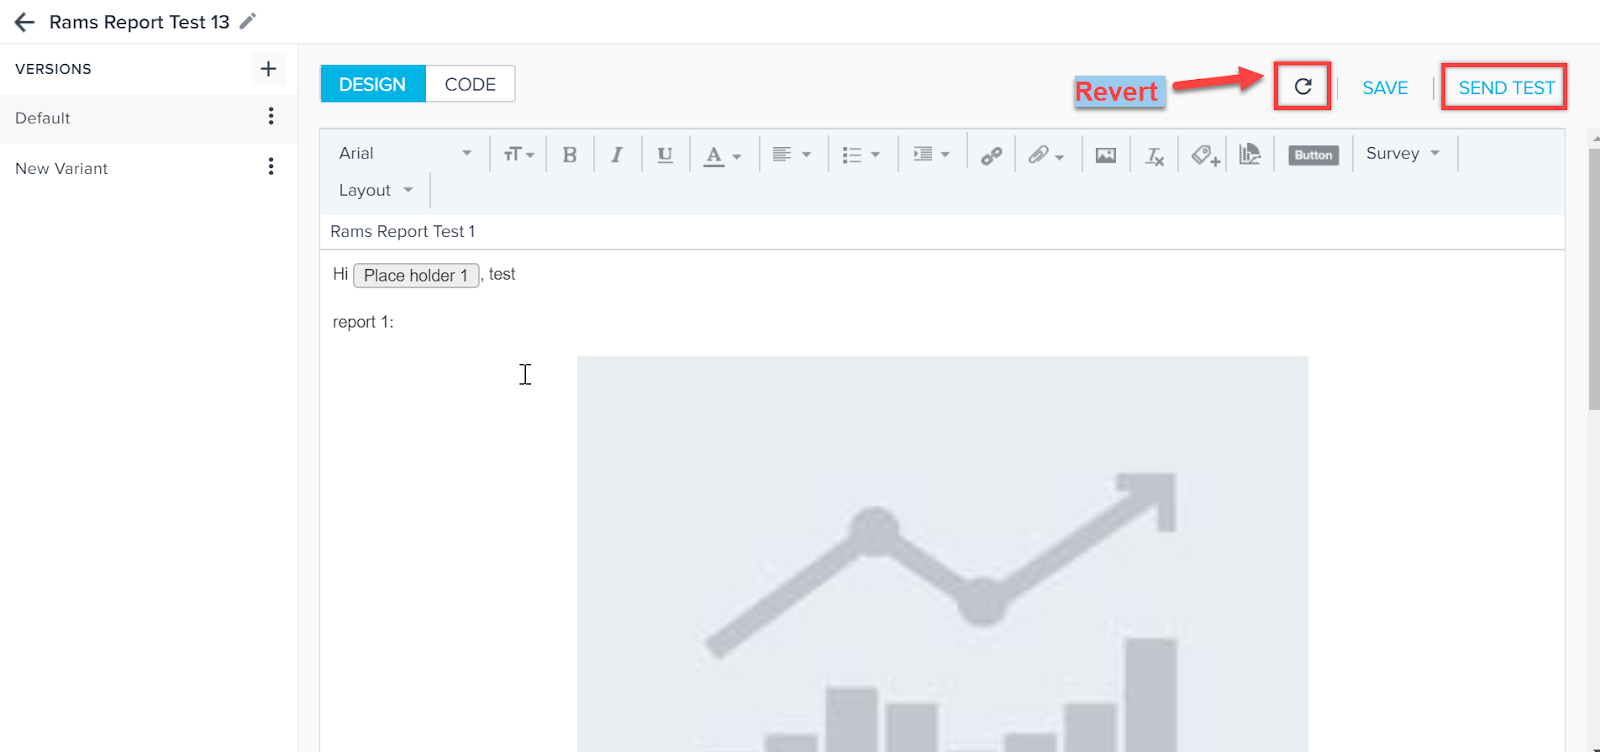
Admins have an option to preview the email by using the SEND TEST option. This feature allows the user to test the email for formatting related issues and to confirm the overall accuracy of the email.
Admins can also use the Revert option to revert back to the previously saved version.
Email Template Design Tools: Admins can apply a variety of options available in the design tools to the email template. For more information, refer to Email Template Design Tools.
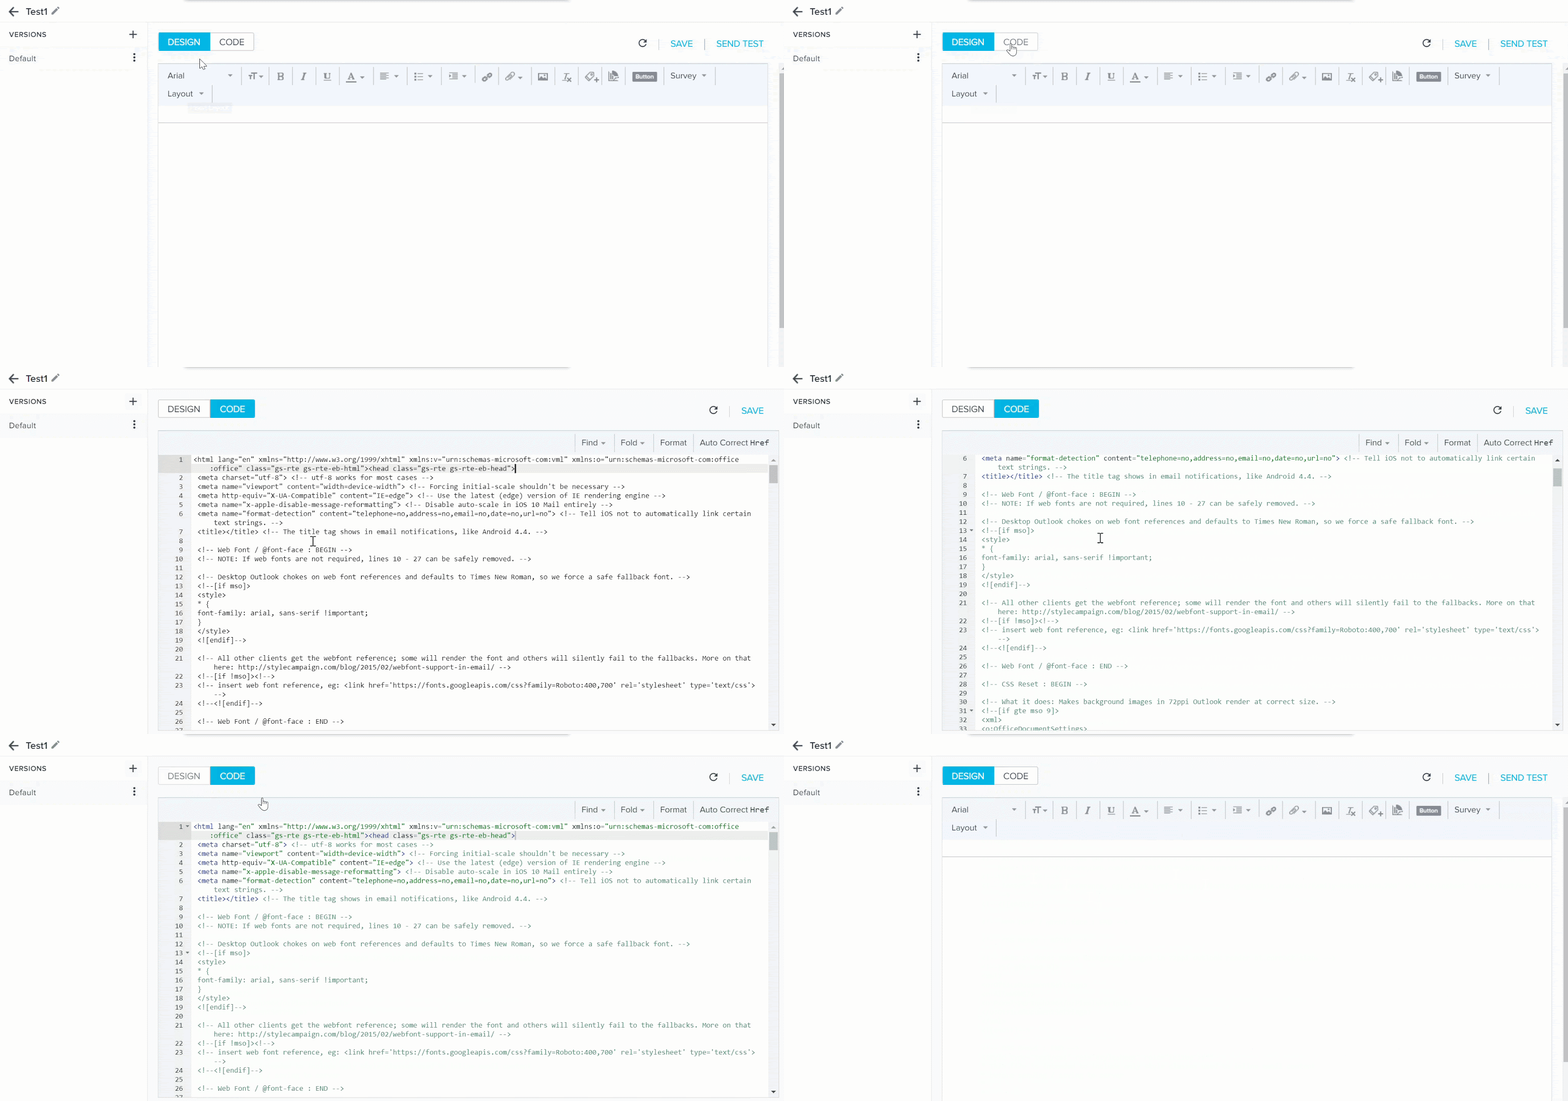
- Design and Code tabs: Introduction of DESIGN and CODE tabs on the template editor page allows the user to edit the email either in design mode or HTML code. For more information, refer to the HTML Editor section.
-
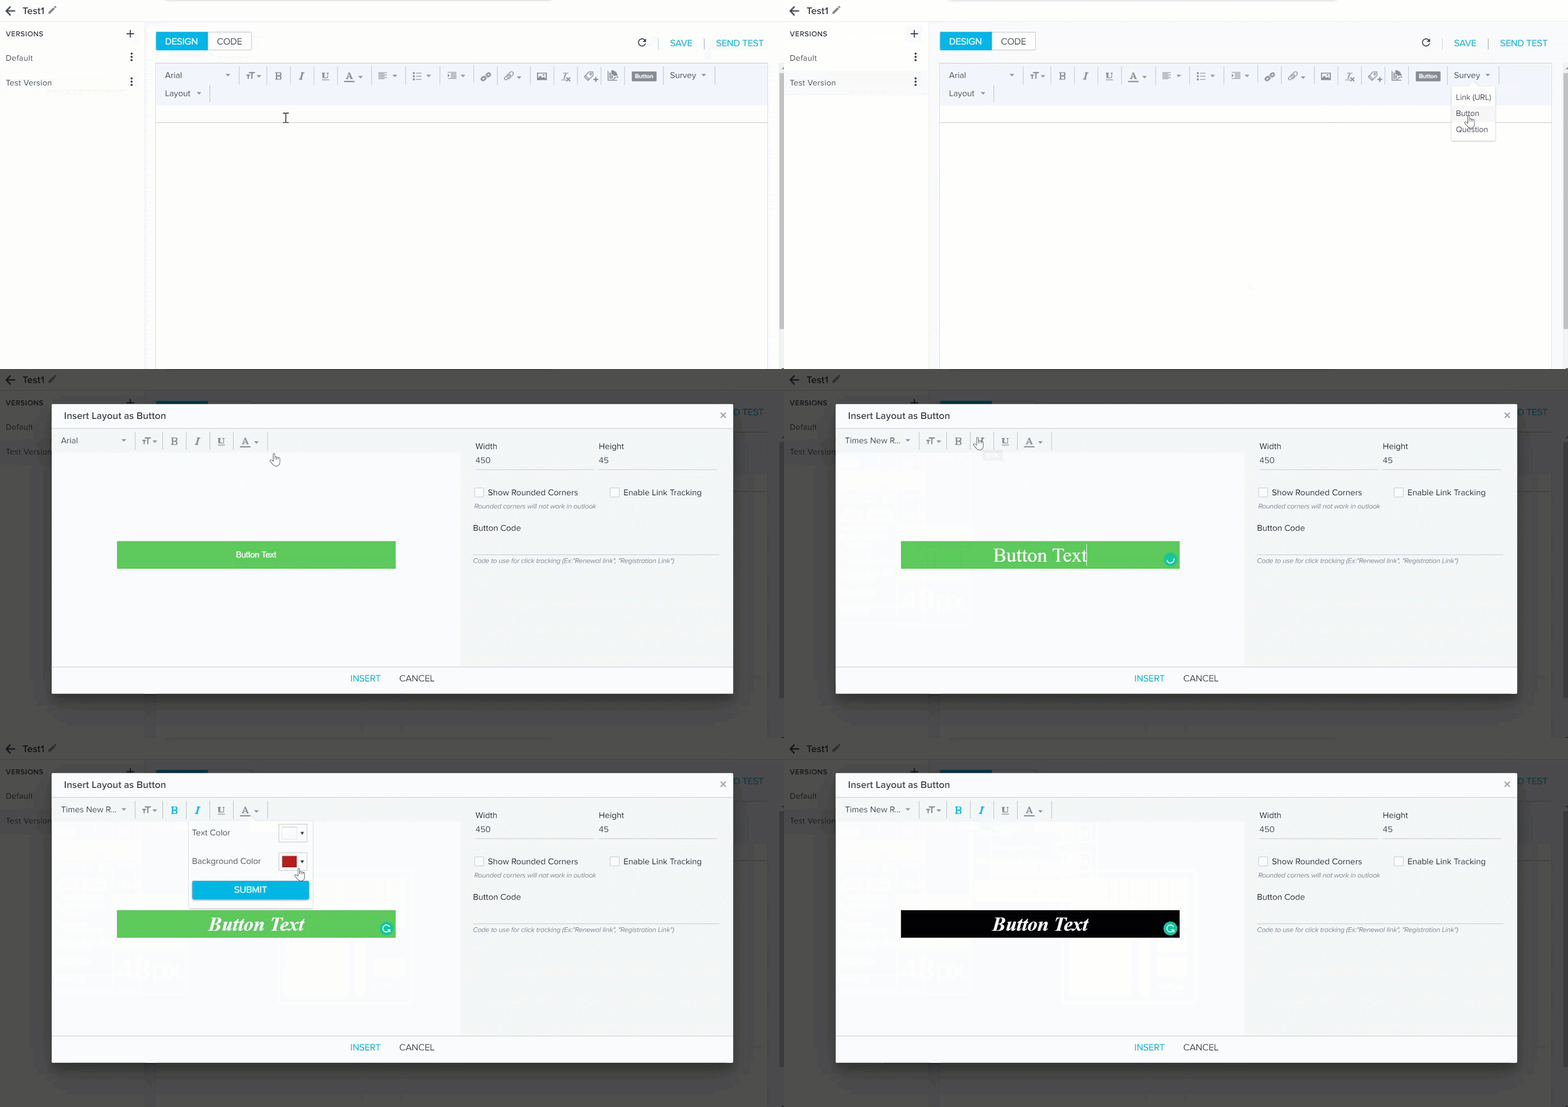
Formatting Button Text: Button Text can be formatted based on new formatting options while inserting Buttons, Survey Buttons, or Layout Buttons.
-
New Configure Report Layout: The layout for inserting/configuring a report into the template when it is used in Programs is enhanced for better viewing of all the details related to the report.
To configure a Report in the template:
- Create or Edit a Program.
- On the Send Email action type, click the Edit icon.
- In the Template field, select a template with report. The template layout is loaded.
- Click Configure. The Report Configuration screen appears.
- In the Import a Report dropdown menu, select a report.
- Click SAVE.
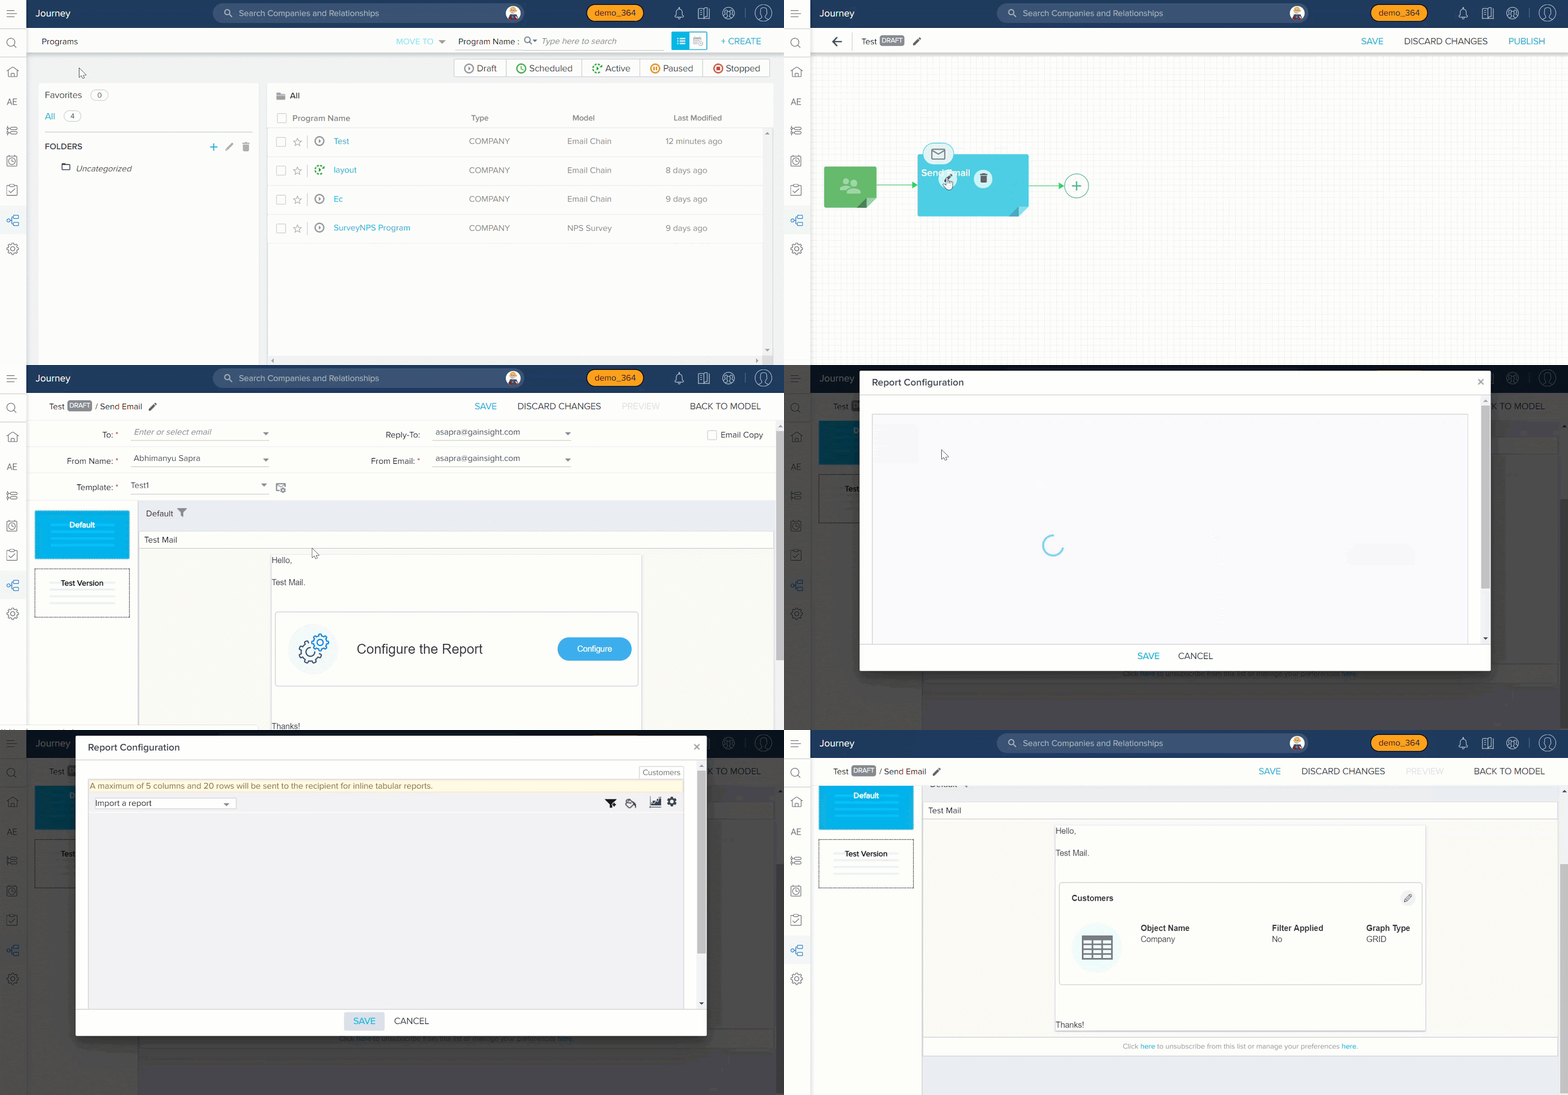
After the report is configured in the Program, the details regarding the report such as Object Name, Columns, Show me (Y-Axis), Show me (X-Axis), Filters added after importing the report (at JO level), and Graph Type are displayed in the email.
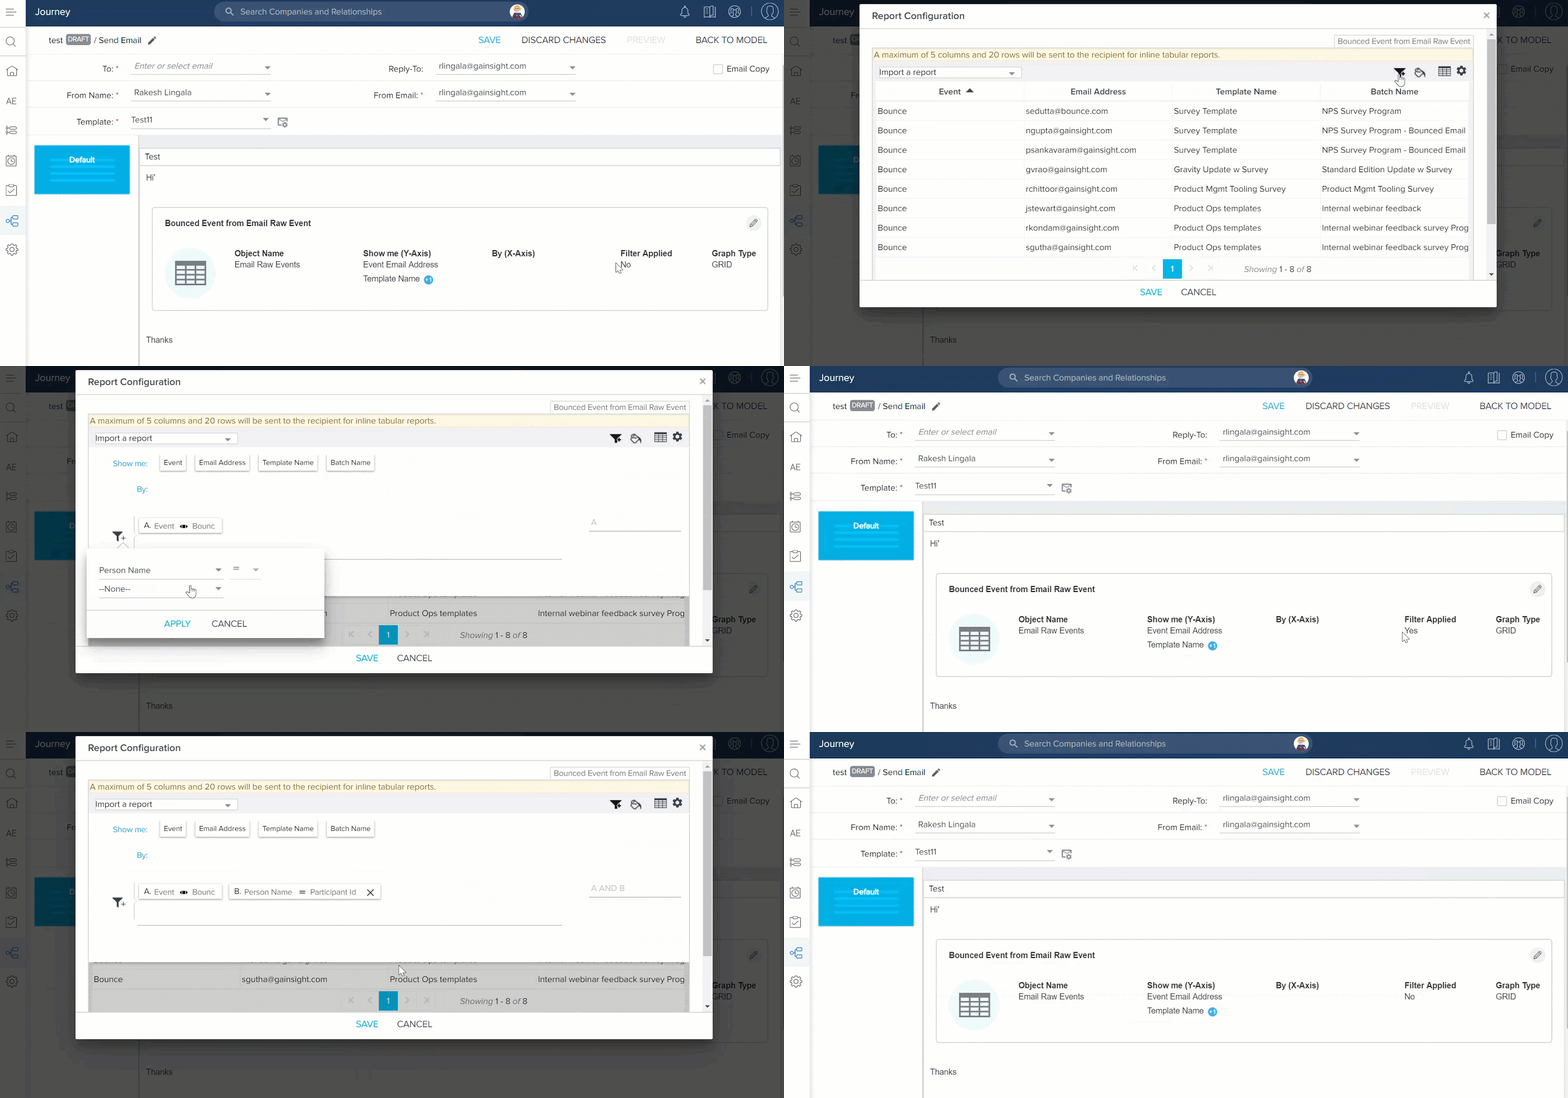
Notes:
- When Fixed layout type templates are used in Programs, the information related to Show me (Y-Axis) and Show me (X-Axis) in Reports are not displayed.
- When Fluid layout type templates are used in Programs, the information related to Show me (Y-Axis) and Show me (X-Axis) in Reports are displayed.
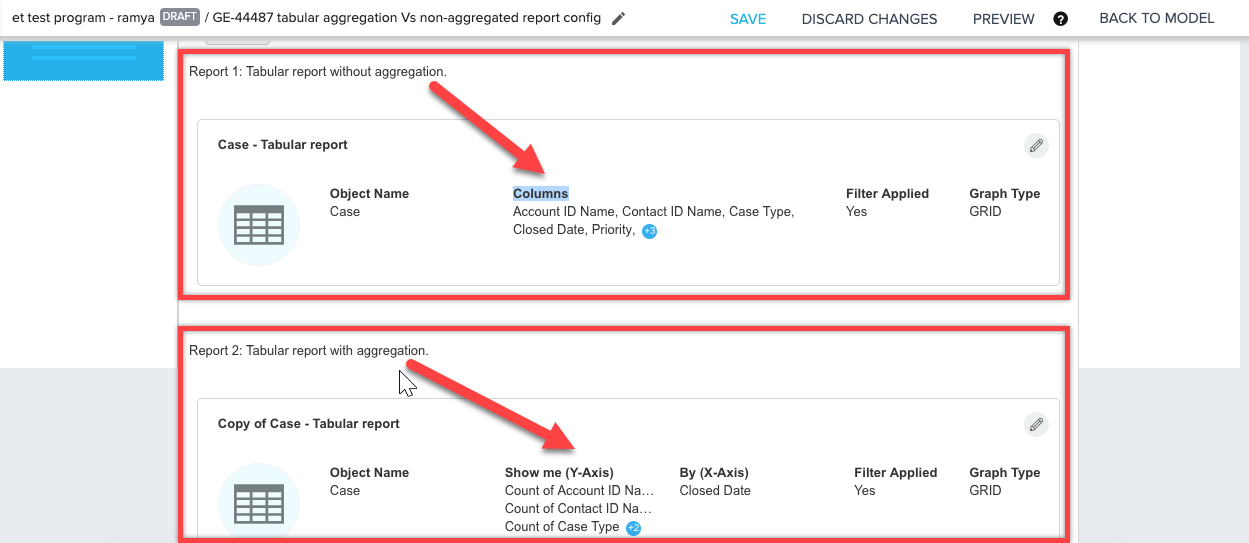
- For Tabular reports without aggregation is used in Programs, the ‘Columns’ related to the report are displayed in the report configuration.
- For Tabular reports with aggregation is used in Programs, the information related to Show me (Y-Axis) and Show me (X-Axis) of the report are displayed in the report configuration.
-
Versions: “VARIANT’s” are now renamed “VERSIONS” in the updated email template. Version is used to create modified versions of the email template.
Create Email Template Versions
Versions are separate forms of the same email, contained within a single email template. Each program is meant to be sent to a different segment of customers. You will not assign segments to each version when creating your email template. Instead, you will complete this step as part of program configuration.
First, you must create a multi-version template before you can configure a multi-version program.
The existing Default version cannot be deleted.
To add versions to an email template:
- Click + adjacent to VERSIONS. The New Version page appears.
Note: You can create a maximum of 15 versions. - In the Version Name field, enter the name of the version.
- Select an opt-out language in the Choose an Opt-Out Language dropdown menu.
- Select either Fluid or Fixed option in the Choose a Layout section.
- Click CREATE.
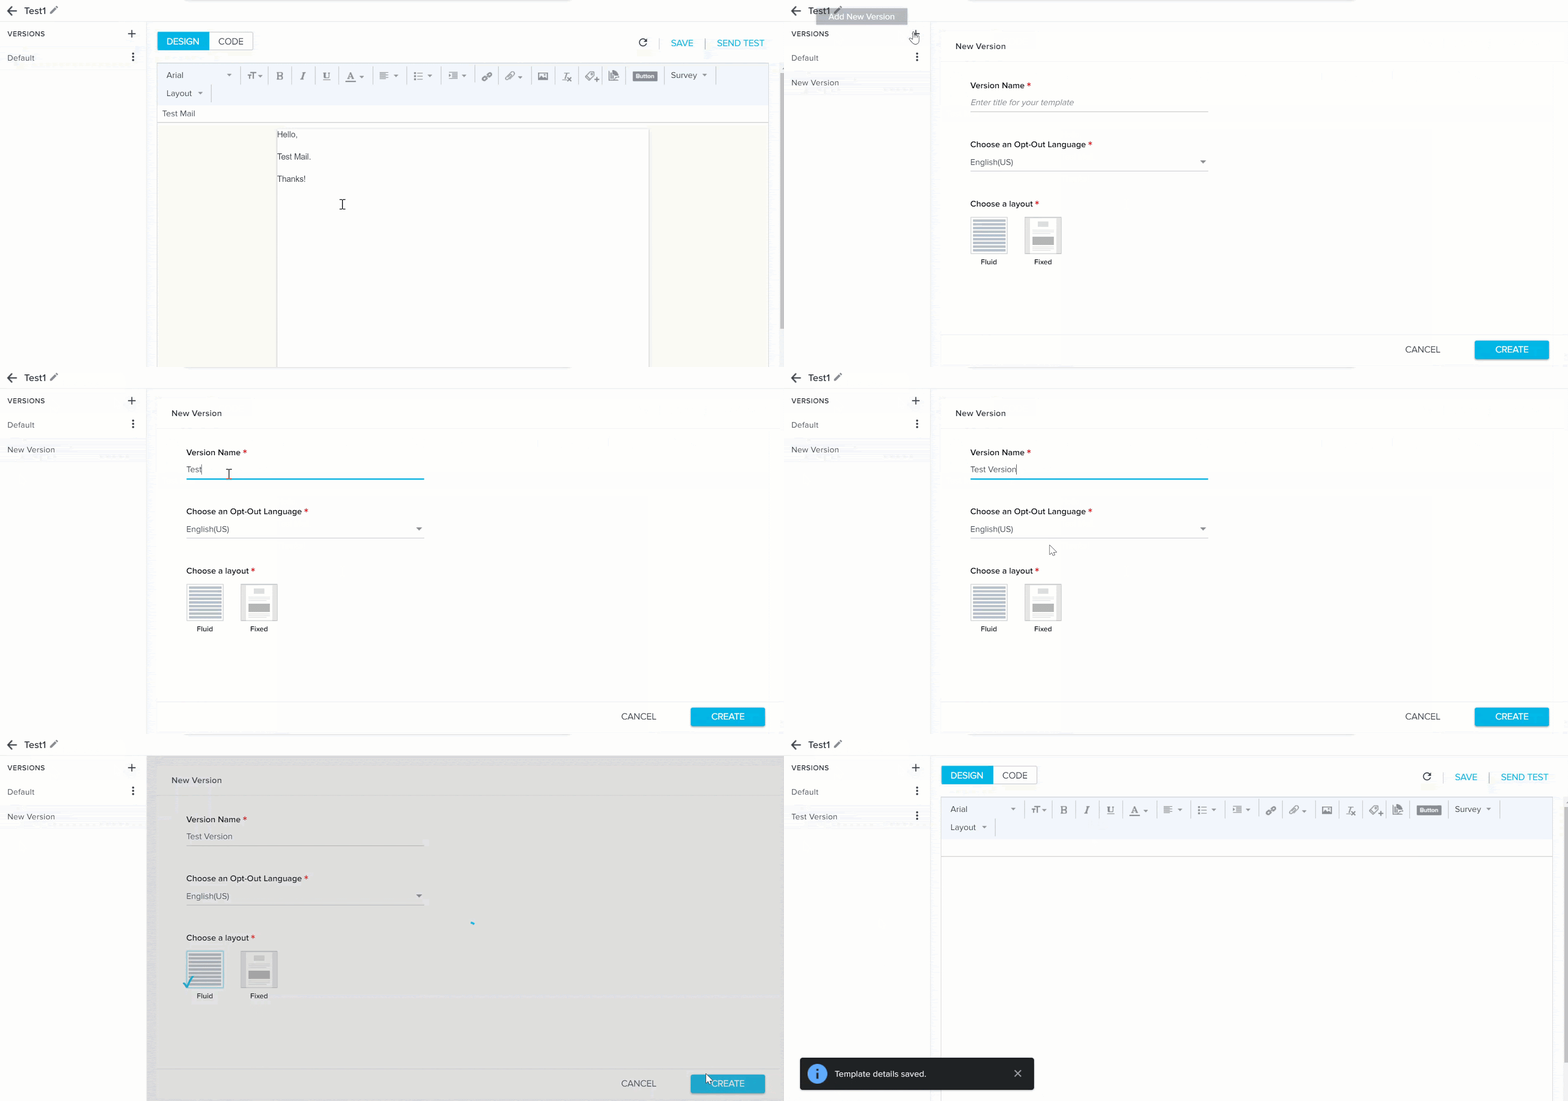
Note: Admins can also Edit, Clone, and Delete versions by clicking the three dots adjacent to the Version.
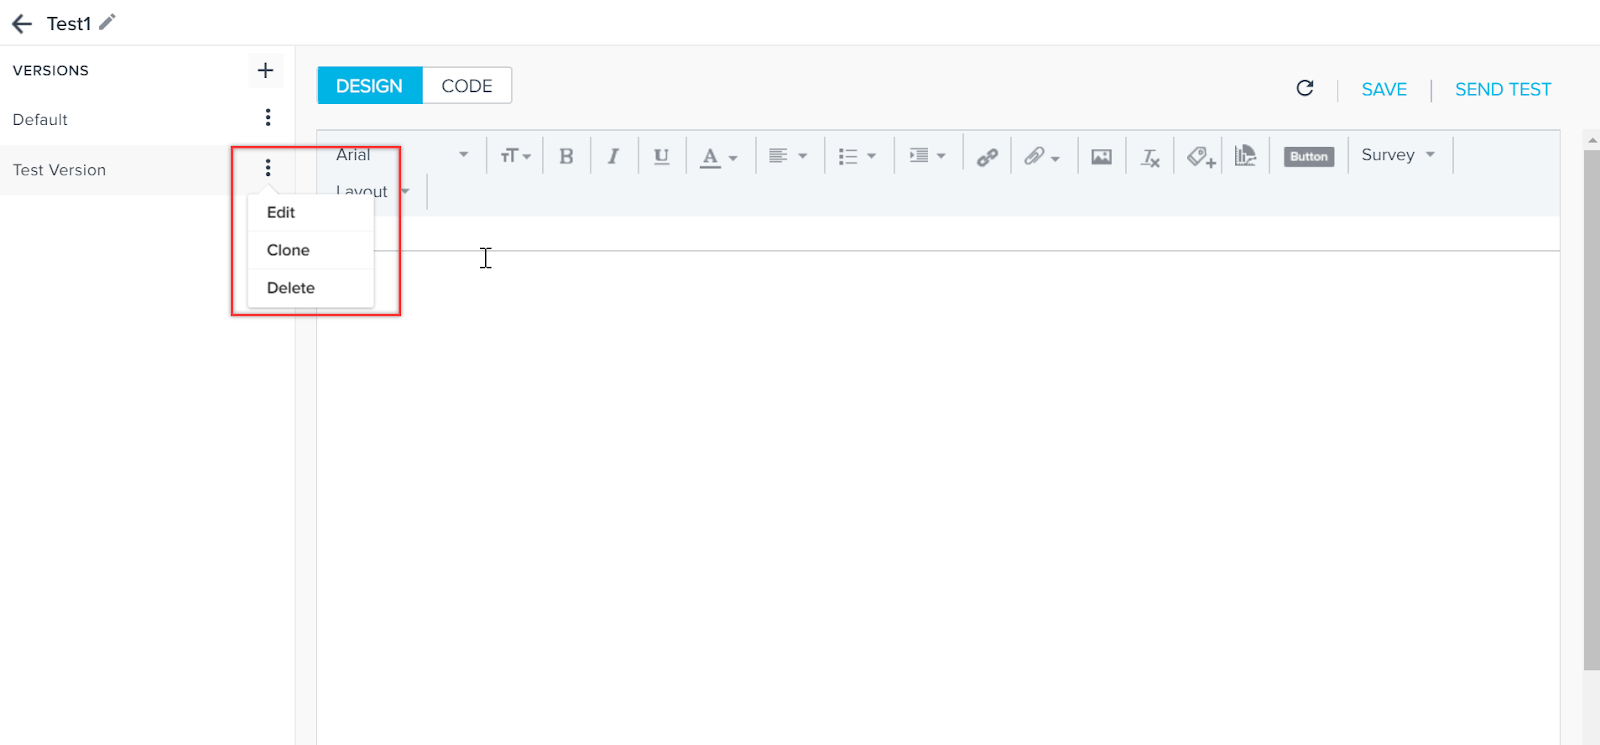
Limitations/Known Issues:
- Ensure that the button inserted has enough space to accommodate full button text. Outlook email client will truncate the text.
- Modification of Layout type is not possible when cloning an email template. For example, if a user clones a template with Fluid type layout, it cannot be changed to Fixed type.
- Indents in mobile clients and Pixel Gmail clients do not display correctly in the existing email templates; users have to manually remove the ‘Blockquote’ tag style. This issue does not occur for newly created email templates.
- Arial black font is not supported in iPhone mobile clients.
- When the user copies HTML with Buttons from one email template to another email template, or from one version to another version, then that button is not detected as a button. It is treated as a Link. Users must remove this button and add a new button accordingly.
- When the user copies a button which contains tokens from one email template to another, or from one version to another, then the button tokenization is not reflected on the button in the copied email. Users must remove the copied token and add a new token.
- Following are the list of expected behaviors when the user copies the code from one version to another, or from one email template to another template:
- For Tokens and Survey Questions Placeholders: It is displayed as ‘${}’.
- For Standard Buttons: It displays the properties like color, font, Bold. But when the user clicks on Edit, it shows the old UI as this is not detected as a button. User must delete this and can add a new button.
- For Survey Buttons: It is displayed as ‘${}’.
- For Survey Links: It does not display the text as well as the default selected survey.
- For Reports: Reports are not copied, only the cursor is displayed.
- For Inline Image Upload or Web Address: It only shows the name of the image uploaded
- For Attachments: Attachments are not copied.
- Ability to use External API connections as an Action step in a Program: Gainsight now supports a new action type called ‘Call API’ in Programs, to integrate with the external callout framework and to list all the connections used by the user. This action type is supported for all model types in Journey Orchestrator. Admins can now select an external connector and its respective actions and also select the participant fields and tokens to be populated for the dynamic token fields from external callout.
The primary use case is to call external API and update the parameters based on the events occurring in Gainsight CS. Some of the examples are:
- Creating/Updating case in external ticketing system when CTA is closed lost.
- Posting CSAT survey response to the external ticketing system.
- Updating an external data system based on the events happening in Gainsight CS with Customer/Relationship/Person data.
- Sending alerts to an external system when Customer Health Score drops by X%.
- In-App Notification API in external system can be sent when email is not responded to.
Note: By default, this feature is not enabled. To enable this feature, contact support@gainsight.com.
Admins can add the Call API step by clicking + after a Wait Timer or Conditional Wait step.
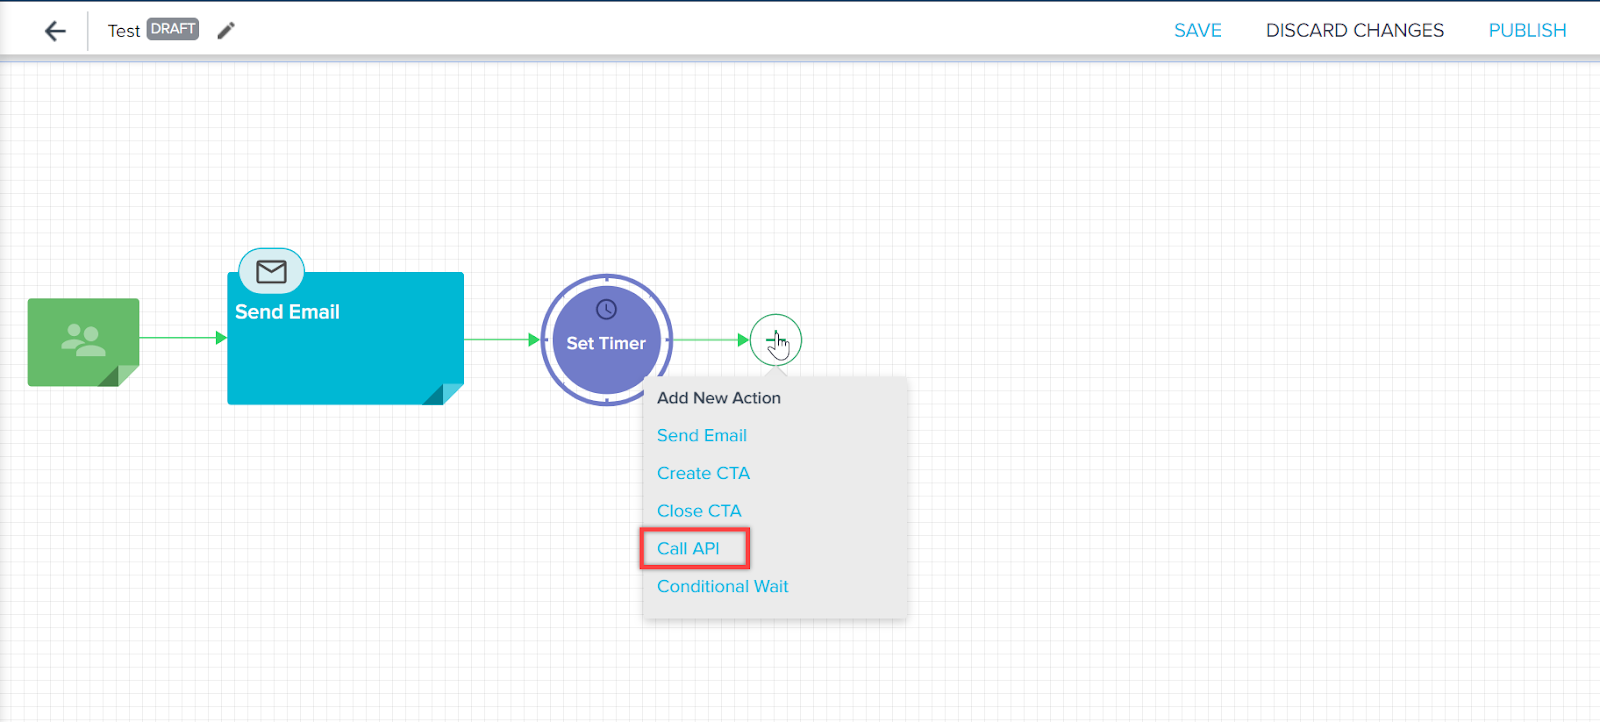
Create Call API Step
Create a Call API step to call external API and update parameters based on the events happening in Gainsight CS.
To configure the Call API step:
- Click + to add a new action and select Call API.
- Hover on the Call API step and click the edit icon. The Configure External API To Call page appears.
- From the Connector and External API dropdown options, select the appropriate connector and external API type which are configured in the External Actions page.
- Enter the values for the fields opted for that external connector.
Note: Admins can even enter the custom values if the data is not defined. - Click SAVE.
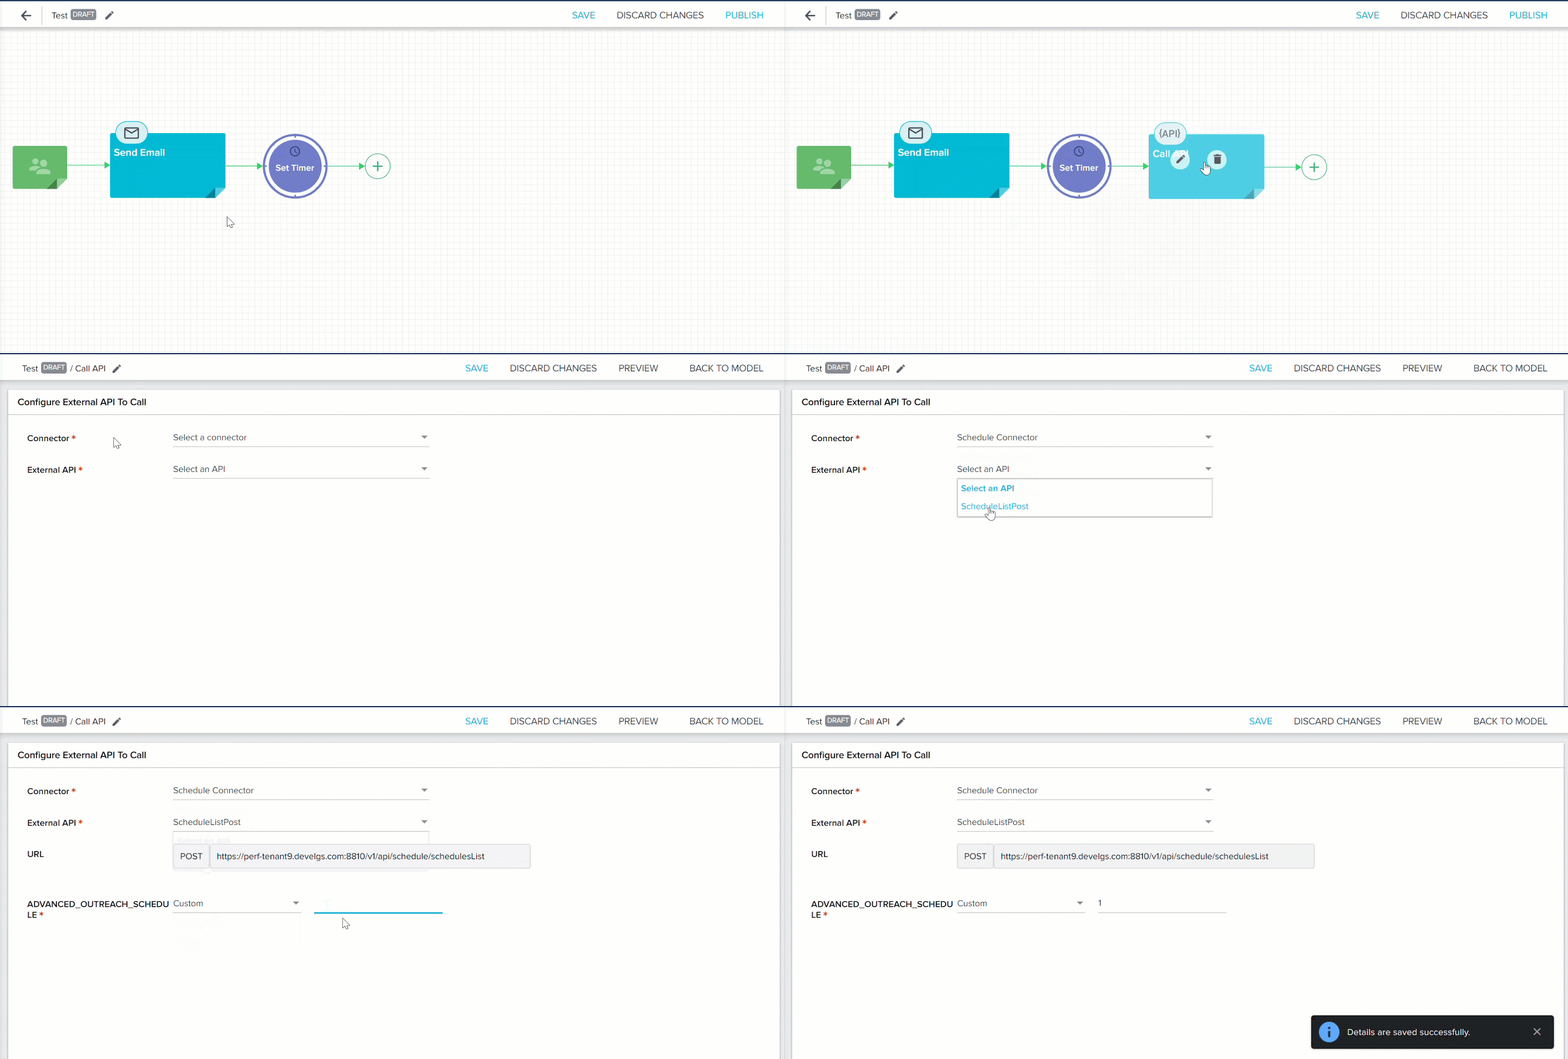
Note: Click PREVIEW to test the API call and also view the response as part of the Test API.
The Call API step can be modified post publishing the journey. This will be immediately applicable to all the participants who are yet to be part of this step.
When an error happens, the admin can choose whether to drop the participant or continue the participant’s journey.
During the execution, the external API callout details are stored in the database for analytics.
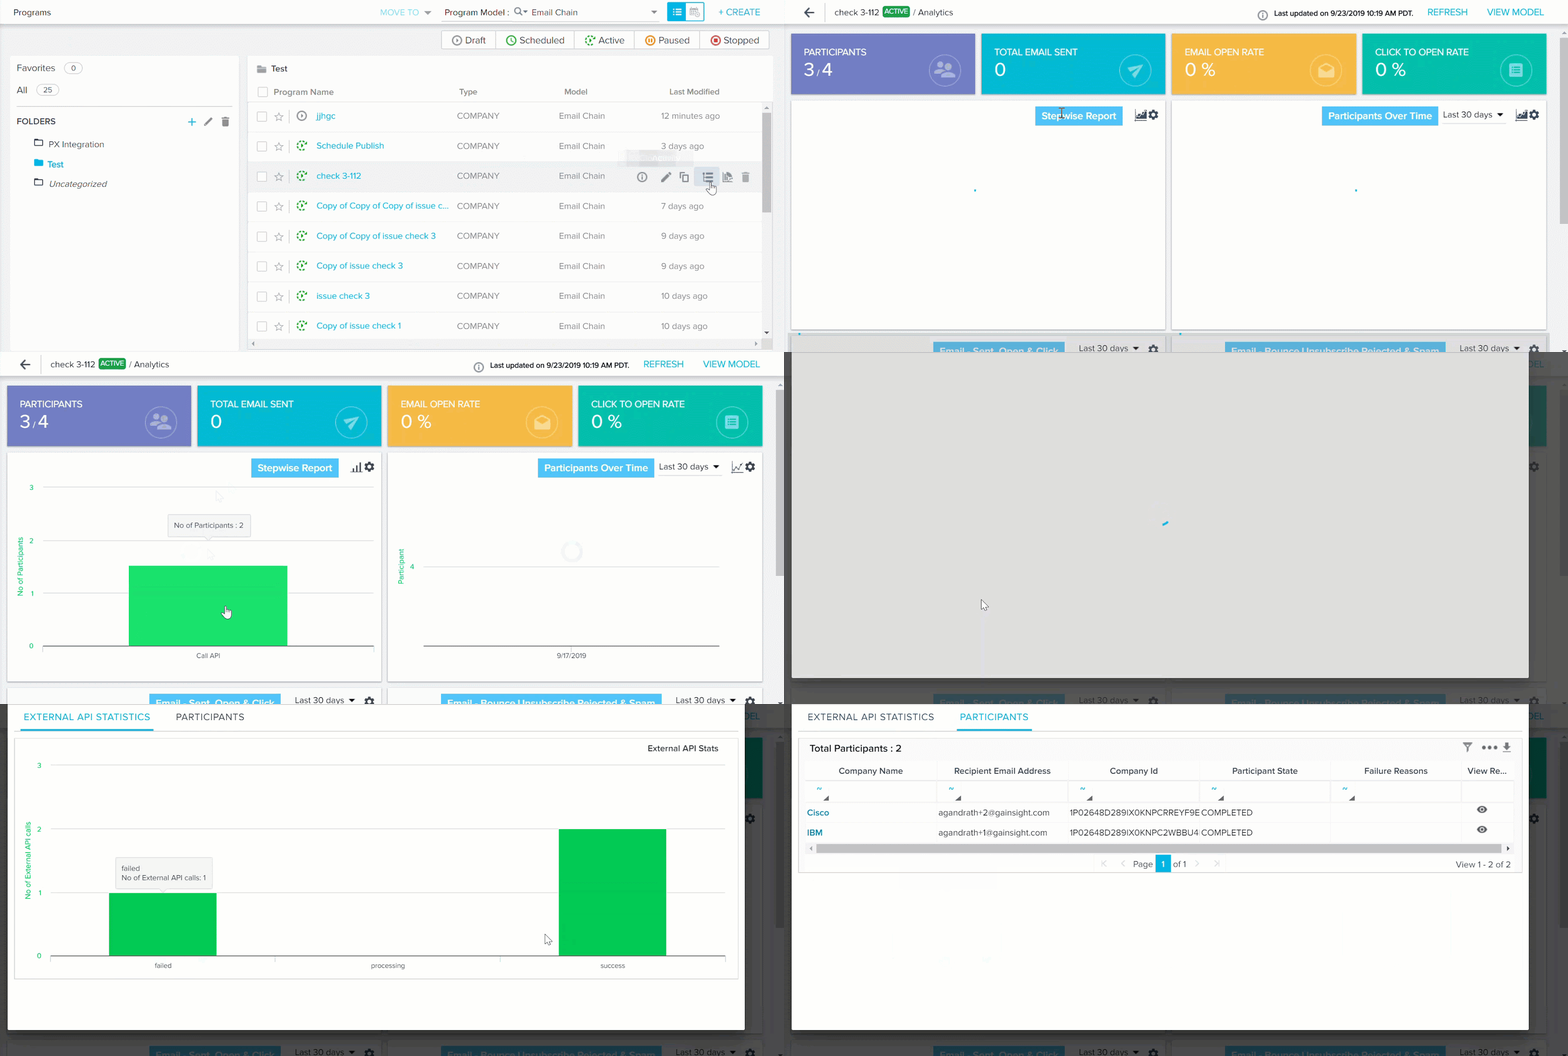
Limitations
-
When Call API action type is used in programs, it will take more time than usual to get the list of participants if the participants are more in number.
C360
The Customer 360 (C360) is a central hub of your customer’s business information in Gainsight. It synthesizes business data from various sources and provides you with a holistic view of your customers. This minimizes the preparation time for your customer meetings.
- Assign C360 Layouts based on criteria from the Company and User object: Previously, it was only possible for admins to assign C360 Layouts based on one attribute (each from Company and/or User) as assignment criteria. Now, admins can combine attributes using any field from the Company or User object, and apply these attributes with advanced logic. Any company or user that fits the selected criteria will be assigned the layout automatically.
To assign C360 Layouts, take the following steps:- Navigate to Administration > Company > C360 Layouts.
- Click the action button for the layout you want to assign.
- Select the Assign action. This opens the Assign Layouts window.
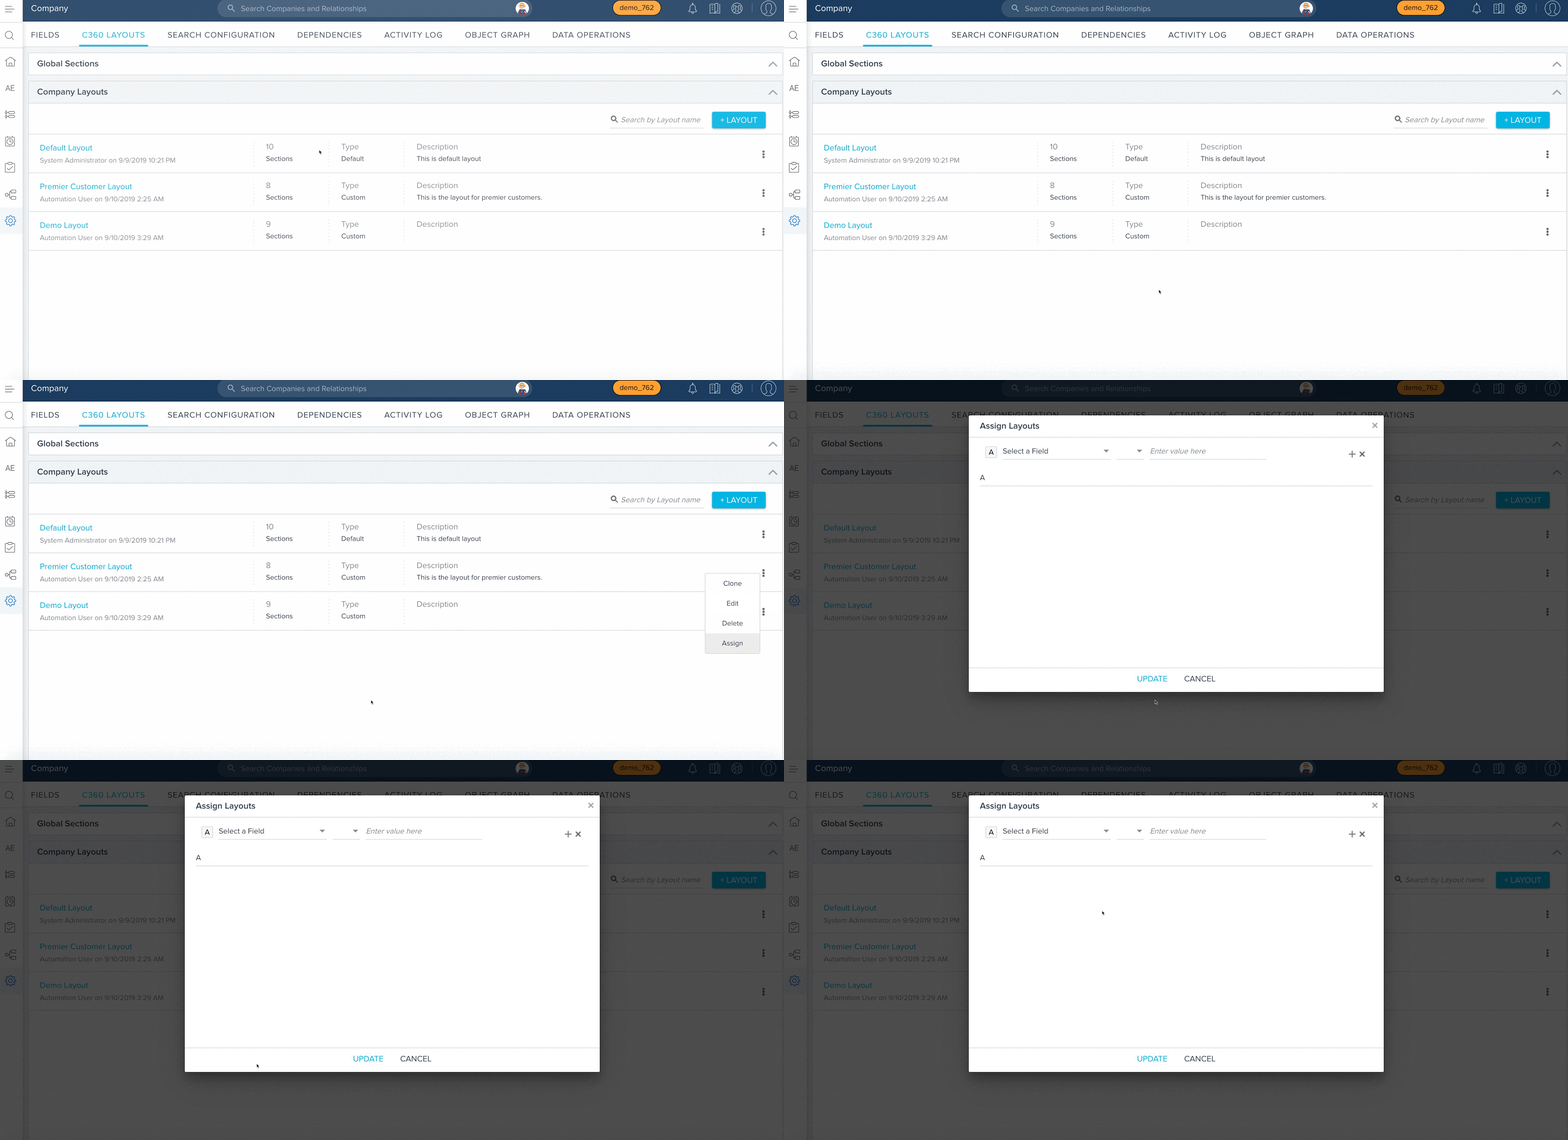
- Add attributes using any field from the Company or User object.
- Apply Advanced Logic.
- Click UPDATE.
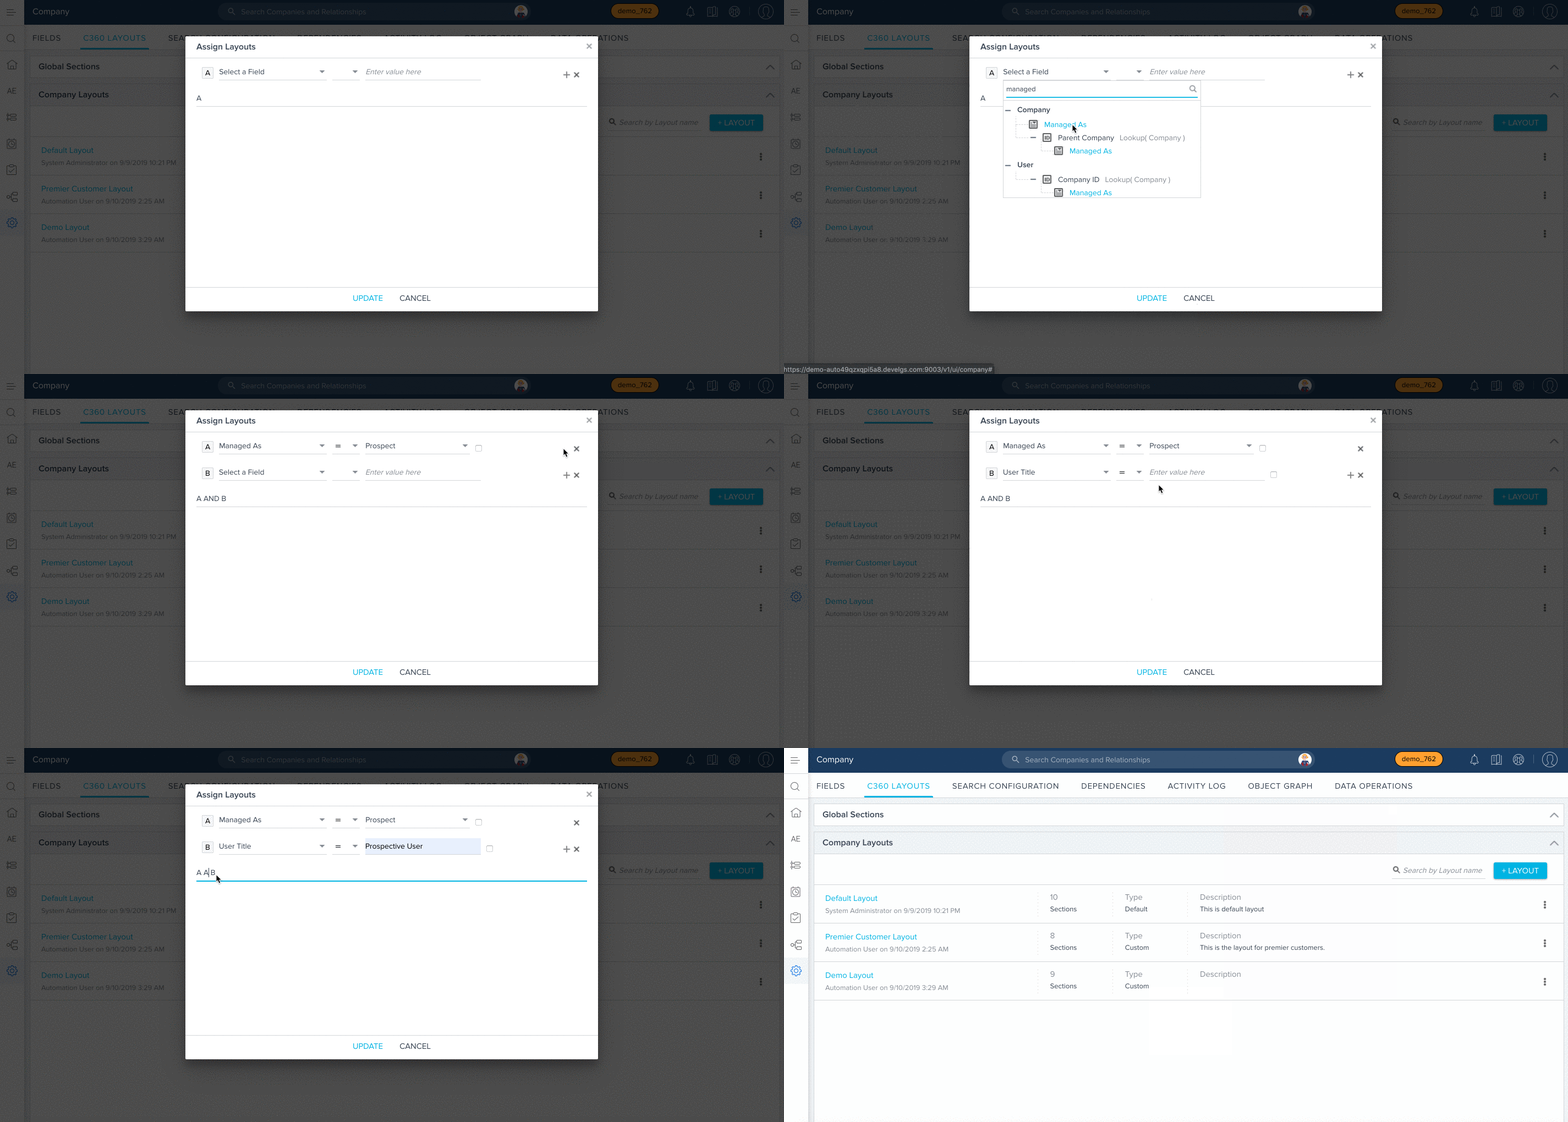
In cases of assigned layout overlap, the order of the layouts on the C360 Layouts page will determine which layout gets assigned, with the top layout being assigned first. For more information on C360 Layouts, refer to Create and Assign Multiple C360 Layouts.
Note: This feature does not apply to the default layout as that does not get assigned.
-
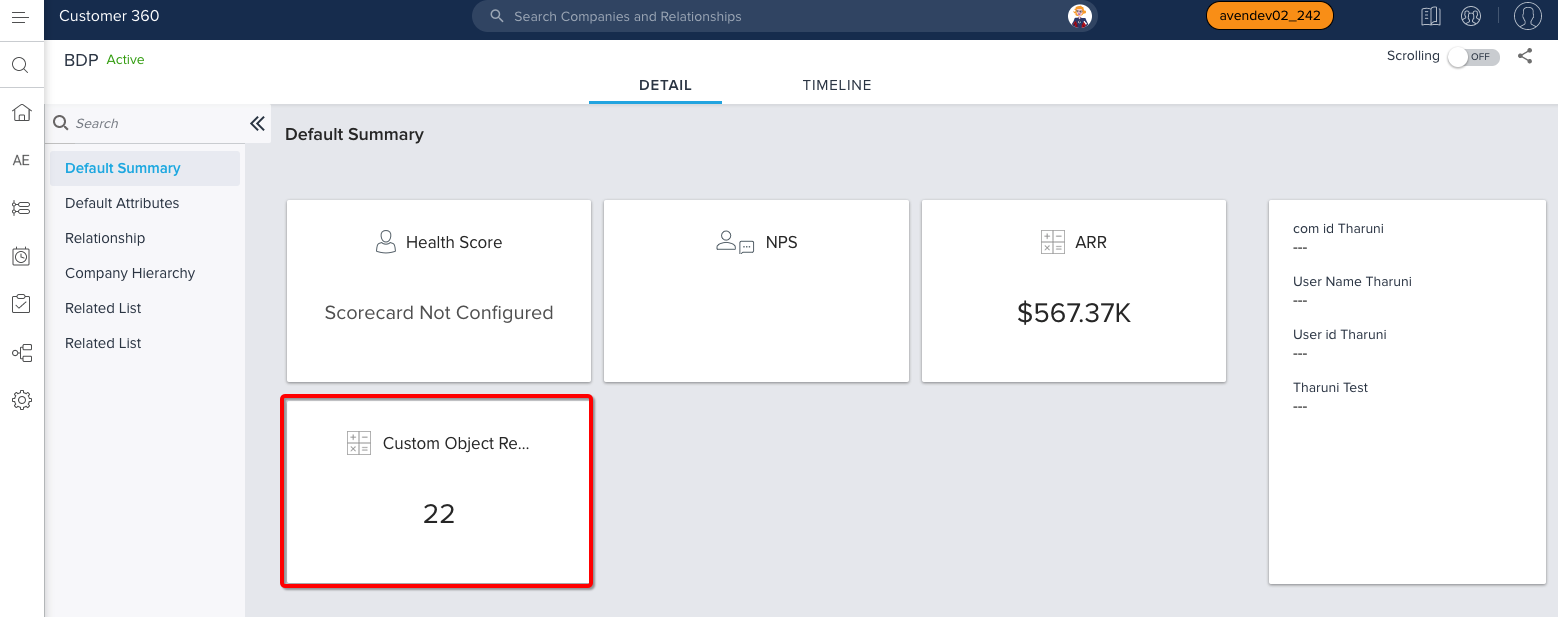
 Add widgets containing reports based on custom objects: Previously, admins could add custom widgets containing reports based off of standard and system objects to the 360 summary section, but could not add widgets containing reports based off of custom objects. This prevented them from quickly seeing customer data stored in custom objects on the 360 page. Now, widgets containing reports built off of custom objects can be added to the 360 summary section, making the data stored in these objects easier to reference. For more information on creating and adding custom widgets, refer to Configure 360 Summary.
-
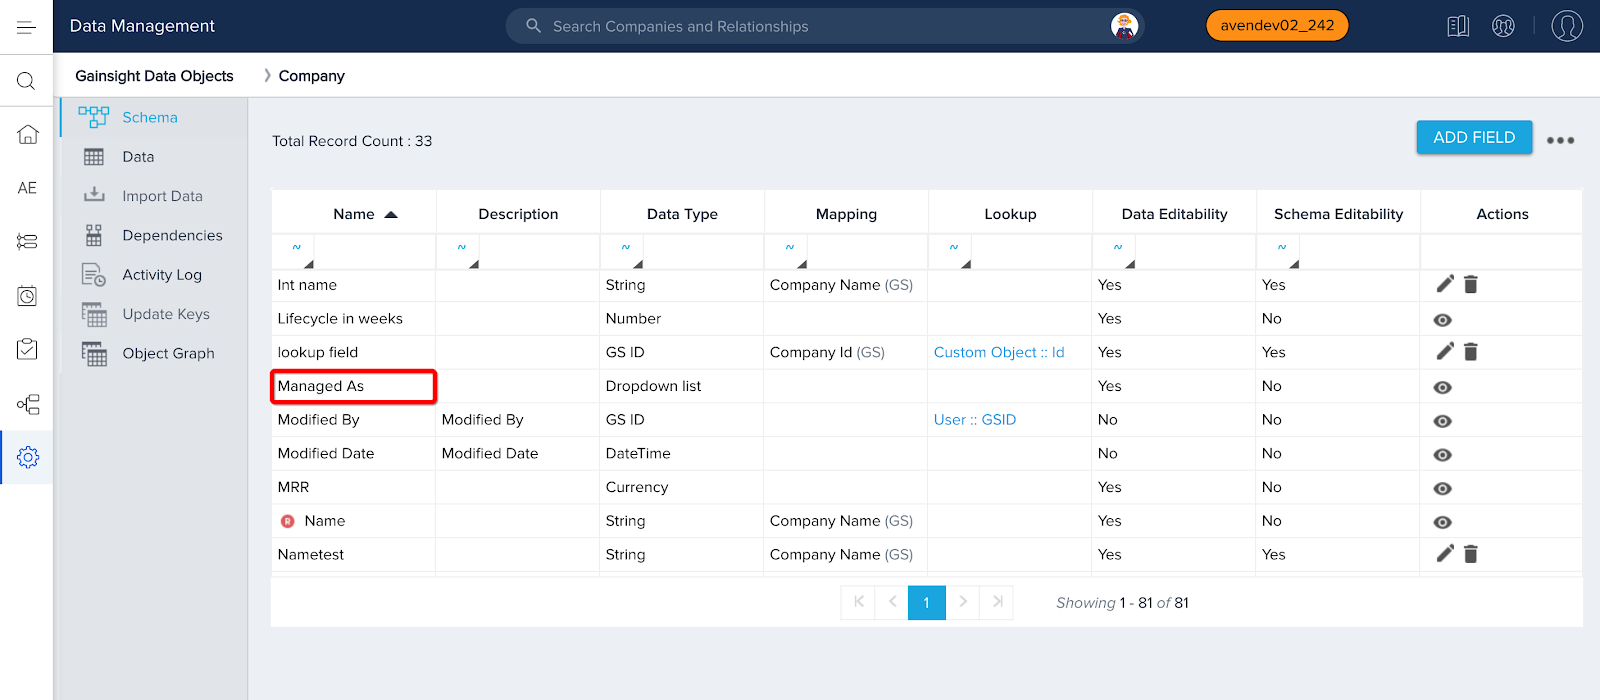
New “Managed As” Field added to Company object: Previously, there was not a systematic way to determine which records in the Company object were customers, and which were not. This system picklist field contains four values: Ex-Customer, Customer, Partner, and Prospect. It is not possible to add or delete any value in this field. By default, this will be set to Customer.
Gainsight Data Management
Gainsight Data Management offers you the flexibility and full control over your object structure, schema and data within Gainsight. Create and edit all aspects of your data design through an administrative interface to continually develop your Gainsight schema with your evolving business.
- Introduction of Audit Logs in Data Operations page: Audit Logs in the Data Operations page capture all of the activities performed on Low volume custom objects. You can select a date range for which you wish to view the logs. Logs are stored for a maximum period of 120 days and then they are cleared. The activities performed on Low volume custom objects from the Data Operations page or C360 page are captured in the Audit logs. A new tab called LOGS is introduced to store all the audit logs. You can find the list of objects in the DATA tab of the Data Operations page.
The Audit Logs has four main sections:
- Modified Time: The date and time when the modification was made.
- Object Name: The low volume object that was modified.
- Modified By: The name of the user who modified the object.
- GSID: The GSID of the user who modified the object.
To use this enhancement:
- Navigate to Administration > Operations > Data Operations.
- Click the LOGS tab.
- Select a Date range for which you wish to view the logs.
- Click FETCH LOGS.
- Expand a log to view the old and new value.
When you expand a record, you can view the following fields:
- Field: The name of the field whose value was modified.
- Old Value: The old value which existed in the modified field.
- New Value: The current value present in the modified field.
 Delete Records functionality is improved in the Data Operation page: Following are the enhancements offered by Gainsight to the Delete Records functionality in the Data Operation page:
- You can now delete as many records as you want, from any object from the Data Operation page. Earlier, you were limited to deleting 5000 records in a single execution, but this limitation is now removed.
- It also consumes less time to delete records compared to earlier.
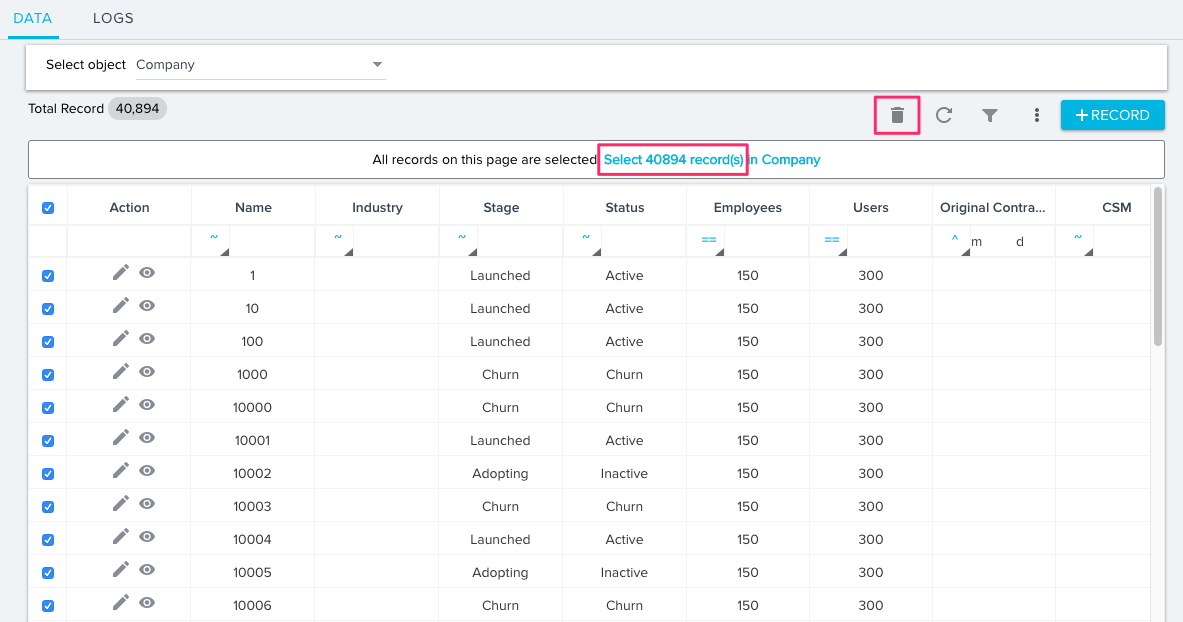
- When you apply filters on the records, the filtered record count is now displayed next to the total record count as shown in the image below.
- You can now filter records from any object and delete only the filtered records. For the detailed information on how to filter and delete the records, refer Data Operation.

-
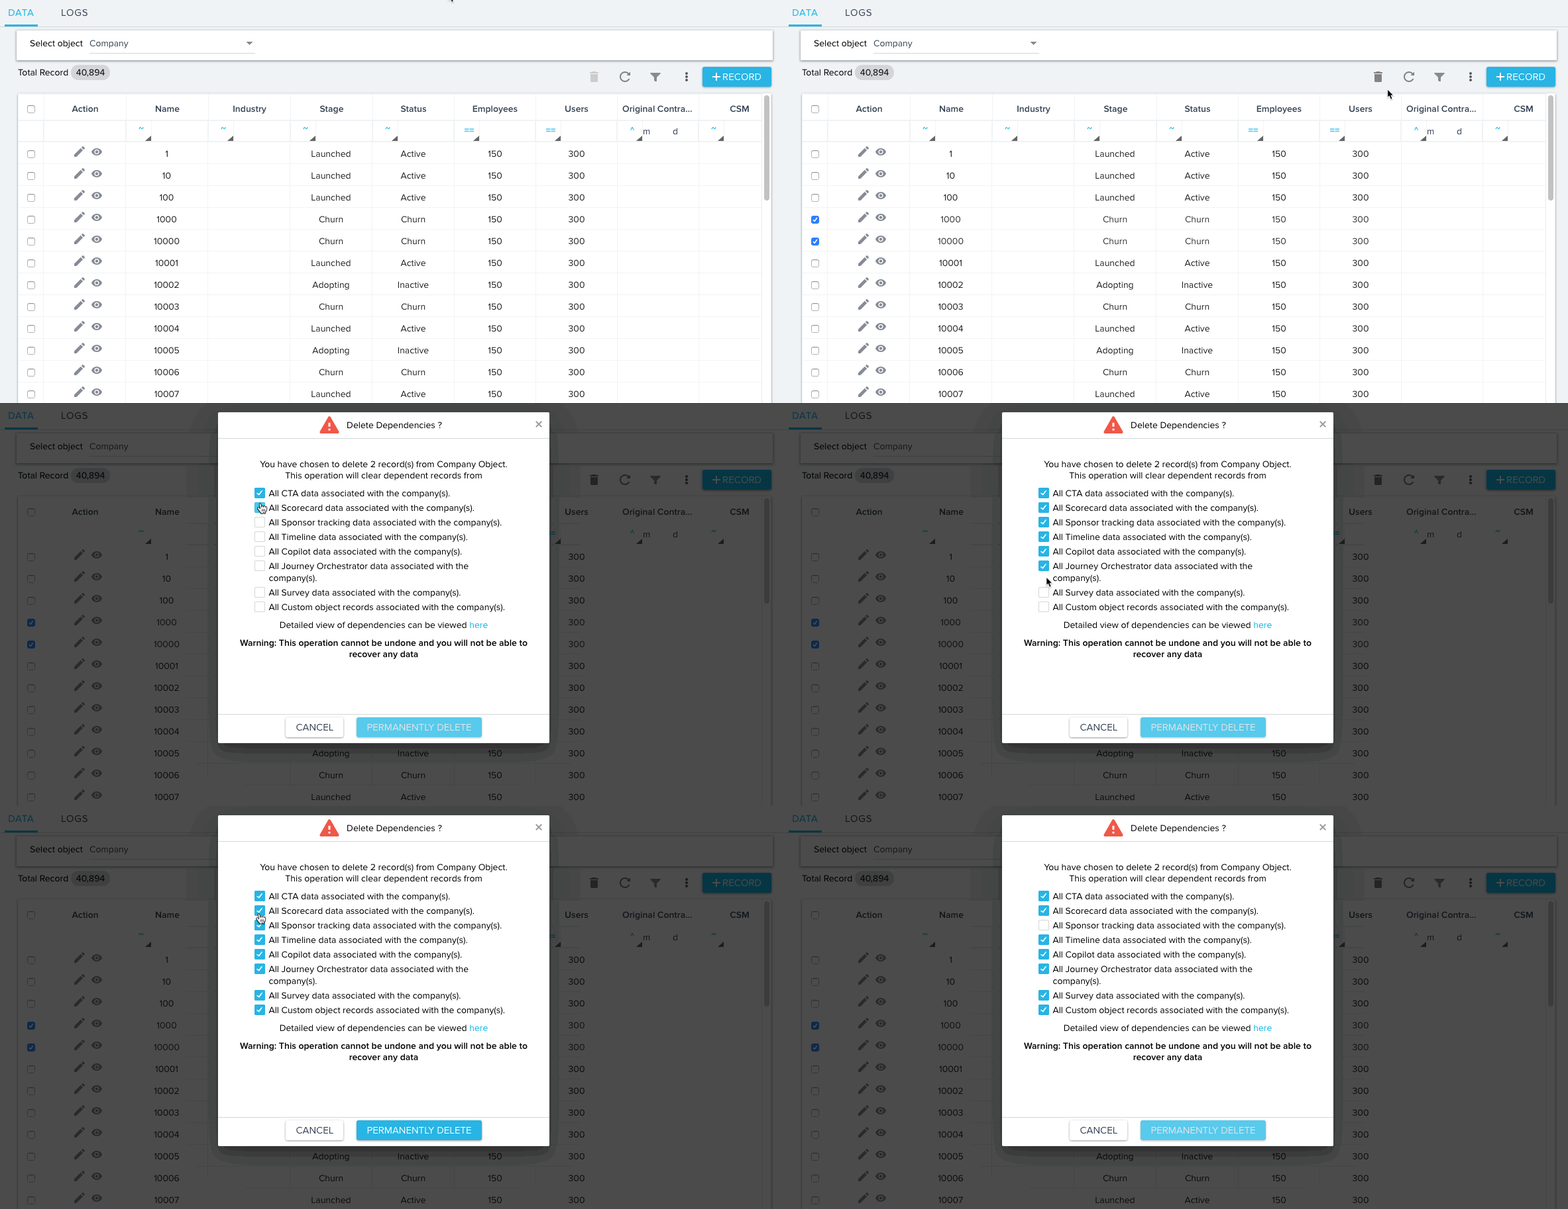
While deleting records from the Data Operation page, in the Delete Dependencies confirmation message, you should now select all of the dependent features of the delete records to proceed with deleting records permanently. This ensures the admin is aware of all the dependent features impacted by deleting records from the Data Operation page. When the records are deleted from the Data Operation page, records from the dependent features are also deleted. This operation cannot be undone and you cannot recover the deleted data.
To delete records from the Data Operation page:
- Navigate to Administration > Data Operation.
- Select the records that you want to delete. You may select some or all of the records manually, or select records by applying filters.
- Click the Delete icon at the header of the Data Operation page. Delete Dependencies? Confirmation dialog appears.
- Select all of the dependent features to proceed with deleting records.
Note: If you do not select any of the dependent features, the system does not allow you to delete records. - Click PERMANENTLY DELETE. The selected records are now deleted.
For more information on the Data Operation page, refer to the Data Operation article.
Rules Engine
Rules Engine is designed to improve your underlying customer data to produce superior customer outcomes. It can perform powerful multi-step, in-memory data transformations for large datasets in Gainsight within one rule. Transformations include aggregations, multi-dataset merges, formulas and time-series calculations; helping your team to better identify meaningful data signals.
-
Add Custom Derived Lookups in Load To Company Action Rule: Previously, admins could only configure derived mappings to the Company::CSM and Company::Parent Company lookup fields while configuring the Load to Company action. For Load to Company rules, it was not possible to add a mapping with a lookup field that could fetch GSIDs. With this enhancement, admins can map additional derived lookup fields to custom objects to achieve this.
For example, say you have a dataset using which you want to load to the company object and you need a lookup from the Company to Product object to fetch Product ID. Before creating your Load to Company rule, you will need to create a custom GSID field on the Company object called Product ID. For more information on this process, refer to Gainsight Data Management.
When configuring the Load to Company action of your rule, add a custom derived lookup to fetch Product ID from the Product object. By configuring this mapping, account records loaded to the Company object by this rule will have the lookup to the custom Product object.
Custom derived lookup fields can be added on the Setup Action step of a Load to Company rule. For more information on configuring rule actions, refer to Setup Rule Action Types.

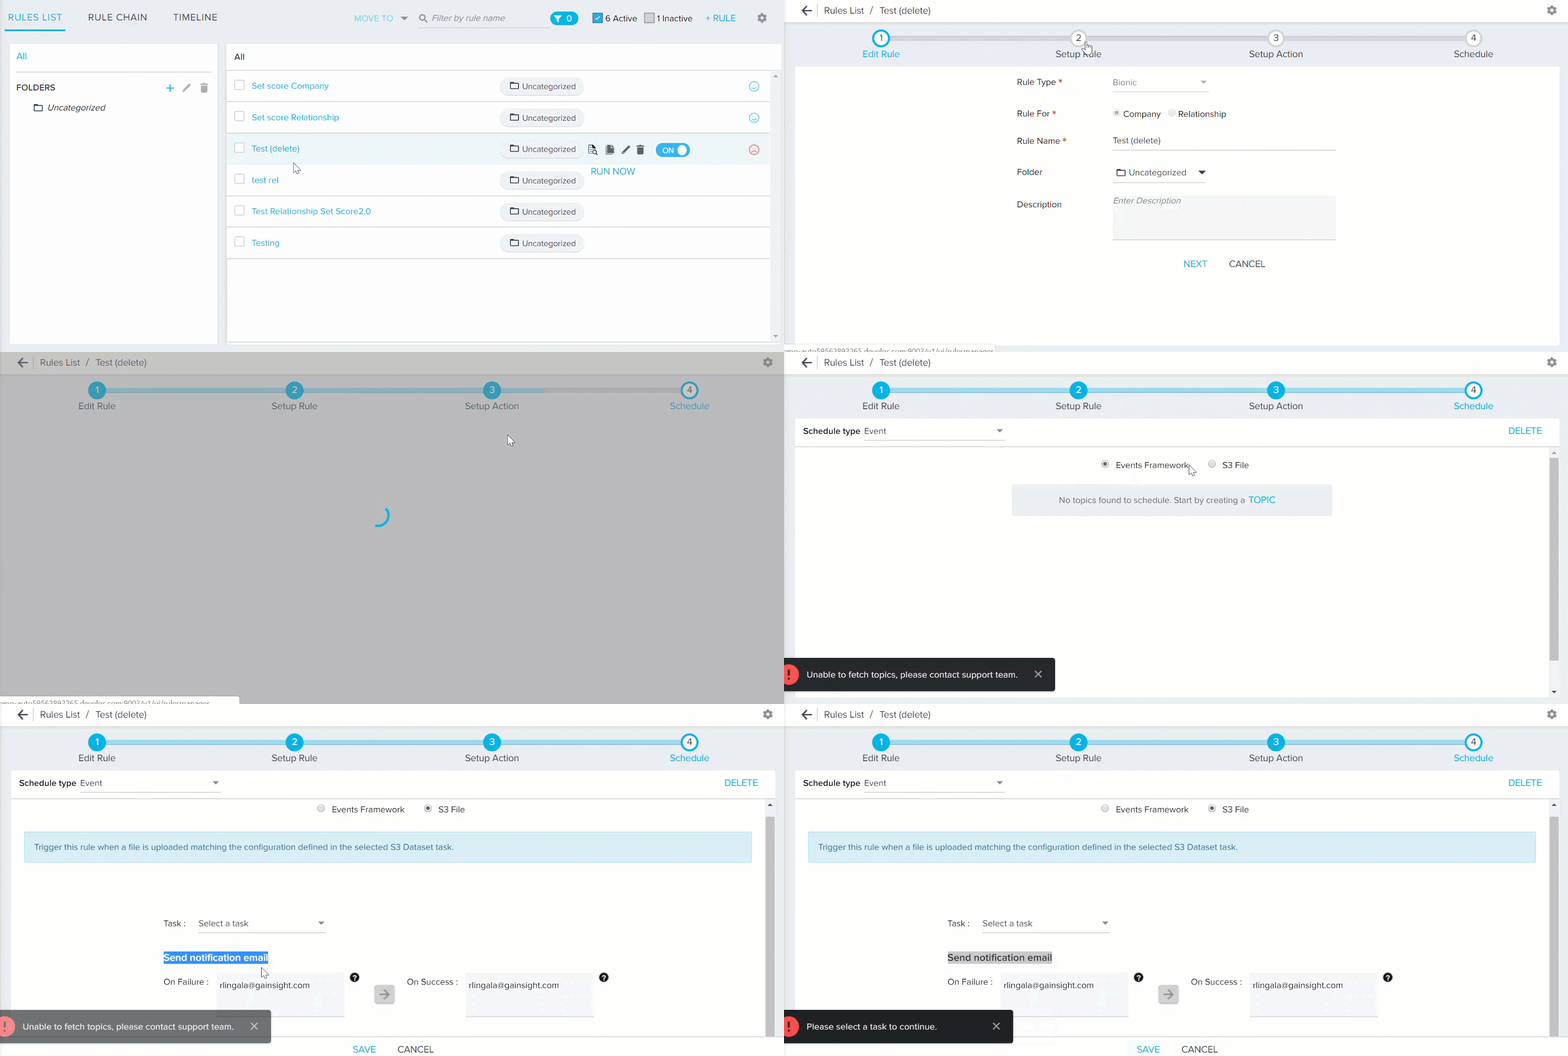
- Ability to Send Notifications Emails When Event-Based Schedule Type is Selected: Previously, when a Rule was scheduled to run by selecting S3 File in the Events based Schedule Type, there was no option for admins to add email addresses to get notified if the rule was successful or failed. By default, only the logged in user gets notified. With this release, the Send notification field option is added to notify users about the success or failure of the rule when admins are creating S3 dataset task in rules. Admins can now add the email addresses for concerned users if the rule is successful or fails.
To use this enhancement:- Create a rule with S3 dataset. For more information, refer to S3 Dataset Task in Rules Engine article.
- Click Schedule.
- In the Schedule type dropdown menu, select the Event option.
- Select the S3 File option.
- In the Task dropdown menu, select an Event.
- In the Send Email Notification field, enter the email addresses of the users to be notified in case of Success or Failure of the Rule.
_-_Cropped.gif?revision=1)
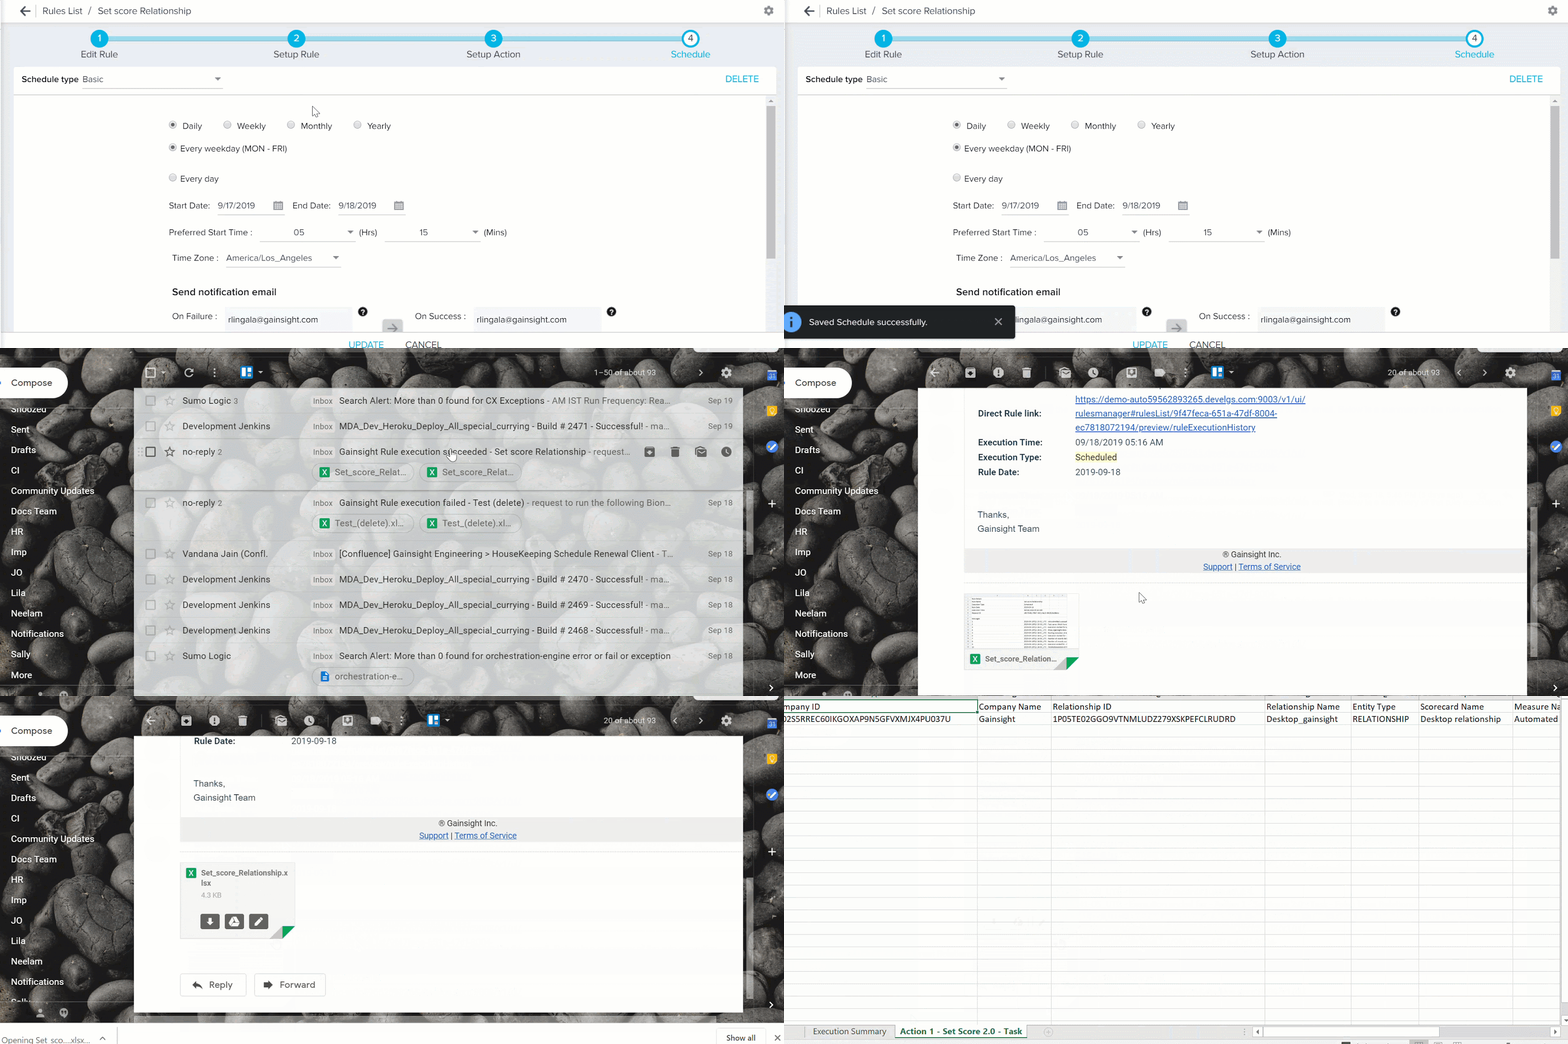
- Ability to add Action Details in Rule Execution File in case of Scheduled Runs: Previously, in the Rule results excel sheet, a separate worksheet for each action item was displayed with details of the number of records processed in each action, if the rule was executed manually. However, for a scheduled execution, these details were not displayed in the rule results sheet. Gainsight now supports this feature even for the scheduled execution of a rule.
Note: By default, this feature is not enabled. To enable this feature, contact support@gainsight.com.
CAUTION: If you enable this feature, system performance might be impacted significantly because there can be multiple rules scheduled every hour and it becomes a tedious job for the system to collect the data for every scheduled rule.
For more information on how to schedule a rule, refer to Schedule and Execute Rules article.
Gainsight Mobile App
Gainsight Mobile App helps CSMs, Account Managers, and Executives to quickly get customer information while on the go – whether they’re headed to a customer meeting, traveling, meeting customers at conferences, or juggling a busy schedule. With limited time and many customers, CSMs and AMs also need to quickly know if key customers are at risk. Gainsight Mobile App allows you to access Timeline Activities, key customer information using Sally, and view Notifications received directly from your smartphone while on the go!
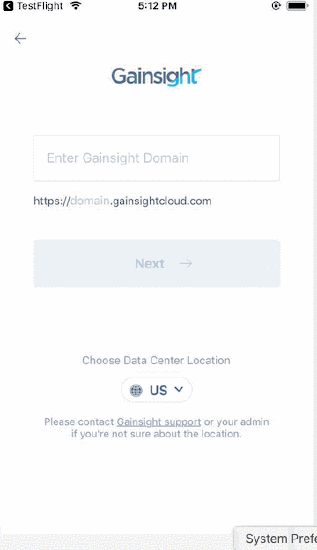
- Support to access tenants hosted in Europe regions: You can now access your Gainsight Data Centers (tenants/instances) hosted in Europe regions as well. To select a Data Center, tap the Choose Data Center Location dropdown and select the required region (either US/EU).
Important: Before you enter your login credentials, ensure that you have already selected your Data Center region.
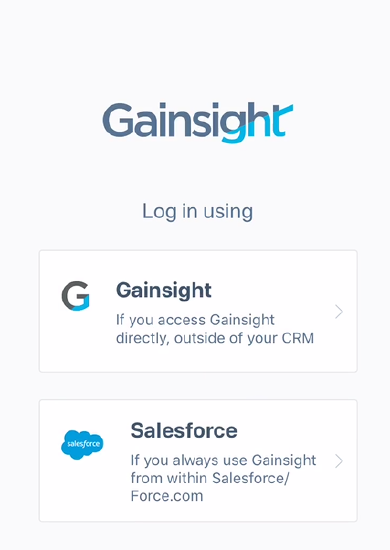
- Improved Login page: Login flow has been further improved to make it more simpler for users. With the new login flow, you can now easily select the required Gainsight edition you want to login, either Salesforce or Gainsight NXT.
Issues Addressed
Rules Engine
-
Unable to Save Rule Action whe Datetime Fields are Compared in Action Criteria: Previously, if the user adds Datetime comparison in action criteria, the rule action was saved for the first time. But, the rule was not saving if they try to make some modifications after some time and save again. This issue is now resolved.
-
Unable to Fetch Accurate Date while Previewing the Rule on Sponsor Tracking MDA Object: Previously, when the rule is built on Sponsor tracking object in MDA, the data fetched was not accurate when they preview the rule by applying some filters. This issue is now resolved and the data fetched is accurate.
-
Unable to Set Boolean Field Value Equal To False in the Filters: Previously, users were unable to set the Boolean field value to False while setting up the actions in a Rule. However, it is converting back to True, if the users try to change the value to False and save it. This issue is now resolved and the users can set the Boolean field value to False.
-
Unable to Save Rule Merge Task Due to Inclusion of MDA Originated URL Field: Previously, users could not save the rule, whenever a URL field from MDA is pulled into a fetch and later attempted to merge. This issue is now resolved.
-
Unable to Save/Clone the Rule: Previously, the "Please correct the validation errors to be able to clone" error message is displayed when the users try to save/clone the rule. This issue is now resolved and the users can Save or Clone the rule.
-
Data in Rule Preview Result is Different from Rule Result Sheet: Previously, users had observed a differences in rule preview result and actual rule execution result sheet. For example, the rule preview displays names but execution sheet shows ids. This issue is now resolved.
360
- Inactive users displaying in C360 attribute section: Dropdown lists under the C360 Attribute section were previously displaying inactive users as options for selection. This issue only occurred in NXT edition and has since been resolved.
User Management
-
If Admins make users Active in the User Management page, a Welcome Email was sent to the just activated users. This issue was observed in some use cases and is now resolved.