Create Journey Orchestrator Email Templates
This article explains how to create and manage Email Templates and its versions in Journey Orchestrator.
Gainsight NXT
Overview
Journey Orchestrator includes a robust email template designer with a variety of tools for creating attractive and actionable communications. You can copy existing email templates into Journey Orchestrator and create new ones. To access email templates, navigate to Digital Journey > Email Templates.
Email Template List View
The email template list view displays each template as a separate line item. Each entry displays the email template's name, number of versions, Version number, who last modified it, when it was last modified, and the number of outreaches using the template.
You can take the following actions from the list view:
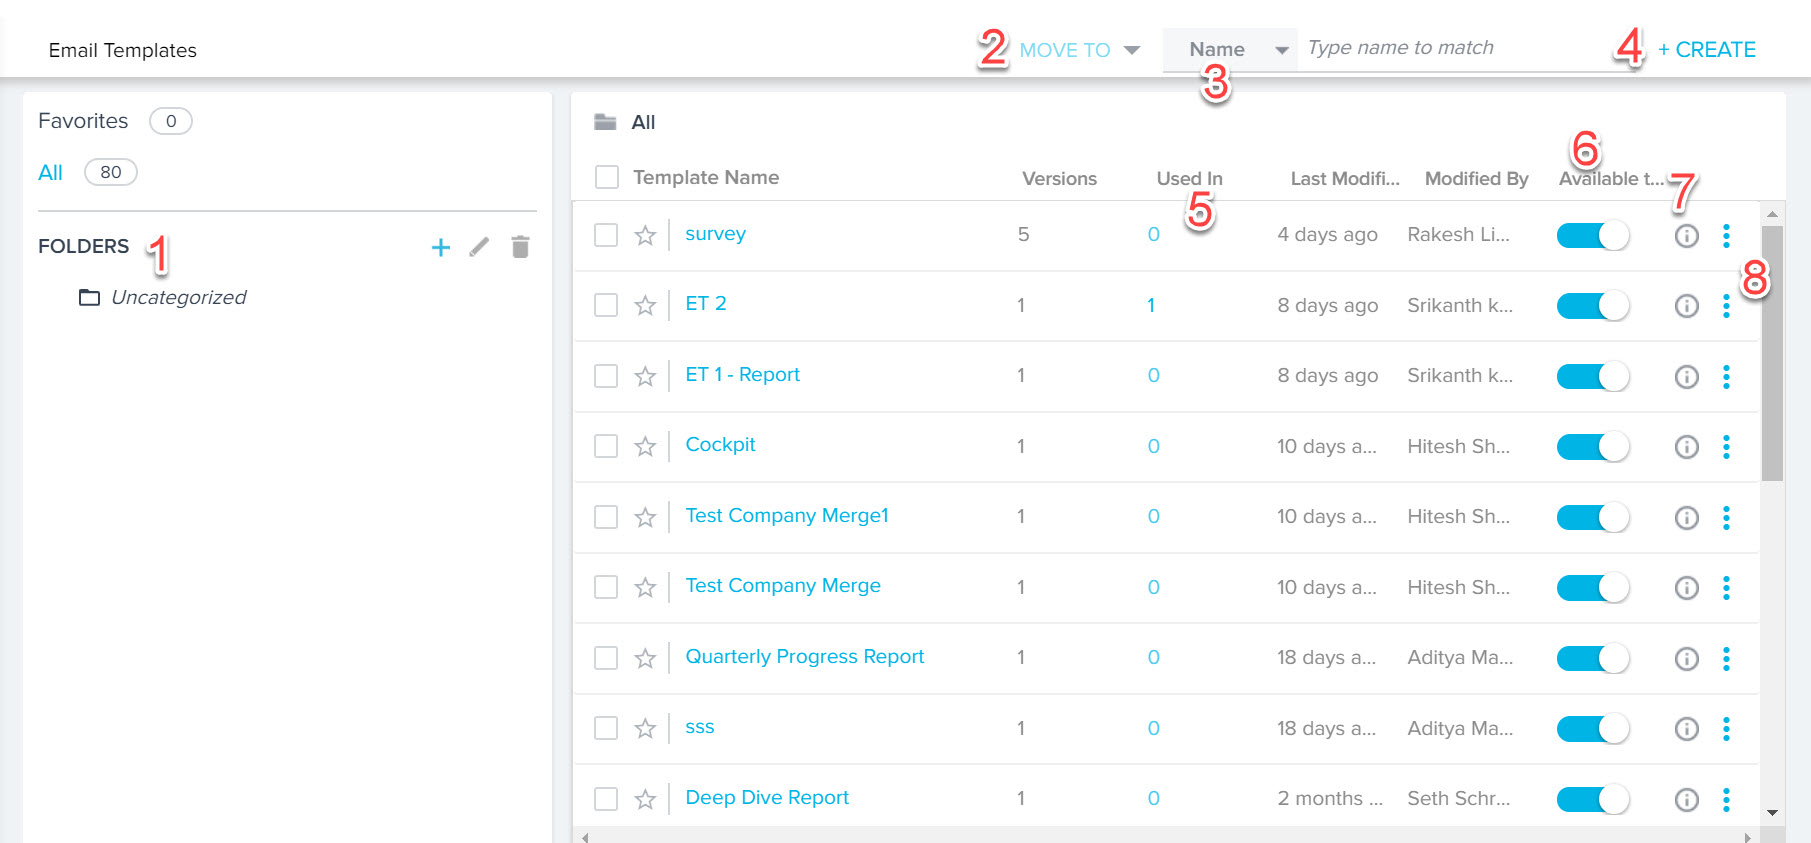
- Folders: Users can create folders on the Email Templates page to organize their templates. For more information on Folders in Email templates, refer to Folders in Email Templates section.
- Move to: Users can move their templates to a particular folder by using this option.
- Search: Search for existing email templates. You can click the drop-down field to select one of the following search methods:
- Name: Search by entering the email template name.
- Created By: Filter the list to show only the templates created by the user you select from the drop-down.
- Type: Filter the list to show only the templates of the same type you selected from the drop-down. Template type is determined by the content of the template. Templates can have more than one type. You can select from the following template types:
- Standard Template: The default email template type. A template is considered standard unless it contains a survey link, button, or question.
- Survey Template: The email template contains a survey link, button, or question.
- Report Template: The email template contains a report placeholder.
- Layout Template: The email template contains a layout link or button.
- Templates Without Plain Text: The email template that does not contain Plain Text format.
- Version: Filter the list to show only 1.0 templates, 2.0 templates, or all email templates.
- Entity Type: Filter the list to show only Account-based templates, Relationship-based templates, or User-based templates.
- Create: Click the +CREATE button to begin creating a new Email Template. For more information on creating templates, refer to Journey Orchestrator Email Builder section.
- Used In: Admins can view which Programs the email templates are used in.
To view the list of dependencies of a particular email template:- Navigate to the Digital Journey > Email Templates page.
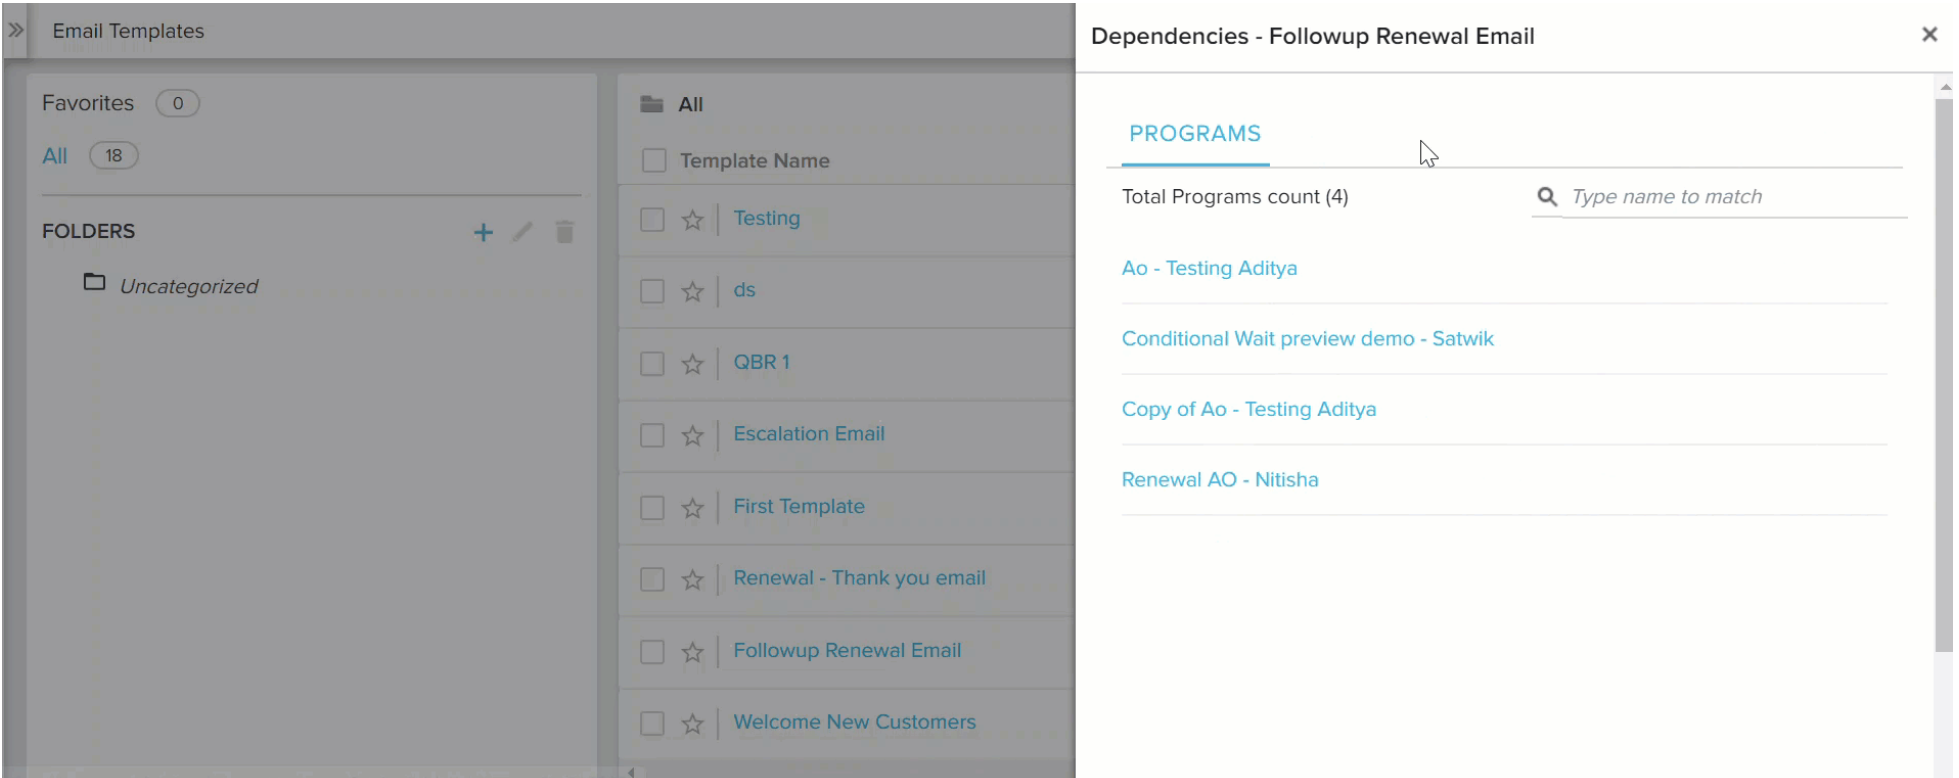
- In the Used In column of the Email templates list panel, click on the number adjacent to a particular email template. The Dependencies screen of the selected email template appears.
The Admin can view a list of all the Programs and Outreaches, in which this particular Email Template is used, in the PROGRAMS and OUTREACHES tab respectively.
Note: Admins can either click on the particular Program or Outreach to navigate to the respective page, and also search for a Program or Outreach in the Search field. - Click Close icon to close the dependencies screen.
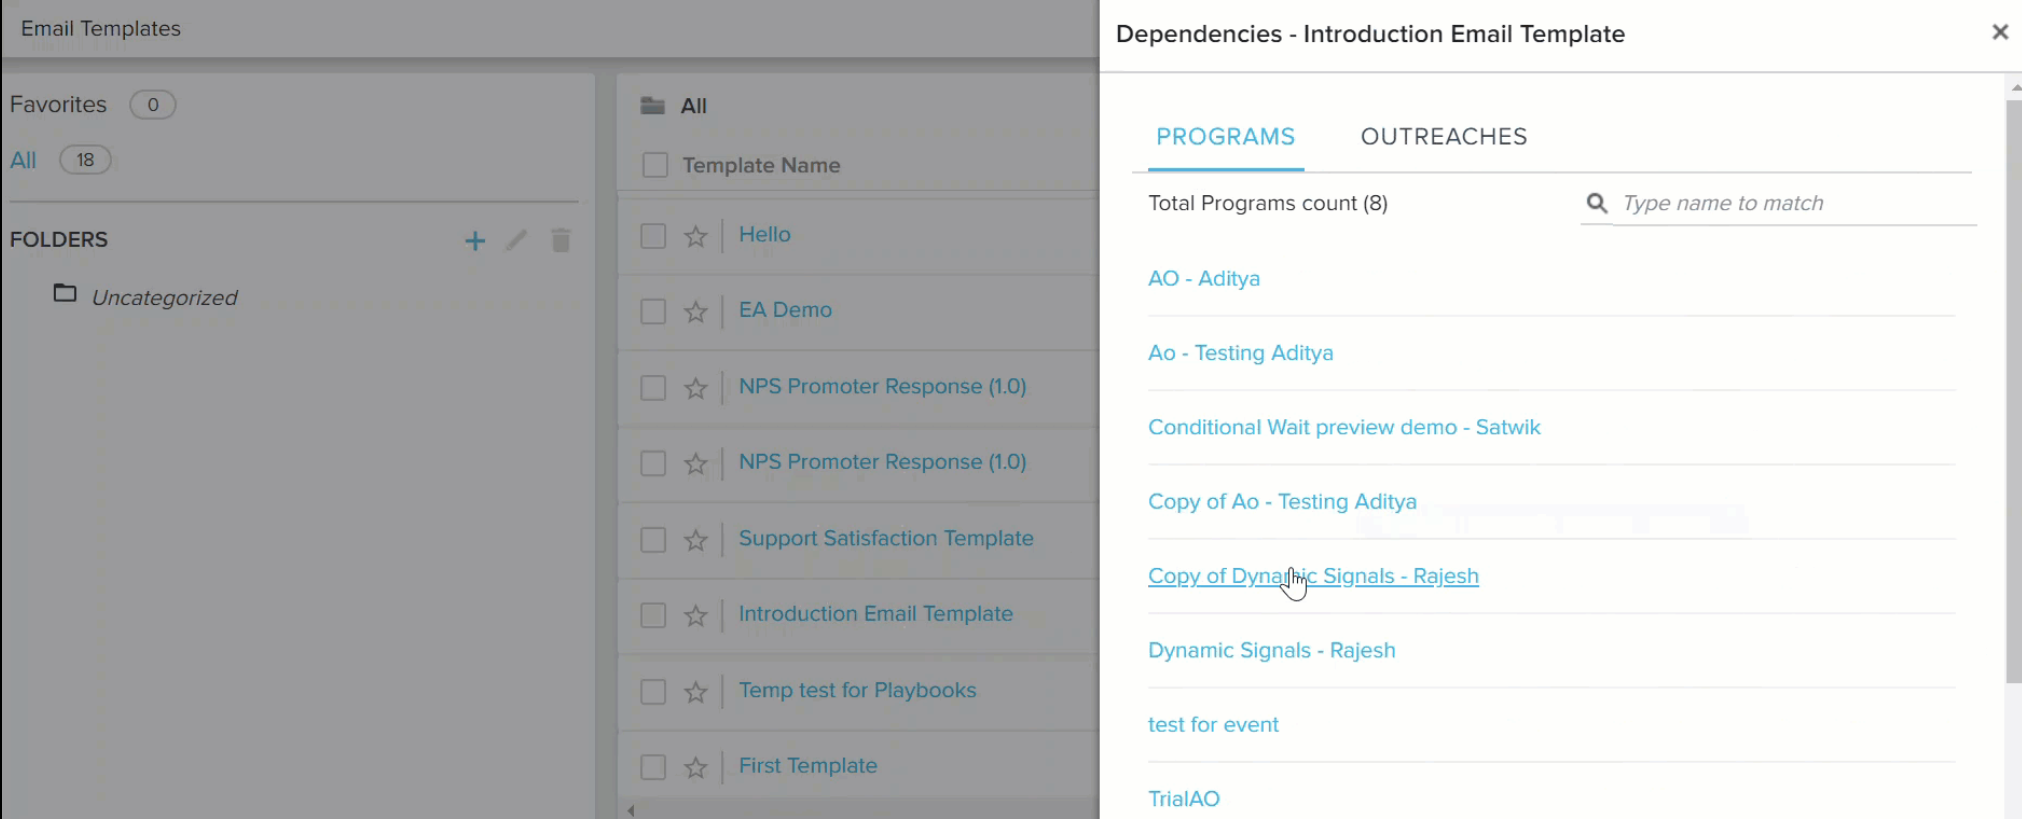
Note: If the Email Template is not used in either Programs or Outreaches, that particular tab is not displayed in the Email Template Dependencies screen.
The following options are only visible when hovering on an existing email template:
- Available to Users: Admins can use the ‘Available to Users’ toggle option to have control over which email templates can be accessed by CSMs when they are using the Send Email option. For more information, refer to the Send Emails from Cockpit (via Email Assist and Send Email Option) article.
- Information: Hover over this icon to display the template type and created date.
- Three Dots: Admins can access the following options by clicking on it:
- Edit: Click this icon to open the Journey Orchestrator Email Builder and make changes to the template.
- Clone: Click this icon to create a clone or copy of the existing template.
- Delete: Click this icon to delete an existing template.
Journey Orchestrator Email Builder
When you select to edit or create an email template, the email designer page opens automatically. On the designer page, you can enter text into the subject line and email body.
Note: If you copy and paste text from another source, the formatting will be removed.
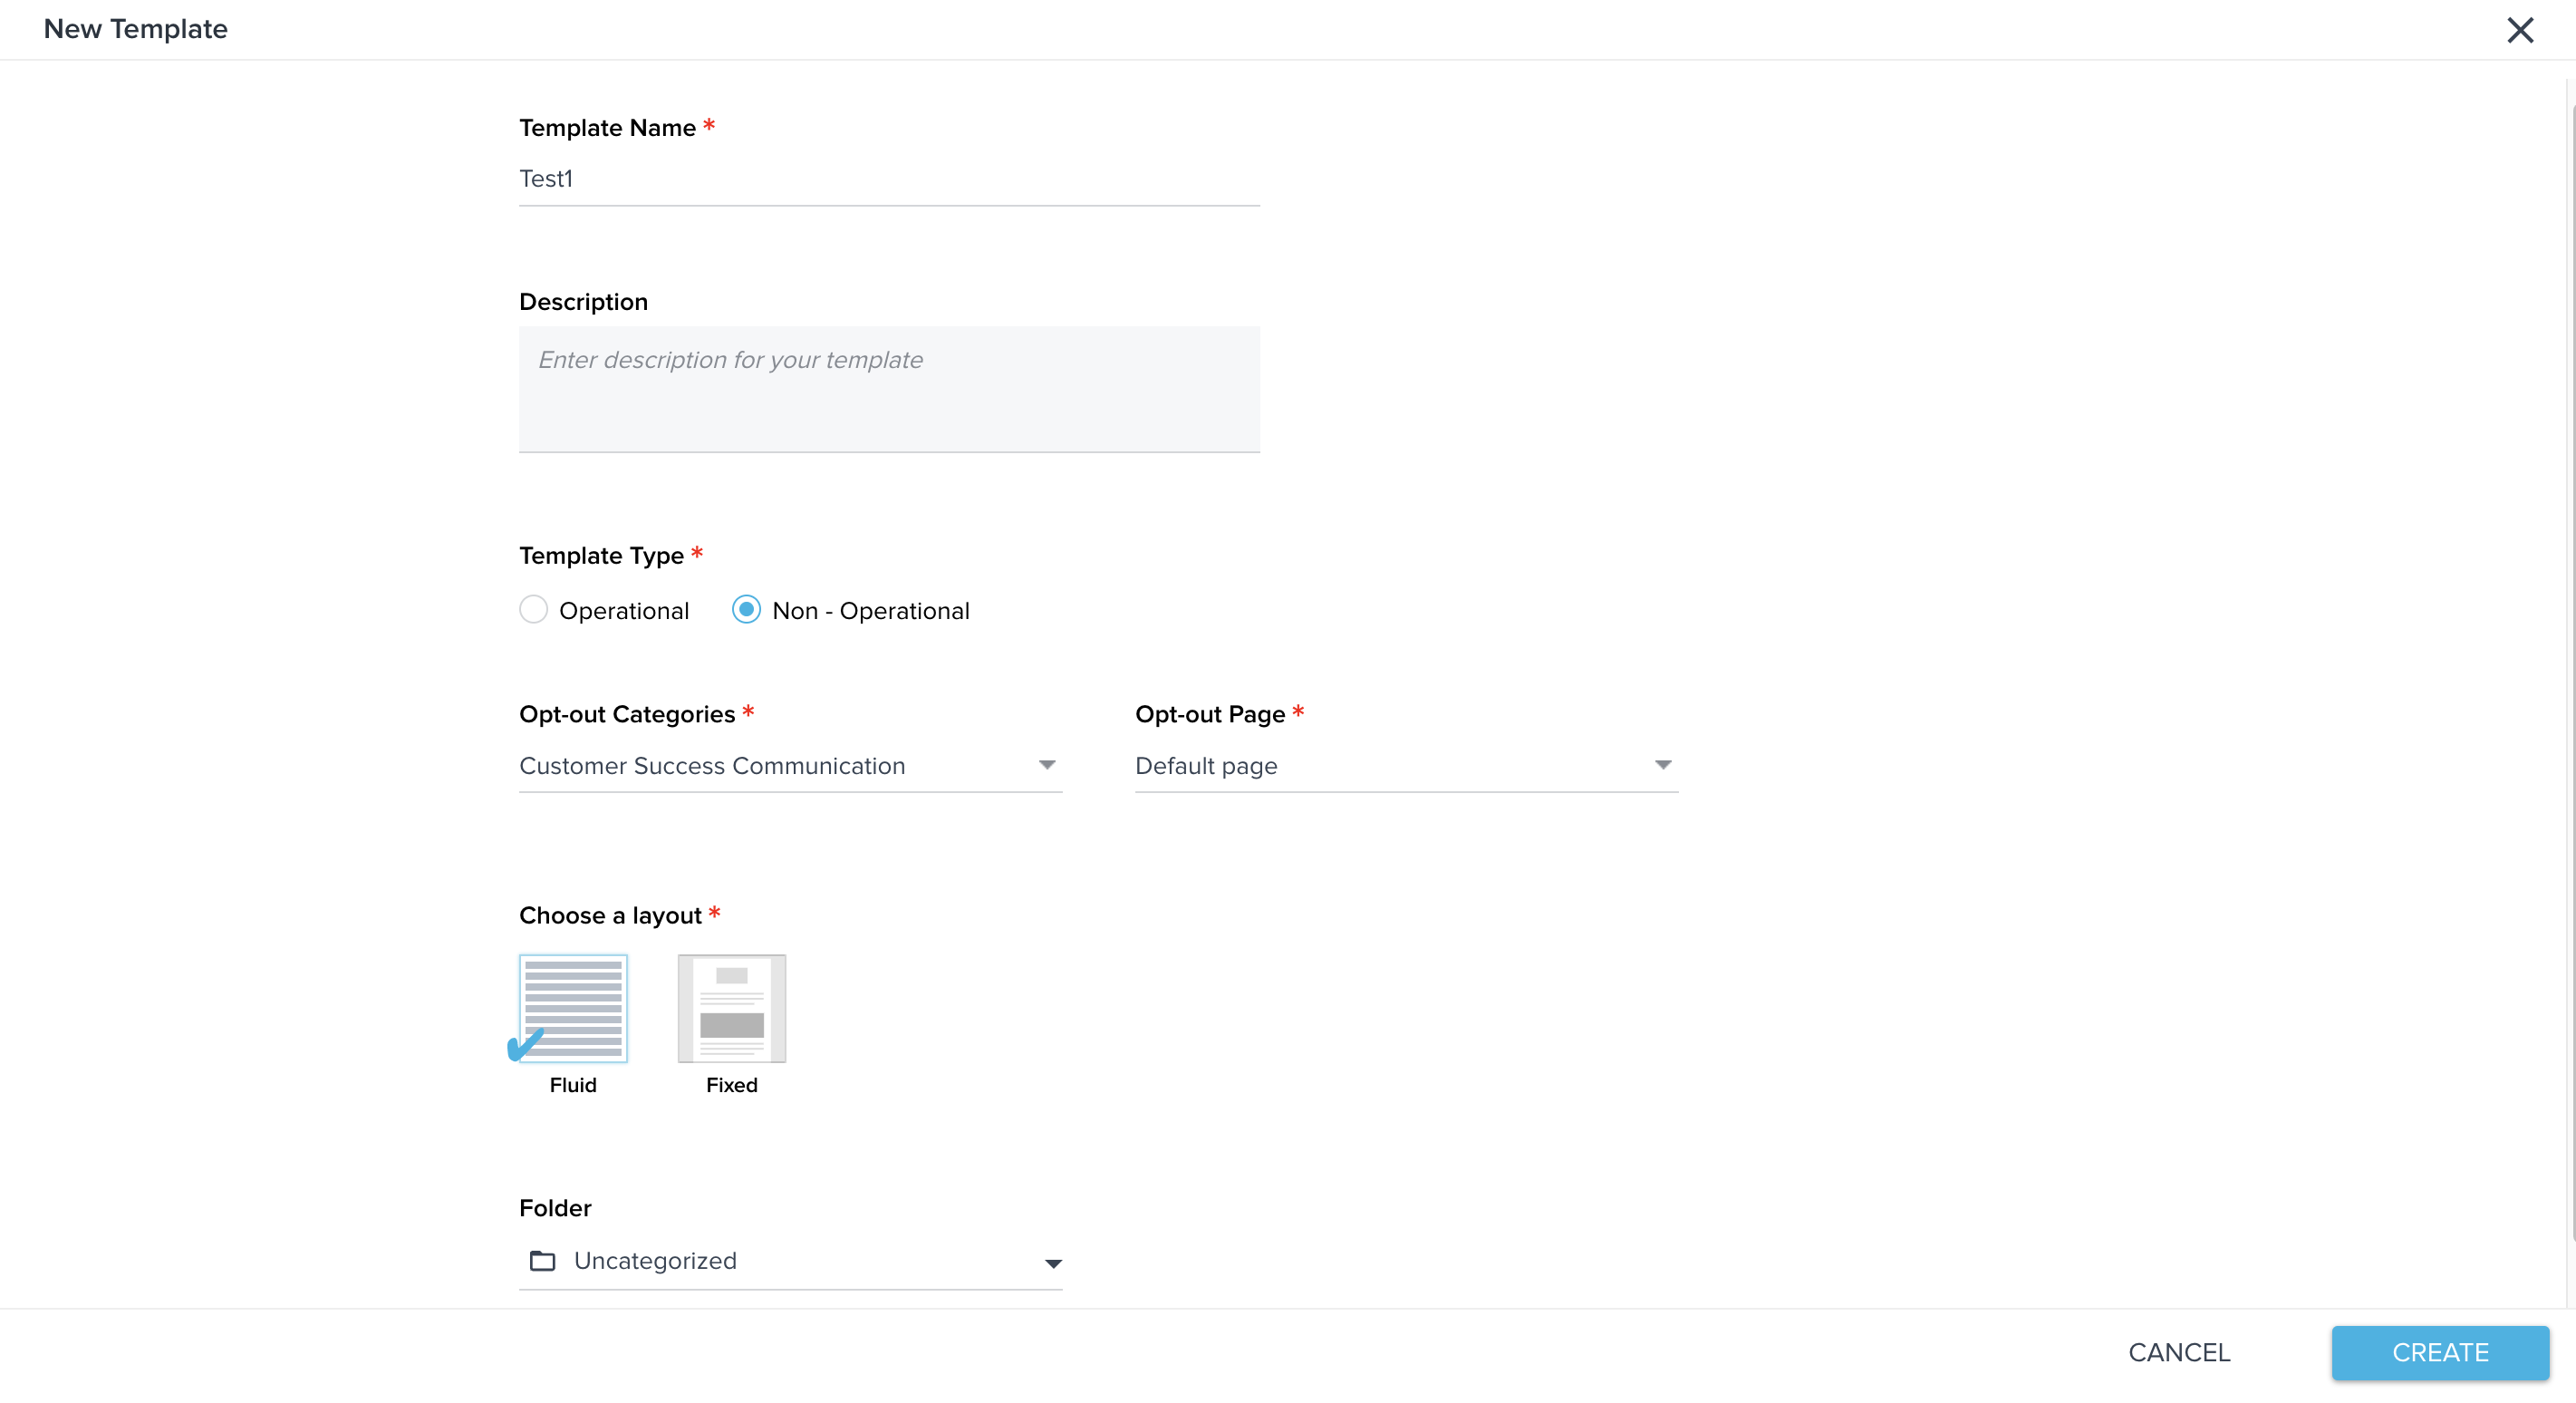
A new page called ‘New Template’ is introduced to provide details such as template name & description, selection of template type, opt-out categories & page, layout, and folders.
Admins can edit the above-mentioned details later, except for layout type.
To create a new email template:
- Navigate to Digital Journey > Email Templates.
- Click +CREATE. The New Template screen appears.
- In the Template Name and Description (Optional) fields, enter the name of the template and description for the template.
- In the Template Type section, select either Operational or Non-Operational options. For more information, refer to the Operational Emails section.
- Select the Opt-out Categories and Opt-out Page options, if Non-Operational option is selected in the Template Type section. For more information, refer to the Opt-Out Settings section.
- In the Choose a layout section, select the type of layout you want to use in the email template.
Fluid and Fixed type Layouts: Fluid layouts are blank templates that are completely customizable, and Fixed layouts are typically used for marketing emails with white space on either side of the body of content.
Admins can now select either Fluid or Fixed type layouts to design email templates as per customer requirements. For more information, refer to the Email Template Layouts article. - In the Folder section, select the folder name the user wants to place the template. For more information, refer to the Folders in Email Templates section.
- Click Create.
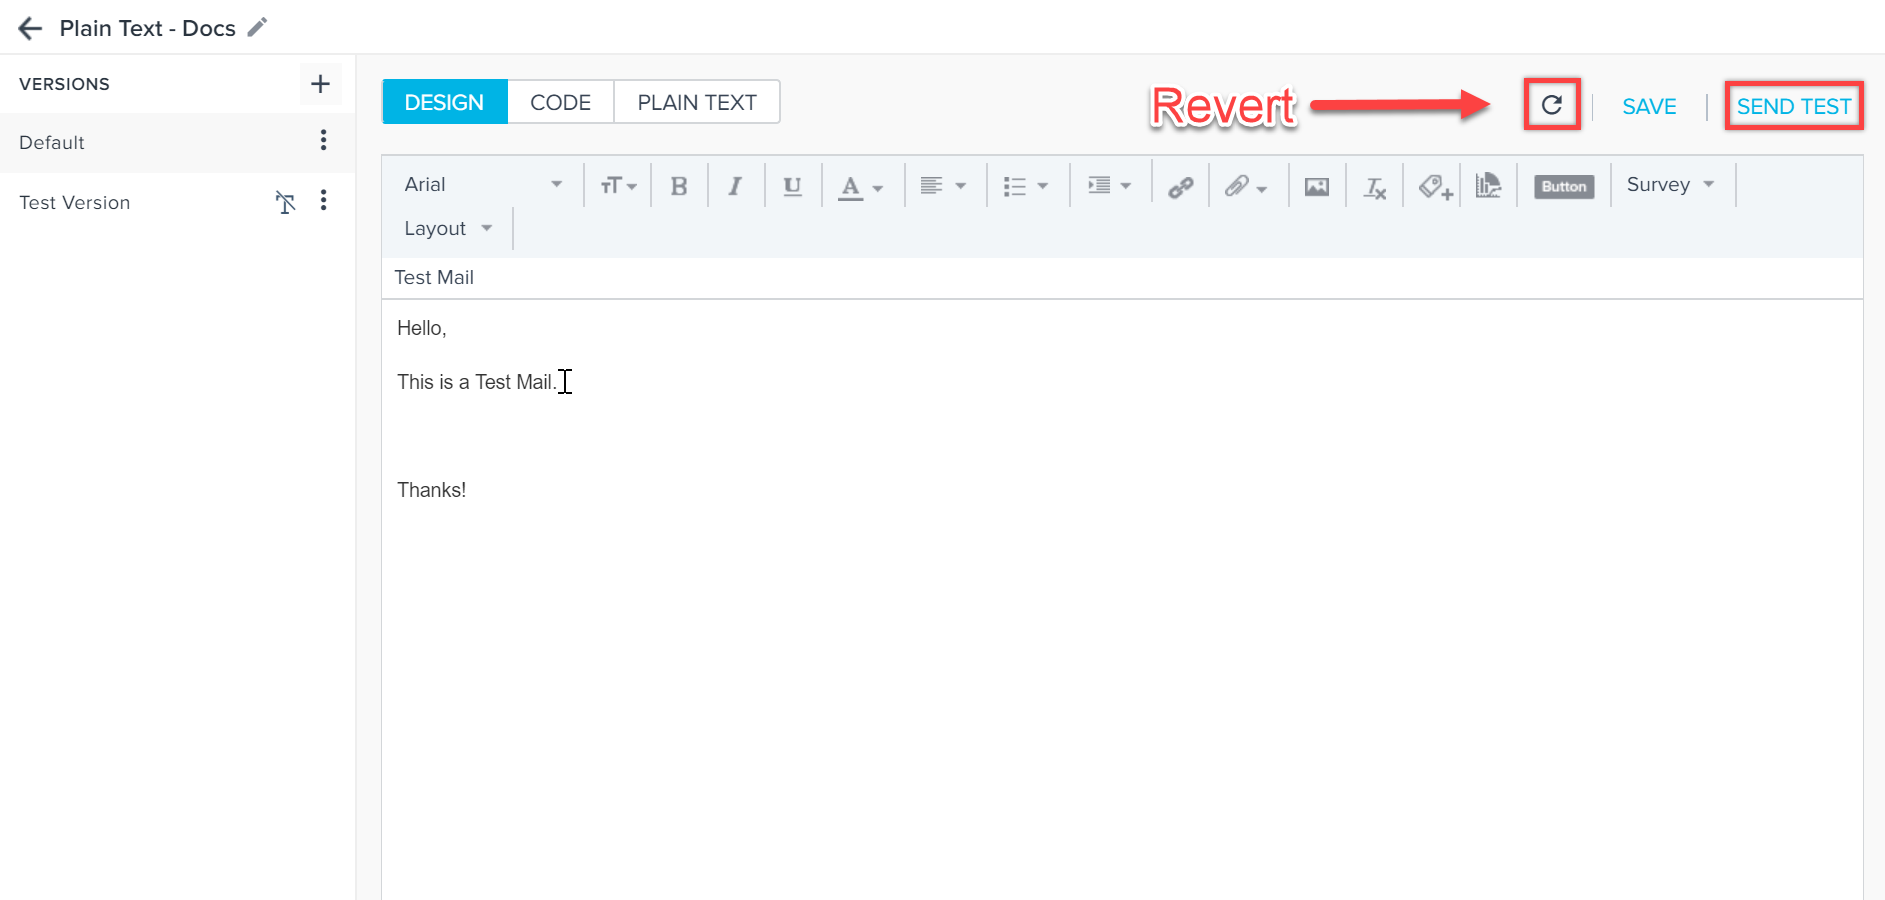
Admins have an option to preview the email by using the SEND TEST option. This feature allows the user to test the email for formatting related issues and to confirm the overall accuracy of the email.
Note: The SEND TEST email option from the Email Template will only send the email without attachment, if there are any.
Admins can also use the Revert option to revert back to the previously saved version.
Limitations/Known Issues:
- Ensure that the button inserted has enough space to accommodate full button text. Outlook email client will truncate the text.
- Modification of Layout type is not possible when cloning an email template. For example, if a user clones a template with Fluid type layout, it cannot be changed to Fixed type.
- Indents in mobile clients and Pixel Gmail clients do not display correctly in the existing email templates; users have to manually remove the ‘Blockquote’ tag style. This issue does not occur for newly created email templates.
- Arial black font is not supported in iPhone mobile clients.
- When the user copies HTML with Buttons from one email template to another email template, or from one version to another version, then that button is not detected as a button. It is treated as a Link. Users must remove this button and add a new button accordingly.
- When the user copies a button which contains tokens from one email template to another, or from one version to another, then the button tokenization is not reflected on the button in the copied email. Users must remove the copied token and add a new token.
- Following are the list of expected behaviors when the user copies the code from one version to another, or from one email template to another template:
- For Tokens and Survey Questions Placeholders: It is displayed as ‘${}’.
- For Standard Buttons: It displays the properties like color, font, Bold. But when the user clicks on Edit, it shows the old UI as this is not detected as a button. User must delete this and can add a new button.
- For Survey Buttons: It is displayed as ‘${}’.
- For Survey Links: It does not display the text as well as the default selected survey.
- For Reports: Reports are not copied, only the cursor is displayed.
- For Inline Image Upload or Web Address: It only shows the name of the image uploaded
- For Attachments: Attachments are not copied.
- For more information on best practices to be followed while using Email Template, refer to the Email Template Best Practices article.
Email Template Design Tools
Admins can apply a variety of options available in the design tools to the email template.

- Font: Click to select the font for any highlighted or newly written text.
- Text Size: Click to select the size of any highlighted or newly written text.
Note: It is possible for certain email clients, such as Microsoft Outlook, to display the content of emails at different sizes than what is configured in Gainsight. This can make the text of the email appear to be a different size for the recipient. - Bold: Click to make any highlighted or newly written text bold.
- Italic: Click to make any highlighted or newly written text italicized.
- Underline: Click to make any highlighted or newly written text underlined.
- Text Color: Click to select the color for any highlighted or newly written text.
- Alignment: Click to select the alignment for any highlighted or newly written text.
- Bulleted/Numbered List: Click to format any highlighted or newly written text into a bulleted or numbered list.
- Indent/Outdent Text: Click to indent or outdent the line of text currently selected.
- Insert Link: Click the Hyperlink button to insert a link in the email body. Images can also be inserted into the body (or as an attachment) using an image file or web address. When inserting a link you can also enable link tracking by clicking the Link Tracking checkbox. Users can provide additional context for screen readers using the Add link description for screen readers to read aloud link under the Display Text.
Link Tracking gives Gainsight the ability to track when users click links you send them and record this in Journey Orchestrator analytics. This feature lengthens the URL of the link, which can negatively impact email deliverability. For this reason, this feature is disabled by default. - Add Attachment: Click the paperclip icon to attach most popular file types as attachments to your emails. The cumulative size of your attachments and email template must not exceed 2 MB. Files can also be attached inline within the body of the email.
- Insert Image: Add an image to the email template.
- Remove Formatting: Click to clear the text formatting.
- Insert Token: Use the Token button to select text in the email body to set up as a token, or to add a token placeholder if no text is highlighted. Token linking or mapping is performed during Program setup. Examples: select contact’s name and/or sender’s name to personalize the text when the email is sent. You can also setup Default Values for tokens by clicking the tagged text.
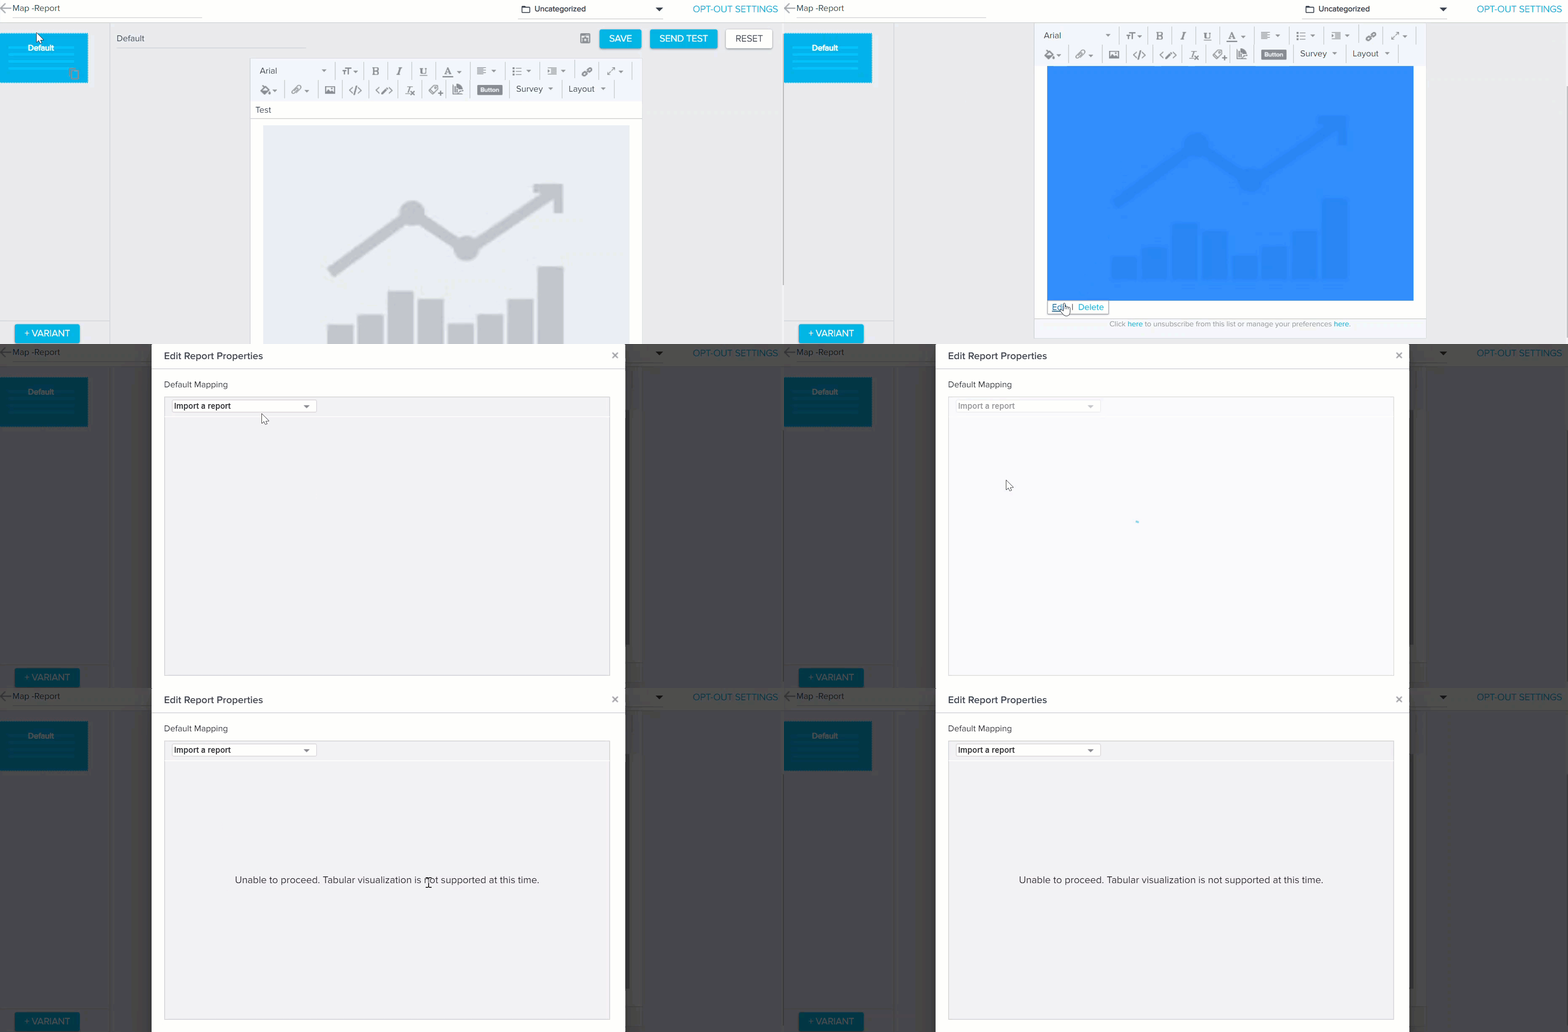
- Insert Report: Click to insert up to 5 reports in an email template.
- Insert Button: Click the Button icon to insert a button in the email body. Buttons are linked to web URLs and can be customized in the email designer.
- Insert Survey: Click Survey to select a Gainsight survey to insert with a link, button, or question (to be used as part of an in-line survey). You may include multiple links or buttons to the same Survey within an email template.
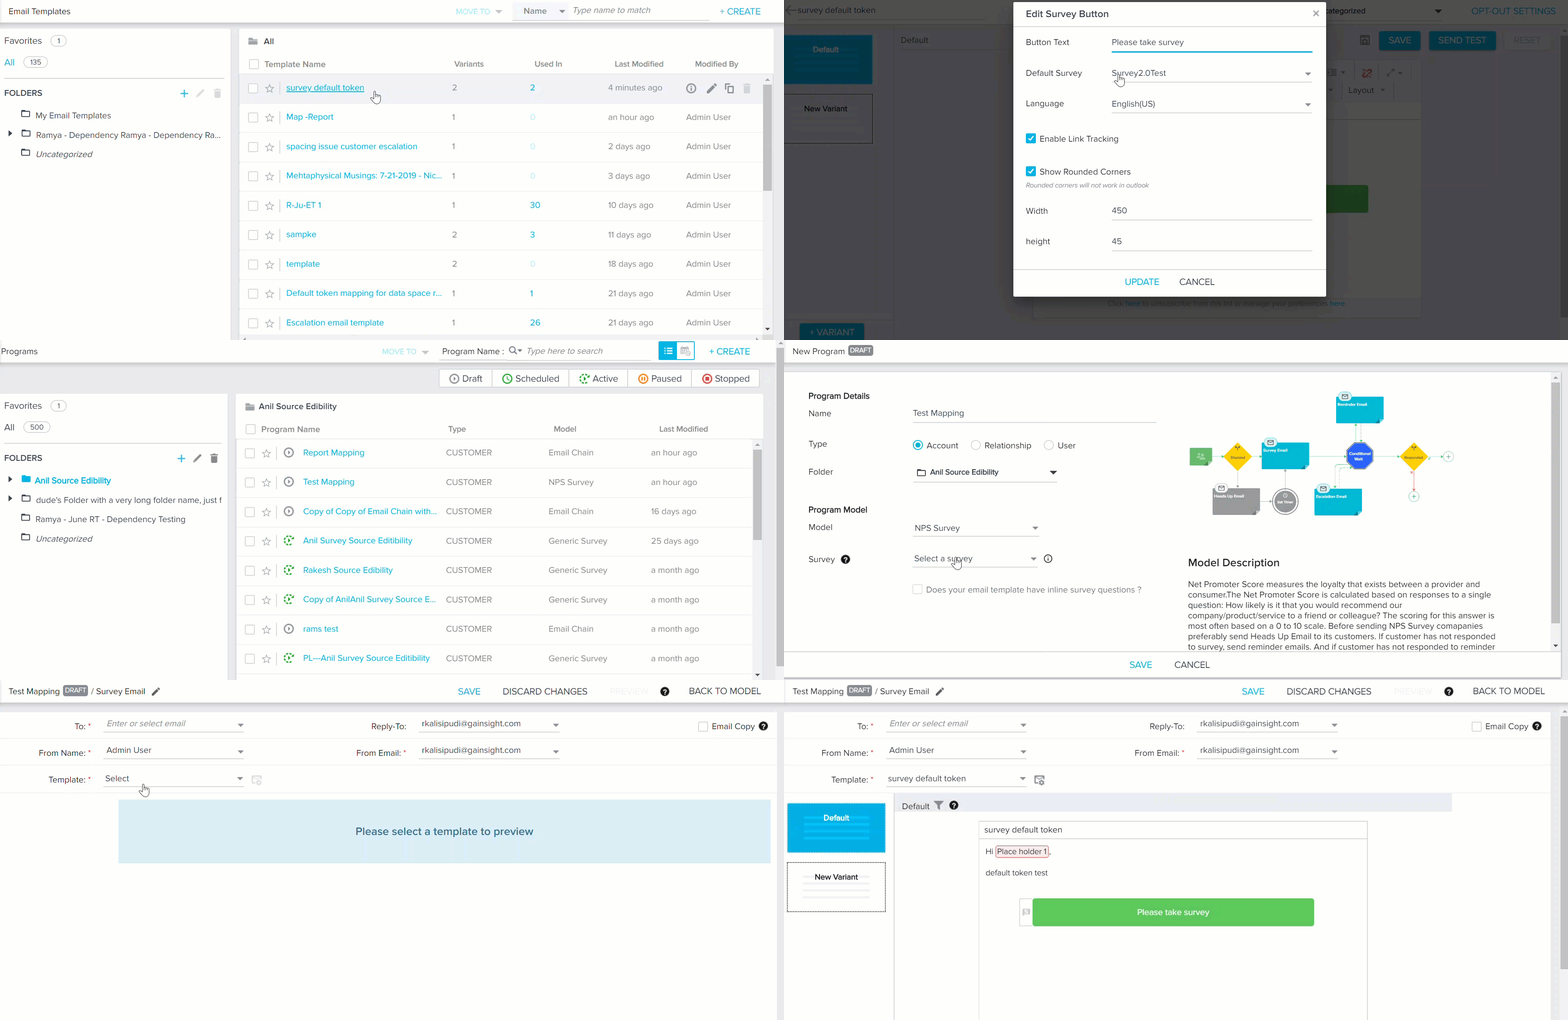
Admins can add the default mappings for Surveys and Reports in the Email Templates while inserting a Survey Link/Button or Report in the email template or they can even use the Edit option for the existing templates, to insert the default mappings.
However, the default Survey/Report mapping configured in Email templates will only reflect in `Email-Assist` module. The configured mappings will not have any effect to Programs/Outreaches.
Note: This enhancement is only applicable for enabled tenants.
Note: Tabular reports are not supported in the default report token mappings.
-
Insert Layout: Click to insert link or button.
Note: If you are unable to create or edit Email Templates, you may not have the correct Journey Orchestrator permissions. For more information on these permissions, refer to the Journey Orchestrator Permissions article.
Versions
“VARIANT’s” are renamed as “VERSIONS” in the updated email template. Version is used to create modified versions of the email template.
Create Email Template Versions
Versions are separate forms of the same email, contained within a single email template. Each program is meant to be sent to a different segment of customers. You will not assign segments to each version when creating your email template. Instead, you will complete this step as part of program configuration.
First, you must create a multi-version template before you can configure a multi-version program.
The existing Default version cannot be deleted.
To add versions to an email template:
- Click + adjacent to VERSIONS. The New Version page appears.
Note: You can create a maximum of 15 versions. - In the Version Name field, enter the name of the version.
- Select an opt-out language in the Choose an Opt-Out Language dropdown menu.
- Select either Fluid or Fixed option in the Choose a Layout section.
- Click CREATE.
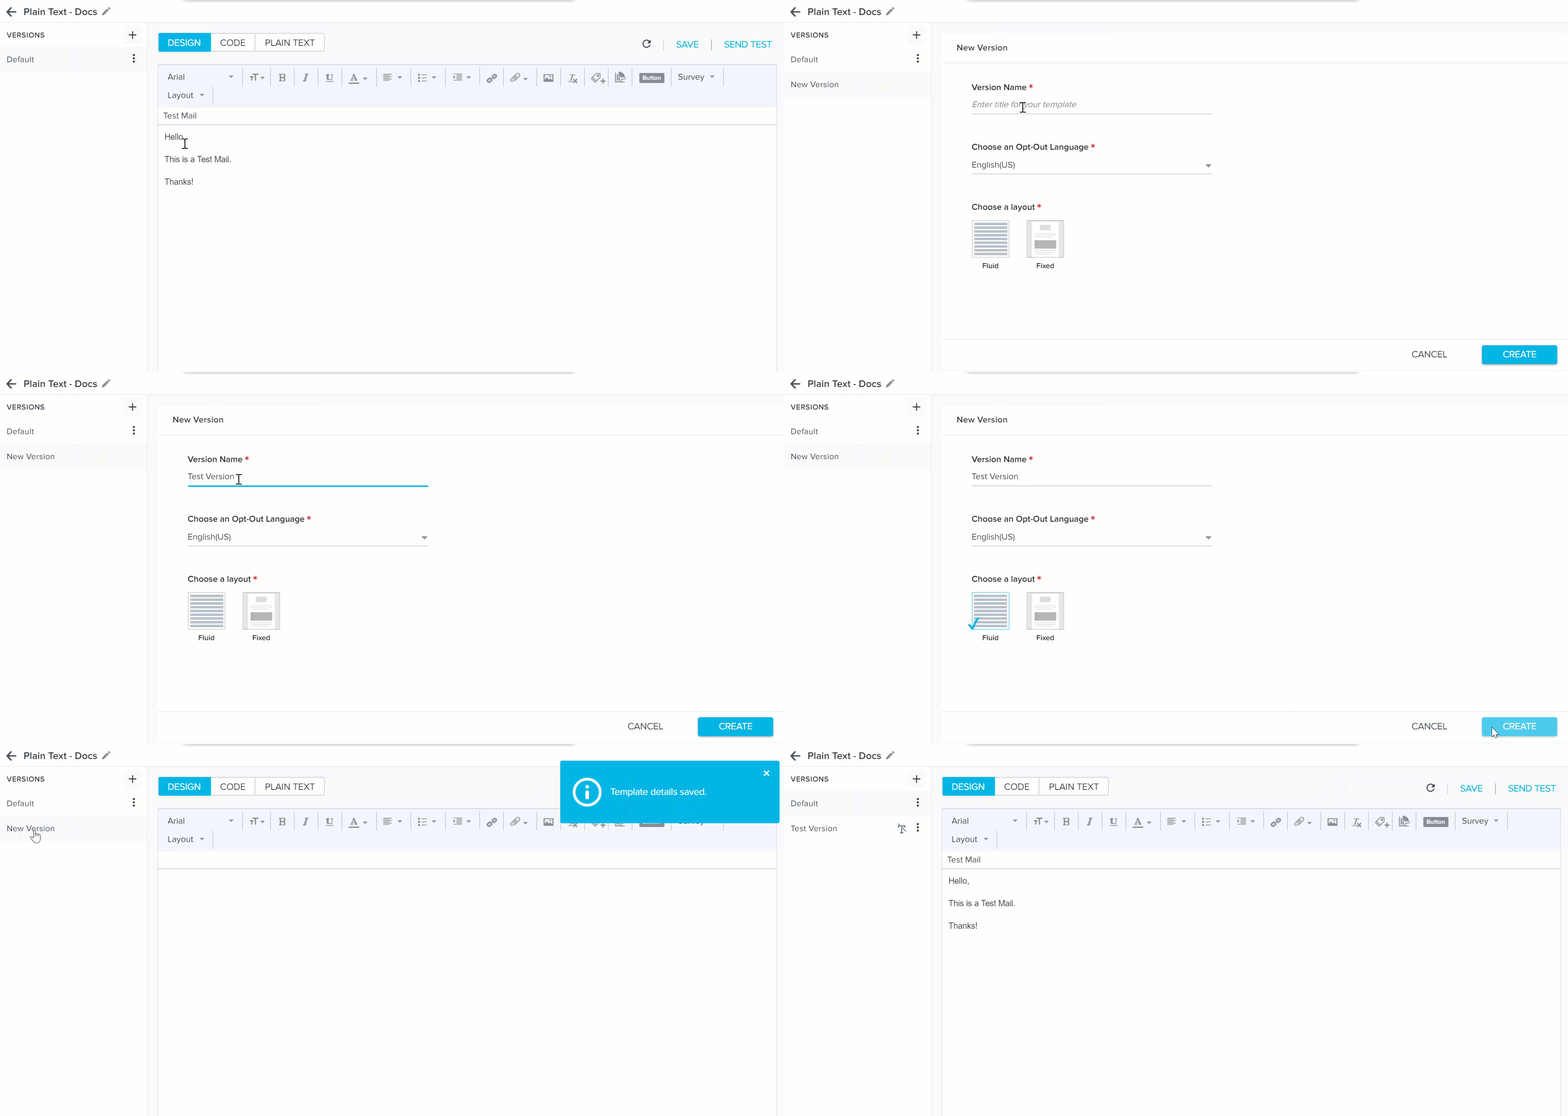
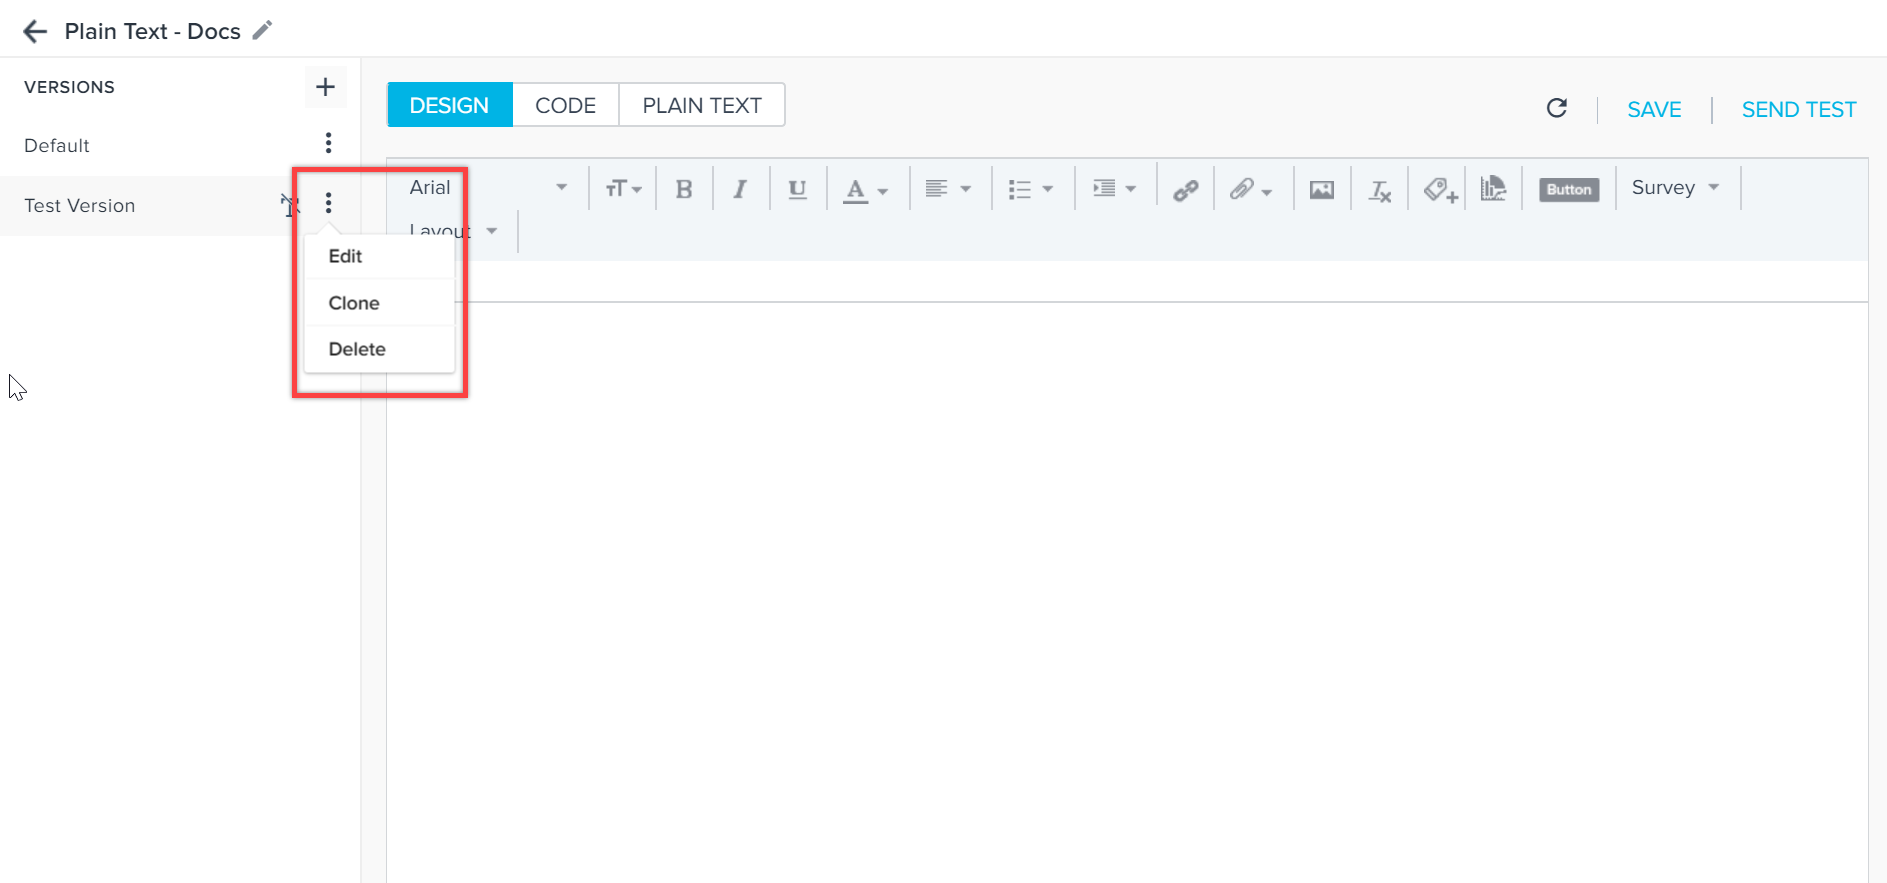
Note: Admins can also Edit, Clone, and Delete versions by clicking the three dots adjacent to the Version.
Folders in Email Templates
Users can create folders on the Email Templates page to organize their templates accordingly. All the folders are displayed in the left pane on the respective page. If you click any particular folder name, all the templates included in that folder are displayed in the right pane. Gainsight provides a default folder called Uncategorized where all of the existing Email Templates are stored. You cannot modify the name of this folder or delete it.
Create Folder
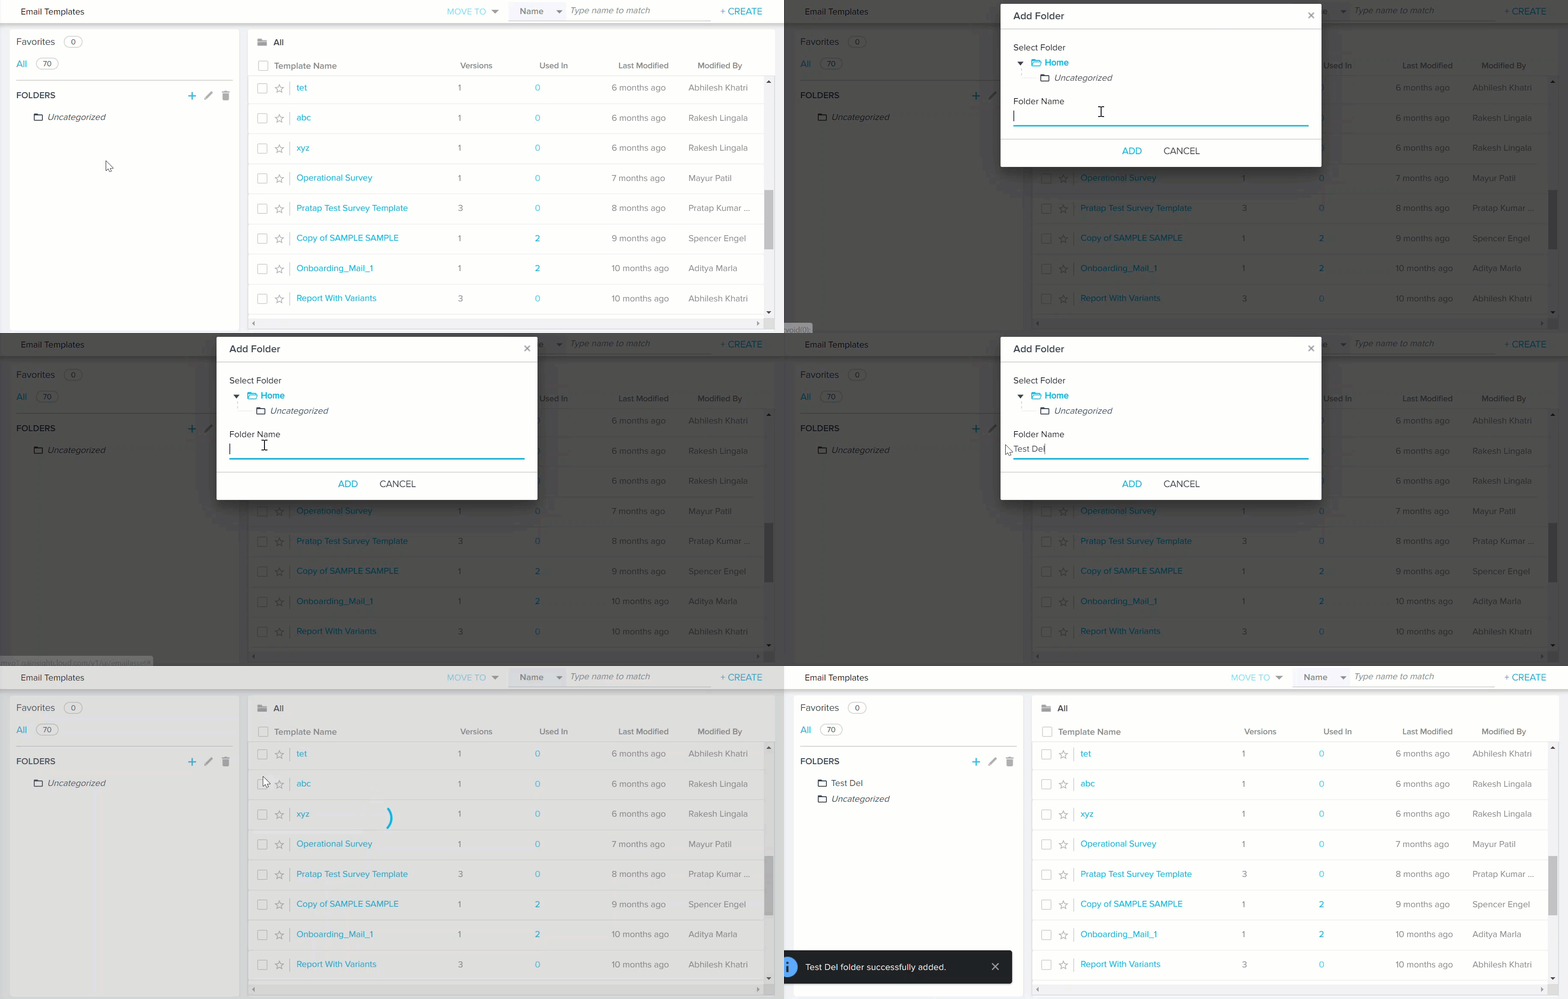
To create a new folder:
- Click the + icon.
- (Optional) Select the folder under which you want to nest this folder.
- In the Folder Name field, enter a name for the folder.
- Click ADD.
Move Email Templates to Folder
Once you create a folder, you can move the Email Templates created into the newly created folder.
Note: Single Email Template cannot be part of multiple folders.
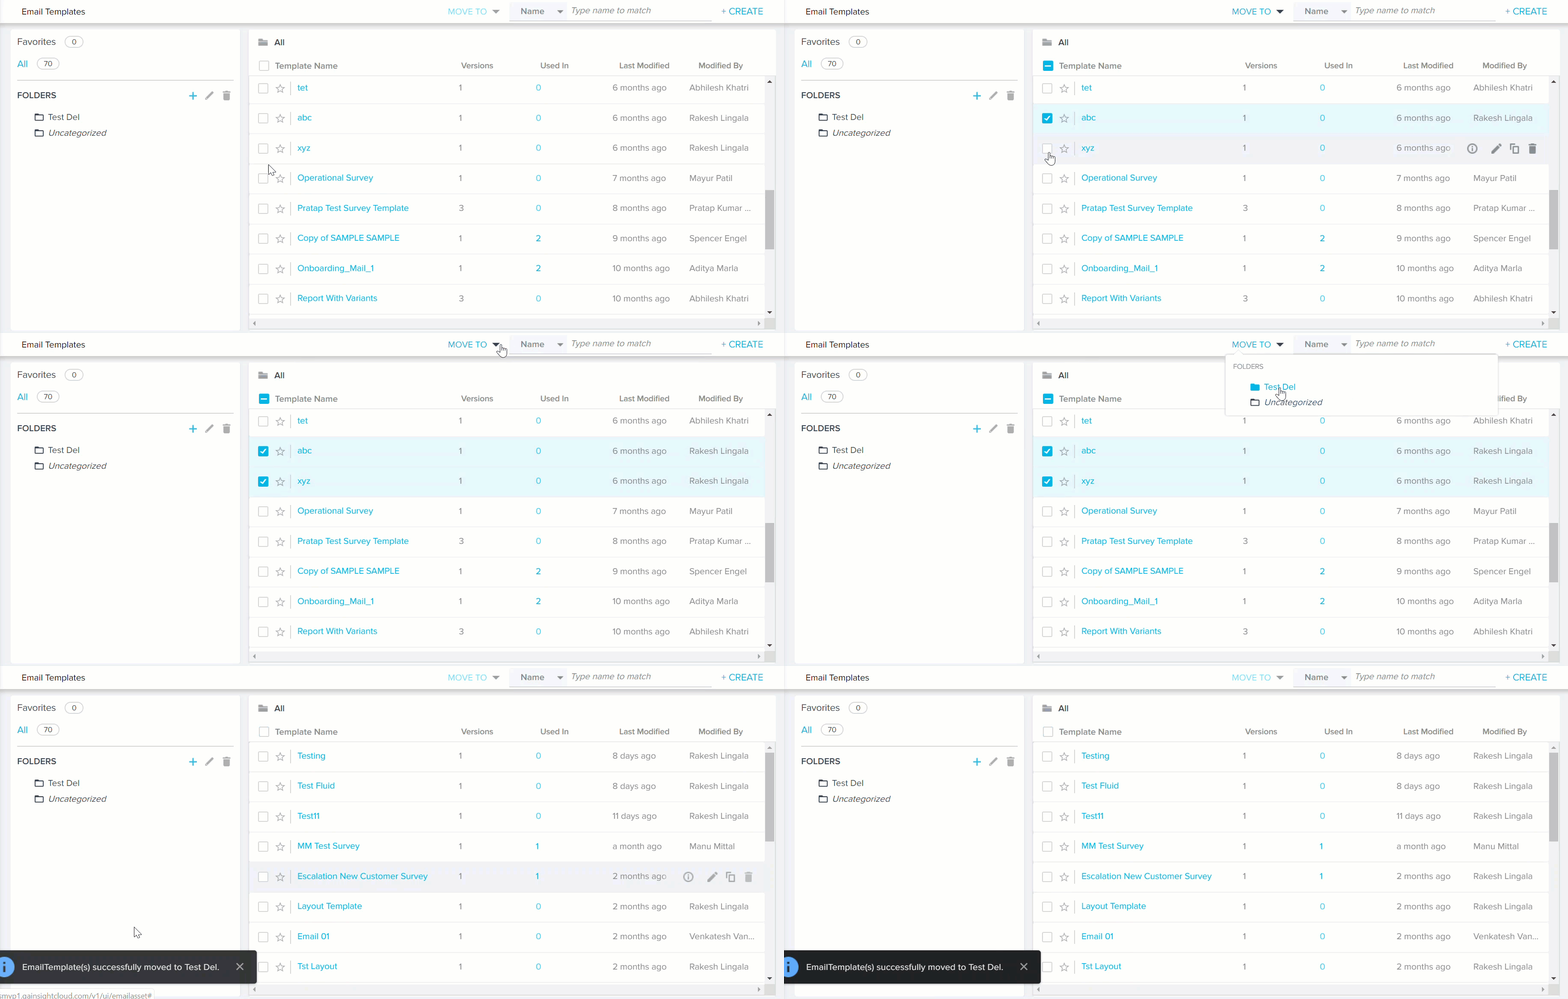
To move the email templates to a folder:
- Select the check box for the required email template(s).
- From the MOVE TO dropdown list, select the required folder or drag and drop to a particular folder.
- Click OK.
Delete Folders
You can delete a folder if it has no other sub folders under it or it does not contain any Email Templates. You cannot delete the Uncategorized folder.
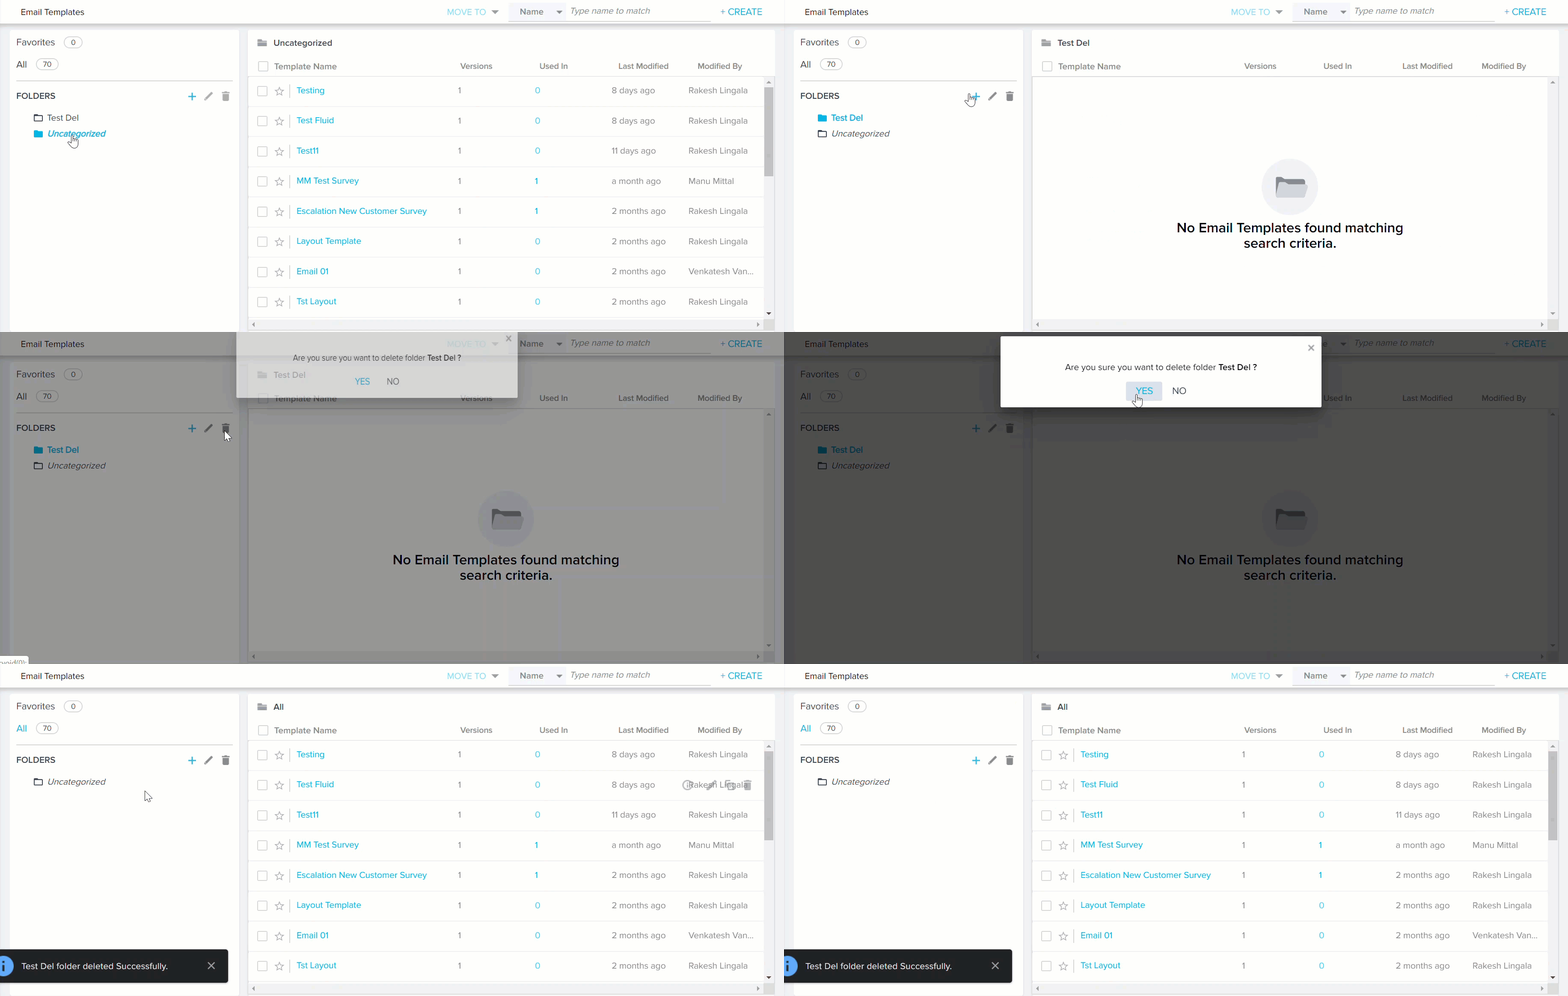
To delete a folder:
- Select the required folder and click the delete icon.
- Click OK.
Insert Button
Button Text can be formatted based on new formatting options while inserting Buttons, Survey Buttons, or Layout Buttons.
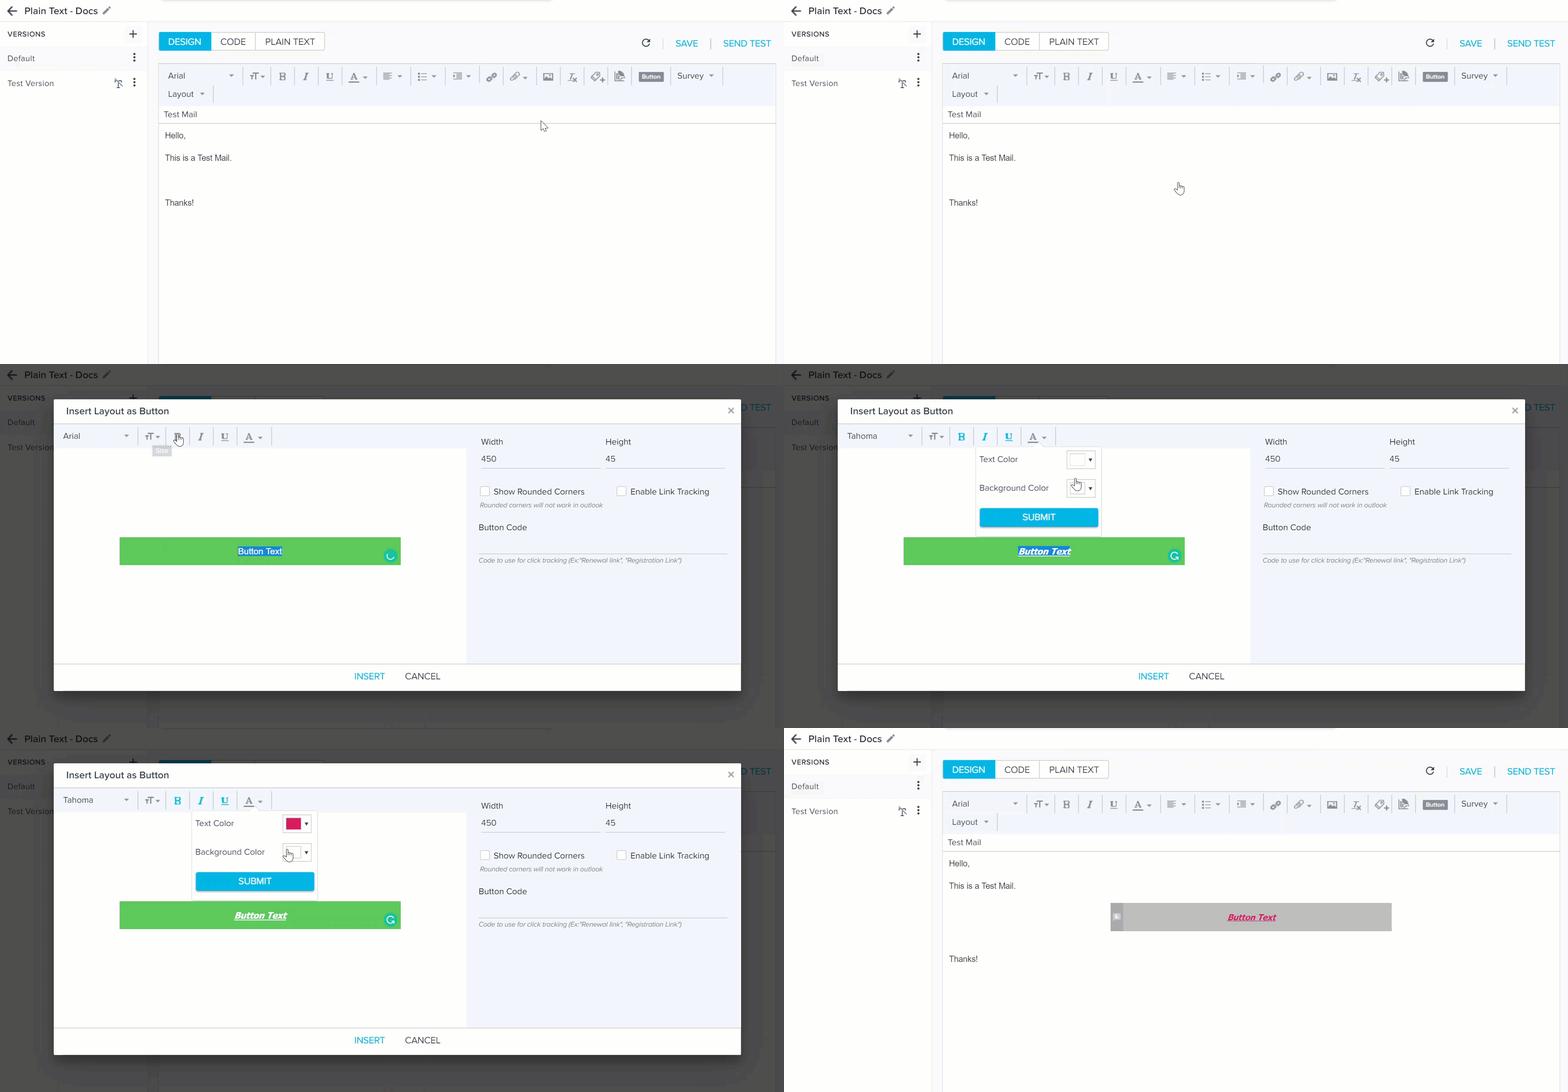
- Button Text: This is the text that displays on the button
- Link: Enter the URL to link to the button
- Token: Use this token to create parameterized URLs.
- Enable Link Tracking: Clicking this checkbox allows Gainsight to track when users click the button and navigate to the associated link and records this information within Journey Orchestrator Analytics. This feature lengthens the URL of the link, which can negatively impact email deliverability. For this reason, this feature is disabled by default.
Note: If the Enable Link Tracking option is enabled, the Survey link may not open as expected owing to the user's firewall security settings. - Width & Height: Select the width and height of the button in pixels
- Button Code: Enter a designation you would like to use for this button for click tracking purposes
- Insert Button DesignTools: Users can use the Insert Button design tools to modify the font of the text, increase/decrease the size of the font, make the font Bold/Italic/Underlined, and also modify the Button Text font color and Button background color.
You can use a link or button added to an email template to send Shared C360 Layouts through Program emails. To learn more about this feature, refer to the Send Shared 360 Layouts through Programs article.
Edit Token Properties
After inserting a token, select it and click Edit to edit its properties.
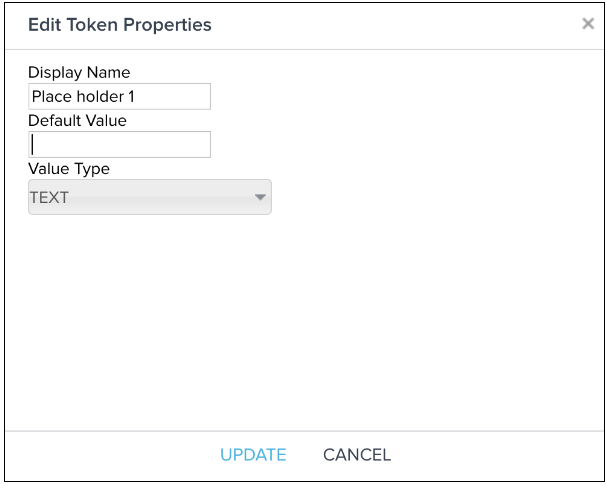
You can edit the following token properties.
- Display Name: the placeholder text or label for the tokenized field
- Default Value: enter text to be inserted in cases where the token value is missing (Example: for a first name field that is blank, the default could be "customer")
- Value Type: select Text, Date, or Number (supported formats listed below)
Supported Number and Date Formats for Tokens
HTML Editor
DESIGN and CODE tabs: On the template editor page allows the user to edit the email either in design mode or HTML code.
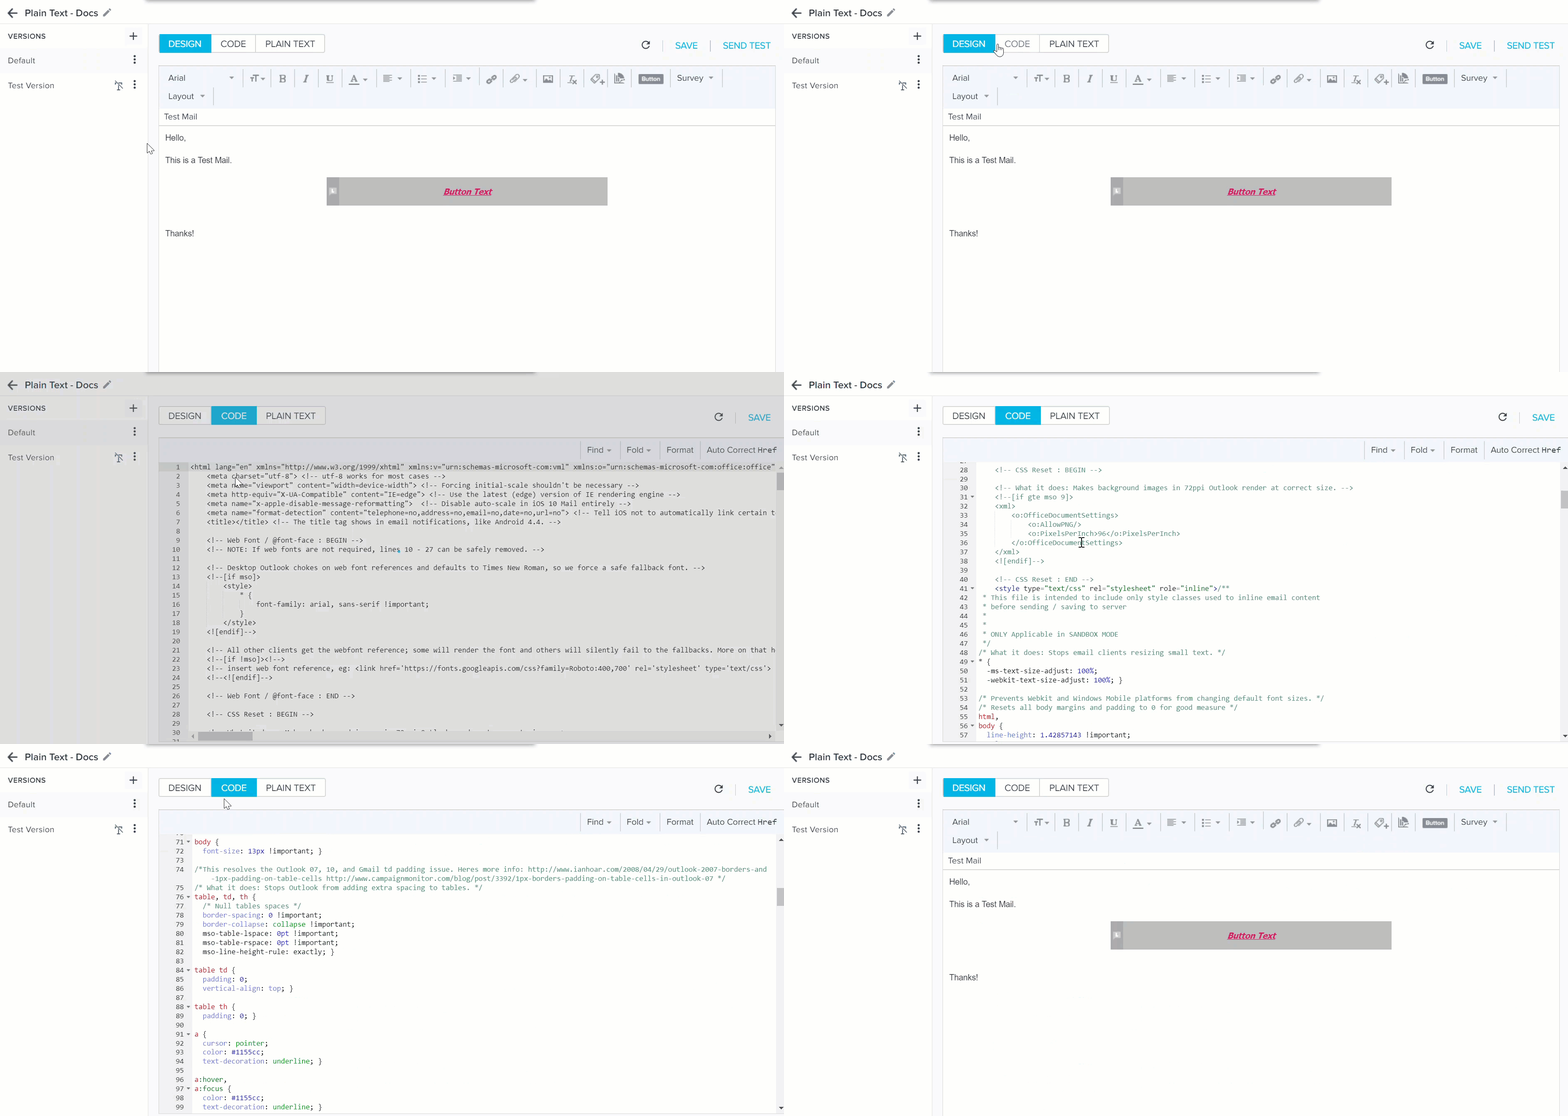
Search and Replace Text: Within the email template HTML editor, press Ctrl-F to pull up the text search bar, enter the text you are searching for, and click the + icon to enter the text you would like to replace it with. You can select to replace either the highlighted text, or every instance of the text in the template.
Collapse Style and Image Attributes: Within the email template HTML editor, click the gear icon in the upper-right corner. You can select Fold style/src to collapse all style and image attributes in the template’s HTML, and Unfold style/src to expand all style and image attributes. When the attributes are collapsed, you can click the purple collapse icon in the HTML to expand the individual element.
Plain Text Editor
Admins have an option to plain text format emails in JO. A plain text email is a simple email message that only includes text without any formatting, images, or graphics.
Some of the benefits of using Plain Text feature in Email templates are:
- Increase in email delivery.
- Increase in customer touches (email open rates).
- Increase in response (link/survey click rates).
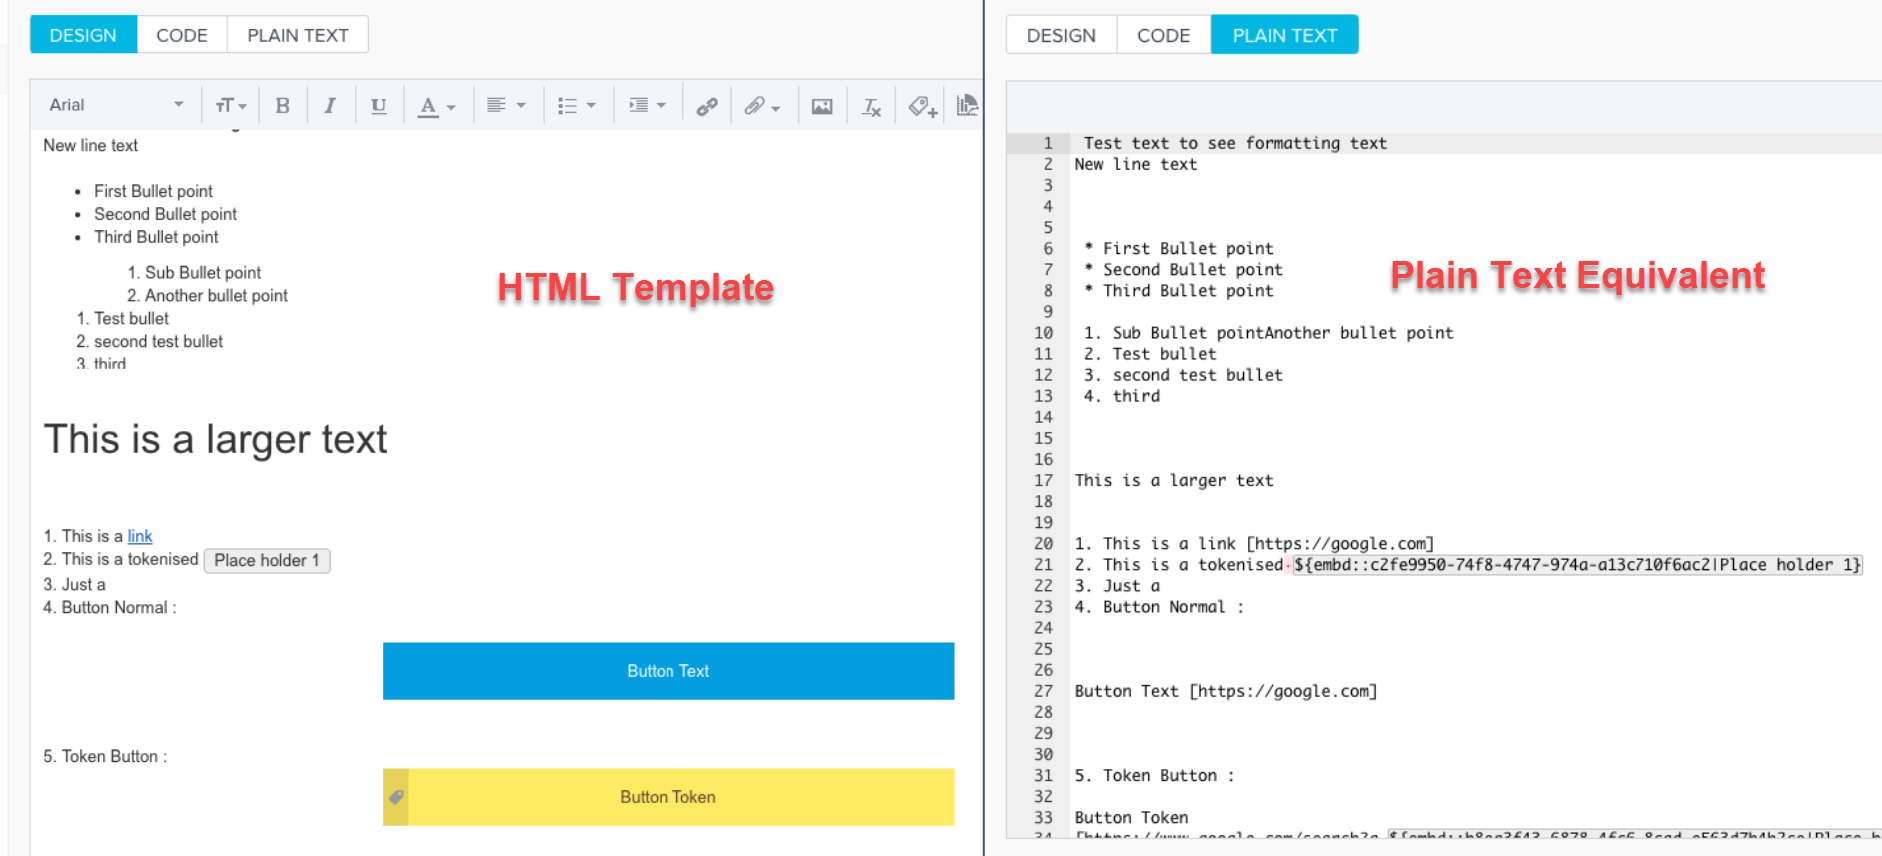
The following are some of the features of the Plain Text format:
- All rich text is converted, including attachments.
- Tokens are converted and are highlighted in grey color in Plain text format along with token IDs. Users can click Ctrl + 4 to add or view the list of available tokens used in the existing template.
- Links (including image links) are converted along with the link text.
Notes:
- Images without links are not converted to plain text format. But, images with links are converted to plain text with the name of the image and link.
- Currently, the following are not supported in Plain Text format:
- Inline Images
- Inline Reports
- Inline Surveys
- Inline Tabular reports
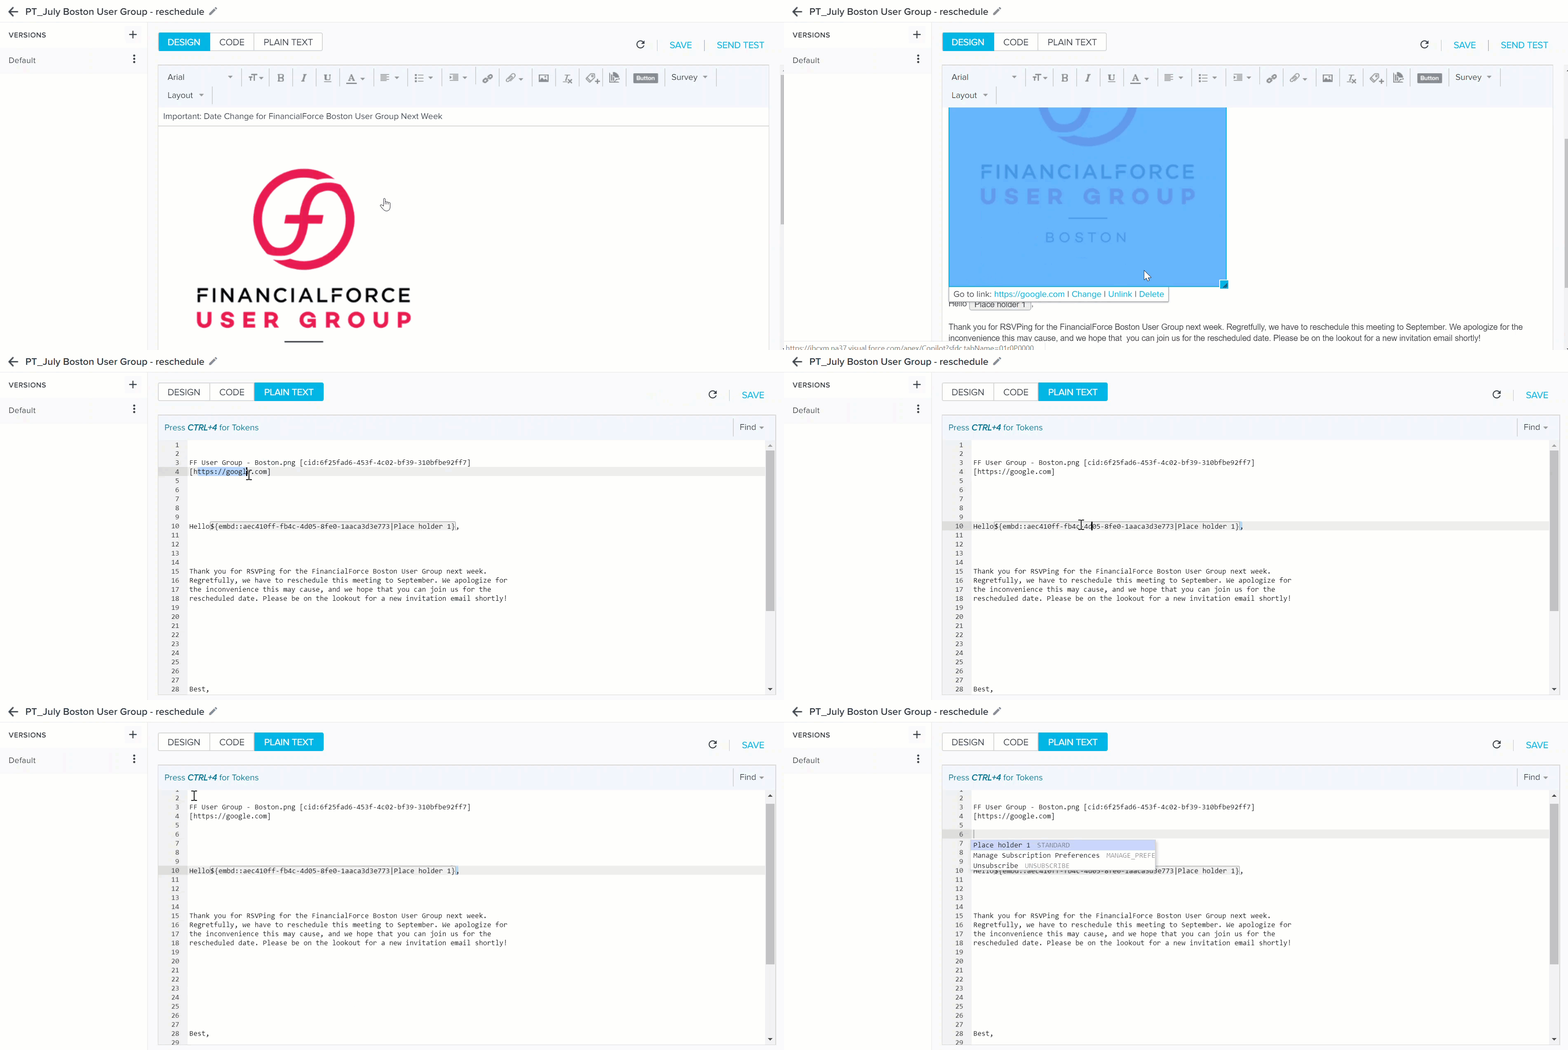
For more information about how to generate plain text format, refer to the Support of Plain Text format in Email Templates article.
Opt-Out Configurations
Admins have several configuration options to control the opt-out experience for any email recipient.
Opt-Out Settings
The following are opt-out configuration options:
- Email Type: Select if the email template is Non-operational or Operational. For more information on operational emails, refer to the Operational Emails article.
- Select Categories: Select Opt-Out Categories for your email template. You must select at least one category to save the email template. Opt-out categories are configured under the Email Preferences page. For more information on adding categories, refer to the Email Opt-Out Configurations article.
- Select Page: Select an Opt-Out Page for your email template. The pages available for this field are determined by the opt-out categories selected. If no category is selected, then no page will be available. You must select an opt-out page to save the email template. Opt-out pages are configured under the Email Preferences page. For more information on configuring opt-out pages, refer to the Email Opt-Out Configurations article.
IMPORTANT: According to new regulatory changes, a one-click opt-out footer is now mandatory for non-operational emails. If the footer lacks a one-click unsubscribe link, an error will occur, and administrators will need to make the necessary adjustments.
For the old editor, create the link by selecting text in the footer and clicking on the link option in the toolbar. In the new editor, select text in the footer, click on the link option in the toolbar, and then click on the footer to apply the link.
Operational Emails
Operational emails are intended for sharing important information specific to a customer or based on a specific customer's activity.
You can send operational emails without including an opt-out message with the Manage your subscription preference settings link in the footer. To mark an email as operational, admins have to select Operational at the time of creating a template.
Contacts who have unsubscribed to regular emails from Journey Orchestrator will receive operational emails regardless of the categories they have unsubscribed from. For operational emails, the Power List size must not exceed 5,000 contacts.
Notes:
- You should only use this option when you are sending operational or transactional emails such as reminders for an upcoming renewal, or welcoming a new customer.
- You can schedule an Operational email any number of times in a day.
Opt-Out Message
At the bottom of the email template, the opt-out message appears for all non-operational emails.
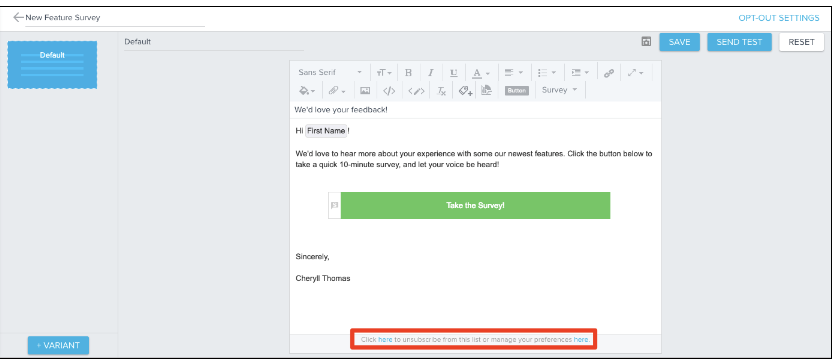
You can click to edit the text of the opt-out message. By default, the message will include two links:
- Clicking the first link will automatically unsubscribe the user from all emails with the same category as the email they unsubscribed from.
- Clicking the second link will open the Manage Preferences page in a new tab. On this page recipients can select specific categories to opt-out from, and provide a reason for why they are opting out. You can select which page to display here under Opt-Out Settings. By default, the Manage Preferences page will display as the following:
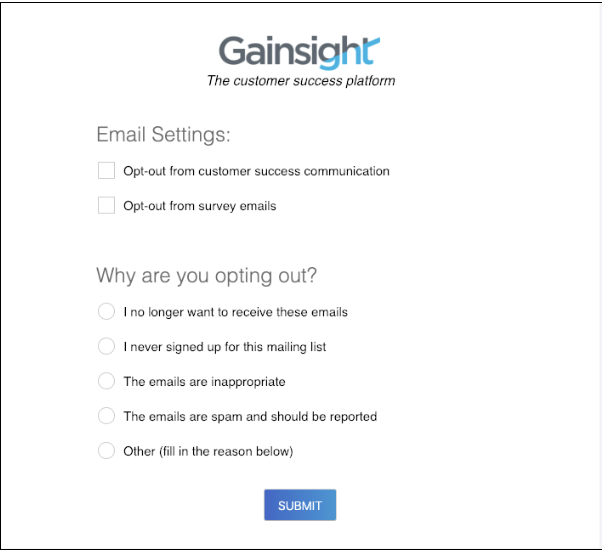
For more information on how to send emails without the opt-out message, refer to the Operational Emails section.
Note: The opt-out message links will not work in test/preview emails.
Tips
- Tokens added on the template are just placeholders; actual fields for the tokens are mapped when you set up the Program.
- Choose a layout for the email layout under the Resize Editor. It will maintain the integrity of your template, especially if you are using a complex format.
- You can view a report that displays performance stats of the Email Templates used within the Program module. To access the Email Template Performance Report, navigate to Digital Journey > Journey Analytics > Email Template Performance Report. For more information on Program Analytics, refer to the Reports Across Programs article.