Configure Gainsight Home
Gainsight NXT
This article explains how admins can configure Gainsight Home to provide your CSMs with relevant information and right workflows.
Overview
Gainsight Home is a centralized workspace for Customer Success Managers (CSMs) that can be configured with widgets from various features in Gainsight. It provides your CSMs with the most important insights and action items at one place thus making their work more productive.
As an admin, you can configure the widgets and reports that matter most to your business requirements, and help your CSMs with their day-to-day tasks. For more information on Gainsight Home, refer to the Gainsight Home Overview article.
Configure Gainsight Home
CSMs do not see Gainsight Home as their home page until you configure and publish it from Administration > Gainsight Home. The following configurations are available for you to get started:
- Gainsight Recommended: This view comprises pre-configured widgets and reports recommended by Gainsight. You need not check for updates manually. Gainsight automatically updates your Gainsight Home with new widget(s) as and when they are available.
- Custom: You configure Gainsight Home with custom widgets and reports. You have full control to customize the home page for your CSMs based on your business workflow. For more information, refer to the Create Custom Gainsight Home section.
IMPORTANT:
- After you publish Gainsight Home, the Home icon navigates to Gainsight Home. To view Dashboards (previously navigated when clicked on Home icon), click Dashboards on the left menu pane.
- If you have created a custom permission bundle for your CSMs, ensure that they are assigned access to Home and Dashboards in the Navigation Permissions section. For more information, refer to the Bundles section in the Permission Bundles article.
- Gainsight Home is available only to Full License users. Viewer+ Analytics and Viewer License users continue to see the Dashboard and Timeline respectively as their home page. For more information on user license types in the Gainsight, refer to the Gainsight License Types of the User License Management article.
.png?revision=1)
Publish Gainsight Recommended Home
Get started instantly with Gainsight Recommended Home configuration which is a pre-configured Gainsight Home. Preview and publish Gainsight Home right away so that your CSMs have access to the following widgets on the home page:
- Summary Ribbon
- My Portfolio
- Timeline
- Calendar
- Cockpit
For more information on these widgets, refer to the Widgets in Gainsight Home section.
To publish Gainsight Recommended Home:
- Navigate to Administration > Gainsight Home. The Gainsight Home configuration page is displayed.
- Click on the Home tab.
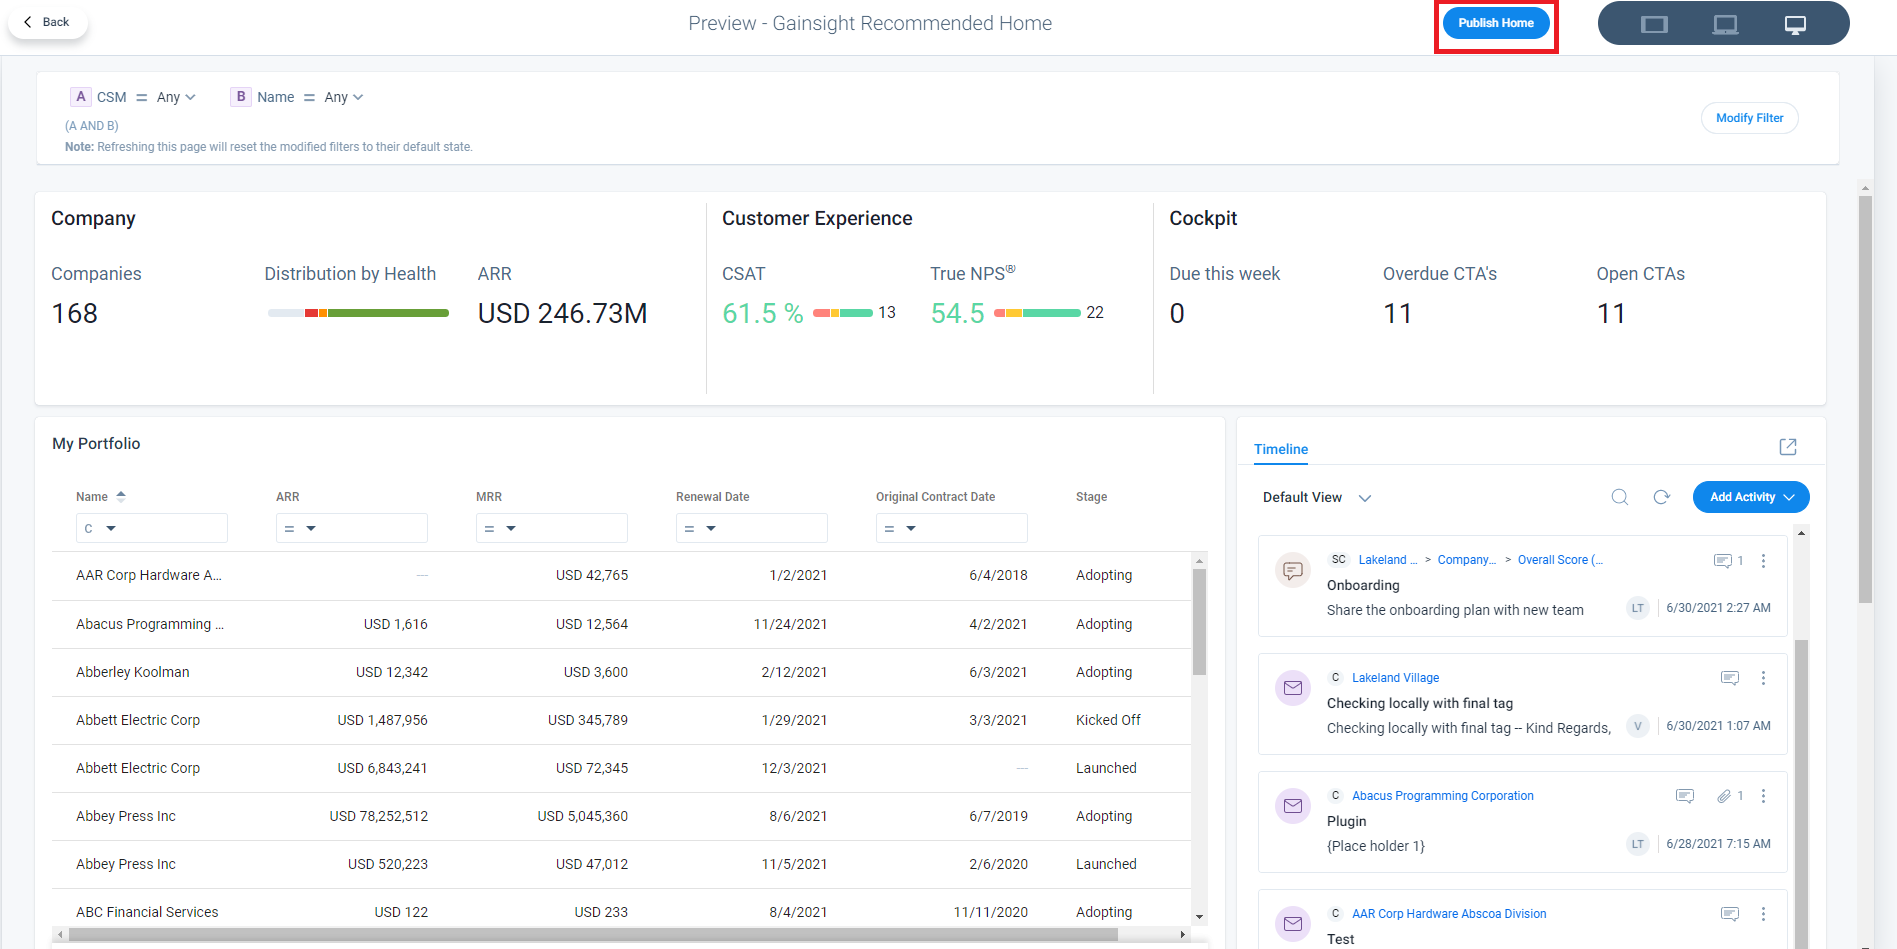
- On the Gainsight Recommended card, click Preview.
- On the Preview - Gainsight Recommended Home page, preview the widgets and look and feel of the home page in various screen resolutions.
- Click Publish Home.
Create Custom Gainsight Home
Design and customize Gainsight Home with various widgets that are relevant to your CSMs. The Custom Gainsight Home gives you full control of widgets and reports that are displayed on the home page.
To configure Custom Gainsight Home:
- Navigate to Administration > Gainsight Home > Configuration. The Gainsight Home Configuration page appears.
- Click the Layout tab. A list of available home layouts appears.
- Click the Home Layout name you want to edit. The Gainsight Home Builder page is displayed.
- Drag-and-drop the widget(s) from the Widgets pane. For more information on how to configure individual widgets, refer to the Widgets in Gainsight Home section.
- (Optional) Turn ON the Live Data toggle to render the widgets as you add.
Note:
- For a light-weight drag-and-drop widget experience and improved responsiveness when you have multiple widgets, turn OFF the Live Data toggle.
- For removing empty spaces on the layout, click the auto-arrange button.

- Click Modify Filter, to define the filter conditions for widgets. For more information, refer to the Configure Global Filters section.
- Click Preview to preview the customized home.
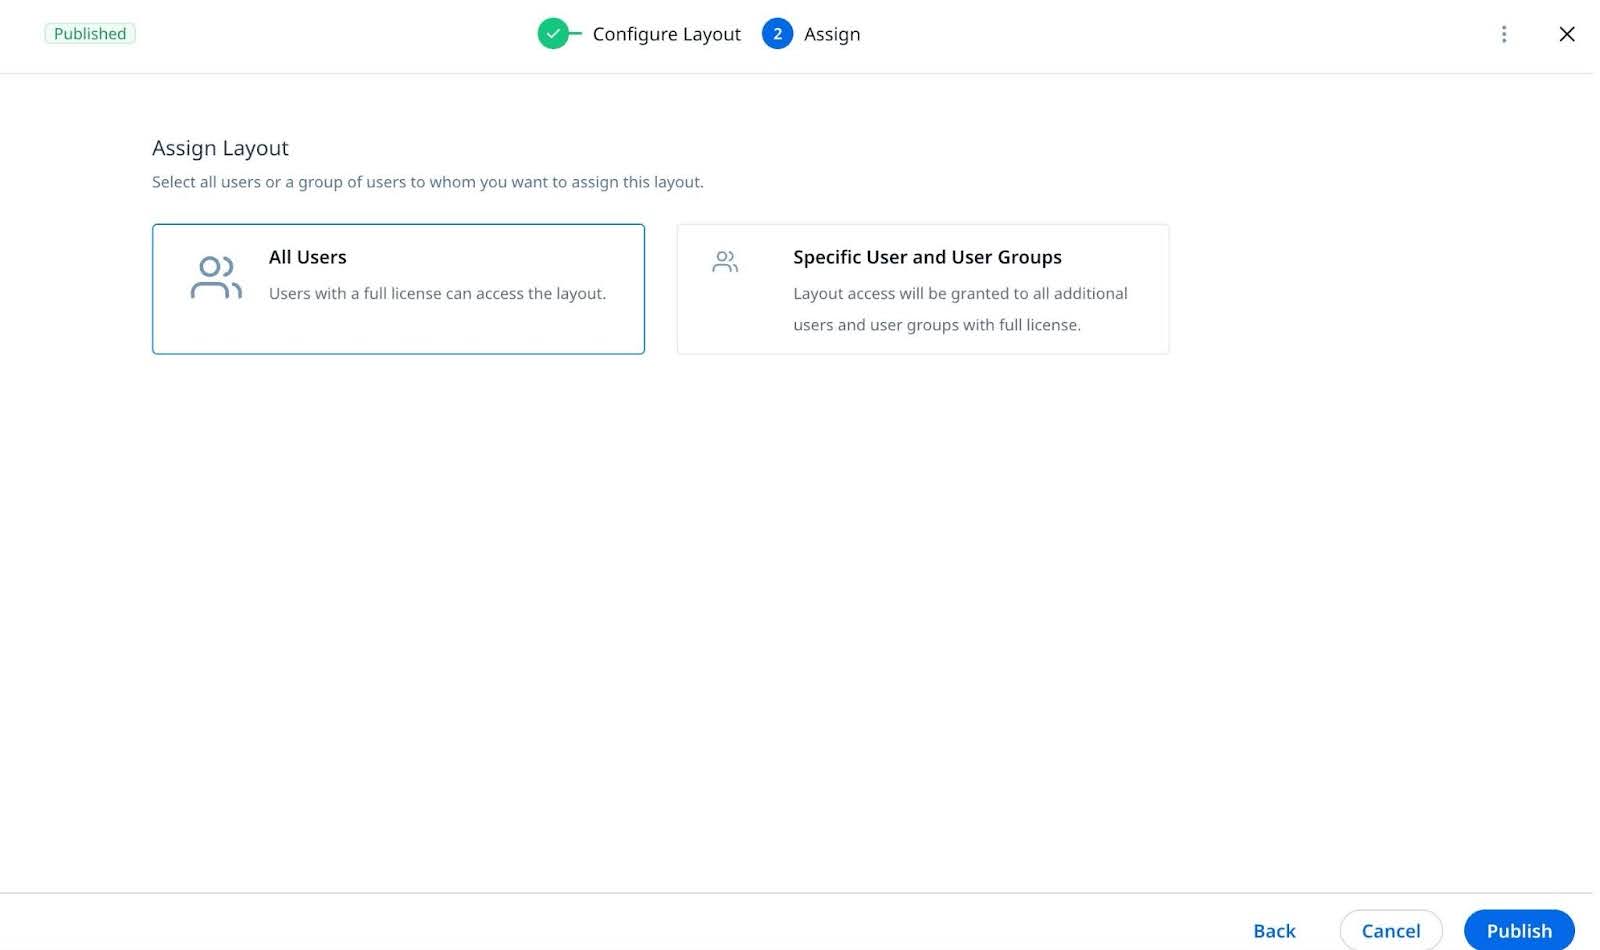
- Click Save and Next. The Assign Layout page appears.
- Select one of the following options:
- All Users: Assigns the layout to all users with a full license.
- Specific Users and User Groups: Assigns the layout to selected users or groups.
- Click Confirm to apply the layout to users who have not personalized their home page.
Configure Global Filters
Widgets in Gainsight Home use global filters to refine data based on selected object fields, ensuring users see only relevant information.
Supported Filter Types:
- Company & Relationship: Activates filtering based on company and relationship objects.
- Company Team: Activates filtering based on assigned company teams.
- Relationship Team: Activates filtering based on assigned relationships.
Note: Filters configured by you can be modified by CSMs based on their requirements.
Feature Enablement Requirements
Before configuring filters, ensure the following features are enabled:
| Feature | Purpose |
|---|---|
| Company Team Enabled | Check the availability of the Company Team Objects. |
| Relationship Team Enabled | Check the availability of the Relationship Team Objects. |
| Layout Team Filter Enablement | Activates the Team filters based on Gainsight Home layouts. |
Note: Without these features enabled, Company Team and Relationship Team filtering options won’t be available.
To configure global filters:
- Navigate to Administration > Gainsight Home > Configuration.
- In the Gainsight Home Builder page, click Modify Filter.

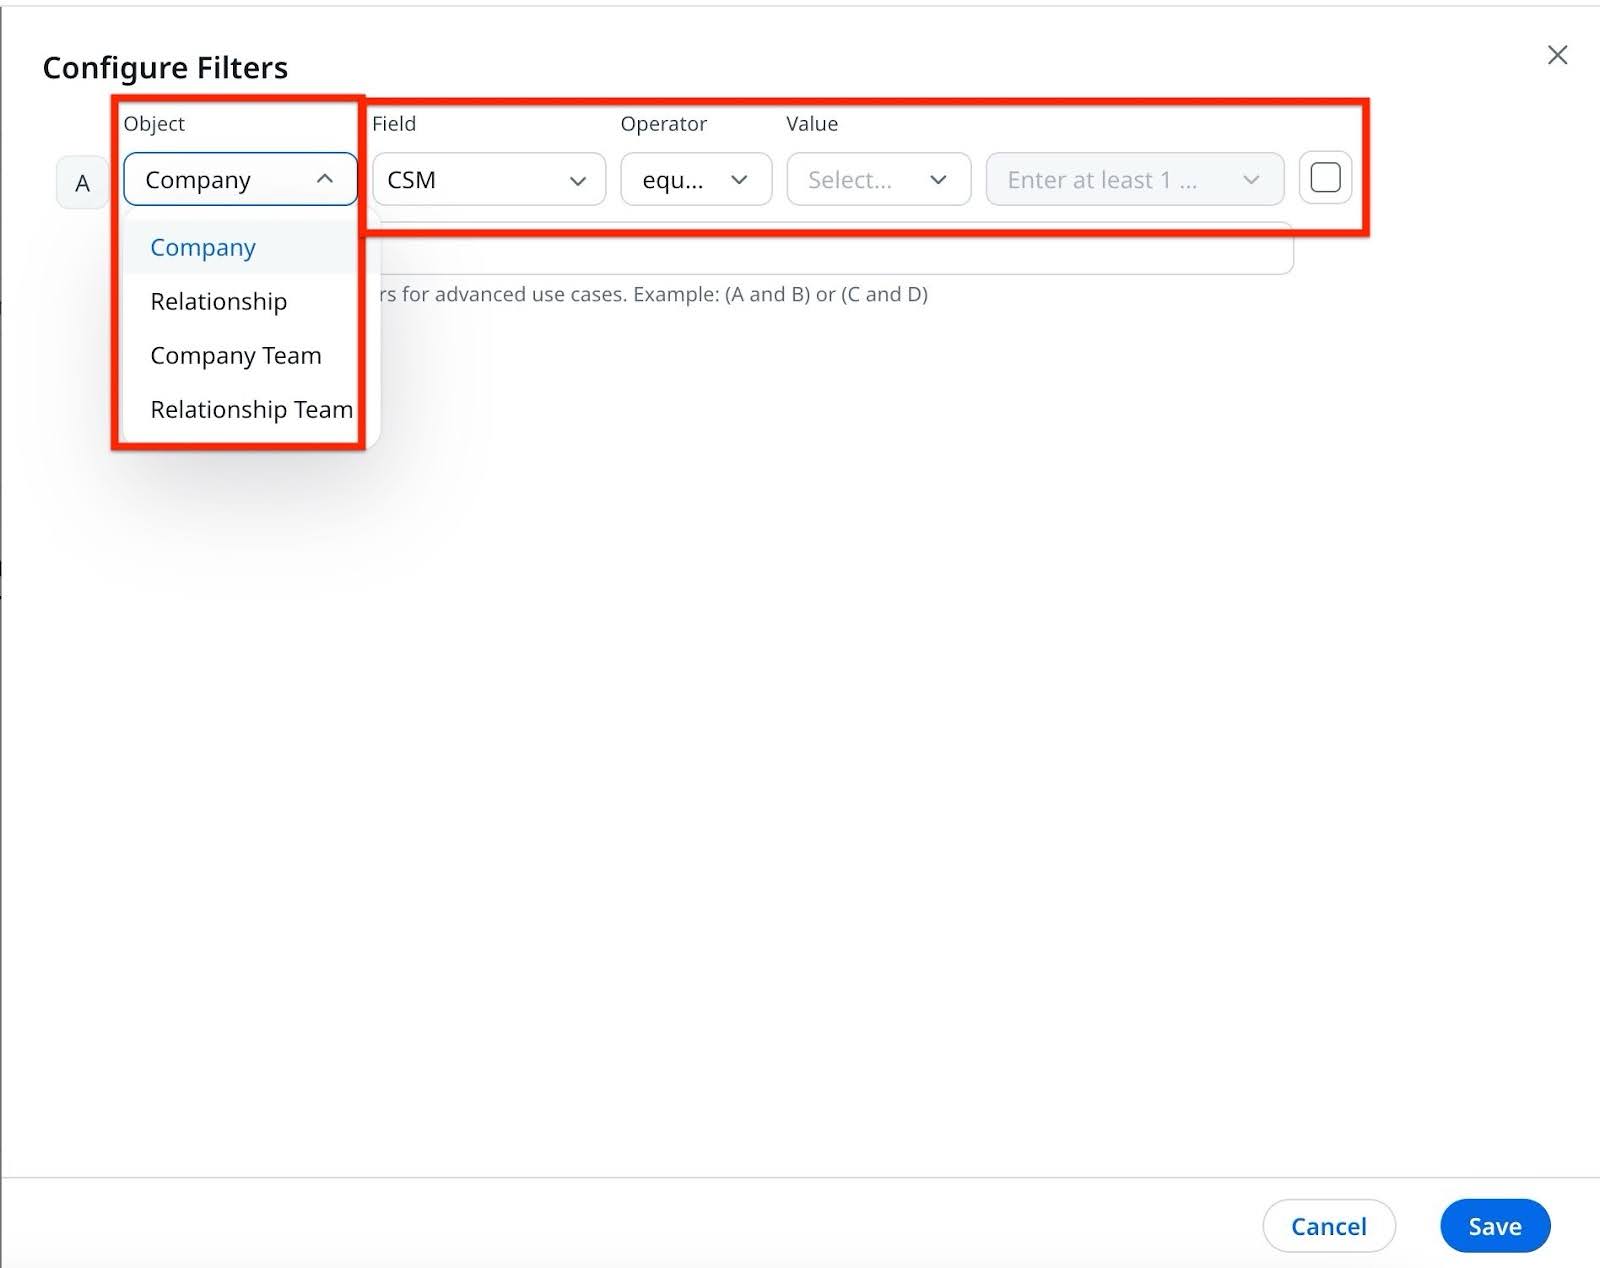
- In the Configure Filters section, specify the filter criteria. Perform the following sub-steps:
- Select Company, Relationship, Company Team or Relationship Team in the Object drop-down field.
- Select Field (data field) in the object.
- Select Operator and specify appropriate value.
- Select the check box next to the Value field to include null values.
-
Click + to add a new filter condition.

- In the Advanced logic field, specify the logic to group the filter conditions. For example, (A AND B) OR (C AND D).
Note: Ensure that the logic for grouping the filter conditions is correct to avoid errors while loading widgets. - Click Save to apply the filters.
Note: The configured filters now apply to all widgets on Gainsight Home. If a filter is applied at the layout level, all widgets will automatically inherit that filter.
Admin Best Practices for Configuring Filters
Best practices help ensure accurate data filtering in widgets.
- Apply the team user filter first before adding Team Role or other filters to ensure correct data visibility.
- Use AND logic with the team user filter when applying multiple team filters to refine results effectively.
- Ensure that Company Team User filters are grouped with AND logic, while Relationship Team filters should also follow the same grouping structure.
How Widgets Apply Filters
Widgets display data based on applied filters, ensuring users see only relevant information based on their assigned companies, relationships, and roles.
| Filter Type | Applied On | Effect on Data Visibility | Can User Edit? | Example |
|---|---|---|---|---|
| Company Team User Filter | Company Team | Displays data only for the logged-in user’s assigned companies. | No | If Company Team = User’s Assigned Companies, the widget shows all assigned companies. |
| Team Role Filter | Company Team | Further refines the portfolio to display only companies where the user holds the selected role. | Yes | If Company Team + Team Role such as Channel Manager is applied, the widget shows only companies where the user is a Channel Manager. |
| Relationship Team Filter | Relationship Team | Displays only the relationships assigned to the user instead of companies. | No | A CSM manages multiple relationships across companies. |
| Relationship Team + Team Role Filter | Relationship Team | Further refines the relationship portfolio to show only relationships where the user holds the selected role. | Yes | If Relationship Team + Team Role such as Account Manager is applied, the widget displays only relationships where the user is an Account Manager. |
| User Filter (Auto-Applied) | Company Team / Relationship Team | Applied automatically to restrict data to the logged-in user’s assigned portfolio. | No | A CSM’s portfolio includes XYZ Corp, ABC Inc., and Answer Ltd. |
| No Team Role Filter | Company Team / Relationship Team | Displays all assigned companies or relationships without additional filtering by role. | Yes | If no Team Role filter is applied, the widget shows all XYZ Corp, ABC Inc., and Answer Ltd. in the portfolio. |
IMPORTANT:
- If the Company Team object is selected and a field such as Team Role is chosen, Gainsight automatically applies a Company Team User filter. However, if a User filter already exists, Gainsight does not add another.
- If a Company Team User filter is created, it cannot be edited.
- If a Company Team User filter exists alongside other Company Team filters, it cannot be deleted. If it is the only Company Team User filter, it can be deleted.
- If the selected Team Role has no associated data such as Channel Manager with no linked companies, no results appear.
- If a user has multiple roles, Gainsight Home displays all companies where the user matches any of the selected roles.
Automatic User Filter
Gainsight automatically applies to Team User filters when a Company Team or Relationship Team filter is selected to ensure users see only relevant data.
- If a non-user field is selected, Gainsight applies a Team User filter to restrict data to the logged-in user’s assigned companies.
- If a Team User filter already exists, Gainsight does not add another to prevent duplication.
- If the Team User field is selected, Gainsight does not apply an additional User filter.
- If a User filter is created automatically, its value is set to the current user and cannot be edited.
- If a Company Team filter (excluding Team User filter) exists, then the Team User filter cannot be deleted.
- If a Company Team filter contains only one rule, the User filter can be deleted.
Actions on Widgets
Resize, reposition, and delete the widgets based on how and when you want to show the widgets on Gainsight Home.
- To resize, hold and drag the widget at the bottom right corner. As the widgets are responsive, the data adapts to the size. For more information on the supported dimensions for each widget, refer to the Dimensions for Gainsight Home Widgets section.
- To reposition any widget after you add it to the layouts pane, hold and drag the widget within the layout pane.
- To delete, click the Trash icon.
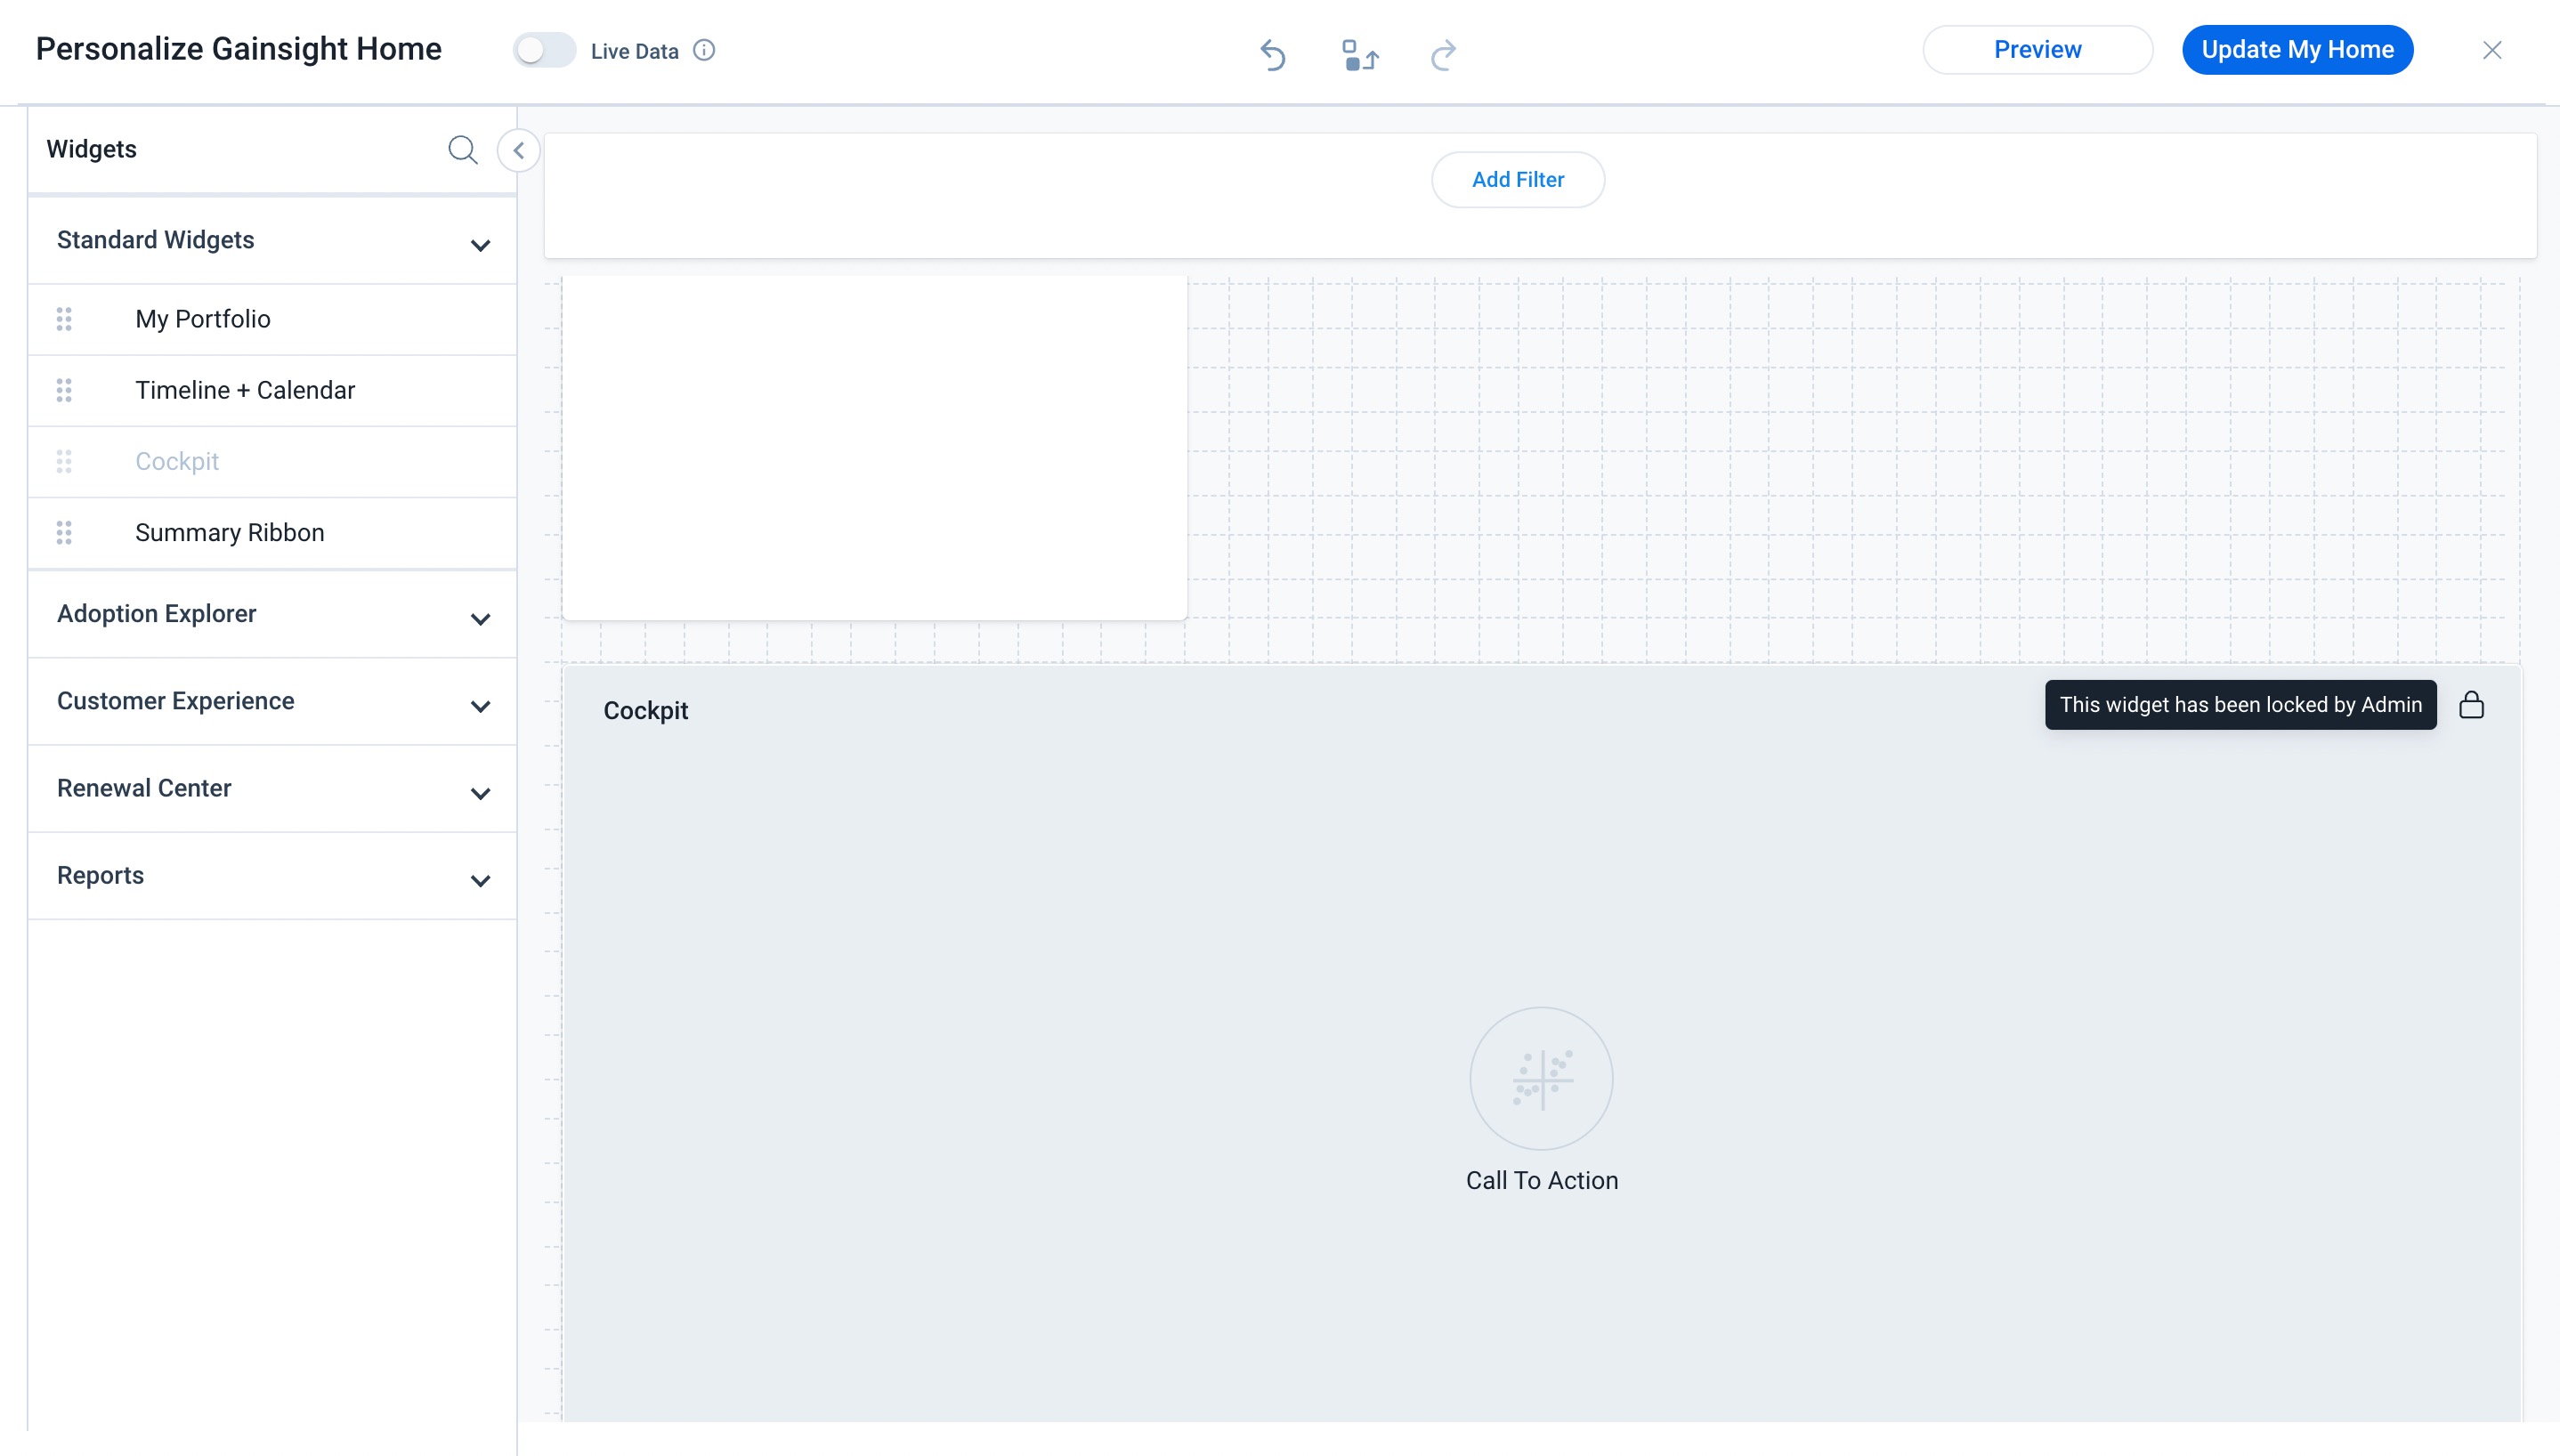
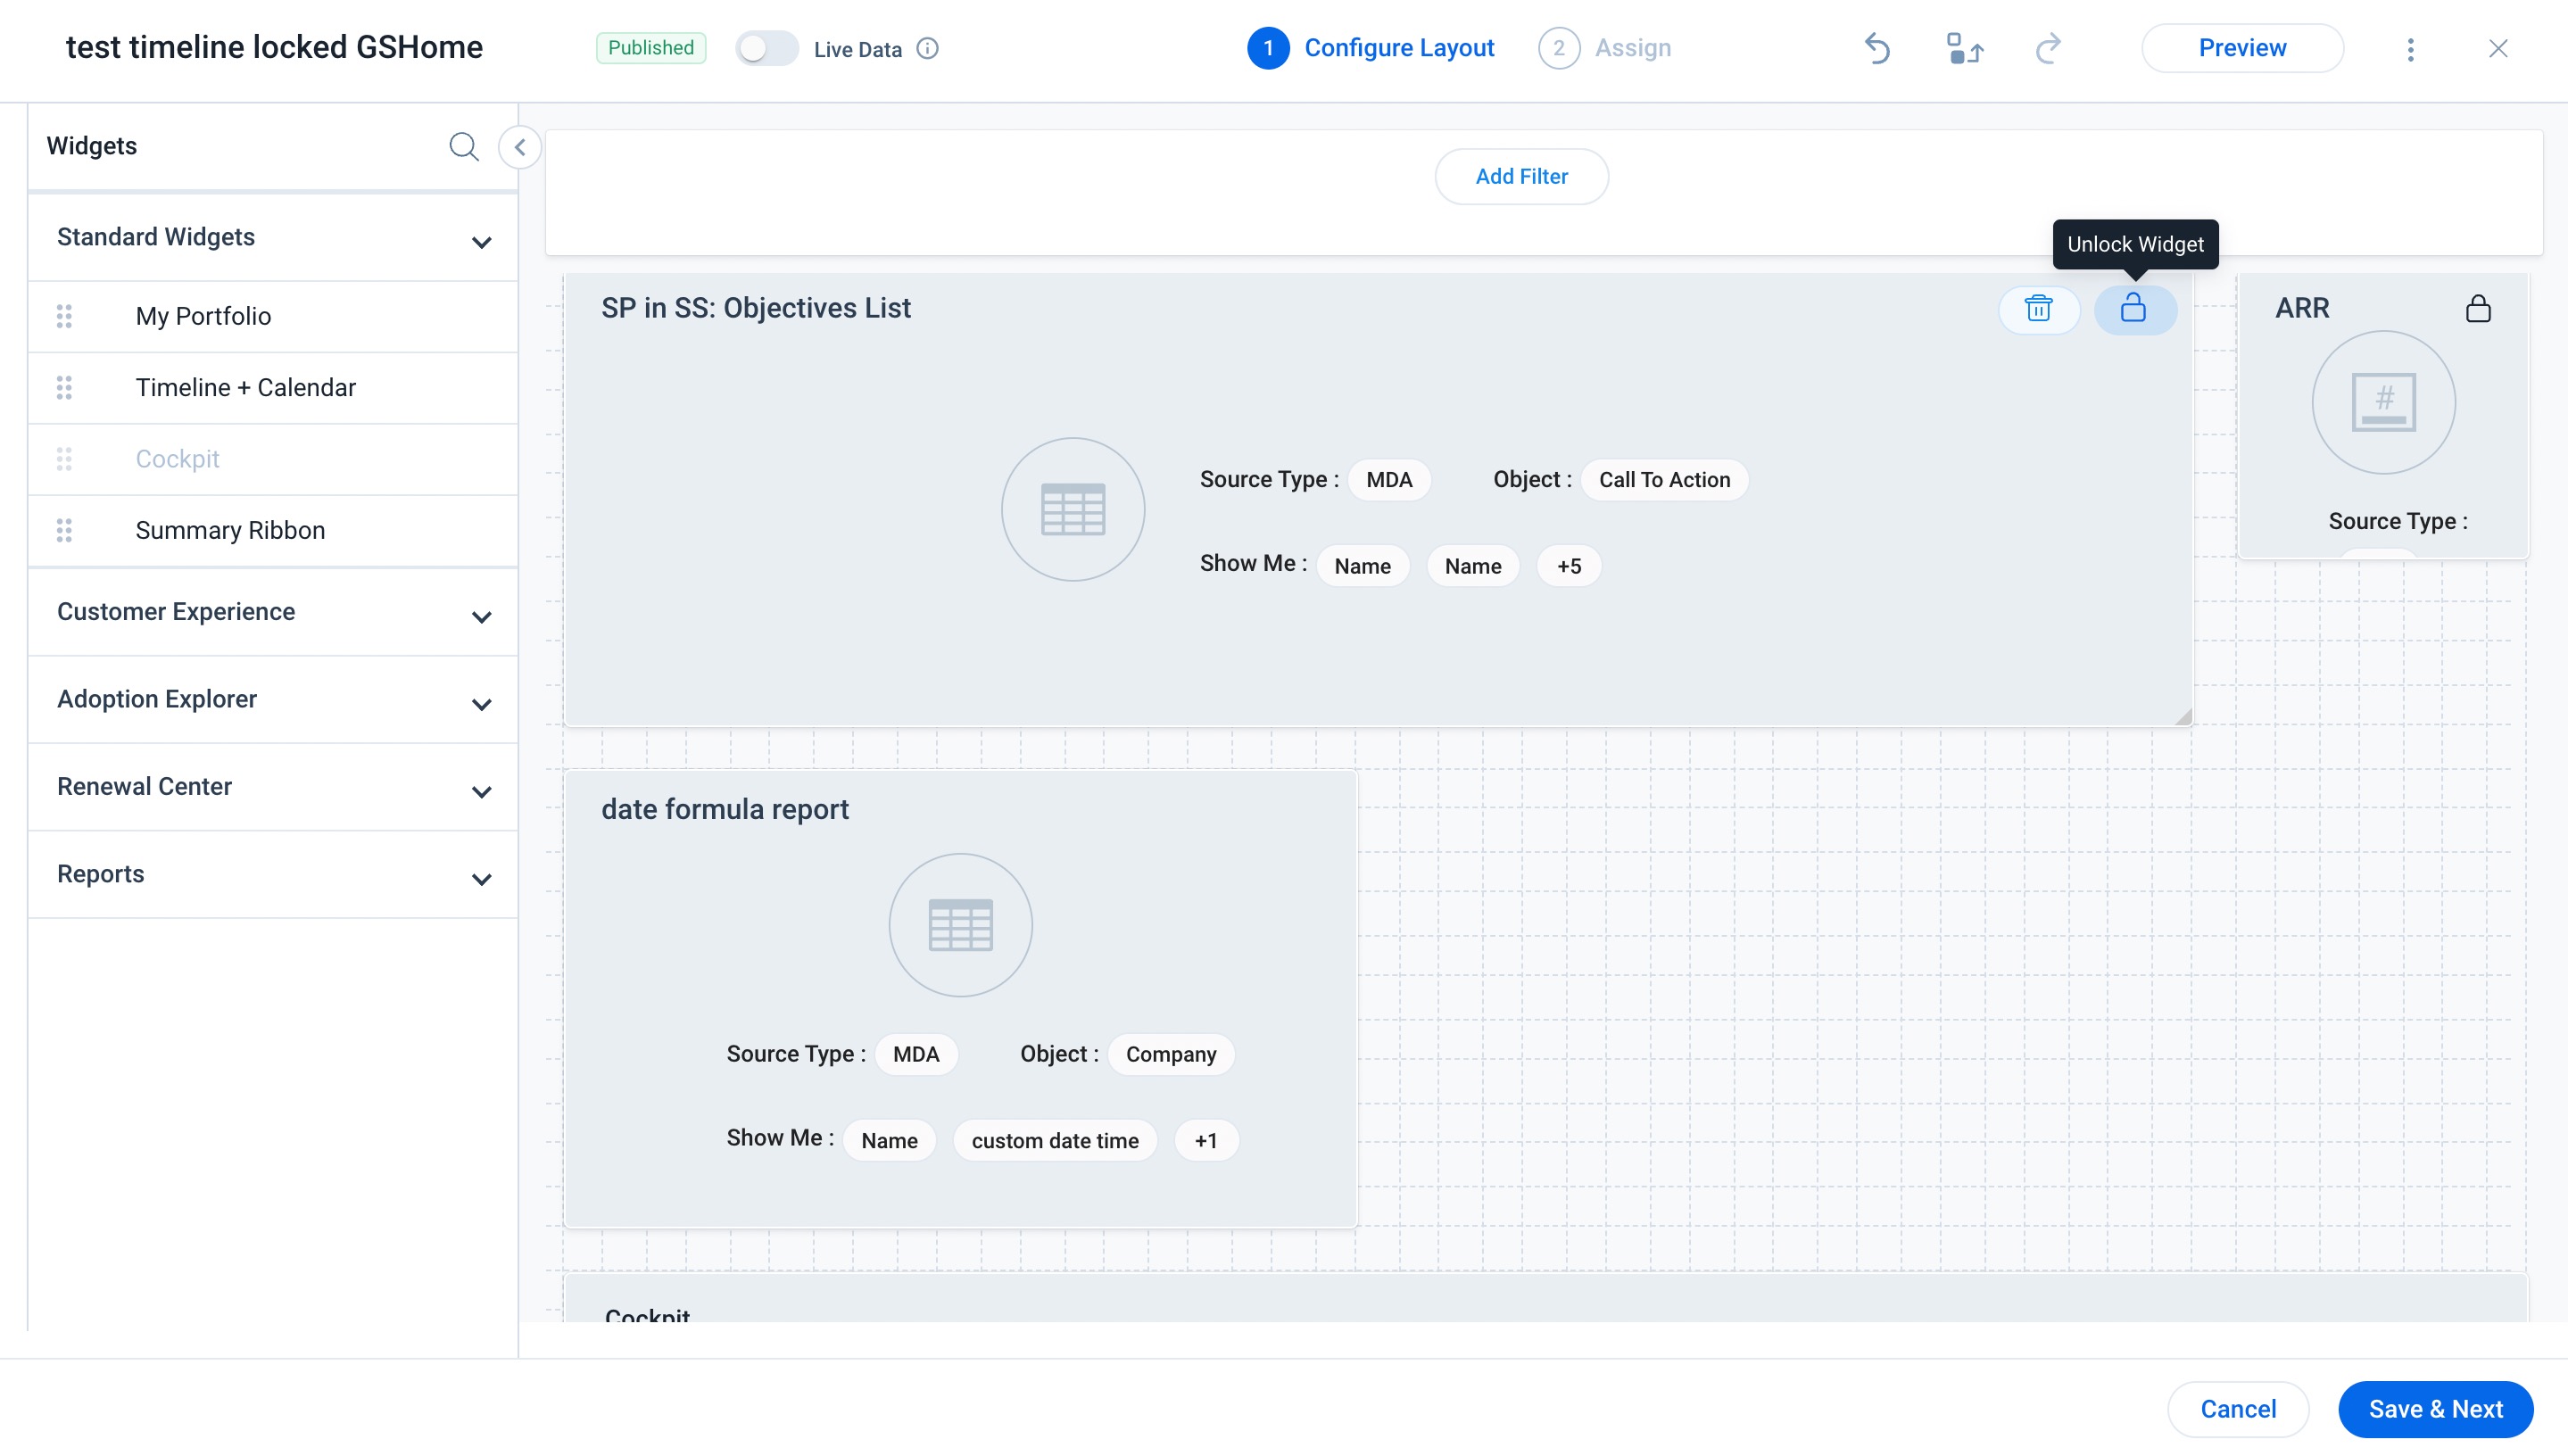
Lock or Unlock Widgets
In the Gainsight Home Layouts, you can lock or unlock widgets. Locking widgets in Gainsight Home will ensure that the CSMs always see certain widgets, even in the personalized Gainsight home.The primary goal of the lock and unlock widgets is to standardize the Gainsight Home Layout across all customized layouts.
One other benefit of having lock and unlock widgets is that when administrators make changes to a locked widget and publish them, those changes appear in every locked widget of the CSM's customized layout. The locked widget cannot be deleted, but CSMs can resize and move the widgets around in the personalized Gainsight Home.
To lock a widget:
- Navigate to Administration > Gainsight Home > Configuration. The Gainsight Home Layout tab appears.
- Click the three-vertical dots icon against the desired layout.
- Click Edit .The Gainsight Home Builder page appears.
- From the Widgets pane, drag and drop the required widget to the layouts pane which you want to lock. You also have the option to unlock the lock widgets in the layouts pane.
- Click lock icon. The widget gets locked.
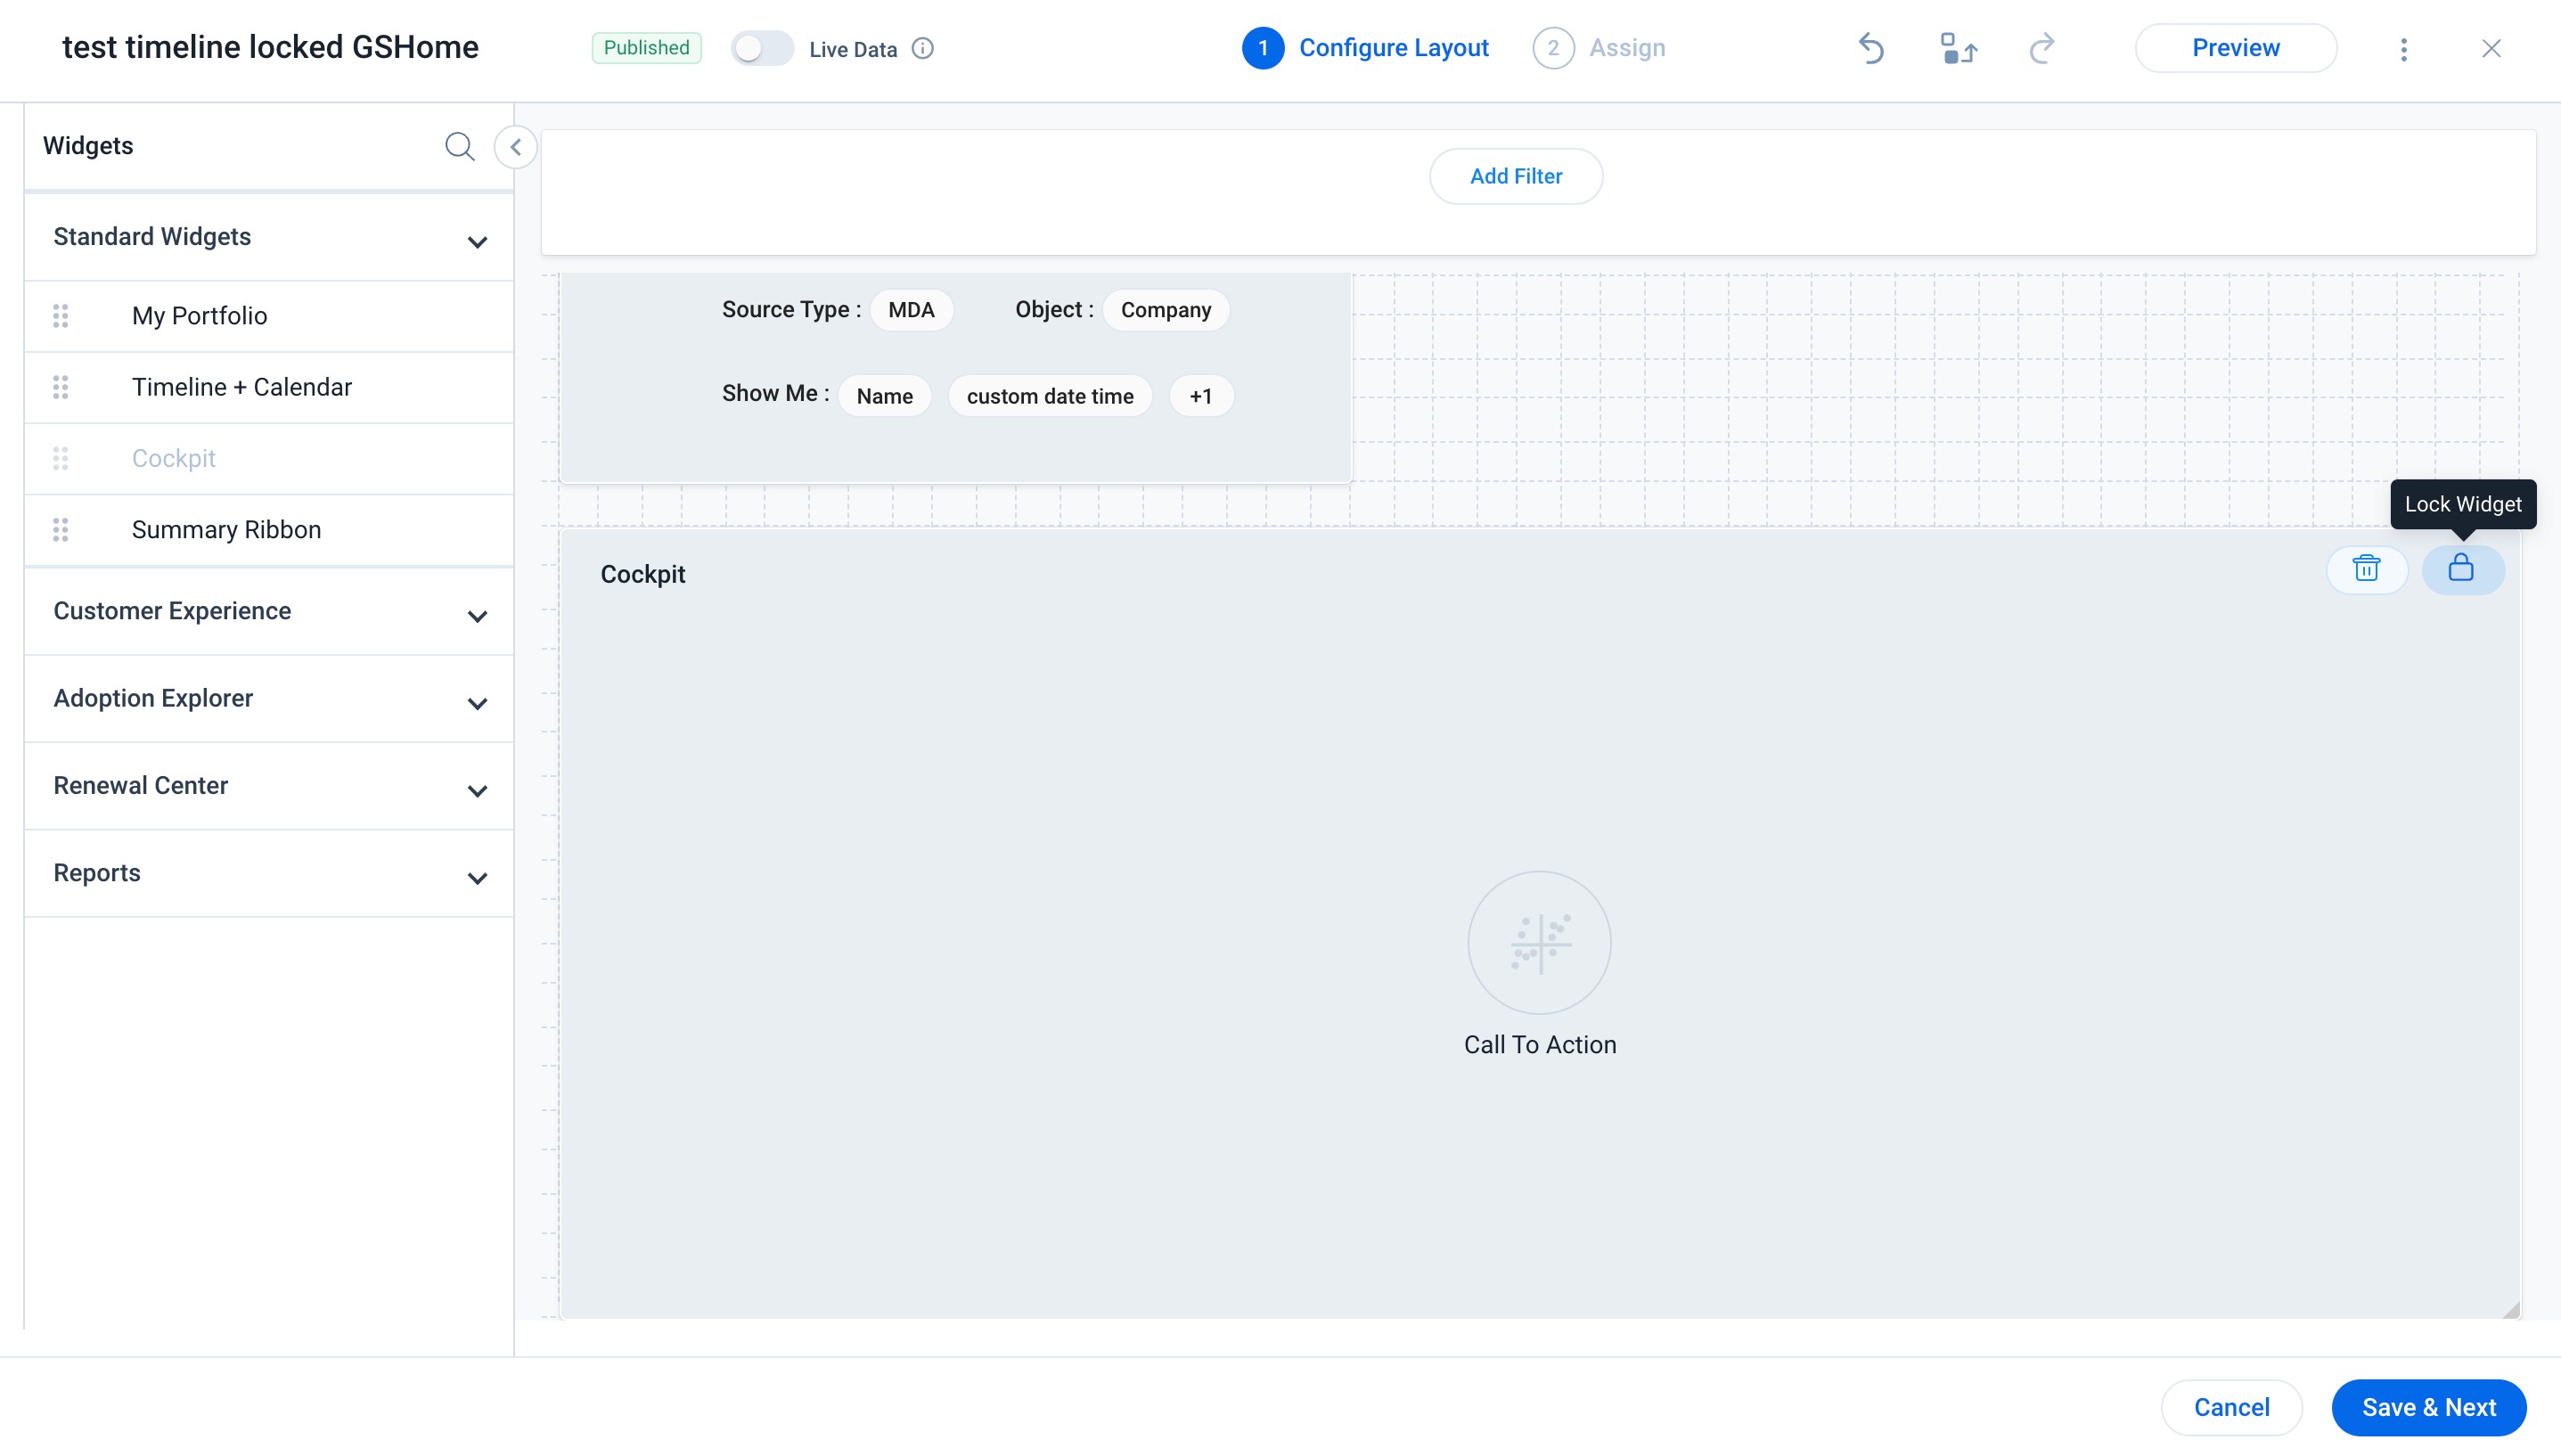
- (Optional) Click Preview to review the layout.
- Click Save & Next button. A message appears asking for confirmation.
- Click Confirm. The Assign tab appears.
- From the Assign Layout, Select All Users.
- Click Publish button.
- Navigate to the CSM Gainsight Home > Personalized Home Page.
- Hover over the lock icon of the locked widget. A message pops-up as This widget has been locked by Admin.
Notes:
- Standard widgets are excluded from the lock and unlock functions.
- In contrast to the unlocked widget, the Delete icon is not present in the locked widget for CSMs.
To unlock a widget:
- Navigate to Administration > Gainsight Home > Configuration. The Gainsight Home Layout tab appears.
- Click the three-vertical dots icon against the desired layout.
- Click Edit .The Gainsight Home Builder page appears.
- Hover over the lock icon. A message pops-up as Unlock Widget.
- Click lock icon. The widget gets unlocked.
- (Optional) Click Preview to review the layout.
- Click Save & Next button. A message appears asking for confirmation.
- Click Confirm. The Assign tab appears.
- From the Assign Layout, Select All Users.
- Click Publish button.
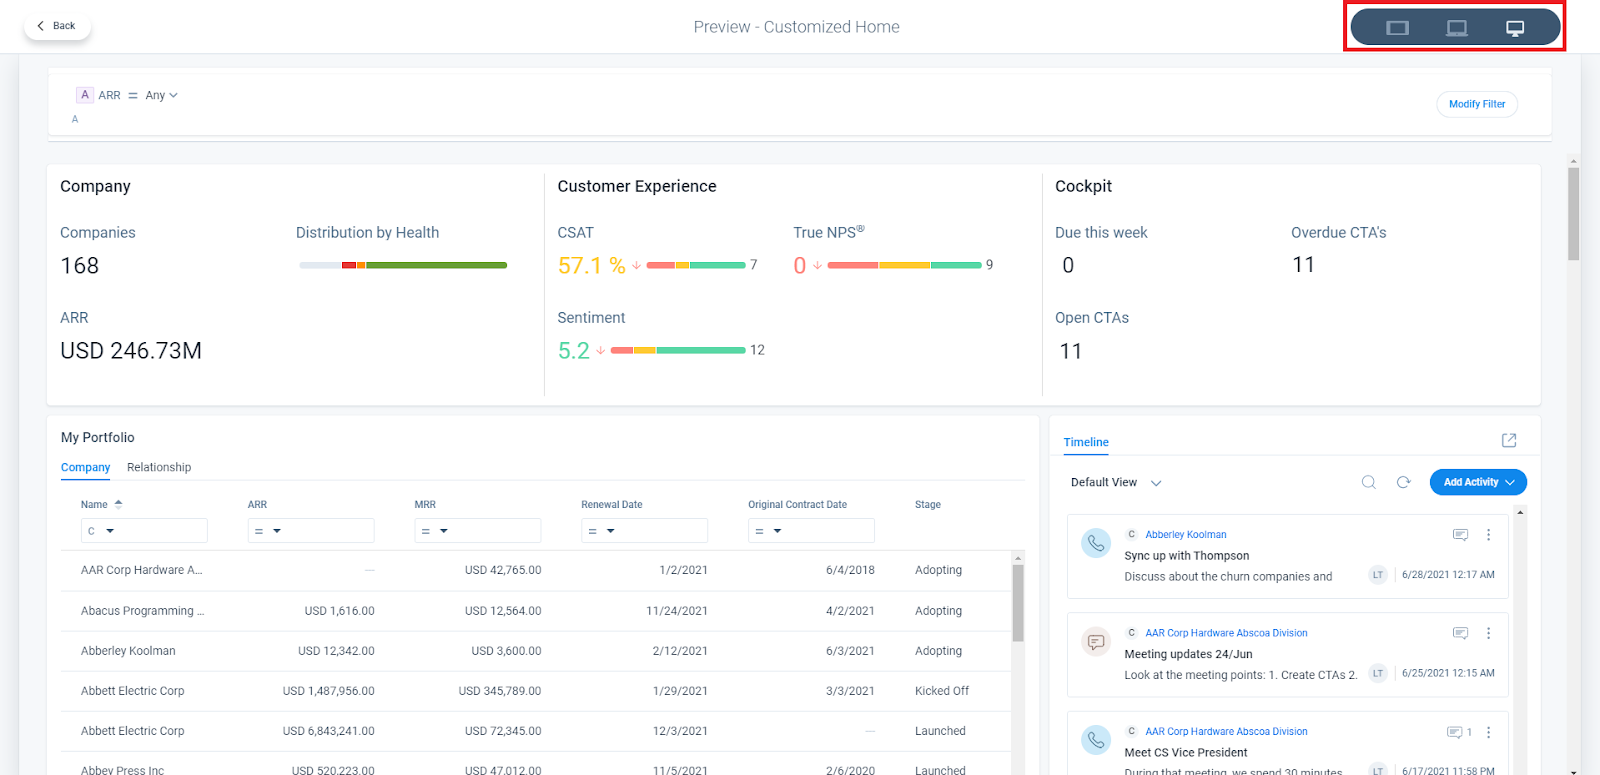
Preview Gainsight Home
After you configure Gainsight Home, preview the widgets on the layout pane. You can apply filters, and check the look and feel of the Gainsight Home in various screen resolutions.
To preview the Gainsight Home, click Preview. The Preview - Customized Home page is displayed with widgets that you configured.
Configure Gainsight Home Settings
Configure global settings for Gainsight Home, and for widgets from various features in Gainsight.
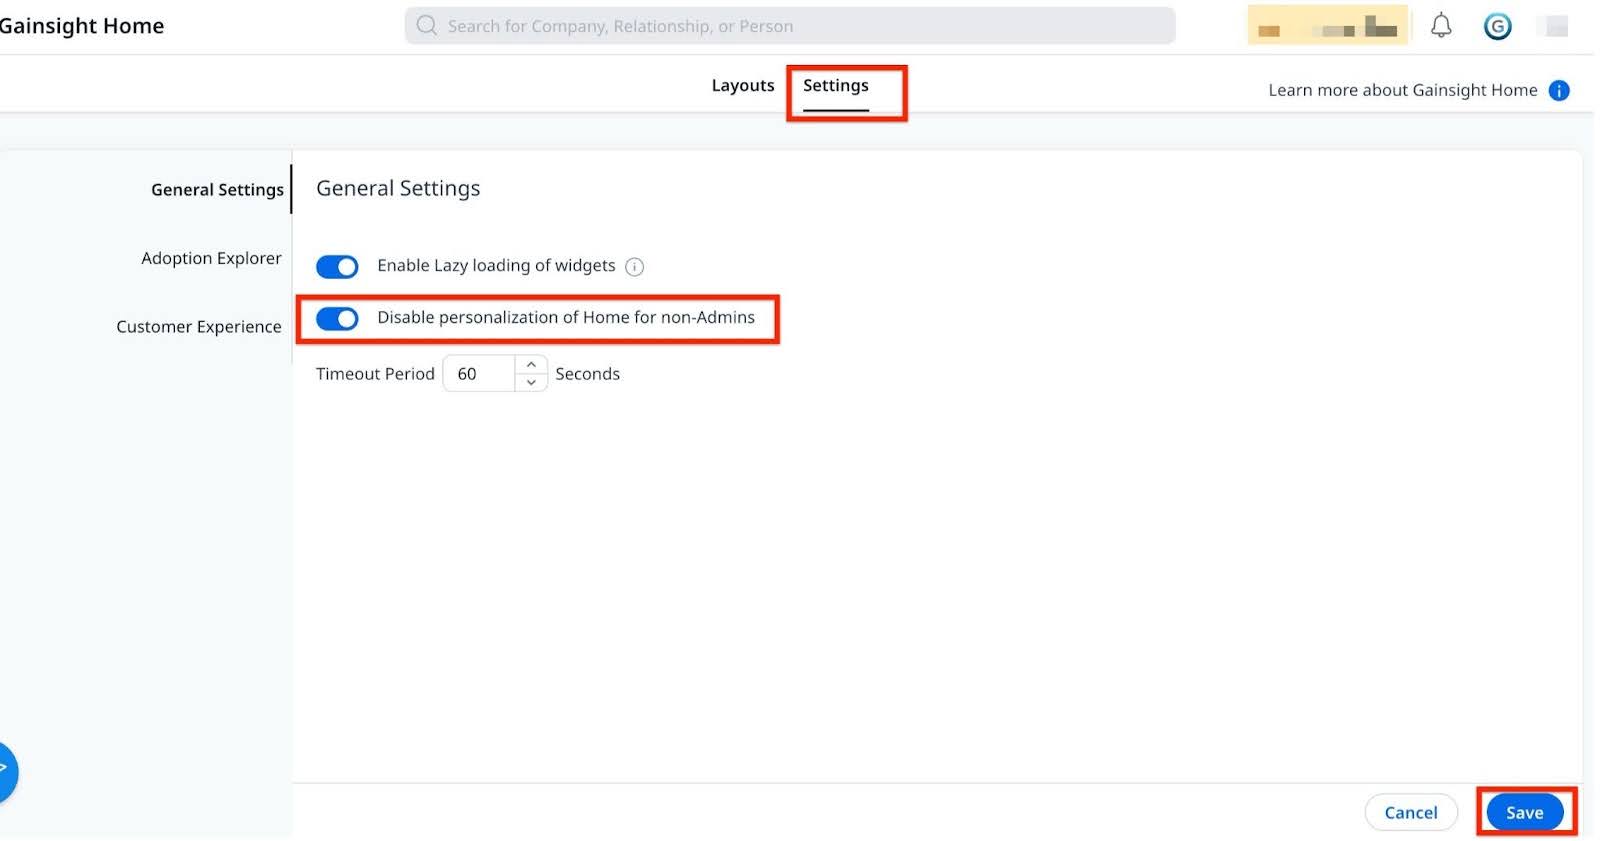
To configure the widget settings at feature level, navigate to Administration > Gainsight Home. From the Settings tab, you can configure the following settings:
General Settings
In the General Settings section, configure the following settings:
- Enable lazy-loading of widgets: Turn ON the toggle to allow lazy-loading of widgets on Gainsight Home which means data in the widget loads only when the user scrolls to it. This reduces initial loading time for the home page. The number of widgets displayed on the screen depends on your screen resolution.
- Timeout Period: Enter the Timeout Period value (in seconds) to limit the loading time for the widget. This is helpful when there are widgets with large amounts of data affecting the overall load time of the Gainsight Home.
.png?revision=1)
Adoption Explorer Settings
In the Adoption Explorer (AE) section, you can add the required Usage Reports from the AE projects as widgets to Gainsight Home. This section also displays the list of Widget Names and Widget Paths.
To add a Widget:
- Navigate to Administration > Gainsight Home.
- Click the Settings tab.
- In the Adoption Explorer section, click Add Widget.
- In the Enter Name field, enter the widget name.
- From the Adoption Explorer Project dropdown menu, select a project.
- From the Usage Dashboard from the Project dropdown menu, select freeform layout.
Note: Only freeform layouts can be added as a widget to the dashboard. - From the Usage Section from the Dashboard dropdown menu, select the usage report.
Note: In the Preview section, you can view the widget data, select the report, set the time frame, and can select the required chart type. - Click Add Widget.

The usage report is added as an Adoption Explorer widget to Gainsight Home. However, you can add multiple usage reports to the layout, and these reports are displayed as separate widgets on Gainsight Home. For more information on what is usage report, refer to the Usage Section in a Layout article.
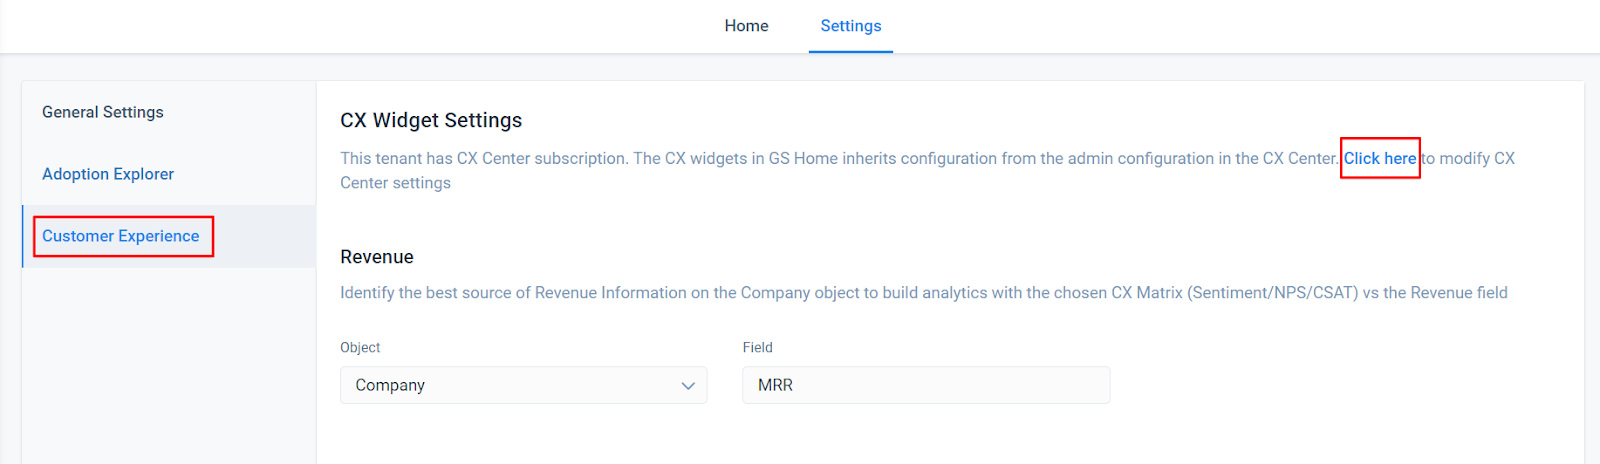
Customer Experience Settings
These settings are for Customer Experience widgets on Gainsight Home. In the Gainsight Home Builder > Customer Experience section, there are two scenarios. Based on the scenario, you can perform the following actions:
Scenario 1: When the CX Center feature is enabled in the customer org.
The CX widgets on Gainsight Home honors the CX Center admin configurations. To modify the existing CX Widget configurations:
- Navigate to the CX Widget Settings subsection.
- Click the here option. The CX Center admin page is displayed.
In the admin page, you can now modify the CX Center configurations. For more information on how to configure the CX Center, refer to the Configure CX Center article.
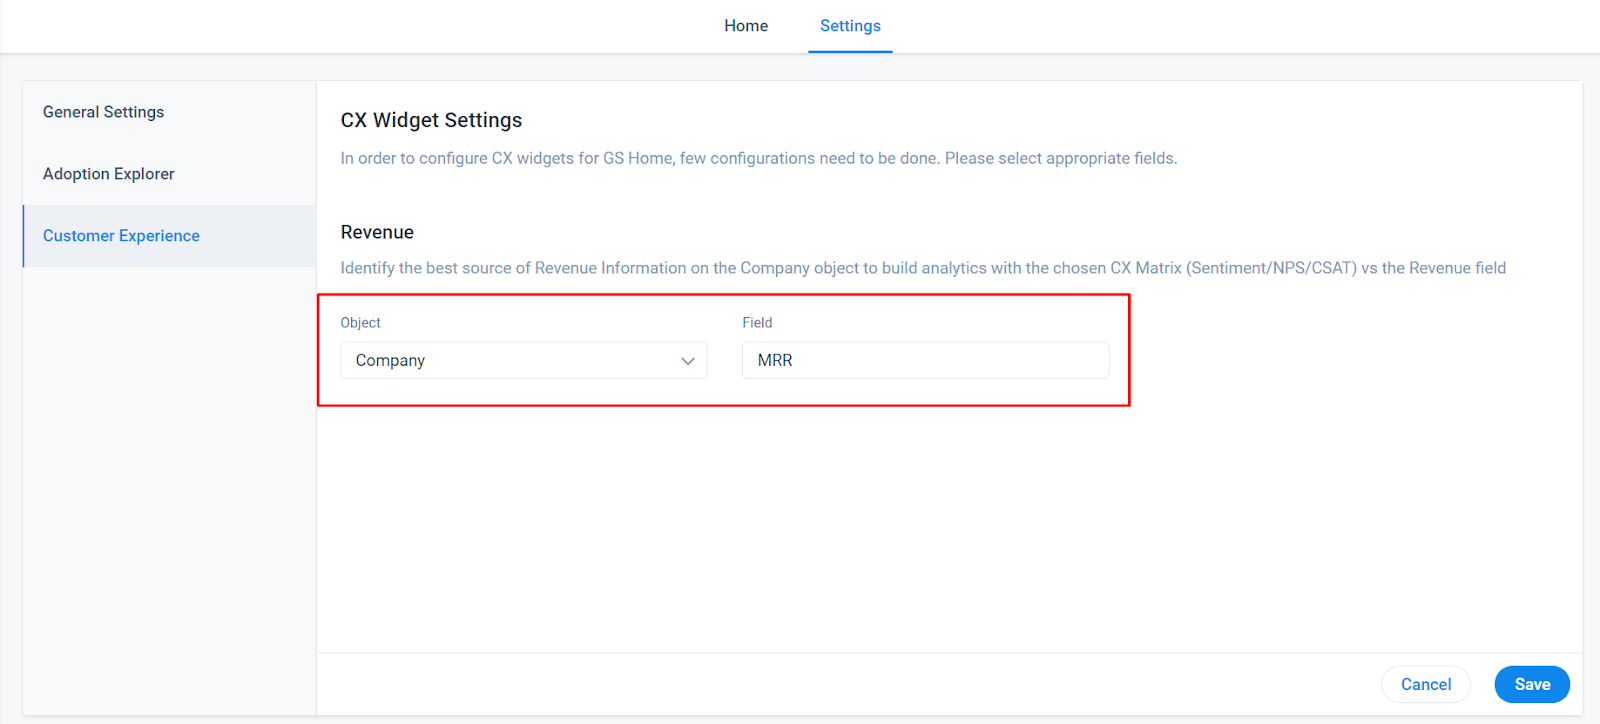
Scenario 2: When the CX Center feature is not enabled in the customer org.
- Navigate to the Revenue subsection.
- From the Object drop-down, select the required object.
- From the Fields drop-down, select the required field (Currency).
Note: The selected field (Currency) is displayed in the Revenue Matrix widget on Gainsight Home. - Click Save.
Note: In this scenario, the Sentiment metric in the Summary Ribbon widget is rendered as No Sentiment.
Personalization Settings in Gainsight Home
The personalization setting allows admins to restrict non-admin users from modifying configurations, ensuring a controlled and consistent user experience.
Super Admin vs. Non-Admin Access
| Personalization Setting | Super Admin Access | Non-Admin (CSM) Access |
|---|---|---|
| When toggle Disable personalization of Home for non-Admins is ON |
|
|
| When toggle Disable personalization of Home for non-Admins is OFF |
|
|
Impact of Disabling Personalization on CSM Layouts
| Personalization Option | Impact on CSMs |
|---|---|
| Disabling Personalization | Removes all customizations made by CSMs. The admin-defined layout replaces any previous modifications. |
| Re-enabling Personalization | Restores the previous personalized CSM layout, if any. |
| Admin Updates Layout While Personalization is Disabled | Changes apply to all assigned CSMs automatically. CSMs cannot modify these updates. |
Filter Behavior When Disable personalization of Home for non-Admins is Enabled
- If an admin updates filters on a shared layout, the changes immediately apply to all assigned CSMs.
- If the shared layout does not contain any filters, the filter icon is hidden for CSMs.
- CSMs can still use admin-configured filters but cannot create or modify them.
How to Configure Personalized Settings?
Admins can enable or disable personalization settings based on user roles to control customization options in Gainsight Home.
| Action | Configuration Steps |
|---|---|
| Enable Personalization for Non-Admins |
To Enable Personalization for Non-Admins:
Note: Once enabled, non-admin users can personalize their Home layout, modify filters, and manage widgets. |
| Disable Personalization for Non-Admins |
To Disable Personalization for Non-Admins:
Note: Once enabled, non-admin users will see only the predefined configuration set by the admin, without the ability to personalize their Home layout. |
| Restoring Layouts After Personalization is Re-Enabled |
|
Assignment Section in Gainsight Home
The Assignment Section in GS Home is important to streamline the management and visibility of Gainsight Home layouts. This section highlights the access and configuration privileges across Super Admin and Admin.
Super Admins and Admins have the capabilities to create and assign layout to:
- All Users: Users with a full license can access the layout.
- Specific User and User Groups: Layout access will be granted to all additional users and user groups with full license.
Note:- User groups pull member details from Data Permissions > Sharing Groups.
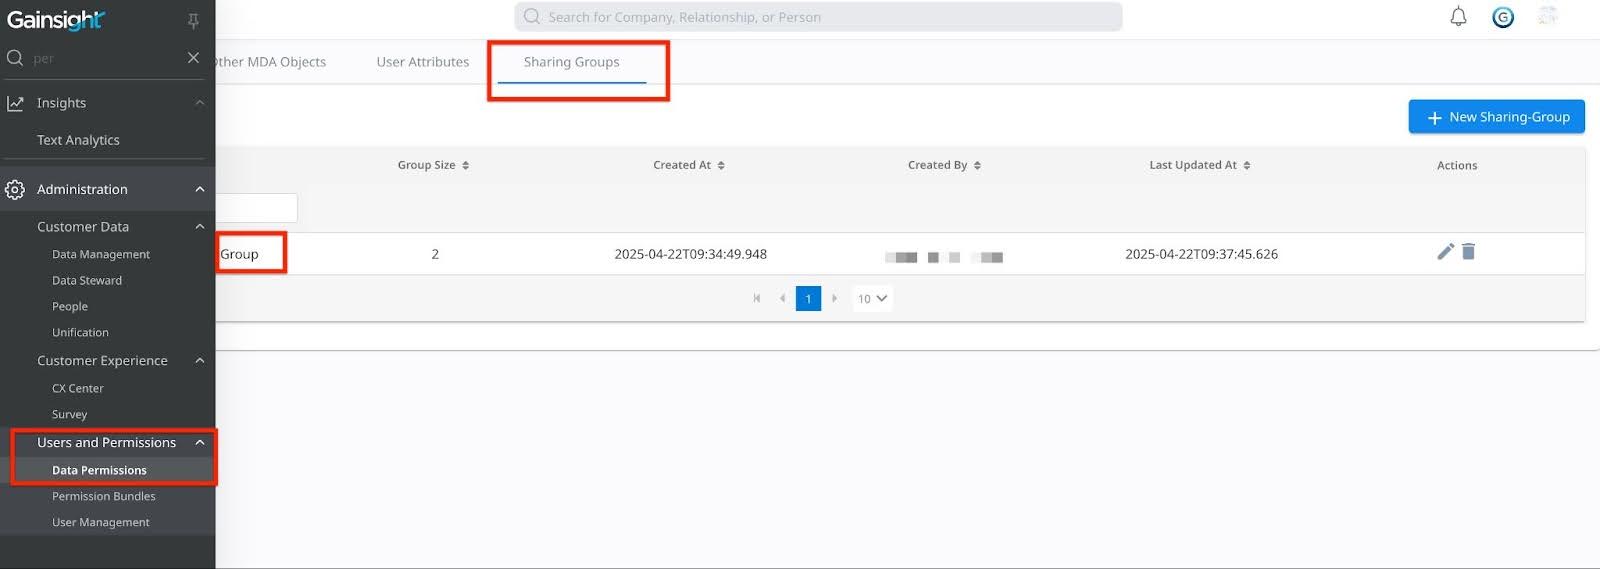
- The maximum number of Users or User Groups must not exceed 50.
- User groups pull member details from Data Permissions > Sharing Groups.
Layout Permissions
Access permissions of super admin and admin.
Super Admin Access
Super Admins hold the highest level of access within Gainsight Home. For Super Admin access:
Case 1: By default, the "Rank 1" layout is automatically assigned as the Super Admin's default layout, irrespective of whether they are part of that layout or not.

Case 2: If a Super Admin selects any layout, previews it, and chooses the Make this My Home option, it will become the Home Page.
Admin Access
Admins also hold the high level access within Gainsight Home. Admins can create and assign layouts with precision. For Admin access:
Case 1: Admins can see the top layout for which they are assigned as a user.
Case 2: Similar to Super Admins, if an Admin selects any layout, previews it, and chooses the Make this My Home option, it will become the Home Page.
Widgets in Gainsight Home
When configuring Custom Gainsight Home, you can add the following widgets:
- Summary Ribbon
- My Portfolio
- Timeline
- Calendar
- Cockpit
- Scorecard
- Adoption Explorer
- Report Widget
- Renewal Center
- Customer Experience
- Standard Widget
Note:
- All widgets support Team Filters, except for Adoption Explorer, which always displays all available data.
- When a Company Team or Relationship Team Filter is applied, widgets display data only from companies where the logged-in user has an assigned role.
- Standard Widgets, such as images or text are static and do not require filtering.
Summary Ribbon Widget
The Summary Ribbon widget provides a summarized view of the portfolio of customers. You can select from the out-of-the box attributes such as Annual Recurring Revenue (ARR), health score distribution, NPS® or add any custom metrics that are valuable to your business via the KPI report. The following attributes/metrics can be configured either individually or grouped into categories:
- Companies
- Distribution By Health
- ARR
- CSAT
- True NPS®
- Sentiment
- Due this week
- Overdue CTAs
- Open CTAs
- Renewals in next 90 days
Notes:
- Maximum 12 attributes can be added or distributed into maximum five groups.
- Relationship filters are not supported for the Distribution by Health and Company attributes in the Summary Ribbon widget.
- The Distribution By Health attribute provides a breakdown of Companies with similar Scorecard schemes based on the color of their health score. If the selected Companies have two or more schemes, the health distribution is not displayed.
- The CSAT and True NPS® attributes do not have dependency on the CX Center license. To view the Sentiment analysis, CX Center must be activated for your tenant.
- Large numeric values in the Summary Ribbon are dynamically scaled based on the user locale for better readability. Currently, scaling applies only to KPIs. For example, 84,729,950,000,000 is displayed as 84,729.95B.

To configure the Summary Ribbon attributes and widget:
- Navigate to Administration > Gainsight Home > Configuration.
- Click Customize Home. The Gainsight Home Builder page is displayed.
- From the Widgets pane, drag-and-drop the Summary Ribbon widget to the layouts pane.
- Click the Settings icon on the widget. The Configure Summary Ribbon window is displayed.
- Click Add Group.
Note: The Add Group button is turned on only if the No Groups toggle is turned ON. Turn OFF this toggle to add the attributes without grouping.
- Click + Attribute/Report.
- Click Add Attribute to select the attribute that displays on the widget or click Add Report to select the report from the Select KPI Report window and display on the widget.
Note: When adding a KPI report, you must select the applicable Company/Relationship ID in the Select KPI Report window and click Save.
- Click Save.
- Click Save Home.
- (Optional) Click Preview to review the layout. For more information on Gainsight Home preview, refer to the Preview Gainsight Home section.
- Click Publish Home. The confirmation message is displayed.
- Click Confirm.
My Portfolio Widget
The My Portfolio widget on Gainsight Home provides your CSMs with a summarized list of their Companies and Relationships. This widget is included in the Gainsight Recommended configuration. You can customize the widget in the following ways by adding it to a custom layout:
- Available fields for CSMs to display
- Display name for each field
- Editable fields for CSMs
- Visibility of the Company and Relationship tabs
To add the My Portfolio widget to Custom Gainsight Home:
- Navigate to Administration > Gainsight Home > Configuration.
- Click Customize Home. The Gainsight Home Builder page is displayed.
- From the Widgets pane, drag-and-drop the My Portfolio widget to the layouts pane.
- (Optional) Configure the size of the My Portfolio widget.
- Click Settings to configure the widget. For more information on how to configure the My Portfolio widget, refer to the My Portfolio Settings section.
- (Optional) Click Preview to review the layout. For more information on the Gainsight Home preview, refer to the Preview Gainsight Home section.
- Click Save Home.
- Click Publish Home. The confirmation message is displayed.
- Click Confirm.
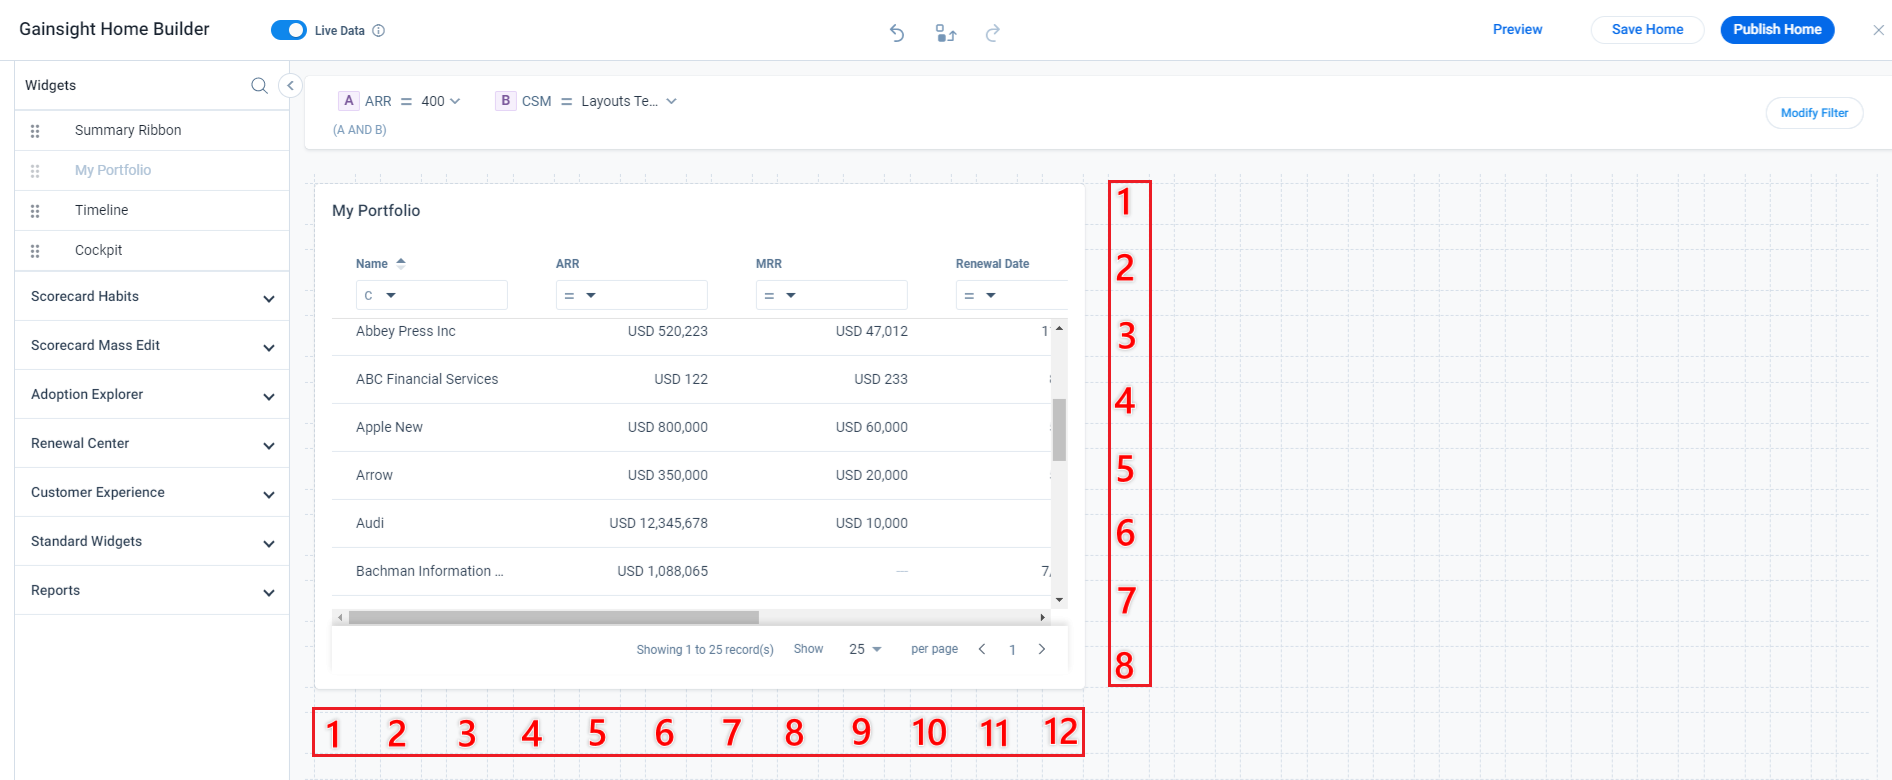
My Portfolio Widget Settings
Click the Settings icon of the My Portfolio widget for the following configuration options:
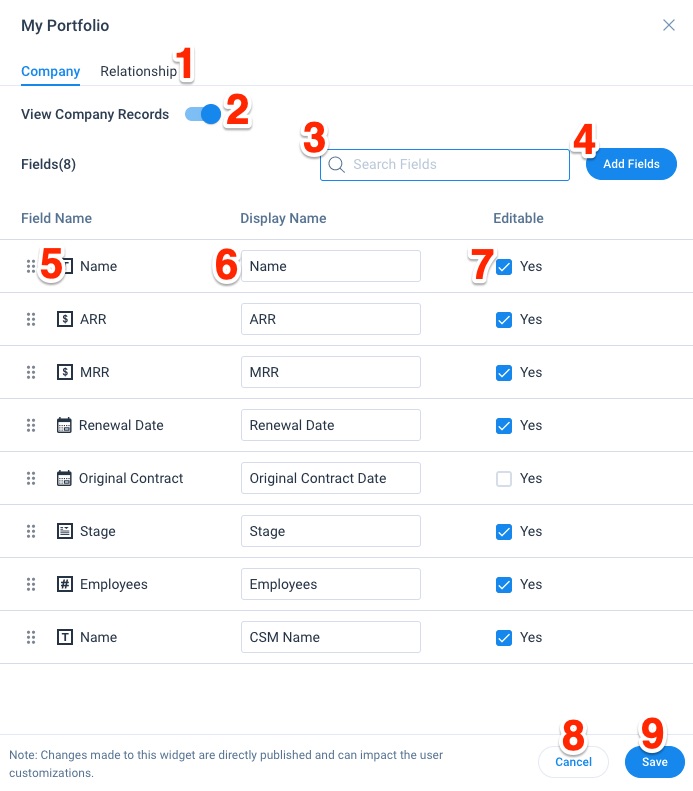
| Label | Configuration Option |
|---|---|
| 1 | Company/Relationship tab: Click to view either the Company or Relationship tab. The tabs have identical configuration options. |
| 2 | View Company Records or View Relationship Records: Toggle ON/OFF the Company and Relationship tabs. CSMs cannot see the tabs that are toggled OFF. |
| 3 | Search Fields: Search by Field Name. Only fields added through the Add Fields button can be selected |
| 4 | Add Fields: Click to display the Select Fields pane. Perform the following steps to select fields:
|
| 5 | Reorder fields: Drag-and-drop fields to reorder them. |
| 6 | Display Name: Enter text to change a field’s display name. This name is visible to CSMs. |
| 7 | Editable check box: Select the checkbox to give CSMs the ability to edit the field inline. |
| 8 | Cancel: Click Cancel to remove changes made to the widget. |
| 9 | Save: Click Save to preserve changes made to the widget. |
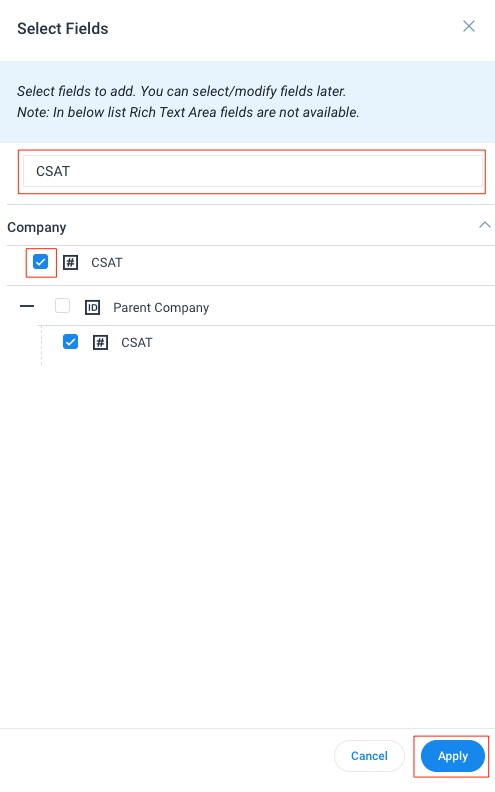
Add Fields
To add fields to the My Portfolio widget perform the following steps from the My Portfolio configuration pane:
Note: These steps are identical for both the Company and Relationship tab.
Perform the following steps to select fields:
- Search for a field by name.
- Click fields to select them.
- Click Apply.
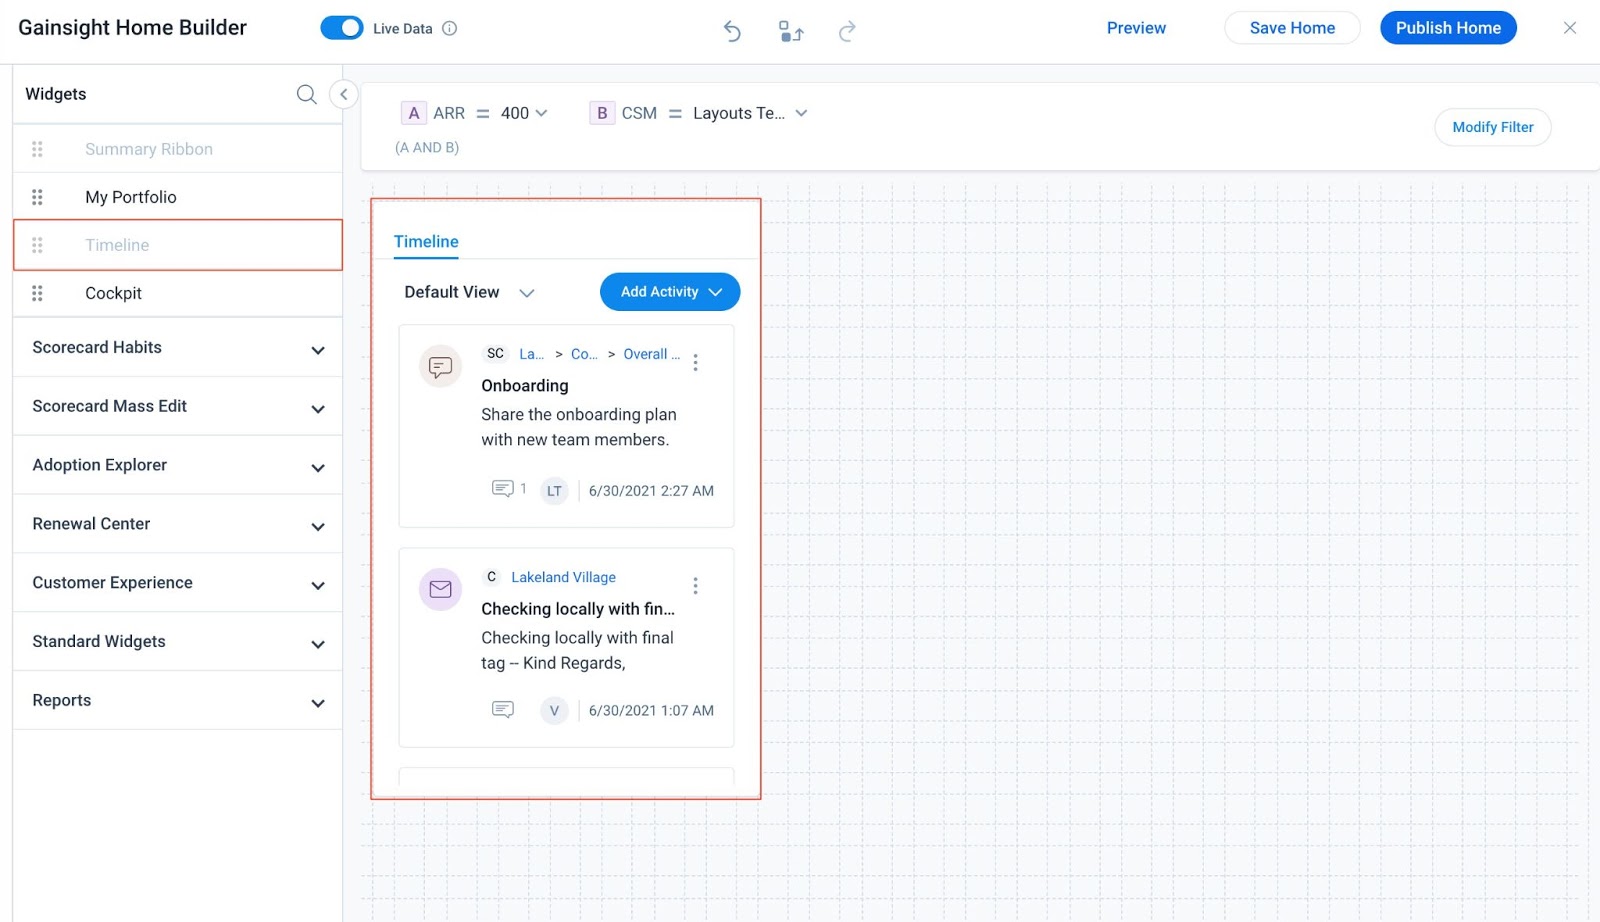
Timeline Widget
The Timeline widget provides your CSMs an official record of customers. You can add this widget so your CSMs can log, view, and edit activities that help them track customer interactions and quickly gather insights.
To add the Timeline widget to Gainsight Home:
- Navigate to Administration > Gainsight Home > Configuration.
- Click Customize Home. The Gainsight Home Builder page is displayed.
- From the Widgets pane, drag and drop the Timeline widget to the layouts pane.
- (Optional) Configure the size of the Timeline widget.
- Note: You can configure the widget to a maximum height of 20 rows. The width cannot be changed.
- (Optional) Click Preview to review the layout. For more information on Gainsight Home preview, refer to the Preview Gainsight Home section.
- Click Save Home.
- Click Publish Home. The confirmation message is displayed.
- Click Confirm.
Calendar Widget
The availability of the Calendar widget in Gainsight Home ensures that CSMs can improve their day-to-day activities such as attending customer calls, meetings from the application. CSMs can even start taking notes in the Calendar widget while attending meetings.
Note: Once admin configures the Calendar widget and enables it for a CSM, the CSM then authorizes the calendar and starts accessing all calendar events from Gainsight Home page.
For a specific calendar event, CSMs can directly add an Activity in the Timeline from the Calendar widget of Gainsight Home.
Additional Resources:
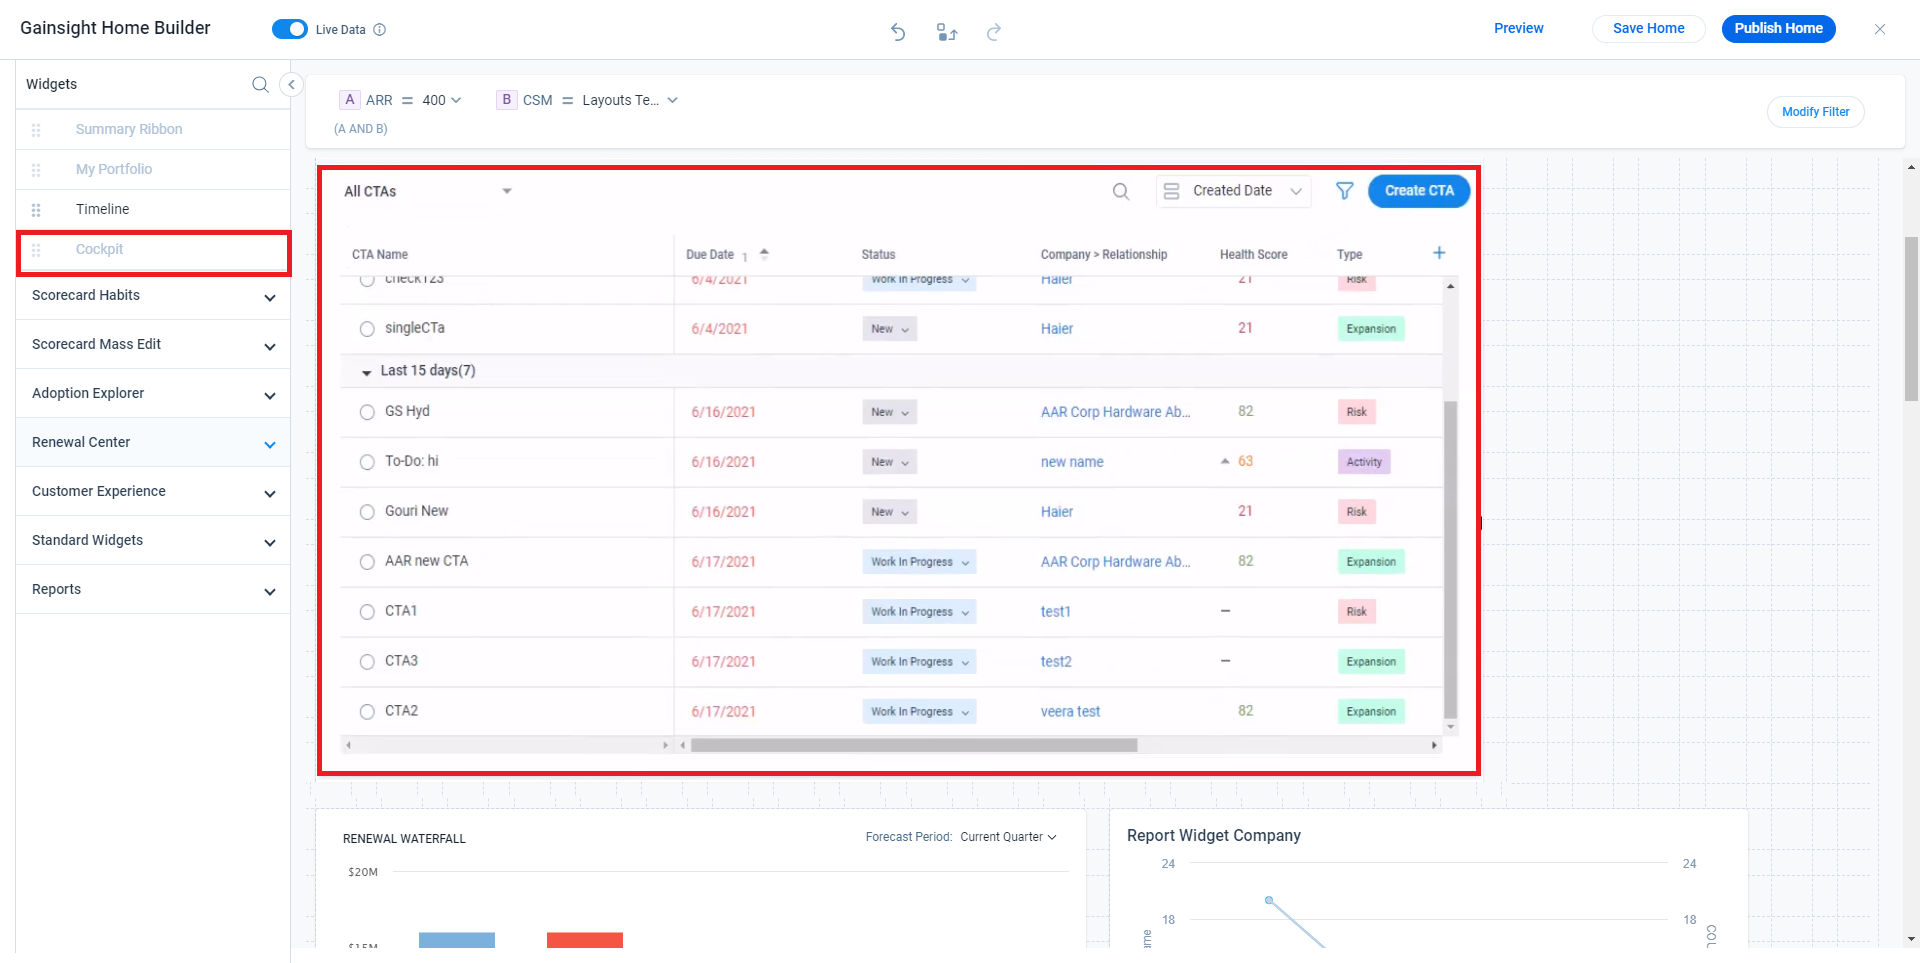
Cockpit Widget
Your CSMs can perform all the activities such as create, edit, and filter CTAs in the Cockpit widget on Gainsight Home. These activities are similar to the activities in the Cockpit except creating the CTA Views. For more information about Cockpit, refer to the CTAs, Tasks, and Playbooks Overview (Horizon Experience) article.
To add the Cockpit widget to Gainsight Home:
- Navigate to Administration > Gainsight Home > Configuration.
- Click Customize Home. The Gainsight Home Builder page is displayed.
- From the Widgets pane, drag and drop the Cockpit widget to the layouts pane.
- (Optional) Click Preview to review the layout. For more information on Gainsight Home preview, refer to the Preview Gainsight Home section.
- Click Save Home.
- Click Publish Home to publish the layout. The confirmation message is displayed.
- Click Confirm.
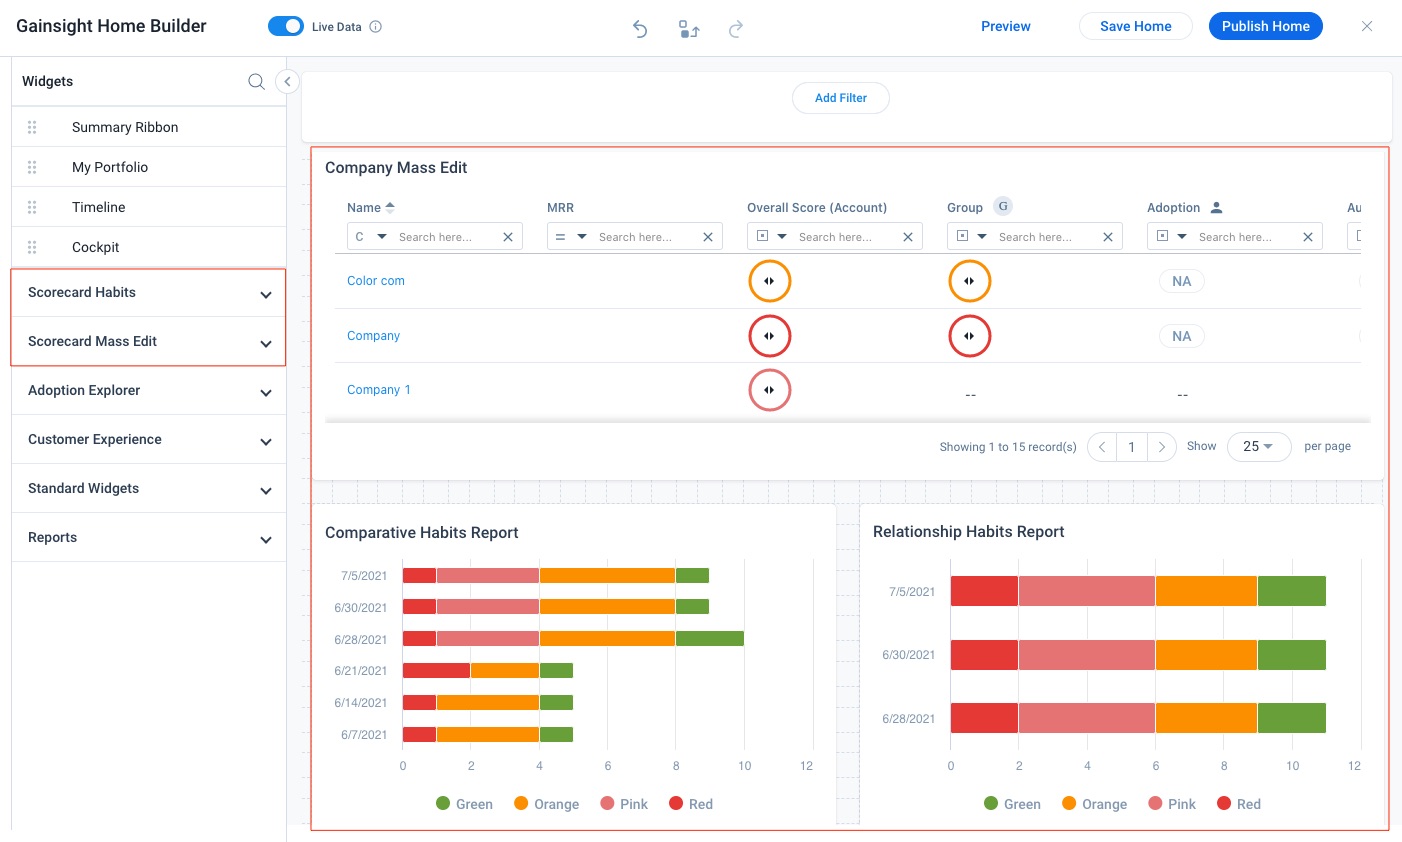
Scorecard Widget
You can add Scorecard Mass Edit reports and Scorecard Habit reports as widgets to custom Gainsight Home layouts so your CSMs can monitor their customer’s vital dimensions of health. CSMs can use these widgets to manually update their customer’s scorecard measures as well as easily review the health scores of their entire customer portfolio.
Note: The Gainsight Home Scorecard widgets only support Scorecard reports from Horizon Analytics. For more information on this feature, as well as Scorecard Mass Edit and Scorecard Habit Reports, refer to the Scorecard Widgets Overview article.
To add Scorecard widgets to Gainsight Home:
- Navigate to Administration > Gainsight Home > Configuration.
- Click Customize Home. The Gainsight Home Builder page is displayed.
- In the Widgets pane, expand the Scorecard Habits section and the Scorecard Mass Edit report section to view the full list of available scorecard reports.
- Drag and drop the relevant Scorecard report widgets to the layouts pane.
- (Optional) Configure the size of the scorecard widgets.
- (Optional) Click Preview to review the layout. For more information on Gainsight Home preview, refer to the Preview Gainsight Home section.
- Click Save Home.
- Click Publish Home. The confirmation message is displayed.
- Click Confirm.
Adoption Explorer Widget
The AE widget(s) on Gainsight Home provides your CSMs with a quick view of usage data insights fetched from multiple AE projects.
Prerequisite: To add an AE widget to Gainsight Home, you must configure the widget. For more information on how to configure AE widget, refer to the Adoption Explorer Settings section.
To add an AE widget to Gainsight Home:
- Navigate to Administration > Gainsight Home > Configuration.
- Click Customize Home. The Gainsight Home Builder page is displayed.
- In the Widgets pane, expand the Adoption Explorer section.
- Drag and drop the required widget to the layouts pane.
- Click Save Home.
- (Optional) Click Preview to review the layout. For more information on Gainsight Home preview, refer to the Preview Gainsight Home section.
- Click Publish Home. The confirmation message is displayed.
- Click Confirm.
Report Widget
The Report widget provides your CSMs with quick access to reports that they need regularly. Admins can add the required report widgets to Gainsight Home from the available list of reports.
Note:
- You can view and add only the reports built on Horizon Analytics Report Builder. The previous version reports are not supported.
- Reports from Data Designer objects in GS Home do not support filtering. However, users can use the company and relationships filters as solution.
To add the Report widget to Gainsight Home:
- Navigate to Administration > Gainsight Home > Configuration.
- Click Customize Home. The Gainsight Home Builder page is displayed.
- In the Widgets pane, expand the Reports section.
- Drag and drop the required report widget to the layouts pane.
- (Optional) If there are multiple Company and Relationship IDs associated with this report, you can select the required Company ID and/or Relationship ID.
- Click the Settings icon on the widget.
- Select the required Company ID and/or Relationship ID from the respective drop-downs.
- Click Confirm.
- Click Save Home.
- (Optional) Click Preview to review the layout. For more information on Gainsight Home preview, refer to the Preview Gainsight Home section.
- Click Publish Home. The confirmation message is displayed.
- Click Confirm.
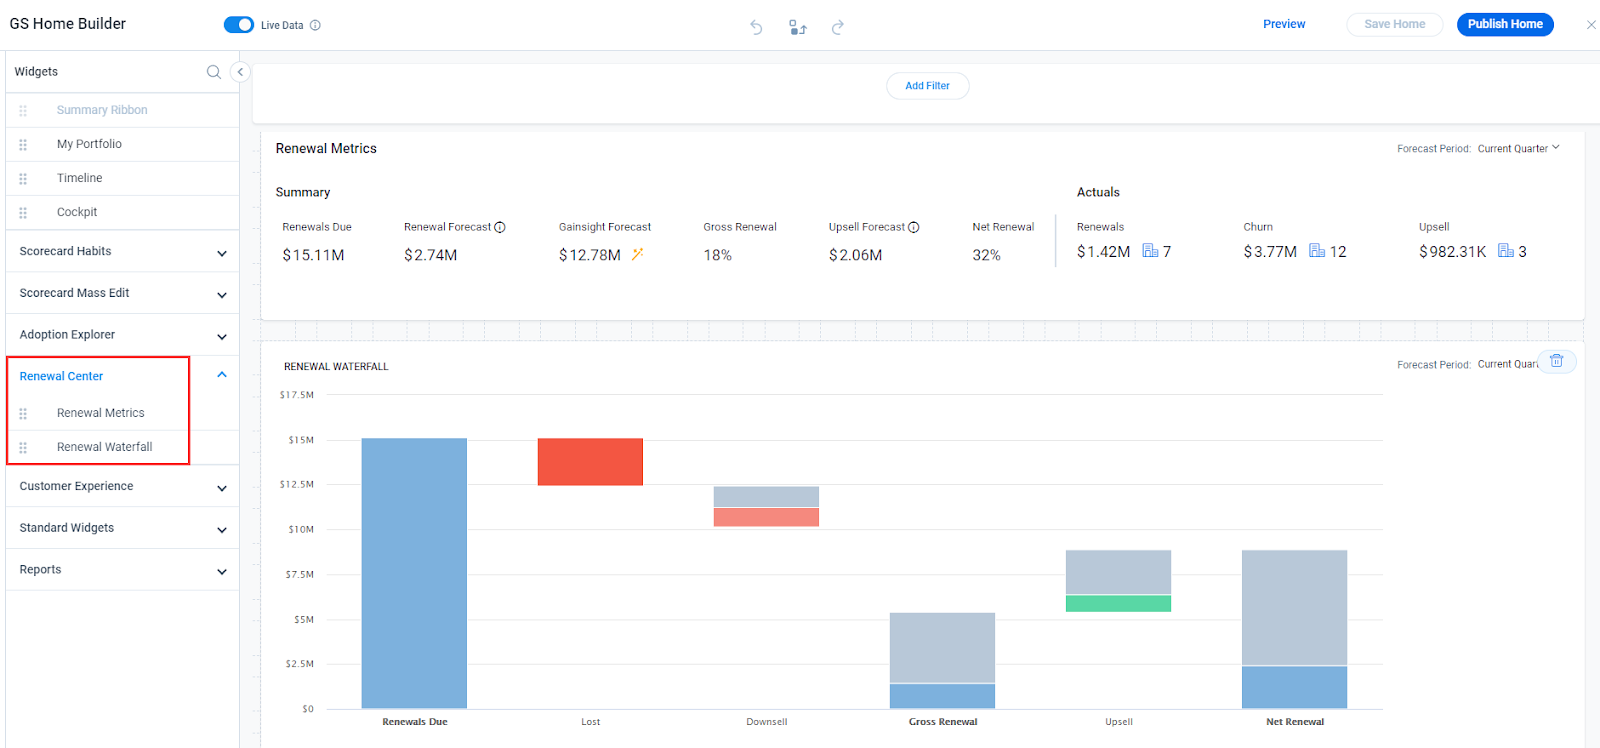
Renewal Center Widget
The Renewal Center Widgets provide your CSMs with a quick view of the important renewal metrics, and help them visualize the data to take appropriate actions.
The following Renewal Center widgets can be configured on Gainsight Home:
- Summary Widget: This widget displays important renewal metrics such as Renewals Due, Renewal Forecast, Gainsight Forecast, Gross Renewal, Upsell Forecast, and Net Renewal. For more information on this widget, refer to the Renewal Center User Guide article.
- Renewal Waterfall Widget: This widget provides a graphical explanation of what is happening to your renewal business. This chart helps you visualize the Renewals Due in the selected time period, expected downsell and so on. For more information on this widget, refer to the Renewal Center User Guide article.
To add a Renewal Center widget to Gainsight Home:
- Navigate to Administration > Gainsight Home > Configuration.
- Click Customize Home. The Gainsight Home Builder page is displayed.
- In the Widgets pane, expand the Renewal Center section.
- Drag and drop the required widget to the layouts pane.
- Note: You can set the required Forecast Period to view the data for the selected period.
- Click Save Home.
- (Optional) Click Preview to review the layout. For more information on Gainsight Home preview, refer to the Preview Gainsight Home section.
- Click Publish Home. The confirmation message is displayed.
- Click Confirm.
Customer Experience Widget
The Customer Experience (CX) widgets (Trend and Revenue Matrix) help your CSMs to view and analyze the aggregated attributes such as Sentiment, NPS®, and/or CSAT scores across companies.
Note: CX Center license is not mandatory to view the Trend and Revenue Matrix widgets and the NPS® and CSAT attributes in the Summary Ribbon widget.
For information on configuring the global Customer Experience widget settings, refer to the Customer Experience Settings section.
To add the Customer Experience widget to Gainsight Home:
- Navigate to Administration > Gainsight Home > Configuration.
- Click Customize Home. The Gainsight Home Builder page is displayed.
- In the Widgets pane, expand the Customer Experience section
- Drag and drop the required widget (Trend and Revenue) to the layouts pane.
- Click the Settings icon on the widget and select the required aggregated attributes (Sentiment, NPS®, and/or CSAT).
Note: You can select the required metric(s) when the widget is added to the layouts pane.
- Click Save.
- Click Save Home.
- (Optional) Click Preview to review the layout. For more information on Gainsight Home preview, refer to the Preview Gainsight Home section.
- Click Publish Home. The confirmation message is displayed.
- Click Confirm.
Standard Widget
Configure Standard widgets (Image, Rich Text, and Web Page) on Gainsight Home to upload images, add custom text, and embed third party content such as publicly hosted documents and share with CSMs.
To add the Standard widget to Gainsight Home:
- Navigate to Administration > Gainsight Home > Configuration.
- Click Customize Home. The Gainsight Home Builder page is displayed.
- In the Widgets pane, expand the Standard Widgets section.
- Drag and drop the required widget to the layouts pane.
- For information on how to configure the Image, Rich Text, and Web Page widgets, refer to the Standard Widgets section in the Configure Dashboards (Horizon Analytics) article.
- Click Save Home.
- (Optional) Click Preview to review the layout. For more information on Gainsight Home preview, refer to the Preview Gainsight Home section.
- Click Publish Home. The confirmation message is displayed.
- Click Confirm.
Dimensions for Gainsight Home Widgets
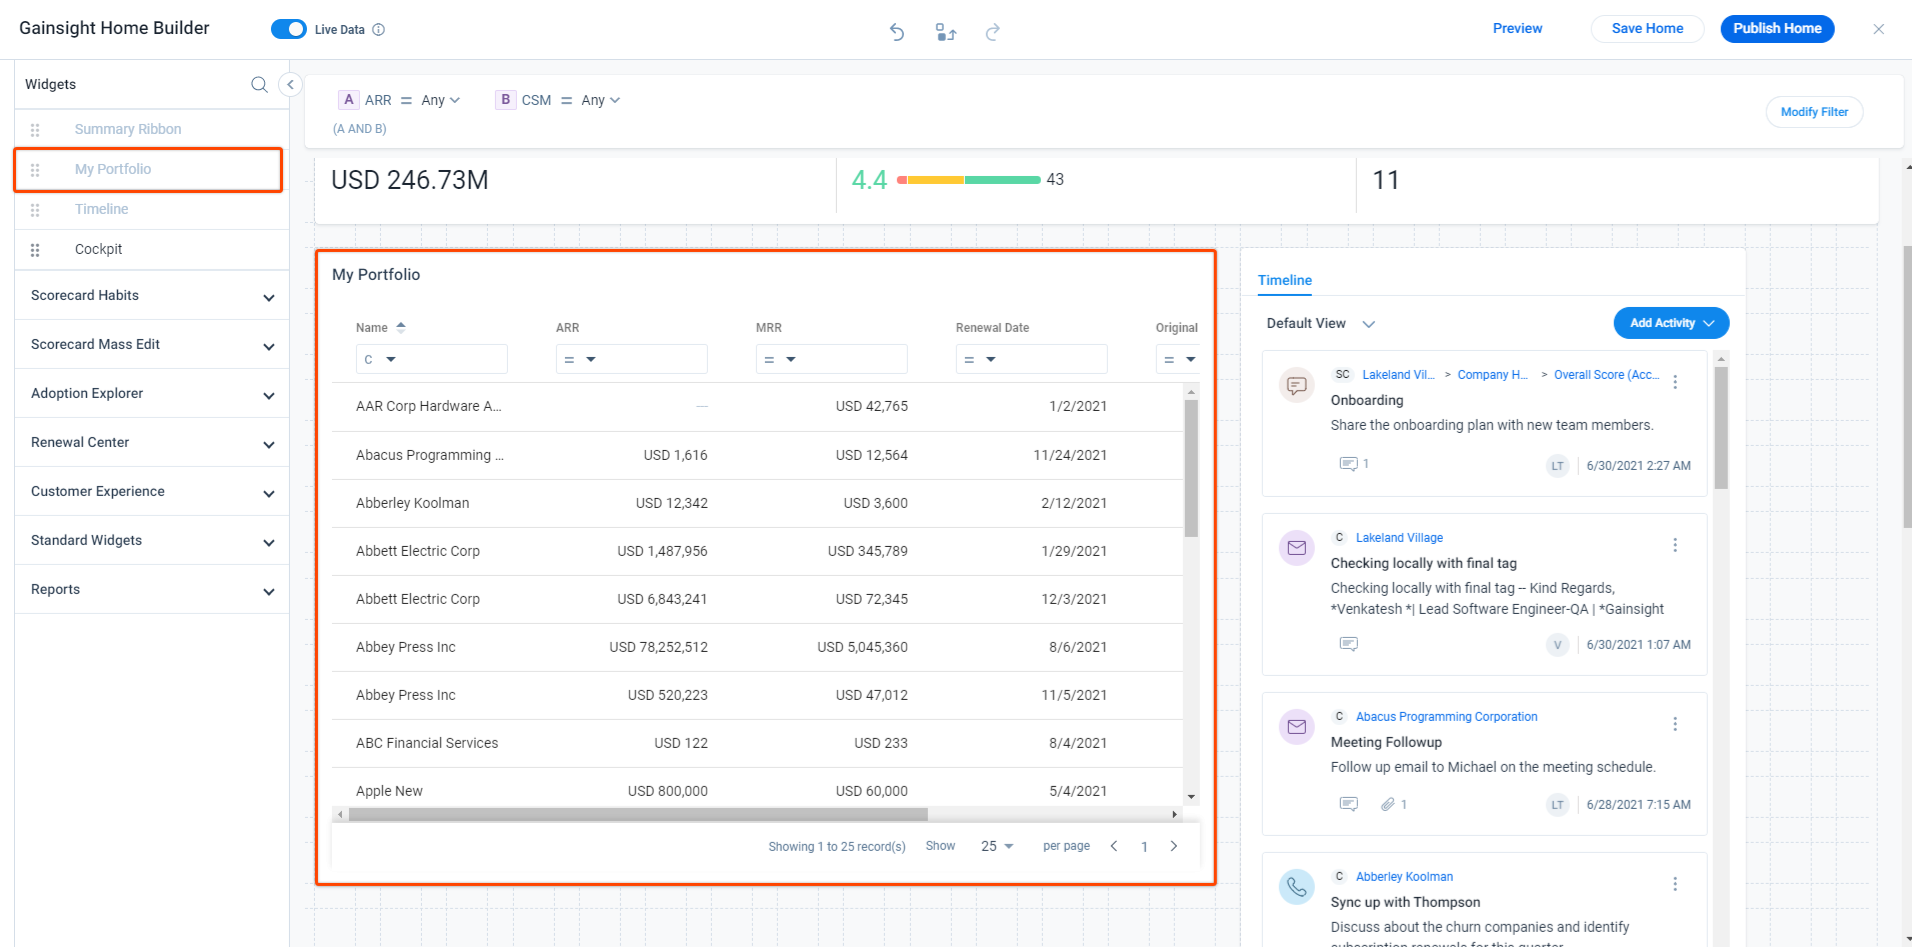
Every widget in Gainsight Home has permissible limits for the height and width up to which it can be configured. The following image shows the My Portfolio widget set to minimum height and width (8*12).
Note: Width of the widget can be identified by the number of columns it occupies on the layouts pane while the height by the number of rows.
The following table lists the minimum and maximum height and width for the Gainsight Home Widgets.
|
Widget |
Width (Columns) | Height (Rows) | ||
| Minimum | Maximum | Minimum | Maximum | |
|
Summary Ribbon |
24 |
24 |
2 |
4 |
|
My Portfolio |
12 |
24 |
8 |
12 |
|
Timeline |
8 |
8 |
12 |
20 |
|
Cockpit |
16 |
24 |
8 |
12 |
|
Scorecard - Mass Edit |
12 |
24 |
8 |
10 |
|
Scorecard - Habits |
12 |
24 |
8 |
10 |
|
Adoption Explorer |
4 |
24 |
4 |
10 |
|
Report Widget |
8 |
24 |
4 |
12 |
|
Renewal Center - Renewal Metrics (Summary) |
24 |
24 |
4 |
4 |
|
Renewal Center - Renewal Waterfall |
4 |
24 |
4 |
10 |
|
Customer Experience - Trend |
5 |
5 |
24 |
24 |
|
Customer Experience - Revenue Matrix |
12 |
24 |
10 |
10 |
|
Standard Widget - Rich Text |
2 |
24 |
1 |
12 |
|
Standard Widget - Image |
2 |
24 |
1 |
12 |
|
Standard Widget - Web Page |
4 |
24 |
4 |
24 |