
Program Elements
This article helps admins understand the elements in the advanced program in Journey Orchestrator.
Overview
The Journey Orchestrator consists of the following elements to configure your program:
- Audience
- Email/Survey
- CTA
- API
- PX Engagements
- Slack
- Customer Community (CC)
- Customer Education (CE)
- Conditional Wait
- Evaluate
Do not copy paste the text with tokens from one step or node to another step or node, as this will not create the required references to the actual source fields.
Audience
Audience allows you to add participants to the program. Add the audience to your program through the following five sources:
- Segments
- Data Designer
- Query
- CSV
- Events
Each program can have only one source. For segment or Data Designer sources, you can select just one segment or Data Designer. However, for a CSV source, you have the ability to upload up to 5 CSV files within a single program.
To select a data source:
- Click Audience on the Programs Editor page. The Audience slide-out pane appears.

- From the Source tab, select the required source:
- For the Data Designer or Segments source, select the required Data Designer or Segment from the drop-down list.
Note: You can click Create Segment or Create Data Designer to navigate to the respective Segment or Data Designer creation page. - For Query source,
- Click New Query Setup. The query creation page appears.
- Select a Data Source. The objects in that data source appear.
- Drag and drop the required objects and create a query.
- Click Save & Sync.
Note: To view the execution history of the query data source, navigate to Audience > Source, click the three-dots vertical menu, and then select Execution History.For more information on query creation, refer to the Rules Engine Horizon Experience Overview article.
- For Events source:
- Select the required Event Topic.
- Select the required Event.
- Select the Event Version.
- Click Done.
For more information on events, refer to the Add Participants to a Program article.
Note: When Events are used as a source, you can change the data types of each field in Source Fields using the dropdown menu next to each field.
- For the CSV source, upload a CSV file.
Note: You can upload a maximum of five CSV files.
- For the Data Designer or Segments source, select the required Data Designer or Segment from the drop-down list.
- Click Done. The mandatory fields are identified, and the uniqueness criteria are auto-selected. All fields from the source are available for tokens and conditions selection, without the need for field mapping.
- Wait for the selected source to load and the audience to be synced.
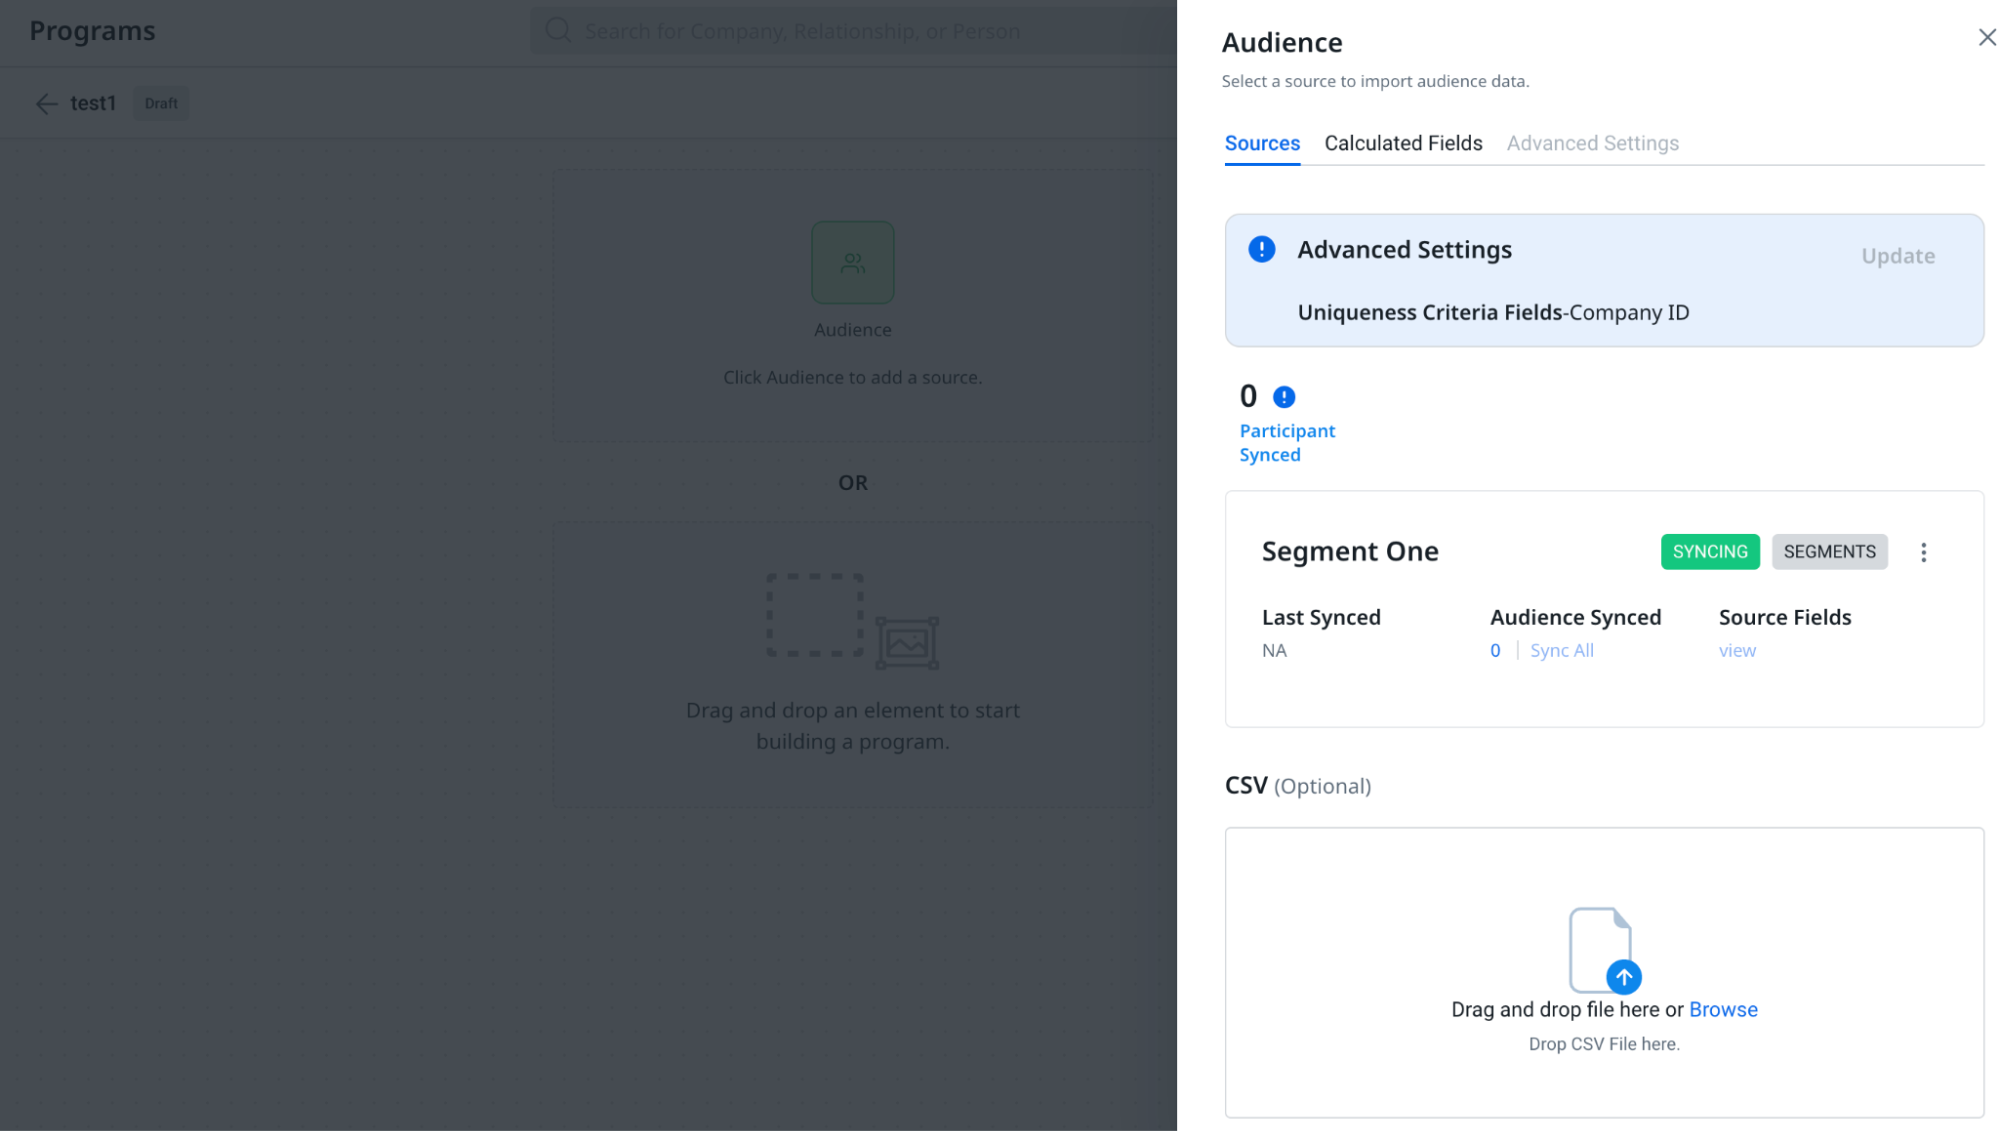
- Click Sync All to synchronize participants with the program. If changes are made to the source data in a draft program, a prompt appears with the following options:
- Clear and Sync: Removes all previously synced participants and syncs the updated participant list.
- Sync Only New: Retains the existing participants and adds only the newly identified participants.
Note - If you select Sync All while the program is in Draft mode, participants are synced based on the current audience criteria at that moment. When the program is later published or scheduled as a recurring program, the first scheduled run will not re-sync participants. Instead, it uses the participants manually pulled in through the Sync All action—unless those manually synced participants are cleared beforehand.
- To pause the scheduled participants sync for a program, toggle off the Participant Sync on the Programs page.
- The Journey Orchestrator program no longer supports Auto Sync when a source is added or when the Advanced Settings change. You can only add participants using the Sync All button.
- The use of Test Participants or participants with a Participant Type of Test has been deprecated. The program only syncs the Actual Participants.
- (Optional) Click the Audience Synced number to view the synced audience.
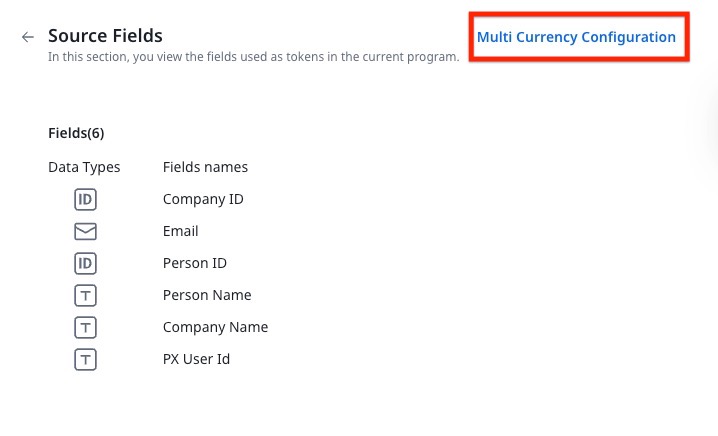
- (Optional) Click the View option in Source Fields to view the fields used as tokens in the program.
Note- You can view the Source Fields that can be used to modify the data types when a CSV is added.
- The 'Sync All' function syncs data for up to 25 fields from the source, though all fields are available for token mapping. After publishing the program, only the fields used in the program are retained.
- Renaming a field or changing its properties, such as the data types at the source level (e.g., Data Designer, Segments) when the program is active, will cause errors because updates to field definitions are not permitted when the program is active.
- To show currency values in a company’s local currency across emails, reports, CTAs, and the participant grid, admins must set up multi-currency in Source Fields using the Multi Currency Configuration button. For more details, refer to the Multi-Currency Impact on Journey Orchestrator article.
- You can upload additional CSVs to add more participants to the program.
Note- You can upload a maximum of 5 CSV files to any source.
- You can create the CSV file manually, ensuring it has the same number of columns and column names as the previous source. Alternatively, you can export the CSV file from the Audience Synced section and remove the following columns: Participant ID, Participant State, and Participant Type. Then, rename the Company ID and Recipient Email Address columns to match the field names in the previous source.
- Click Update to modify the program's advanced settings:
- Mandatory Fields: Required to identify the company/relationship and email of the participant in the program.
- Uniqueness Criteria Fields: Set criteria to ensure unique entries.
- Audience Re-entry Criteria: Define conditions for re-entering the audience.
- Advanced Criteria: Additional settings for the program.
- Audience Exclusion List: Manage excluded participants by uploading a CSV file or selecting participants from another program based on their status.
- Action Execution Schedule: Schedule when actions will take place.

- (Optional) Click on the Event Fields tab, to add Event Fields.
-
In the Events Fields tab, click Add. The New Events Field page appears.

-
- In the New Events Field page, provide the following details
- Event Field Name
- Event Topics
- Event
- Version
- Provide the Event and Audience Filters
- Click Save. The newly created Event Field appears under the audience tab.
 Note
Note
- A maximum of two Event Fields can be added.
- You can add the new fields for the event from the Source tab
For more information on these configurations, refer to the Add Participants to a Program article.
Action Execution Schedule
The Action Execution Schedule feature helps admins set the schedule for when actions such as emails, surveys, and APIs should be executed for the customers. Admins can easily set the day, time, and timezone for the action execution for the entire program using just one source for all participants.
Example Business Use Case:
Admins can set the day, time, and timezone for the entire program, sending all emails during business hours (e.g., between 9 AM to 5 PM) or at a specific time of the day.
To set the action execution schedule:
- Click the Audience step on the Programs Editor page. The Audience slide-out pane appears.
- Click the Advanced Settings tab.
- Click the Action Execution Schedule toggle.

- Select the days when the action is to be executed.
- Select the time range when the action is to be executed.
Note- Ensure that a minimum of three hours of time range is selected for the action schedule.
- Participants who do not meet the time window criteria specified at the beginning of the process will be moved to the next window. For instance, if the schedule is set from Monday to Friday, 8 am to 1 pm, and 1000 participants did not enter the action before the end time of the schedule on Friday, they will wait until Monday for the action to be executed.
- When a paused program resumes, the next scheduled window is immediately checked to execute actions for participants, without adding any paused duration to the action execution schedule.
- Select the Timezone option:
-
Select the Participant’s Timezone option to use the participant's local timezone.
-
Select the Common Timezone option to use the common timezone for all participants.
-
-
Fill in the required information for the selected timezone option:
-
For the Participant’s Timezone option, select the participant’s timezone and Fallback Timezone.
Note: To use the Participant’s Timezone option, Timezone field must be included in the selected data source for executing the action at the participant’s timezone. -
For the Common Timezone option, select the common timezone for action execution.
-
-
Click Save.
IMPORTANT: If your survey program is configured to send emails only on weekdays during business hours, unexpected email delivery issues may occur.
For example, if a survey's response timer ends on a Friday, reminder emails scheduled for non-respondents are not sent until the following Monday. As a result, participants who complete the survey over the weekend might still receive reminder emails.
To prevent this, schedule your survey response timers to account for weekends, ensuring reminders are delivered on weekdays without overlapping responses.
Override Action Execution Schedule
You can override the Action Execution Schedule to immediately send specific emails, like thank-you messages or survey completion confirmations. To configure this:
- In the program editor, click the required Email element to configure. The configuration page appears.
- Select a template.
- Click the three-dots horizontal menu and select Sync Settings.
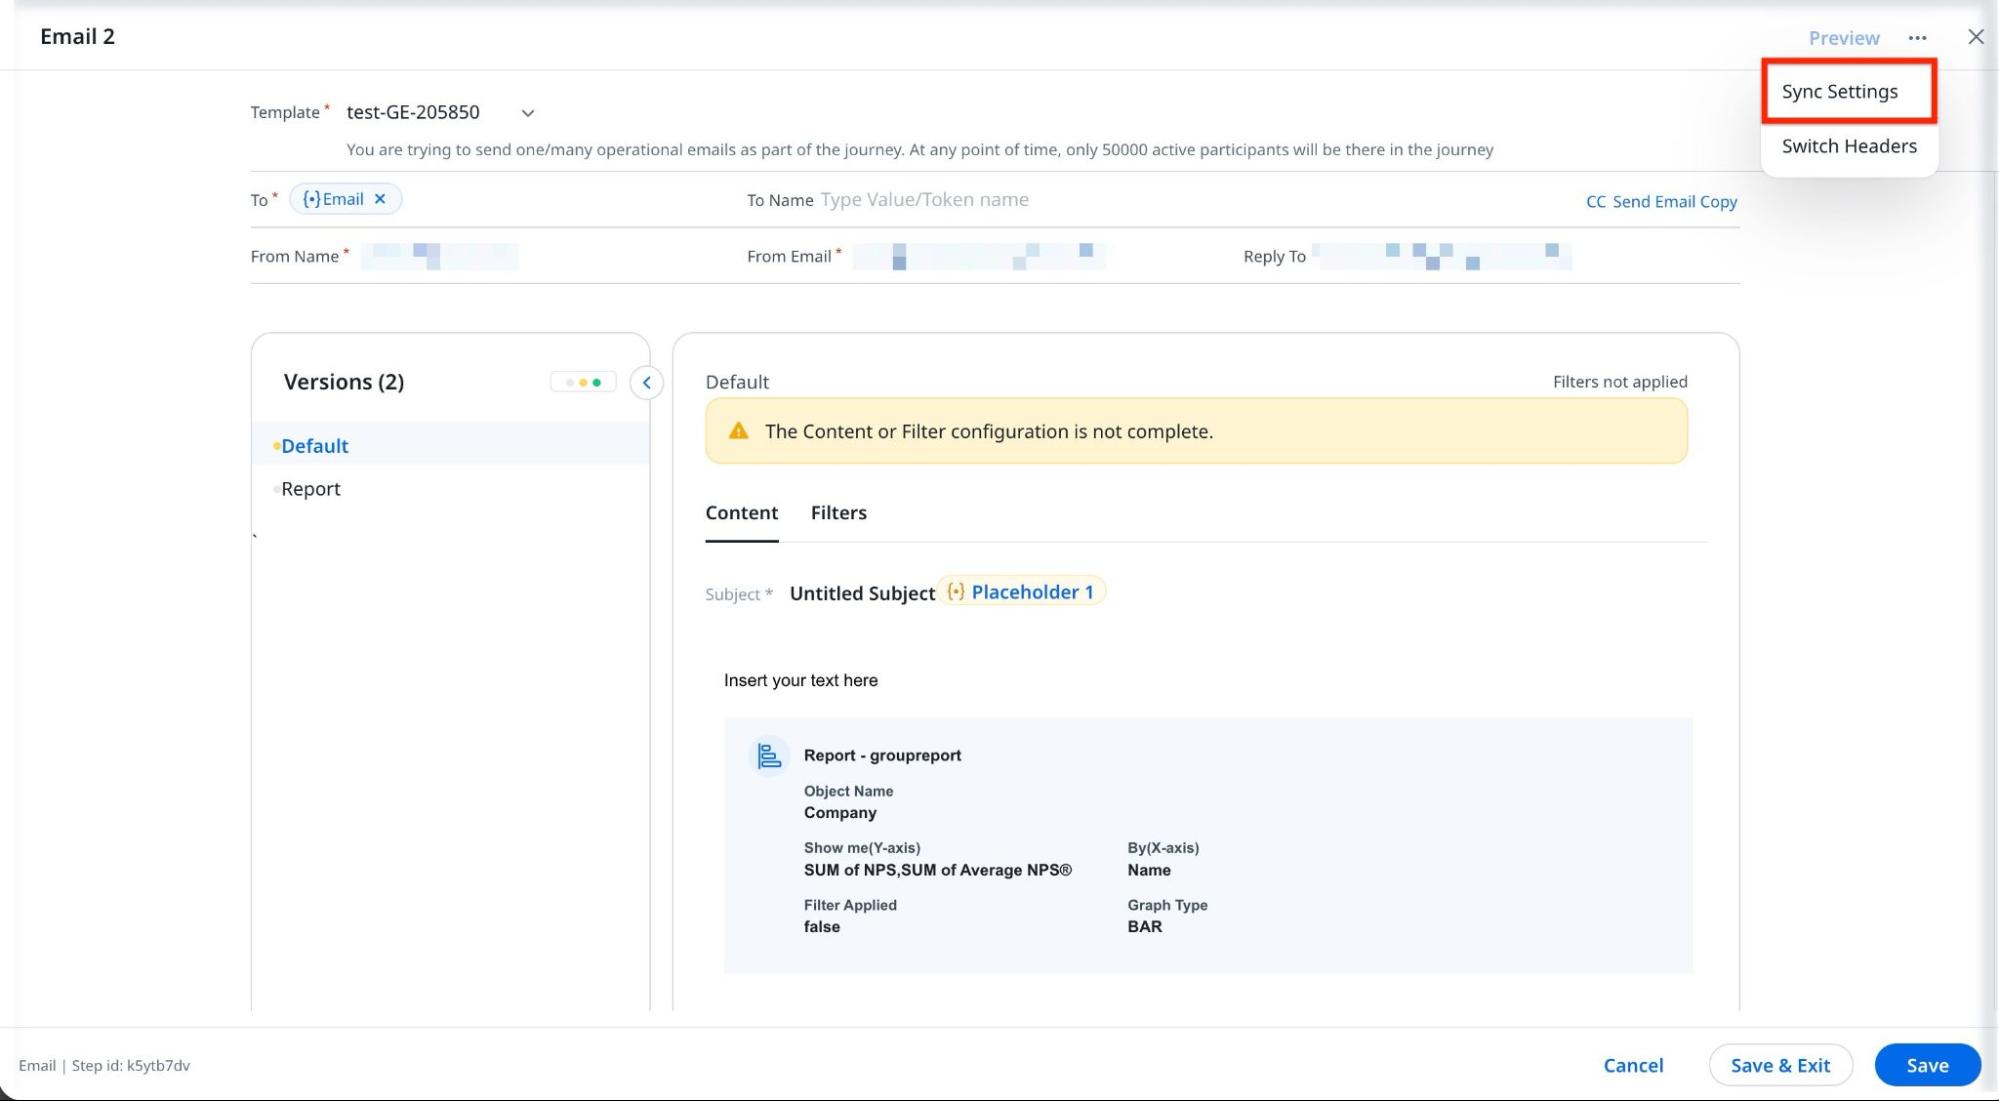
- In the Sync Settings slide-out panel, select the Override Action Execution Schedule checkbox.

The system now bypasses the Action Execution Schedule and sends the email instantly when a participant reaches this step in the program.
Edit Action Execution Schedule
Enable the Action Execution Schedule for an active program.
Once the Action Execution Schedule is enabled and the program is published, it cannot be changed.
To enable the action execution schedule in an active program:
- Open the active program and click Edit. Or open a program in draft mode.
.png?revision=1)
- Click the Audience element on the Programs Editor page. The Audience slide-out panel appears.
- Click Advanced Settings.
- Turn on the Action Execution Schedule toggle.
- Provide the following:
- Select the days when the action is to be executed.
- Select the time range when the action is to be executed.
- Select and configure the Timezone option, for instance, the participant's common timezone.
-
Click Save.
Email/ Survey
Email or Survey action allows you to configure Email or Survey in the selected template. Just like emails, you can add surveys to your program. You can add multiple emails and surveys to the program.
Note: Currently, surveys can only be distributed through email. However, with future releases, in-app distribution using Gainsight PX will also be available.
To configure an Email or a Survey action:
- Drag and drop the Email or Survey actions from the Elements section to the Programs Editor page.
- Click the required Email or Survey element on the editor to configure. The configuration page appears.
- Select the template.
- (For Survey action) In the email body, click the survey from the added link or button.
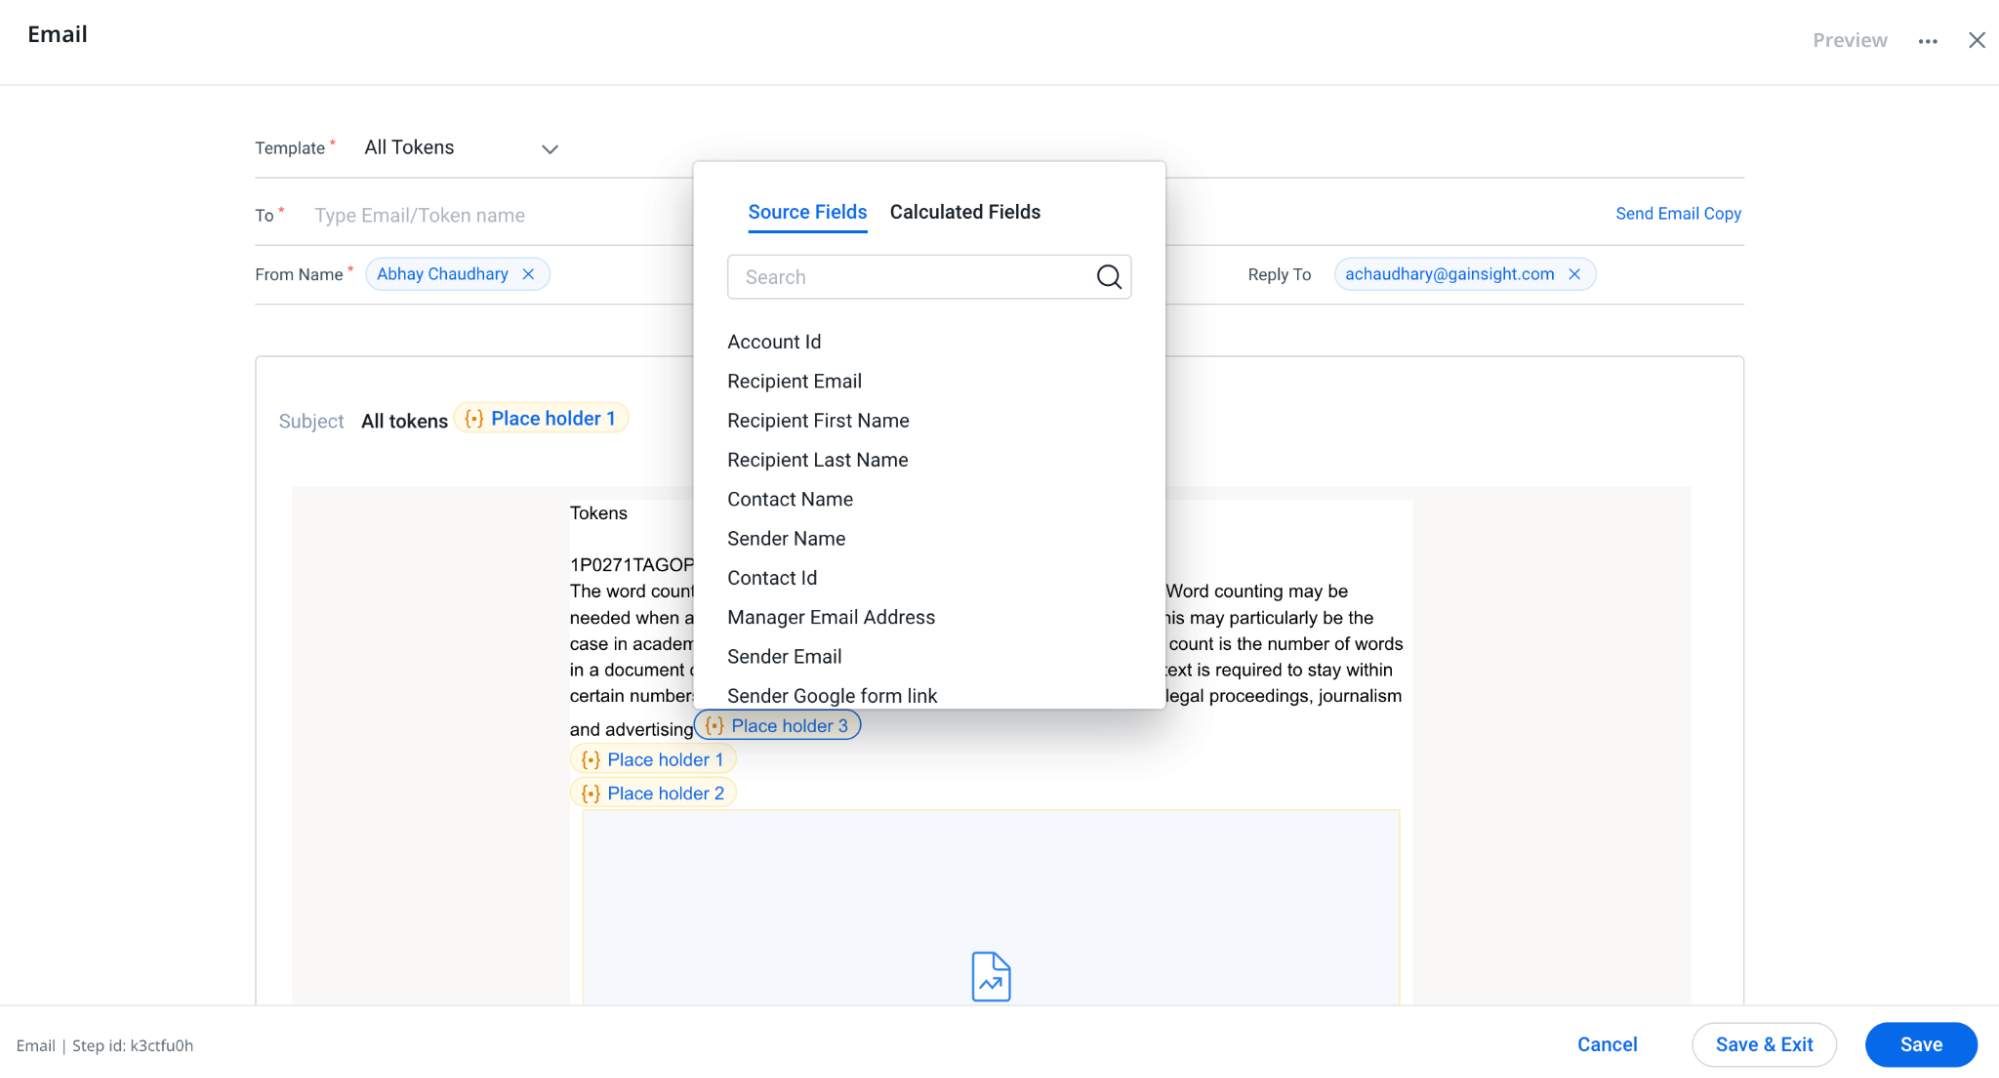
Note: Anonymous and semi-anonymous surveys do not support branching or response-based evaluation. The Survey URL and Survey Page Open Count fields are populated only for non-anonymous surveys. - The unmapped tokens are displayed in yellow. Click the token to map. The Source Fields list and Calculated Fields list appear.
- Select the field to map with the token.
- (Optional) Click Preview to preview the email.
- (Optional) Click Send Test Email to send a test email to ensure that the template appears correctly in the recipients’ email.
- (Optional) Click the three dots to access additional options for Sync Settings or to switch headers between local and global.
Note- Any modifications to the email template, such as content update or version changes, must be manually re-saved in the program's email step configuration to ensure they take effect before publishing the program.
- Send default version if the version filter value does not have a match is enabled by default if multiple versions are present for an email.
- Log to Timeline is available under Sync settings in the email step, which is not enabled by default.
- The Log Emails to Salesforce option in Sync Settings is only available when logged into Gainsight through Salesforce. Ensure the program source has a Person ID for this to function properly.
- The email is created as a task in Salesforce. The Task Owner must be a Salesforce user. In the configuration, select a Task Owner Field from the source that contains a User field. The Default Task Owner is mandatory and serves as a fallback when a task owner cannot be identified from the selected source field.
- Emails are logged to Salesforce in near real time after the email platform processes them.
- A maximum value for a Delay step is 365 days, and for the Evaluate step is 90 days.
- Allow sufficient time between a primary action and any follow-up (for example, a primary survey and its reminder). For production environments, set intervals to at least 1 hour. For quick validation, use 10–15 minutes in a dedicated staging or sandbox environment. Avoid very short minute-level gaps because, under load, they can trigger retry or backoff behavior, resulting in significantly longer delays.
- Click Save. The email or survey action configuration is saved.
Override Action Execution Schedule for Email
You can override the Action Execution Schedule to immediately send specific emails, like thank-you messages or survey completion confirmations. To configure this:
- In the program editor, click the required Email element to configure. The configuration page appears.
- Select a Template.
- Click the three-dots horizontal menu and select Sync Settings.

- In the Sync Settings slide-out panel, select the Override Action Execution Schedule checkbox.

The system now bypasses the Action Execution Schedule and sends the email instantly when a participant reaches this step in the program.
If your survey program is configured to send emails only on weekdays during business hours, unexpected email delivery issues may occur.
For example, if a survey's response timer ends on a Friday, reminder emails scheduled for non-respondents are not sent until the following Monday. As a result, participants who complete the survey over the weekend might still receive reminder emails.
To prevent this, schedule your survey response timers to account for weekends, ensuring reminders are delivered on weekdays without overlapping responses.
Set Up Group Email
Admins can send messages to participants grouped by the same Company or Relationship. When sent as a group email, all participants associated with the same company receive an email containing the same details included in the template. Participants added in the CC field can also receive all subsequent replies from the group in a single email thread.
To enable Group Email:
- On the Programs Editor page, select the first Email node connected to the Audience node.
- Choose an Operational Email template.
- Click the three-dots vertical menu.
- Click Sync Settings.
- Select the Send as Group Email checkbox.

- Group email is supported only for the first email element in a program.
- The email must be configured as an operational email.
- In Advanced Settings, set the uniqueness criteria to Company/Relationship ID and Email only.
- Outcomes are not supported for group emails.
- The Action Execution Schedule configured in Advanced Settings does not apply to this step.
Set Up PX Survey
Use PX surveys when you want to collect feedback through an in-app engagement experience. Unlike email surveys, PX surveys are delivered through Gainsight PX and are intended for users who interact with the application.
To configure a PX survey:
- On the Programs Editor page, select a Survey step. The Survey Configuration page appears.
- In the Survey Configuration, click the Distribute via Dropdown and select PX.

- Select the required Connector and Survey type.

- Click Save.
Spaces bulk Invite
Space invitations can be triggered directly from a program, allowing teams to invite user to Spaces in bulk. The invitation is sent using an Email element by using the Spaces email template, and the program branches each participant to the appropriate next step based on the response.
.png?revision=1)
-
A Spaces-specific outcome is available for the Email element when the email is used as a Spaces invite. Use this outcome to define the next steps based on whether a participant has accepted the invitation.
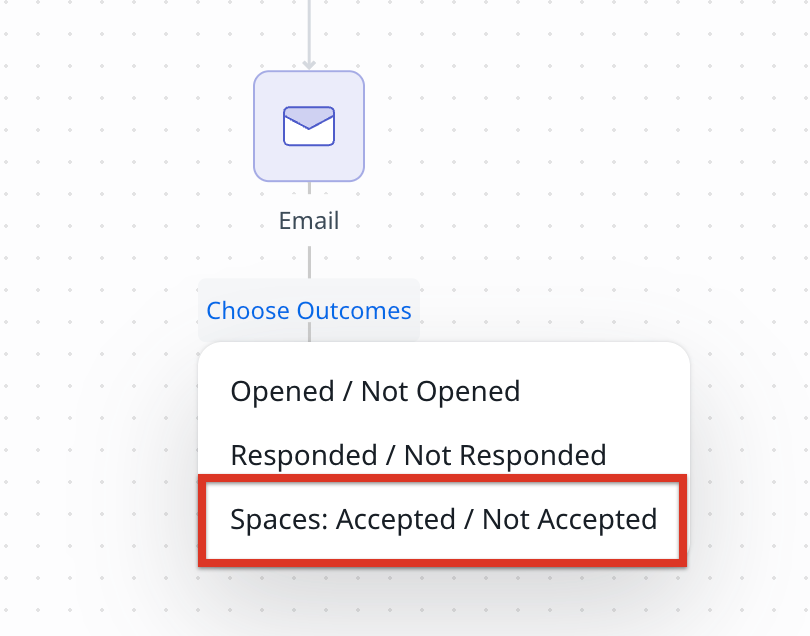.png?revision=1)
-
To identify the status of a Space invitation, add an Evaluate element, set the condition to Previous Steps, and select one of the following value:
- Not Opened: This is triggered when the email is not opened.
- Opened but invite not accepted: This condition is triggered when the email is opened but not clicked on the invite.
- Revoked: This condition is triggered when the user clicks on the link, but the space invite link was revoked/Expired.
.png?revision=1)
The Customer Community prerequisites apply. SSO must be enabled, and a Customer Community connection must exist on the Connectors page.
CTA
CTA action allows you to create or close the CTA in the program. To add CTA action in the program:
- Drag and drop the CTA action from the Elements section to the Programs Editor page.
- Use one of the following options to create a new CTA or close an existing one in the program.
- Click the Create CTA option to create a new CTA for the company person (or)
- Click the Close CTA option to close the created CTA in the program.
- Click Done.
Note
- The CTA option selection step is irreversible. To change the option you need to create a new CTA action.
- Admins can now utilize calculated fields within the Owner and Associated Person fields, as well as source fields in the CTA step, enhancing data management and accuracy. They can also use calculated fields of ID data types, including GSID, Lookup, SFDC ID, and Who ID, ensuring relevant data is easily accessible.

API
The Call API Action type enables admins to establish a connection between Gainsight and external systems through a request action from the external system using an API.
Example Business Use cases:
- Admins can send NPS® surveys and relay responses to collaboration platforms like Slack.
- Admins can send CSAT surveys and forward responses to external ticketing systems such as Zendesk.
- Admins can alert external systems when the Customer Health Score drops by a specified percentage, including actions like creating a CTA.
Prerequisite
The following are the prerequisites to use the API action type:
- The connection between Gainsight and external systems must be created.
- The API Action type for the connection must be configured.
For more information on how to configure the connection and action, refer to the Configure Custom Connectors and Configure External Actions sections in the Configure External Action from Gainsight article, respectively.
To configure the API action:
- Drag and drop the API action from the Elements section to the Programs Editor page.
- Click the required API element on the editor to configure. The API configuration slide-out panel appears.
- From the Connectors dropdown, select the API connector.
- From the External Action dropdown, select the API Action.
- (Optional) In the Description field, add an API description.
- (Optional) Click the Create Connection or Create Action options to create a new connection or action, respectively.
- In the Field Mapping section, select the respective Source Fields to map with the Action Fields.
- Click Save. The API action configuration is saved.

PX Engagements
Gainsight integrates Journey Orchestrator (JO) with Gainsight PX. You can trigger PX in-app engagements from Programs, and take action based on the engagement events in Programs. You can further analyze and measure the Program and Engagement effectiveness. This integration helps customers achieve a unified customer engagement strategy by leveraging the best of both JO and PX applications.
Note
- The PX Engagements cannot be configured for programs with a User entity.
- By default, this feature is enabled for all the customers who have CS and PX subscriptions.
- Sharing PX Surveys is not supported at this time but will be added in future releases.
Prerequisite
The following are the prerequisites to in-app engagement action:
- Customers must have subscriptions for both the Gainsight Journey Orchestrator module in the CS application and also the Gainsight PX application.
- Configure the PX Connector in the Gainsight CS application. For more information, refer to the Gainsight PX Connector article.
To configure the PX engagement action:
- Drag and drop the PX Engagement action from the Elements section to the Programs Editor page.
- Click the required PX Engagement element on the editor to configure. The PX Engagement configuration screen appears.
- If there are multiple PX instances connected, then select the connection from the Connections dropdown. The connection can also be changed from the dropdown field on the top-right corner in the engagements listing view.
Note- Programs can only have one PX connection. If a different connection is selected, it updates the connection details of all the previous engagements created.
- PX engagements are filtered based on the PX connector identifier: Company or Relationship.
- PX engagements are filtered based on the PX connector identifier: Company or Relationship.
- The engagement cards are emphasized when hovered over, and the different steps of the engagement, if present, will auto-play in a carousel. Each of the engagement cards also provides information on the Engagement Name, Type, Product, Channel, Labels, and Environment.
-
Click Preview on the card to view the engagement steps in detail along with other Engagement information such as Schedule, Qualification Rule, and Throttling.
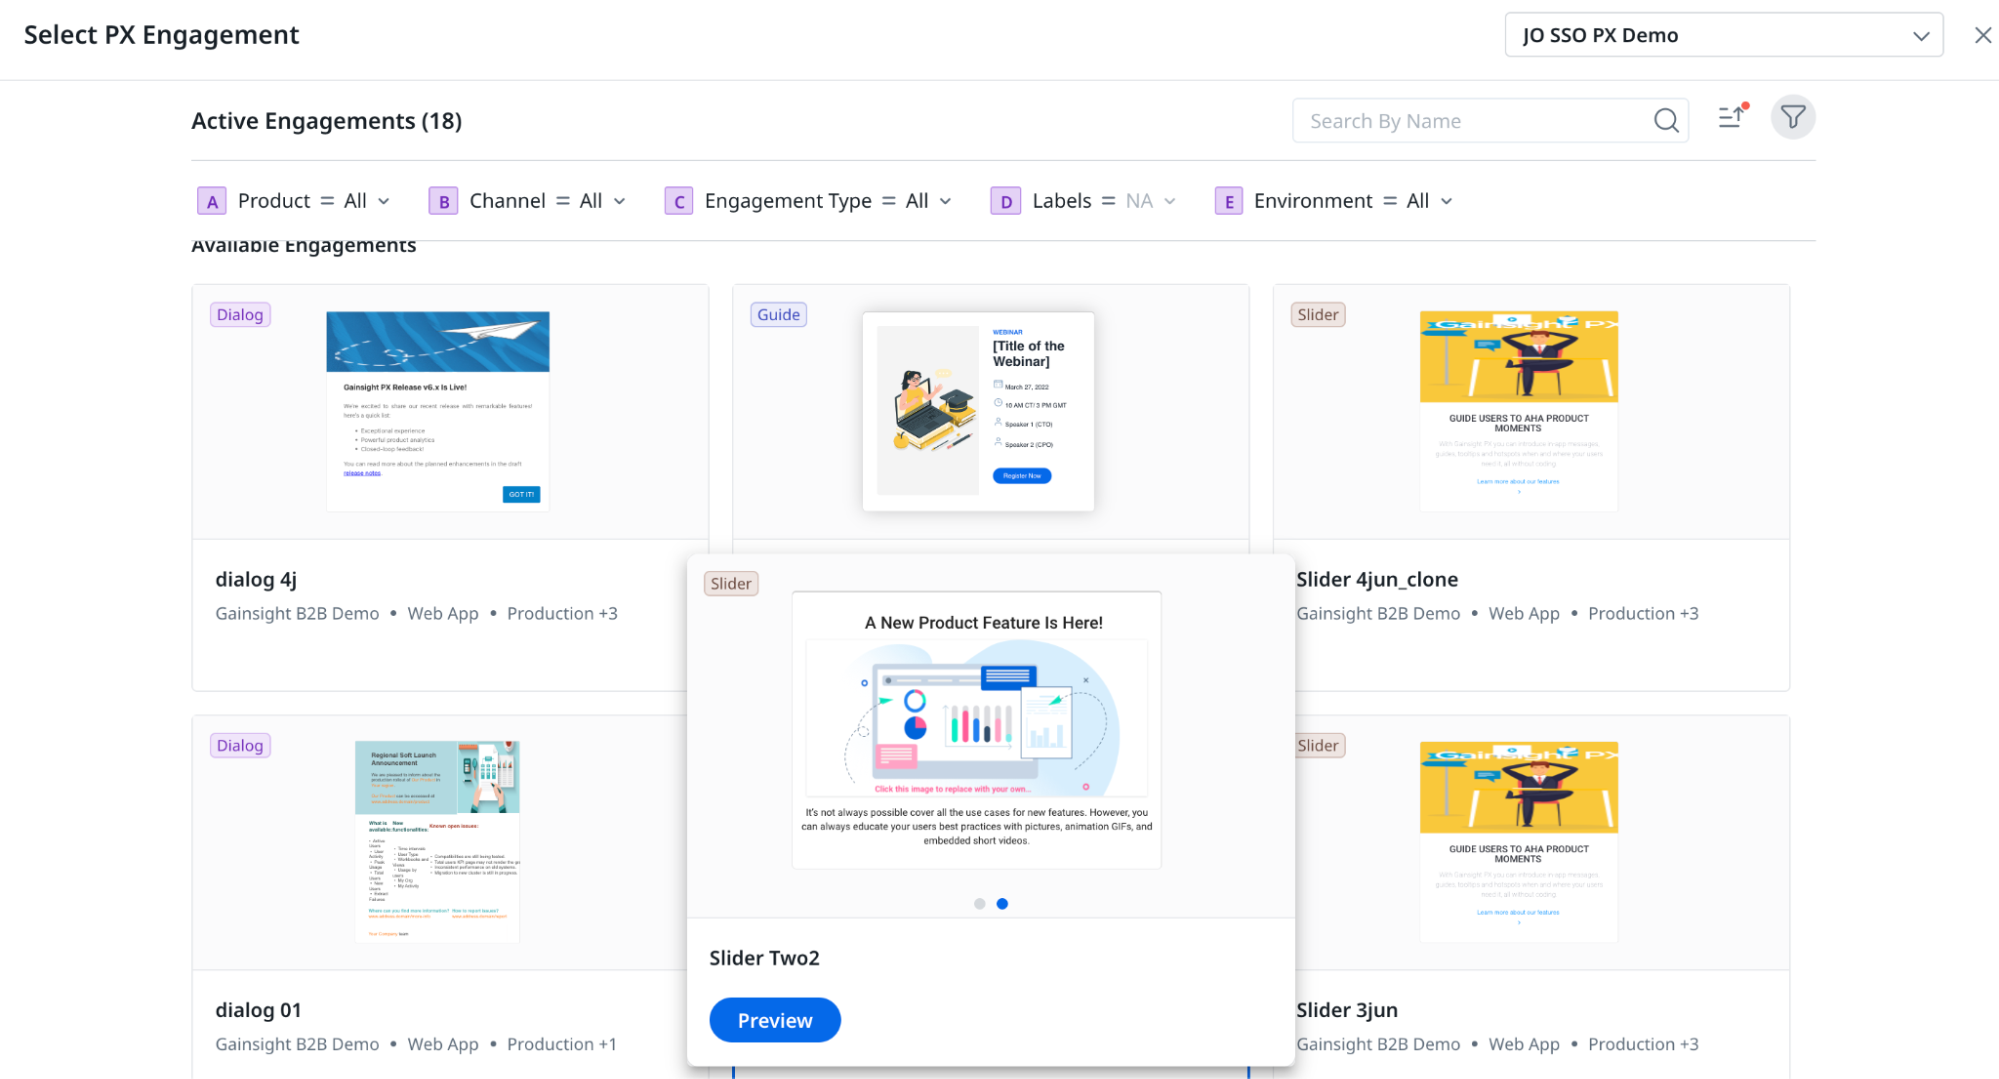
-
(Optional) To edit an engagement in PX.
-
In the preview window, click Edit in PX. The engagement in PX appears in a new browser tab.
-

-
Make the necessary in-app changes and click Save.
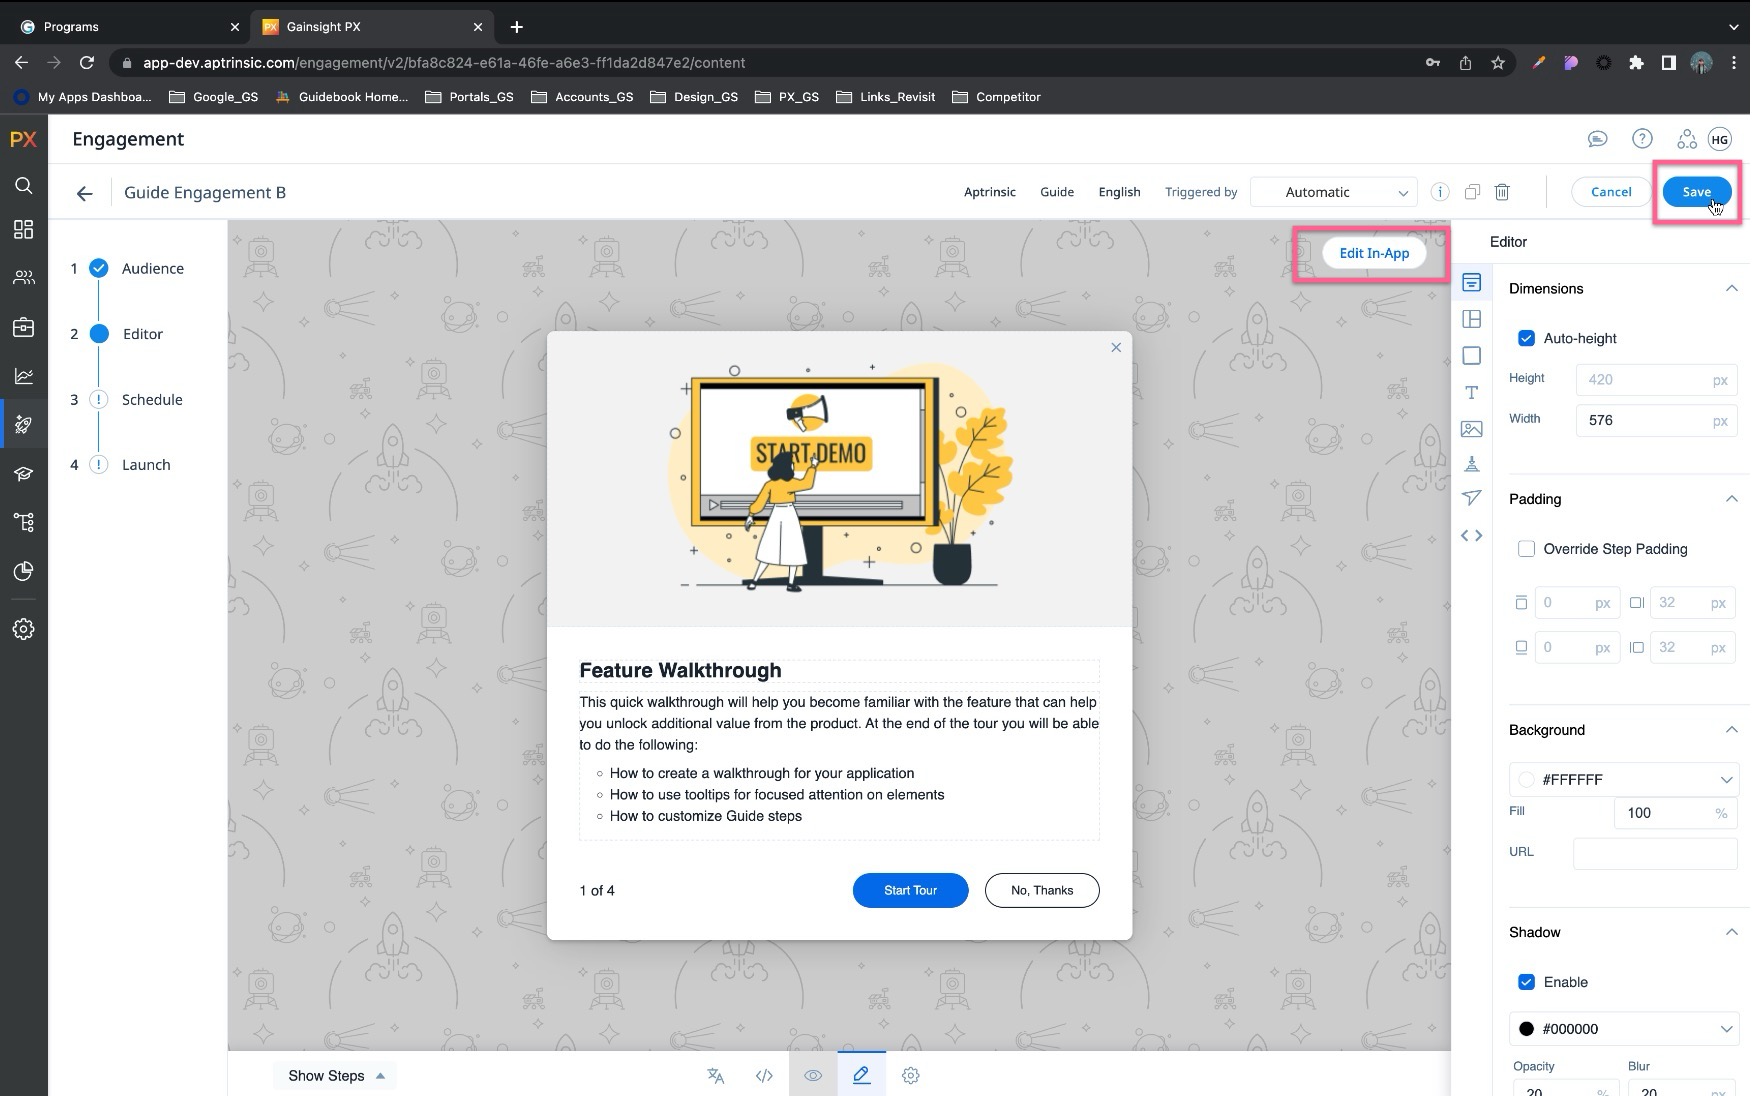
-
To continue setting up your PX engagement, manually return to the previously opened JO browser tab.
-
To load the latest edits made in PX, click Refresh.
-
Click Save to select the engagement. The selected engagement is shown in the listing view.

Slack
Admins can access Slack as an action within the Advanced Programs configuration. The Slack integration within Journey Orchestrator provides the following capabilities:
- Easy Selection of Slack Channels and Workspaces: Choose from available Slack channels and workspaces for directly posting messages through Journey Orchestrator.
- Comprehensive Message Customization: Draft impactful messages with formatting options and tokens for adding customer-specific data.
- Insightful Analytic Reports: Access reports in Journey Orchestrator's Analytics for detailed insights into each participant's message delivery status.
Prerequisite
To use Slack action in Journey Orchestrator, ensure the out-of-the-box Slack Connector is set up, and to authorize the Slack app from Gainsight for integration requires Slack admin permissions.
For more information on how to set up a connector, refer to a Preparation of Connector Jobs article.
To configure the Slack action:
- From the Elements section, drag the Slack action to the Programs Editor page.
- On the Programs Editor page, click the required Slack element to open the configuration slide-out panel.
- From the Connection drop-down list, select the required connection.
- Search for and select the channel in which you need to post a message.
- In the message box, compose your message.
Note- In the message box, markdown language is supported for formatting, such as italic, bold and strikethrough.
- Using @ in the message box allows you to add customer data as tokens.
- The integration currently supports messages only to Public channels.
- Using @User is not supported. @CSM name will only display the CSM's name and does not mention the user in Slack.
- Click Save. The message is delivered when the program runs.
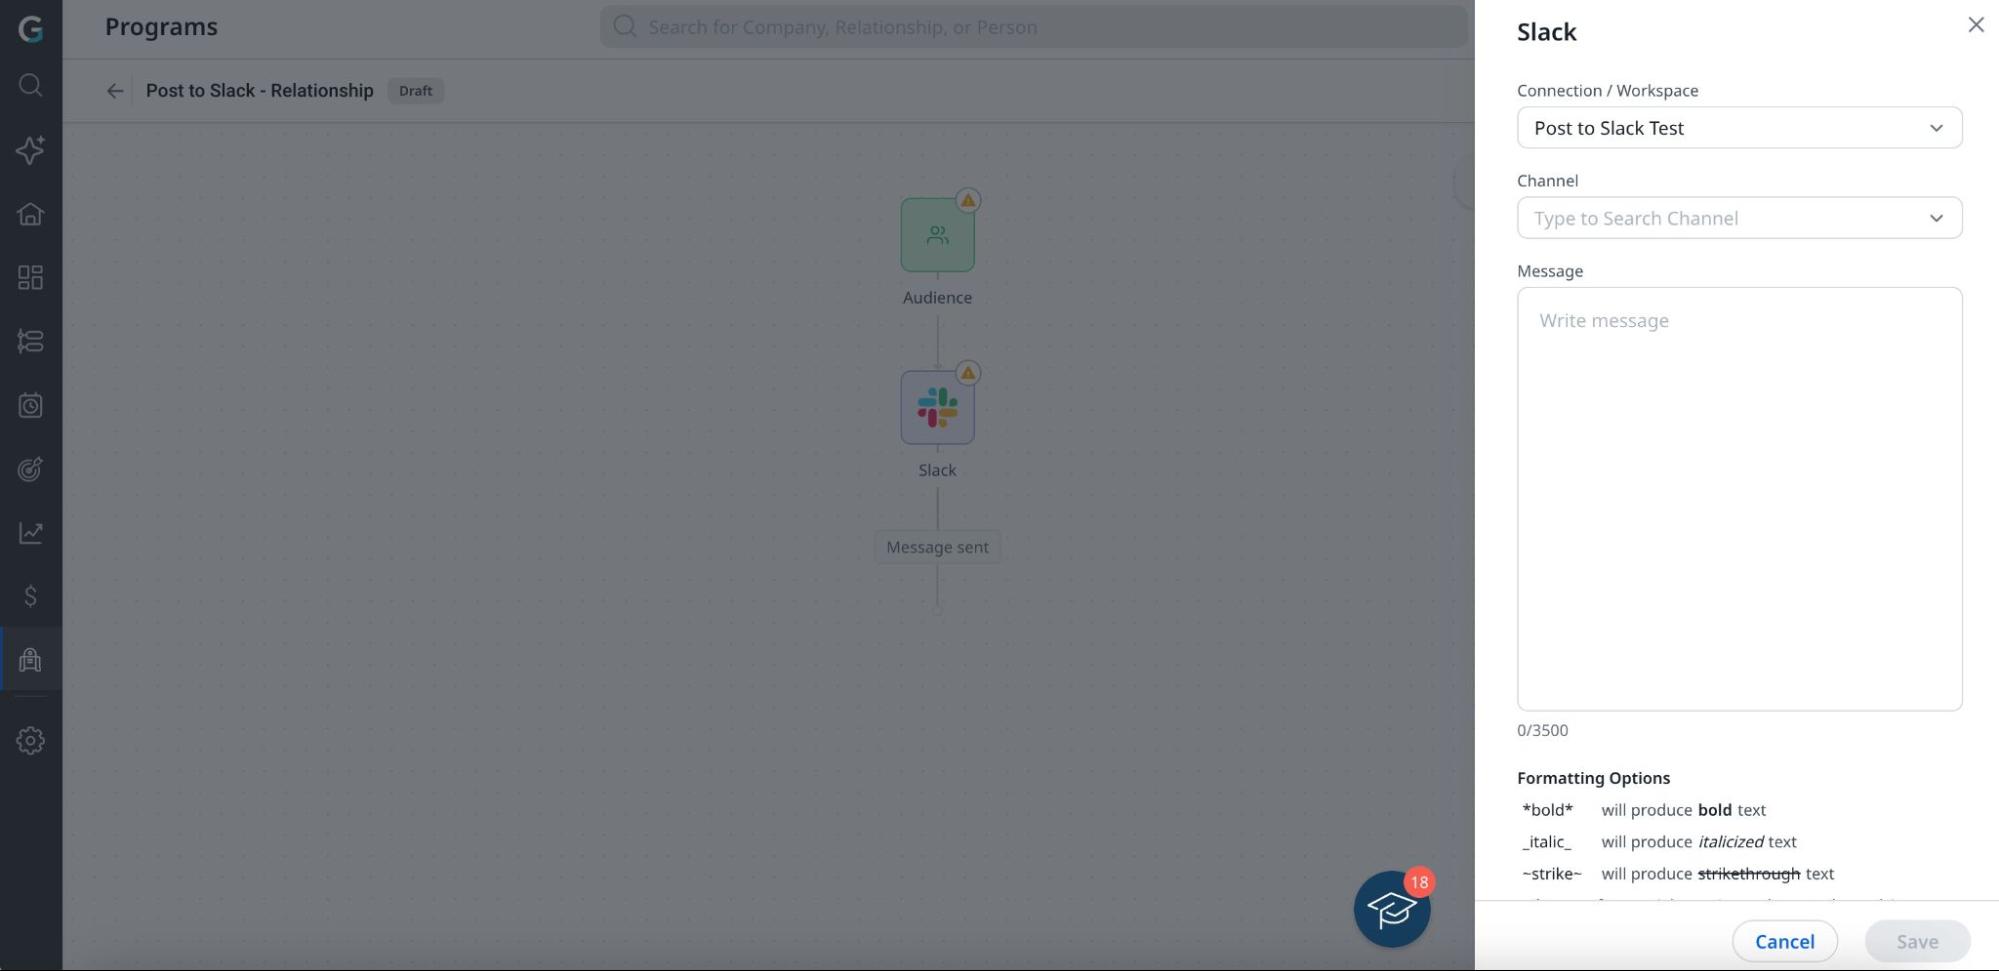
Customer Community
Customer Community (CC) enables admins to assign badges, enhancing touchpoints with customers and making it easier to engage with them throughout their journey.
Prerequisite:
- SSO must be enabled in your instance to use CC action. To enable SSO in your instance, contact Gainsight support.
- A Customer Community connection must be created on the Connectors page to access CC actions in Journey Orchestrator.
For more information on how to set up a connector, refer to a Customer Communities and Gainsight Integration - Admin Guide article, refer to a Preparation of Connector Jobs article.
To configure the CC action:
- From the Elements section, drag the CC action to the Programs Editor page.
- On the Programs Editor page, click the required CC element to open the configuration slide-out panel.
- From the Badges drop-down list, select the required badge to assign to the program participants.
- Click Save. The CC action configuration will be saved.

Note
- During the program run, if a participant in the JO program is not present in CC, they will not be dropped from the program. Instead, the CC step will be skipped for that participant, and they will move to the next configured step in the program.
- Admins can see the status of the badge assignment in the Step-wise report under Action Status in program analytics.
- A maximum of 20 CC elements can be added to a program.
Customer Education
Customer Education (CE) enables admins to assign courses, enhancing touchpoints with customers and making it easier to educate them throughout their journey.
Prerequisite
- SSO must be enabled in your instance to use CE action. To enable SSO in your instance, contact Gainsight support.
- A Customer Education connection must be created on the Connectors page to access CE actions in Journey Orchestrator.
For more information on how to set up a connector, refer to a Customer Education (CE) Integration article.
To configure the CE action:
- From the Elements section, drag the CE action to the Programs Editor page.
- On the Programs Editor page, click the required CE element to open the configuration slide-out panel.
- From the Connection / School drop-down list, select the required connection.
- From the Course drop-down list, select the required course.
- Click Save. The CE action configuration will be saved.

Note
- During the program run, if a participant in the JO program is not present in CE, they will be dropped from the program.
- Admins can see the course completion stats on the program analytics page under the Overall Performance report.
Conditional Wait
Conditional Wait in Gainsight's Journey Orchestrator is a capability that allows you to pause the progression of participants in a journey based on specific conditions. This capability is essential for ensuring that participants move to the next step only when certain criteria are met.
Previously, the conditional wait consisted of two sections - one for checking the outcomes of the previous step and another for checking a logical condition to branch participants with a common wait time.
With the new experience, the conditional wait is split into the following sections:
- Action Outcomes
- Evaluate
Action Outcomes
The Action Outcome enables you to branch participants based on their interactions with the actions. The following are the types of action outcomes:
- Email Outcomes
- Survey Outcomes
- CTA Outcomes
- API Outcomes
- PX Engagement Outcomes
To access the outcomes, click Show Outcomes on the editor. The branches and the wait period appear.
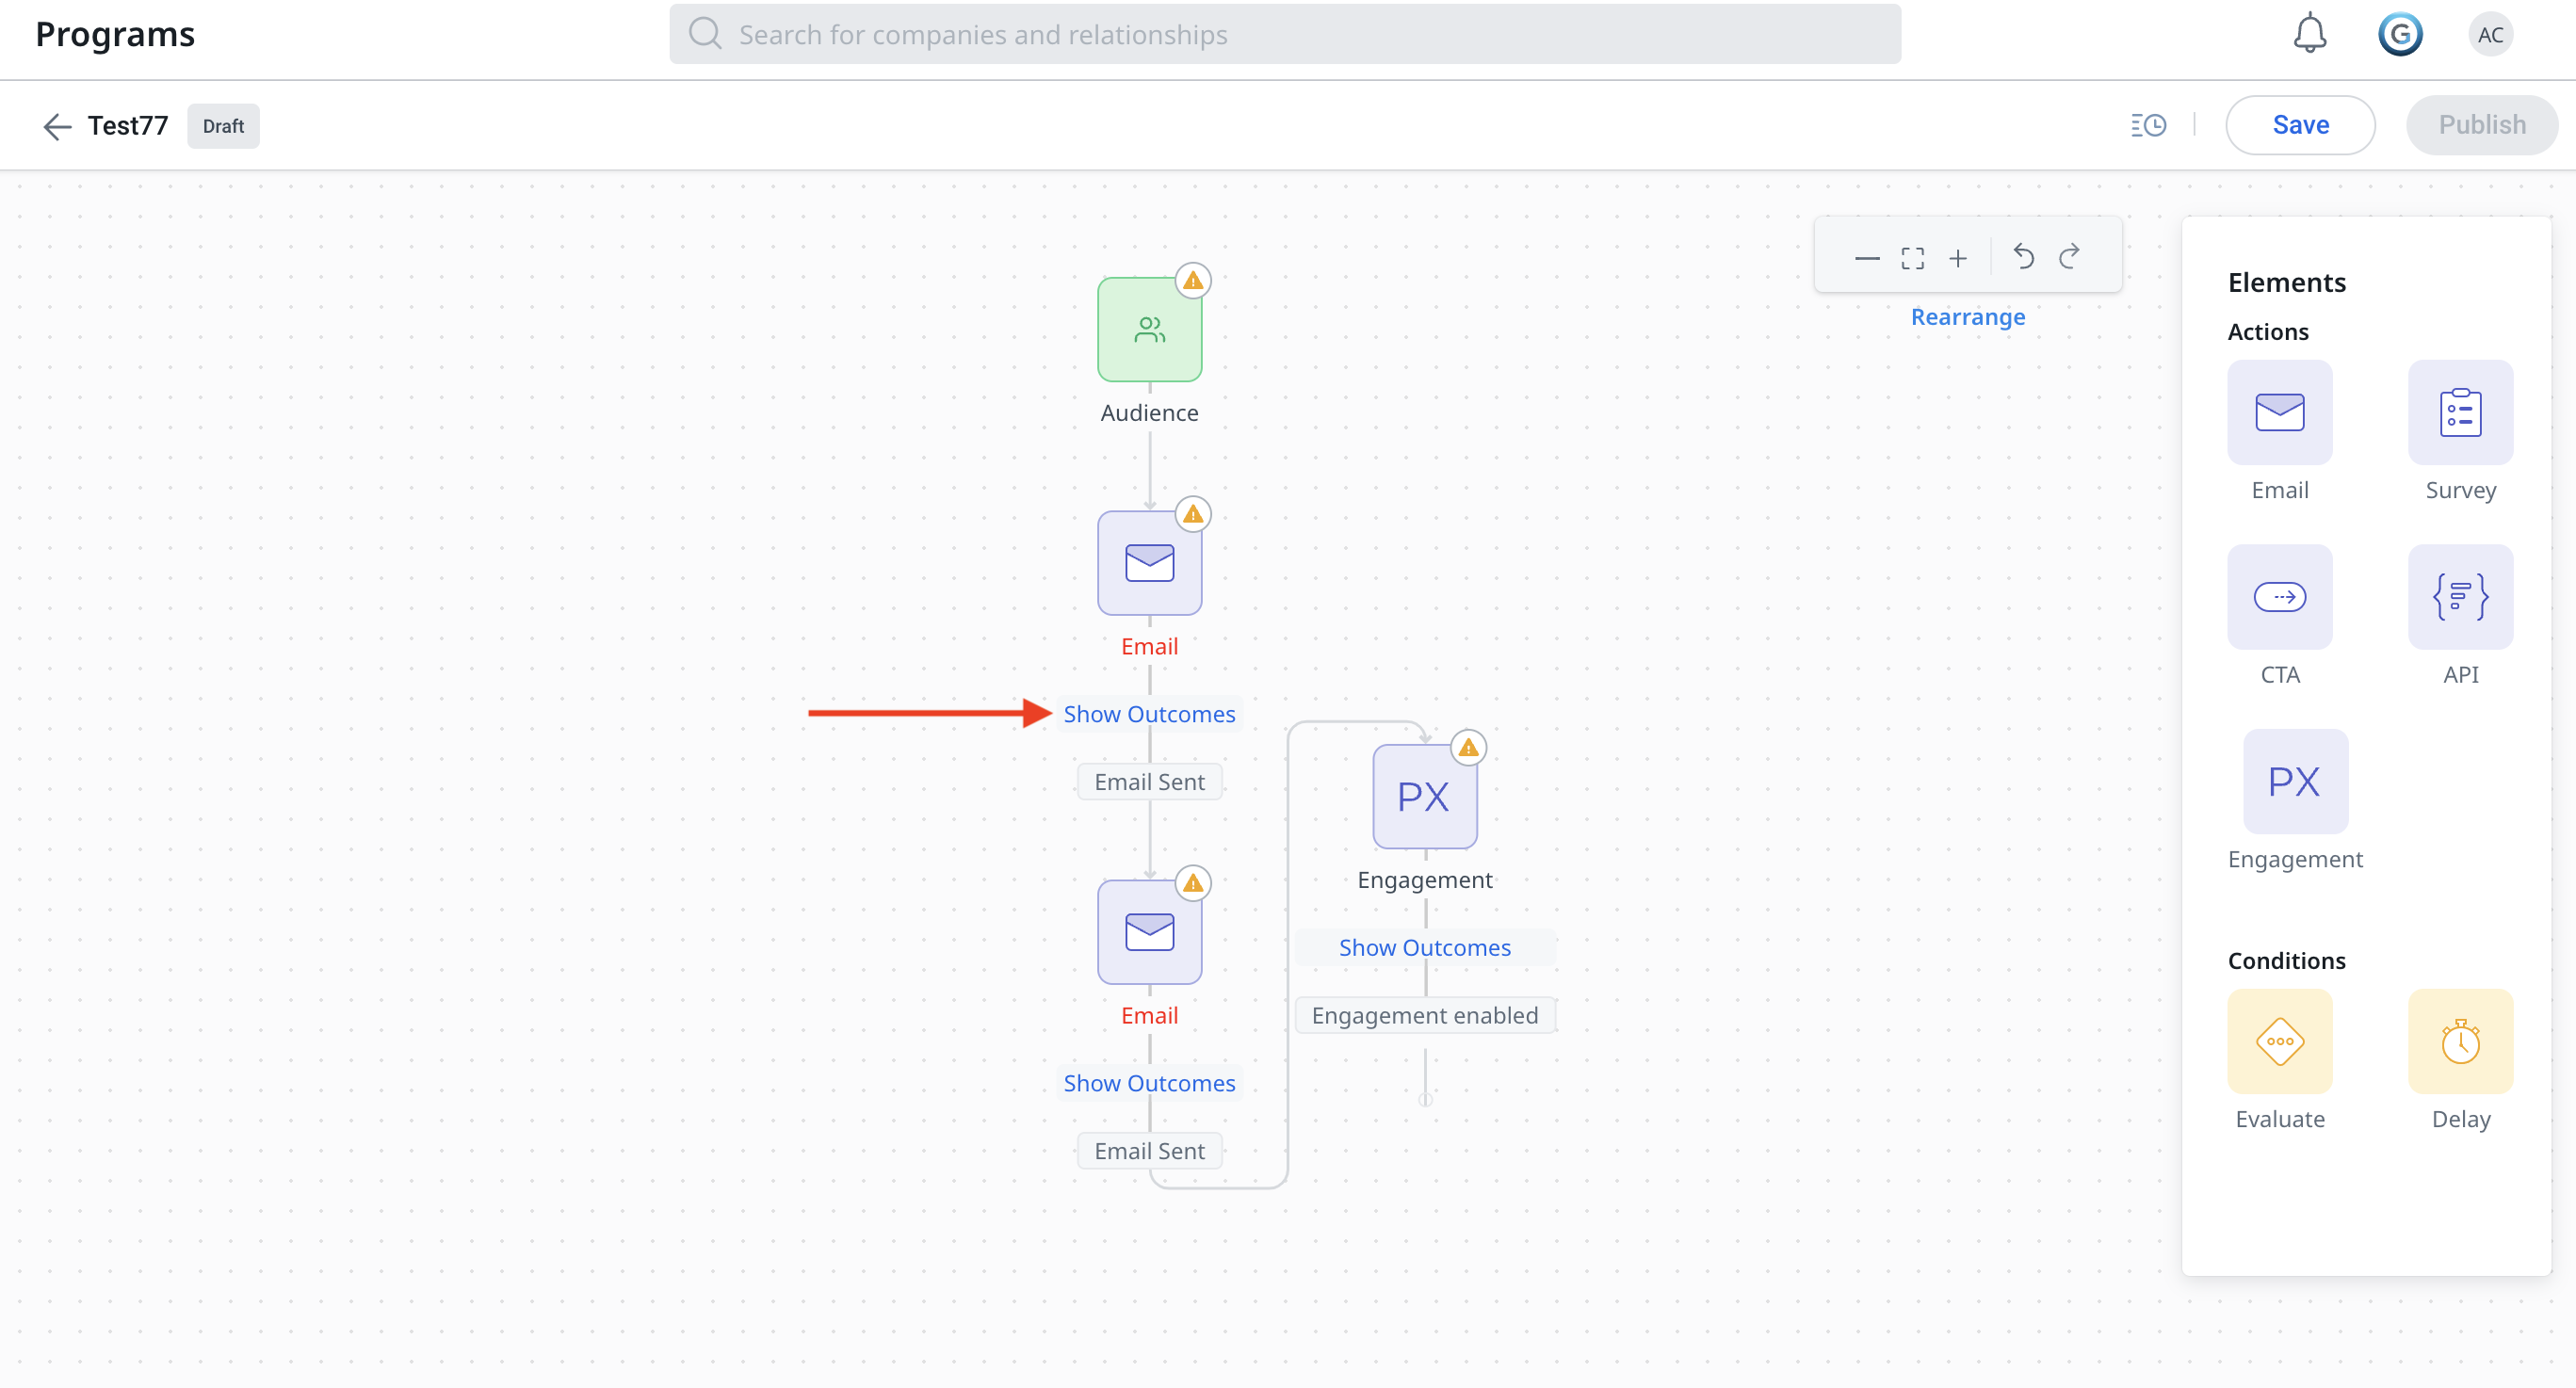
10 Days is selected by default as a wait period. Click Wait for 10 Days for the email to be opened to edit the wait period. It can be configured for Minutes, Hours, or Days.
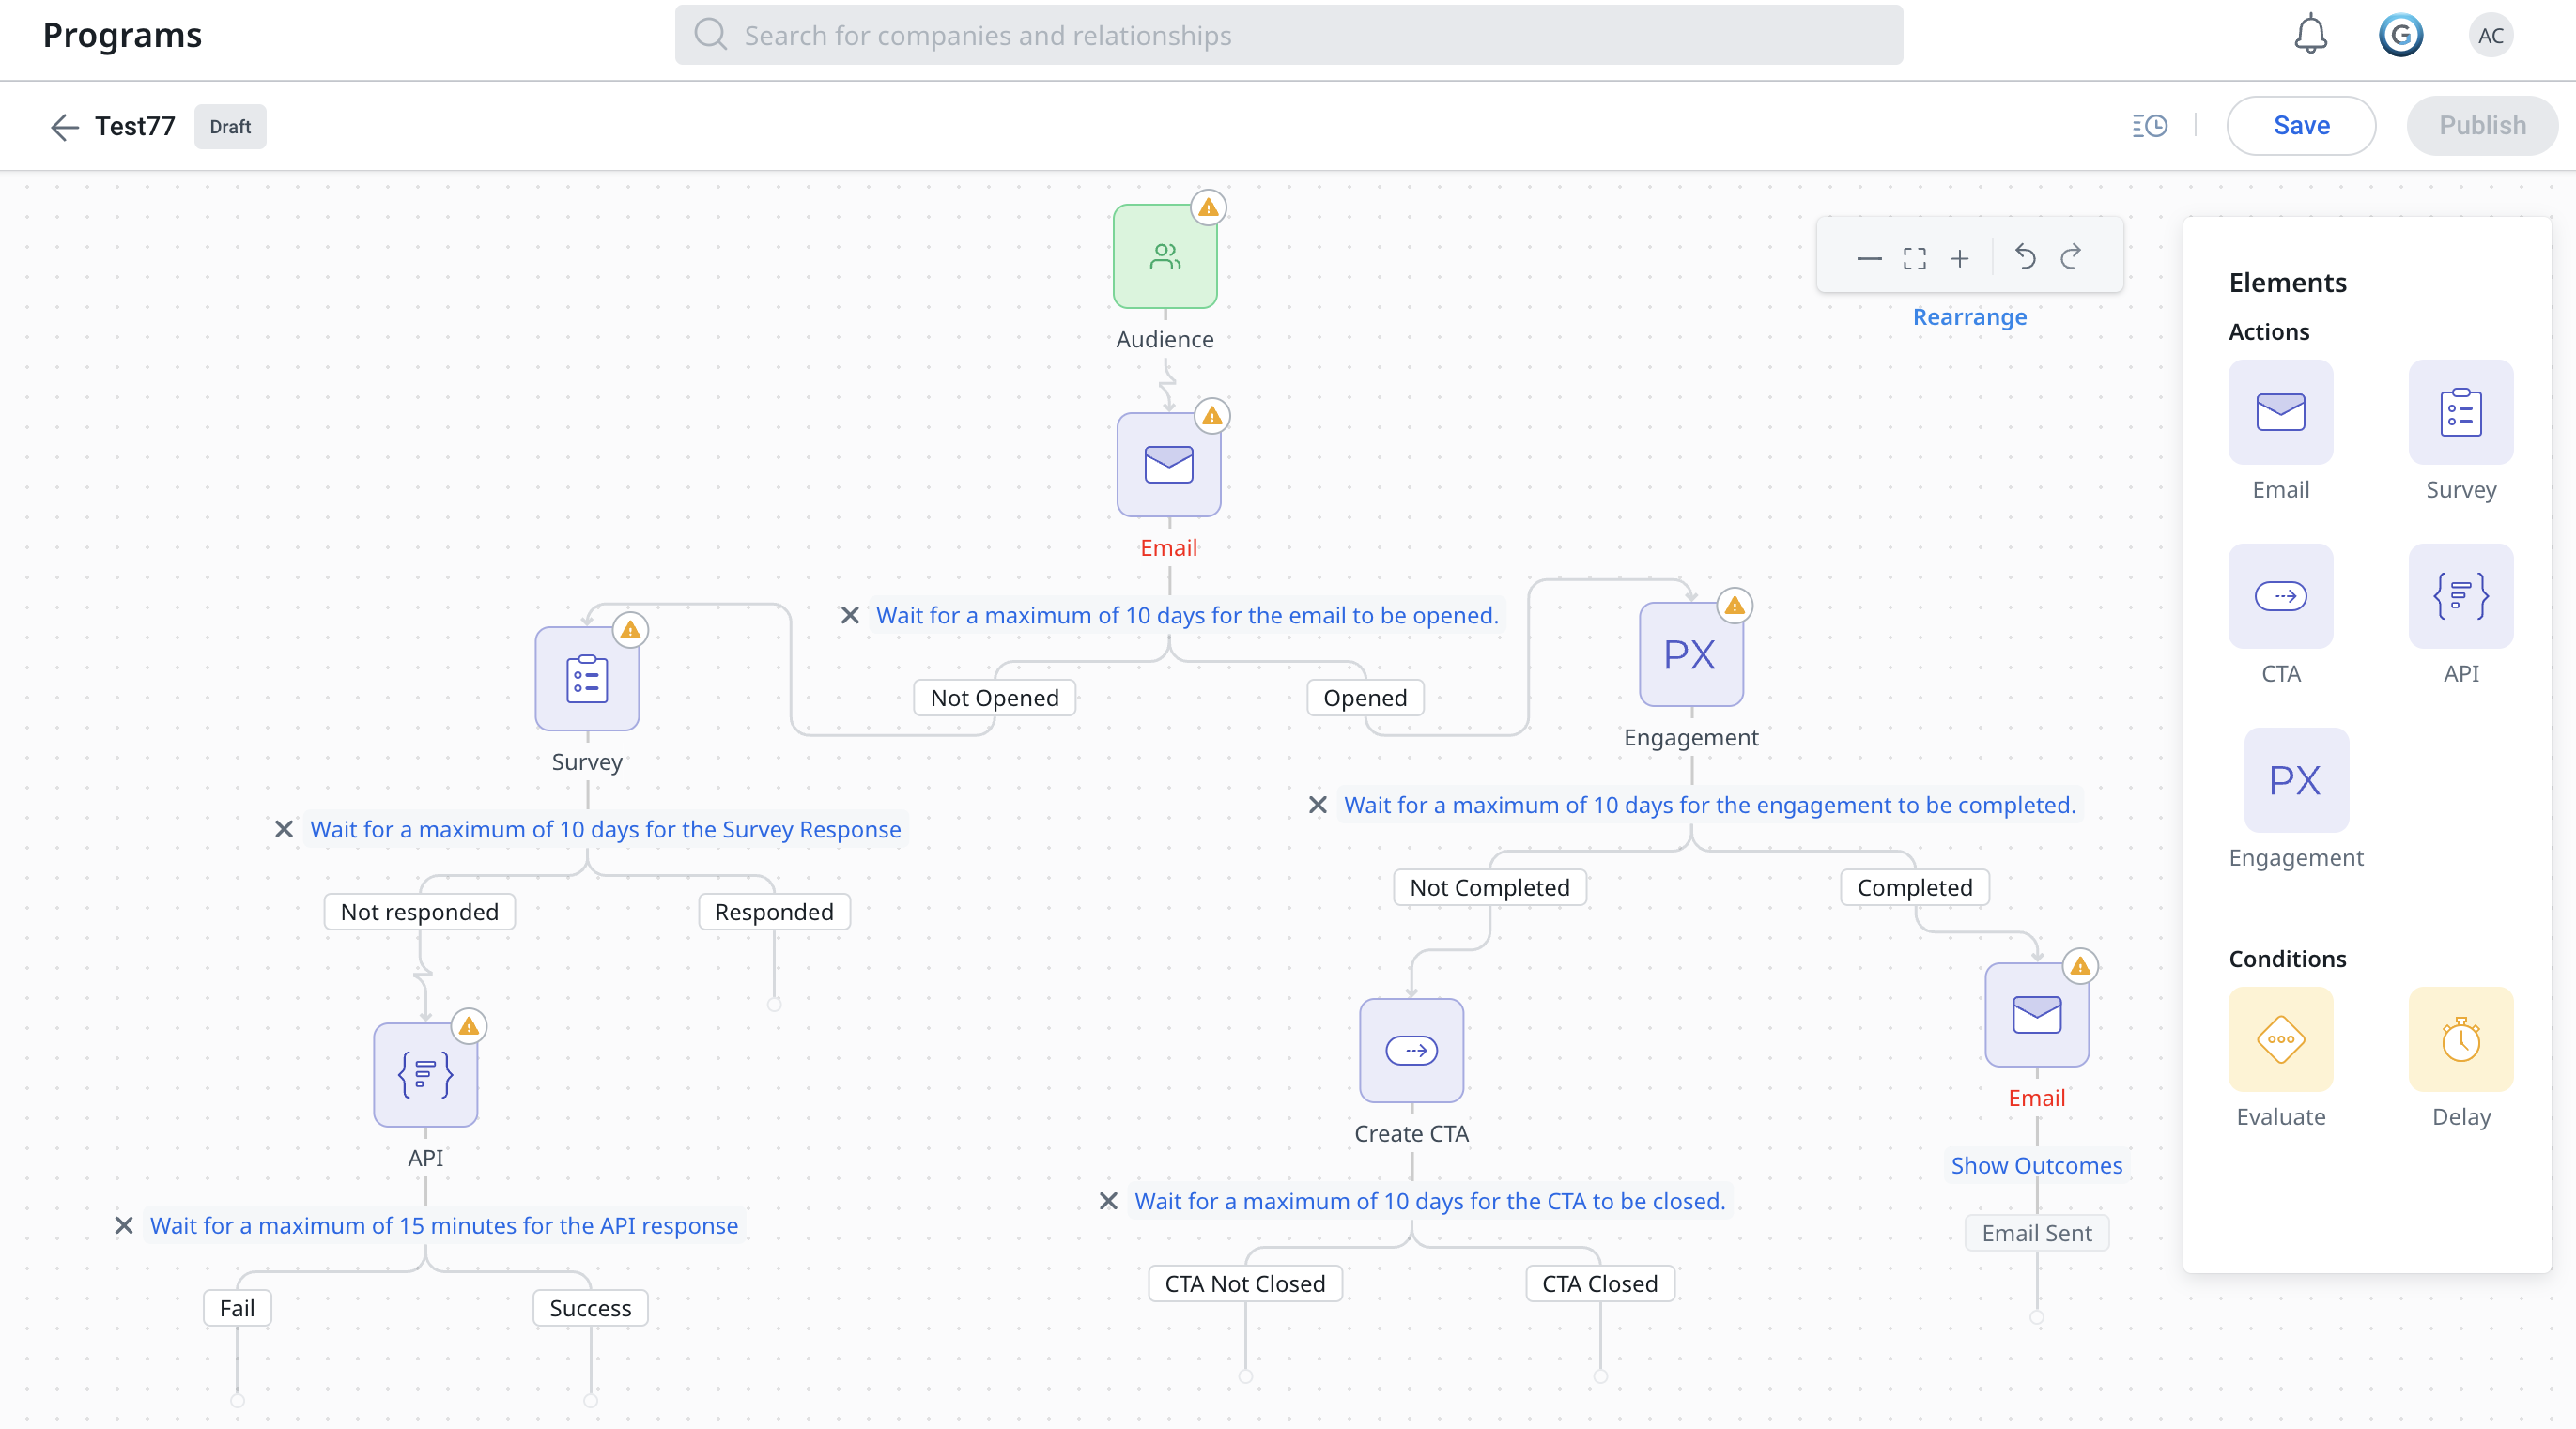
|
Outcome Type |
Possible Outcomes |
System Checks |
|---|---|---|
|
Email Outcomes |
|
Whether the email links were clicked or not clicked |
|
Whether the email was opened or not opened |
|
|
Whether the email was responded or not responded | |
|
Whether the space invite was accepted or not accepted | |
|
Survey Outcomes |
|
Whether the survey was responded to or not responded |
|
CTA Outcomes |
|
Whether the CTA is closed or not closed |
|
API Outcomes |
|
Whether the API connection was established successfully or not |
|
PX Engagement Outcomes |
|
Whether the end user completed the configured in-app engagement or not |
|
Customer Education Outcomes |
|
Whether the end user completed the assigned course or not |
Note
- To track email activity, configure Auto Email Capture to sync emails to Timeline. For configuration steps, refer to the AI Follow-Up & Auto Email Capture Admin Guide article.
- For Auto Email Capture eligibility criteria, refer to the Auto Email Capture User Guide article.
Evaluate
In the Evaluate step, users can create complex conditions and move their audience into multiple branches, with up to 5 branches plus an additional default branch. This limitation helps maintain clarity and manageability within the program flow.
Example Business Use Case: Consider a scenario where you need to tailor your customer engagement strategies based on their Survey or NPS® responses. With the Evaluate step, you can create branches for Promoters, Passive responders, and Detractors according to their NPS feedback. This allows you to construct the journey as follows:
- For Promoters: Set up a Thank You email.
- For Passive Responders: Implement an automated follow-up message.
- For Detractors: Add a manual intervention, like a Call to Action (CTA) for the Customer Success Manager (CSM) to engage directly, addressing their concerns and improving their experience.
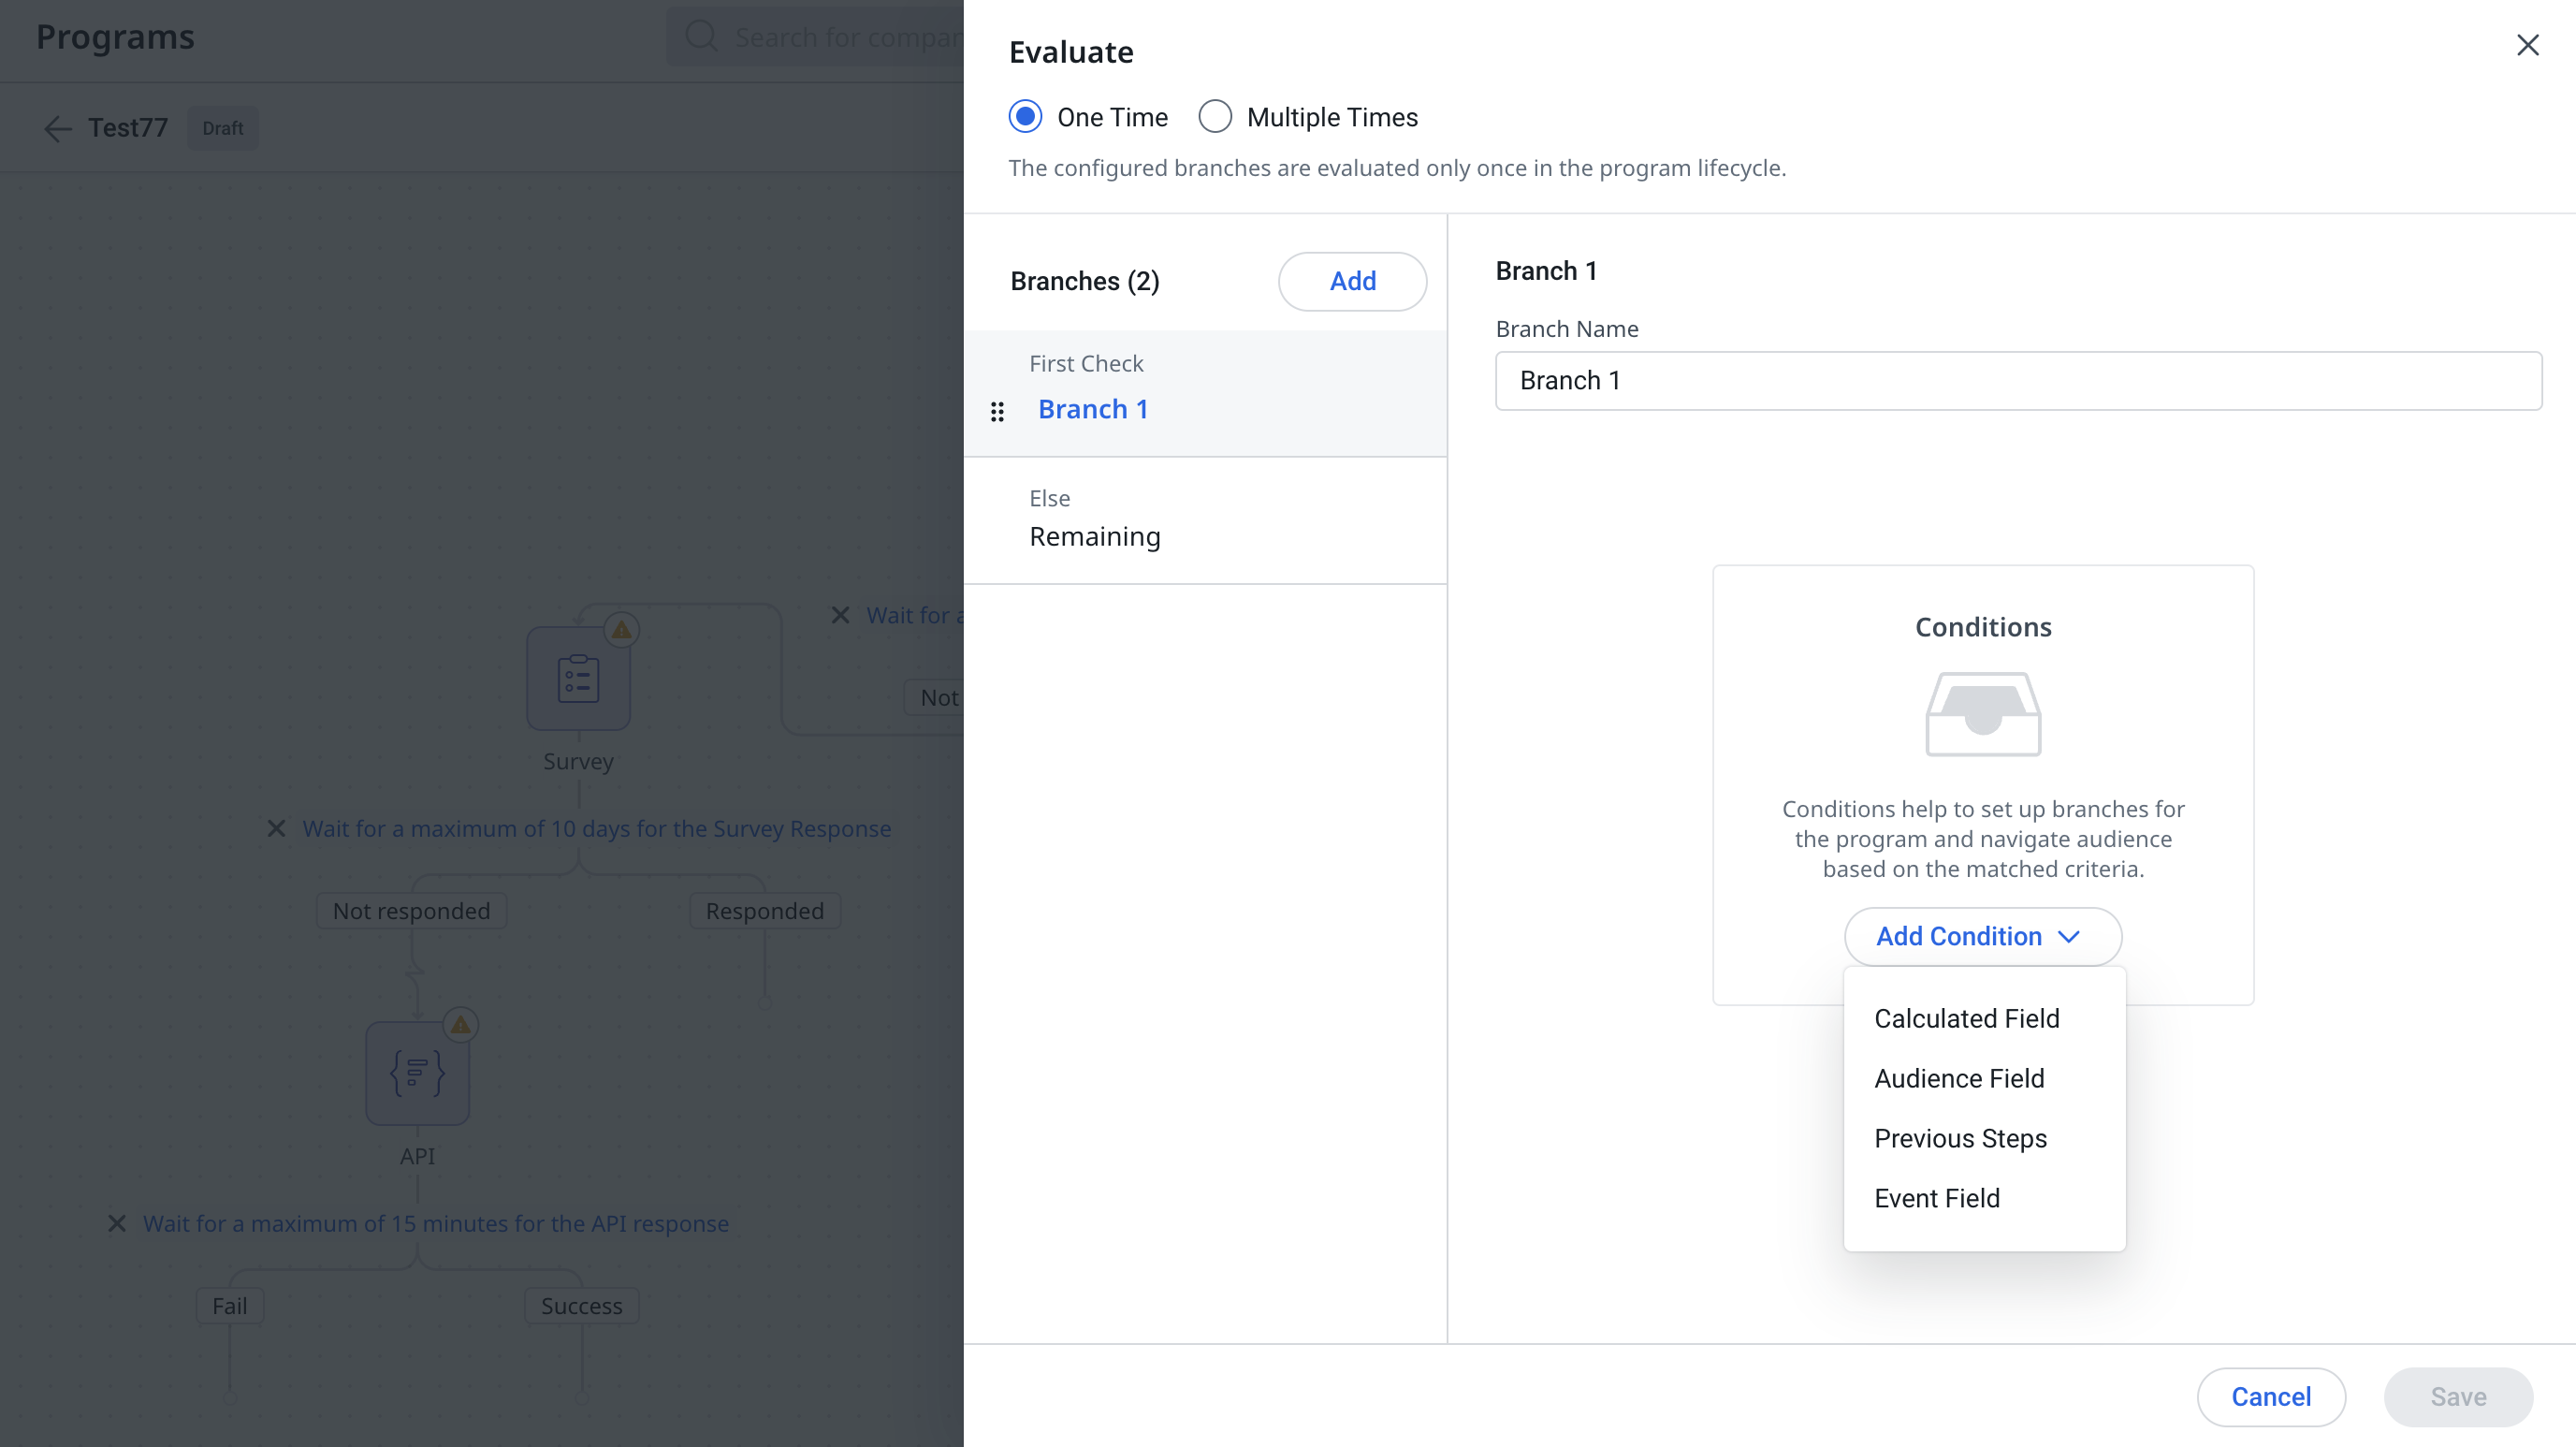
Define Multiple Branches
To add multiple branches with defined conditions:
- Drag and drop the Evaluate condition from the Elements section to the editor.
Note: The Evaluate condition allows you to create up to 5 branches plus an additional default branch, ensuring clarity and manageability in your program flow. - Click the Evaluate element on the editor to configure. The Evaluate slide-out panel appears.
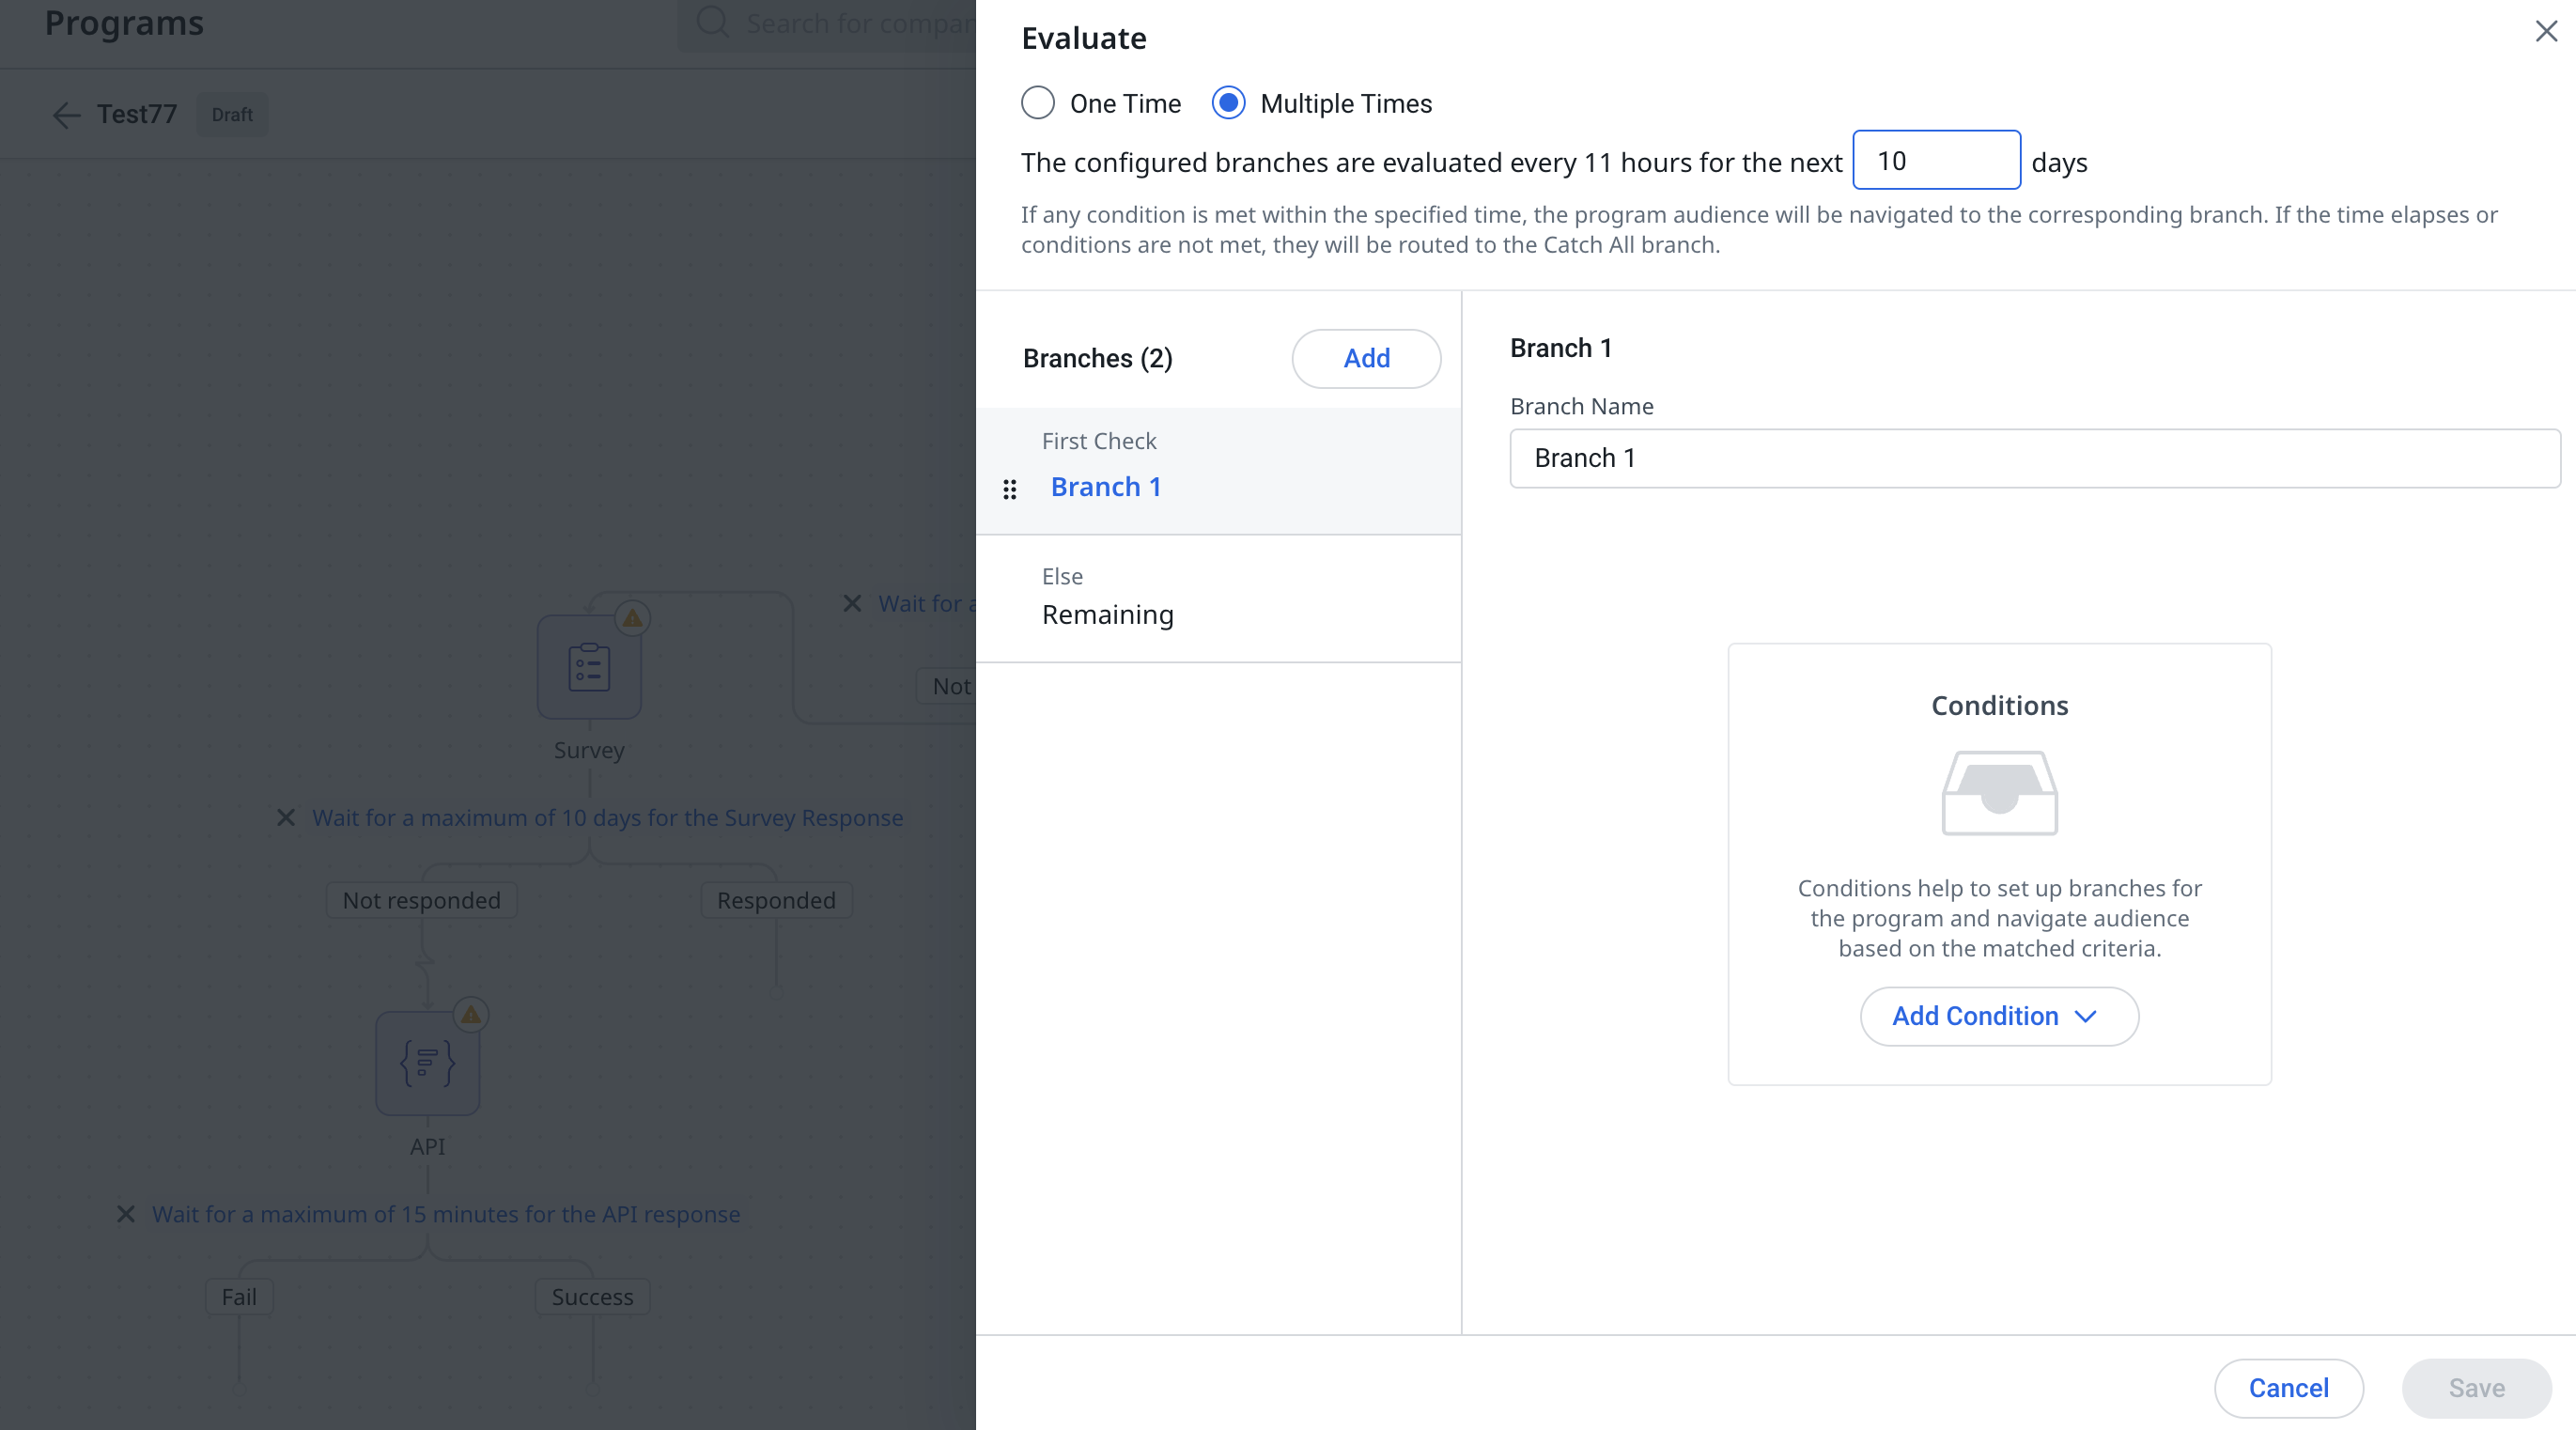
- Select the option to evaluate from One Time or Multiple Times.
Note:- When the Multiple Times option is selected, enter the number of days to evaluate configured branches repeatedly every 11 hours. The participant flows through the step multiple times until the branch condition is met.
- When you select One Time, the branch conditions are evaluated once for each participant. If a condition is met, the participant proceeds to the corresponding branch.
- Click Add Condition.
- Select the conditional fields from the following available options:
- Audience Field
- Calculated Field
- Previous steps (only supported for Email link not clicked, CTA Closed, and Survey not responded if they are present in the path where Evaluate step is connected)
- Survey Questions (available when a survey is added to the program)
- Event Field
- Define the conditions for each branch.
Note: If none of the conditions are met, the audience is moved to the Remaining branch. - Click Save.
Clone an Evaluate Element
Admins can clone an existing Evaluate element and reuse its configuration across different paths in a program. Cloning an Evaluate step saves configuration time and helps keep branching logic consistent.
When you clone an Evaluate element, JO retains the existing configuration and places the cloned element to the right of the original step without any connections. Connect the cloned element to the required path, and update its configuration as needed.
Admins can clone an Evaluate element only in programs in Draft mode. It is not supported in a Post-Publish Edit Draft.
Example Business Use Case: An admin creates an Evaluate element to route participants based on specific conditions. Another path in the same program requires similar branching logic. Instead of configuring the Evaluate element again, admins clone the existing element, connect the clone to the required path, and update only the differing conditions.
If the original Evaluate step uses conditions that reference survey question answers or previous steps, the values in those conditions are cleared in the clone. These references do not carry over because the cloned step has no connections, so the program cannot determine which path or survey they belong to. Before you publish the program, reconnect the cloned step and reconfigure these conditions.
To clone an Evaluate element:
- From the main menu, navigate to Digital Journey > Programs. The Programs list page appears.
- Open a program in Draft mode.
- Click Evaluate step. The Evaluate slide-out panel appears.

- Ensure all conditions and Branches are configured.
Note: The Clone option is enabled only after the Evaluate step is completely configured. Until then, it remains deactivated. - Click Clone. The Confirmation dialog box appears.

- Click Confirm. The new cloned evaluate step appears.

- Drag and connect the cloned step to the required path in the program.

- (Optional) If the original step referenced survey answers or previous steps, reconfigure the cleared conditions in the cloned step.
- Click Save.
Evaluate Preview
The Evaluate Preview option allows admins to preview how conditions in the Evaluate step behave for specific participants. It shows which conditions pass or fail and highlights the path each participant will follow. This simulation helps validate complex branching logic before the program is executed, ensuring participants are routed correctly based on the defined conditions.
This ensures your logic is working as intended without needing to activate the program or sync real participants.
Example Business Use Case: Suppose you’ve set up the Evaluate step to tailor customer engagement based on their NPS® responses:
- Promoters get a Thank You email
- Passives receive a follow-up
- Detractors trigger a CTA for the CSM

Use Evaluate Preview to simulate each participant type and confirm they’re routed to the correct branch, while ensuring your logic is accurate before launching the program.
How to Preview the Evaluate Step
- From the main menu, navigate to Digital Journey > Programs. The Programs page opens, displaying the list of all programs.
- Select any draft or active program to open the program editor.
- Click the Evaluate step. The Evaluate slide-out panel appears.
- Add conditions for the branches.
Note: A maximum of 26 conditions can be added per branch. - To see how a participant flows through the branches, click the Preview button.

Note: Preview may be disabled if configurations are incomplete or unsaved, or if no participants are synced. Make sure to save all changes in the Evaluate step to view updated details. - Choose a participant from the Choose Participant dropdown list to evaluate. The system checks their data against the branch conditions.
The dropdown list in the Evaluate Preview displays the following:- Only email IDs of participants
- Up to 10 participants at a time, with the option to search and select others
- All synced participants, excluding any that failed to sync
After selection, the system displays the condition results in green, red, and yellow, signifying matching value, not matching value, and dependent value, respectively.
.jpg?revision=1)
On the left pane, one of the following states displays for each branch: - Qualified: The participant meets the condition(s) for the branch.
Example: This person is qualified to go in branch one. - Not Qualified: The participant does not meet the branch conditions and can be routed to the other branches.
- Possible: The system cannot determine the outcome because the condition depends on a future event or previous step (example: survey not responded yet, no records are returned).
- If the preview result is not as expected, adjust your branch conditions and preview again.
Note: The preview of calculated fields with dynamic values shows results based on the data present at the time of evaluation. A maximum of 20 calculated fields can be added for a branch in Evaluate.