Call to Action (CTA) Detail View
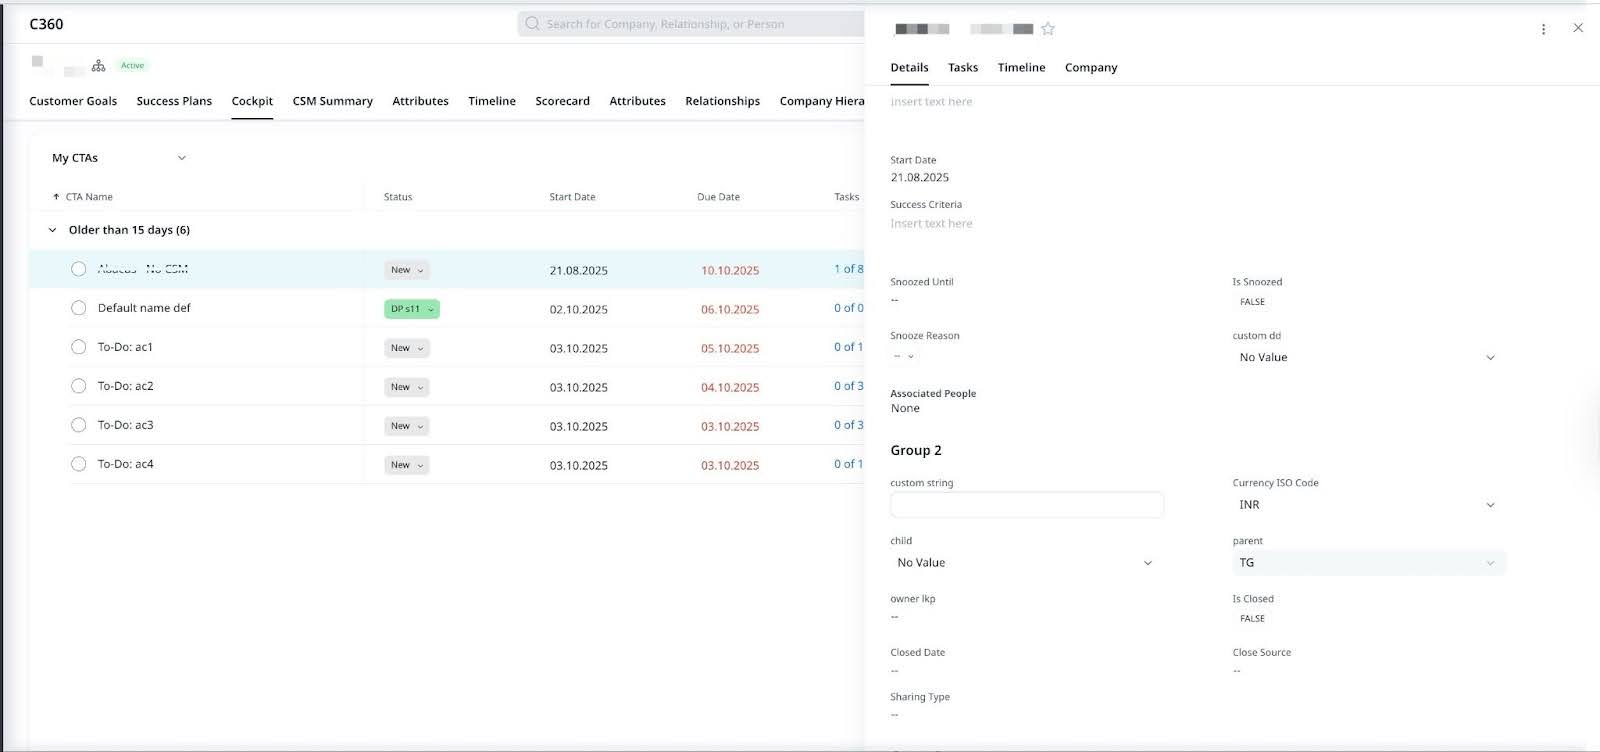
Cockpit List View is displayed in the Cockpit page and C360/R360 > Cockpit section. You can click the name of a CTA to access its details in the CTA detail view and the task details are displayed if you click the Task tab in the detail view.
Overview
The Cockpit Detail View provides customer success managers (CSMs) a centralized space to view and manage Calls to Action (CTAs). It is accessible from the Cockpit tab in both C360 or R360.
From this view, you can:
- Review CTA details, tasks, and related company information.
- Update CTA attributes such as owner, due date, status, or priority.
- Log activities and apply playbooks.
The fields and actions available depend on how your admin has configured the CTA layout. For layout configuration details, refer to the Configure CTA Detail View Layouts article.
CTA Detail View
If you click a CTA name, the CTA Detail View is displayed with the following tabs are displayed:
- Details Tab: View and update CTA-level information like owner, due date, priority, and status.
- Tasks Tab: Manage associated tasks.
- Timeline Tab: Log activities and view updates tied to the CTA.
- Company Tab: View relevant data from the associated company.
The fields and options visible within these tabs depend on how your admin has configured the CTA layout.
From the CTA Detail View, you can perform the following actions, depending on admin configuration:
- Change the name of the CTA
- Change the CTA Assignee
- Edit the Due Date
- Snooze the CTA. For more information, refer to the Snooze CTA section.
- Add Associate Persons. For more information, refer to the Associate Persons section.
- You can Apply/Replace Playbook or Delete CTA from the CTA detail view. For detailed information, refer to the Apply Playbook section.
- Delete CTA from the CTA Detail view. For more information, refer to the Delete section.
- Log a Timeline activity for the particular Company or Relationship, and tied to the specific CTA and create tasks for this activity. For more information, refer to the Timeline Tab section.
- You can create or link to a transactional object with a lookup to the Company object (for Company CTAs) or associated with the Relationship Type (for Relationships CTAs).
- Copy CTA link to clipboard
- Change CTA Reason, Priority, and CTA Status.
- View fields that are read-only, including those configured as Editable Only During Creation.
- See information in the read-only fields that are added from admin configuration.
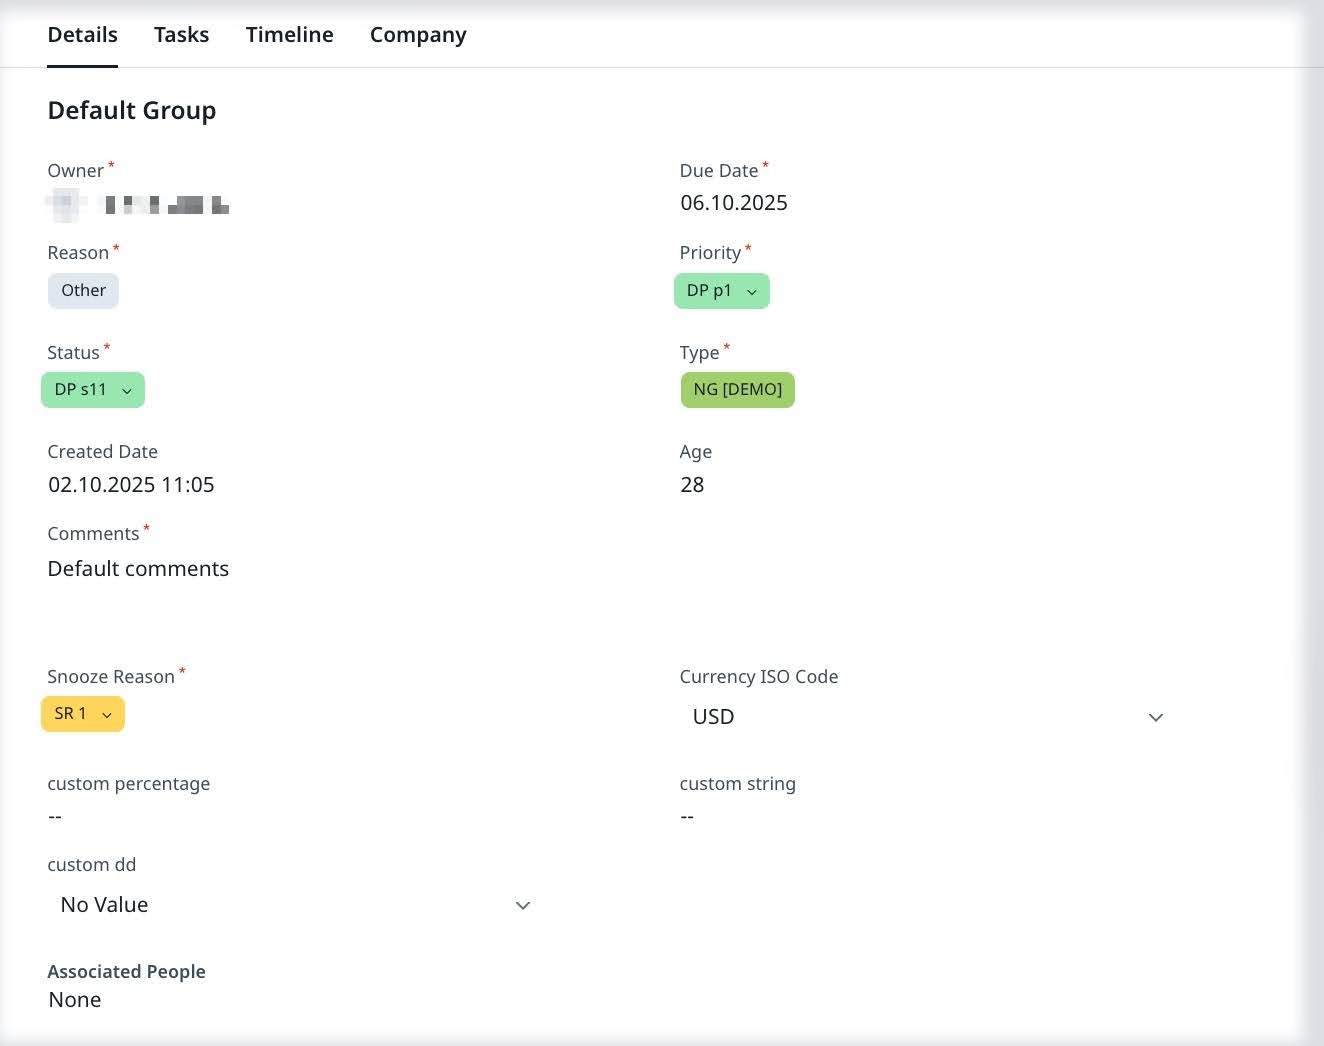
Details Tab
Use the Details tab to view and update key CTA information, based on your admin’s layout configuration.
- Change the CTA Owner
- Edit the Due Date
- Change CTA Reason
- Change CTA Priority
- Change CTA Status
- Associate People with CTA
- View or edit fields, including those marked as Editable Only During Creation. These fields become read-only after the CTA is saved.
Note
- Fields configured as read-only or editable only during creation cannot be modified after the CTA is saved. For changes, contact your admin.
- All other fields configured in the layout are also displayed in this section.

For more information on editing CTA Name and Details, refer to the Inline Editing in Cockpit Detail View article.
Add Dependent Picklist Values
You can add and update the dependent picklist values defined by the Admin in the Call to Action layout. Each dependent picklist always has a controlling picklist. The dependent picklist values are populated based on the values selected in the controlling picklist.
When the controlling picklist value is changed, the dependent picklist value is automatically cleared. If the controlling value is reverted, the previously selected dependent value does not reappear and must be selected again if still valid.
Note: If the dependent picklist field is configured as Editable Only During Creation, it cannot be changed after the CTA is saved.
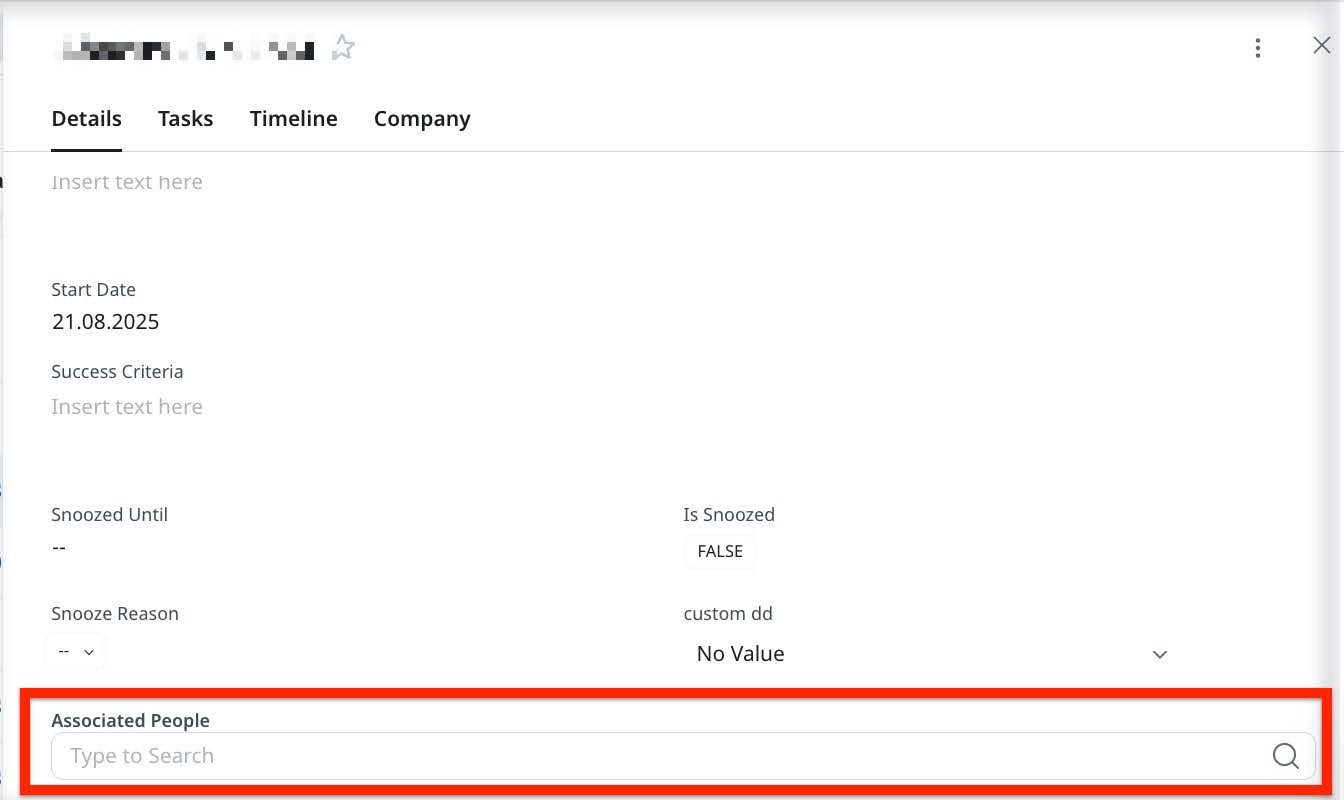
Associate Persons
Link key contacts or stakeholders to a CTA using the Associated People search field in the Details tab. You can only link Company Person or Relationship Person records to a CTA.
To add associated people:
- In the Details tab, click Associated People
- Enter a name in the search field.
- Review the search results and select the desired personPerform a search as required and you can now view the results as configured.
You can use the search field to find individuals across all companies. You can see the company name by hovering over an individual’s name. This is useful if for instance, you are logging a CTA with Abbett. You can tag a board member from XYZ as an Associated Person, even if they are not directly associated with Abbett.

For you to manage cross-company people tagging, admin must activate the Enable Company Hierarchy View feature and Person toggle from C360 Layouts. For more information on activating company hierarchy rollup view, refer to the Configure Company Hierarchy Rollup View article.
For more information about how to add new persons, refer to the Configure Cockpit List View, General Settings, and Reporting Categories article.
Tasks Tab
The options in the Tasks Tab allows you to:
- Add Task manually
- Apply/Replace Playbook
- Change Task Due Date
- Change Task Priority
- Change Task Status
- Associate People with a task
- Close or Delete Tasks
Note: Task fields follow the same field behavior settings as the CTA. If a task field is configured as Editable Only During Creation, it becomes read-only after the task is saved.
For more information on editing tasks, refer to the Create Manual CTAs and Tasks and Inline Editing in Cockpit Detail View articles.
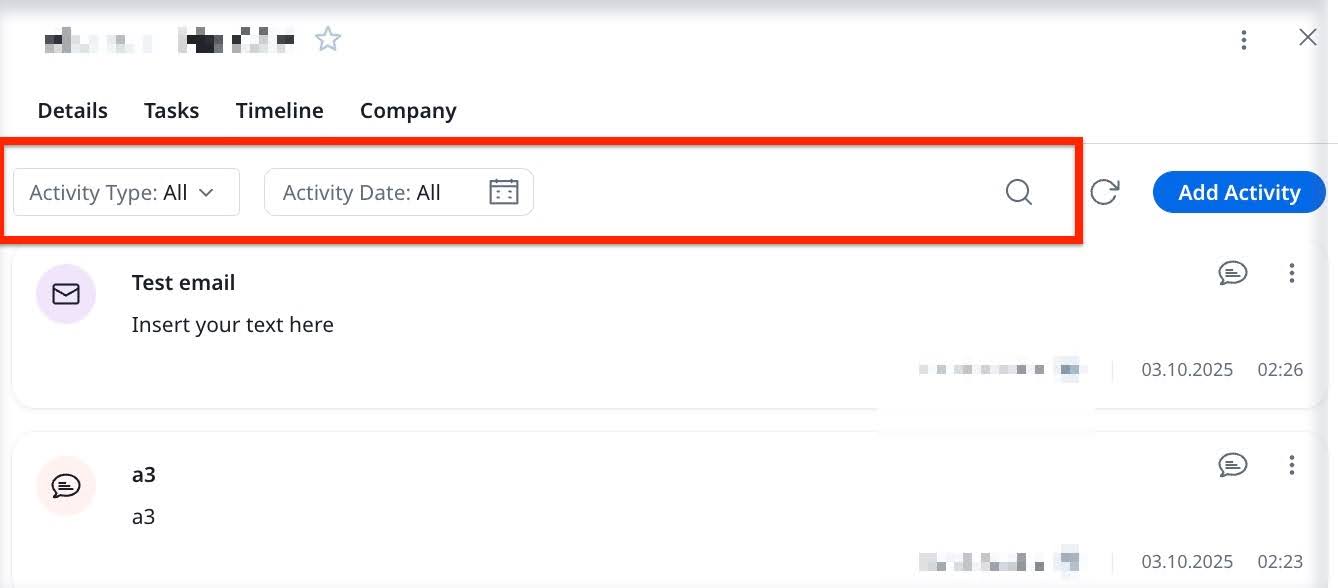
Timeline Tab
Use the Timeline tab to log activities related to a specific CTA. These activities capture key customer touchpoints and can include tasks created directly from the activity log.
To log activity from the CTA Detail View:
- Navigate to CTA Detail View > Timeline tab. All the activities tied to the CTA appear.
- Click Add Activity dropdown menu to log an Update, Call, Meeting, and Email or Milestone. The New Activity screen appears.
- Enter the required activity and task details in the mandatory fields.
- Click Log Activity to save the entry. The activity is logged to the Timeline.
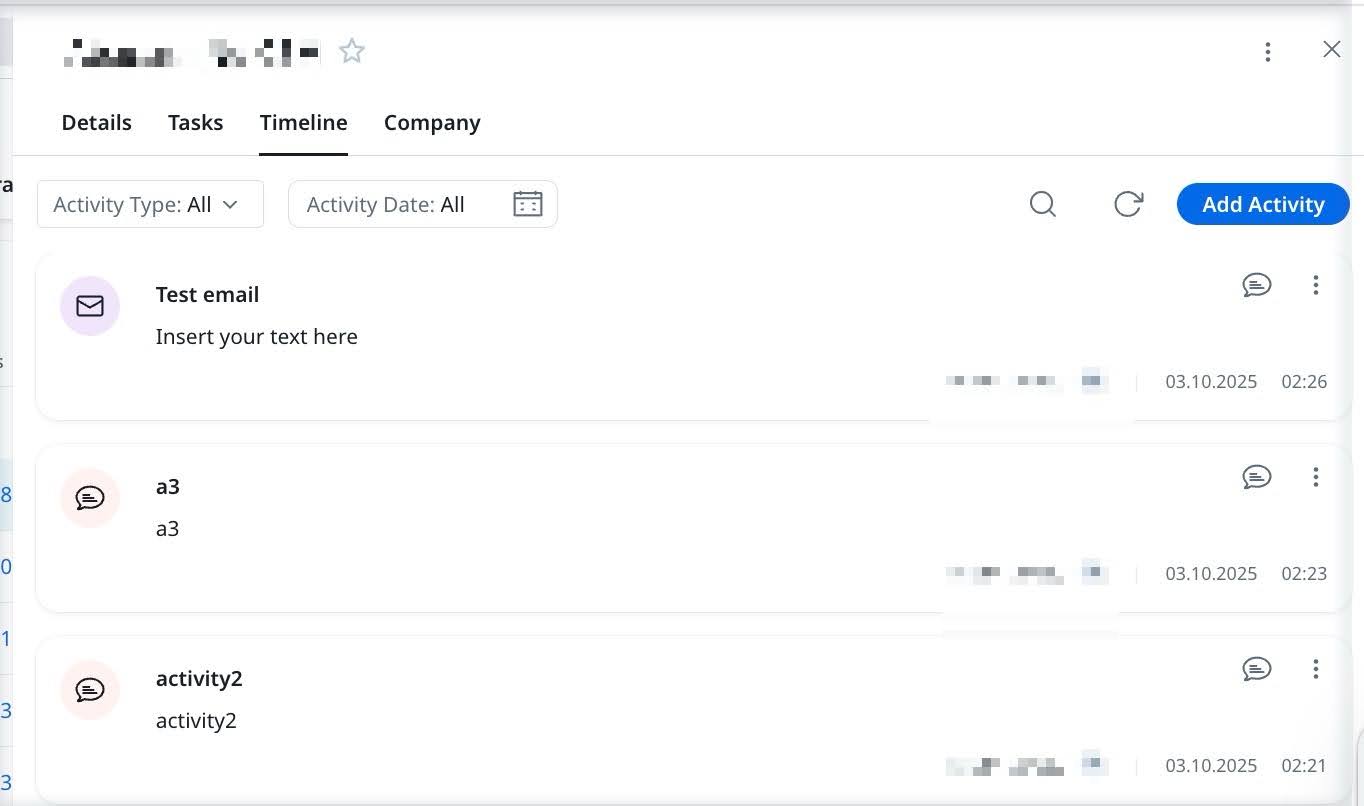
Tasks created from a Timeline activity are automatically linked to the CTA and appear in the Tasks tab.
Note: Tasks created from the Timeline tab in Cockpit can be edited or deleted by the CTA owner. When viewed from C360/R360 > Timeline, these tasks are read-only.
Additional Timeline Options
You can also:
-
Search and filter the activities based on the Activity Type and Date in the Timeline tab.
-
Click the three-dots icon on a logged activity to:
- Apply Playbook
- Copy Link
- Snooze
- Send Email
- Add to Calendar
- Delete
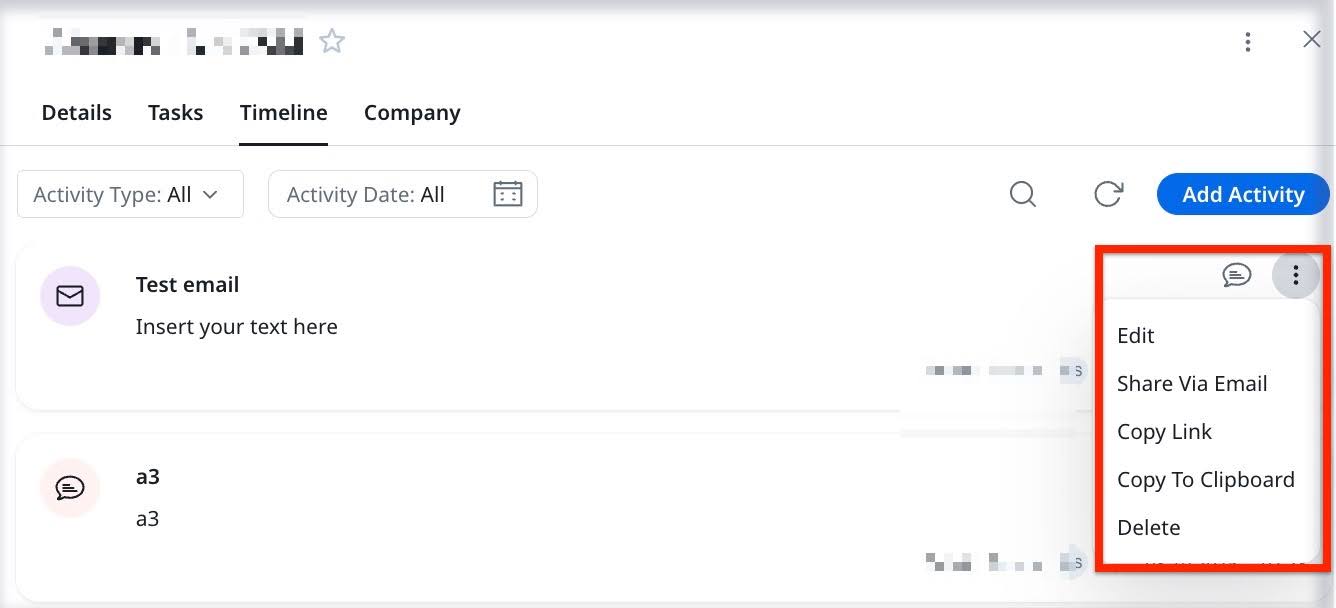
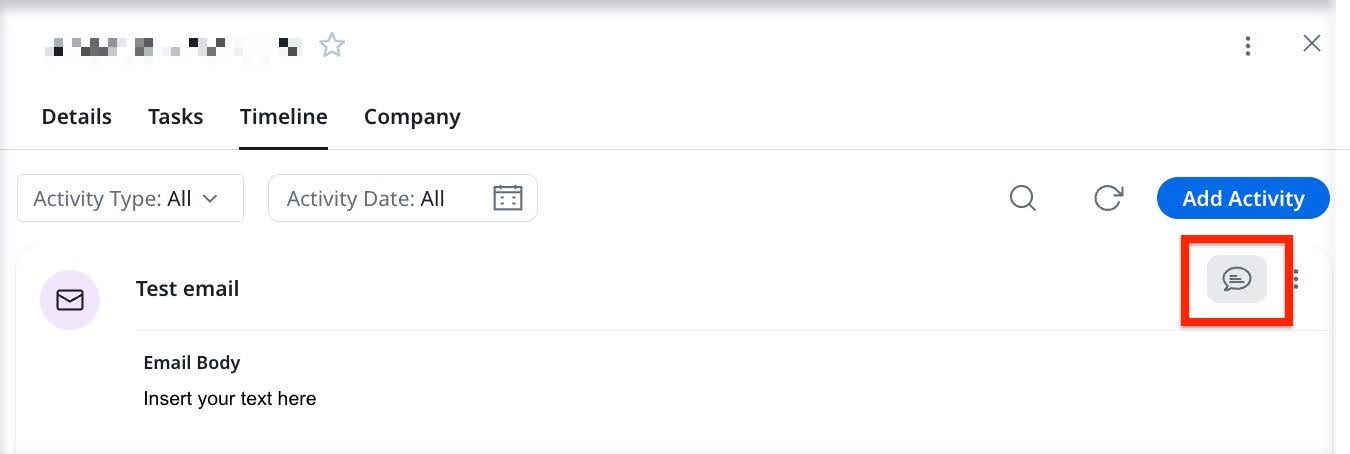
- Click the Comments icon to view and add new comments to the activity.
For more details, refer to the Use Timeline to Log Activities article.
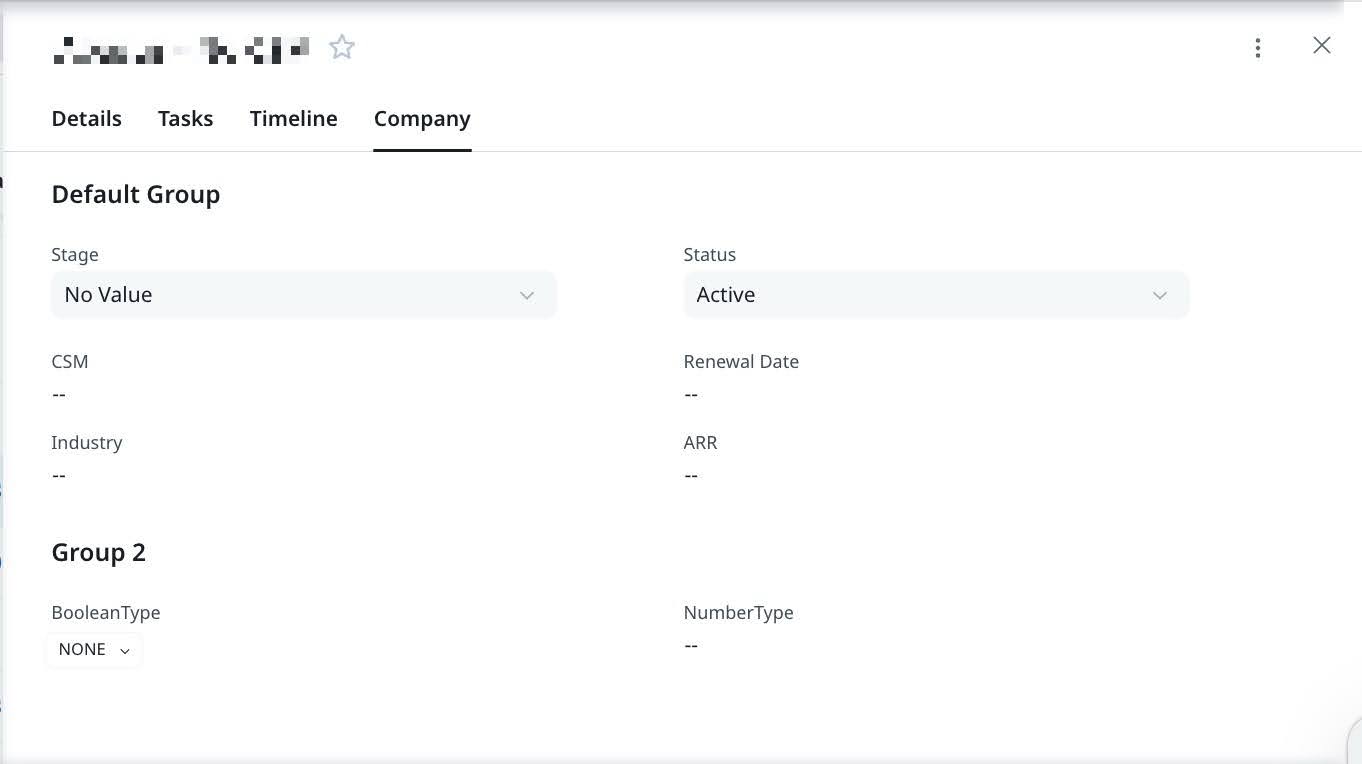
Company Tab
The Company tab displays key information about the company associated with the CTA.
Note: Fields in the Company tab are typically read-only. Contact your admin for changes to the company-level information.
Additional Options
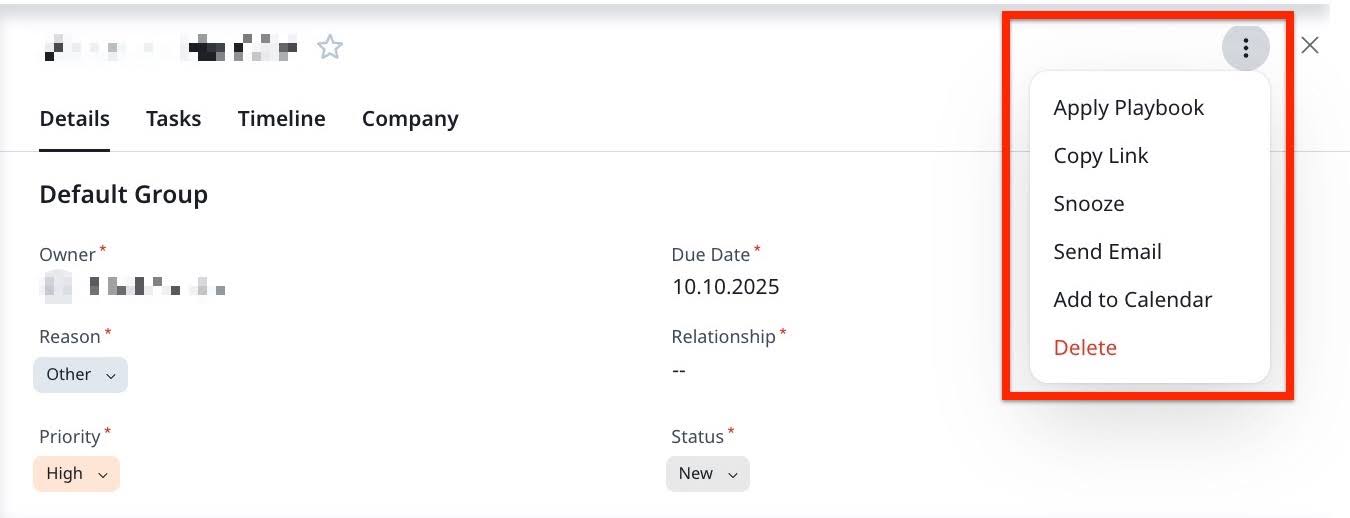
In the CTA Detail View, click the three-dots icon in the top-right corner to access the additional CTA-level actions mentioned below:
- Apply Playbook: Attach a new playbook to the CTA if one is not already applied.
- Copy Link: Copy a direct link to the CTA and share it with other Gainsight users.
- Snooze: Temporarily hide the CTA until a specified date.
- Send Email: Launch an email editor to communicate directly from the CTA context.
- Add to Calendar: Add a related calendar event using integrated scheduling options.
- Delete: Permanently delete the CTA and all associated tasks.
Apply Playbook
You can apply a playbook to a CTA to automatically assign a predefined set of tasks.
To apply a playbook to a CTA:
- From the CTA Detail View, click the three-dots vertical menu icon in the top right corner.
- Click Apply Playbook. The Apply Playbook window appears.
- Select or search for the playbook you want to apply.
- Click Apply. The selected playbook is applied to the CTA, and its tasks appear under the Tasks tab.The playbook is added successfully to the CTA and can be viewed in the Tasks tab.

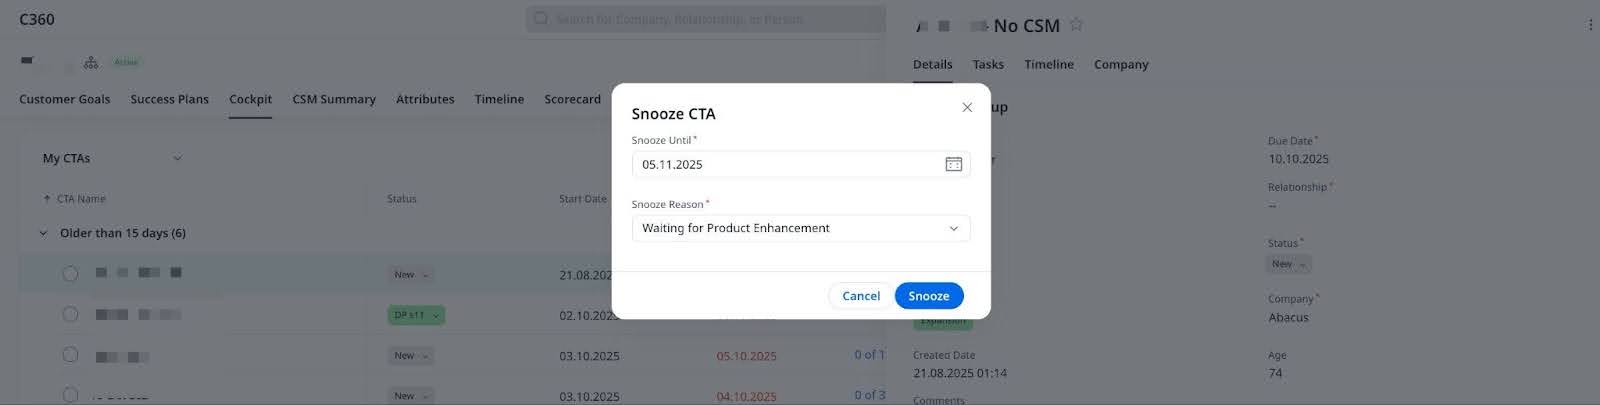
Snooze CTA
The main reason to snooze a CTA instead of closing it is to make sure Rules Engine is not firing similar CTAs. For example, you have configured a rule that triggers CTAs when there are less than 5 logins per week. Then you find out that the customer is on vacation for a month. In this scenario, you could snooze the CTA instead of closing it, and in effect avoid getting another CTA in the next 3 weeks when you know the usage is going to be low.
To snooze a CTA:
- From the CTA Detail View, click the three-dots icon in the top right corner.
- Click Snooze. The Snooze CTA dialog appears.
- In the Snooze Until field, select a date for the CTA snooze to end.
- In the Reason field, select the reason for snoozing.
- Click Snooze. The Snooze is in effect through the selected date. The Snooze date is based on the individual user's timezone settings.
Note: CTAs are un-snoozed automatically at the end of the snooze period, and reappear in the Cockpit List View.
You must set the filter view with "Is Snoozed " filter value as true to view snoozed CTAs in the Cockpit List View. Snoozed CTAs also display in the C360/R360 > Cockpit section.
To update either Snooze Date or Snooze Reason, click the three-dots icon in the top right corner again and change the details as required, and click Update.
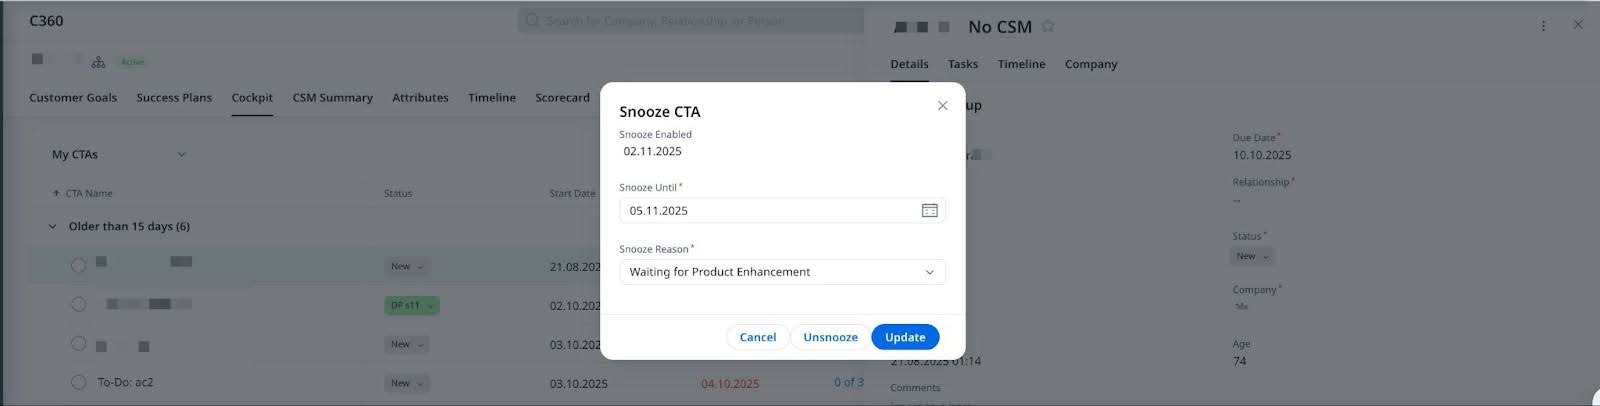
You can also un-snooze a CTA manually by clicking the Un-Snooze option, and that CTA reappears in the Cockpit List View. Users can now track the previous snooze date in the same dialog.
Note: The snooze option and snooze reasons are configured by your Admin. For more information on how to configure the snooze option, refer to the Configure Cockpit: CTA Types, Reasons, Priority, Snooze and Federated Customer Management article.
Copy Link option
Copy a direct link to a CTA using the Copy Link option, and share it with other Gainsight users to quickly direct them to the same CTA in Cockpit.
Example Business Use Case: A CSM needs to share a CTA with their manager to review the due date. Using the Copy Link option, they can generate a direct link to the CTA and share it for quick access in Cockpit.
To copy a CTA link:
- In the CTA Detail View, click the three-dots vertical menu icon in the top- right corner.
- Click Copy Link. The CTA link is copied to your clipboard and can be shared with any Gainsight user.
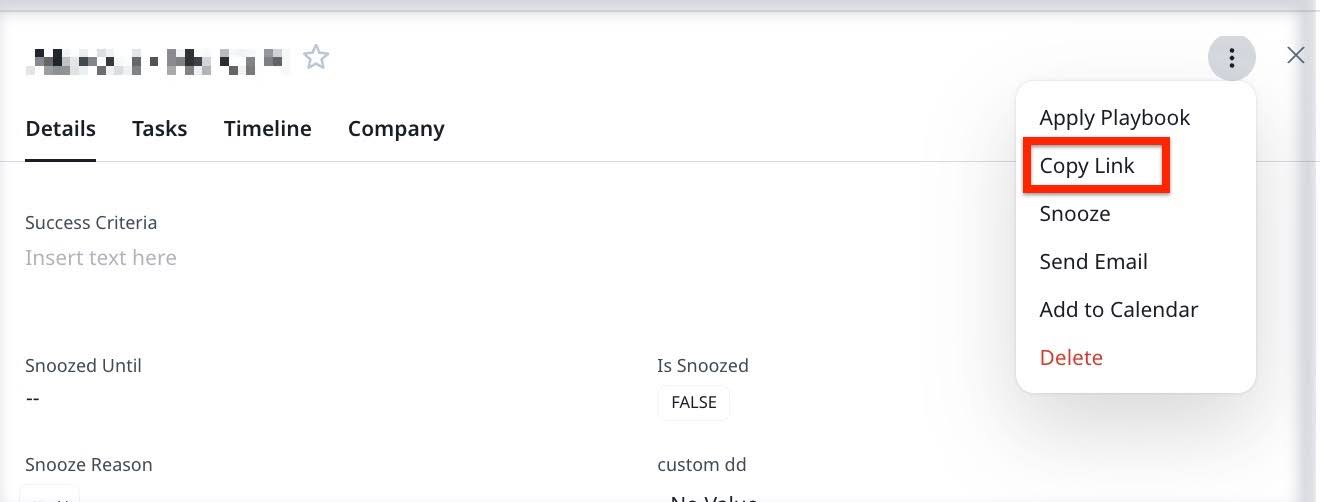
The following image shows how a shared CTA appears when a Gainsight User clicks the link.

Delete
Use this option to delete the CTA and its associated tasks.
To delete a CTA:
- In the CTA Detail View, click the three-dots icon in the top right corner.
- Click Delete. A confirmation dialog appears.
- Click Yes. The CTA is deleted successfully.
CTA Fields
The editability of fields in the CTA Detail View depends on admin configuration. This ensures data accuracy and consistent processes across your organization..
Editable Only During Creation
Some fields are editable only while you are creating a CTA and become read-only after you save it.
- You can edit these fields only in the Create CTA form.
- After saving, they appear as read-only in the CTA Detail View.
- If needed, you can update these fields using APIs or Rules.
- Gainsight pre-fills default values if your admin has defined them at the layout level. If not, you must complete required fields manually during CTA creation.
- Once saved, these fields are locked. Contact your admin if you need to make changes later.
Mandatory Fields
You must complete mandatory fields before you can save the CTA.
- If a required field does not have a default value, you need to enter one during CTA creation.
- These fields stay editable after saving, unless your admin has configured them as read-only or editable only during creation.
Read-Only Fields
Read-only fields cannot be modified by users.
You can not modify read-only fields.
- Your admin defines and maintains the values in these fields.
- These fields stay locked in all views, including the Create CTA form and the CTA Detail View.
