Gainsight NXT Release Notes 6.9 December 2019
| Note: For information about new functionality or fixes delivered as patch releases of version 6.9, refer to the Gainsight NXT Patch Release Notes: Version 6.9.X series article. |
Short on time? Watch this 5-min. video overview to see what's new in the 6.9 release!
Gainsight NXT Release Notes Version 6.9 contains the following subsections:
- New Features in Gainsight which may require the Admin to setup new processes or re-think existing processes.
- Enhancements (per module) describe improvements made in the existing product capabilities.
- New Components which are introduced and modified in every release.
- Permission Sets section contains the list of the updated Gainsight and SFDC permission sets for several features in a release.
- Issues Addressed section contains issues which are fixed in this release and also issues reported by customers.
New Features
Company Intelligence
IMPORTANT: With this release, Company Intelligence is available for all customers as a paid add-on feature to our Customer Success platform. For more information on how to license it, please contact your Gainsight account manager.
Company Intelligence helps users to stay informed about their customers and competitors. It processes information through Slack by searching publicly available information on the companies and signals in which they are interested. For more information, refer to the Company Intelligence Overview article.
To use this feature, admins must first configure the list of companies for which they want to receive intelligence information, and also set the signals to track for the selected companies. For more information on how to configure this feature, refer to the Configure Company Intelligence article.
Business Use Cases:
- As a CSM, get curated posts about your portfolio of customers from publicly available sources, including press releases, news articles delivered directly to your slack instance without spending hours each week doing research.
- Admin can select from a list of signals like M&A, executive changes, expansion, funding and more, so you only receive news that is relevant to your organization.
- Perform actions like Create CTA, and post to timeline if you think a particular post needs follow-up actions or deserve a mention in the company timeline from directly within slack with a few simple clicks.
Benefits of Company Intelligence
Following are some of the benefits of using Company Intelligence feature:
- Stay up-to-date on your key customers, prospects, and competitors without any effort.
- Seamlessly access and receive updates in Slack.
- Take action on intelligence news that signals a risk or indicates an opportunity.
For more information on how to get the required information in Slack, refer to Use Company Intelligence in Slack.
Enhancements
Cockpit
Cockpit is the day-to-day workspace for CSMs. As a turbo-charged “to-do list” that integrates with the rest of your system, it turns customer insights into tangible action items for your team. Calls-to-action, or CTAs, are tied to customers and are the backbone of Cockpit. CTAs can be created manually, but more often are triggered by business rules that analyze usage data. For each CTA that appears in the CSM's Cockpit, a prescribed playbook of best practice tasks can help guide the CSM through the right steps.
-
 Search for Dropdown List Type Fields
Admins can now search a value for the Dropdown List type fields on the following pages:
- Admin > Workflow > CTA
- Admin > Workflow > Task
- Admin > Workflow > Success Plan
Use Case: If you have a lot of Reason Names for a CTA Type, for example, it can be time consuming to scroll and find the required Reason Name to be edited. To address this, Search for Dropdown List Type Fields is enhanced, so that when you search for a keyword from the required Reason Name, the system displays the filtered search results.
Note: Search Operation is allowed only on the String fields.
Success Plan
With Success Plans, you can capture, track activity and share progress on your customers’ key goals using Objective CTAs and their associated Tasks. Admins can create Templates for Success Plans to ensure a consistent approach to developing customer goals. Once configured, Success Plans can be manually created and viewed in the Customer 360 and Relationship 360. Admins can also create them using the Rules Engine.
-
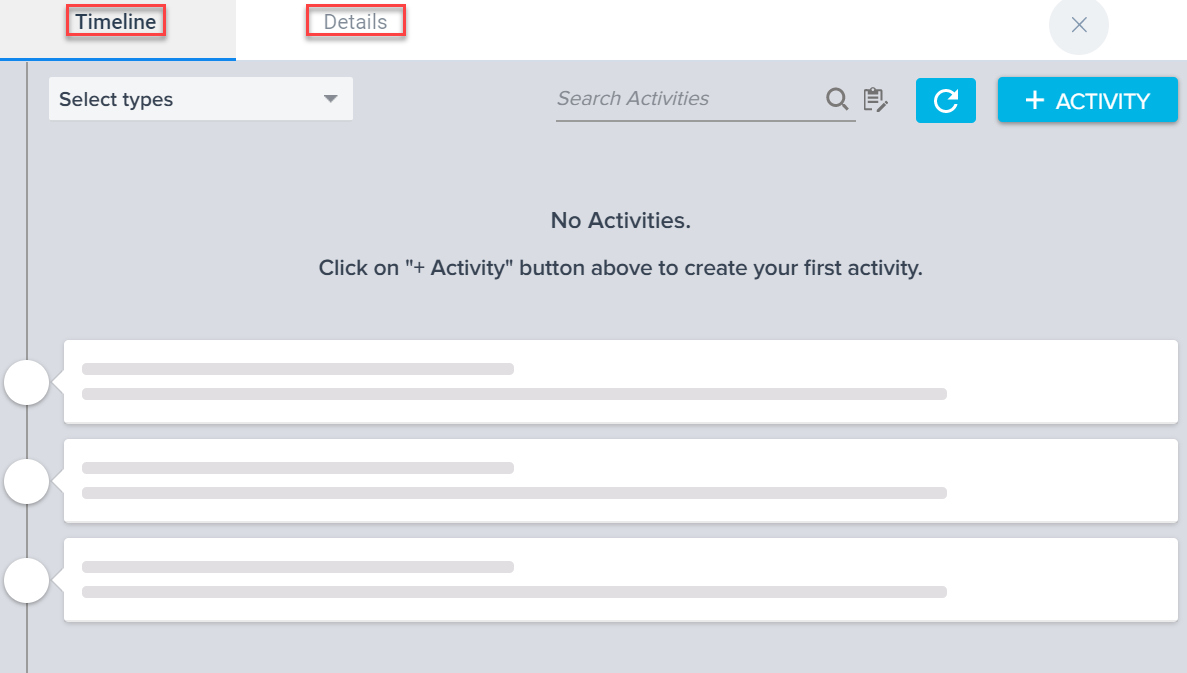
Timeline Integration in Success Plans
Gainsight has now introduced a Timeline tab at the Success Plan level. With this enhancement, CSMs can now post activities, save drafts, and view all activities related to the Success Plan. Each Success Plan will have its own Timeline tab, but this tab is not available for externally shared Success Plans.
Use Case: For instance, CSMs may handle their customer onboarding tasks using Success Plans, and post the progress of the onboarding task to Timeline. Managers can now see the full update at the Success Plan level, instead of going through the individual activities of the objective CTAs.
IMPORTANT:
- Currently, you cannot see the Timeline drafts created at Success Plan, within the Success Plan > Timeline tab. You can see all of the Timeline drafts created at Success Plan on 360 > TIMELINE.
- The Timeline tab at Success Plan level displays all the timeline entries from the objective CTAs of the success plan, along with the entries at the Success Plan level (i.e the single location to see all the updates happening in a success plan).
- All Success Plan and objective CTA activities can also be seen on 360 > Timeline.
- On the 360 > TIMELINE, the label “SP” is used for all activities created at the Success Plan level. You can also share the link of the activities created at the Success Plan level with other Gainsight users.
- When an in-line task is created from Timeline at the Success Plan level, it creates a new objective CTA in the success plan, under which the newly created in-line task can be seen. The new objective CTA created in Success Plan has a Default Objective Category, as set on Admin > Workflow > Success Plan.
For more information on how to log a Timeline activity, refer to Log Activities to Timeline.
Adoption Explorer
Adoption Explorer helps manage your customer’s usage data in the Gainsight environment, and quickly surface the most relevant view of usage data across your customer base. Adoption Explorer offers powerful segmentation capabilities to manage multiple product lines, more robust control of aggregations and calculations, and totally re-imagined visualizations to surface deep insights. Customer’s usage data at Company and/or Person level can be stored at both daily and weekly level along with their entitlements. Using the ingested data, admins can define new derived fields without the need of Rules Engine.
-
Date Functions in Layouts
Date Functions in Adoption Explorer Layouts help you adjust date ranges as required to see the Usage trends, such as: Start of Week, Month, Quarter, Year, etc. For instance, CSMs might want to know how a Product is being adopted by their customers on a quarterly basis, to inform their priorities. Using Last Day of Calendar Quarter date function, you can create a usage section to see the number of Page Views for each quarter (that ends on the last day of every quarter). CSMs can then analyse the adoption rate, and accordingly send out Surveys to gather feedback, if the adoption is low, or trigger CTAs to work on increasing the adoption.
Note: You can apply Date Functions only on the Timeseries and Entitlement Objects.
For information on the other Date Functions supported by Adoption Explorer, refer to the Adoption Explorer Functions article.
To use a Date function:
- Navigate to Adoption Explorer > Administration. Hover on the required project and click the Layouts icon.
- Select the layout in which you want to add a usage section.
- In the Layout Detail view, click + at the bottom right corner of the page.
- Click Add New Usage Section.
- From the Usage Section Type dropdown list, select Analytics.
- From the Data Sources dropdown list, select the required object.
- Add the required fields to Show Fields section.
- Click + and select Add Function.
- From the Function Type dropdown list, select Date.
- From the Function dropdown list, select a Function. Here, to solve this use case, select Last Day of Calendar Quarter.
- From the Fields dropdown list, select the Date Field.
- In the Target Field Name textbox, enter the name of your choice.
- Click SAVE.
Click Show Preview and select the Date Range as 365 days to see the report on Page Views data for each quarter, and click SAVE. If required, you can also add this report to the C360 and monitor usage adoption.
For information on how to configure a Usage Section in C360, refer to Configure Usage Section in C360 article.
-
Adoption Explorer Layouts in R360
You can use Adoption Explorer (AE) to Data model for Relationships using ‘Instance’, but until now there was no capability to add layouts specific to instance to R360 page. But, with this enhancement, AE Layouts are now linked with R360, and you can now add layouts specific to instance to R360 page.
Use Case: For instance, you might want to regularly monitor the Adoption Analytics at Relationship level, and create a Success Plan to work on the adoption rate, if the adoption is low. To achieve this use case, you can add the instance level layout to R360, and monitor the adoption rate and take necessary business related actions.
Prerequisite: Before you configure a Usage section in a R360 layout, make sure that you have already created a Project at the Instance level and a Usage Layout in the respective Adoption Explorer Project. For more information on how to create an Adoption Explorer Project, and a Usage Layout in an Adoption Explorer Project, refer Configure Projects in Adoption Explorer.
To see AE Layouts in R360, perform the following actions:
- Map Identifiers
- Add Usage Section to R360 Layouts
Map Identifiers: To enable AE layouts in R360, Instance Identifier field in Adoption Explorer project must be mapped to the ID field (GS Relationship attribute) that uniquely identifies the Relationship in Gainsight’s Relationship object. This mapping creates a lookup for AE InstanceID to the GS Relationship object, and resolves the Instance identifier in usage data to Gainsight Relationship record.
Add Usage Section to R360 Layouts:
- Navigate to Administration > General > Relationships > TYPES > Relationship Types.
- Click Edit on the existing Relationship Type, to add a usage section.
- Click LAYOUTS.
- Click Options and click Edit.
- Drag and drop the Usage section from the Available sections to the Selected sections.
- Click Settings.
- Select the required Adoption Explorer Project and Usage Layout to be displayed on R360 page.
- Click SAVE.
For more information on how to configure R360 Page and Section Types, refer Configure R360 Page and Section Types.
Now, navigate to the C360 page and click Relationship. Here, you can see all of the Relationships available for this particular Company. Clicking the Relationship name navigates you to the R360 page, where you can see the Usage section to which AE layouts are linked.
Note: In the Layouts dropdown list, you can only see the Company and Person layouts.
-
Enhanced Permissions in AE Layouts and Usage Sections
Gainsight now offers a permission control over the Layouts and Usage Sections created in an Adoption Explorer project. With this enhancement, Edit and Delete operations on the Layouts and Usage Sections can be performed only by the Super Admins and Owners (Created By). But, the other non-super admins/users can still create a new layout in any project and add usage sections to it.
The following image shows how the permissions (full access) work on Layouts/Usage Sections, for Super Admin/Owners (Created By).
The following image shows the permission control on Layouts/Usage Sections, for non-super admins/users.
You can see the following information messages, when you try editing/deleting a Layout/Usage Section for which you are not the Owner or a Super Admin.
- When you try deleting a Layout: ‘You cannot delete this layout because you are not the Super Admin or the creator of this layout!’
- When you try editing a Usage Section: ‘You cannot edit this usage section because you are not the Super Admin or the creator of this usage section!’
- When you try deleting a Usage Section: ‘You cannot delete this usage section because you are not the Super Admin or the creator of this usage section!’
Journey Orchestrator
Journey Orchestrator is your center for automated communications. It leverages the power of automation to make your job easier as you communicate with customers at scale. Gainsight enables customer success teams to launch automated emails based on customer attributes such as health score, product usage, survey results and lifecycle stage. Through automation, you can scale customer touches and engage with a growing list of customers often and effectively.
-
Support for Plain Text Email format
Gainsight now supports plain text format emails in JO. A plain text email is a simple email message that only includes text without any formatting, images, or graphics.
Business Use Case: Most of the email clients such as Outlook or Thunderbird have the option of selecting only Plain Text format emails to be delivered, instead of rich formatted email. In order to better support our customers, Gainsight now offers both HTML and Plain Text format in Email Templates. Both the formats can be used simultaneously and the main idea behind using both formats is that when HTML emails are disabled for particular users/org, the Plain Text format email is delivered.
Some of the benefits of using Plain Text feature in Email templates are:
- Increase in email delivery.
- Increase in customer touches (email open rates).
- Increase in response (link/survey click rates).
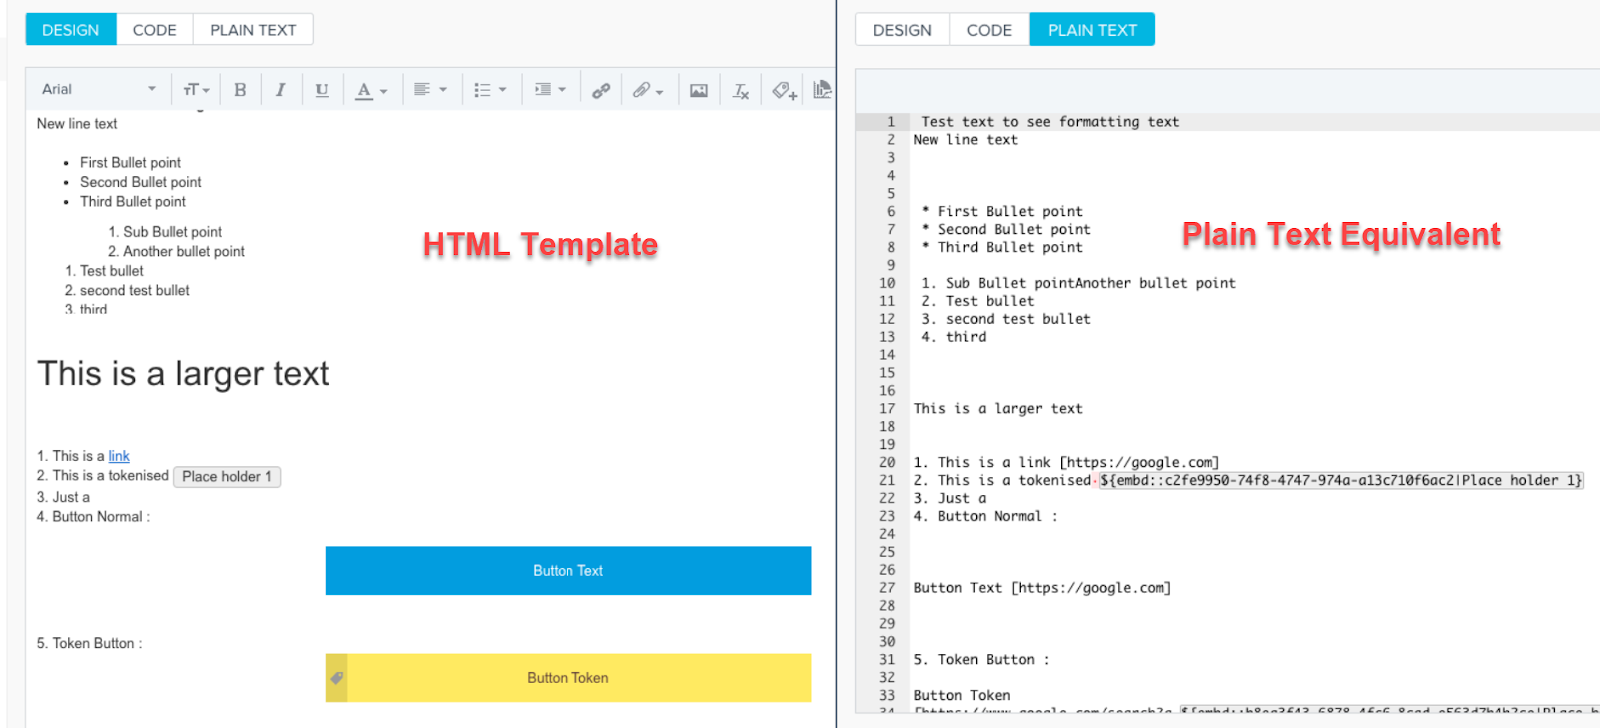
The following are some of the features of the Plain Text format:
- All rich text is converted, including attachments.
- Tokens are converted and are highlighted in grey color in Plain text format along with token IDs. Users can click Ctrl + 4 to add or view the list of available tokens used in the existing template.
- Links (including image links) are converted along with the link text.
Notes:- Images without links are not converted to plain text format. But, images with links are converted to plain text with the name of the image and link.
- Currently, the following are not supported in Plain Text format:
- Inline Images
- Inline Reports
- Inline Surveys
- Inline Tabular reports
To assist users in easily filtering out email templates without Plain Text, a new ‘Templates without Plain Text’ filter is added under Type filter in the Email Templates page.
Users can automatically migrate their existing templates to Plain Text format using the new Plain Text tab or the Plain Text icon adjacent to the version name.
For more information about supporting Plain Text format in Email Templates, refer to the Support of Plain Text format in Email Templates article.
-
Event Fields in JO Conditional Wait Step
Previously, JO was supporting only Email events in the Conditional Wait step. But, with this release, Gainsight has now extended its support for Events in the Conditional Wait step of a Journey. You can use Event Fields to configure conditions as part of the conditional wait step. You can choose fields from any of your event objects, use the value on the fields, and use it in a conditional wait step within a Program. This feature helps admin to immediately trigger an action in a program.
Business Use Cases: Following are some of the Business Use Cases for the Event Fields in Conditional Wait feature:
- Send an integration document when a new user creates an account in a non-Gainsight system.
- An event can be the completion of a data load that could subsequently be used to trigger a program.
Example: Consider the following scenario where Admins must inform CSMs about changes in activities:
- A Zendesk ticket is created by a Customer with High priority.
- A CTA must be created and assigned to the respective CSM when the ticket priority is changed to Critical/Blocker.
- The CTA must be closed once the Zendesk ticket is closed.
The above workflow can be easily configured in Journey Orchestrator, but the actions required to identify a Zendesk ticket priority is not an easy or straightforward task. This identification process is now made easy by configuring a Zendesk event in the events framework, and also by adding a participant in JO, when a Zendesk ticket is created.
Some of the benefits of Event Fields in Conditional Wait feature are:
- The decision of a customer’s path can be taken based on real-time events data.
- Better personalization of emails.
- Take action based on the customer’s current data.
Users can create Event Fields as part of a Program. The created Event fields can be used only as conditions within the Conditional Wait step to determine how the Program journey progresses. Event Fields can be added at the following places in the Program configuration:
- Participant Configuration
- Conditional Wait Configuration
Note: Currently, admins can add up to a maximum of 10 Event Fields. If they need to add more than 10 fields, raise a request to support@gainsight.com.
For more information on how to create new Event Fields and use them in Program, refer to the Use Event Fields in Programs article.
Renewal Center
Renewal Center helps quota carrying CSMs and Renewal Managers forecast and manage their book of business. By enriching Salesforce Opportunities with Customer Success insights, as well as calculating a Likelihood to Renew score for each opportunity, Renewal Center enables your team to efficiently manage and predict renewals and related upsell, recognize risks in a timely fashion, and report on key metrics.
-
Scorecard and Timeline Updates in Renewal Center
Gainsight now supports modifying Scores for a Company’s Scorecard from the Scorecard tab in Renewal Center Detail view. Users can also create Timeline entries and comments from the Timeline tab. You can only edit those activities which were created by you. Timeline entries created from Renewal Center can be viewed and edited from global Timeline and other Timeline consumption areas. This enhancement simplifies the workflow for users since they do not need to navigate to C360 to edit scores or create Timeline entries. These tasks can now be completed from within Renewal Center.
To use this enhancement:
- Navigate to Renewal Center.
- Click the Forecast tab.
- Click the detail view icon for the required company.
- Click the Scorecard or Timeline tab.
- Modify scores, create entries as needed.
Scorecard
Timeline
-
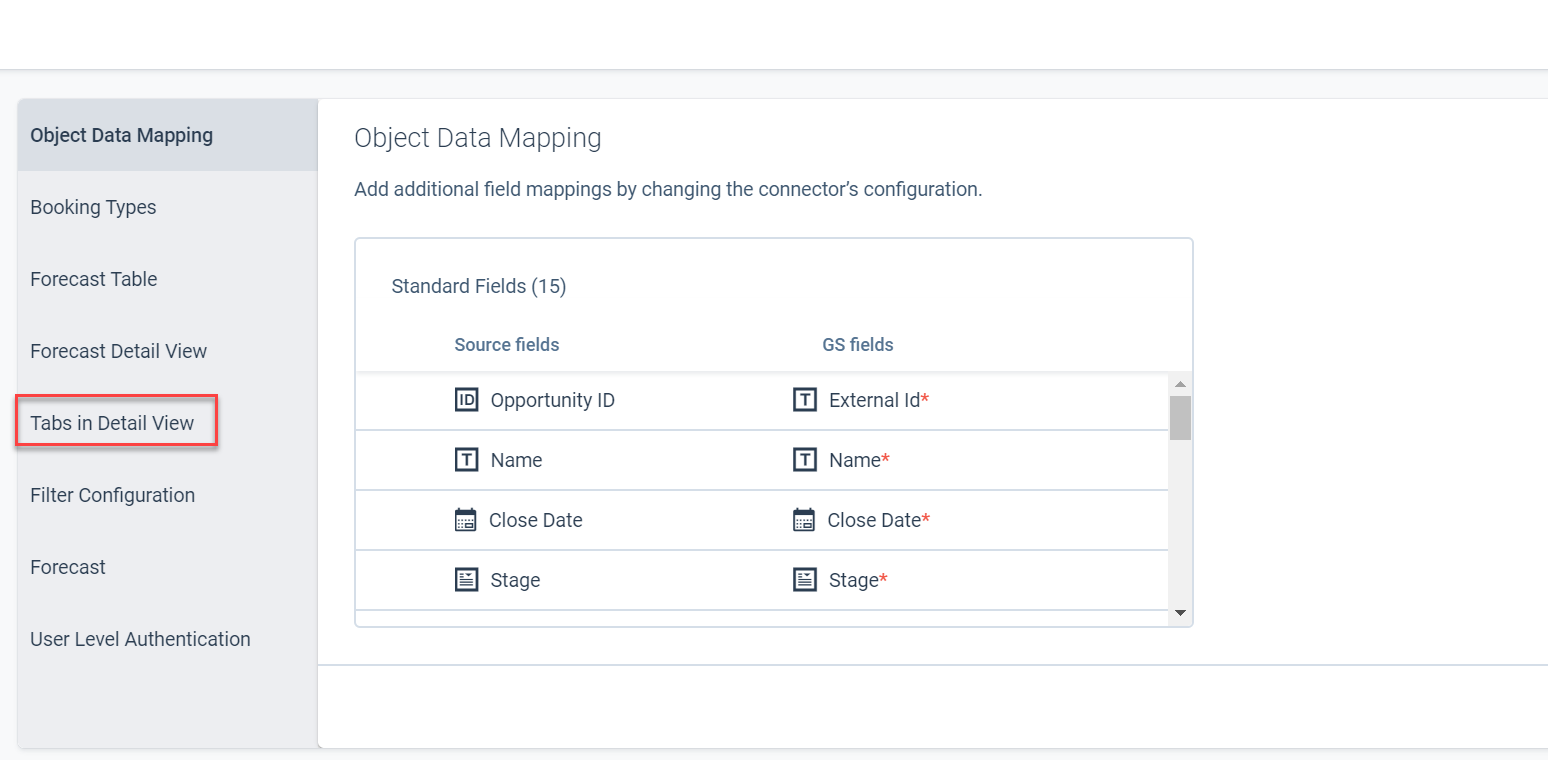
Configure Tabs in Detail View
Gainsight has introduced a new section in the Renewal Center admin configuration called Tabs in Detail View. This section allows you to configure the tabs which must be displayed in the Renewal Center detail view section. By default, Renewal Center detail view displays three tabs: Details, Timeline, and Scorecard. You can choose to hide or display the Timeline and Scorecard tab(s) from the detail view. You can also change the order of the tabs. The Details tab will always show since it holds all the basic information about the opportunity.
Business Use Case: Making Scorecard and Timeline optional enables customers to deploy Renewal Center without these dependencies. Customers can immediately start to get value out of Renewal Center while Scorecard and Timeline is being configured.
To use this enhancement:
- Navigate to Administration > Renewal Center Configuration > Renewal Center.
- Click the Tabs in Detail View section.
- Toggle on or off for Timeline and Scorecard sections, as required.
- (Optional) Hold the Drag Handle icon and drag the tabs to rearrange their position on the detail view.
- Click Save.
The detail view now displays only Timeline tab and the Details tab.
-
Standardized Churn Colors
Gainsight is standardizing the colors configured for various Churn reasons. Previously, you could configure the colors for each Churn reason from the Dashboards section in the Renewal Center administration page. This tab is now hidden and you cannot view it on the administration page. However, if you have already modified the default churn colors, the configured colors are honored.
People Maps
Capture your contacts in an organizational chart to understand the roles and relationships of the people you do business with across your customer base. Explore the org chart to understand who influences whom within a company and drill-into a person for deeper insights.
-
Delete Influencer Relationships from People Maps
CSMs can now delete Influencer relationships from any person in People Maps. You can delete all Influencer types (Positive, Negative, Neutral) from the org chart.
To delete an Influencer:
- Navigate to any customer’s C360 > Person section > Org Chart.
- Click the Influencers icon of the person widget to delete its associated influencers. Influencer widgets with their associated relationship arrows are displayed.
- Click the relationship arrow of the Influencer that you want to delete.
- Select Delete Influencer. The selected Influencer relationship is deleted from the People Map.
To see the Influencer detail view, click the Influencer arrow and select Edit Influencer. Earlier, the Influencer detail view was displayed after clicking the Influencer arrow.
Issues Addressed
C360
-
Global Search Displaying Incorrect Character: Within the global search feature, there was a previous issue where “&” displayed as “&” in the relationship’s Company Id name. This issue has now been resolved, and “&” is displaying as expected.
-
Unable to Add or Delete Fields from Company Object: After adding a WhoID field to the company object, users were previously receiving an error if they attempted to add or remove fields from the object. They were able to successfully add or delete fields after removing the WhoID field. This issue has been resolved, and users can add or remove fields from the company object regardless of the type of fields they’ve already added.