Gainsight NXT Release Notes 6.8 November 2019
| Note: For information about new functionality or fixes delivered as patch releases of version 6.8, refer to the CS Patch Release Notes: Version 6.8.X series article. |
New Features
 Data Designer (BETA)
Important: With this release, Data Designer (BETA) is available for all customers.
Data Designer (BETA): Easily discover richer, more meaningful insights from your customer data. Data Designer provides a simple, easy-to-use solution to merge and transform your data, then make it accessible across the Gainsight platform for further analysis and exploration.
Gainsight Reporting allows you to build reports and analyze the data available in one particular object. But, the data within Gainsight is distributed across various applications like: Timeline, Success Plans, and Cockpit etc. (or) the data you might want to analyze and report on may not come from Gainsight. In order to derive the most meaningful insights, you need to merge the data from these various data sources. Data Designer gives you the tools to do this, helping you merge and transform data from these disparate data sources to create a Dataset for your further analysis.
Once a Dataset is created in Data Designer, you can explore and analyze the data to see if it’s valuable, and then make it permanent and universally available across Gainsight. Once a dataset is permanent, it is saved as a Dataspace under MDA data source. You can then use this Data Space in other functionalities of Gainsight like, Reporting, Rules, and Journey Orchestrator (JO).
To access Data Designer, navigate to Administration > Analytics > Data Designer (BETA).
For more information on Data Designer, refer to Data Designer (BETA) Overview article.
Enhancements
Journey Orchestrator
Journey Orchestrator is your center for automated communications. It leverages the power of automation to make your job easier as you communicate with customers at scale. Gainsight enables customer success teams to launch automated emails based on customer attributes such as health score, product usage, survey results and lifecycle stage. Through automation, you can scale customer touches and engage with a growing list of customers often and effectively.
- Trigger PX In-app Engagements from Journey Orchestrator: Gainsight now integrates Journey Orchestrator (JO) with PX. You can trigger PX in-app engagements from Programs, take action based on the engagement events in Programs, and analyze and measure Program and Engagement effectiveness. This integration helps customers achieve a unified customer engagement strategy by leveraging the best of both JO and PX applications. PX engagements can be triggered in all Program model types.
By default, this feature is enabled for all the customers who have CS and PX subscriptions.
This integration only supports the following three types of engagements created in PX:
- Dialog
- Slider
- Guide
Note: Email type engagements are not supported because it is already available in JO. While Survey type engagements are currently not supported and planned for future release.
Business Use Cases
Following are some of the business use cases for the JO+PX integration feature:
- While On-boarding a new customer, Admins can send an ‘Welcome Email’ with a walkthrough of the CS application using PX engagement.
- After a new release, Admins can trigger a PX engagement, from Program, which consists of a release video to all users.
Prerequisite
The following are the prerequisites to use this feature:
- Customers must have subscriptions for both the Gainsight Journey Orchestrator module in the CS application and also the Gainsight PX application.
- Configure the PX Connector in the Gainsight CS application. For more information, refer to the Gainsight PX Connector article.
For more information on how PX engagement is triggered by Program, refer to the Trigger PX In-app Engagements from Journey Orchestrator article.
- Automatic Validation of a Published Program: Previously, when a program was published, there was no appropriate validation process to check whether all the configurations of a program were correct or not. Gainsight now runs a Validation process, in the backend, to validate all the configurations of a program, once the program is published. If there are any errors, it sends out an email notification to the user who published the program. Therefore, the status of the program is changed from ACTIVE to DRAFT and also the participant’s state is changed from NEW to REVIEW.
Note: Validation service is applicable only for Published programs.
An email notification is sent to the following users in different cases:
- For Manual Execution - Email notification is sent to Logged in user or the user who is publishing the program.
- For Scheduled Execution - Email notification is sent to the user who created the schedule.
This validation process is applicable to all program models. The following are the scenarios where validations are performed in the backend for a published Program:
- Survey/Report token validations.
- Versions exist or not.
- Configured email template exists or not.
- From and To email address exists or not.
- All the tokens in the email template mapped or not.
- Standard tokens exist in the participant mapping or not.
- The calculated fields exist in the JO configuration or not.
Note: Validation service is not supported for Call External API feature.
- Disable Results via Email for Bionic Queries: Previously, for a Bionic Query in a program, users would get the results file as an attachment in the result execution notification Email. However, Gainsight has now disabled the results via email for a Bionic Query in a Program. The toggle switch has been disabled in the backend and users will not receive the results file in Email notifications anymore.
Report Builder
Gain deep customer insight with Reports and Dashboards. Gainsight’s ability to blend together multiple data sources provides a structured, holistic picture of the customer across all types of vendor/customer interactions. Using an intuitive interface and compelling visualizations, each of your customer-facing functions can build their own strategic view to get actionable insights, fast.
Report Gainsight Data in Tableau
Gainsight NXT in Salesforce CRMContent in this section supports Gainsight NXT accessing through Salesforce Login. To learn more about Gainsight NXT in Salesforce, click here.
- Click here to expand for more information on how to Report Gainsight Data in Tableau
-
Quite a lot of the Gainsight customers use Tableau as their company wide BI tool. With Gainsight’s Tableau integration customers can quickly connect Tableau to their Gainsight instance and build reports on their customer success data in Tableau for fast discovery and analysis. This integration not only provides the customers an opportunity to leverage Tableau’s functionalities such as Advanced Visualizations, Collaboration and Ask Data but also allows you to join Gainsight data with other data sources in Tableau.
Once the connection between Gainsight and Tableau is established, users can access all of the Gainsight objects and some important Salesforce objects like, Account, User, Case, etc. in Tableau.
Important:- Gainsight integration with Tableau is built based on Salesforce authentication. If you are a Salesforce user, using Gainsight NXT in Salesforce, you can leverage this integration and pull your customer success data from Gainsight to Tableau, provided you have logged-in via Salesforce. You can access all of the Gainsight objects and some important Salesforce objects like, Account, User, Case, etc. in Tableau.
- You would additionally see some empty Gainsight objects such as CTA Group (Old Success Plan object).
To integrate Gainsight with Tableau:- Login to your Tableau account.
Note: You can also integrate Gainsight with Tableau Public edition. -
Navigate to Connect > To a Server.
-
Select Web Data Connector. Web Data Connector page appears.
-
Copy and paste this https://gateway.gainsightcloud.com/v1/public/tableau/wdc URL, in the Enter your web data connector URL here text box, and press Enter command. Salesforce Connector page appears.
-
Click Login with Salesforce. Salesforce login page appears.
-
Enter the Username and Password.
- Click Log In. You can see the Tableau Data Source page.
For detailed information on how to integrate Gainsight with Tableau, refer to Gainsight Integration with Tableau article. For information on how to explore data, build basic Visualizations and Dashboards in Tableau, refer Tableau article.
Renewal Center
Renewal Center helps quota carrying CSMs and Renewal Managers forecast and manage their book of business. By enriching Salesforce Opportunities with Customer Success insights, as well as calculating a Likelihood to Renew score for each opportunity, Renewal Center enables your team to efficiently manage and predict renewals and related upsell, recognize risks in a timely fashion, and report on key metrics.
- New Column Level Filters on the Forecast Table: Gainsight now allows you to filter data on individual columns, in the Forecast table. With the introduction of this column level filters, the forecast filter is disabled.
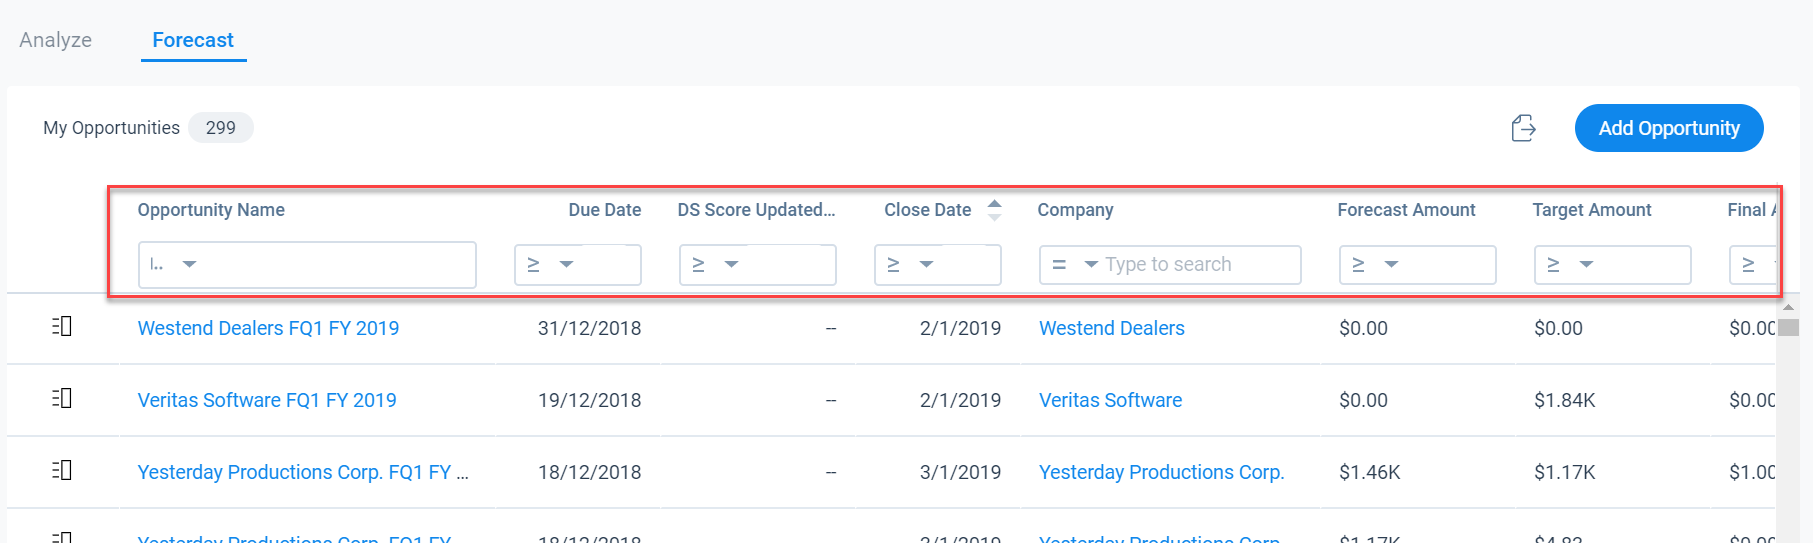
The operators provided in the column level filter vary for each field and are dependent on the data type of the field. Server side filtering is done in the column level filters. The data displayed in the Forecast table is based on the filters applied in the global filter. Column level filters can be applied on this data which is displayed after incorporating the global level filters.
To use this enhancement:
- Navigate to Renewal Center.
- Click the Forecast tab.
- Apply the appropriate filters for the required columns.
-
(Optional) Click X to remove an applied filter.
IMPORTANT: Once you apply all the required filters, you can also sort data in a column either in ascending/descending order (Number, Currency, Date, Date time data fields) or alphabetical order (for string data type fields). The sorting performed is Server side. When you click a column for the first time, data is sorted alphabetically/ascending order, based on the data type of the field. When you click the column again, the data is sorted in descending/ reverse alphabetic (Z-A) order.
Notes:
- While applying filters, you can search for required values. You must enter search terms which are inline with the Datatype of the field; for instance, you cannot enter letters for Date, Datetime, Number, or Currency Data Type fields.
- Currently, you cannot apply column level filters on Text area data type fields.
- Currently, multi picklist selection is not supported in column level filters.
- Select a Range in Forecast Period: Gainsight now allows you to select a range of Months, Quarters, or Years, in the Forecast Period section. When you select a range (say May 2018 to May 2019) in the Forecast Period section, data related to all the opportunities whose due date falls in the selected range, is displayed.
Previously, you could only select a specific quarter in the Forecast Period section and all the data related to all the Renewal opportunities whose due date was present the selected quarter, was displayed.
By default, renewal data is displayed for the current year in the Forecast Period section. You can change this and select a range. You can also choose to view renewal data for an individual month, quarter, or year instead of a range. While selecting a range, the maximum limit allowed is previous three years and future three years from the current year. For example, if the current year is 2019, the maximum range you can select in the past is Jan 2016 and the maximum range you can select in the future is Dec 2022.
Business use case: As a Renewal Manager, you can now view opportunity data for all the opportunities which are due to be renewed in the upcoming year. Also, you can view the renewal opportunity data for the past year and analyze how many opportunities missed their due date, how much of churn was incurred, and other renewal related data, for the past year.
To use this enhancement:- Navigate to Renewal Center.
- Click the Forecast period section and create your range by using the Month, Quarter, and year options.
- Click Done.

- (Optional) To select an individual period and not a range, select the required period and double click it.
- (Optional) To reset the Forecast Period to the default value, click Clear.

- Sort Data on Drill down Windows: Gainsight now allows you to sort data on the drill down windows. You can now sort data either in ascending/descending order (for Number, Currency, and Date data types) or alphabetical order (String and Boolean data type). Server side sorting is performed on data present in the drill down windows. When you click a column for the first time, data is sorted alphabetically/ascending order, based on the data type of the field. When you click the column again, the data is sorted in descending/ reverse alphabetic (Z-A) order. When you export data after sorting, the sorting is not honored in the exported CSV file.
Business Use case: Drill down windows display data specific to a section of a chart; the opportunities which contribute to that section of the chart. You can drill down the Renewals Due chart and sort the Forecast Amount field in descending order. This ensures that renewal opportunities with the highest forecast values get the first preference.
To use this enhancement:- Drill down on the required field.
- Click the field name to sort the data.
- View the Factors Contributing to the DS Likelihood score: The DS Likelihood Score is an automated field whose value is automatically calculated by using the best in class data science tools. This field displays the likelihood of an opportunity to be renewed.
Gainsight now displays the various factors (Gainsight features) which contribute to the DS Likelihood score. You can now get insights about what exactly is driving the Likelihood Score and also understand how much Renewal manager should rely on the score based on a view of what data source supports the score. You can now get information about the aspects of customer health, engagement and other areas which are impacting the Score.
To view the factors which contributed to the Renewal Likelihood score of an opportunity, you must hover your mouse on the required score. When you hover your mouse on a score, you can view the following:
- Gainsight features contributing to the score
- Level of impact the feature is having on the score (high, medium, low)
- Nature of impact the feature is having on the score (Positive, negative).
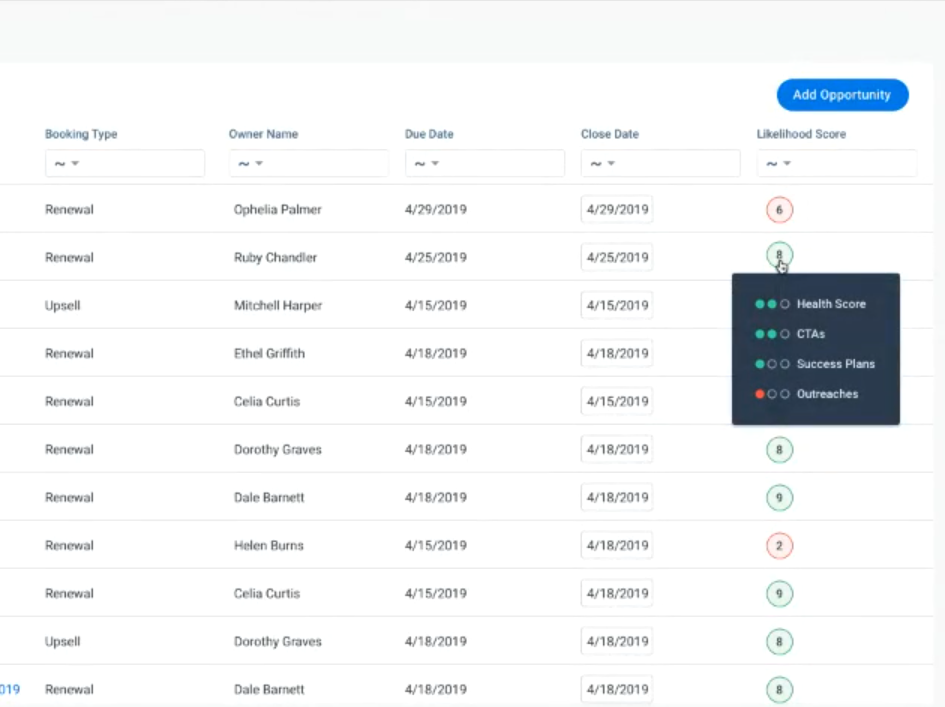
From the above image, you can infer that:
- Four Gainsight features Health score, CTAs, Success plans and Outreaches are having an impact on the score.
- Health score and CTAs have a medium impact, Success plans and Outreaches have a low impact on the score.
- Outreaches has a negative impact and rest of the features have a positive impact on the score.
The features contributing to the score and the level of impact of a feature is auto calculated by Data Science. You cannot modify these areas.
-
Perform User Level Authentication: Gainsight now allows you to define the method by which you can sync back data to your CRM. Gainsight can sync back data either as an Integration user or Oauth user. Integration user is the user who synced data from your CRM to Gainsight (generally admins). Oauth User is the user who uses renewal center (CSMs, renewal managers).
Previously, all data was synced to your CRM as an integration user itself. This caused Salesforce validation rules to be bypassed. However Gainsight now allows you to choose the method in which you wish to sync back data to Salesforce; you can select to sync data either as Integration user or as Oauth user. When you sync data as an Oauth user, all the validation rules created in Salesforce are verified and not bypassed.
Gainsight has created a new pane called User Level Authentication to implement this feature.
To use this feature:- Navigate to Administration > Renewal Center configuration.
- Click the User Level Authentication pane.
- Select the required user role with which you wish to sync back data.
- Click Save.
- Set a Field as Mandatory: Gainsight now allows admins to set fields as mandatory. When a field is set as a mandatory, users must enter values in the field. To facilitate this enhancement, a new Required check box is introduced. When you select this check box for a field, users must mandatorily enter some value for this field before saving the opportunity. The Required check box is frozen for the Fields which are mandatory by default. When you set a field as mandatory in Renewal Center, the corresponding field in Salesforce is not set as mandatory. You can create mandatory fields in both Forecast Table and Forecast Detail view pages.
To use this enhancement:- Navigate to the Renewal Center Configuration page.
- Click Forecast Table or Forecast Detail view.
- Click the Settings icon for the required field.
- Select the Required check box.
- Click Ok.
- Click Save.
-
View Custom and Actual Field Labels: As an admin, if you change the label of a field, Gainsight now displays both actual and custom labels used on the field. However, the end users can only view the custom label used on a field. This enhancement helps you easily identify the actual label of a field, when you have used custom labels on multiple fields. You can create custom labels on fields present in the Forecast table and Forecast Detail view.
The fields for which custom labels are created are displayed as per the syntax, Custom Label (Actual Label). You can also view the custom and actual label when you hover your mouse on the field.
To use this enhancement:- Navigate to the Renewal Center Configuration page.
- Click Forecast Table or Forecast Detail view.
- Click the Settings icon for the required field.
- Enter the new label in the Custom Label field.
- Click Ok.
- Click Save.
The Created Date field is now displayed as Origin Date on the Renewal Center user page.
Timeline
Timeline is the official record of your customers. It allows you to log information regarding customer interactions in a way that enables you to quickly gather insights and drive action. The Timeline View in the Customer or Relationship 360 allows you to log and view activities that help you track customer interactions over the course of a customer’s life-cycle. The Timeline View in the Customer or Relationship 360 allows you to log and view activities that help you track customer interactions over the course of a customer’s life-cycle. The Timeline tab in the CTA Detail View allows you to log activities for a specific CTA. These activities will also appear in the Timeline View in the Customer 360.
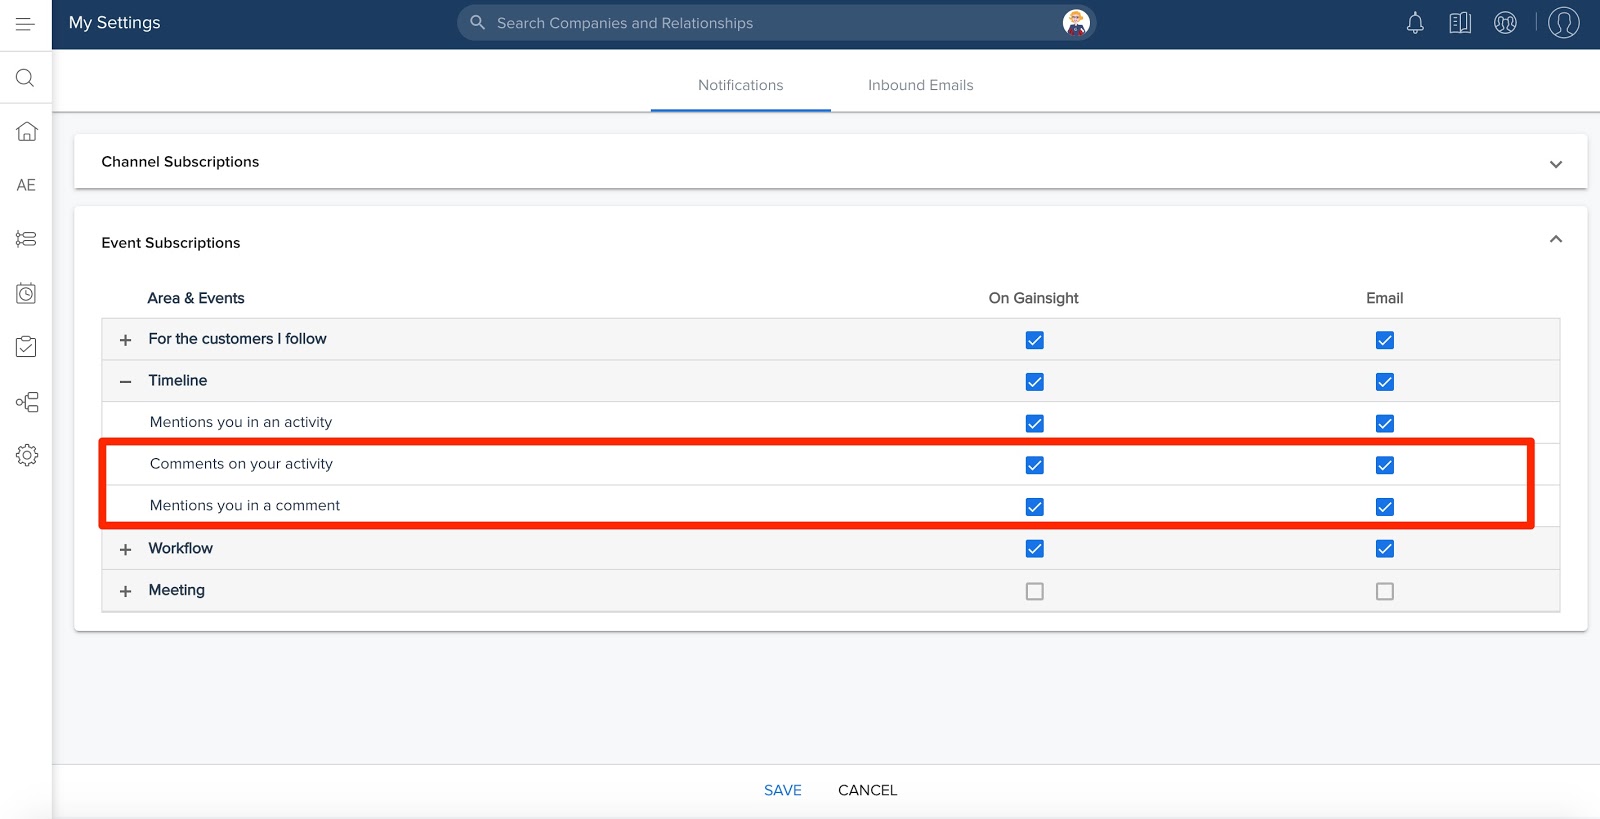
 New Notifications for Timeline Comments: Previously, users had the ability to comment on timeline activities posted by other users, and tag other users in timeline activity comments, but users would not receive an email notification for either of these events. This meant users had to manually check timeline activity to see comments on their posts, and to see if they were tagged in a comment. With this release, users will now receive notifications for the following timeline activity events:
- If another user comments on their activity post.
- If they are tagged in another user’s comment.
For more information on timeline activities, refer to Log Activities to Timeline.
By default, users will receive notifications for these events in Gainsight and via email. Users can configure if they receive these notifications on the My Settings page by navigating to My Settings > Notifications > Event Subscriptions > Timeline.
For more information on configuring notifications, refer to Setup User Notifications.
Cockpit
Cockpit is the day-to-day workspace for CSMs. As a turbo-charged “to-do list” that integrates with the rest of your system, it turns customer insights into tangible action items for your team. Calls-to-action, or CTAs, are tied to customers and are the backbone of Cockpit. CTAs can be created manually, but more often are triggered by business rules that analyze usage data. For each CTA that appears in the CSM's Cockpit, a prescribed playbook of best practice tasks can help guide the CSM through the right steps.
-
Share CTA as a link: With this enhancement, you can now share a CTA as a link with any Gainsight User, based on your business requirements.
Use Case 1: For instance, as a CSM you may want to share a CTA with your CSM Manager and want to review the CTA - Due Date. This option allows you to share a CTA as a link with your CSM Manager.
Use Case 2: For instance, CSM has created a CTA for a bad NPS® response and has included all relevant details, and may want to have a meeting with the product team to discuss on the CTA. CSM can now include the CTA link in the meeting invite for the product team to have context.
Benefit: CSMs can easily generate a link to share a CTA across their preferred channels: Slack/Email etc.
To use this enhancement:
- Navigate to Cockpit List View page.
- Click the CTA Name you wish to share as a link.
- Click the three dots on the upper right corner of the CTA Detail View.
- Click Share Link.
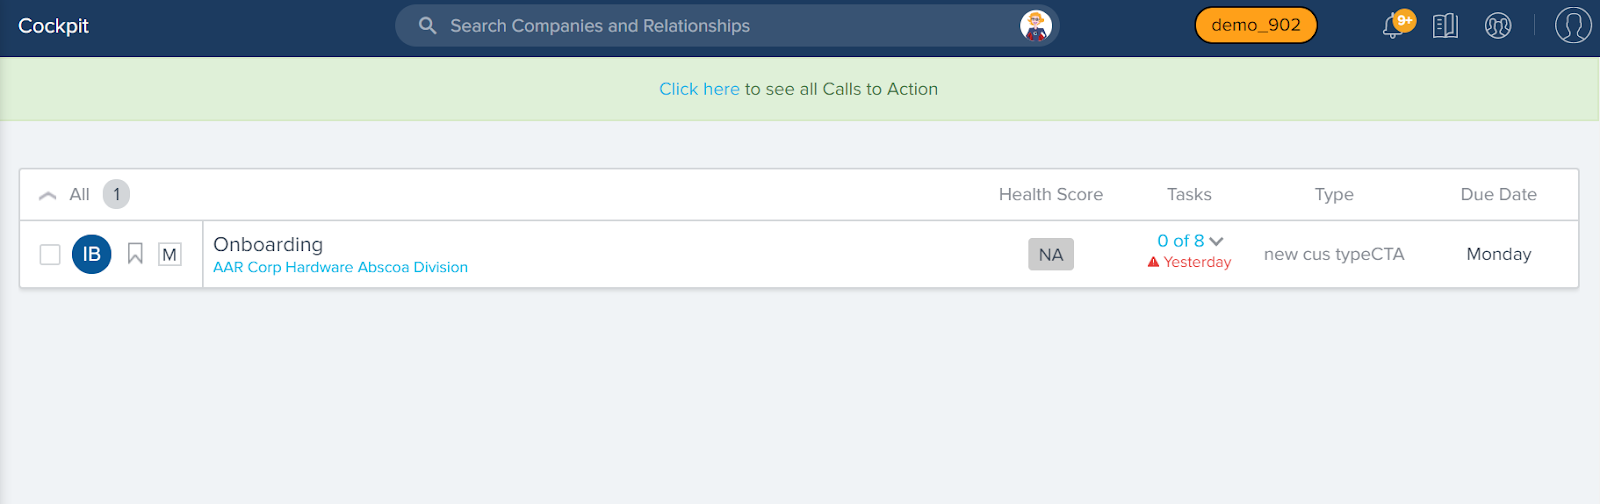
- Click COPY. The link is copied to the clipboard and can be shared with any Gainsight User.
The following image shows how a shared CTA appears, when a Gainsight User clicks on the link.
Success Plan
With Success Plans, you can capture, track activity and share progress on your customers’ key goals using Objective CTAs and their associated Tasks. Admins can create Templates for Success Plans to ensure a consistent approach to developing customer goals. Once configured, Success Plans can be manually created and viewed in the Customer 360 and Relationship 360. Admins can also create them using the Rules Engine.
-
Share Success Plans: Previously, CSMs could only share a Success Plan with their customers/People(External) in read-only mode, and customers could not collaborate and provide their inputs directly in the Success Plan. The CSM had to follow-up with customers and update their inputs to Gainsight. With this enhancement, CSMs can now collaborate directly with their customers using Success Plans. This enhancement help CSMs assign Objectives/Tasks to People(External), assign permissions and share Success Plans with them so that they can directly make changes in the Plan using the shared link.
Note: Persons (External Users) are now called as People (External).
Use Case 1: For instance, you are using Success Plans for Onboarding, i.e to track all the tasks that need to be completed for successfully completing the onboarding of your customer. Some of the tasks during onboarding might be owned by your customers, such as conducting a training session, collecting feedback from CSM team, etc. As of today, the CSM is responsible for identifying the status of the task and updating it to Gainsight. With this enhancement, you can now assign a Objective/Task to the customer and share the Success Plan in Edit mode, based on your business requirements.
Use Case 2: For instance, you might have created a Project Plan and may want to review and finalize with your customers who can provide their feedback or provide details (such as Due Date) of the tasks they own.
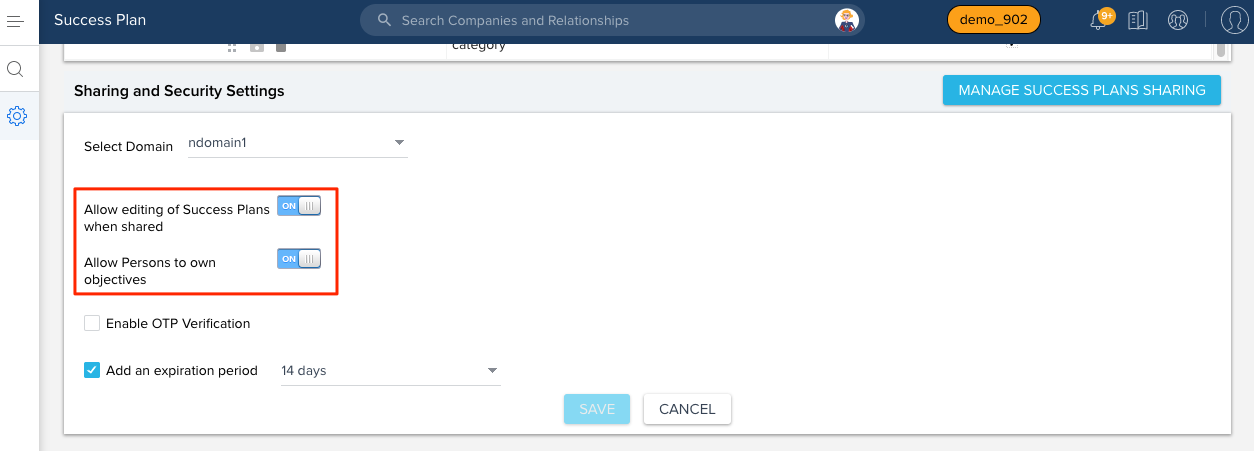
To use this enhancement, admins must first enable the following toggle buttons:- Navigate to Administration > Workflow > Success Plan > Sharing and Security Settings.
- Enable Allow editing of Success Plans when shared toggle button, to share a Success Plan in Edit mode.
- Enable Allow Persons to own objectives toggle button, to assign a Success Plan to People(External).
While sharing a Success Plan, you can now perform the following tasks:
- List the People(External)/Users whom you want to share a Success Plan
- Share a Success Plan with People(External)/Users in Edit mode
- Preview how the shared link behaves for all People(External)/Users
- Send/update an email invite to all the People(External)/Users whom you want to share
- Revoke access from the People(External)/User with whom a plan was shared
- Assign an Objective/Task to People(External) from within the Success Plan
Additional Resources:
- For detailed instructions on how to assign an objective/task to People(External), and how to share a success plan with People(External)/Users, with permission assigned, refer Share Success Plan document.
- For information on the most frequently asked questions on Share Success Plan, refer Share Success Plan FAQs.
Sally
Powered by AI, Sally makes rich Gainsight data easily accessible through simple conversation. Chatting with Sally is just like chatting with a real person and machine-learning technology helps Sally get smarter with each interaction. Not only can Sally provide answers to a diverse set of questions about your customers, Sally can also update customer data, provide information on health scoring, current risks, and opportunities. Your company can quickly collaborate on the latest customer intelligence to more rapidly deliver customer outcomes across all parts of your organization.
- Query all fields in Company and Relationship Objects: Previously, only summary, health score, NPS® survey, CSM, CTA summary, recent activities, and renewal date intents of the Company/Relationship custom and standard objects were available for query in Sally. However, Sally for Slack now supports querying of all the fields that are available in the Company/Relationship custom and standard objects.
To view the fields defined in the Company/Relationship objects, navigate to Administration > Operations > Data Management page and click on the Company/Relationship objects.
Note: Only the users with full Gainsight license can query for all Company/Relationship fields in order to reduce information security risks.
The following are some examples of the new info you can query:
- ARR
- Renewal Date
- MRR
- Original Contract Date
- Stage
- GSID
Note: Currently, users can query new intents only through Slack.
People Maps
Capture your contacts in an organizational chart to understand the roles and relationships of the people you do business with across your customer base. Explore the org chart to understand who influences whom within a company and drill-into a person for deeper insights.
- Add Influencer Relationship in People Maps: Gainsight now allows you to add influencers to a People Map. An Influencer is a Person who can impact the decision maker in an organization. This impact (known as Sentiment in People Maps) can be negative, positive, or neutral. For example, if a Manager (Ex: Joan) is a decision maker, one of their direct reports can be an influencer to this manager who can either have a positive or negative impact on the manager, when you try to sell your product to Joan.
The hierarchical structure of an organization gives you a clear picture of the direct reports and their manager. However, the hierarchical structure does not give you a picture of the internal relationships that exist in every organization. With this feature, Gainsight now allows you to model and visualize these connections which exist between various stakeholders. With the ability to add influencers, you get deep insights about the decision maker, the possible opportunities (positive influencers), threats (negative influencers), the right influencer to be approached for renewal, and so on.
Business Use case: For example, a Person named, Chris is using your product. Chris is very happy with your product (gave very good NPS® responses). Chris reports to Joan, who is the renewal decision maker for your product. You can create an influencer relationship from Chris to Joan. Chris would definitely recommend Joan to renew your product since Chris provided a very good NPS® score. Chris can be considered as a positive influencer on Joan. Similarly, if any stakeholder at your customer’s organization has given too many negative NPS® responses, you can mark them as a negative influencer on the decision maker and be better prepared to overcome the threats which could arise from this negative influencer.
Technical Aspects:
- You can create an Influencer relationship between stakeholders of any level irrespective of their position in the hierarchy.
- It is mandatory to specify the sentiment of an influence relation. This sentiment can either be positive, negative, or neutral.
- Positive influence is denoted by a green arrow, negative influence is denoted by a red arrow, and neutral influence is denoted by a grey arrow.
- Once you create an Influencer relationship, you cannot delete it. However, you can change the sentiment of an influence relationship.
- If an Influencer relationship exists between a manager and a direct report, and the direct report is removed from the hierarchy, the influencers count for the manager does not decrease. However, the name of the influencer or influence arrow is not displayed.
- You can only create a 1:1 Influence relationship between any two stakeholders; Person X can influence Person Y only in either positive, negative, or neutral way. You cannot create an Influence relationship in which Person X can have a positive influence on Person Y for one product, and a negative influence on Y for another product.
To use this enhancement:
Prerequisite: Ensure that the Influencer that you want to add to an existing person is already added to the Person object. Influencer should already have a record in the Person object.
- Navigate to C360 > Person Section.
- Create a Person Map chart or navigate to the existing person map.
- Click the ellipsis menu for the Person to whom you wish to add an Influencer.
- Select Add Influencer. The Influencer detail view is displayed.

-
Perform the following actions:
- Influencer: Enter the name of the person who is the influencer and select from the recommendation.
- Sentiment: Select the Influence Sentiment (Positive/Negative/Neutral).
- (Optional) Notes: Add details of the influence relationship.
- Click SAVE.
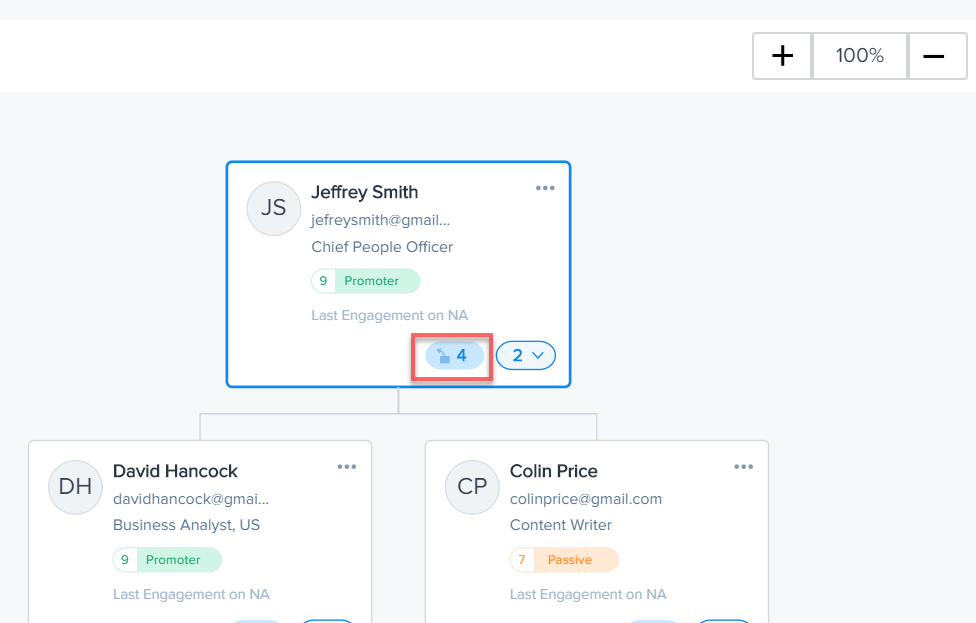
You can see that the Influencer icon for Jeffrey Smith shows 4. This is because David Hancock is now an Influencer to Jeffrey Smith, apart from the three previous influencers.
-
Click the Influencers icon to view the Influencer relation arrow(s).
-
(Optional) Click the Influencer arrow to view the influencer detail view. You can change the sentiment or add/edit notes in the detail view.
You can have only 1:1 level Influence relationship. In the above example, if you attempt to create another Influence relation from David Hancock to Jeffrey Smith, you receive an error message.
- UI Enhancements to People Maps: Gainsight has improved two UI level aspects of the person map. The improved aspects are:
- You can now view the Person map as a regular hierarchical chart. Previously, the person Map was displayed as a pyramid shaped chart.
- You can now view upto five levels of hierarchy which exist under a Person. Previously, only one level of hierarchy was displayed.
Surveys
With Surveys, you can create highly customized surveys that capture customer insights and transform them into actionable next steps for your organization. You can easily create multi-page surveys with a variety of question types, including multiple choice, matrix, and a standard NPS® question type. Surveys gives admins the ability to design and distribute surveys in Gainsight without a dependency on sites or features.
- Enable/Disable the Auto Save of User Answers: In the Survey Properties tab, the Additional Fields section is now enhanced with a toggle called Allow Auto Save Answers. This option when enabled saves the survey responses automatically while the survey participant is filling out the survey.
Note: By default, the toggle remains enabled, and you can turn it off based on your requirements.
- Sticky filters in Survey Analyze and NPS® Analytics tabs: Previously, the filters applied in the Survey Analyze and NPS® Analytics tabs would reset to default when the page is reloaded or switched between the tabs. With this enhancement, users can now preserve the applied filters in the Survey Analyze and NPS® Analytics tabs.
Survey Analyze tab:
NPS® Analytics tab:
- Import Theme from existing survey: Admins can now import the theme of an existing survey, and use it in a new survey.
To import the theme:- Navigate to Surveys > Survey List > Select the Survey/New Survey > Properties > Theme.
- Click Import theme from Existing survey (
 ). Select Existing Theme window appears.
 - From the existing survey list, select the required survey.
- Note: You can view the selected survey theme on the Right pane.
- Click APPLY.
To restore the theme to default:
- Click Import theme from Existing survey (
 ). Select Existing Theme window appears.
 - Click Default.
- Click APPLY.
- Add/Delete fields in Survey Participants Grid: In Survey Analytics and NPS® tabs, under Participants Chart, users can now Add/Delete the fields from Company / Relationship / Company Person / Relationship Person objects, as per your business need. For instance, to know the Modified Date of the response, you can add the Modified Date field to the participants chart.
The Export Responses operation would honor these selected fields. The table of participants in the Response Report tab would honor the same fields that are selected in the Analyze tab. Users can also preserve the selected fields in the Survey Analyze and NPS® Analytics tabs.
To use this enhancement:- Navigate to Surveys > Survey List > Select the Survey > Analyze >Survey Statistics.
- Click Choose Fields. Field List window appears. You can view all the fields that are added to the Participant chart.
- Click Add Fields. Select Fields window appears.
- Select the required fields.
- Click Save.
Survey Analyze tab:
 NPS® Analytics tab:
Rules Engine
The Rules Engine is designed to improve your underlying customer data to produce superior customer outcomes. It can perform powerful multi-step, in-memory data transformations for large datasets in Gainsight within one rule. Transformations include aggregations, multi-dataset merges, formulas and time-series calculations; helping your team to better identify meaningful data signals.
- New “Call External API” Action in Rules: Gainsight has introduced a new Action type called Call External API in the Rules Engine which allows you to interact with external applications. You can use this action type to automate day to day activities like posting messages to Slack, creating Zendesk tickets, creating JIRA tickets, and so on.
Business Use Cases:
- You can create a rule which posts messages to Slack when an opportunity is won. This message helps teams prepare for onboarding new customers.
- You can create a rule which fetches all of your escalations from a CSV file or from an S3 bucket and creates JIRA tickets for each of the escalations.
Prerequisites
To start using this Action type, you must perform two configurations; set up the Custom connectors and External Actions. You need to perform these configurations only once. These configurations are explained in detail below:
-
Configure Custom Connectors: Gainsight has introduced custom connectors in the Connectors 2.0 page. You can use a custom Connector to create a link to external applications. Once the connection is established, you can create actions for the external application on the External Actions page. When you create a connection to an external application, you must specify the Authorization method used to establish the connection and then setup parameters for this authorization mechanism.
To use custom Connections:- Navigate to Administration > Operations > Connectors 2.0.
- Click Custom Connector.
- Click Create Connection. The Create a Connection window is displayed.

-
Perform the following tasks:
- In the Connection Name field, enter a name for the connection.
- From the Authorization Type drop-down menu, select either Basic or Token Based authorization.
- Basic Authorization: This authorization method uses the traditional User ID and Password to authenticate the connection. Optionally, you can also provide key value pairs in Headers. You can provide multiple headers, if required. You must also specify the Get URL of the target application.
- Token Based Authorization: This authorization method uses a header based key value pair to perform authorization. You can provide multiple headers, if required. You must also specify the Get URL of the target application.
- Click TEST CONNECTION to verify your connection to the target application.
- Click SAVE.
-
External Actions: Once you setup a connection to an external application, you can create actions on the External Actions page. Once you create an action here, this action can be used in the Rules engine action type field. The External Actions page has five sections for you to configure.
To access the External Actions page:
- Navigate to Administration > Operations > External Actions.
- Click Create Action.
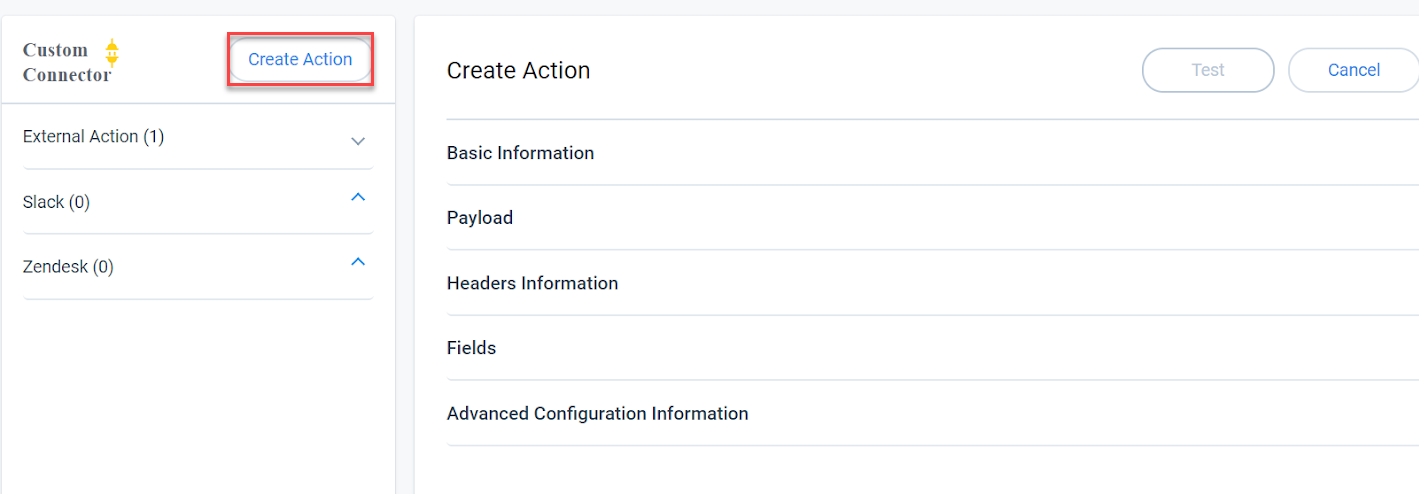
The various sections present in the External Action page are:
-
Basic Information: In this section, enter the following details:
- Select a Connector: Select the connector for which you wish to create an action.
- Action Name: Enter a name for your action.
- Method and URL: Select an HTTP Method and enter the URL. You can also use token in URL to make it a dynamic URL.
- Payload: Enter your payload either in the plain text format or x-www format. Any token you insert here is created as a field.
- Headers Information: Enter key value pair for header info. You can use multiple key value pairs.
- Fields: The list of fields are automatically pulled from the payload URL and headers. These fields are displayed on the Rules Engine Actions page under the Call External API Action. Data can be loaded to these fields from the Rules Engine Datasets.
- Advanced Configuration Information: Set a limit for the Max Retries Limit field. The numeric value specified in this field represents the number of times the system should re-try if the action fails. By default, this value is set to 3.
Click Test to test your Action. Click Create to create the Action.

-
Use the Action in Rules Engine page: Once you create and configure the custom connection and External action, you can see that the action type is now displayed in Rules Engine.
To use the Call External API Action:- Create a Rule and include the required fields in the dataset.
- From the Action menu select, Call External API.
-
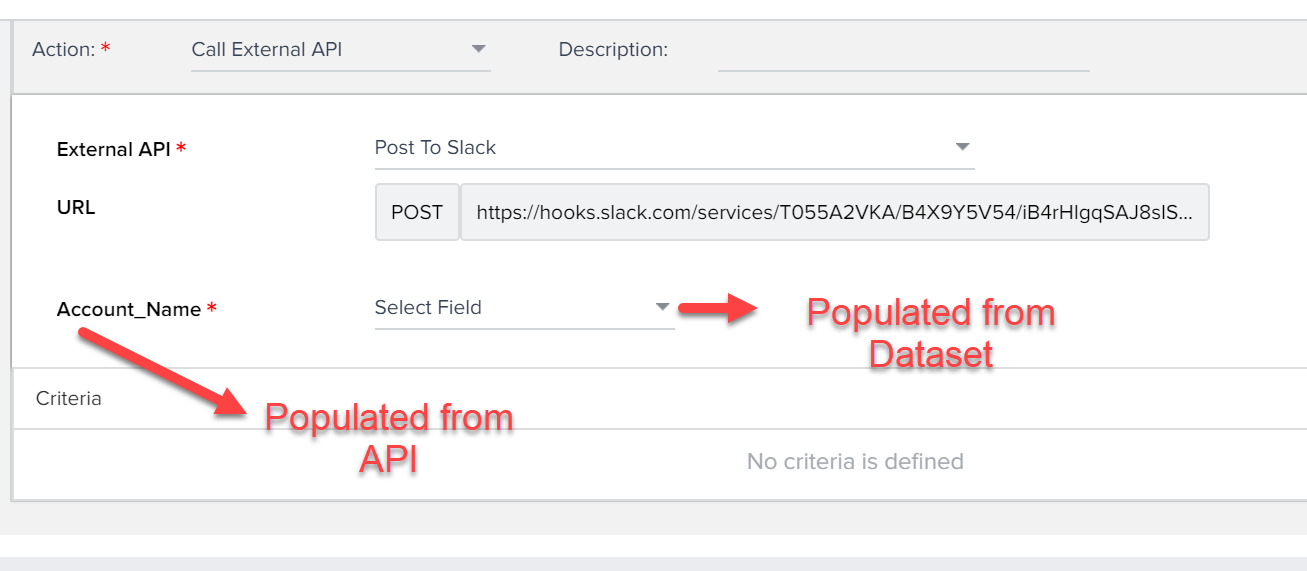
From the External API drop-down menu, select the required action configured in the External Actions page. Your actions are listed down under their respective connections. In this example, the connection name is Slack and the action name is Post to Slack.
You can view the POST URL. It is in read only mode. You can view the list of fields which are populated from the API and the fields populated from your dataset. In the following example, only one field is populated from API. However, you can have multiple fields.
-
Map the Dataset field to your API field.

Data present in the dataset field is ingested into the API field and this ingested value is posted to Slack (in this action).
You can map the values to any of the dataset fields. The value present in the Dataset is ingested to the API field. You can also choose to ingest custom values which are not present in the dataset.

- Ability to Send Rule Results Without Email Attachments: Gainsight has now disabled the process of attaching the rule results file in the Email notifications. When you execute a rule, you receive an Email notification. However, this Email notification does not contain any attachments related to rule results. You can download the rule results from the Execution History tab, located on the Rule Preview window.
- Removal of Services Check box from manual Rule Execution List: Gainsight has now removed the Include Gainsight check box from the manual rule execution check box. Previously, if you selected this check box, a copy of your rule results was sent to the Gainsight Services team. This option is no longer available.
Scorecards
Scorecards provide a robust, comprehensive framework that accurately measures customer health. Gainsight scorecards can capture the nuances of customer health by supporting multiple scorecard models, measuring both objective and subjective inputs, calculating weighted overall health and accounting for scoring exceptions.
- Replacing Scorecard Measure Comments with Timeline-like Activity Feed: Currently, in Scorecard comments, only the latest entry against the Scorecard measure is retained. Especially for manually editable scores, the comment history contains a lot of important context on the measure history that is lost if we do not maintain the history. Also, the current comments box does not support any rich text formatting. To solve these issues, Gainsight is replacing the comments box with a timeline-like activity feed.
Following are the benefits of upgrading to this feature:
- Retains a history of activities against a measure.
- Allows use of rich text formatting.
- Users can @mention colleagues in comments.
- Users can start comment threads.
- Displays manual updates in the company/relationship Timeline.
- Provides clear visuals in reporting.
Release Plan:
We would like to upgrade all our customers to this enhanced version, and request you to manually enable this for your organization. We are providing admins with a 90 day window to enable this feature. If you do not enable it within 90 days, it will be enabled automatically.
Note: Enabling this feature is a one time action, and you cannot revert back because all of the existing data is migrated.
To enable this enhancement:
- Navigate to Administration > Health Scoring > Scorecard
- Click Enable on the pop-up caution note about enabling the Scorecard Timeline on top of the page. The Enable Scorecard-Timeline dialog appears.
- Select the I understand that once enabled, I cannot go back to the old version checkbox.
- Click ENABLE. The ‘Scorecard-Timeline’ Enabled message appears.
Notes:
- The process to enable this feature might take some time to complete.
- You can contact Gainsight Support, if any error occurs during the upgrade process.
Here are some of the important points of this enhancement:
- You can create an Activity for a Measure or the Overall score.
- When you create an Activity from Scorecard, the current score of the Measure or Overall score is also captured.
- Activities in the Scorecard can be created either from the C360/R360 or Mass Edit report pages. Rules can also automatically create Activities for Scorecards based on health score changes, up to once per week.
- You cannot create Scorecard Activities from the global Timeline page. You can only view Scorecard Activities created manually on the global Timeline page. Scorecard Activities created from rules are not displayed on the global Timeline page. Only manually created Scorecard activities are displayed in the company/relationship Timeline.
- All the historical comments logged by you are auto converted to Activity of type “Update”.
Comments Logged from Rules
- In Rules, you can still see the Comments section for the Set Score 2.0 Action Type. The comments entered in the comments section are logged in as Activities of the type “Update”. These Activities are not displayed on the global Timeline. The text entered in the Comment box of Rules Engine is logged as a Comment in Scorecard's Timeline.
- If a rule runs multiple times in a single week and changes the comments multiple times, the latest Scorecard activity's comments are updated immediately by replacing the existing comment, until the end of the week. On the last day of the week the activity's comment is frozen, with the latest comment that was logged by the rule.
- If the rule runs again in the subsequent weeks and pushes new comments, a new activity is created for that week and comments are logged in to this new activity, until the end of the week. The latest comment replaces the old comment, until the end of the week and the Comment for that Activity is frozen on the last day of the week.
- If you select the Clear Existing Comments check box, the comments are still present in the Activity Timeline.
- Activities created by a rule can only be edited by the Admin who created the rule, since that user is the owner of the activity.
To use this enhancement from C360/R360 page:
- Navigate to the Scorecard section of the C360/R360 page.
- Select a Measure or the Overall Score. The Timeline section appears.
- From the + drop-down menu, select an Activity type.
- Create the Activity, as required. For more information, refer to the Create/Log an Activity article. You can see that the newly created activity also has the scorecard.
You can see that this activity is also displayed on the global Timeline. In this case, the Activity subject is New score. You can edit the Activity from the global Timeline, if you are the owner of the Activity.
To use this enhancement from Mass Edit Report:
- Create a Mass Edit report.
- Click the Timeline icon. The Timeline section appears.
- Add or edit the activities.
Issues Addressed
C360
-
Text Overflow Caused Names to Disappear: The Company Hierarchy section of the C360 page previously had an issue where company names that were more than 45 characters disappeared from view. This issue was only observed for NXT orgs displayed in the Firefox browser. Company names are now displaying as expected regardless of character length, and this issue is resolved.
-
Add Button Not Visible on C360 Page: The C360 page previously had an issue where the Add button was not visible whenever the related list report was unable to return data for the account currently being viewed. This issue has now been resolved, and the Add button is visible on the C360 page as expected.
-
Picklist Attributes Not Multi Selectable: Previously, there was an issue with C360 Layout Assignment configuration, where picklist field types would only allow for selecting a single value. The issue has now been resolved, and it is now possible to select multiple picklist values as expected.
-
Load to Company Rules Failing on Syntax Error: Rules with the “Load to Company” action type were previously failing whenever they attempted to update the Parent Company Field while using GSID as an identifier. This issue has now been resolved, and “Load to Company” rules are able to update the Parent Company Field as expected, even while using GSID as an identifier.
| Net Promoter®, NPS®, NPS Prism®, and the NPS-related emoticons are registered trademarks of Bain & Company, Inc., NICE Systems, Inc., and Fred Reichheld. Net Promoter ScoreSM and Net Promoter SystemSM are service marks of Bain & Company, Inc., NICE Systems, Inc., and Fred Reichheld. |