Gainsight NXT Release Notes 6.3 May 2019
Short on time? Check out this 9-min. video for a preview of the latest release!
New Features
Adoption Explorer (Limited Release; fka, UDM)
Adoption Explorer provides a WYSIWYG Editor to fill out the info on your adoption data and automatically create the underlying data structures, tools to automate statistical calculations and data transformations, and pre-built analytics and visualizations on the 360 View and reports and dashboards. Adoption Explorer is an end-to-end tool that creates the data structures needed to effectively model product adoption data, provides integrated statistical calculations and algorithms that take the lift out of generating data science insights, and pre-built visualizations that provide structure insight for every user.
Adoption Explorer helps manage your customer’s usage data in the Gainsight environment. Customer’s usage data at Company and/or Person level can be stored at both daily and weekly level along with their entitlements. Using the ingested data, admins can define new derived fields without the need of Rules Engine.
Adoption Explorer allows admin to build projects on Company and/or Person Usage info, Timeseries and Entitlement objects, in which Company, Company + Instance, Person and Entitlements related information and metrics are stored. Once the usage data is stored/ingested to Adoption Explorer objects, admins can calculate new metrics, summarize, and enable these projects for the end users to view on C360 usage sections. For more information about Adoption Explorer, refer Adoption Explorer Overview.
Note: Adoption Explorer is currently available as part of a limited release. If you’re interested in working with the new feature and sharing your feedback, please contact your COM for more information.
To access Adoption Explorer, navigate to Administration > Adoption Explorer, you will see the following tabs:
- Administration
- Analytics
Administration is where admins create a project, setup source connections, configure metrics and calculations for your key usage data, check on how existing setups are working, and create/edit new Usage Section layouts, for end users/CSMs to see on C360 page. For more information on how admins configure Adoption Explorer projects, refer Configure Projects in Adoption Explorer.
Once a project is configured and saved from Admin > Adoption Explorer, Analytics in Adoption Explorer allows the authorized users to view, add or modify the visual layouts (usage layouts) in a project. For instance, from the below image, you can see that the visual layout in a project has been configured with a Pie chart and Tabular report. Pie chart refers to the number of page views on each page(title) and Tabular report refers to the comparison between Sum of pageviews and Sum of Unique pageviews. Similarly, you can configure usage layouts in an Adoption Explorer project, as per your business requirement.
Adoption Explorer also has an out of the box integration to connect with Gainsight PX and pull pre-aggregated Feature usage data and Engagement data to provide quick insights via out of the box metrics and layouts. For more information on Gainsight PX and Gainsight CS integration, refer Enable Gainsight PX Data in Adoption Explorer.
Important: Currently, Adoption Explorer is shipped only for limited customers, if you want to participate in this limited release, you can reach out to us.
Enhancements
Timeline
Note: The following features were added in patch 6.3.4 release on June 4.
Timeline is the official record of your customers. It allows you to log information regarding customer interactions in a way that enables you to quickly gather insights and drive action. The Timeline View in the Customer or Relationship 360 allows you to log and view activities that help you track customer interactions over the course of a customer’s life-cycle. The Timeline View in the Customer or Relationship 360 allows you to log and view activities that help you track customer interactions over the course of a customer’s life-cycle. The Timeline tab in the CTA Detail View allows you to log activities for a specific CTA. These activities will also appear in the Timeline View in the Customer 360.
-
Draft Activity Limit Per User: Gainsight now calculates your draft limits at the User level and not at the org level. Previously, draft limit was set to 2000 per tenant. This limit will now be calculated at the User level. Each user can log a maximum of 50 drafts. This limit includes:
-
Activities which were auto saved as drafts
-
E2T emails which were logged as drafts
-
Ability to Mass Delete Draft Activities: Previously, you had to manually delete each draft activity. This was cumbersome when you had many drafts to be deleted. Gainsight now allows you to delete multiple drafts simultaneously. A check box has been introduced for each draft to accomplish this task.
To mass delete drafts:
-
Select the check box for the required draft(s)
-
Click the delete icon.
-
Ability to Create Reports, Rules, and Surveys on Attendees: You can now use the Timeline Internal Attendees and External Attendees fields in various analytical and action based modules of Gainsight. To accomplish this task, Gainsight has introduced the following new components:
- Internal Attendees and External Attendees fields: The Activity Timeline object is now enhanced with two new fields; Internal Attendees and External Attendees. These fields return the list of internal and external attendees (respectively), who attended a particular meeting.
- Activity Attendee Object: A new junction object called Activity Attendee has been introduced. This object has Activity ID and internal and external Attendee ID fields. You can use this object while creating rules or reports which are based on an attribute of a person.
Note: When you type the name of a Person (attendee) in the filter field, ensure that you enter the exact name of the person. You cannot find name suggestions based on the characters entered.
Business Use cases:
-
Reporting: In reporting, you can use this enhancement to address the following use cases:
-
Create a report on the list of activities, organized with a particular person(s) (internal or external) in the past one month, quarter, or year. To accomplish this, use Activity Timeline as the source object and add the required fields in the Show me section. Use the Internal Attendees/External Attendees field in the filter area and enter the name of the required person.
-
- Create a report in which a particular internal or external attendee was involved.
-
Create a report which enlists internal or external attendees who have not attended any meeting in a given period of time.
-
Review the internal attendees who attended meetings with a customer, who recently churned out.
-
Surveys: You can send out a survey to a list of external attendees with whom you recently had an EBR meeting
-
Rules Engine: You can create a rule to check when exactly was the last time you met an executive (with a specific role) from a particular company. To learn more about how to use this use case, refer to the Track Last Activity on People with Specific Roles article.
-
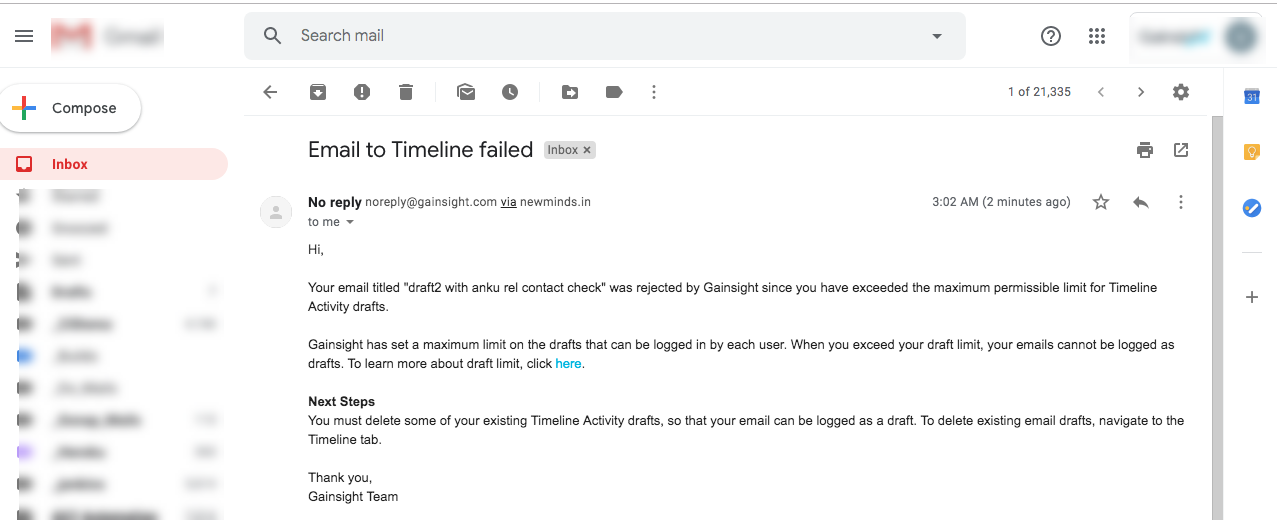
New Failure Reason emails when E2T Email is not successful: Previously, if an E2T email was logged as a draft in Timeline, Gainsight did not send a notification or reason for this. With this release, you will receive an Email notification if the following conditions are met:
- Your email is logged as a draft.
- You have reached the maximum draft limit.
The email informs you about the failure reason and the possible actions that you can take.
Cockpit
Cockpit is the day-to-day workspace for CSMs. As a turbo-charged “to-do list” that integrates with the rest of your system, it turns customer insights into tangible action items for your team. Calls-to-action, or CTAs, are tied to customers and are the backbone of Cockpit. CTAs can be created manually, but more often are triggered by business rules that analyze usage data. For each CTA that appears in the CSM's Cockpit, a prescribed playbook of best practice tasks can help guide the CSM through the right steps.
-
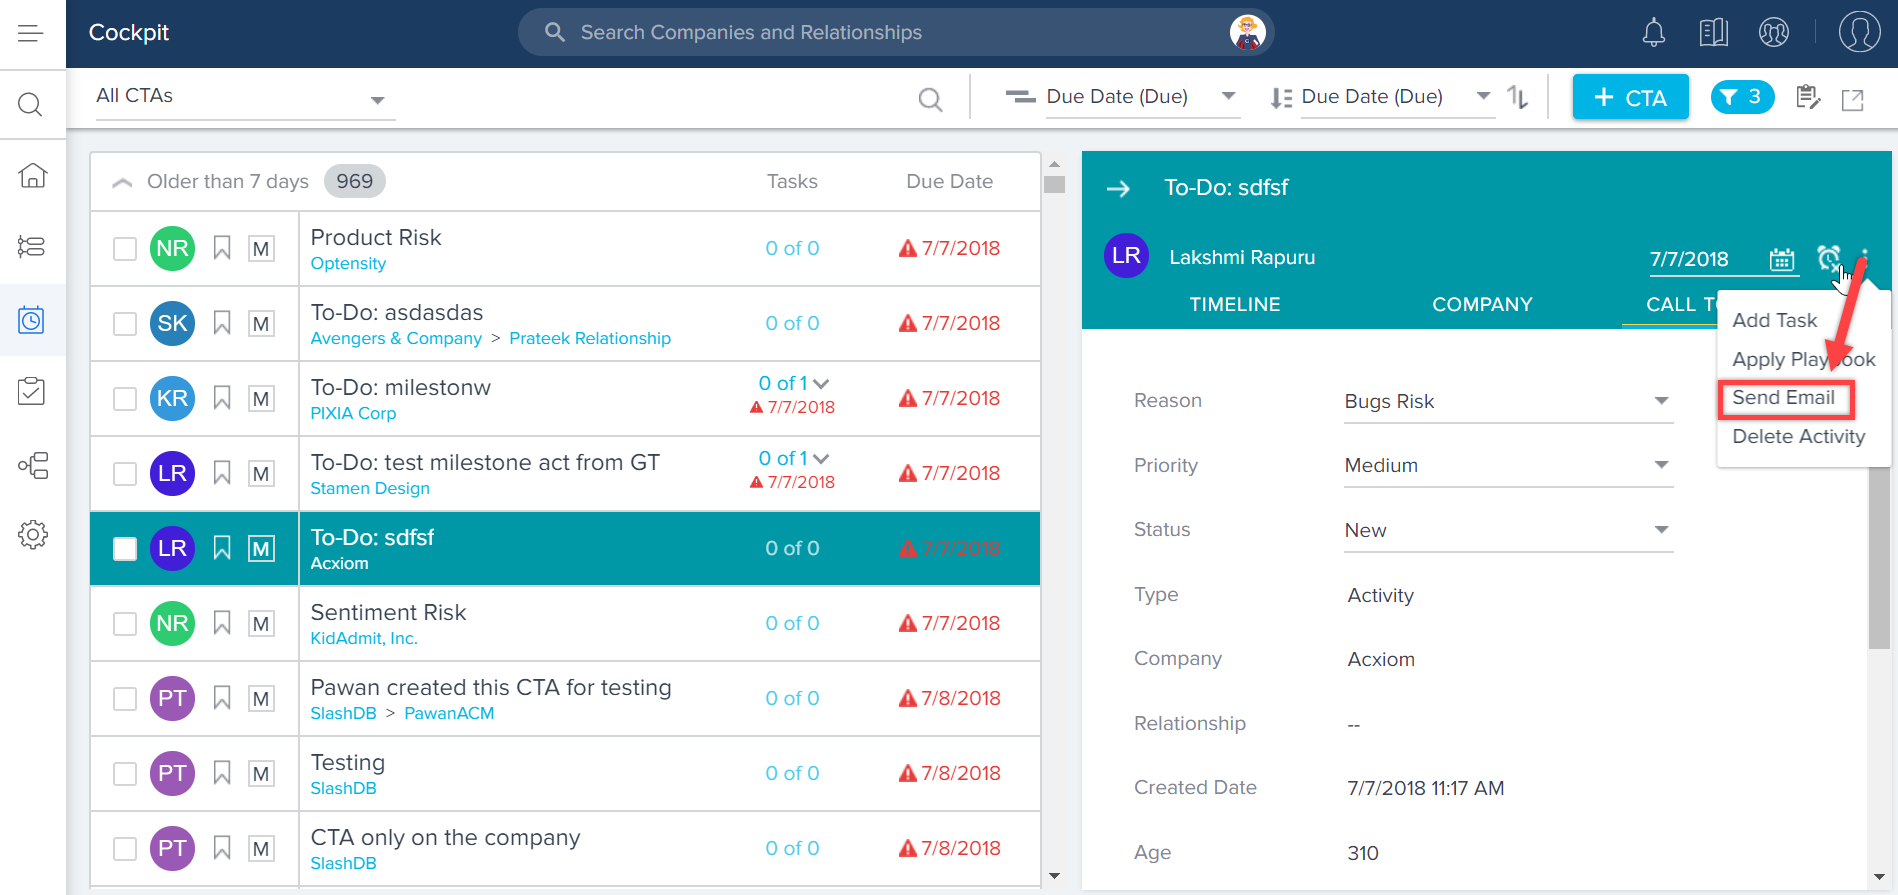
Ability to Send Ad-Hoc emails from Cockpit: Previously, CSMs who wanted to send emails directly to contacts from Cockpit were required to apply a playbook with an email task. This meant admins had to ensure that the right templates were readily available in playbooks. To address this issue, Cockpit is enhanced with a feature called Send Email, which enables CSMs to send emails using any email template in a CTA, without applying a playbook. For example, a Sales Representative will call the customer to discuss the renewal and based on interaction, they must send out a follow-up email.
To enable this functionality, admins must first configure an email template, and then CSMs can select the email template to associate with the email task. For more information, refer to Send Ad-Hoc Emails from Cockpit.
The advantages of sending emails from Cockpit are:
- Email Task will be created within the CTA which allows for better tracking.
- CSMs can use Email Analytics
- Email is automatically logged to Timeline
Sending emails from cockpit can be enabled or disabled based on the CSM’s requirements in the Email Configuration page.
To enable this feature, navigate to Administration > Communication > Email Configuration and select COMPLIANCE tab. Turn ON the Allow sending emails directly from CTA's toggle button.
-
Ability to View, Update, and Delete existing Fields on the CTA Object: With this release, a new section called Fields on Call To Action is added at the Global level in the Administration > Call To Action (CTA) page. This section now displays the existing fields used in the CTA Object, in a tabular format. Admins can review, modify, and delete the existing fields used in the Call To Action Object by using these options:
- View field: To view the information of the existing fields.
- Edit field: To update the existing fields information
Note: Admins cannot update the Field name and Data type fields for the existing fields. - Delete field: To delete the existing fields used in CTA Object.
Note: Admins cannot delete the fields that are already used in any layouts, reports, or rules.
Note: You can only create Custom Fields and view Fields on Call To Action section only on the GLOBAL tab of the Call To Action (CTA) page.
This enhancement is applicable to Task object as well, you can see Fields on Task section on the Task configuration page.
Success Plans
Success plans develops, delivers, and demonstrates customers outcomes with Success Plans. Success Plans organize your team’s activities to realize a customer’s desired outcomes. The plan’s discrete objectives and tasks help your team execute the right actions and demonstrate to your customer how your efforts translate to results. The Gantt Chart visualization and ability to export the Success Plan into a presentation-ready PowerPoint makes it easy to collaborate and share updates directly with the customer.
-
Ability to View, Update, and Delete existing Fields on the Success Plan Objects: With this release, a new section called Fields on Success Plan is added at the Global level in the Administration > Success Plan page. This section now displays the existing fields used in the Success Plan Objects, in a tabular format. Admins can review, modify, and delete the existing fields used in the Success Plan Object by using these options:
- View field: To view the information of the existing fields.
- Edit field: To update the existing fields information.
Note: Admins cannot update the Field name and Data type fields for the existing fields. - Delete field: To delete the existing fields used in Success Plan Object.
Note: Admins cannot delete the fields that are already used in any layouts, reports, or rules.
Note: You can only create Custom Fields and view Fields on Call To Action section only on the GLOBAL tab of the Call To Action (CTA) page.
Report Builder
You can gain deep customer insight with Reports and Dashboards. Gainsight’s ability to blend together multiple data sources provides a structured, holistic picture of the customer across all types of vendor/customer interactions. Using an intuitive interface and compelling visualizations, each of your customer-facing functions can build their own strategic view to get actionable insights, fast.
- Formula Fields in Reporting: The Report Builder now offers a new functionality called Formula Fields. With Formula Fields in Reporting, admins can instantly create a formula field in Report Builder, based on their business requirements. These reports can then be consumed in all other functionalities of Gainsight, like: Dashboards, C360/R360, Success Snapshots, etc.
Currently, in Gainsight, admins can also create Formula Fields in Rules Engine and Data Management, and can use them in reports.
You can create Formula Fields of String, Date and Number Data Types.
You cannot create formula fields on the following objects: Email Logs, Email Raw Events and Unsubscribed Emails.
Business Use case:
For instance, as a CSM you may want to know the number of days a participant has taken to respond to a survey feedback, you can now achieve this by using Date Diff function in the Formula Fields.
The Date Diff function calculates the difference of days between the “Survey Sent Date” and “Responded Date”, and displays the number of days a participant took to respond to a survey.
To perform this in a report:- Navigate to Administration > Analytics > Report Builder.
- Click + REPORT to create a new report (or) you can use the existing report, if you wish to.
- Select the required Object on which you want to create a report.
- Add the required fields to Show me and By.
- Click the + button.
- Click +FORMULA FIELD. The Add Formula Field window appears.
- Enter the following details
- Field Name: Enter the display name as Participant Response Duration.
- Data Type: Select the Number data type.
- For the Date Diff function, provide the following information:
- Start Date: Select the Survey Sent Date field from the dropdown list.
- End Date: Select the Responded Date field from the dropdown list.
- Interval: Select the Day as interval from the dropdown list.
- Click ADD to save the Formula field. You can now see the created Formula field in the report.
Users can also apply this formula field as a filter based on their business needs. For example, if you want to look into all the participants who took 2 or more days to respond to a survey. You can apply the formula field created as a filter and input the value is greater or equal to 2 days.
If you want to know the average duration a participant has taken to respond to a survey, you can even apply Average function from Column calculations.
Note: If you have created multiple Formula Fields in a report and have used only a few, then while saving the report you will see the following confirmation message:
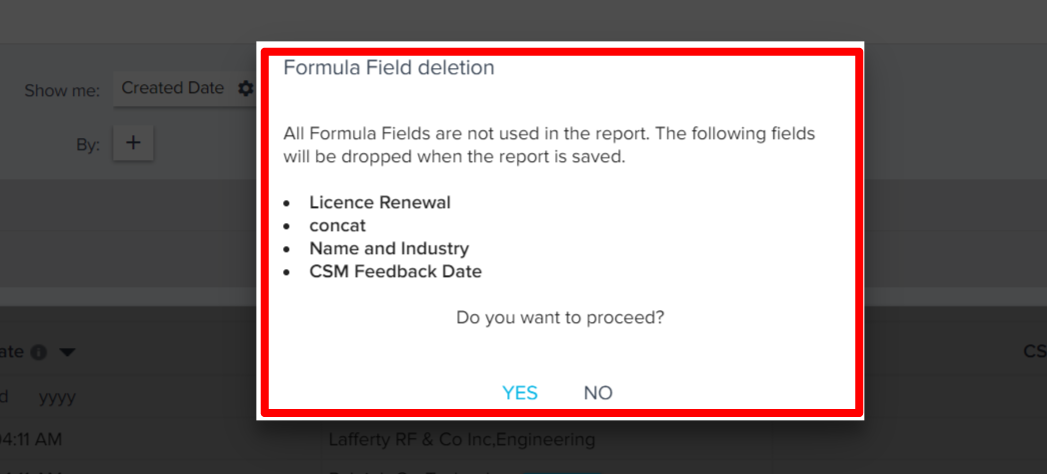
For information on how to create formula fields on String and Date data types, refer Formula Fields in Reporting.
C360
The 360 view centralizes the insight your team needs to understand their customer, product or relationship into one single source of truth. Gainsight consolidates data from multiple sources to make it easy and efficient to gain a holistic understanding of your customer. Design multiple 360 layouts to show the right view depending on the customer’s attributes or the user’s rule.
-
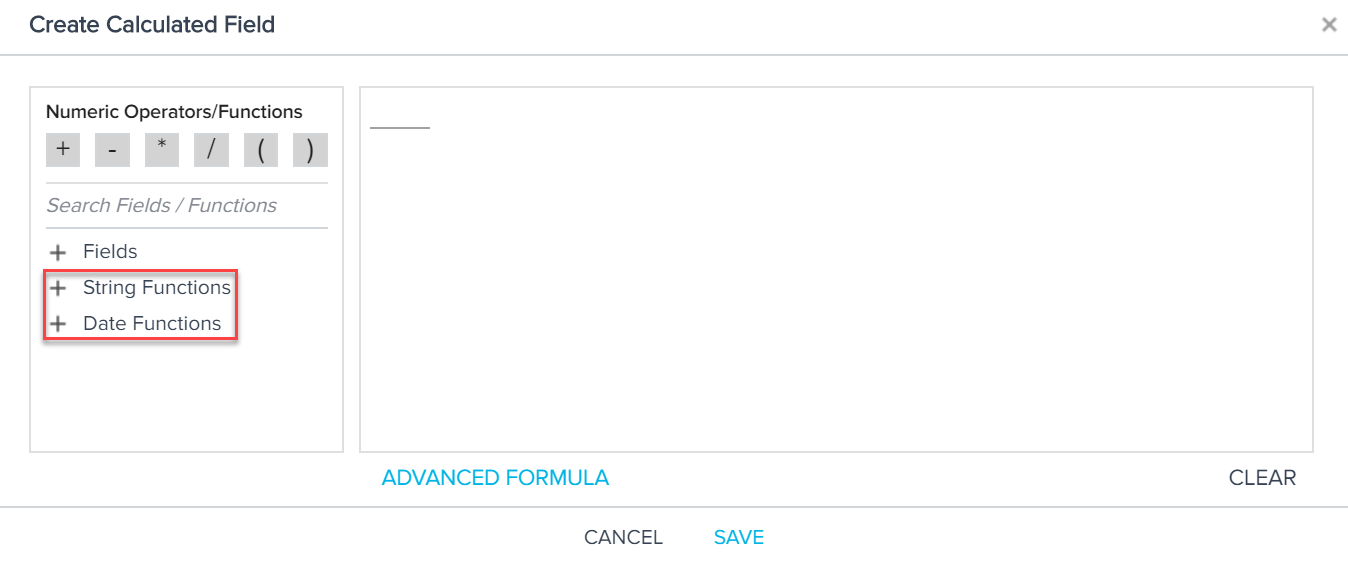
Add Calculated Fields to the Company Object: Admins can now add a Calculated field in the Company object from the Company Admin screen. Admins can add Date and String functions to the calculated fields they add to the Company object.
To add a Calculated field to the Company object, take the following steps:- Navigate to Administration > Operations > Data Management.
- Click to open the Company Standard Object.
- Click ADD FIELD.
- Click the Calculated Field checkbox.
- Click CREATE FORMULA to open the Create Calculated Field window.
- Add the fields and functions necessary to complete your formula.
- Click SAVE.
- Complete the remaining field configurations.
- Click ADD.
For more information on adding calculated fields, refer to the Create Calculated Fields on Gainsight Object section of the Gainsight Data Management article.
- Ability to Create People Maps: With this release, Gainsight has launched the People Maps feature. You can use this feature to build hierarchical structure which exists in customer organization. This helps you visualize who reports to whom, which in turn helps you to reach out to the right contacts.
You can use People Maps to Capture your contacts in an organizational chart to understand the roles and relationships of the people you do business with across your customer base. Explore the org chart to understand who influences whom within a company and drill-into a person for deeper insights. For more information about configuring People Maps, refer to the Configure Chart View section of the Configure 360 Person section article. For more information about using the People Maps, refer to the People Maps article.
Rules Engine
The Rules Engine is designed to improve your underlying customer data to produce superior customer outcomes. It can perform powerful multi-step, in-memory data transformations for large datasets in Gainsight within one rule. Transformations include aggregations, multi-dataset merges, formulas and time-series calculations; helping your team to better identify meaningful data signals.
-
Ability to change Column Headers in S3 Dataset: Previously, you could not change the Column Headers of the source file in an S3 Dataset. With this release, you can now edit the column header of source file in S3 Dataset. After you change the column header in the S3 dataset, be sure to make the corresponding update in the source file, located in the S3 bucket. During rule execution, if a column has a different name in the S3 dataset and S3 bucket, the rule execution fails.
To use this enhancement:- Create an S3 dataset.
- Configure the fields and click LOAD COLUMN DETAILS.
- Modify the field names under the column header.
Journey Orchestrator
Journey Orchestrator enables you to design integrated customer journeys that blend human and digital touchpoints to guide customers to enhanced outcomes. Journey Orchestrator can simultaneously analyze multiple sources of customer data to uncover the trends that affect your customers’ success. Then you can orchestrate dynamic, multi-step journeys that adjust to each customer to create effective, personalized engagement at scale. For more information, refer to the Journey Orchestrator & Automated Email Overview article.
- Ability to Pause and Resume a Published Program in JO(NEW):
(Note: The following enhancement was added in the 6.3.2 patch release on May 24, 2019.)
Previously, in Journey Orchestrator, users could not pause or resume a Program in an Active status. Now, Admins can Pause and Resume an Active Program, and when it is paused, the Participants status is set to paused.
The Actions/Activities that are in queue at the time when the Program is paused are executed normally, and the participants are paused only at the next Wait Timer/Conditional wait. Once the Program is resumed, all the timers will be adjusted to account for the paused duration. For example, assume that you have a step which says Wait for 3 days, but you have paused the program for a day and then resumed it. The wait step automatically recognizes the pause duration of 1 day, and now waits for 4 days instead of 3 to compensate for the pause duration.
Note: While the program is in a paused state, Gainsight is not listening for events such as Open Email, Close Event, CTA Open/Close. Therefore, when you resume, it will assume that the participant has not read the email, for example, and proceed in the Program path based on that assumption. We are planning to address this in a future release.
-
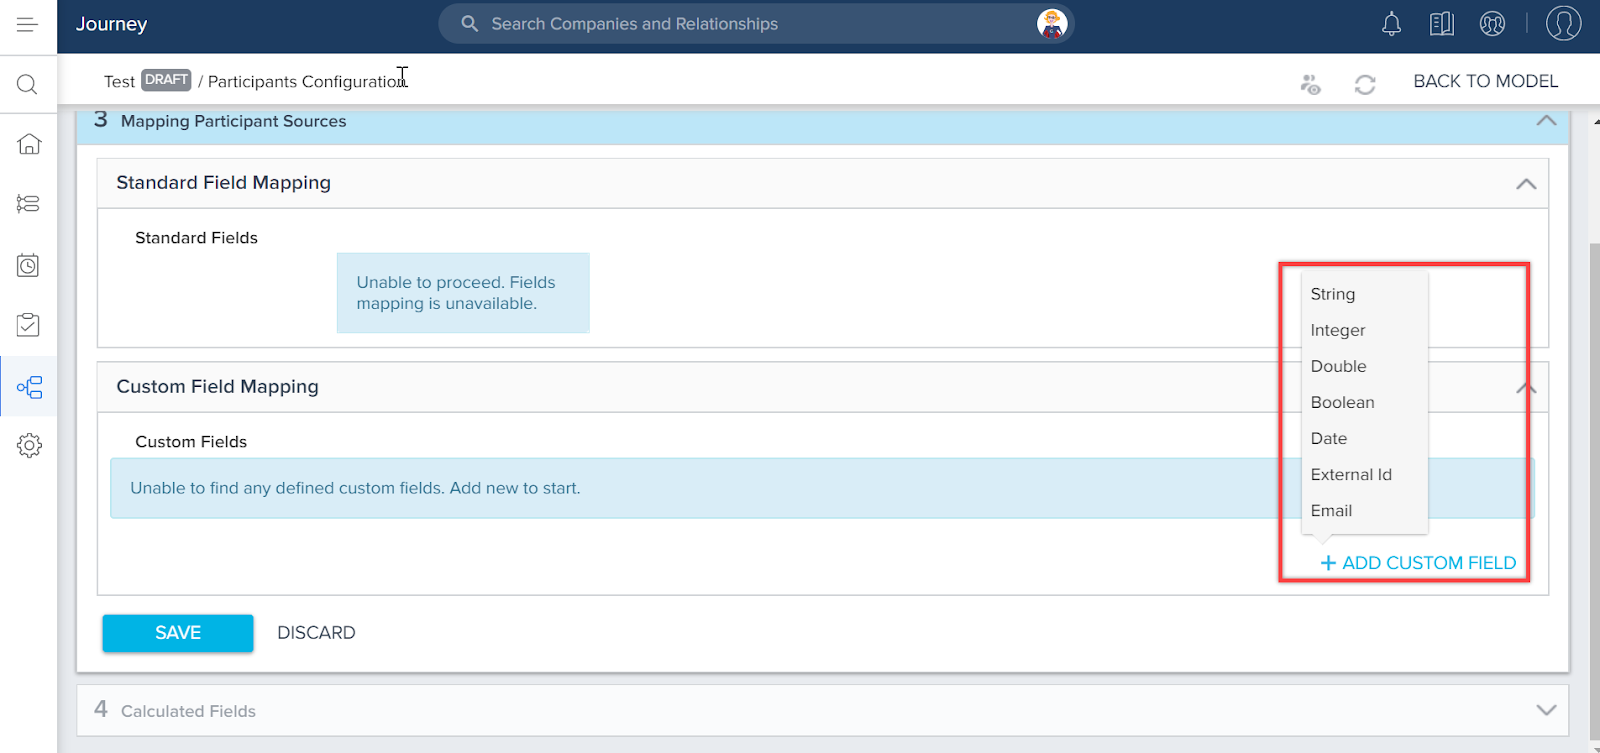
Ability to add a maximum of 50 custom fields in the Participant List configuration area of Programs: Previously, the maximum designated number of fields permitted was six fields for String Data Type and 3 fields each for Integer, Double, Boolean, Date, External Id, and Email Data Types. With this Release, the user can add a maximum of 50 fields for all data types together or any one data type in the Participant List configuration area of a Program. This eases the configuration of complex multistep programs, and also allows admins to define programs easily.
This configuration is only applicable for newly created Programs. The user cannot add any Custom Fields if the Program already exists and it’s in an Active status. However, if the created Program is in Draft stage, the user can add more fields by deleting the existing Custom Fields.
Notes:
- The same functionality is also applicable for cloned Programs. The user must delete the existing Custom Fields and can add a maximum of 50 fields.
- If you need to add more than 50 fields, raise a request to support@gainsight.com.
Business Use Case: Consider a scenario where a customer has to add many Email steps or CTAs in a Program. With this enhancement, they can define up to 50 custom fields which can be used as Tokens in the Email/CTA steps of a Program.
-
Ability to control JO Module with Permission Set for CSMs/CS Designers: Previously, there were no permission sets defined. But, if user can access Programs page through side navigation, they can access, modify, or create Programs. With this release, by default, some permissions bundles are present but not assigned to any user. Only Super Admins, who have access to all the permissions, can assign permissions to users accordingly.
Note: When a new Tenant Copy is created, no permissions are present. Only Super Admin will have permissions.
-
Ability to Disable or Delete Tenant after registering Journey Orchestrator to the tenant management microservices: With this release, if the Programs are running for a Tenant which is disabled, those Programs will continue to run as expected. Journey Orchestrator has not yet Onboarded with Tenant Disable feature. If the Tenant is deleted for Programs, the processes and data related to Journey Orchestrator are deleted. The deleted information cannot be retrieved after Tenant delete is completed.
Gainsight Data Management
Gainsight Data Management offers you the flexibility and full control over your object structure, schema and data within Gainsight. Create and edit all aspects of your data design through an administrative interface to continually develop your Gainsight schema with your evolving business.
-
Introduction of String and Date Formula Functions: With this release, Gainsight now allows you to create calculated fields by using String and Date functions. You can find these functions on the Create Calculated Field window.
You can create a calculated field by using the existing fields in that object, as arguments of the function. Apart from the existing fields, you can also use other applicable formula functions as arguments while building a formula field.
Business Use case:
String Function: If you have two custom fields called First Name and Last Name, you can merge them using the Concat function to create a Name field which stores the full name of the person.
Date Function: The Company object has a data field called Renewal Date which stores the renewal date for the customer. Generally, renewals which are due in the current quarter are given high priority. You can use the Date diff function to calculate the number of days left for renewal in the current quarter.
A step by step procedure to implement the above two use cases is demonstrated in the Create Calculated Fields on Gainsight Object section of the Gainsight Data Management article.
IMPORTANT:
- In a string function, you can use any field with Data type Email, GS ID, Rich Text Area, SFDC ID, String, and URL.
- In a Date Function, you can use any field which has Data type, Date or Datetime.
- To use a formula function in a custom field, you must ensure that the Data type of the custom field is same as the return type of the formula function. For example, the Date Diff function returns output in Number format. To use this function, your custom field must have data type as either Number, Percentage, or Currency. Substring function returns output in String format. You cannot use it if your custom field’s data type is currency or Date.
-
Ability to view and delete records from the custom objects from the Data Operations page: Data Operations is an Administration page that helps Admins view, edit, and delete existing records in the Gainsight standard objects, Company and Relationship.
You can now view and delete records in the Custom MDA objects from the Data Operations page. Before upgrading Gainsight to V6.3, you could view and delete records in the custom MDA objects from the Data Management page only.
To see this enhancement:- Navigate to Administration > Data Operations.
- Select a custom object from the object drop-down list. You can now see custom MDA objects in the drop-down along with existing standard objects, Company and Relationship. You can now see all of the records from the custom object.
- Select required fields of the custom object from the Column selector to see selected fields and the values stored in them for all the records.
- Select checkboxes against one or multiple records and click the Delete record icon to delete the corresponding records. You can also filter the records using Advance filters option and delete them.
Note: You cannot add or edit records into custom objects now, but you can just view or delete them.
Remaining options in the Data Operations page work for the records from the custom objects as similar to the Standard objects. For more information, refer Data Operations.
-
Deletion of Parent record identity in the Child record when Parent record is deleted: Self-Lookup enables admins to lookup to the same standard object and fetch GSID of another record to the target field using derived mappings in the configuration of a data ingestion channel. Self Lookup functionality is used to create User - Manager hierarchies, ‘My team’ and ‘Portfolio view’ reports, etc. Example: You can populate values into the fields, Company::Parent Company and User::Manager using self lookup configuration. For more information, refer Self Lookup.
Enhancement: If two records (parent and child) in an object are connected through self-lookup, for example, to show Company Hierarchy or Person Hierarchy in the C360 page, when the parent record is deleted, identity of this record in the child record is also deleted. This enhancement helps to create better hierarchical maps for Company, Person, etc.
To experience this enhancement in the Company object from the Data Operations page, consider there are two records named ABC and XYZ in the Company object connected through Self-lookup. Parent Company field of the XYZ record is populated with GSID of the ABC record. If the ABC record is deleted, Parent Company field of the XYZ record becomes null as shown below:
Connectors
Customer data is collected and stored in various data stores in any organization. Connectors are integrations that are offered out of the box to connect the varied data sources and sync up information into Gainsight.
-
Introduction of PX Connector: With this release, Gainsight has introduced the PX connector. You can use this connector to sync data from Gainsight PX to Gainsight. You can sync data from:
- Accounts object in Gainsight PX to the Company object in Gainsight
- User object in Gainsight PX to Company Person object in Gainsight
To accomplish the above sync tasks, Gainsight PX connector has two out of the box sync jobs; Company Sync and Company Person sync job. You cannot create custom jobs in the PX connector. You can view the PX connector on the Connectors 2.0 page.
For a detailed procedure on how to configure the PX connector, and use the default jobs to sync data, refer to the Gainsight PX Connector article.
Scorecards
Scorecards provide a robust, comprehensive framework that accurately measures customer health. Gainsight scorecards can capture the nuances of customer health by supporting multiple scorecard models, measuring both objective and subjective inputs, calculating weighted overall health and accounting for scoring exceptions.
- Scorecard Habits report available out-of-the-box: A Scorecard Habits Report allows you to review your customer’s health scores. This report displays the trends with reference to your configured grading scheme.
Previously, you had to manually build a habits report. With this enhancement, Gainsight now allows you to choose a habits report from the drop-down menu. When you select Account Scorecard History or Relationship Scorecard History in the Report Builder page, you can now select Scorecard Habits as the report type. Selecting this option provides you with basic fields in Show me, by and filters section. You can add more fields as required. If you created a habits report previously, those reports are automatically updated with the Scorecard Habits report type.
To use this enhancement:- Navigate to Administration > Analytics > Report Builder.
- Click + REPORT.
- Select either Account Scorecard History or Relationship Scorecard History object.
- From the Report Type drop-down menu, select Scorecard Habits.
- Scorecard Grouping by Scheme in Habits Report filters: With this release, when you filter a Habits report using the Scorecard Name field, all of the available scorecards are grouped automatically based on their scoring schemes.
To use this enhancement:- Navigate to Administration > Analytics > Report Builder.
- Click + REPORT.
- Select either Account Scorecard History or Relationship Scorecard History object.
- From the Report Type drop-down menu, select Scorecard Habits.
- Select Scorecard Name field in the filters. You can view that Scorecards are grouped according to their scoring scheme.
- Ability to select Comments for specific measures in a mass edit report: With this release, you can now view comments for measures and overall score from the Mass edit report. The comments are displayed only for the selected Measures.
To use this enhancement:- Navigate to Administration > Analytics > Report Builder.
- Click + REPORT.
- Select a fact object as the source.
- From the Report Type drop-down menu, select Scorecard Mass Edit.
- Add Measures and Overall score to the Show me section.
- Click RUN.
- From the settings icon, click Chart options and select the check box for the measures for which you wish to view comments.
You can clear the checkbox to remove the comments column. Select the checkbox for other measures to view their comments.
X-Org Migration
In Administration > Migration, Gainsight offers a migration tool to migrate your Custom Object's schema, Reports, Rules, Playbook assets, Data Spaces, Power Lists, and Reports from a source org to a target org. For example, if you have built and tested rules in your sandbox org, you may want to migrate them to your production org. This feature saves Admins valuable time and is enabled by default. A detailed document on X-Org FAQs would be published very soon.
Note: The Migration tool can be used to migrate Scorecards 2.0 and Surveys 2.0 configurations. A detailed document on Cross-Org Migration will be published very soon.
-
Migrate Scorecard Mass Edit Reports: Admins can now migrate Scorecard Mass Edit Reports along with the report’s associated fields, measured filters, and measured groups. Scorecard Mass Edit Reports are built off of either the Unified Scorecard Fact - Relationship object or the Unified Scorecard Fact - Company object in report builder. Previously, it was not possible to migrate reports built off of these objects. Only the fields, filters, and groups associated with the report will be migrated.
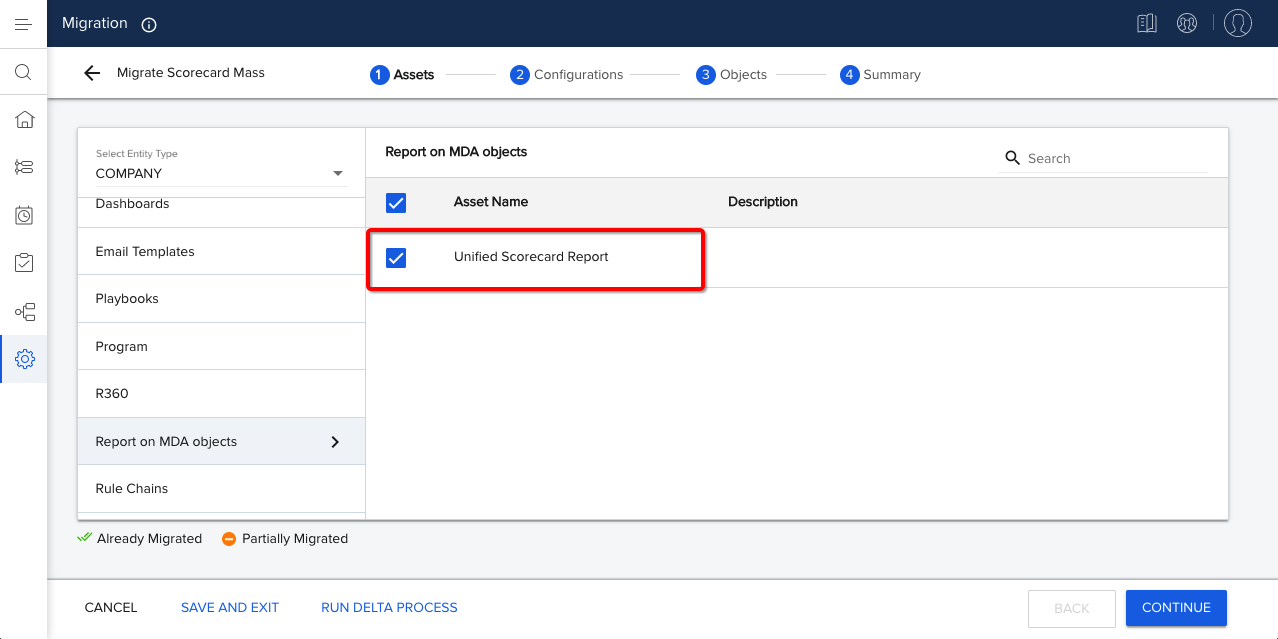
For more information on Scorecard Mass Edit Reports, refer to Edit Scorecards 2.0 with Mass Edit Report.
-
Migrate Import Lookup Configurations with Rules: Previously, Admins did not have the ability to migrate import lookup configurations as part of a rule migration, and had to manually set up the configurations in the target org. This defeated the purpose of the migration, as the setup was already tested in the source org, and then had to be tested again on the target org. Now that migrating import lookup configurations is supported as part of rule migration, Admins do not have to spend time manually setting up configurations or testing them a second time.
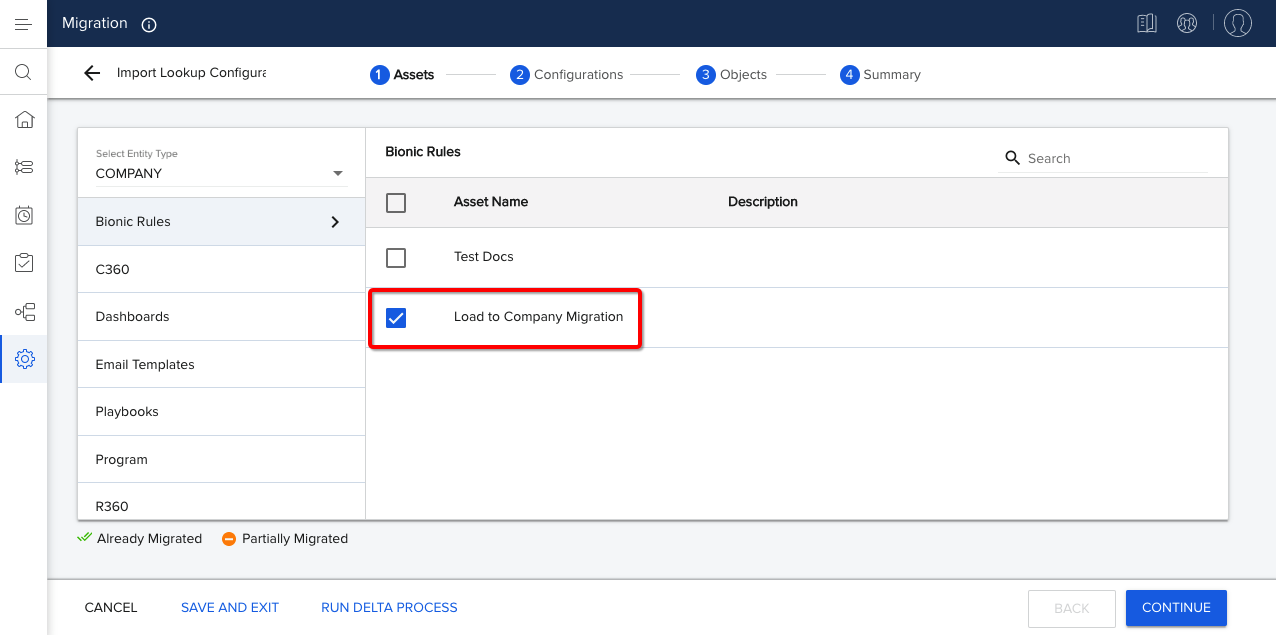
Lookup configurations are part of the Setup Action step of a rule when Load to Company is set as the rule’s action.
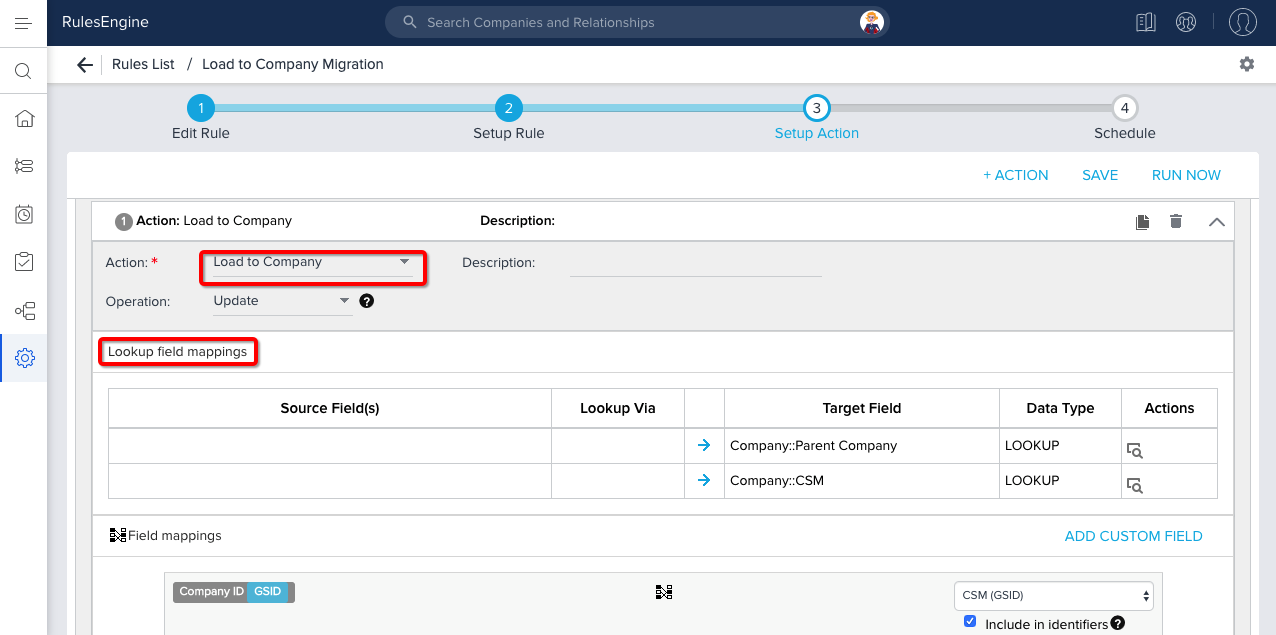
For more information on configuring Lookup field mappings, refer to Load to Company section of the Setup Rule Action Types article.
-
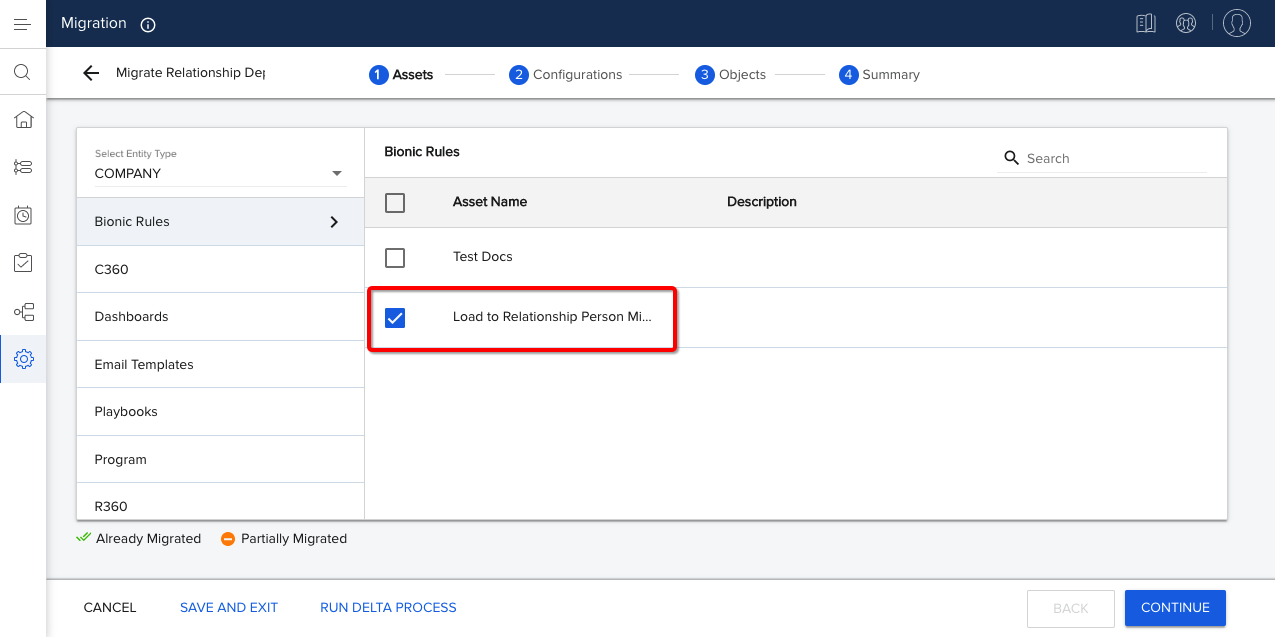
Migrate Relationship Types with dependent assets: Previously, when migrating assets dependent on Relationship types, it was not possible to migrate Relationship type with the asset. Now admins can migrate Relationship types implicitly along with a dependent asset, such as a rule. The relationship type on which the asset is dependent is migrated automatically along with the original asset being migrated.
Only the relationship type name will be migrated with the asset. Any objects and layouts associated with the relationship type are not migrated. It is not possible to explicitly migrate Relationship Types, along with any associated objects and rules, at this time.
Rules with the following action types can be successfully migrated for Gainsight NXT:
- Load to Company
- Load to Relationship V2
- Load to Company Person
- Load to Relationship Person
-
Ability to Migrate Activity types: You can now migrate Timeline Activity types and Milestone types from a source org to a target org. When you migrate an activity type, the associated layout is also migrated. If you modify the Activity type after migration, only the updated layout configuration of that Activity Type is migrated during subsequent migrations. You can view the Activity Type in the Configurations page.
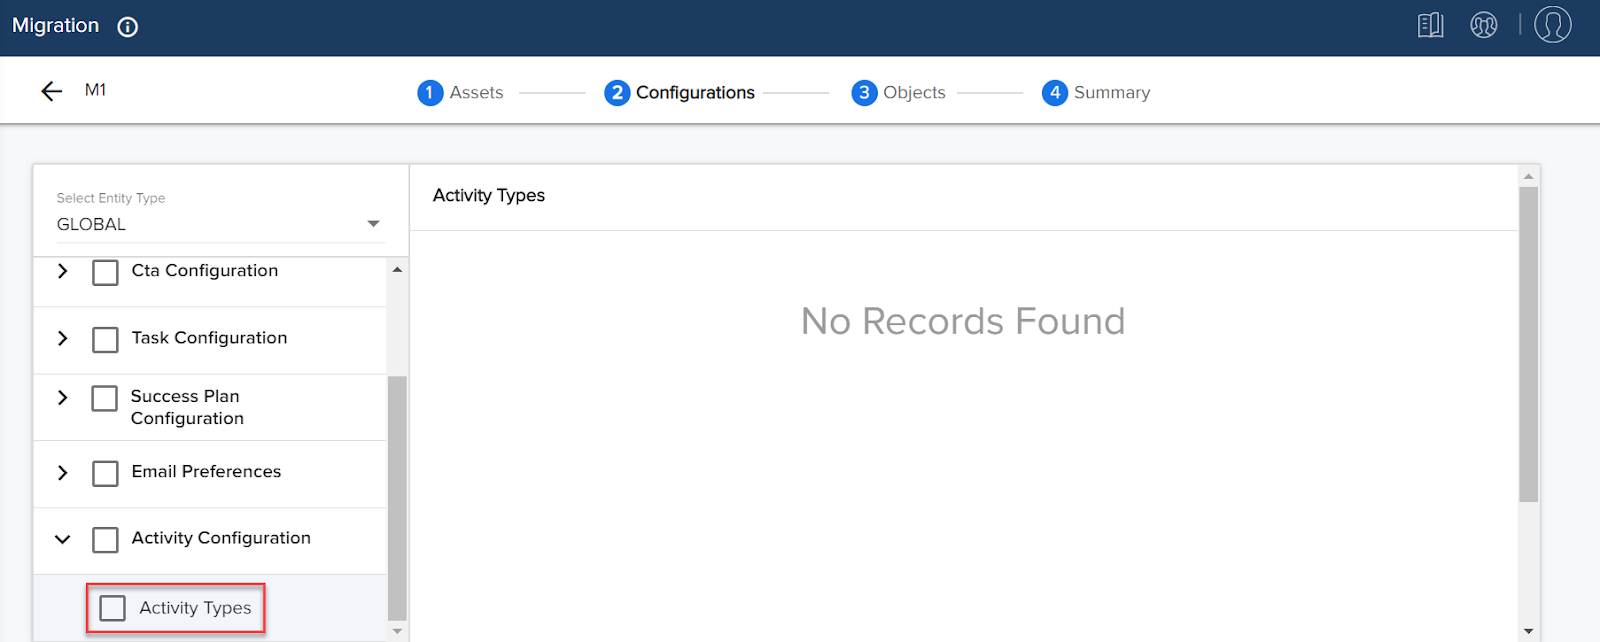
For a detailed step by step procedure, refer to the Migrate Activity types article.
-
Ability to Migrate Activity types and Activities sync configuration: You can now migrate Timeline Activity types and sync configuration, from a source org to a target org.
When you migrate an activity type, the associated layout is also migrated. If you modify the Activity type after migration, only the updated layout configuration of that Activity Type is migrated during subsequent migrations.
When you migrate Activity Sync configuration, the Salesforce Status and Salesforce Priority fields, along with the field mappings are migrated.
Sally in Gainsight Application
Sally is an AI-powered bot that enables interaction with Gainsight data and functionality within a user’s favorite channels. Sally allows you to ask diverse questions about your customers, receive Gainsight notifications, update customer data and gain insight into risks and opportunities. Sally’s Natural Language Processing makes rich Gainsight data easily accessible through simple conversation and her machine-learning technology helps her get smarter with each interaction.
-
Renewal Date Intent Support in In-App and Slack Sally Channels: You can now use the Renewal Date intent, from the Select a Suggestion dropdown list, to view the renewal date of a company. This retrieves the information from the renewal date field in the Company Standard object.

Surveys
With Surveys, you can create highly customized surveys that capture customer insights and transform them into actionable next steps for your organization. You can easily create multi-page surveys with a variety of question types, including multiple choice, matrix, and a standard NPS® question type. Surveys gives admins the ability to design and distribute surveys in Gainsight without a dependency on sites or features.
(Note: The following enhancement was added in the 6.3.4 hotfix release on June 07, 2019.)
- Ability to compute the True NPS® for the Survey NPS® Survey Response: Gainsight created a new field called True NPS® in the NPS® Survey Response Object. True NPS® field stores the value 100 (Promoter) / 0 (Passive) / -100 (Detractor) for the NPS® response. Admins can now build reports using this field to average the values of this field to compute the True NPS® categorized by Participant/Company attributes. For more information on how to calculate True NPS®, refer to Calculation of True NPS® on Survey Responses article.
Business Use case:
For instance, if you sent an NPS® Survey to different participants handled by different CSMs, you might want to report the True NPS® by CSM to determine the positive or negative trend of NPS® responses. You can achieve this by below steps.
To achieve this in a report:- Navigate to Administration > Analytics > Report Builder.
- Click + REPORT to create a new report.
- Select the NPS® Survey Response as the source object.
- Add the True NPS® field to Show me section.
- Click the Settings/Gear icon and select Average from the Aggregation dropdown list.
- Add the CSM Name field to By section.
- Click RUN to see the records in the report.
You can also add this report to a dashboard and apply a global filter to view by customer region. For more information on Global Filters, refer Global Filters for Dashboard.
| NPS, Net Promoter, and Net Promoter Score are registered trademarks of Satmetrix Systems, Inc., Bain & Company and Fred Reichheld. |