Gainsight PX Connector
Gainsight NXT
| IMPORTANT: Gainsight is upgrading Connectors 2.0 with Horizon Experience. This article applies to tenants which have been upgraded to the Horizon Experience for Connectors 2.0. If you are using Connectors 2.0 with the previous version, you can find the documentation here. |
This article explains how to create a connection between Gainsight CS and Gainsight PX org. After a connection is established, Out Of the Box Jobs will be created, and you can Configure Job or Job Chains in Gainsight. You can learn about Out Of the Box (OOB) Jobs and Job Chain provided by Gainsight for the PX integration.
Note: This document provides general guidance on creating a Connection, configuration of the OOB jobs. The business use case of each job is different and needs a unique configuration, for detailed information, refer to the Configuration of Connectors in the Additional Resource section at the end of this article.
Overview
Set up in-app messages and collect useful analytics from web applications with the help of Gainsight PX which is a premier tool of Gainsight.
Integrate PX with Gainsight by creating a connection from the Administration > Connectors 2.0 > Connections page. Gainsight provides OOB jobs to sync data such as Company and Company Person with Gainsight.
Benefits
- Get real-time insights of the data, advanced data visualization methods, and so on through Gainsight’s Adoption Explorer, when PX data is synced to Gainsight. For more information about Gainsight Adoption Explorer, refer to the Adoption Explorer Overview article in the Additional Resources section.
- Gainsight integrates Journey Orchestrator (JO) with Gainsight PX. You can trigger PX in-app engagements from Programs and take action based on the engagements events in Programs. You can analyze and measure the Program and Engagement activities. Following are a few sample business use cases for the JO+PX integration feature:
- While On-boarding a new customer, Admins sends a ‘Welcome Email’ with a walkthrough of the CS application using PX in-app engagement.
- After a new release, a PX engagement containing release video is triggered from JO > Program.
- CS admin sends an in-app Net Promoter Score (NPS®) survey and if not responded then an email reminder is sent.
- Support team sends an in-app CSAT survey after a support ticket is closed.
To configure the PX connection, perform the following steps:
- Create Connection: Establishes a connection between Gainsight CS and PX org.
- (Optional) Configure OOB Jobs: Admins can modify the out of the box configurations in the OOB jobs.
Create a Connection
An API secret key is required to create a connection to PX from Gainsight CS. The key is generated from the PX org and shared by Gainsight PX admin. Only one connection can be created at any given point of time, in the PX connector.
To create a connection:
- Navigate to Administration > Connectors 2.0 > Connections.
- Click Create Connection. The Create Connection dialog appears.
- From the Connector dropdown list, select Gainsight PX.
- Perform the following actions:
- Name of Connection.
- URL: Enter the URL based on your tenant location ( US or EU)
- For US: https://api.aptrinsic.com/v1/
- For EU: https://api-eu.aptrinsic.com/v1/
- API Secret Key: Enter the API secret key of the PX org that you want to establish a connection with.
Note: The REST API key is the API secret key of the Gainsight PX org. REST API key in PX can be created by navigating to the Settings > REST API section in Gainsight PX. Contact your Gainsight PX admin to get the API secret key.
- (Optional) Multi-Instance: Toggle the switch ON to connect your Gainsight CS org with multiple accounts in the PX source org. For example, you might have a customer named ABC who has a single record in Gainsight CS but has multiple accounts in PX named ABC Systems, ABC Electric, etc. (where one PX USER belongs to one PX Account only). In the Gainsight CS, enable the Instance level checkbox in the Adoption Explorer project to consider all these PX accounts as instances.
- (Optional) Test Connection: Click Test Connection to check if the entered API key is correct.
- Click Save. A connection successful dialog appears.
- Click Done. (or)
- Click View Jobs to navigate to the Jobs page.
Note: For more information on the endpoint URLs for different data centers, refer to the Gainsight PX Rest API.
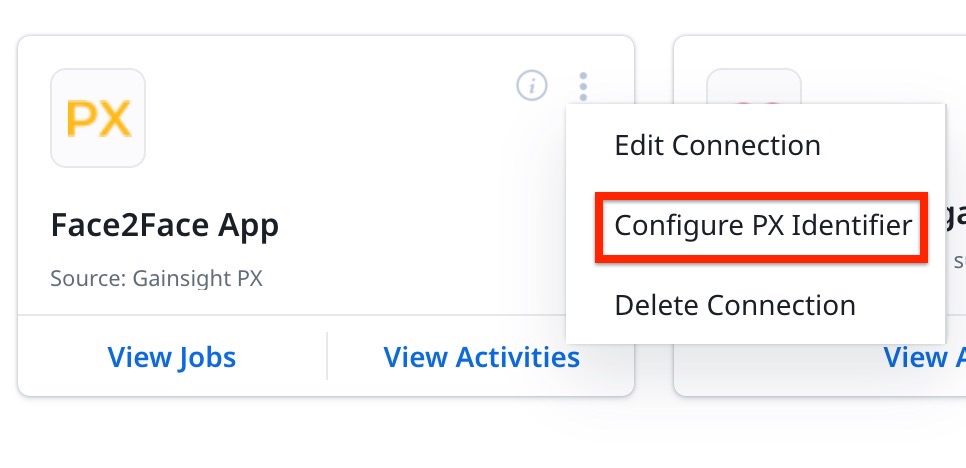
Context Menu
Once the connection is established, configure the connection with one of the following Context menu options:
- Edit Connection: Use this option to modify the PX connector details.
- Delete Connection: Use this option to delete the connection, if the associated Job Chains and data jobs are deleted.
- Configure PX Identifier: Use this option to configure Company or Relationship identifiers from PX.
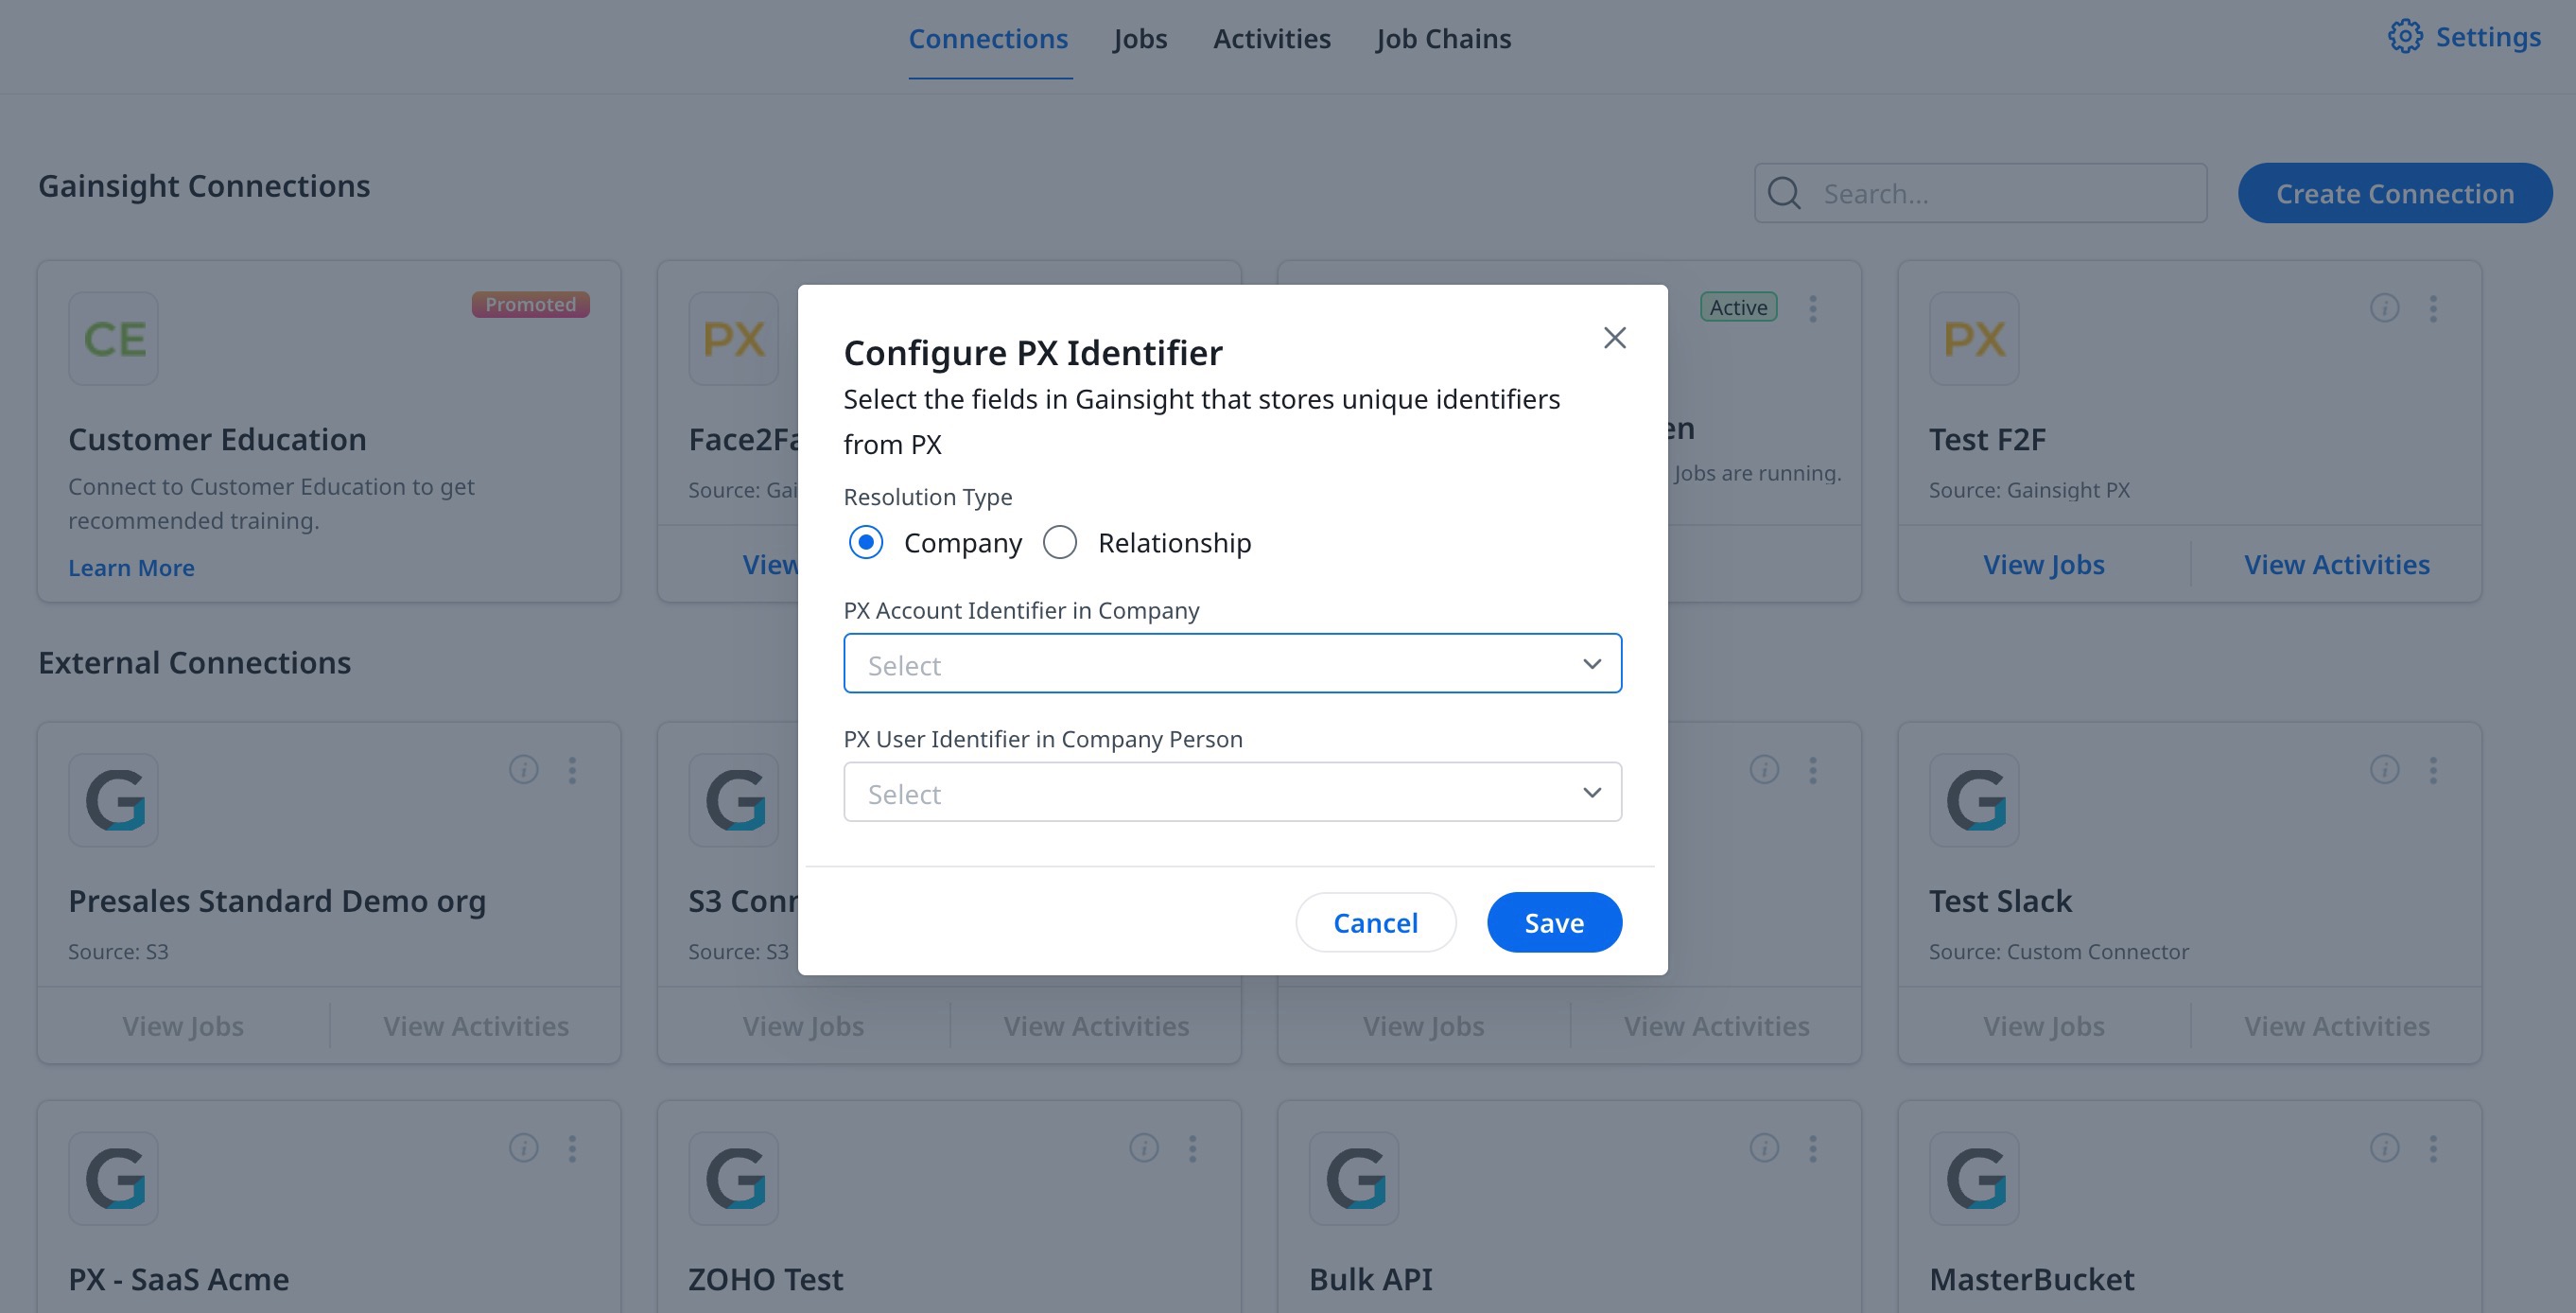
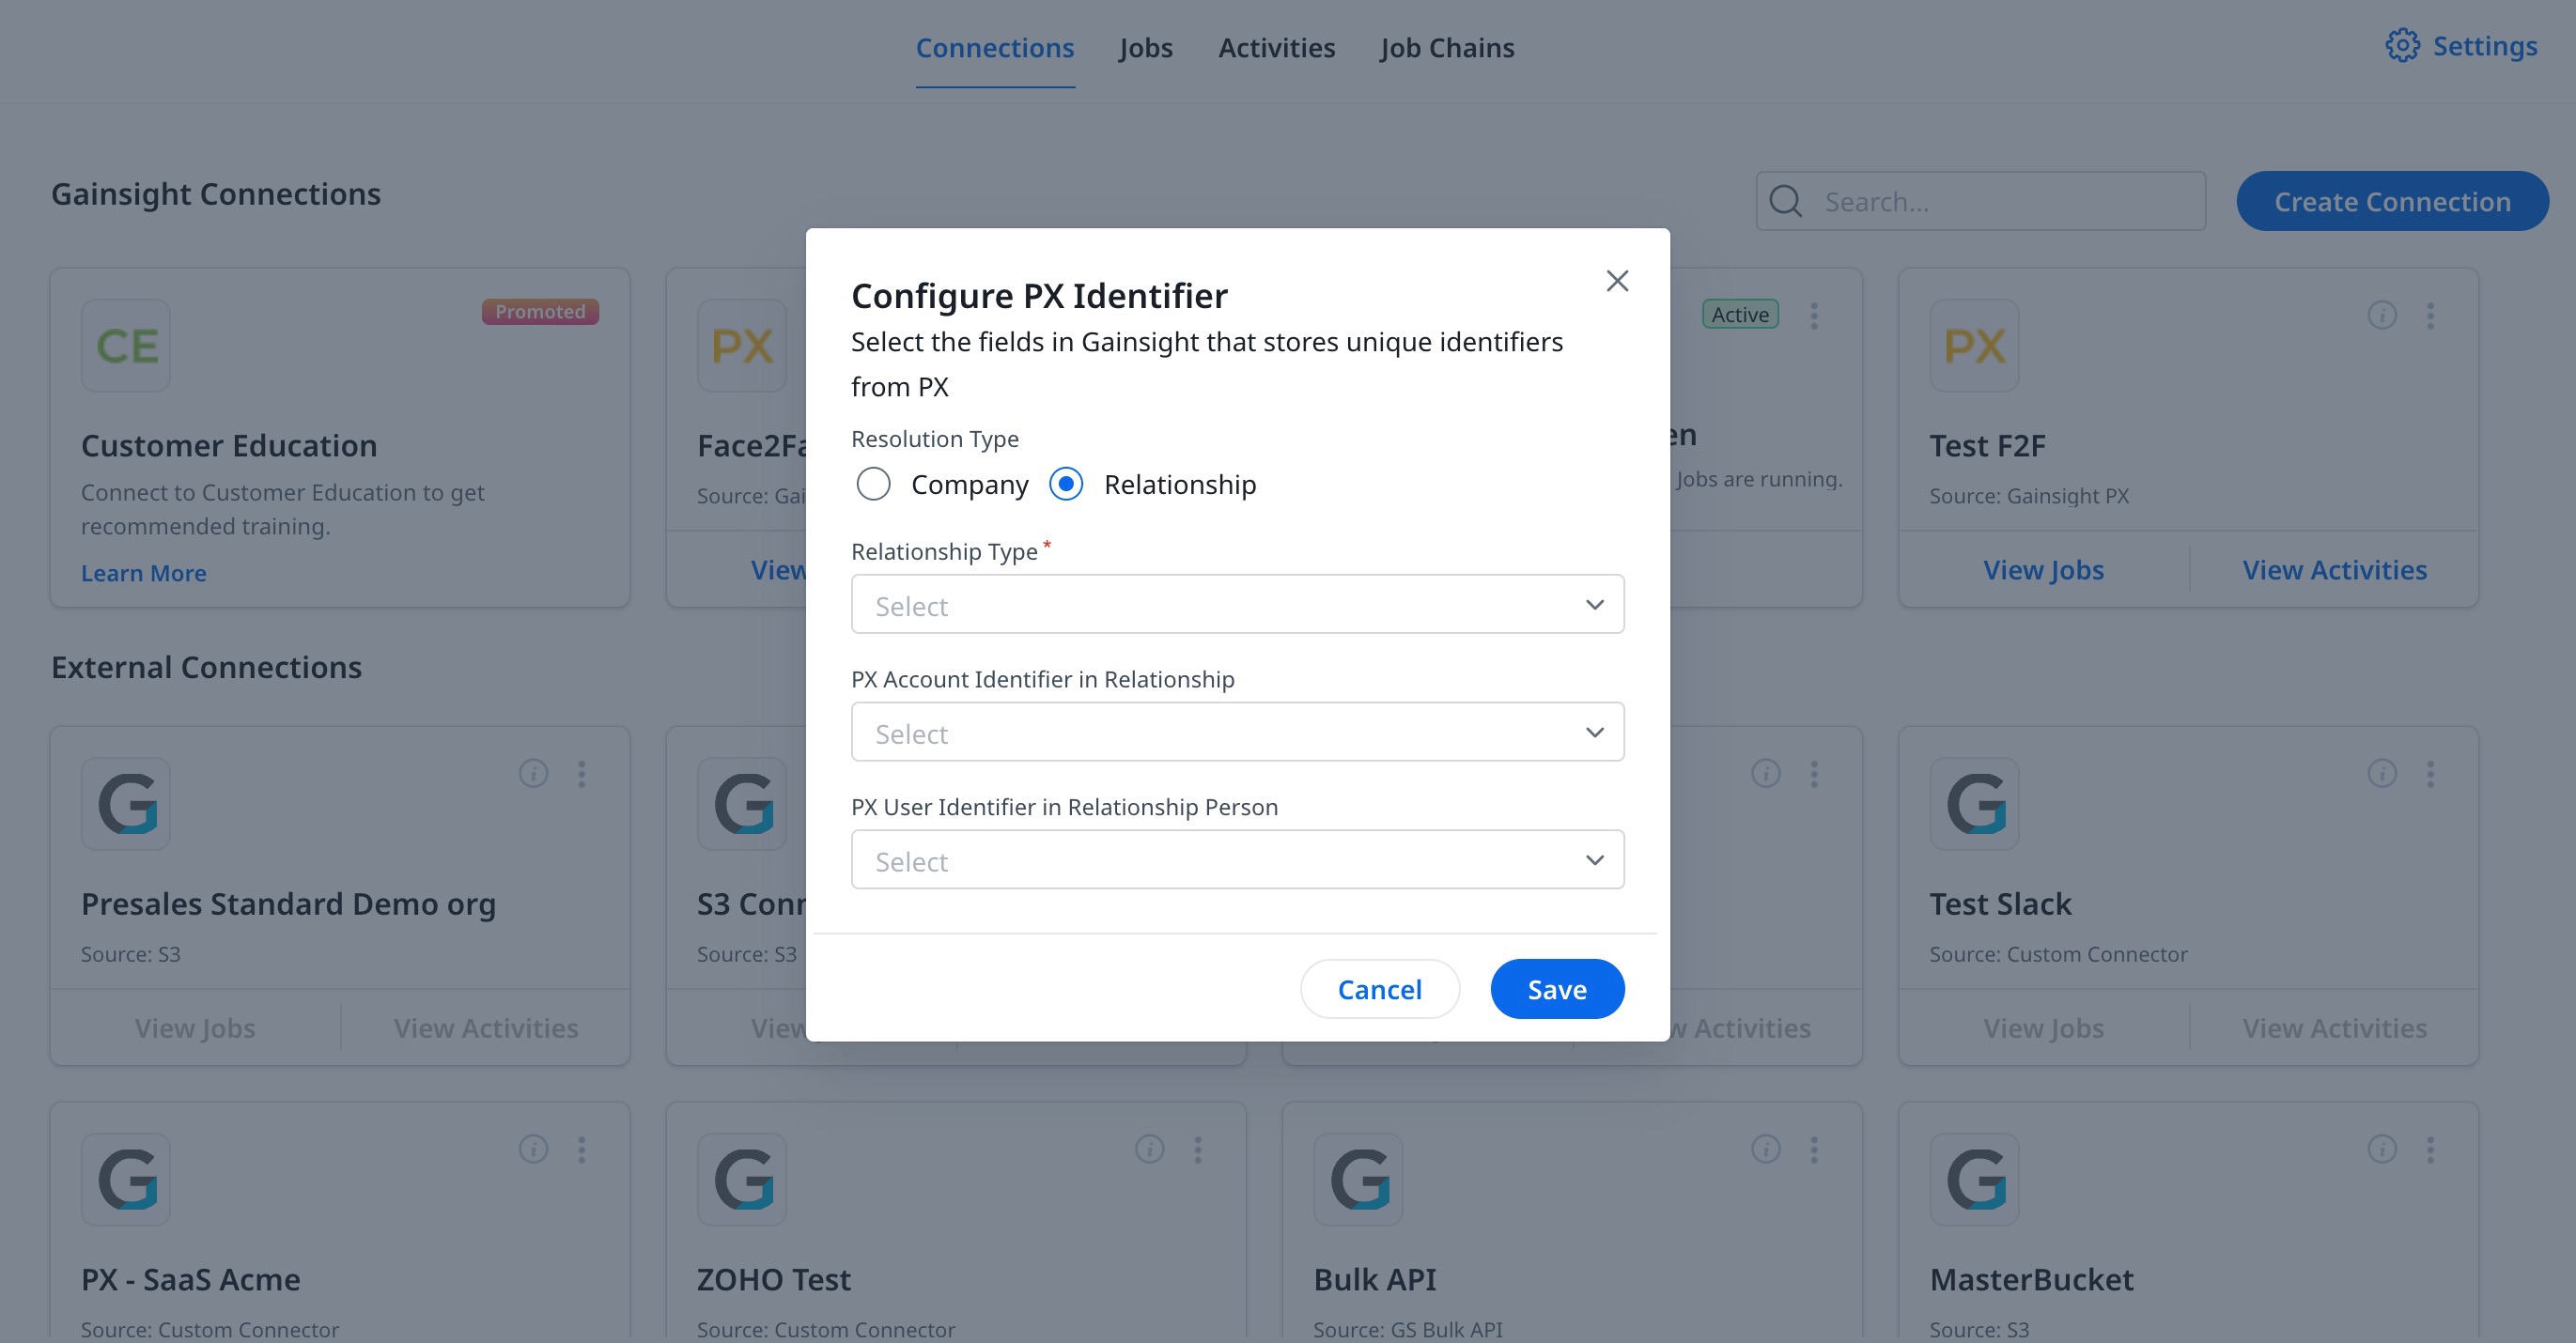
Configure PX Identifier
You can select the fields in Gainsight that store unique identifiers of records coming from PX. You can select identifiers based on Company or Relationship Model.
To configure the identifier:
- Click the three vertical dots menu.
- Select Configure PX Identifier. The Configure PX Identifier dialog appears.
- Select Resolution Type:
- Company: Select this option if your Gainsight CS model is based on Company:
- PX Account Identifier in Company: Select the field within the Company object in Gainsight CS that holds the PX account identifier.
- PX User Identifier in Company Person: Select the appropriate field from the Company Person object that contains the PX person identifier.
- Company: Select this option if your Gainsight CS model is based on Company:
- Relationship: Select this option if your Gainsight CS model is based on Relationship:
- Relationship Type: Select the type of relationship.
- PX Account Identifier in Relationship: Select the field within the Relationship object that holds the PX account identifier.
- PX User Identifier in Relationship Person: Select the field from the Relationship Person object that stores the PX contact identifier.
Out of the Box Jobs
After the PX connection is successfully established, Gainsight provides two OOB jobs in the Jobs page to sync important data such as Accounts and Users, which are required for the assessments of data in Gainsight. The following are the OOB Jobs and their mapping details.
- Company Sync: This job syncs PX Accounts with the Gainsight Companies.
- Company Person Sync: This job syncs PX users with Gainsight Person and Company Person objects.
Note: Custom data sync jobs in Gainsight PX cannot be created.
Company Sync Job
The Company Sync job syncs data from the Gainsight PX Account object to the Gainsight Company object. This job is named as Company Sync_Connection Name (here Company Sync_Gainsight PX Connector).
In the Company Sync OOB job, the following configurations are provided out of the box:
- Gainsight_PX_account object is selected as the source object in the dataset preparation and the following source fields are selected.
- Gainsight Company is selected as the target object and PX source fields are mapped with the Gainsight target fields through the Add to Destination configuration.
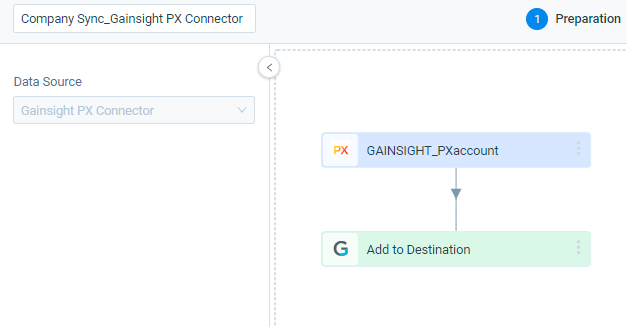
By default, there are three field mappings provided in this data sync job. Either use an existing mapping as the Upsert key or manually configure a new mapping and set it as the Upsert key.
Note: Without configuring the Upsert key you cannot schedule or execute the job.
The following table lists all the fields and the Direct Mappings available in the Add to Destination section.
| Source Fields | Target Fields |
|---|---|
| Name | Name |
| Number of users | Number of users |
| Id | PX Account ID |
Notes:
- Map custom PX fields to any standard or custom fields in the Gainsight object.
- No derived mappings are provided out of the box. You can configure any new derived mappings as required.
Company Person Sync Job
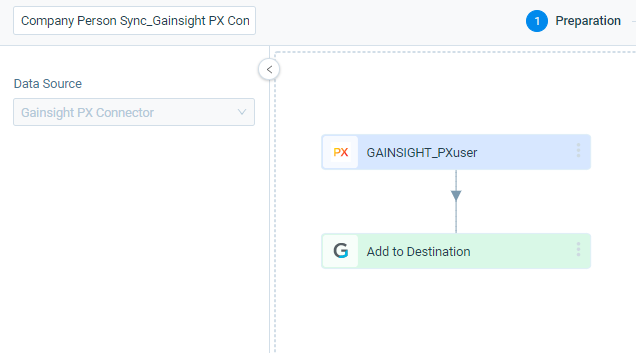
The Company Person Sync job syncs data from the User object in Gainsight PX to the Company object in the Gainsight. This job is named as Company Person Sync_Connection Name (here Company Person Sync_Gainsight PX Connector).
In the Company Person Sync OOB job, the following configurations are provided out of the box.
- Gainsight_PXuser object is selected as the source object in the dataset preparation and the following source fields are selected. A filter is added to sync users with email IDs from PX org with Gainsight.
Note: In PX, we do not offer support for filters on lookup fields originating from the source object. Consequently, such filters are not accessible within the filter section.
- Gainsight Person and Company Person objects are selected as the target objects and PX source fields are mapped with the Gainsight target fields through the Add to Destination configuration.
Note: The Match Criteria or Resolution key will be set as identifier.
The following are the fields and the Direct Mapping in the Add to Destination.
| Source Fields | Target Fields |
|---|---|
| Email (Person) | |
| First name | First Name (Person) |
| Last Name | Last Name (Person) |
| Sign up date | Sign up date (Company Person) |
| aptrinsicId | PX User Id |
Upsert keys for the mapping between Gainsight PX User object and Gainsight Person object are determined by the Person Resolution Key configuration. Fields selected in the Person Resolution Key configuration must be selected as Upsert Keys in the Company Person Sync Job > Field Mappings section.
There can be one or multiple upsert keys used for the identification of people in Gainsight and you cannot edit them. For more information on the Person Resolution Key configuration, refer to the People Management in the Additional Resource section at the end of this article.
Notes:
- Upsert keys must be mapped in the Field Mappings section. If they are not mapped, the data sync job fails.
- Map the custom PX fields to any standard or custom fields in the Gainsight objects.
Derived Mapping
Populate GSID values by configuring the Derived Mappings section. By default, a Derived Mapping is configured to populate GSID values into the Company ID field of the Company Person object. This mapping is configured by matching the Account id field of the Account object in PX with the PX Account ID field in Gainsight Company object.
The following table lists the configurations for OOB derived mappings:
| Fields | Values |
|---|---|
| Source Field | Account ID |
| Select the intermediate object. | Company |
| Gainsight Field | Company ID |
| Field in Intermediate Object | PX Account ID |
| When Multiple Matches Occur | Mark record with error |
| When No Matches Are Found | Reject Record |
Configure OOB Jobs
You can configure the Schedule of the OOB jobs as required. For more information, refer to the Configure Job or Job Chain Schedule in the Additional Resource section at the end of this article.
If you configure the schedule of the OOB Job Chain, the schedule of the individual jobs is not honored.
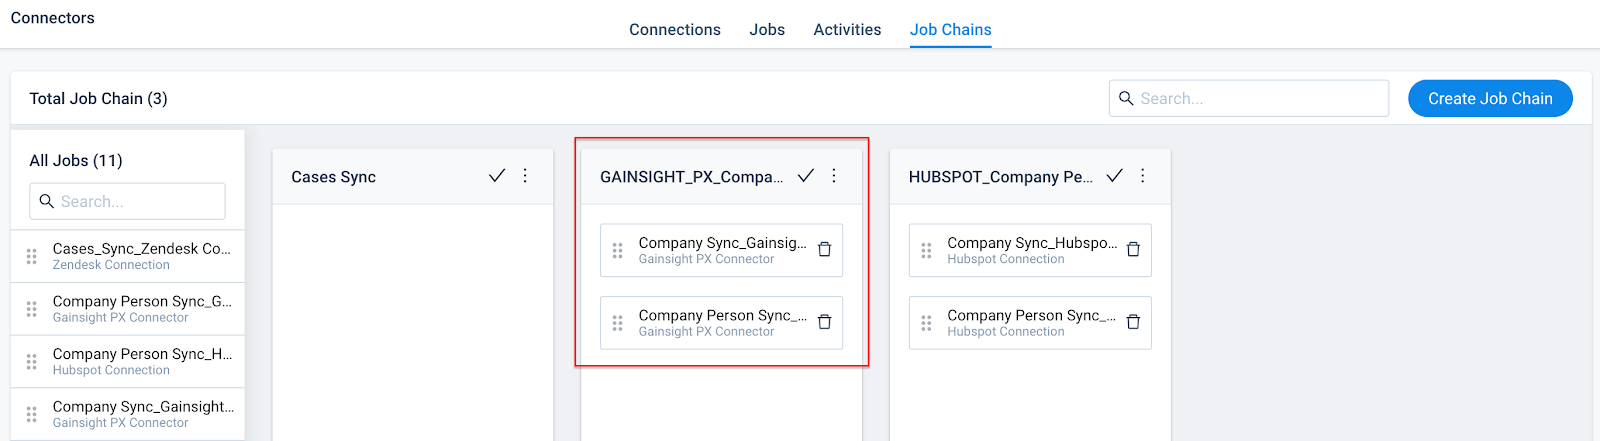
Configure OOB Job Chain
Gainsight offers an OOB Job Chain Gainsight_PX_Company Person Sync for the OOB jobs. This job chain has the following OOB jobs in the following sequence:
- Company Sync
- Company Person Sync
This chain is provided as the Company Person Sync job is dependent on the Company Sync job. You can configure the schedule of this Job Chain as required.
You can create a custom Job Chain on the OOB and schedule as required. For more information, refer to the Job Chain Page and Configure Job or Job Chain Schedule in the Additional Resource section at the end of this article.
Job Activities
You can view the Execution and Update Activities of all the data jobs in the Activity page. You can also download the error logs of the jobs from this page. For more information, refer to the Activity Page in the Additional Resource section at the end of this article.
Create Multiple PX Connections
If you own multiple PX subscriptions for your products, then you can configure multiple PX connections in your Gainsight CS instance. Admins can follow the same procedure as described in the previous section to achieve this.
Notes:
- The API Secret Key in each connection should correspond to a relevant subscription.
- The out-of-the-box jobs are not configured for the additional PX connections. They are available only for the primary PX connection.
For more information on this, refer to the Configure Multiple PX Connections in CS article in the Additional Resources section.
Additional Resources
For more information about Connectors, refer to the following articles: