What's New in Data Management Horizon Experience
Gainsight NXT
This article provides a quick overview of the new capabilities, design improvements, and changes that you will observe in the new Data Management Horizon Experience.
| IMPORTANT: The old version of Data Management will be removed on May 02, 2022. |
Newly Added Functionalities
Gainsight has redesigned the Data Management, powered by Gainsight Horizon Experience. The new Data Management feature is simplified from its earlier version to improve the user experience. We have added new enhancements, enhanced existing functionalities to simplify creating or editing an Object, field, or Dropdown list.
The following are the new functionalities and improvements:
Summary Ribbon
We have added a new summary ribbon at the top in the Data Management page. This ribbon displays the following information about your tenant:
- Low Volume Objects:
- Total number of Low Volume objects
- Maximum limit of Low Volume objects
- Percentage of utilized Low Volume objects
- Number of Custom objects
- Number of Standard objects
- Total size of data in the tenant

Seamless Object Creation Flow
Gainsight has simplified object creation flow and made it more intuitive. You can create, add, or delete fields in the object in the same flow.
To create an Object:
- Navigate to Administration > Customer Data > Data Management (BETA) > Objects tab.
- Click Create Object. The Create Object page is displayed.
- In the Object Informations step, enter information or select options in the respective fields as explained in the following table:
| Fields | Description |
|
Object Display Name |
A unique name for the object. |
| Object Name | Object Name is auto-generated with a suffix of __gc (), based on the Object Display name you have entered. Object name cannot be modified later. |
| Description | A brief description of the object. |
|
Object Type |
Select one of the below options:
|
- Click Next. The Fields section is displayed.
In the Fields section, you can add the fields by the following two methods:
- Upload CSV file
- Drag-and-drop fields
Upload CSV file
You can upload a CSV file containing field details from your local system.
To add fields through CSV file:
- Click browse to select a file with the schema (fields) information. Admins can edit the fields and the data types in the CSV file as per the requirement.
Note: The CSV file size should be less than or equal to 1 MB. - Click Save.
Drag and drop fields
You can drag and drop fields from the Data Type pane to the Fields pane to add them into the object.
Note: While adding a dropdown type field, you can create a new dropdown, if required.
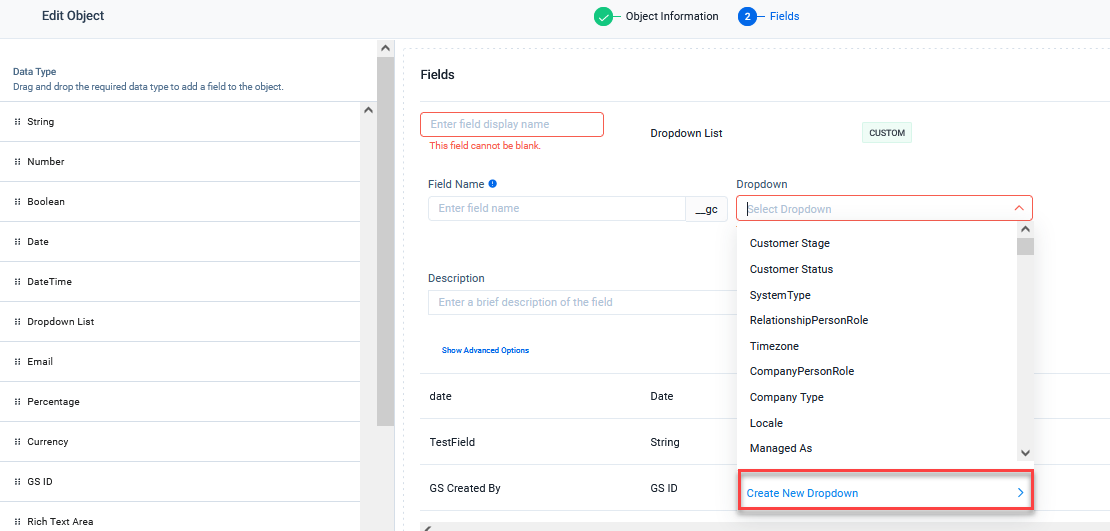
To add a field through drag and drop method:
- Drag and drop the required data type from the Object pane to the Fields pane.
- In the Display Name field, enter a unique name of the field.
- (Optional) In the Default Value field, enter a default value of the field.
- Click Save.
Review Changes
When you edit fields information, you can review all the changes made before saving the information.
To edit and review changes made to fields:
- Navigate to Administration > Customer Data > Data Management (BETA) > Objects tab.
- Click the three vertical dots menu of the Object and select View Field.
- Click Add or Edit Field. The Edit Object page is displayed.
- Expand the field which you want to edit.
- Modify the fields as required.
Note: You can modify more than one field and review all changes at once.
- Click Review Changes. The Review Changes window is displayed with all the updated fields information.
- Click Back.
Note: This action does not cancel your changes but navigates you to the Edit Object page.
- Click Save.
Apply Enhanced Filters and Save it as Custom View
Admins can use filters to group objects into functional groups, in order to better organize them. After applying filters in the objects tab, they can add it as a Custom View in the View list. They can also filter Dropdowns and Activities as per their requirements.
Note: Filters are preserved when a user toggles between the tabs in Data Management.
To filter the objects based on the volume and save them as a Custom View:
- Navigate to Administration > Customer Data > Data Management (BETA) > Objects tab.
- Click the Filter icon.
- Click the Edit filters. The Edit Filters page is displayed.
- From the Field dropdown, select Data Volume.
- From the Operator dropdown, select Includes.
- From the Value dropdown, select Low.
- Click Apply. The filter changes are applied.
- Click Save.
- Click Save As. The Create View page is displayed.
- In the View Name field, enter a unique name of the view.
- Click Create View. The custom view is added to the View list.
Object View List
Users can select Standard Views (All/Custom/Standard/System objects) or Custom Views (views created by users) from the Object View list in the Data Management > Objects tab.
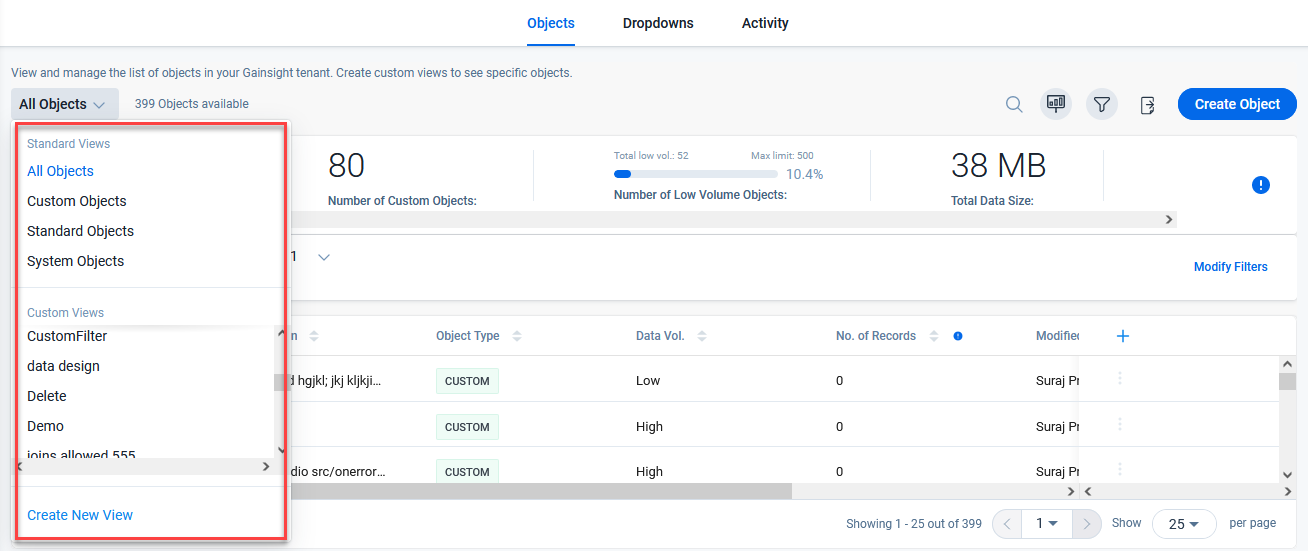
The Standard Views contains the following list as explained in the below table:
| List | Description |
| All Objects | This view displays all the objects. |
| Custom Objects | This view displays all the custom objects. |
| Standard Objects | This view displays all the Standard objects. |
| System Object | This view displays all the System objects. |
Create Custom Views
You can create a custom view and add the objects as per your requirement. For example, create custom views to see only the objects whose data is utilized in the Gainsight features used in a company.
To create custom views:
- Navigate to Administration > Customer Data > Data Management (BETA) > Objects tab.
- Expand the Objects List View and select Create New View. The Create View page is displayed.
- In the View Name field, enter a unique name of the view.
- From the View Type dropdown, select any of the following methods to add the objects to be displayed in the View:
- Objects based on applied filters: The objects are dynamically fetched based on the filters you apply for the View.
- Manually selected objects: The list of objects in this type of View remains the same as per your selection.
Objects Based on Applied Filters
Admins can select the filter criteria based on the objects displayed in the custom View. For example, to filter the objects based on object type:
In the Filters section,
- From the Field dropdown, select Object Type.
- From the Operator dropdown, select Includes.
- From the Value dropdown, select Standard and System objects.
Note: Click + to add additional filter criteria and then update the logic as AND/OR as per your requirement.
- Click Create View.
Manually Selected Objects
Admins can manually select the objects that need to be displayed in the Custom View.
To manually add the objects:
- Select Manually selected objects.
- Drag and drop the required object from the Create View pane to the Selected Objects pane.
- Click Create View.
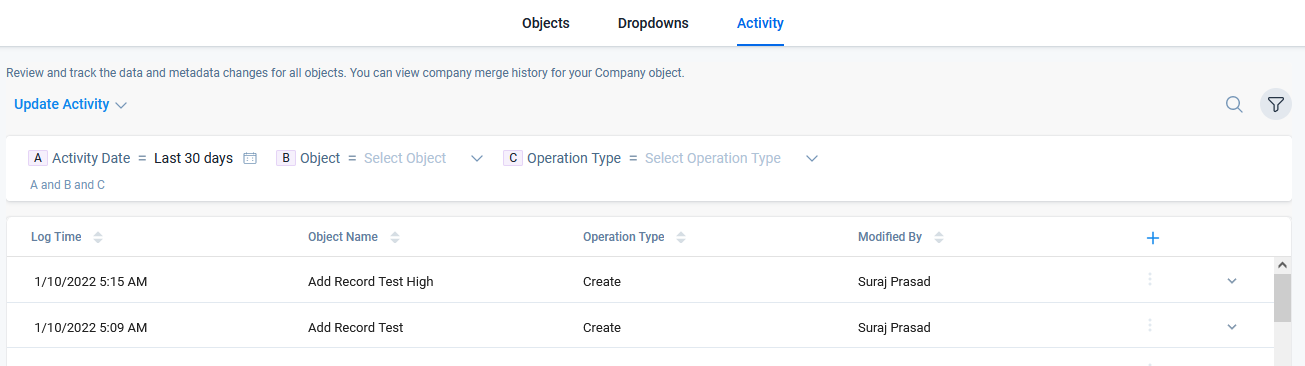
Activity Views
Admins can view the Update activities in the Activity tab.
Note: Admins can filter the activities by Activity Date, Object, and Operation Type.
Enhanced Search Capabilities
Admins have more options for searching objects, fields, dependencies, dropdowns,and activity logs. The following are the areas where search options are added/enhanced:
- Objects: Search objects by its name, description, or object type.
- Fields: Search field by name, description, data type and field type.
- Dependencies: Search dependencies by application name and field.
- Dropdown: Search dropdowns by name, type, description, and variant.
- Activities: Search activities by object name, update type, and modified by.
Enhancement in Dependencies
In the Dependencies tab, Admins can:
- View the Object or Object’s fields dependency from all the application areas in a single page with minimal mouse clicks.
- View the list of fields and the application’s name where those fields are used. They can click on the application’s name to directly go to the page where the field is used for configurations in Gainsight.
- Export the dependencies of objects in an Excel file from the Dependency tab to analyze the fields and view where they are used in Gainsight.
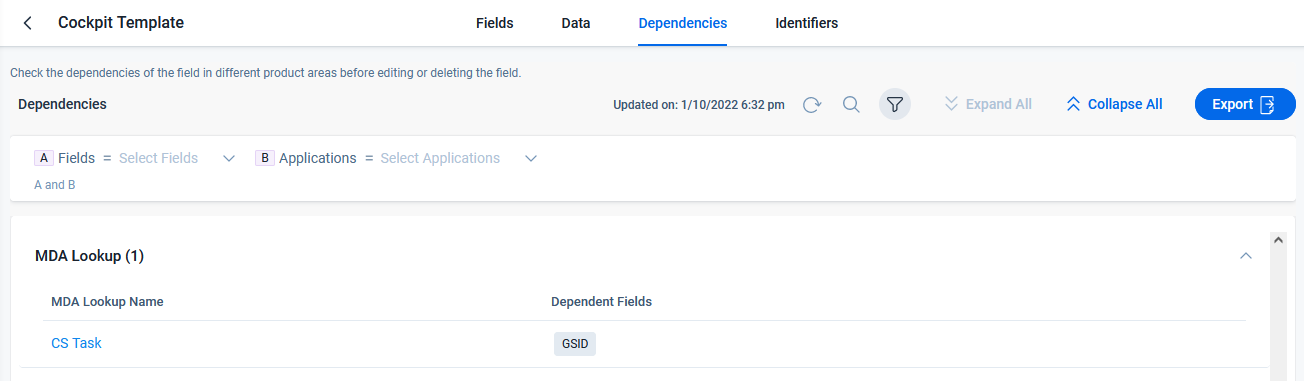
- Users can filter dependencies based on fields and/or applications in the Dependencies tab.
To filter dependencies of an Object:
- Navigate to Administration > Customer Data > Data Management (BETA) > Objects tab.
- Click the three vertical dots menu of the object and select View Dependencies. The Dependencies tab is displayed.
- Click the filter icon if not already selected.
- From the Fields dropdown, select the field(s).
- From the Applications dropdown, select the application(s). The dependencies details are displayed.
Enhancements in Activity Tab
Admins can Edit Objects or Field details directly from the Activities tab > Activity's context menu.
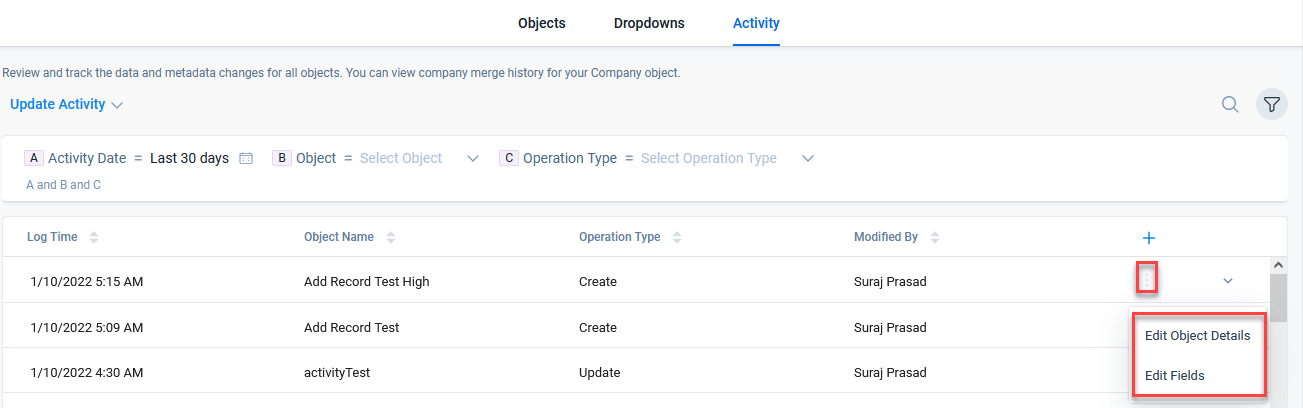
The new timeline view of activities on an object displays all the activity data in a concise manner.
To view the activities on an object:
- Navigate to Administration > Customer Data > Data Management (BETA) > Activities tab.
- Expand to view the activity details as explained in the following table:
| Fields | Description |
| Changes made to | Displays the Object/Field’s field name which is updated. |
| Operation Type | Displays whether the field is created or updated. |
| Old Value | Displays the old value of the field, if it is an existing field. |
| New Value | Displays the new value of the field. |
Enhancements in Dropdowns
Admins can create the Dropdown and its values in a more intuitive way. You can add values to a Dropdown List either manually or through a CSV file.
To create a Dropdown:
- Navigate to Administration > Customer Data > Data Management (BETA) > Dropdowns tab.
- Click Add Dropdown.
- Enter information or select the options as explained in the following table:
| Fields | Description |
| Dropdown Name | A name to identify the dropdown. |
| Description | A brief description of the dropdown. |
| Variant |
|
- Click Next. The Create Dropdown page is displayed.
You can add the values by the following two methods:
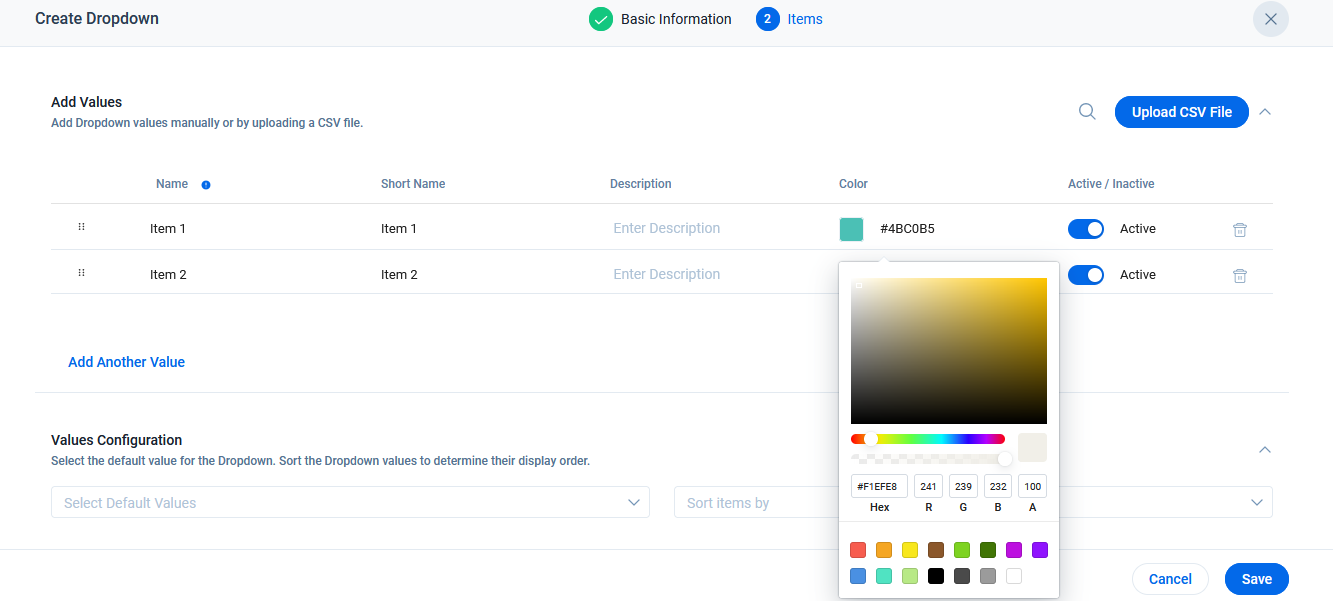
Manually Add Values
To manually add the Values in a dropdown list:
- In the Name field, enter a unique name.
- In the Short Name field, the name you enter in the previous field is auto populated, which is editable.
- In the Description field, enter a brief description.
- In the Color field, a unique color is auto populated for the Value but you can modify it as per your requirement.
- In the Active/Inactive field, turn ON/OFF the toggle to make the field active or inactive for selection in the dropdown list.
- Click Add Another Value to add more values.
Note: Click the Delete icon to delete the unwanted fields.
- In the Values Configuration,
- Select Default Values: Select a default value for the dropdown list which is auto populated, by default.
- Sort Items by: Select the order of the dropdown list, that is A to Z or Z to A.
- Click Save.
Add Values through a CSV file
Admins can create dropdown list items in bulk by uploading a valid CSV file that contains the list of items. The CSV file must contain the following headers:
- Name: This is a mandatory field and needs to be mapped with the source field.
- Description: Enter a brief description of the value.
- Short Name: Enter a short name for the value.
- Active/Inactive: Enter True or False for the status of the values.
- Color: Enter a hex color code for the color of values.
To add dropdown values in bulk using a CSV file:
- Click Upload CSV File. The Add Values via CSV file page is displayed.
- Click Browse and select the file from your system. The Field Mapping section is displayed.
- Select the source fields as explained in the following table:
| Source Field | Target Field |
| Name | Name |
| Short Name | Short Name |
| Description | Description |
| Active/Inactive | Active/Inactive |
| Color | Color |
- Click Upload CSV.
- While adding values to a Dropdown, drag and drop the dropdown values to sort them as per your preference.
- While creating dropdown values, unique colors can be added for each value. You can also add Hex color codes in the CSV file while creating dropdown values in bulk.
- Enhanced dependency creation flow of mapping controller dropdown and dependent dropdown, admins can see the already mapped fields for a controller dropdown, which makes it easier to select the unmapped fields.
To create Controller and Dependent Fields:
- Navigate to Administration > Customer Data > Data Management (BETA) > Dropdowns tab.
- Click the Dependencies tab.
- Click Add Dependencies.
- From the Controller dropdown, select the main dropdown.
- From the Dependent dropdown, select the dependent dropdown.
- From the Value Mapping section, select the required dependent values.
- Click Save.
Additional Resources
For more information on how to manage Gainsight data, refer to the following articles:
- Gainsight Matrix Data Architecture Overview
- Gainsight Data Management
- Data Import Lookup
- Dropdown List
- Basic Operations in Data Management
- Advanced Operations in Data Management
- Gainsight Objects
- MDA Joins
- Gainsight Company Object
- Gainsight User Object
- Gainsight Person Object Model
- Usage Data Overview
- Data Management Change Document
- What's New in Data Management Horizon Experience