Adoption Tracker
This article helps admins set up Adoption tracking in Customer Success.
Overview
Adoption Tracker is a powerful feature that enables product usage analytics in Gainsight Customer Success (CS). It facilitates a streamlined data flow, enhancing customer insights and engagement strategies.
The Adoption Tracker can be achieved with a single click setup - this simplifies the process, making it both efficient and user-friendly. To start tracking the usage data, admins need to add the Gainsight tag to their products and define how to identify their product users and accounts/customers. Navigate to the sections below to set up the Adoption Tracker and install the Gainsight Tag.
| IMPORTANT: Adoption Tracker is available as a paid add-on feature. For more pricing information, Gainsight recommends contacting your Gainsight Account Manager. |
|---|
Setup Adoption Tracker
The Adoption Tracker allows you to track data for up to three products. To add more products, Gainsight recommends reaching out to Gainsight support.
Admins need to set up a Adoption Tracker on Gainsight Customer Success (CS) to start tracking your product usage data.
- Navigate to Administration > Connectors 2.0.
- Click Track Product on the Adoption Tracker card.

- Click Configure. The Enter Product Details dialog appears.

- Enter the following details related to the product to be tracked:
- Name: Enter the name of the product.
- Product URL: Enter the URL of the product.
- (Optional) Description: Enter the description of the product.

- Click Start Tracking. The Adoption Tracker page appears.
Gainsight Tag
For every product that you want to track, a unique Gainsight Tag is created for these products. The Adoption Tracker page appears once the product details are added from the previous step. On this page, the admins can view the Gainsight Tag and also obtain information on the tag installation status.

To add the Gainsight tag to the product, developer assistance is required. You can send the pre-drafted email to your developer that includes instructions and explanations to add the Gainsight Tag along with the Identity Code. The Identify code helps identify your Users and Accounts thereby enabling to associate usage data with Users and Accounts.
To send the email:
- Click Email Code to Developer.
- Review the content and click Send Email.
In addition to emailing your developer, you can also Copy and paste the tag or snippet into a Slack msg or a ticketing tool for your developer.
Note: If you’re installing the Gainsight Tag, ensure that it is added to the <head> section of your web application as close to the opening <head> element as possible and below any dataLayer=[{...}] declarations.
Additionally, in your production web application, you’ll need to also push the correct user, and account details to Gainsight so that the events that are tracked (i.e. clicks, features, etc.) are associated with the correct user and account.
Note: User ID and Account ID are case-sensitive. Ensure to check and send them in the right format.

Email Code to Developer
******************************************************************
*** BEGIN SAMPLE EMAIL TO DEVELOPER TEAM ***
******************************************************************
Hi Dev Team,
We've signed up to use a new feature of Gainsight called “Adoption Tracker” that will allow us to track how our customers use our products. As part of their installation, we need to perform both of the below tasks:
Add the Gainsight Tag to our code to push our web app's events to Gainsight CS. Install the Gainsight Tag to the section of our web application, as close to the opening <head> element as possible and below any dataLayer=[{...}] declarations. Here is the tag to add to our production web application:
<!-- Gainsight Tag-->
<script type='text/javascript'>
(function(n,t,a,e,co){var i='aptrinsic';n[i]=n[i]||function(){
(n[i].q=n[i].q||[]).push(arguments)},n[i].p=e;n[i].c=co;
var r=t.createElement('script');r.async=!0,r.src=a+'?a='+e;
var c=t.getElementsByTagName('script')[0];c.parentNode.insertBefore(r,c)
})(window,document,'https://web-sdk-staging.aptrinsic.co...PZ2NUBH0Y63-2');
</script>
<!-- Gainsight Tag-->
In our production web app, we'll need to also push the correct user/account over to Gainsight so that we can associate the events that are tracked (i.e. clicks, features etc.) with the correct user/account. Please add the below javascript to the location where the authentication code takes place in our web app.
// Passing user and account objects:
aptrinsic('identify',
{
    // User Fields
    'id': 'unique-user-id', // Required for logged in app users
    'email': 'userEmail@address.com',
    'firstName': 'John',
    'lastName': 'Smith',
    'signUpDate': 1522697426479, //unix time in ms
},
{
    // Account Fields
    'id':'unique-account-id', //Required
    'name':'Acme Inc',
});
******************************************************************
*** END SAMPLE EMAIL TO DEVELOPER TEAM ***
******************************************************************
Verify Tag Installation
On successful installation of the tag, the Adoption Tracker product card status is updated to Awaiting Usage Data.

On receiving the usage data, the status updates to Active.

Exclude Specific Users from Tracking
Admins can also exclude specific users from being tracked. To exclude users, your developer must modify the Identify Code.
Please refer to the text if*(user email= ....) in the code snippet below, which is a change to our standard code.
******************************************************************
*** BEGIN SAMPLE CODE ***
******************************************************************
//passing user and account objects:
if*(user email= ....)
aptrinsic("identify",

{
    // User Fields
    'id': 'unique-user-id', // Required for logged in app users
    'email': 'userEmail@address.com',
    'firstName': 'John',
    'lastName': 'Smith',
    'signUpDate': 1522697426479, //unix time in ms
},
{
    // Account Fields
    'id':'unique-account-id', //Required
    'name':'Acme Inc',
});
******************************************************************
*** END SAMPLE CODE ***
******************************************************************
Map Product Features
To track usage data of specific features, Gainsight recommends defining and mapping your key product features. To do this, click Map Features.
IMPORTANT: Only 50 features per product can be mapped.

You are redirected to the application with an in-app product mapper displayed at the bottom of the screen, floating on top of your application.
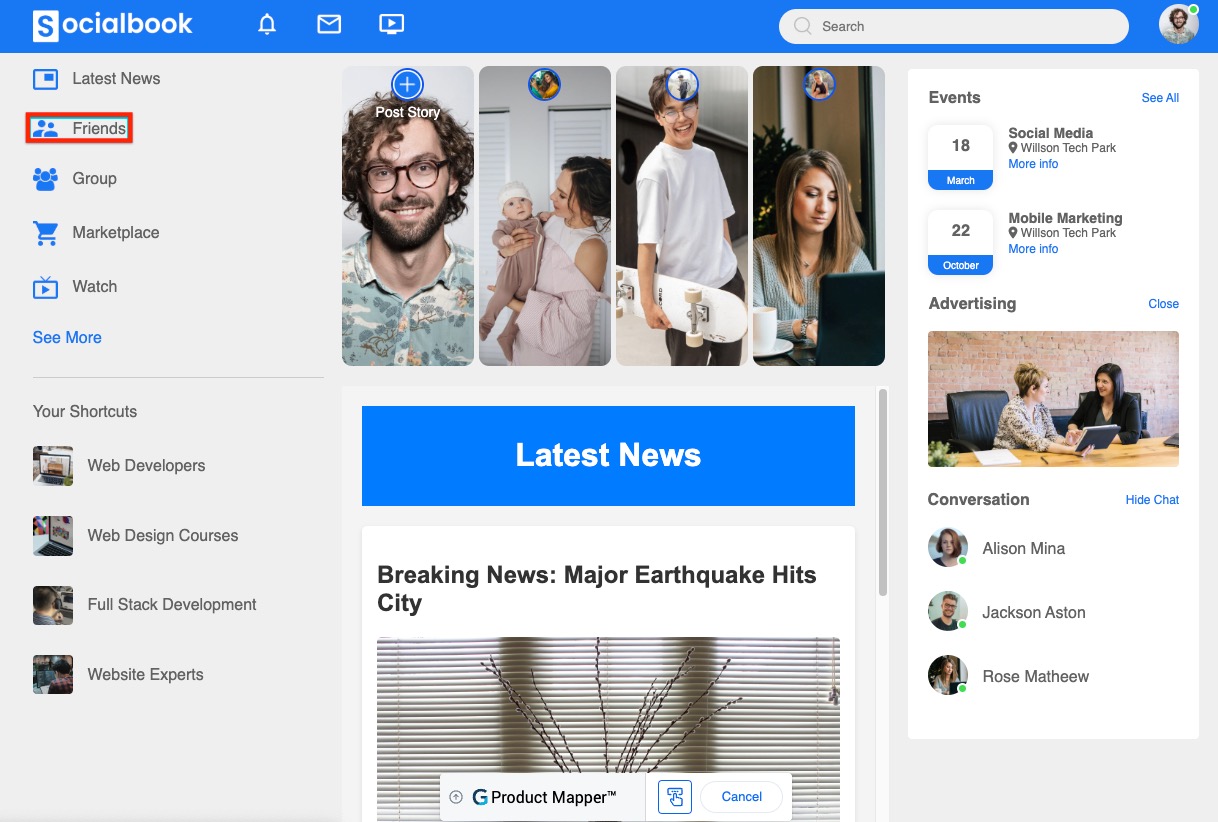
For demonstration purposes, the following demo application is used to demonstrate the process of identifying modules and features. Gainsight recommends applying the same process to your application.
Use Case: Socialbook is a fictional B2B SaaS Company that provides casual social networking for employees within a company or portfolio companies.

In-App Product Mapper helps you organize your product's features into a hierarchical tree structure directly on your application’s interface, for a seamless user experience. To instrument your product:
Add Modules
A Module in Product Mapper represents a module in your product which can be a section, tab, or window of your application. While modeling your product, use modules and sub-modules driven by the way you describe your product and the way the UI is built.
To create Modules:
- In the floating mapper, click the Add button and select Module.

- Enter the module name and press Enter. A new module is created.
- (Optional) To create nested modules, click the Edit icon of the parent module and select Add Module.

- Continue to add modules or sub-modules corresponding to sections of your application.

You can see that the application is modeled into a product tree. Collectively the modules and features form the product tree of the application.
Add Features
A feature in Product Mapper represents a feature in your product. Once you have added modules, you need to add features for each module or sub-module to track feature adoption. The In-App Mapper provides you with an easy click-and-tag experience to map UI elements and create features in Product Mapper.
While using the In-App Mapper, you can tag and create features using either of the following ways:
Add Feature to a Module
Adding a feature nested within a module helps you add multiple features of your product that may reside on the same page or section.
To add a feature:
- In the product tree, click the Edit icon of the parent module or sub-module.
- Click Add Feature.

- Enter the feature name and press Enter. A new feature is created.
- Continue to add features for modules or sub-modules corresponding to your application.
Add Rule as a Feature
Adding a rule directly as a feature allows you to create features that are not part of any module or sub-module, and have to be tagged independently. Such rules will be created at the parent level (level zero) of the feature tree.
Business Scenario Example: Consider you have a universal search present in the header of your application, and you wish to track each time the search box is clicked. Since the search box appears across your application, you may want to track it independently, without tagging to a specific module. For such a scenario, you can create a UI Element rule as a feature.

To add a rule as a feature:
- In the floating mapper, click the Add button and select the rule you wish to create. Ensure that there is no item selected in the product tree.
- Create and save the rule to add it as a feature in the tree. For more information on how to create rules, refer to the Add Rules section below.

Add Rules
Features consist of rules that are mapped to events from your application. The following are the types of rules you can use in a feature:
URL Rule
A URL rule is used to track the page view event. In a single-page application, this generates a page view event on URL change even if the page is not reloaded
To create a URL rule:
- In the product tree, select the feature in which you want to create the rule.
- In the floating mapper, click the Add button and select the URL Rule. For example, here URL Rule is applied to the Friend feature.

- In the Rule Name, enter a name for the rule.
- In the URL Details section, enter the URL of the page to be tracked. In this example, the URL of the Friends page is entered.
In the above example, whenever a user opens the above URL (accesses the Friend page), the rule is matched and the count of the Friends List page views is incremented by one.
- Quick Tip: Use Wildcards for multiple instances of a URL. Click to expand.
- You can use a Wildcard (*) to match multiple instances of a URL. Additionally, you can also use wildcards to match a rule. Consider a scenario in which you have multiple URLs for the Friend page (for instance, Friend/v1, Friend/v2, Friend/v, and so on), but all three URLs redirect to the same Friend page. In such cases, you can use the asterisk (*) wildcard to match all instances of the Friend URL as shown below:

In this case, the Friends List page view is incremented, irrespective of the URL used to access the page.
You can also use the wildcard at the beginning of the URL in case you have multiple instances of the URL.
- (Optional) Click + to add multiple URLs.
- In case of multiple rules, define the logic from the Operator field.
- Click Apply. The rule is created in the selected feature. Click Rules to view all rules created for the selected tree item.
UI Element Rule
The UI Element rule tracks the number of times a clickable UI element (such as a button) is clicked by matching against the DOM element using a unique CSS Selector. In-App Mapper allows you to click-and-tag UI elements to create accurate rules. This brings a unified rule-creation capability for CSS selectors and texts.
Create UI Element Rule
To create a UI Element rule:
- In the product tree, select the feature in which you want to create the rule.
- In the floating mapper, click the Add button and select UI Element Rule.
- Click the UI element you want to use for the rule.
- In the UI Element Rule window, enter a name for the rule.
- In the UI Element Details section, verify the CSS selector chosen based on the UI element clicked.

- (Optional) Click Show Advanced Selector Configurations if you wish to select a different CSS selector or enter a custom one.

- (Optional) Click Change Mapping if you wish to change the UI element tagged to the rule.
- Click Apply.
Create UI Element Rules with Text Matches
Additionally, you can use the Text Match option to create features with CSS plus text match along with the UI Element rule. This helps prevent applications with dynamic UI elements from experiencing CSS selector match issues and provides flexibility to map the unique elements faster.
To create a UI Element rule with text match:
- In the floating mapper, click the Add button and select UI Element Rule.
- Click the UI element you want to use for the rule.
- In the UI Element Rule window, enter a name for the rule.
- In the UI Element Details section, verify the CSS selector chosen based on the UI element clicked.
- (Optional) Click Show Advanced Selector Configurations if you wish to select a different CSS selector or enter a custom one.
- Enable the Text Match Details toggle switch.

- Select the logic identifier and enter the text to be matched.
- (Optional) Click Change Mapping if you wish to change the UI element tagged to the rule.
- Click Apply.
Note: The Modules and Features will start showing data from the time they are mapped and are not backfilled.
Remove Parts of the Product Feature Tree
Over time, certain modules, features, or rules in your product tree may become outdated or no longer relevant due to UI changes, product restructuring, or evolving instrumentation needs. Product Mapper allows you to delete such items directly, from both in-app as well as the manual experience.
You can delete a mapped item (module, feature, or rule) if it is no longer needed. For example, if a previously tracked button is removed from your application or a module was mapped in error, you can clean up your product tree accordingly.
- Navigate to the Product Feature Tree section in the in-app mapper.
- Click the Edit icon for the required module, sub-module, feature, or rule.
- Click Delete. The delete confirmation window appears. This is a permanent action and cannot be reversed.

- Click Yes to confirm deletion.

View Data Model
Once the Gainsight Tag is successfully added, the data flows into CS. To view the data, navigate to Administration > Adoption Tracker > click Data Model.

Import Usage Data
Usage data from your product is imported to CS using a set of standard objects populated by default. Gainsight provides the following standard objects:
| Standard Objects | Descriptions |
|---|---|
| Tracked Account | This object holds all the Accounts/Customers that are being tracked for usage. This object holds information about them along with some auto-populated information by the Adoption Tracker like Last Seen Date, Number of Visits, and Number of Users associated with the customer. |
| Tracked User | This Object holds information about Users associated with the Accounts/Customers that are being tracked for usage. This object holds information about Users along with some inferred data like inferred city, country, Timezone, etc along with auto-populated like Last Seen Date, Signup, and Number of Visits. |
| Tracked Account Product | This object holds information about the association of Accounts -Product along with First Visit and Last Seen date. |
| Tracked Account Product User | This object holds an association of User-Account-Product with its First Visit and Last Seen Date. |
| Account Usage Metrics | This object holds usage data at the Account level by the end of the day. This object has the usage metrics of 1 Day, 7 Day, 30 Day visits, #Feature Used Feature1, and #Feature Used Feature2 as captured at the end of the day. |
| Account Usage Metrics Snapshot | This object holds the Snapshot of the Account Usage Metrics data per Day up to 180 days. |
| User Usage Data | This object holds information about feature usage at an Account, User, and Feature granularity. |
To preview usage data:
- Click each object to view the associated fields and preview the fields' data. The fields are non-editable.
- Click Done.
Gainsight recommends previewing imported data to understand how these associations work in practice. This association is crucial for creating a cohesive customer profile, enhancing data accuracy, and enabling more effective customer engagement strategies.
After verifying the data, you can create reports on data available on users, accounts, and features. To create Reports, click Create Reports, you will be redirected to the Report Builder page.

Gainsight provides out-of-the-box (OOTB) dashboards called Adoption Summary for admins to get better insights on the data obtained or once the reports are created, admins can build dashboards for their specific purpose.
For more information on Adoption Summary, and Reports refer to the following articles:
ID Mapping
The default ID mapping is CRM ID/ SFDC Account ID for the account or customer records whereas it is SFDC Email ID for users.
Note: The ID mapping is successful only when the records match is more than 30%.
When the records match is less than 30%, the ID mapping fails. In such cases, an ID Mapping Failed message appears on the connectors page and needs to be addressed only after the objects’ data is fetched.

To resolve this, click Re-map ID. The Edit ID Mapping page appears. Perform the following mapping steps to achieve an association between CS and your product and click Save.
- Choose a Field to Identify Your Company: From the Company Field dropdown, select a field to match and click Evaluate.
- Choose a Field to Identify Your Users: From the Person dropdown, select a field to match and click Evaluate.
Manage Products in the Adoption Tracker
Admins can manage the products that are installed in Adoption Tracker. You can perform the following actions on the added products.
Edit and Delete Products
Products added for tracking might need some editing in terms of Name change, description or URL update. Admins can achieve this by editing the products.
Note: When editing a product URL, first remove the product tag from the old product to stop tracking and install it in the new product (updated URL) to start tracking.
To edit a product:
- Navigate to Administration > Connectors 2.0.
- Click View Products. The Adoption Tracking page appears.
- Hover over the product slot, and the Edit icon appears.

- Click the Pencil icon to edit. The Edit Product Details window appears.

- Click Save once the changes are made.
To delete a product:
Note: Deleting a product is a permanent action and removes all associated data.
- Navigate to Administration > Connectors 2.0.
- Click View Products. The Adoption Tracking page appears.
- Hover over the product slot, and the Delete icon appears.
- Click the Trash icon to delete. The Delete Confirmation window appears.

- Click Ok to delete the product.
Add More Products to Track
In Adoption Tracker, you are provided three out-of-the-box slots to add up to three products. To add a new product to any of these slots:
Note: Gainsight recommends to raise a ticket, to add additional product slots if the default allocation does not meet the needs.
- Navigate to Administration > Connectors 2.0.
- Click View Products. The Adoption Tracking page appears.

- Click Add Product. The Enter Product Details dialog appears.
- Enter the following details related to the product to be tracked:
- Name: Enter the name of the product.
- Product URL: Enter the URL of the product.
- (Optional) Description: Enter the description of the product.
- Click Start Tracking.
Follow the instructions from the above sections to complete the usage tracking process for the newly created product.