Anatomy of Engagements
This article explains different types of engagements and configurations to launch your engagements.
Overview
Engagements in PX allow you to launch in-app announcements, provide tooltips, send automated emails, and surveys. PX supports five types of Engagements. This article introduces each engagement type and explains the configurations which are common to each type of engagement.
Engagement Sections
PX engagements consist of five sections. These sections are common to each of the five types of engagements. The five sections are explained below:
Audience
The Audience section allows you to select your target audience, or who can view the engagement. You can create rules to match your requirements.
For example, the below rule ensures that the engagement is displayed only to the user with the specified email ID, and who resides in the United States as the AND logic is selected. You can use the AND or OR logic within a rule, to configure multiple parameters. Click + Add to add multiple parameters.

Gainsight PX supports the following rules that you can use with logical operators to define your target audience.
| Rule | Usage |
|---|---|
| Users | To set target users who can view the engagement. |
| Account | To set target Accounts (customers) that can view the engagement. |
| In-App Engagement | To use another engagement as a parameter. For example,
For example, you can push a feature enhancement to a customer via an email. Insert clickable link "https://app.aptrinsic.com/dashboard?refer=email" in the email, engagement rules will read the values and display the guide engagement with the new feature description. |
| Product Mapper | To use features from the Product Mapper as parameters. |
| NPS Survey | To use the NPS Survey response of a user as a parameter. |
| CES Survey | To use the CES Survey response of a user as a parameter. |
| Rating Survey | To use the Rating Survey response of a user as a parameter. |
| Boolean Survey | To use the Boolean Survey response of a user as a parameter. |
| Query Parameters | To customize the content for the values passed in URL.
For example, you can share a feature enhancement to a customer via an email. Insert clickable link "https://app.aptrinsic.com/dashboard?refer=email" in the email, engagement rules reads the values and display the guide engagement with the new feature description. |
| In-App Engagement |
To deliver targeted and personalized email engagements to the qualified users based on their specific interactions with the application. For example, if a user has not used a specific feature (by not viewing a targeted In-App engagement) for a long time and needs to be intimated, an email can be automatically triggered and sent to the qualified user. |
| Inferred Company | To use an account’s inferred location as a parameter. |
| Inferred Location | To use a user’s Inferred location as a parameter to create the rule. |
| Account Location | To use an account’s location as a parameter to create the rule. |
| Location | To use a user’s location as a parameter to create the rule. |
| URL |
To use a page URL as a parameter. Note: URL rule is case sensitive. For example, Gainsight PX considers '/udp/reports' and '/udp/Reports' as two different pages when filtering the audience. |
| Device | To use a specific device (Mobile, Desktop) as a parameter. |
| Platform (OS) | To use an operating system as a parameter. |
| Browser | To use the browser as a parameter. |
| Browser Language | To use a language supported by a browser, as a parameter. |
| Referrer | To use a referrer as a parameter. The referrer is the webpage that sends visitors to your site using a link. In other words, it’s the webpage that a user was on right before landing on the page of your application. |
| Custom events | To use custom events as parameters. |
| Global Context | To use a Global Context filter (created in Adoption Report) as an engagement rule. For more information about the Global Context, refer to the Global Context API article from the Additional Resources section. |
| Segments | To use segments as parameters. For more information about segments, refer to the Segments article from Additional Resources section. |
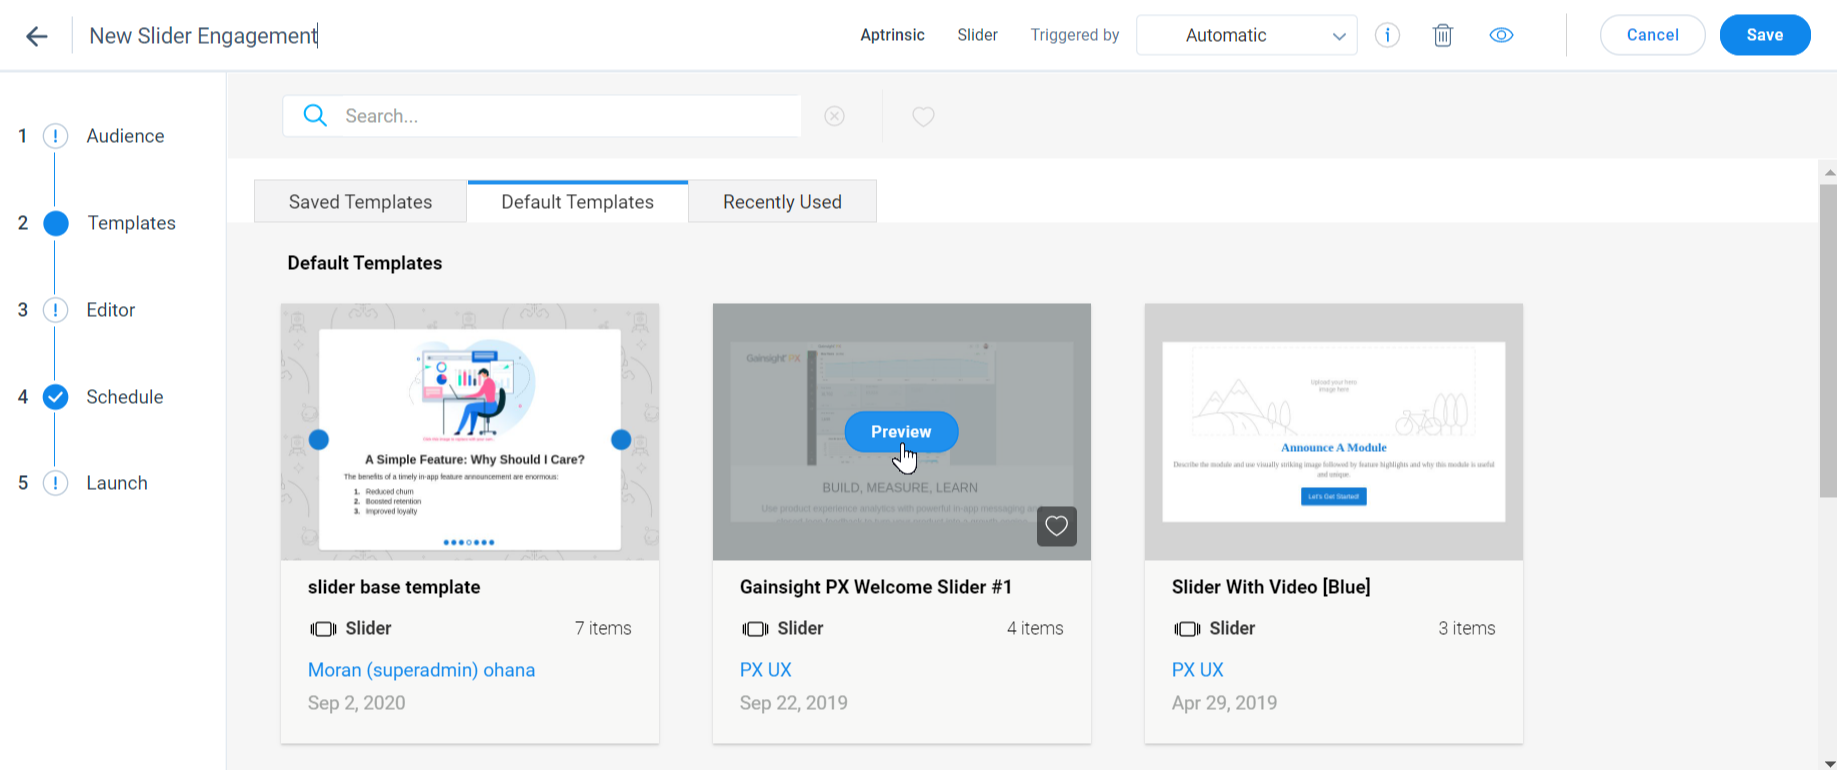
Templates
PX offers a library of engagement templates. Templates are categorized into the following tabs:
- Saved Templates: Displays the list of your saved templates.
- Default Templates: Displays the list of default templates, provided by PX.
- Recently Used: Displays the list of your recently used templates.
If you have multiple PX subscriptions and want to share the templates across these subscriptions, refer to the Share Engagement Templates Across Subscriptions section of the Install Gainsight PX on Your Web App article from the Additional Resources section.
Select template for your engagement
Choose the template of your choice from the default or existing templates for the engagement. This is an optional step.
To use the default or existing template:
- Navigate to the Templates section.
- Hover on the template and click Preview.
- Click Use. You are navigated to the Editor section.
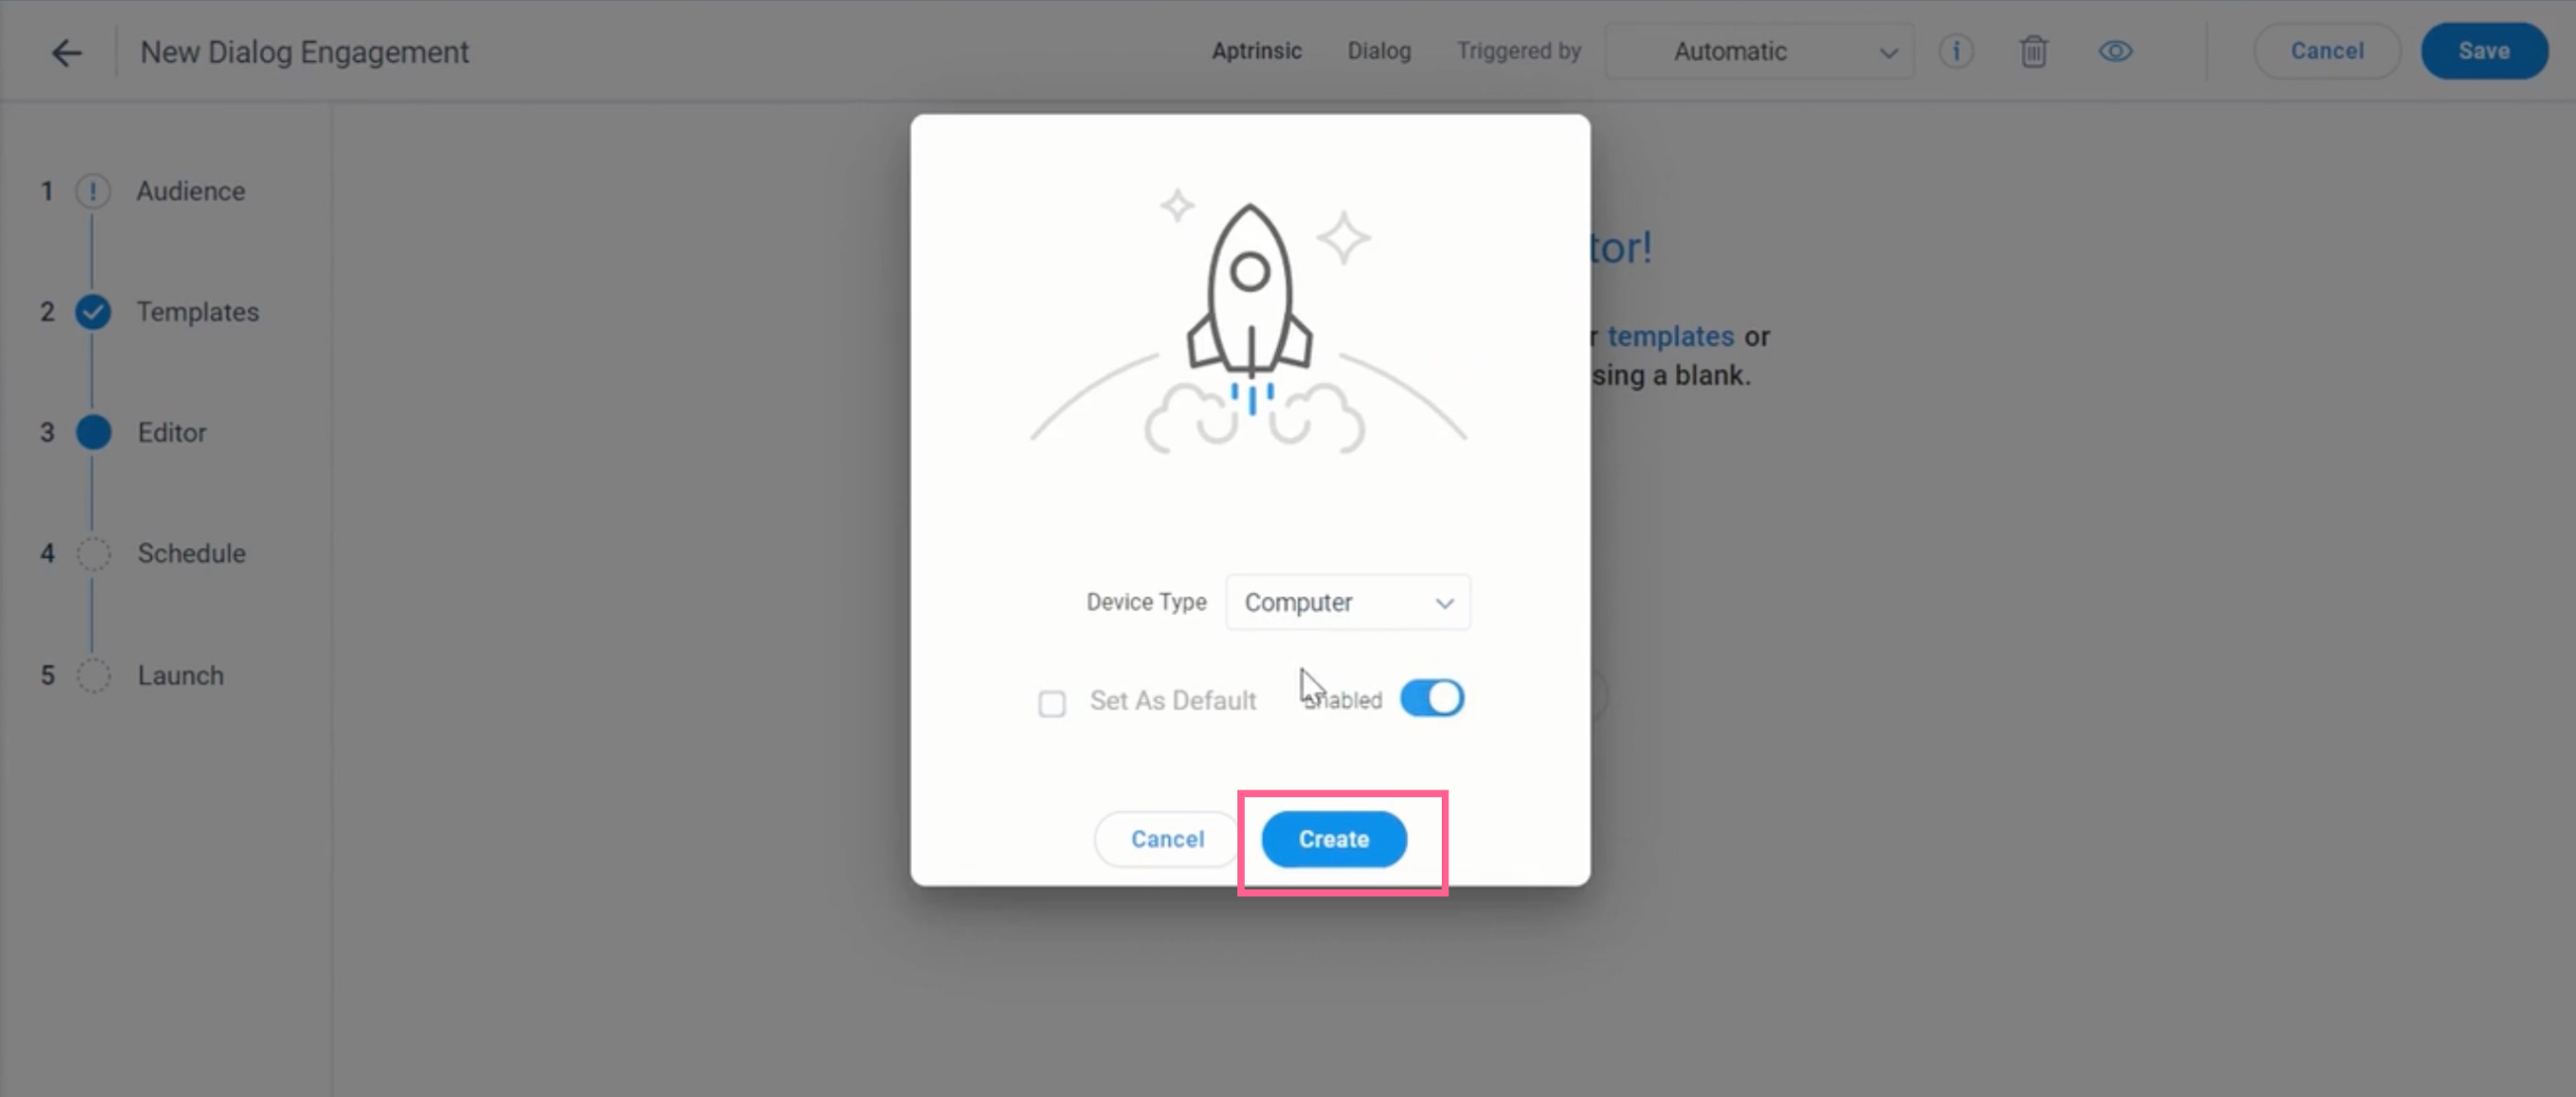
Create engagement without using template
- Navigate to the Editor section.
- Click New Device Content.
- Select the Device Type.
- Click Create. Configure the engagement using the Editor tab.
Editor
Use the Editor section to create content for your engagement, add images, videos, use text editors, add hyperlinks. You can do the following in the Editor section:
- Edit Engagement content
- Add images
- Add Tokens
- Edit Size, Background, and Navigation options
- Edit View Type, Position, Overlay color, and Behavior
- Edit CSS content in Engagement
- Preview, Save, and Delete Engagement
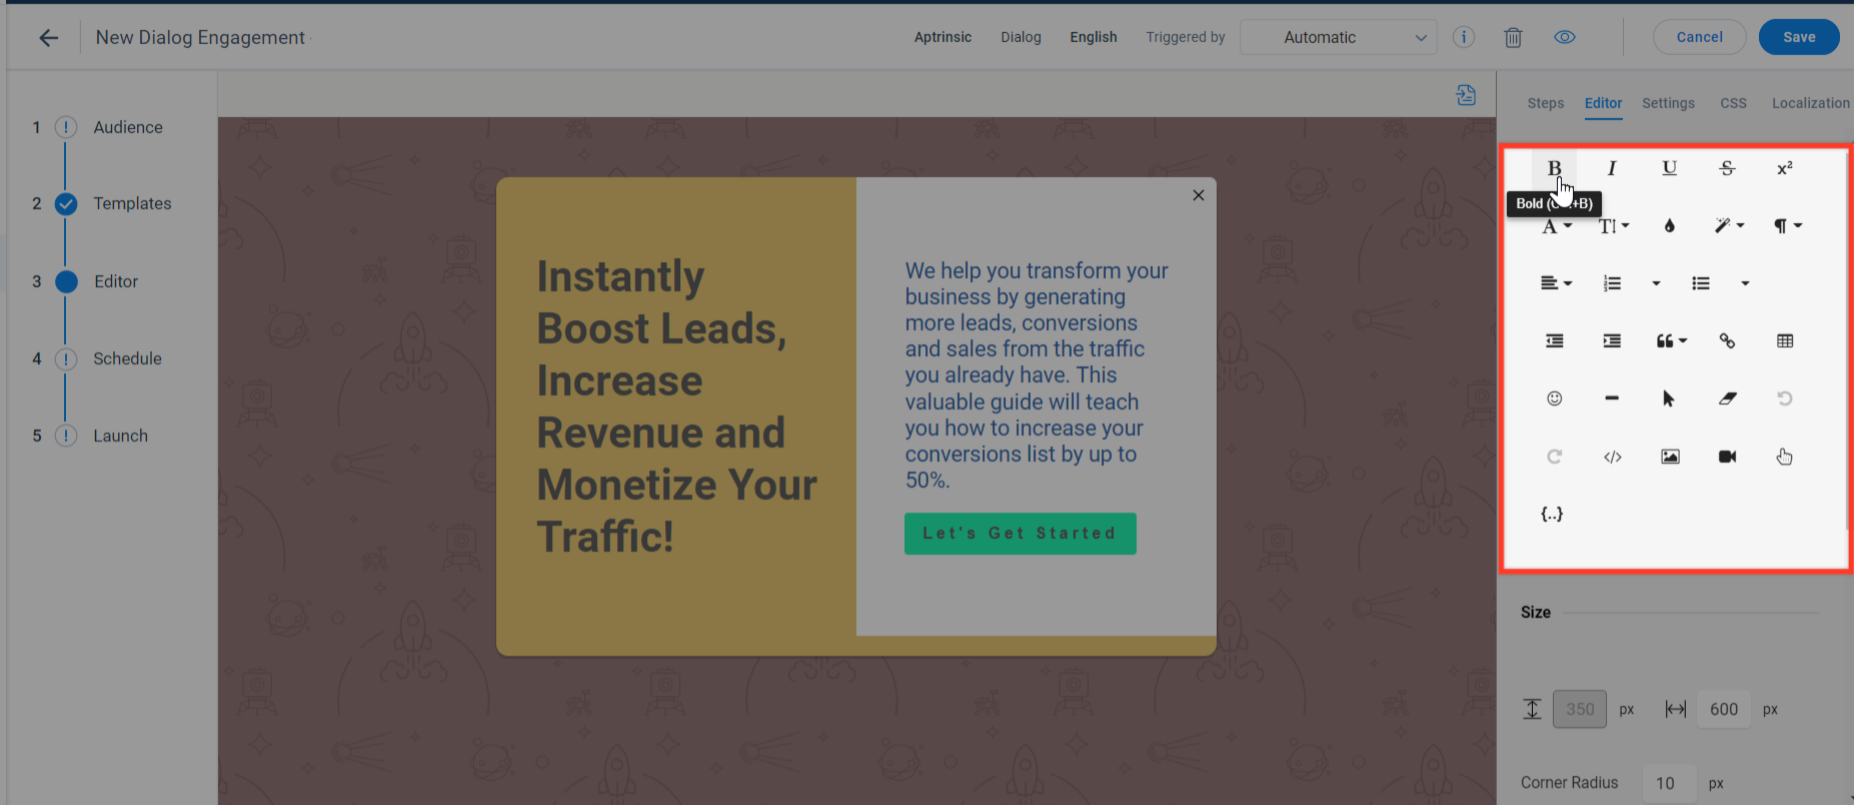
Edit Engagement Content
The Editor section provides text editors which you can use to apply text effects (bold, italic underline), hyperlink a word in your engagement, change font size and color, add images, embed videos, add buttons, and many more.
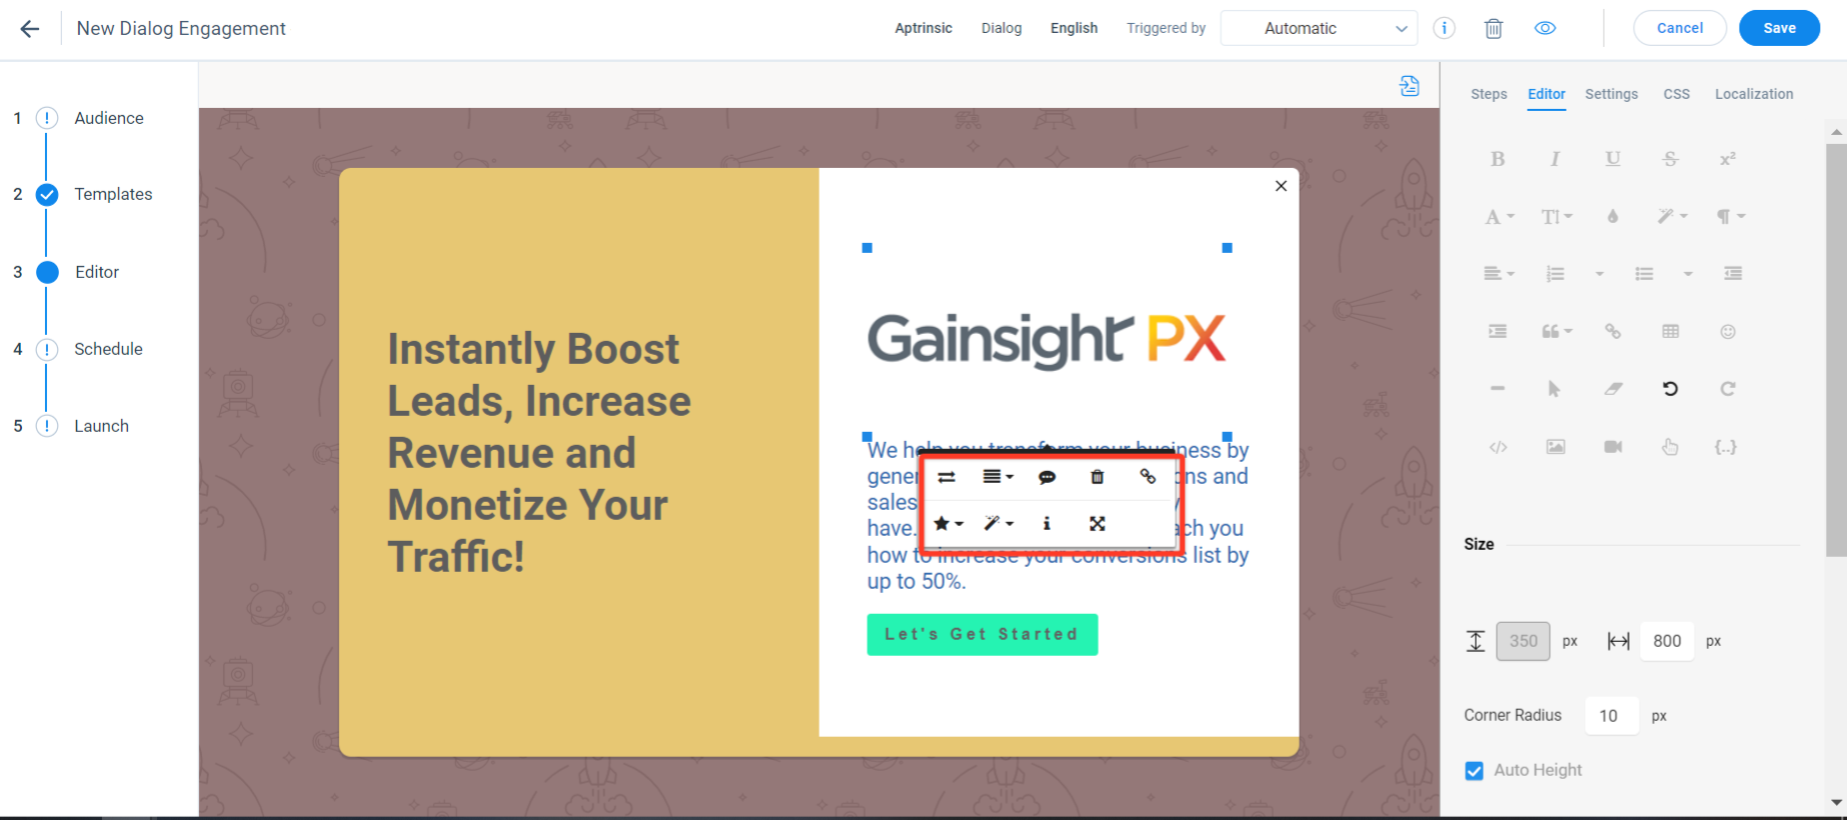
Add Images
Add images to your engagements to make it visually appealing to the viewers. To add an image, click the Insert Image icon from the Editor tab.
The maximum file size for an image or GIF that can be uploaded is 5MB.
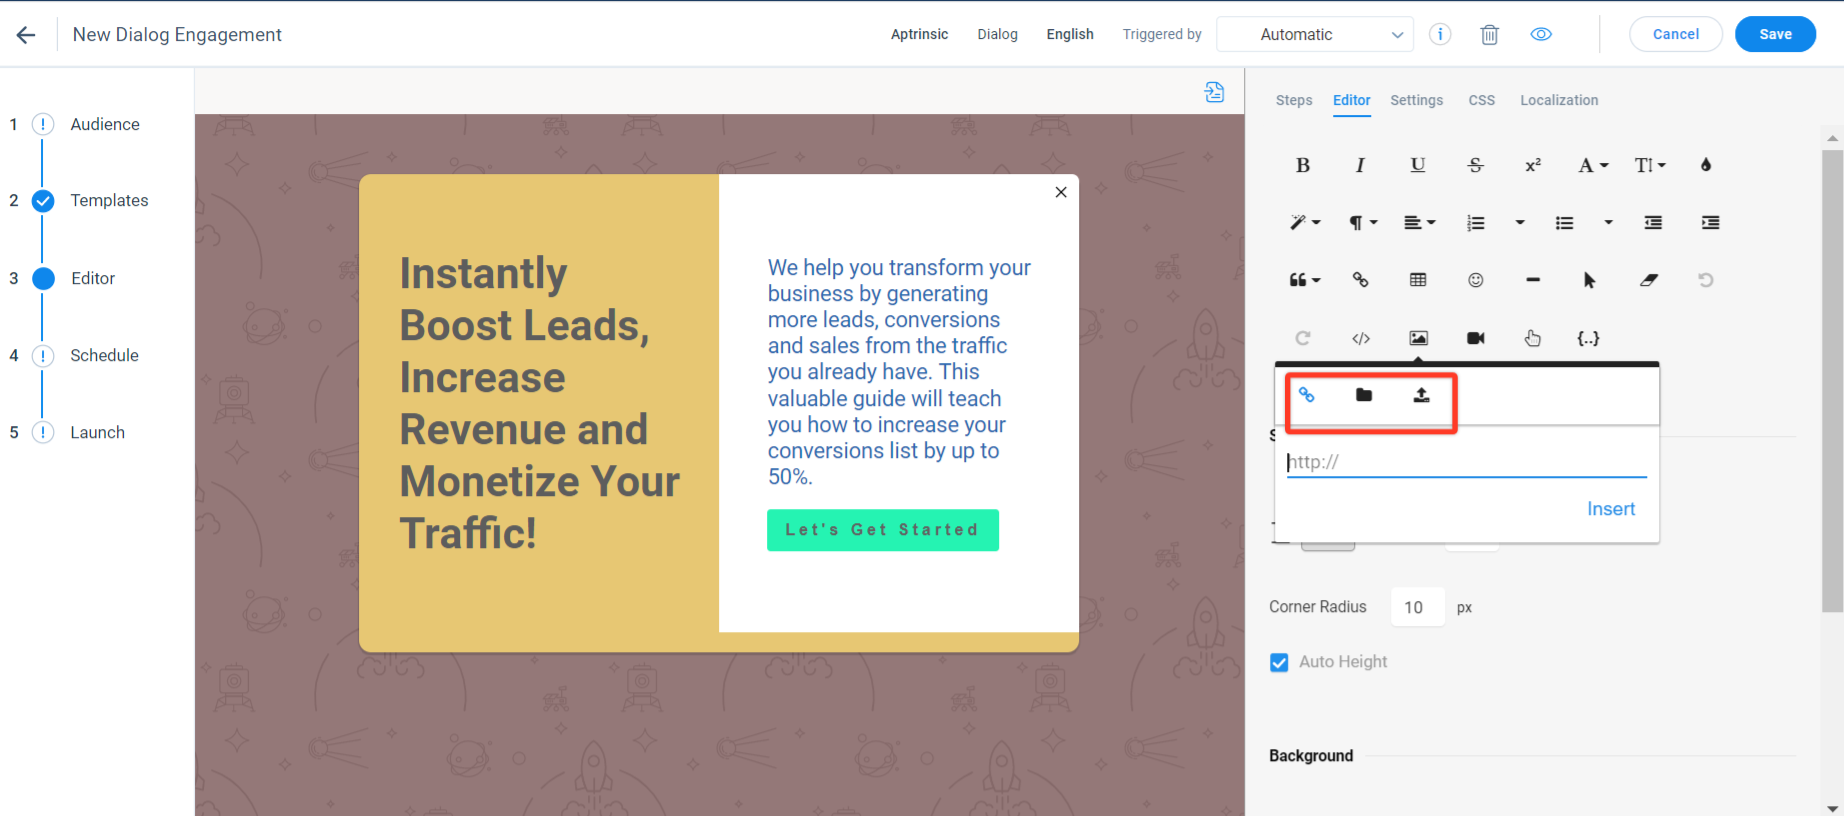
Following options are available to Add an image:
- By URL: Enter the URL of a web image that you want to add.
- Browse: Choose an image from the library of images that are already uploaded or used in the subscription.
- Upload Image: Upload an image from your computer to the engagement.
After you add the image, click on it to use the options like Display, Style, Size, Align and many more.
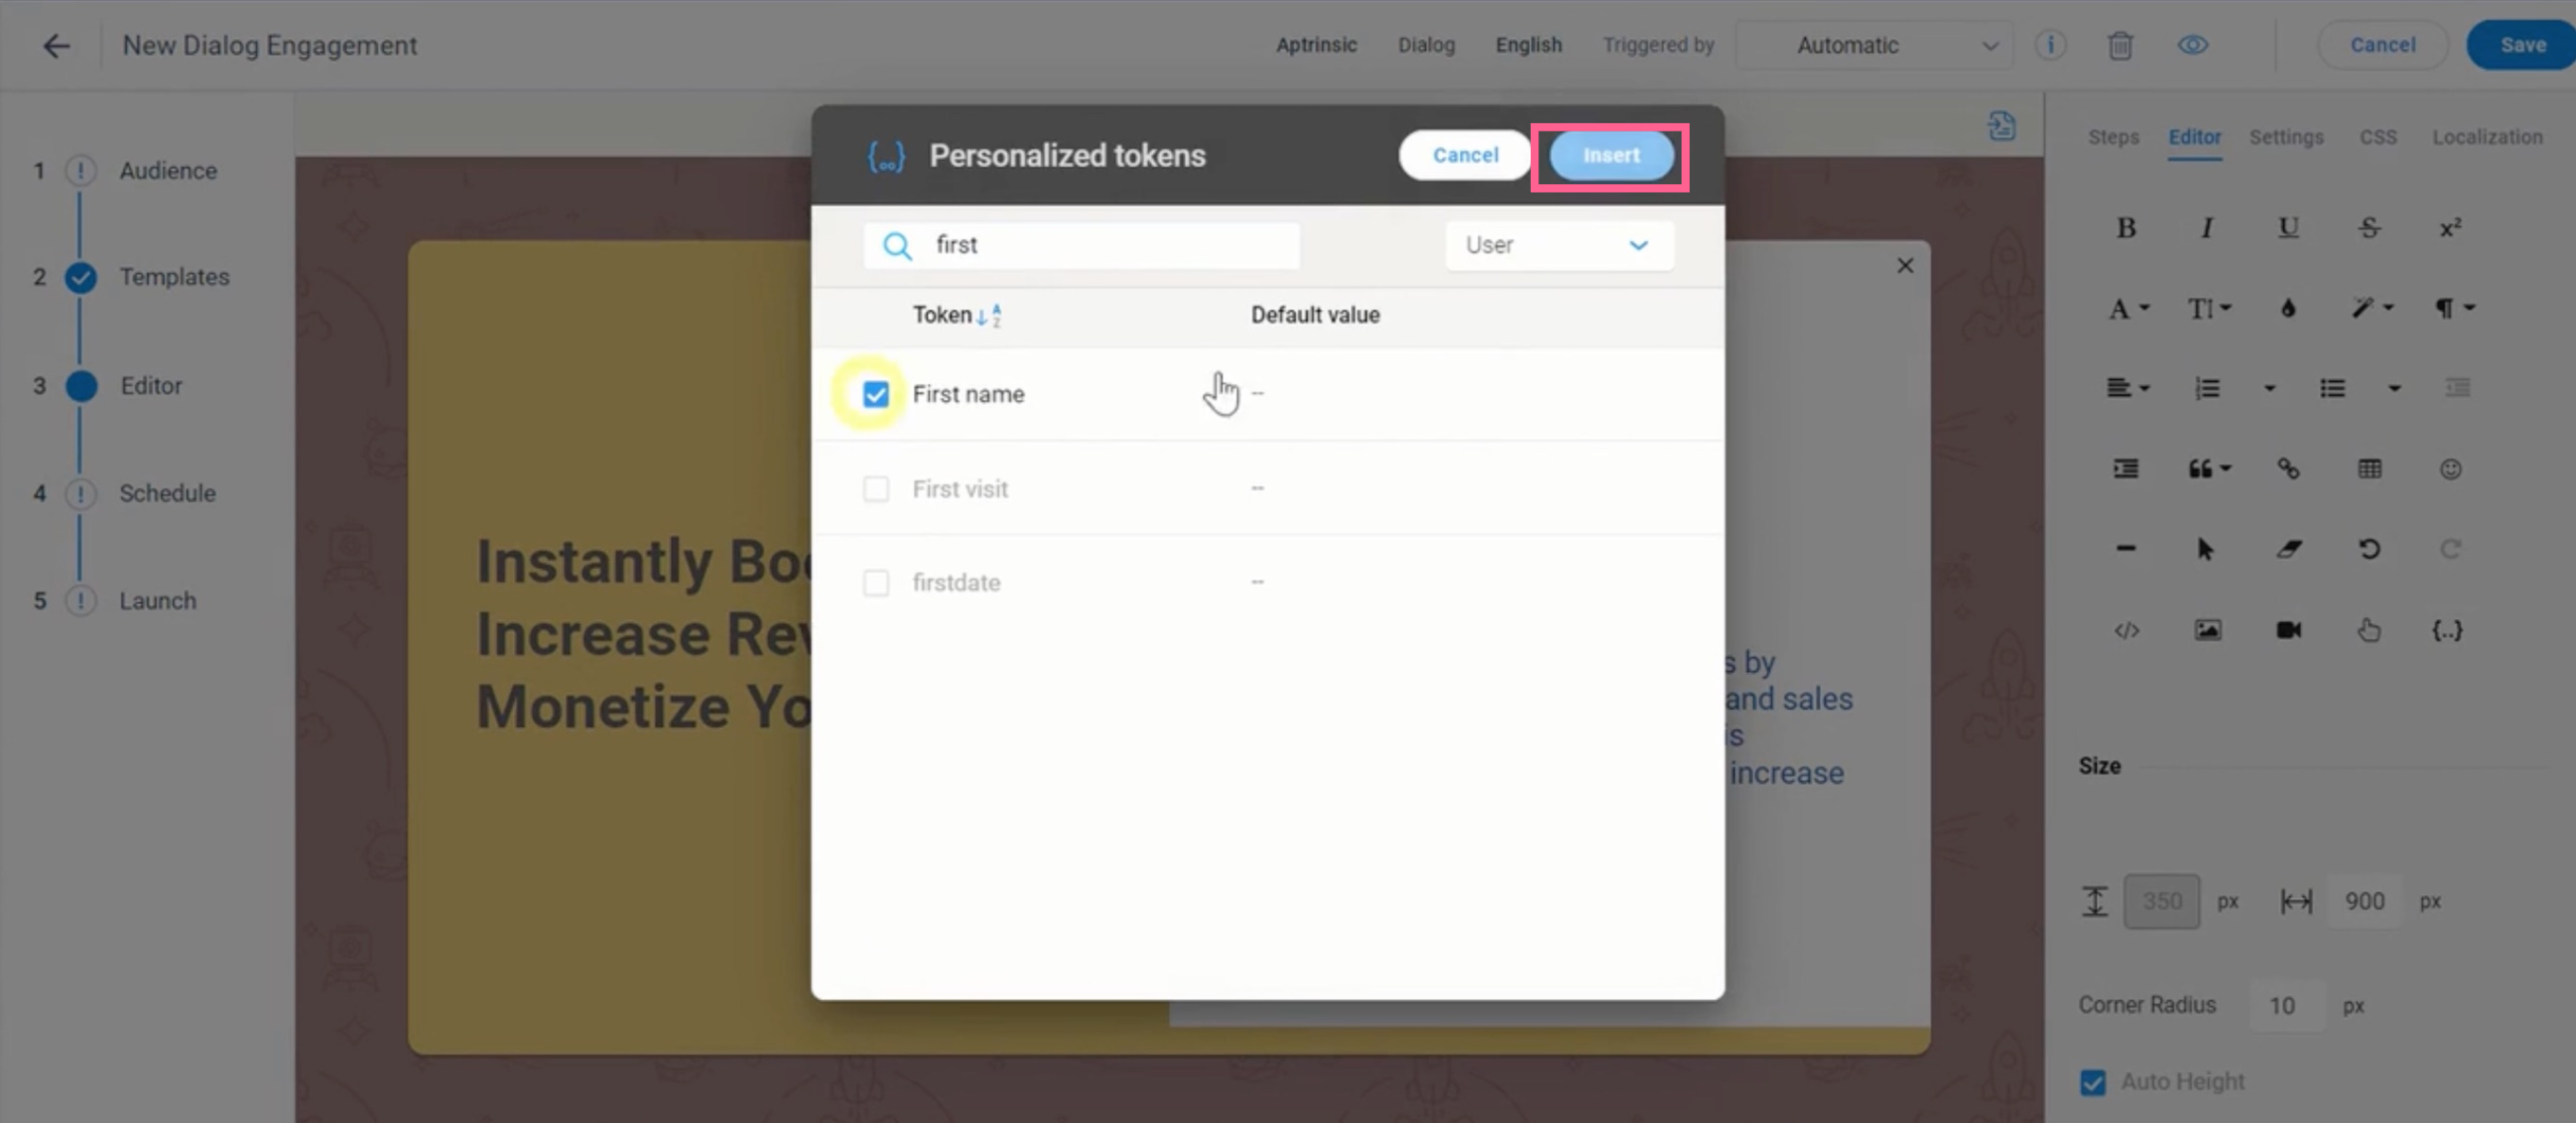
Add Tokens
You can add tokens in your engagements. Gainsight PX automatically resolves tokens with their respective values, when you launch the engagement. You can use fields from the User or Account object to create tokens.
Edit Size, Background, and Navigation options
Modify the size of your engagement (not applicable to Email engagement), background color of engagement, and set the navigation path for the engagement. These options are available on the Editor tab and vary based on the engagement.
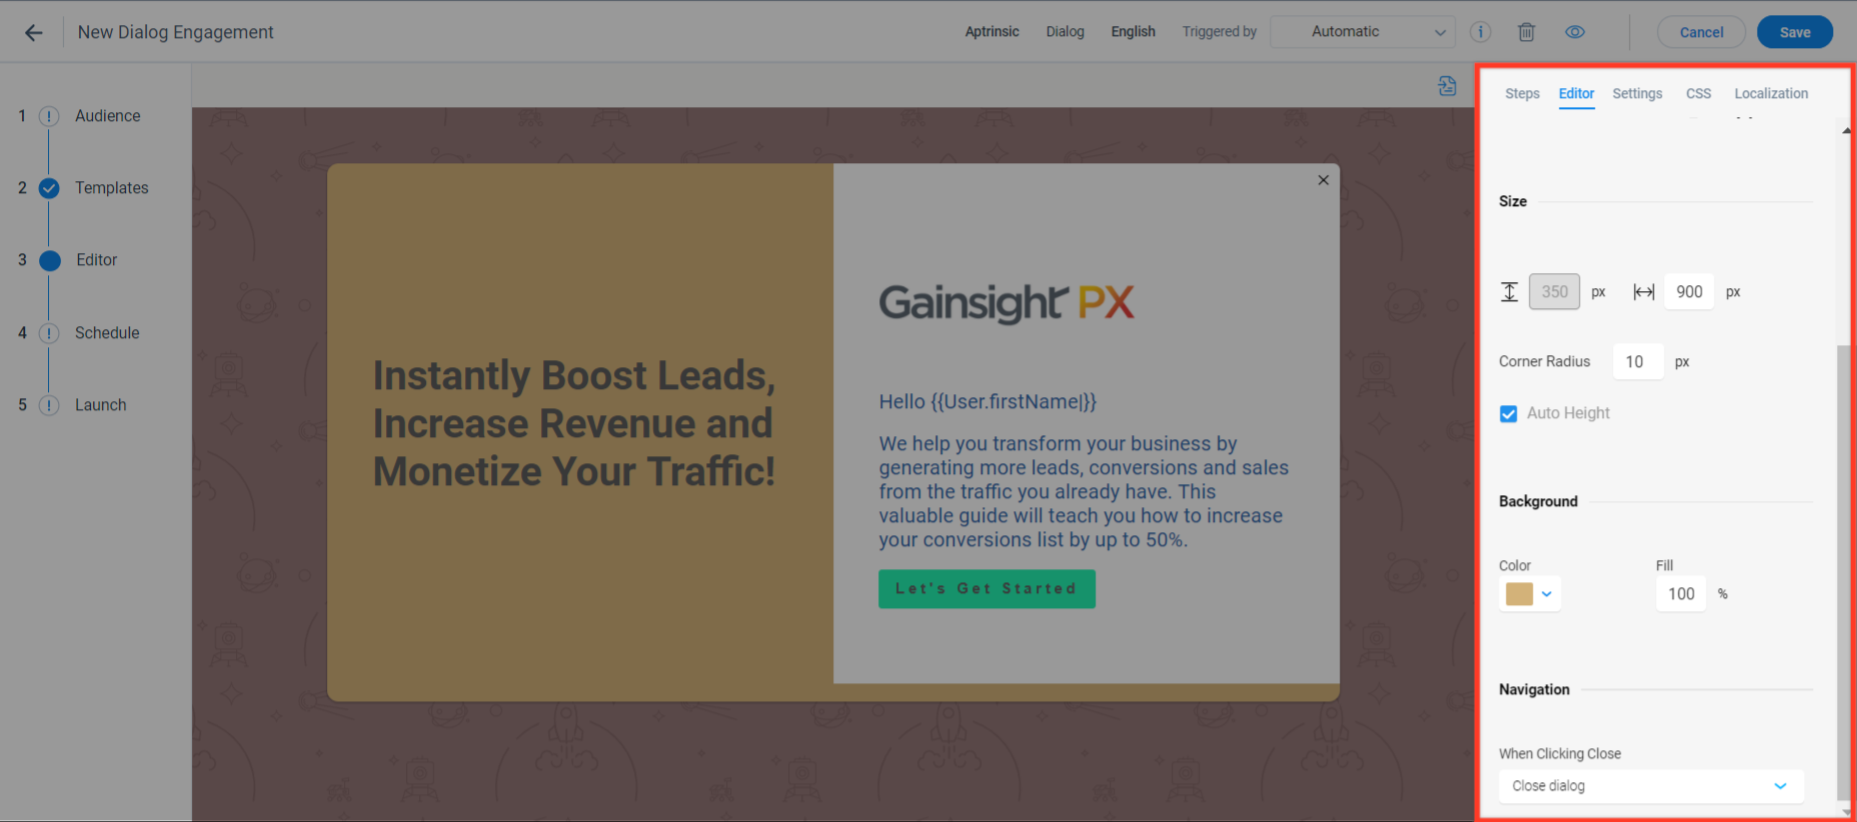
The options highlighted in the above image are applicable only to a Dialog engagement.
Edit View Type, Position, Overlay color, and Behavior
Set the position and appearance of your engagement and timeout for the engagement on the target application page. These options are available on the Settings tab, and are not applicable for an Email engagement.
Following options are available for you to configure:
- View Type: Allows you to select a Dialog or Bar view for your engagement.
- Position: Option to place your engagement at the required position on the target application page.
- Overlay: Places a colored overlay on the target application page, underneath your engagement.
- Behavior: Allows you to set a time frame after which the engagement is not displayed.

The above option shows the engagement in the top right corner of the target application page, with Dialog view type, in the selected Overlay color (red). The dialog disappears after 5 seconds, as set in the Behavior section.
Edit CSS content in Engagement
The CSS view is displayed on the fourth tab of the engagement. You can edit CSS content for each step of the Guide/Slider/Survey/Multi-Question Survey Engagements separately. This does not apply changes to the entire engagement. The step CSS takes precedence over the engagement CSS. For example, in the engagement CSS if you set the content text color as Red, and in the step CSS you set the color as Blue, the text color is displayed in Blue.
The following tabs are available under CSS:
- Step: Editable CSS for the selected engagement step
- Slider/Guide/Survey: Editable CSS for the entire engagement
- Default: Non-editable default CSS
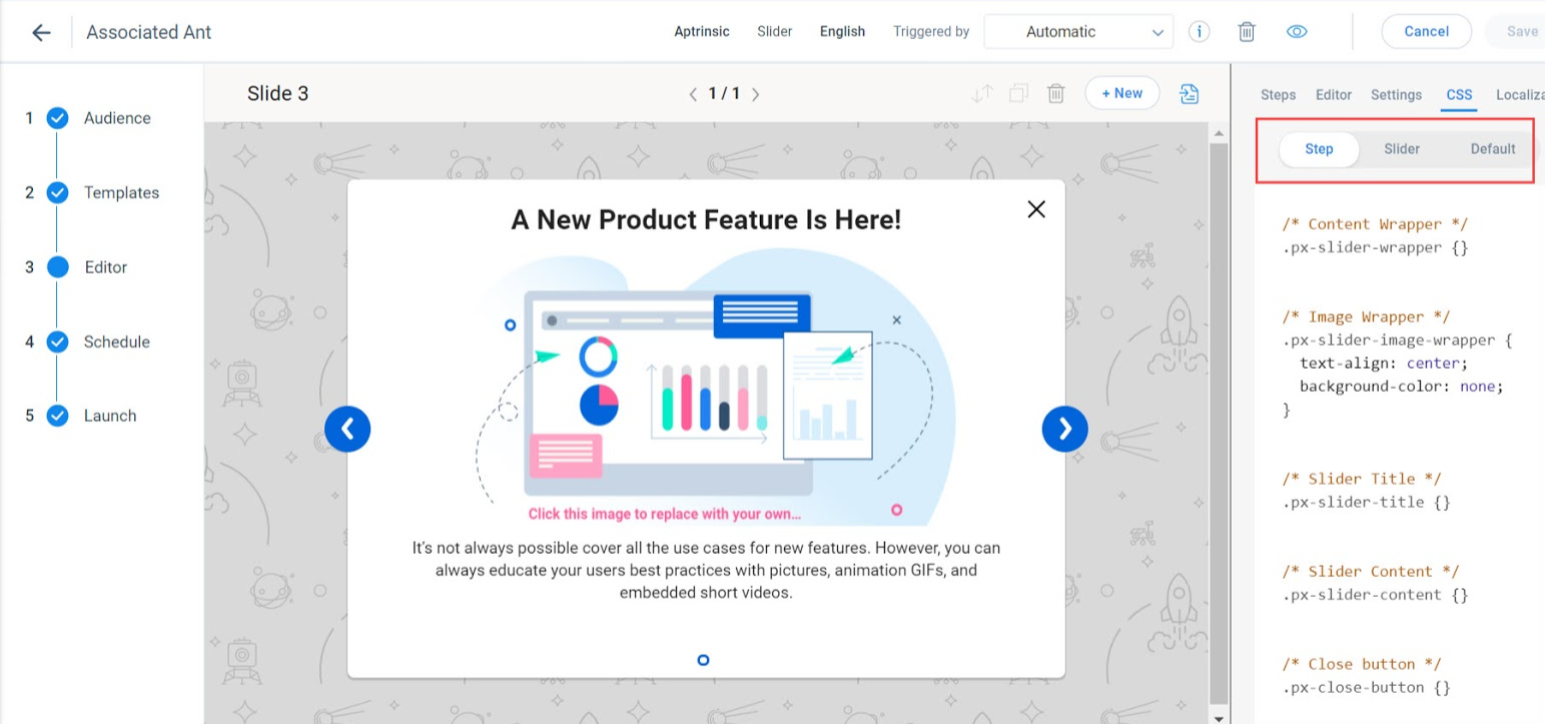
From the CSS view, you can customize the font for the header title and content in the engagement step. For example, to customize font for the header of a slider step, you can add the 'font-family: <<Font-Name>>' property in the '.px-slider-content-header' class in the Step tab. For more information on the CSS Styling, refer to the Use Templates article from the Additional Resources section.
After updating the CSS, you can save the template with styling changes to use it in new engagements. For more information on how to save the engagement as a template, refer to the Preview, Save, and Delete Engagement section.
Preview, Save, and Delete Engagement
After you finalize the appearance and content of your engagement, save and preview the engagement on any page of your application. You can also save the engagement as a template.
Save Engagement As Template
To save an engagement as a template:
- Click the save as Template icon.
- Enter a name for the template.
- Click Save.
- Navigate to the Saved Templates tab in the Templates section to view your template.
Note: Hover on the template and click the Delete icon to delete the template.
Preview Engagement
To preview an engagement:
- Copy the URL of your application page on which you want to preview the engagement.
- Click Click to Preview. The Preview window is displayed.
- Paste the application page URL.
- Click Launch.
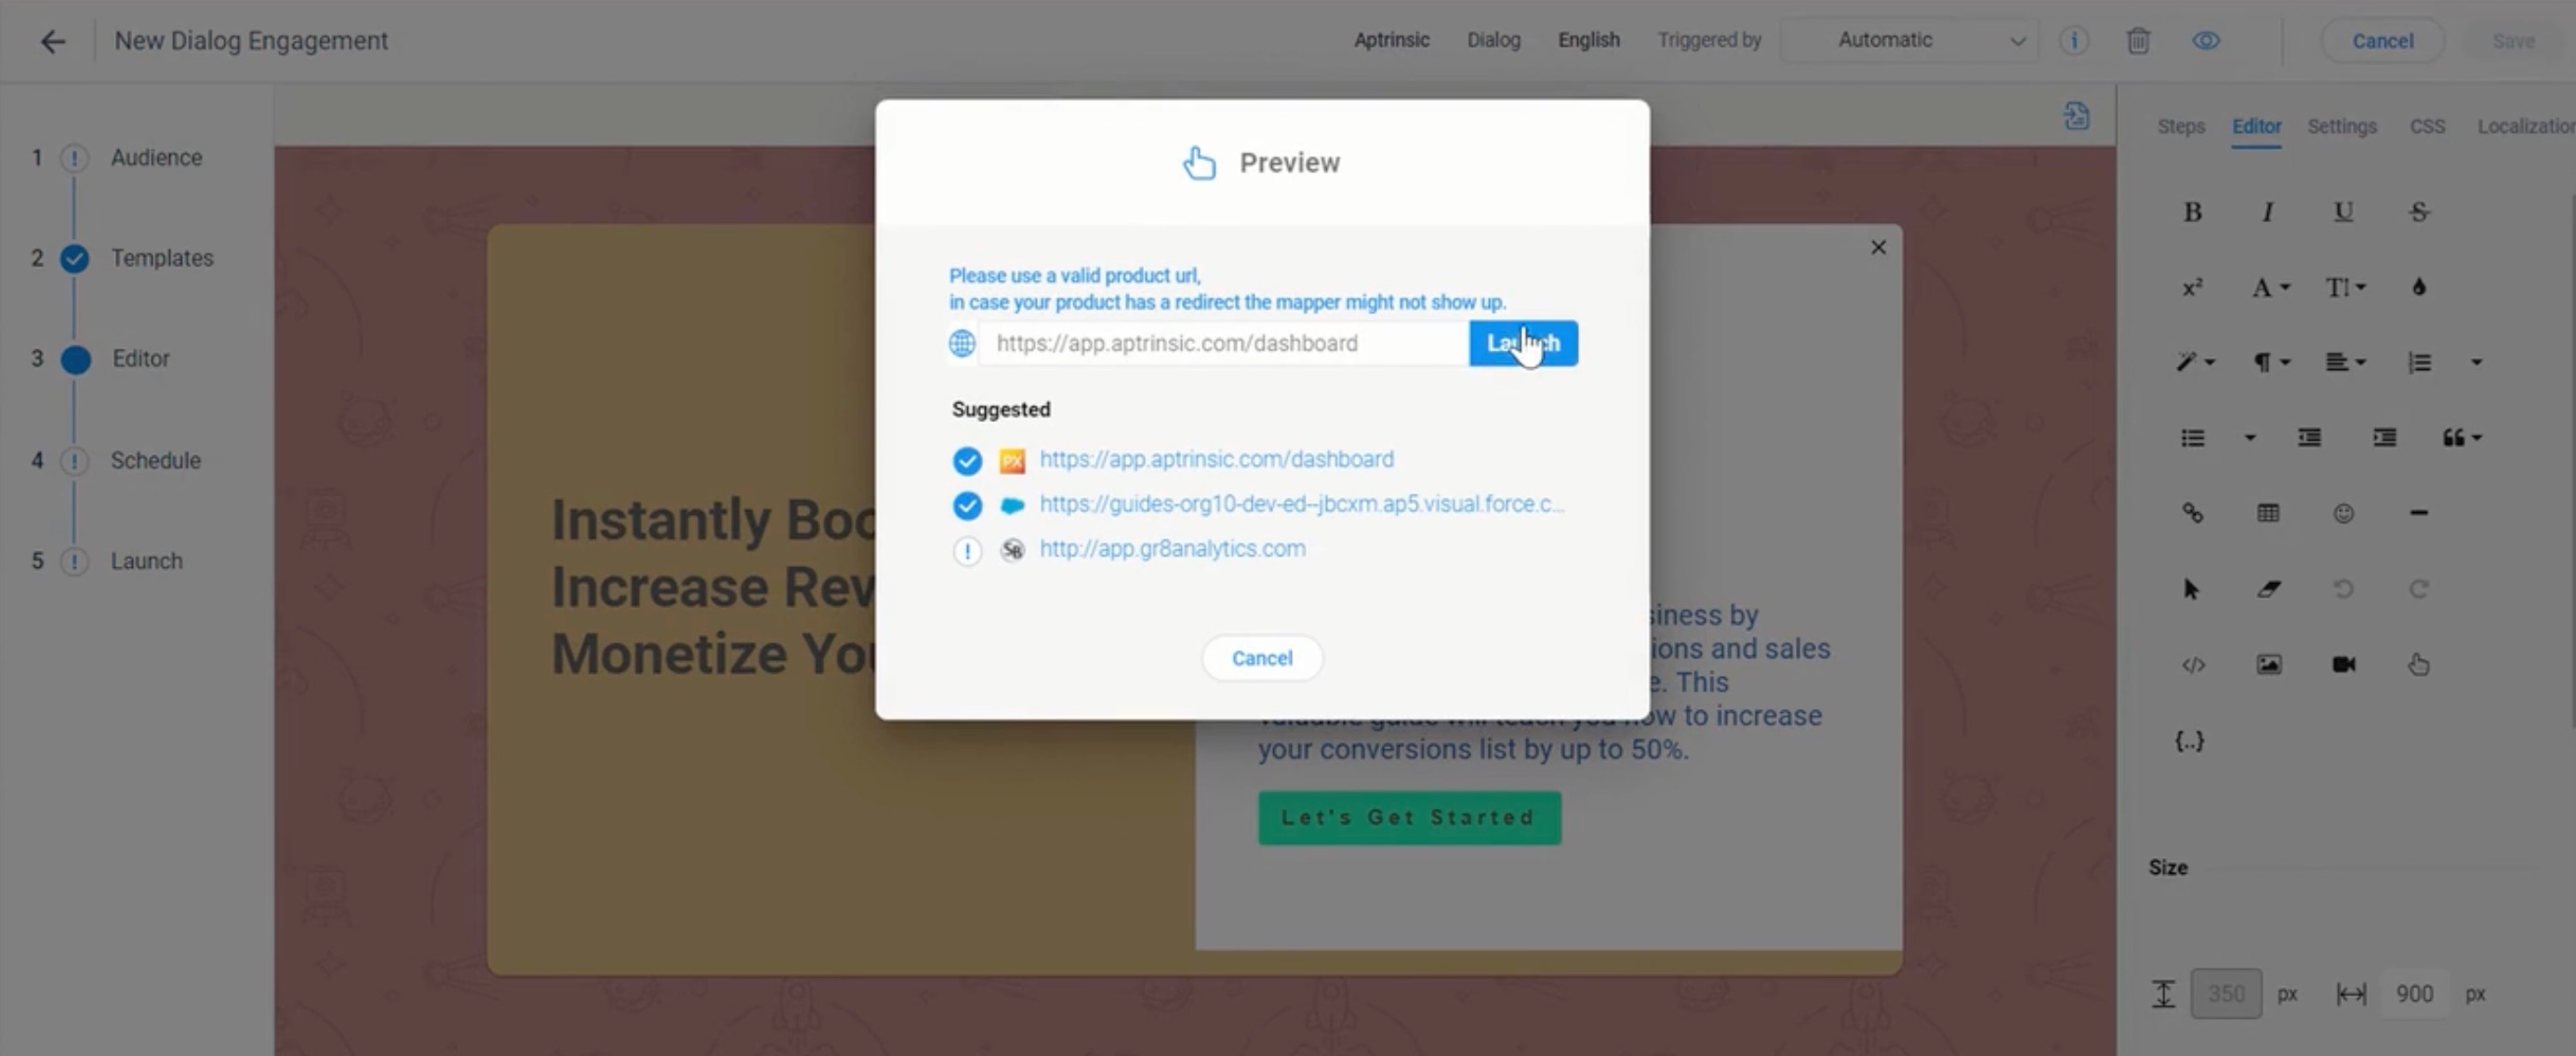
Tip: If your content is very close to the border of the engagement, increase the width of your engagement from the Editor tab.
Delete Engagement
Gainsight PX provides you the option to delete the engagements that you no longer use to avoid clutter on the engagement list page. You can delete an engagement in the following ways:
- From the engagements list page, click the three-vertical dots icon for the required engagement and click Delete. OR
- From the engagement details screen, click on the Trash icon.
Schedule
Schedule your engagement to define when and how it should be evaluated and triggered. In-app scheduling differs from email scheduling due to the different nature of these engagement channels, for example Email can be a great way to reach out to users after they are no longer in your app and driven by a predefined schedule whereas in-app will always be triggered by users when using the app.
For more information about Engagement Scheduling and qualification scope, refer to the In-app Engagement Qualification Scope article, and for the Email Engagement Scheduling, refer to the Email Engagement Qualification Scope article from the Additional Resources section.
Engagement Throttling Settings
The engagement throttling setting controls how often the engagement is displayed to the qualified users in your application. They allow you to add limits to keep each engagement reasonably spaced from other engagements so that users are not overwhelmed. Throttling settings are applicable:
- Only to in-app engagements both existing and new engagements.
- Only in the Production environment of Gainsight PX.
- For Automatic and JO trigger types.
PX supports the following throttle settings:
- Minimum time gap between engagements: To set the minimum time between two engagements.
- Maximum engagements shown in a Day/Hour/Minutes: To set a limit on the maximum number of engagements that a user can view in the specified hours, minutes, or days.
.png?revision=1)
Global Throttling is available only if multiple products are added to the subscription.
Based on how your PX subscription is designed, you have the following settings available::
- Throttling: Limits the number of engagements displayed for a specific product.
- Global Throttling : Limits the number of engagements displayed across all products within the subscription, provided each product has a unique ID.
Example Business Use Case: A PX subscription includes three products: A, B, and C. The engagement limits are set to one per day and five per week.
- Throttling Settings for Product A: Users of Product A receive only one engagement per day and up to five engagements per week.
- Global Throttling: A user with access to Products A, B, and C receives a maximum of one engagement per day and up to five engagements per week, regardless of which product they use.
To configure the throttling settings:
- Navigate to Administration > Throttling.
- Turn on the toggle switch in At least and At most sections.
- Set the time and number of engagements to be shown parameters.
- Click Save.

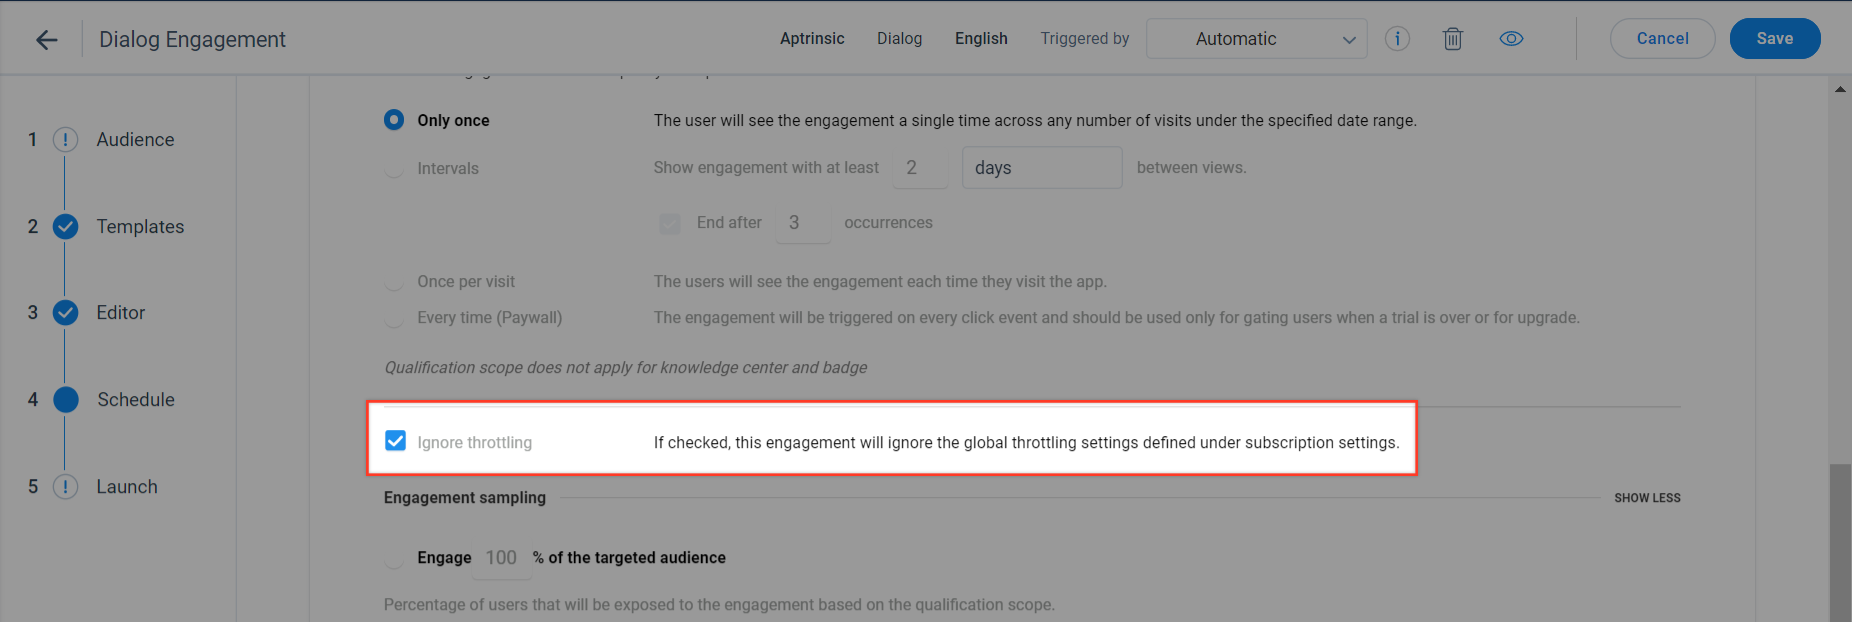
Ignore Throttling
If an engagement is critical and must be communicated on priority (for example, application maintenance message), you can select the Ignore throttling checkbox in the Schedule section of the engagement to override the global throttling settings.
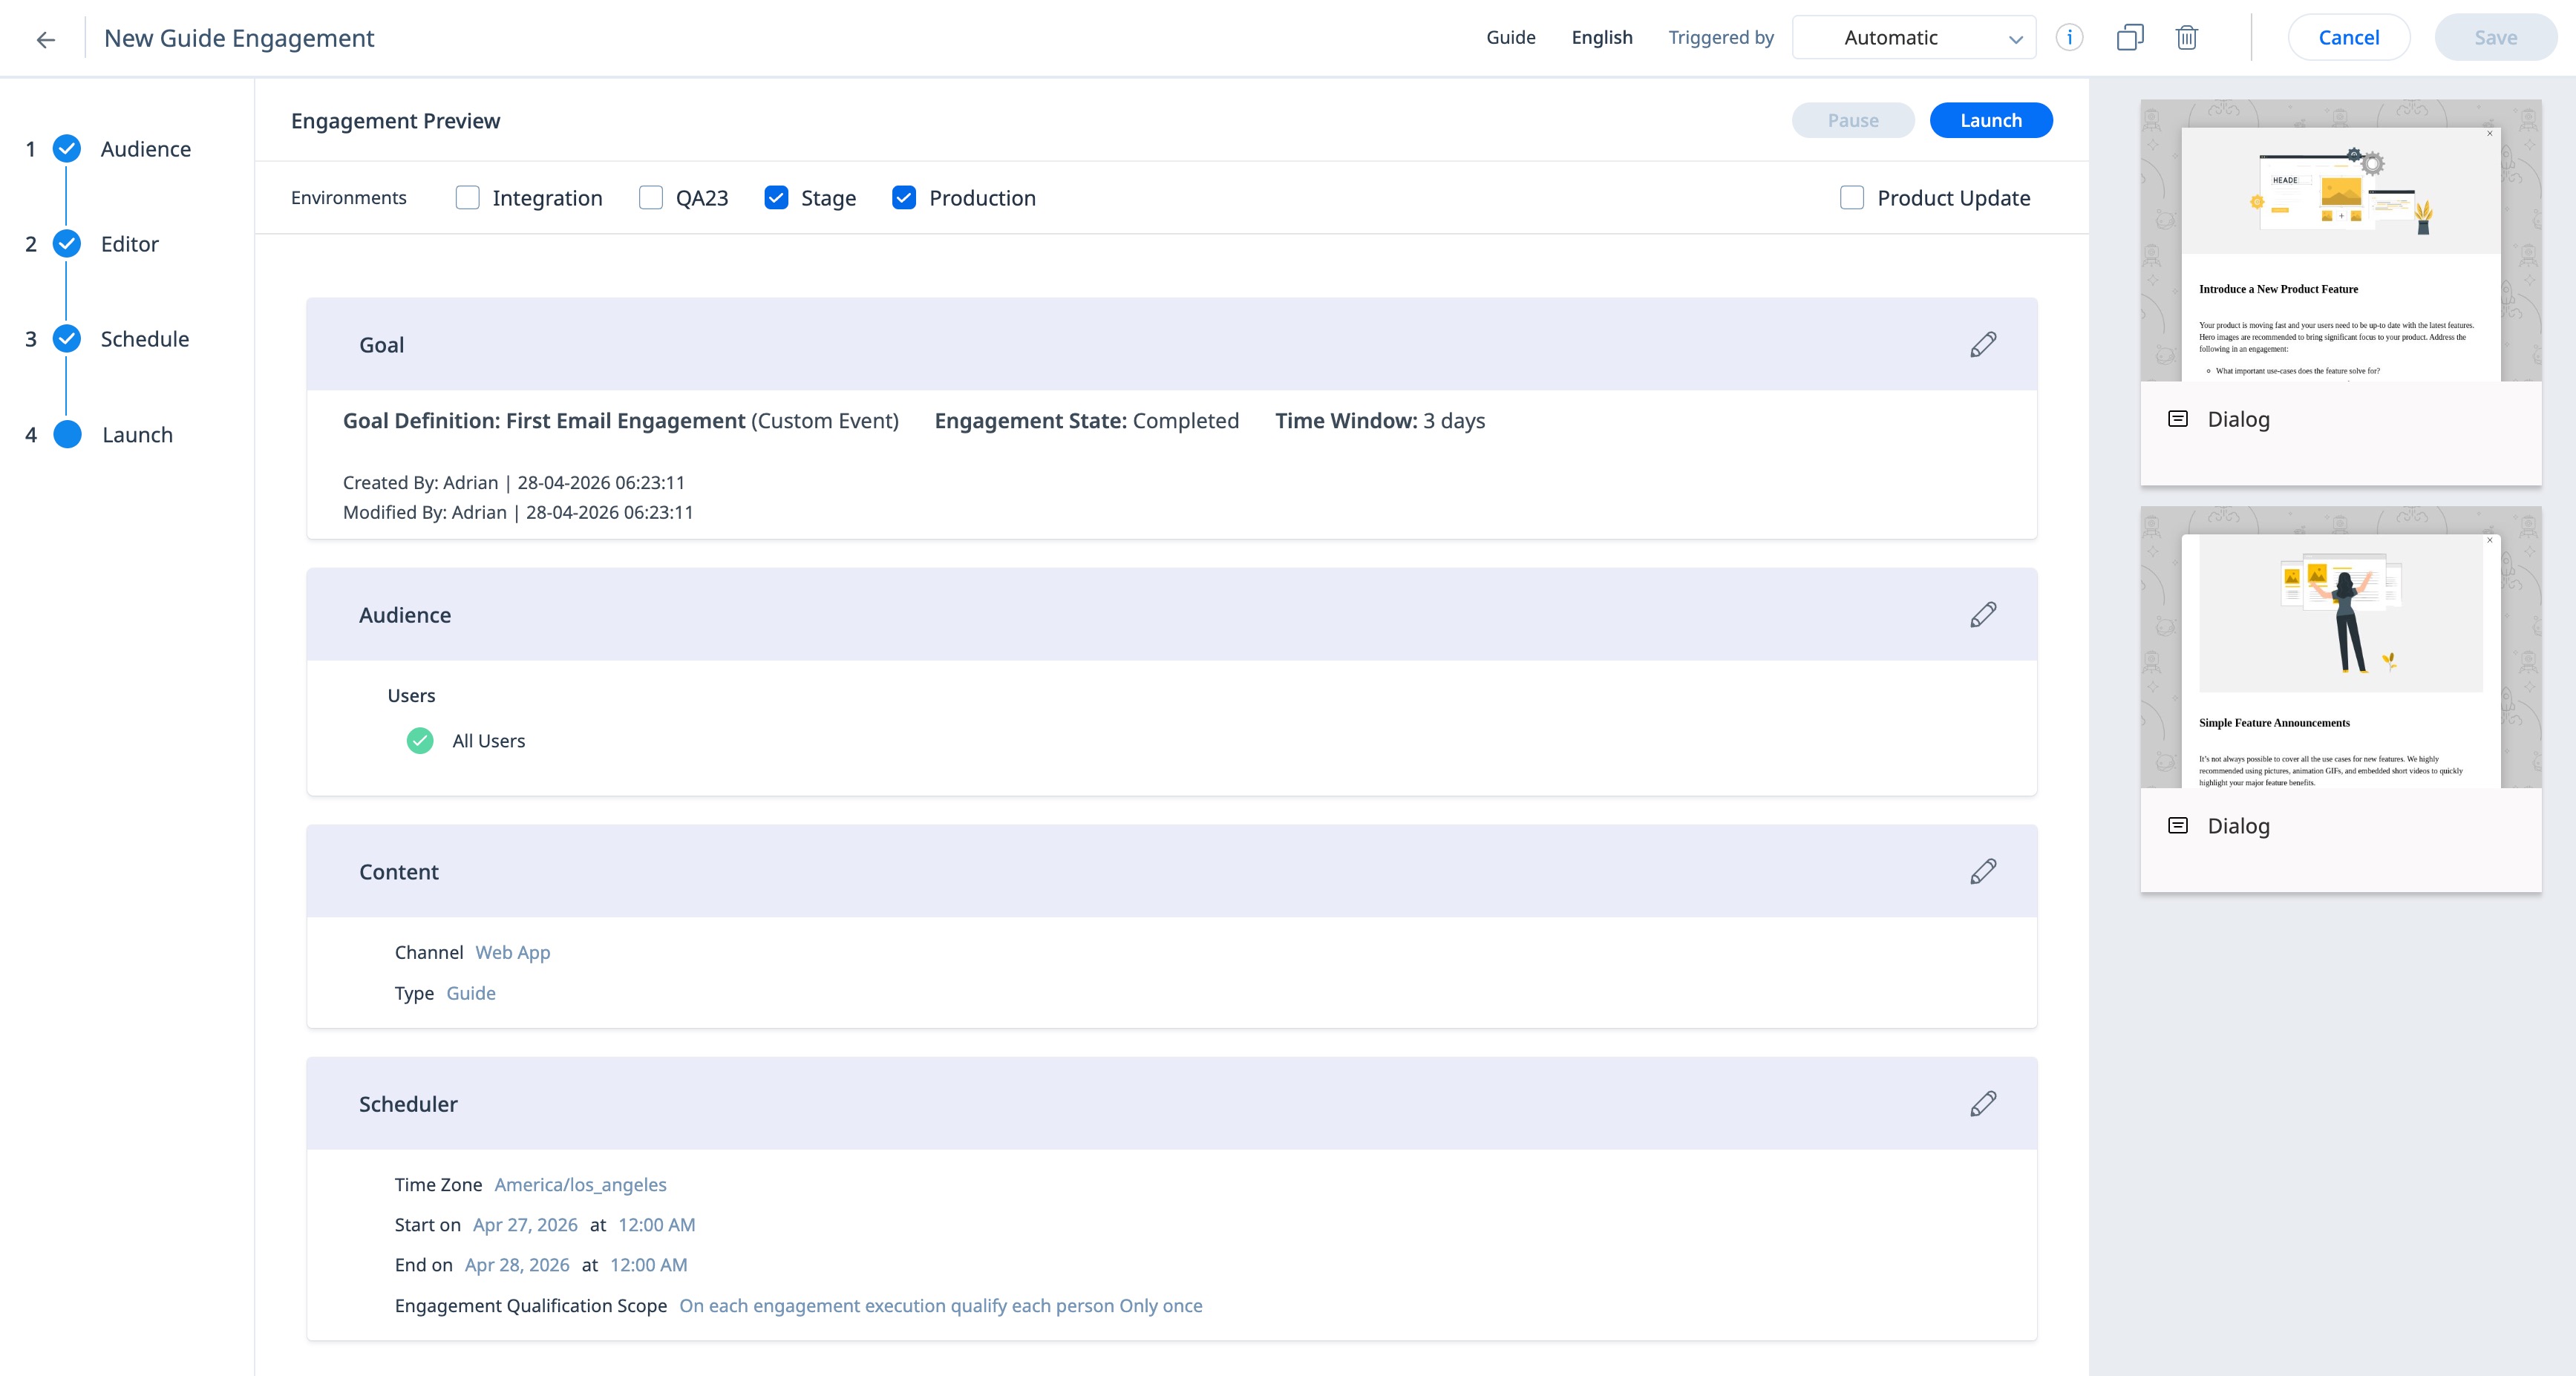
Launch
The Launch section displays a summary of all the configurations for your engagement, including Goal, Audience, Content, and Scheduler. You can launch an engagement or pause a launched engagement from this section.
In the Launch screen, you can:
- Verify all configurations of the engagements
- Select the environment(s) to which you want to launch the engagement. For more information, refer to the Gainsight PX Environment Settings article.
- Configure completion goals for the engagements. For more information, refer to the Engagement Goals section.
In case of a configuration error in any section, an exclamation (!) is displayed next to the respective section and the Launch section. You can launch an engagement only if all sections, including the Goal configuration (if defined), have a checkmark next to them.
Engagement Goal
The Goal section allows you to define and review the objective of your engagement. You can configure a goal to track the impact of the engagement using feature usage or custom events. This helps ensure that the engagement is aligned with a measurable outcome before launch.

To add a goal:
- In the Goal section, click Add Goal.
- From the Type dropdown, select one of the following:
- Feature (to track feature usage)
- Custom Event (to track a specific event)
- (Optional) For custom events, click Add Property to select the event property and define the condition to refine the goal based on specific event attributes.
- From the Item dropdown, select the feature or event you want to track and
- In the Engagement State field, select when the goal should start tracking:
- Viewed: Starts tracking after the user views the engagement.
- Completed: Starts tracking after the user completes the engagement.
- In the Time Window field, select the time frame within which the goal must be achieved.
- Click Add Goal.
- Adding a goal to an engagement is optional and does not affect the launch workflow.
- Editing a goal updates the goal definition and recalculates goal analytics based on the new criteria.
- Goal performance can be viewed in engagement analytics. For more information, refer to the Understand Engagement Analytics article.

Trigger the Engagement
The Triggered by option determines when and how your engagement launches for eligible users. You can specify the trigger mechanism and combine it with user qualification criteria to ensure the right users see the right message at the right moment. By configuring the trigger precisely, you can deliver contextual, timely experiences that increase adoption, guide key workflows, and drive customer value.

The following trigger options are available:
- Automatic: The engagement is displayed only on those application pages which you select in the Audience section.
- Knowledge Center: The engagement is displayed only in the Knowledge Center bot.
- Badge: Use the badge icon to trigger a Guide engagement. The guide starts to play when the user clicks on the badge icon.
- Journey Orchestrator: Trigger an in-app engagements such as Dialog, Slider, or Guide engagement from Gainsight’s Journey Orchestrator (JO) module. This feature is available only to the customers who use both the CS and PX applications. When you trigger an engagement from JO, you can use it in the JO module. For more information about the configurations to be performed in JO, refer to the Trigger PX In-app Engagements from Journey Orchestrator article.
If you choose to trigger an engagement by both Automatic and Knowledge Center, the engagement is visible on the selected UI and also on the KC bot.
Additional Resources
- Overview of Engagements
- In-App Engagement Qualification Scope
- Email Engagement Qualification Scope
- Use Templates
- Use Global Context API
- Segments
- Gainsight PX Environment Settings
- Organize Engagements
- Engagement Labels
- Install Gainsight PX on Your Web App
| Net Promoter®, NPS®, NPS Prism®, and the NPS-related emoticons are registered trademarks of Bain & Company, Inc., NICE Systems, Inc., and Fred Reichheld. Net Promoter ScoreSM and Net Promoter SystemSM are service marks of Bain & Company, Inc., NICE Systems, Inc., and Fred Reichheld. |