Configure CTA Linked Objects
This article provides step-by-step instructions to configure Linked Objects for CTA types, enabling admins to display and manage custom object data directly within the CTA workflow.
Overview
Admins can link one or more Low Volume custom objects (formerly known as Transactional Objects) to any CTA type associated with a Company or Relationship. These objects support editing schema and data. You can link an object to any CTA type, and it appears in all CTAs created under that type.
When an object is linked to a CTA type, CSMs can create new records or link existing records directly from the CTA detail viewThis configuration enables admins to configure CTA forms that display or collect information from the CSM directly in the Cockpit.
Only Low Volume custom objects are available for linking in the Linked Objects section.
Prerequisites
Before linking an object to a CTA type, ensure that::
- The object is a Low Volume Custom object.
- The object includes a lookup field to the Company object (GSID).
- For Relationship CTAs, the associated CTA Type is configured for the Relationship entity.
For more information on enabling lookup fields and creating low volume custom objects, refer to:
Add a Linked Object to a CTA type
You can configure Low Volume custom objects to be linked with specific CTA types in the Linked Objects section. Only objects that include a lookup field to the Company object (GSID) are available in the dropdown list.
If Relationships are enabled in your org, you can configure linked objects for the following CTA types:r:
- Company: Applies only to Company CTAs
- Relationship: Applies only to Relationship CTAs
Select the appropriate tab to add linked objects for the corresponding entity type.
For more information on how you can configure linked objects when you have enabled Relationships, refer to the Federated Customer Management article.
To link Objects with CTA:
- Navigate to Administration > Cockpit.
- Locate the desired CTA Type.
- Click the three-dots horizontal menu next to the CTA type and select Edit.
- Click the Add Linked Objects tab. The Add Linked Objects configuration screen opens.
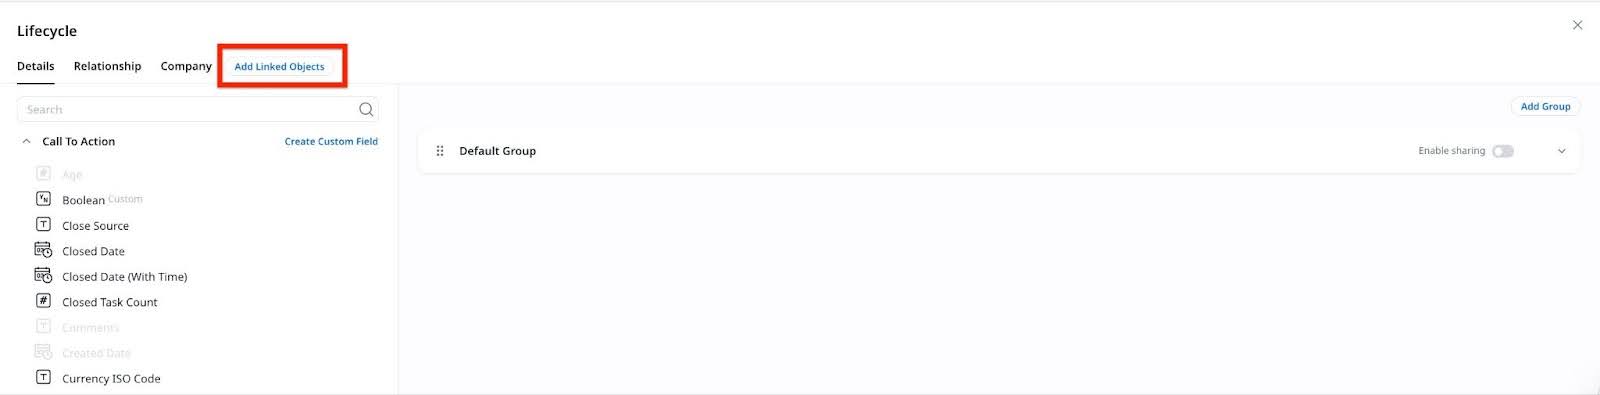
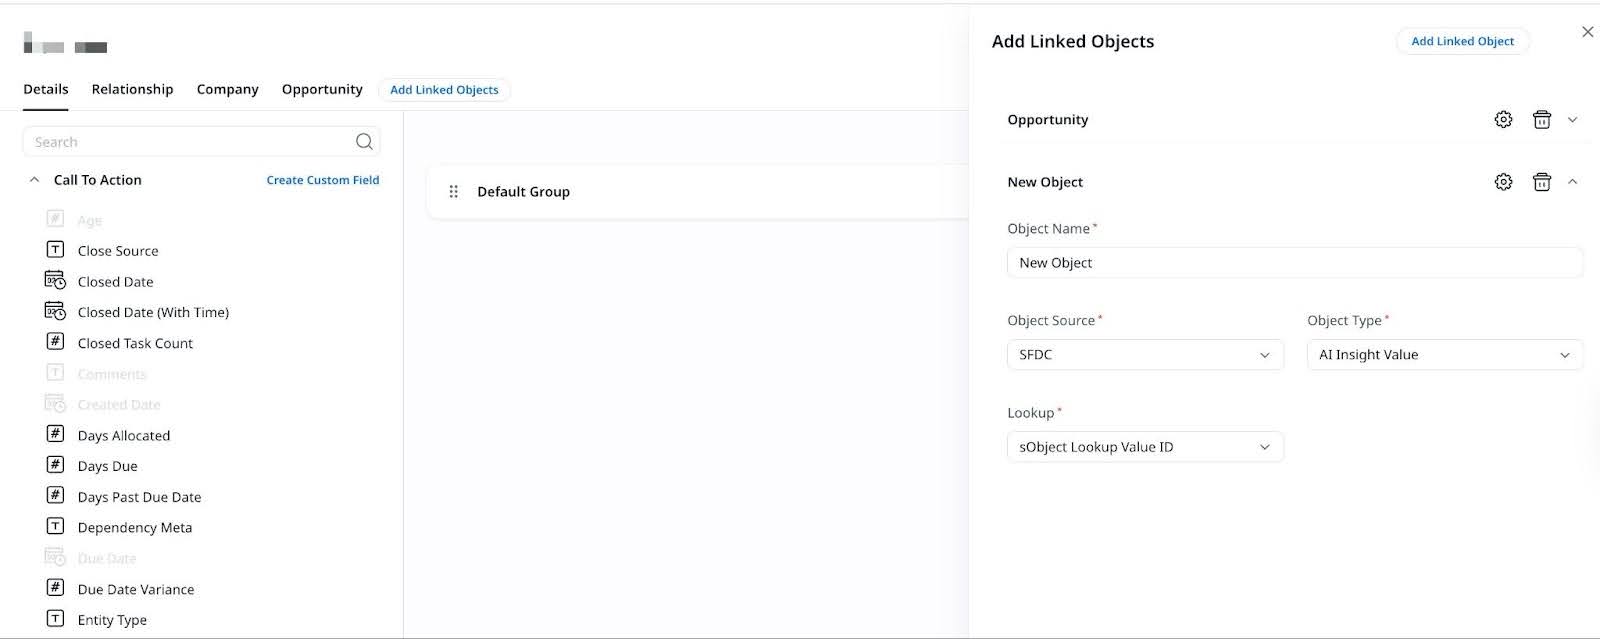
- To start configuring a new object, click Add Linked Object.
- In the New Object section:
- Enter the Object Name.
- Set the Object Source to MDA.
- Choose the Object Type.
Note: Once the object type is selected, additional configuration sections appear, including Search Fields and Filters. - Select the appropriate Lookup field.
- (Optional) Select the Bi-Directional checkbox.

-
Click Save. After saving, a tab labeled with the object’s name appears in the Detail View Layout Configuration, where you can configure which fields are shown to CSMs in the CTA detail view.
For the lookup fields, expand the object and add the required GSID field. This applies to both Salesforce and Gainsight objects.
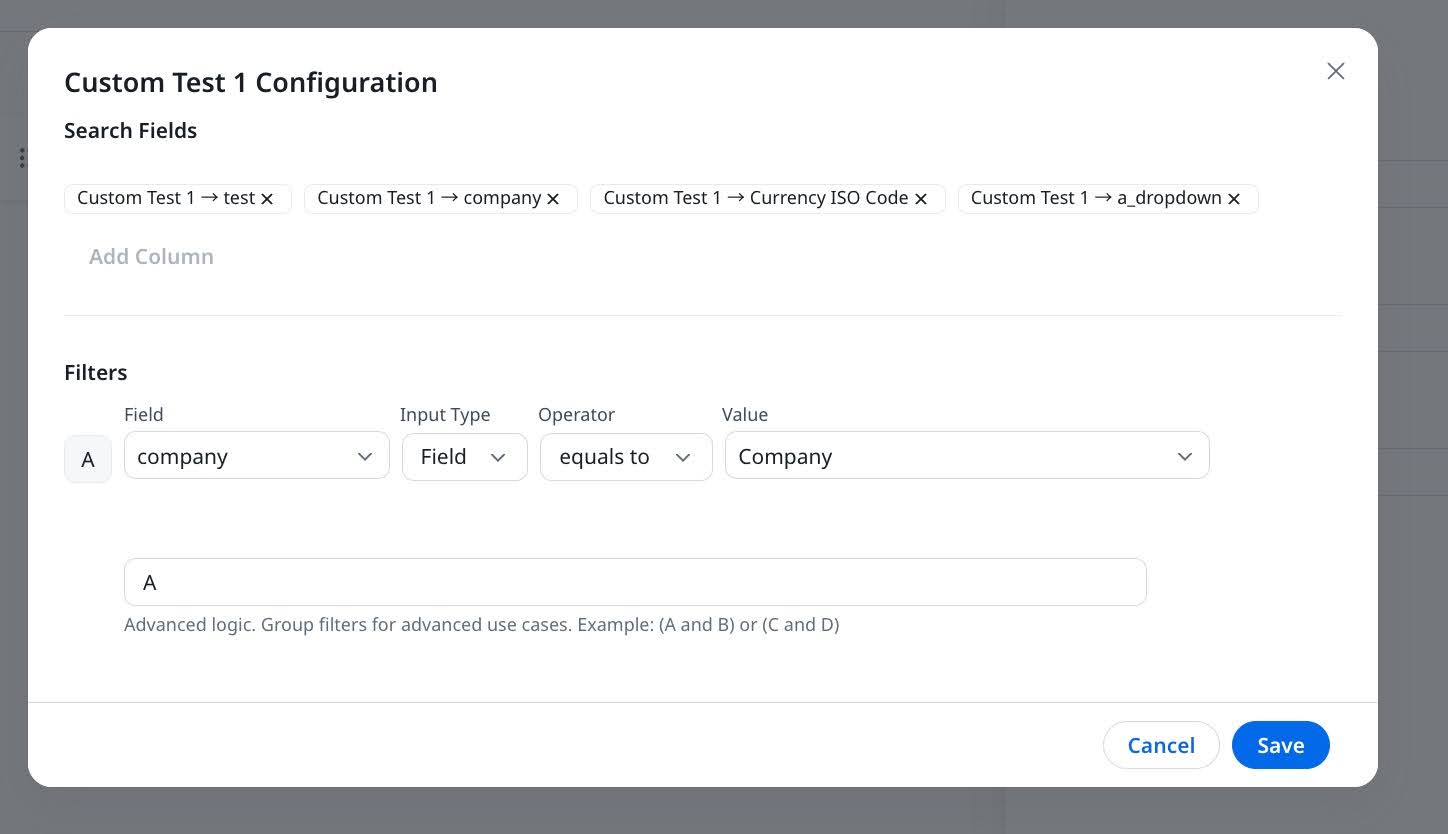
Add Search Fields
Search fields determine how CSMs search for records while linking objects.
After selecting the object type and completing the initial configuration, define how CSMs search for records during CTA creation. The Search Fields section allows up to four fields that end users use to look up records from the linked object within the CTA detail view.
- In the Search Fields section, click Add Column.
- In the Field selector dropdown list, select a string-type field such as Name or Company to enable search.
- Repeat the process to add up to four fields. Each selected field appears as a tag next to the Add Column button.
Note
- The string-type fields you select as search fields define what users can type in the CTA detail view when searching for records from the linked object.
- You can configure a maximum of four search fields per linked object.
Define Filters (Optional)
Use filters to limit the set of records that appear when CSMs search for linked object data. This is optional but helpful when you want to control visibility based on specific criteria.
In the Filters section:
- Click Add Column.
- Select the Field, Input Type (Field or Value), Operator such as equals to, and Value. Use multiple filters to limit record visibility (example: Company = Gainsight).
- (Optional) Use advanced logic such as (A and B) or (C and D)) in the logic input box.
Note: Filters control which records are visible to the CSM during search.
Complete the Linked Object Setup
After saving the initial configuration, perform the following tasks to complete the linked object setup:
- (Optional) Enable Bi-Directional Sync
- Select the correct Account lookup field
- Configure the CTA detail view layout
Enable Bi-Directional Sync
If Bi-Directional was enabled during setup, a reference field is automatically added to the linked object. This field stores a reference to the associated CTA, allowing for two-way traceability between the CTA and the object record.
Use this option if you want to report on CTAs or take actions from the linked object’s side, such as through the Rules Engine or reports.
Select the Correct Account Lookup Field
If the linked object contains multiple lookup fields to the Account object (or Account ID), a dropdown appears next to the settings icon during setup.
Choose the correct lookup field that should tie the object record back to the account or relationship.
This ensures CTAs are properly associated with the correct entity in Gainsight.
If there is only one field that has lookup to the Account object, it is selected by default.
Configure the CTA Detail View Layout
Once an object is linked, a new sub-tab appears in the Detail View Layout Configuration screen for that CTA type.
To complete the setup:
- Navigate to Administration > Cockpit > Call to Action.
- Select the desired CTA Type, then open the Detail View Layouts section.
- Click the tab labeled with the linked object’s name.
- Drag the desired fields from the object into the layout.
This layout defines what CSMs see and can interact with in the CTA detail view.
Add SFDC Linked Objects to a CTA Type
If your org is connected to Salesforce using the Salesforce Connector, you can link SFDC objects to CTA types, similar to MDA-linked objects. This option is visible only in Salesforce-enabled tenants.
SFDC Linked Objects can be configured only through the primary Salesforce connection. For more details, refer to the Multi-Salesforce Connections article.
SFDC-linked objects can be added to CTA types configured for:
- Company: Applies only to Company CTAs
- Relationship: Applies only to Relationship CTAs. To configure this, the object must be associated with a Relationship Type.
Note: For more information on associating an object to a Relationship Type, refer Configuring Associated Objects to a Relationship Type article.
For both Salesforce and Gainsight objects, make sure to expand the object structure during configuration and add the required GSID field. This is important to correctly link the object back to the appropriate Company or Relationship in Gainsight.
To link an SFDC object to a CTA:
- Navigate to Administration > Cockpit.
- Locate the desired CTA Type.
- Click the three-dots horizontal menu next to the CTA type and select Edit.
- Click the Add Linked Objects tab. The Add Linked Objects configuration screen opens.

- To start configuring a new object, click Add Linked Object.
- In the New Object section:
- Enter the Object Name.
- Set the Object Source to SFDC.
- Choose the Object Type.
Note: Once the object type is selected, additional configuration sections appear, including Search Fields and Filters. - Select the appropriate Lookup field.
-
Review your configuration and click Save to apply changes.
Select the Unique Identifier Field
If the SFDC object contains multiple lookup fields to the Account object or Account ID, a dropdown appears next to the settings icon during configuration.
From this list, select the lookup field that should be used to associate the object record with the correct account or relationship in Gainsight.
If only one valid lookup field exists, it is selected automatically.

Configure the CTA Detail View Layout
After saving the linked object, a new sub-tab appears in the Detail View Layout Configuration for the selected CTA type. Select the tab to configure which fields from the linked object should appear in the CTA detail view.
Note
- When a CSM creates a new record from the CTA detail view, the record is added to the linked SFDC object and becomes available in Salesforce.
- The same applies to existing records linked through the CTA, they retain their association with the correct account through the selected lookup field.
Configure Renewal Center Opportunity Objects to a CTA Type
Admins can link the Gainsight Renewal Center Opportunity object (GS Opportunity) to any CTA type from the Linked Objects section. This allows CSMs to view, create, or update Opportunity records directly from the CTA detail view in Cockpit.
To link GS Opportunity, admins must select MDA as the object source, choose GS Opportunity in the object type dropdown list, and enter a custom name in the Object Name field. This name becomes the tab label in the layout.
IMPORTANT: This feature is available only to orgs that:
- Have access to Renewal Center.
- Have the GS Opportunity object provisioned by Gainsight.
For more information, refer to the Renewal Center Overview article.
Example Business Use Cases
- An admin links the GS Opportunity object to a CTA type.
- A CSM creates a new opportunity record from within a CTA.
- A CSM links or unlinks an existing Opportunity to/from a CTA.
- A CSM updates opportunity details directly from the CTA layout.
Configure the GS Opportunity Layout
After linking the GS Opportunity object to a CTA, refer to the Add a Linked Object to a CTA Type section. A new tab labeled with the Object Name you defined appears in the Detail View Layout Configuration for that CTA type. This layout controls which GS Opportunity fields are visible and editable in the CTA detail view.
To configure the layout:
- Navigate to Administration > Cockpit > Call to Action.
- Select the desired CTA Type, then open the Detail View Layouts section.
- In the layout editor, click the tab labeled with the Object Name you provided during setup.
- Drag the necessary fields from the GS Opportunity object into the layout.
- Click Save.
For the GS Opportunity object, field configuration is completed in the Renewal Center Admin screen. If the Go to Renewal Center Admin button appears, click it to open the layout setup in Renewal Center.
For more information on how to set up opportunity fields for visibility and edit access, refer to the Configure Renewal Center article.
For more information on how CSMs create or link opportunities from Cockpit, refer to the Call to Action (CTA) Detail View article.
Configure Detail View Layout for Linked Objects
After linking an object to a CTA type, you must configure its layout in the Detail View Layout section to determine which fields end users (CSMs) can view and edit from the CTA.
To configure fields in the Configure detail view section:
- Navigate to Administration > Cockpit > Call to Action.
- Select the desired CTA Type, then open the Detail View Layouts section.
- In the layout editor, click the tab labeled with the linked object’s name.
Add Fields to the Layout
Use this section to control which linked object fields are visible in the CTA detail view.
- You can add fields to the Default Group or create a new group.
- To create a new group, drag a field into the Drop here to create new group section.
- To use the existing Default Group, drag fields into that section.
At least one field must be added to the Default Group based on the object selected.
Configure Field Properties
Use the Configuration window to define how each field behaves in the CTA detail view.
To configure field properties:
- After adding a field to the layout, click the settings icon on the field to open the Configuration window.
- In the Configuration window, configure the following options:
- (Optional) Display Label: Rename the field label as it will appear to CSMs.
- Editable: Select this checkbox to allow CSMs to edit the field.
- Close Mandatory: Select this checkbox to require CSMs to complete the field before closing the CTA.
Note: Close Mandatory is not supported for SFDC-linked objects. - Default Value: For lookup fields such as CSM, Manager, you can select a default user or value from the dropdown list.
Note: Only the lookup field which is updated in lookup configuration while configuring linked objects does not have those options. Admins have options to make other lookup fields editable or close mandatory.
- Click Save.
Once configured, CSMs can view the selected fields in the CTA detail view. They can also create a new record or link an existing record from the Cockpit list view, depending on the linked object setup.
For more details, refer to the Configure CTA Detail View Layouts article.
From the Cockpit list view, users can open a CTA to access the CTA detail view, where the configured linked object fields are displayed. Users can also create a new record or link an existing record for the linked object from the CTA detail view.
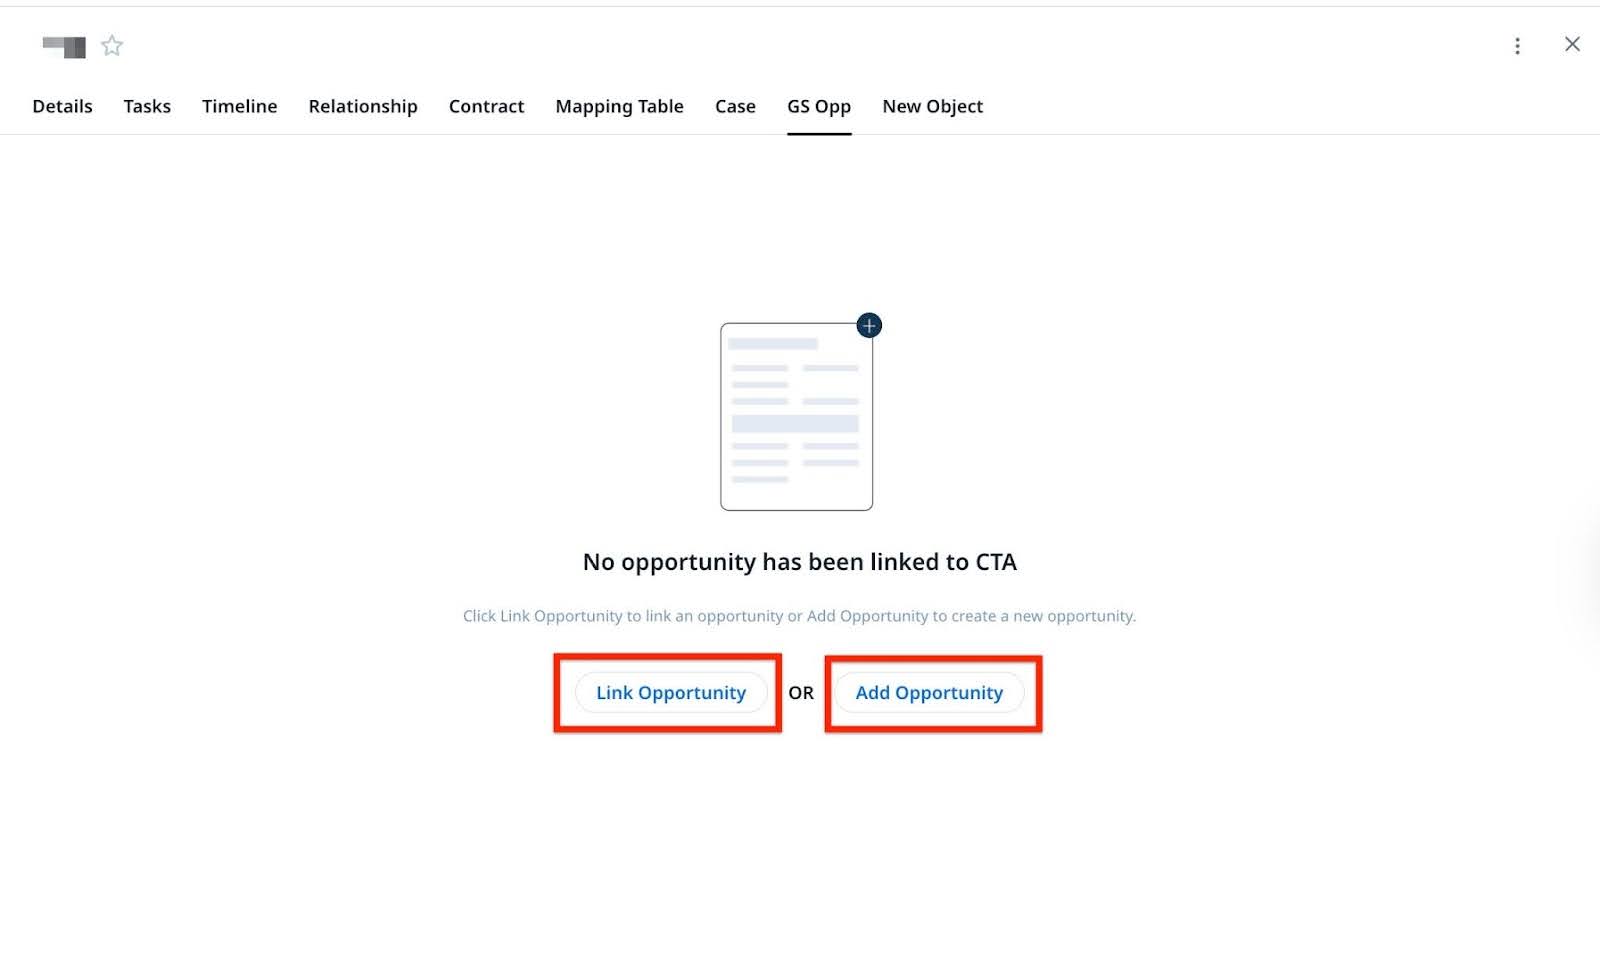
Create or Link Records from a Linked Object
If a CTA has a linked object configured, CSMs can either create a new record or link to an existing record directly from the CTA detail view.
To access the linked object:
- From the left navigation pane, navigate to Cockpit
- In the Cockpit list view, locate and open the relevant CTA such as Risk CTA.
- In the CTA detail view, go to the Linked Objects section.
- Click the tab labeled with the linked object’s name, such as Company CTA or GS Opp.

-
Depending on the configuration, choose one of the following:
- Click Add Opportunity to create a new record, or
- Click Link Opportunity to search for and link an existing record.
-
Follow the on-screen prompts:
- For Add: Fill out the fields in the form that appears, then click Save.
- For Link: Use the search bar to locate a record using configured search fields, select the record, and click Save to link it to the CTA.
The fields displayed in the form and the search behavior depend on the configuration defined by your admin in the CTA Detail View Layout and Linked Object setup. After linking or creating a record, the data appears in the Linked Object tab within the CTA.