Send Emails from Cockpit (via Email Assist and Send Email Option) (Horizon Experience)
Gainsight NXT
This article explains how you can send emails from Cockpit using Email Task and Send Email options.
Overview
Email Task and Send Email features to help you send emails directly to contacts from Cockpit. For example, a CSM might want to send an email directly from Cockpit when they need to reach out to a customer to determine a suitable time to conduct an EBR; or to gather more details about a negative response to an NPS® Survey.
You can send emails from Cockpit using the following methods:
-
Email Task
-
Send Email
Email Task: A new CTA Task Type called Email Task is available for inclusion in Playbooks. Admins can create Email Tasks in Playbooks and associate them with a Journey Orchestrator email template. Once the Playbook is applied to a CTA (via a Rule or manually in Cockpit), the Email Task will be visible to the CSM, and the email template can be customized and sent to contacts of their choosing. For information on how to configure email tasks, refer to the Configure Emails to Send From Cockpit article.
Send Email: This feature allows you to send emails using any email template from Cockpit (within a CTA), without applying a playbook. To allow you to send Ad-Hoc emails from Cockpit, admins must first configure an email template, and then you can select the email template to associate with the email task. For information on how to configure email tasks, refer to the Configure Emails to Send From Cockpit article.
Send Email Tasks
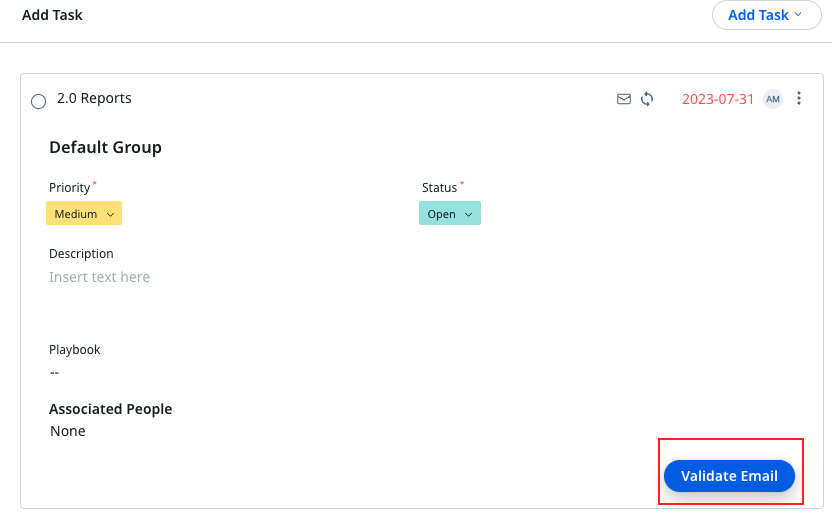
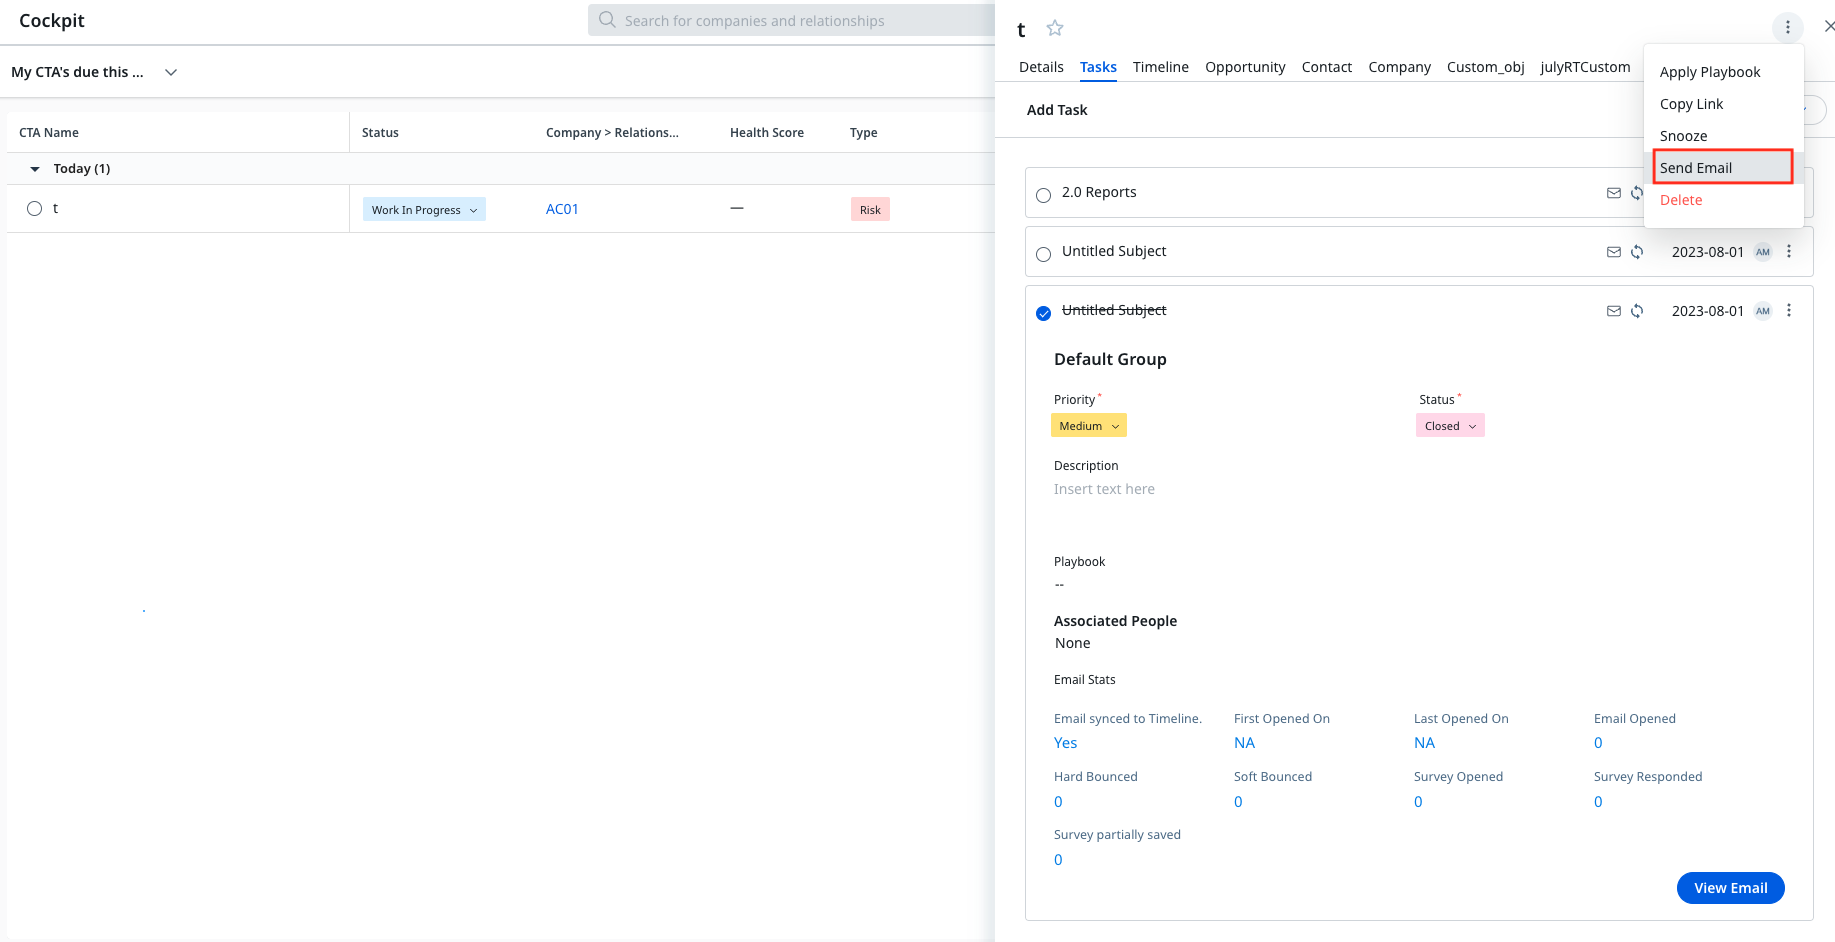
In the Cockpit List View, Cockpit Email Tasks display an email icon next to the Task title. When users click the Task name, the Task Details pane opens on the right with a Validate Email option at the bottom.
Note: Only the owners of Email Assist Tasks can send emails.
To send or save an Email Task:
- Click the Email Task name to view the details in the respective Task Detail View.
- Click VALIDATE EMAIL. The Edit Email dialog box is displayed.
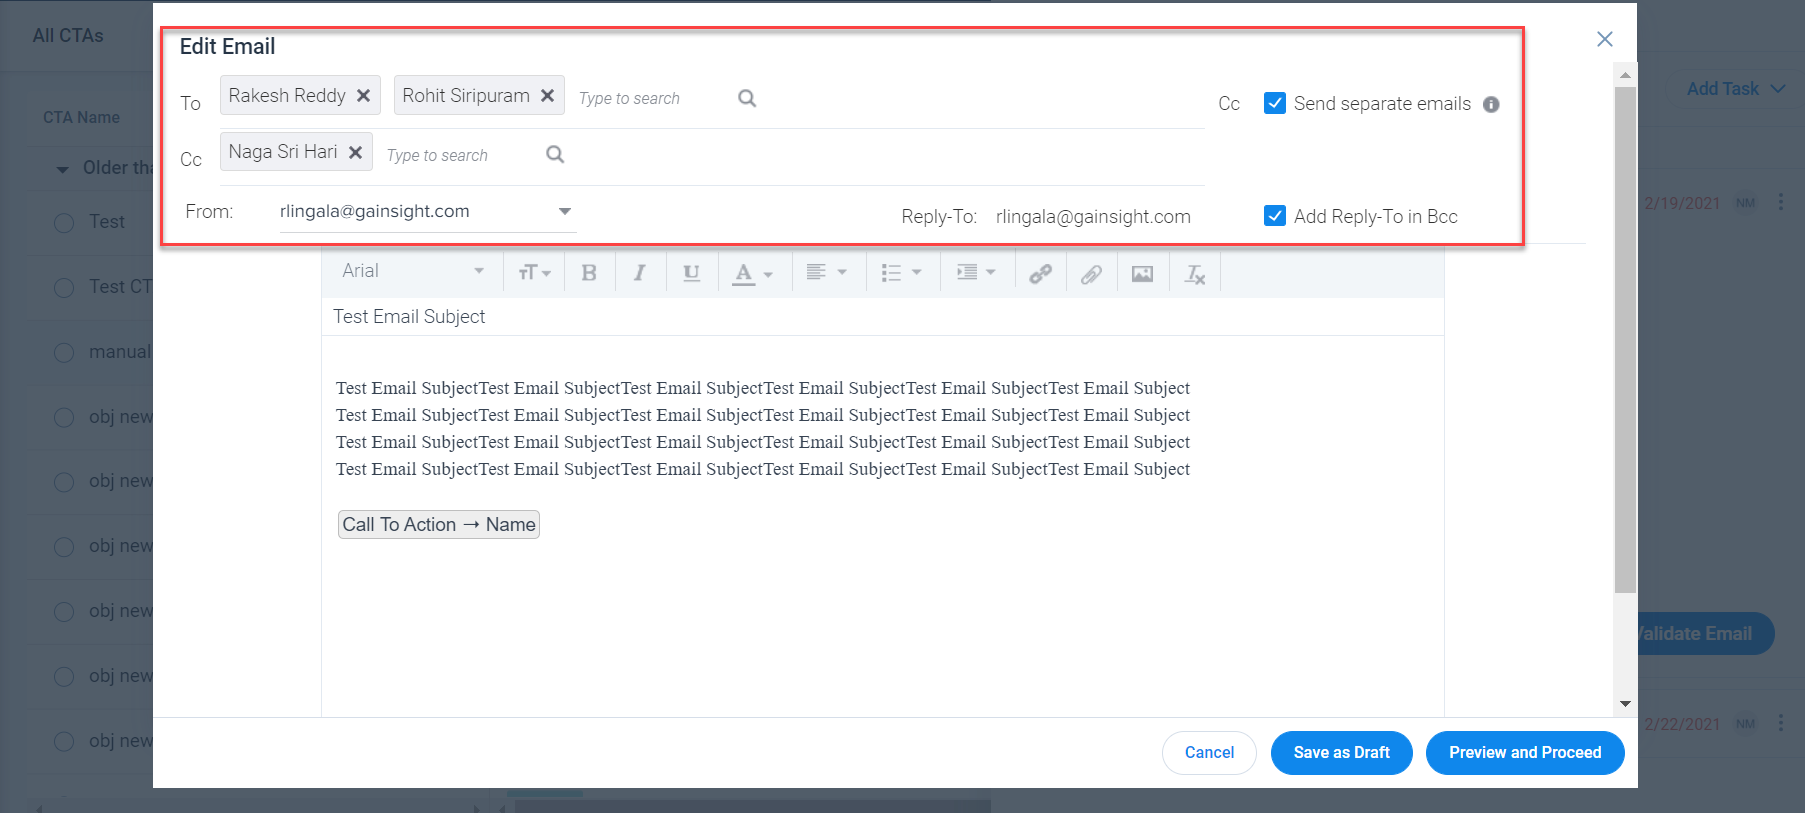
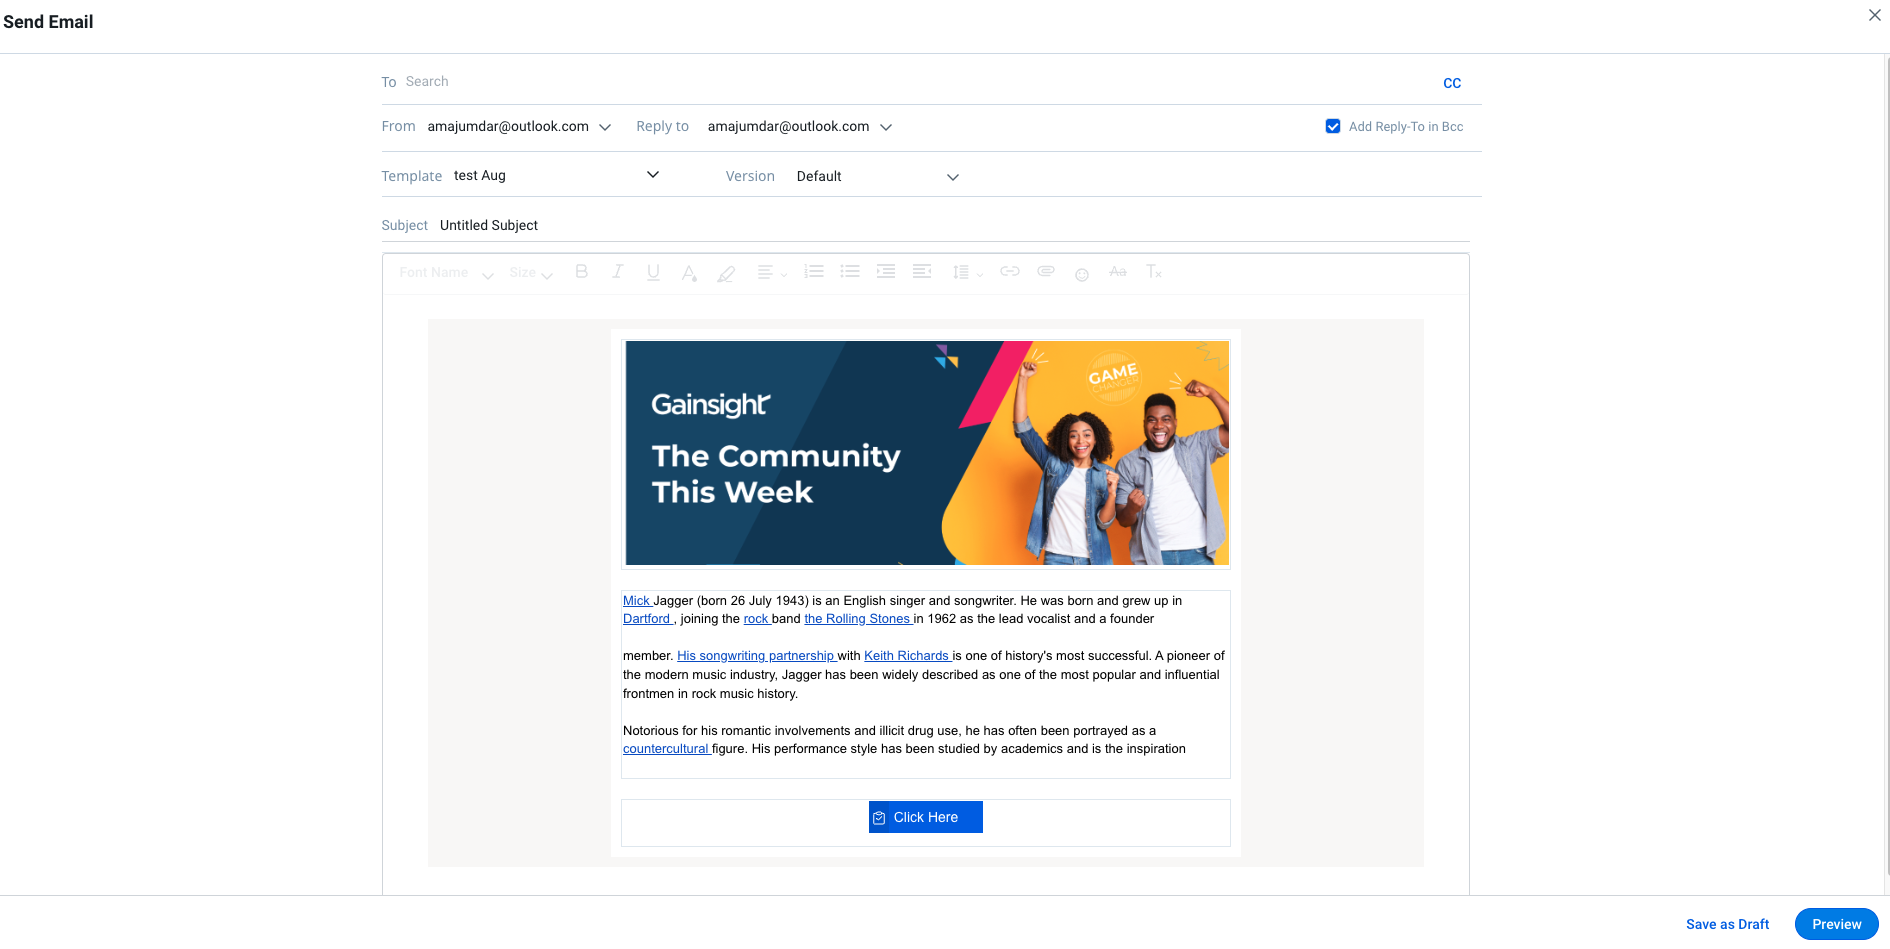
- Enter or select from the following options:
- To: You can add multiple recipients in this section. Search option is provided to search and add the recipients.
Notes:- The recipient’s Email address is auto-populated. For more information, refer to the succeeding section.
- When multiple recipients are added, the Email can be sent to all the recipients only after previewing the Email for each recipient.
- Send separate Emails to multiple contacts: Select this option to send separate emails to individual recipients specified in the ‘To’ section. If this option is not selected, a common Email is sent to all recipients.
- Separate Emails can be sent if the Email template contains:
- Survey
- Person/User object tokens
- Report with Person object filters
- Separate Email threading experience is applicable as follows:
- Applicable only when Send as Separate Email option is selected.
- Supported on Outlook and Gmail.
- Applicable to responses received from the recipient marked in the To field. Email replies from different recipients are no longer threaded together.
- Not Applicable for recipients in the CC and BCC fields.
- Not Applicable for the Out of Office auto-reply emails.
-
Cc: Add contact to send a carbon copy of the Email.
-
From and Reply-To addresses: By default, these addresses are the logged-in user’s Email addresses. You can modify the From address. Select from the drop-down list of options that are populated based on the configuration set in Administration > Calls to Action (CTA) > Account/Relationship > General Settings. For more information on the configuration of From and Reply-To addresses, refer to the Configure Cockpit List View, General Settings, and Reporting Categories article.
-
Reply-To in Bcc: Select this option to add ‘Reply-To’ Email in Bcc.
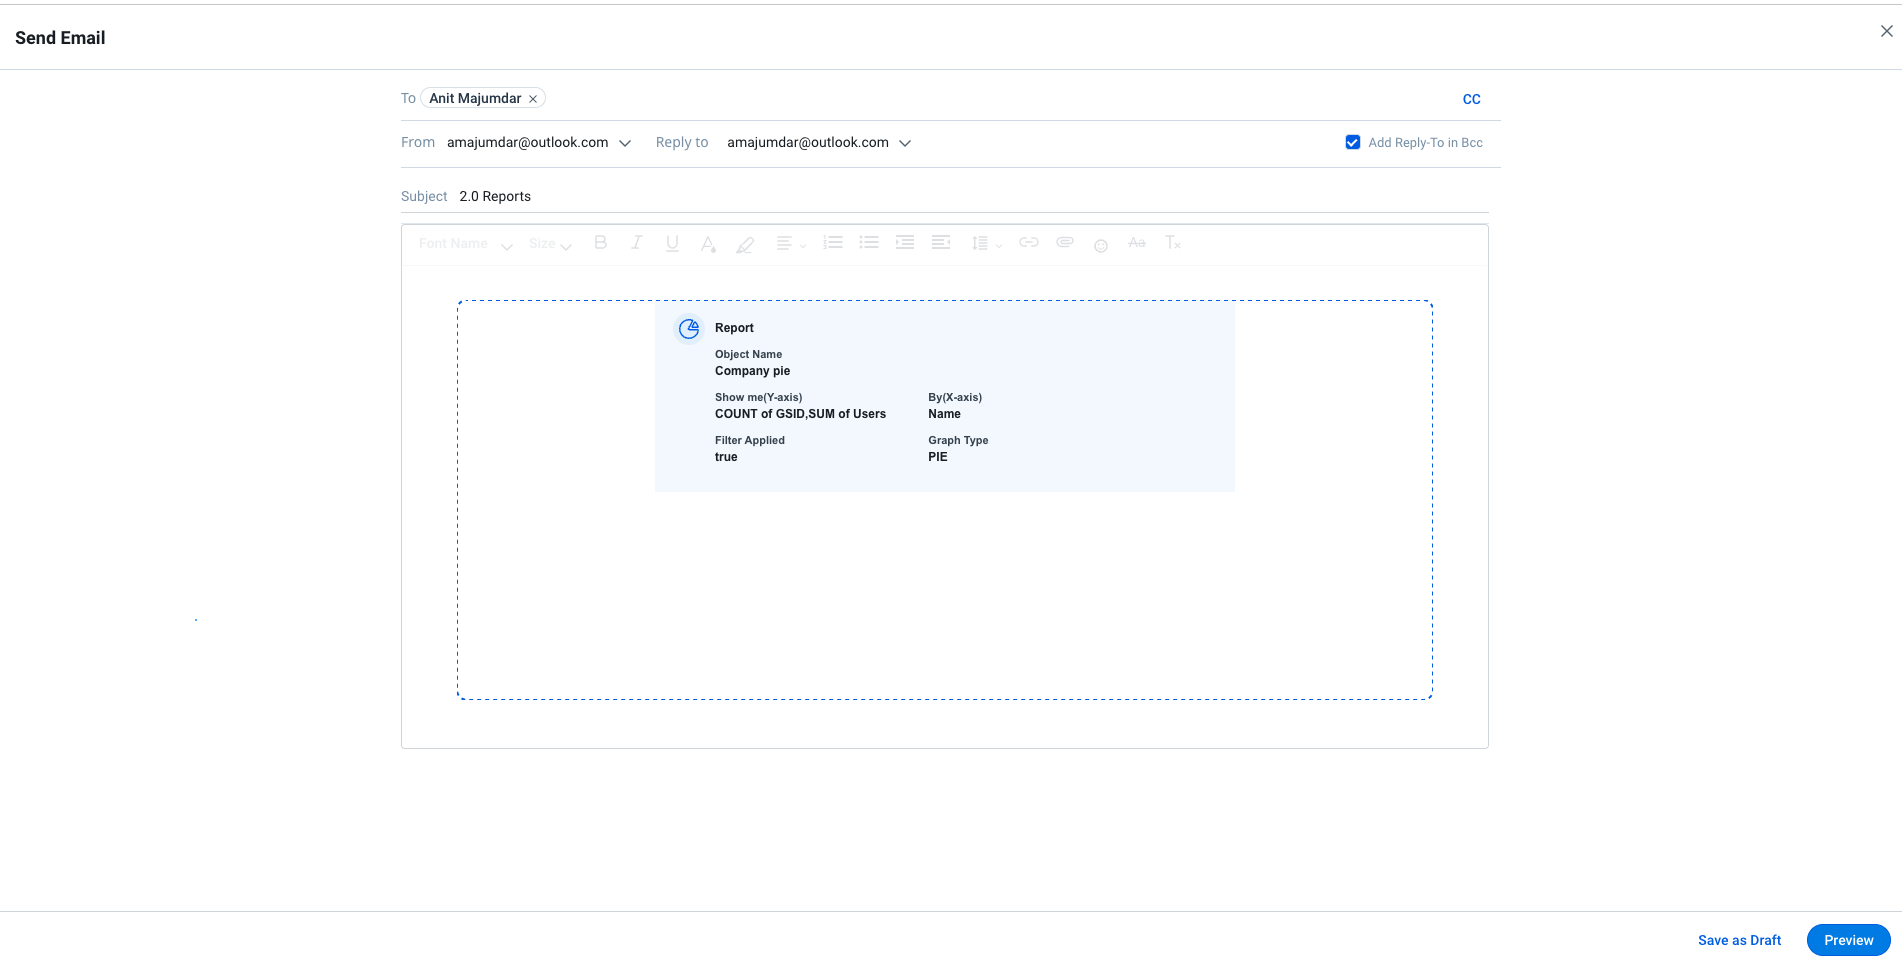
- (Optional) Enter or modify the email template’s subject and body. You can edit/delete a token placeholder if necessary and proceed with sending. You can see the Reports and Surveys tokens are automatically mapped with the values if the selected email template has a default mapping. For more information on how to configure Default Mapping, refer to the Configure Email Templates article.
- (Optional) Add attachments, insert images and hyperlinks, and use the other formatting tools in the email designer. The maximum size of each file you can attach is 2 MB, and the cumulative size of your attachments and email template must not exceed 10 MB.
- If you are not ready to send the email, click SAVE AS DRAFT. Otherwise, click PREVIEW AND PROCEED to preview the email.
- In the Preview Email screen, click:
- GO BACK to edit the email further.
- SEND TEST EMAIL to send a test email to the currently logged-in user.
- SEND EMAIL to send the email.
Notes:- When multiple contacts exist, this button is enabled while previewing the last contact's Email. It is disabled otherwise.
- Use the NEXT and PREVIOUS arrows to preview the next and previous contact's email respectively.
- CANCEL to close the window.
Note: After you send the email, the status of the Email Task is automatically updated to 'closed'.
Auto-populate Email Recipient
The recipient’s Email address is auto-populated. This is based on the source of CTA creation. Consider the following:
-
If the CTA is created manually, the associated contact in the Email Task Detail View > Person field is populated.
- If a person is available at a task level, this person is used instead of the CTA person. If not, the CTA person is populated.
- If multiple CTA or task level contacts are available, a recently used person is populated. If the Email address is not available for the latest person, no recipient address is populated.
- If the CTA is created from Rules Engine: The person selected in the Associated Person field in the Setup Action > Create CTA page is populated.
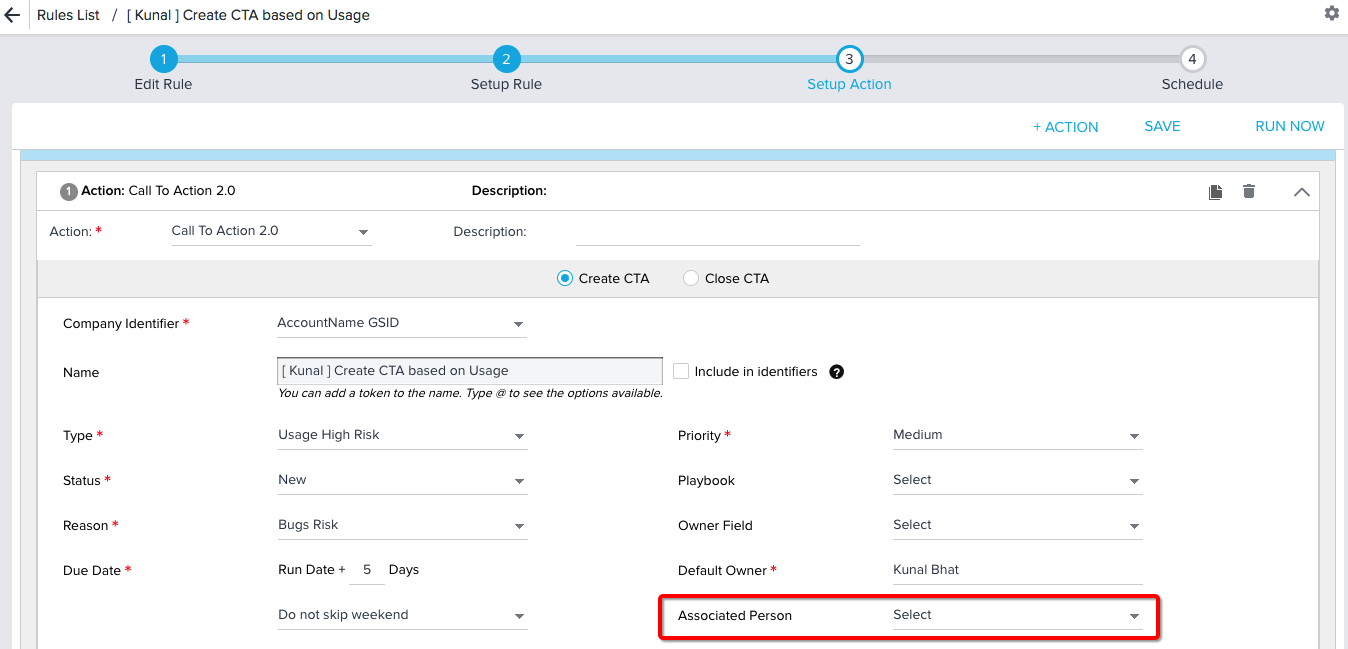
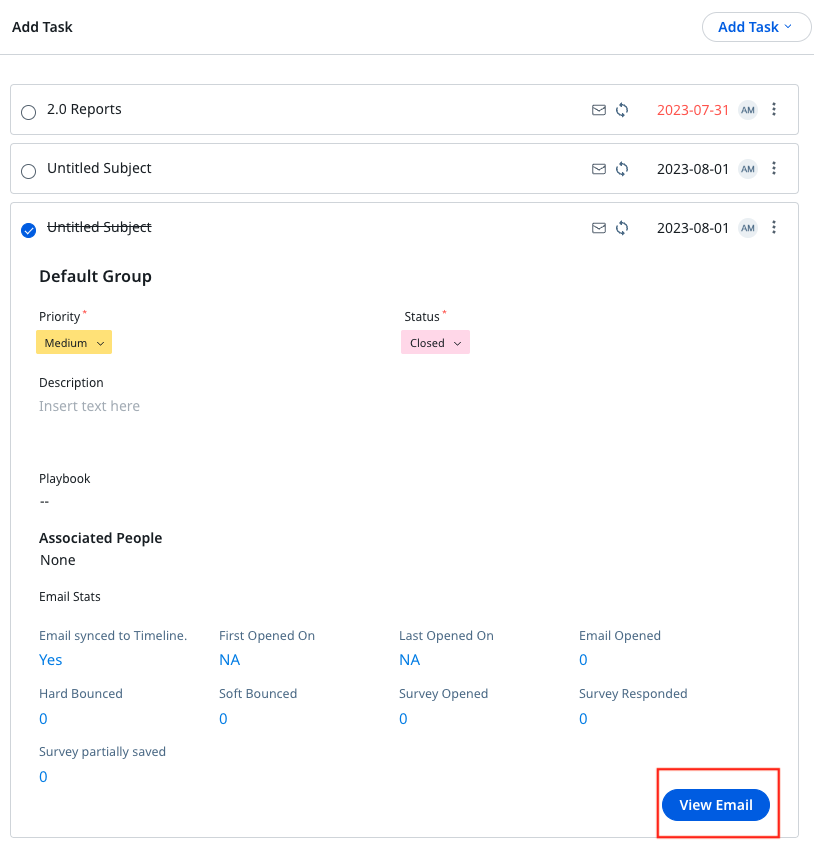
View Email Open Stats
In the Task Detail View, click View Email to view the Email statistics.
If your Admin configures reports on the Email Logs object and displays them in dashboards or in a C360 section, you'll be able to view open/click/view stats for your email. However, Email Tasks are not available in the out-of-the-box Journey Orchestrator Analytics.
Limitations to Tracking Email Opens
- Tracking whether the email was opened by the recipient may not work if it has been purposefully blocked by the customer's email client security settings.
- For Email Assist tasks, Gainsight tracks open statistics by using a small invisible image attached to each email. When that image is loaded, it sends info back to the Gainsight logs to say that the email was opened. This tracking method is fairly standard among email providers.
- With Email Assist, sometimes the tracking image is blocked when the email is received. Unless the user clicks "Show all images" in the email, we cannot track whether or not the email was opened. This is a common limitation that all email service providers encounter.
- In Journey Orchestrator emails, the tracking link itself is embedded in the URL, so this is not an issue.
- On a related note, if the contact in 'To' forwards an email to 10 other contacts, then those 10 emails will be tracked against the contact's name. The open rate count will be added against the 'To' ID when the forwarded email is opened.
Managing Email Responses
If a recipient responds to your email, the response will go directly to your email inbox. There is currently no way to respond to them via the Email Task. If you wish to receive a copy of the email in your own inbox, enter your email address in the CC line.
Track Email Assist tasks in Timeline
Turn on the Automatically track email assist emails in a timeline toggle switch to track the Email Assist tasks in Timeline. For more information, refer to the Configure General Settings article.
Send Email (Ad-Hoc Emails) from Cockpit
Send Email feature allows you to send emails using any email template in a CTA, without applying a playbook. For example, a Sales Representative will call the customer to discuss the renewal, and based on interaction, they must send out a follow-up email.
Prerequisites
- Sending emails from the cockpit can be enabled or disabled based on the CSM’s requirements on the Email Configuration page. To enable this functionality, refer to the Configure Emails to Send From Cockpit article.
The advantages of sending emails from Cockpit are:
- Email Task will be created within the CTA which allows for better tracking.
- You can use Email Analytics.
- Email and its attachments are automatically logged to Timeline.
- The following are the supported attachment file types; jpg, jpeg, gif, png, bmp, pdf, doc, docx, txt, ppt, pptx, xls, xlsx, and csv. The number of emails and the attachment size limits to be synced is based on the Timeline Activities limits. For more information, refer to the Log Customer Emails as Timeline Activities article.
Note: If the size and number of attachments synced are higher than the permissible limits, the system automatically selects the random attachments as per the limit. An email notification is sent to the concerned user about the number of attachments skipped, but not the exact names of attachments.
Limitations:
-
Multi-version templates are not supported while sending emails from Cockpit using Send Email feature. Only English version templates are supported. In case, if you want to send out an email in a different language using Send Email feature from Cockpit, you can follow the workaround explained in the below-mentioned use case.
Workaround:- In the Email Templates page, for example, users must create a template in the Japanese language separately and then use that particular template while sending emails to Japanese customers using the Email Assist feature.
- In the case of Survey templates, users must create a survey also in the Japanese language. Then only users can access that survey in Japanese.
- Users cannot resolve tokens in email templates using lookup fields in the Person object. As a walk around, users can directly resolve the tokens using a Person object. For example, users can resolve tokens using Company Person > Person > First Name instead of Company Person > Person ID > First Name.
- When sending an email, the CC and BCC recipients will only receive one copy of the email which could be of any random recipient, and not the copies for all the recipients, if:
- There are multiple recipients in the TO list
- One or more recipients in the CC/BCC list
- The subject of an email is the same
- The body does not contain any Reports
Workaround: Use tokens in the subject of the email to differentiate the recipients to receive a copy for every TO recipient.
To send email from Cockpit:
- Navigate to Cockpit > List.
- Click CTA Name from which you want to send an email or associate an email task.
- Click three dots on the upper right corner of the CTA Detail View.
- Click Send Email.
-
Search for the contact to whom the email has to be sent.
-
Select the email template from the Template dropdown list.
Notes:
- Admins can control which email templates can be accessed by you when they are using the Send Email option. For more information on how to restrict, refer to the Create Journey Orchestrator Email Templates article.
- CSMs can select a version of the email template. You can select multiple versions of an email template to scale personalized customer communications.
For more information on how to create multiple template versions, refer to the Create and Send Multi-Version Emails article. - The version of the template selected is applicable to all the recipients.
- Multi-version template selection is currently supported only for Send Email option in Cockpit.
- Once the version is selected, it cannot be changed if the Email is saved as draft.
- Multi-version template selection is currently not supported in Playbook (admins cannot add a template version into Playbooks as email tasks) and Gainsight Assist Plugins.
- You can see the Reports and Surveys tokens are automatically mapped with the values if the selected email template has a default mapping. For more information on how to configure Default Mapping, refer to the Configure Email Templates article.
The following image shows the Default Values displayed for Surveys and Reports when you choose to send email via Send Email option.
Notes:
- You can also edit/delete a token, if you wish to, before sending out an email.
- If a token in the email is unresolved, CSM has to manually delete the token before sending out the email. Otherwise, you will not be able to send out the email.
- Tabular Reports can be selected in the Report tokens.
- Tabular Report displays a table of only 5 columns and 20 rows.
- Click PREVIEW AND PROCEED. The Preview Email window appears.
Based on the contacts chosen, the tokens are replaced with the correct values.
Note: Once you send out an email, an email task is created in a CLOSED state, for tracking purposes. If the email is left in draft mode, the email task is created in an OPEN state.
General Tips
- When copying/pasting into an email, highlight the font & re-size to ensure the best results.
- CC yourself to get a copy of the email in your personal email (you can also ask your Admin to add an email address to Administration > Communication > Email Configuration > Compliance to receive BCC's of all Cockpit emails).
- Type an email signature if you’re interacting with someone that you don’t very often (custom signatures are not possible currently).
- Only Task owners can send email tasks, but you can easily re-assign task owners as needed.