Instrument Your Product using In-App Mapper
This article explains how to use In-App Product Mapper as a modeling and instrumentation tool.
Overview
Product Mapper allows you to model your product using a simple and powerful hierarchical tree structure that is designed to help you quickly and effectively map your product’s features and associate the tracked user events into the corresponding features and modules with zero coding.
Prerequisite
To use Product Mapper, ensure that the Gainsight PX tracking code is configured in your application. Anatomy of Product Mapper. For more information, refer to the Install Gainsight PX on Your Web App article.
Instrument Your Product
Product Mapper is an easy to use way of describing your product features with a simple point-click-describe method. Modules and features can be organized to match your application. For example, you can organize by modules and features or you can nest sub-modules under modules and add features at any level.
To map your application:
- Navigate to Product Mapper from the main menu.
- In the Map Product In-App section, click Get Started.
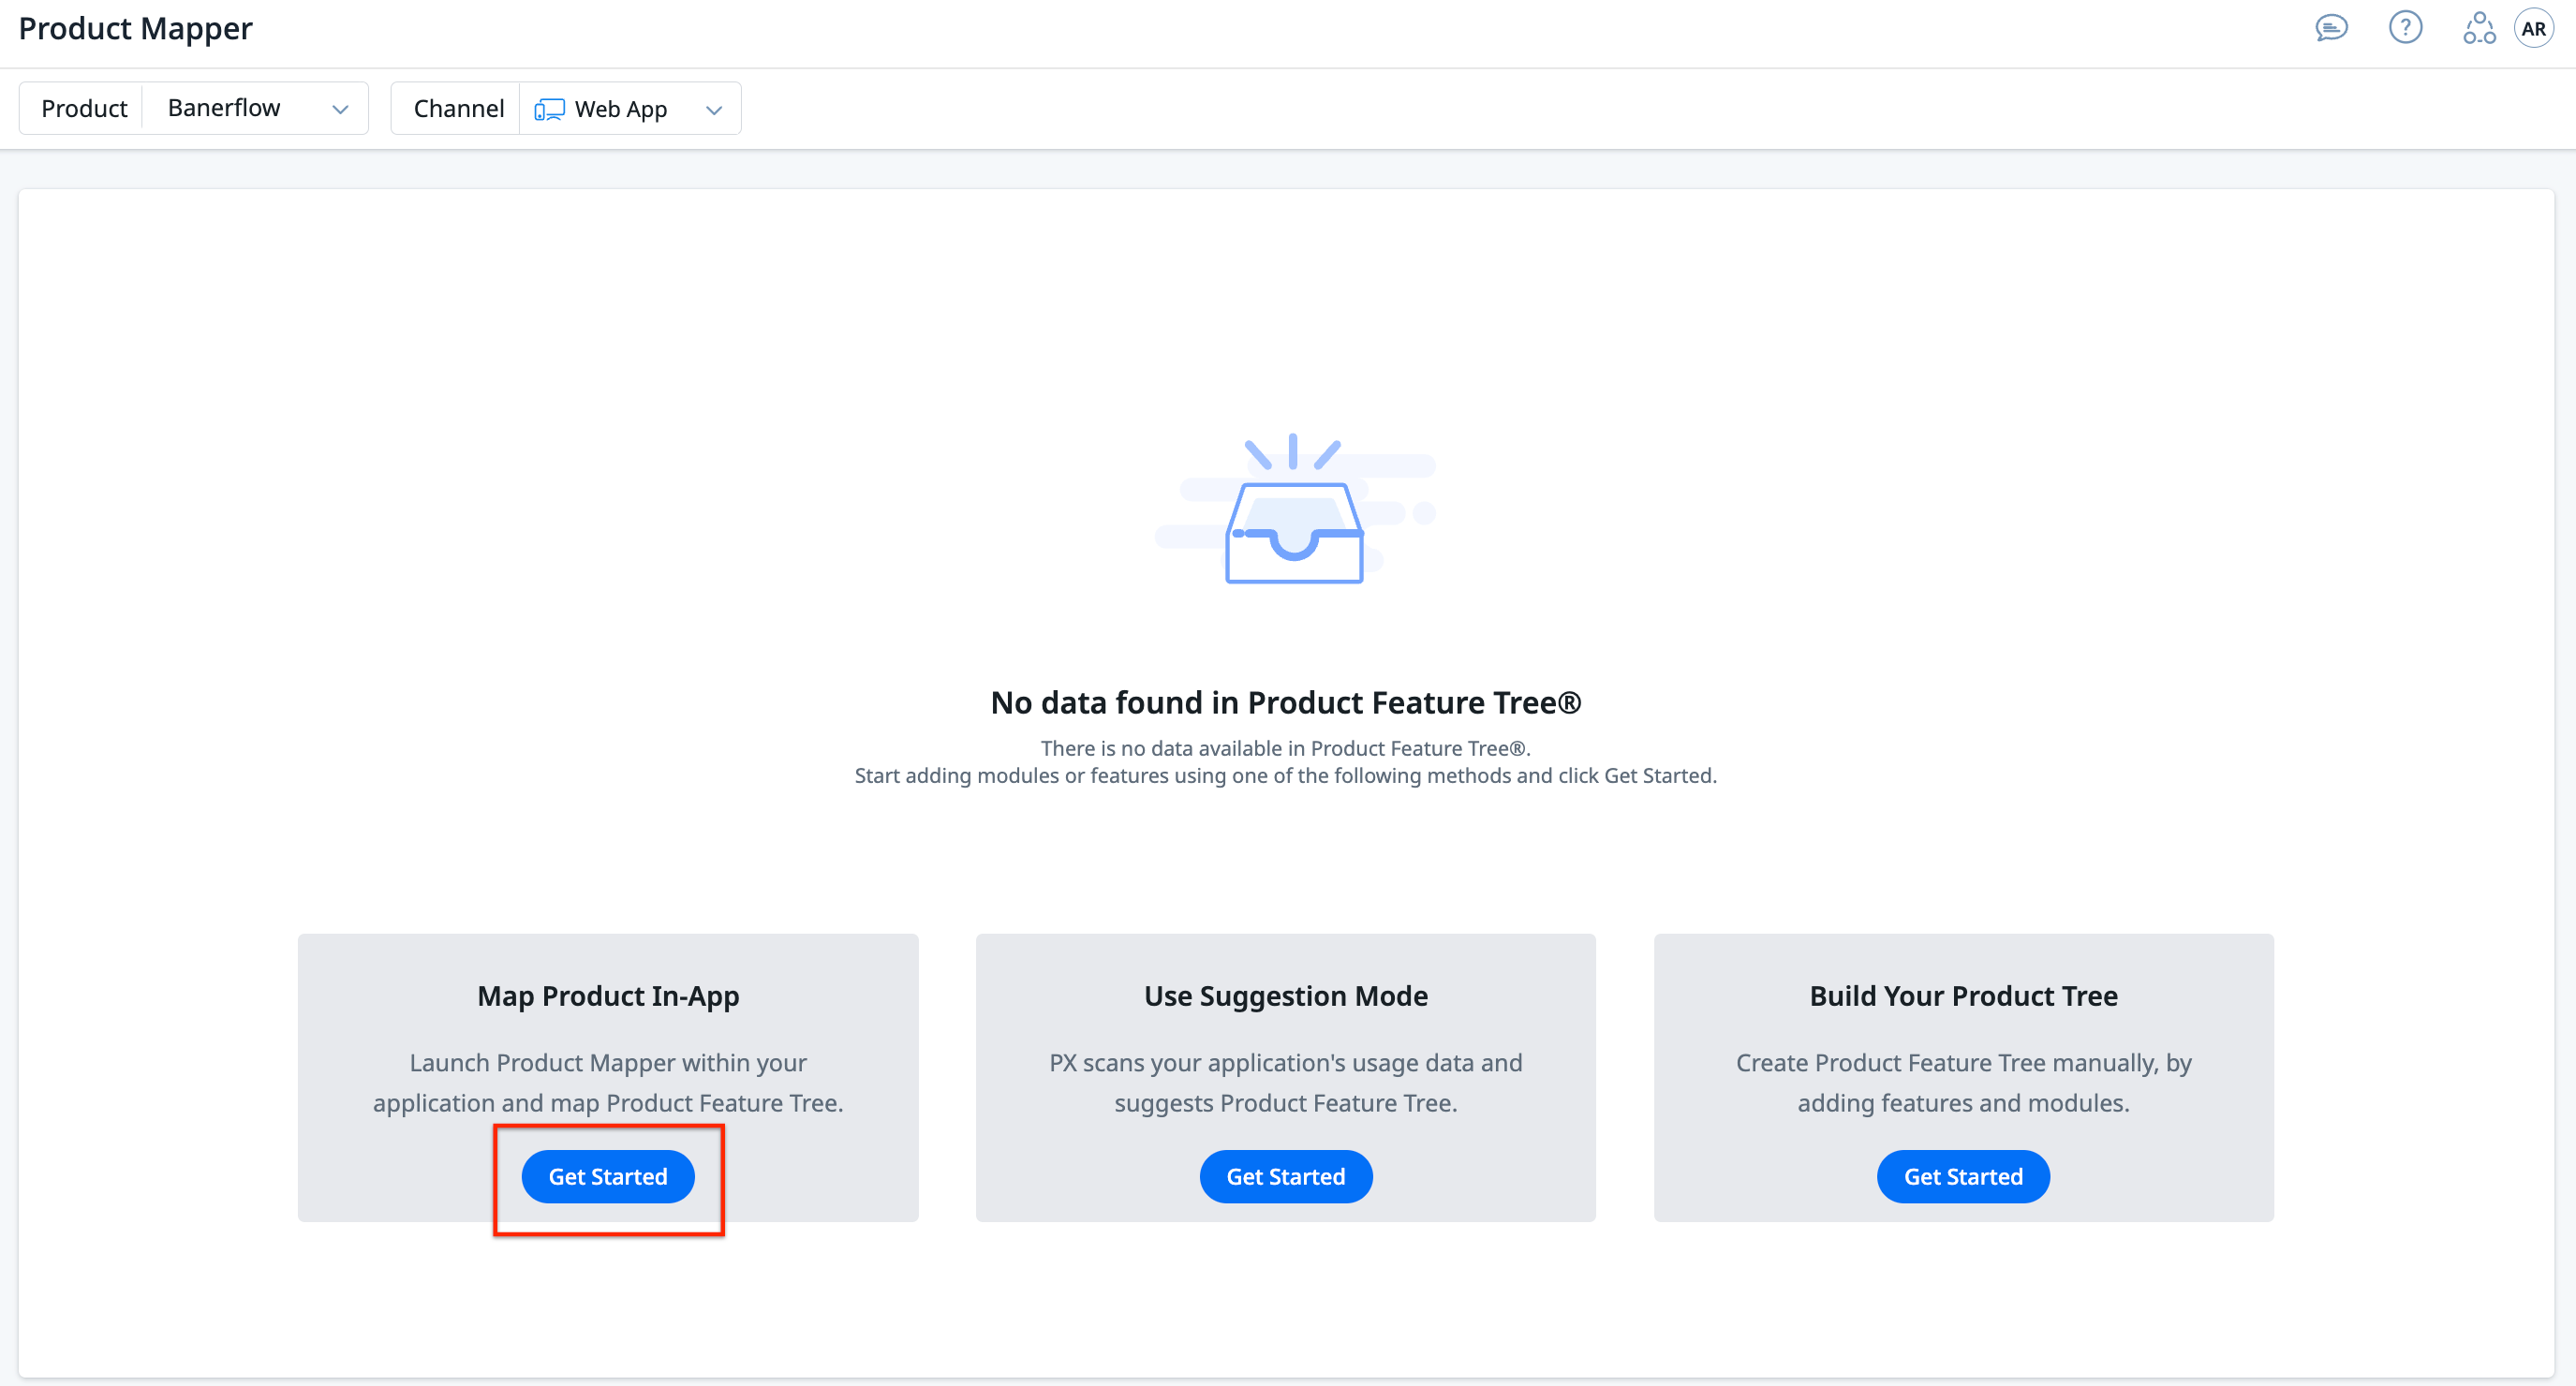
- In the Launch In-App Product Mapper window, enter the URL of your product.
- Click Launch. Gainsight PX displays the In-App Mapper in your application.

In-App Product Mapper helps you organize your product's features into a hierarchical tree structure directly on your application’s interface, for a seamless user experience. To instrument your product:
- Add modules
- Add features
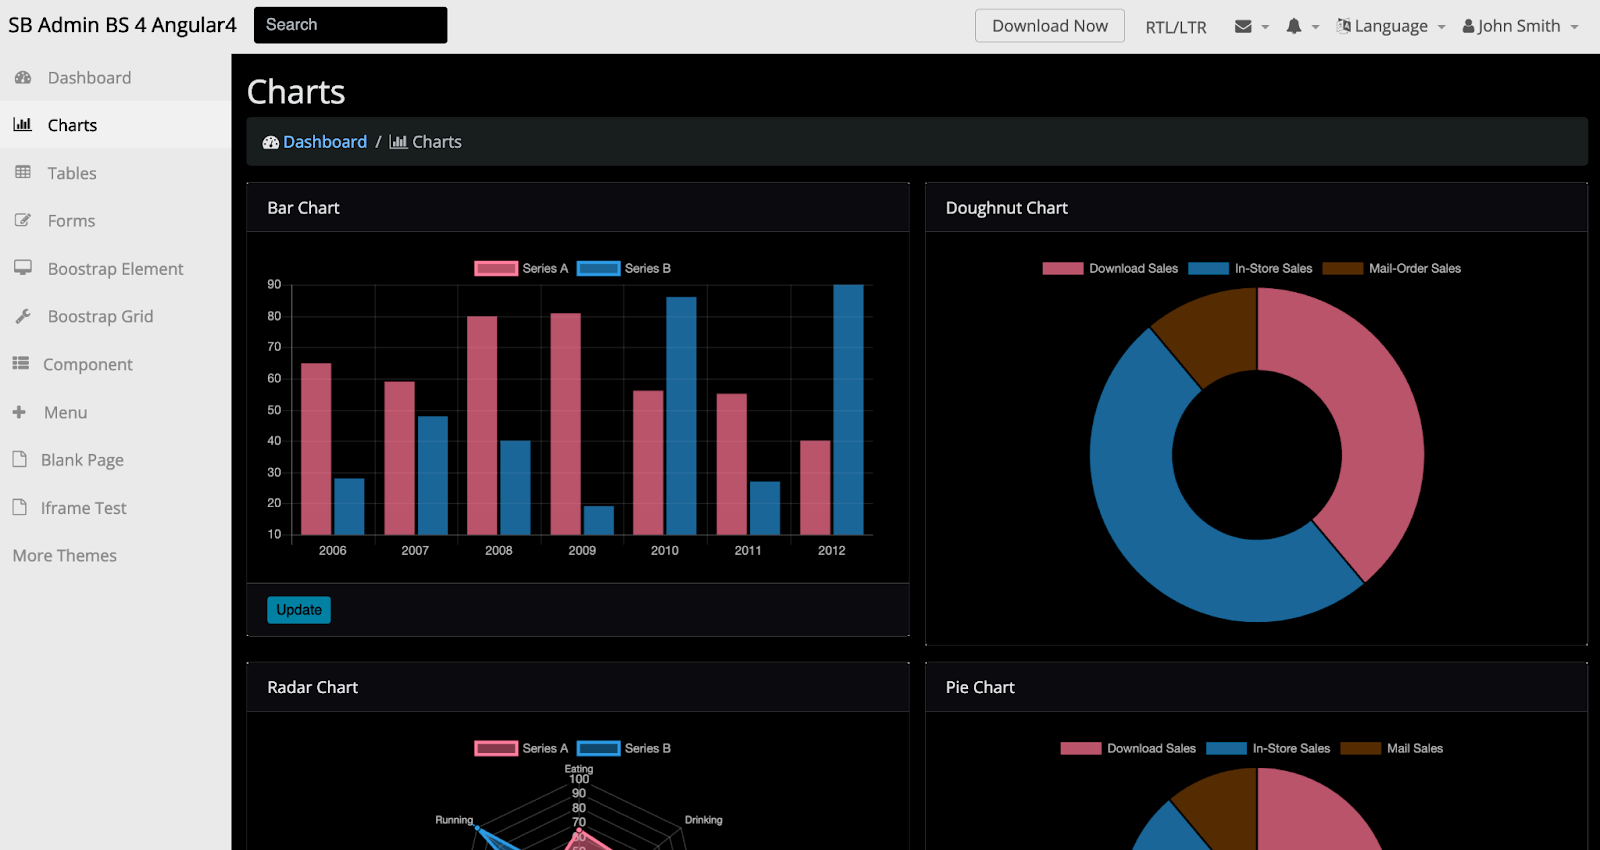
For demonstration purposes, the following demo application is used to demonstrate the process of identifying modules and features. Gainsight PX recommends applying the same process to your application.
Add Modules
A Module in Product Mapper represents a module in your product which can be a section, tab, or window of your application. While modeling your product, use modules and sub-modules driven by the way you describe your product and the way the UI is built.
To create Modules:
-
In the floating mapper, click the Add button and select Module.

- Enter the module name and press Enter. A new module is created.
- (Optional) To create nested modules, click the Edit icon of parent module and select Add Module.
- Continue to add modules or sub-modules corresponding to sections of your application.

You can see that the application is modeled into a product tree. This product tree has many modules; Dashboards, Charts, Tables, and so on. Collectively the modules form the product tree of the application.
Add Features
A feature in Product Mapper represents a feature in your product. Once you have added modules, you need to add features for each module to track various metrics on your web page. The In-App Mapper provides you with an easy click-and-tag experience to map UI elements and create features in Product Mapper.
While using the In-App Mapper, you can tag and create features using either of the following ways:
Add Feature to a Module
Adding a feature nested within a module helps you add multiple features of your product that may reside on the same page or section.
To add a feature:
- In the product tree, click the Edit icon of the parent module.
- Click Add Feature.
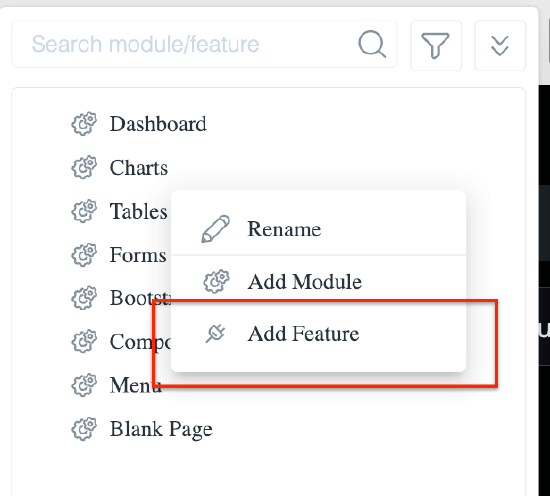
- Enter the feature name and press Enter. A new feature is created.
- Continue to add features for modules or sub-modules corresponding to your application.

Add Rule as Feature
Adding a rule directly as a feature allows you to create features that are not part of any module or sub-module, and have to be tagged independently. Such rules will be created at the parent level (level zero) of the feature tree.
Business Scenario Example: Consider you have a universal search present in the header of your application, and you wish to track each time the search box is clicked. Since the search box appears across your application, you may want to track it independently, without tagging to a specific module. For such a scenario, you can create a UI Element rule as a feature.
To add rule as a feature:
-
In the floating mapper, click the Add button and select the rule you wish to create. Ensure that there is no item selected in the product tree.

-
Create and save the rule to add it as a feature in the tree. For more information on how to create rules, refer to the Add Rules section.
Add Rules
Features consist of rules that are mapped to events from your application. The following are the types of rules you can use in a feature:
- URL Rule
- UI Element Rule
URL Rule
A URL rule is used to track the pageview event. In a single-page application, Gainsight PX generates a pageview event on URL change even if the page is not reloaded.
To create a URL rule:
- In the product tree, select the feature in which you want to create the rule.
- In the floating mapper, click the Add button and select URL Rule.

- Enter a name for the rule.
- In the URL Details section, enter the URL of the page to be tracked. In this example, the URL of the Charts page is entered. This tracks the number of pageviews for the Charts page.
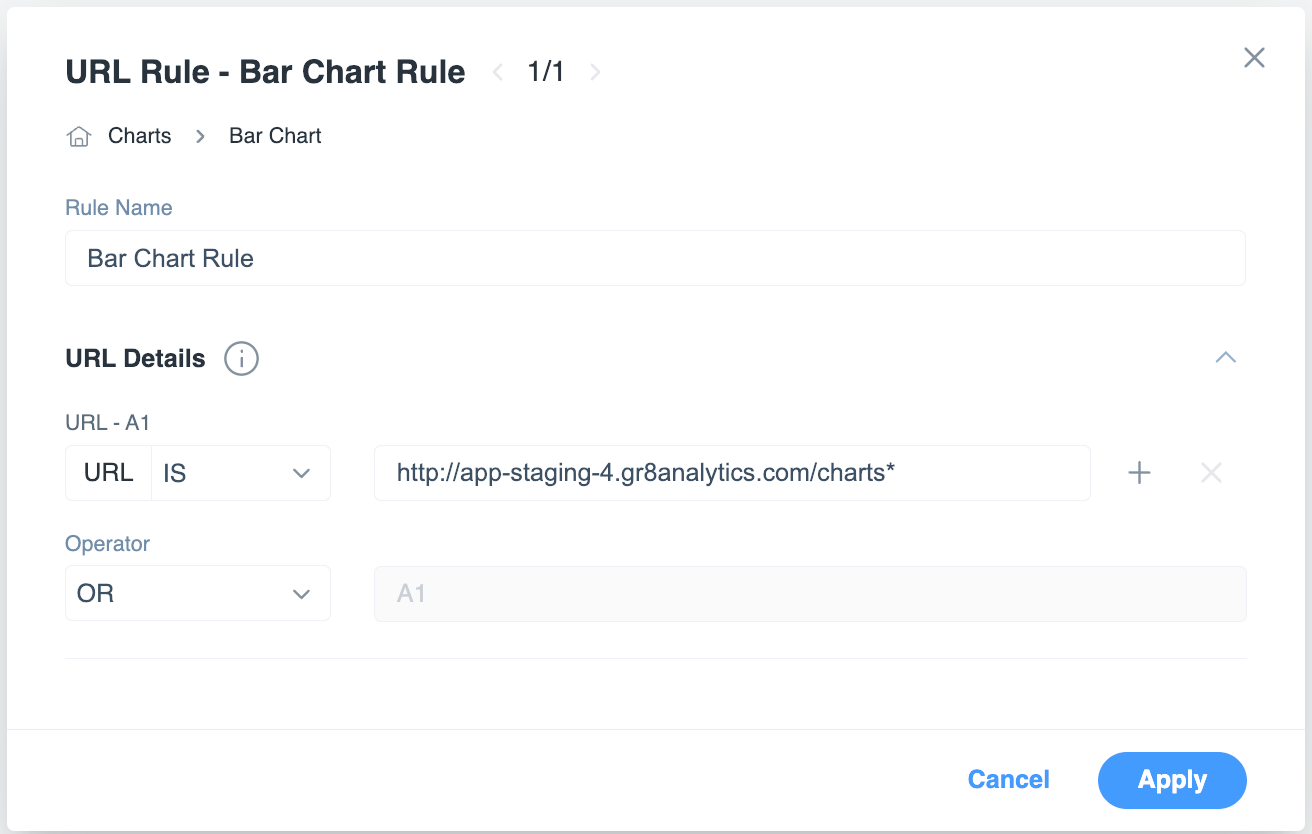
In the above example, whenever a user opens the above URL (accesses the Charts page), the rule is matched and the count of the number of Charts views is incremented by one.
- Quick Tip: Use Wildcards for multiple instances of a URL. Click to expand.
- You can use a Wildcard (*) to match multiple instances of a URL. Additionally, you can also use wildcards to match a rule. Consider a scenario in which you have multiple URLs for the Home page (for instance, Home/v1, Home/v2, Home/v3 and so on), but all three URLs redirect to the same Home page. In such cases, you can use the asterisk (*) wildcard to match all instances of the Home URL, as shown below:
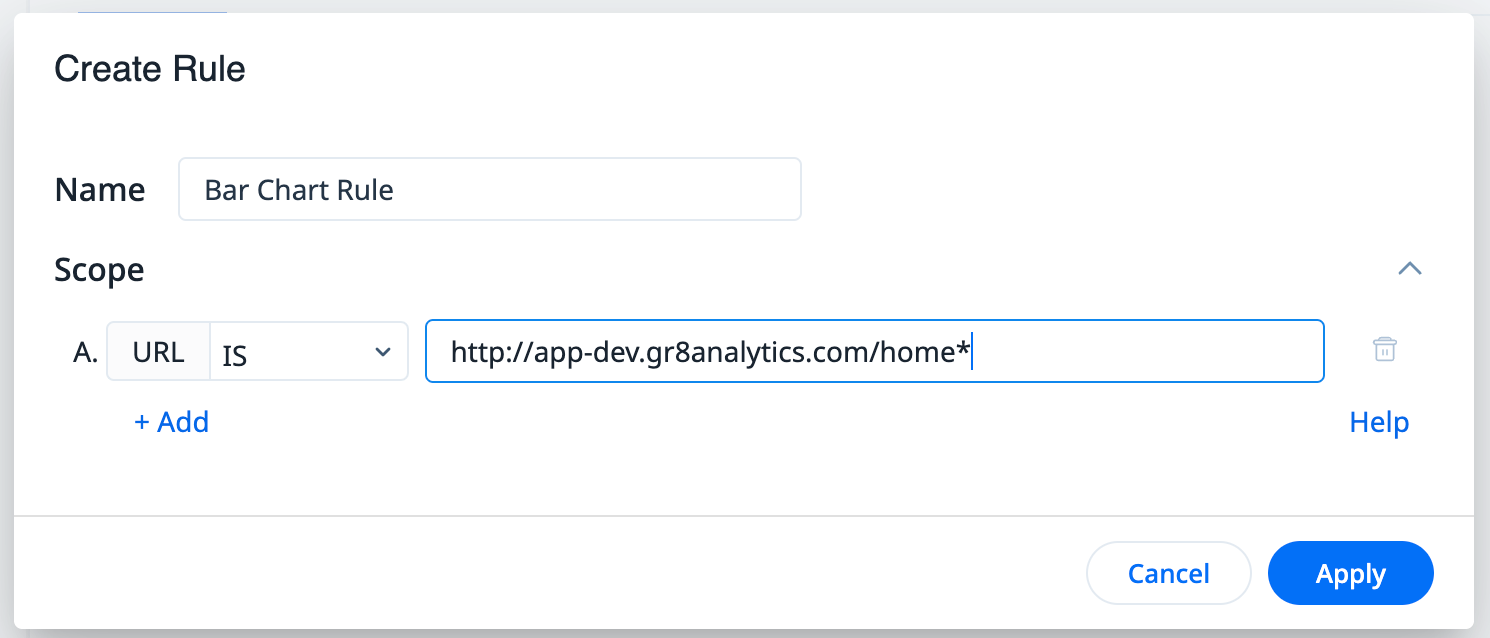
In this case, the Home page view is incremented, irrespective of the URL used to access the page.
You can also use the wildcard at the beginning of the URL in case you have multiple instances of the URL.
- (Optional) Click + to add multiple URLs.
- In case of multiple rules, define the logic from the Operator field.
- Click Apply. The rule is created in the selected feature. Click Rules to view all rules created for the selected tree item.

UI Element Rule
The UI Element rule tracks the number of times a clickable UI element (such as button) is clicked by matching against the DOM element using a unique CSS Selector. In-App Mapper allows you to click-and-tag UI elements to create accurate rules. This brings a unified rule creation capability for CSS selectors and texts.
Create UI Element Rule
To create a UI Element rule:
- In the product tree, select the feature in which you want to create the rule.
- In the floating mapper, click the Add button and select UI Element Rule. Alternatively, you can press Control + M on the keyboard to start mapping.
- Click the UI element you want to use for the rule.
- In the UI Element Rule window, enter a name for the rule.
- In the UI Element Details section, verify the CSS selector chosen based on the UI element clicked.
- (Optional) Click Show Advanced Selector Configurations if you wish to select a different CSS selector or enter a custom one.
- (Optional) Click Change Mapping if you wish to change the UI element tagged to the rule.
- Click Apply.
Create UI Element Rules with Text Matches
You can use the Text Match option to create features with CSS plus text match. This helps in preventing applications with dynamic UI elements from experiencing CSS selector match issues, and provides flexibility to map the unique elements faster.
To create a UI Element rule with text match:
- In the floating mapper, click the Add button and select UI Element Rule. Alternatively, you can press Control + M on the keyboard to start mapping.
- Click the UI element you want to use for the rule.
- In the UI Element Rule window, enter a name for the rule.
- In the UI Element Details section, verify the CSS selector chosen based on the UI element clicked.
- (Optional) Click Show Advanced Selector Configurations if you wish to select a different CSS selector or enter a custom one.
- Enable the Text Match Details toggle switch.
- Select the logic identifier and enter the text to be matched.
- (Optional) Click Change Mapping if you wish to change the UI element tagged to the rule.
- Click Apply.
Note: Rules created using the Text Match option cannot be backfilled.
Create Rules with Only Text Matches
You can use the Text Match option to create features solely with text match. This helps in preventing applications with dynamic UI elements from experiencing CSS selector match issues, and provides flexibility to map the unique elements faster.
To create a UI Element rule with only text match:
- In the floating mapper, click the Add button and select UI Element Rule. Alternatively, you can press Control + M on the keyboard to start mapping.
- Click the UI element you want to use for the rule.
- In the UI Element Rule window, enter a name for the rule.
- In the UI Element Details section, turn off the UI Element Details toggle.
- Enable the Text Match Details toggle switch.
- Select the logic identifier and enter the text to be matched.
- (Optional) Click Change Mapping if you wish to change the UI element tagged to the rule.
- Click Apply.
Note: Rules created using the Text Match option cannot be backfilled.
Add Tracking Properties
Tracking Properties allow you to capture additional context from user interactions in your product. They extend the information collected by rules so you can analyze behavior with greater precision in PX Analytics. Once defined, Tracking Properties can be used in Query Builder to filter, group, and analyze events.
Tracking Properties can only be created in the In-App Product Mapper, and they are always associated with a feature. Once a property is created, it can be viewed in Product Mapper. You can also associate existing properties with a feature.
The following types of Tracking Properties are available:
- URL: Captures details from the page URL, such as path segments, or query parameters, helping you analyze navigation behavior. For instance, if the page URL has a query parameter (such as ?step=3) that tracks a user's onboarding location, you can leverage this property to capture the exact step using the value supplied by the parameter.
- UI Element: Captures attributes or values from on-page elements, such as placeholder text, inner text, or selected options. This enables you to track the actual input or choice a user makes during an interaction. For instance, you can capture the value a user selects from a drop-down menu.
- Advanced JS: Uses a simple JavaScript path to reference values from browser objects such as window or document. This is useful for cases where you want to fetch additional metadata that is not easily accessible from the URL or UI attributes. Supported data types include string, number, and boolean.
- Out-of-the-box Properties: PX automatically provides system-level properties, including UTM tags, screen height, screen width, browser type, platform type, platform version, device, page title, referrer URL, and URL scheme. This can be directly added to a feature to track for specific features.
Note
- Tracking Properties can only be created in the in-app mapper.
- Tracking Properties can only be created at the feature level.
- At least one rule (URL, UI element, or text element) must be defined for a feature before you can add properties.
- Each feature can have up to five properties, and each product in a subscription supports up to 1,000 properties.
- For pages that contain iframes, PX resolves Tracking Properties as follows:
- URL properties and JS functions: Always resolved from the top window.
- Click properties:
- If the click occurs inside an iframe, PX first resolves properties from that iframe’s context.
- If some properties cannot be resolved within the iframe, PX then looks for them in the top window and other iframes on the page.
- If the click occurs in the top window, PX resolves properties from the top window first.
- If any properties remain unresolved, PX searches for them in the iframes, if present.
- If the click occurs inside an iframe, PX first resolves properties from that iframe’s context.
To create a property:
- In In-App Product Mapper, select the feature where you want to add a property. Ensure you have at least one rule (from URL or UI) for the feature.
- Click the Add button.
- Select the property type from the following options: :
![]()
Create URL Property
URL Properties help you capture path segments and query parameters of a URL.
To create a URL property:
- Select the required feature with at least one rule.
- Click the Add button and select URL Property. The Create URL Property window appears.
- Enter a name and an optional description.
- In the Property Details section, choose which part of the URL should be tracked:
- URL Path
- Enter text in the Ignore Before field to remove everything before a specified value.
- Enter text in the Ignore After field to remove everything after a specified value.
- Use the Preview field to validate how the captured path appears.

- Query Parameter
- Enter the name of the parameter you want to capture (for example, step or source). The value of that query parameter will be recorded whenever the rule matches.
- Review the Preview field to ensure the property captures the intended value.

- URL Path
- Click Create to add the property.
The URL property is now available in the Tracking Properties tab and can be used in PX Analytics to filter, group, and analyze feature usage.
Create UI Element Property
UI Element Properties help you capture attributes such as placeholder text, inner text, or selected values.
IMPORTANT: This property is dependent on how the element has been developed and results can vary on how the element has been modelled to capture the choices or selected states.
To create a URL property:
- Select the required feature with at least one rule.
- Click the Add button and select UI Element Property.
- Click the required UI element to start mapping. The Create UI Element Property window appears.
- Enter a name and an optional description.
- In the CSS Details section, perform the following:
- In the Selector field, verify the CSS selector chosen based on the UI element clicked.
- Review the Selector Strength and the number of matched elements to confirm accuracy.
- (Optional) Click Show Selector Options if you wish to refine the selector or enter a custom one.
- From the Select Attribute dropdown, choose which attribute of the element you want to capture.
- Use the Preview field to validate that the property captures the correct value.
- Click Create to save the property.
![UI Element Property setup form with CSS selector targeting [href='/components'] and attribute set to 'textContent' for tracking dashboard names](https://support.gainsight.com/@api/deki/files/29109/create_UI_element_property.jpg?revision=1)
The UI Element Property is now associated with the feature and available in the Tracking Properties tab in Events. Further, you can use this property in PX Analytics to group, filter, and analyze events based on the captured attribute values.
Create Advanced JS Property
The Advanced JS Property helps you specify a JavaScript path to pull a value from browser objects like window or document.
To create an Advanced JS Property:
- Select the required feature with at least one rule.
- Click the Add button and select Advanced JS Property. The Create Advanced JS Property window appears.
- Enter a name and an optional description.
- In the Property Details section, enter the JavaScript object for the value you want to capture. The path must start with window or document. For instance, window.innerHeight to capture the browser window height or document.title to capture the page title.
- Review the Preview field to confirm the property returns the expected value.
- Click Create to save the property.

Note
- Advanced JS Properties are limited to returning string, number, or boolean values.
- They cannot execute functions; the referenced value must already exist in the browser context.
- Use this option when the data you need is not available through URL or UI Element properties.
Filters in Product Feature Tree
Filters on Product Feature Tree allow you to quickly find what you need by narrowing down your product tree using multiple criteria such as Tree Items (empty or non-empty modules and features, Modified by, Labels, and Rule Type.

View Mapped Features
Product Mapper has a Show Mapped Features option that helps you view the features mapped already in your application. This helps in identifying the features that are yet to be mapped, thus avoiding duplicate mapping.