Install and Configure Adobe Tags Extension
This article explains how to install and configure the Gainsight PX Adobe Tags extension.
Overview
Use the Gainsight PX Tags extension to install the Gainsight PX tag for your application. To install the Gainsight PX Tags extension, click here.
Key Terms
- Adobe Tags: Adobe Tags is an Adobe Platform where you can create extensions. You can consider Adobe Tags to be an OS.
- Extensions: Extensions are the integrations created by Adobe or Adobe partners to add more functionalities to your application. If Adobe Tags is considered to be an OS, Extensions are the apps that can be installed.
- Property: A Property is a placeholder in Adobe Tags. You can store your Extensions and other key elements in a Property.
- Gainsight PX Tags: Gainsight PX Tags is a Gainsight extension in the Adobe Tags platform.
- Adobe Rules: An Adobe rule is used to perform various tasks automatically. Adobe Rules have three elements; Events, Conditions, and Actions. The rule works with the logic “when an Event(s) is recorded with the set Condition(s), perform the Action(s)”.
Prerequisite
Configure a Property for your application in the Adobe Tags Platform, before you install and configure Gainsight PX Tags. For more information about properties, refer to the Companies and properties article from the Additional Resources section.
Add Gainsight PX Tags Extension to Property
A property in Adobe is a placeholder to store your extensions, rules, and data elements. After you create a property for your application, add the Gainsight PX Tags extension to your property. For more information about adding extensions to properties, refer to the Extensions from the Additional Resources section.
To add the PX Extension to your property;
- Log in to your Adobe Tags account.
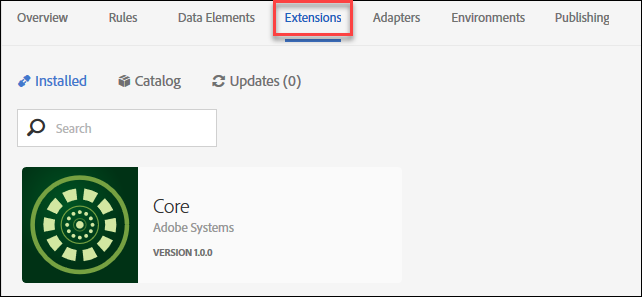
- Click the Extensions tab.
-
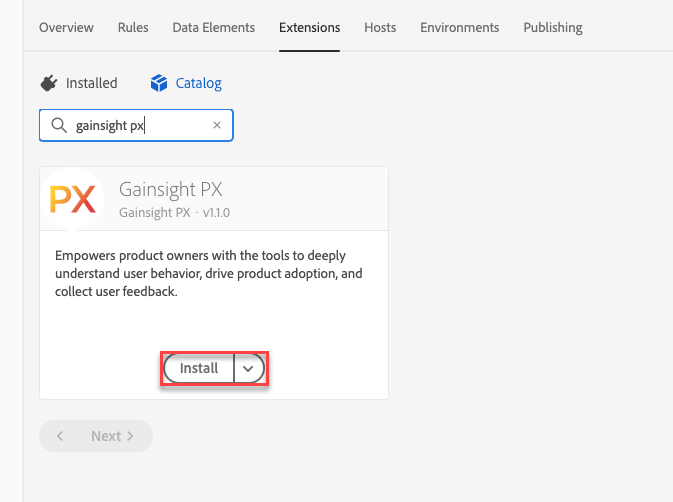
Search for the Gainsight PX extension and click Install.
Configure PX Extension with Product Key
After you add the Gainsight PX Extension to your property, configure the extension with the Product key of your PX instance.
To configure PX Extension with Product key:
- Log in to Gainsight PX.
- Navigate to Administration > Products and copy your product key.
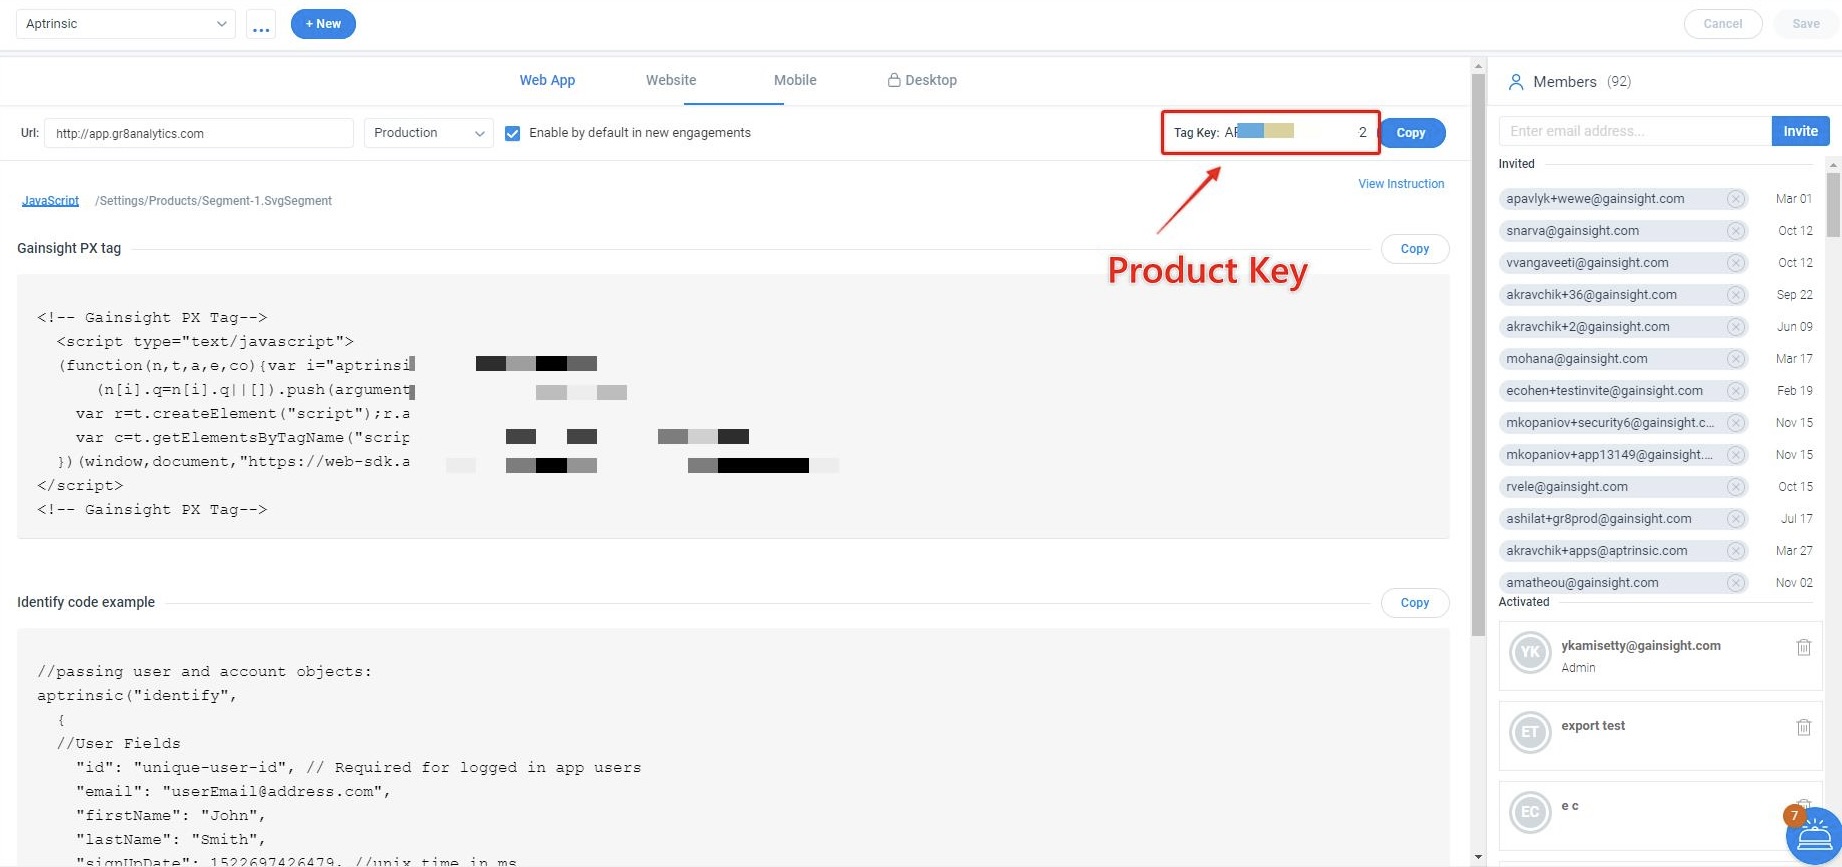
- Switch to Adobe Tags Gainsight PX extension.
- Paste the Product key in the Gainsight PX Product Key field.
- Click Advanced to expand the menu.
- Configure the following options:
- Independent iframe: Check this box only if PX is installed in an iframe that does not have PX installed in the parent document. This is not the usual case, typically PX is installed in both parent window and child iframe. For more information about this scenario, refer to the Application is running as a tenant iframe under a different application section of Install Gainsight PX in iframes article from the Additional Resources section.
- Identify from iframes: if you want to support calling the identify call from an iframe instead of the parent document. In this case Gainsight PX is also installed in the parent document but you still want the iframe to make the identify call.
- CSS Nonce: Enter the nonce value in this field. For more information on this, refer to Using PX with Content Security Policy (CSP) article.
- TLS Level: Select the Transport Layer Security (TLS) level used for communication with the Gainsight PX servers for tracking calls.
- Enable PX Environments: Check this box to send PX events to a different PX environment based on the Tags environment. If you select this option, the events are sent to the environments according to the mapping defined in the table. If you do not select this option, all events are stored in the production PX environment. For more information on PX environments, refer to the Gainsight PX Environment Settings article from the Additional Resources section. A typical environment setup is given in the following screenshot.
Note: If you have customized any of your environment names, identify the default names before performing the mapping.
-
Click Save.
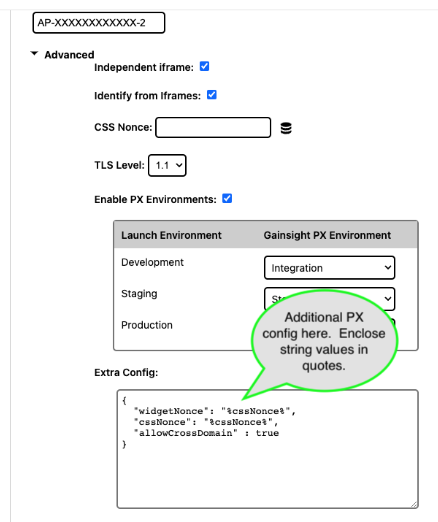
- Add any additional PX config values in the Extra Config section. The value must be a valid JSON string. Adobe Data References can be used in the values. If a data reference contains a string value, it should be surrounded by quotes (for instance, “%dataRefName%”).
Note: If the corresponding values are set, they will override the iframe and Nonce values set at the top of the Advanced section.
Create Rules
After you install the Gainsight PX extension, create rules to load Gainsight PX and identify users and accounts. This section explains the process to create rules to:
Create Load Rule
This sub-section explains how to create a rule that loads PX into your application.
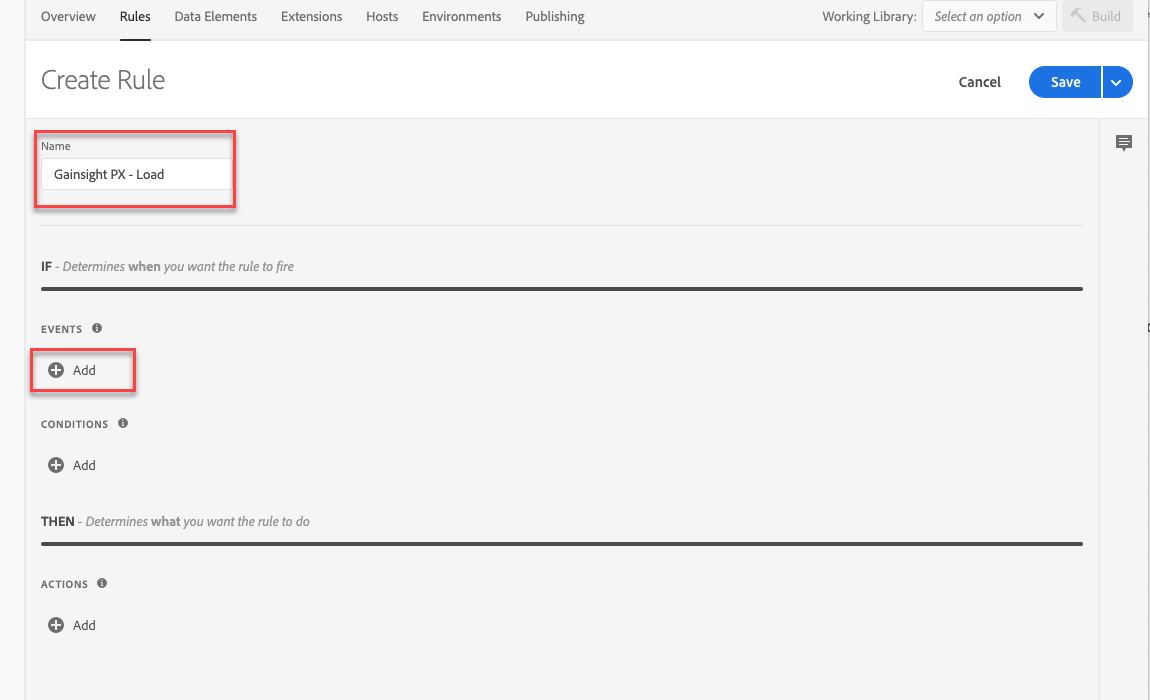
To create a data load rule:
- Log in to your Adobe Tags account.
- Click the Rules tab.
- Click Create New Rule. The Create Rule window is displayed.

- Enter a name for the rule in the Name field.
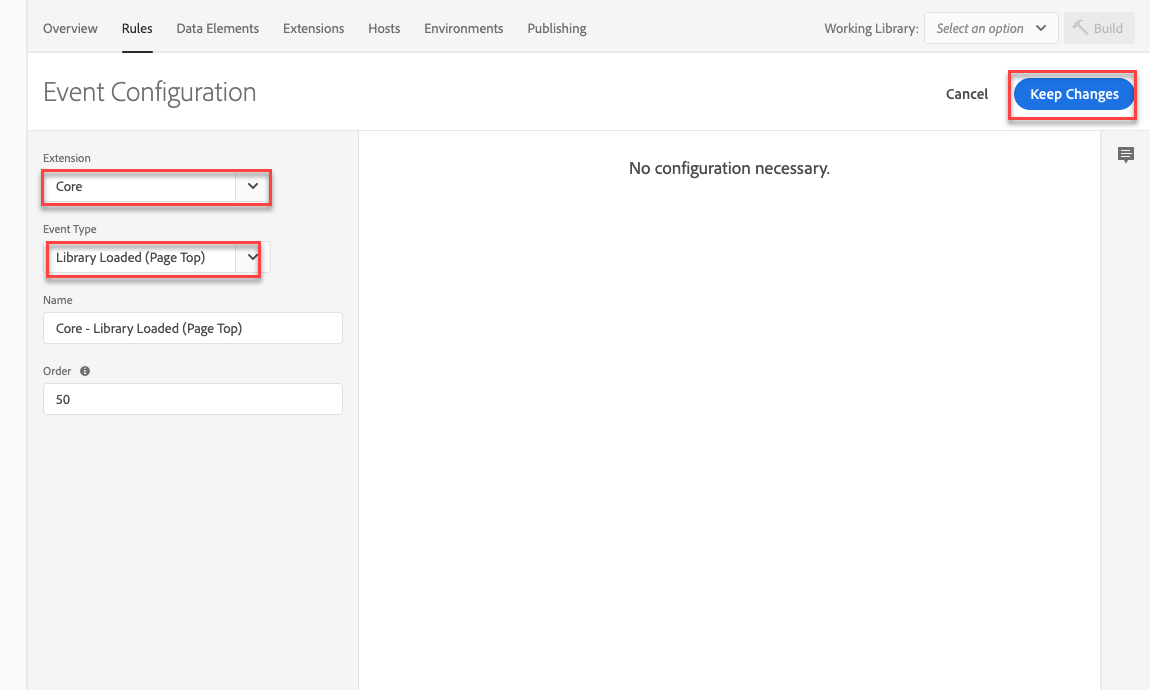
- Click Add under the Events section. The Event Configuration window is displayed.
- Select Core from the Extension drop-down menu.
- Select Library Loaded (Page Top) from the Event Type drop-down menu.
- Click Keep Changes.
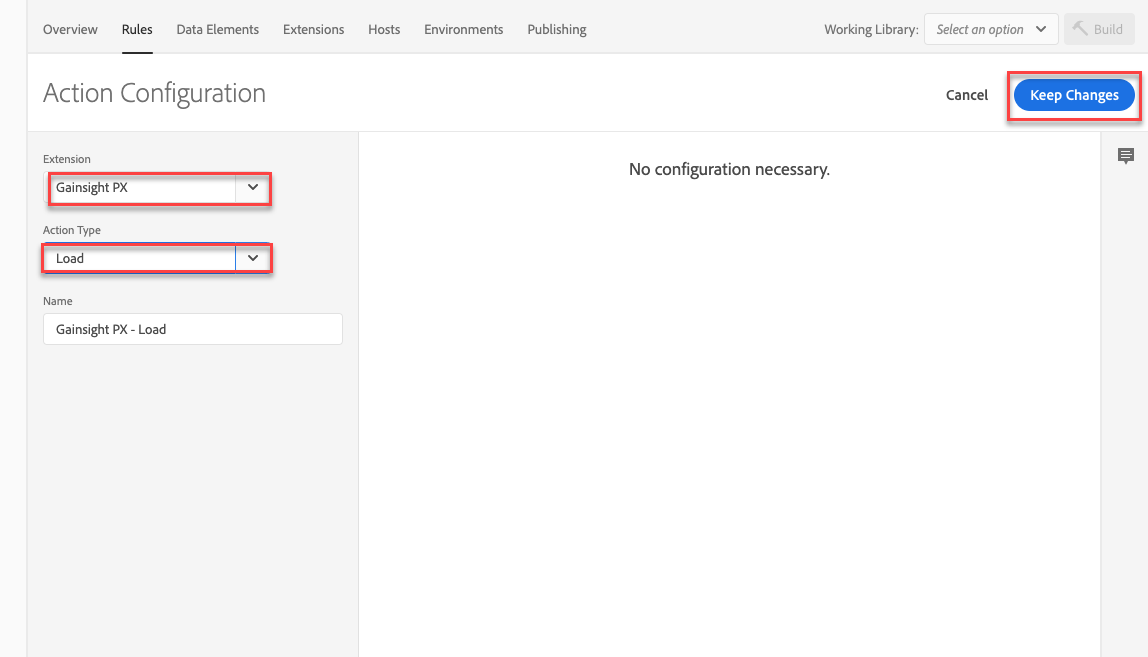
- Click Add under the Actions section. The Action Configuration window is displayed.
- Select Gainsight PX from the Extension drop-down menu.
- Select Load from the Action Type drop-down menu.
- Click Keep Changes.
A new rule is created.
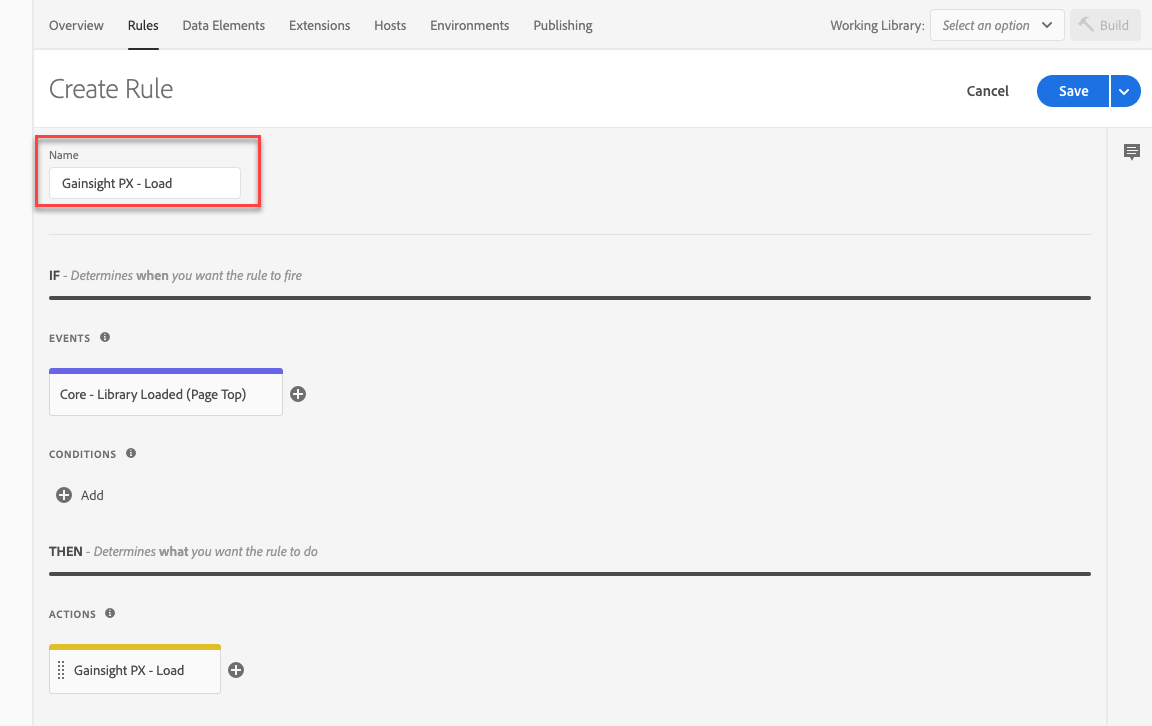
-
Click Save.
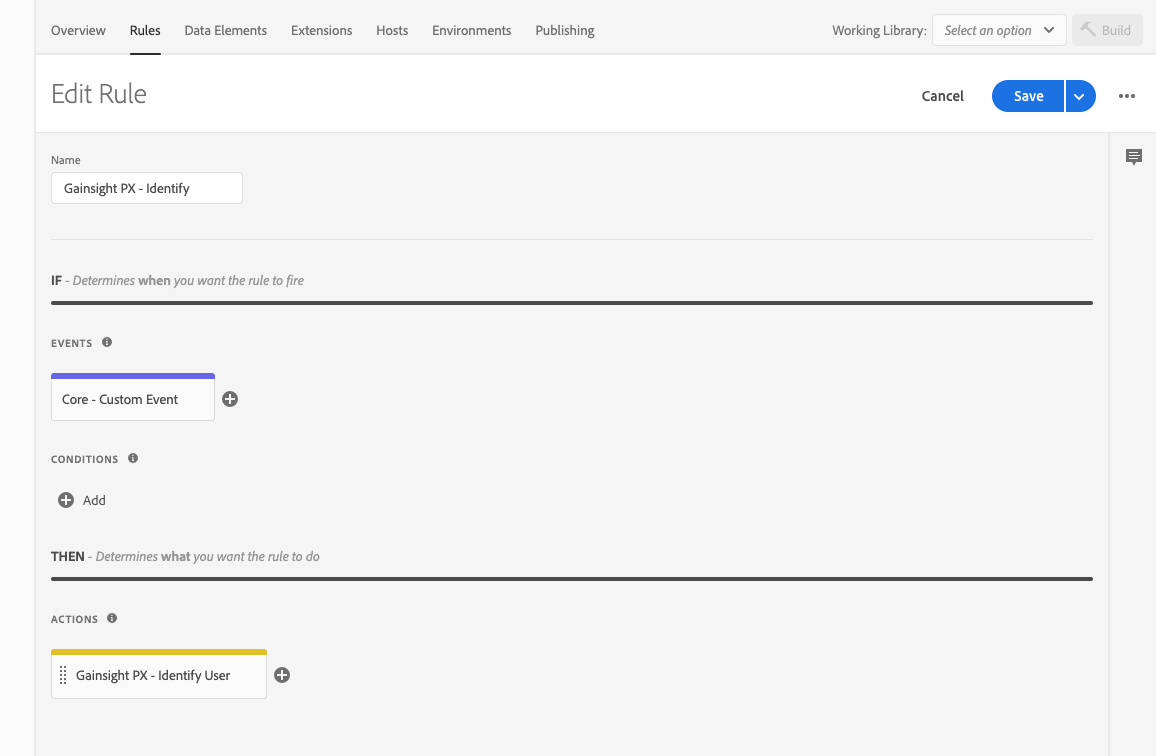
Create Identify Rule
This sub-section explains how to create a rule that maps User and Account attribute data from your application to Gainsight PX.
To create the rule:
- Click the Rules tab and click Add Rule.
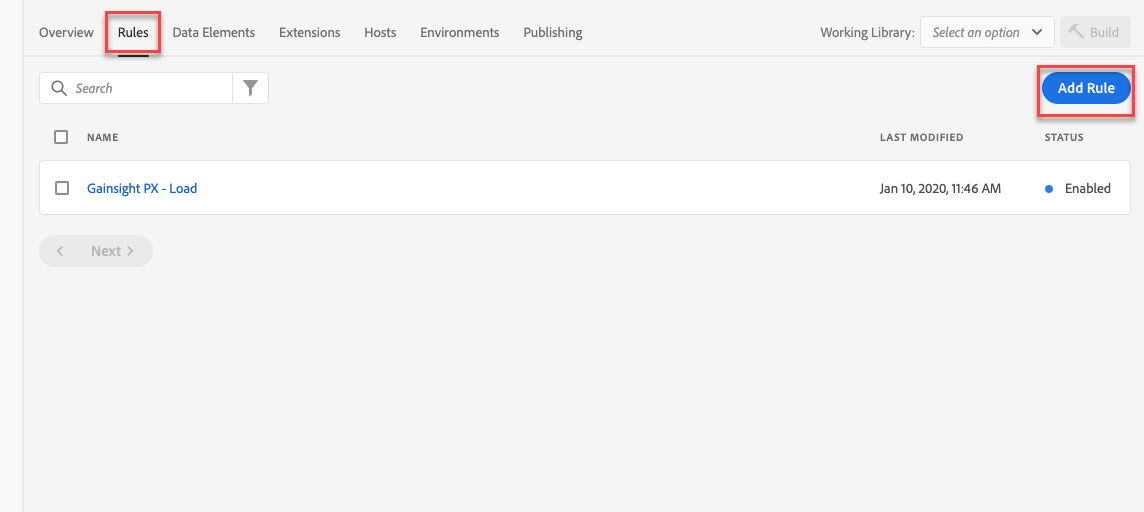
- Enter a name for the rule in the Name field.
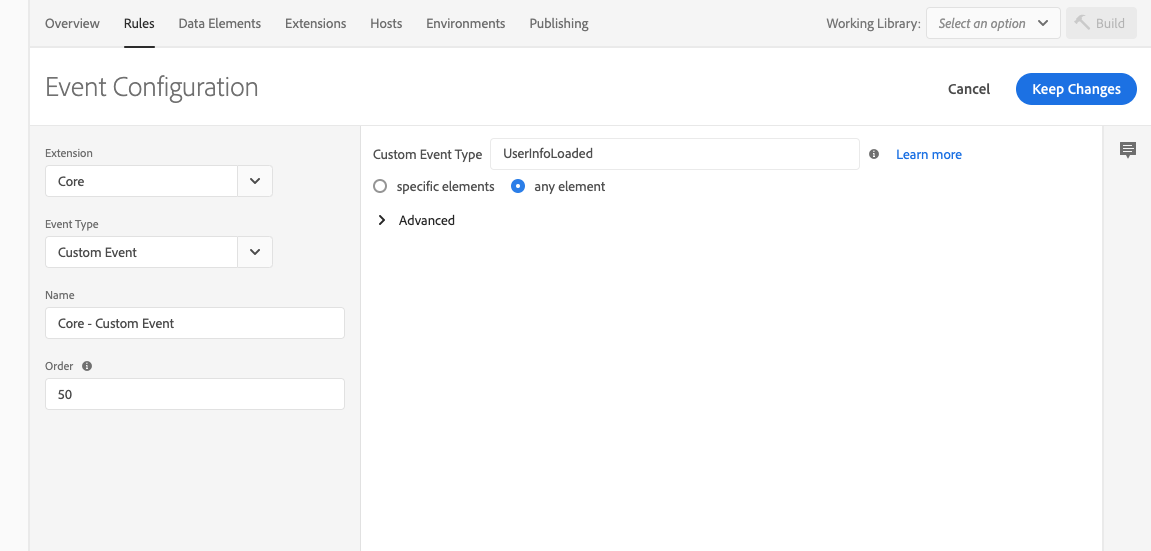
- Click Add under the Events section. The Event Configuration window is displayed.
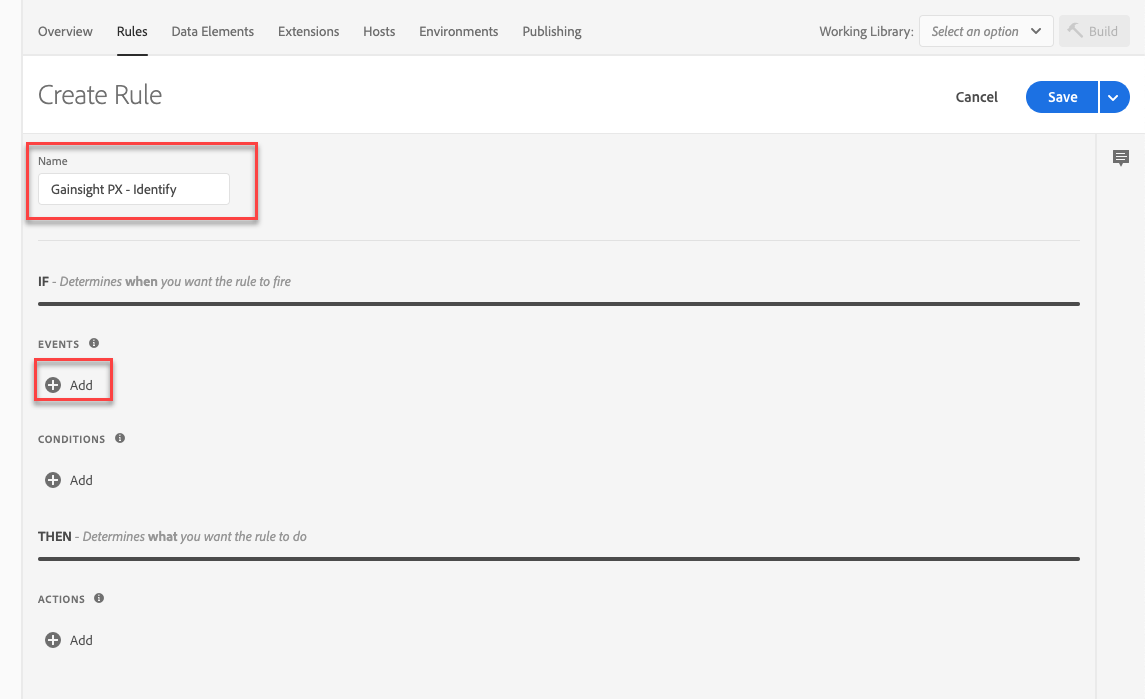
- Configure an event that triggers when your application has access to the user identity information. In some cases (like page refresh) your users are unlikely to proceed through your application’s login screen, so this event should not depend on that.
The following image is an example and may vary for your application. Contact your development team for the values. - Click Keep Changes.
- Click Add under the Actions section. The Action Configuration window is displayed.
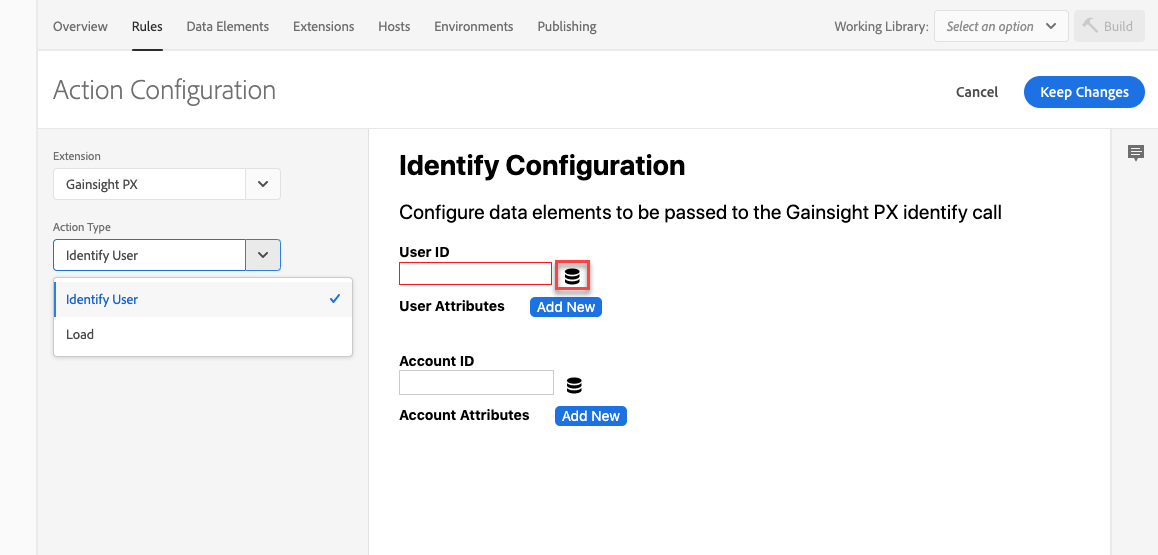
- Select Gainsight PX in the Extension field.
- Select Identify user in the Action Type field.
- Click Keep Changes.
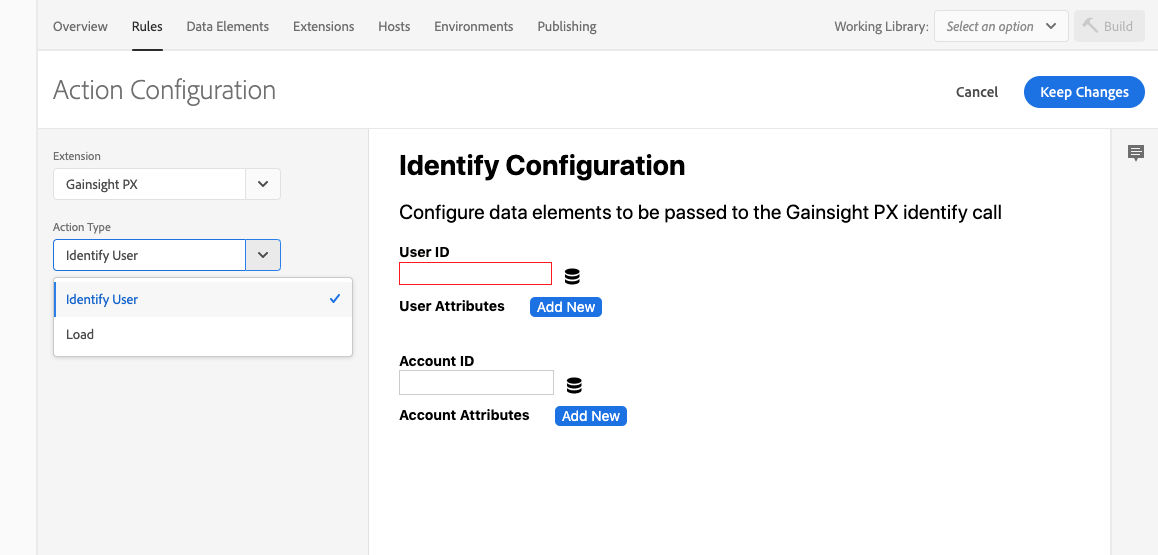
-
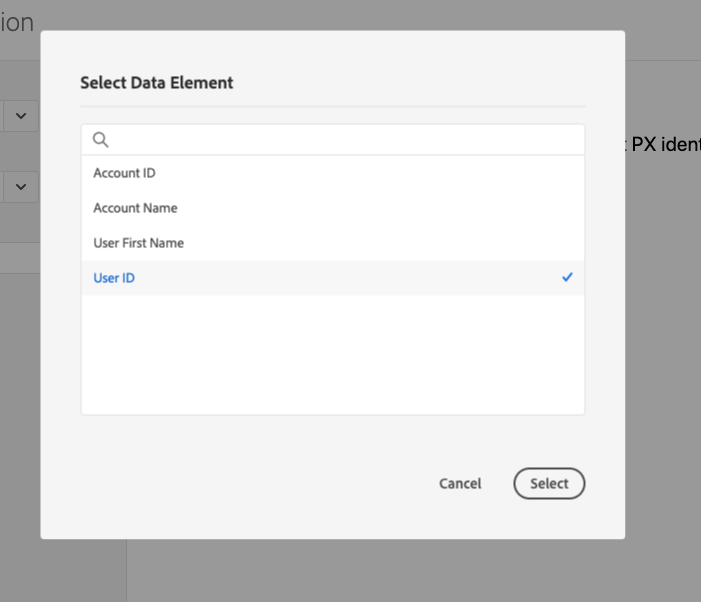
Click the Data element chooser icon next to the User ID field.
-
Select data elements that identify a user. This data is sent to PX from your application and helps PX identify your users.
For more information about Data elements, refer to the Data elements article from the Additional Resources section.
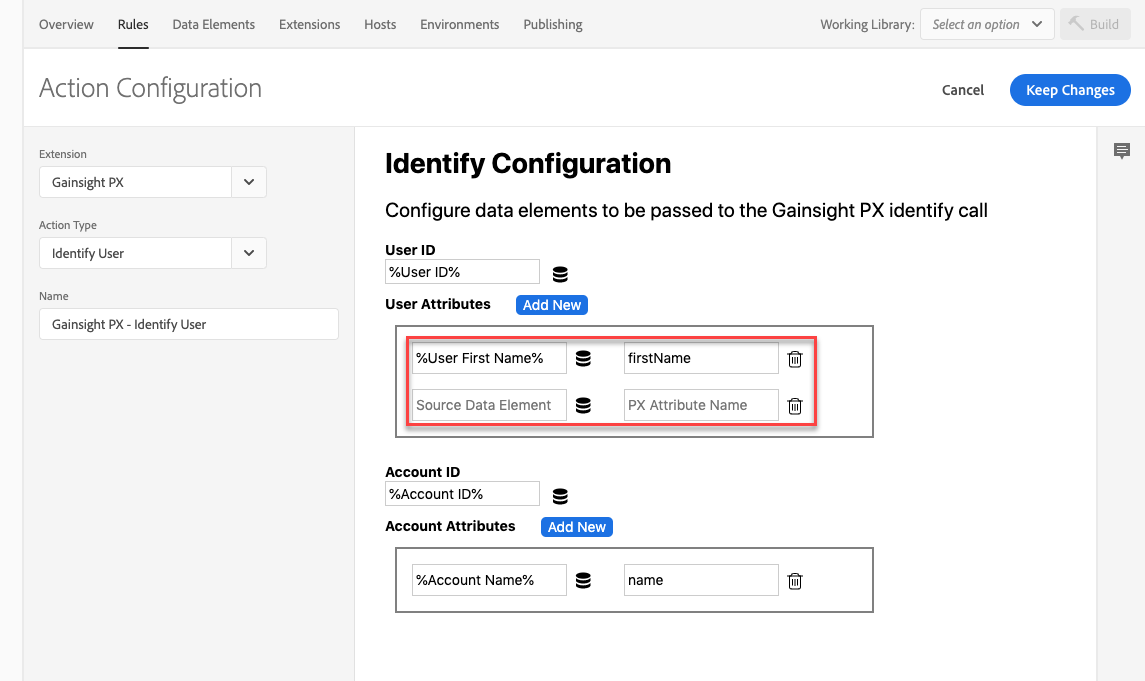
- (Optional) Click Add attribute, if you have multiple data elements which pass unique user identifier data to Gainsight PX.
- Add the name of the Gainsight PX attribute in the PX Attribute Name field, for each unique identifier configured.
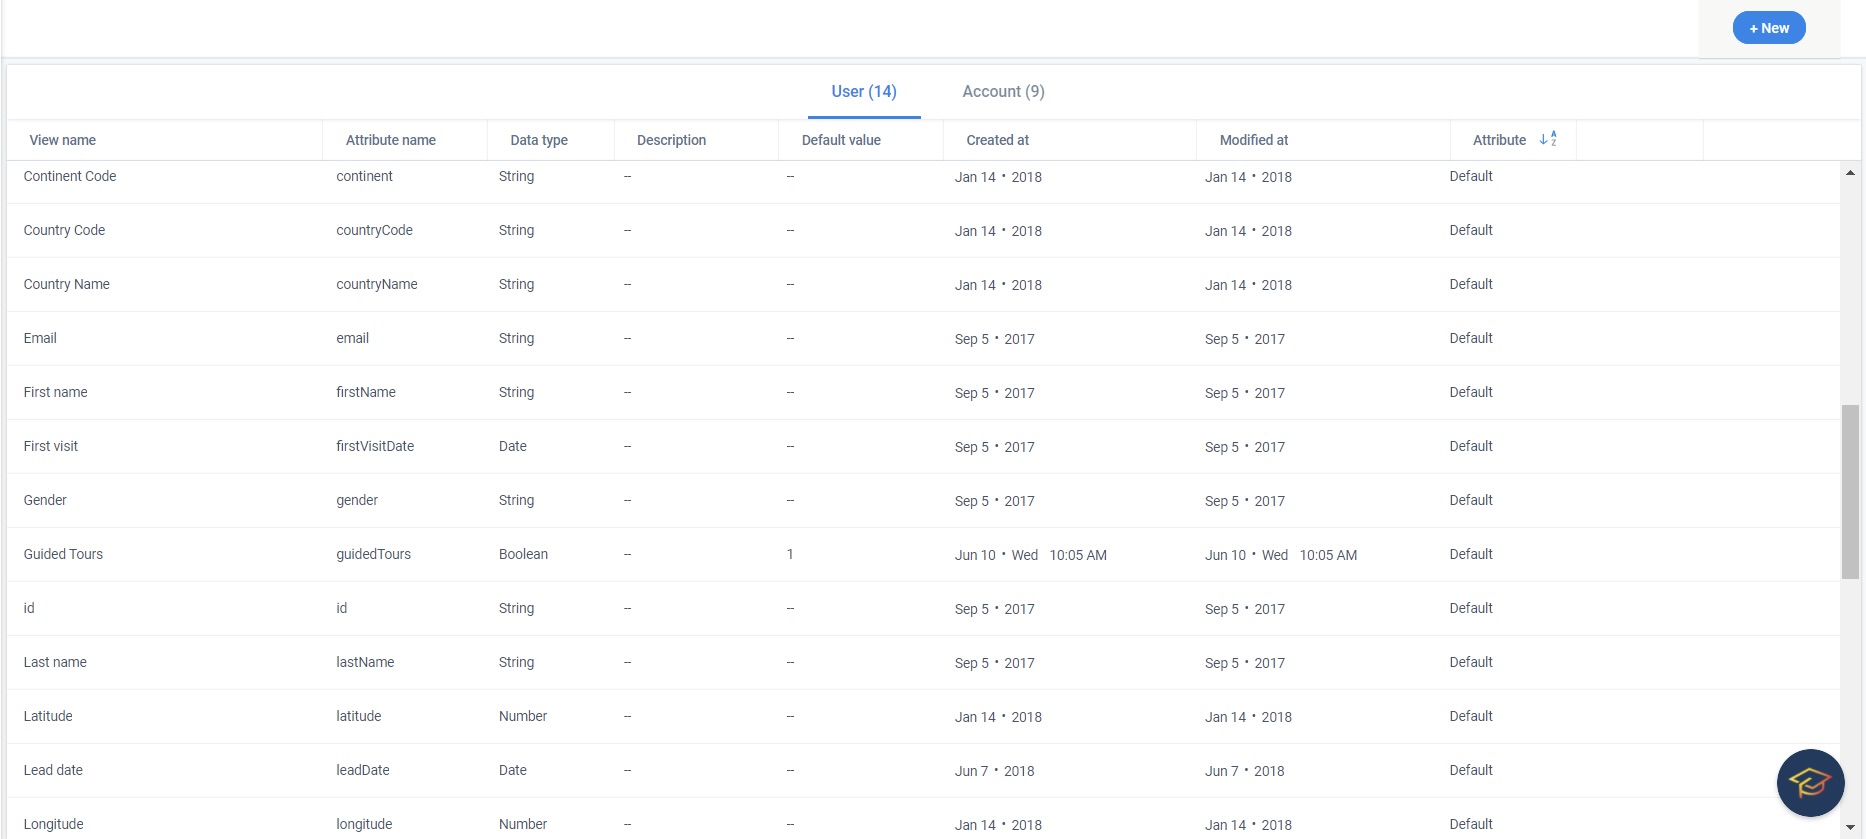
Navigate to Administration > Attributes on Gainsight PX to view the Account and User identifiers.
- (Optional) Configure a unique identifier for Account as well.
- Click Keep Changes.
- Click Save.
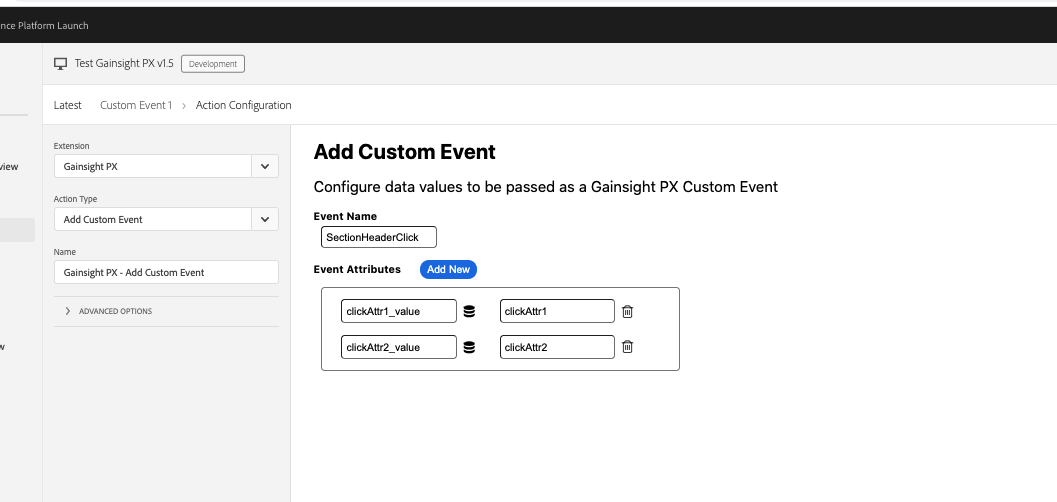
Add Custom Events
Gainsight PX supports the ability to send custom events via API. Trigger an API call to create a custom event using the name for the custom event as well as properties/values for that event. For more information on this refer to the Use Custom Event API article.
Alternatively, you can create custom events by navigating to the Administration > Events page.
This sub-section explains how to create a rule that triggers a custom event in Gainsight PX based on an action in your application.
To create a rule to trigger a Gainsight PX Custom Event:
- Click the Rules tab.
- Click Add Rule.
- From the Extension dropdown select Gainsight PX, from the Action Type dropdown select Add Custom Event.
- In the Add Custom Event screen, enter the Event Name and Event Attributes. Click Keep Changes. The rule is now created.
Set Global Context
Gainsight PX Web SDK supports the ability to set a Global Context (super properties) for all user interactions captured by the Gainsight PX tracking tag. Setting the context automatically attaches/assigns those properties/values to all auto-tracked events. For more information on this, read the Use Global Context API article.
This sub-section explains how to create a rule that sets a Global Context in Gainsight PX based on an action in your application.
To create the rule:
- Click the Rules tab.
- Click Add Rule.
- From the Extension dropdown select Gainsight PX, from the Action Type dropdown select Set Global Context.
- In the Set Global Context screen, enter Global Context properties. Click Keep Changes. The rule is now created.

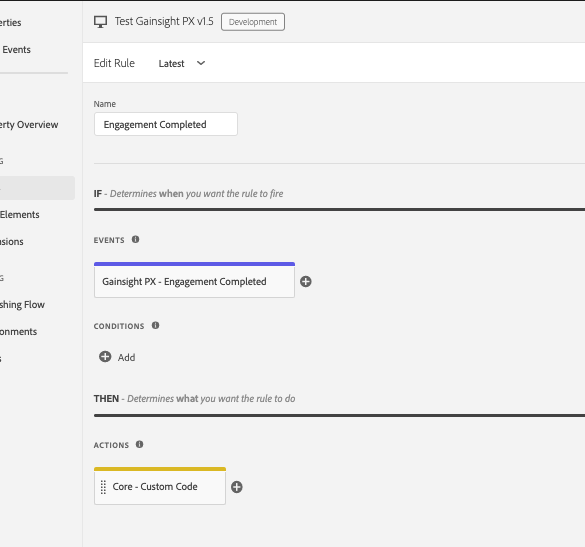
Configure Event Listener
Gainsight PX's Javascript Event Listener allows you to easily send Engagement Analytics data to other applications. For more information on this refer to the Javascript Event Listener API article.
This sub-section explains how to create a rule that triggers an action in your application based on Gainsight PX events.
To create the rule:
- Click the Rules tab.
- Click Add Rule.
- From the Extension dropdown select Gainsight PX, from the Event Type dropdown select the event you need to trigger in Gainsight PX.
- Configure the required action in your application.
.png?revision=1)
After you complete these configurations, publish them in Adobe Tags. Use the publishing workflow to publish and promote the changes to production, after you complete testing. For more information about Adobe Tags approval workflow, refer to the Approval Workflow article from the Additional Resources section.