Overview of Partners and Settings
Gainsight NXT
This article provides an overview of the Partners and Settings pages to admins.
Overview
The Partners and Settings pages serve as the control hub of the Through-Partner Customer Success feature. As an admin, once you have successfully added the Partner data in the initial configuration, the data is populated in the form of a list view in the Partners page.
For more information on the business use case, benefits, information flowchart, and different user personas, refer to the Through-Partner Customer Success Overview article.
Prerequisites
Partner data must be added to the module to access configurations in the Partners and Settings pages. For more information on how to add Partner data, refer to the Add Partners article.
Partners Overview
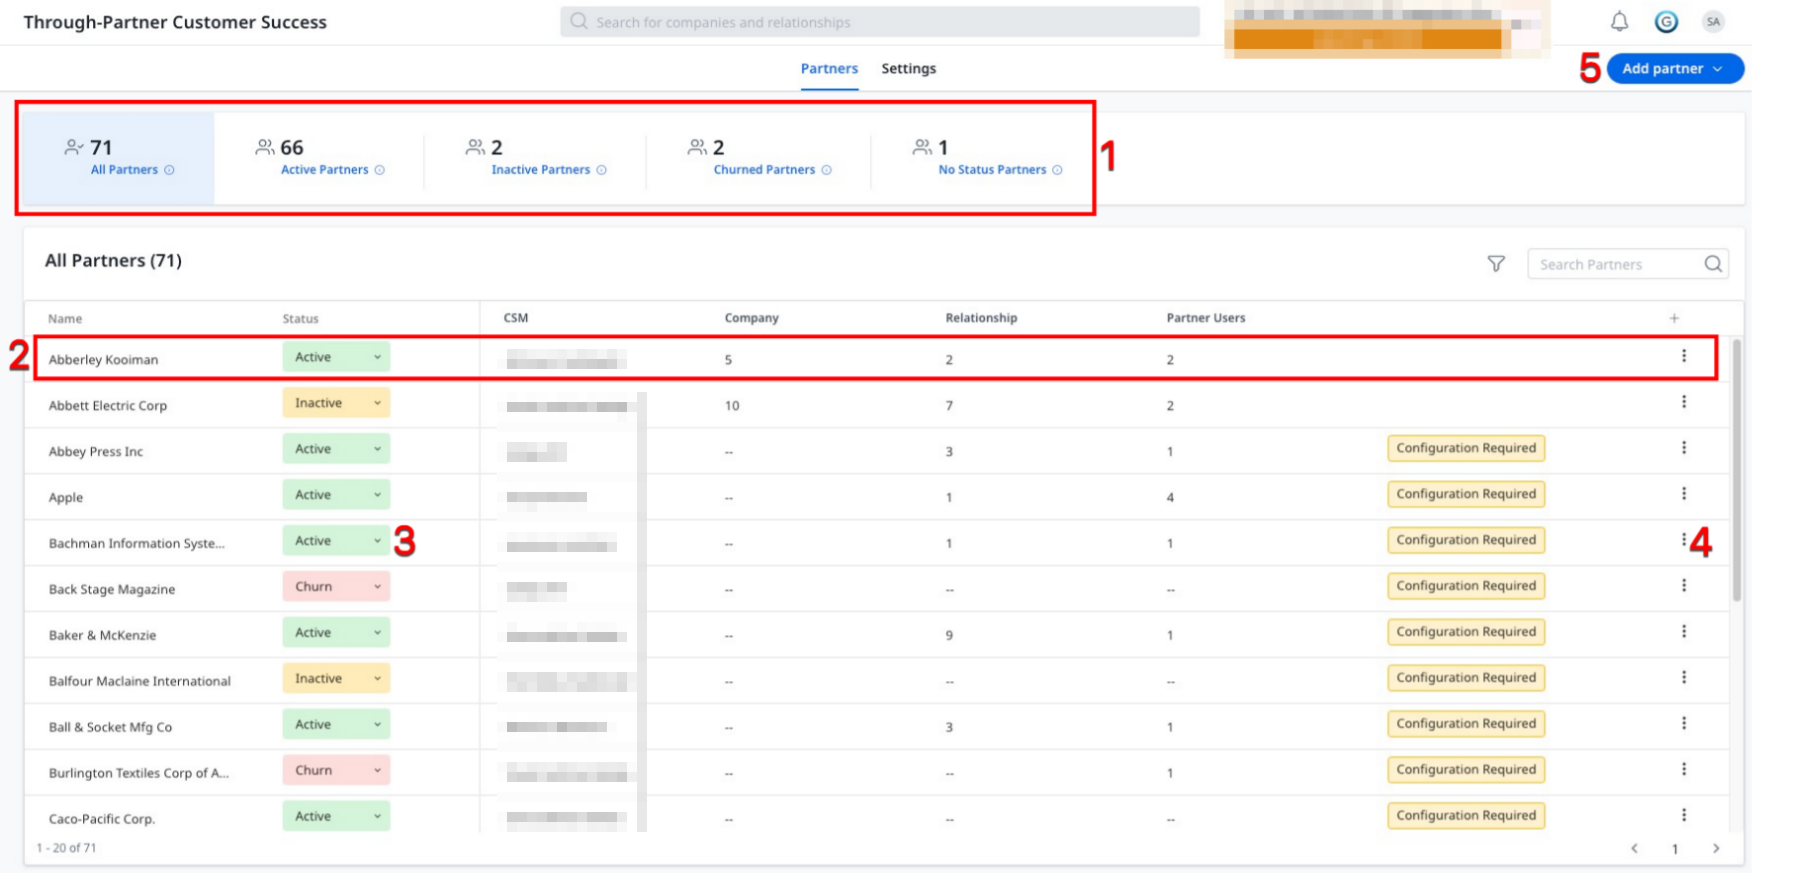
The Partners page provides an overview of all Partners that you have added to the module. To access this page, navigate to Administration > Partner Success > Through-Partner CS. The Partners page is the default landing page for this module. This page offers two primary views:
Partners List View
The Partners list view provides an overview of all Partners in the module based on their statuses. You can take following actions in the list view:
- Filter Partners based on their statuses. Four status types are available:
- Active Partners - Displays the total number of Partners with active statuses.
- Inactive Partners - Displays the total number of Partners with inactive statuses. Inactive Partners cannot login. If the status of a Partner is changed to inactive, the status of all Partner Users listed under it automatically changes to inactive.
- Churned Partners - Displays the total number of Partners that are no longer partners.
- No Status Partners - Displays the total number of Partners without any assigned statuses.
- Click the Partner name to view the Partner details. For more information, refer to the Partner Detail View section.
- From the drop-down, change the Partner status to Active, Inactive, or Churn.
- From the three-vertical dots menu icon, click Edit to make changes in the Partner details.
- From the Add Partner drop-down, select the option to add additional Partners to the module. For more information on how to add partners, refer to the Add Partners article.
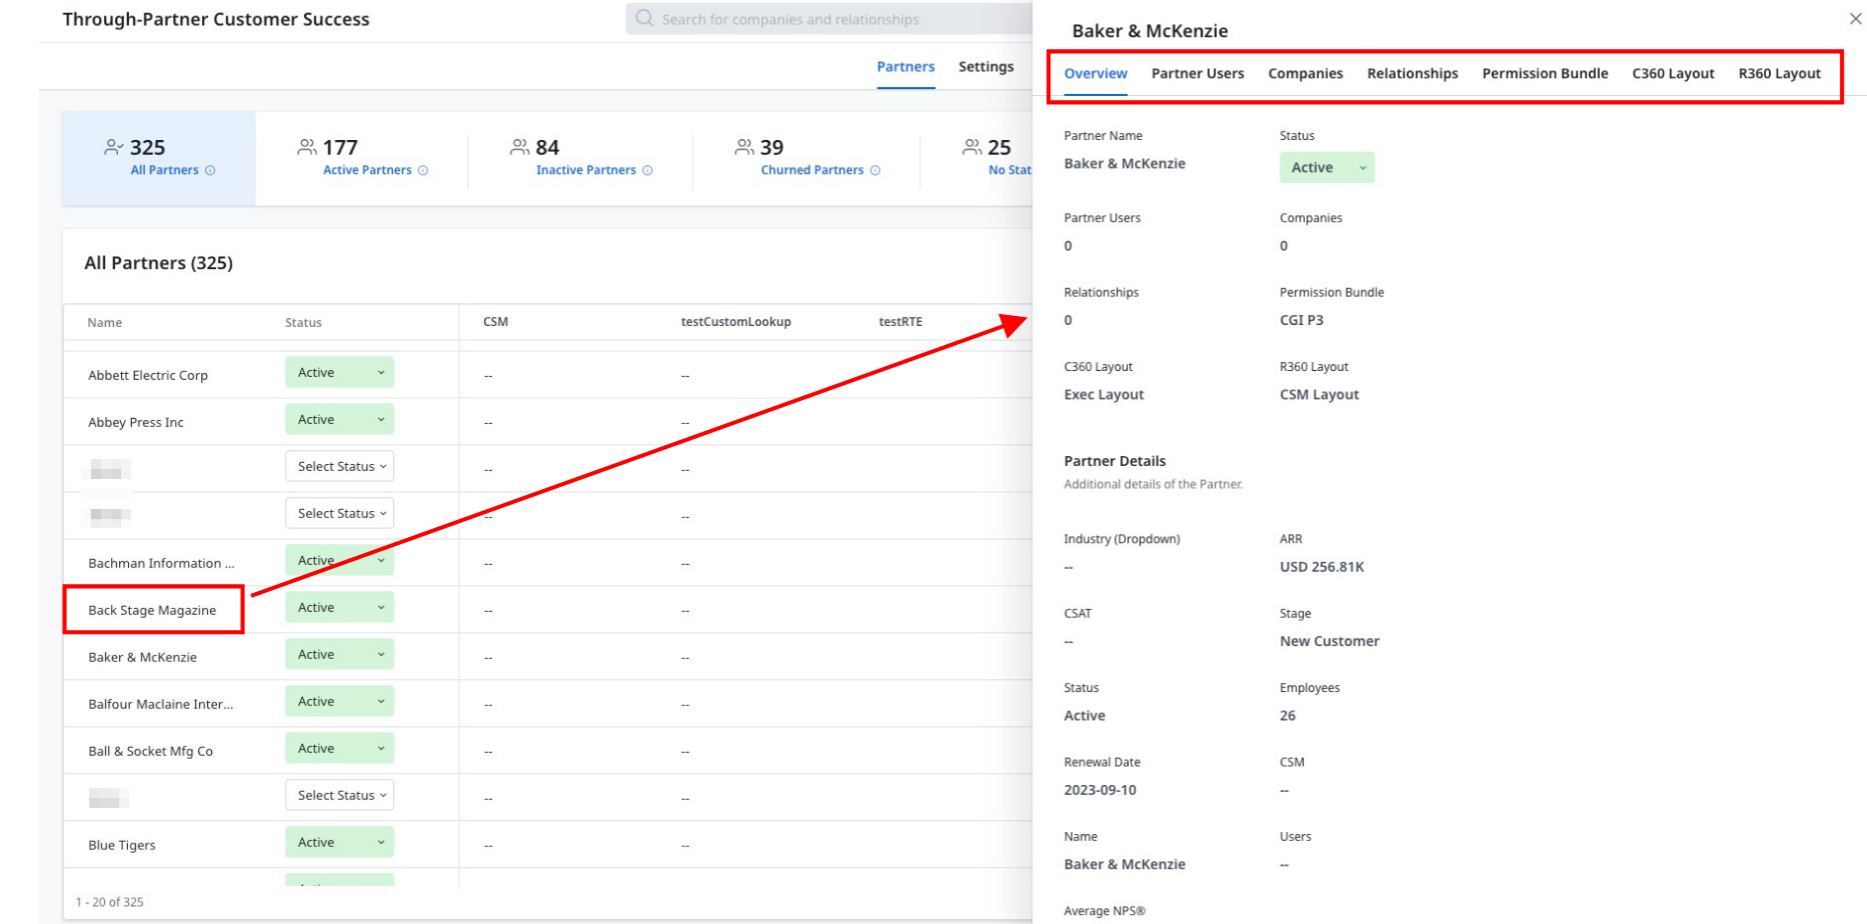
Partner Detail View
The Partner detail view provides all details related to the Partner and accesses available to them. Access details related to Partner Users, Company Records, Relationship Records, 360 Layouts, and so on are displayed. You can manage and customize these accesses from this view.
Select a Partner name to access the Partner detail view slide-out panel. The following tabs are available:
- Overview - This tab provides basic and additional information about the Partner. The basic information covers details such as number of Partner Users, number of Company records assigned, assigned Permission Bundle, and so on. The additional information covers details that you provided initially while adding the Partner.
- Partner Users - This tab provides information about all Partner Users and their statuses. You can also add Partner Users from this tab. For more information on how to add Partner Users, refer to the Add Partner Users article.
- Companies - This tab provides information about Company records that the Partner and its users can access. You can also provide access to Company records from this tab. For more information on how to give access to Company records to Partners and its users, refer to the Assign Company Records section of the Assign Company and Relationship Records article.
- Relationships - This tab provides information about Relationship records that the Partner and its users can access. You can also provide access to Relationship records from this tab. For more information on how to provide access to Relationship records to Partners and its users, refer to the Assign Relationship Records section of the Assign Company and Relationship Records article.
Note: This tab is only available for customers operating at the Relationship level. - Permission Bundle - This tab displays the assigned Permission Bundle to the Partner and its users. You can select from the list of Permission Bundles available in the drop-down. For more information on the available Permission Bundles for Partners, refer to the Partner Permission Bundle article.
- C360 Layout - This tab displays the assigned C360 Layout to the Partner and its users. You can select from the list of layouts available in the drop-down. For more information on the available C360 Layouts for Partners, refer to the Partner 360 Layouts Overview article.
- R360 Layout - This tab displays the assigned R360 Layout to the Partner and its users. You can select from the list of layouts available in the drop-down. For more information on the available R360 Layouts for Partners, refer to the Partner 360 Layouts Overview article.
Settings Overview
The Settings page consolidates Partner-related configurations applicable across all Partners within the feature. You can use these options to save time when Partner-level customization is not necessary.
To navigate to the Settings page:
- Navigate to Administration > Partner Success > Through-Partner CS. The Partners page appears.
- Click the Settings tab. The Global Settings section appears.
The following sections are available in the Settings page:
Global Settings
This section allows you to assign Permission Bundle, C360 Layout, and R360 Layout to all Partners in your org at once. You can also create customized bundles and layouts by navigating to the respective pages.
Click the edit icon to navigate to the Permission Bundle, C360 Layout Configuration, and R360 Layout Configuration pages respectively.

Note: Global Settings do not override Partner level configuration, where custom bundles and layouts are already assigned from the Partner detail view. If there are no bundles and/or layouts assigned to a Partner, bundles and layouts selected in Global Settings are automatically assigned to that Partner.
General Settings
This section allows you to provide access to Company only, Relationship only, or both records to all Partners in your org at once.

Note: General Settings do not override Data Permissions. For instance, if you are updating the records access from Company Records to Relationship Records, you must update Data Permissions if access to Company Records is provided from there.
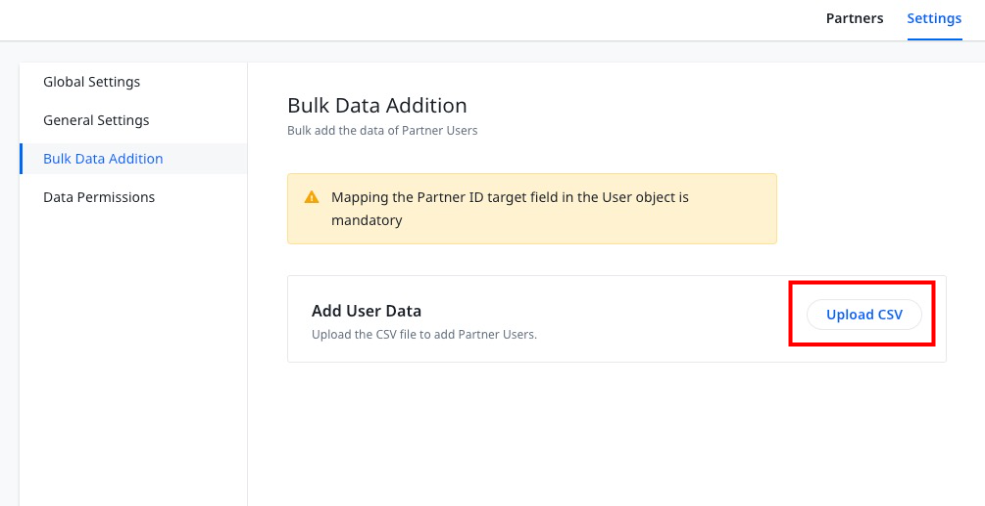
Bulk Data Addition
This section allows you to import and add Partner Users data in bulk.
Note: In User Object, mapping the Partner ID target field is mandatory. This field mapping helps in identifying the Partner under which the Partner User is categorized.
To add the user data:
- Click Upload CSV.
- In the Upload CSV screen, upload the CSV file.
- (Optional) To view the recommended sample format of the CSV file, click Download a sample CSV.
- (Optional) In the CSV Properties section, the properties are auto-populated based on the file uploaded. You can make changes, if required.
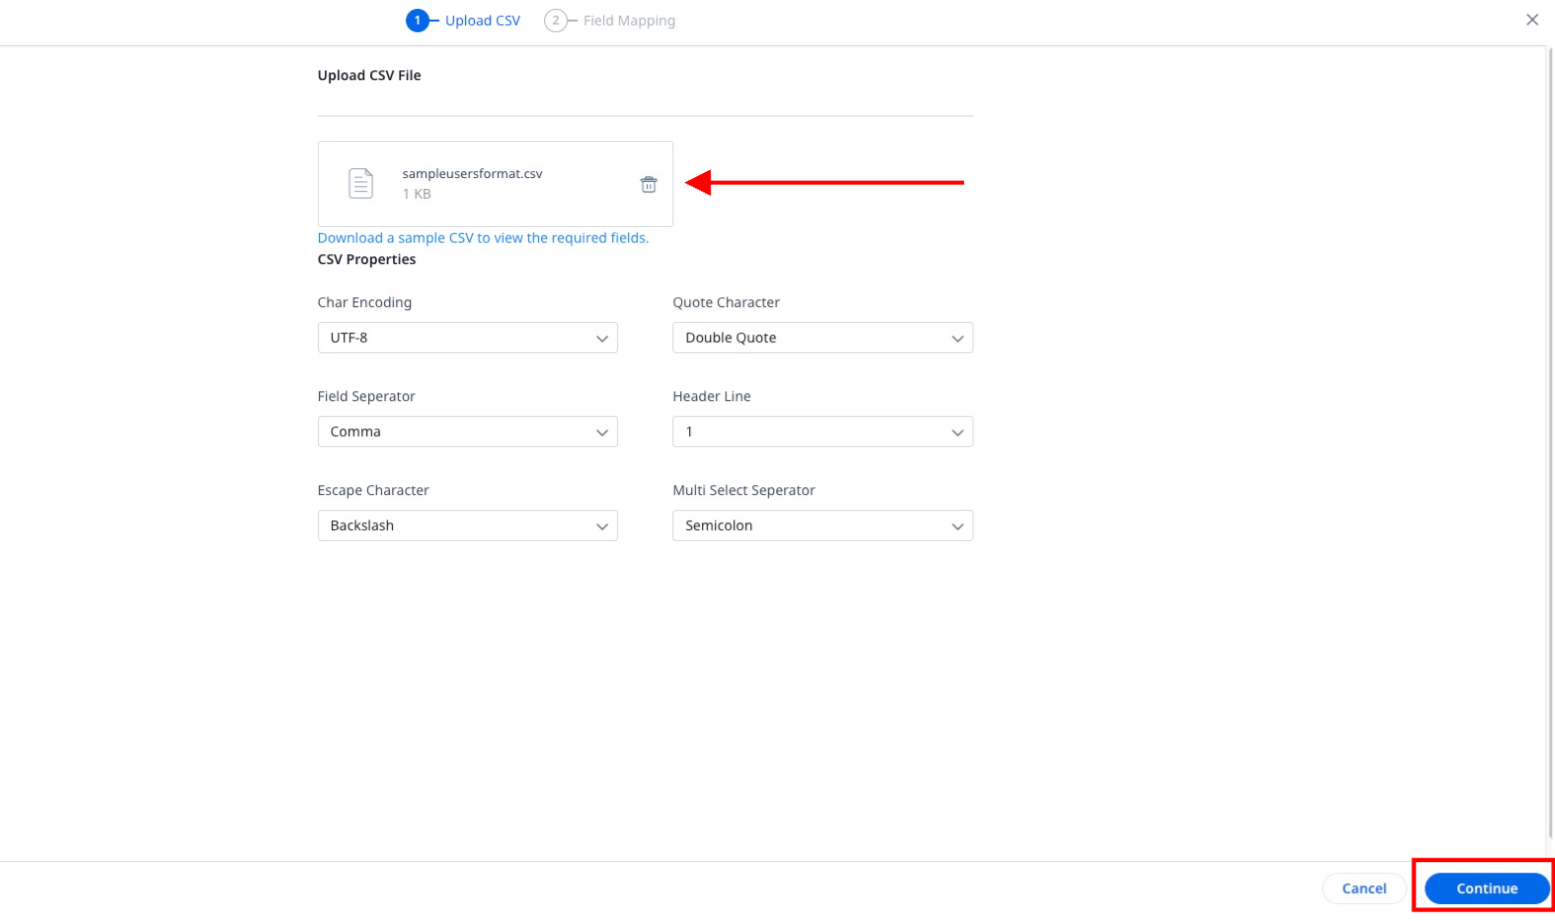
- Click Continue. The Field Mapping screen appears.
- In the Field Mapping screen, map the target fields with the source fields.
Note: The Name, Last Name, Email, and Username fields mapping are mandatory. These fields cannot be deleted.
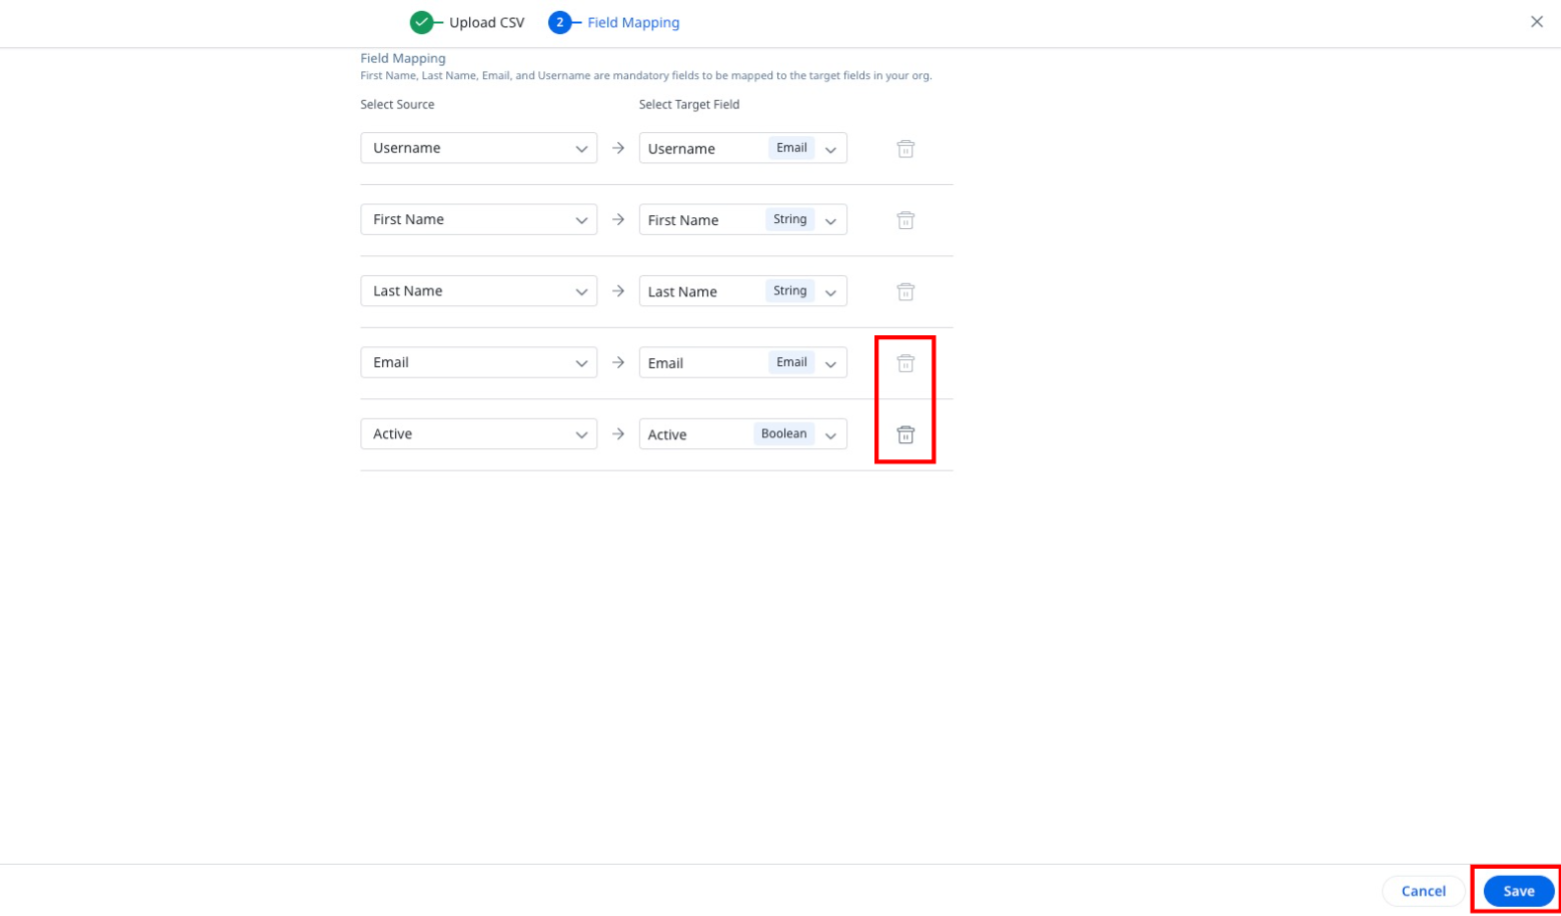
- Click Save. Partner Users are added successfully.
Data Permissions
This section allows you to navigate to the Data Permissions page to make changes in existing permissions or create new permissions. Click Edit Data Permissions to navigate to the Data Permissions page.
For more information on how to create custom Data Permissions, refer to the Data Permissions article.
