Dashboard Permissions
Gainsight NXT
This article explains how admins can use the dashboard permissions to restrict a user/group of users from accessing a single or a set of dashboards.
Overview
Admins can enable and assign permissions to dashboards and can restrict a user/group of users from accessing a single or a set of dashboards
This document explains the following topics:
-
Dashboard Permissions (Single dashboard)
-
Permissions at Folder Level (Set of Dashboards)
-
Permission Assignments
-
Revoke Permissions and User/User Group Deletion
-
Create a User Group
Prerequisites
- Admins must be identified as Super Admins in Administration > User Management page in order to have unrestricted access to Dashboards and Dashboard Folders. For more information, refer to the Gainsight User Object article in the Additional Resources section at the end of this article.
For a user to be reflected in the User List as a Super Admin, it takes at least 6 hours. If you want the update to be reflected immediately, navigate to Administration > Sharing Setting, in the User Attributes section, click Refresh User Data.
Key Terms
|
Term / Dashboard Permissions |
Description |
|---|---|
|
Private, Public, or Shared access |
Note: Admins can also view the same from Dashboard Builder
|
|
User and UserGroup |
|
|
New Dashboards |
|
|
Super Admin |
|
|
Normal Admin |
|
|
Inheriting permissions from its parent |
|
Dashboard Permissions (Single Dashboard)
Admins can grant permissions to a user/group of users on a single dashboard at Administration > Dashboard Builder (BETA).
To apply permissions on dashboards:
-
Navigate to Dashboard Builder.
- Click the Context menu of the specified dashboard and select Manage Permissions. The Manage Permissions window appears.
Note: Manage Permissions is enabled only for the admins of the dashboard. If you are not the admin of the dashboard, the Manage Permissions will be restricted.
In the Manage Permissions window, the access level will be Private by default and only the creator has access to it. As an admin, you can change the access level to Public - View, Public- View and Share, and Public - View & Edit but as a Super Admin, you can even change the access level to Public - View, Public- View and Share, Public - View & Edit, and even Admin as required.
-
From Select Permission Type dropdown,select Give access to specific people.
Note: Select Public- View to give permissions to the users to only view the specific dashboards or select Public - View & Edit to allow anyone with access to Dashboards to view it and anyone with the access to Dashboard Builder to edit it or Public - View & Share to allow anyone with access to Dashboards to view it and anyone with the access to Dashboard Builder to share it. -
From the Search dropdown list, select Users or User Group.
-
Type the required user’s name to see a list of matching users.
-
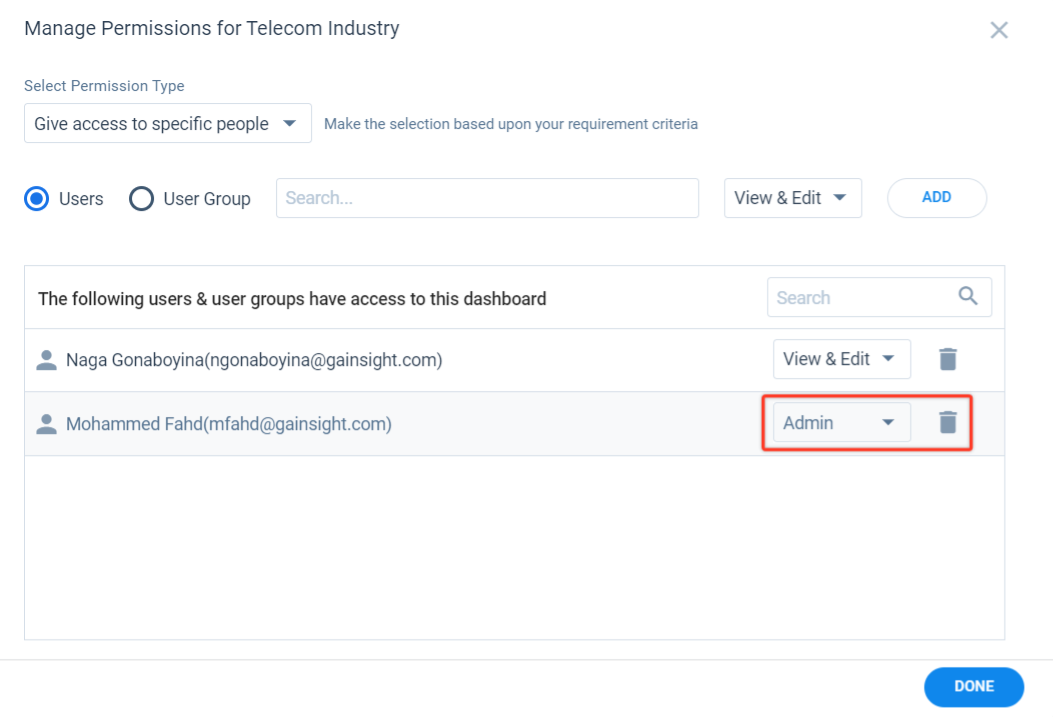
As an admin/super admin, decide what level of access you want to grant to the specific User(s) or User Group(s).
- Click ADD.
Note: Before you select a User Group, you need to create the same. To know about how to create a User Group, refer to the Create a User Group section in this article.
- When you click ADD, the list of users/user groups that have permissions on the asset will be displayed at the bottom of the same window. Click the delete icon to revoke access anytime.
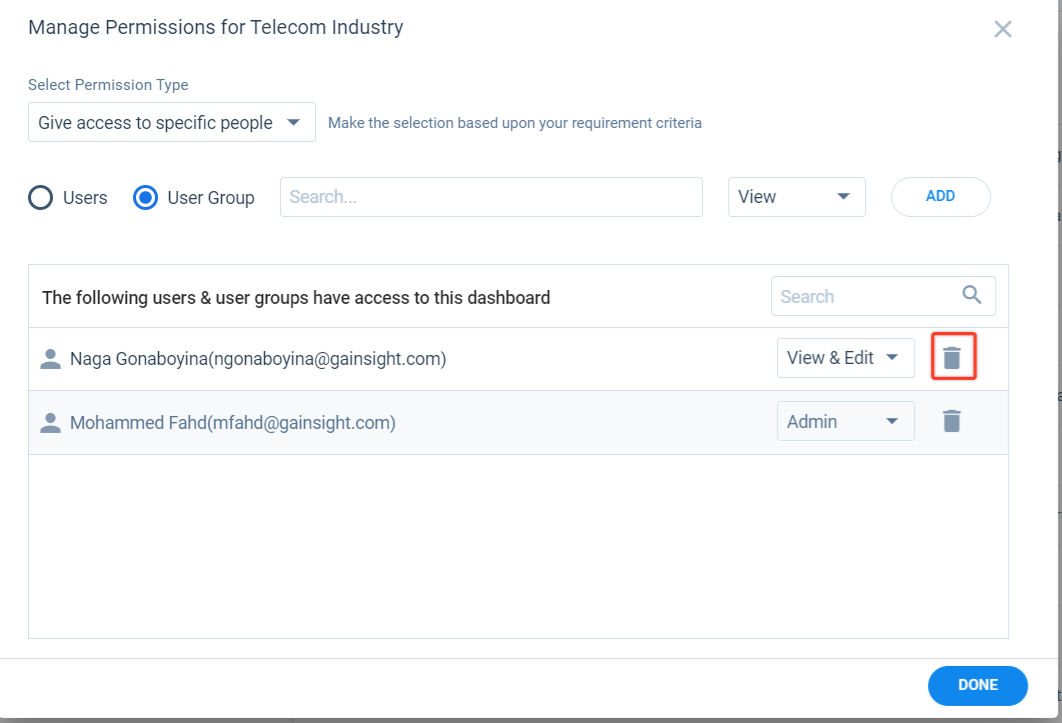
Note: If the listed user is an admin, you will not be allowed to revoke their access when you have only View and View & Edit permission to a specific dashboard. Only Super Admin can assign permission to such users.
Permissions at Folder Level (Set of Dashboards)
Admins can apply permissions on multiple dashboards that are grouped under a folder. To provide access to a user/group of users for a set of dashboards grouped under a folder, navigate to Administration > Dashboard Builder (BETA).

Notes:
-
In the above image, Home > Folder_1 (2nd level folder) > Folder_2 (3rd level folder) displays all three levels of folders and dashboards can be saved in any of the above folders. By default they will be saved to Uncategorized, a system folder available for all users.
- Permissions will be honored up to three levels of asset hierarchy (asset is either a folder or a dashboard). The Home folder is accessible to everybody.
To apply permissions to the Folders:
- Navigate to Dashboard Builder.
- Hover on the desired folder and click the Manage Permissions icon.
- Permissions can be set as described in the Dashboard Permissions section in this article.
Permission Assignments
Following are the permission levels which the Admin can assign:
-
Private: Dashboards/Folders can be accessed only by the owner and admin.
-
Public - View: Everyone can read dashboards with this level of permission.
-
Public - View & Share: Everyone can read/share dashboards with this level of permission.
-
Public - View & Edit: Everyone can read/edit dashboards with this level of permission.
- Give access to specific people: Only specific user(s) or group of user(s) who are given access can access the dashboards.
When Manage Permissions is clicked on an asset (dashboard), the option that is highlighted (selected) shows the permission level granted on that asset.
In the permissions assignment screen on an asset, the permissions inherited from all of its parents will be shown. In the dashboard listing screen, action icons will be greyed out if the user doesn't have that permission.
When a user with only a Public - View permission clicks on a dashboard, the dashboard icons he doesn't have access to will be greyed out.
Revoke Permissions and User/User Group Deletion
| Role | Revoke Capabilities |
|---|---|
| Super Admin | Can see all the dashboards that are shared with users/group of users. Can edit and remove users access if required. |
| Admin | Can control who gets to see items in the dashboard but not edit or delete items inside the dashboard. Admin can revoke access from the users with whom the admin shared the dashboard. |
| User |
Can see all the Dashboards shared with the user through the various sharing options. Users can access the dashboard only when the permissions are granted. Users cannot revoke access as the user might have only limited access to others’ dashboards that cannot be edited. Note: User with only a Public - View level of permission, clicking on a dashboard will take the user to the dashboard but grey out all the icons the user doesn't have access to. |
To revoke access:
- Navigate to Administration > Dashboard Builder (BETA) > [click the Manage Permissions] for any dashboard. The Manage Permissions window is displayed.
- Click the Delete icon to remove the user(s) or group of user(s) from the dashboard.
Notes:
-
Super Admins can revoke the access from any user who is admin/creator of the dashboard. Users who have been granted View or View & Edit or View & Share permissions, cannot revoke access for other users in the same dashboard.
-
In the Manage Permissions window of a dashboard, if the user with whom the dashboard is shared inherits the permissions from the parent, the user’s permissions level will be shown.
-
If you are the admin or you have been assigned admin level of access to a specific dashboard, other users with View/View & Edit/View & Share permissions cannot delete the user from the list or change the access level.
Limitations
- Access Levels: For the logged in user, the list of dashboards (assets) that the user can access will be displayed on the dashboard listing screen, on the Dashboard page, or any other consumption area should be controlled only for the assets the user has access to. All the assets (folders or dashboards) should be displayed along with all the parents in the folder hierarchy.
Note: If you change the access level from a specific user to Public - View/Public - View & Edit/Public - View & Share, it will revoke the access granted to all the specific users/user groups. Only Super Admin can do this action for any dashboard user.
- Viewing as: Super Admin can only view permission assignments which are Private when Admin and current users are different. Viewing as is accessible only when you are logged in as a Super Admin and Super Admins are similar to System Admins in that they have access to everything.
Note: For more information about how a user can be identified as Super Admin, refer to the Prerequisite section in this article.

-
Admins or users with access to Dashboards can move the dashboards. If you do not have permission, the checkbox, MOVE TO field, Delete, and the Manage Permissions will be disabled.
Note: Only 50 dashboards at a time may be moved from one folder to another.
Create User Groups ( Shared Groups)
Before you select a User Group, you need to create the same.
To create a User Group:
- Navigate to Administration > Users and Permissions > Gainsight Data Permissions.
-
Click +New Sharing-Group.
-
Enter a name for the user group. While naming the New User Group, avoid using space, numbers, or special characters as only Alphanumeric strings are allowed.
-
Click Ok.
- Provide the criteria details in the Users meeting the following criteria section.
Or, add users manually to create a group. For more information about how to add users manually to create a group, refer to the Sharing Groups section in the Gainsight Sharing Settings article in the Additional Resources section at the end of this article. -
Click Update.
-
Navigate back to Administration > Dashboard Builder (BETA) > [click Manage Permissions].
-
Select Give access to specific people.
-
Select User Group option.
- Start typing the User Group name that you just created at Administration > Sharing Setting > Sharing Groups.
Note: In the Manage Permissions window, you can access the list of user groups that are created at Administration > Sharing Setting > Sharing Groups, and assign permissions if you are a super admin.