Gainsight Assist Chrome Plug-in User Guide
Gainsight NXT
This article provides an overview of the Gainsight Assist Chrome Plug-in. It also explains how users can compose and send emails from their Gmail account using Gainsight templates, and easily sync them to Timeline directly from Gmail.
Overview
The Gainsight Assist Chrome plug-in helps users manage their day-to-day customer communications and saves them time and effort. Users can access their Gainsight email templates directly from Gmail, thereby saving time when composing customer emails and helping to drive consistency in communications. Also, the ability to log emails to Timeline from their inbox saves time and ensures that every important conversation is captured.
Note: This plug-in is not supported for emails that are sent using the Schedule Send option in Gmail.
Business Use Cases:
- As a user, while composing an email from Gmail, I want to access the email templates my admin has created in Gainsight to save time and effort.
- As a CSM, I want to log all of my customer communications/emails from Gmail to Timeline using the logged-in user credentials.
License and Permission
Users with a Full License, Viewer License, and Viewer Analytics License can log email to the timeline using plugins.
Prerequisites
Users must install the Gainsight Assist Chrome plug-in from the Chrome Web Store. After installing the plug-in, refresh your Gmail account to view the Gainsight logo and sidebar.

Limitations
Following are some of the limitations in using Gainsight Assist Chrome Plug-in:
- Gainsight does not support any Chrome external extensions that modify the Gmail theme; activities will be logged with the default Gmail theme.
- Inactive companies will not be shown in the company or relationship search from the plugin to log the activity.
- When a Company's status is marked as Churn in Gainsight, it cannot be selected from the Gainsight Assist Company/Relationship dropdown. However, its Relationships remain selectable unless the Relationship's status is specifically changed to Churn. Similarly, if the Relationship's status is marked as Churn, the Company remains selectable unless its status is also Churn. If both the Company and Relationship's status are marked as Churn, neither of them will be available for selection in the Gainsight Assist Company/Relationship dropdown.
- If a contact is associated with an inactive/churned company, the company name still appears. However, if they are directly searched, inactive or churned companies do not show up.
Gainsight Assist Plug-in
Access to the Gainsight Assist Chrome Plug-in is restricted to the users who use the plug-in directly from gmail.com or googlemail.com. However, users will still be able to use the plug-in if any Gainsight user has registered their Gmail ID with Gainsight.
Login Process for Chrome Plug-in
Gainsight Assist plug-in provides the following integrations:
- Gainsight Account (For NXT customers): Use your Gainsight NXT account, if you want to access Gainsight directly outside your platform. For more information on types of authentication methods, refer to the User Login Methods to Gainsight NXT article.
Note: If users face errors after logging in, navigate to Privacy and Security section of the General settings page of Chrome browser and enable the Block third-party cookies in Incognito option. - Salesforce Account: Use the Salesforce account, if you use Gainsight from the Salesforce platform. If this option is selected, it directly asks for the user credentials.
Users can log into Gainsight Assist Plug-in based on which of the following category they belong to:
- Users with a single domain
- Users with a single domain and multiple environments ( Production, Sandbox)
- Users with multiple domains
Users with a Single Domain
Users that have a single domain can log in using the following steps:
- Click the Gainsight icon on the Gmail slide-out panel. The Login page appears.
- Click Gainsight integration.
- In the Username field, enter the username.
- Click Next. The Gainsight login window appears.
- Enter Username and Password of your Gainsight account.
- Click LOG IN. The Welcome to Gainsight page appears.
Note: If a user is already logged in to a domain, then the Gainsight Assist plug-in automatically redirects to the Welcome to Gainsight page.
Users with a Single Domain and Multiple Environments
Users that have a single domain and have access to multiple environments such as Production or Sandbox orgs, can log in using the following steps:
- Click the Gainsight icon on the Gmail slide-out panel. The Login page appears.
- Click Gainsight integration.
- In the Username field, enter the username.
- Click Next.
- From the Select domain dropdown, select the required domain.
- Click Next. The Gainsight login window appears.
- Enter Username and Password of your Gainsight account.
- Click LOG IN. The Welcome to Gainsight page appears.
Users with Multiple Domains
Users that have multiple domains can log in using the following steps:
- Click the Gainsight icon on the Gmail slide-out panel. The Login page appears.
- Click Gainsight integration.
- In the Username field, enter the username.
- Click Next.
- In the Gainsight Domain field, enter the Gainsight domain URL.
- From the Choose Data Center Location dropdown, select one of the following options:
- US1 Data Center: Covers the US Region and contains data specific to the existing US customers only.
- US2 Data Center: Covers the US West 2 Oregon region and contains only new US customers' data.
- EU Data Center: Contains customer data specific to the EU region.
- Click Next. The Gainsight login window appears.
- Enter Username and Password of your Gainsight account.
- Click LOG IN. The Welcome to Gainsight page appears.
Chrome Plug-in Updates
In Gmail, a pop-up dialog appears at the plug-in logo if there are any updates available for the Gainsight Assist plug-in to be downloaded.

The plug-in will automatically update and may take up to 24 hours for the update to reflect across all regions. Post update the user must fully quit and relaunch Chrome.
However, manual steps are required if the plugin needs to be updated within 24 hours of release. If users open the plug-in, the update pop-up appears. Perform the steps below to manually update the plugin:
- Click Open Extension to navigate to the Chrome Plug-in extension updates page.

- Turn on the Developer mode toggle in the top right corner of the Extensions window.

- Click the Update button near the top left corner of the Extensions window. The plug-in is updated.
Note:
- After downloading the updates, Gainsight recommends you turn off the Developer Mode toggle switch.
- Gainsight has reduced the width of the Chrome plugin.
Template Selection for Composing Emails
When the email composer is opened, all the Gainsight email templates which can be accessed by the user are displayed in the side panel, sorted on the basis of the last modified date. All the attachments, images, and tokens (except the report and survey) are supported by this feature.
Note: Only the templates with the Available to Users toggle switch ON are displayed. For more information, refer to Restrict Email Templates Available in Send Email Service section.
The email templates displayed in the slide-out panel cannot be edited from the plug-in. However, the content in the template can be edited once they are moved to the composer.

[Changes made on August 24, 2024]:
- The Include Empty Folders checkbox was previously available for both Chrome and Outlook. This checkbox is removed.
-
The folder icons are no longer visible next to the folder names and email template names within the folders.
-
The hover text for each template created in the Gainsight application and listed in this location has been updated.
You can also apply email templates when using the email composer window in maximize state as well. If you do not want to use Gainsight templates, click the minimized icon of the Email Templates section.
Limitations
The following are some of the limitations of viewing Gainsight email templates in the plug-in:
- Users can view both the Operational and Non-Operational templates. For non-operation templates, the unsubscribe option is not available.
- Templates with Survey and Report tokens are not displayed.
- Customer info object is not supported for token resolution in the Chrome Plug-in. Company, Relationship, Person, Company Person, Relationship Person, and Relationship Type are the only objects supported.
Composing Emails
To resolve tokens dynamically that are mapped to default mapping in email templates while editing a token, enable the Edit default token mapping in cockpit toggle button in the Administration > Email Configuration > Compliance tab.
To compose emails using Gainsight Assist plug-in:
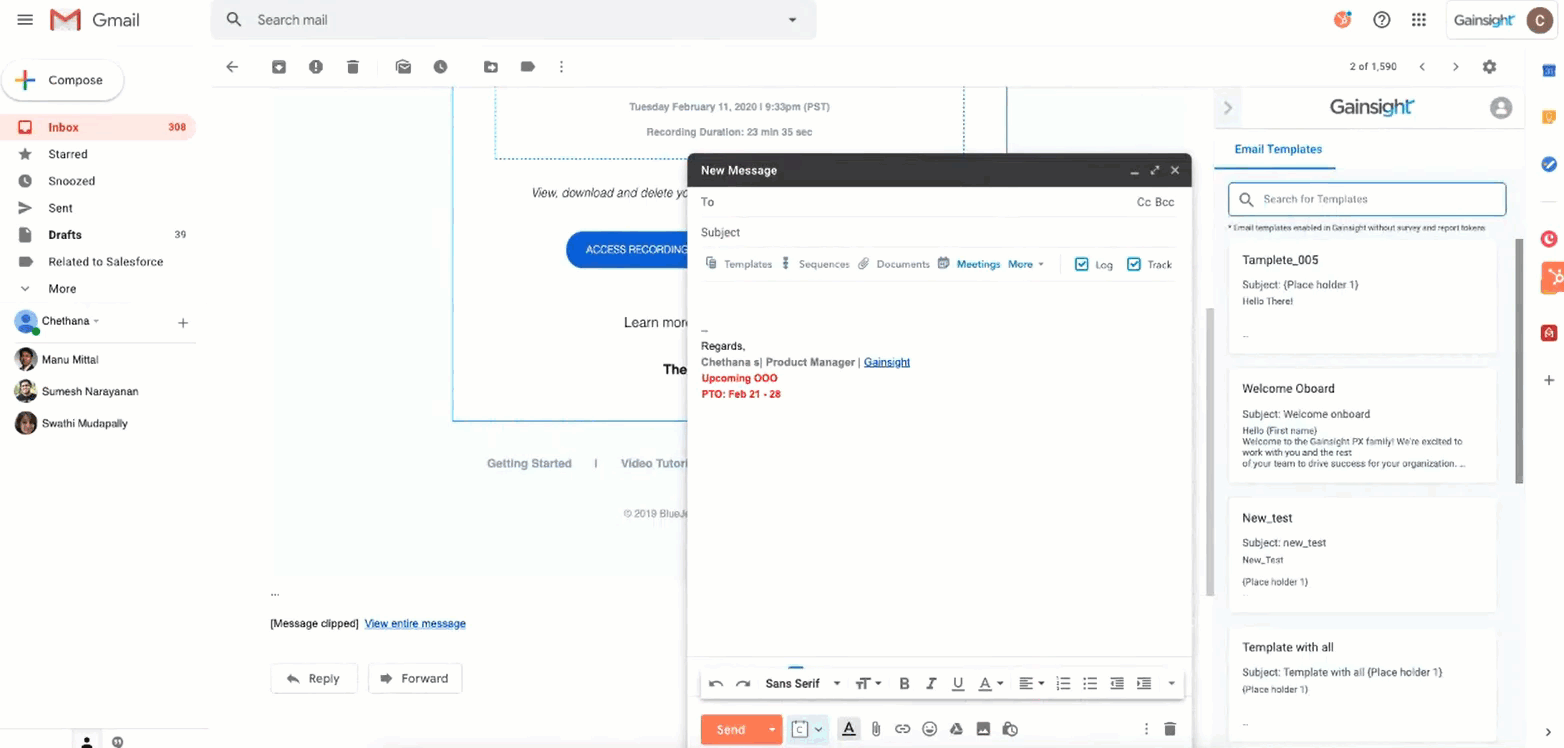
- Click the GS Assist Plug-in icon on the side panel. The Welcome to Gainsight page appears.
- Click Compose or Compose a mail. The New Message window appears along with the list of Email Templates from Gainsight in the side panel.
- Click on the template you want to use.
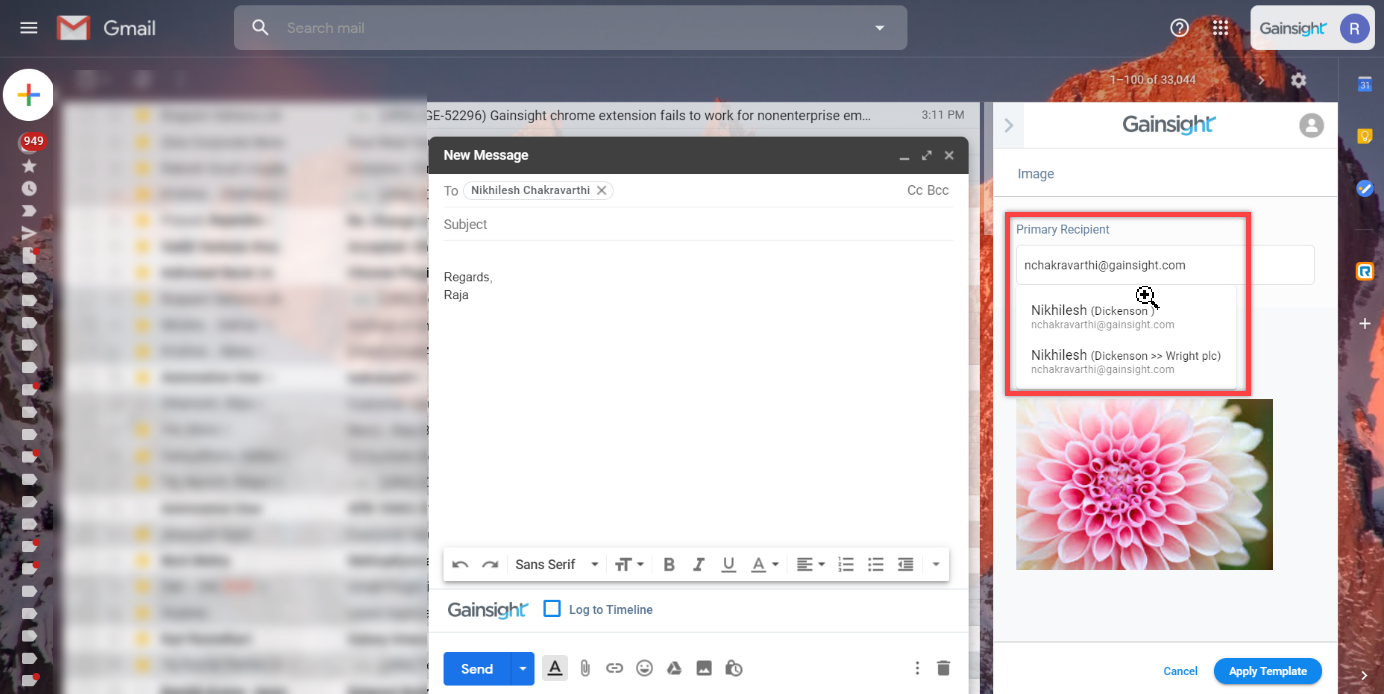
Note: Users can also search through the list of templates by complete name and select a particular template. - In the Primary Recipient field, enter the email address of the recipient to automatically resolve the tokens.
Note: The search in the Primary Recipient field occurs on Company Person object and also the Permission Bundles are honored in the search. However, when the Add this email to Timeline resolution happens, the search is based on the Company Person object and it does not honor the Permission bundles. - Click Apply Template. The template from the side panel is copied to the email composer and a successful message appears.
- Click Done.
Important Notes: The following are some of the important points when composing an email using templates from plug-in.
- Users can directly click the Apply Template option without providing primary recipient details to edit the tokenization values manually.
- You can also add multiple email templates to a single email by placing the cursor in the composer, at the point you want to add content in the email.
-
If a user adds the primary recipient in the composer and then click on the template, the email address provided in the composer is automatically copied to the Primary Recipient field in the plug-in sidebar.
-
When the recipient copied from the composer to the primary recipient, after which the primary recipient is modified, the new recipient is copied to the recipient list to the composer and added as the last recipient when the template is applied.
-
The email ID added as primary recipient from the plug-in is copied to the To field in the Composer even though the recipient is not found while searching in the Primary Recipient field.

-
If the email ID belonging to the same Company and Relationship is added to the primary recipient search box, a dropdown list with the options is displayed for the users to select the correct email ID.
-
You can also apply Gainsight email templates while replying to the existing emails.
Add Email to Timeline
Users can sync emails to Timeline directly from Gmail when they send out the email. These emails are logged to Timeline, and its status is updated in Gmail. Also, the Add Email to Timeline feature from the plug-in is applicable for older emails as well. These logs are added as an activity to the user's company Timeline.
Note: The email is not logged to Timeline if:
- The subject line exceeds more than 256 characters.
- The body of the email exceeds more than 32K characters.
- The Subject of the email is empty.
- The Body of the email is empty.
The Add this email to Timeline checkbox is not selected by default. If you want to add emails to Timeline, select the checkbox before sending out the email.
Email activities logged to Timeline reflect the original date and time the email was received, ensuring accurate activity tracking. This change is effective from April 26, 2025, provided you are on the latest version of plug-in.
When the Add this email to Timeline checkbox is selected, the following scenarios arise:
- If all the recipients are from the same Company/Relationship, Gainsight resolves the Company/Relationship details that are required to log the email against the Timeline.
- Select the Company/Relationship to which the email must be logged. If there are any resolution conflicts, it displays the list of email recipients as well as the Company/Relationship to which they belong to.
- If the required Company/Relationship is not listed, users can use the Search icon to find a Company/Relationship to add, and then add the email to Timeline against this Company/Relationship.
- If the user does not resolve and directly sends the email, the email is saved in the drafts section of Timeline. Users have to log that email manually by logging into the Gainsight application.
Note:
- ID used to log into Gainsight org will be logged to Timeline as internal attendee.
- Email IDs not recognized as Internal, or Company / Relationship Person will be logged as External IDs.
- When emails in the Inbox are logged to Timeline, following IDs are resolved:
- From email ID
- To recipients
- CC recipients
- BCC recipients
- When an email is composed, the following IDs are resolved:
- To recipients
- CC recipients
- BCC recipient.
- For sent emails, the following IDs are resolved:
- To recipients
- CC recipients
- BCC recipients
IMPORTANT: If a user sends an email to multiple users:
- Any user can log the email as an activity.
- The status of that email is changed to logged for all the users if one user logs that email to Timeline.
- Once the email is converted as an activity, all the users view the email status as Logged. The user who has already created a draft of that email has two entries, one as a draft and another as an activity.
Log Older Emails
Users can also log older emails to Timeline by clicking on the Add this email to Timeline pill, which is available if that email is not already logged to Timeline.
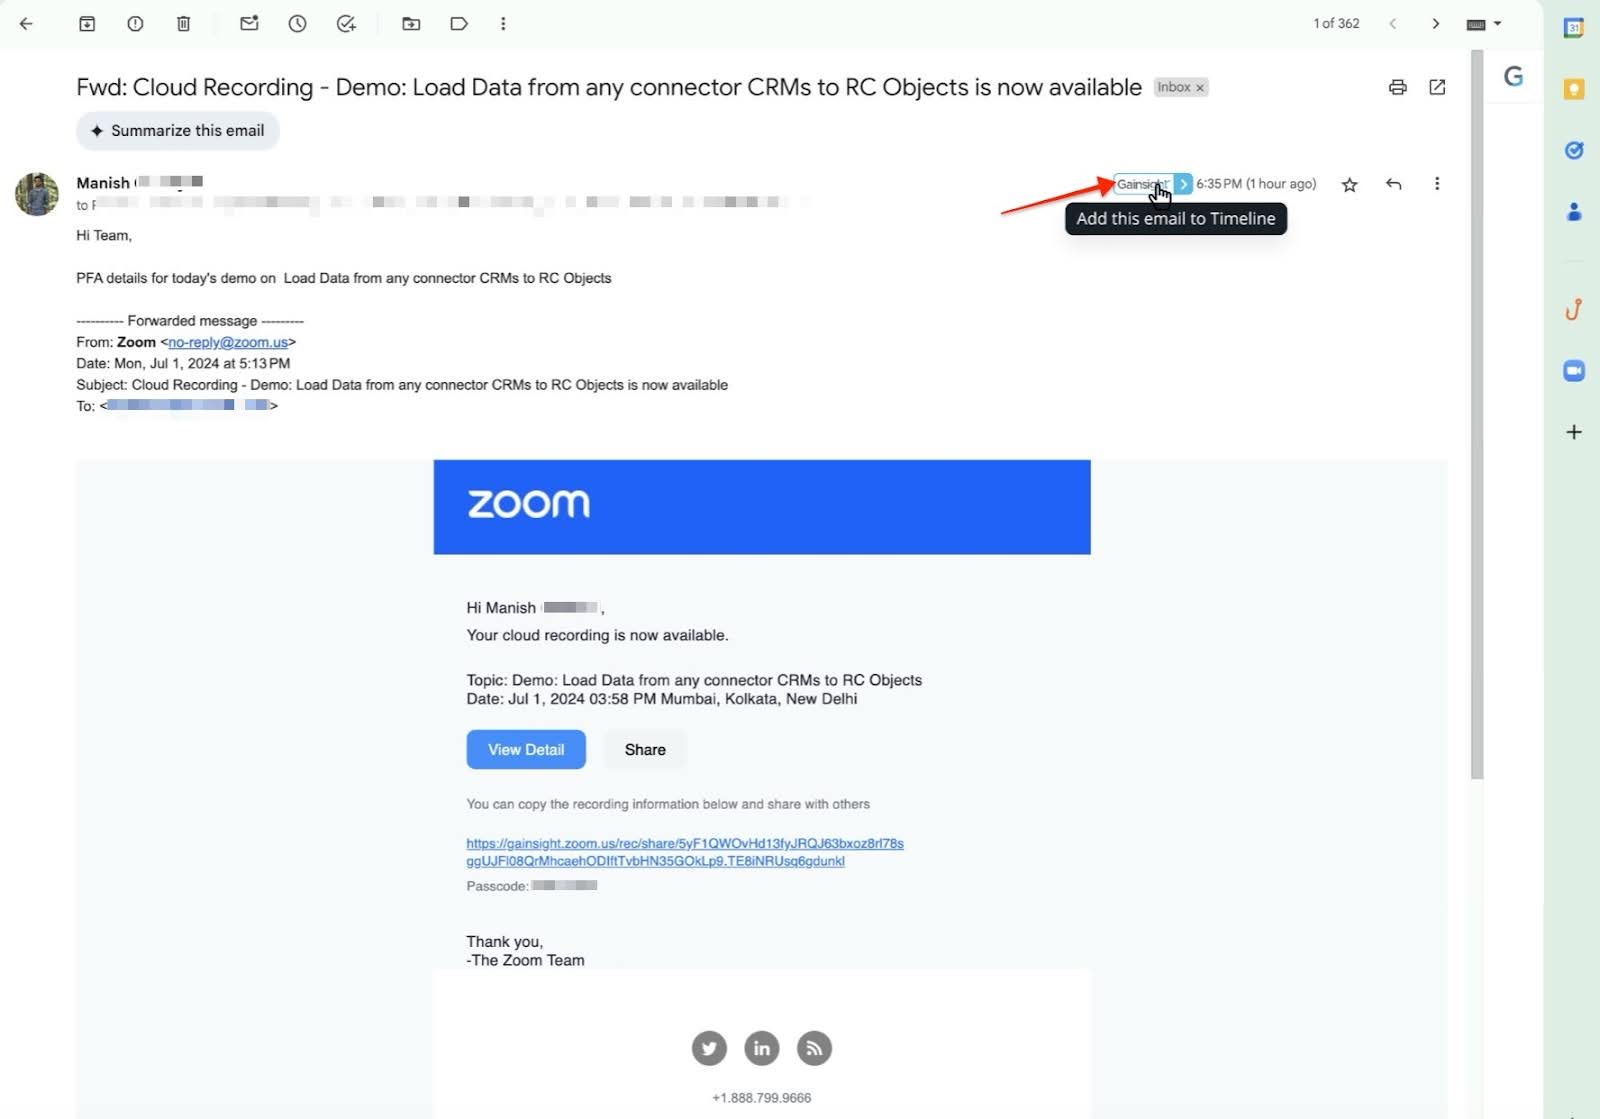
If the resolution of Company or Relationship fails, then try the following options:
- If the resolution is not successful, select Timeline for the Company/Relationship manually to which the email must be logged.
- If the user does not resolve or directly sends the email, the email is saved in the drafts section of Timeline. Users have to log that email manually by logging into the Gainsight application.
Users can check the status of the Add this email to Timeline from their Gmail Account Sent Items. The following are the statuses users can find for their emails:

Add Emails with Attachments
The attachments in the email are also logged to the Timeline. If the attachment size is larger than 30 MB, then the Google drive link is embedded in the email body. Users can access this link from the Timeline. Based on the permissions set on the file, users may have to request access.
The following are the attachment file types that are supported: jpg, jpeg, gif, png, bmp, pdf, doc, docx, txt, ppt, pptx, xls, xlsx, and csv.
The number of emails and the attachment size limits in the email to be synced is based on the Timeline Activities limits. For more information, refer to the Log Customer Emails as Timeline Activities article. If the size and number of attachments synced are higher than the permissible limits, the system automatically selects the random attachments as per the limits. An email notification is sent to the concerned user about the number of attachments skipped, but not the exact names of attachments.
Undo Emails
Based on the user settings (5 to 30 seconds) defined in their Gmail account, emails can be recalled after they are sent. If the email with Add this email to Timeline option selected is recalled from Gmail within the user setting limits, the email can be recalled successfully but the activity will still be logged to Timeline. However, users have to delete the saved logs manually from Timeline.
For more information on the most frequently asked questions on the Gainsight Assist Chrome Plug-in, refer to the Gainsight Assist Chrome Plug-in FAQs article.
Select Activity Type and Call Duration for Timeline Entries
This section outlines the changes that are visible when the feature flag is enabled at the individual tenant level.
The Timeline email integration enhances user efficiency and satisfaction. When pushing emails into Gainsight as Timeline entries, Customer Success Managers (CSMs) can add recipients, allowing the company or relationship to be automatically selected. Once the company or relationship is auto-selected, the other fields listed below are enabled.
-
Activity Type Selection: CSMs can choose the appropriate Activity Type, with the default set to "Email," when adding emails to the Timeline. End users can change this as needed, eliminating the need for manual corrections.
-
Duration: The ability to add Call Duration provides more detailed and accurate activity logging.
Note: Duration (in minutes) cannot be entered or edited for all activities that do not have the Duration configured in Timeline. For other activity types, it is enabled with a default value of 30 minutes, which the end user can change.
IMPORTANT:
- CSMs must update the Chrome extension to see the new changes or if the above mentioned options do not appear.
- The enhancement launched in August 2024 release can be disabled or reverted to the previous version by contacting the Gainsight Support team. However, even after disabling the feature, some minor UI-related changes, such as updated UI messages, will persist. For more information, refer to the Gainsight Assist Chrome Plug-in FAQ article
The following image shows the Gainsight Assist in the side pane. The message emphasizes the integration with Gainsight Timeline, which enables users to automatically log emails as Timeline activities. You can click X if you don’t want to see this message again.
You can click Learn more to navigate to additional resources or documentation where you can find further details about Gainsight Assist and how to use it effectively.

Steps to select Activity Type, Call Duration, and log the email activity to Timeline:
-
Compose an email you want to push to Gainsight in your preferred email client (example, Outlook, Gmail).
-
Add recipient's email address in the To field.
-
Select Add this email to Timeline checkbox to push the email and its details to Gainsight’s Timeline.
-
Based on the recipients, the Company or Relationship name will be automatically selected if there is no conflict. If a conflict arises, please select the appropriate Company or Relationship from the dropdown.
- In the side pane, you find the Activity Type dropdown. Choose the appropriate Activity Type from the list if the default type (email) is not relevant.

- Enter the duration in the provided field if relevant.
- Review all the entered details for accuracy.
- Click send email and the email will be logged to Timeline as well.
Note: Any attachments included in the email are also logged to the Timeline. If the attachment size exceeds 30 MB, a Google Drive link is embedded instead. Users can access this link based on the file permissions set.
Users can verify the logged activity by navigating to the Timeline section in Gainsight.
To log older emails to Timeline:
- Open an older email you want to log to Timeline.
- Click the Add this email to Timeline pill. The side pane opens.
Note: This functionality is applied when the feature flag is enabled. If the feature flag is not enabled, the system reverts to the previous version. This enhancement can be disabled or reverted to the previous version by contacting the Gainsight Support team.

Example Use Case:
Scenario: A CSM had a call with a client and wants to log the follow-up email with details of the conversation.
-
The CSM opens the email, initiates the push to Gainsight, selects the activity type, enters the duration if relevant, and submits the entry.
-
The details are now logged in the Gainsight Timeline, providing a complete record of the interaction.
Best Practices for Effective Logging
-
When selecting the Activity Type, choose the most accurate option to maintain clarity.
-
Always enter the details consistently to ensure data integrity.
-
Regularly review your Timeline entries to confirm they are logged correctly and make any necessary adjustments.
Gmail Languages Support In Plugins
Gmail displays localized date and time formats that vary by country, which can affect how timestamps appear. Gainsight supports standardized formats to ensure accurate conversion to UTC and epoch when logging emails to Timeline.
Gainsight supports Gmail accounts that are configured with the following languages:
- English (US)
- English (UK)
- English (India)
- German
- French
- Italian
- Dutch
- Portuguese (Brazil)
- Russian
- Japanese
- Chinese (Simplified)
- Korean
- Finnish
- Hindi
- Thai
Limitations
The following are the Gainsight Assist Chrome Plug-in limitations when it is used simultaneously with other chrome extensions for Gmail:
- When the Gainsight Assist Chrome Plug-in is used along with the Mixmax chrome extension, the email does not get logged to the Timeline when the Add this email to Timeline option is selected while sending emails from the compose mode. As a workaround, users must go to Sent Emails and log the email to Timeline.
- The Gainsight Assist Chrome Plug-in does not work as expected when it is used along with the Salesloft chrome extension.
Uninstall Gainsight Assist Add-In
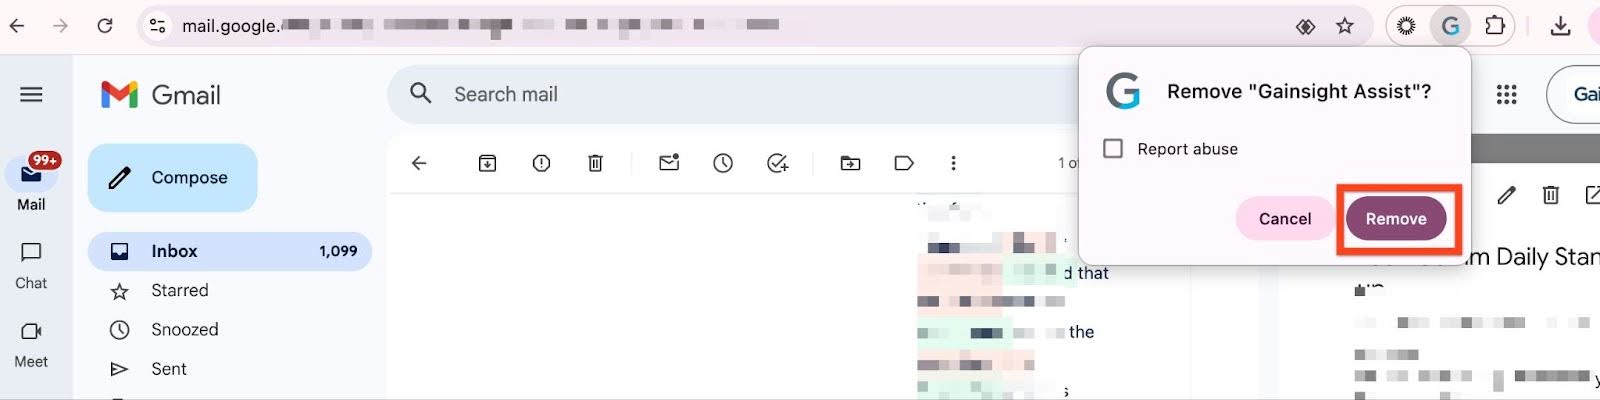
To uninstall the Gainsight Assist add-in in the Chrome Web application:
- In the Chrome Web Application, click the Extensions icon.
- Click the three-dots vertical menu next to Gainsight Assist add-in.
- Click Remove from Chrome. The Remove Gainsight Assist confirmation window appears.

- Click Remove.