Configure CSQL
Gainsight NXT
This article describes how admins can configure CSQL and the CSQL sections in 360 and Gainsight Home.
Overview
Customer Success teams identify and share leads with Sales. CSMs can use this feature to identify a lead, share it with sales via CRM, and report on the revenue impact. This feature provides a standard method to track the leads, analyze leads data, and generate lead reports.
As an admin, you need to add the CSQL section into the C/R360 layouts and in the Gainsight Home page for your company, and configure the CSQL feature from the Administration section. You can also configure reports to measure the revenue impact from this feature.
Configure Sync Options
CSQL can be configured to store leads only in Gainsight or synchronize them with Salesforce’s Lead object. Customers who want to use Rules Engine to send CSQLs to other objects or CRMs should select Gainsight only.
The easiest way to get started with CSQL is to deploy without the Salesforce integration. CSQLs are created only in Gainsight and the assigned Lead Owner can be notified by email.
Note: Lead Owner is likely to be a Sales counterpart and does not have to be a Gainsight licensed user. They can be added as Internal Collaborators.
Integrating with Salesforce's Lead object requires coordination with Sales and Marketing teams. Before starting deployment, we recommend working with these teams to determine how leads should be routed and the role people and technology play in converting leads to opportunities. This approach is ideal for customers who expect to generate leads that require the support of marketing to nurture and qualify before sending to Sales.
Navigate to Administration > Revenue Optimization > CSQLs > Data > Sync Options and configure the sync options for the Lead data. The following sync options are available:
Gainsight
CSQLs exist only in Gainsight.

IMPORTANT:
- Running the connector jobs will sync all the data from the respective Salesforce objects to Gainsight (User->User, Account->Company, and Contact->Person).
- Avoid running the respective connector jobs if the required User, Company, and Person data are already present in Gainsight.
- The OOB Lead Sync job will only pull lead records that have LeadSource as Gainsight on the SFDC Lead record. (This is a hidden filter)
Salesforce
CSQLs are synchronized with Salesforce. You can further select whether leads should synchronize with Salesforce as leads or opportunities. For more information on how to configure the Salesforce sync option, refer to the Sync Leads or Opportunities to Salesforce article.

IMPORTANT:
-
If Sync Option is selected as Salesforce Lead, then Salesforce source fields mapped in the out-of-the-box Lead Sync job are updated. For more information on the field mappings between Salesforce Lead and Gainsight Lead objects, refer to the Lead Sync section of the Salesforce Connector article.
- Ensure that the Salesforce Connector is authorized. For more information on how to authorize the Connector, refer to the Create a Connection section of the Salesforce Connector article.
Run Company Person Sync Job
Perform the name field mapping in the Company Person Sync job using the following steps:
- Navigate to Connectors 2.0 > Jobs.
- Click the three-vertical dots menu for the Company Person Sync job and click Edit.
- In the Preparation step, click the three-vertical dots menu for SFDC Contact and click Edit.
- Click Add Fields.
- Select the checkbox for the Full Name field and click Select.
- Click Save.
- Click the three-vertical dots menu of Add to destination and select Edit.
- Click the Direct Mapping tab.
- From the Select Target Field dropdown, select the Person::Name for the Full Name Source field.
- Click Save. The field mapping is saved.
- Click Save. The job is saved successfully.
Run the Salesforce’s User Sync, Company Sync and Company Person Sync jobs from the Administration > Connectors 2.0 > Jobs page. For more information on how to configure the sync jobs, refer to the Salesforce Connector article.
Switch Sync Options
You can switch between Sync Options from Gainsight Only to Sync with Salesforce, or vice versa. However, the other sync option remains inactive if there are existing lead records in the GS Lead object. These records must be first deleted from Data Management.
.png?revision=1)
For more information on how to delete lead records from the GS Lead object, refer to the Delete Lead Records section in this article.
Delete Lead Records
To delete lead records from the GS Lead object:
- Navigate to Administration > Customer Data > Data Management. The Data Management screen appears.
- Search GS Lead in the Objects tab search box. The search results appear.
- In the Object Display Name column, click GS Lead. The Fields tab for GS Lead appears.
- Click the Data tab. The Total Records table appears.
- Select the record or records you want to delete. The Delete Records button appears.
- Click Delete Records. The Delete Dependencies dialog box appears. It displays the existing dependencies that are impacted.
- Select the dependency checkbox. The Permanently Delete button becomes active.
- Click Permanently Delete. The record is deleted. It is also removed from the CSQL widget in GS Home and C360.
Note: It takes a few seconds for the records to disappear from the Total Records table.
Bulk Delete All Lead Records
To delete all lead records at once from the GS Lead object:
- Select the global checkbox. The Select all N records and Delete Records buttons appear.
Note: Only the records displayed on the current page are selected and a count of the selected records are displayed. - Click the Select all N records button. All records in the GS Lead object are selected.
- Click the Delete Records button. The Delete Dependencies dialog box appears.
- Select the dependency checkbox. The Permanently Delete button becomes active.
- Click Permanently Delete. The records are deleted.
Configure Lead Status
Lead Status displays the progress of the leads during the lead creation and lead conversion process. You can configure Lead Status by navigating to Administration > Revenue Optimization > CSQLs > Data > Lead Status.
To create custom statuses, you need to configure the GS Lead object in Data Management and then configure the same in the Lead Status section. For more information on how to add values in Dropdown, refer to Manually Add Values in a Dropdown section in the Dropdown List article available in the Additional Resources section.
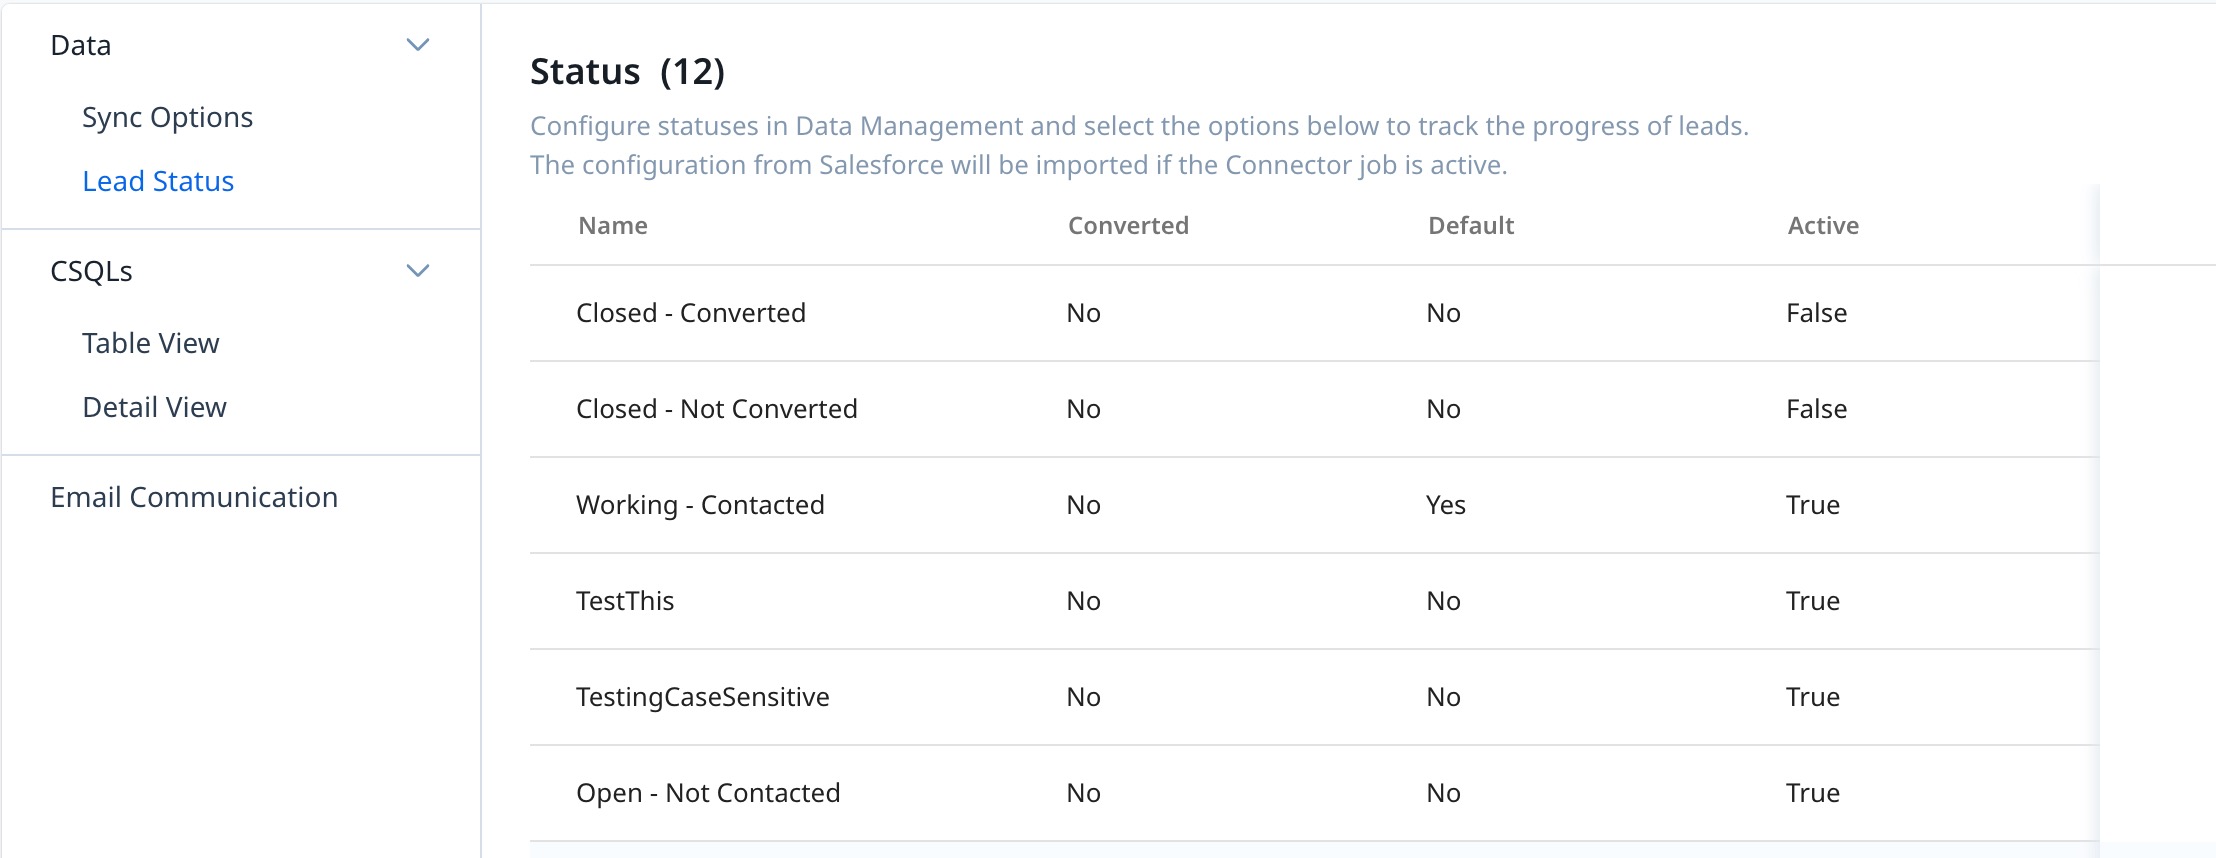
Notes:
- Only one status can be set as Default.
- Statuses are editable only if the Sync Option is selected as Gainsight.
- If the sync option is Salesforce, the Lead statuses will be synced from Salesforce on the first successful run of the Lead connector job.
Configure Table View and Detail View
Table and Detail Views allow you to control how end-users interact with the CSQL features through the Gainsight Home and C/R360 pages.
Configure Table View
Table View provides end-users with the qualified leads details based on the fields you select. To configure the fields in Table View:
- Navigate to Administration > Revenue Optimization > CSQLs > Table View.
- Click Add Fields.
- Select the required fields and click Add.
- Verify the fields and click Save to save the configuration.
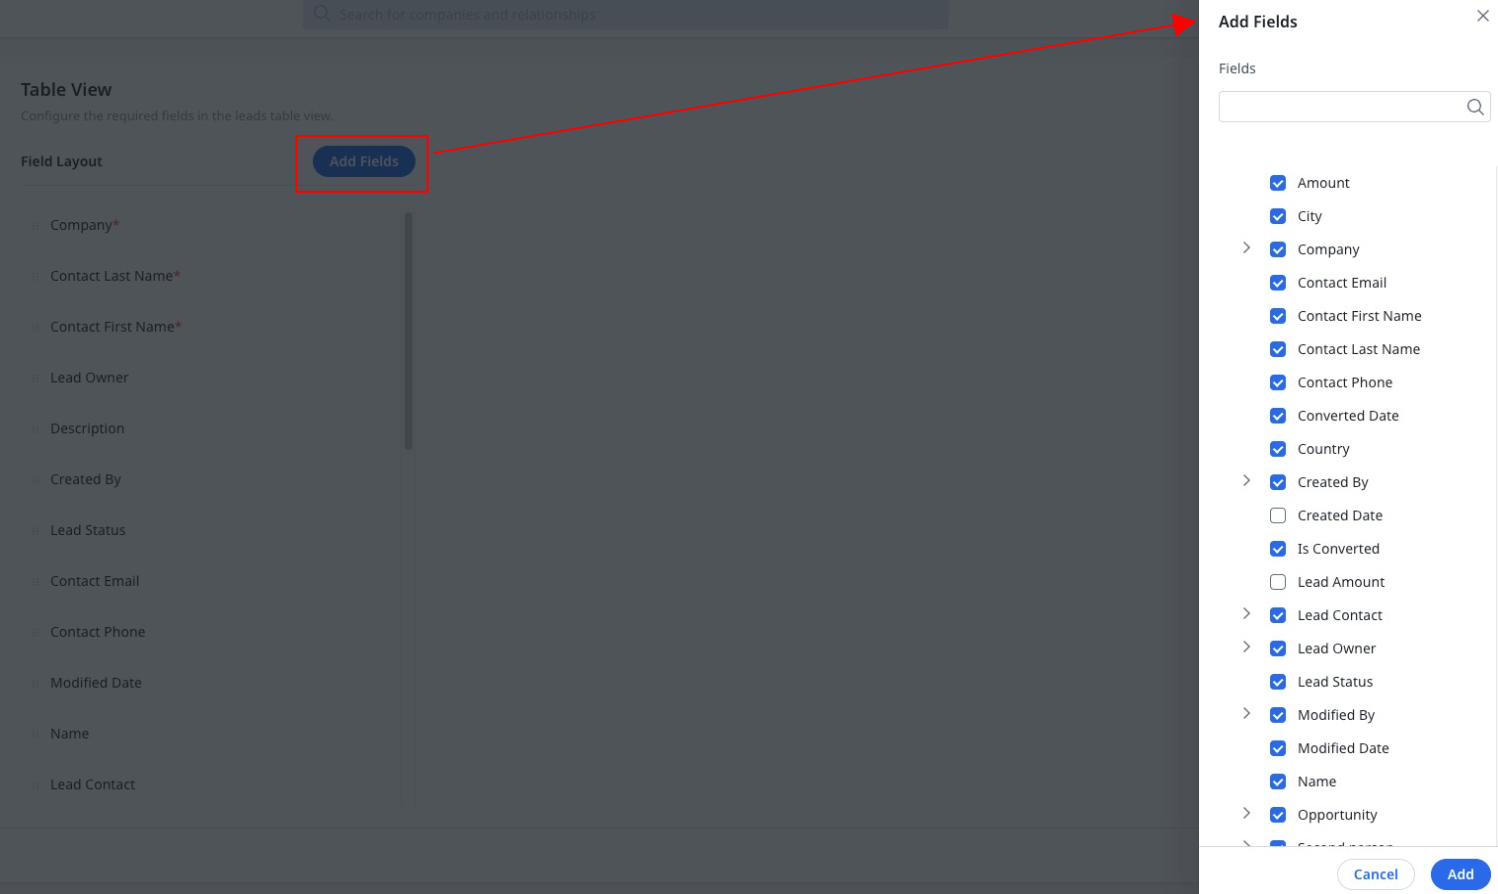
Note:
- The fields can be configured as Editable or Required based on your requirements.
- The External ID field is hidden in the CSQL table view as it serves no purpose in this format. However, it is used in the detail view to generate the View in Salesforce hyperlink for Salesforce flow, which explains its visibility there.
Configure Detail View
Detail View provides end-users with the information they need to enter when they are creating a qualified lead. To configure the fields in Detail View:
- Navigate to Administration > Revenue Optimization > CSQLs > Detail View.
- Click Add Fields.
- Select the required fields and click Add.
- Verify the fields and click Save to save the configuration.
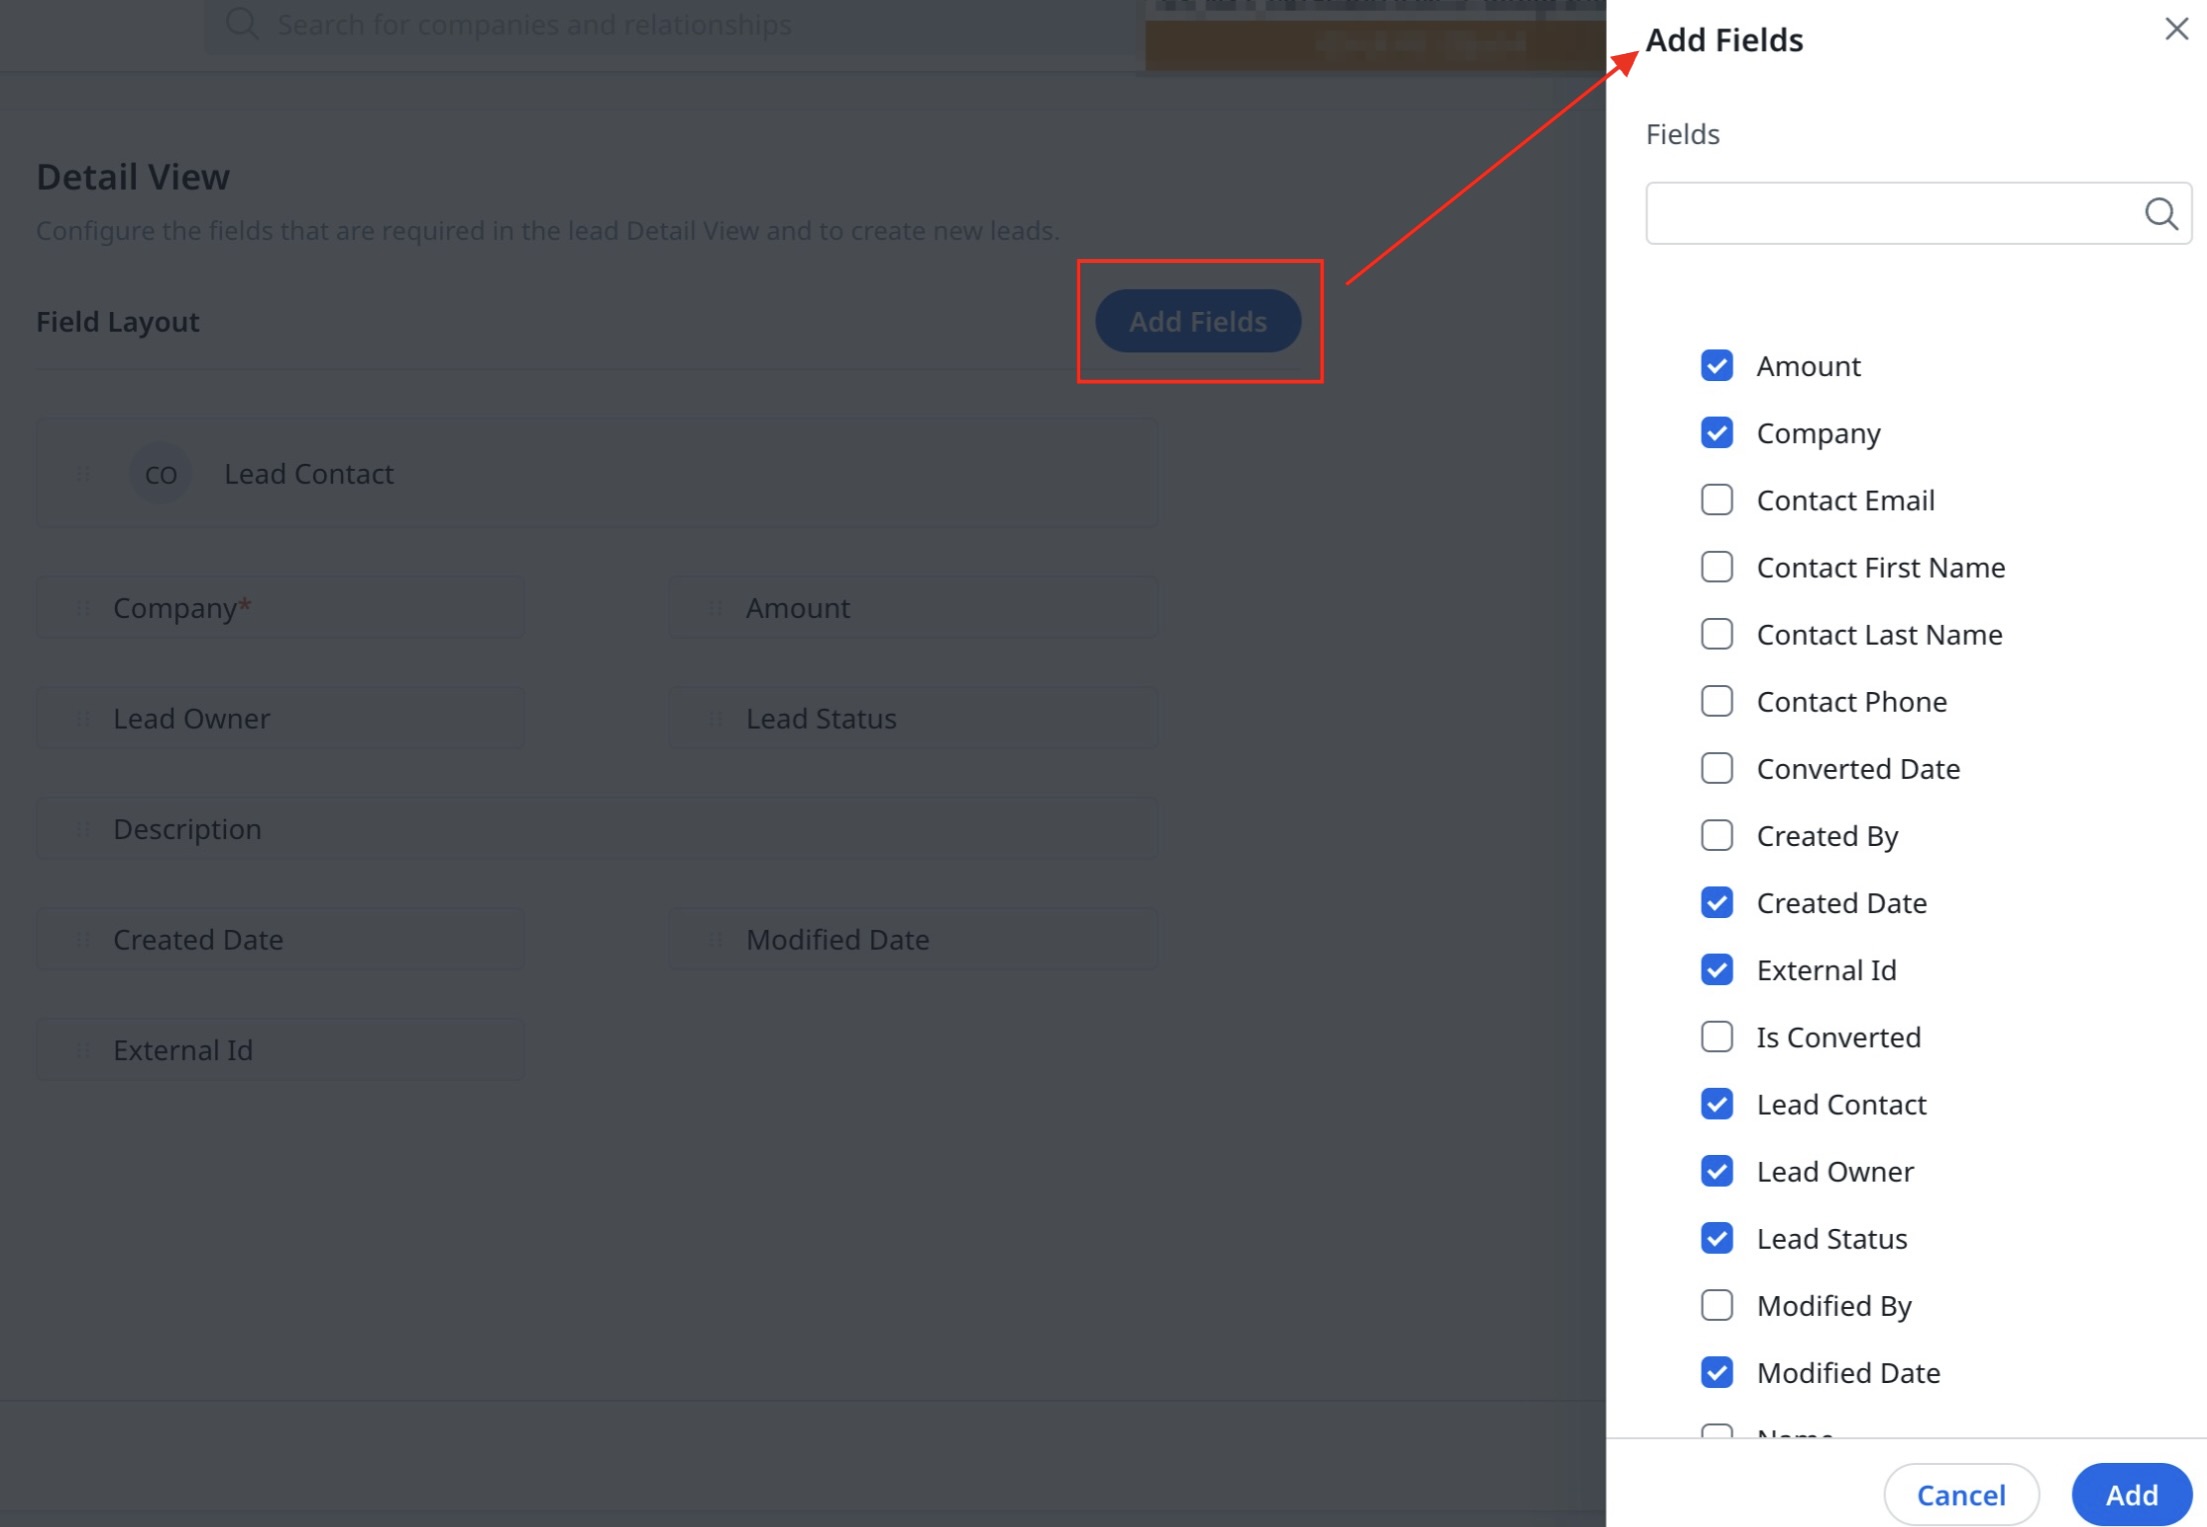
Note: The fields can be configured as Editable or Required based on your requirements.
Configure Description Field in Detail View
The description field provides additional account-related insights to CSMs and end-users for which they are creating a lead. The insights are available in the Company, Relationship, and Company Person objects.
To configure the description field:
- Add the Description field to the Field Layout.
- Click the Settings icon on the Description field.
- In the Customize Customer Insights section, click Add under each section to include insights from the following sources:
- Company Insights: The fields that are available in the Company object are available as insights.
- Relationship Insights: The fields that are available in the Relationship object are available as insights.
- Contact Insights: The fields that are available in the Company Person object are available as insights.
- Click Add.
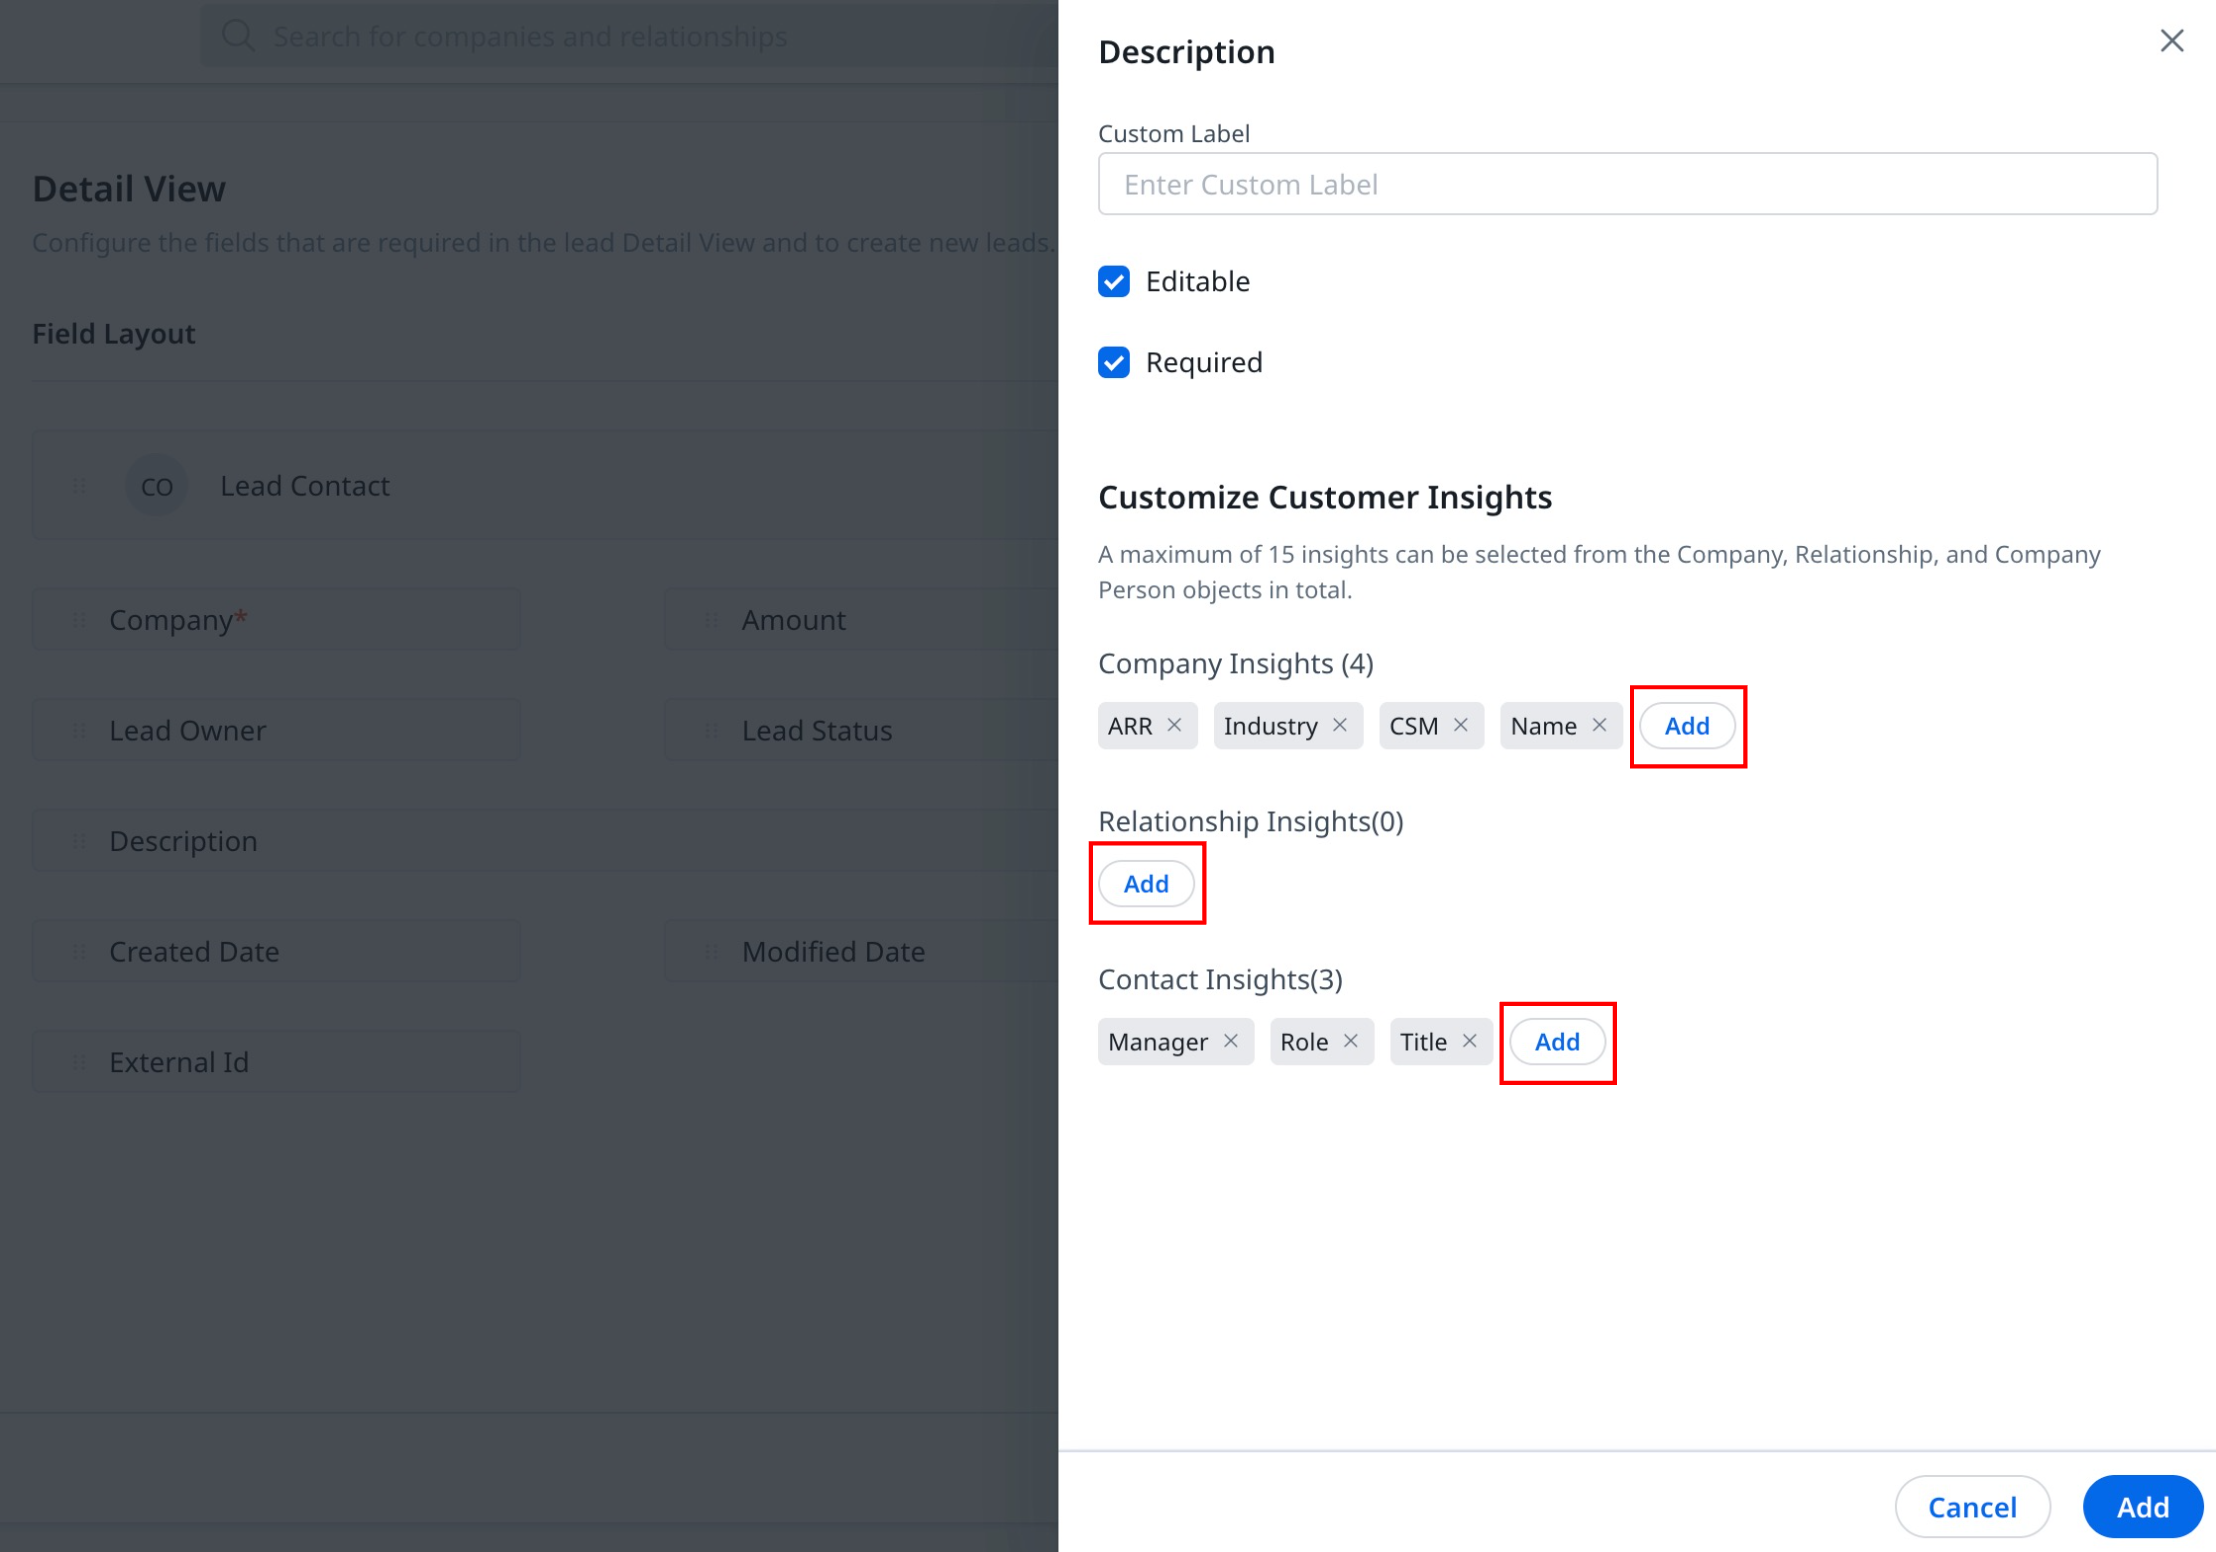
Notes:
- A total of 15 insights can be added from all the three insights, namely Company Insights, Relationship Insights, and Contact Insights.
- A set of out-of-the-box insights are available from Relationship Insights when you add the description field. These insights are Current Score, NPS, CSM, ARR, and Stage.
Add CSQLs Section to C/R360 Layouts
To view the qualified leads data in the C/R360 pages, you need to first configure the CSQLs section in the C/R360 Layout.
To add the CSQLs section in the C/R360 Layouts:
- Navigate to Administration > 360 Layouts > C/R360. The C/R360 Layouts page appears.
- Click the required layout to which you want to add the CSQLs section.
- From the C/R360 Sections, drag-and-drop the CSQLs section into the layout.
- Click Save.
- (Optional) Click Preview to view the layout before saving the changes.
- To view the newly added CSQLs section, navigate to the C/R360 page of the company.
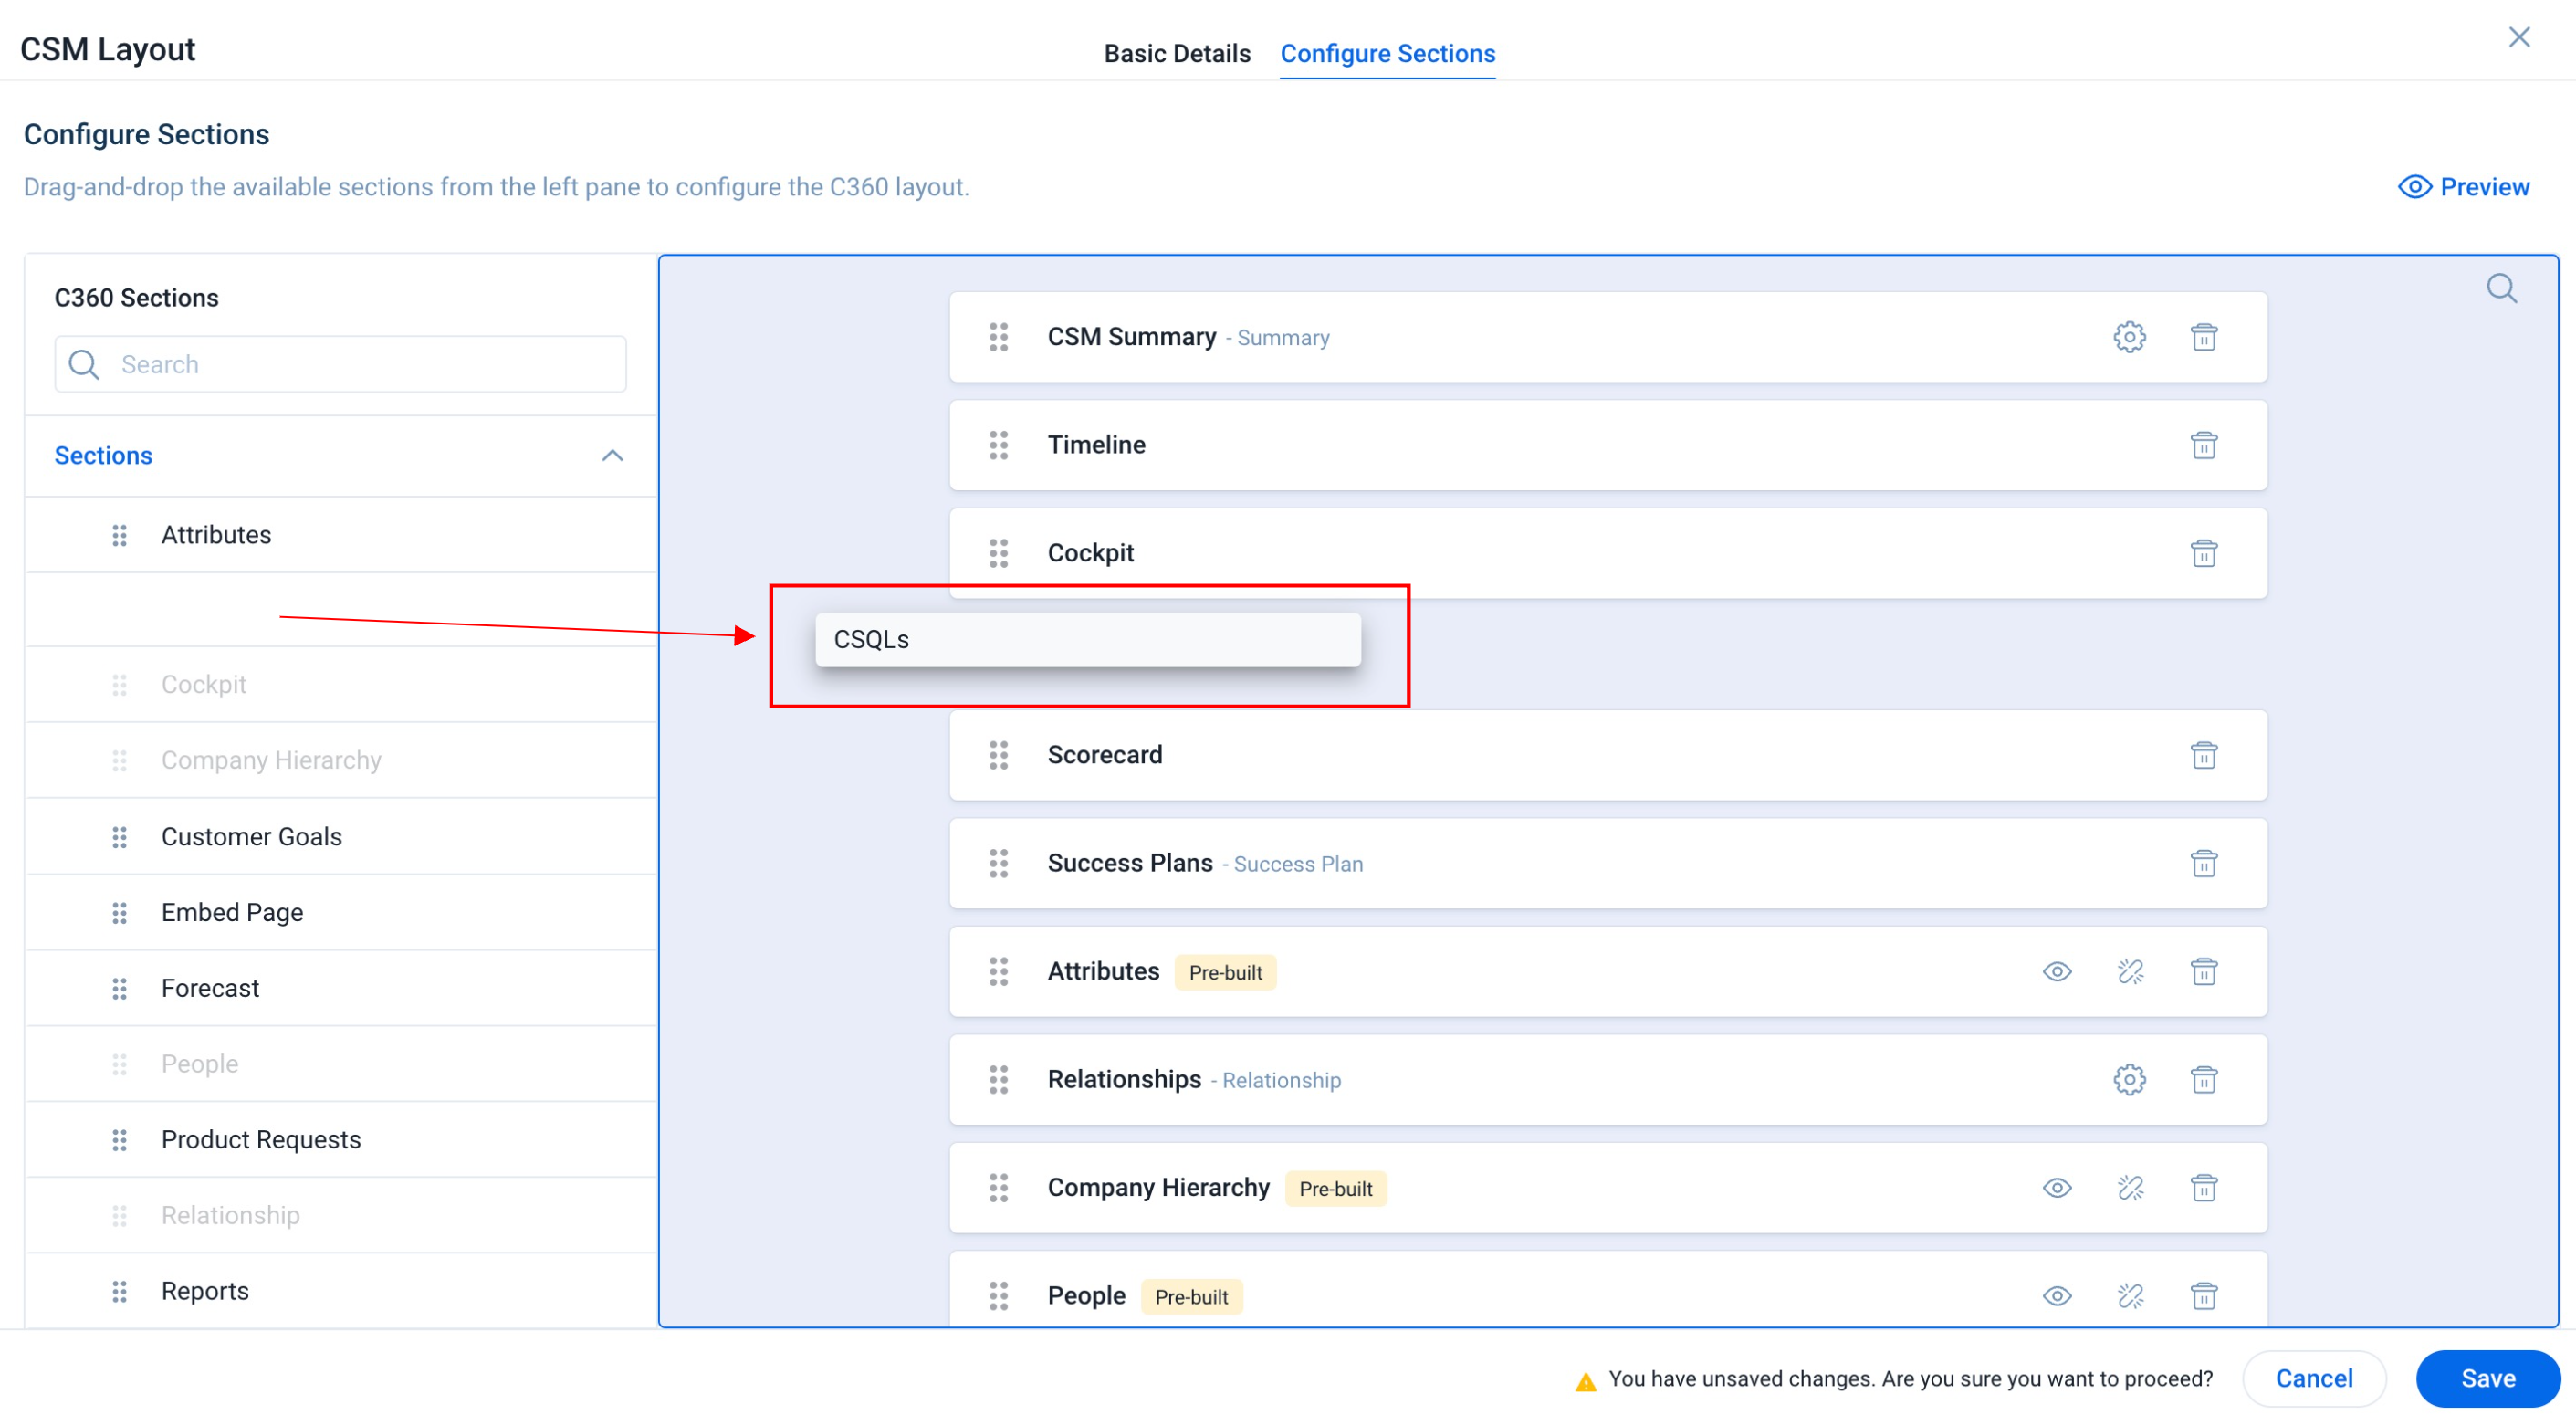
For more information on the CSQL section in 360 in Sidebar, refer to the Configure Layouts for 360 in Sidebar section in the 360 in Sidebar article.
Add CSQLs Widget to C/R360 Layouts
To view and analyze the qualified leads data in the Summary section of C/R360, you need to first configure the CSQLs widget in the C/R360 Layout.
To configure the CSQLs widget:
- Navigate to Administration > 360 Layouts > C/R360. The C/R360 Layouts page appears.
- Click the required Layout to which you want to add the widget.
- Click the Settings icon on the Summary section.
- From the Widgets pane, drag-and-drop the CSQLs widget to the Canvas pane.
- (Optional) Click Preview to view the widget before saving the changes.
- Click Save. The CSQLs widget is added to the selected layout.
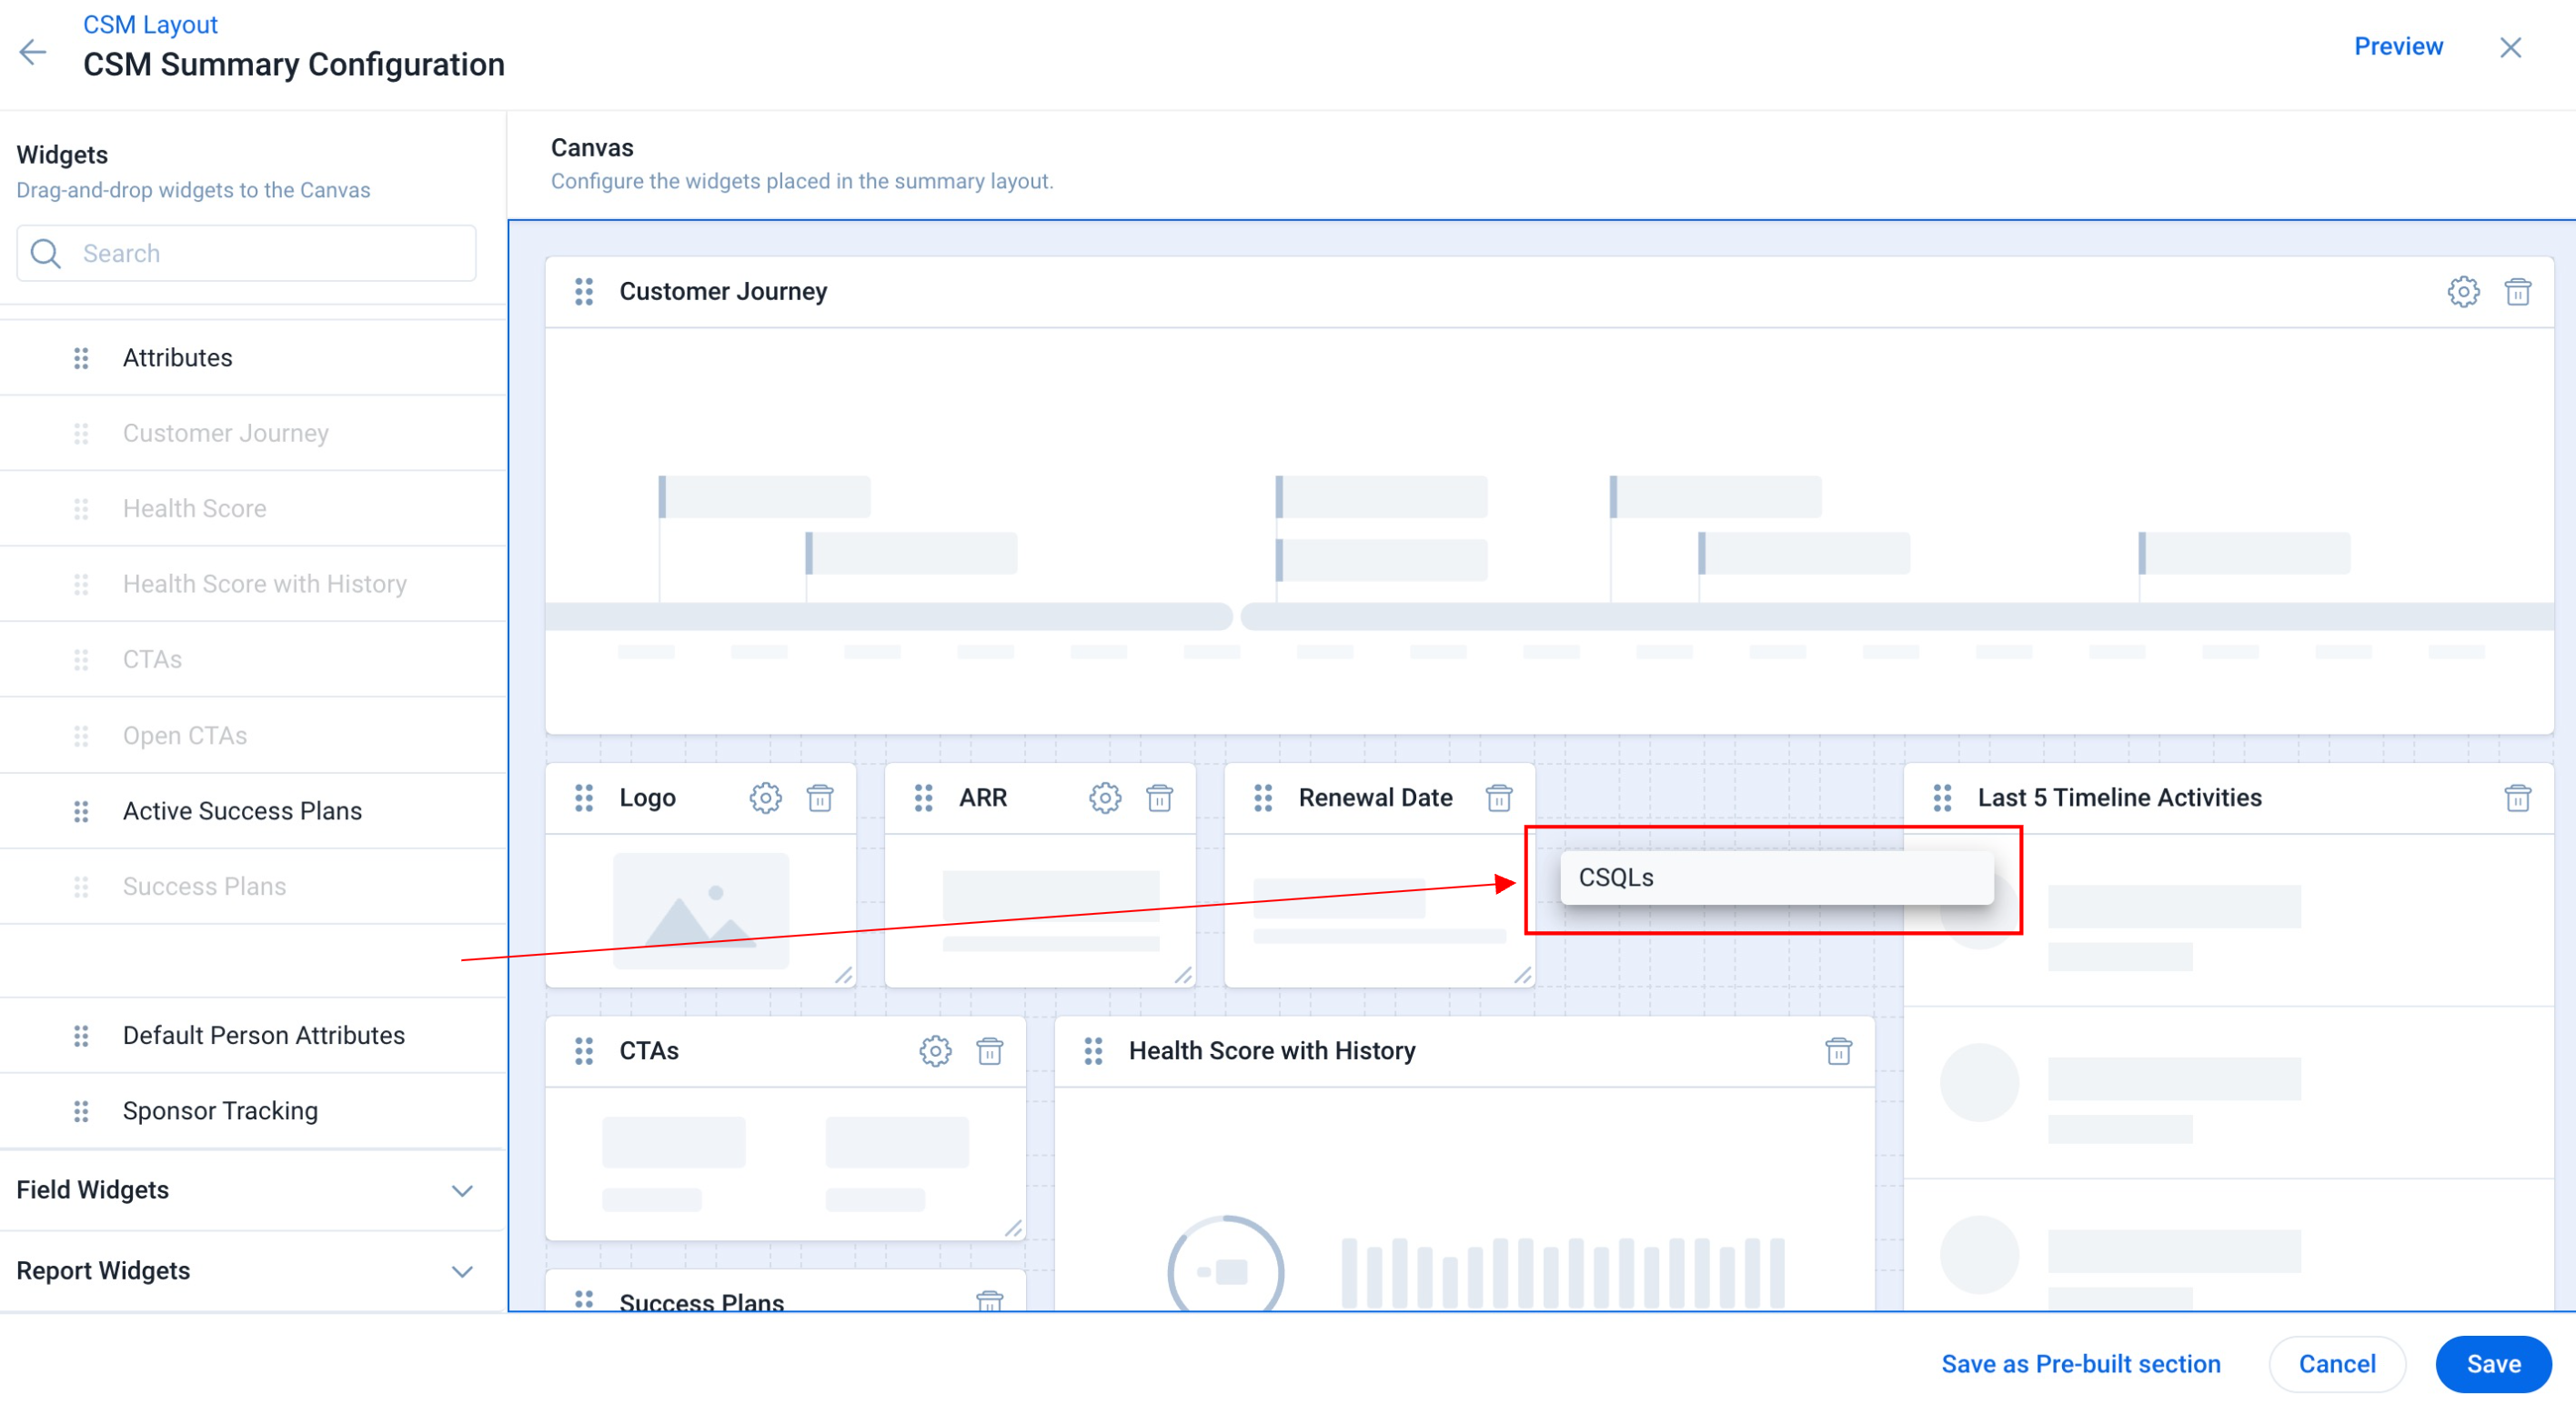
For more information on the CSQL widget in 360 in Sidebar, refer to the Configure Widgets for 360 in Sidebar section in the 360 in Sidebar article.
Add CSQLs Widget to Gainsight Home
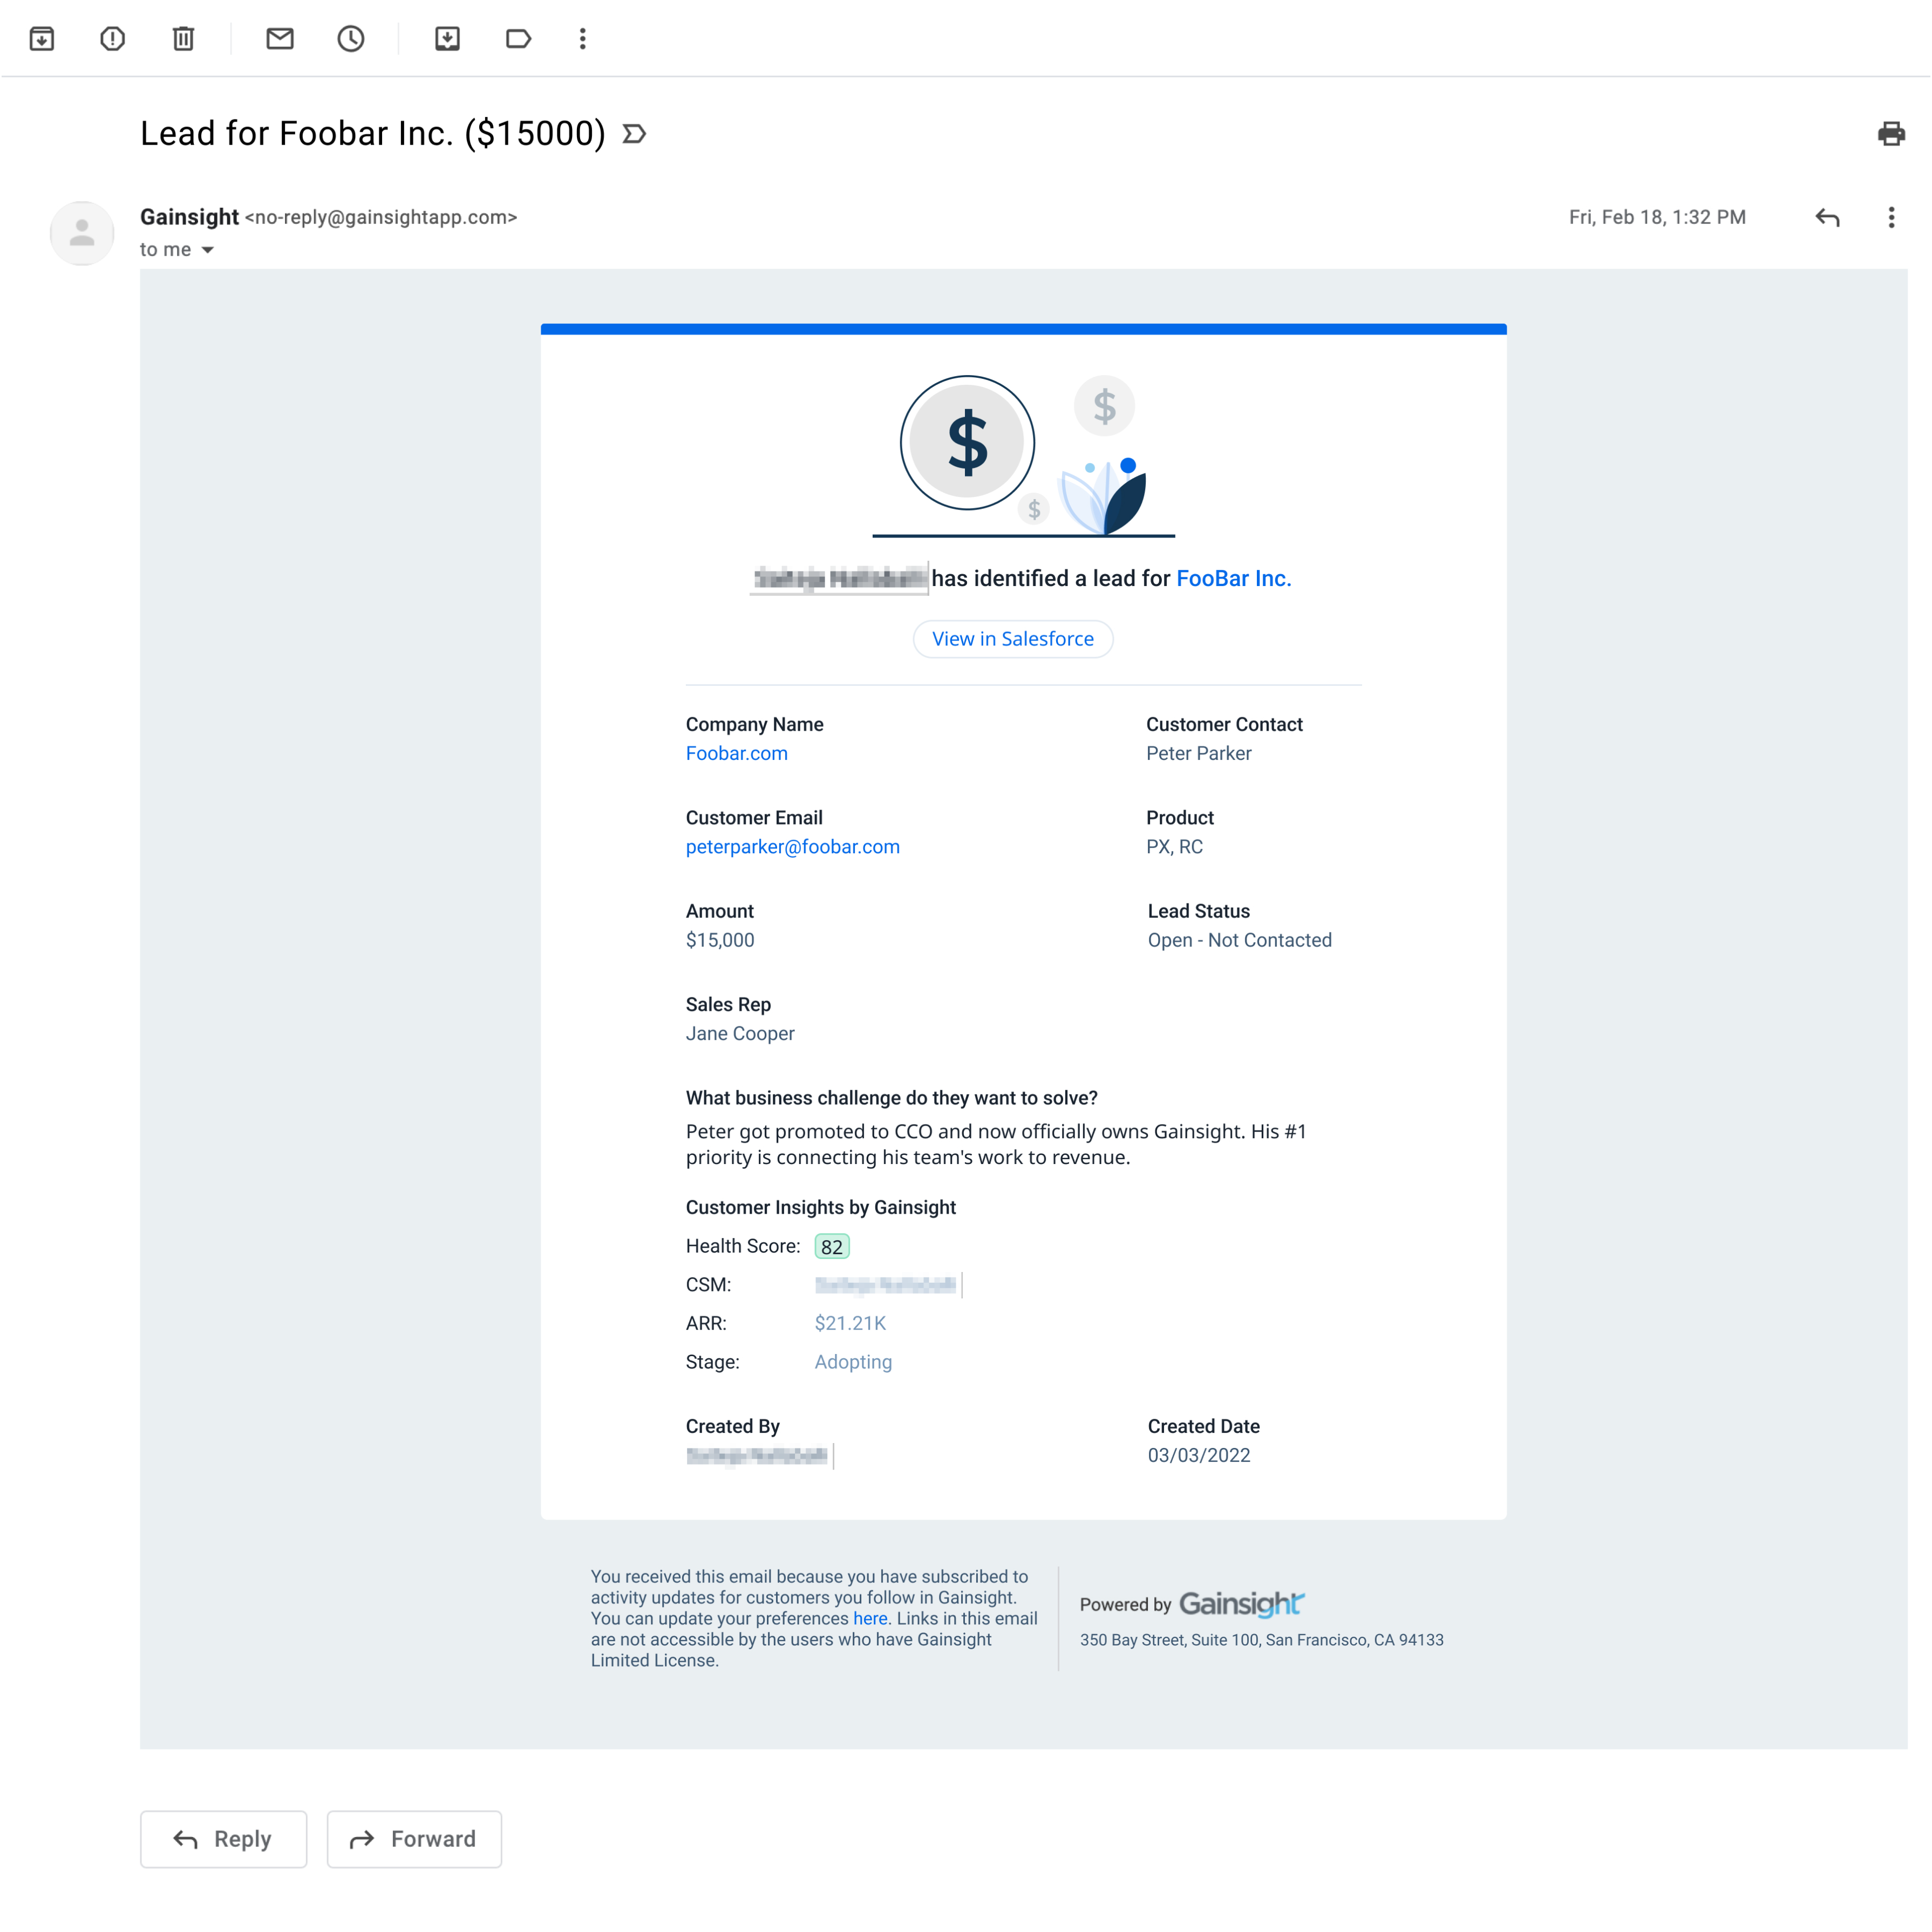
The CSQLs widget provides end-users a consolidated view of qualified leads data in Gainsight Home. End-users can create new leads, edit the lead details from the list view, drill down to each lead entry, and also view the total leads value.
You need to add the CSQLs widget to Gainsight Home for the end-users to access the widget. To add the widget:
- Navigate to Administration > Gainsight Home > Configuration. The Layouts tab appears.
- Click the required layout to which you need to add the widget.
- In the Widgets pane, expand the CSQLs section.
- Drag-and-drop the CSQLs widget to the layouts pane.
- Click Save and Next.
- (Optional) Click Preview to review the layout.
- Click Publish. The confirmation message is displayed.
- Click Confirm.
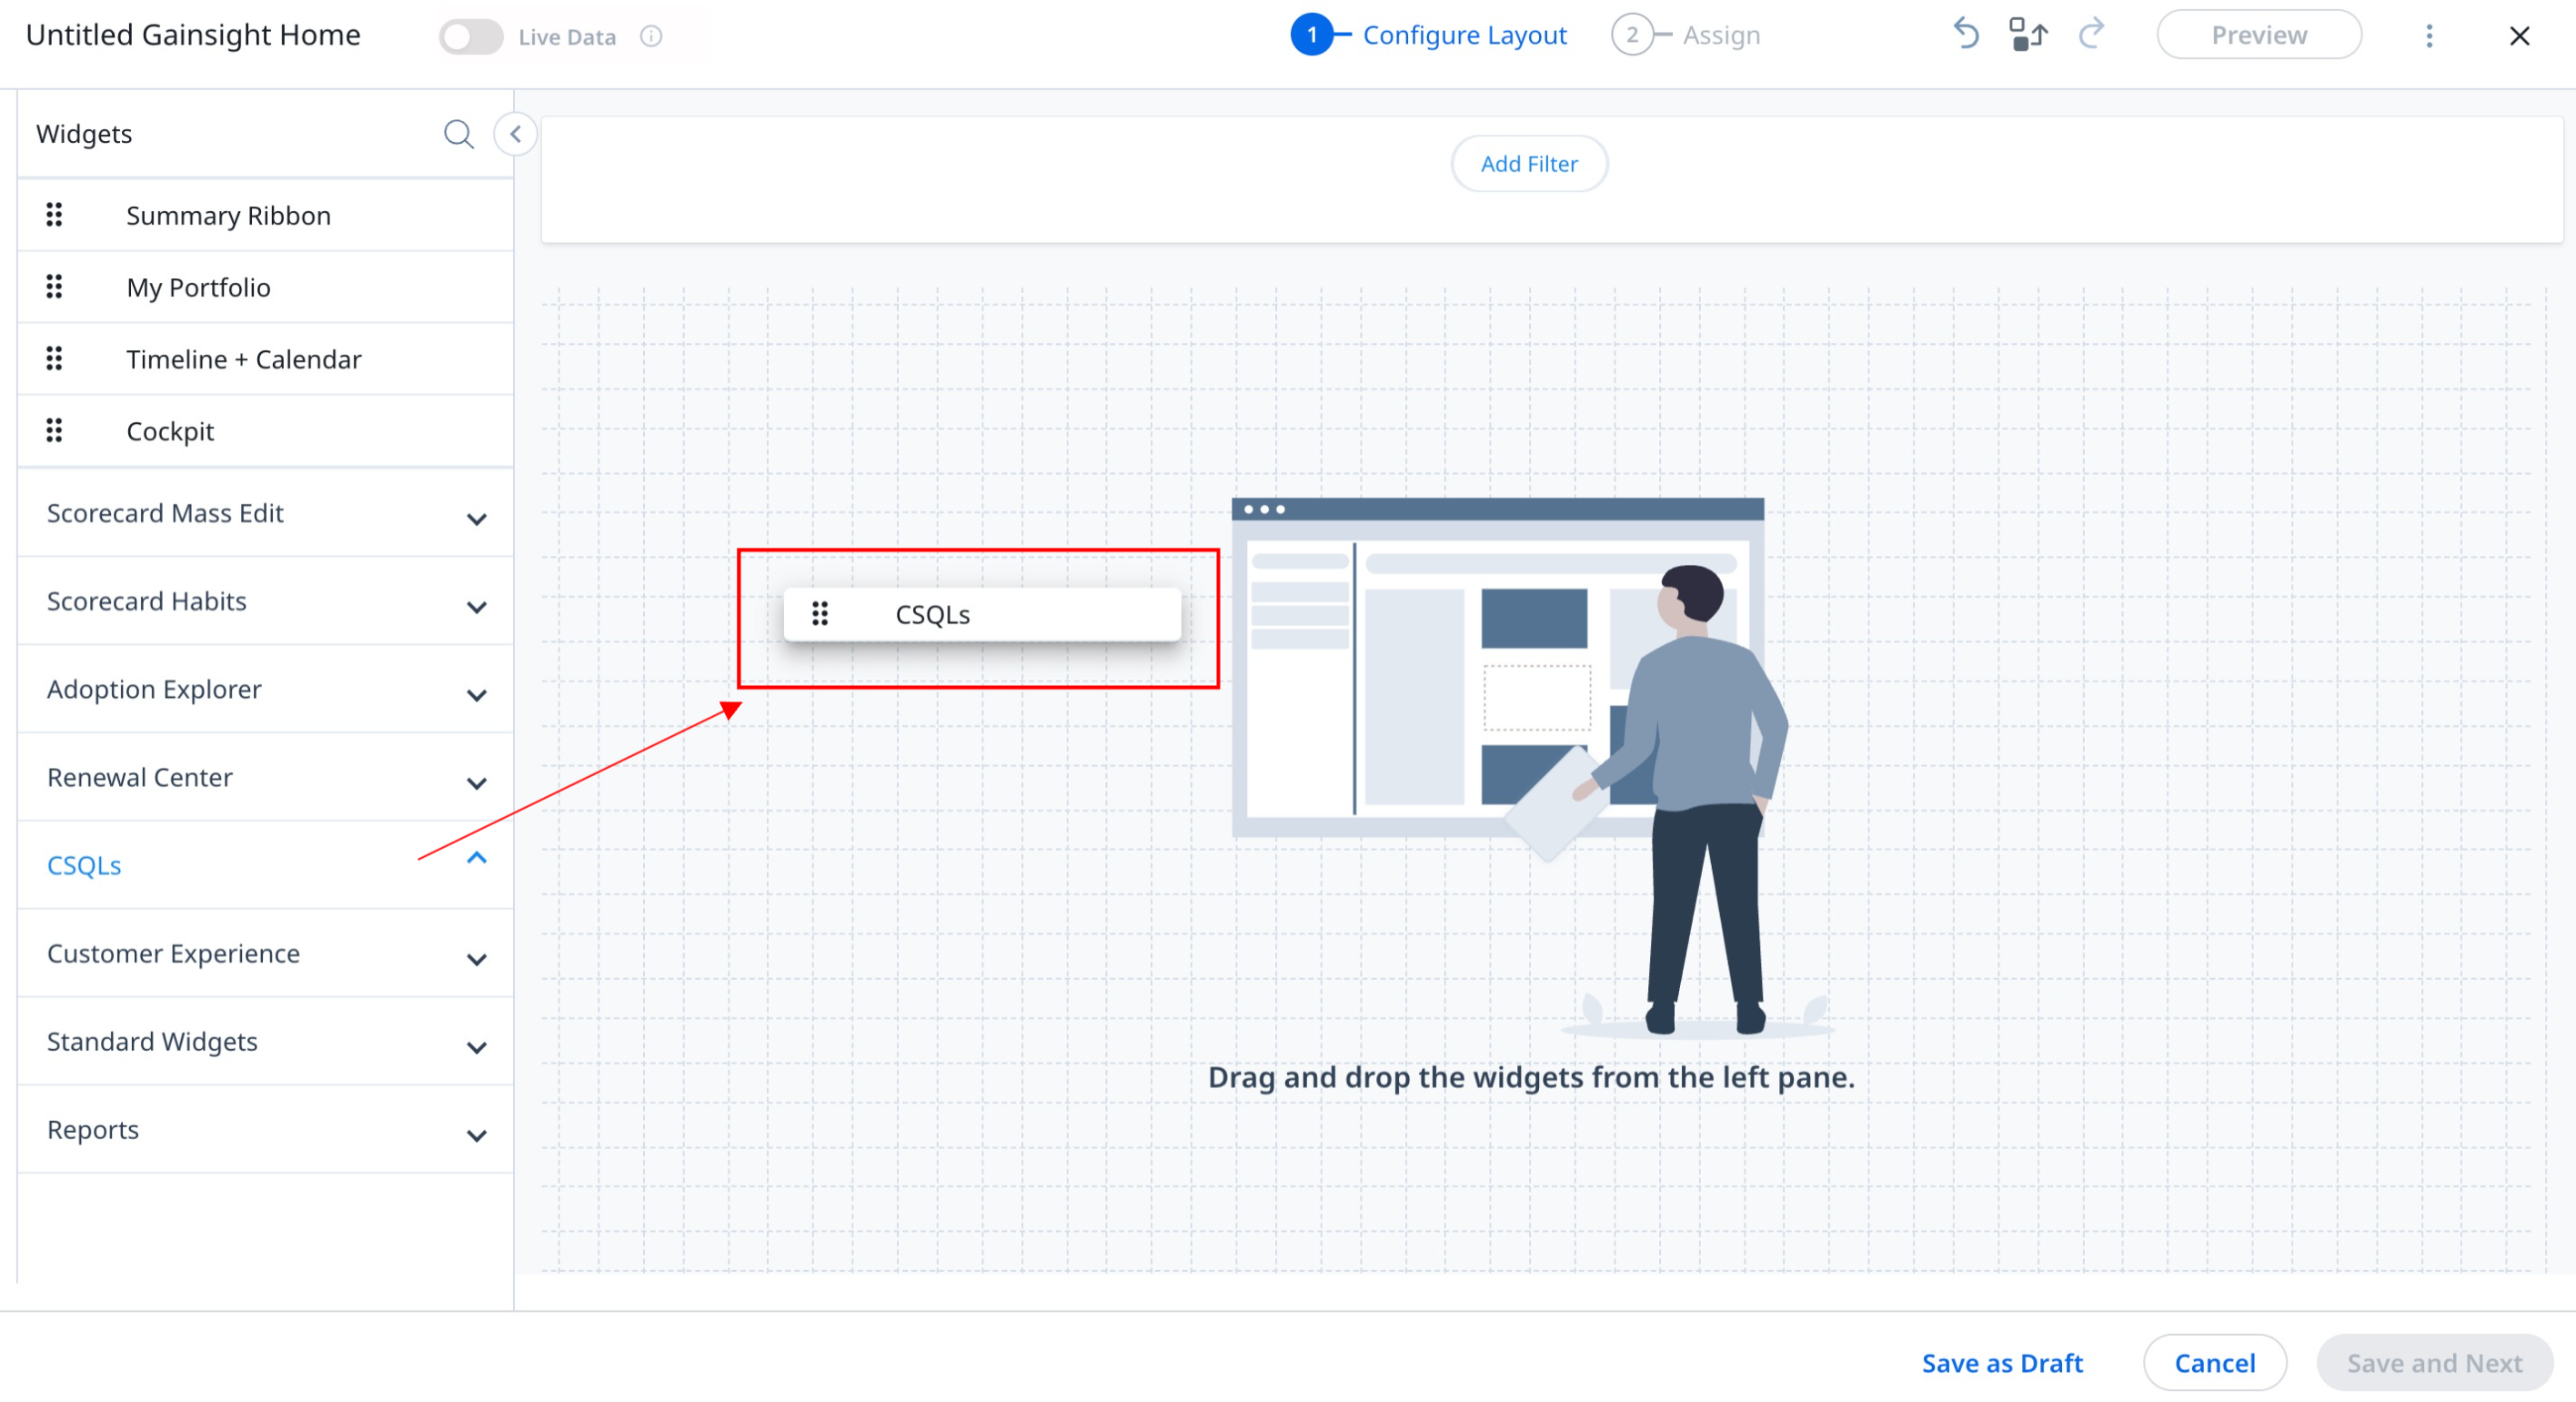
For more information, refer to the Preview Gainsight Home section in the Configure Gainsight Home article available in the Additional Resources section.
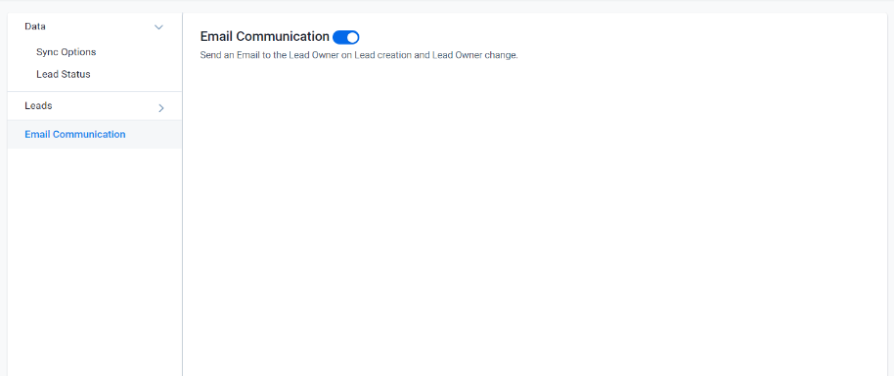
Configure Email Notifications
As an admin, you can enable email notifications for the lead owner when a new lead is created and assigned to them. The updated lead owner will also receive email notifications when this field is updated.
To enable the email notifications:
- Navigate to Administration > CSQLs > Email Communication.
- Turn on the Email Communication toggle switch. The email notifications are enabled for the users.
Note: The email notifications setting is only available when the selected sync option is either Gainsight or Sync to Salesforce as Leads. This setting is not available when the selected sync option is Sync to Salesforce as Opportunity.
Email Notifications in Inbox
The lead owner receives an email notification with lead information when the CSM creates a lead, as shown in the following screenshot.