Gainsight PX Connector
Gainsight NXT
IMPORTANT NOTE: Gainsight is upgrading Connectors 2.0 with Horizon Experience. This article applies to tenants which are yet to be upgraded to the Horizon Experience of Connectors 2.0. If you are using Connectors 2.0 with Horizon Experience, you can find the documentation here.
Overview
Gainsight PX (Product Experience) is Gainsight’s premier tool to set up in-app messages and collect useful analytics from web applications. PX Connector allows you to establish a link between Gainsight and PX. This connector is located on the Connectors 2.0 page. Once you establish a connection with PX, you can sync usage data from PX into Gainsight. Once you sync data from your PX org to Gainsight, you can use the data in Gainsight’s Adoption Explorer to get real-time insights of your data, advanced data visualization methods, and so on. To learn more about Gainsight Adoption Explorer, refer to the Adoption Explorer Overview article.

To setup the Gainsight PX connector, you must perform the following tasks:
Create Connection
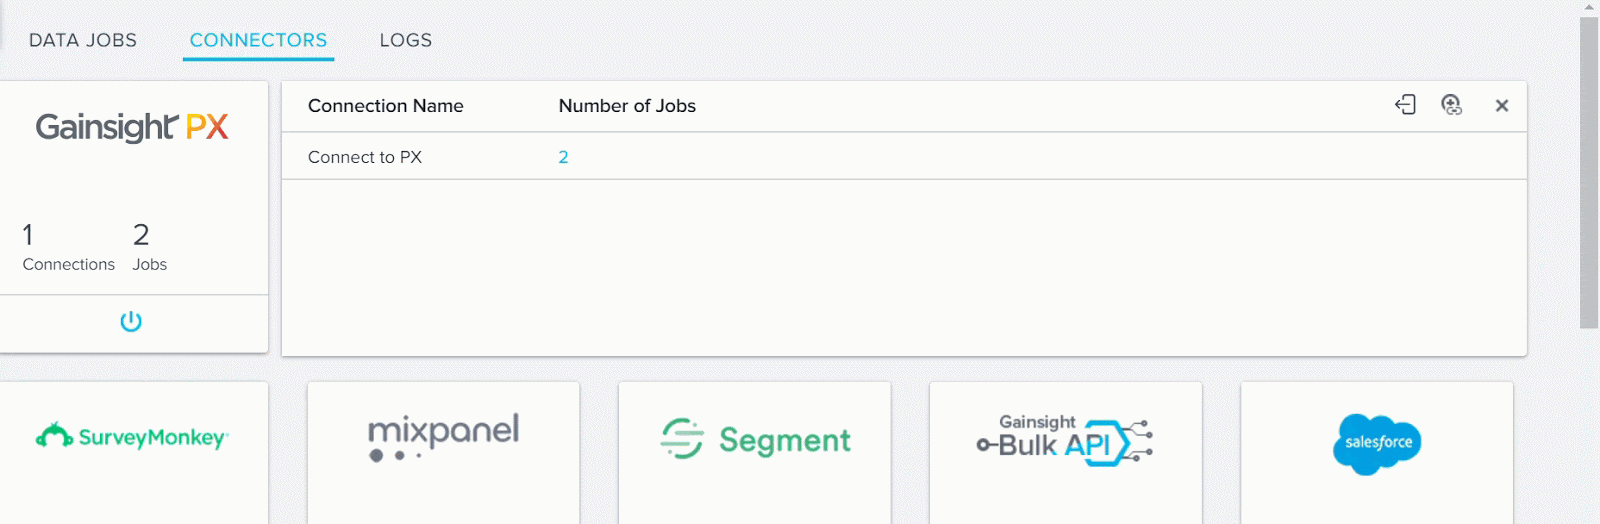
This section explains how to create a connection to PX from Gainsight. You must use the API secret key of the PX Connector to establish a connection between PX and Gainsight. You can create only a single connection at any given point of time, in PX connector.
To create a connection:
- Navigate to Administration > Connectors 2.0.
- Click the CONNECTORS tab.
- Click the Gainsight PX widget.
- Click the Create Connection icon. The Add Connection Details window is displayed.
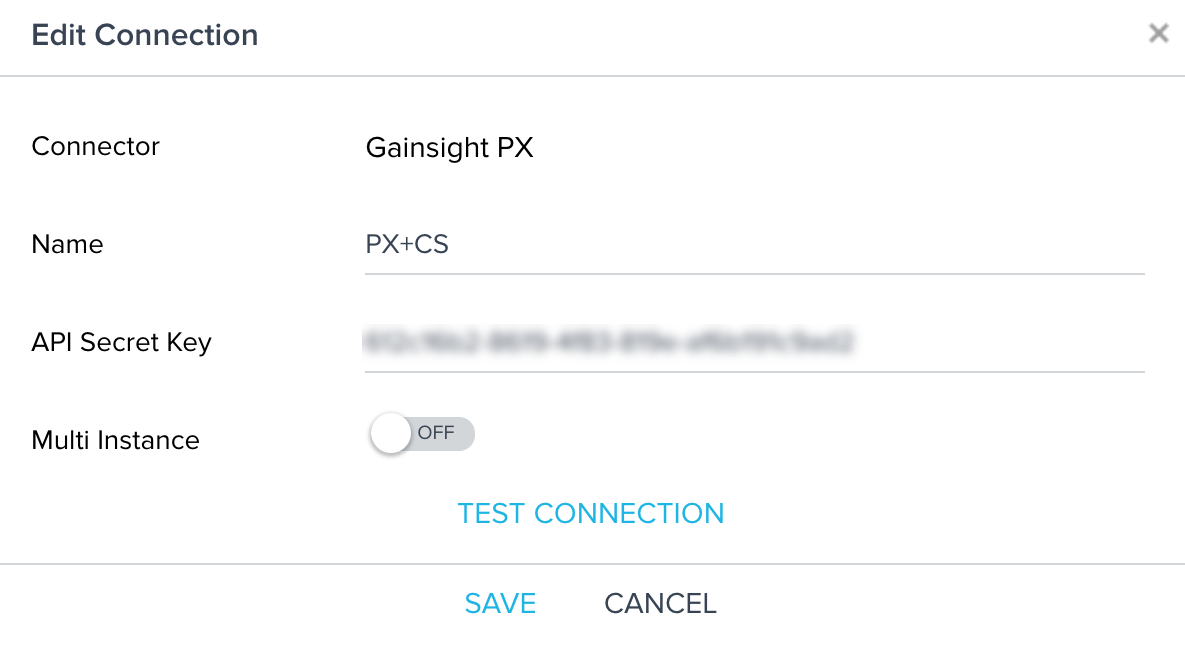
- Perform the following tasks:
- Name: Enter a name for the connection.
- API Secret Key: Enter the API secret key of the PX org, to which you wish to establish a connection.
- (Optional) Multi Instance: Switch the toggle ON to connect your Gainsight org with multiple accounts in the PX source org. For example, you might have a customer named ABC who has a single record in Gainsight CS, but has multiple accounts in PX named ABC Systems, ABC Electric, etc. (where one PX USER belongs to one PX Account only). In the Gainsight CS, you can enable the Instance level checkbox in the Adoption Explorer project to consider all these PX accounts as instances.
- Click TEST CONNECTION. If you entered the right key, the test connection is successful.
- Click CREATE.
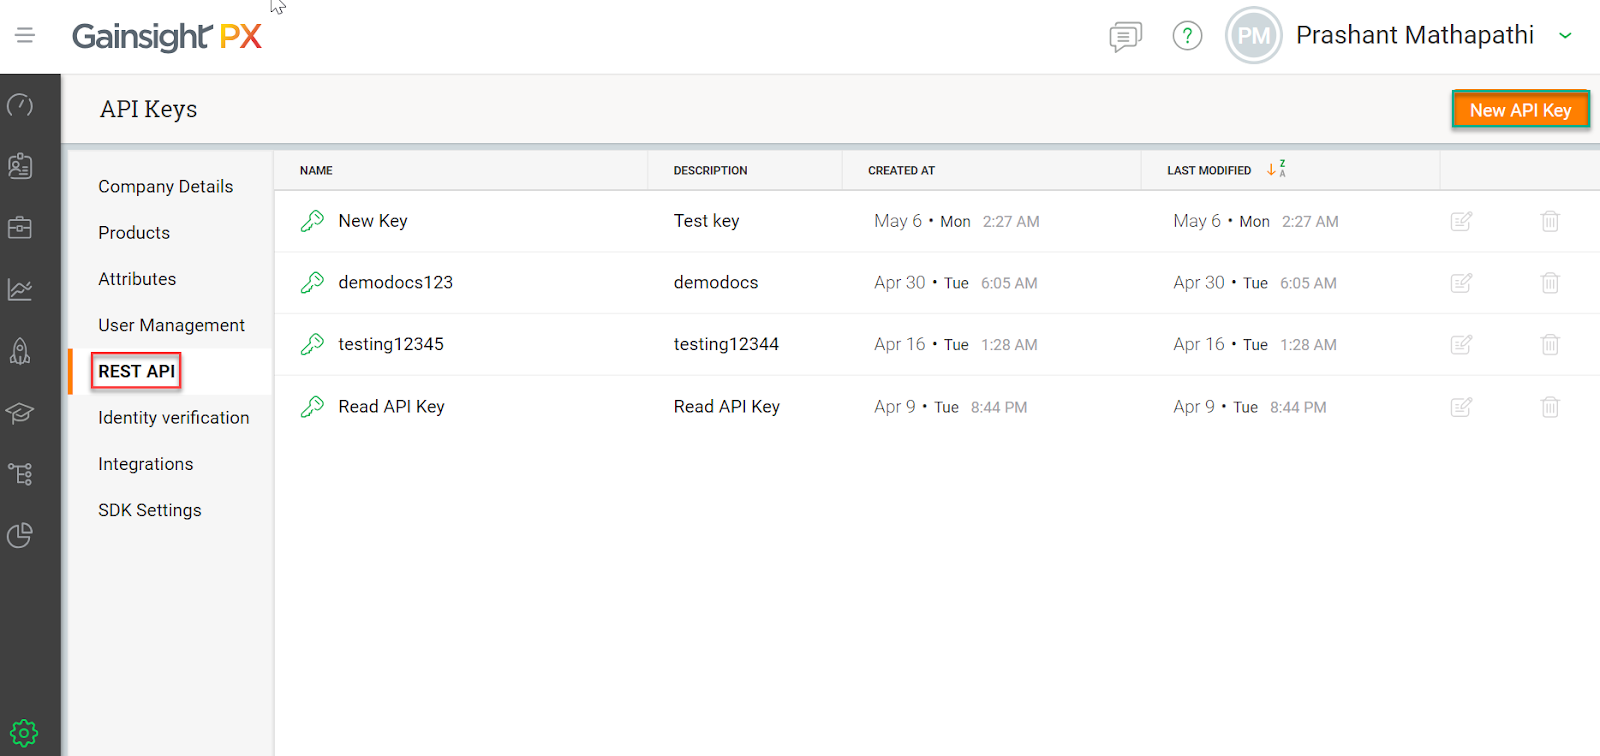
IMPORTANT: The REST API key is the API secret key of the Gainsight PX org. You can create REST API key in PX by navigating to Settings > REST API section in Gainsight PX.
Configure Data Sync Jobs
This section explains how to configure the data sync jobs in PX connector. By default, PX connector has two data sync jobs. You cannot create custom data sync jobs in Gainsight PX. The two out of the box jobs are Company Sync and Company Person Sync jobs.
Company Sync Job
This job is named Company Sync_Connection name (here Company Sync_Connect to PX). This job syncs data from the Account object in Gainsight PX to the Company object in Gainsight. By default, there are three field mappings in this data sync job. However, none of the three mappings are configured as the Upsert key. You must either use an existing mapping as the Upsert key or manually configure a new mapping and set it as the Upsert key. Without configuring the Upsert key you cannot schedule or execute the job.
This job has five stages:
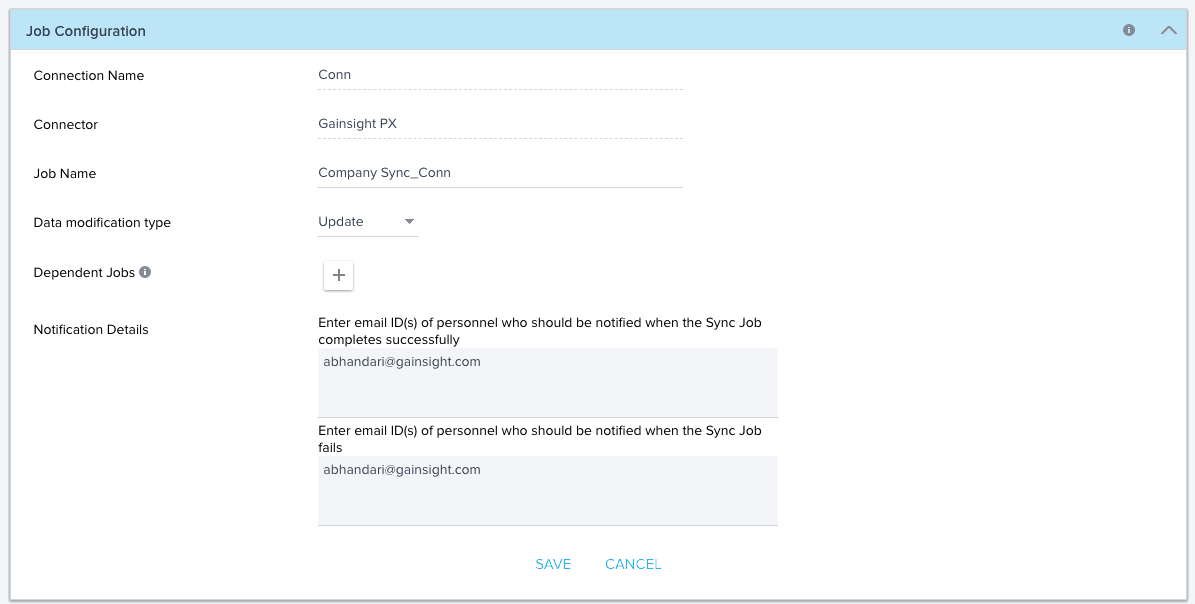
Job Configuration
In this section, enter the following details:
- Connection Name: Name of the connection entered in the Create Connection dialog is displayed here. You cannot edit connection name in this section.
- Connector: Connector Name, Gainsight PX is always shown here. You cannot edit value in this field.
- Job Name: Enter a valid Job name in this field. You can always edit the job name in this field.
- Data Modification Type: Select either the Update or Upsert option from this field. Following are the details of these options:
- Update: This option updates the existing records, if available. No new records are created.
- Upsert: This operation updates existing records, if matching records are found. Records are compared based on the Upsert Key selected. If no matching records are found for updating, new records are created.
- Dependent Jobs: Click + and select other PX data job if you want to add as a dependent job. Jobs configured as dependent will be synced first before syncing the current job.
- Notification Details: By default, this field contains the email address of the logged in user. You can add, edit, or delete email recipients. In the Notification Details, add email address of the recipients who need to be notified when this job execution succeeds or fails. Click SAVE to proceed to the other sections in the job configuration.
Data Source and Field Mappings
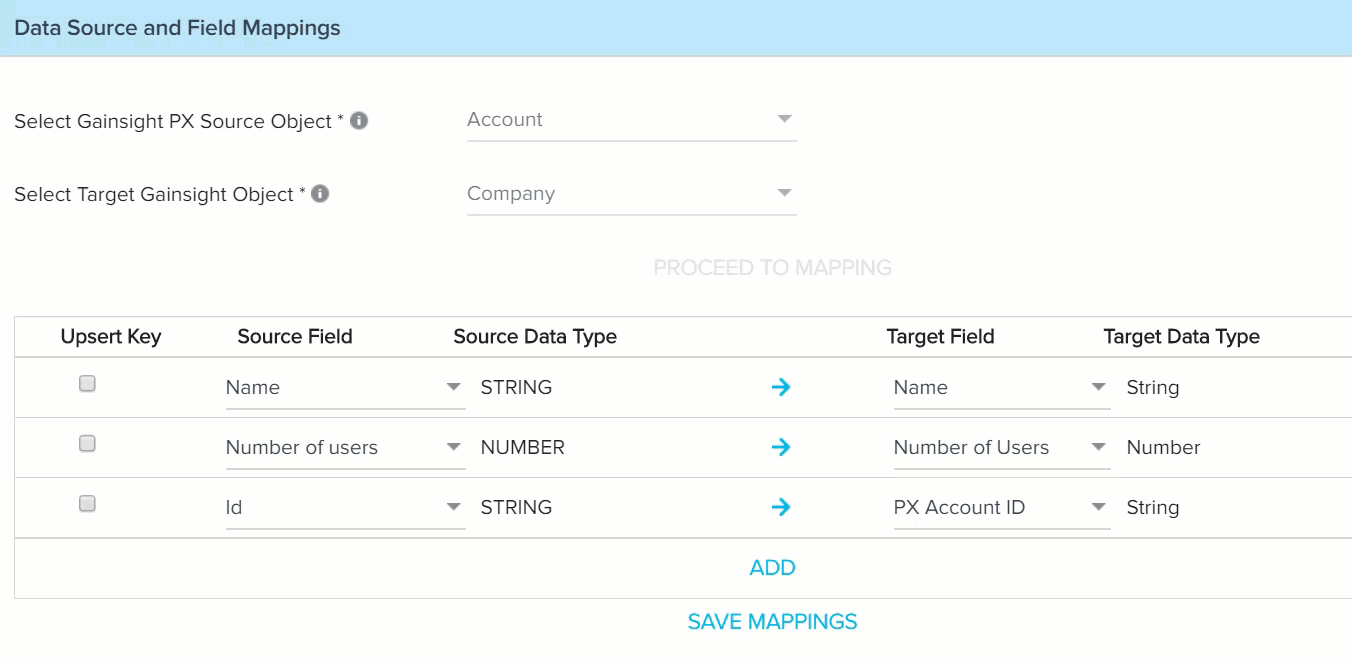
This stage consists of the source and target object for data sync. You cannot change the source and target object fields. The source object is the Account object from Gainsight PX and target object is Gainsight Company object. There are three field mappings which are displayed below:
- Name (PX Account object) -> Name (Gainsight Company object)
- Number of users (PX Account Object) -> Number of Users (Gainsight Company object)
- Id (PX Account Object) -> PX Account ID (Gainsight Company object)
IMPORTANT: Admins must configure mapping for an external ID field that is available both in GS Company Object and PX Account object. This mapping must be marked as the upsert key. You cannot sync this job without configuring an Upsert key.
Click ADD to configure a new mapping. Once you configure a mapping, select the Upsert Key checkbox for your newly configured mapping, to set it as the Upsert key.
Note: You can map custom PX fields to any standard or custom fields in the Gainsight object.
Click SAVE MAPPINGS, once you configure the Upsert key.
Derived Mappings
In this stage, you can configure the derived mappings. For more information about derived mappings, refer to the Data Import Lookup article. By default, there are no derived mappings.
Sync Filters
In this stage, you should configure the filters. The filters configured in this stage are applied during data sync and only those records which match the filter criteria are synced. By default, no filters are configured.
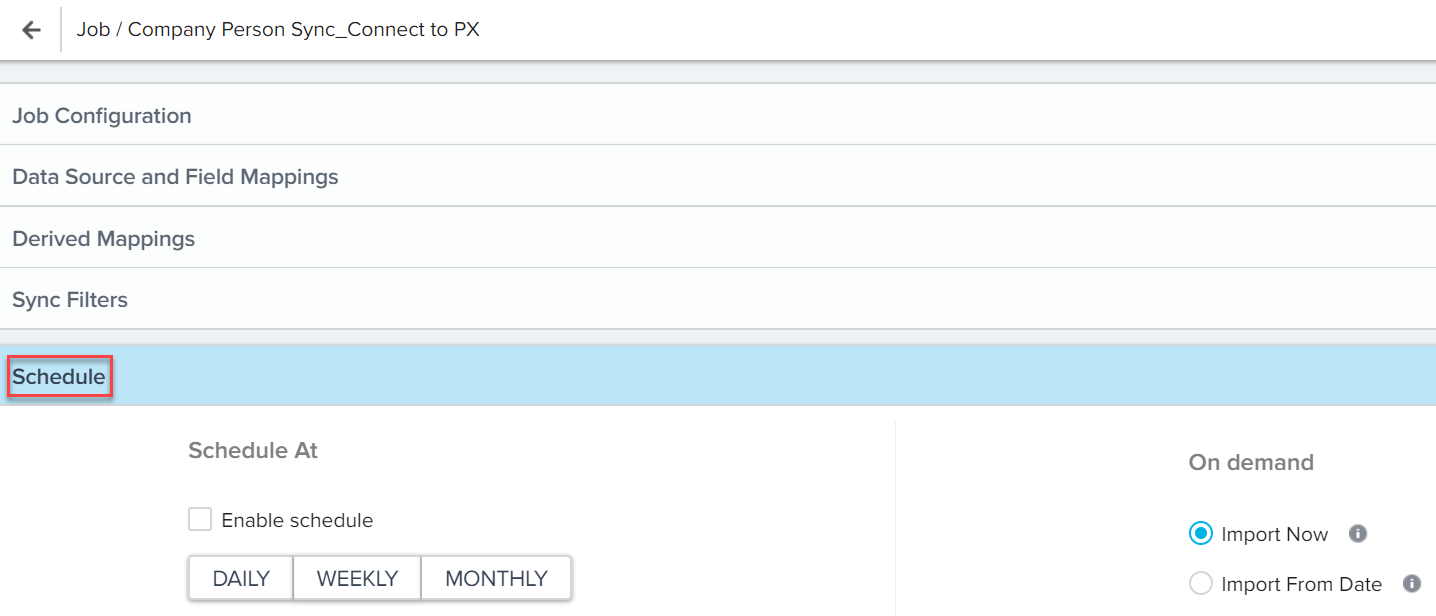
Schedule
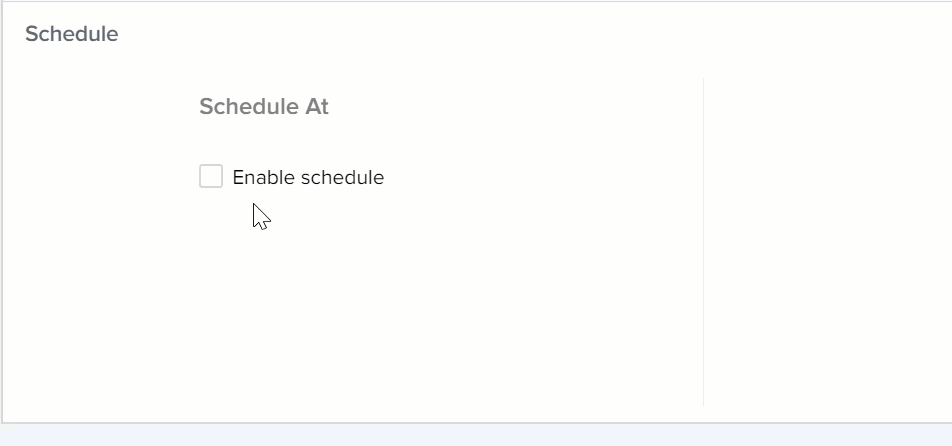
In this stage, you can schedule your data sync job to be executed later, or execute a Data sync Job on the fly. By default, the schedule is set to one hour interval. You can view this when you select the Enable schedule checkbox.
Scheduled Execution
In this subsection, you can schedule the execution of the job as required. When the job is executed for the first time, all the values are inserted into Gainsight NXT. For all subsequent job executions, only the newly added data is inserted; if any data which was previously inserted into Gainsight NXT from Salesforce, is modified in Salesforce, corresponding data in Gainsight NXT is updated.
To schedule the job:
- Select the Enable Schedule check box.
- Select one of the following options:
- Daily: The data is synced on a daily basis.
- Select Once to run the job once everyday. Choose the time at which the job must be executed, in the Select a Time section.
- Select Repeat to repeat the execution of the job. Select the other options as listed below:
- Daily: The data is synced on a daily basis.
- You can select the time frame between which the execution must be performed, in the From and To fields.
- You can select the frequency at which the execution must be performed in the set time frame, in the For every field.
For example, if you select from 10 am to 2 pm time frame and select every hour frequency, job is executed five times at 10,11,12,1 and 2.
- Weekly: Select the days of the week on which the job must be executed.
Select the required time at which the job must be executed, in the Select a Time field.
- Monthly: Select the date on which the job must be executed, in the Monthly on day field. Select the required time at which the job must be executed, in the Select a Time field.
- Click SAVE.
On Demand Execution
In this sub section, the following options enable you to execute the job immediately:
- Import Now: If you select this option, job execution is started immediately. In the first execution, all the data from 1970 till date is executed. For subsequent imports, the last import date is considered to be the start date and current date is considered to be the end date. For example, if you imported data for the first time on 1st Feb 2018, data is imported from 1st Jan 1970 to 1st Feb 2018. If you execute the job again on 5th Feb 2018, new records and modified records between 1st Feb and up to 5th Feb are imported.
- Import From Date: If you select this option, the job is executed and data updated during the specified dates in Salesforce, is added to Gainsight. You can select date range in this option to import new and modified Salesforce records in the specified date range.
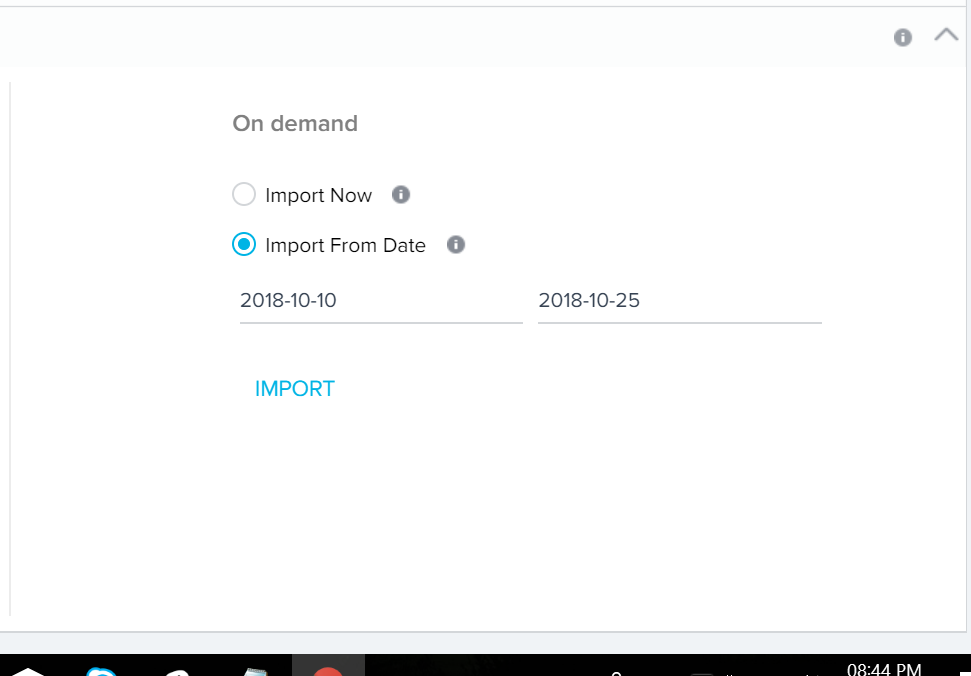
Click IMPORT to start the data import process.
Company Person Sync Job
This job is named Company Person Sync_Connection name (here Company Person Sync_Connect to PX). This job syncs data from the User object in Gainsight PX to the Company Person object in Gainsight.
This job has five stages:
Job Configuration
This stage has the same fields and configurations as in the case of Company sync job. You can find the Connection name, Job name, and Notification Details section. This job has a dependency on the Company Sync job. The Company sync job is executed before executing this job. Once you make the required modifications, you must click SAVE to proceed to the job configuration. Refer Job Configuration in the Company Sync Job for more details.
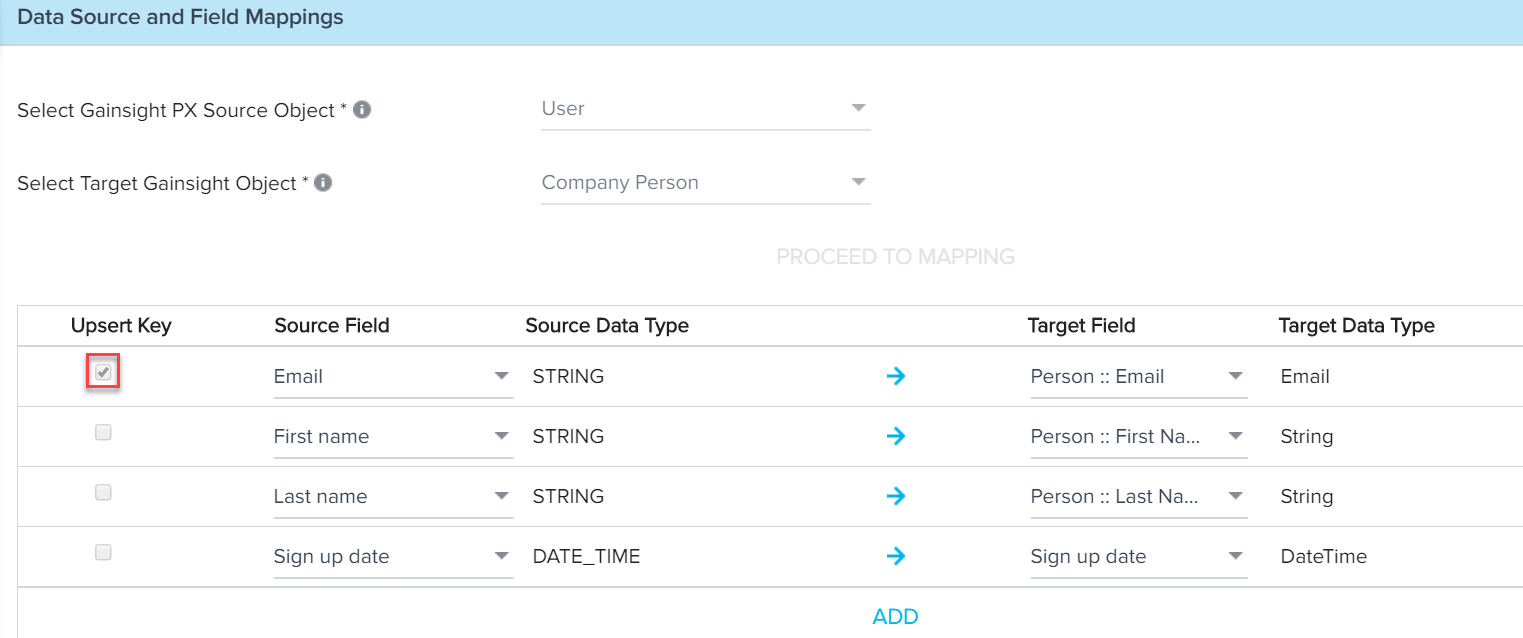
Data Source and Field Mappings
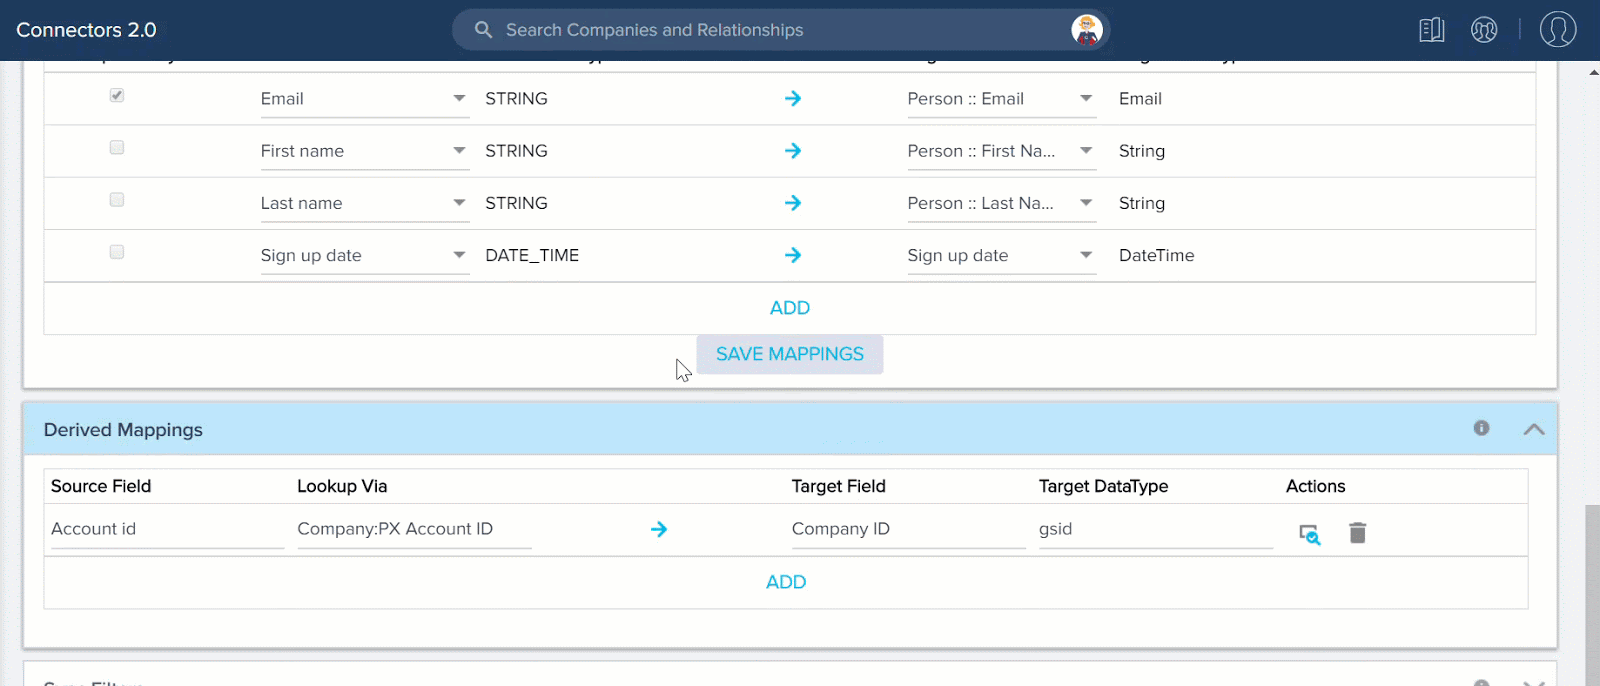
This stage syncs data from the Gainaight User object to the Person and Company Person objects in Gainsight. This stage has five field mappings:
- Email (PX) -> Email (Person)
- First name (PX) -> First Name (Person)
- Last Name (PX) -> Last Name (Person)
- Sign up date (PX) -> Sign up date
Upsert keys for the mapping between the Gainsight PX User object and the Gainsight Person object are determined by the Person Resolution Key configuration. Fields selected in the Person Resolution Key configuration are automatically selected as Upsert Keys in the Company Person Sync Job > Field Mappings section. There can be one or multiple upsert keys used for the identification of people in Gainsight and you cannot edit them. For more information on the Person Resolution Key configuration, refer to the People Management article.
Upsert keys must be mapped in the Field Mappings section. If they are not mapped, data sync job fails.
You can map custom PX fields to any standard or custom fields in the Gainsight object.
Derived Mappings
This stage allows you to configure the derived mappings to populate GSID values. By default, a derived mapping is configured to populate GSID values into the Company ID field of the Company object. This mapping is configured by matching the Account id field of the Account object in PX with the PX Account ID field in Gainsight Company object. To add more derived mappings, click ADD. To learn more about configuring derived mappings, refer to the Data Import Lookup article.
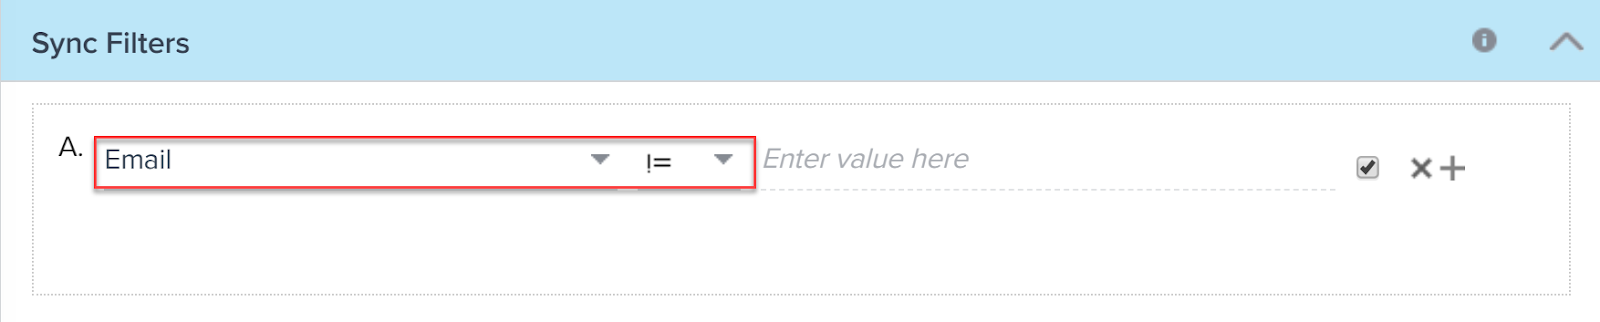
Sync Filters
In this stage, you should configure the filters. The filters configured in this stage are applied during data sync and only those records which match the filter criteria are synced. By default, there are no filters. By default, the filter is configured to sync only those records which have an Email ID. You cannot remove this filter, since Email field is used as an Upsert key.
Schedule
This stage allows you to schedule the execution of this job. The schedule of this job works the same way as in the Company Sync job. The configurations to schedule the execution remain the same.
View Logs
You can navigate to the LOGS tab to see the log history of all the data sync jobs. This page displays the logs for all the Connectors. You can filter this page to display logs only for a specific job from a specific connector. To filter the logs, select the required job from the Show drop-down menu and click REFRESH.
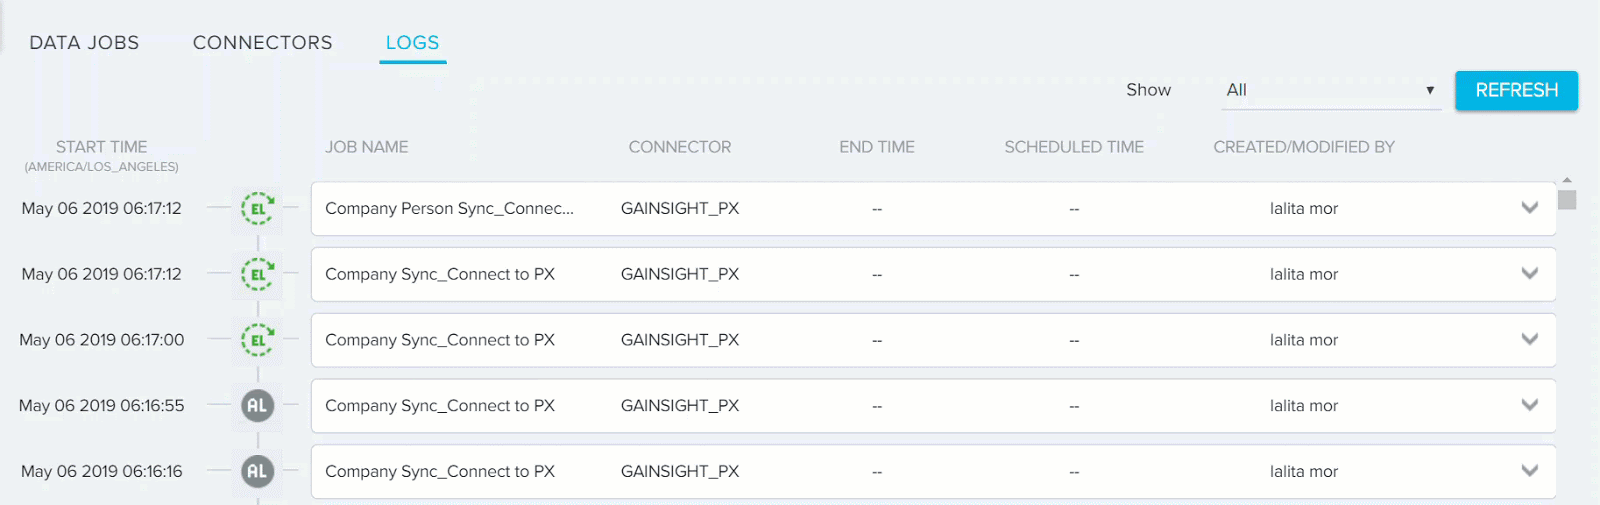
Gainsight maintains two types of Logs for every Data Sync job:
- Audit logs: An audit log is recorded when an activity is performed on a job. The various activities could be Create, Edit, delete, and so on. Audit logs are represented by AL symbol. The various fields displayed in this log are:
- Attribute: The stage of the job which was modified. For example, if you modified a mapping, this field displays Mapping.
- Sub-Attribute: The element modified in an attribute..
- Action: The activity performed on the job. Possible values can be Create, Edit, Delete.
- Old Value: The value which was modified.
- New Value:The current value in the modified field.
- Additional Info: Additional information about the activity.
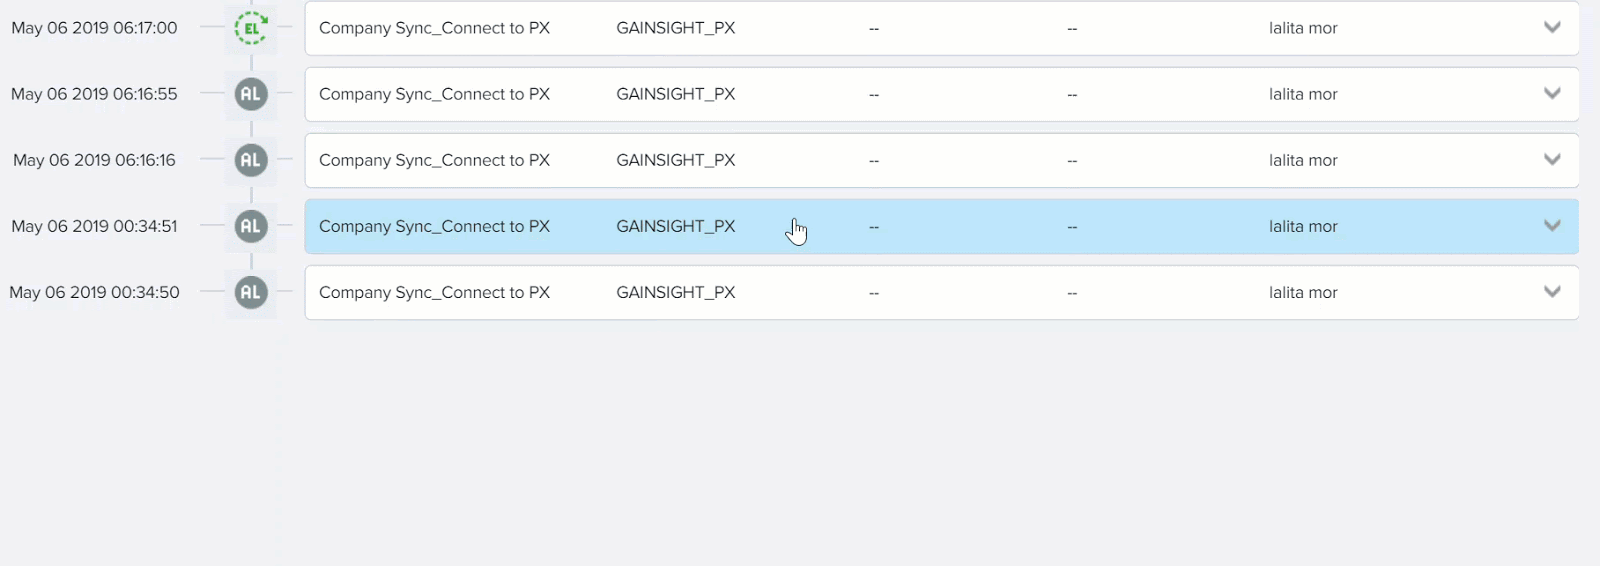
- Execution logs: An Execution log is created when a job is executed. Execution logs are represented by EL symbol. An EL symbol in green indicates a successful execution.
The various details displayed by Audit logs are:
- Date: The date of job execution.
- Calltype: Always displays APPLICATION_DATA for SFDC connector.
- pStatus: The status of the job. Possible values could be Success, Failure, in progress.
- # Success: Number of records which were synced successfully.
- # Failure: Number of records which failed to sync.

The LOGS page displays the logs only for the Data Sync jobs. To view the Connection logs, you can navigate to the Salesforce Connector logs page. The various columns in Connection logs are:
- Connection Name: The name of the connection.
- User: The user who created the connection.
- Action: The action performed on the connection.
- Modified on: The date on which the connection was last modified.
- Attribute: The element modified in the connection.
- Old Value: The value which was replaced after modification.
- New Value: The new value which replaced the old value.
Use Gainsight PX data in Adoption Explorer
After the successful integration of PX with Gainsight, you can use PX data in the Gainsight Adoption Explorer. Adoption Explorer is a new end-to-end tool that creates the data structures needed to effectively model product adoption data, provides integrated statistical calculations and algorithms that take the lift out of generating data science insights, and pre-built visualizations that provide structure insight for every user.
To learn more about using Gainsight PX data in Adoption Explorer, refer to the Enable Gainsight PX Data in Adoption Explorer article.