Set up a Gainsight Domain
Gainsight NXT
Important: Configurations while creating Domain, Sites, and Pages require your Network Administrator Support. For Example, the Certificate Key, Certificate Body, and Certificate Chain you receive while configuring, are required for creating custom domains. You must contact your Network Administrator to obtain these certificate details.
Introduction
This article talks about how to create and configure a domain, site, and pages for rendering surveys. The primary domain in Gainsight is gainsightcloud.com; you can create a sub-domain on this primary domain. For example, if a sub-domain name is customerfeedback then the sub-domain appears as customerfeedback.gainsightcloud.com.
If you have an existing domain within your organization, you can create a custom domain within Gainsight, and map with your existing domain. For example, if your existing domain is yourcompanyname.com, and the custom domain name is customerfeedback, then the custom domain appears as customerfeedback.yourcompanyname.com.
To set up a domain for your business requirement, you can select a sub-domain or custom domain. You will need to set up a domain to publish surveys by creating the following:
- Sub-domain or Custom domain
- Pages
- Sites
Important
- Types:
- SUB_DOMAIN: Domain created by Customer within Gainsight
- CUSTOM_DOMAIN: Domain provided by Customer
- Primary Domains: gainsightcloud.com
- Pre-registered Sub-domains: gainsight, gong, gs, gainsight-qa, gainsight-test, gainsight-preprod, gainsightapp, gainsight-dev
Prerequisites
- Certificate Key, Certificate Body and Certificate Chain are required for creating custom domains.
Note: Contact your Network Administrator to obtain these certificate details.
Key Terms
- Sub-domain: The primary domain for Gainsight is gainsightcloud.com, the sub-domains can be created and configured on the primary domain.
- Sub-domains are created within Gainsight. The sub-domain name appears in all tenant URLs and uses the instance name of Gainsight. For example, you can brand your URL by naming the sub-domain with your company name.
Sample Sub-domain: https://myCompanyName.gainsightcloud.com/ (not for use). - Custom domain: The custom domains can be created and customized irrespective of the Gainsight primary domain. The custom domain name appears in all org URLs and replaces the instance name of Gainsight.
For example, you can brand your URL by naming the custom domain with your company name.
Sample Custom Domain: https://myCompanyName.com/ (not for use)
Note: Domains contain the list of configured sub-domains and custom domains in the organization. You have the ability to edit and delete domains except for domains that are already used in a site. - Pages: Pages are used to create custom HTML content and these pages can be used in Sites.
- Sites: Sites uses the domains and pages for distributing surveys.
Limitations
- Once a sub-domain is available and saved by the user, the user cannot modify the sub-domain further.
- You may create up to five sub-domains and one custom domain per tenant.
Frequently Asked Questions
Why Domains?
By setting up a domain, you have the flexibility to create URLs that you can then use to distribute surveys and collect feedback from participants. Domains are also used for External Sharing.
What Flexibility are we offering?
Customers have the option of setting up Custom Domains or creating sub-domains under gainsightcloud.com.
Custom Domains give you more control over the domain name, but also require a security handshake between Gainsight and your organization. IT involvement from both parties is required to set these up.
Sub-domains give you access to Gainsight’s out of the box offerings, and does not require IT staff to be involved.
Why Sites?
Sites act as placeholders for HTML resources like Pages. They help segregate URL paths based on their context. Sites have no meaning on their own in absence of pages. You can create any number of sites in an org.
Why Pages?
A Page is an HTML artifact that can hold any valid HTML content. Pages are useful for multiple use cases:
- Primary Use Case: A user can create multiple variants of the “Thank You” page to be rendered after a survey response is submitted.
- A user can create a custom page that helps them render meaningful application info from publicly accessible sources.
- A Page can be in the form of a default landing page for a site, an access denied page, a UI page that renders the text when a page is not found, etc.
A Page must belong to a site to be visible. It can not exist on its own.
Rendering Surveys using Sub-domain
To get started, create the following:
- Sub-domain
- Pages
- Sites
- Publish

Create a Sub-domain
To set up a sub-domain, choose a unique sub-domain name and register it with Gainsight domain registries. You can try out names and check availability before registering it. Choose your name carefully. When you register, Gainsight updates its domain registries with your sub-domain. After the sub-domain name is verified and saved, Gainsight Customer Support can only disable or change your sub-domain name.

To create a sub-domain:
- Navigate to Administration > General > Domains.
- Click Create to create a new sub-domain.
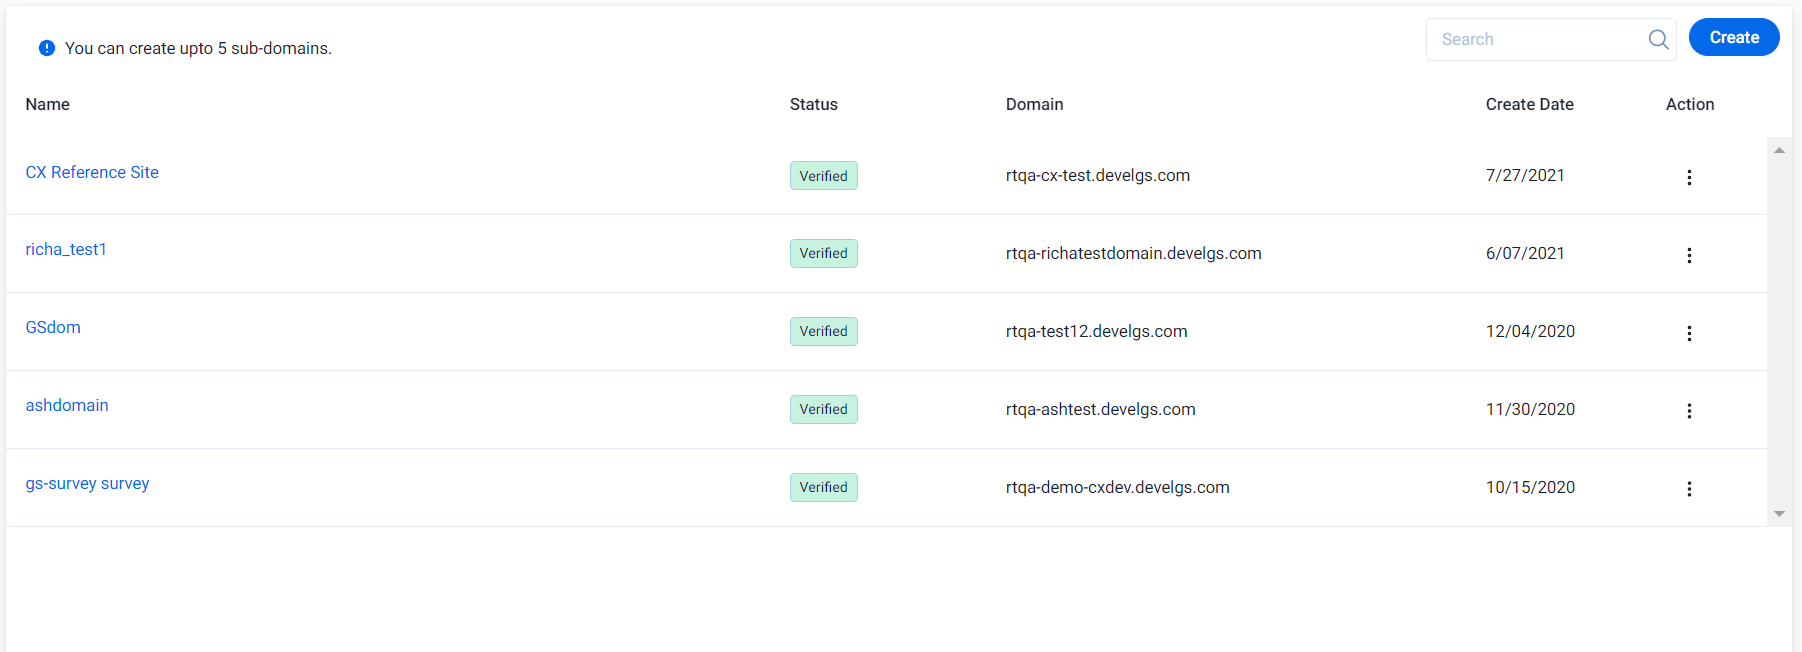
- Enter the following details:
- Name: Domain Name
- Description: Domain Description
- Map your existing domain: Do not enable this, as the sub-domains are created within Gainsight.
- Configure your Gainsight Domain: The customized sub-domain name (maximum of 15 characters ).
- Click Check Availability to confirm if the selected sub-domain name is available for use.
- Click Save.
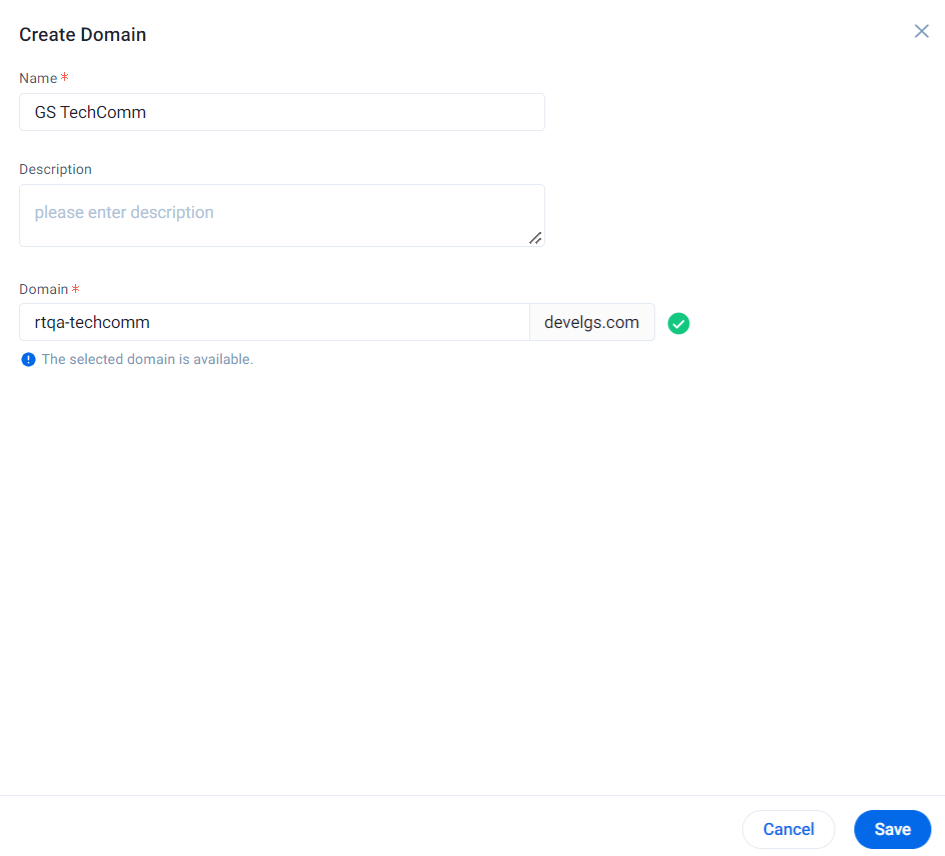
- Wait for some time and refresh the page. You will see the sub-domain is verified automatically.
Notes:
- The domain verification is required to ensure that the domain is valid and you have sufficient privileges over the domain.
- The maximum waiting time for the verification of sub-domain is 2 to 3 hours.
- Contact support@gainsight.com if the sub-domain remains Unverified.
Create Pages
Page is an individual HTML content created for your business need and configured with a site. Here, you can edit the HTML contents to create a survey form.
Notes:
- You must create a page to host your survey in order to distribute it successfully.
- (Optional) You can also use select Pages as custom Thank You messages for your survey. Custom Thank You messages are not required to distribute your survey. For information on using Pages for Thank You messages, refer to Survey Properties.
To create a page:
- Navigate to Administration > General > Pages.
- Click Create to create a new page.
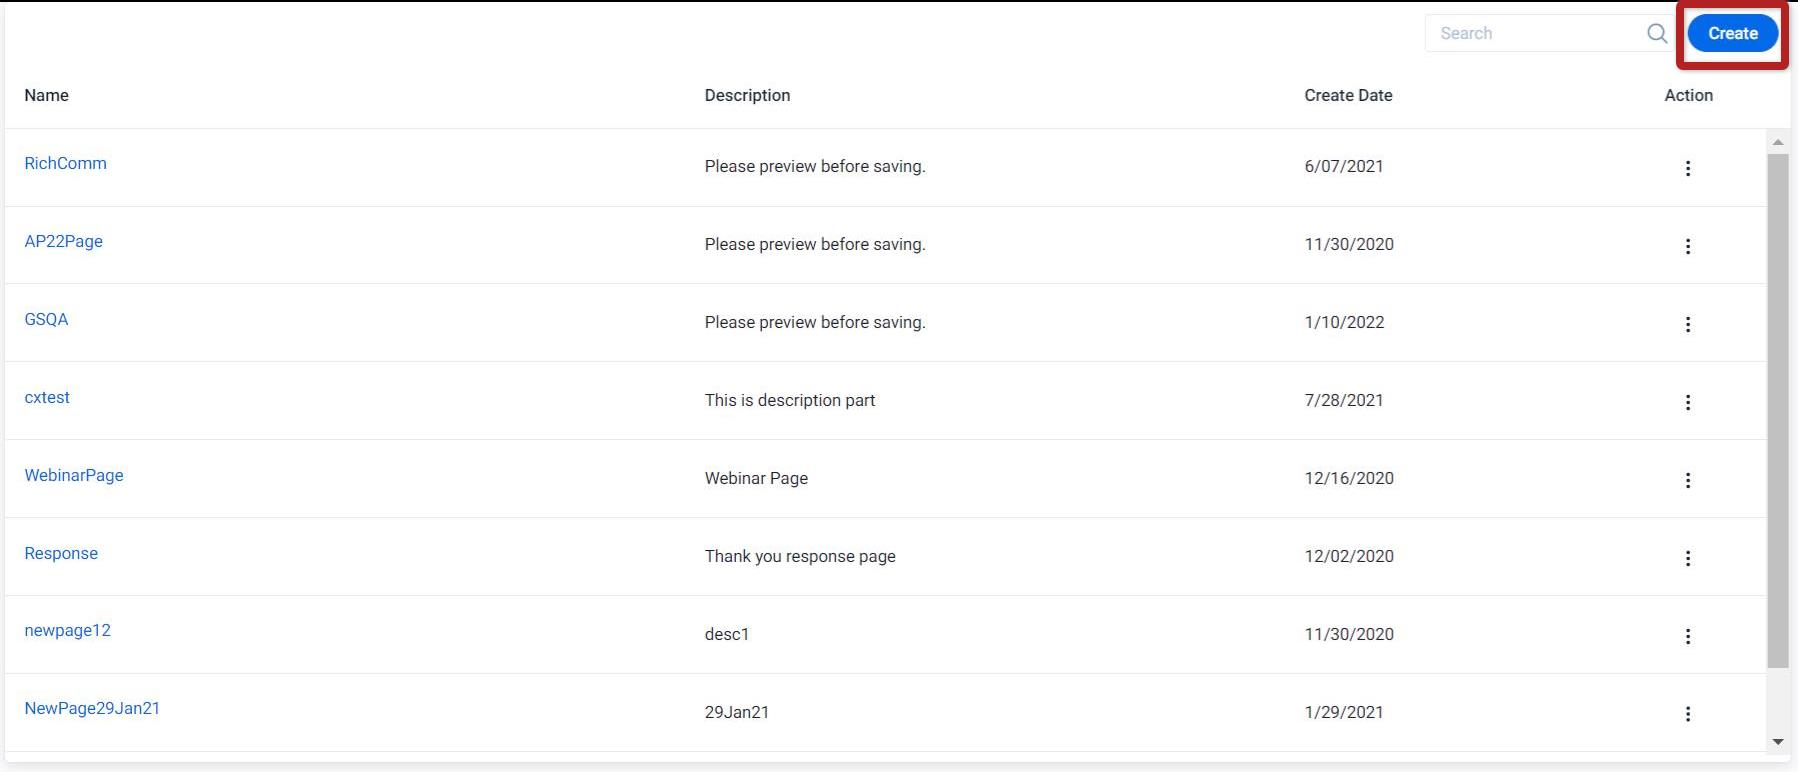
- Enter the following details:
- Name: Page Name
Note: Ensure that the characters you enter are alphanumeric. - Description: Page Description
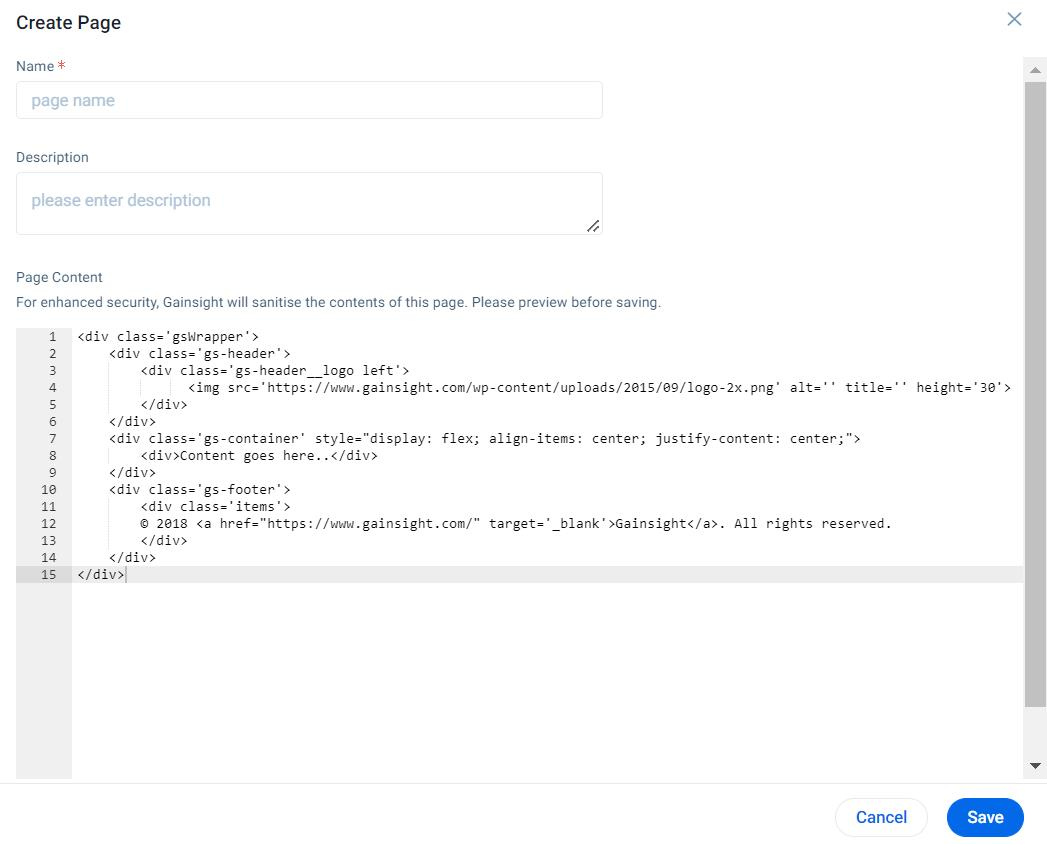
- Page Content: You have the ability to create or insert the html content and use it in Sites.
Note: You may see an error message, if there are any errors in the HTML.
- Click Save.
Create Sites
Site is a collection of HTML pages created for your business requirement and located under a single domain name. Here, the site URL is used for rendering Surveys.
To create a site:
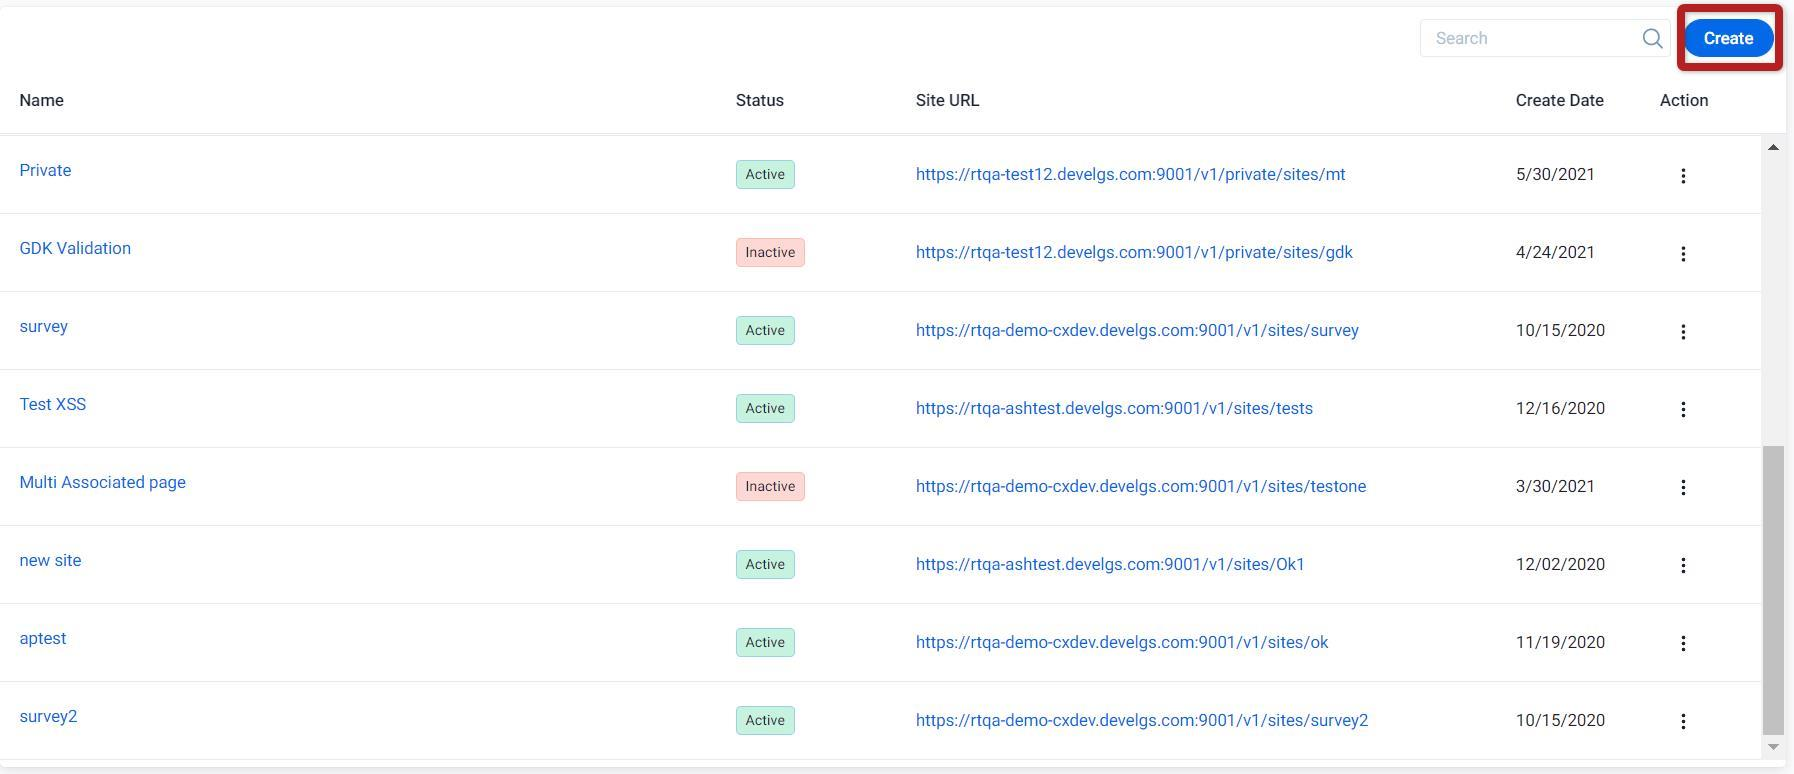
- Navigate to Administration > General > Sites.
- Click Create to create a new site.
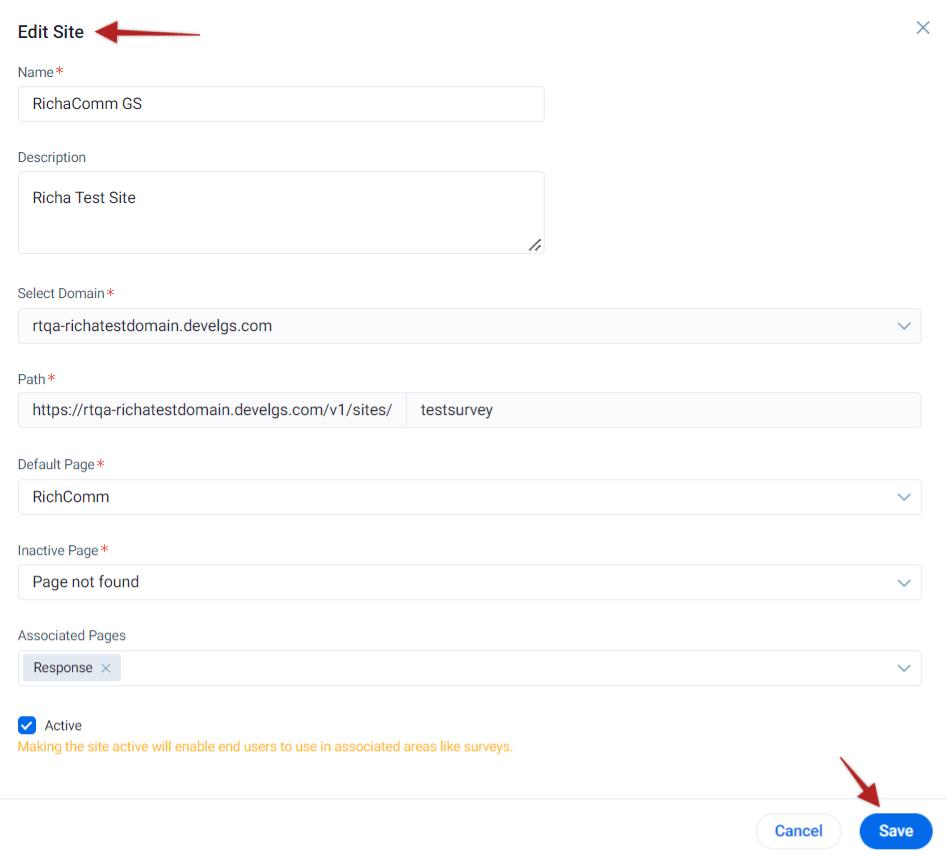
- Enter the following details in the Sites Management page:
- Name: Site Name
- Description: Site Description
- Select Domain: Select a domain from the available list.
Note: You can see only the valid and verified domains in the dropdown list. - Path: Choose the path for your site configuration. For the combination of domain and path, validate the path to check if it is unique, otherwise you will not be able to save the site.
- Default Page: Select the default page from the dropdown list. The default page is the page you enter when you click the path.
- Inactive Page: Select the in-active page from the dropdown list. Select the pages as in-active, when the sites are down or under maintenance or in case of any error.
Note: To configure a site, you should at least select the Default and In-active pages. - Associated Pages: You have the ability to select multiple pages from the dropdown list to be associated with a site.
Note: Default, In-active and Associated pages should be mutually exclusive. - Active: Select the Active checkbox to activate the site. This site can now be used in the Survey module.
- Click Save to save the question and its configuration.
- Click URL and a new tab appears to preview the survey page.
Note: By default, Gainsight standard HTML is inserted in the header and footer so that you can modify the content and use it for the page configuration. - Once the site is saved, you can select the relevant site URL from the dropdown list, on the survey distribution tab. For more information, refer to Distribute Surveys.
Publish
To publish Surveys, refer to Distribute Surveys.
Rendering Surveys using Custom Domain
To get started, create the following:
- Sub-domain
- Pages
- Sites
- Publish

Create a Custom Domain
To set up a Custom domain, choose a unique custom domain name and register it with Gainsight domain registries. You can try out names and check availability before registering it. Choose your name carefully. When you register, Gainsight updates its domain registries with your custom domain. After the custom domain name is verified and saved, only Gainsight Customer Support can disable or change your custom domain name.

To create a custom domain:
- Navigate to Administration > General > Domains.
- Click Create to create a new custom domain.

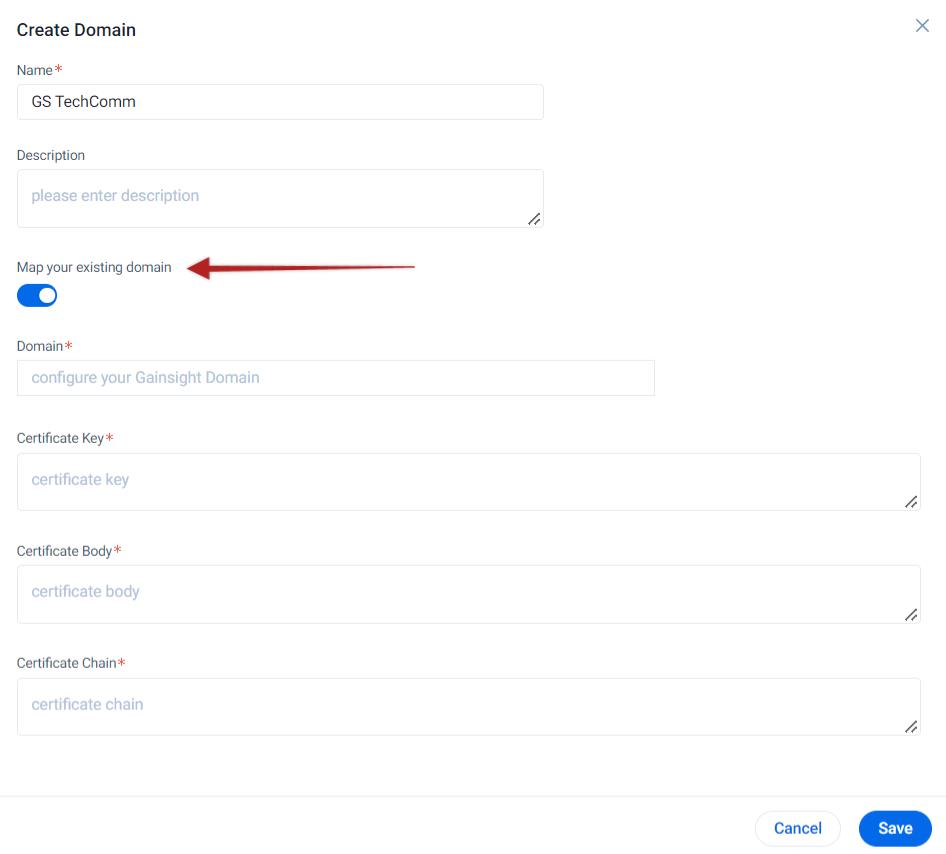
- Enter the following details:
- Name: Custom Domain Name
- Description: Domain Description
- Map your existing domain: Enable this to map and configure the existing domain.
- Configure your Gainsight Domain: The custom domain name
Note: Ensure that the number of characters in the domain name are less than 15.
- Click Check Availability to confirm if the selected domain is available for use.
- Before setting up a custom domain name, you must obtain the certificate key, certificate body and certificate chain, these details are required to establish a secure connection between a web server and browser. The certificate key, certificate body, and certificate chain must be Privacy Enhanced Mail (PEM)–encoded.
Enter the following details:
- Certificate Key: Copy and enter the certificate key. The following image shows an example of a certificate key.
- What is a Certificate Key: These keys are simply numbers (128 bit being common) that are combined with the message using a particular method, commonly known as an algorithm, e.g. RSA, to either encrypt or sign the message. Almost all encryption methods employ public and private keys. The public key is placed in the certificate or request. The associated private key is kept secret. You will specify the private key when you import the certificate. The key must be unencrypted. The following example shows an RSA private key.

- Certificate Body: Copy and enter the body of the certificate from your certificate authority. The following image shows an example of a certificate body.

- Certificate Chain: Copy and enter the certificate chain.
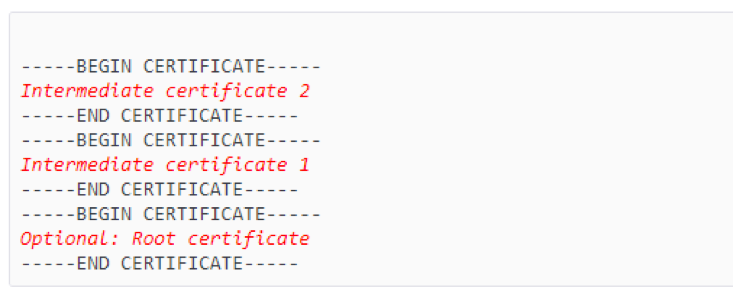
- What is a Certificate Chain: The certificate issued for your domain constitutes the certificates chain with a CA bundle. A certificate chain contains one or more certificates. You can use a text editor, the copy command in Windows, or the Linux cat command to concatenate your certificate files into a chain. The certificates must be concatenated in order so that each directly certifies the one preceding. Copy the root CA certificate last. The following examples contain one and three certificates respectively. Your certificate chain may contain one or more certificates.

Notes:
- Do not copy the certificate body into the certificate chain.
- If you edit any of the characters or if you add one or more spaces to the end of any line, the certificate body, certificate chain, or certificate key will be invalid.
- Click Save at the bottom-right of the page to save the question and its configuration.
- By default, the custom domain remains unverified.
- Click on the custom domain created, you will see a CNAME generated.
Note: Certificate key, body and chain are sensitive information, you will not be able to see these details once it is configured and saved. In case, if you want to modify the certificate details, click Modify Certificate to enter the new details for certificate key, body and chain. This will override the previous entries configured. - Copy the CNAME link and configure the settings with the DNS provider so that whenever the custom domain URL is clicked, it will redirect to the CNAME.
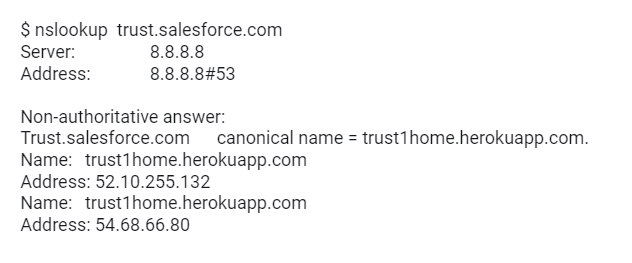
Note: This configuration may require your Network Administrator Support and can use the nslookup command to know if the domain is mapped correctly or not. The following image shows an example of nslookup command for trust.salesforce.com domain.
- On the Domain Configuration page, hover to the Options and verify the domain to confirm that the CNAME is configured correctly.
- After the verification is done, the custom domain is available for use in Sites.
Create Pages
To create pages, refer to Create Pages.
Create Sites
To create a site, refer to Create Sites.
Publish
To publish Surveys, refer to Distribute Surveys.
