Spaces Widgets and Permissions for CSMs
This article helps Customer Success Managers (CSM) customize Spaces with a detailed widget-by-widget guide, highlighting role-based functionality and personalization options.
Overview
Spaces is Gainsight’s dedicated platform for secure customer collaboration. It enables teams to share updates, manage Success Plans, and exchange documents - all in one centralized location. Spaces can operate independently or be integrated with Gainsight’s Customer Communities for a seamless, connected experience.
This guide is designed for Customer Success Managers (CSMs) and provides a clear, widget-by-widget overview of customization options within Spaces. It explains how each widget functions across roles (Admin, CSM, End User), what can be customized, and how to ensure secure, tailored experiences for your customers.
Navigation
To start using the Spaces layouts shared with you:
- Use the global search bar to navigate to your company C360 page.

- On the C360 page, click Shared Space. The company’s Shared Space page appears.

Spaces Widgets
Widgets in Gainsight Spaces are building blocks that display key information, insights, and collaboration tools in customer-facing views. For CSMs, they offer a powerful way to personalize the experience, highlight what matters most, and foster stronger engagement with customers, all within admin-defined structures.
This section gives you a quick overview of each widget, what it’s used for, and what actions you can take as a CSM to tailor the experience for your customers.
Banner Widget
The Banner Widget in Gainsight Spaces allows teams to create a visually engaging and personalized header section for each customer’s portal. It displays key branding elements, welcome messages, and CSM contact details, and serves as the first point of interaction in the shared space. The Banner widget offers the following benefits:
- Provide a branded, welcoming experience for customers
- Highlight key information like CSM contact and welcome text
- Customize the visual look and feel per customer context

What Can CSMs Do
As a CSM, you can override admin-defined settings for a specific company while accessing their shared spaces. This allows you to customize the banner to better reflect individual customer account needs. You can also make further changes in the Banner widget that another CSM may have made for a given company. This includes:
- Configure the background image
- Configure banner widget
- Personalize welcome message
Note: When a banner layout or specific elements are locked by an admin, those fields cannot be edited. A tooltip identifies any restricted sections.
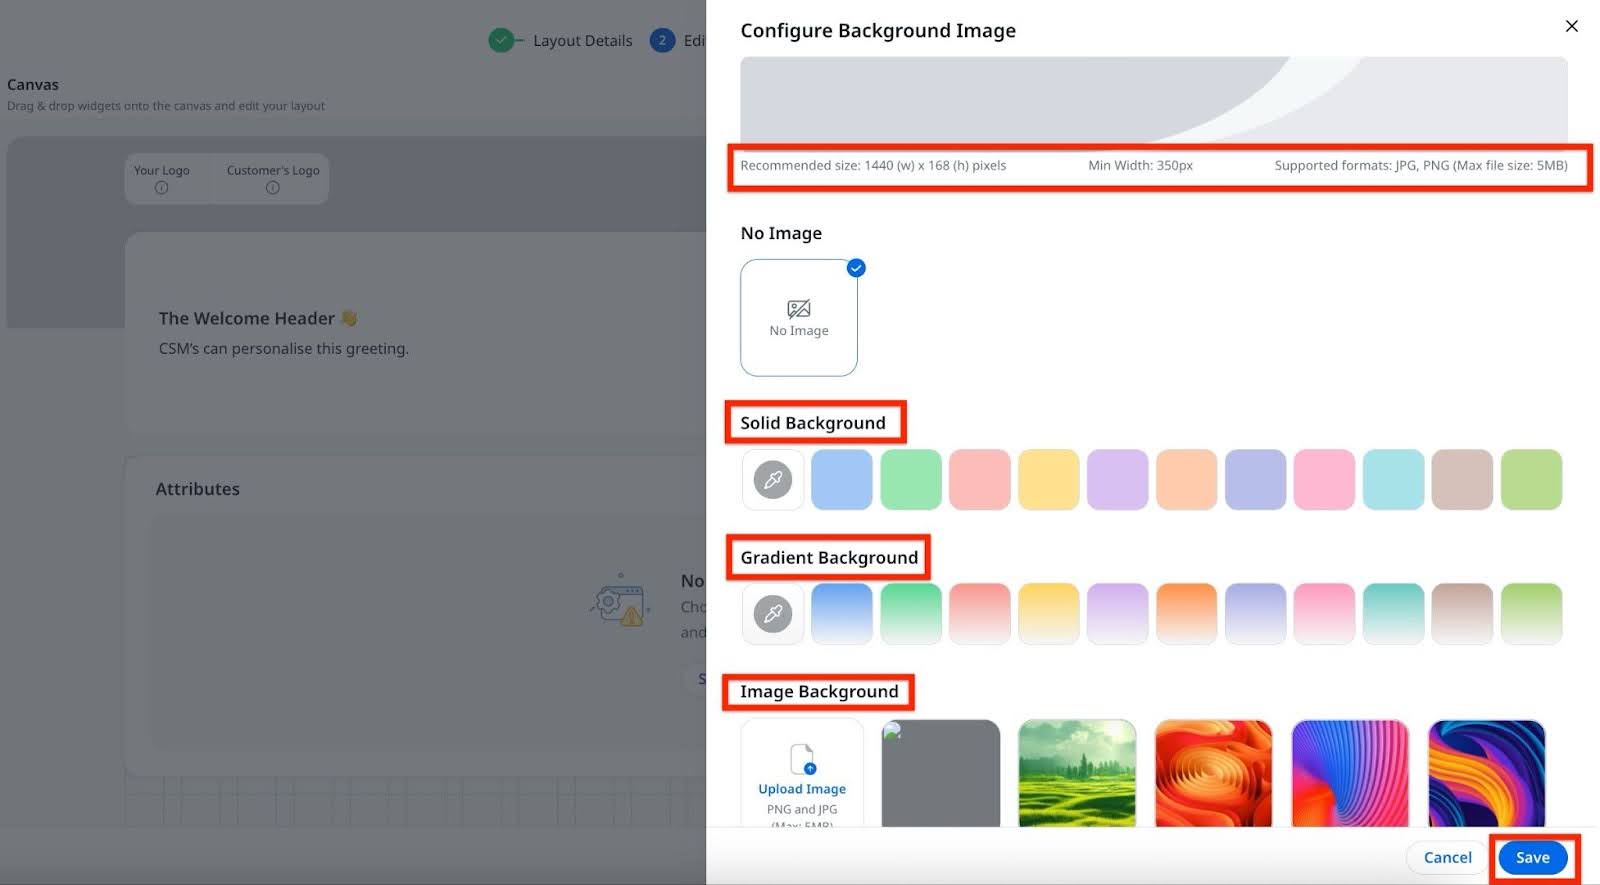
Configure the Background Image
By default, the background image is set by the admin when the layout is created. To customize it, follow these steps:
- Click the settings icon on your layout interface. The Configure Background Image slide-out panel appears.
- Choose your preferred background type:
- Solid Background: Select a solid color or create one using the color picker.
- Gradient Background: Choose a gradient or design your own with the color picker.
- Image Background: Upload an image or enter a public image URL.
- Check the size guide for recommended dimensions.
- Click Save.
Configure Banner Widget
- Click the settings icon on the Banner Widget. The Configure Banner Widget slide-out panel appears.

- Select a display layout with or without a multimedia section (image, GIF, or video).
Note: Only public URLs are supported for videos and GIFs; uploading or streaming is not available. - In the CSM’s information section, select or uncheck the boxes for Email ID, Timezone, and User Title to show or hide these fields.
Note: To update your profile picture or name, go to the CS application settings.

- Click Save & Continue.
Personalize Welcome Message
The welcome message section allows you to create and edit personalized messages that greet end users when they access Spaces. This section is designed to help you set the tone for collaboration and provide relevant context upfront. Key features include:
- Rich text editing: Format messages using bold, italic, lists, alignment options, and other basic text styling tools.
- Multilingual input: The field accepts messages in any language.
- Fixed display area: The message box has a set height, and any overflow text scrolls within the widget. There is no restriction on the length of the text you enter.
Double-click the Welcome message space to enable editing.

Behavior Across Roles
|
Role |
Capabilities |
|---|---|
|
Admin |
Sets default layout and banner for all companies |
|
CSM |
Overrides banner per company, edits visuals and messaging |
|
End User |
View-only access; cannot interact or customize |
Permission Requirements
To modify the banner, CSMs must have the appropriate permission bundle set up, such as modifying widget content, Edit toggle enabled at the widget level during Admin setup and so on. For more information on available permissions for CSMs, refer to the Configure Permissions for Spaces article.
Best Practices
- Ensure both company and customer logos are uploaded to prevent display issues. The customer logo should be uploaded to the Company object, and the tenant logo should be set under Application Settings. If neither logo is available, no logo will be displayed.

- Use wide-format images to avoid stretching
- Double-check visibility settings to prevent sharing restricted content
Spaces Notes
The Spaces Notes widget allows you to capture and share key highlights, important callouts, and links to supporting documents. With rich text formatting, you can add structured and detailed content that enhances collaboration. The widget also supports embedding images and videos, which can be inserted inline or stacked vertically to improve visual clarity and organization.
What Can CSMs Do
- Write and Edit Notes: Input, edit, and update notes using a built-in Rich Text Editor.
- Format Your Message: Apply standard formatting like bold, italics, bullet points, and headings to structure your message.
- Embed Media:
- Images: Include visual content using publicly hosted image URLs. Local uploads are not supported.
- Videos: Embed videos from YouTube or Vimeo by pasting the video URL.
- Use for Communication: Share contextual information, guidance, or updates that end users should read or view.
- Rich Text Editor Tools Available: Standard editing tools plus insert options for images and videos enhance the clarity of your communication.
- Hide or Display the Widget: Hide or unhide the Notes widget as needed, along with the content configured.
Limitations
- You cannot upload files directly—only public links can be embedded.
- Only end users who have been invited will be able to view your notes. They cannot respond or edit anything in the widget.
End User Experience
End users can view your notes and play embedded videos but cannot reply or make any edits.
Summary Ribbon Widget
The Summary Ribbon Widget in Gainsight Spaces is designed to present a high-level snapshot of key customer data in a compact, visually prominent format. Positioned at the top of a space layout, it allows teams to highlight essential metrics and insights that are most relevant for day-to-day customer engagement.
Admins can configure this widget to display standard attributes, custom fields, or KPI data from reports, enabling a data-rich view that's both informative and easy to navigate. While CSMs and end users have a view-only experience, the Admin has full control over what is shown and how it is structured.

Key Benefits
- Surfaces critical information, such as renewal date, active success plans without navigating away.
- Organizes data into logical sections to support focused customer conversations.
- Displays real-time KPI metrics sourced directly from Reports.
- Ensures standardized customer views across the organization.
- Supports horizontal scrolling for layouts with multiple data groups.
Key Considerations
- Supports up to six groups of fields
- Each group can display:
- Single or multiple fields
- Fields stacked or side-by-side
- Fields can be:
- Standard Attributes (example: CSM Name, Renewal Date)
- Custom Fields from the Company object
- Report Fields from KPI reports (using Report Builder)
- Fields come from:
- Company object and its lookup fields
- KPI Reports (with company mapping)
Note: Proper field mapping is required for dynamic reports to show accurate data
What Can CSMs Do
While CSMs cannot configure the Summary Ribbon, they can:
- View all configured data for the company.
- See grouped metrics as arranged by the Admin.
- Configure the number of widgets displayed per view using the Choose Ribbon Layout option under the Configure Summary Ribbon panel. Select one, two, or three widgets to display upfront. The remaining widgets appear in a carousel.
- Experience a clean interface with horizontal scroll if more than three groups are displayed.
Note: You cannot edit or choose to hide the Summary Ribbon widget.
End User Experience
- End users also see a read-only version of the Summary Ribbon.
- The view is identical to what CSMs see, offering a shared context for collaboration.
Behavior Across Roles
|
Role |
Capabilities |
|---|---|
|
Admin |
Full control over layout, field selection, grouping, order of display and visibility |
|
CSM |
View-only access; layout applied per company |
|
End User |
View-only; layout appears exactly as configured by Admin or CSM |
Best Practices
- Group related metrics, such as usage and financials for intuitive reading
- Use calculated fields for real-time summaries
- Keep visible groups to three or fewer to avoid scroll fatigue
- Ensure all report-based fields have proper Company ID mapping to display accurate, filtered data
Attribute Widget
The Attribute Widget in Gainsight Spaces is designed to display multiple customer data fields in a single, grouped format. It pulls data directly from the Company object and its lookup fields, allowing Admins to organize related attributes in a clean, consolidated view. This widget supports both standard and custom fields and gives Admins and CSMs flexible control over visibility and editability.
It’s especially useful for surfacing detailed customer information, such as industry, account tier, usage stats, or customer status, within a compact section of the layout.

Key Benefits
- Grouped View: Consolidates related fields for easy scanning and context.
- Custom Vocabulary: Supports renaming of field labels to match company or customer-specific language.
- Set the field label: Supports setting a user friendly readable display name for the field.
- Flexible Display Options: Allows formatting of numerical and currency fields for clarity.
- Edit Controls: Admins can control whether fields are view-only or editable by CSMs.
- Company-Specific Customization: CSMs can hide or reveal the entire widget based on company context.
What Can CSMs Do
Customize an Attribute Widget
After adding an Attribute Widget, customize it using the following steps
- Rename the field label to match your organization’s terminology.
- Add a description to provide context or instructions.
- Choose a format type from the dropdown based on the attribute’s data type. For fields like ARR or Average NPS, select from:
- Number
- Currency
- Financial
- Percentage
- Adjust formatting options based on the selected format type:
- If Percentage: set the number of decimals and enable numeric summarization.
- If Number, Currency, or Financial: configure decimal places and numeric summarization.
IMPORTANT
- CSMs interact with the Attribute Widget on a per-company basis:
- Edit Field Values (if enabled by Admins and supported by their permission bundle)
- Hide or unhide the entire widget for specific companies, without affecting others
- View-only experience if edit permissions are not granted
- Changes made by CSMs are scoped only to the specific company they’re working with
Note: For a CSM to edit a field, both the field must be editable (as set by the Admin) and the CSM must have the Modify Widget Content permission enabled.
End User Experience
- End users see the Attribute Widget in a read-only format.
- All fields displayed are based on the Admin’s configuration and CSM-specific visibility settings.
Field Widget
The Field Widget in Gainsight Spaces is used to display individual data points, one field per widget, from the Company object or its lookups. Unlike the Attribute Widget, which groups multiple fields together, each Field Widget stands alone, allowing for granular control over layout and visibility.
This widget is ideal when different fields need to be shown or hidden independently across customer contexts, providing maximum flexibility for customization.
Key Benefits
- Field-Level Control: Customize the visibility and positioning of each data point independently.
- Flexible Layout: Position each widget exactly where needed in the layout.
- Visibility Granularity: CSMs can hide or show individual widgets based on the customer context.
- Consistency with C360: Pulls the same field data used in C360, making it familiar to teams.
What Can CSMs Do
CSMs have flexible controls when working with Field Widgets:
- Edit field values if:
- The Admin has enabled field editability in the widget settings
- The CSM has the required permission bundle (Modify Widget Content)
- Hide or unhide individual Field Widgets per company, offering tailored experiences.
- Each change by a CSM is scoped only to the specific customer they manage - other layouts remain unaffected.
Field Widgets provide more precision than Attribute Widgets for CSM-driven customization.
End User Experience
- End users can view field values only.
- Field Widgets are displayed based on what Admins and CSMs choose to show, with no interactive controls or editing available to the end user.
Standard Widgets
Standard widgets display key fields and attributes (like CSM, Renewal Date, and Customer Since.) associated with a customer. These fields provide quick access to structured information that’s relevant for both internal use and sharing with end users.
What Can CSMs Do
- View and edit Fields:
- If the admin has marked fields as editable, you can update values directly within the widget.
- Editable fields might include text fields (example: Account Comments), certain dates, or user assignments (example: selecting a different CSM).
- Customer Since Widget: Displays how long the company has been your customer, calculated from a selected date field (example, Original Contract Date, Created Date).
- CSM Field Widget: Shows the assigned CSM, and you may be able to change it depending on admin settings.
- Renewal Date Widget: Displays the company’s renewal date. This is not editable but includes helpful context like 10 days left to renew.
- Image Field Widget: Displays logos or other visual identifiers based on available image fields. You’ll see the image if only one is present; otherwise, options may appear.
- Text Field Widget: Lists all available text fields tied to the Company or Relationship objects. You can edit if allowed.
Visual Enhancements
Avatars/Icons: These appear on specific fields like the CSM widget for quick visual identification.
- You can’t add or remove widgets, only admins control layout setup.
- Editable access is field-specific and controlled by the admin.
- End users can only view what’s shown and cannot make changes.
End User Experience
- Read-Only Access: End users can only view the data shown in standard widgets (example, CSM, Renewal Date, Customer Since, logos, text fields).
- No Edits: They cannot modify or interact with any fields.
- Contextual Info: Fields like Renewal Date and Customer Since include helpful context (example: days to renewal, customer duration).
Success Plans Widget
The Success Plans Widget in Spaces allows Gainsight users to display and interact with Success Plans within Spaces. This widget enhances collaboration between internal CSMs, administrators, and external end users by making curated success content accessible and interactive, based on permission levels.
Key Benefits
- Facilitates transparent communication between internal teams and external users.
- Allows fine-grained control over what information is visible and editable based on user roles.
- Updates in Spaces are reflected in the main Success Plan module and vice versa.
- Supports both viewing and selective editing based on ownership and user type.
Key Considerations
- Draft Success Plans are not visible to CSMs for adding to Spaces.
- Call-to-Actions (CTA) must be explicitly marked as shareable in order to appear within Spaces.
- When a Success Plan is shared from the Success Plan page, CSMs can choose specific CTAs to include.
- When a Success Plan is added through the widget, all eligible CTAs are automatically included without an option to select.
- The terminologies Add Success Plan in Spaces and Share to Spaces in the Success Plans module area refer to the same action.
- Tasks must be created from the main Success Plan interface. You cannot create tasks in Spaces.
- Permissions for viewing and editing vary depending on whether the user is an internal CSM, an admin, or an external participant.
The Success Plans widget in Company Spaces displays a merged list of Success Plans created at both the company and relationship level. The Company > Relationship column identifies the source of each plan. Relationship Spaces display only the assets for that specific relationship.
What Can CSMs Do
- Add/Remove Success Plans: CSMs can curate which Success Plans appear in the widget, provided those plans are not in draft status.
- CTA Selection: When adding using the Success Plan module, CSMs can select which CTAs are shared.
- Editing Rights:
- Own CTAs: Can update due dates, status, and comments.
- Others' CTAs: Read-only access.
- Tasks and Gantt Chart:
- Editable only from the main Success Plan view, not within the widget.
- Inline editing is not supported in the widget; users must access Gantt view.
- Start date, due date can be updated for Own CTAs.
Filter Success Plans by Child Company
When your admin has enabled the Company Hierarchy setting, you can view and filter Success Plans from child companies directly inside the parent company's Space.
To filter Success Plans by child company:
- Click the Filter Company Hierarchy icon on the Success Plans widget to select which child companies to include. The parent company is always included and cannot be deselected.
- Child-company Success Plans are labeled with a Child tag so they are visually distinct from parent company plans.
- The Company > Relationship column shows the child company name alongside the relationship for each plan.

End User Experience
- View-Only by Default: Can see shared Success Plans and associated tasks but cannot edit unless they own the task.
- Limited Edit Rights:
- Own Tasks: Can modify status, description, and comments.
- Others’ Tasks: View-only.
- Comments:
- Can view comments marked for external sharing.
- Can add new comments with contextual tagging.
Customer Goals Widget
The Customer Goals widget in Spaces allows you to view and collaborate on shared customer goals directly within a company's shared space. Once an admin enables the widget, you can share goals to Spaces and track progress collaboratively with external participants.

- Only goals, metrics, CTAs, and Success Plans explicitly selected during sharing are visible in Spaces, everything else remains hidden.
- The Customer Goals widget in Company Spaces displays goals from both the company and relationship level in the same view. The Company > Relationship column identifies the source of each goal. Relationship Spaces displays only the goals for that specific relationship.
The Customer Goals widget helps CSMs perform the following:
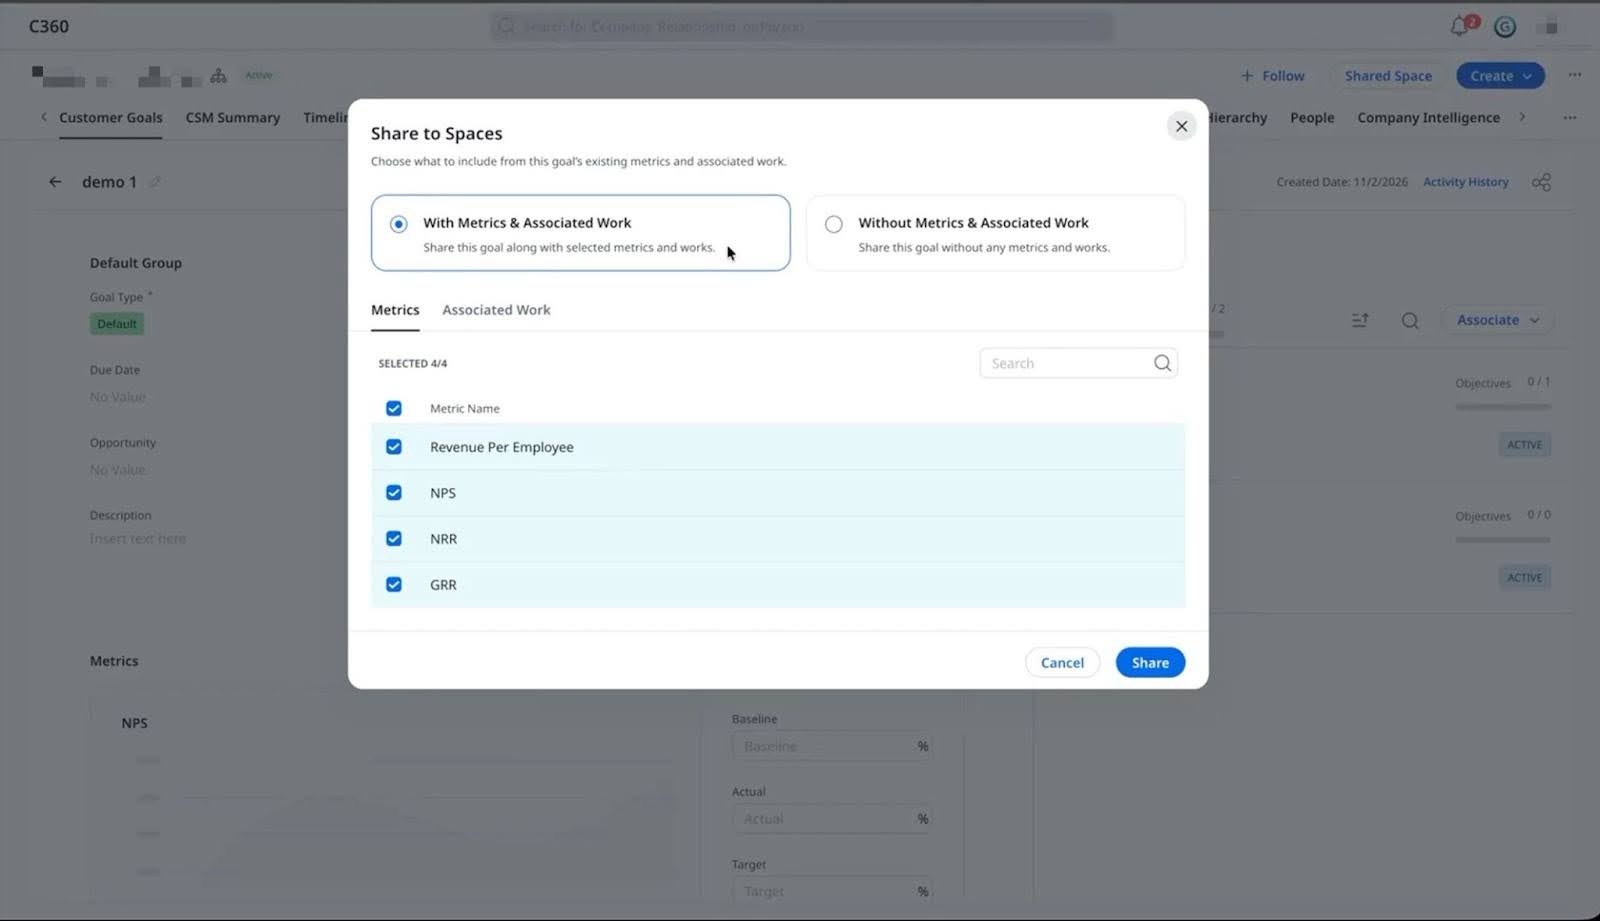
- Share Goals to Spaces: Select specific goals to share. You can choose from the following options:
- With Metrics & Associated Work: Share the goal along with selected metrics, CTAs, and Success Plans.
- Without Metrics & Associated Work: Share the goal without any metrics or associated work. This option is selected by default if a goal has no metrics, CTAs, or Success Plans associated.
- Update Goal Values and Progress: Edit goal values and update progress directly from the Goals section in Spaces.
- Post Comments: Add comments on CTAs and Success Plans directly from the Goals section in Spaces.
- Search and Group Goals: Search for specific goals and group them within the Goals section by Goal Name, Status, Goal Type, Created Date, Created By, or Due Date in Quarters.
- Control Visibility: Show only the goals you explicitly share in Spaces, while keeping all other goals private.
- Manage Shared Goals: Remove a goal from Spaces, update its sharing options, or share or unshare individual metrics, CTAs, and Success Plans directly from the goal list or detail view, without navigating to C360.
- Add Goals to Spaces: Click Add Goals to open the Add Customer Goals to Spaces panel. The panel lists all goals associated with the company that have not yet been shared to Spaces. Select a goal to open the sharing options.
-
Track Work Progress: The goal details header displays a work progress indicator that updates automatically when the status of a shared CTA or Success Plan changes.
- When updating CTAs from the Goals section in Spaces, you can update values and post comments. Creating tasks, applying playbooks, and adding notes are not supported from Spaces.
- When updating Success Plans from the Goals section in Spaces, you can update values and post comments. Other actions are not supported from Spaces.
Example: You can share key customer goals, such as Net Promoter Score (NPS), along with relevant CTAs and Success Plans in Spaces so customers can track progress collaboratively.
Role-Based Capabilities for Customer Goals in Spaces
Access and capabilities for Customer Goals in Spaces vary by role. The following table outlines what each role can do.
| Role | Capabilities |
|---|---|
| Admin | Enables the Customer Goals widget in Spaces layouts and controls goal sharing permissions. |
| CSM | Adds and shares goals to Spaces, updates goal values and progress, posts comments, manages sharing options, searches and groups goals, tracks work progress. |
| End User | Views goals, searches and groups goals, updates owned CTAs and tasks, adds comments on Success Plans. |
Attachments Widget
The Attachments Widget in Spaces allows Customer Success Managers (CSMs) to share files with end-users securely. You can upload new files, select existing company attachments, and remove files from the shared view, all without leaving the company’s shared space.
Navigation: Navigate to C360 > Shared Space > [Company Space] > Attachments.
What can CSMs do
CSMs can fully manage files in the Attachments widget, depending on Admin configuration.
| Action | Description |
|---|---|
| Upload new files | Upload files directly from your system into the widget. |
| Add existing attachments | Share files already uploaded in the company's C360. |
| Remove files | Remove shared files from Spaces without deleting them from the repository. |
| Tag files | Apply tags to any file, including those added by end users. |
| Manage permissions | Control end-user file access (if Admin allows permission overrides). |
End-User Experience
End-user capabilities depend on the permission level set by the CSM.
End-User Permissions
CSMs can manage end-user permission, if it is allowed by Admin.
| Permission | End User Can | End User Cannot |
|---|---|---|
| View Only | View and download files. | Upload, edit, or delete files. |
| View and Manage | Upload new files; edit, delete, or tag their own files. | Add repository files, tag, edit or delete others’ files. |
Note: Permission override must be enabled by Admin for CSMs to manage end-user access.
How to Manage End-User Permissions
To change end-user file access:
- Open the Attachments widget.
- Click the three-horizontal dots menu.
- Select the appropriate End-User Permission from the dropdown.
Note: This option appears only if Admins have enabled permission overrides.
How to Upload and Share Files
Add files to Spaces by uploading them or selecting existing ones from C360.
Upload a New File
Add a file directly to the Attachments widget. To upload a new file:
- In the widget, click Upload New.
- Select a file (max 30 MB; allowed types: PDF, DOC, PPT, XLS, TXT, JPG, PNG).
- Click Upload. The file is now visible to end users.
Add an Existing File from C360
Select and share files already available in the company’s C360 record. To add a file from 360:
- Click Add Existing.
- Choose from previously uploaded attachments in 360.
- Select files to share into Spaces.

How to Remove Files from Spaces
You can remove any file you have added to Spaces using the Remove from Spaces option. To remove a file:
- Click the three-dot menu on the file.
- Select Remove from Spaces.
Note
- This removes the file only from Spaces. It remains available in C360 and the repository.
- Use the Remove from Spaces option to hide a file from end users while keeping it available in C360 for internal use.
Upload Rules
Defines who can upload files, file size limits, and supported formats.
| Persona | Max File Size | Supported Types | Restricted Types |
|---|---|---|---|
| CSM | 30 MB | PDF, DOC, PPT, XLS, TXT, JPG, PNG | None |
| End User (if permitted) | 5 MB | PDF, DOC, PPT, XLS, TXT, JPG, PNG | Audio, video |
Display and Visibility
Explains how shared files appear in the widget and how branding is applied.
- Only files explicitly shared to Spaces appear in the widget.
- A new Attachments widget appears blank until content is added. Even if files exist in C360, they do not appear in Spaces until explicitly shared by you.
- The widget inherits the same branding (fonts, colors) as the Space.
IMPORTANT
- You cannot change end-user permissions if the Admin disables overrides
- You cannot edit files uploaded by end users, but you can apply tags to them
- When a file is deleted, it is moved to the Recycle Bin. Only Admins can access the Recycle Bin and restore deleted files if needed.
- Restoring a file adds it back to 360, but you need to share it again to make it visible in Spaces.
Reports Widgets
The Reports Widget in Gainsight Spaces enables organizations to display visual analytics and insights directly on company or relationship layouts. These widgets can house data visualizations like tables, charts, and KPIs that are built using the Report Builder. They enhance decision-making by bringing actionable insights closer to end users in a contextual layout.
There are two main types of report widgets:
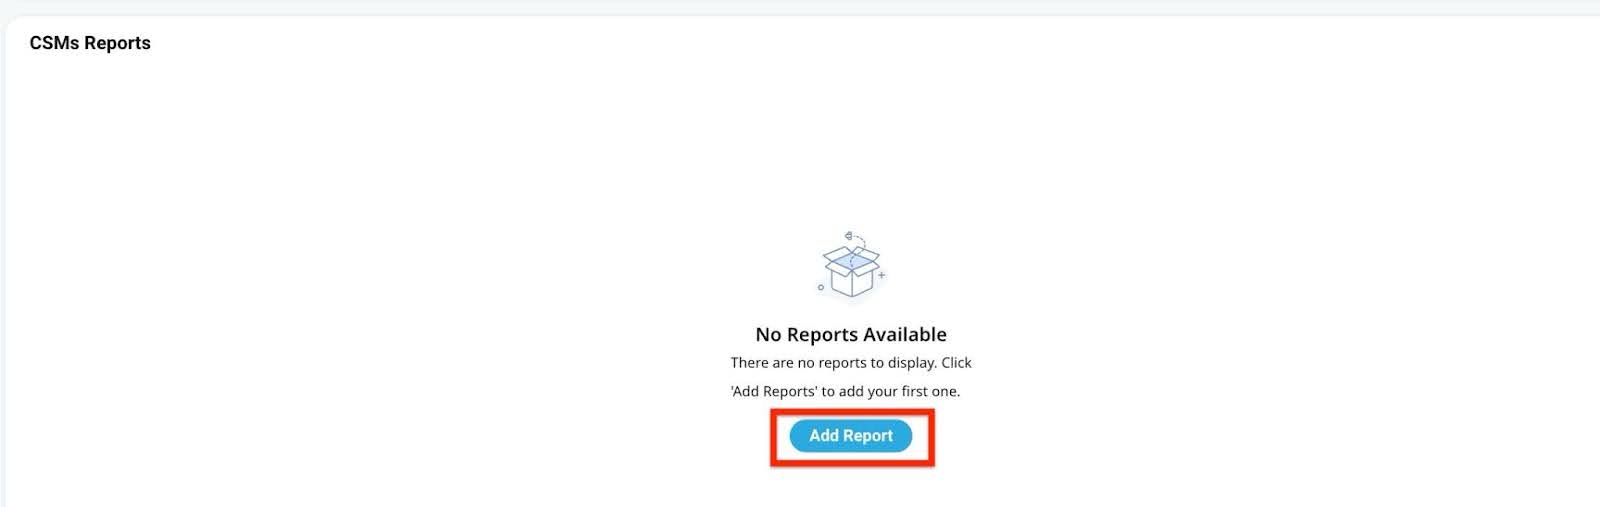
- Direct (Regular) Reports – Admin-configured reports visible to all users tied to a layout
- CSM Reports – Blank widgets that allow CSMs to share reports with specific companies or relationships.
Key Benefits
- Enhanced Visibility: Integrates key performance indicators and reports directly within user workflows.
- Role-Based Customization: Distinct configuration options for Admins and CSMs to tailor visibility.
- Contextual Reporting: Supports company-specific or relationship-specific insights.
- Interactive Insights: Allows filtering, chart visualizations, and other user-specific views.
Key Considerations
- Widget Scope:
- Direct Reports apply globally to all layouts using them.
- CSM Reports are scoped per company or relationship.
- Inline Editing:
- Supported only for low-volume custom objects if enabled during report configuration.
- Not available for standard or high-volume objects.
- Report Types Compatibility:
- KPI Reports are supported only in the Summary Ribbon.
- Grid and Chart Reports are compatible with both Direct and CSM Reports Widgets.
- User Segmentation:
- CSM Reports offer fine-grained control—different reports for different clients.
- Direct Reports provide consistent visibility across all clients using the layout.
- Visual Richness:
- Supports bar charts, pie charts, tables, and more depending on the configuration in Report Builder.
What Can CSMs Do
Customize CSM Reports Widget:
- Can add multiple reports per company or relationship.
- Ideal for showing customer-specific insights not relevant to all entities.
- Reports appear as tabs in the CSM Reports Widget, making it easier to identify and navigate between them.
- CSMs can reorder report tabs to prioritize the most relevant reports.
- When adding reports, the list is filtered by the logged-in CSM by default. CSMs can remove or modify this filter to search across all available reports.
- Filter selections are saved and restored the next time the widget is opened.
- To switch to the new tabbed view, click Switch to New Version.
- When Show data from all children is enabled on a report widget, end users see the same rolled-up child company data as the CSM. End users do not see the Show data from all children toggle, only the resulting data.
Limited Control on Direct Reports:
- Can only hide or unhide direct report widgets.
- No capability to change content or filters.
KPI Reporting:
- KPI reports (used in Summary Ribbon) are not supported in CSM Reports Widget - limited to grid and chart types.

End User Experience
- View-Only Access:
- Can only view the reports as configured by Admin or CSM.
- No edit or configuration access.
- Filter and Interaction:
- Can interact through filters to personalize views but cannot save changes.
Invite Users to Spaces and Customize Email
To invite users to Spaces and customize your invitation email:
- Navigate to your company’s shared space.
- On the top right corner, click Invite. The Invite to Spaces slide-out panel appears, where you can select users and customize the invitation email.
- Search for users or add them manually (if allowed).
Note: Select at least one user to enable the email editor panel.

- Customize the Invitation Email
When the panel appears, you have access to an editable email template. The customization options include:- Editable Sections
The invitation email includes structured, customizable sections. The subject line is editable using a rich text editor, and CSMs can insert dynamic tokens like the company or relationship name using the Insert Entity Name option.
The email body contains editable fields such as the header and main content, both pre-filled with default text. A call-to-action (CTA) button, like Get Started, is required to send the invite. The button’s label and redirect target (example: login or sign-up) can be adjusted.
The footer displays the name of the logged-in user by default and supports personalization. Above the CTA, there’s an editable bookmark message. While editing, a placeholder represents the invitation link, which is dynamically generated when the invite is sent.
IMPORTANT: Editing is limited to specific predefined sections; new sections cannot be added - Branding
Invitation emails automatically inherit the branding set at the CC instance level, including primary colors, text colors, fonts, and button styles. This ensures visual consistency with the organization’s overall design.
For example, headings display in the primary color, text uses the designated font and color, and CTA buttons reflect the configured styles. The company logo appears by default but can be removed or re-added using the editor.
While the branding is applied automatically, CSMs can override specific elements, like font styles or colors, using the rich text editor within the editable sections.
Note: Branding syncs from the layout settings, and any updates there will reflect in the invitation unless manually changed during customization. - Customize the Invitation Email
- Solid Color: Select a color that matches your brand.
- Gradient Color: Apply a smooth gradient for visual appeal.
- Image Background: Upload an image to use as the background. Recommended size and format guidelines appear during selection.
- Plain White: Use the plain default look.
In addition to branding elements such as fonts and button styles, CSMs can customize the background of the invitation email. The available customization options include:
These options appear in the Email Customization panel once you select a user to invite. The background appears behind the email content, aligned with the overall layout style.
-
Select Sender Email Address: When sending a Space invitation, you can select the sender’s email address from the From dropdown in the Invite Message section. The dropdown displays all email domains configured in your organization, with the default domain pre-selected.
- Editable Sections
If the Admin has locked the default domain, the From dropdown is not available to CSMs and all invitations use the default domain. CSMs do not have access to the From dropdown.
- Manage Templates
- Save as Template: Click the Save as Template icon in the Invite Message section. A tooltip confirms: Save as a template to reuse your changes for future invites. The saved template is automatically populated the next time the invite page is opened.
- Reset to Default: Restores the original default content if you want to discard changes.
- Set Permissions and Send
- Choose the type of invite:
- Collaborate Only: Users can view content but cannot invite others.
- Collaborate and Invite: Users can view and also invite others (their invitees cannot re-invite).
Note: Only one CTA button is required per email. You cannot send the invite without including one.
- Click Send Invite to complete the process.
Note
- If an end user is invited with Collaborate and Invite, they also have access to the same email editor and customization capabilities.
- Admins can:
- Revoke access
- Resend invites using the same customizable template
- Perform bulk actions (edit permissions, revoke access) through the Manage Users panel.
Send a Test Email
You can send a test email before sending Space invitations to verify that the email content, formatting, and tokens appear correctly.
To send a test email:
- In the Invite to Spaces panel, customize the invitation email as needed.
- In the Invite Message section, click Send Test Email.
- The logged-in user's email address is pre-populated by default. You can change it to any internal user's email address.
- Click Send Test Email. A test email is sent to the specified address.
For bulk invites, select a company or relationship to preview how tokens resolve in the email. This does not send an actual invitation or grant access to the selected company.
Resend an Invitation
You can resend invitations from the Invite to Spaces page. This is useful when users have missed or not acted on the initial email.
To resend an invite:
- Navigate to your company’s shared space.
- From the upper-right corner, click Invite. The Invite to Spaces slide-out panel appears.
Note: You can filter, search, and scroll through users in the Invite to Spaces panel. The available actions vary based on each user's status. - In the Invite to Spaces panel, search for the user by name or use filters to narrow the results.
- Next to the user’s name, click the three-dots horizontal menu and select Resend Invite. A confirmation window appears.

-
Review or update the permissions, then click Resend to send a new invitation email.

User Statuses in Invite Grid
The following table explains the different statuses visible in the Invite grid and which actions are available for each.
| Status | Description | Available Actions |
|---|---|---|
| Pending | User invited but has not yet accepted | Resend Invite, Revoke Access |
| Accepted | User has accepted the invitation | Resend Invite, Revoke Access |
| Revoked | User access was manually revoked | Resend Invite |
Bulk User Invitation
The bulk invitation feature enables administrators to efficiently onboard multiple users to a space. Accessible from the Spaces Configuration page from Manage Spaces Users, this feature opens a side panel for uploading a CSV file.
The CSV should contain the following fields:
- Entity Type: either company or relationship
- GSID: the unique identifier for the entity
- Email: address of the user being invited
- Permission Type: choose collaborate only or collaborate and invite
A sample CSV template is available and includes placeholder data, which should be replaced with the actual invitee information.
Processing varies by file size:
- Less than 20 records: Invitations are processed immediately (synchronously).
- More than 20 records: Handled in the background (asynchronously) and may take additional time. Confirmation is sent using email once completed.
Admins can monitor invitation outcomes under Invitation History, which shows:
- Success: All records processed successfully.
- Failure: All records failed.
- Partial Success: Some records succeeded, some failed.
- In Progress: Processing is ongoing.
Detailed logs are available for download, allowing admins to review and correct errors. The maximum number of records per upload is currently set at 500.
Each successfully invited user receives a customizable email. Templates support token insertion (example: company name), and further enhancements to email content customization are in development.
Spaces invitations can also be sent in bulk through Group Send or automated through Journey Orchestrator. For more information, refer to the Program Elements article.
Perform Bulk Actions on Invited Users
CSMs can perform bulk resend and bulk revoke actions on eligible users from the Invite grid.
Limitations
- Bulk actions are only available for users with Pending or Accepted status.
- If all selected users are Revoked, no bulk actions are available.

Additional Resources
| Net Promoter®, NPS®, NPS Prism®, and the NPS-related emoticons are registered trademarks of Bain & Company, Inc., NICE Systems, Inc., and Fred Reichheld. Net Promoter ScoreSM and Net Promoter SystemSM are service marks of Bain & Company, Inc., NICE Systems, Inc., and Fred Reichheld. |