Configure Spaces Layouts
This article helps admins create, configure, manage, and publish Spaces layouts. It also covers general settings, branding, and other layout-related configurations.
Overview
As an admin, you can create and manage different Spaces layouts for various teams, projects, or customer accounts. To begin, navigate to Administration > Spaces Configuration.

Create a New Layout
To create and publish a new Spaces layout:
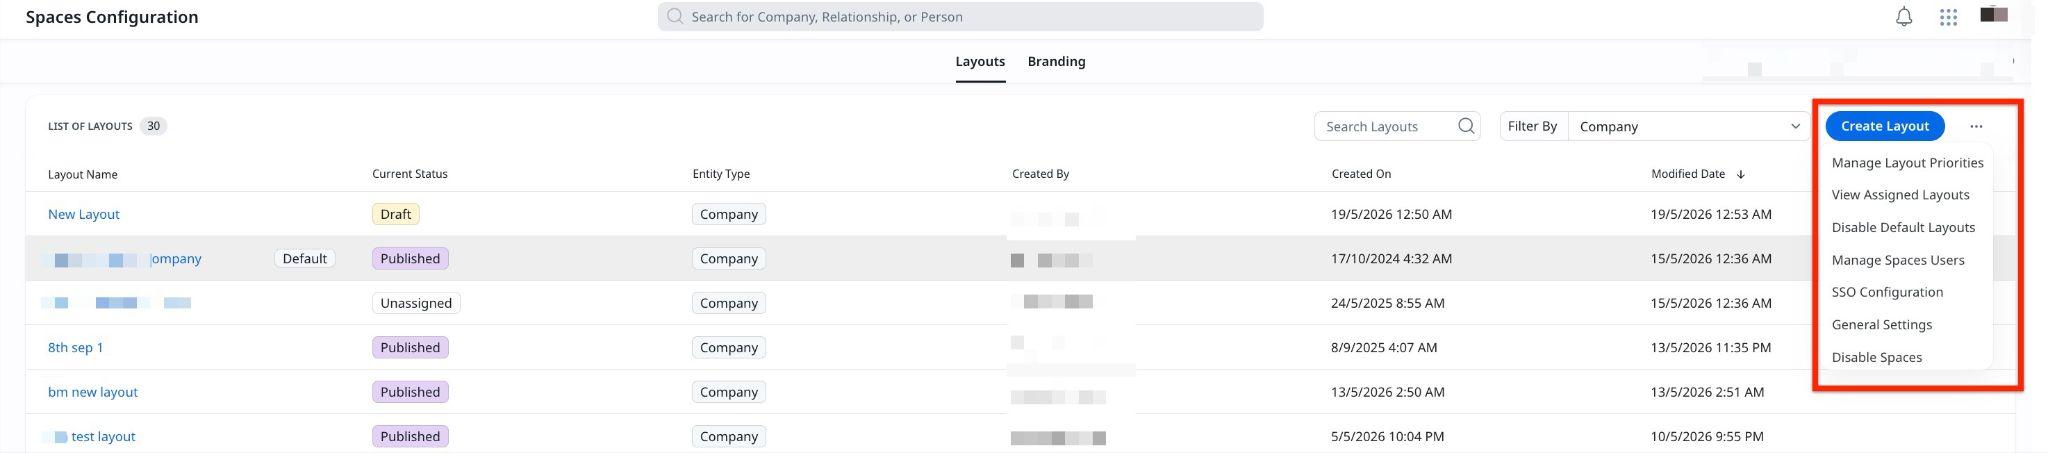
- Navigate to Administration > Spaces Configuration. The Spaces Configuration page opens in the Layouts tab, displaying the list of existing layouts.
Note: The page also includes a Branding tab where you can customize the appearance of your Spaces instance. - Click Create Layout. The New Layout page appears.
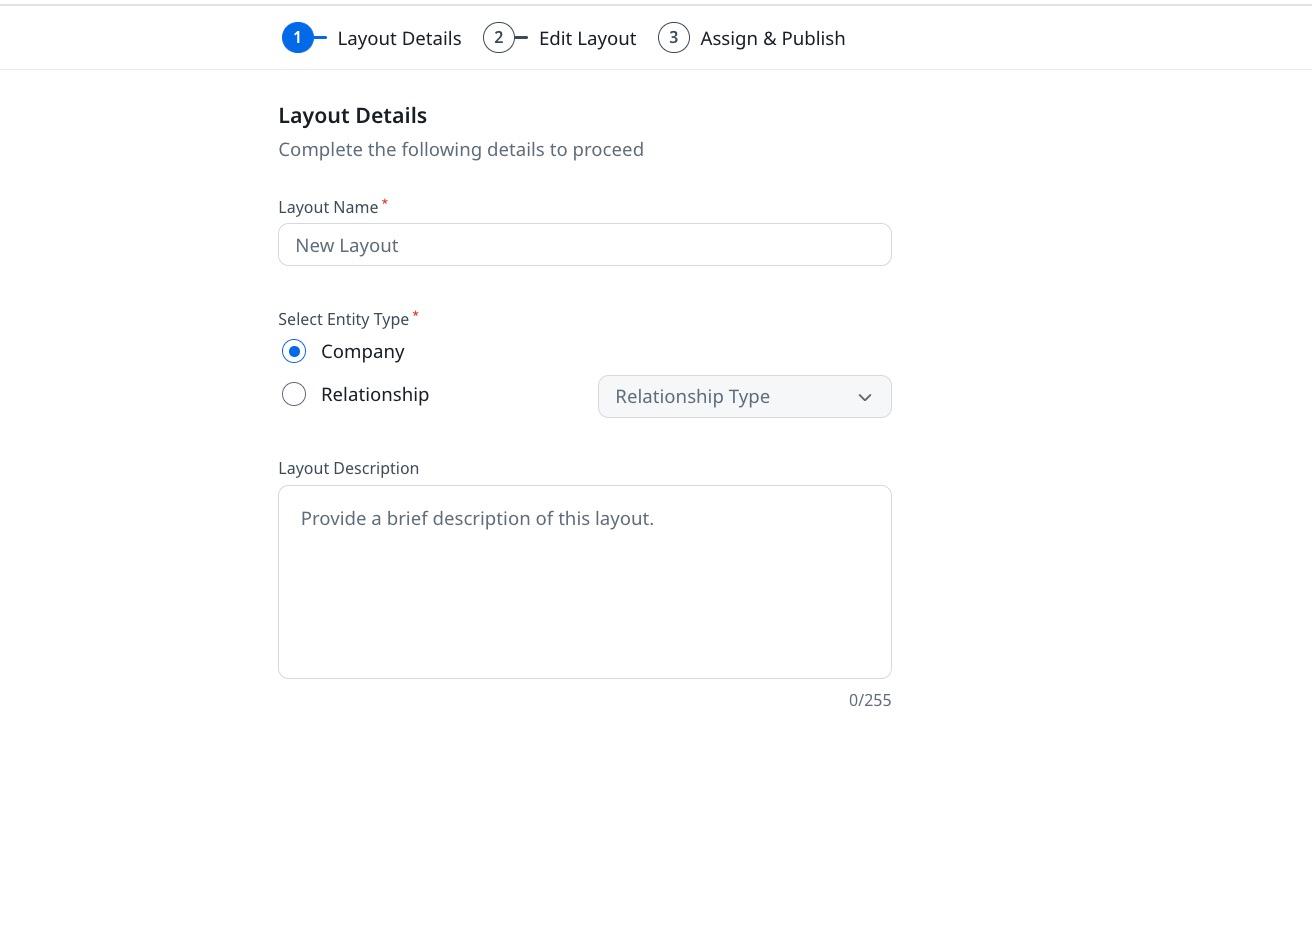
- In the Layout Details section, enter the following information:
- Layout Name: Enter a name for the layout.
- Select Entity Type: Choose either the Company or the Relationship. If you choose Relationship, select the Relation Type from the dropdown menu.
- Layout Description (Optional): Enter a description for the layout.
- Click Next. The Edit Layout tab appears with a canvas where you can configure the widgets placed in the summary layout.

- From the widgets pane on the left, drag the desired widgets, such as the Summary Ribbon or Spaces Notes, onto the canvas.
- (Optional) In the top-right corner, enable the Allow Add Person toggle to allow CSMs to invite a new person whose person record does not already exist. By default, this option is turned off for admins.

- Click Preview Layout to review how the layout appears to CSMs.
- Click Next. The Assign & Publish tab appears with the Assign Layout Criteria section.
- In the Assign Layout Criteria section, select the criteria based on which the layout is assigned to companies that meet those conditions. For more information, refer to the Understand Layout Assignment Criteria section.
- Click Publish. A confirmation message appears.
- Click Yes, Publish to publish the layout. The layout becomes available for CSMs to use.
Understand Layout Assignment Criteria
Layout assignment criteria allow admins to control which layout is displayed for a specific company or relationship. Each layout includes conditions built from four components.

The following table describes each component of the assignment criteria:
| Component | Description |
|---|---|
| Object | The data source, either Company or Relationship. |
| Field | A specific attribute in the object, for example: Status, ARR, or Name. |
| Operator | The rule used for matching, for example: equals, greater than, or starts with. |
| Value | The target value to match, for example: Active, 100K, or Salesforce. |
The system evaluates whether a company or relationship meets the defined criteria. If multiple layouts match, layout priority determines which one is shown. If no layout matches, the default layout is used.
- Layout assignment criteria are case-sensitive. For example, a name starting with Salesforce does not match salesforce. If the case does not match, the system uses the default layout instead.
- Adjust layout priorities under Manage Layout Priorities to control which matching layout takes precedence.
Manage the Default Layout
When you first enable Spaces, a default layout is automatically provided as a starting point. By design, this layout includes only the Layout Details and Edit Layout options. The Assign and Publish option, used to define and apply assignment criteria, is not available in the default layout.
- Each entity type, such as Company or Relationship, can have only one default layout at any time.
- Default layouts are listed out of the box when you first enter the Spaces Configurations page.
- The default layout is marked with a Default label to clearly indicate its status as the system-provided layout.
Set or Change the Default Layout
You can create a new layout and assign it as the default layout at any time. Only users with the layout editing permission can assign or change a default layout.
Note: This permission is not restricted by user role, such as CSM or admin. Instead, it depends on whether the user's permission bundle includes the ability to edit layouts.
- Navigate to Administration > Spaces Configuration. The Spaces Configuration page opens in the Layouts tab.
- On any published layout, click the three-dots vertical menu and select Set as Default Layout.
Note: Setting a layout as the default ensures that all companies use this layout when no other layout is assigned. - In the confirmation message dialog box, click Set as Default Layout to confirm. The new layout is set as the default.

The following behaviors occur when a layout is set as or removed from default:
| Action | Behavior |
|---|---|
| Layout set as default | Loses any assignment criteria. Cannot be deleted while it holds default status. Applied universally across the entity type. |
| Default layout demoted | Regains assignment criteria settings. Can be assigned based on specific rules. The previously default layout is automatically replaced. The layout name might still reference Default unless you rename it, but its functional behavior changes once demoted. |
Business Use Case Example
- Ideal for scenarios where assigning layouts individually to each company or relationship is impractical. For example, managing 300 companies with just 10 CSMs. Criteria-based assignment ensures consistency and CSMs efficiency in focusing on customer engagement.
- Acts as a baseline layout when no specific layout is assigned.
Manage Layout Assignment Priority
When multiple layouts meet the assignment criteria for the same company, you can control which layout is applied by managing assignment priority.
To manage layout assignment priority:
- On the Spaces Layouts page, next to the Create Layout button, click the three-horizontal dots menu.
- Select Manage Layout Priorities. The Manage Assignments dialog box appears.
- In the layouts list, reorder the layouts by dragging them to set priority order.
The layout that comes first in the list and meets the criteria is applied. You can change the order at any time, and the new order takes effect immediately.
Business Use Case Example: Gainsight CS checks which layout to assign to a company named Albatross. If two layouts meet the criteria, you use Manage Assignments to set their priority. The layout that comes first in the list and meets the criteria is applied. You can change the order anytime, and the new order takes effect right away.

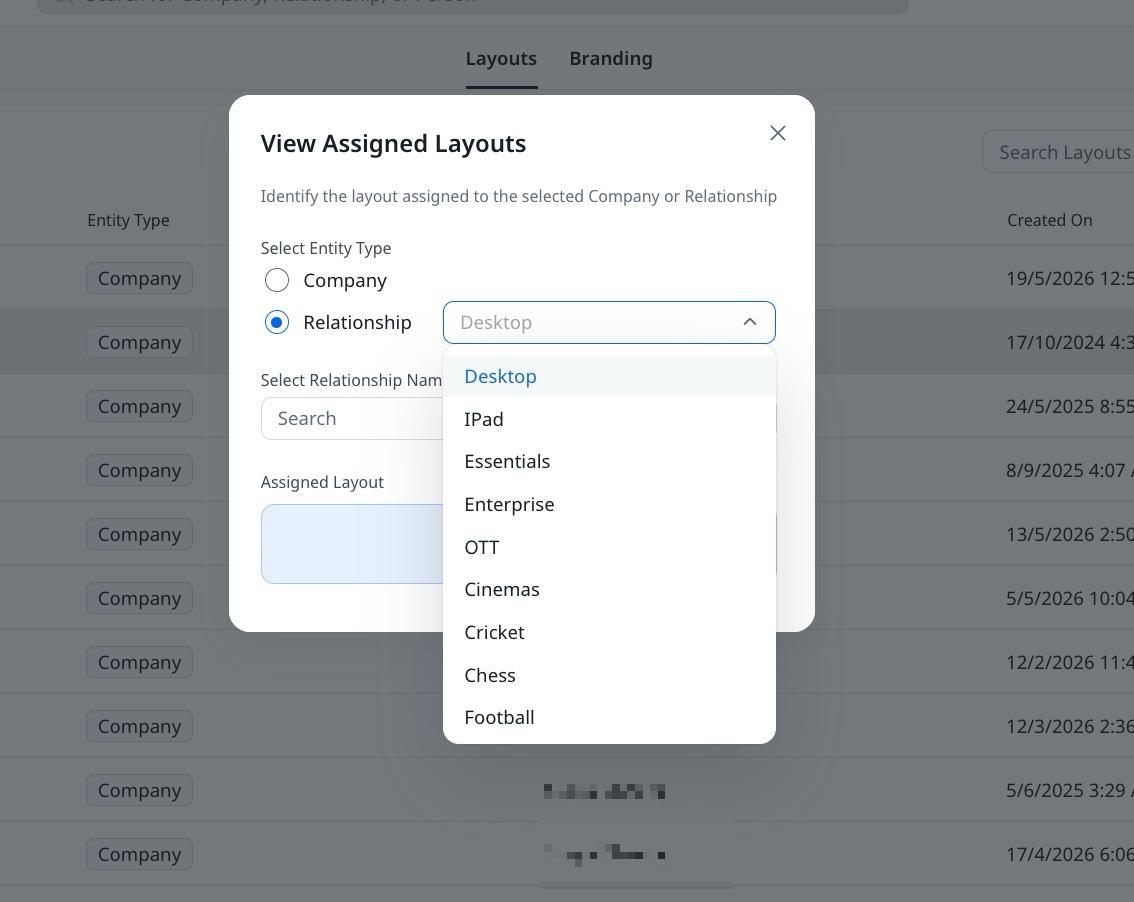
View Assigned Layouts
Use View Assigned Layouts to identify the layout assigned to a specific company or relationship.
To view which companies or relationships are assigned to a specific layout:
- Navigate to Administration > Spaces Configuration. The Spaces Configuration page opens in the Layouts tab.
- Click the three-horizontal dots menu in the top-right corner.
- Select View Assigned Layouts. The View Assigned Layouts dialog box appears.
- Select the Entity Type, either Company or Relationship. If you select Relationship, choose the Relationship Type from the dropdown menu.
- In the Select Company Name field, search for and select the company. The assigned layout appears in the Assigned Layout field.
Disable Default Layout
Turning off the default layout removes it for the company and all relationship types. You may need to assign specific layouts, otherwise, no layout is available.
To turn off the default layout:
- Navigate to Administration > Spaces Configuration. The Spaces Configuration page opens in the Layouts tab.
- Click the three-horizontal dots menu in the top-right corner.
- Select Disable Default Layouts. A confirmation dialog box appears.
- Click Disable Default Layouts to confirm. The default layout is removed for the company and all relationship types.
Manage Spaces Users
You can manage all users invited to Spaces, update permissions, and track invitation history from a centralized view. For more information, refer to the Manage Spaces Users and Invitations article.
General Settings
General Settings allow you to configure default permissions and restrictions for your Spaces instance.
To access General Settings:
- Navigate to Administration > Spaces Configuration. The Spaces Configuration page opens in the Layouts tab.
- Click the three-horizontal dots menu in the top-right corner.
- Select General Settings. The General Settings page appears.

Attachments
The Attachments settings allow you to define default end-user permissions for file sharing across all Spaces. Under Attachment Settings, configure the following:
End-User Permissions
Control how end users can work with attachments by selecting one of the following options:
| Option | Description |
|---|---|
| View Only | End users can view attachments only. |
| View & Manage | End users can view, add, edit, or delete their own attachments. |
Collaborator Permissions
- Select Allow collaborators to change end-user attachment permissions to let CSMs override the default end-user permissions set here.
SSO Configuration
SSO Configuration allows you to set up single sign-on for your Spaces instance by accessing the linked community instance. When you select SSO Configuration, you are redirected to the community instance login page to complete the setup.
To access SSO Configuration:
- Navigate to Administration > Spaces Configuration. The Spaces Configuration page opens in the Layouts tab.
- Click the three-horizontal dots menu in the top-right corner.
- Select SSO Configuration. The community instance login page appears.
- Enter your Email / Username and Password.
- Click Log in. You are redirected to the community instance where you can configure SSO settings.
Disable Spaces
Disable Spaces makes it unavailable for all users but does not unassign layouts from companies or relationships.
To turn off Spaces:
- Navigate to Administration > Spaces Configuration. The Spaces Configuration page opens in the Layouts tab.
- Click the three-horizontal dots menu in the top-right corner.
- Select Disable Spaces. A confirmation dialog box appears.
- Click Disable to confirm. Spaces is turned off and become unavailable, but existing layout assignments for companies and relationships are retained.
Note: To re-enable Spaces, navigate to Administration > Spaces Configuration and click Enable Spaces.
Branding
The Branding tab allows you to customize the appearance of your Spaces instance to align with your organization's brand identity.
If a specific layout instance is associated with Community, branding is managed through Spaces within Community. If the layout operates as a standalone instance, you can customize its appearance from the Branding tab.
To configure branding:
- Navigate to Administration > Spaces Configuration. The Spaces Configuration page opens in the Layouts tab.
- Click the Branding tab. The Branding configuration page appears with Colors and Font tabs.
- Under the Colors tab, configure the following options:
| Option | Description |
|---|---|
| Primary color | Define the brand color for the most common interaction elements and visual cues such as buttons, URLs, and labels. |
| Heading color | Define the heading color for headers and titles. |
| Text color | Define the text color for paragraphs. |
| Metadata color | Define the metadata color for topic information and post actions. |
| Placeholder color | Define the placeholder color for input field placeholders. |
- Click the Font tab and select the preferred font for headers, titles, and body from the dropdown list.

- Click Apply. The branding settings are applied to your Spaces instance.
Note: Click Reset to revert to the default branding settings, or Discard to cancel unsaved changes.
Next, read: Spaces Widgets Configuration