Create Customer Goals
Gainsight NXT
This article helps CSMs create goals and associate CTAs and Success Plans to Customer Goals.
Overview
Customer Goals help Customer Success Managers (CSMs) capture, track, and manage their customers' objectives in C360 and R360. These goals enable you to align business strategies with customer needs, ensuring a structured approach to success planning.
How Customer Goals help CSMs
Customer Goals enable you to track customer commitments, improve collaboration, and make data-driven decisions to drive customer success.
- Document and track customer commitments to ensure accountability.
- Provide a centralized view of customer priorities for better visibility.
- Ensure transparency and foster collaboration across teams to align efforts.
- Enable data-driven decision-making by tracking progress and key metrics.
Customer Goals vs Success Plans
Understanding the differences between Customer Goals and Success Plans is key to effective customer engagement. This section clarifies their unique roles and how they complement each other in helping you achieve customer success more efficiently.
| Category | Customer Goals | Success Plans |
|---|---|---|
|
Purpose |
Capture and track customer’s goals from C360. |
Manage and communicate the progress of key projects like onboarding or risk management |
|
Function |
Uses Cockpit CTAs and Success Plans for planning and prioritization of customer goals.. |
Uses Objective CTAs and associated tasks to manage projects. |
|
Visibility |
Enhances cross-team coordination to meet customer objectives. |
Ensures consistent approach to business scenarios by using admin-created templates. |
|
Integration |
Fully integrated within C360 for a comprehensive customer overview. |
Linked with Objective CTAs for a structured way to manage tasks and objectives within a customer’s Success Plan. |
|
Benefits |
Showcases the business goals that customers achieve using our products and services. |
Fosters transparency and trust by sharing progress with customers.. |
|
Administration |
Focuses on planning and prioritizing goals with customers. |
Standardizes method for addressing and achieving any project by using admin-created templates. |
Create Customer Goals
You can create goals by selecting a goal from the Goals Library and customizing it as per your requirement or create a new custom goal. Once the goals are created, you can associate CTAs and Success Plans to it to track the progress.
Add Goal
The Goals Library provides a collection of standard, pre-configured goals that you can select based on their access and customer relationship. You can either choose from existing goals or create new goals from a pre-populated list. The available options for creating goals include:
Add Goal from Library
Select a pre-defined goal from the Goal Library that aligns with common success objectives.
To add a goal from the library:
- Navigate to C360 > Customer Goals tab.
- Click Add Goal and select Add Goal from Library.
- The library displays Admin-defined goals relevant to your permissions.
Note: The goal list is filtered based on relationship attributes such as account type or ownership. Admin-defined filters ensure you only see goals that apply to the customer relationship you are managing. - Select and edit the goal:
- Type: Choose the appropriate goal type from the dropdown menu.
Note: This field is predefined and non-editable because goal types are auto-assigned based on the selected goal and configured by admins to ensure consistency. - Status: Set the goal’s status such as On Track, Achieved.
- (Optional) Due Date: Specify a target completion date.
- (Optional) Description: Provide a detailed description of the goal.
- Metrics: Select relevant metrics from the Metrics dropdown menu.
Note: The Metrics dropdown menu displays only metrics associated with the selected Goal Type, based on admin configuration. This helps you choose metrics tailored to each goal type. - Associate Work: Link Cockpit CTAs, Success Plans, or tasks to the goal for better tracking and execution.
Note:- The ability to edit goal fields, including whether a field is read-only or editable only during creation, is defined by your admin. To know more about how field behavior is configured, refer to the Configure Customer Goals article.
- If the goal is linked to a Success Plan template by the admin, the template is automatically added when the goal is created. If the associated Success Plan includes a pre-configured template, that template is applied automatically along with the goal, ensuring consistency across accounts. When applying a template that contains multiple CTAs, you can select only the CTAs relevant to your customer.
- If the associated Success Plan includes a pre-configured template, that template is applied automatically along with the goal, ensuring consistency across accounts.
-
Company Details: Verify the company name. This field is auto-populated and cannot be edited.

-
(Optional) Click Add More Details to expand and fill in additional fields like such as company lookup email, company lookup name, CustomUrl, and Lookup Fields for enhanced goal configuration.
Note: If your admin has selected Show All Fields on Goal Creation Page in Attributes & Settings > Other Settings, all configured fields are visible upfront without the need to expand Add More Details.

-
Click Add Goal to save the details.
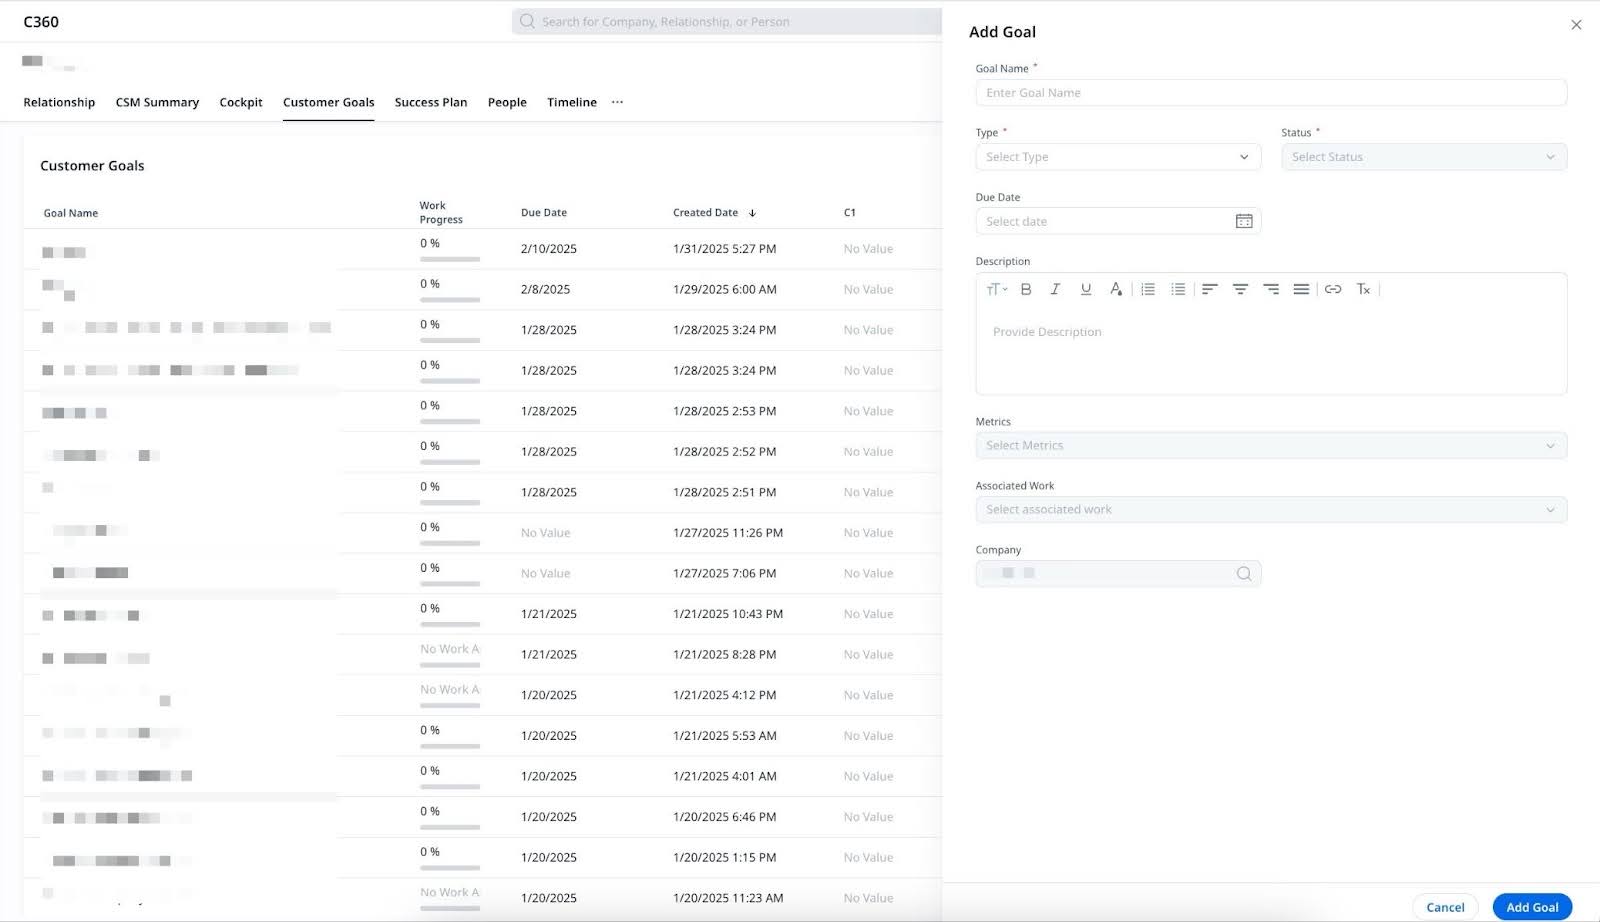
Add Custom Goal
Create a custom goal by entering details that match your specific objectives.
To add custom goals:
- Navigate to C360 > Customer Goals tab.
- Click Add Goal select Add Custom Goal.
- In the slide-out panel, enter the following details:
- Goal Name: Provide a unique name for the goal.
- Type: Select the goal type from the dropdown.
Note: This may be predefined based on admin settings. - Status: Choose the goal status such as On Track, Achieved.
- (Optional) Due Date: Specify a target completion date.
- (Optional) Description: Provide a detailed description of the goal.
- Type: Select the goal type from the dropdown.
-
Choose relevant metrics from the dropdown to track goal performance. (This may be pre-configured by admins.)
- Link associated work, such as Cockpit CTAs, Success Plans, or other tasks, for tracking and execution.
- Verify the Company field, which is auto-populated and not editable.
- Click Add Goal to save the custom goal.
Note: Based on admin settings, metrics and associated work can be defined either at the Goal Type or Goal level. If goal-level configuration is enabled, you can select or customize metrics and associated items while creating or editing a goal.
Track Goal Progress with Metrics
Tracking metrics is crucial for assessing the progress and success of customer goals. You can use metrics to track and manage customer goals effectively.
To view metrics:
-
Navigate to C360 > Customer Goal tab. You see a list of customer goals.

- Select a goal from the list. The goal details page opens.
- Review goal information. You can view details such as:
- Goal Type: Displays the assigned goal category. (Predefined by admins)
- Status: Shows the current goal progress such as On Track.
- Due Date: Displays the goal’s target completion date.
- Description: Editable field to add goal-specific notes.

- In the Metrics section, if no metrics are added, click Add Metrics to select and track key performance indicators for the goal. For more information on adding metrics to a goal, refer to the Add Metrics to a Goal section.
- Under the Associated Work section, you can:
- Click Associate CTA to link an existing Cockpit CTA for tracking.
- Click Create CTA to generate a new CTA directly from the goal details page.
- Switch between CTAs and Success Plans tabs to view linked work.
- Click Activity History to view a log of changes made to the goal.
Add Metrics to a Goal
Select and assign relevant metrics to track goal performance.
To add a metrics to a goal:
- Navigate to C360 > Customer Goals tab. You see a list of customer goals.
- Select a goal from the list. The goal details page opens.
- Click Add Metrics. The Add Metrics window appears.

-
Choose relevant metrics from the list. You can:
- Select individual metrics by checking the boxes.
- Use the Search bar to find specific metrics.
- Click Select All to add all available metrics.

-
Click Add Metrics. The selected metrics are now linked to the goal.
Note: Metrics help track goal performance and may be pre-configured by admins for consistency.
Update Metric Values
Navigate to the Metrics section to view key performance indicators. Update the Baseline, Target, and Actual values to accurately track goal progress. You can enter the following:
- Baseline: The starting value for the metric.
- Target: The desired outcome to be achieved.
- Actual: The current progress made toward the goal.
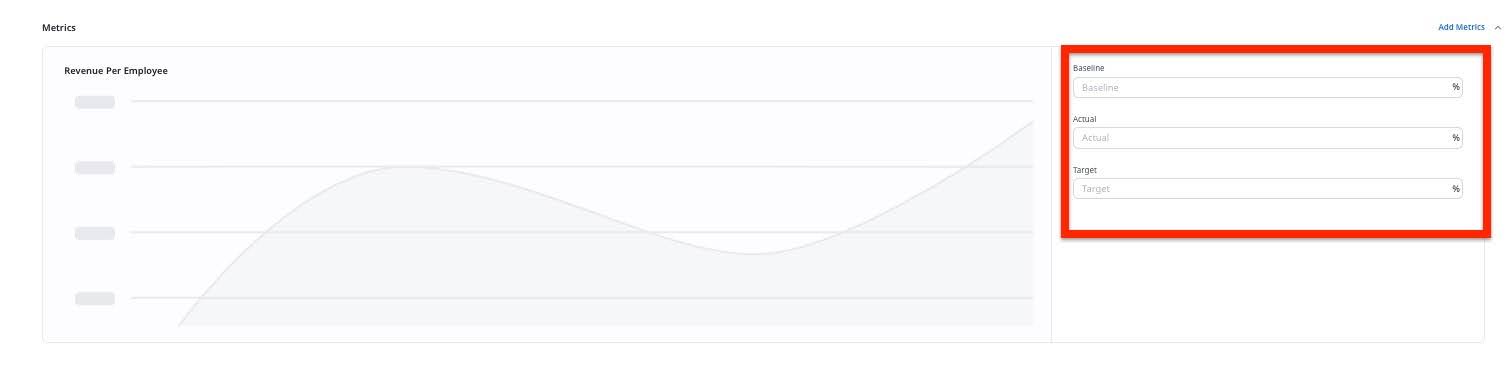
You can share metric progress with customers during meetings using available charts and discussing the status of their goals.
Note
- You can update metrics daily, but only one update per day is saved, regardless of how many updates are made.
- The system saves the latest update.
Detailed View and Metrics
After adding or creating a goal, the new detailed view allows for greater flexibility in managing metrics and tracking goal progress.
Key updates
- Metric Addition and Removal: If a goal contains metrics such as NPS, ARR, you can:
- Add or remove metrics during goal creation from the available list.
- Select from predefined metrics (example: NPS, ARR) available in the dropdown menu.
Note: If a metric is deleted, any associated values are also removed and cannot be restored if the metric is re-added later.
- Daily Metric Updates: When updating metrics multiple times in a day, only the latest update is recorded. Users can track baseline, target, and actual metrics, ensuring up-to-date progress reporting.
Manage Disabled Metrics in Goals
As a CSM, you may encounter situations where a metric previously used to track goals has been disabled by an admin.
How it works:
- Metrics already used in existing goals remain available for those specific goals.
- Disabled metrics cannot be assigned to new goals.
- If the admin re-enables the metric, you have to manually add it to any new goals.
- Deactivated metrics stay visible in historical goals but are unavailable when creating or editing new ones unless re-enabled.
To verify if a metric is available:
- Navigate to Customer Goal > Add Goal > Add Goal from Library.
- Check the list of available metrics when creating a new goal.
- If the metric is missing from the list, it has likely been disabled and cannot be used for new goals.
Verify Metric Availability
To verify metric availability:
- Navigate to Administration > Customer Goal > Goals Library.
- Check the list of metrics available when creating a new goal.
- If the metric is not listed, it is likely disabled and cannot be assigned to new goals.
Associated Work with a Goal
The Associated Work section is divided into two parts: CTAs (Calls to Action) and Success Plans. These allow you to link actionable tasks and strategic plans to a goal, ensuring better tracking and execution.
- CTAs: For more details on associating, creating, updating, and removing CTAs, refer to the CTAs in Customer Goal section.
- Success Plans: For more details on associating, creating, updating, and removing Success Plans, refer to the Success Plans in Customer Goals section.
CTAs in Customer Goal
Associate CTAs with goals to track progress made by teams. You can also manage CTAs directly from the Customer Goals list view page by performing the following actions:
- Associate CTAs: Link existing CTAs to a goal to track progress.
- Create and Associate New CTAs: Create a new CTA and automatically associate it with the goal.
- Update Associated CTAs: Modify details such as status, priority, due date, or owner.
- Remove Associated CTAs: Remove a CTA from the goal if it is no longer relevant.
Associate CTAs
You can associate existing CTAs from Cockpit to track the progress made towards achieving the Goal.
Note: Objective CTAs and Tasks cannot be associated with the Customer Goals directly.
To associate CTAs:
- Navigate to the company’s 360 page by entering the name in the universal search bar.
- Navigate to the Customer Goals tab. You see a list of customer goals.
- Select the Goal from the list view page. Use the search bar to find a specific goal if needed.
- In the detail view page, click CTA under the Associated Work section.
- Click Associate CTAs. A list of available CTAs appears.

- Select the CTAs you want to associate with the goal.
- Click Associate CTAs to save your selection.

Create and Associate New CTAs
You can create a new CTA directly from the goal's detail view page, and it is automatically associated with that goal.
To create and associate a new CTA:
- Navigate to the company’s 360 page by entering the name in the universal search bar.
- Navigate to the Customer Goals tab. You see a list of customer goals.
- Select the Goal from the list view page. Use the search bar to find a specific goal if needed. The new CTA is automatically associated with this goal.
- In the detail view page, click Create CTA under the Associated Work section. The Create CTA window appears.
- Provide the required CTA details. For more information on creating CTAs, refer to the Create Manual Call To Action( CTAs) and Tasks article.
- Click Save. The new CTA is now created and automatically associated with the goal.

Update Associated CTAs
Once the CTAs have been associated, you can edit them from the Customer Goals tab in the company’s 360 page. Changes made to the Status field reflect in the associated goal’s Progress bar.
To update a CTA:
- Navigate to the company’s 360 page by entering the name in the universal search bar.
- Navigate to the Customer Goals tab.
- Select the Goal from the list view page. You can use the search bar to search for the goal.
- In the goal’s detail view page, select the CTA you want to edit.
- In the CTA’s detail view page, click the fields you wish to modify and make the necessary changes.
Remove Associated CTAs
You can remove associated CTAs from the goals. This has no effect on the CTA and remains available on the Cockpit page.
To remove a CTA:
- Navigate to the company’s 360 page by entering the name in the universal search bar.
- Navigate to the Customer Goals tab.
- Select the Goal from the list view page. You can use the search bar to search for the goal.
- In the goal’s detail view page, hover over the CTA you want to remove.
- Click the close icon.
- Select Confirm in the confirmation box.

Success Plan in Customer Goals
Associate Success Plans with goals to track structured initiatives and progress. You can also manage Success Plans directly from the Customer Goals list view page by performing the following actions:
- Associate Success Plans: Link an existing Success Plan to a goal for structured tracking.
- Create and Associate New Success Plans: Create a new Success Plan and automatically associate it with the goal.
- Update Associated Success Plans: Modify details such as status, owner, or due date.
- Remove Associated Success Plans: Remove a Success Plan from the goal if it is no longer relevant.
Associate Success Plans
To associate Success Plans:
- Navigate to the company’s 360 page by entering the name in the universal search bar.
- Navigate to the Customer Goals tab.
- Select the Goal from the list view page. You can use the search bar to search for the goal.
- In the detail view page, click the Success Plans tab under the Associated Work section. The Associate Success Plans window appears.
- Click Associate Success Plan.
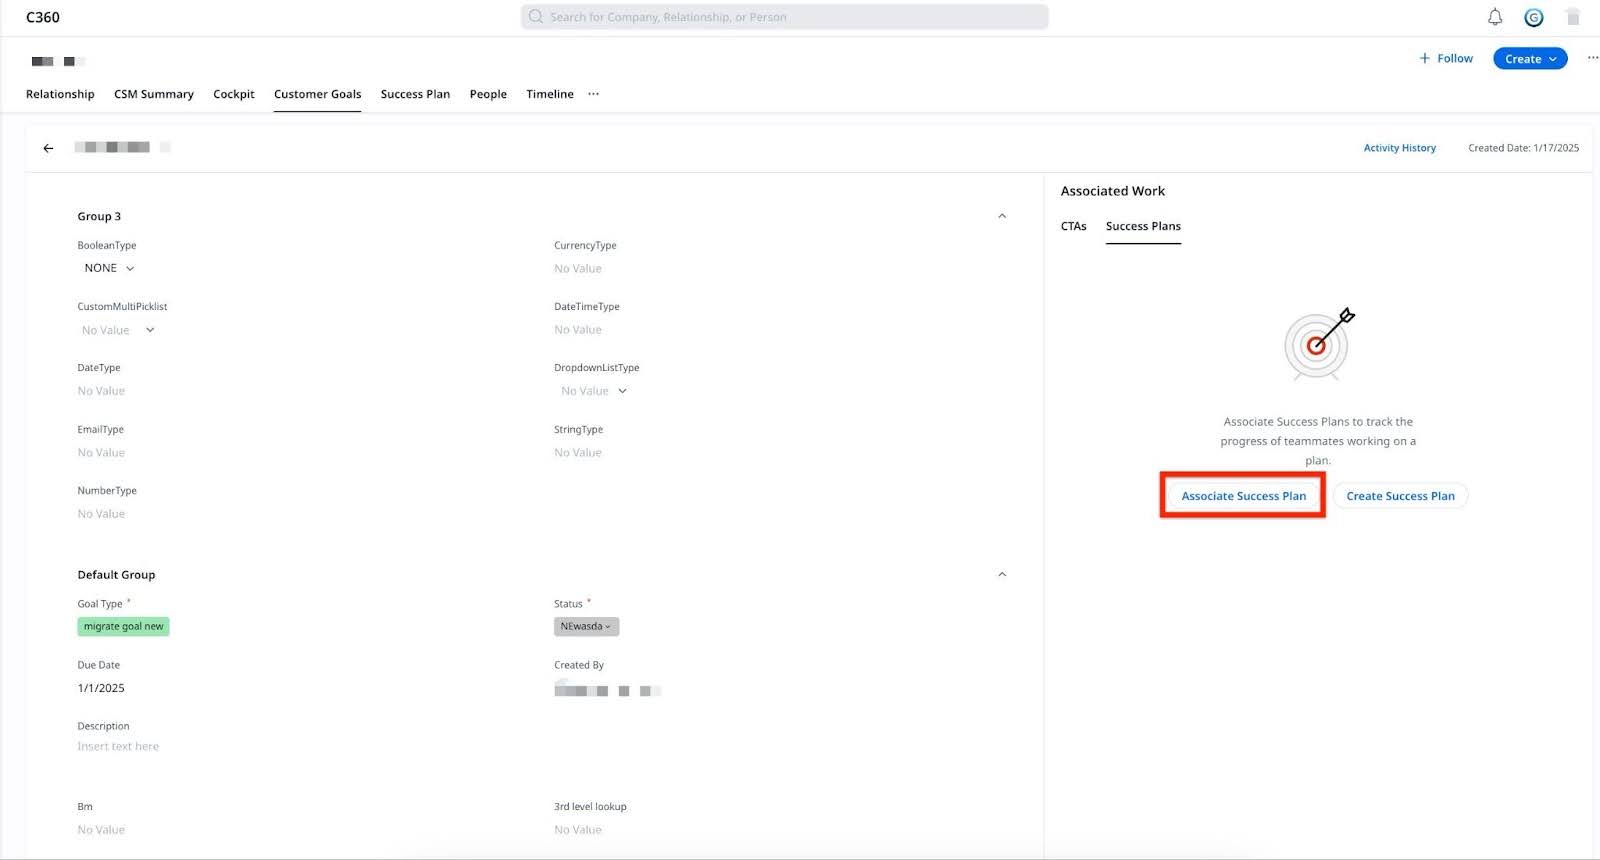
- Select the Success Plan.
- (Optional) Click on the plan to view details.

Note: You can also associate success plans with goals from the Success Plan page, provided this feature has been enabled by your admins. Click Associate Goals on the success plan detail page and select the goals you wish to associate.
Create and Associate New Success Plans
You can create new Success Plans from the detail view page of a Goal. The Success Plans are then automatically associated with the same goal.
To create and associate new Success Plans:
- Navigate to the company’s 360 page by entering the name in the universal search bar.
- Navigate to the Customer Goals tab.
- Select a goal from the list. Use the search bar to find a specific goal if needed.
- In the associated work panel, navigate to Success Plans.
- Click Associate Success Plans.
- From the dropdown menu, select New Success Plan.

- Provide the required Success Plan details. For more information on creating Success Plans, refer to the Create Success Plan article.
- Click Save. The new Success Plan is automatically associated with the goal.
Note: If a Success Plan template is assigned as part of the associated work configuration, it is automatically used when the Success Plan is created from the goal.
Update Associated Success Plans
Once the Success Plans have been associated, you can edit them from the Customer Goals tab in the company’s 360 page. Changes made to the Status field reflect in the associated goal’s Progress bar.
To update a CTA:
- Navigate to the company’s 360 page by entering the name in the universal search bar.
- Navigate to the Customer Goals tab.
- Select the Goal from the list view page. You can use the search bar to search for the goal.
- In the goal’s detail view page, select the Success Plan you want to edit.
- In the plan’s detail view page, click the fields you wish to modify and make the necessary changes.
Remove Associated Success Plans
You can remove associated Success Plans from the goals. This does not have any effect on the Success Plan and remains available on the Success Plan page.
To remove a CTA:
- Navigate to the company’s 360 page by entering the name in the universal search bar.
- Navigate to the Customer Goals tab.
- Select the Goal from the list view page. You can use the search bar to search for the goal.
- In the goal’s detail view page, hover over the CTA you want to remove.
- Click the close icon.
- Select Confirm in the confirmation box.

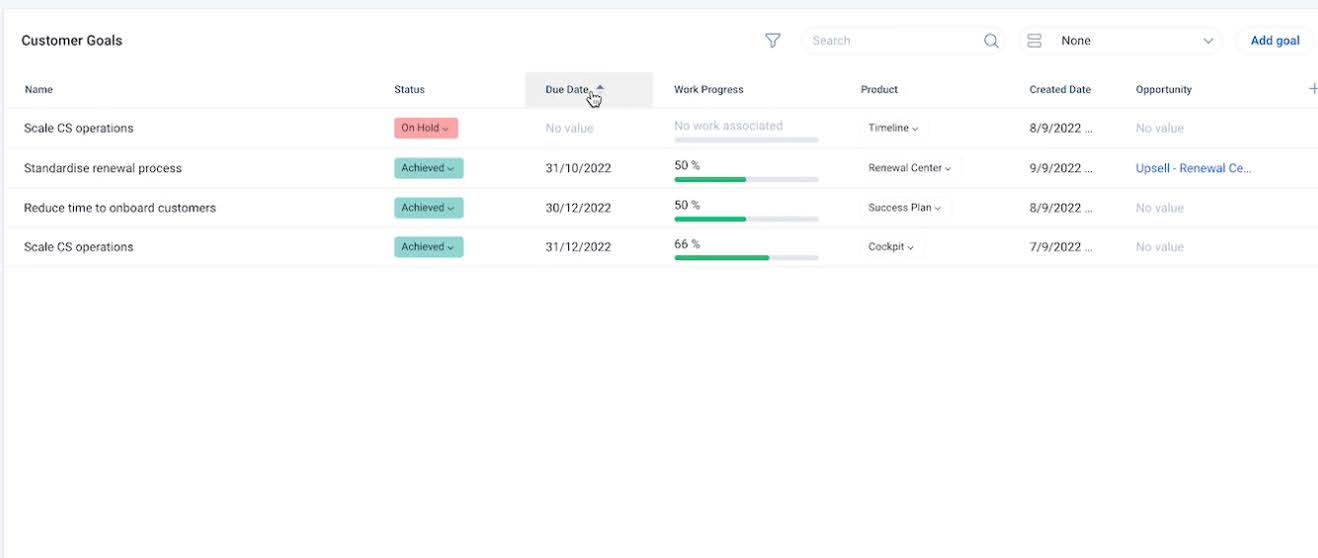
Customer Goals List View
The Customer Goals List View provides a centralized view of all goals, allowing users to track goal details, update information, and customize displayed columns for better visibility.
To navigate the lost view page:
- Navigate to the company’s 360 page by entering the name in the universal search bar.
- Navigate to the Customer Goals tab.
- View the available goal details. The following information is displayed by default:
- Goal Name
- Work Progress
- Due Date
- Created Date
- Goal Type
- Status
- Use the search bar to find a specific goal.
- The following information is available by default on the list-view page:
- Goal Name
- Due Date
- Status
- Work Progress
- The following information is available by default on the list-view page:
- The most recently created goals are displayed at the top on the list view page for easy reference. To remove this section, click Dismiss.

-
Add more columns to display additional information by clicking the plus icon on the list view page.

-
You can update a goal from the list-view page itself by navigating to the goal and double-clicking the respective field.

Note: Goals created on relationship and Opportunity show up in C360 when configured by admin.
Group Goals
You can group goals by any of the attributes (columns) available on the list view page. Select the attribute from the Group dropdown menu.
Note: If you are grouping goals by Due Date in Quarters, you have the option to group the goals either by Calendar or Fiscal year.

Sort Goals
You can use the columns to sort the goals on the list view page. Click the column name to view the sort icons.
Note: Columns that support dropdowns or multi-select dropdowns, do not have the sort option.
Filter Goals
You can filter goals using any of the fields available on the Customer Goals object.
- The Opportunity and Opportunity Stage fields can help you filter goals that are in closed or initial stages.
- The relationship fields help you filter goals based on attributes like account type, ownership. These filters match the configurations applied by admins to tailor your view.
To apply filters:
- Click the filter icon. The Advanced Filters page appears.
- Click Apply Filter > Add Filter.
- From the Field dropdown, select the field you want to filter by.
- From the Operator dropdown, select the operator.
- Select the values.
- (Optional) Click the plus icon to add another filter criteria.
- Define the logic between all the added filter criteria in the Advanced logic field.
- Click Apply.
Delete Goal
To delete a goal, hover on the goal in the list view page and click the delete icon that appears. In the confirmation page, click Confirm.
Note: Deleting a goal does not delete the associated CTAs and Success plans.
Goals Detail View
The detail view helps you view the attributes associated with the goal.
-
From the Goals List View page, select the goal to open it's detail view. You can change the status of the goal and edit other details by clicking on the respective field. The non-editable fields are not clickable.

- The Activity History provides a log of all changes made to the goal.
- The Associated Work sections helps you associate CTAs and Success Plans from the detail view page.
-
You can edit the name of a goal, change the status or edit other details by clicking on the respective field.System fields are not editable and not clickable.
Customer Goals in Salesforce
Salesforce users can create goals, associate CTAs and Success Plans, and update progress using the same procedure as described in the sections above. The Customer Goals tab can be accessed from the Account, and Opportunity pages in Salesforce.
-
Navigate to the company’s Account page and select the Customer Goals tab from the NXT Account Widget.

-
Navigate to the Opportunity page and select the Customer Goals tab from the NXT Opportunity Widget. The customer Goals tab here displays on the goals created on Opportunity.

Create Reports on Customer Goals
Create Reports on Customer Goals Metric Actual Value
Navigate to Analytics > Reports in Gainsight to create reports on Customer Goals. Reports can be created on the following Customer Goals objects:
- Customer Goals
- Customer Goal Template
- Customer Goal Association
For more information on the Customer Goals objects, refer to the Gainsight Object Glossary article.

For more information on how to create and share reports, refer to the Create and Share Reports article.
| Net Promoter®, NPS®, NPS Prism®, and the NPS-related emoticons are registered trademarks of Bain & Company, Inc., NICE Systems, Inc., and Fred Reichheld. Net Promoter ScoreSM and Net Promoter SystemSM are service marks of Bain & Company, Inc., NICE Systems, Inc., and Fred Reichheld. |