Databricks Connector
This article explains to admins how to create a connection from Gainsight to Databricks, create a data job, merge datasets, and transform and configure jobs or Job chains in Gainsight.
Overview
Databricks is a unified data analytics platform offering scalable, collaborative, and integrated solutions for data engineering, data science, machine learning, and analytics.
Integration of Gainsight with Databricks allows you to ingest data into Gainsight standard objects (for instance Company, Person, and so on) and custom objects. Get deep insights from Databricks to understand how customers use your product. Predict churn risks, and personalize outreach for better customer success.
Key Benefits:
-
Improved Data Ingestion: You can now easily bring data from Databricks tables into Gainsight. This lets you connect with multiple warehouses and schemas, and perform transformations and merges between tables in connectors for meaningful data ingestion in Gainsight.
-
Expanded Data Connectivity: With the new Databricks connector, you can utilize Data Designer to blend Databricks tables with other data sources in Gainsight. This integration opens up possibilities for richer insights, which can be leveraged in Reporting, Rules, and Journey Orchestrator (JO).
Limitations:
- The following data types are supported:
- Int
- String
- Boolean
- Double
- Float
- Timestamp
- Date
- Bignit
- Smallint
- Decimal
- Timestamp_NTZ
- Tinyint
- Gainsight recommends to extract only 100 fields per table from Databricks to run a job. For additional fields, create another job to ensure a successful job run.
Note:
- For datetime fields in DataBricks, which are in NTZ format ( No Time Zone), Gainsight considers DateTime in UTC format.
- By default, you can create five connections of Dataricks in your tenant. To create more connections, reach out to Gainsight support.
Fetch Credentials from Databricks
Gainsight provides the OAuth type of authentication and connectivity to integrate Databricks:
- OAuth uses OAuth Client ID and OAuth Client Secret for authentication and Warehouse or Compute for connectivity.
The following table list the different credential requirements for OAuth authorizations:
| OAuth | |
|---|---|
| Warehouse | Compute |
| Database Host | Database Host |
| Warehouse ID | Organization ID |
| N/A | Cluster ID |
| Catalog Name | Catalog Name |
| Schema Name | Schema Name |
| OAuth Client ID | OAuth Client ID |
| OAuth Client Secret | OAuth Client Secret |
| (Optional) SSL Certificate | (Optional) SSL Certificate |
The required credentials can be obtained from Databricks as follows::
- Database Host
- Warehouse ID
- Catalog and Schema Name
- OAuth Client ID and OAuth Client Secret
- Organization ID
- Cluster ID
- SSL Certificate
- mTLS Certificate
Database Host
Database host is the URL of your Databricks account. It is in the following format :
Database Host: <yourDomain>.cloud.databricks.com
Note: For the database host, do not include https://
To obtain the Database Host:
- In Databricks, navigate to SQL Warehouses.
- Click any of the existing warehouses.
- Click Connection details.
- Copy the Server hostname.

Warehouse ID
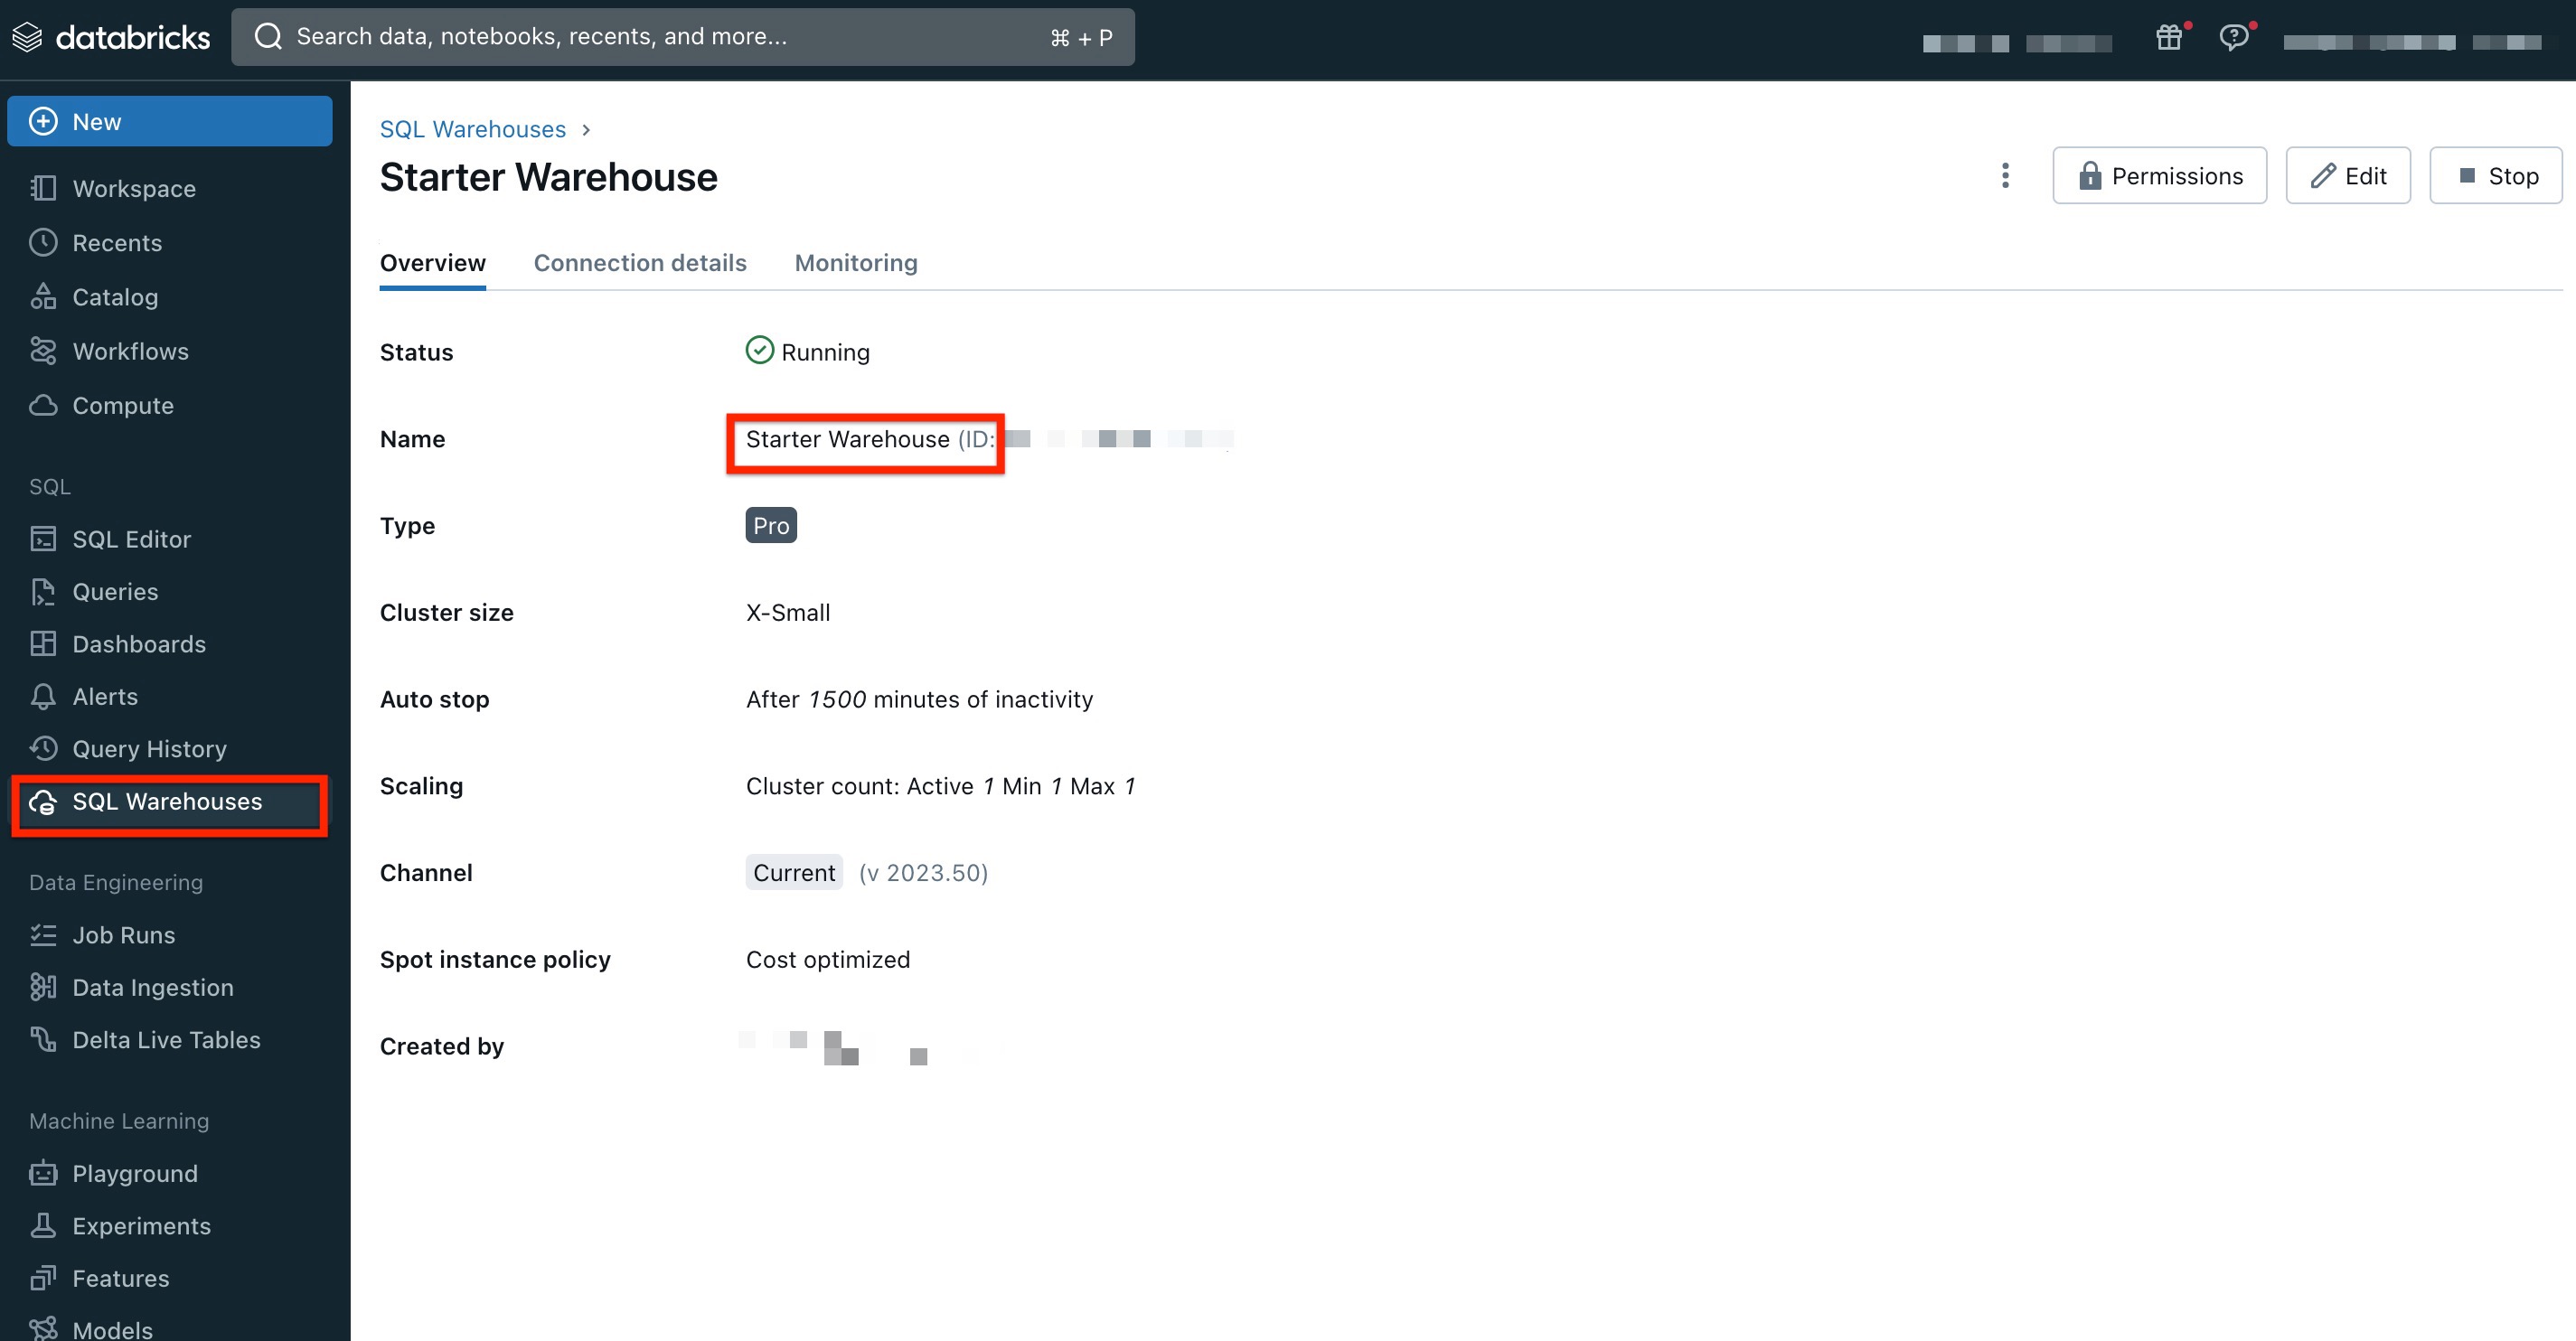
Warehouse ID is a unique identifier assigned to the SQL warehouse within the Databricks environment. When you create a SQL Warehouse in Databricks, the platform automatically assigns it a Warehouse ID.
To obtain the Warehouse ID:
- In Databricks, navigate to SQL Warehouses.
- Click any of the existing warehouses.
- From the Name field, copy the Warehouse ID.
Catalog and Schema Name
Catalog name refers to the name of the catalog you are working within. In Databricks, it acts as a top-level container for metadata, including databases, tables, views, and functions.
Schema name refers to a logical grouping of database objects such as tables, views, and functions.
To obtain the catalog and schema names:
- In Databricks, navigate to SQL Editor.
- Copy the Catalog and Schema name as follows:
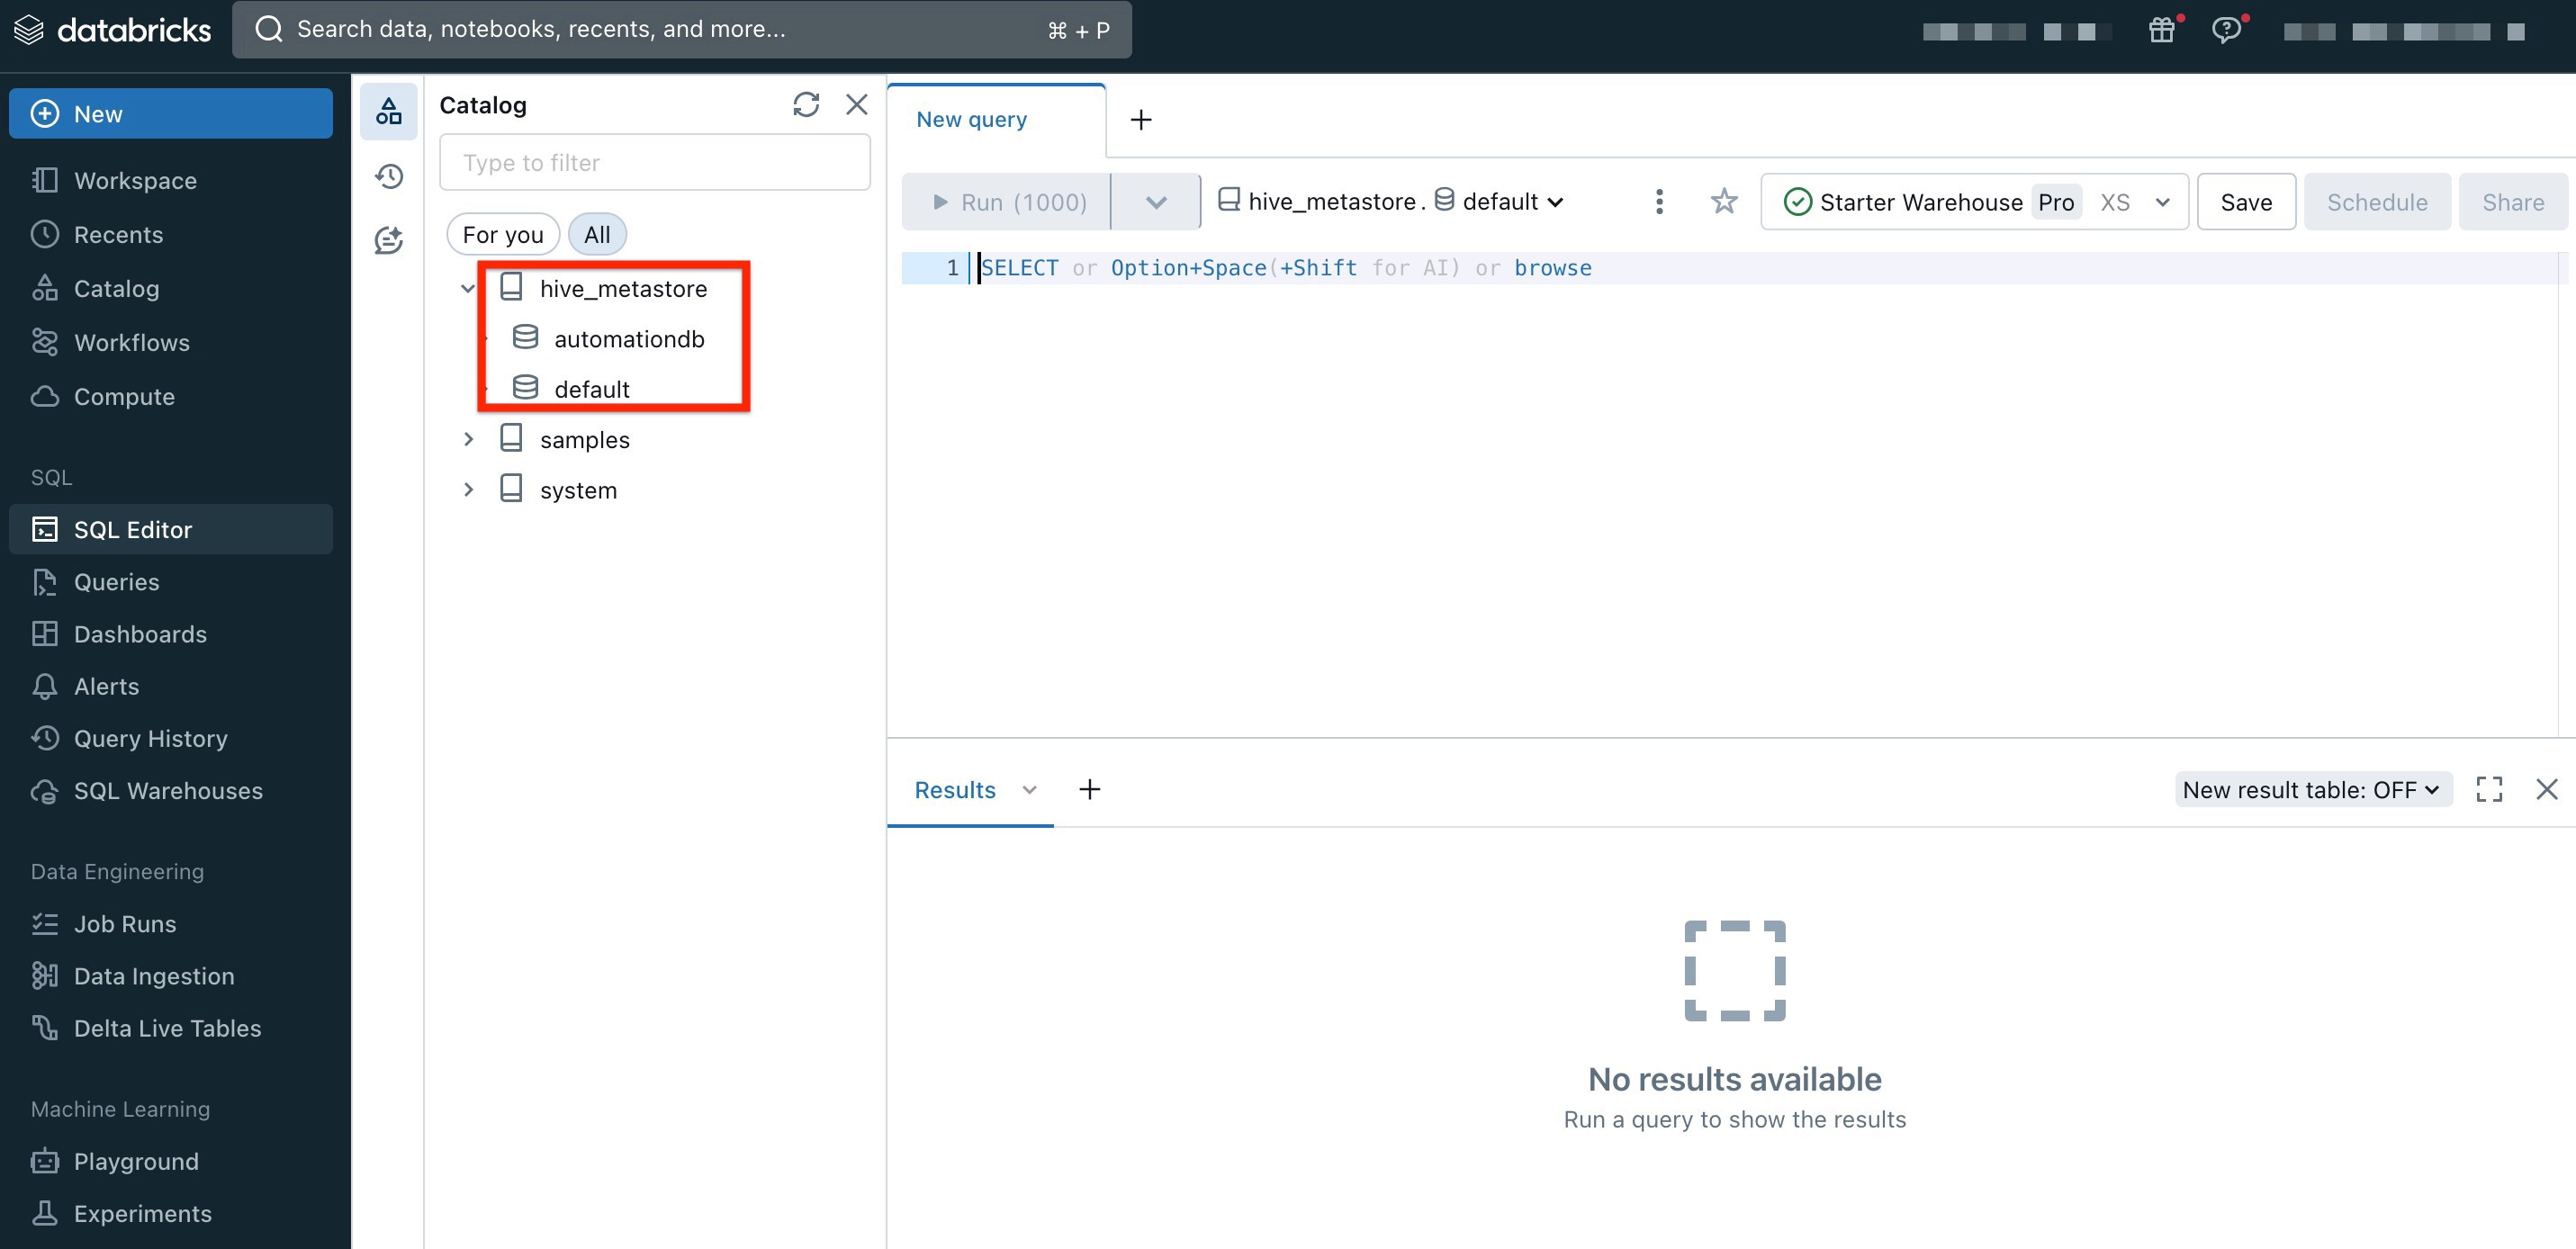
In the above example, the Catalog name is Hive_metastore and the Schema name is automationdb or default.
Note: The data tables that are visible in the Connector jobs in Gainsight CS are the tables that reside inside the catalogs as schemas.
OAuth Client ID and OAuth Client Secret
For OAuth machine-to-machine (M2M) authentication, Oauth Client ID and OAuth Client Secret are required. To obtain the OAuth Client ID and OAuth Client Secret from Databricks, you need to create service principals. A service principal is an identity that you create in Databricks to use with automated tools, jobs, and applications.
For more information on how to create a service principal, refer to the OAuth Machine-to-Machine (M2M) authentication article from Databricks.
Once the service principal is created, navigate to the Workspace Settings > Identity and Access in Databricks.

To obtain the OAuth Client ID and OAuth Client Secret:
- Click Manage next to Service principals.
- Click any existing principal.
- From the Configurations tab, copy the OAuth Client ID also known as Application ID..

- Click the Secrets tab.
- Click Generate Secret. The Generate secret window appears.
- Copy the OAuth Client Secret.

Organization ID
To find your organization ID in Databricks, simply log into your Databricks workspace. Once logged in, you can locate the organization ID by checking the URL in your browser’s address bar. The organization ID is typically a series of numbers at the end of the URL, after the = sign. Copy the organization ID as follows:
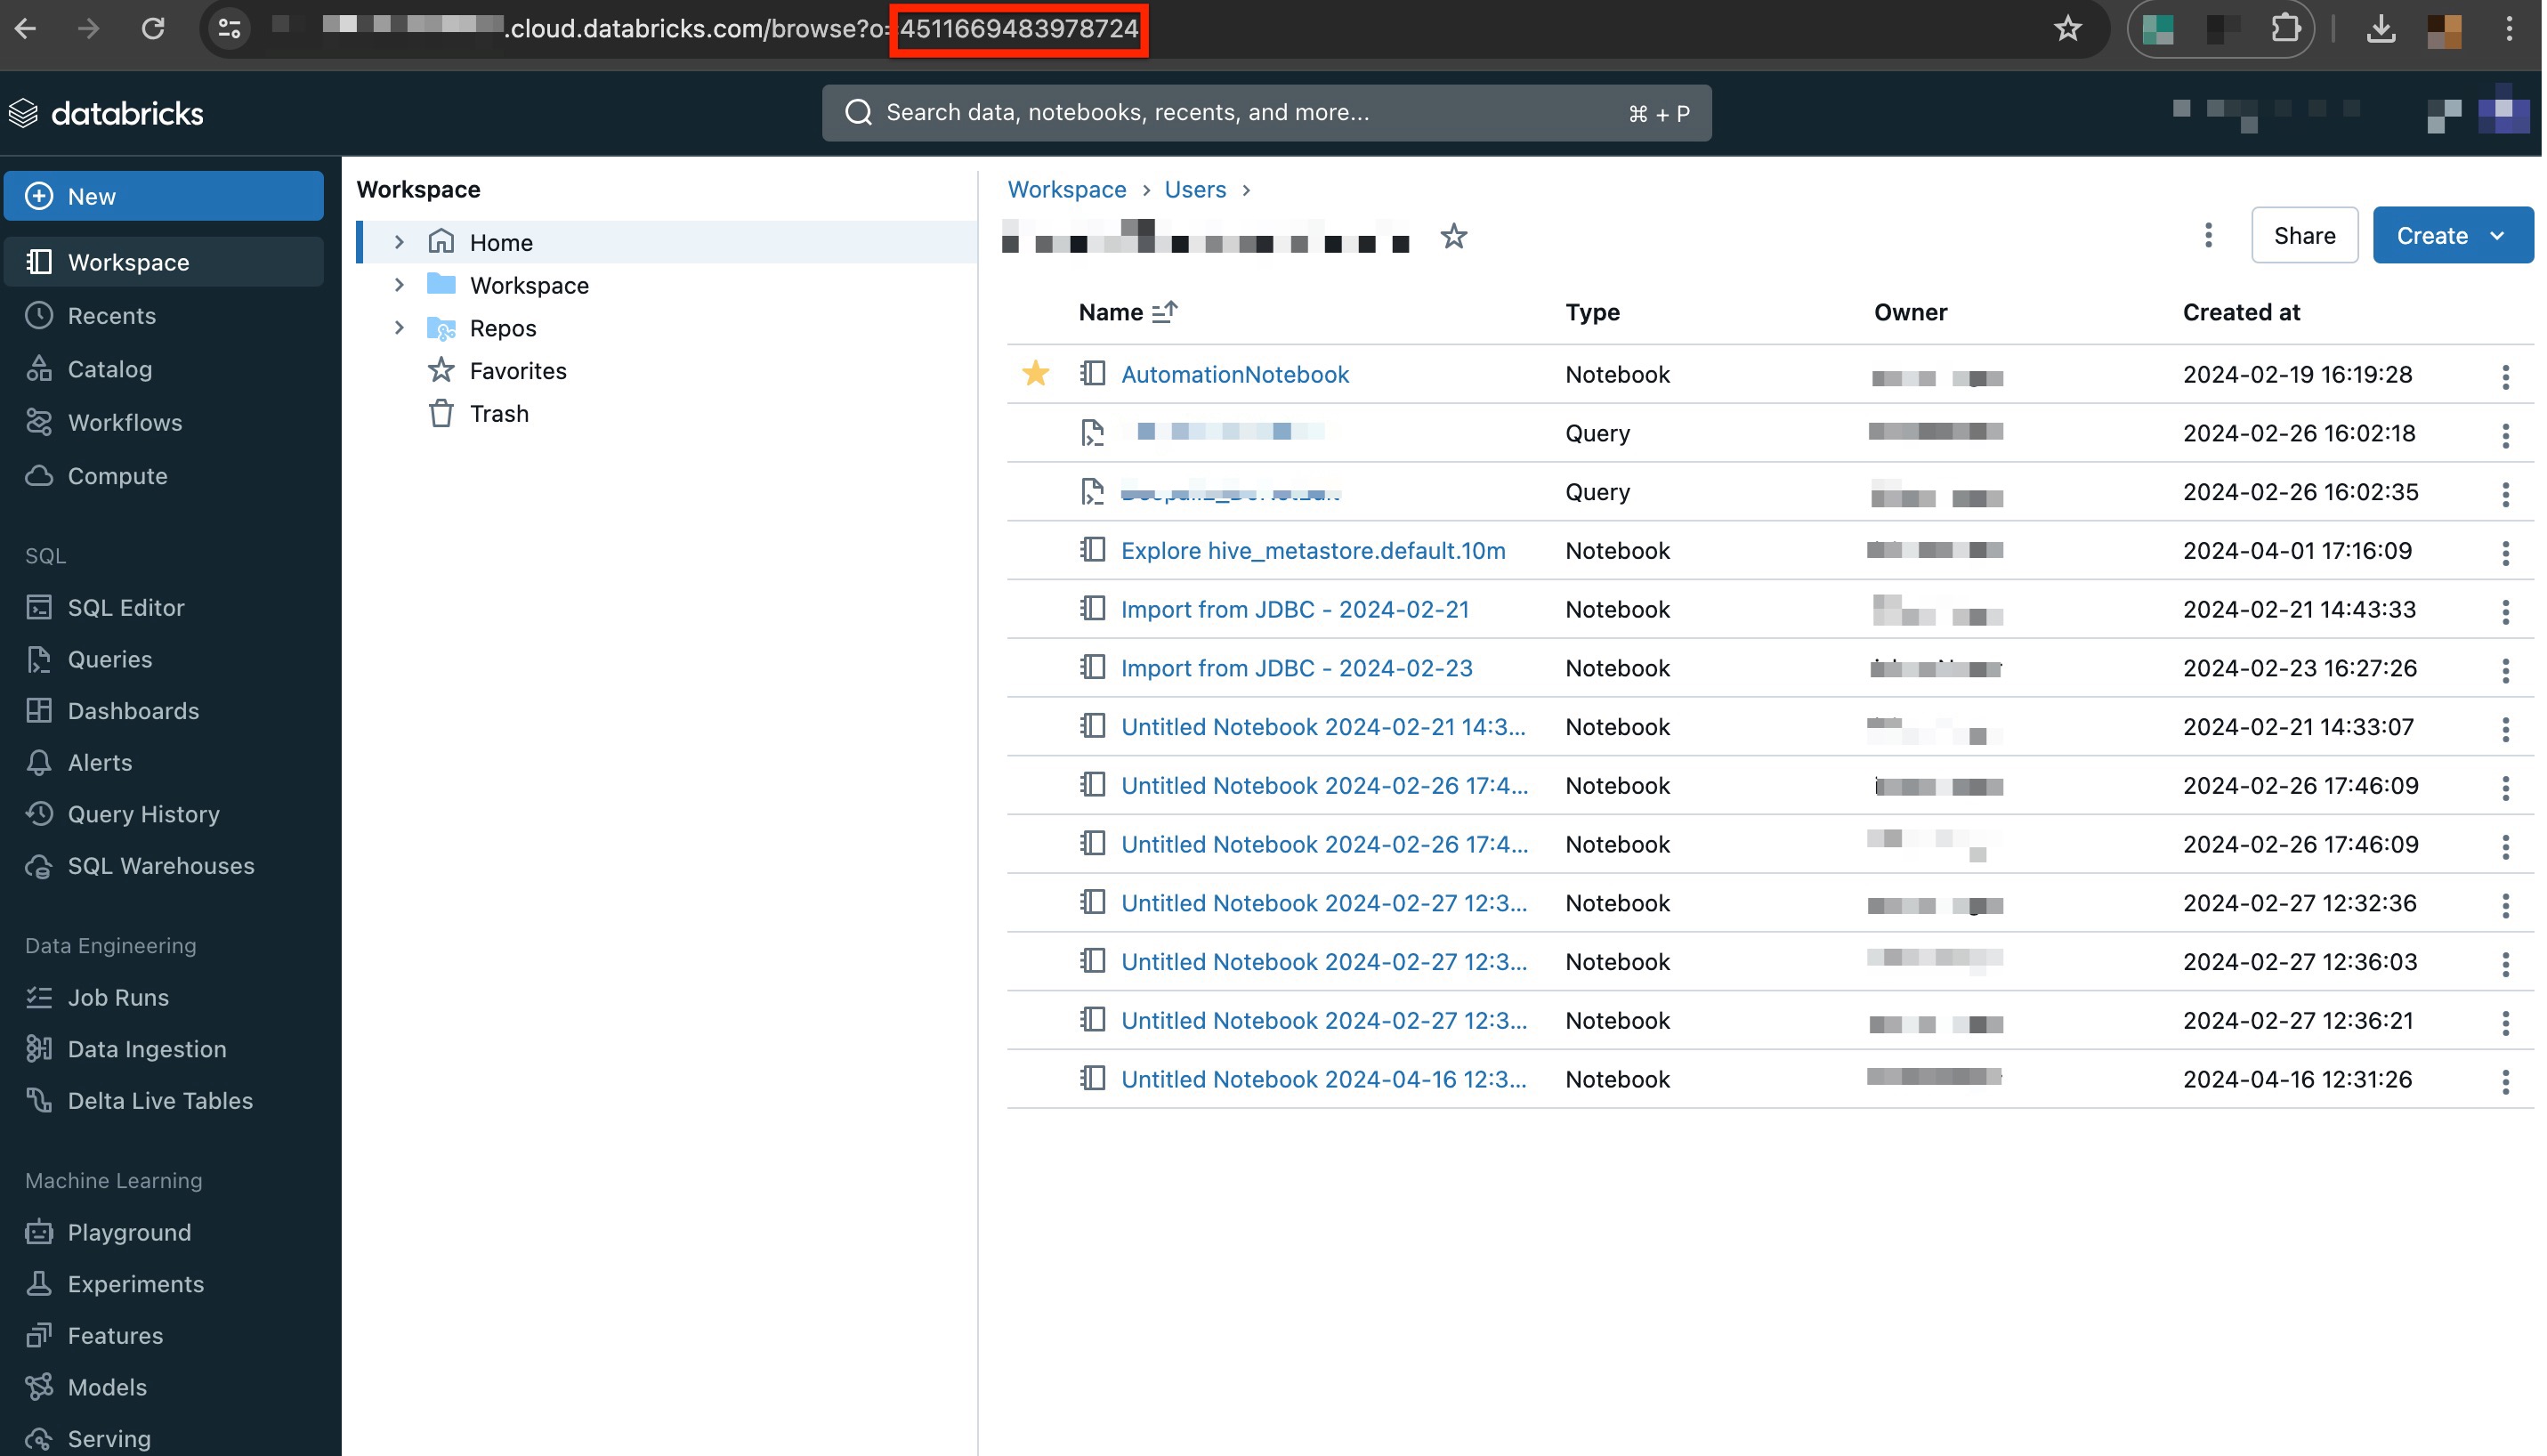
Cluster ID
In Databricks, each cluster is assigned a unique Cluster ID.
To obtain Cluster ID:
- Navigate to the Compute section.
- Click to open any cluster. The Cluster page appears.
- The Cluster ID appears in the browser’s URL field as an alphanumeric series after /cluster/ <cluster id>.

SSL Certificate
To secure your connection in Gainsight, download the SSL Certificate for your Databricks account.
To download the SSL Certiicate:
- Click View Site Information on the address bar.

- Click Connection is secure.
- Click Certificate is valid. The Certificate viewer window appears.
- Click Details tab.
- Click Export to download the SSL certificate.

Alternatively, you may upload your own SSL certificate that has been authenticated on Databricks.
The SSL certificate is in the .CER format.
mTLS Certificate
To secure your connection in Gainsight, download the mTLS Certificate for your Databricks account from the Connectors page.
To download the mTLS Certificate:
- From the Access Key dropdown, select the mTLS certificate.
- Click Download, and the new mTLS certificate is downloaded.

Note
- Gainsight automatically generates a new certificate 30 days before expiry.
- Gainsight sends timely reminders to admins 30 days before the certificate expires, advising them to upload a new certificate to avoid data sync disruptions.
Create a Connection
After obtaining the Databricks credentials, you can create a connection between Gainsight and Databricks.
Note: Gainsight recommends that before attempting to connect, verify that the Databricks Warehouse or Cluster you are connecting to is active and running.
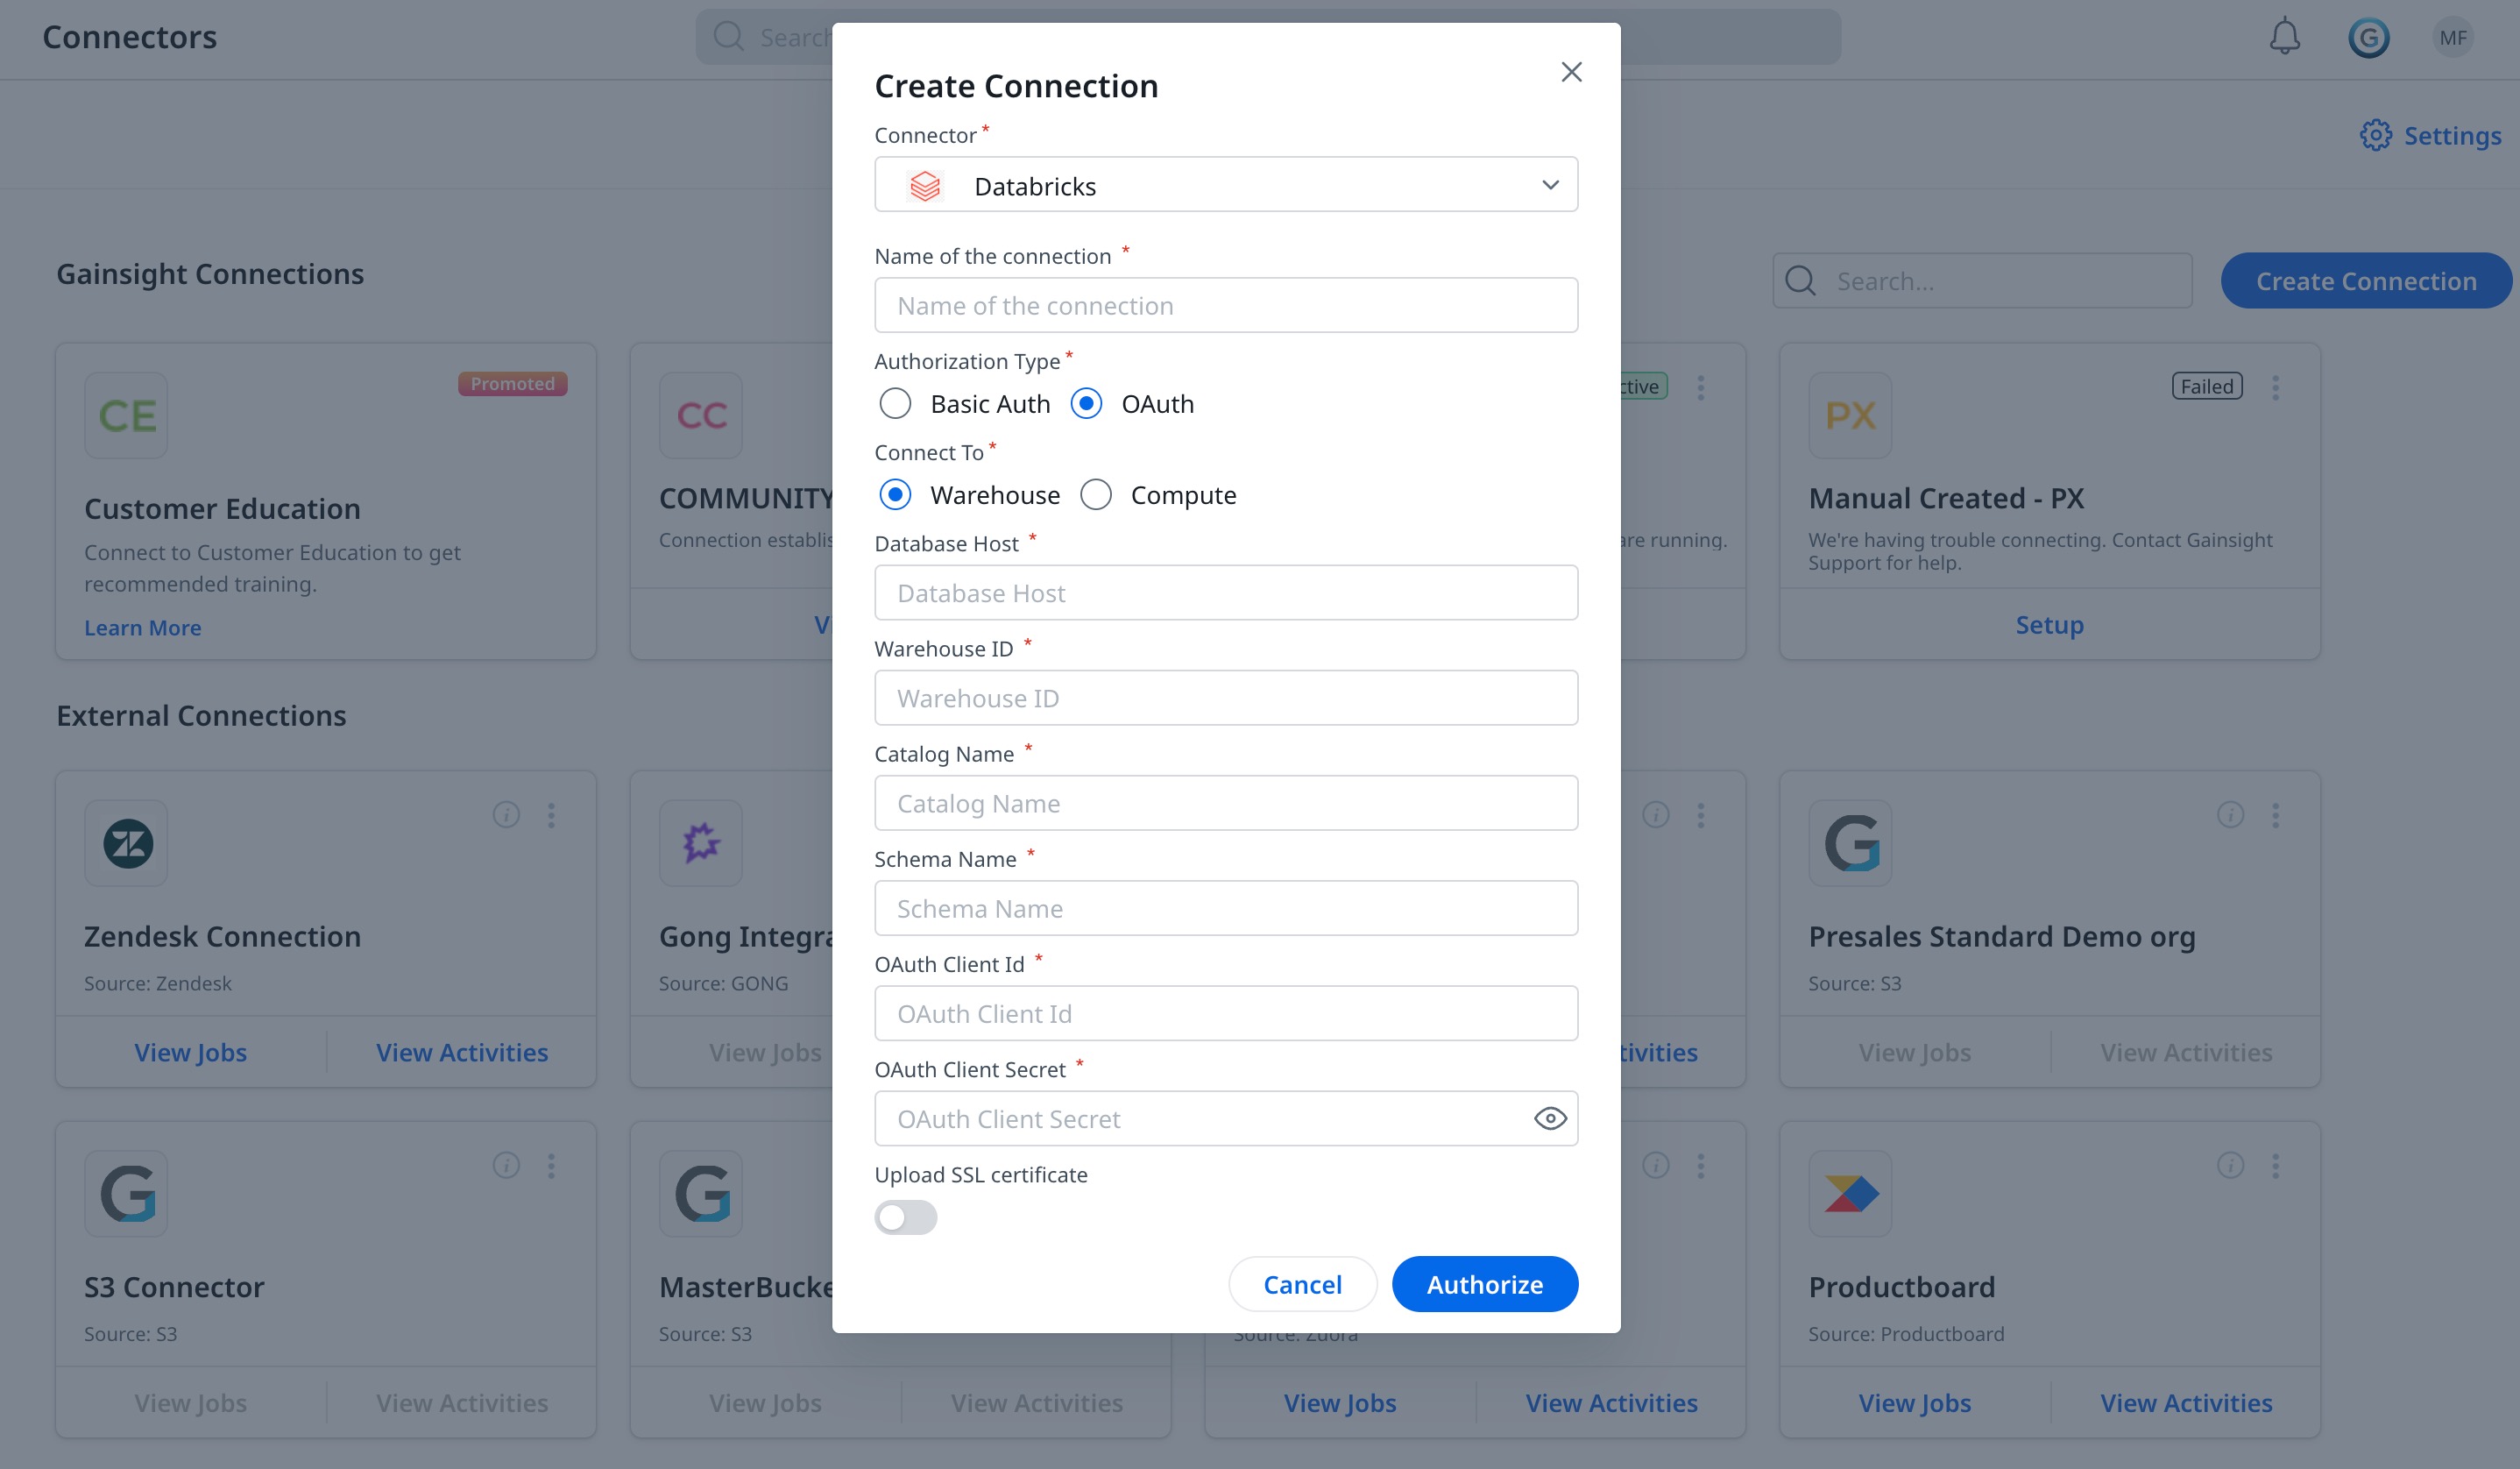
To create a connection:
- Navigate to Administration > Connectors 2.0.
- Click Create Connection. The Create Connection dialog appears.
- From the Connector dropdown, select Databricks.
- In the Name of the connection field, enter a name to identify the connection.
- In the Authorization Type field, select the type of authentication as OAuth.
Note: Gainsight recommends not to use Basic Auth ( username and password) based authentication as Databricks has stopped supporting this authentication mechanism. - In the Connect To field, select the type of connectivity:
- Warehouse
- Compute
- Enter the credentials obtained from Databricks, based on the selected Authorization and Connect To options.
- Click Save.
Context Menu Options
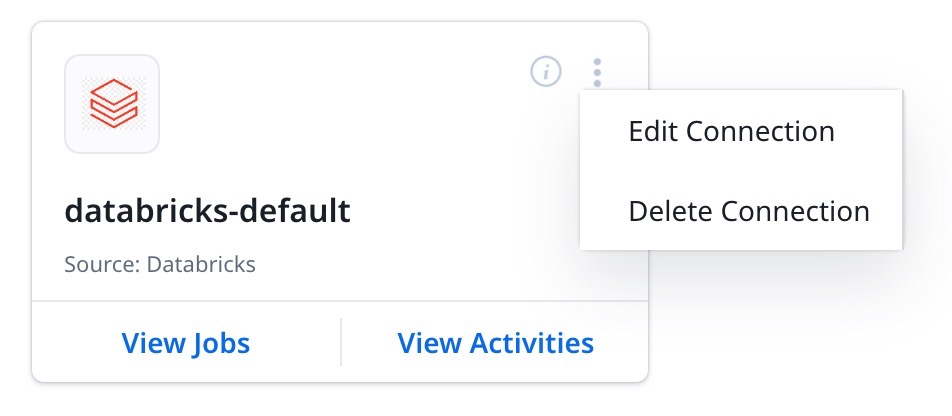
Once you authorize the connection, configure your connection with one of the following three vertical dots menu options, as required:
- Edit Connection: Update or modify the Databricks connection details.
- Delete Connection: Delete the Databricks connection,
Note: Databricks connection can be deleted when the associated Job Chains and data jobs are deleted first.
Create a Job
Admins can create jobs from the Jobs page to sync data from required source objects with Gainsight. After selecting the Data Source, you can view all the Databricks objects in the left pane. Drag and drop a source object to the Preparation screen to start creating a job.
Note: To sync newly created views from Databricks to Gainsight, ensure that you re-authorize the Databricks connection from the Connections page.
For more information, refer to the Preparation of Connector Jobs article.
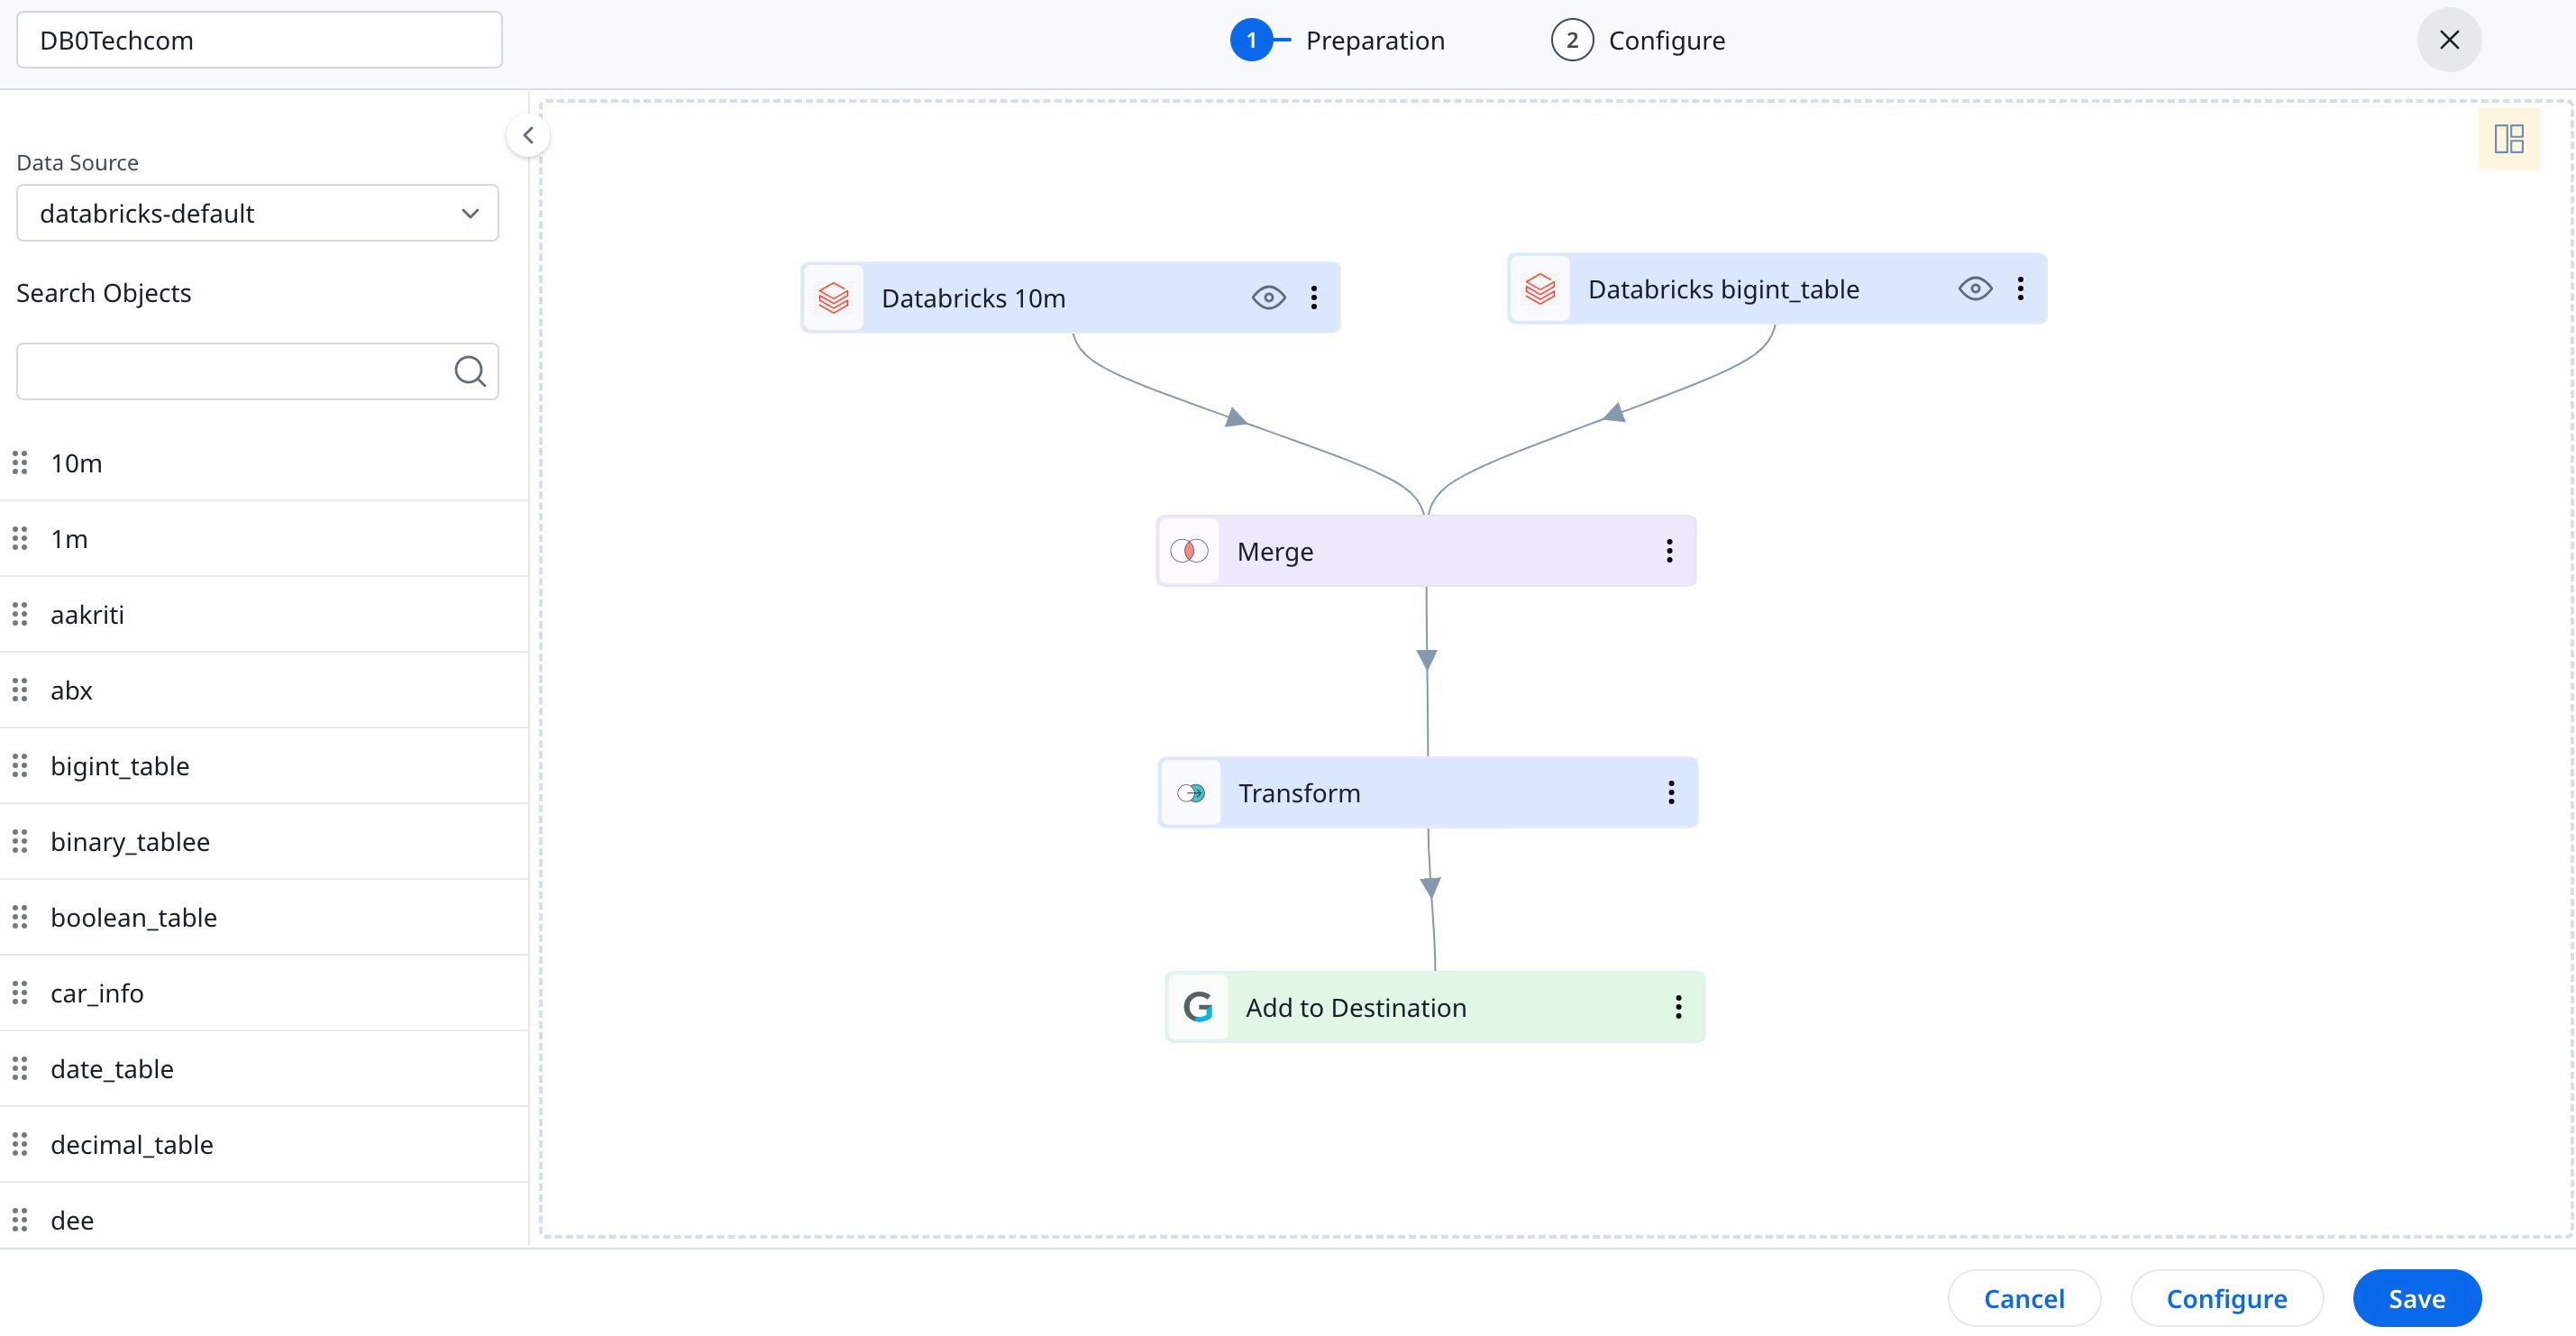
If the data jobs in a connection are dependent on each other, create a Job chain and configure the schedule to the Job Chain. For more information, refer to the Configure Job or Job Chain Schedule article.
Merge Datasets
You can merge two or more datasets and create an output dataset. For example, you can merge datasets related to Bitcoin Cryptocurrency and Company datasets to know the list of transactions for each company and create an output dataset such as Company ARR.
For more information on Merge, refer to the Preparation of Connector Jobs article.
Transform Data
In the Preparation step of a connector job, you can transform data and add Case Fields to get more meaningful insights from the customer data.
Business use case: The Transform function provides the capability to create or modify new case fields. The new case fields can be used to modify the external field as per the consumption requirement in Gainsight’s data model. Case fields can be defined to populate different values for different case conditions. For example, External picklist values such as New, Open, and Closed can be modified to Active and Inactive to match Gainsight’s picklist values.
For more information on how to use the Transform function, refer to the Preparation of Connector Jobs article.
Add Destination
Once the final output dataset is prepared, you can add a destination to the output dataset to sync data from the source to the target Gainsight object.
For more information on how to add destinations, refer to the Preparation of Connector Jobs article.
Direct Mappings
To sync data from an external system to Gainsight using Direct Mappings, you must map fields from the external system's source objects to Gainsight's target objects. The data sync happens based on the configured field mappings.
For more information on Direct Mapping, refer to the Preparation of Connector Jobs article.
Derived Mapping
(Optional) You can use Derived Mappings to populate values in an object's field (of the GSID data type) with values from the same or another standard Gainsight object. Lookup is used to accomplish this, and you can match up to six columns in the lookup.
Note: To use Derived Mappings, your Target Object must have at least one field of data type GSID.
For more information on Derived Mapping, refer to the Preparation of Connector Jobs article.
Job Chain
The Job Chain feature helps simplify the process of scheduling a group of related jobs that you need to run in a particular sequence. This sequence is based on the scheduled time of the Job Chain.
For example, if Job A and B are to be executed in a sequence with Job B to automatically start as soon as Job A is completed, and there is no need to schedule a job separately.
Note: When a job is added to a Job Chain, it follows the Job Chain's schedule, not its own, and executes in the sequence specified within the chain.
For more information on how to use Job Chains , refer to the Job Chain Page article.
Configure Job or Job Chain
After the job or job chain is configured, you can configure the Schedule for the job run.
If there are multiple Jobs in a Connection which are dependent on each other, Gainsight offers an option to create a Job Chain to sync data in sequence.
For more information, refer to the Configure Job or Job Chain Schedule article.
Job Activities
You can view the Execution and Update Activities of all the data jobs on the Activity page. You can also download the error logs of the jobs from this page to help troubleshoot the configuration issues.
For more information, refer to the Activity Page article.