Configure Renewal Center
Gainsight NXT
This article explains how to configure various sections of Renewal Center. After reading this article, admins can set up the Salesforce connector to sync opportunity data, configure forecast list view and detail view pages, and setup color codes for different churn types.
Pre-Deployment Checklist
- To support the out of the box analysis, the following standard fields of the GS Opportunity object must be mapped from the Salesforce Opportunity or updated using Rules Engine. The below data requirements are applicable only to the Analyze function. Opportunity management using Forecast in Renewal Center, C360, or Cockpit do not require the below data:
- Target Amount is the original renewable value of an opportunity. This value is usually determined at the time of the original sale. This field supports the summary calculation for “Renewals Due.” “Renewals Due” is the denominator in the calculations for Gross and Net Renewal Rates.
- Forecast Amount is the estimated total sale amount. For a renewal opportunity, if this value is higher than the Target Amount, then the difference would be considered upsell (renewal with upsell). If this value is lower than the Target Amount, then the difference would be considered downsell (renewal with downsell). For opportunities that are of type Upsell or Downsell, the total Forecast Amount value is considered upsell or downsell, respectively.
- Final Amount: The official amount that the opportunity closed. For Won opportunities, this amount is compared to the Target Amount to calculate if a renewal has upsell or downsell. The amount is used for all Actuals calculations on the Dashboard. Customers who do not have a need for this can create a rule to make this equal the Forecast Amount.
- The amounts here for all opportunities must be consistently ARR or MRR to ensure accurate calculations.
- Due Date: The original date the renewal opportunity was expected to renew. This would be one year from the original sale date for a one-year deal. This date is used to calculate if a renewal is early or late, as compared to the Close Date. Customers who do not track Due Dates can create a rule to make this equal the Close Date. The Late Renewal chart and Action Card will not be available.
-
To create new opportunities in Renewal Center, you must configure all the fields that are required to pass validation rules in Salesforce. This configuration includes the creation of the custom field in Data Management, map in Connector, and configure in the Opportunity Detail View. To know more, refer to the Create and Configure Custom Fields in Renewal Center article in the Additional Resources section of this article.
Note: When you sync a Picklist data type field from Salesforce to Renewal center, all the Picklist values are automatically synced from Salesforce. You need not create Picklist values manually in Renewal Center.
-
Company ARR must be populated in the ARR field of the Company object. This supports the analysis on missing opportunities, and calculation of Data Science Likelihood Score. If you are currently populating this data in a custom field, you can create a rule to copy the data to this standard field.
Configure User Locale
Renewal Center supports and honors the user locale settings applied in your Salesforce org. When you configure the User Locale settings, Renewal Center users (Renewal Managers, CSMs etc ) can view the values in the Date and Date Time Data type fields in the selected format. By default, US Locale settings are configured. If you do not configure this section, Renewal Center users continue to see the values in US Locale format.
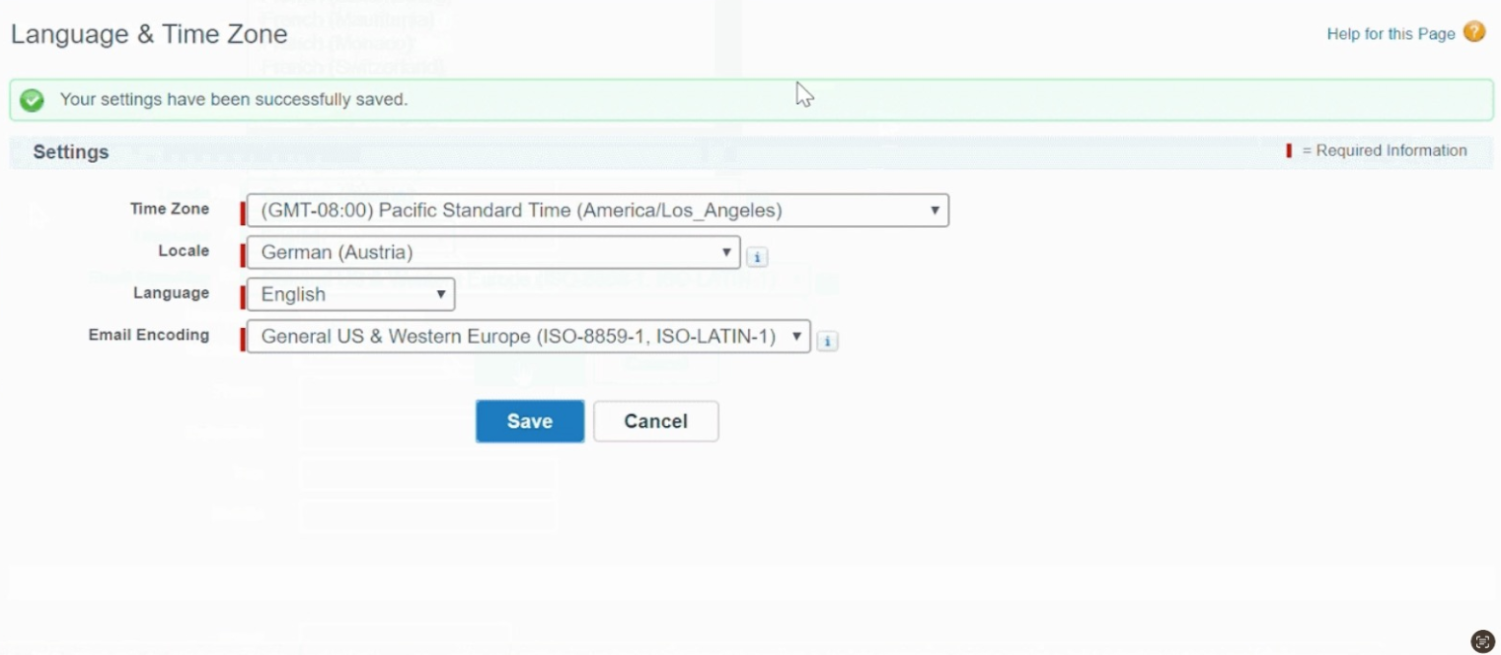
To configure Locale Settings (SFDC):
- Navigate to My Settings in Salesforce. You can see that currently the Date values are displayed in US format.
- Navigate to Personal > Language & Time Zone. The Language & Time Zone window is displayed.
- Select the required locale from the Locale dropdown menu.
- Click Save.
To configure User Locale Settings for Gainsight NXT:
- Click the User icon on the top-right corner.
- Click See your profile. My Profile page appears.
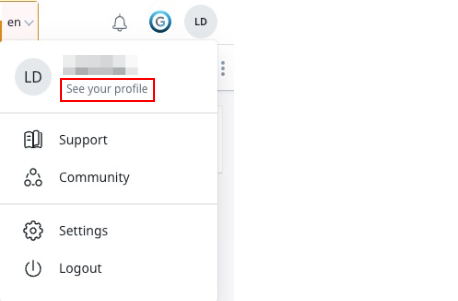
- Select the applicable options from the Enter timezone and Enter User Locale dropdown list.
- Click Save.

Configure Data Permissions
Renewal Center now Gainsight Data Permissions. Admins can restrict the read and write access that users have over specific opportunities.
For example, users can be restricted to only see the opportunities that they own. To configure, navigate to Administration > Users and Permissions > Data Permissions.
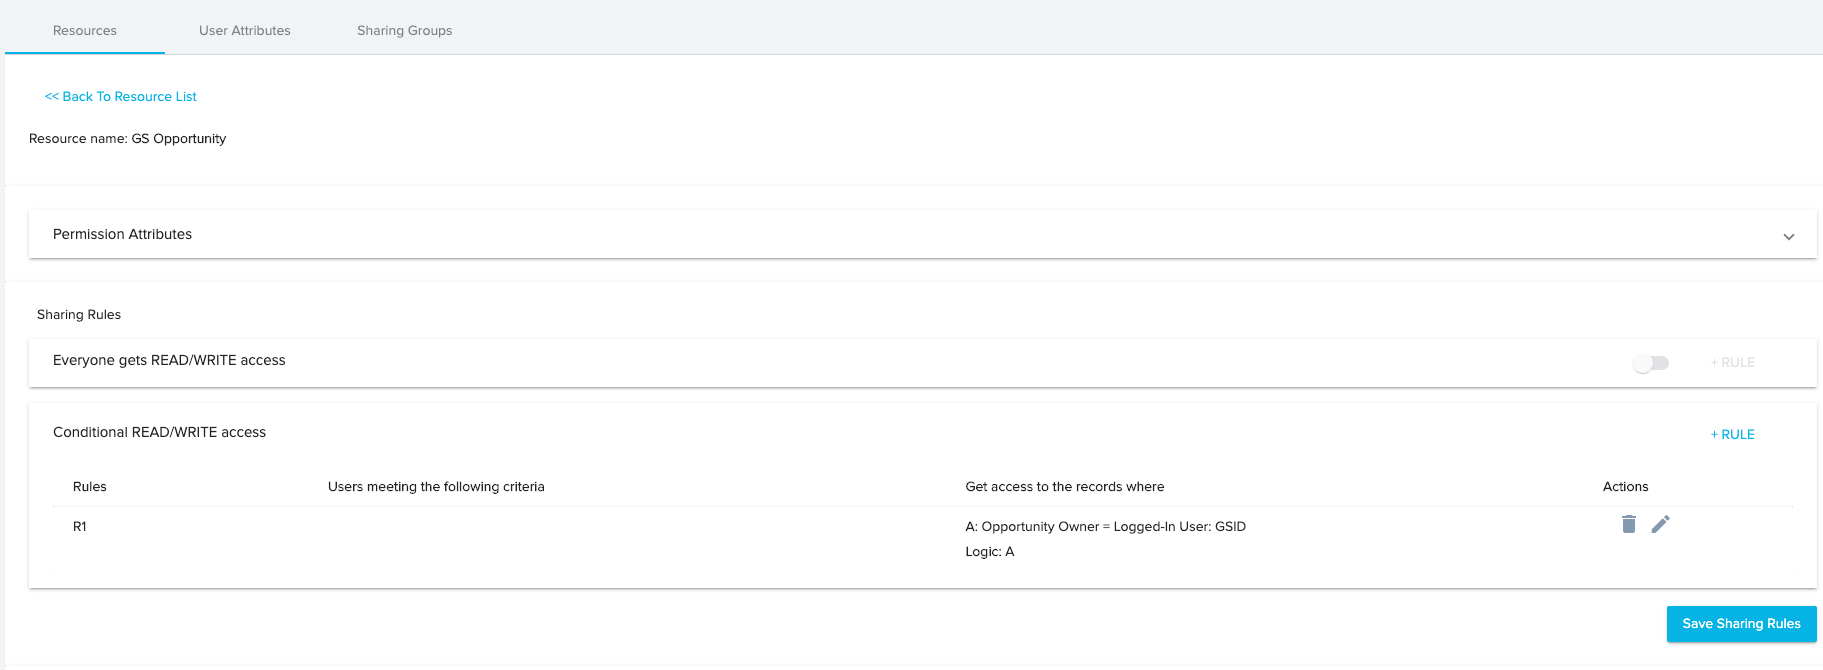
Note: Renewal Center uses the GS Opportunity object. Controlling the permissions on this object determines the data displayed in Renewal Center.
For more information on Gainsight Data Permissions, refer to the Data Permissions article in the Additional Resources section of this article.
Renewal Center Objects
This section explains the objects used in Renewal Center and how data can be ingested into these objects.
Gainsight offers four objects with the Renewal Center; GS Opportunity, GS Opportunity Stage, GS Record Type, and GS Predictions. The GS Opportunity object consists of fields that hold various information about an opportunity. Users can view and edit these fields based on the configurations made by the admin. Data is ingested into this object through the Opportunity Sync job in Salesforce Connector. Data is ingested into the GS Opportunity Stage Object through the Opportunity Stage Sync job.
Before you configure Renewal Center, ensure that Salesforce Connector and related data sync jobs are executed. To learn more about configuring Salesforce jobs for Renewal Center, refer to the Salesforce Connector Jobs for Renewal Center article in the Additional Resources section of this article.
Configure Renewal Center
Renewal Center admin page has multiple sections that allow you to perform various configurations.
To configure Renewal Center, navigate to Administration > Revenue Optimization > Renewal Center.

The following fields are required for Renewal Center to function properly at the opportunity level:
- Closed Date
- Due Date
- Target Amount
- Stage
- Forecast Amount
- Final Amount
- Opportunity Name
- Company

Note: Fields marked with an asterisk (*) are not mandatory, but it is advisable to configure them to get the maximum business value from Renewal Center.
Data
This section allows you to configure the general configurations for Renewal Center.
The following configuration options are available:
Sync Options
In this section, you can select the sync options for the Opportunity data, depending on the CRM you use. Renewal Center is available to users who do not use Salesforce at all or manage renewals outside of Salesforce.
Following options are available:
- Gainsight: Opportunities will exist only in Gainsight. For more information on how to configure this feature, refer to the Deploy Renewal Center Without Salesforce article in the Additional Resources section of this article.

- Salesforce: Opportunities will be synchronized with Salesforce.
The following fields are mandatory in Salesforce and should be configured properly:- Closed Date
- Due Date
- Target Amount
This section allows you to define the method through which you can sync renewal data back to the CRM, either as an Integration User or Logged In User. Integration user is the user who is designated for connector data sync from your CRM to Gainsight (generally Admins). Logged in User is the user who uses Renewal Center (CSMs, Renewal Managers).
- Selecting Integration User allows any Gainsight user to modify or create opportunities. API must be enabled for the integration user.
- Selecting Logged In User allows only the CRM user, who has the permissions in their CRM, to modify or create opportunities to do so. API must be enabled for the relevant user(s) in your CRM.
- Note:
-
A standard field, Source Type, in the GS Opportunity object identifies whether the opportunity is created from RC or CSQL features. The values stored in this standard field are CSQL and OPPORTUNITY. For example, for opportunities created from CSQL, the value in this field is populated with CSQL. For opportunities created or loaded via RC, Connectors, Rules Engine, C/R 360, or CTAs, the value in this field is populated with OPPORTUNITY.
-
When an opportunity is updated, Gainsight checks the source from where the opportunity was originally created or loaded. If the opportunity source is CSQL, then the synchronization options configured in the CSQL admin are followed. If the opportunity source is RC, Connectors, Rules Engine, C/R360, or CTAs, then the synchronization options configured in the RC admin are followed.
-

To configure Sync Options:
- Navigate to Administration > Revenue Optimization > Renewal Center configuration.
- In the left pane, expand the Data menu options and click Sync Options.
- Select the relevant sync option.
- Configure the settings as required.
- Click Save.
IMPORTANT: Sync Option selected will impact the capability of CSMs to edit the Opportunity Line details. For more information on the impact, refer to the Edit Opportunity Line section of the Renewal Center User Guide article in the Additional Resources section of this article.
Switch Sync Options
You can switch between Sync Options from Gainsight Only to Sync with Salesforce, or vice versa. However, the other sync option remains inactive if there are existing lead or opportunity records in the GS Lead or GS Opportunity objects. These records must be first deleted from Data Management.
Note:
- You can change the sync option by deleting only opportunities created from RC and not CSQL. The SourceType field in the GS Opportunity object identifies whether the opportunity is created from RC or CSQL features. For more information, refer to the Data Operations section in this article.
- For more information on how to delete opportunity records from the GS Opportunity object, refer to the Delete Opportunity Records section in this article.
Delete Opportunity Records
To delete opportunity records from the GS Opportunity object:
- Navigate to Administration > Customer Data > Data Management. The Data Management screen appears.
- In the Objects tab search box, enter GS Opportunity. The search results appear.
- In the Object Display Name column, click GS Opportunity. The Fields tab for GS Opportunity appears.
- Click the Data tab. The Total Records table appears.
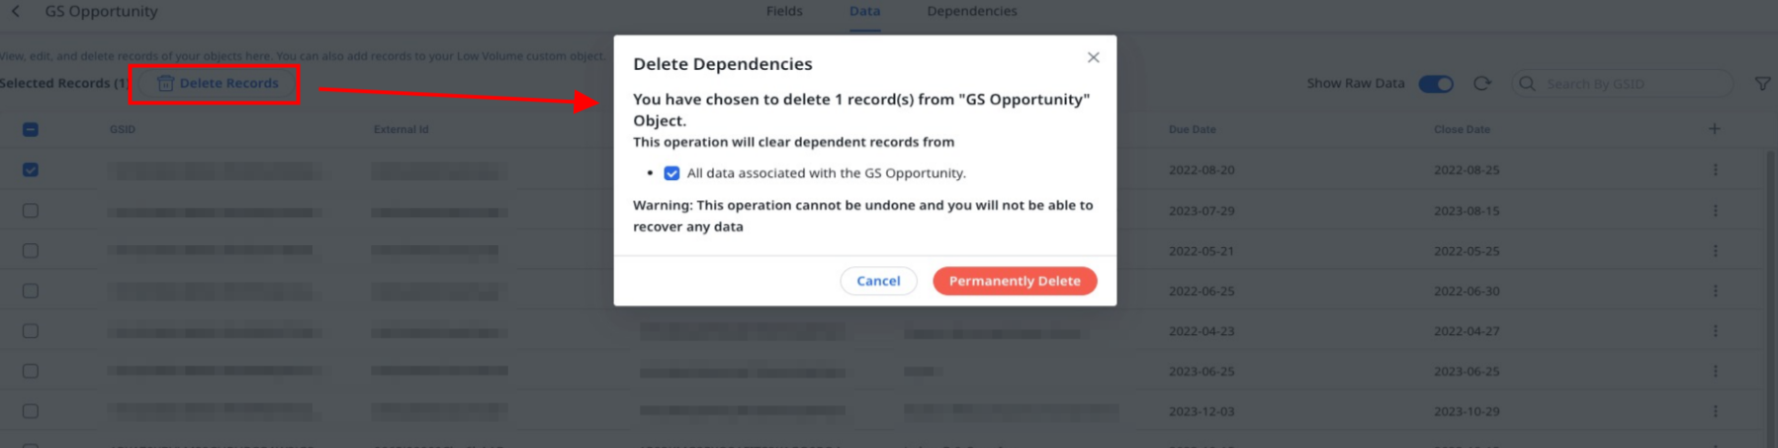
- Select the record or records you want to delete. The Delete Records button appears.
- Click Delete Records. The Delete Dependencies dialog box appears. It displays the existing dependencies that are impacted.
- Select the dependency checkbox. The Permanently Delete button becomes active.
- Click Permanently Delete. The record is deleted.
Note: It takes a few seconds for the records to disappear from the Total Records table.
Bulk Delete All Opportunity Records
To delete all opportunity records at once from the GS Opportunity object:
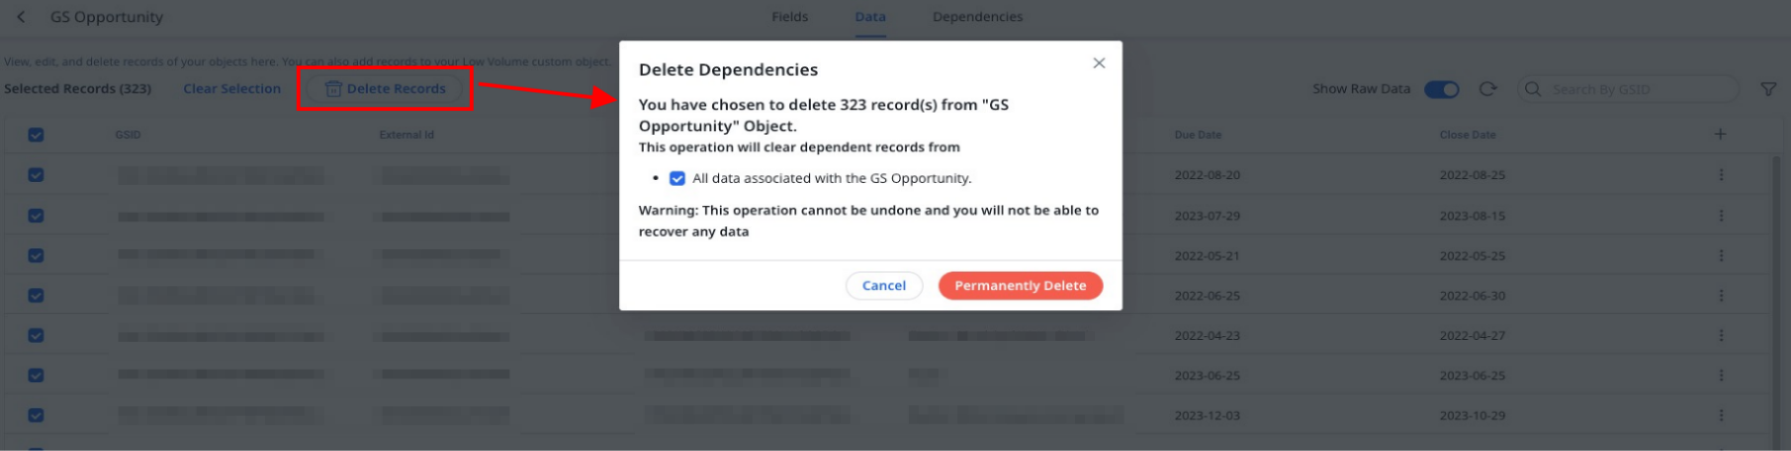
- Select the global checkbox. The Select all N records and Delete Records buttons appear.
Note: Only the records displayed on the current page are selected and a count of the selected records are displayed. - Click the Select all N records button. All records in the GS Opportunity object are selected.
- Click the Delete Records button. The Delete Dependencies dialog box appears.
- Select the dependency checkbox. The Permanently Delete button becomes active.
- Click Permanently Delete. The records are deleted.
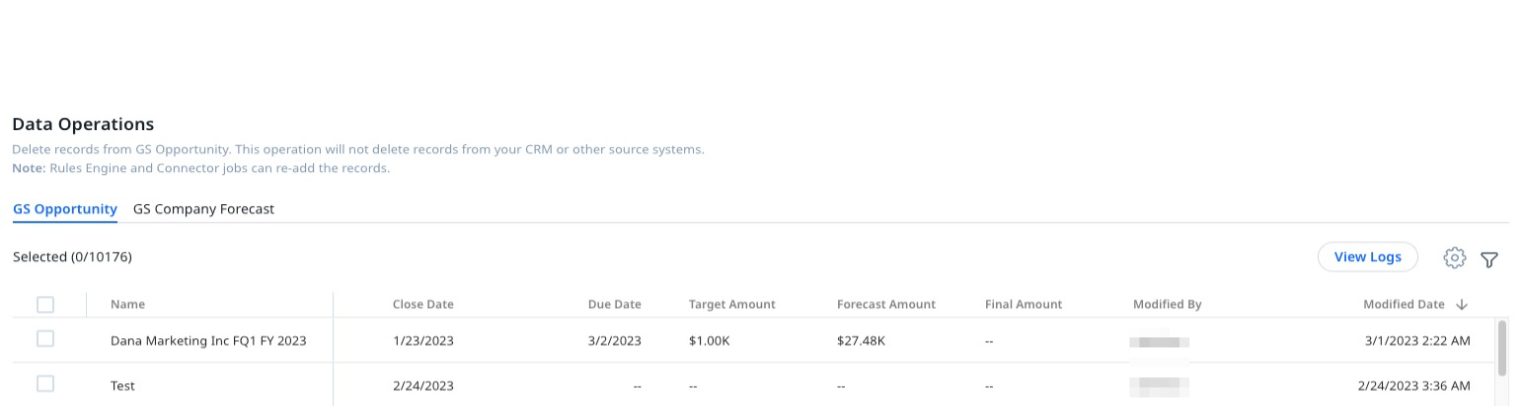
Data Operations
This section allows you to delete records from GS Opportunity. This is required if Connector or Rules criteria has changed to sync fewer opportunities. Sync jobs should be changed before deletion, or deleted opportunities get re-added.
Admins can delete all selected opportunity records using the Delete option. When you select the global checkbox and click Select all Opportunities, all the selected opportunity records are deleted.
Note:
- This operation will not delete opportunities from your CRM.
- You can identify opportunities created from RC and CSQL using the Source Type field as a filter criteria.
Stages
You need to configure stages in the Data Management section to reflect the progress of Opportunities.
For Salesforce Sync Option
This section consists of field mappings configured between the Salesforce Opportunity object and the Gainsight GS opportunity object.
Note:
- The field mappings are displayed as configured in the Opportunity Sync job of Salesforce Connector.
- Renewal Center also displays fields that are not mapped yet. (generally, these can be custom fields). You must map these additional fields as they are required to successfully update an opportunity in Salesforce.
- To edit a field mapping, click Edit Connector.
- When you click Edit Connector, the Salesforce Connector page is displayed.
- Once you edit the field mappings for Opportunity Sync job and save it, the latest field mappings are populated in the Renewal Center’s Object data mapping window.
Once you configure Stages in Data Management, you can map the Type, Probability and Forecast Category in this section.

For Gainsight Sync Option
You need to create stages and configure picklist values if you are using the Gainsight sync option. For more information, refer to the Deploy Renewal Center Without Salesforce article in the Additional Resources section of this article.
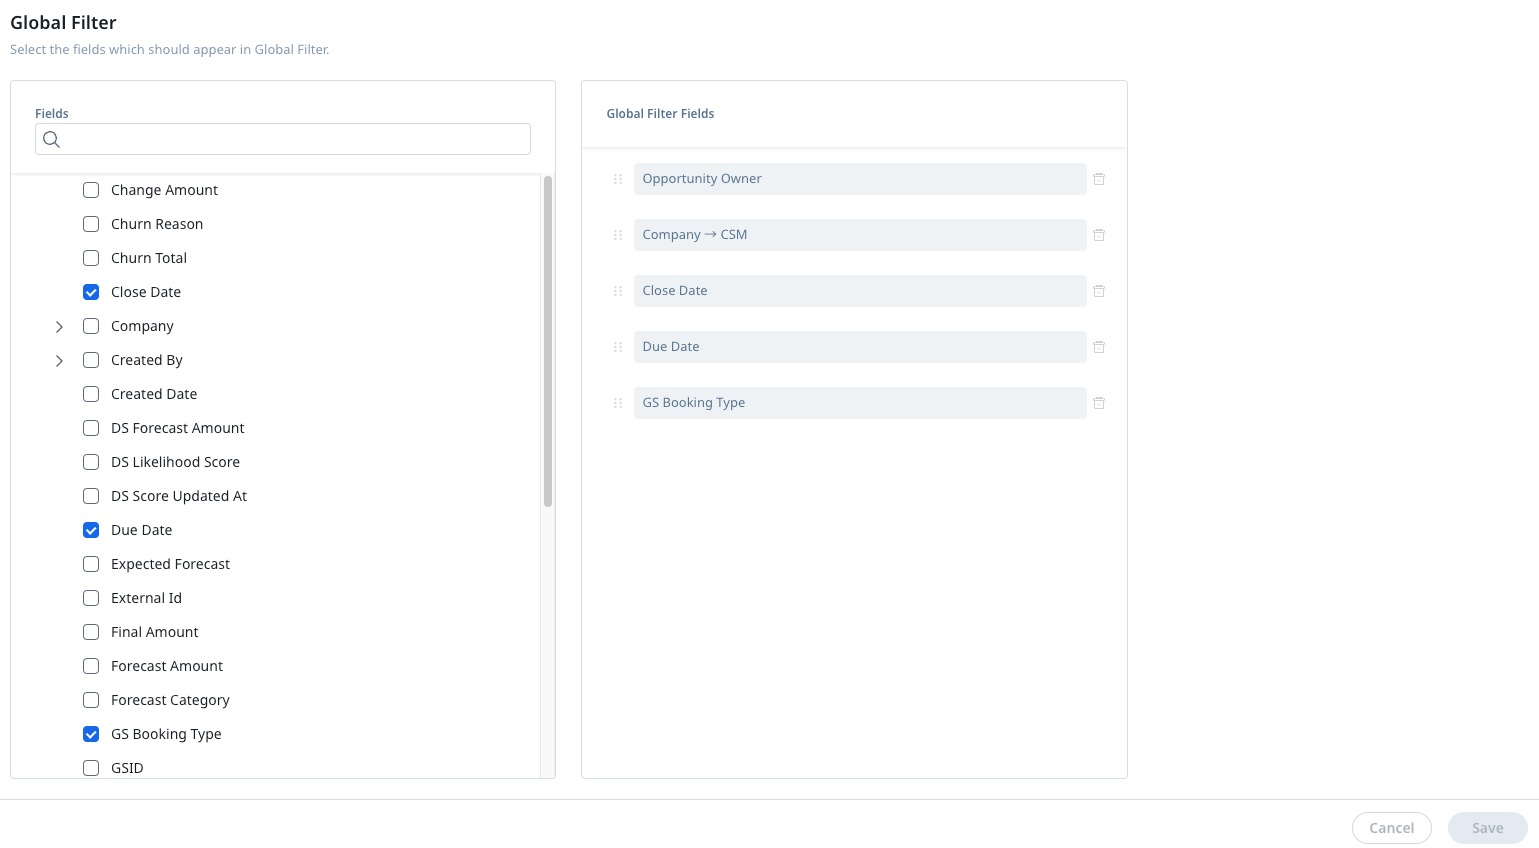
Global Filter
This section allows you to configure the fields for the Global filters. Users can use the configured fields to filter data. The global filter is for the user to select their book of business. The filters configured in the Global Filters section derive all of the calculations and Opportunities listed for forecasting. Global filters applied by the user are retained on the next login.
To configure a field for Global filter:
- Click the Filter Configuration pane.
- Select a field from the Fields column to add it to the Global Filter Fields column.
- (Optional) Drag and drop the ellipsis menu of a field, to change the order of display.
- Click Save.
Analyze
This section consists of two sub-sections which are displayed on the Analyze page.
Forecast Scenarios
This section allows admins to configure the calculation method of Renewal Forecast and Upsell Forecast in Renewal Center.

Calculation Methods for Renewal Forecast and Upsell Forecast: Gainsight offers the following methods to calculate the value of the forecast fields. The methods are:
- CRM Probability: This option multiplies the value of the Forecast Amount field with the value in the Probability(%) field, for all the qualifying opportunities and adds up the product of all opportunities to obtain Your Forecast value.
- Forecast Scenarios: Apart from the CRM probability method, Gainsight offers three scenarios to calculate Your Forecast value; Low, Medium, and High. These names are just for representation purposes and can be changed. For each of the three scenarios, you can configure the values from the Forecast Category fields. When you select a scenario, the Forecast Amount is added for all qualifying opportunities whose Forecast Category is one of the values configured for the selected scenario.
Note: Forecast Category is a picklist field in the GS Opportunity object. Each Opportunity has a value for this field. This value is synced from Salesforce.
In the following image, you can view the Low, Medium, and High scenarios.
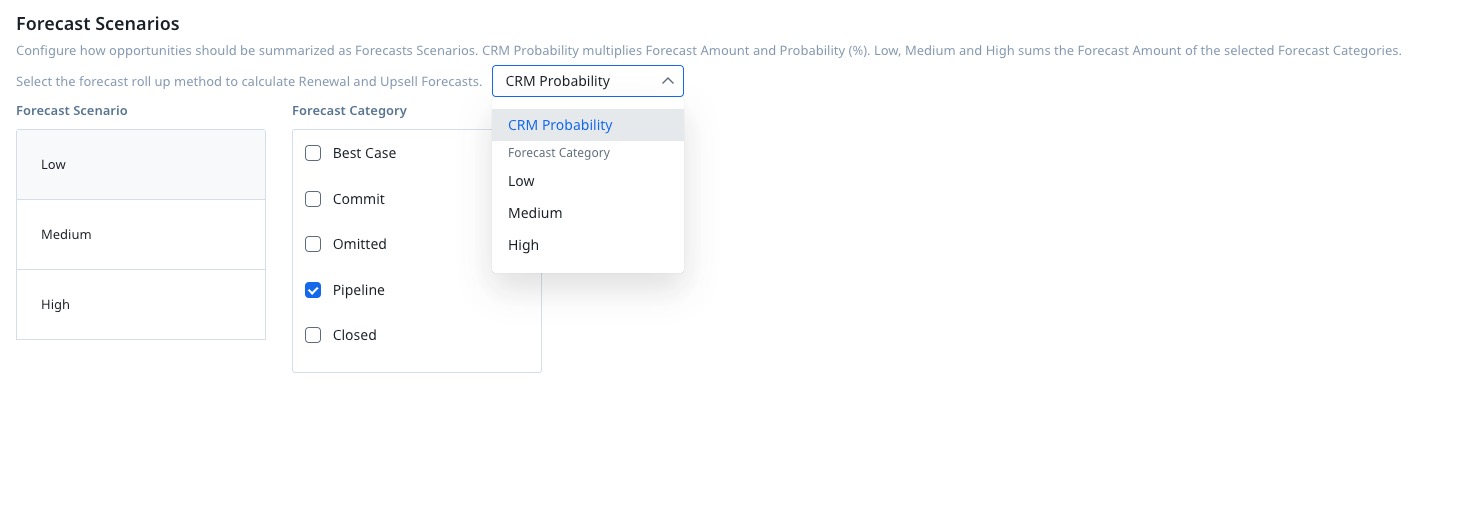
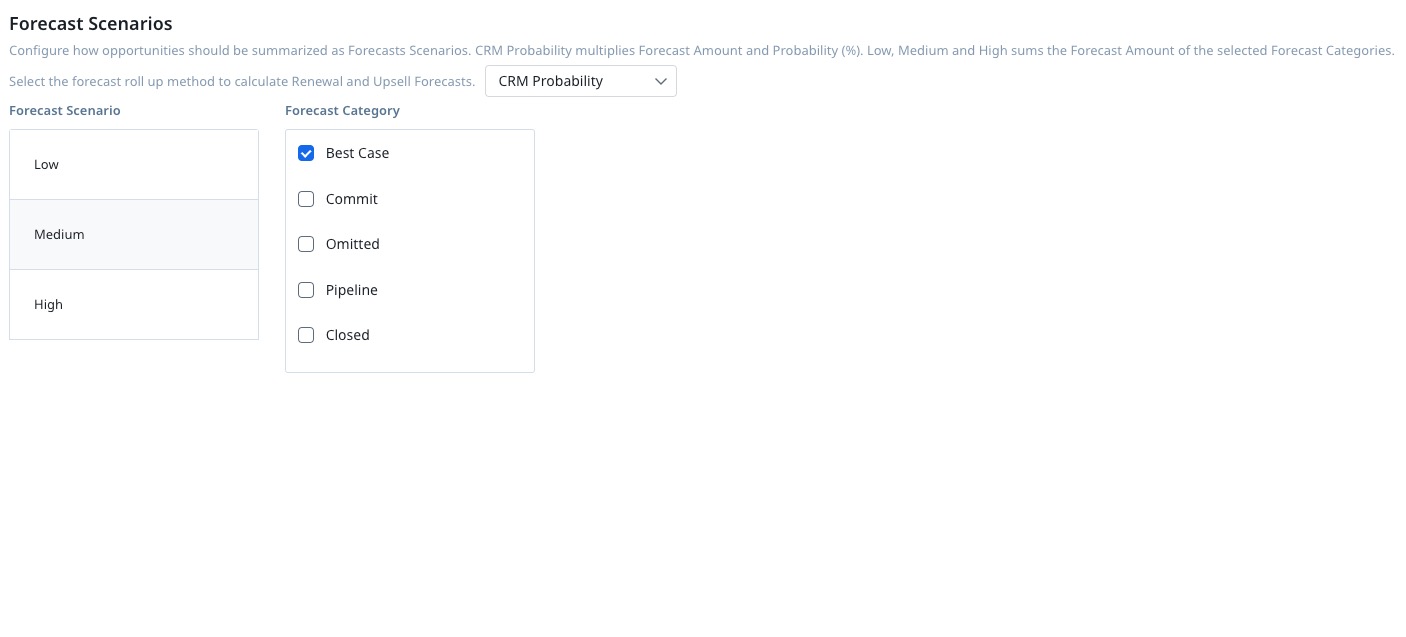
Now, for the Low scenario, you can configure picklist values from the Forecast Category Picklist field. The below image shows that Forecast Category has five picklist values. Out of these five picklist values, Commit and Closed values are configured for the Low scenario.
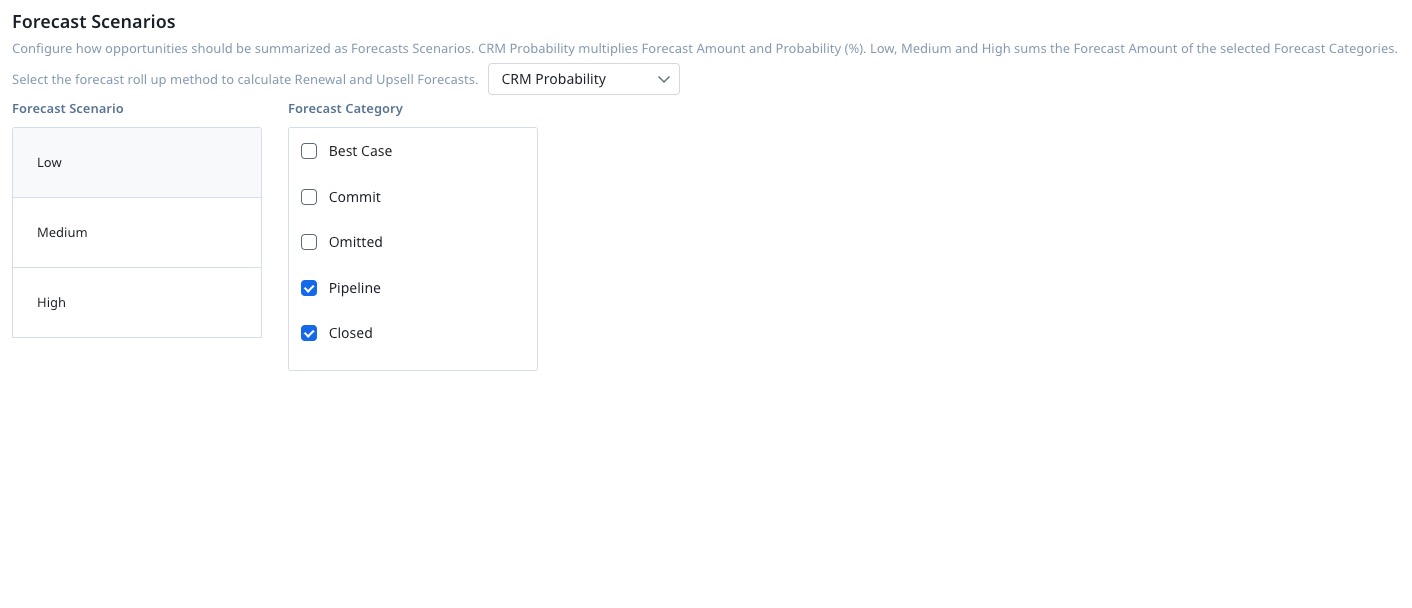
Now, if you select the Low scenario as the calculation method for the Forecast fields, all the opportunities whose Forecast Category is either Closed and Commit, are selected for calculation. The value in the Forecast Amount field of all these opportunities is added to obtain the forecast values.
Apart from Low, you can also configure picklist values for the Medium and High scenarios. The scenario which is selected in the dropdown menu determines the calculation method for Renewal Forecast and Upsell Forecast.
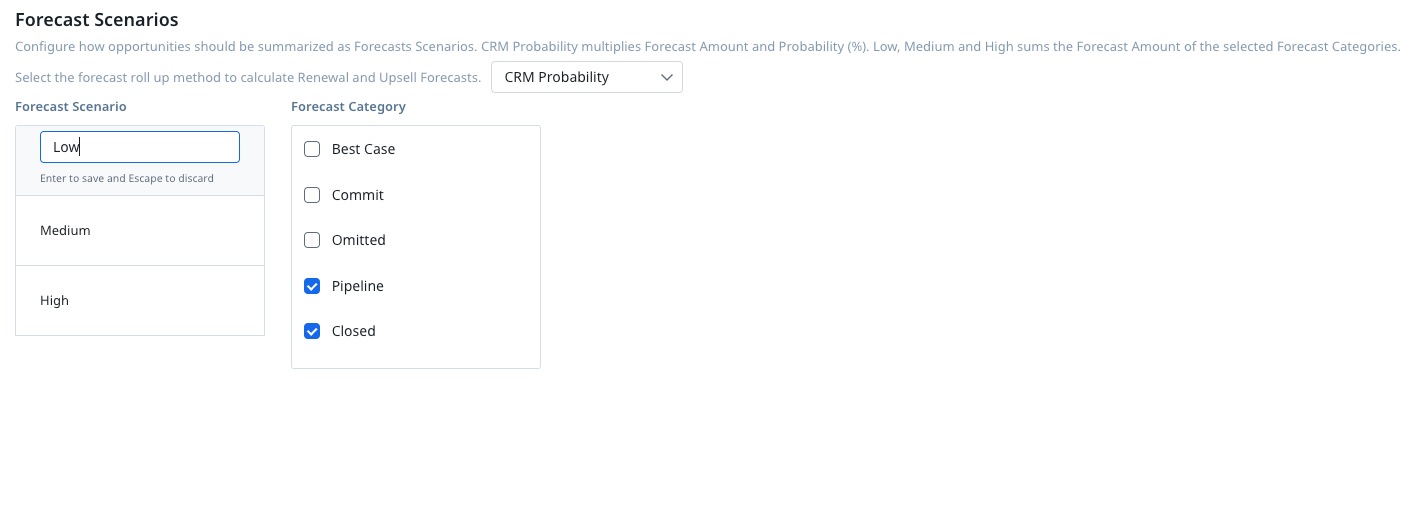
You can also change the name of the scenarios as shown below in the following image. You must click Save after changing the name of a scenario.
The Renewal Center user page displays the Renewal Forecast and Upsell Forecast fields after performing the calculation by using the method you selected. Users can also see the values if other calculation methods were applied, by hovering on Renewal Forecast and Upsell Forecast.

In the following image, Your Forecast value is $19.77K. When you hover on the tooltip, you can see the values if other calculation methods were applied.
The following table summarizes the four calculation methods for Your Forecast value:
|
Calculation Method Name |
Calculation Method |
|---|---|
|
CRM Probability |
Multiplies the Forecast Amount field with Probability (%) field for all the qualifying Opportunities and adds the product of all opportunities. |
|
Low scenario (Name can vary) |
Adds the Forecast Amount field of all Opportunities whose Forecast Category is configured with this scenario. |
|
Medium scenario (Name can vary) |
Adds the Forecast Amount field of all Opportunities whose Forecast Category is configured with this scenario. |
|
High scenario (Name can vary) |
Adds the Forecast Amount field of all Opportunities whose Forecast Category is configured with this scenario. |
To configure forecasts:
- Navigate to Administration > Revenue Optimization.
- Click Renewal Center.
- Click on the Analyze Section drop down.
- Click on the Forecast Scenarios pane.
- Select your forecast roll up method.
- Configure your scenarios with Forecast Category values (applicable only if either High, Medium or Low is selected).
- Click Save.
Booking Types
Booking type is a Gainsight category used to help Renewal Center identify opportunities that are Renewal, Upsell, and Downsell. You can configure how Renewal Center should identify these opportunities. Most customers have a different Opportunity Type or Opportunity Record Type for Renewal, Upsell, and Downsell. Other Picklist Data type fields from the Salesforce Opportunity object may also be used.
Mapping to Upsell and Downsell is not required for customers who do not create separate opportunities for Upsell and Downsell. Upsell and Downsell are also calculated when there is a difference between Forecast Amount and Target Amount, for Open opportunities. For closed Opportunities, the difference between the final amount and the target amount is considered.

You can now select any combination of Record type and Picklist values, to define your Booking type.
A Booking Type is assigned to all the opportunities once you configure and save this page. If you have not created opportunities exclusively to track Downsell and Upsell, it is not required for you to perform any mappings. Gainsight automatically calculates Renewals with upsell and Renewals with downsell based on the difference between the forecasted amount and target amount. Renewal with upsell and Renewal with downsell are derived Booking types.
Note: All of the Opportunity records are checked to verify if they satisfy the matching criteria for a Booking type. If a record qualifies the matching criteria for multiple booking types, the record is added to the first Booking type for which it matched the criteria.
IMPORTANT: When you click Save, the entire set of opportunity records are re-calculated. This process could take several minutes, depending on the number of records present and the system load. Ensure that you update this configuration during maintenance windows to avoid locking any records which are being used by users.
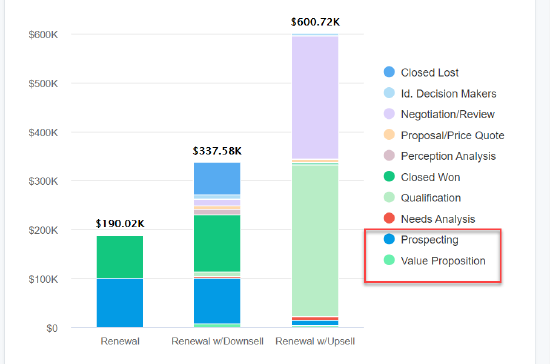
Note: The Renewal Center user page also consists of a Forecast Chart. It displays a bar chart for each of the Booking types against the Stages. The color for each stage is derived from the RM Opportunity Stage dropdown menu. If you have not configured any color for a stage, a random color is assigned to that stage.

In the above image, only the Value Proposition and Prospecting Stages are configured with colors. So the Renewal Center page displays only these Stages with the configured color. Other Stages are assigned a random color.
Detail View
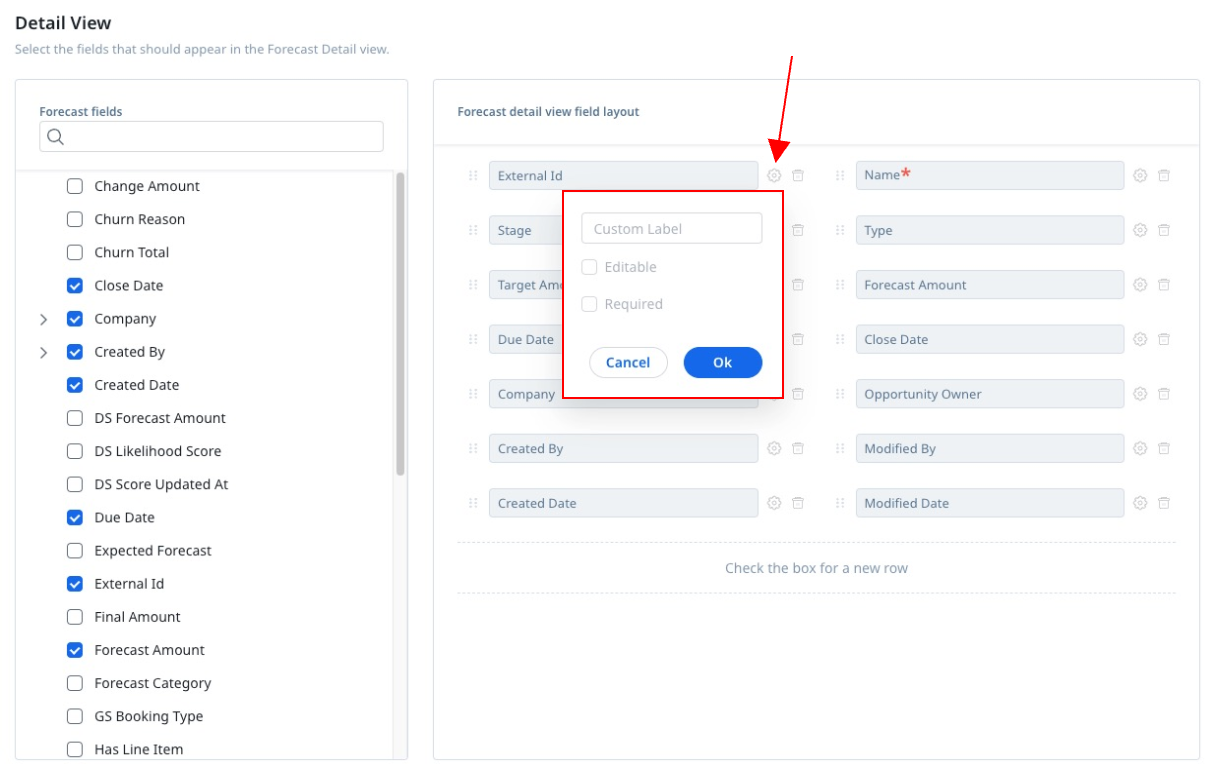
In this section, you can configure the fields which need to be displayed on the Opportunity detail view page. You can also add a custom label to the configured fields. You can also make a field editable or non-editable. You must add and configure all the fields required to update the Opportunity records per the validation rules configured in Salesforce. If you fail to do this, Gainsight cannot sync Opportunity updates back to Salesforce and users will see corresponding error messages from the validation rules while saving an opportunity.
To display a field on the Opportunity detail view:
- Select the required field from Forecast fields column to add it to the Forecast Detail view field layout column.
- (Optional) Drag and drop the ellipsis menu of a field, to change the order of display.
- (Optional) Click the settings icon and enter a name in the Custom label field.
- (applicable only if step 3 is executed) Select the Editable checkbox to make the field editable for the user.
Note: You cannot modify this setting for fields that are not editable (calculated fields).
- (applicable only if step 3 is executed) Select the Required checkbox to make a field mandatory. This checkbox is frozen for fields that are set to be mandatory, by default (for example, the Name field).
- (applicable only if step 3 is executed) Click Ok.
- Click Save.
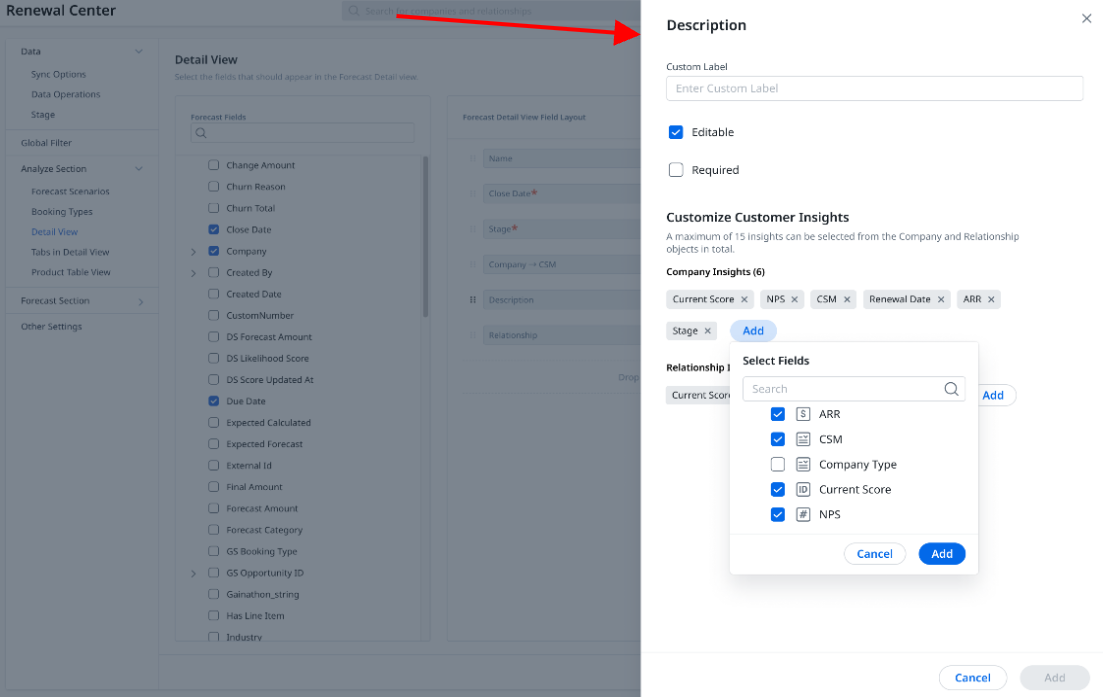
Configure Description Field
You can customize the description fields, available as insights, to provide comprehensive insights at the relationship and individual contact levels to end-users like CSMs and Sales Managers. These insights help the end-users to efficiently nurture leads. The insights are available in the Company and Relationship objects.
To configure the description field:
- Add the Description field to the Forecast Detail View Field Layout.
- Click the Settings icon on the Description field.
- In the Customize Customer Insights section, click Add under each section to include insights from the following sources:
- Company Insights: The fields that are available in the Company object are available as insights.
- Relationship Insights: The fields that are available in the Relationship object are available as insights.
- Click Add.
Note:
- A total of 15 insights can be added from all the two insights, namely Company and Relationship Insights.
- A set of out-of-the-box insights are available from Relationship Insights when you add the description field. These insights are Current Score, NPS, CSM, ARR, and Stage.
View Custom and Actual Field Labels
As an admin, if you change the label of a field, Renewal Center displays both actual and custom labels used on the field. However, end users can only view the custom label used on a field. This enhancement helps you easily identify the actual label of a field when you have used custom labels on multiple fields. You can create custom labels on fields present in the Forecast table and Forecast Detail view.
The fields for which custom labels are created are displayed as per the syntax, Custom Label (Actual Label). You can also view the custom and actual label when you hover your mouse on the field.
To use custom labels:
- Navigate to the Renewal Center Configuration page.
- Click Forecast Table or Forecast Detail view.
- Click the settings icon for the required field.
- Enter the new label in the Custom Label field.
- Click Ok.
- Click Save.
Note: If you change the label of a field and then drag and drop a field from the right column to the left column (hide it from the Renewal Center User page), the original label is retained.
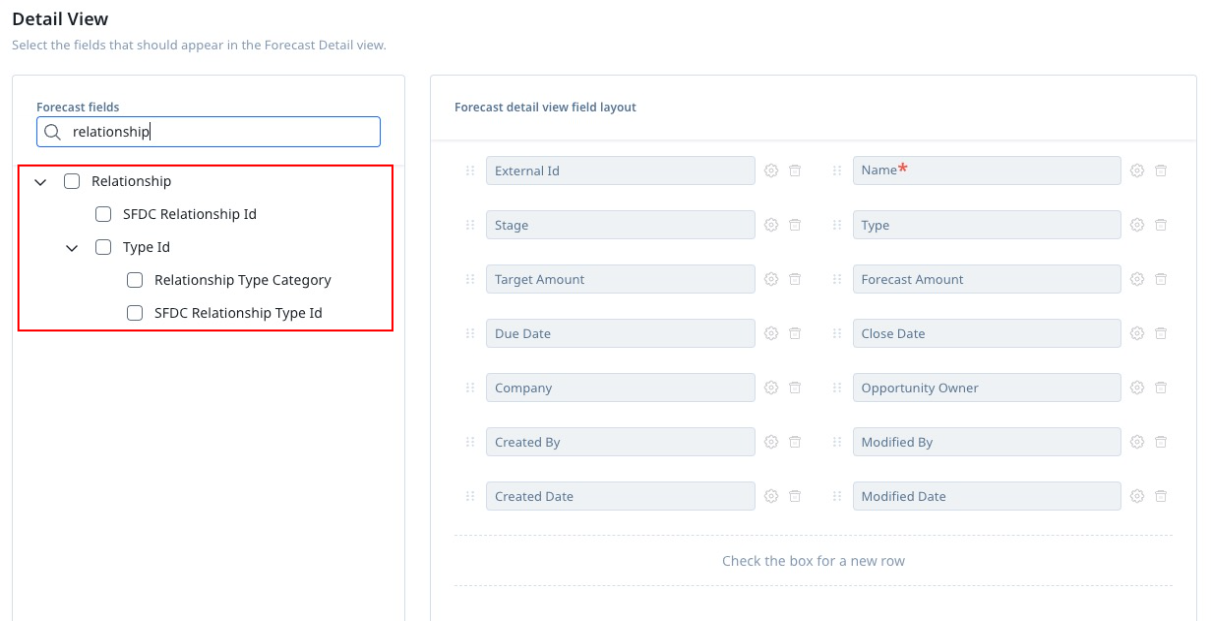
Configure Relationship
Users can work with the Relationship Scorecard and Timeline in Renewal Center. The Likelihood to Renew Score also incorporates Relationship data.
The Relationship field is available for users to select the Relationship as required. If no Relationship is associated with the opportunity, the Company level Scorecard and Timeline will be shown. Admins must first configure the Relationship field to appear in the Detail and Table Views.
To add the Relationship field to the Detail and Table Views:
- Navigate to Renewal Center Configuration > Analyze Section > Detail View.
- Select the Relationship field to add it to the layout.
Note: The same steps apply to Table View as well. - Click Save.
Tabs in Detail View
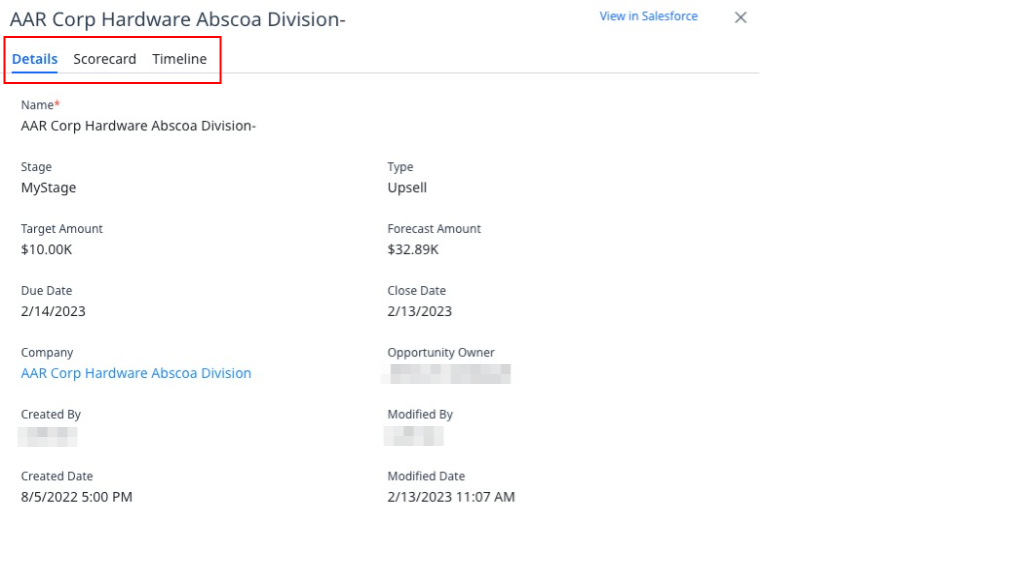
This section allows you to configure the tabs that needs to be displayed in the Renewal Center detail view section. By default, Renewal Center detail view displays four tabs: Details, Product, Scorecard, and Timeline. You can choose to hide or display the Product, Timeline and Scorecard tab(s) from the detail view. You can also change the order of the tabs. The Details tab is always displayed and cannot be hidden since it holds all the basic information about the opportunity.
To hide or rearrange tabs:
- Click the Tabs in Detail View section.
- Select the radio buttons for Product, Scorecard and Timeline sections, as required.
- (Optional) Hold the ellipsis menu button and drag the tabs to rearrange their position in the detail view.
- Click Save.
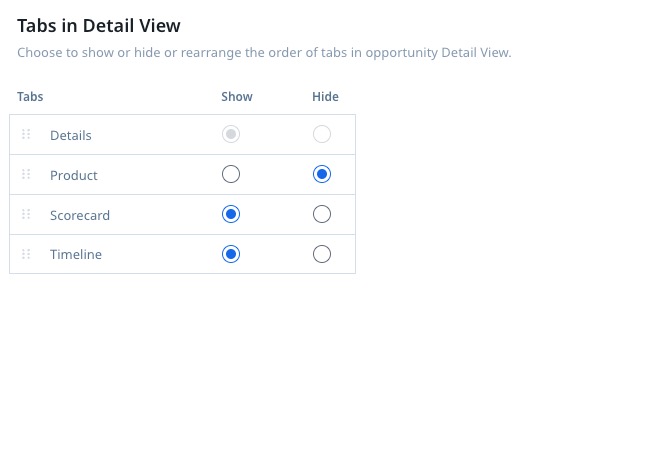
The detail view now displays the Details, Scorecard, and Timeline tabs.
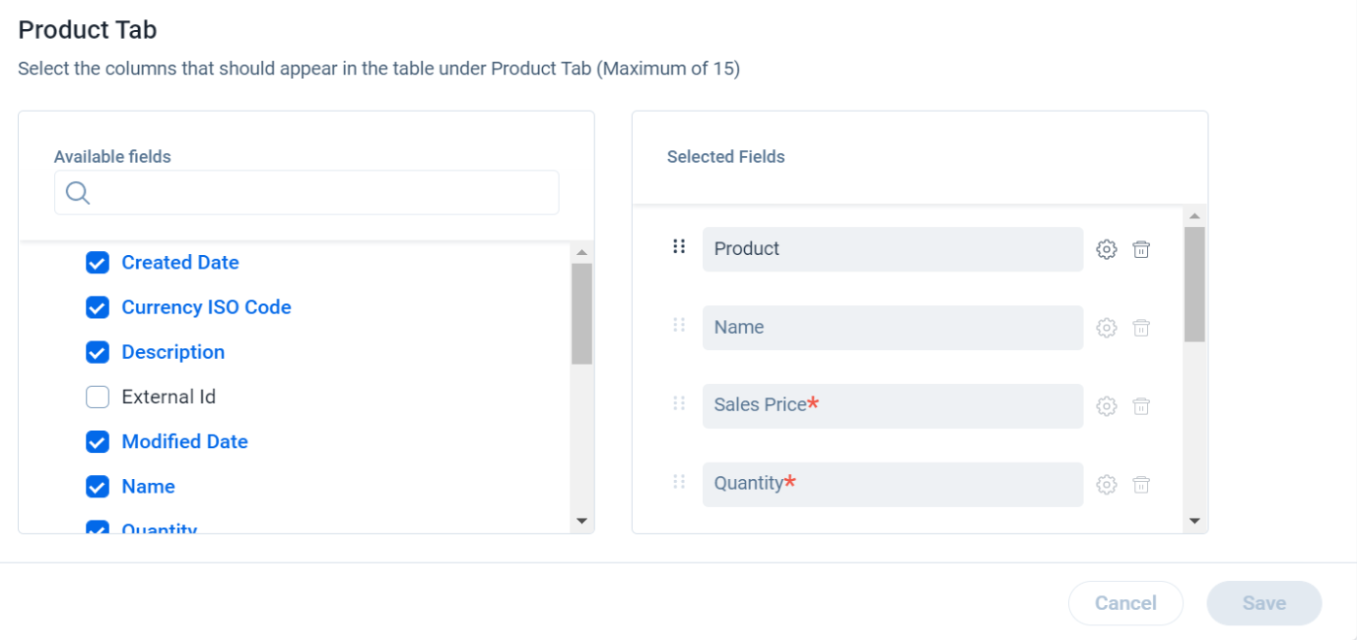
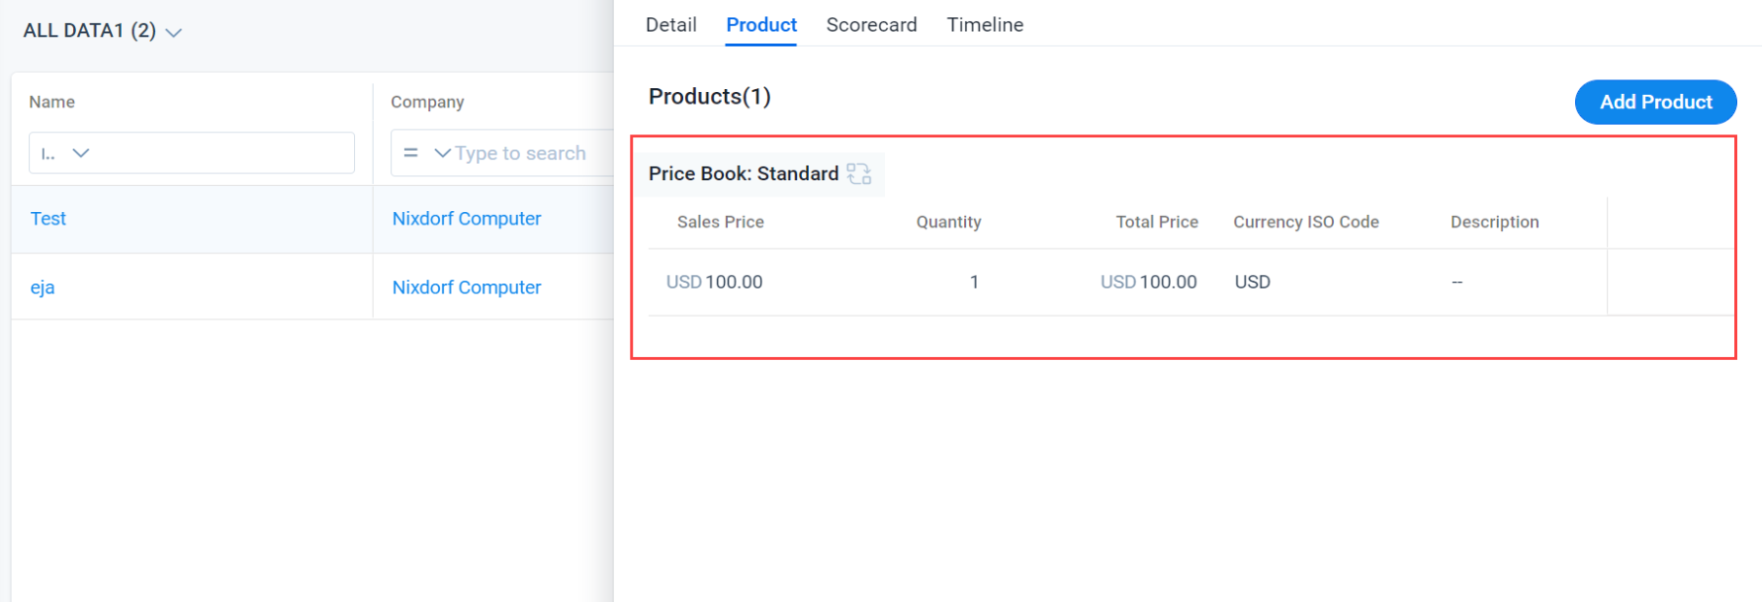
Product Table View
In this section, you can configure the fields in the products list view for the Product tab of the Opportunity details page. You can select the required fields from the Available fields section. The fields in the Selected Fields section appear in the Product tab. You can also drag and drop the selected fields to customize the order of their appearance in the products list view.
Products list view:
Field Tracking
By configuring field tracking, you can:
- Track weekly changes for up to 20 fields including custom fields
- Highlight opportunity changes during the past week
- View the details of the change such as Old Value, New Value, Updated User, and Updated Time while hovering over the highlighted field.
Note: Field Tracking is enabled by default.
![]()
Once you configure the required fields, CSMs can view updates to the opportunity in the Forecast tab along with the changes highlighted.
![]()
Forecast
This section consists of the Opportunity View, Company View, and Change Tracking sub-sections that can be configured for the Forecast page.
Note:
- For more information on how to configure the Company View, refer to the Configure Account Based Forecasting (Company View) article.
- For more information on how to configure the Change Tracking, refer to the Configure Change Tracking section in the Account Based Forecasting (Company View) article.
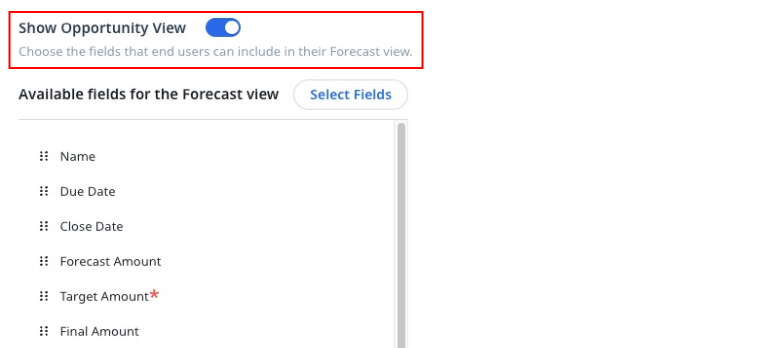
Opportunity View
This section allows you to show or hide the Opportunity View in the Forecast Page, and also configure the fields that should be visible to CSMs and end-users.
Show / Hide Opportunity View
The Show Opportunity View toggle switch allows you to control the Opportunity View in the Forecast page. If you are not maintaining opportunities and not using the GS Opportunity object to, then you can turn OFF the toggle switch. When the switch is turned OFF, then the CSMs and end-users cannot access the out-of-the-box opportunity views or create a new opportunity view.
Note:
- The Show Opportunity View toggle is turned ON by default.
- The Analyze page in Renewals displays an empty state when the Show Opportunity View toggle switch is turned OFF.
Configure Opportunity View Fields
You can select the fields, from the GS Opportunity object, that should be displayed to CSMs and end-users when they access the Opportunity View. To select a field on the Opportunity View:
- Click Select Fields. The GS Opportunity Fields slide-out panel appears.
- Select the field using the checkbox.
- Click Add. The selected fields are added under the Available Fields for the Forecast View section.
- (Optional) Drag and drop the ellipsis menu of a field, to change the order of display.
- (Optional) Click the Settings icon.
- (applicable only if step 3 is executed) Select the Editable checkbox to make a field editable by the user. The Editable checkbox is selected and frozen for a few fields (example calculated fields, you cannot make such fields editable).
- (applicable only if step 3 is executed) Select the Required checkbox to set a field to be mandatory. This checkbox is selected frozen for fields that are mandatory, by default.
- (applicable only if step 3 is executed) Click OK.
- Click Save.
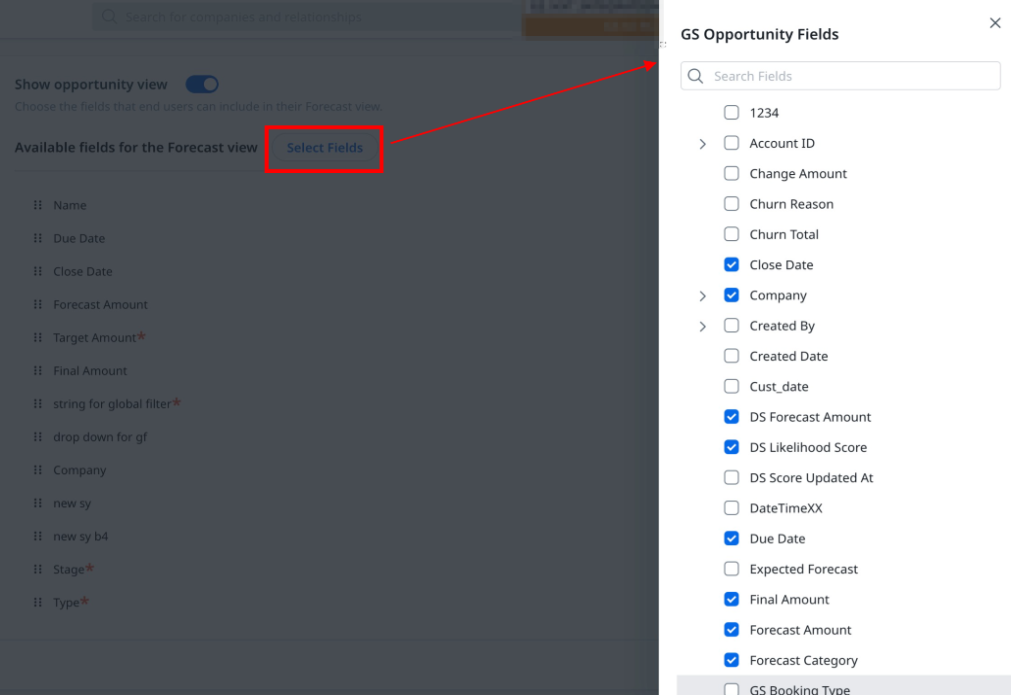
The list view of Opportunities on the Renewal center page displays the configured fields in the same order.
The fields under the Forecast fields column are populated from the GS Opportunity object. Apart from the GS Opportunity object, you can also use fields of those objects to which GS Opportunity has a lookup. Up to three levels of lookup are supported, including parent object (GS Opportunity).
IMPORTANT: The selected Forecast Fields cannot be removed from the Forecast page if they are part of one or more forecast views. The below error message appears when you uncheck the checkbox.
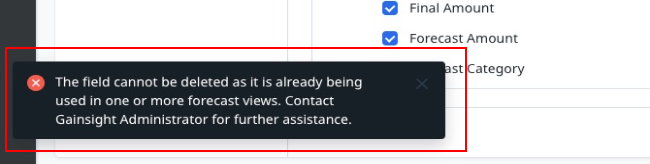
To uncheck the forecast field, you need to first remove the field from all forecast views where it is being already used. Follow the steps below to identify the forecast views where the field is being currently used.
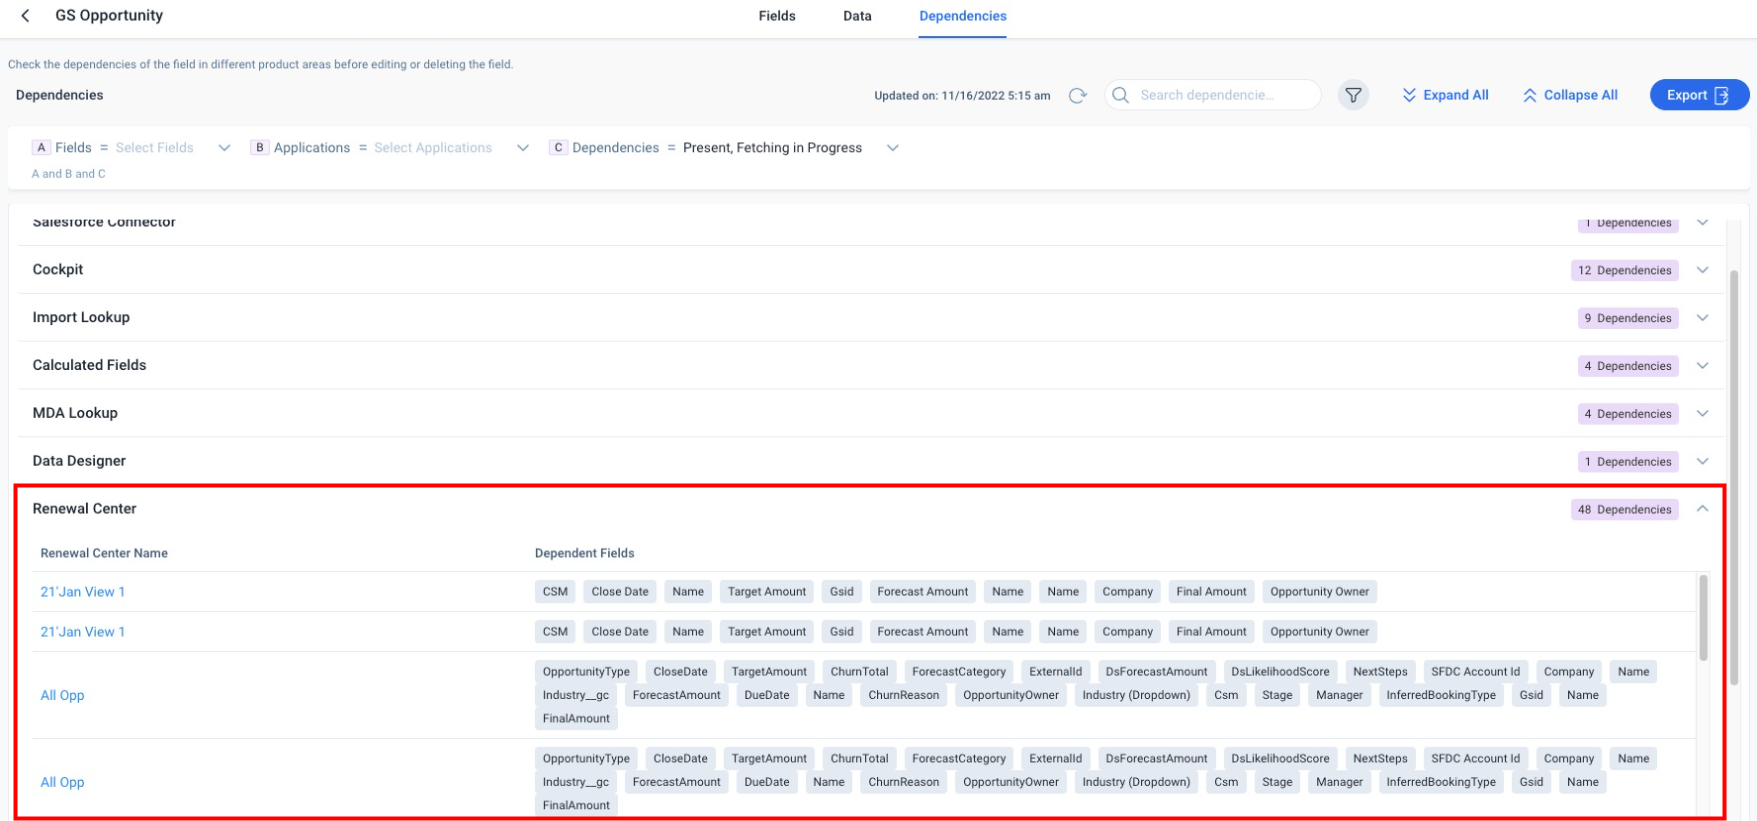
- Navigate to the Administration > Data Management > Objects tab.
- Select the GS Opportunity object.
- Select the Dependencies tab.
- From the dependencies list, expand the Renewal Center drop down. All the views with their forecast fields are listed.
Other Settings
This section allows you to configure the following options:
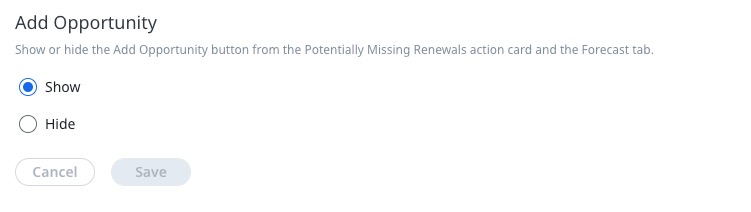
Add Opportunity
Admins have the flexibility to hide the Add Opportunity option for users. You can use this configuration if you want users to work with only opportunities synced from your CRM and not create opportunities in Renewal Center.
To configure Add Opportunity:
- Navigate to Renewal Center Configuration > Other Settings.
- From the Add Opportunity options, select Show or Hide as required.
- Click Save.
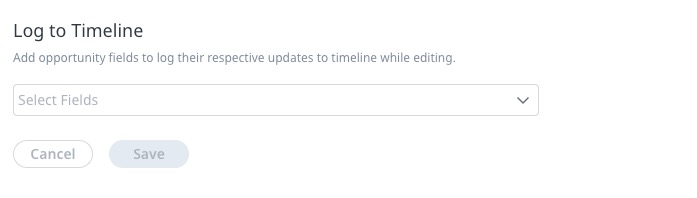
Log to Timeline
Admins can allow users to update the company timeline with notes or additional information entered by users in the opportunity detail view.
Note: Only those fields of the GS Opportunity object that are created as Rich Text Area (Data Type) are available in the dropdown.
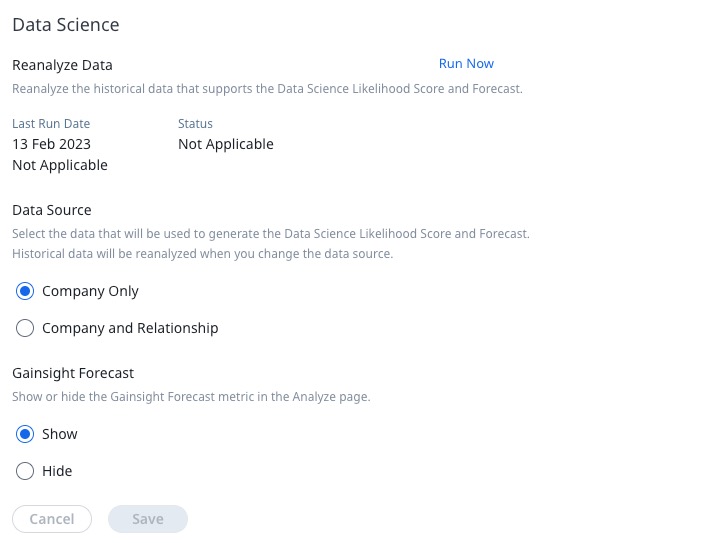
Data Science
The Data Science section allows you to configure the following options:
- Reanalyze Data: Admins can now trigger the recalculation of Data Science scores after making any data updates. Previously Gainsight performed a scheduled job to recalculate DS scores once a week, With this enhancement, you can run the Reanalyze Data job to recalculate the historical data that supports the DS Likelihood score and Forecast instantly as required.
Note: You need to click the Run Now button if you have changed the source data that supports any of the required fields.
- Data Source: Choose from the data source options depending on whether you want only the Company data or Company and Relationship data to be considered while generating DS Likelihood Score and Forecast.
- Gainsight Forecast: This section allows you to display or hide the Gainsight forecast field on the Renewal Center User page. This is useful for customers who are early in their deployment of Gainsight CS and may not have established Health Scorecard, a primary data required for supporting the Data Science in Renewal Center. These customers can immediately gain value from the rest of Renewal Center. Once Health Scorecard has been established, customers can update this configuration to show the Gainsight Forecast.