PX Release Notes January 2020
Version 2.39.0, January 28, 2020
List of Features
| Features | Destination |
|---|---|
| Administration Settings | https://app.gainsightpx.com/settings/subscription |
| Engagements | https://app.gainsightpx.com/engagement |
| Integrations | https://app.gainsightpx.com/settings/Integrations |
![]() : This symbol indicates that an enhancement originated as a customer suggestion on the Gainsight Community.
: This symbol indicates that an enhancement originated as a customer suggestion on the Gainsight Community.
Enhancements
Administration and User Setup
From PX Settings, Admins can configure various settings for their instance, including managing users, adding products, defining user and account attributes, enabling application integrations, and more.
New Environment Settings
For any application, there can be multiple subscription being used. Gainsight has introduced environment settings in PX. Environment settings in PX can be used to differentiate subscription by their usage type. You can use these settings while creating new Products in your subscription. You can also configure all of your existing products with one of the environment settings.
You may be using various environments for your application. You can now associate the Staging PX product with your staging application, QA product with your QA application, and so on. Once you complete this process, you can test how an engagement looks, on your staging application and then push it to your production application for customers to view it. Similarly, you can test other features in multiple environments before pushing them to your production environment.
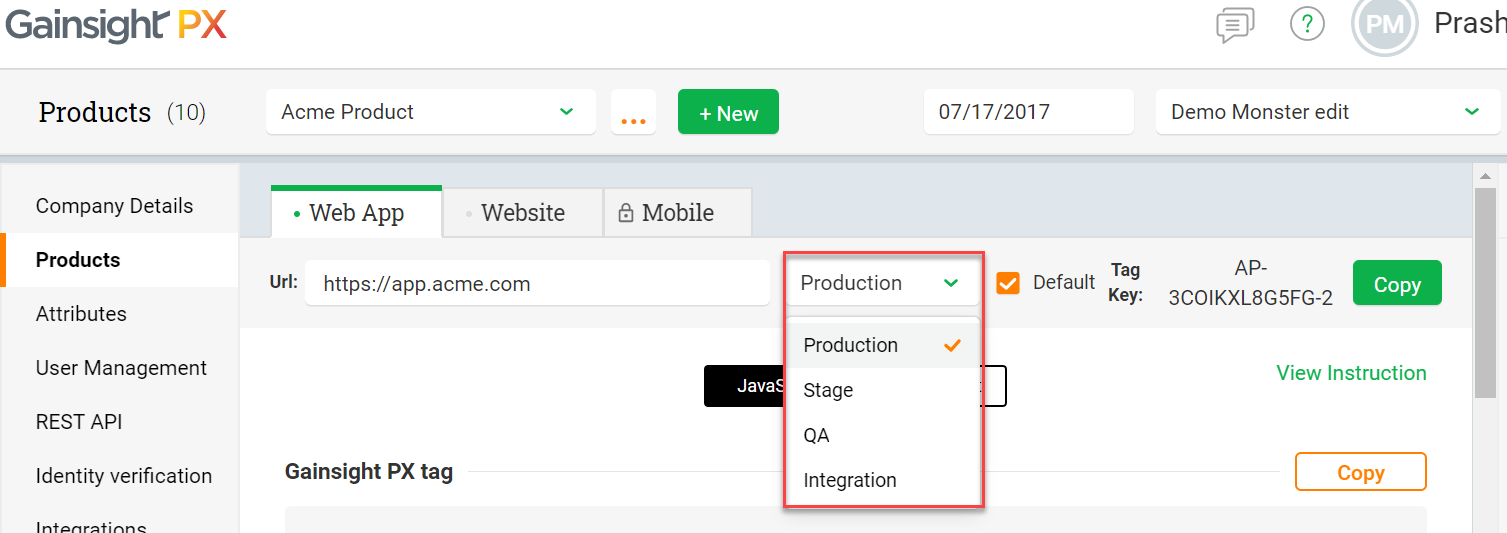
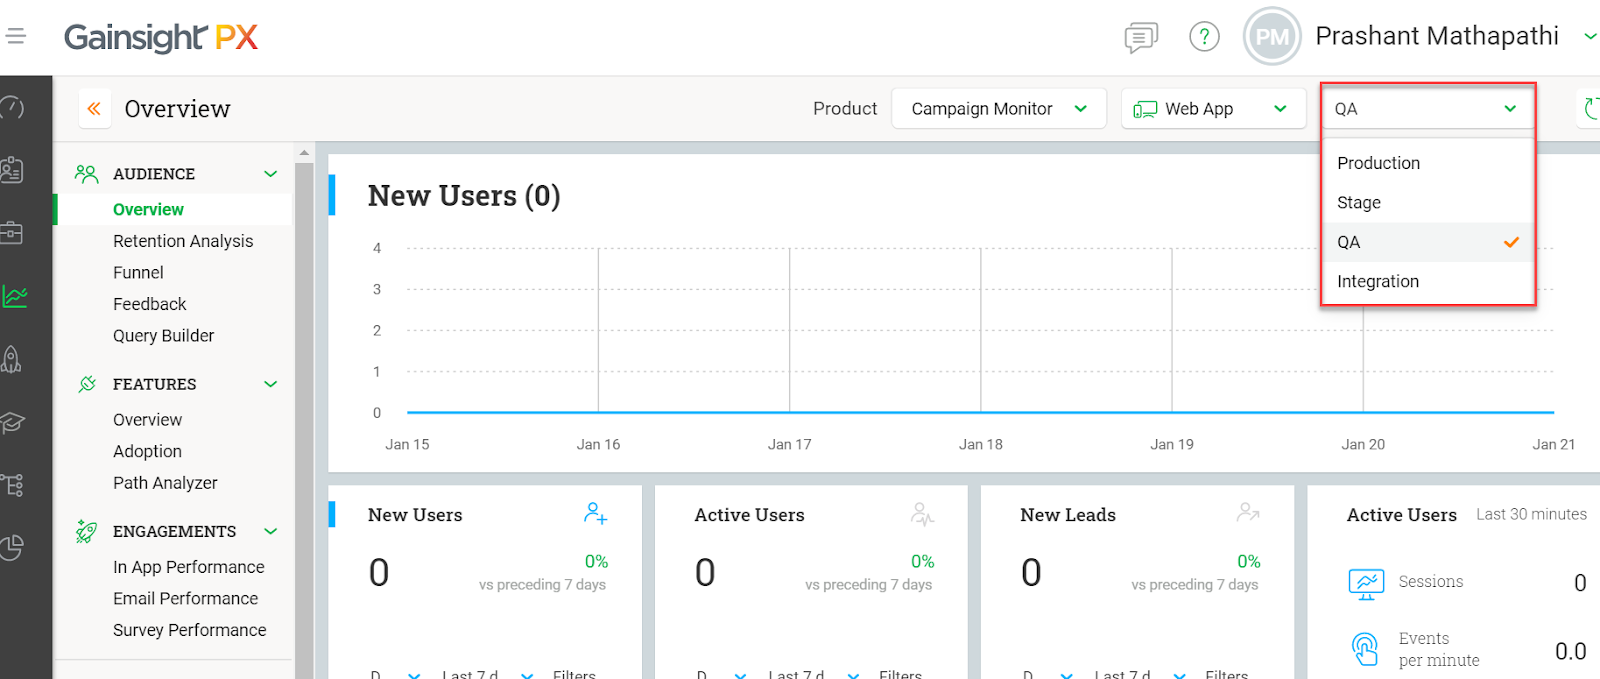
Environment Setting Options
Gainsight PX provides you with four types of environment settings:
- Production: This type of tenant contains real-time data and is generally being used by your customers.
- Staging: Staging tenant is a clone of the production tenant. This type of tenant can be used to test new features before releasing them to production, as well as to test engagements before publishing them to production environments.
- QA: This type of tenant is generally used by Quality Assurance teams to test new features or issues. Once everything passes QA, data can be pushed to the Staging org.
- Integration: This type of tenant is generally used by developers while building new features or modifying existing features. Once development is completed, data can be pushed to QA type tenants for testing.
Nature of Product Key for Production and Non-Production Environments: The production and nonproduction environments can be differentiated by the format of their product keys. A Production environment has a product key in the format XXXXXXXXXX-X. All the non-production environments have product keys in the format XXXXXXXXXX-X-X.
Apart from selecting an environment for your product, you can also select which environments must be enabled by default in new engagements. This setting can be configured from the Enable by default in new engagements check box (see impact of environment in engagements for more information.
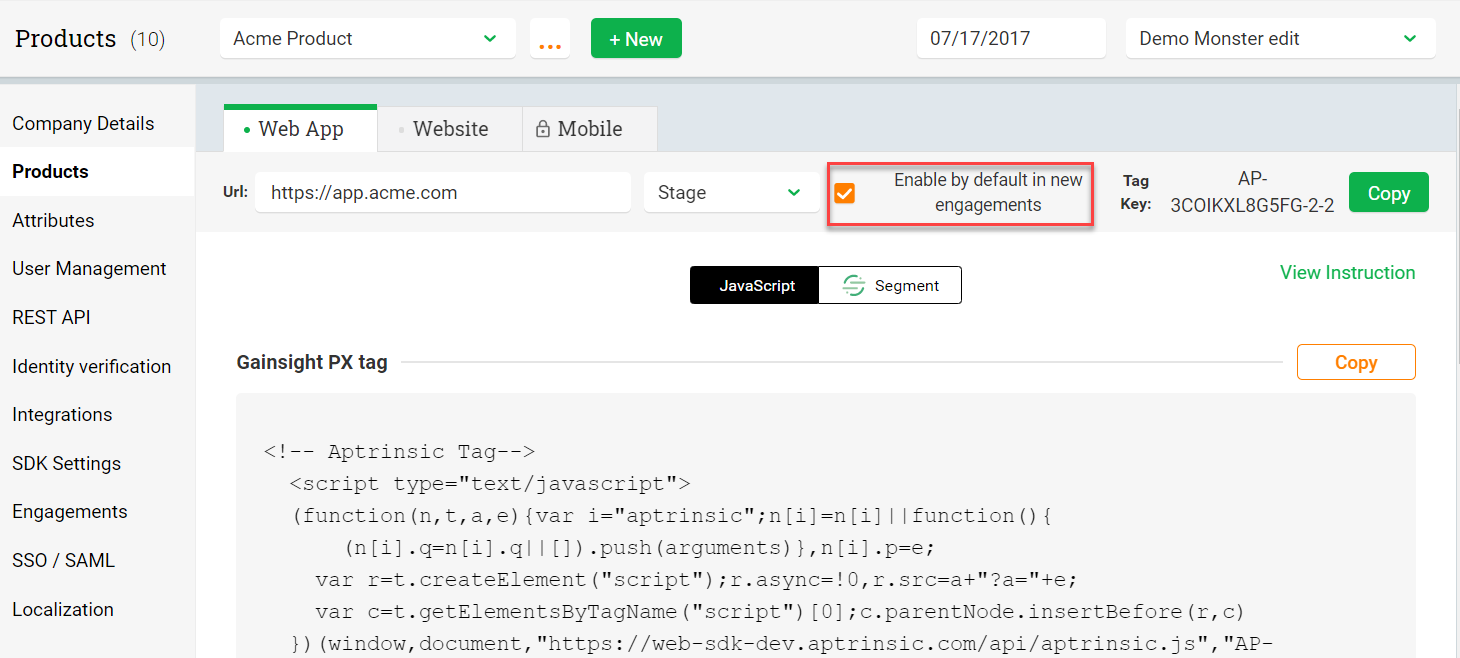
In the above image, the Stage subscription is enabled by default when a new engagement is created.
To use this enhancement:
- Navigate to Settings > Products.
- Select the product for which you wish to configure the Environment setting.
- Select the required environment from the Environment drop-down menu.
- (Optional) Select the Enable by default in new engagements check box.
- (applicable only if the above step is executed) Click Save.
Note: Once the product tag key is generated, you must copy it and paste in your web-app.
Impact of Environment Settings in PX Modules
Environment Settings impact all areas of PX, since this setting works at the Product level. In most areas, you now have an option to filter data based on the available environments. This section explains how the Environment Settings impact various PX modules.
User Management
In User management when you add new users, you have a new check box called Production Launcher. If you select this check box for a user, they can launch engagements in the Production environments. For existing users, if the Manager check box is selected, the Production Launcher check box is also selected automatically.
Engagements
In Engagements, you can now select the environment for which you wish to launch your engagement. This option is available in the Launch section of the engagement.
IMPORTANT: It is mandatory to select at least one of the environment types before launching the engagement.
Note: If you have selected an Environment and launched the engagement, and wish to add more environments, you can do so without pausing the engagement.
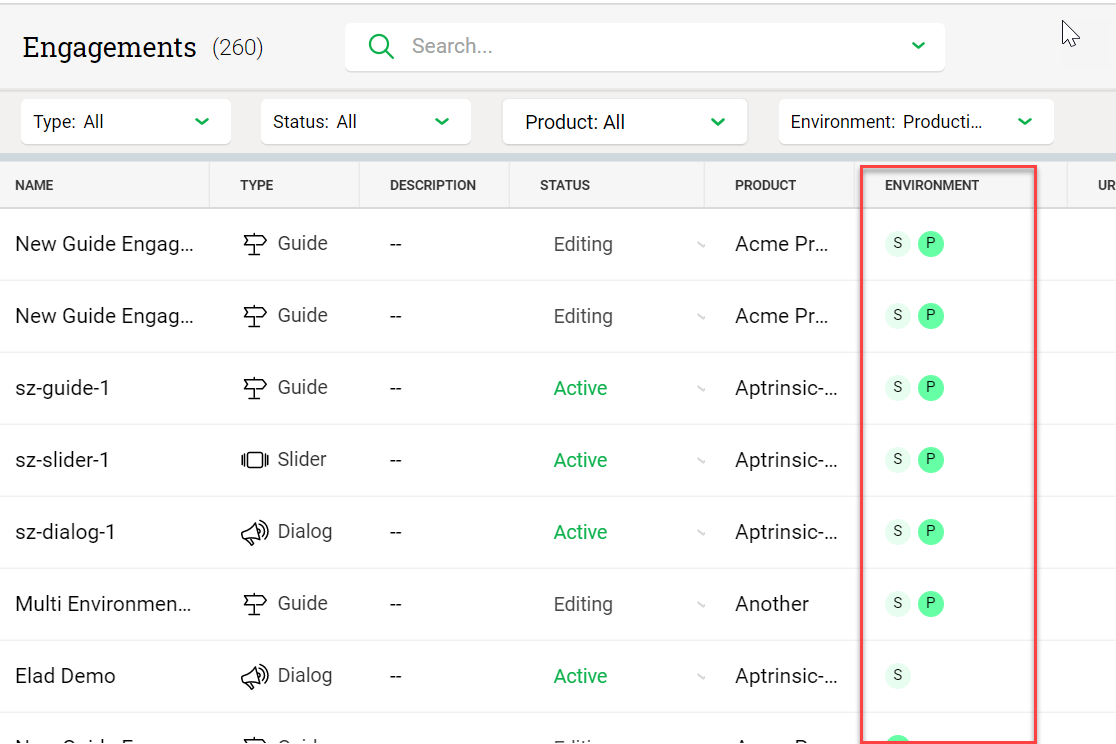
The Engagement List view now has an additional filter that allows you to filter engagements based on the environments for which they are launched (or will be launched). You can select multiple environments in this filter.
The list view also has a new column called Environment. This column displays the initials of the environment type (P for Production, S for Sandbox, etc.) for which the engagement is being used.
Knowledge Center Bot
In the KC Bot, you can now select the environment for which you wish to launch the Bot. Initially, you can test the bot in a Staging org, and then move it to the Production org. The Launch section of the Bot allows you to select the environment for which the Bot must be launched.
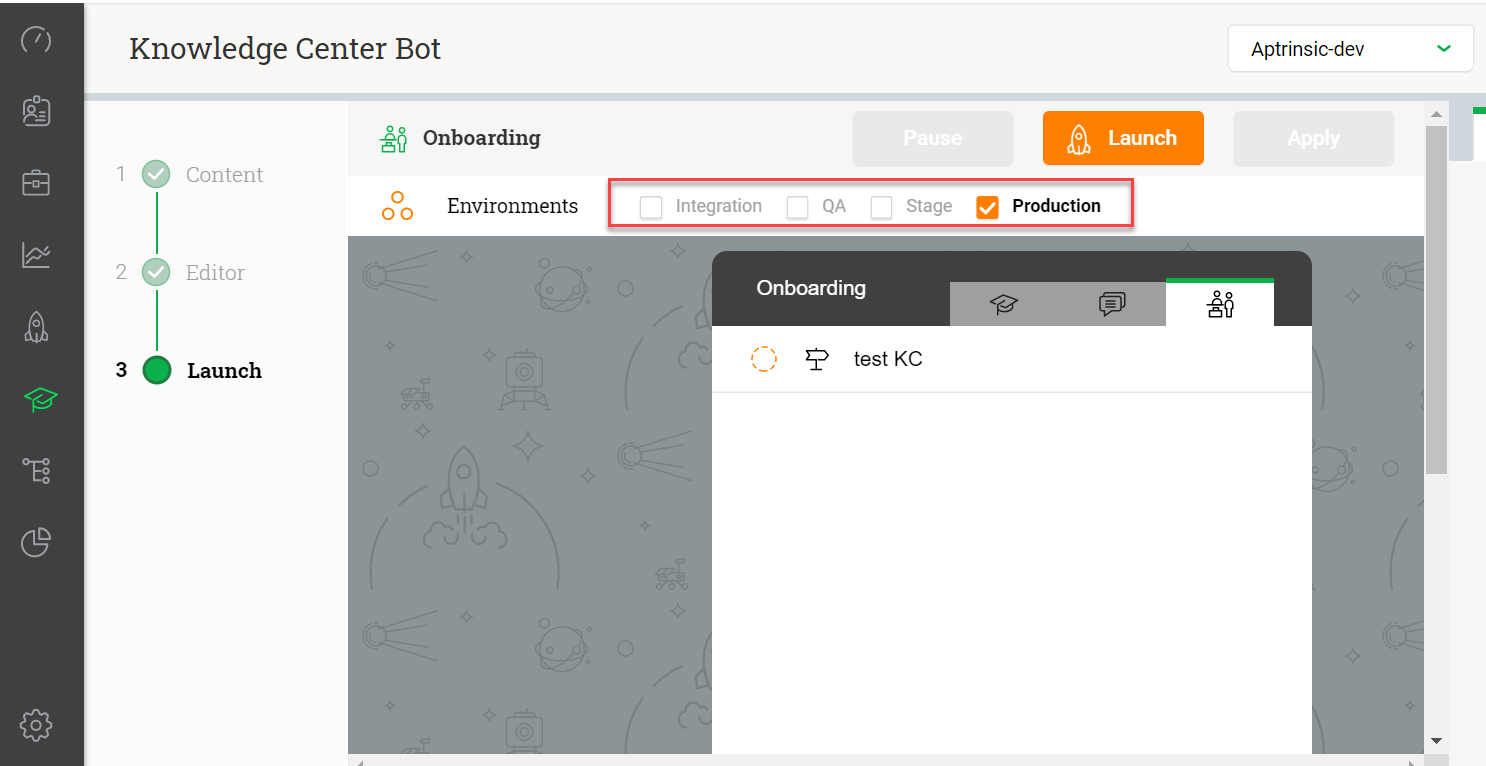
IMPORTANT:
- It is mandatory to select at least one environment type, before launching the bot.
- Consider that there are two engagements whose trigger method is set to KC Bot. One of the engagements is meant to be launched on Production and the other on Sandbox, as shown in the following image.
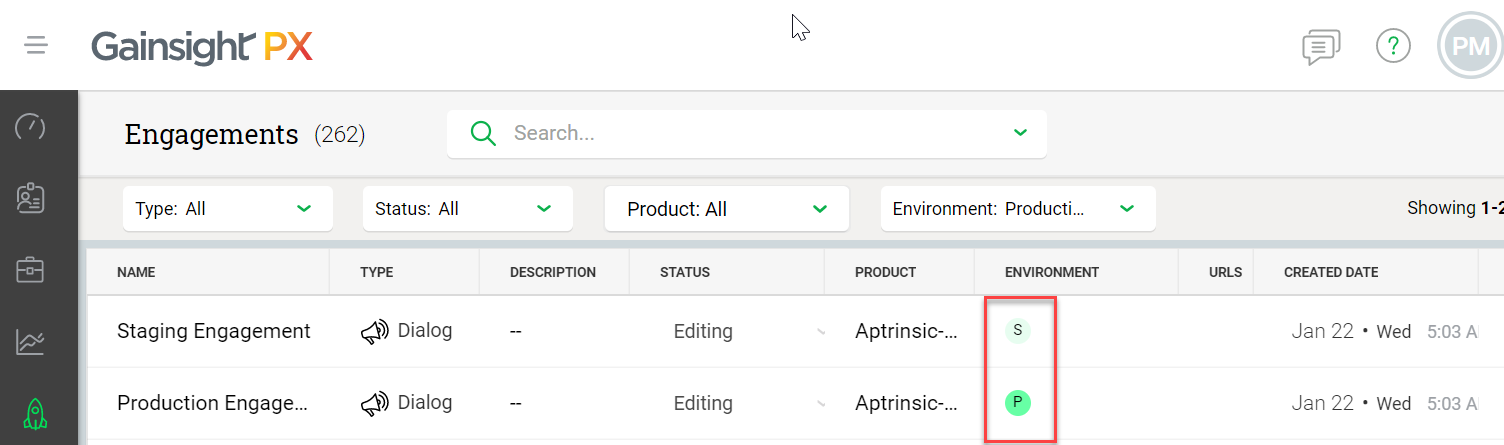
Both the above engagements now appear in KC Bot since the trigger method is set to KC Bot.
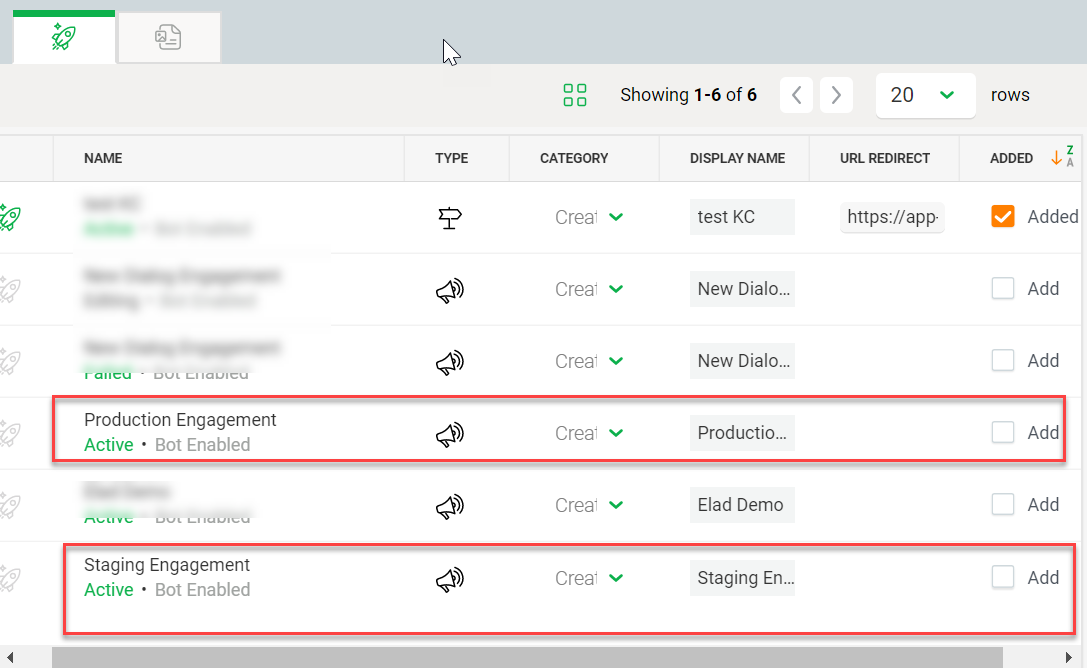
If you select the Add check box for the Staging engagement, the staging engagement is added to the Bot. Now, if you go ahead and launch the Bot for the Production environment, your staging engagement can be viewed on production, via the KC Bot.
Audience Explorer
You can now filter Audience based on the environments.
Accounts Explorer
You can now filter Accounts based on the environments.
Analytics
You can now filter the Analytics section to view data for the required environments.
Dashboards
You can now view Dashboards for a specific environment.
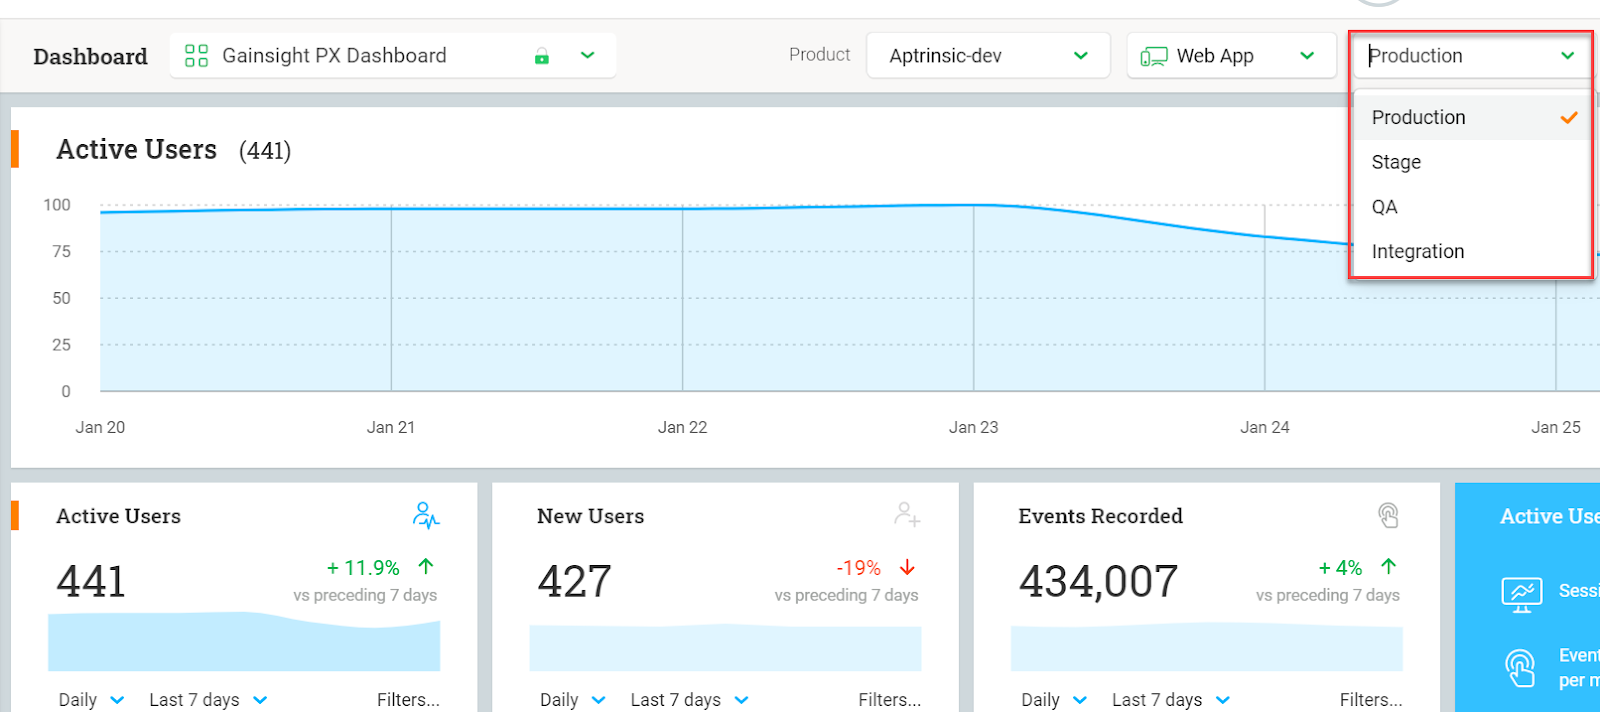
When you create a new Dashboard, you can now select the environment to which the Dashboard belongs to.

Send Request Data as POST Method
Gainsight PX now allows you to send data request payloads as a POST method. Previously, data was requested from an application via the GET method. POST was used only if the Payload size exceeded a certain limit. Gainsight now provides you the ability to use the POST method for all data requests, irrespective of the payload size.
To use this enhancement, you must modify the PX tag with an additional line of code. The code is "usePOST" : true. When you append this code to the PX tag, all the data requests are sent as a POST method.
Advantages of the POST Method:
- POST requests are never cached.
- POST requests do not remain in the browser history.
- POST requests cannot be bookmarked.
- POST requests have no restrictions on data length.
New Java SDK
Gainsight has now introduced the Java SDK. This SDK is an alternate and easy way to use Gainsight PX APIs. With PX REST API you need to write the code that sends requests to the end point. However, with the SDK all the basic level configurations are performed automatically. The HTTP Request to the endpoint, the parsing of the response, etc., are automatically taken care of by the SDK. With the SDK, you only need to use the specific API based on the data required and everything else is performed by the SDK.
To use the Java SDK, you must have the PX API key of your PX subscription. To learn about the APIs provided by the Java SDK, refer to the Gainsight PX Java SDK article.
Gainsight PX Launch Adobe Extension
Gainsight has now introduced the PX Launch Adobe extension. You can use this extension to automatically insert the PX tag code to your web applications. You can find the Gainsight PX Launch extension from this site. This extension is similar to Google Tag Manager, but is much more powerful and allows you to decide when exactly the tag must be loaded. This extension allows you to perform the identify call, without any coding. Before using this extension, you must create a Property for your application in Adobe Extension. Once you create the Property, you can easily store this Extension in your property. You must also have the product key of your PX product to use this extension.
To learn more about the configuration of this extension, refer to the Install PX Adobe Launch Extension article.
Integrations
PX offers a variety of integration options, for the purposes of enhancing productivity (Slack or Zendesk), as well as for data integration (S3, Segment, Gainsight CS, etc.), and to connect your documentation sources with the PX knowledge center bot (Mindtouch, Zendesk, HelpDocs, Salesforce).
Send Engagement Data to Segment
Gainsight now sends data to Segment from PX, thus facilitating a two-way sync between Segment and PX. Currently, you can only send in-app engagement data from PX to Segment. The data is sent as custom events to Segment, by using Segment Track call. To learn more about Segment Track call, refer to this segment article. This enhancement allows you to send PX data to any third party application via Segment.
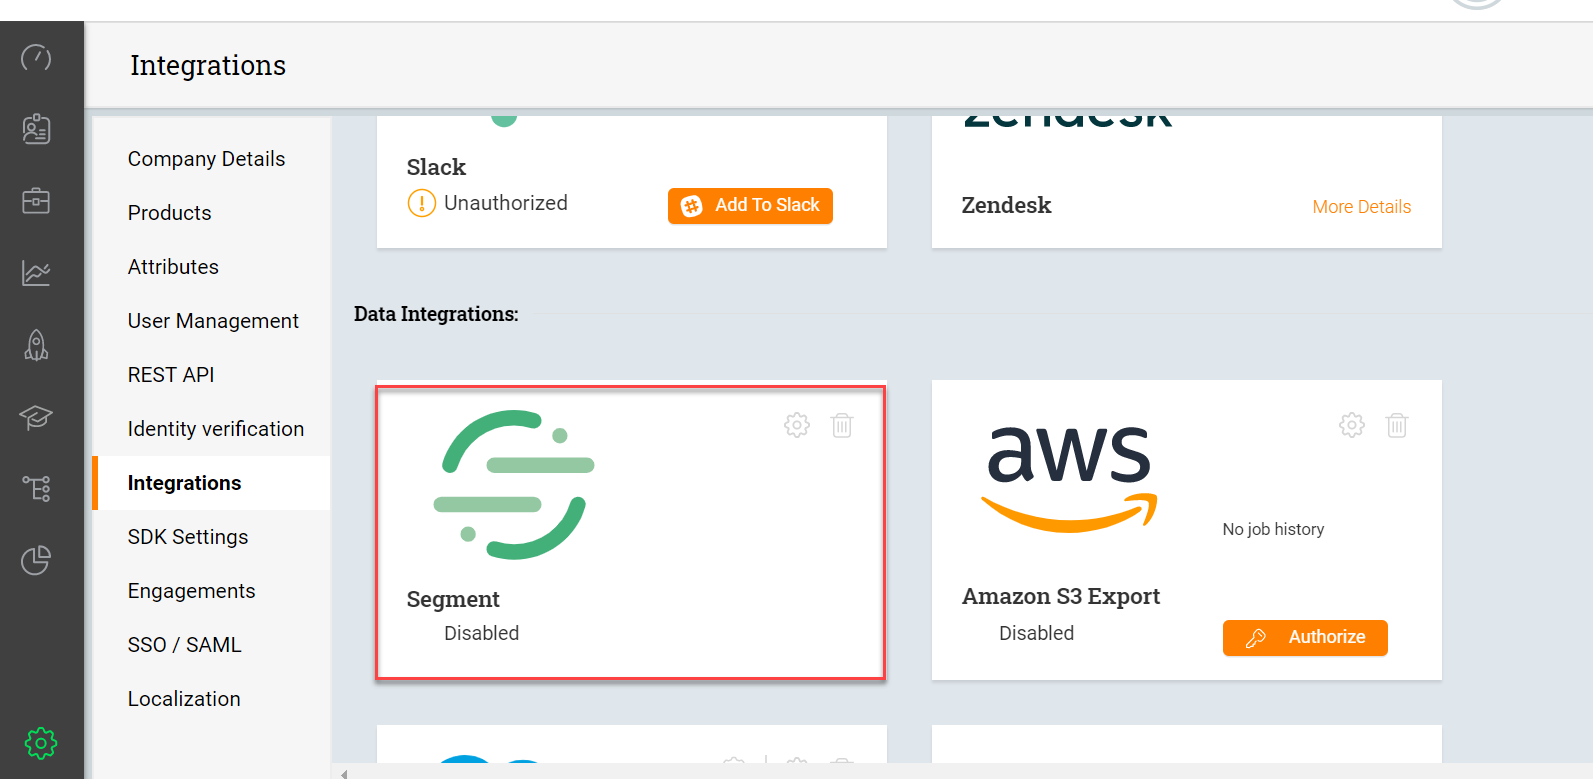
The existing Segment widget is upgraded with a new tab called Push To Segment. This widget pushes data from PX to Segment. The widget will continue to serve the existing functionality of syncing data from Segment to PX.
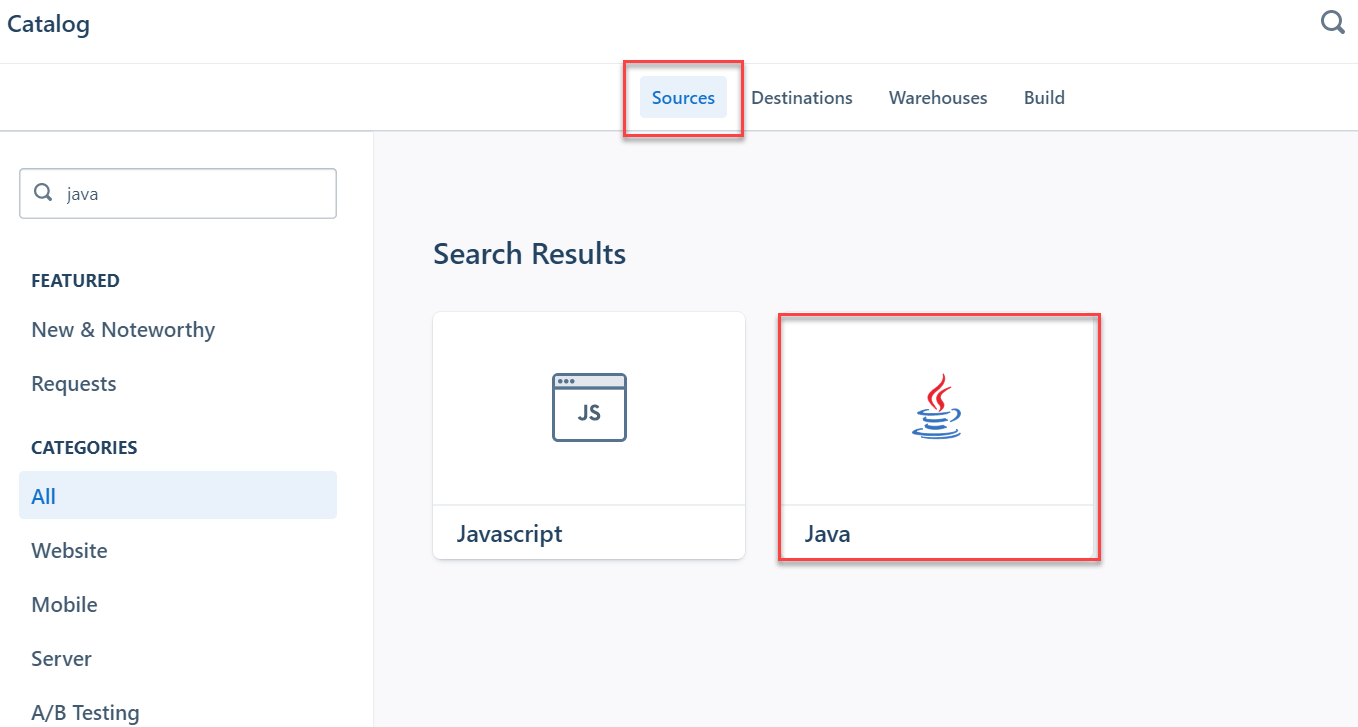
Before configuring the widget, you must create a Java based Source in Segment. Once you create the source, you must note down the Write Key of your source. This key is required to configure the Segment Push widget. To learn more about creating sources in Segment, refer to this Segment article.
To use this feature:
- Navigate to Settings > Integrations.
- Click the Settings icon for the Segment Push widget.
- Click the Push to Segment tab.
- Turn the toggle switch on.
- Select a product from the Product drop-down menu.
- Select an environment from the Environment drop-down menu.
- Paste your segment source key in the Segment Key field.
- Click Add.
- Click Apply.
The engagement data from the selected Product and Environment is synced to Segment. You can create multiple sources in Segment based on the number of products and environments you have. However, a source in Segment can send data to only one destination and not multiple destinations.
The engagement data from PX to Segment is sent as Custom Events. Currently there are two custom events that are sent; GPX In-App Guide and GPX in-App Survey. The GPX In-App Guide event sends data for a Dialog, Slider and Guide engagements. The GPX in-app survey event sends data for all the surveys (currently data is not sent for a Multi-question survey and Email engagement).
The list of parameters sent by the events are:
GPX In-App Guide Event Parameters
| Field Name | Field Value | Description |
|---|---|---|
| Type | Guide, Slider, Dialog | |
| ID | String | GPX engagement ID |
| Name | String | |
| Interaction | Viewed, Viewed step, Completed, Clicked | |
| Step number | Integer | In case of an in-app guide, slider the field will be populated with the step number. |
| Activation | Auto, Bot, Badge, JourneyOrchestrator | |
| Execution ID | Runtime id for the current engagement to allow for event grouping. | |
| Execution date | Date | In addition to the event timestamp, this field is a unified runtime date for the current engagement to allow for event grouping by instantiation timestamp. |
GPX In-App Survey Parameters
| Field Name | Field Value | Description |
|---|---|---|
| Type | NPS®, CES, Boolean, Rating | |
| ID | String | GPX engagement ID |
| Name | String | |
| Interaction | Viewed, Viewed step, Completed, Clicked | |
| Score | Integer | In case of score based survey, the value will be passed via the score field. |
| Score type | Promoter, Detractor, Passive | Relevant to NPS® only |
| User input | String | Represents user input/comment/open text questions |
| Activation | Auto, Bot, Badge, Journey Orchestrator | |
| Execution ID | Runtime id for the current engagement to allow for event grouping. | |
| Execution date | Date | In addition to the event timestamp, this field is a unified runtime date for the current engagement to allow for event grouping by instantiation timestamp. |
Engagements
Engagements are the communications that are executed through product (in-app) or emails for a specific audience at a specific time. These communications can be interactive in nature which helps you to share information, receive feedback, and engage customers with your product. The overall goal of using engagements is to increase your customer's product usage.
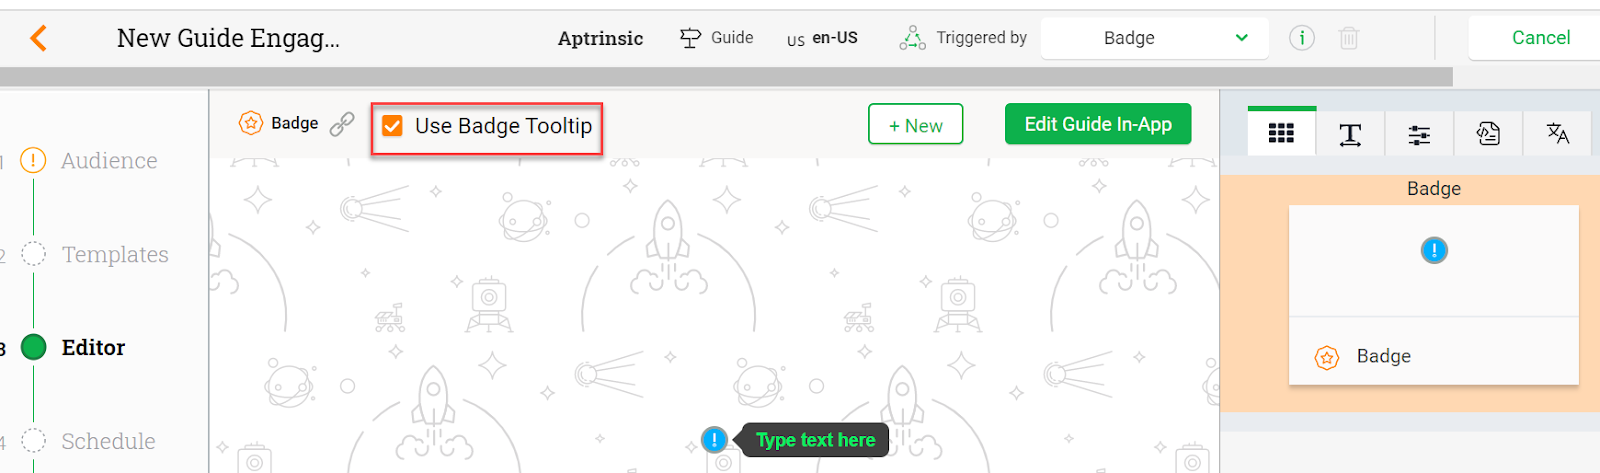
Use Badge Icon Independently
Gainsight PX now allows you to use the Badge icon independently without associating it with any of the steps of the Guide engagement. With this feature, you can now launch a Guide engagement with just the Badge icon, and some Tooltip content, associated with the badge icon. Previously, it was mandatory to use at least a single step with Badge icon.
This feature is very useful when you wish to have permanent tooltips on your application. You can just create the Badge icon, add the Tooltip content and launch the Guide engagement.
To use this feature:
- Create a Guide engagement.
- Select Badge from the Trigger By drop-down menu.
IMPORTANT:
-
The newly introduced Use Badge Tooltip check box allows you to display or hide the tooltip content, associated with the Badge icon. If you clear this check box, the badge icon will not display the Tooltip content.
-
You can clear the Use Badge Tooltip check box only if you have at least one step in your Guide engagement.
- Click Save.
- Click Edit Guide In-app to associate the Badge icon with an element on the application.
- Modify the default Tooltip content and add the required content.
- Click Save.
-
(Optional) Use the text editors to format the Tooltip content.
-
(Optional) Use the Edit option to change the badge icon, position, trigger method, tooltip position, as required.
-
Click Save.
Note: You can also configure the Badge and Tooltip settings from the PX application as well.
 New "Copy to Clipboard" Button
Gainsight has now introduced a Copy to clipboard button in the Audience Rules Section of Engagements.
When you click this button, all the values inserted in the rule are copied. You can paste the values into the Audience section of another engagement. This feature is also available in the Segment Rules.
Business Use Case: Consider that you have created an engagement and added around 50 Email IDs to which you wish to send the engagement. After a few days, you need to send another engagement to the same Audience. Instead of inserting the Email Ids again, you can just copy the Email IDs from the existing engagement and paste them to the new engagement.
IMPORTANT:
-
This button is displayed only when you add values to the Rules.
-
This feature can only be used on Account and User Rules.
-
The Copy to clipboard button is displayed only when you are using either:
-
A Custom attribute of the String Data Type from the User object.
-
A Default or Custom attribute of String Data type from the Account object.
-
To use this feature:
-
Create an Engagement.
-
Configure the Audience section, with the User and/or Account rules.
-
Click the Copy to clipboard button.
-
Paste the copied values, to the required location.
Issues Addressed (Fixes)
This section contains a list of customer escalations that have been addressed and resolved between December 17, 2019 and January 27, 2020.
| Sl. No. | Description |
|---|---|
| 1 | Previously, when you tried to export more than 2000 Account records from Adoption Explorer, the export failed. This issue is now resolved and you can now export more than 2000 records from Adoption Explorer. |
| 2 | Previously, the application CSS overrided the PX CSS in a Multi Question survey, thus preventing you from using few features.This issue is now resolved and application CSS does not override PX CSS anymore. |
| 3 | Previously PX daily usage data was missing for a few dates in UDM. This issue is now resolved and data is now captured for all the dates. |
| 4 | Previously, you could not rename engagements when you used PX from firefox browser. This issue is now resolved and you can now rename engagements from the Firefox browser. |
| 5 | Previously, when you tried to open an engagement on another tab by clicking an element, you received an error. This issue is now resolved and you can now view engagements on other tabs as well. |
| 6 | Previously, the ALLOW CONTACT ME column of an engagement analytics displayed inaccurate data (blank lines), instead of Yes or No values. This issue is now resolved and the column does not display anymore blank values. |
| 7 | Previously, the Badge icon was appearing inconsistently on various parts of the UI. This issue is now resolved and badge icon now appears consistently. |
| 8 | Previously, the SFDC data sync failed even after configuring the mappings accurately. This issue is now resolved and you can now sync data successfully using the Salesforce widget. |
| 9 | Previously, when you used the existing templates to create a Badge icon, the process failed. This issue is now resolved and you can now use the existing templates to create the Badge icons. |
| 10 | Previously, when you launched a Guide engagement with the Badge icon, the Badge behavior was very odd on the UI. This issue is now resolved and the Badge icon now works as expected. |
| 11 | Previously, when you tried to preview a Multi Question survey engagement, the preview operation failed. This issue is now resolved and you can now preview Multi Question Surveys. |
| 12 | Previously, when you tried to apply filters in the Retention Analysis report, the report failed to return accurate values. This issue is now resolved and you now receive accurate values after applying filters in a Retention Analysis report. |
| 13 | Previously, when you tried to use a Tooltip in a Guide engagement, the tooltip was hidden behind another UI screen. This issue is now resolved and you can now use Guide tooltips, as needed. |
| 14 | Previously, you could not scroll the screen when a tooltip was displayed. This issue is now resolved and you can now scroll in the Guide engagement. |
| 15 | Previously, when you submitted feedback, the acknowledgment mail was not sent. This issue is now resolved and you now receive the acknowledgment mail after submitting feedback. |
| 16 | Previously, when you used the Auto resolve feature to trigger engagements through the KC Bot, the engagement was not triggered, as expected, even after using the Auto resolve feature accurately. This issue is now resolved and you can now launch engagements in KC Bot by using the Auto resolve feature. |
| 17 | Previously, when you applied the URL filter rule in the Audience Explorer, the report did not return accurate values. This issue is now resolved. |
| 18 | Previously, when you tried to close an engagement from the IE browser, the engagement did not close. This issue is now resolved and you can now close engagements from the IE browser. |
| 19 | Previously, when you tried to access the Knowledge Base area of PX, you received an error message. This issue is now resolved and you can now access KB. |
| 20 | Previously, when you tried to use the Auto Resolve feature in IE, from the KC Bot, the resolve function did not work as expected. This issue is now resolved and you can now use Auto resolve in KC Bot. |
| 21 | Previously, when you previewed a Guide engagement, the Tooltip step pushed the application down from its actual position. Also, the X button did not work properly in the editor section. These issues are now resolved. |
| 22 |
Previously, when you applied filters on the Time series graph, the graph did not display the latest content by incorporating the applied filters. This issue is now resolved and you can now view filtered data on time series graphs. |
| 23 | Previously, the mask or exclude parameter option did not work as expected. Masking and Exclusion was done from HTML code itself. This issue is now resolved and you can now use the Mask or exclude parameters option. |
| 24 | Previously, when you created a new user in PX, the user did not receive a Welcome email. This issue is now resolved and new users can now receive Welcome Email. |
| 25 | Previously, when you applied Audience rule and launched an engagement, the engagement was not displayed to some of the qualifying users. This issue is now resolved and all the qualifying users now receive the engagement. |
| 26 | Previously, the Survey engagements section displayed inaccurate survey results on some occasions. This issue is now resolved and Survey Analytics now display accurate data. |
| 27 | Previously, when you applied the Group By feature in an Analytics report, the report did not group the results, as expected. This issue is now resolved. |
| 28 | Previously, the Guide engagement’s editor tooltip was blocked and did not allow you to perform any edits. This issue is now resolved. |
| 29 | Previously, when you used a Segment rule in an NPS® survey, users who were not part of the segment could also see the survey. This issue is now resolved and now only those users who are part of the selected segment, see the survey. |
| 30 | Previously, when you used the Accounts API, you received an error message and the API failed to perform the required task. This issue is now resolved and you can now use the Account API. |
| 31 | Previously, when you tried to configure the product Mapper with a CSS selector that started with an underscore, the configuration failed. This issue is now resolved and you can now configure the Product Mapper with CSS selectors that start with an underscore. |
| 32 | Previously, some of the who logged in to the application, were not displayed in PX. This issue is now resolved and all the users who logged in to the application are now visible in PX. |
| Net Promoter®, NPS®, NPS Prism®, and the NPS-related emoticons are registered trademarks of Bain & Company, Inc., NICE Systems, Inc., and Fred Reichheld. Net Promoter ScoreSM and Net Promoter SystemSM are service marks of Bain & Company, Inc., NICE Systems, Inc., and Fred Reichheld. |