PX Release Notes November 2019
Version 2.27.0, November 12, 2019
List of Features
| Features | Destination |
|---|---|
| Engagements (Introducing Badge icon) | https://app.gainsightpx.com/engagement |
| Knowledge Center Bot | https://app.gainsightpx.com/knowledge-center |
| Product Mapper | https://appgainsightpx.com/mapper |
Enhancements
Engagements
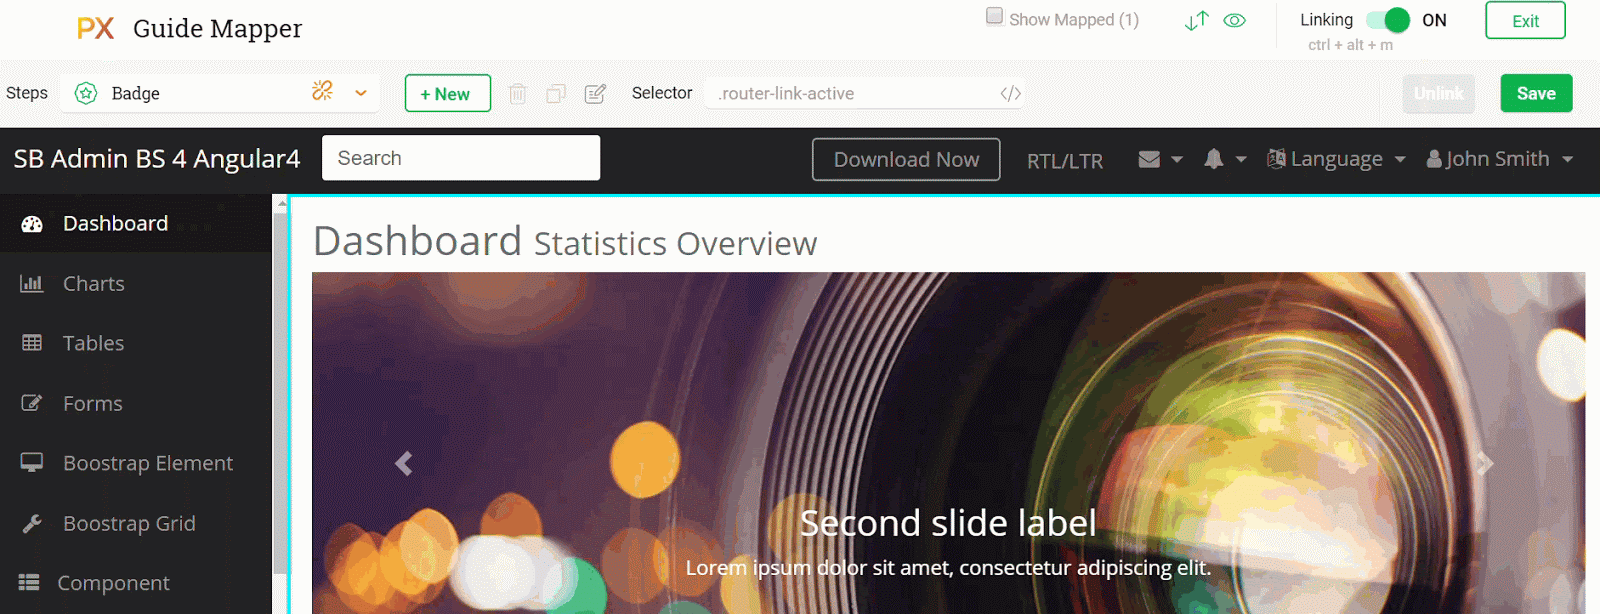
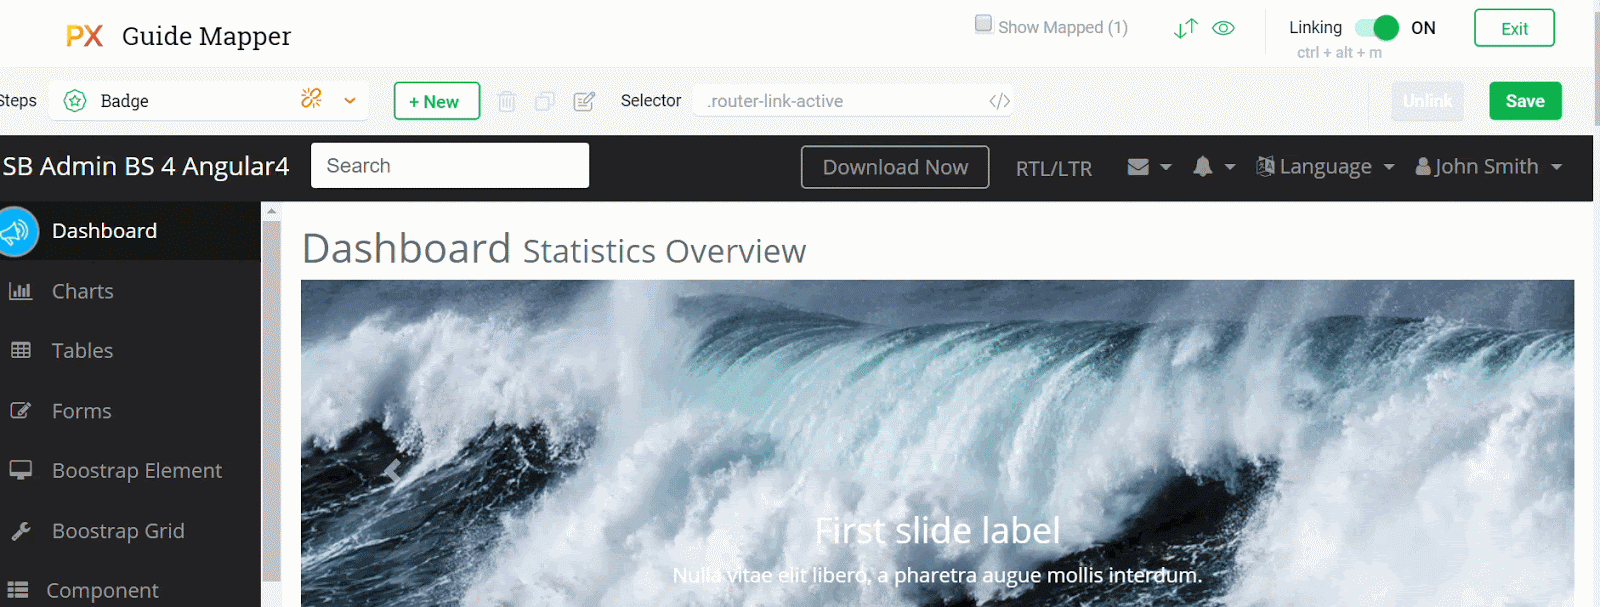
- Trigger Guide Engagements with Badges: Gainsight has introduced a badge icon as a way to trigger a Guide Engagement. Users must click the badge icon to initiate the guide, and the badge can display on the page indefinitely, next to an element for which you want to provide contextual help. When you choose to trigger a Guide engagement with a badge icon, a badge icon is added to your Guide engagement.
The Badge icon is a direct link to the guide which triggers the guide engagement. The difference between Knoweledge Center icon and badge icon is that badge icon can be associated with an element on the UI.
You can perform the following actions on the badge icon:
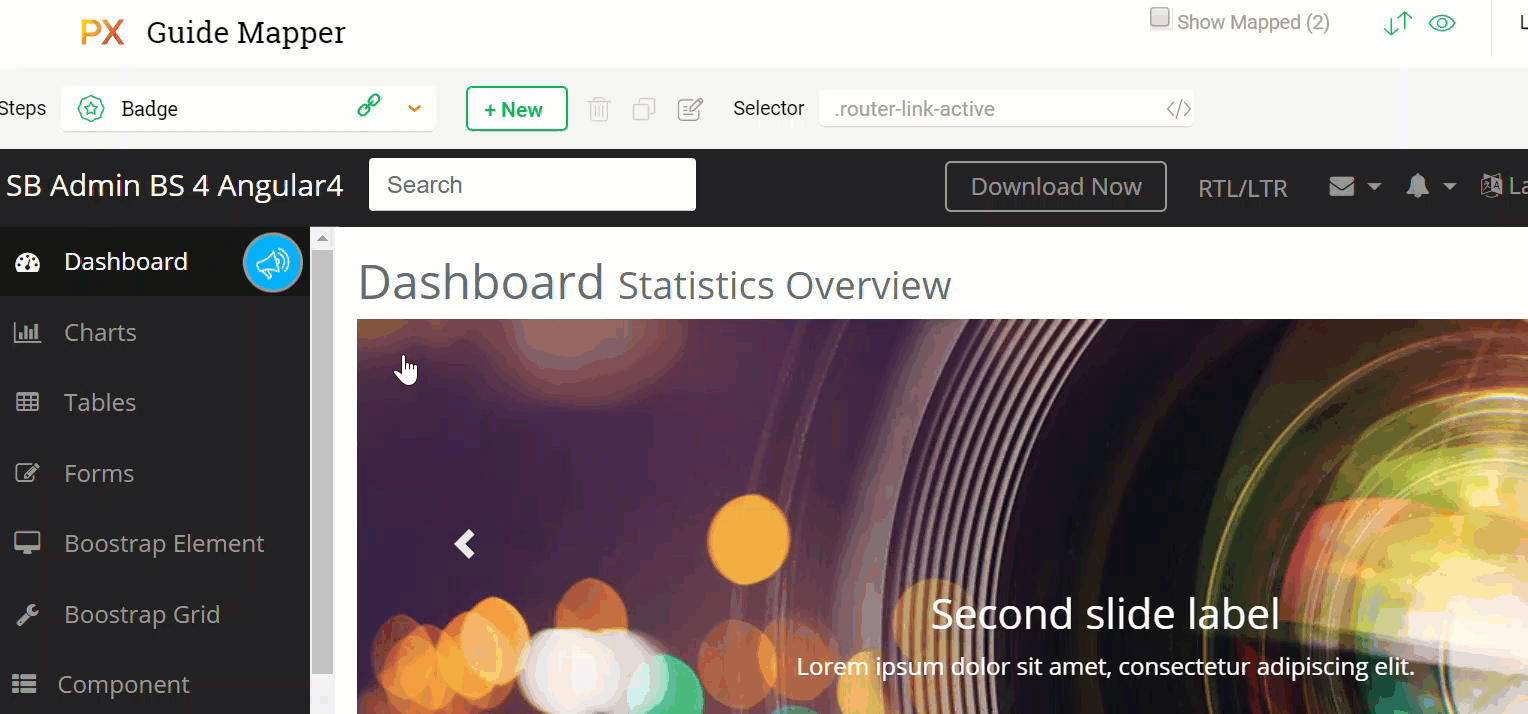
- Link the Badge icon to UI Element
You can link the badge icon to any element in your UI while editing the guide in-app.
Once you link the badge icon to the required UI element, you can adjust the position by using the edit option.
Once you link the badge icon to the required element in your application and return to the PX UI, you can see that the element ID is captured in the Css Selector field.

- Customize the Badge icon: You can customize the style, size, and color of the badge icon.
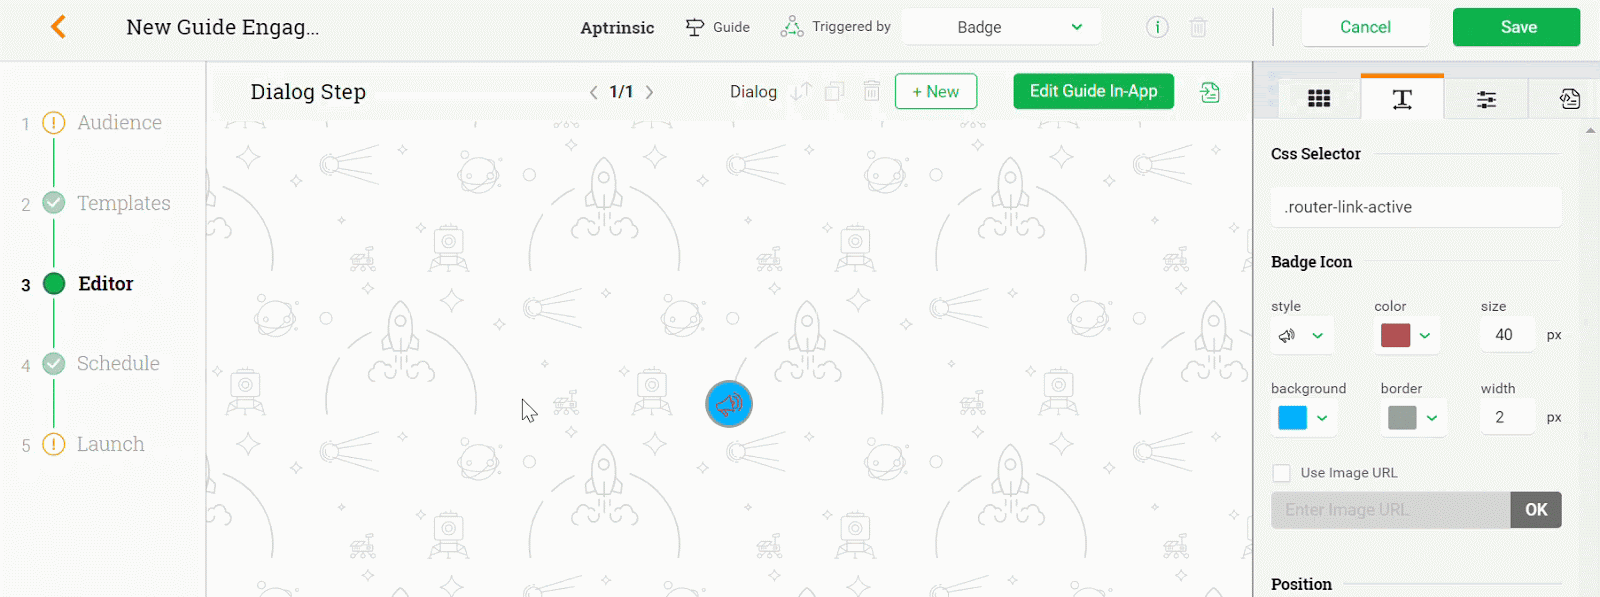
You can also upload custom icons for the badge.
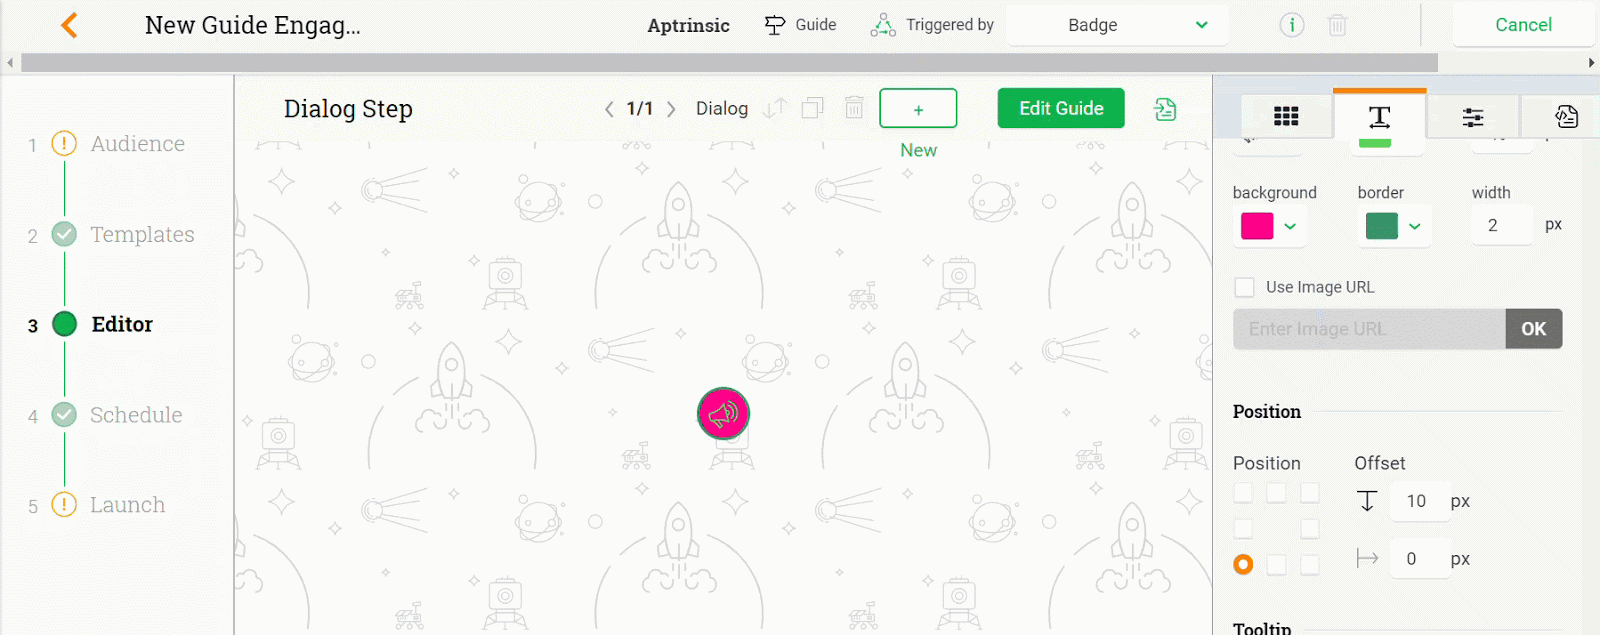
- Set the Position: Gainsight allows you to set the position of the badge icon relative to the page element (right, left, center, top, bottom).
![]()
- Use Tooltip Text: Users can view your tooltip text when they hover on the badge icon. You can also set up the position of the tooltip text, and set the color of the text, but not the font-size and font style.
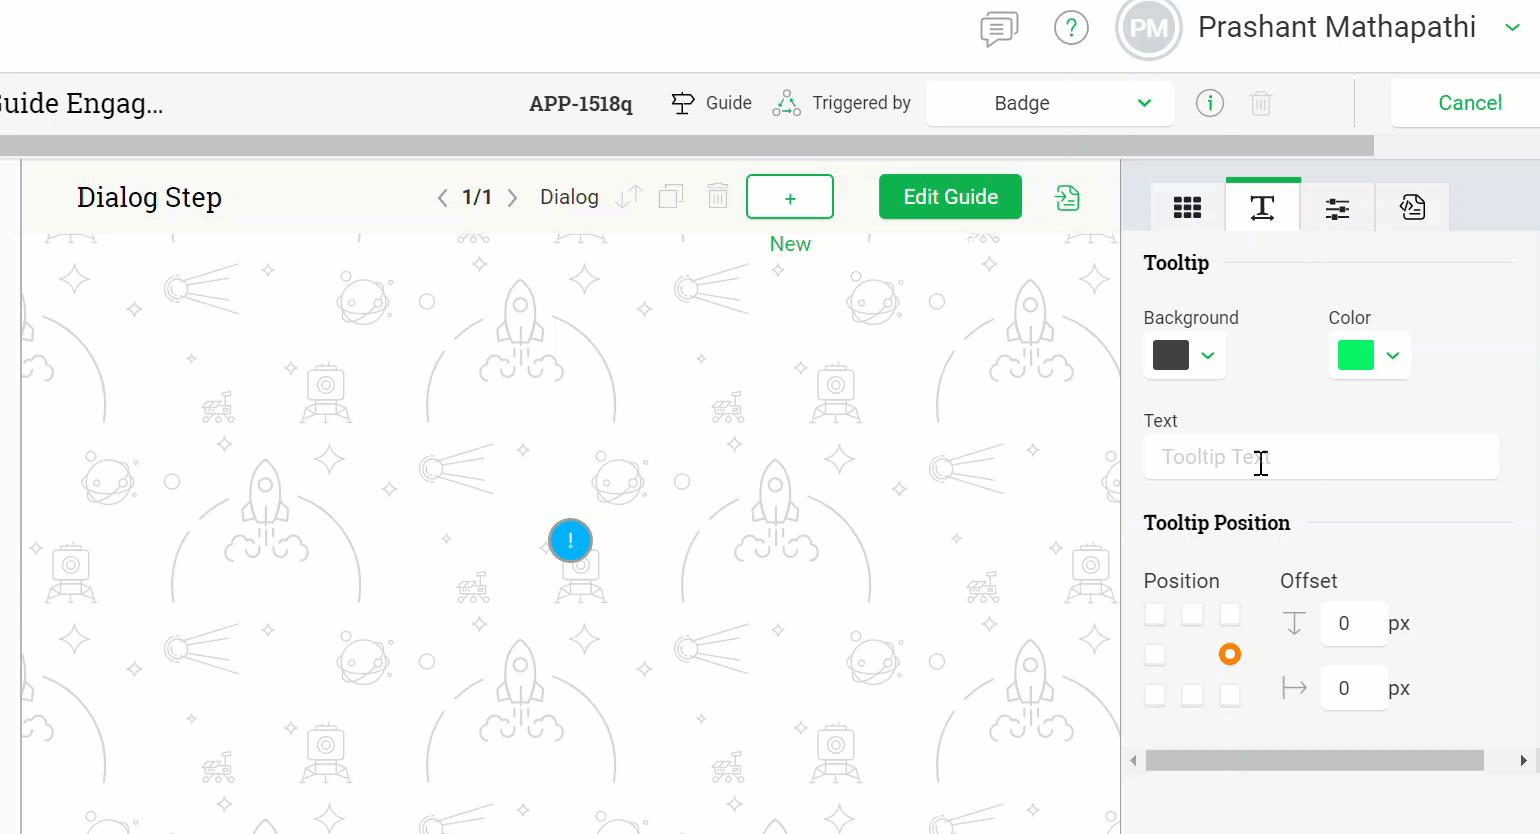
When users hover on the badge icon, they can view the tooltip.
- Launch an Engagement from Gainsight CS’s Journey Orchestrator: Now it’s easy to deliver seamless experiences by coordinating human and digital outreach (email and in-app) in a single journey. Gainsight PX is now integrated with Gainsight CS’s Journey Orchestrator (JO) module, so you can trigger an in-app engagements from JO. To support this feature, Gainsight has introduced a new trigger option called Journey Orchestrator.
Business Use case: With this enhancement, you can now display an engagement to only those users of a JO Program who have completed a specific step in the Program. For instance, if a customer has read a renewal reminder email but not yet responded, you can display a Dialog engagement as a gentle reminder.
Engagements whose trigger methods are set to Journey Orchestrator are displayed in Gainsight’s JO module. You can make further configurations to the engagement from JO. For more information, refer to the Journey Orchestrator and PX Integration article.
- Improved Advanced Settings in Engagements: Gainsight has introduced two new options in the Advanced section of the Engagements; User Sample Group and Account Sample Group.
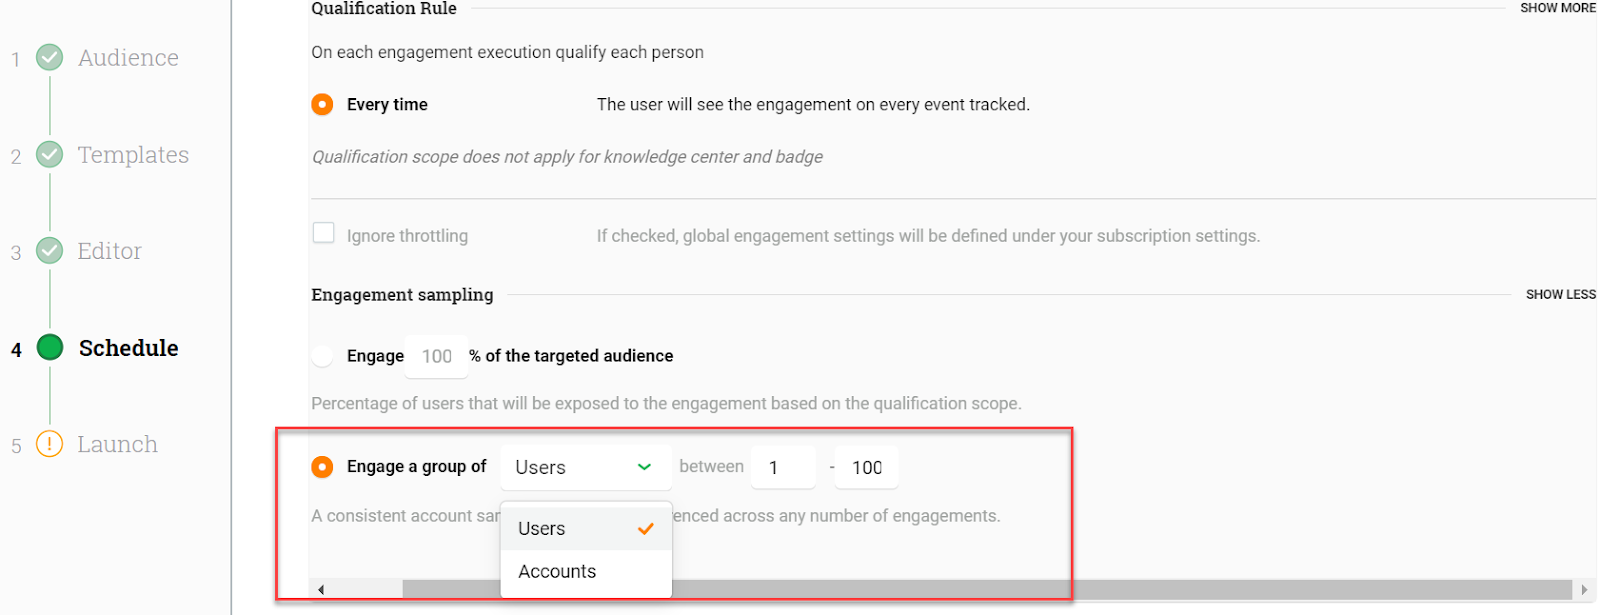
With this feature, Gainsight PX now automatically and randomly creates 100 user groups and 100 Account groups in the backend. Each User or Account record is assigned to one of these 100 groups. You can use the User Sample Group option to trigger the engagement to required user groups. Only those users who are assigned to the selected group can view the engagement. For instance, if you select User groups 1-10 for an engagement, only those users who belong to one of these 10 groups, can see the engagement. Similar logic applies to the Account Sample Group as well.
In Engagement Sampling, you can select to use either the existing sample percentage group of users or select the newly introduced Engage a group of option.
To use this enhancement:
- Navigate to the Engagements section.
- Configure the engagement as required.
- Navigate to the schedule section and go to Qualification Scope.
- Click SHOW MORE for the engagement sampling section.
- Select the Engage a group of radio button.
- Select either Users or Accounts from the drop-down menu.
- Select a range of groups to which you wish to display the engagement.
- New Engagement Throttling Settings: Gainsight is introducing the ability to configure throttle settings on Engagements. Throttling controls how often a user will see a qualifying engagement in your application. To facilitate this feature, a new section called Engagements is introduced in the Settings section.

The Throttling settings are applicable only to in-app engagements. Throttling settings allow you to set two types of configurations:
- Minimum Time gap Between Engagements: You can use this configuration to set a minimum time frame between any two engagements. If you set the minimum time gap to 30 minutes, users who are qualified to view multiple engagements can see each engagement within 30 minutes.
To use this configuration:
- Navigate to Settings > Engagement Settings.
- Turn the toggle switch for At least, to enable the configuration.
- Set the time parameters as required in the At least section.
- Click Save.
- Maximum Engagements in a Day/Hour/Minutes: Apart from setting the minimum time limit, you can also set a limit on the maximum number of qualifying engagements that a user can view in a particular hour, minutes, or days.
To use this configuration:
- Navigate to Settings > Engagement Settings.
- Turn the toggle switch for At most to enable the configuration.
- Set the parameters as required in the At most section.
- Click Save.
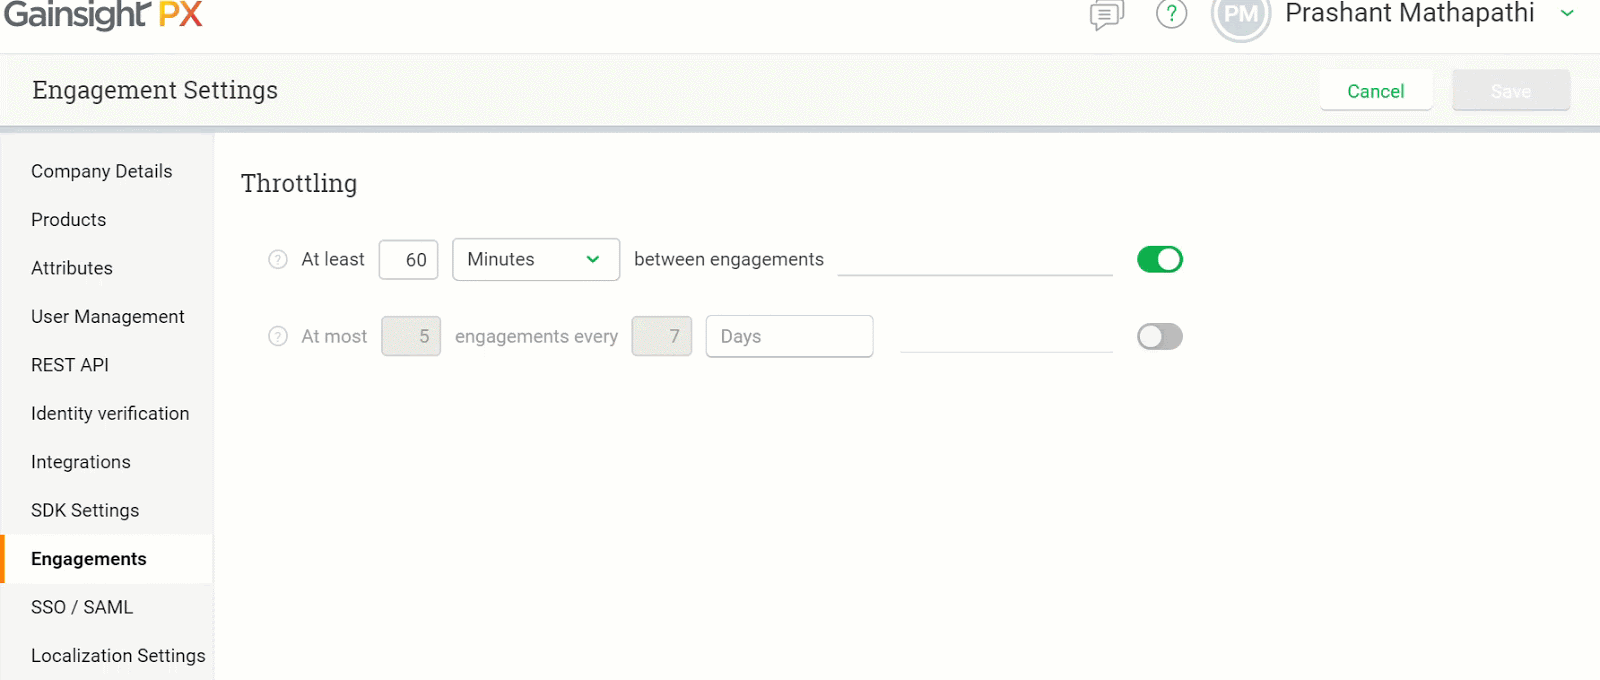
You can also exclude an engagement from the global throttling settings. To exclude an engagement from Global throttling settings, you must select the Ignore global throttling settings checkbox for the required engagement.
Business use case: If a user is qualified to view multiple engagements, and if all the engagements are targeted on the same page, the engagements appear one after the other, which could annoy or overwhelm the user. With this feature, you can set throttling limits, such as one engagement every 20 minutes, or a maximum of 5 engagements in a week.
If you feel that an engagement is very critical and needs to be communicated immediately (for instance, system down message), you can override throttling by selecting the Ignore global throttling settings check box.
- Launch/Pause an Engagement from API: Gainsight PX now allows you to launch or pause an engagement using an API. You can use this feature to programmatically control your engagements. You can insert the API code in your source code, as required, to control the engagement.
Knowledge Center Bot
- Display Contextual Suggestions in Zendesk Knowledge Center: Gainsight has improved the Zendesk Knowledge center integration to provide context-based suggestions in the PX Knowledge Center (KC) Bot.
With this enhancement, when you associate your Zendesk Knowledge Base to PX’s KC Bot, users can view context-based suggestions even before they start to search for an article. For instance, if a user is on the Engagements page, the Bot displays articles related to Engagements, even before the user starts typing the search terms.
IMPORTANT:
- This enhancement is applicable only to the Zendesk Knowledge Base.
- When users start to type search terms, the Bot lists articles based on the search terms provided by the user.
To use this enhancement:
- Configure the Zendesk Knowledge Base in the KC Bot. Click here to learn more about this process.
- Navigate to any application page and open the KC Bot. You can view the contextual suggestions displayed without typing any search term.
Product Mapper
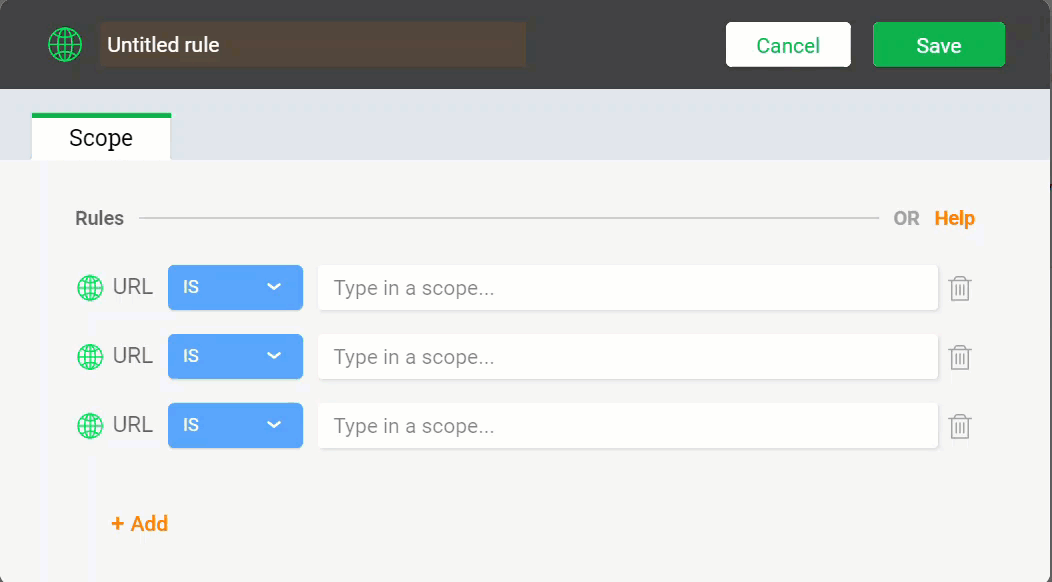
- Implement Logic Between Multiple Rules: You now have the ability to implement AND/OR logic between multiple rules. Previously, when you used multiple rules for a feature, the OR logic was applied by default. This setting could not be changed, However, with this feature you can now change the default OR logic to AND logic.
Business Use case: Consider that your application page has two different pages (say A and B) from where users can navigate to the check-out page (purchase page). You wish to track how many users reached the check-out page from Page A and how many users reached the check out page from page B. With this feature, you can create a URL feature which will increment the page count only if a user navigated to page A and then the check-out page; apply AND logic between URLs of page A and check-out page. This rule tracks the number of users visiting the check-out page through page A. Similarly, you can set another rule for page B.
To use this enhancement:
- Navigate to Product Mapper.
- Create a new feature.
- Create a required rule on the feature.
- Click ADD to add multiple rules.
- Select the AND or OR logic between the rules.
- Click Save.
Issues Addressed (Fixes)
This section contains a list of customers' escalations that have been addressed and resolved between October 12 to November 11 (2019).
Engagements
- Unable to Close an Engagement: In edit mode in some scenarios, when you tried to close an engagement by clicking the close icon, the engagement will appear again. This issue is now resolved
- Integer Data Type Tokens displayed as floating values in Email Engagement: Previously, when you used an Integer data type attribute as a token in an Email engagement, the value of the token was displayed in floating point. This issue is now resolved and values of integer tokens are displayed as integer values in Email engagements.
- Unable to Open Engagement for Review: Previously, when you tried to open an engagement for review and revision, you received an error message and the engagement failed to open. This issue is now resolved.
Knowledge Center Bot
- Unable to Access KB Configuration: Previously, when you tried to access the Knowledge base from the KC Bot, an access restriction error was displayed. This issue is now resolved and you can now access Knowledge base articles from the bot.
- PX Auto Resolve does not work on IE browser for KC Bot: Previously, when you used the PX Auto resolve feature in KC Bot, customers could not see the impact of this feature when they accessed the Bot from the IE browser. This issue is now resolved and PX auto resolve feature now works on KC bot, accessed from IE.
Analytics
- Time Series Graph failed to Refresh: Previously, when you changed the time frame of an Analytics graph, the graph did not reflect data for the latest time frame. This issue is now resolved and you can now view data for the latest time frame selected.
- Feature Adoption Report displayed Inaccurate Data: Previously, when you used the Feature Adoption report and used the “Choose Accounts” option, data was displayed from all the accounts, instead of the chosen accounts. This issue is now resolved.
Product Mapper
- Unable to Map URLs on Product Mapper: Previously, when you tried to map a URL on the Product Mapper page, the mapping failed. This issue is now resolved and you can now map URLs of your application on product Mapper.
- Product Mapper/Guide Mapper Modified the Appearance of Application: Previously, when you tried to map a feature in product Mapper or an element in Guide engagement, from your application, the PX strip modified the appearance of your application. This issue is now resolved.
- Unable to Fetch Historic Data in Backfill: Previously, when you used the backfill option for a feature, the historic data was not retrieved. This issue is now resolved.
Dashboards
- Average Session in Custom Dashboard displayed Inaccurate values: Previously, the Average dashboard widget in Custom Dashboards, displayed incorrect data. This issue is now resolved and the widget now displays accurate data.
Custom Events
- Unable to Create New user records from Custom events: Previously, when you tried to create new user records by using a custom API, the operation failed. This issue is now resolved and you can create a new user records from custom API.