Localize Content for In-App Hub (formerly KC Bot) [Beta]
This article explains how to localize the Knowledge Center Bot and its various contents.
Overview
Localization allows you to deliver a consistent multilingual experience through your Knowledge Center Bot (KC Bot) by translating all end-user–facing content. Localizing content ensures that every interaction within the KC Bot feels natural and relevant to users in all supported languages. In Gainsight PX, you can localize not just the KC Bot interface, but also the content displayed within the bot such as linked articles, engagements and more, so users view information in their preferred language.
Prerequisite
Ensure that the Localization feature is configured and the required languages are enabled for your subscription. For more information, refer to the Localization article.
Translation in Gainsight PX
Translation in PX is managed through a simple export–import workflow using XLIFF files. You can export the source content that needs translation as an XLIFF file, add the translated text using any translation tool or service, and upload the updated file back into PX. This process ensures that all localized content for engagements or KC Bot remains accurate, consistent, and easy to maintain across multiple languages.
To translate content:
Export XLIFF File for Translation
XLIFF is an industry-standard format for exchanging translation data between systems and tools. The exported file contains text in your source language, which can be shared with translators or localization tools. To export an XML Localization Interchange File Format (XLIFF) file from Gainsight PX to translate content used in Engagements, Knowledge Center Bot, or Content Library.
To export:
- Open the required bot, article or engagement.
- For the required language, click the Download icon to export the source file.
- Select the required XLIFF file version for download:
- HTML: Exports content with HTML formatting tags included.
- Contextual: Exports plain text without formatting tags.
The exported XLIFF file contains two key elements:
- srcLang - The source language code
- <source> - The source text content from the bot, content, or engagements

You can translate the content using any external translation tool or editor. After translation, ensure that:
- The <srcLang> (source language) tag is followed by a <trgLang> (target language) tag that specifies the correct target language code.
- Each <source> tag includes a corresponding <target> tag containing the translated text.
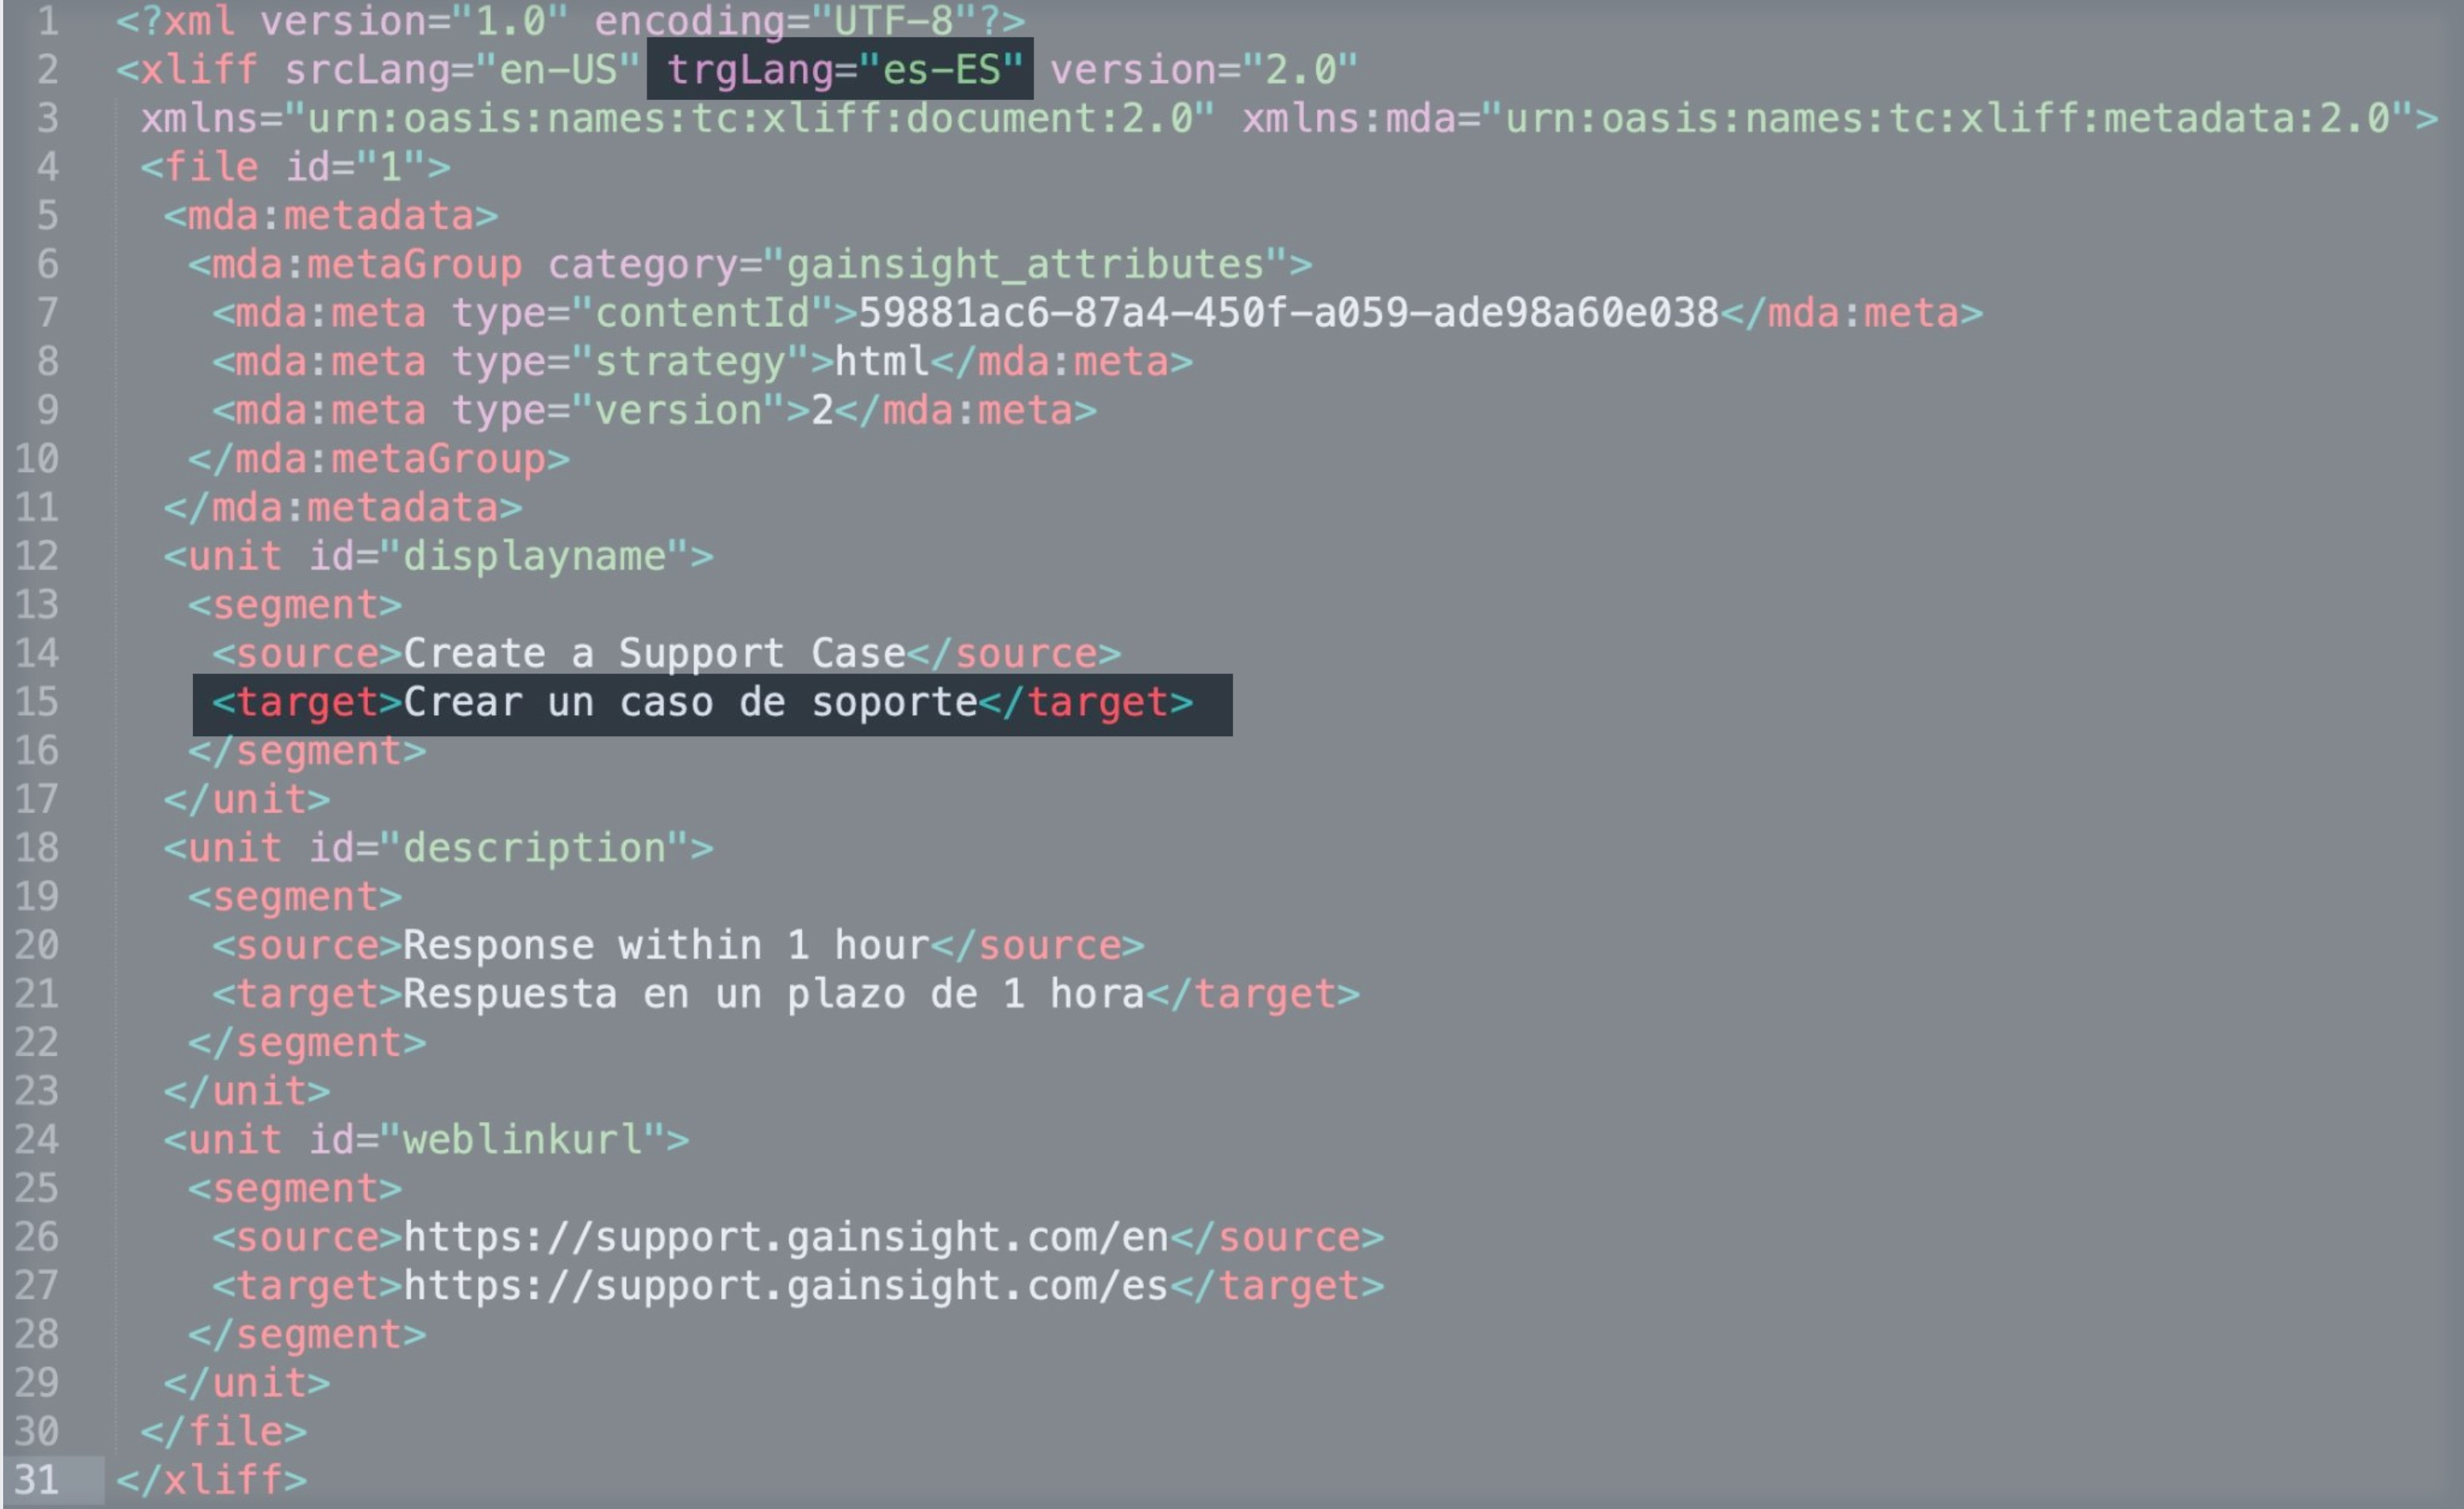
Make sure your XLIFF file includes the required target language tags and translated text before uploading it back to PX. Files missing these elements cannot be imported successfully.
Import XLIFF
After translating your exported XLIFF file, you can import it back into PX to apply the localized content. Importing the file updates the text for the selected language.
To import:
- Open the required bot, article or engagement.
- Click Upload.
- Upload the translated file using the browse option or drag and drop the file.
- Once successfully uploaded, turn on the Enable Language toggle for the translated language.

- You can upload a maximum of 10 MB in file size during a single import.
- Once you upload the XLIFF file, you can click the language name to view content in the translated language.
- If you modify the content, either from the default language or any of the translated language, the changes are not reflected in other languages. You must export the XLIFF file, translate the content, and re-import the XLIFF file into PX.
Localize Content
In PX, all content displayed in KC Bot is centrally managed through Content Library. Once the content is localized, the translated version is automatically available in any bot that uses it.
In Content Library, you can configure multilingual support by localizing the following content types:
Localize Engagement Content
Localization enables you to present engagements in multiple languages, ensuring that users view messages in their preferred language. You can export engagement text for translation, update it externally, and import the translated version back into PX. For more information, refer to the Engagement Localization article.
Localize Hosted Articles
After creating and saving the article content, you can localize the article to one of the preferred languages from the available list of languages.
To localize an article:
- In Content Library, select the Hosted Articles tab.
- Select the article that needs to be localized.
- Click the Localization tab.
- Select the intended language of localization and click Source File.
- Select the required type and version of the XLIFF file version.
- Translate the content externally.
- Click Upload to import the file back to PX.
- Turn on the Status toggle for the language whose translated file you uploaded.

During the localization process, you can set the following statuses manually to mark the stage of localization that is applicable to each article:
- None: Localization workflow has not started.
- Ready: The article is complete and the writer wants to communicate to the translation team that it is ready for translation.
- In Progress: The translation team is performing the localization process.
- Complete: The translation team has completed the localization process and the file is ready to be uploaded.
Localize Linked Articles, Web Links, or JavaScript Functions
After creating and saving your content, you can localize it into one or more preferred languages from the available list of configured languages. The localization process is the same for Linked Articles, Web Links, and JavaScript Functions.
For each content type, you can translate the following fields:
| Content Type | Fields You Can Translate |
|---|---|
| Linked Articles | Display Name, Description |
| Web Links | Display Name, Description, URL |
| JavaScript Functions | Display Name, Description |
To translate:
- In Content Library, select the respective tab for the content type, such asLinked Articles, Web Links, or JavaScript Functions.
- For the item you want to localize, click the three-dots vertical menu.
- Click Localize. The Localization slide-out panel appears.

- For the intended language, click the Download Source File icon.
- To export the XLIFF file, select the required format and version.
- Translate the exported XLIFF file using an external translation tool or service.
- Click Upload to import the translated file back into PX.
- Once successfully uploaded, turn on the Enable Language toggle for the language whose translated file you uploaded.

Localize Bot Content
While content used in Knowledge Center Bot can be translated centrally from Content Library, certain elements are specific to an individual bot and must be localized separately. These include bot-level text such as the main greeting, search texts, content group titles and descriptions, and more. Localizing this content at the bot level ensures that all text within the bot appears in the selected language.
For a bot, you can translate the following fields:
| Widget | Fields You Can Translate |
|---|---|
| Bot Header | Greeting and Subtext |
| Search |
|
| Task List | Title and Subtitle for each list |
| Content Groups |
|
| Recommendations |
|
| Feedback |
|
To translate sections of the bot:
- Navigate to Knowledge Center Bot from the main menu and select the required bot.
- Click Edit.
- Select the Localization section.
- For the intended language, click the Download Source File icon.
- Select the required format and version, to export the XLIFF file.
- Translate the exported XLIFF file using an external translation tool or service.
- Click Upload to import the translated file back into PX.
- Once successfully uploaded, turn on the Enable Language toggle for the language whose translated file you uploaded.
- Click the translated language to preview the localized bot.

Validate Localization Status for Bot Content
The Content Localization section helps you verify whether all content used in your Knowledge Center Bot is translated and enabled for the languages configured for the bot. When a bot is enabled for one or more languages, ensure that all associated content is translated and enabled for each language.
When enabling a bot for multiple languages, ensure that all associated content is translated and enabled for each selected language.
The Content Localization view acts as a centralized validation tool, allowing you to:
- Identify content items that are not translated for an enabled language
- Detect items that are translated but not enabled
- Review localization readiness before launching or updating the bot
To validate localization status:
- Navigate to Knowledge Center Bot from the main menu and select the required bot.
- Click Edit.
- Select the Localization section.
- Expand Content Localization. The list displays all content used in the bot and displays, for each item, the number of languages it is enabled for out of the total languages configured for the bot.

-
Hover over the Languages Enabled column for an item to view the individual status of each configured language and determine whether it is translated and enabled.

Note: An information icon next to the Languages Enabled count indicates that, although the language is marked Enabled, the Display Name and Display Description may still require translation. This applies only to Engagements and Hosted Articles. - Click the Open in a new tab icon to open the content. Add the required translations and ensure the content is enabled for each applicable language. For more information on translating and enabling content, refer to the Localize Content section.
- Return to the Content Localization section to continue the process for other content, or proceed to launch the bot.
Note: Incomplete localization does not block bot launch. You can proceed with launching the bot, but content that is not translated and enabled will not be shown in the