Engagement Localization
This article explains the Engagement Localization feature in detail.
Overview
Gainsight PX allows you to translate the content of your engagement into other languages. The Localization feature in Gainsight PX allows you to set a default language and translate the engagement content into multiple languages, from the default language. If you have customers in different parts of the world, you can now use this feature to display engagements to your customers in their local language. Gainsight PX supports translation to 107 languages.
Business Use case:
Consider that you are a US-based company and have customers in Germany and India. You can use this feature and create a single engagement. You can configure localization on your engagement so that your US customers view the engagement in English, Indian customers in Hindi, and German customers in the German language.
IMPORTANT:
- Gainsight PX only supports you in creating multiple versions of your engagement in different languages but does not translate your content by itself.
- Currently, the translation of images, videos, and GIFs is not supported. Only text can be translated.
- You can translate your content to only those languages that are written from left to right (Arabic, Urdu, etc. is not supported).
- This localization feature is not applicable to Email engagements.
Prerequisite: Ensure that localization is configured for your subscription. For more information on how to configure localization, refer to the Localization article.
Create Localized Engagement Content
Once the admin completes the configuration, users can start translating the content to the required language. To translate content, users must first draft the content and then export it as an XLIFF file. The translation must be performed in the XLIFF file and then the translated XLIFF file must be uploaded back to the engagement. You cannot translate the default language.
Gainsight PX has an automated workflow for Engagement Localization. This helps you integrate PX Localization with your existing CI/CD workflows. The workflow has the following capabilities:
- API Support for export/import of XLIFF file(s)
- Automatic update of the workflow status labels (ready for translation, in progress, etc)
Perform the localization in the following steps:
- Export XLIFF
- Set Engagement Status
- Import XLIFF
Export XLIFF
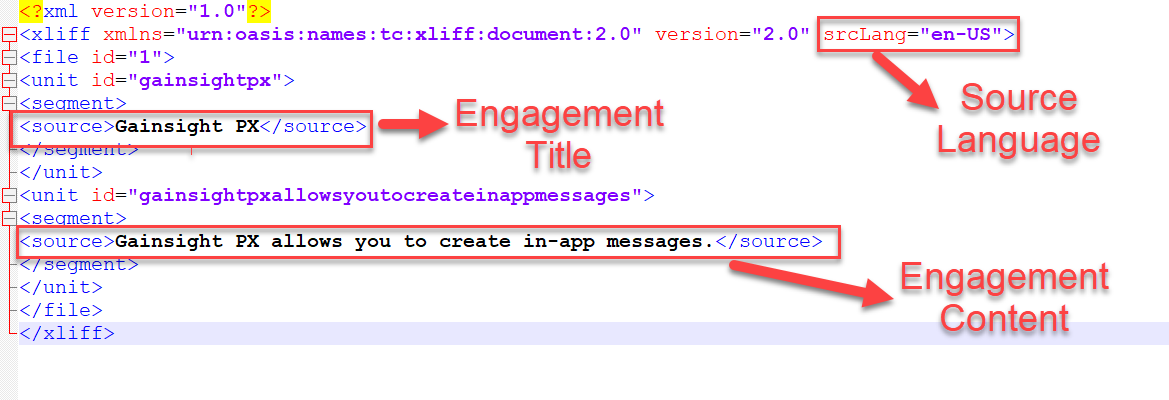
To perform translation, click the ellipsis menu and select the Strategy and the Version to export the XLIFF file. The content available in your engagement is exported to the XLIFF file. You can export Engagement content as an XLIFF file - version 1.2 or version 2.0 when you translate the content of your Engagement into other languages.

The exported XLIFF file has three important sections. The source language code and the source messages (title and content of the engagement).
You can perform translation of the content from an external application. Once you perform the translation, you must ensure that:
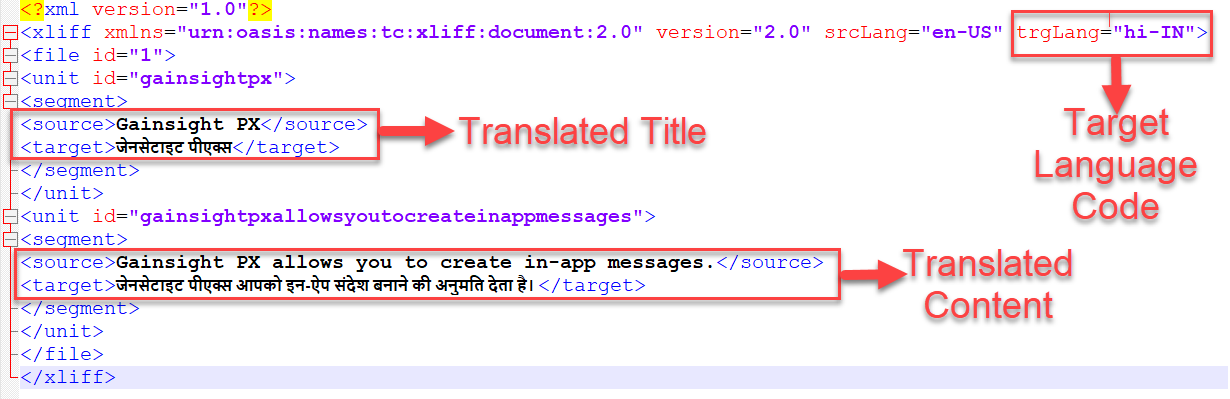
- The srcLang (source language) tag is followed by trgLang (target language) tag. This target language tag must have the language code of the translated language.
- Each source tag must have a target tag. The target tag must contain the translated version of the source language.
If the above two requirements are not present in your XLIFF file, you cannot upload it back to PX.
In the following image, the source language English is translated to Hindi language.
Set Engagement Status
The following statuses are available:
- Ready for translation: Set this status when you finalize the content for translation. The content of the engagement is locked when the status is set as Ready for translation. Also, this status is manually set when you export the XLIFF file for translation.
- Translation in progress: Set this status to indicate that the translation is in progress and any further changes will not be included for translation.
- Translation complete: Set this status to indicate that the translation is complete and the translated content is available in the engagement. Also, this status is manually set when you import the XLIFF file after translation.
Note: Once the Engagement is set to Ready for Translation state the engagement content cannot be changed. It is recommended to not change the status as it serves as a means of communication between teams. It indicates whether the engagement is ready for translation (set by the engagement author), in progress (by the translation team), or completed (also by the translation team).

Import XLIFF
You can now import this XLIFF file back to PX by clicking the settings icon and selecting the Import XLIFF option. Use the drop-zone in the Localization tab of the Engagement editor to bulk import multiple XLIFF files into Gainsight PX.
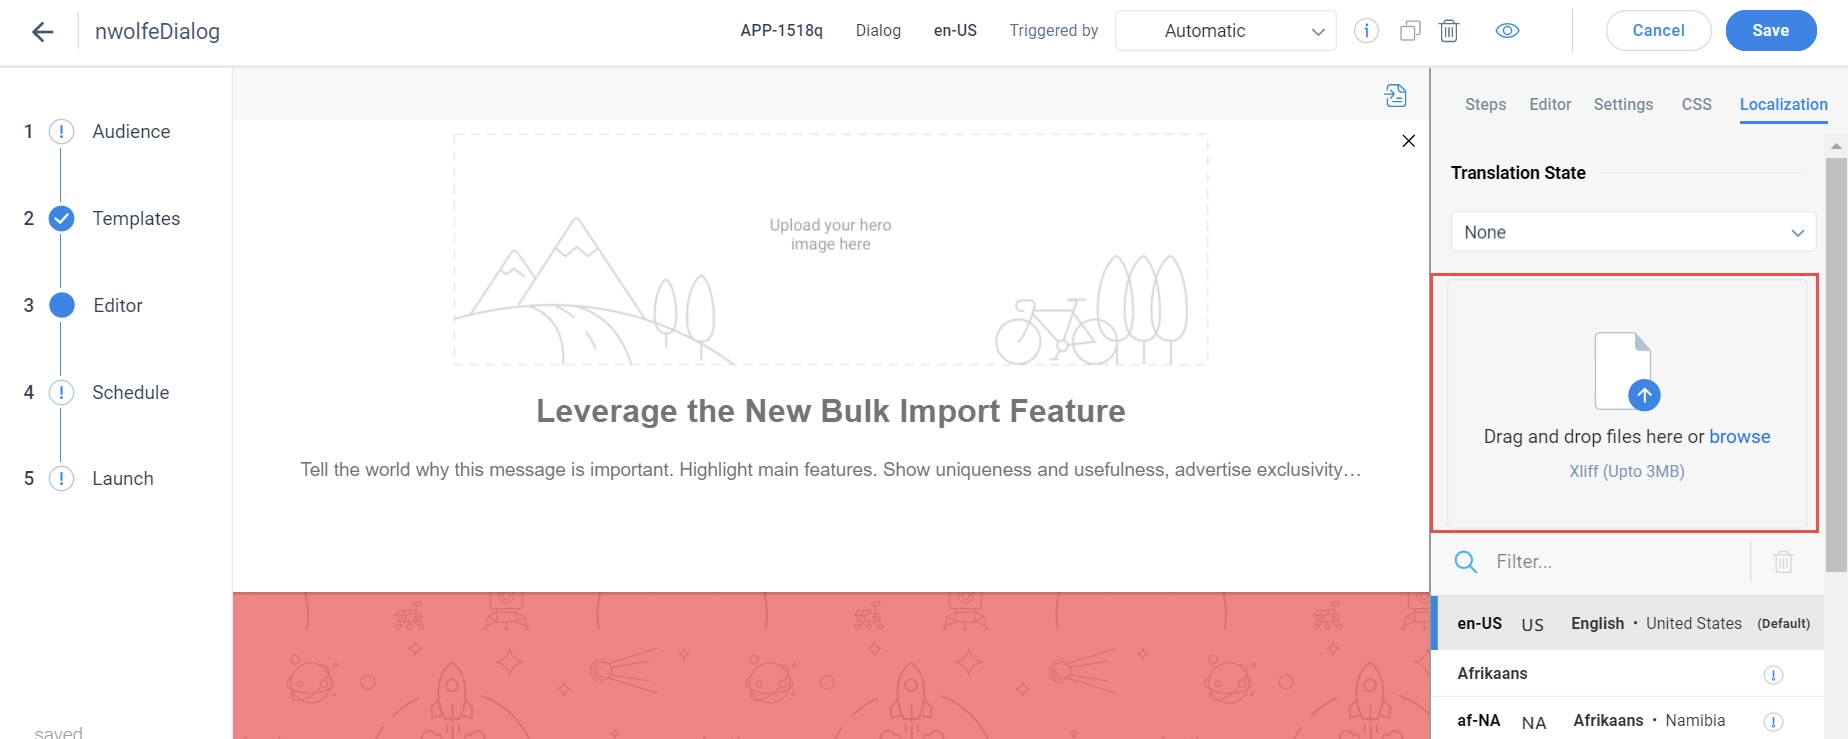
Note: You can upload a maximum of 3 MB in file size during a single import.
Once you upload the XLIFF file, you can click the language name to view and edit the engagement content in the translated language. Editing a translated engagement post-translation can be useful for making minor changes that you don’t need to make to every translation.
If you modify the engagement content (either from the default language or any of the translated language), the changes are not reflected in other languages. You must export the XLIFF file, translate the content, and import the XLIFF file, once again.
In a similar manner, the XLIFF file can be used to translate to any other language, as required. If you do not perform translation for any language and launch the engagement, the engagement is displayed in the default language if Fallback to default language in case translation doesn’t exist checkbox is selected by the admin in the Localization Settings section. If this checkbox is not selected, and the translation is not performed, the engagement is not displayed to those users for whom the non translated language is the local language.
Bulk Import and Export Using XLIFF API
Gainsight PX has built in the capability to export the XLIFF template for engagements that are ready for translation and import the translated XLIFF file from the localization platform to the engagement via API calls. This helps you in bulk import and export.
For more information on the API endpoints, refer to the Work with Import and Export XLIFF APIs article from the Additional Resources section.
Additional Resources
| Work with Import and Export XLIFF APIs |