Segments
This article explains how to leverage the Segments feature in Gainsight PX.
Overview
Segments in Gainsight PX are subsets of users grouped together based on shared attributes, behaviors, or characteristics. These could be demographic details, product usage patterns, subscription levels, or any custom-defined criteria. This feature helps you define user cohorts for engagements or analytics, to create different audience groups. Segments can be used in multiple business actions such as engagements, NPS®, CES, Multi-Question surveys, Analytics, and Dashboards.
Example Business Use Cases:
- Define a segment with URLs to avoid redefining URLs in each engagement. This approach is suitable when defining data constant values where you want to refer to a list of elements such as Account Names/IDs and URLs or define a subset of your customers based on their lifecycle stage or based on the URLs.
- Create a segment for internal users, test users, or customers who attended training on a certain date. This segment can be used to launch specific engagements.
- When you want to define common engagement triggering rules from a single rule set. Modifications to this rule set are applied to all the engagements that use this segment rule as reference.
- Consider a scenario where you have a list of users you want to target for an engagement, or filter analytics for those users. You can create a segment by importing the list of users, and use it across PX as per your requirement.
- Re-use a segment that was previously created in an external platform, in the PX application.
To view the segments to which a user is tagged, navigate to the user profile page in Audience Explorer. For more information on how to view the full user profile, refer to the Audience Explorer section in the Accounts and Audience Explorer article.
Prerequisites
Ensure that you have Viewer access to view segments, and Manager access to create, edit, or manage segments in PX.
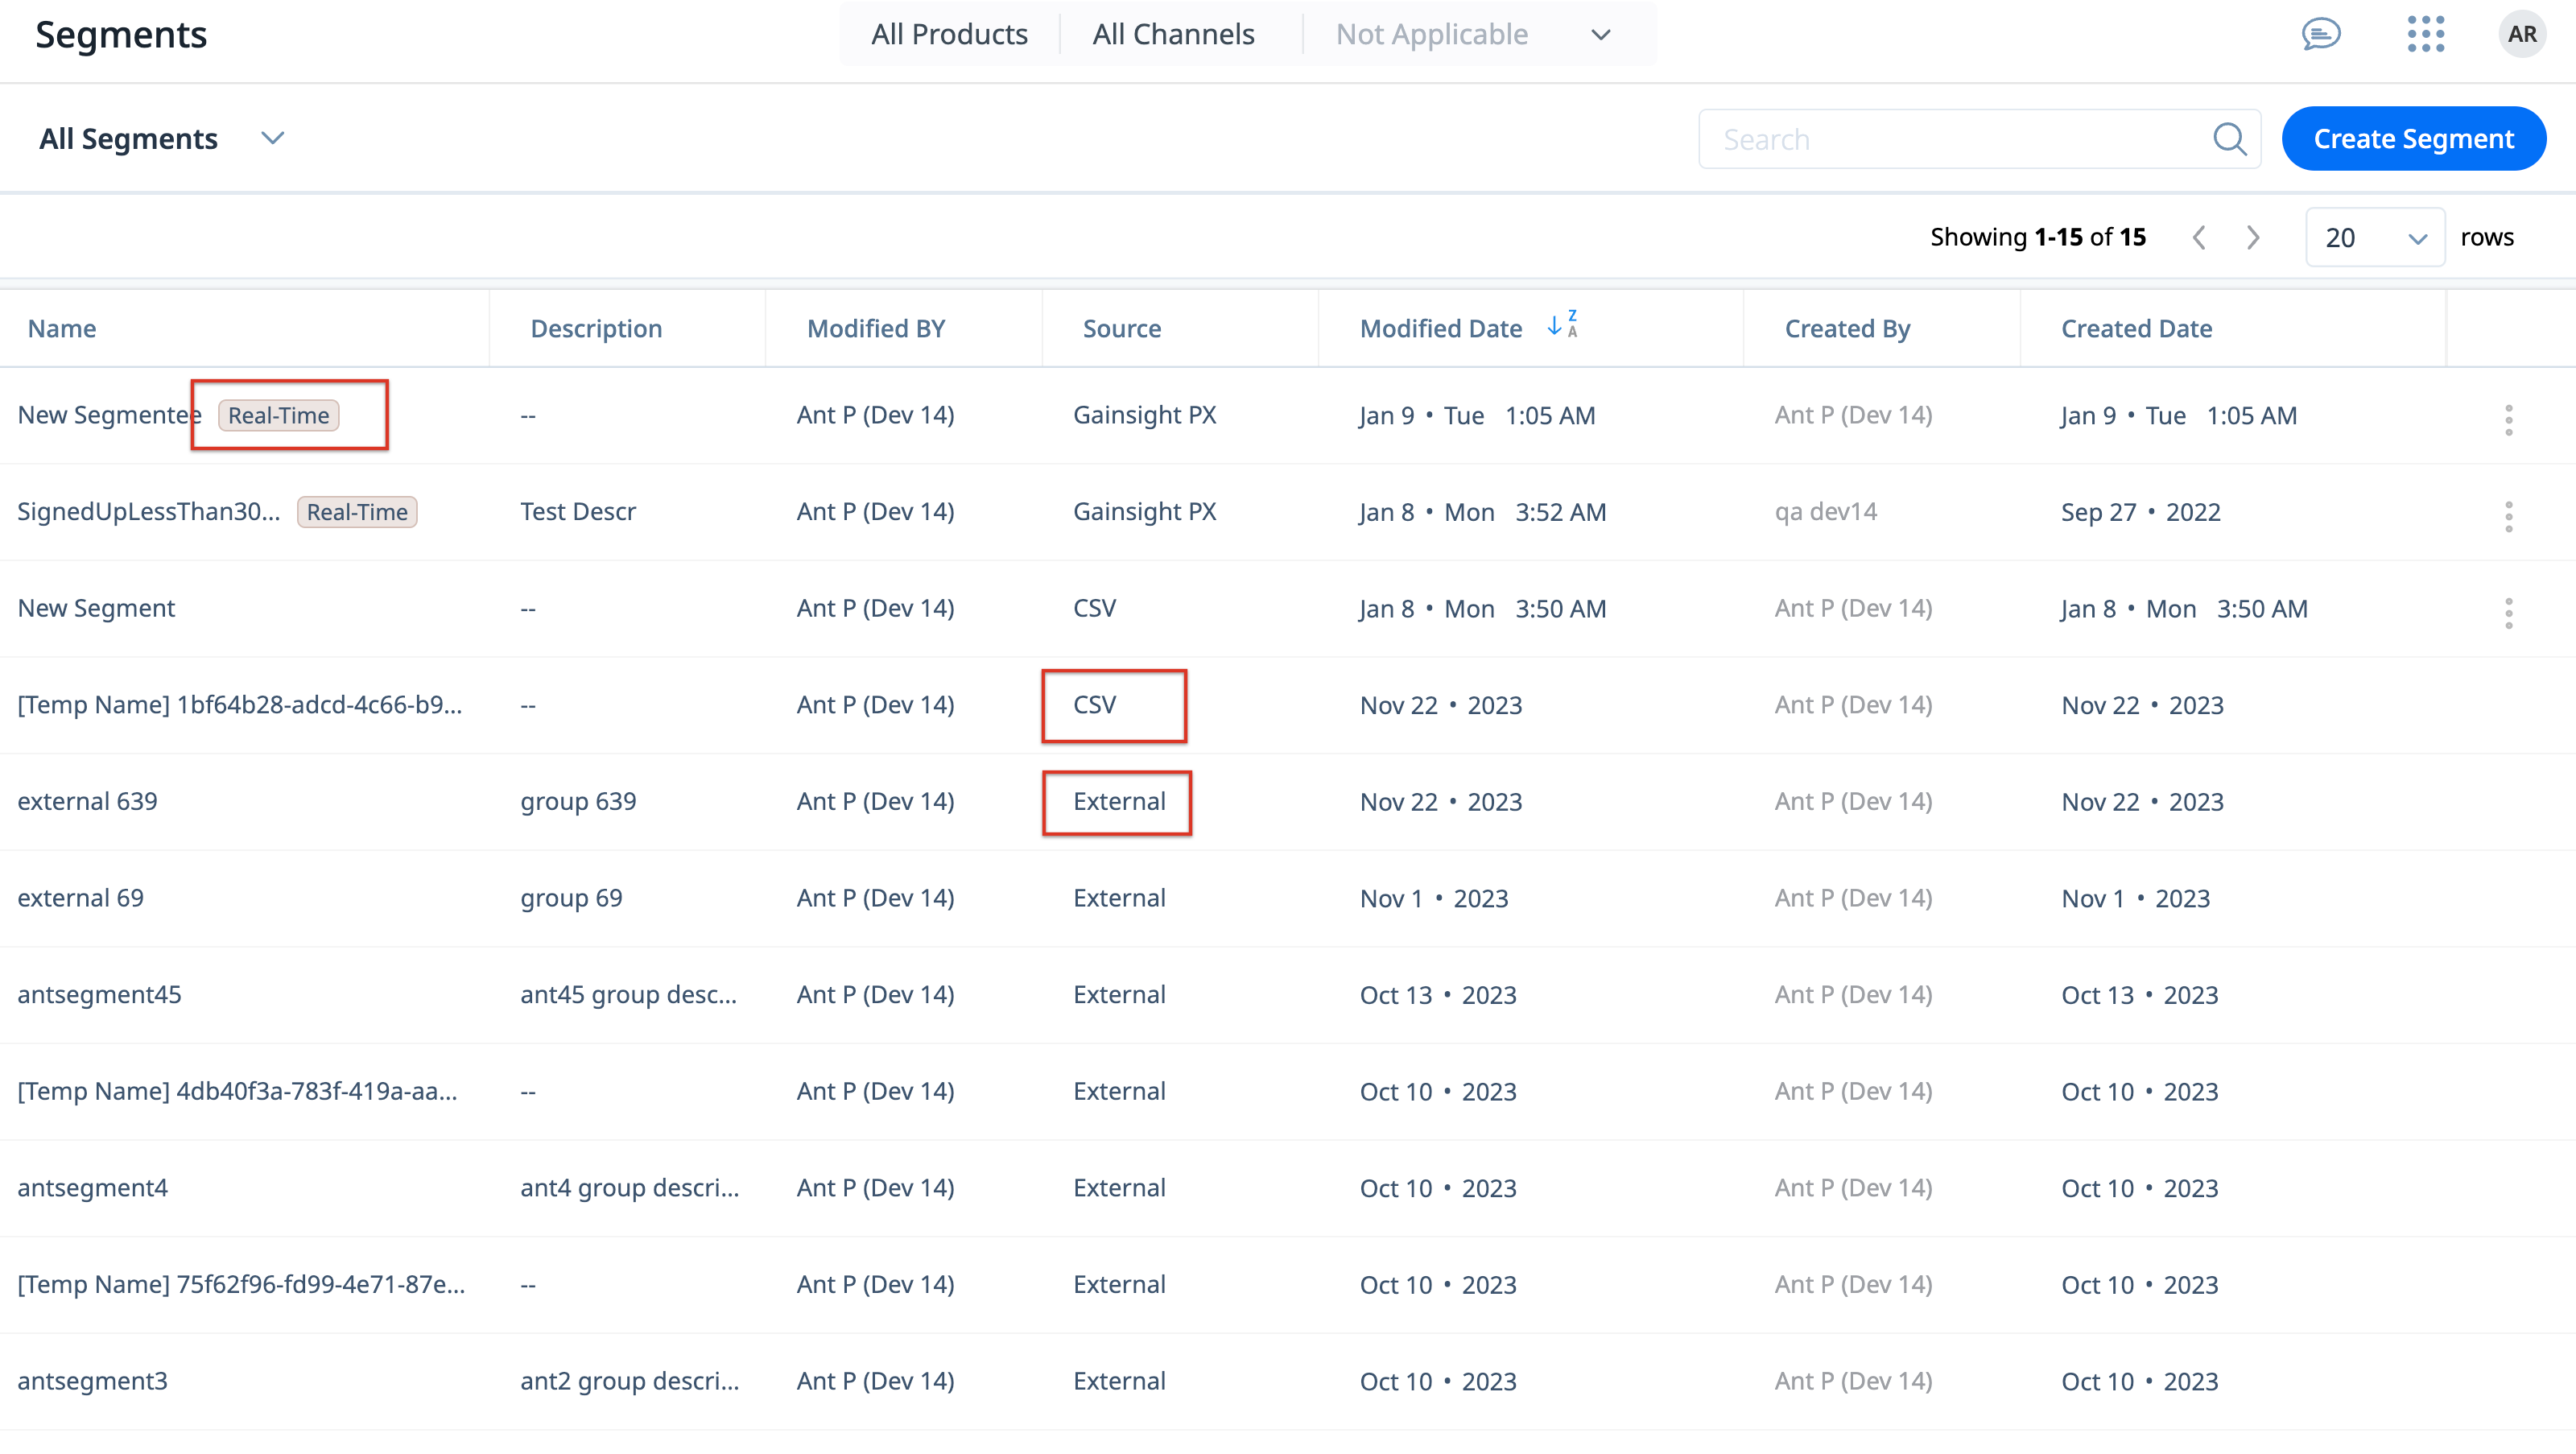
Segments
Segments allow you to establish repeatable audience criteria, enabling the formation of distinct user groups. They are used to deliver targeted messages, analyze specific user groups, personalize product experiences, and measure the impact of product changes or marketing campaigns on different types of users. In PX, Segments are of the following types:
- Real-Time segments: Segments that are created using audience rules, and are evaluated in real time.
- Segments: Segments that are evaluated only when they are created, edited, or refreshed.
- CSV segments: Segments that are created by importing a CSV file containing a specific list of users.
- External segments: Segments that are created in external systems (for instance, Adobe Experience Platform) and brought into PX using APIs.
Create Segments
Creating segments involves grouping users together based on their actions or traits, giving you the ability to send personalized engagements, or analyze data in Analytics or Dashboards. To create segments:
- Navigate to Segments and click the Create button on the upper right-hand corner.
- Select the preferred mode of segment creation from one of the following:

Create Segments using Audience Rules
Rules allow you to create a user cohort based on qualifying conditions. These rules when combined together create useful segmentations. Segments can be used to identify various cohorts such as user/account's demographics, feature usage, platform, custom events, and/or combined in-app behaviors, and more.
To create a segment using rules:
- In the Create Segment dialog box, select Define Rules.
- Click Next.
- Enter a name for the segment.
- Select a rule from the Rules list. For each rule, enter the specific criteria that must be matched. For instance, in the following example, a segment is created based on the user Admin role within Enterprise account plans.
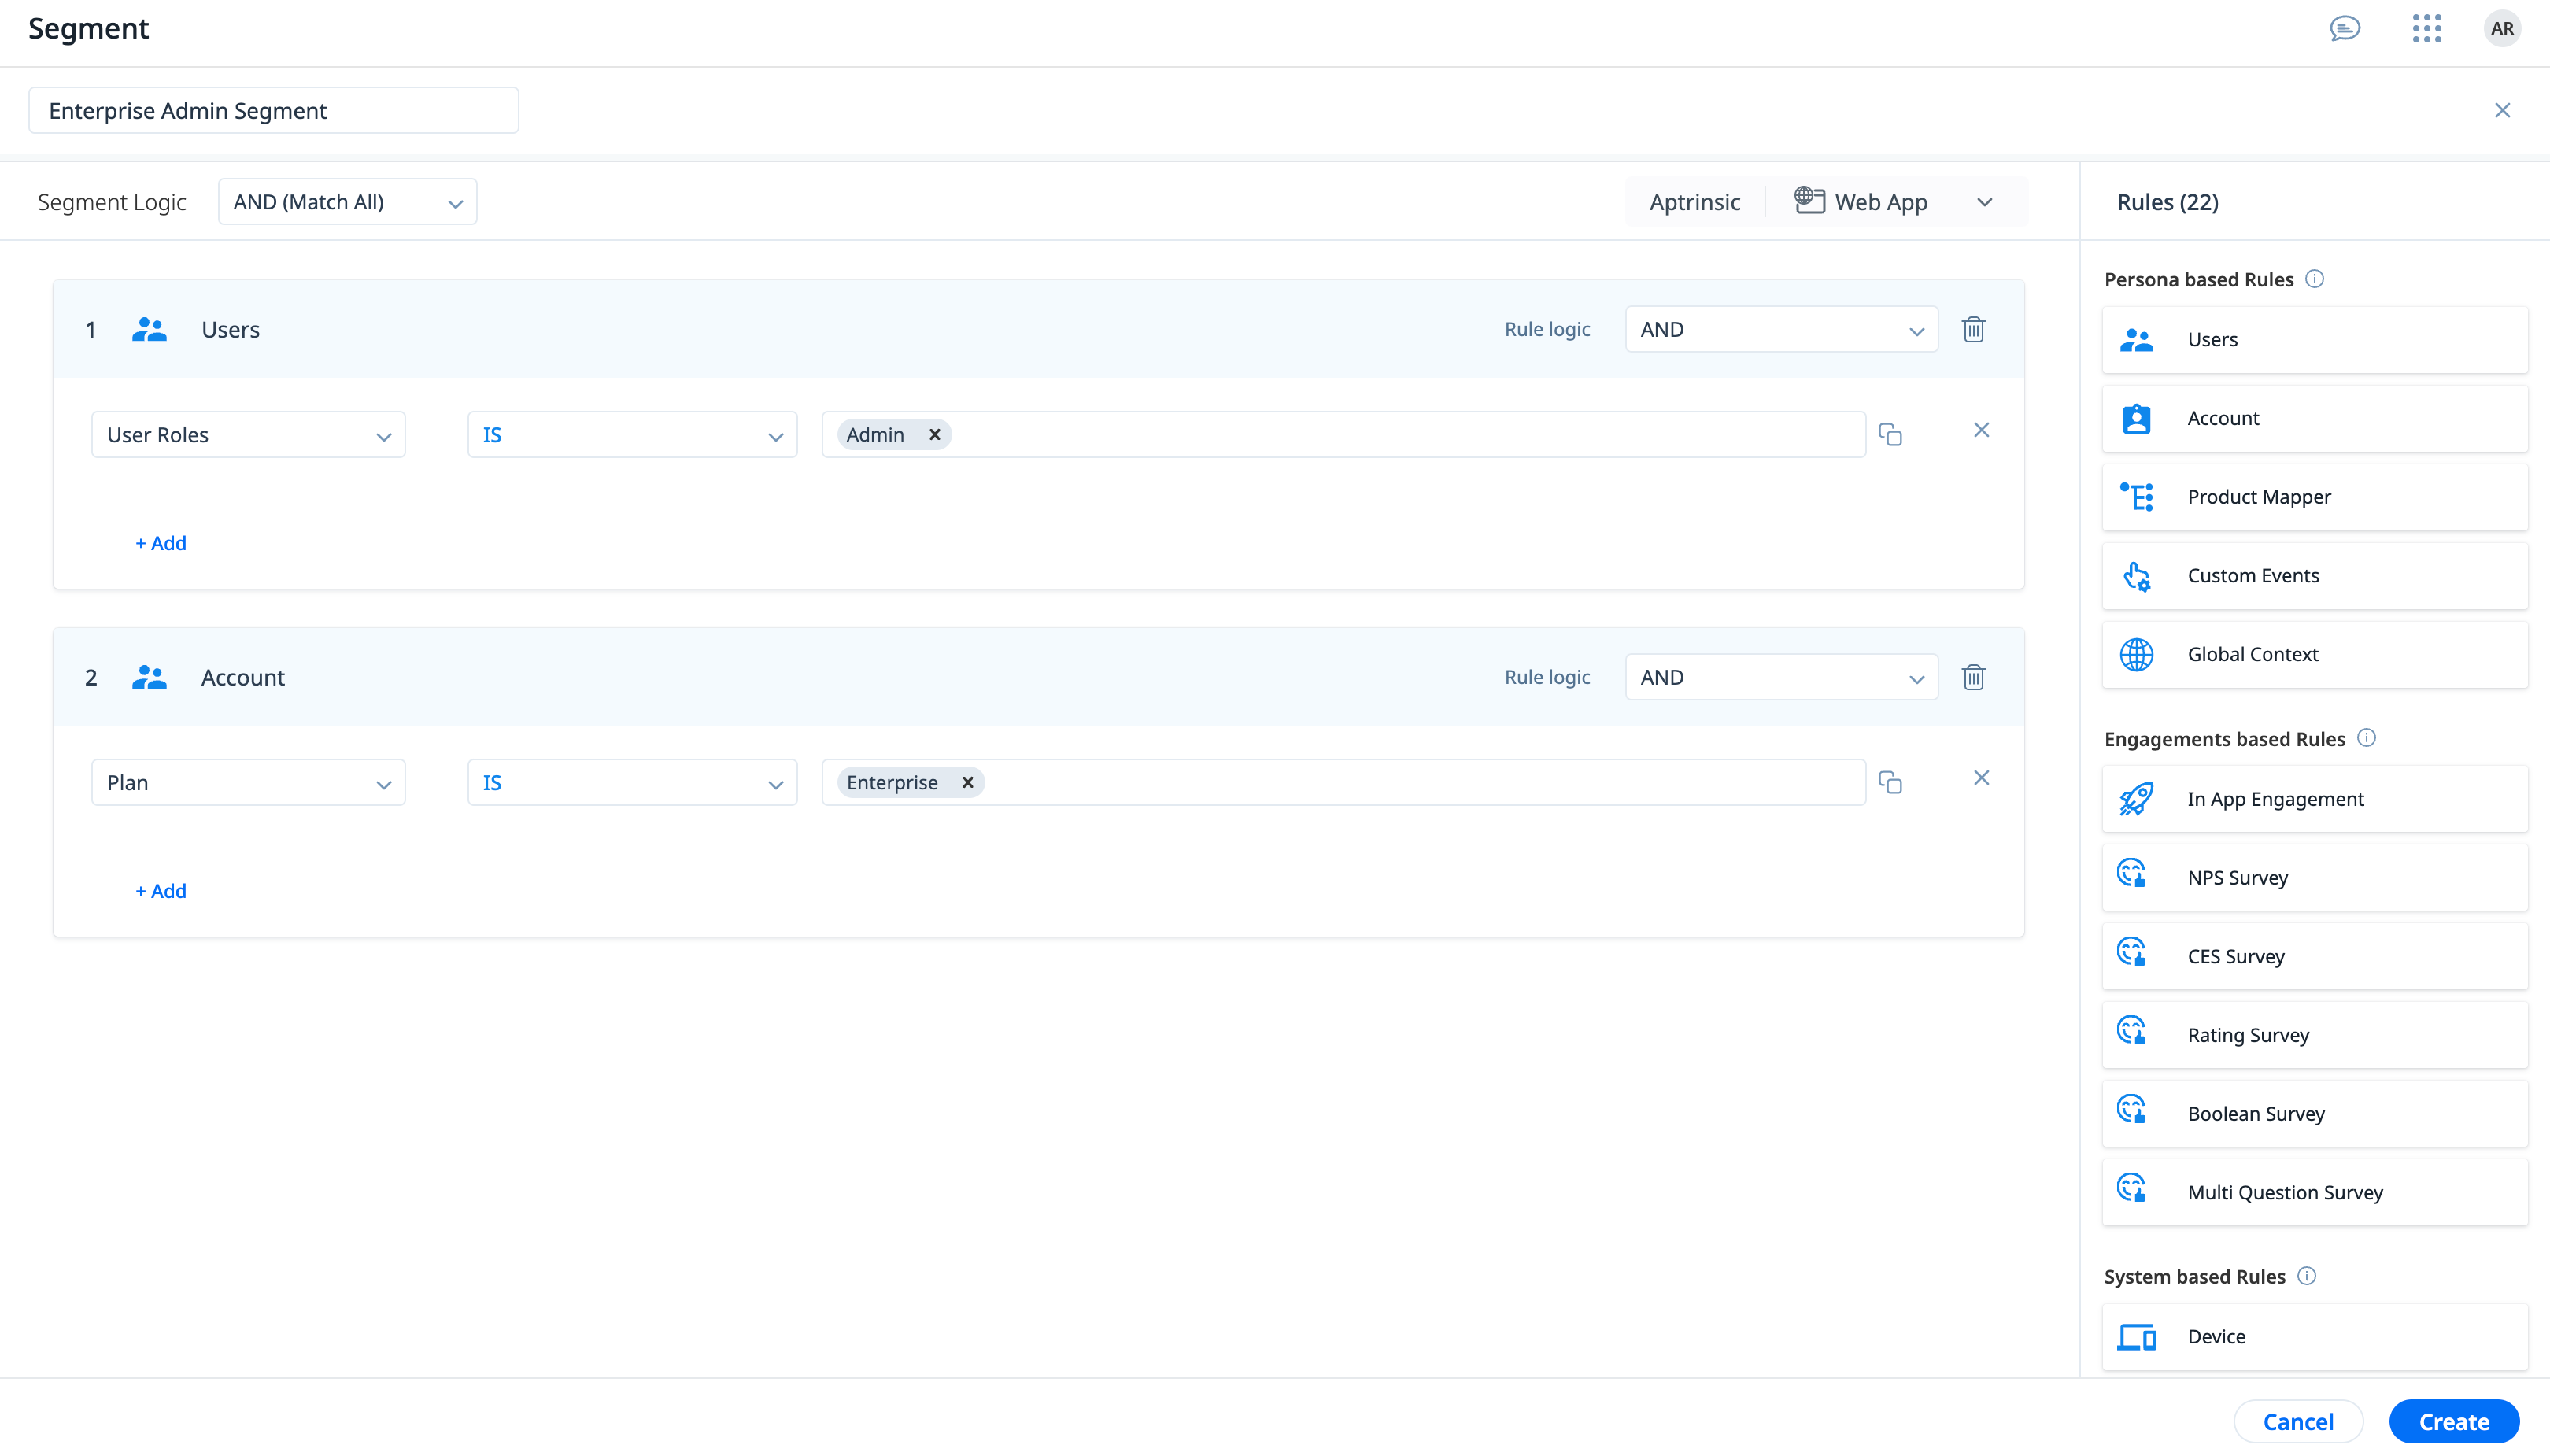
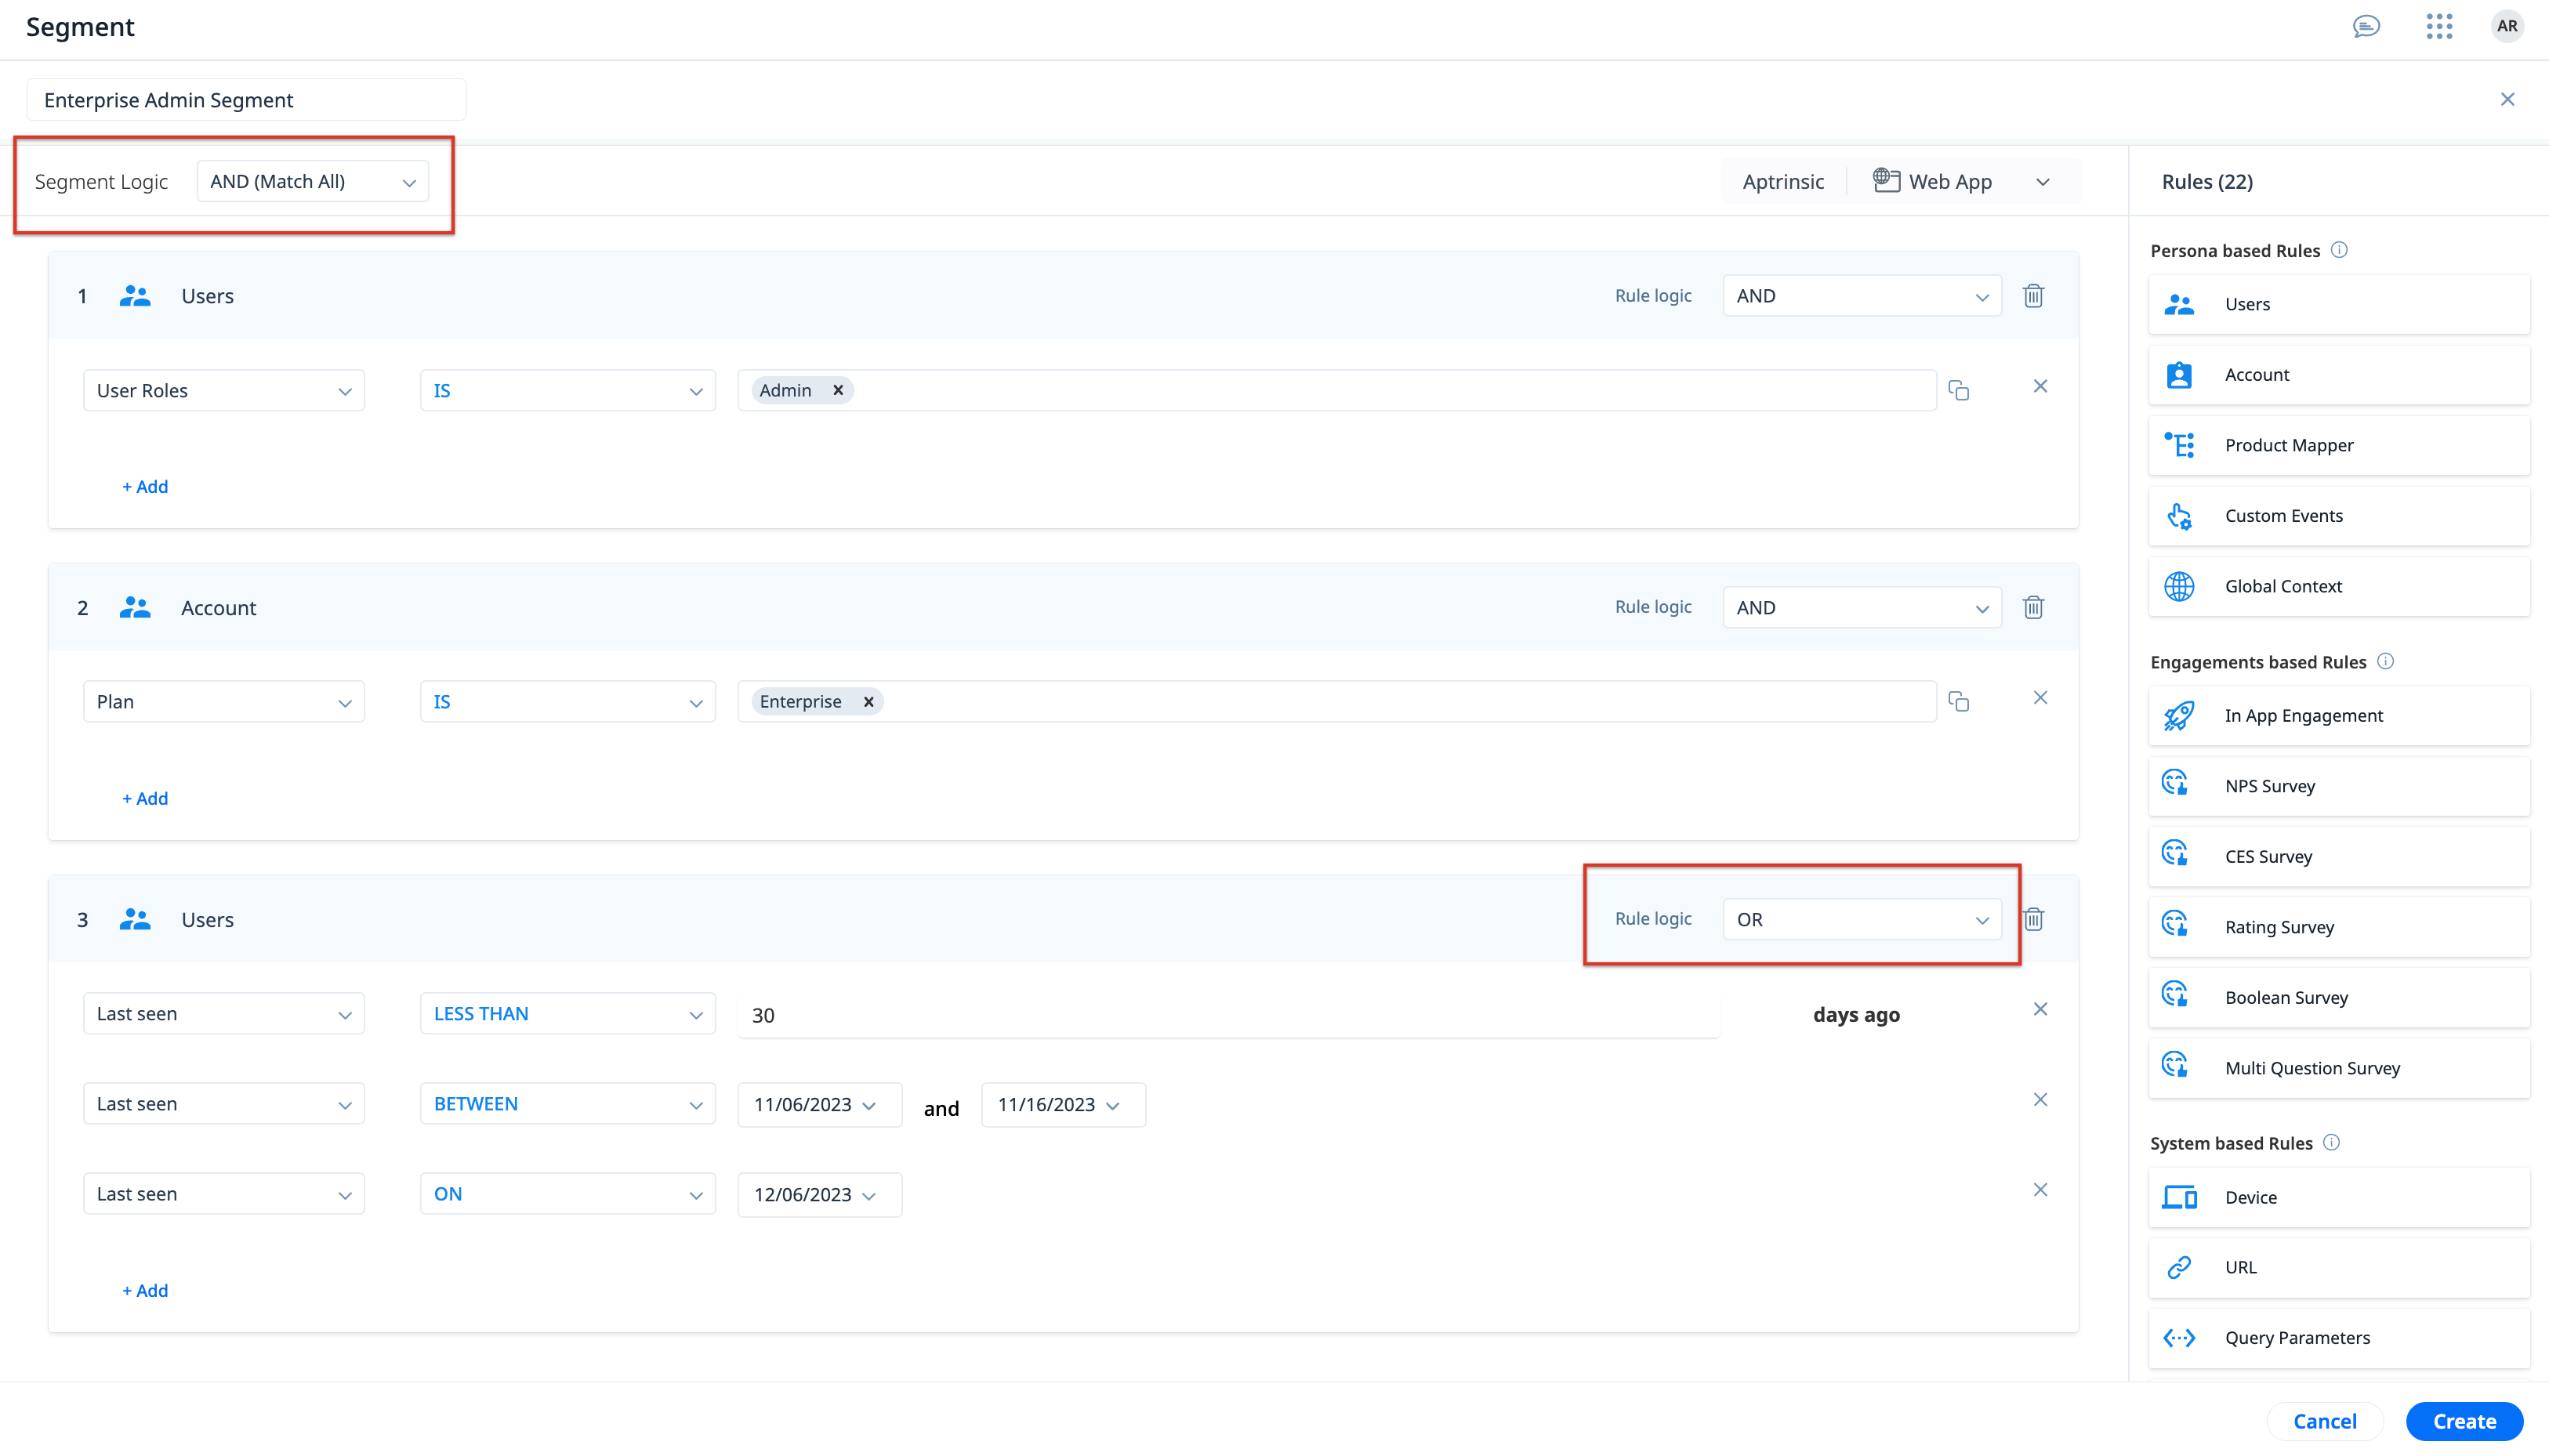
- Select the Rule Logic for each added rule, and Segment Logic for the overall segment. For more information, refer to the Segment and Rule Logic section.
- Rule Logic
- Click Create.
Segment and Rule Logic
When adding rules to your segment, you can decide the qualifying conditions as follows:
- AND: All selected criteria must be true to trigger the segment.
- OR: Any of the selected criteria must be true to trigger the segment.
These conditions can be applied to the following types of logic:
- Segment Logic: The Segment Logic options defines the condition that must be applied to all rules added in the segment.
- Rule Logic: The Rule Logic options define the conditions that must be applied to individual conditions set within a rule. This option can be used to create multiple criteria within a single rule.
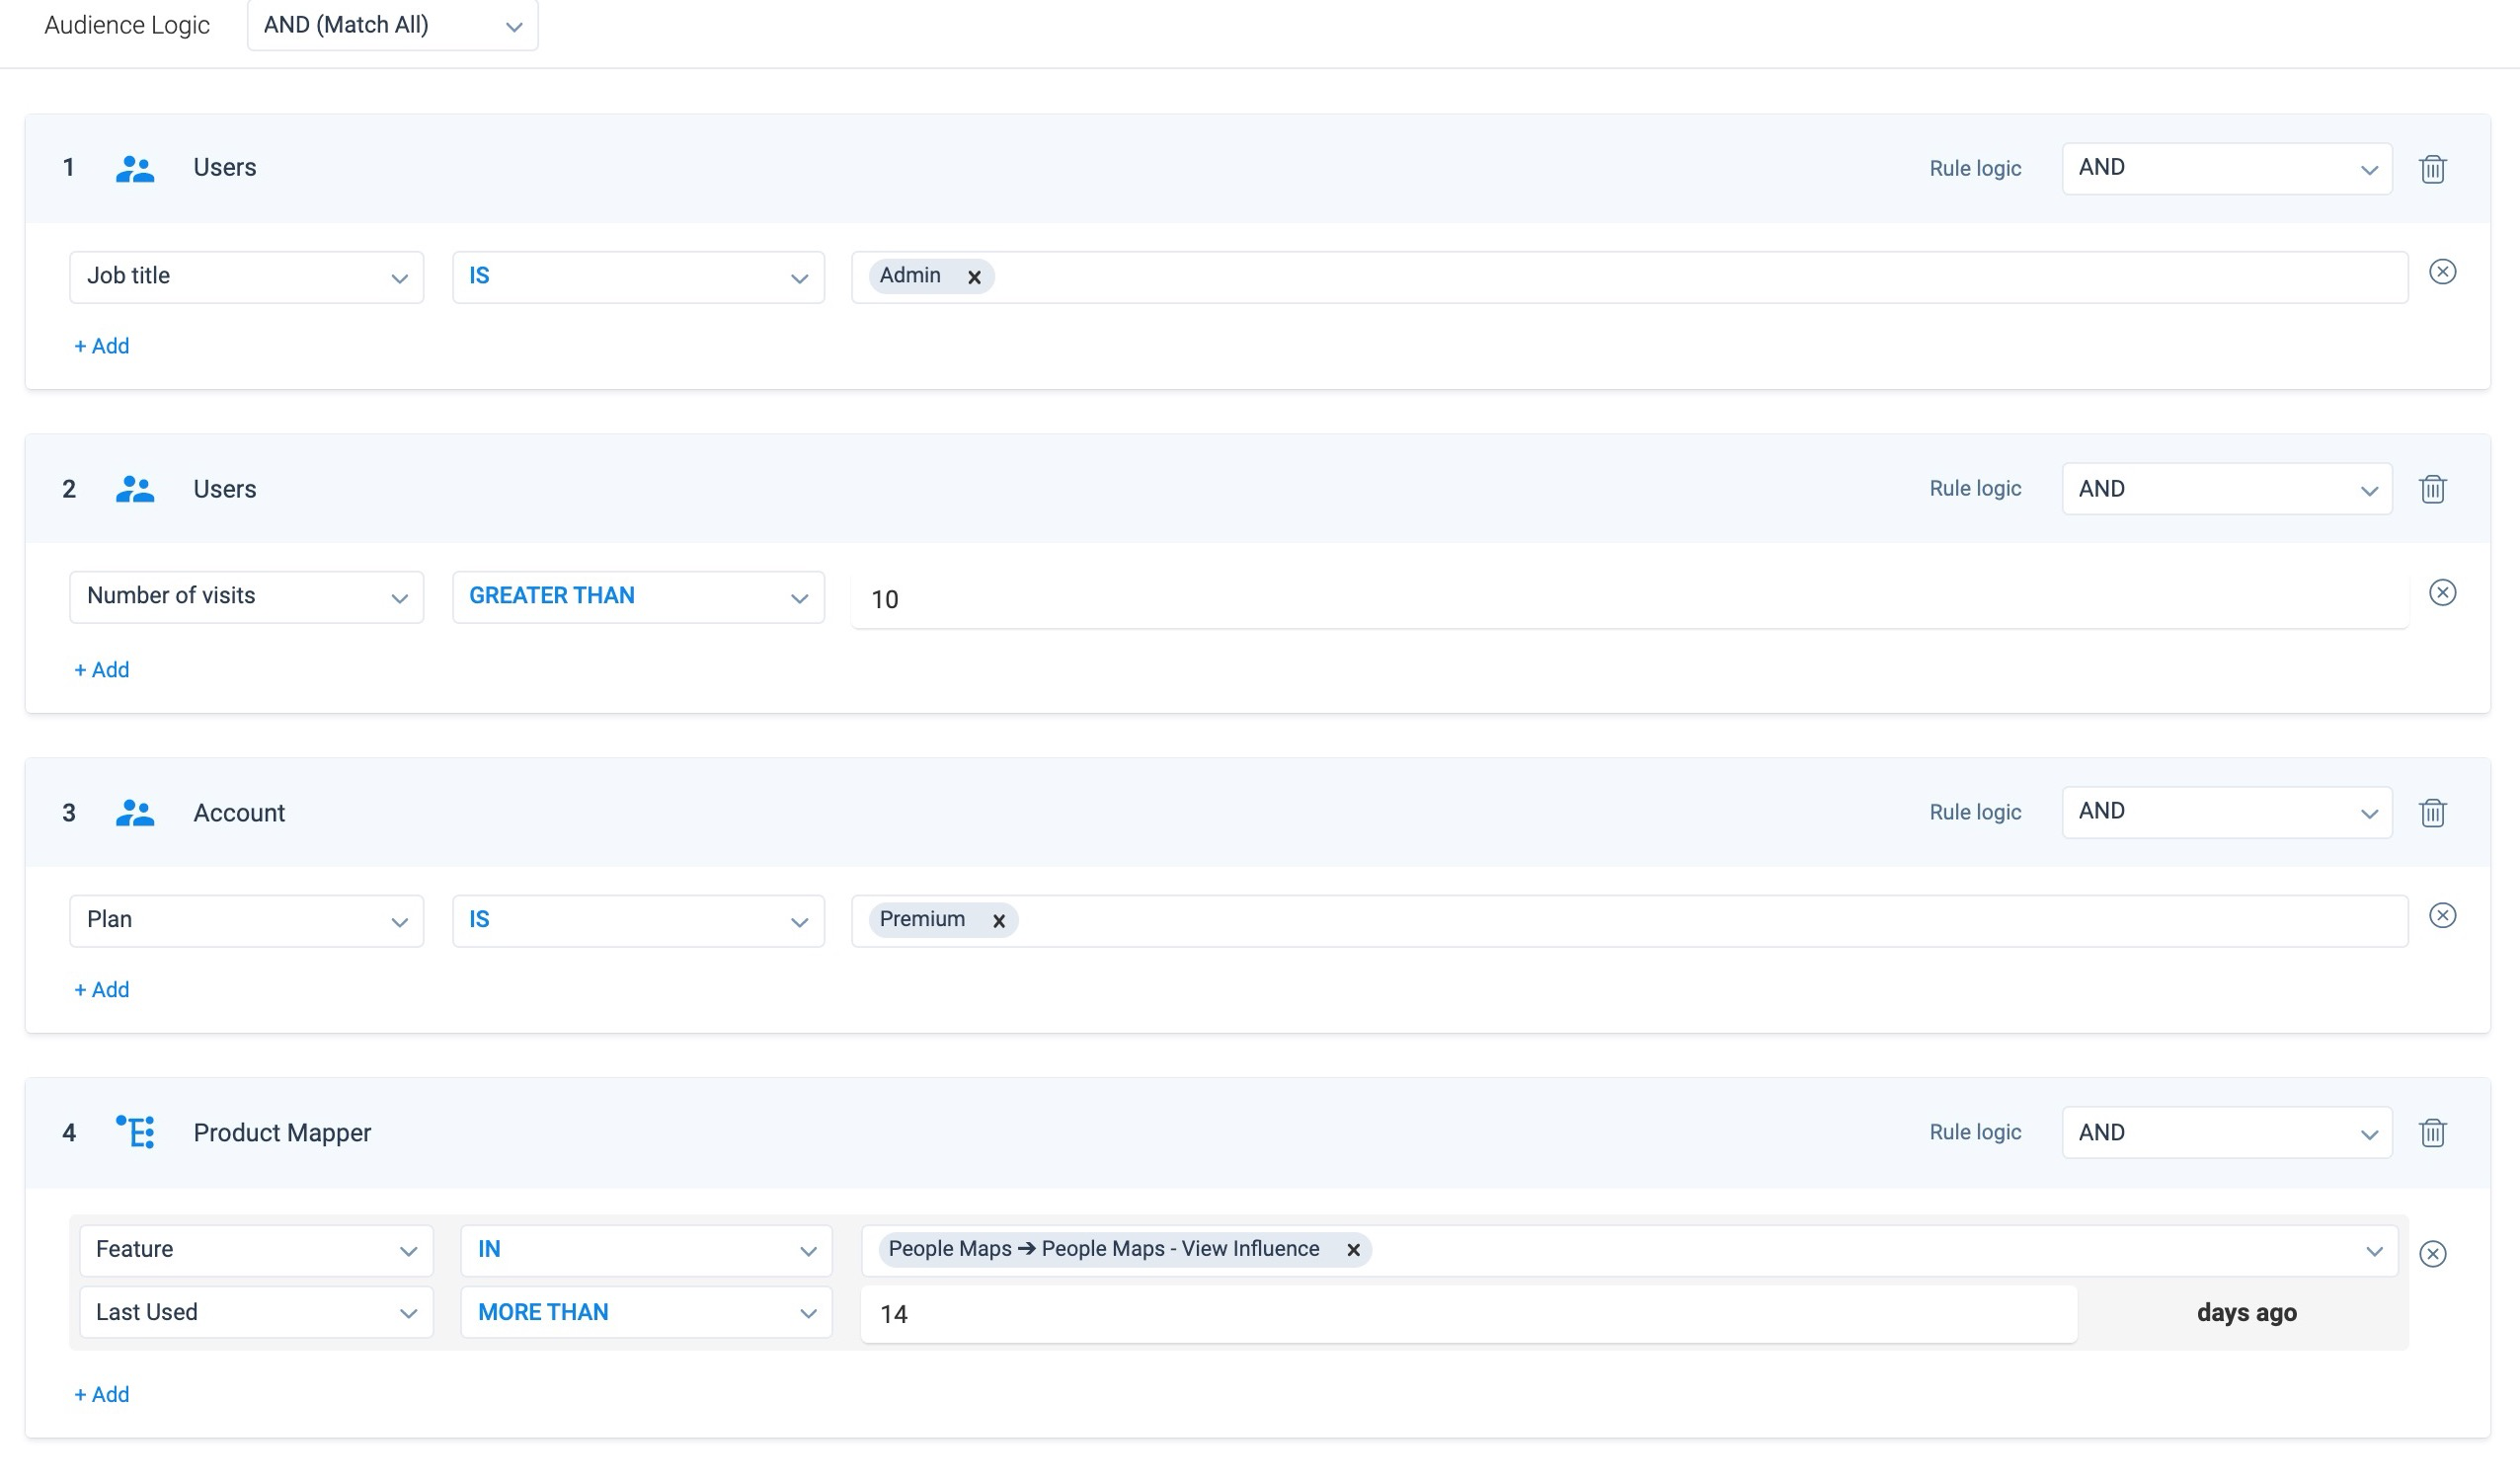
Segments with Advanced Rules
When creating segments using audience rules, you can combine rules and logic to create an advanced set of criteria to target users. The following example displays a segment that is configured to target an audience of Admin users who have visited the product more than 10 times, belong to a Premium account, and have used the People Maps -> People Maps - View Influence feature more than 14 days ago:
Create Segments using CSV Files
The CSV options allows you to create segments by importing a list of specific users or accounts that must be targeted as part of the segment.
To import users or accounts and create a segment:
- In the Create Segment dialog box, select Import CSV.
- Click Next.
- Enter a name for the segment.
- (Optional) If you wish to get familiar with the sample format of the upload file, click Download Sample File.

- (Optional) In the Configure section, select the options based on the file being uploaded.
- Click to view information on individual Configure fields.
-
- Char Encoding: Select the type of encoding to ensure that the data in the CSV file is interpreted correctly by PX. Default value: UTF-8
- Quote Character: Quote Character is used to import a value (along with special characters) specified in the Quotation while importing data. Default value: Double Quotes. Available values: Single Quotes.
- Field Separator: Select the separator used to separate the values of different fields in the CSV. Default value: Comma. Available values: Tab, Semicolon, Pipe.
- Header Line: Header line indicates the row number in the CSV that must be considered as the header for field mappings. Default value: 1
- Escape Character: Escape character is used to include a special character in the value.It is recommended to use Backslash in CSV file to avoid any discrepancy in the data after loading. Default value: Backslash
- Multi Select Separator: Select the separator used to separate multiple values of a field of data type multi select dropdown list. Default value: Semicolon.
- In the Upload File section, drag-and-drop or click browse to select the file containing the list of users or accounts.
Note:
- The CSV file must have a unique identifier column such as an ID or email, so that it can be mapped to the right PX users or accounts effectively.
- The maximum file size allowed is 15 MB.
- In the Select CSV Mapping section, select the CSV header field that serves as a unique identifier.
- Depending on the type of segment being imported, perform the following:
- User:
- In the What would you like to map field, select User.
- In the PX User Attribute field, select the PX attribute that matches the CSV header field to ensure a successful association.

- Account:
- In the What would you like to map field, select Account.
- In the PX Account Attribute field, select the PX attribute that matches the CSV header field to ensure a successful association.

- User:
- Click Create.
IMPORTANT
- Once a segment is created, any further modifications by uploading another CSV file while editing the segment replaces the segment entirely, and does not append or make partial changes.
For instance, if you create a segment with 100 users or accounts and later want to add 20 more, you need to include all 120 users or accounts (as applicable) in the updated CSV file while editing the segment. Uploading a CSV with just the 20 new users or accounts will replace the original 100 users or accounts, not add to them. - Creating a CSV segment may take up to three hours for the full list of users or accounts to be available for engagements, analytics, or dashboards
- Similarly, it may take up to three hours before you can edit or delete a CSV segment, after the CSV upload while creating or editing. However, renaming the segment is permitted at any time.
Create External Segments
External segments allow you to leverage segments created outside Gainsight PX in Gainsight PX. Using the APIs for the External Segments, you can import the segment users, and then use them for engagements and analytics.
For more information on how to create external segments, refer to the Gainsight PX connection article from Adobe.
Note
- The External Segment API currently only supports Adobe Experience Platform.
- External Segment users are visible in Audience Explorer when the segment is used as a filter.
- The create, update, and delete operations for external segments can only be performed using APIs, and not through the PX UI.
Use Segments in PX
After you create a segment, you can use it in engagements to reach specific user groups or to refine who should not receive the engagement. You can also use segments in Analytics and Dashboards to filter data. When applying segments as filters, choose in to include users or not in to exclude them.

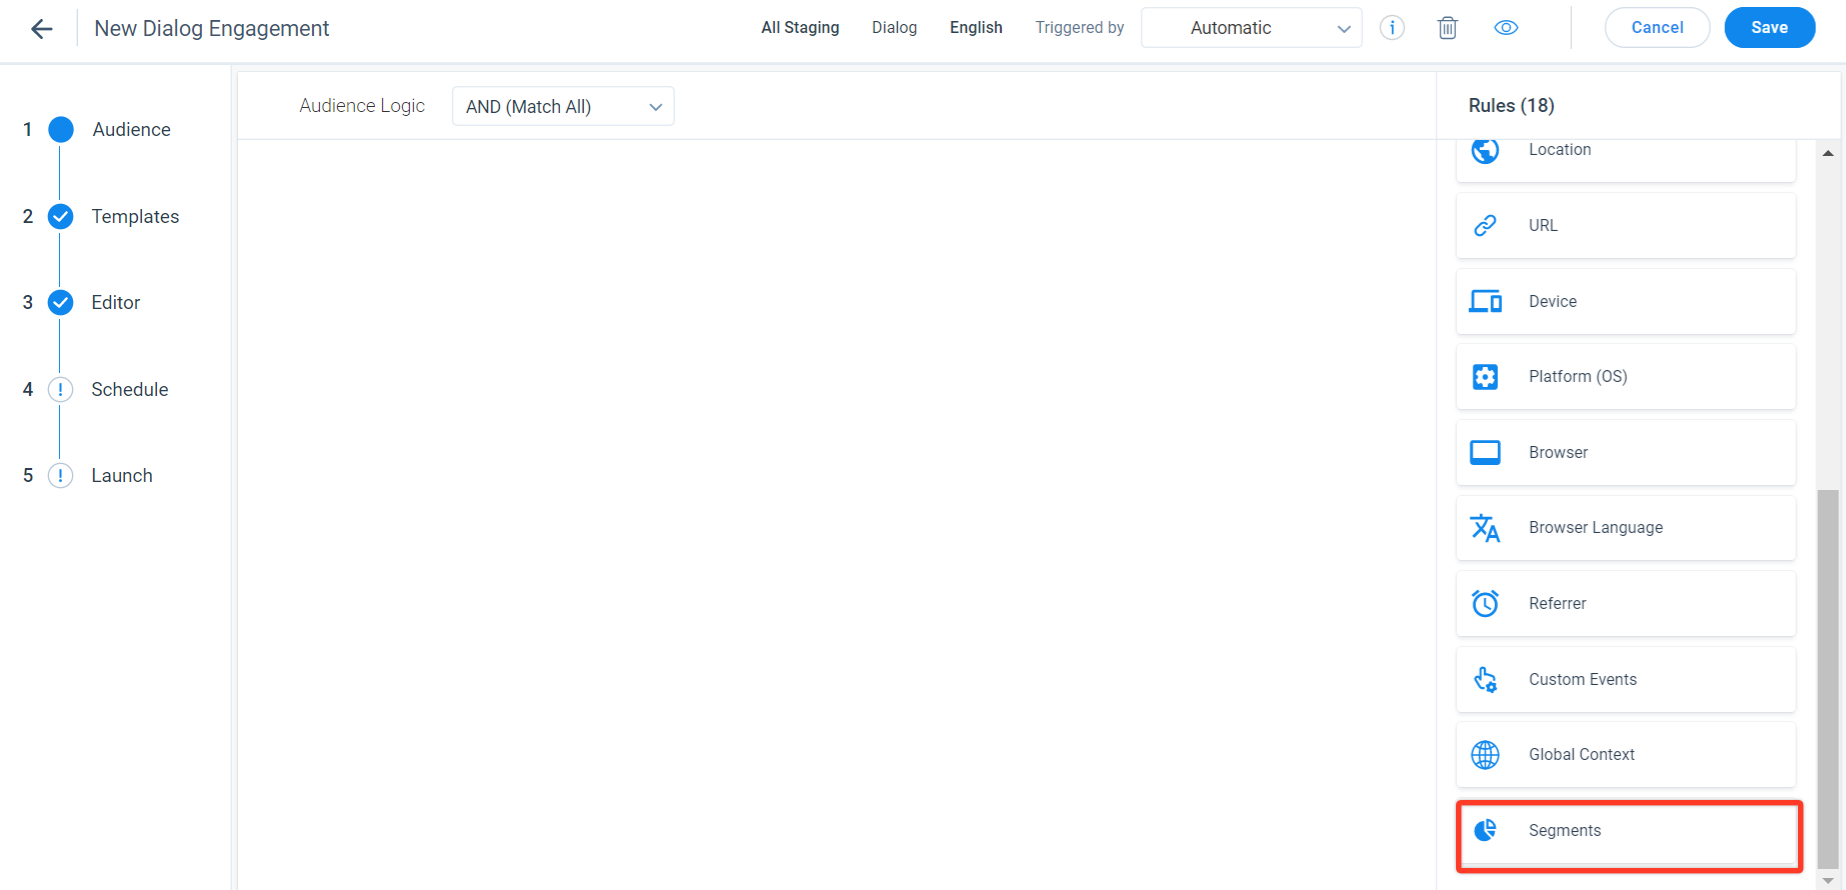
Engagements
While creating an engagement, use the Segments rule to target the engagement to the applicable users:
You can choose to include or exclude users/accounts as follows:
- MATCH ANY: Qualifies users or accounts that belong to at least one segment.
- MATCH ALL: Qualifies users or accounts that belong to all segments.
- NOT MATCH ANY: Excludes users or accounts that belong to any segment.
- NOT MATCH ALL: Excludes users or accounts that belong to all segments.

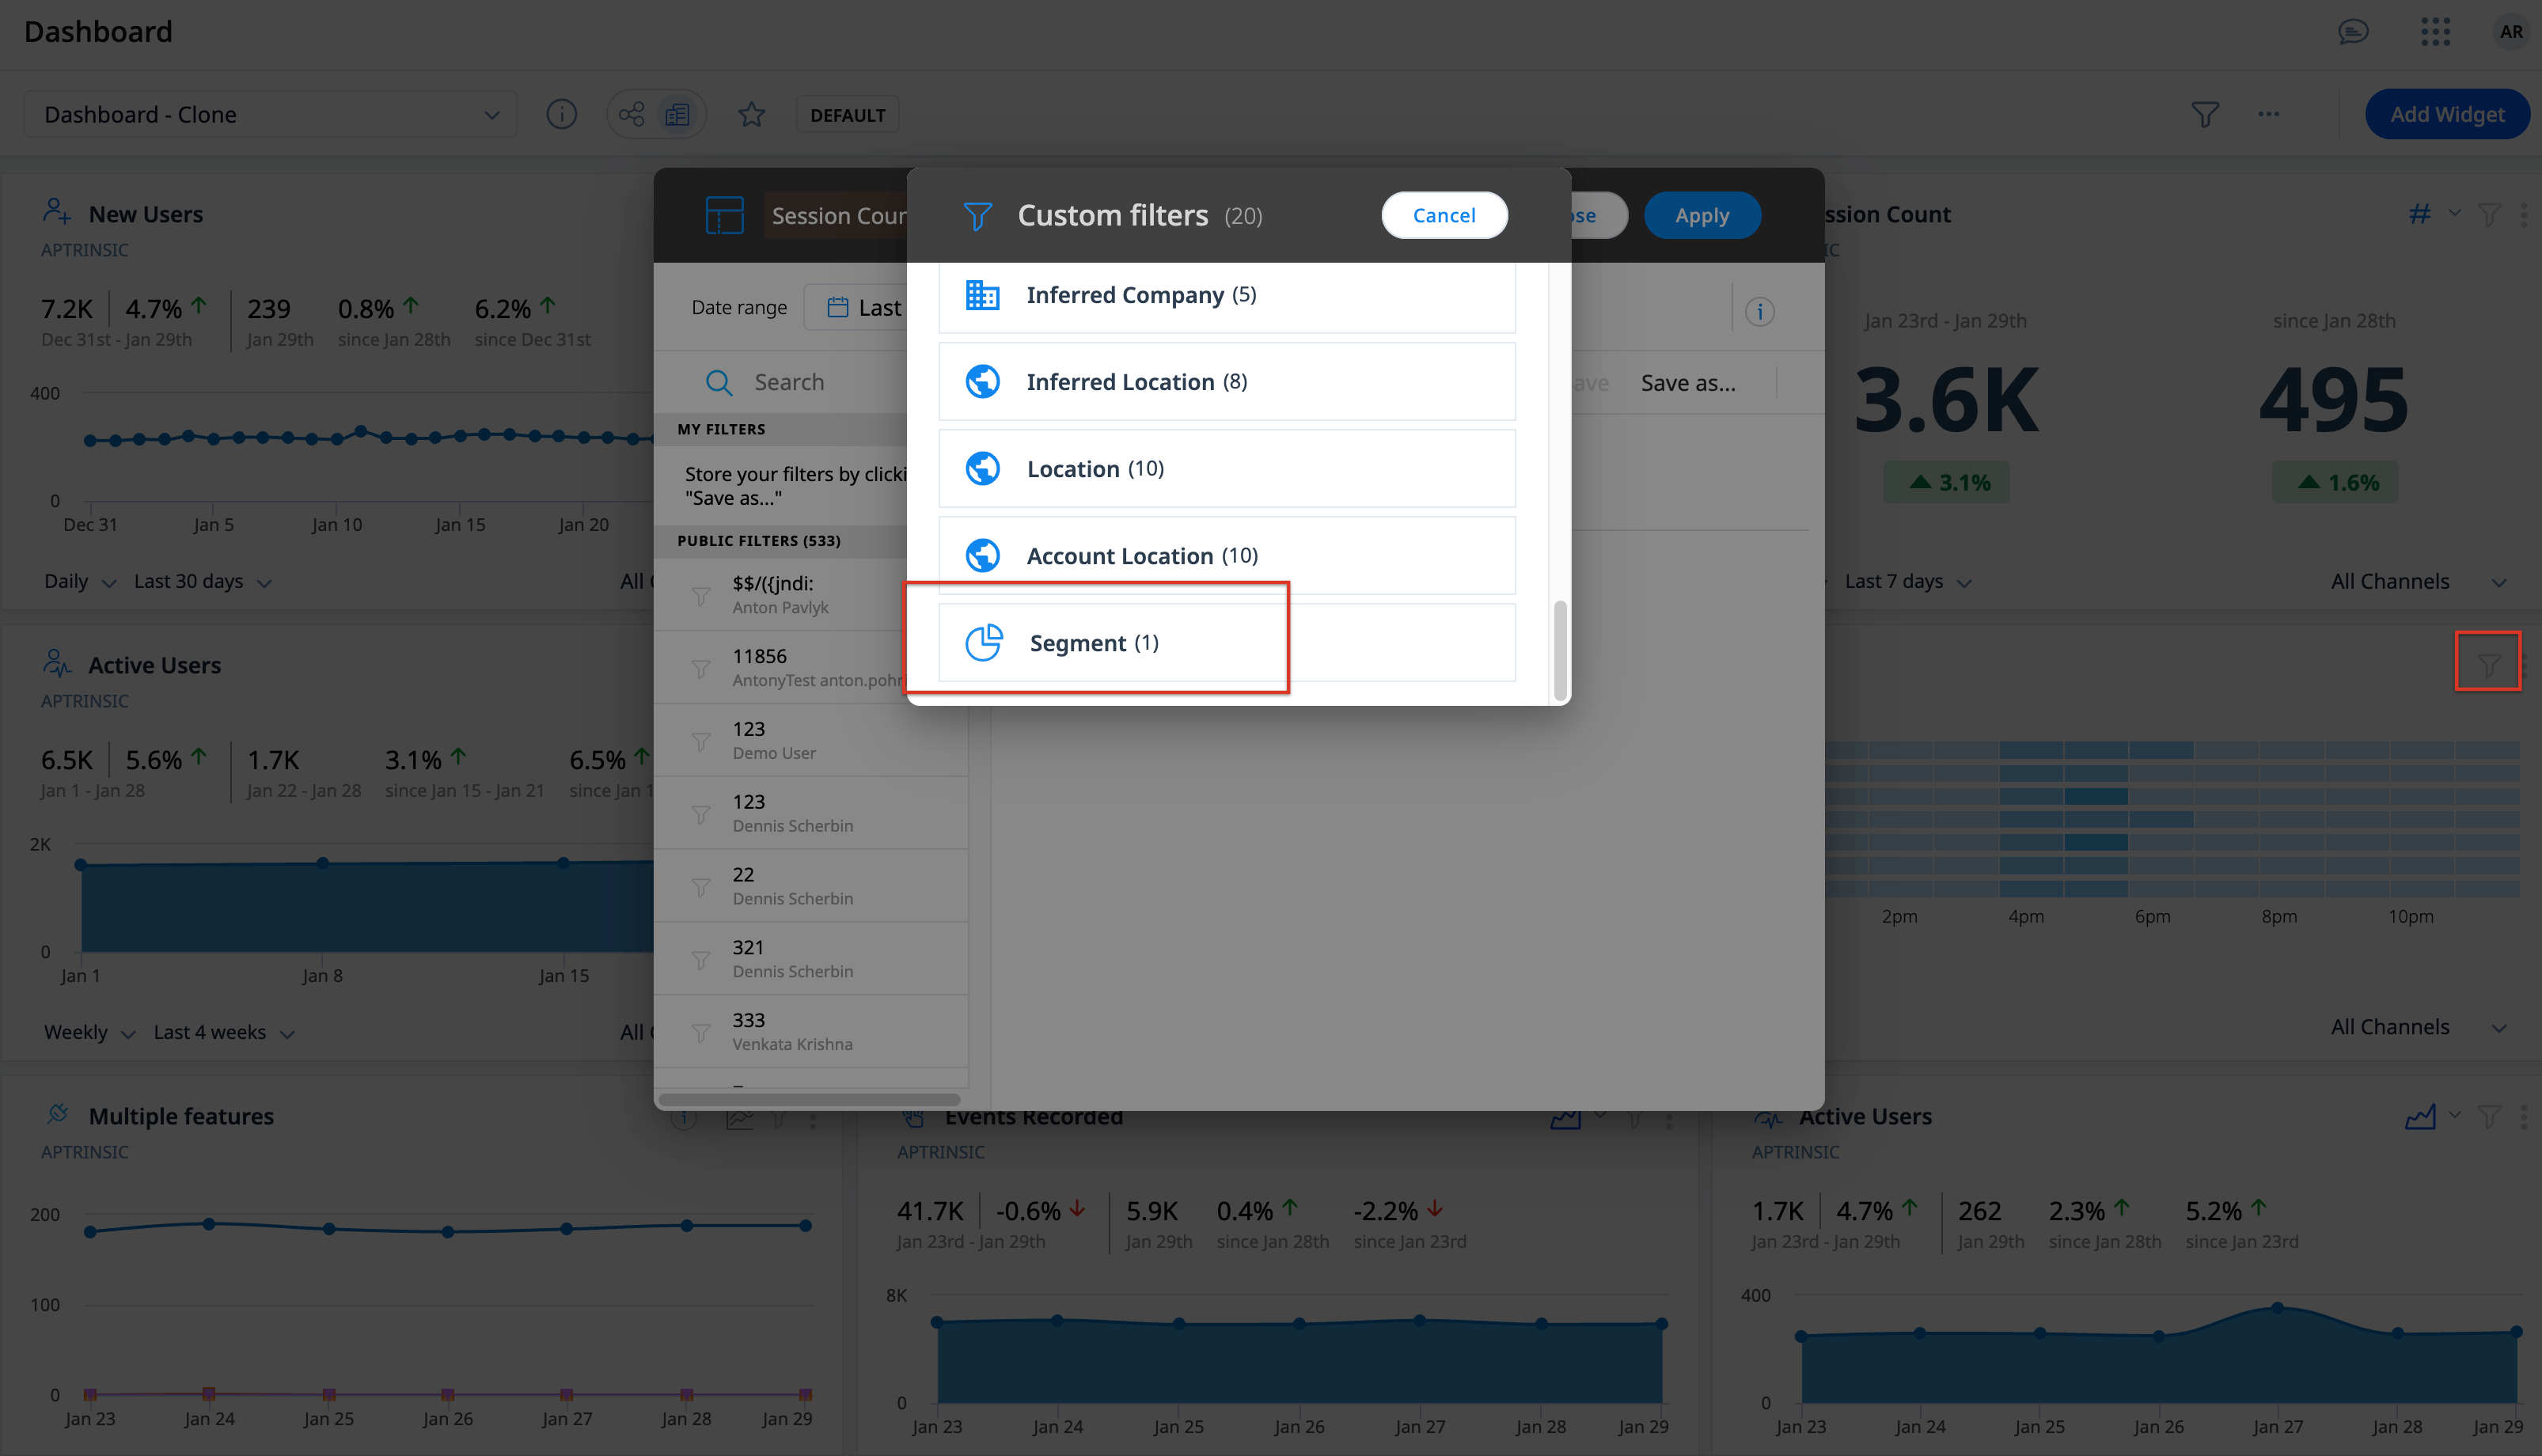
Dashboard
When using Dashboard, use the widget’s filter to analyze data for a certain set of audience:
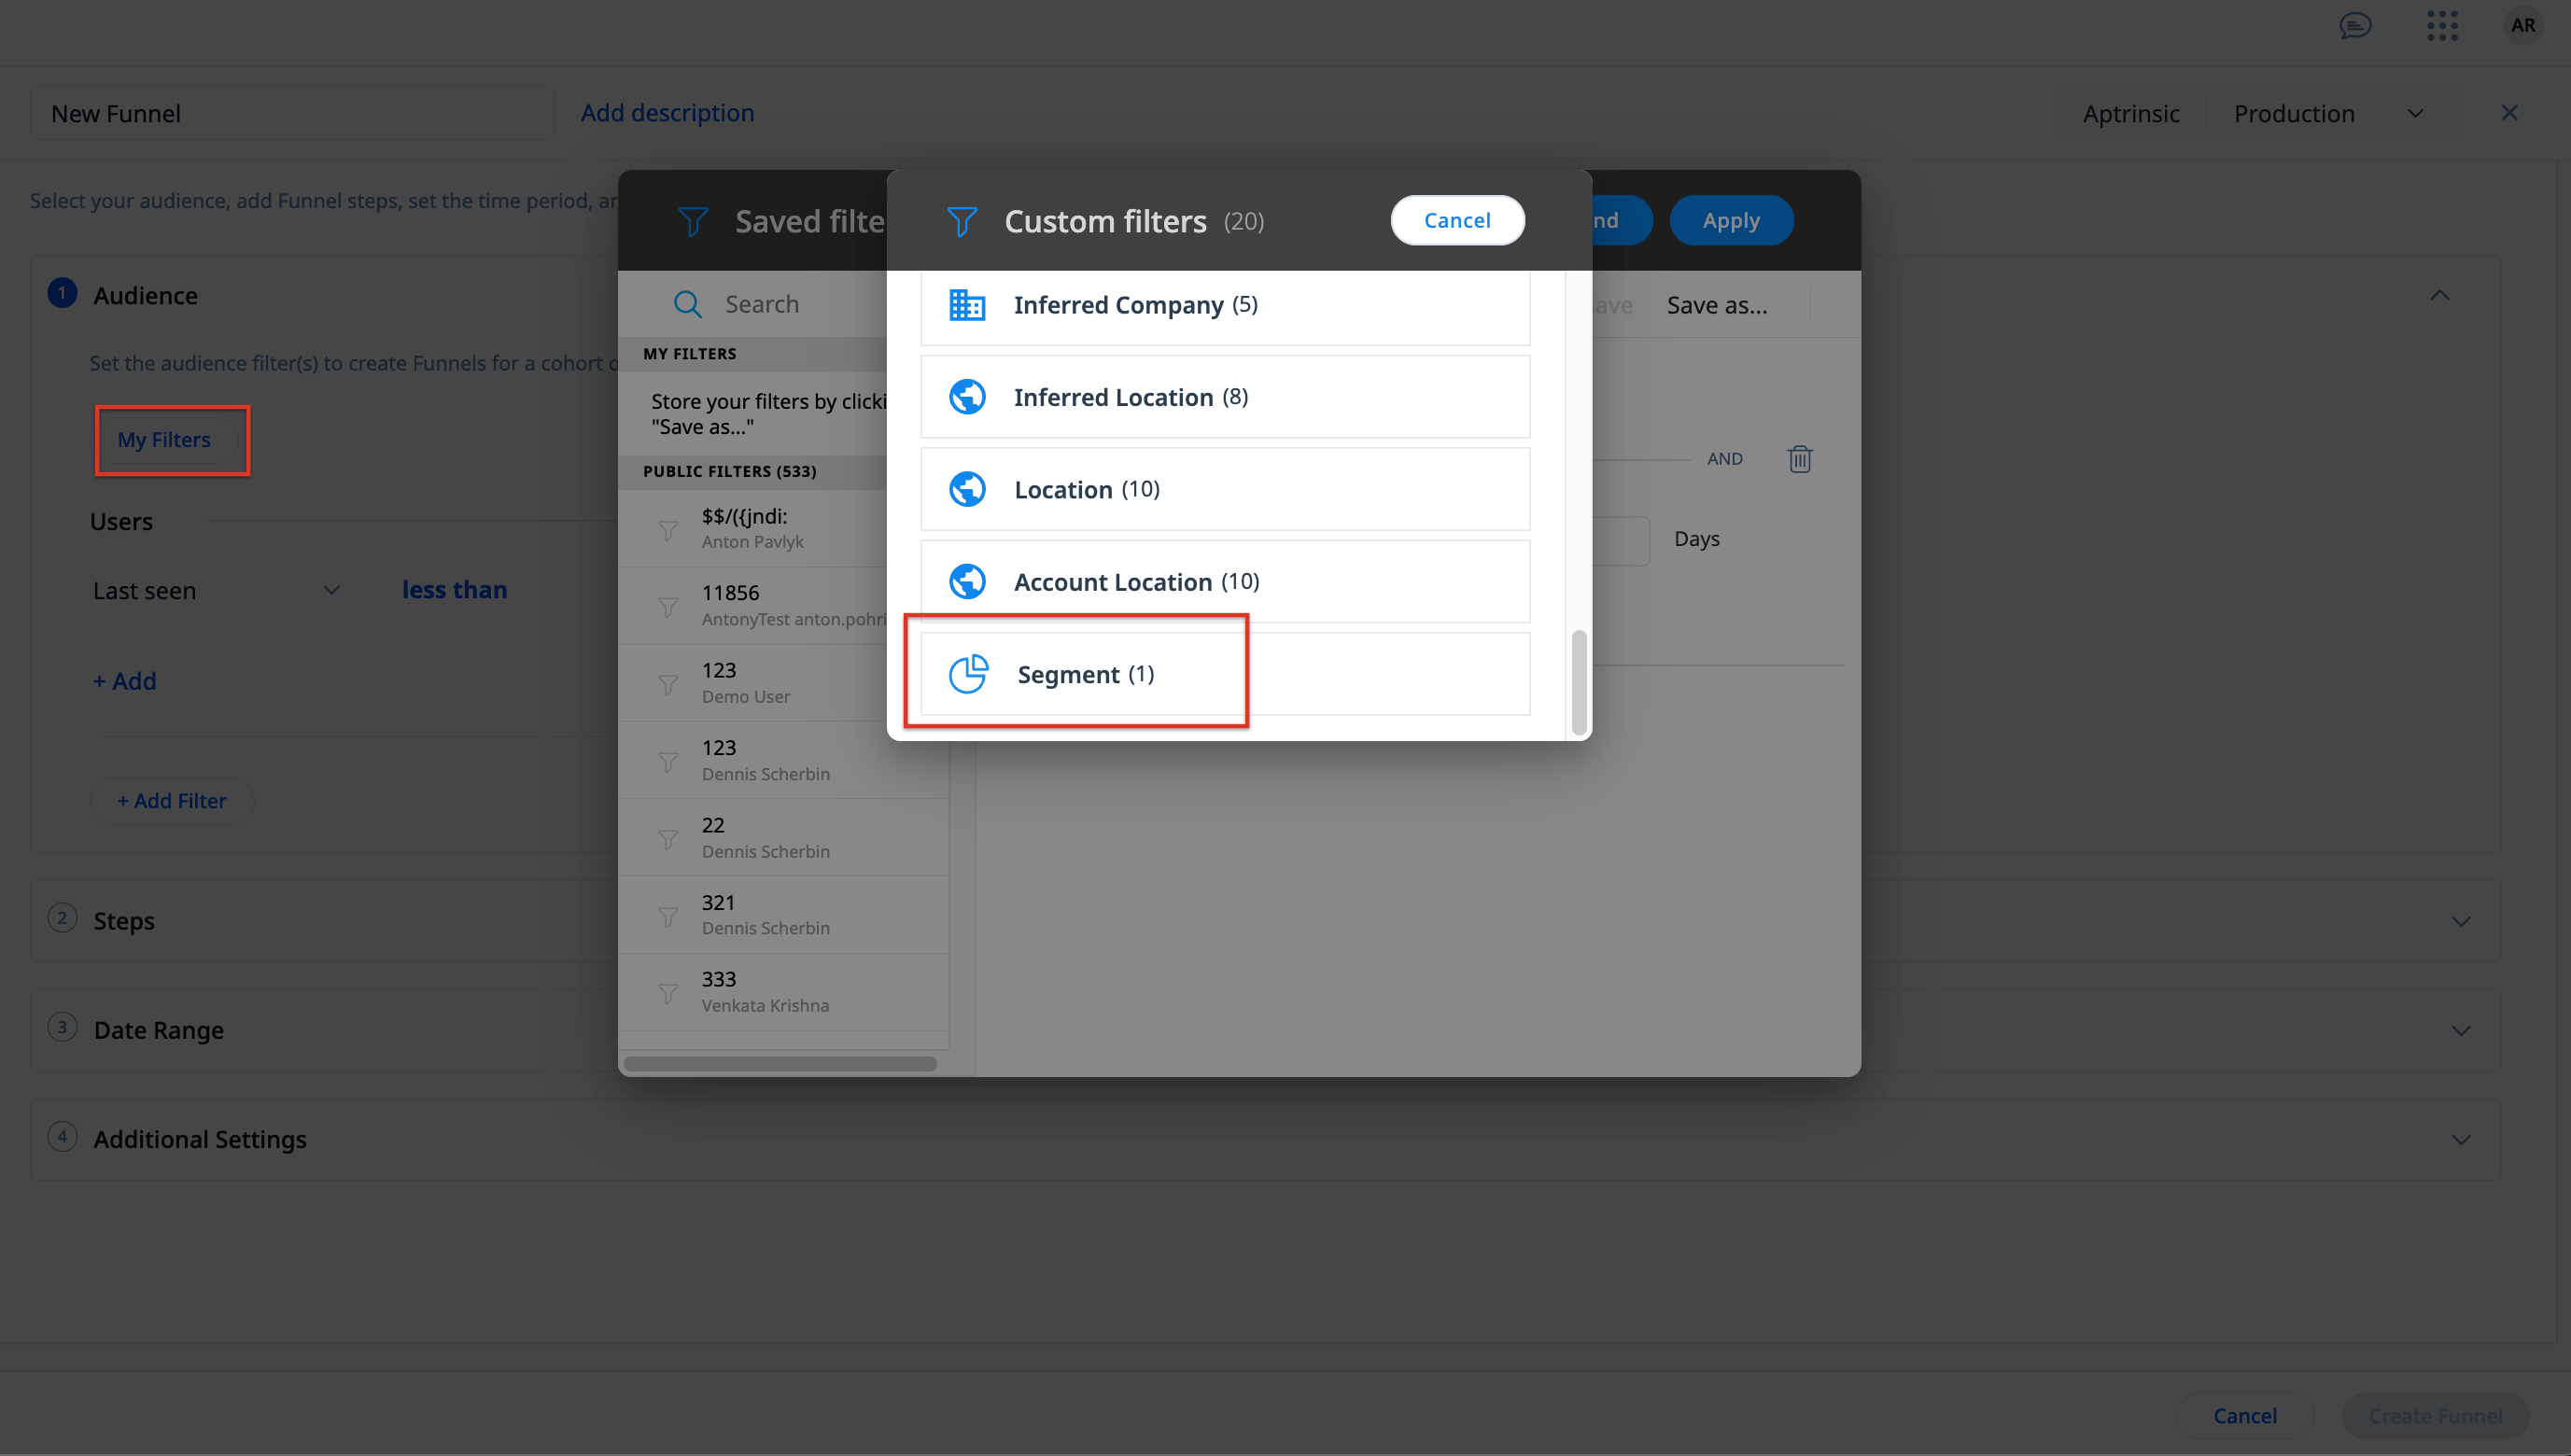
Analytics
When creating a report in Analytics, for instance Funnel, create custom filters using the Segment to filter data specific to the applicable users:
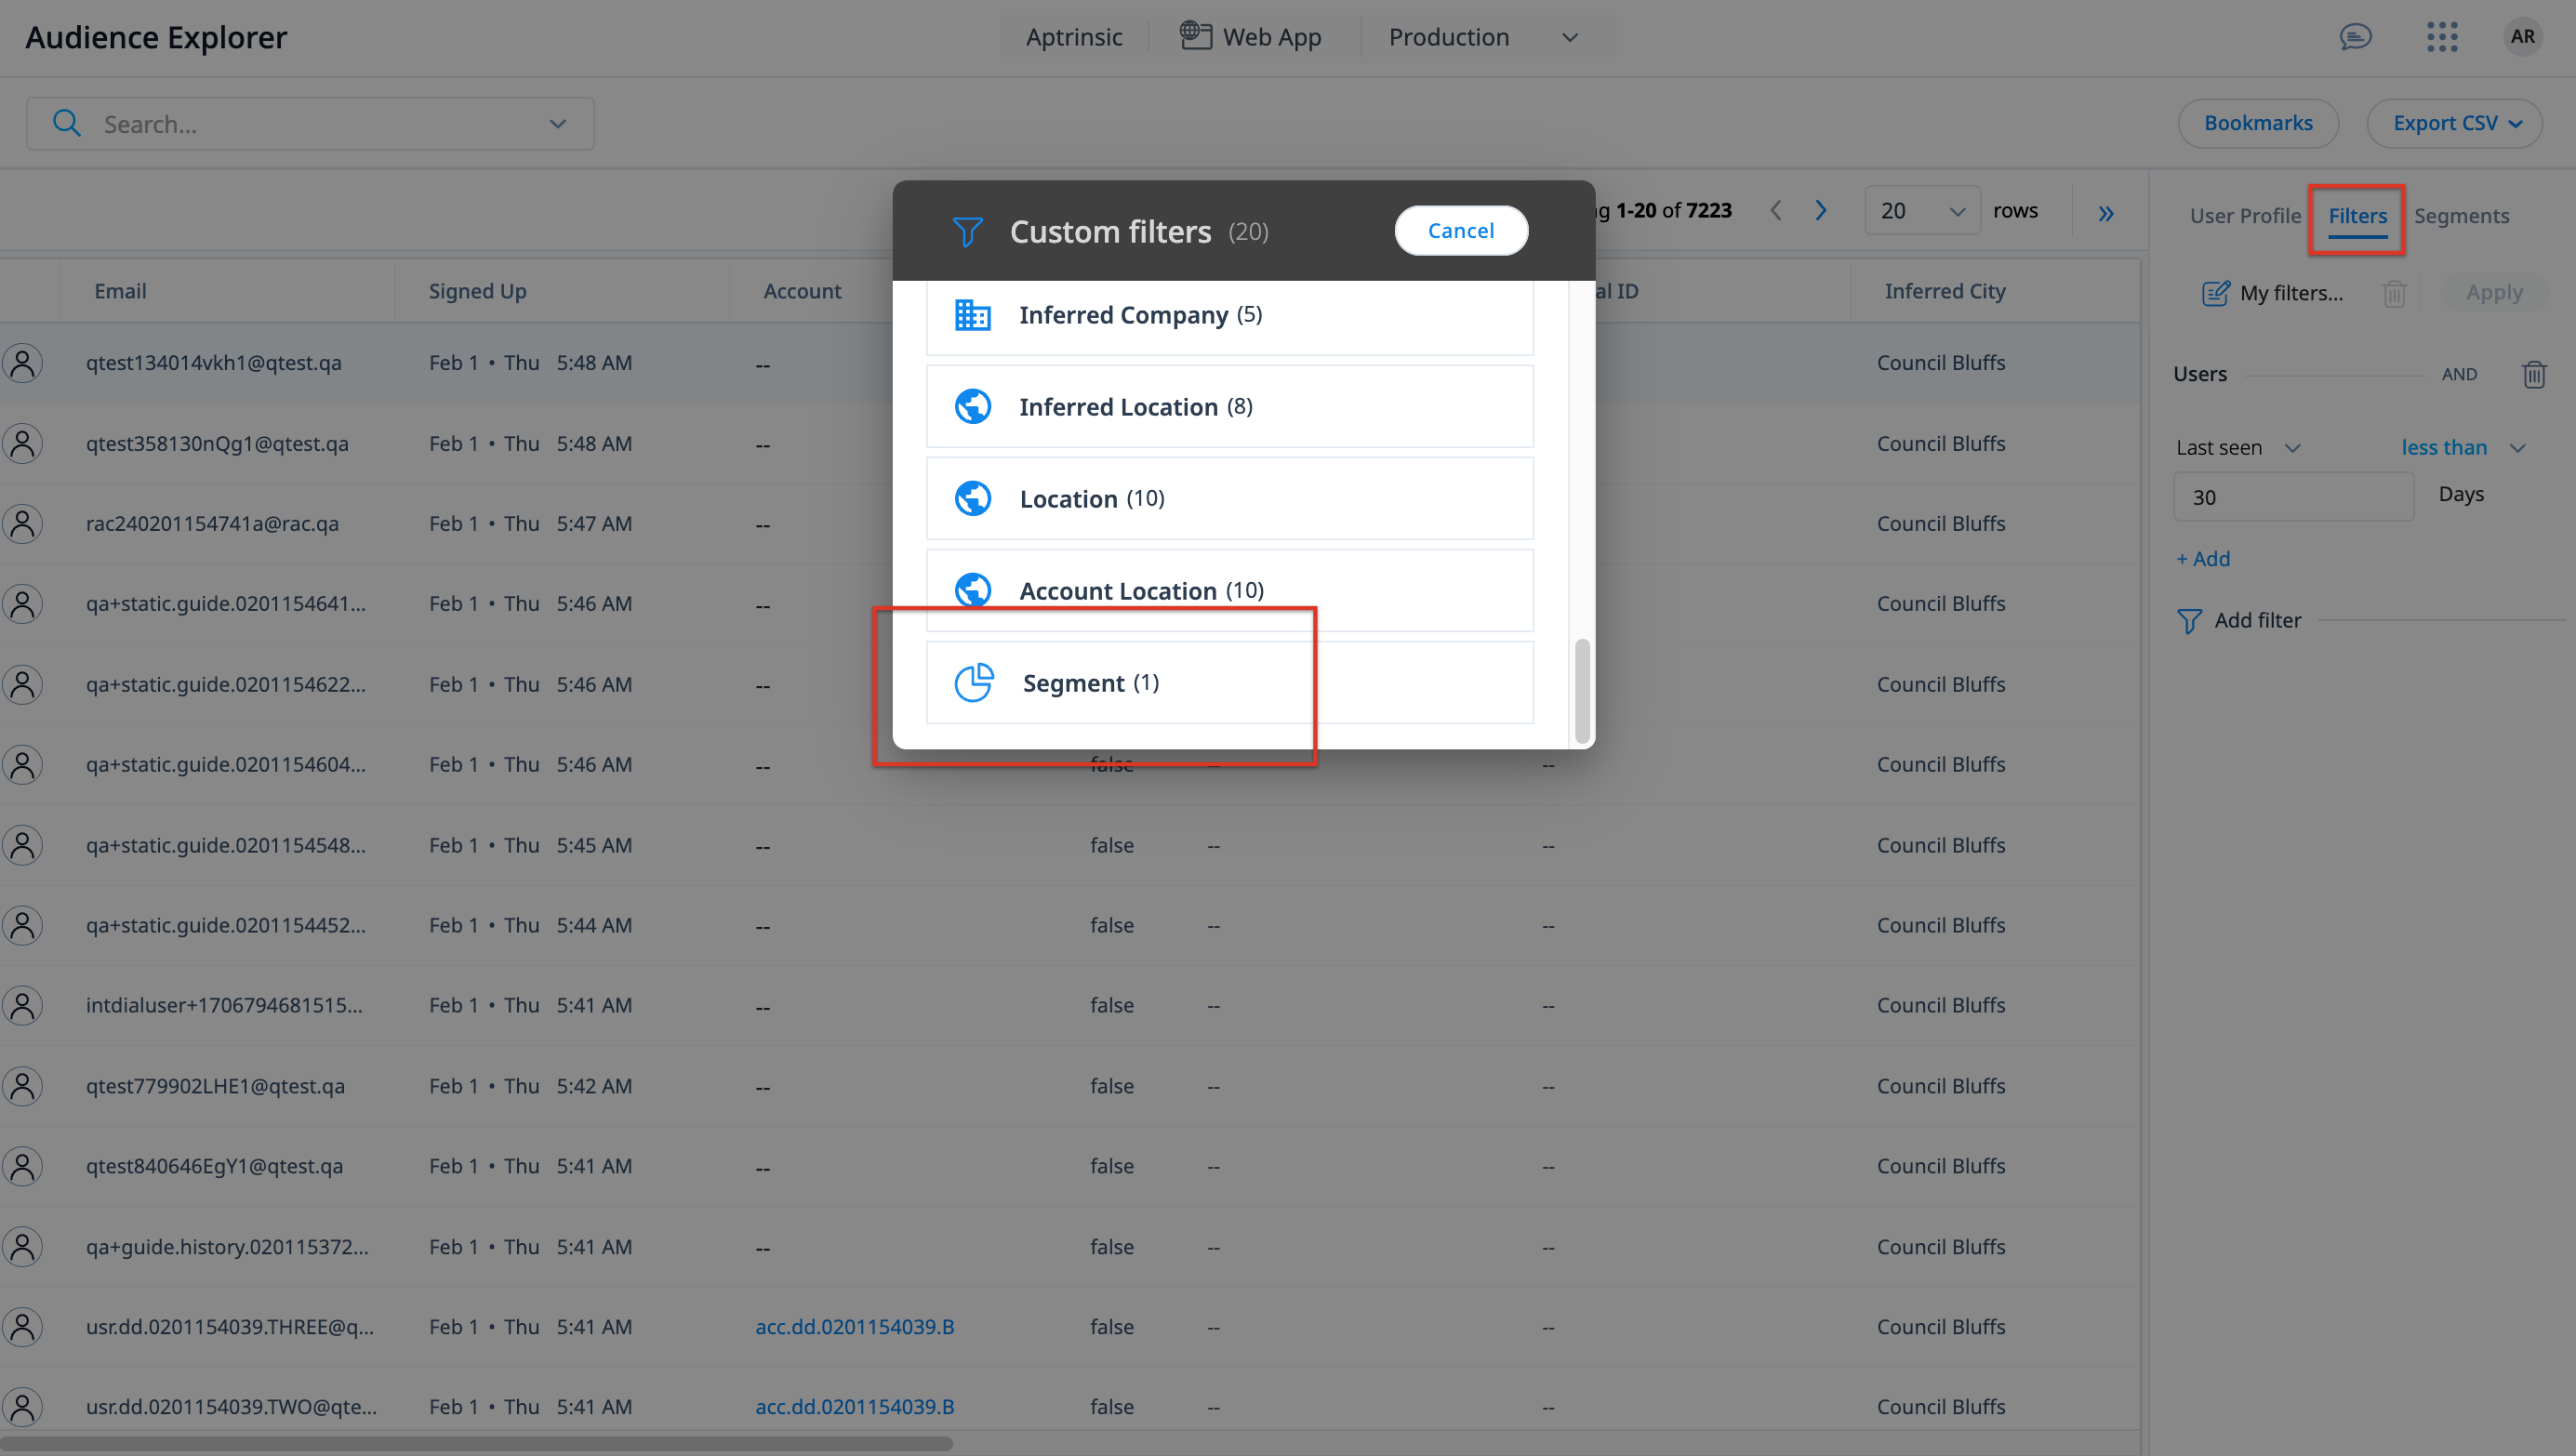
Audience Explorer
When using Audience Explorer, create custom filters using the segment, to view the list of users that belong to a segment:
Manage Segments
The Segments section allows you to view users that belong to a segment, as well as create, edit, or delete segments in PX.
Note: Ensure that you have Manager access to Segments in order to edit or delete segments.
To manage segments:
- Navigate to Segments from the main menu.
- On the Segments page, you can perform the following actions:
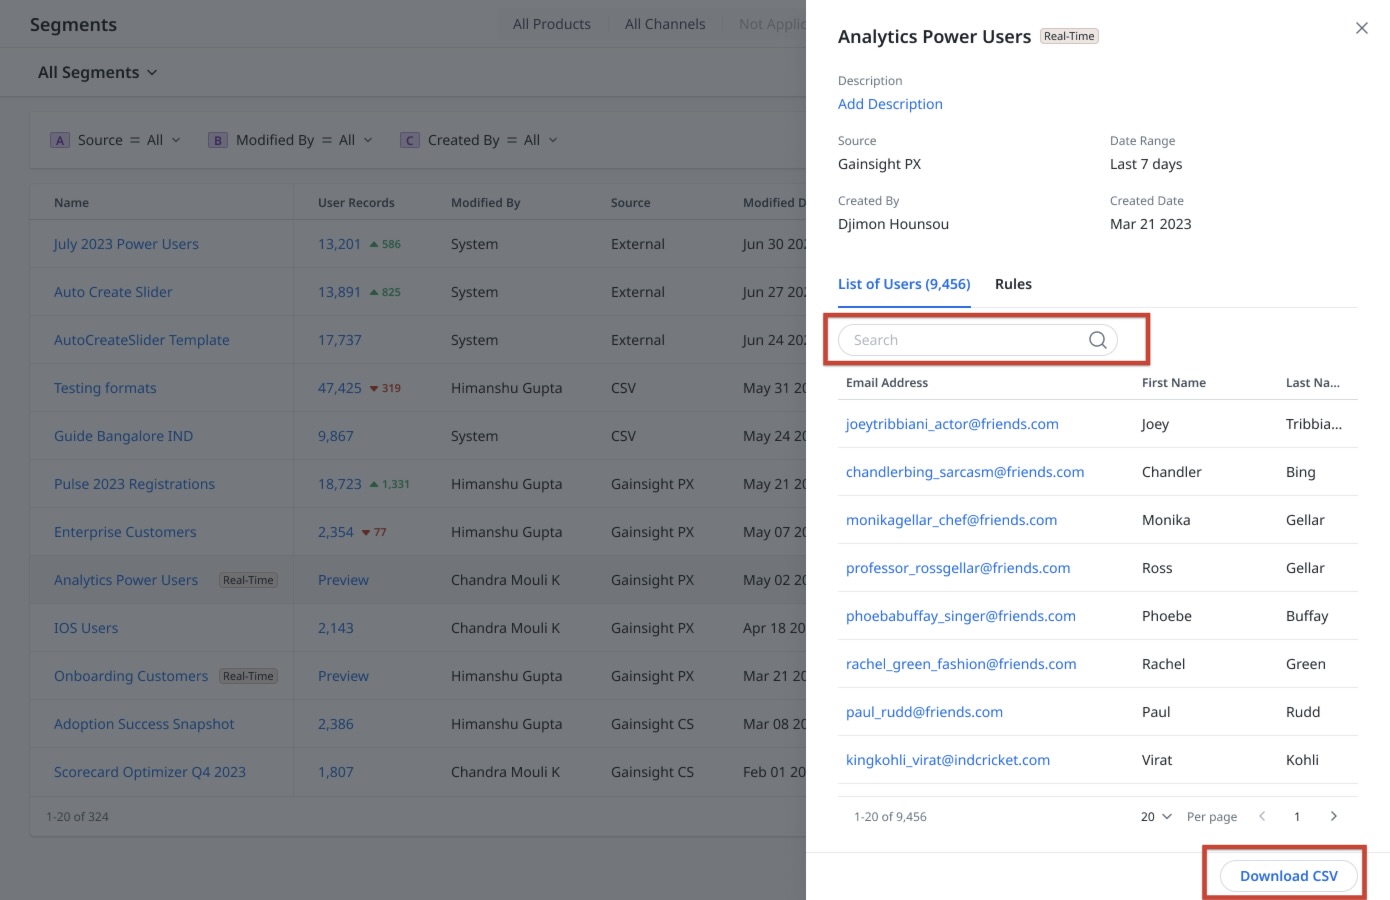
- View segment users: Click a segment to preview all users part of it, based on the type, in the following manner:
- Real-time segments: All users matching the segment criteria in the last seven days.
- CSV and external segments: All latest users that have been added to the segments using CSV upload or External Segments API.
- Search segment users: Search users of a segment using their first name, last name, email address, or user identifier
- Export segment users: Download a CSV file containing the details of all users in the segment.
- Filter segments: Filter and view segments based on the way they are evaluated.
- Manage segments: Edit or delete segments. This option is not available for external segments as they are managed in the external systems such as Adobe Experience Platform (AEP).

Additional Resources
| Net Promoter®, NPS®, NPS Prism®, and the NPS-related emoticons are registered trademarks of Bain & Company, Inc., NICE Systems, Inc., and Fred Reichheld. Net Promoter ScoreSM and Net Promoter SystemSM are service marks of Bain & Company, Inc., NICE Systems, Inc., and Fred Reichheld. |