Prioritize Engagements
This article explains how to configure engagement groups and prioritize engagements.
Overview
Gainsight PX uses various targeting options and decision criteria to show an engagement to the target audience. However, when you launch multiple engagements it is likely that a user qualifies to view more than one engagement. Engagement prioritization helps you set the priority order of the engagements to ensure that the high priority engagement is displayed to the user.
Prioritizing engagements involves the following steps:
- Create priority groups
- Add engagements to the priority groups
- Rank the engagements within a priority group
- Rank the priority groups
If an engagement is part of the priority group, the Priority column on the engagements list page shows the group and ranking of the engagement in the G<x> : E<x> format where ‘x’ indicates the group/engagement ranking.
Engagement Priority Rules
An engagement can be part of only one priority group.When a user qualifies to view two or more engagements the one that belongs to a priority group is shown first.
Depending on the priority groups the following sub use cases may occur:
| Sub Use Case | Engagement that is prioritized |
| When they belong to the same priority group | The engagement with higher priority is shown first. |
| When they belong to different priority groups | The engagement that is assigned to the higher priority group is shown first. |
| When they do not belong to any priority group |
The engagement that is configured with paywall is shown first. Note: If there are multiple engagements with paywall, then a collision occurs and one of the engagement is shown |
| When they are not part of any priority group and also do not have the paywall scope |
The engagement is displayed in the following order of preference:
|
Create Priority Groups
To create priority group:
- On the Engagements list screen, click the Prioritize icon. The Priority Configuration window is displayed.
- Click the plus icon (+) in the Groups section.
- Enter a name for the priority group.
- Click Enter.
Note: Hover on the priority group and click the vertical ellipsis (⋮) to rename or delete the group. - Drag and drop the priority group using vertical ellipsis (⋮⋮) to set the order of preference.
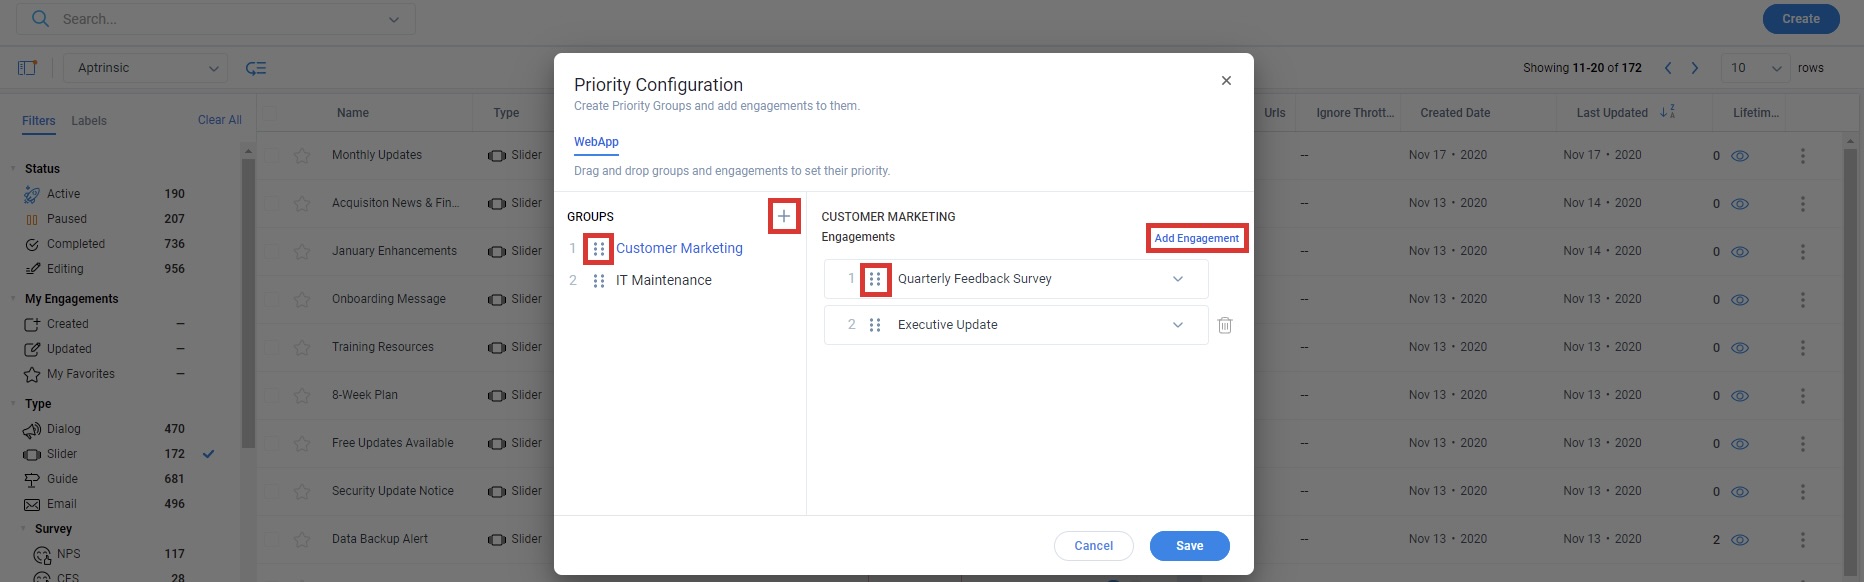
- Click on the priority group.
- Click Add Engagement to add engagements to this group.
- Search the engagement by Name, Type or Status. The list appears as you type and select the required engagement.
- Repeat the steps to add more engagements.
Note: Hover on an engagement and click Delete to remove the engagement from the group. - Drag and drop the engagements using vertical ellipsis (⋮⋮) to set the priority order.
- Click Save.
Filter Engagements by Priority
After you assign an engagement to the priority group, the Priority column on the engagements list page shows the group and ranking of the engagement in the G<x> : E<x> format where ‘x’ indicates the group/engagement ranking.
If you want to work with the prioritized engagements, click the Priority category in the Filter tab on the left side of the screen. For more information on how to apply filters, refer to the Apply Filters section of the Organize Engagements article from the Additional Resources section.
Additional Resources
| Organize Engagements |
| Net Promoter®, NPS®, NPS Prism®, and the NPS-related emoticons are registered trademarks of Bain & Company, Inc., NICE Systems, Inc., and Fred Reichheld. Net Promoter ScoreSM and Net Promoter SystemSM are service marks of Bain & Company, Inc., NICE Systems, Inc., and Fred Reichheld. |