Activity Options
This article explains how to use the various options available in Activities. After reading this article, you can attach files to Activities, share, search and filter activities, and tag internal users in Activities.
The Timeline is a one-stop source for key customer activities such as Updates, Calls, Meetings, Emails, Milestones and note-taking during or after a customer interaction. Timeline preserves a chronological history of your most significant interactions, helps teammates and management get up to speed quickly on the customer’s history, enables smooth management transitions, and reduces the need for leadership to ask for one-off updates from account managers and CSMs. For more information, refer to Timeline Overview in the Additional Resources section at the end of this article.
Overview
The Global Timeline view displays a list of activities for all Companies and Relationships in a centralized area. The C360/R360 page of the respective Company/Relationship displays the associated Timeline activities.
Attach Files To Activities
You can attach files to an activity either while creating an activity or while editing an activity. The file formats supported for attachment are jpg, jpeg, gif, png, bmp, pdf, doc, docx, txt, ppt, pptx, xls, xlsx, xlsm, csv, msg, eml, avi, flv, wmv, mov, mp4, wav, aiff, flac, alac, mp3, aac, wma, and ogg. You can attach multiple files simultaneously. Only the user who creates the activity can add/delete attachments. You can search an Activity by attachment name or attachment content.
Add Attachment
To add an attachment:
- Log an Activity or edit an existing activity.
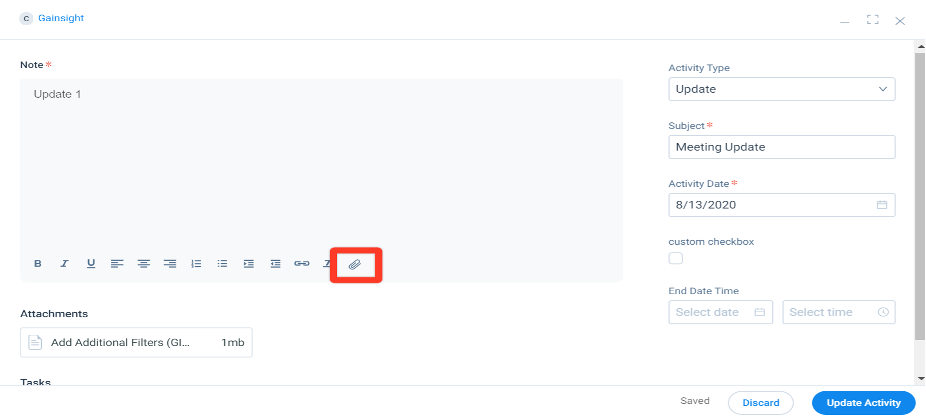
- In the Activity Editor, click the attachment icon, to attach a file.
- Select the file(s) from your computer, that you want to attach.
Notes:- The maximum attachments per activity are five
- Total size of the attachments must be less than 30 MB.
- You can preview and download attachments of GIF and Image types. You can download the attachment types that do not support preview.
- Click Update Activity, to save the activity.

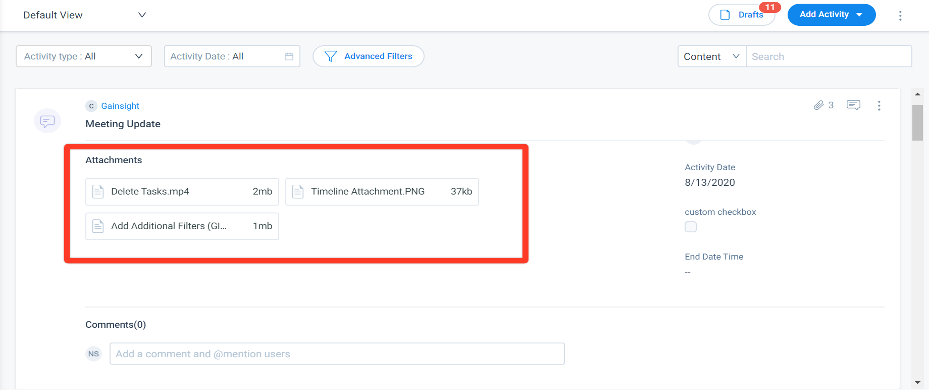
The paper clip icon shows that a specific activity has attachments.

Click the activity to expand it and you can see the attachments linked to it. Click the attachment to preview and download. If the attachment type doesn’t support preview, you still get an option to download it.

Note: The header remains sticky when the activity is expanded.
Delete Attachment
To delete an attachment:
- In the Activity Editor, hover over the attachment.
- Click the Delete icon on the attachment.
- Click Update Activity, to save the activity.
.png?revision=1)
Note: There is no undo option available after deleting the attachment.
Filter Activities
You can filter the activities to display only the required activities. You can filter activities using Basic and Advanced Filters.
Basic Filters
The basic filters are Activity Type and Activity Date. They are explained below in detail.
Filter by Activity Type
You can filter activities by their Activity Types. The list of activity types includes out of the box and custom activity types. You can also select SELECT ALL to display activities of all the activity types.
The list of activity types in the filter is categorized by:
- Global: Activity types that are applicable to both the companies and Relationships.
- Company: Activity types that are applicable to only companies.
- Relationship Types: Activity types are categorized by each Relationship type in the filter list.
Filter by Activity Date
You can filter activities based on Activity Date. Select one of the following options in the activity date filter:
- All: Displays all the activities.
- Today
- Yesterday
- Tomorrow
- This Week: Displays the list of activities created for this week, considering today as the start of the week.
- Last Week: Displays the list of activities created for last week, considering last week Monday as the start of the day.
- Last 7 Days: Displays the list of activities created for the past 7 days, considering today as the start of the day.
- Last 20 Days: Displays the list of activities created for the past 20 days, considering today as the start of the day.
- Custom Date Range: you can manually enter dates of your choice in the Start date and End date.
Click Apply to filter and view activities per selection.
Advanced Filters
You can apply advanced filters to further narrow down the data that you are looking for. When you apply advanced filters, it always acts in conjunction with the applied basic filters which precisely gives the data as required.
When a filter is added, notification count on the number of filters added is displayed on the Advanced Filters label as shown below.
Add Filter
To apply an advanced filter:
- Click the Advanced Filters icon.
- Select the Object (Timeline or Company or Relationship), field, operator and value of your choice.
- (Optional) Click the ‘+’ icon at the end of the filter to add more filters.
- Apply the advanced logic between the two filters using AND, OR conditions. In the example shown below, the logic A AND B is applied.
- Click Apply, to save the filter.
When a filter is added, a notification count on the number of filters added is displayed on the Advanced Filters label as shown below.
.png?revision=1) Delete Filter
Delete Filter
To delete a filter:
- Click the Advanced Filters icon.
- Click ‘X’ to delete a filter.
- Click Apply, to save.
Views In Timeline
A View is a workspace which provides you with filtering options, search boxes and other useful tools to view the required activities. The Default View provides you the list of all the activities available in the Timeline page.
Users can save new filter conditions as a Custom View. The custom view can be modified, as well as re-named. The Timeline Activities are displayed based on the view selected.
When you apply filters on the Default View, you get the option Save As New, to save the view as a new view to see the respective activities as per the applied filters.

When you apply or modify filters on the custom views, you get the options Save and Save As New.

Create Custom View
To Create a Custom View:
- From the Timeline Views dropdown, click Create New View. The Create View page appears.
- Enter the name for the view.
- Select the value of the basic filters: Activity Type and Activity Date.
- (Optional) Click Add Filter to apply advanced filters. Apply the advanced filters of your choice.
- Click Save, to add the view.
Edit View
To edit a view:
- From the Timeline views dropdown, select the view and click the pencil icon. The Edit View page appears.
- Modify the details of the view as required.
- Click Save.

Delete View
To delete a view:
- From the Timeline Views dropdown, select the view and click the Delete icon. The confirmation message is displayed.
- Click Ok, to delete the view.

When you are in any custom View, you can either Edit or Delete View from the context menu at the top right of the page. You cannot perform these actions when you are in the Default view page.

Search Activities And Drafts
Search Activities
You can search Activities from the Global Timeline, Customer 360, and Relationship 360 pages based on three categories: Content, Entity, People.
- Content: Search activities with Notes, Subject, Comments and Attachment Names. Text that matches the search terms will be highlighted.

- Entity: Search activities with Company or Relationship name.
.png?revision=1)
- People: Search activities associated with Author, Internal, and External Attendees. The search operation is carried out on Gainsight Person and user objects.
In this category, when you enter a record in the search field, it differentiates and displays the type of the record such as Person or User.
Internal Attendees are displayed as User type.
.png?revision=1)
External Attendees are displayed as Person type.
.png?revision=1)
Note: In the Relationship 360 page, you can see only the Content and People categories, but not the Entity category as the Relationship itself is the entity when you search activities from the R360 page.
Search Drafts
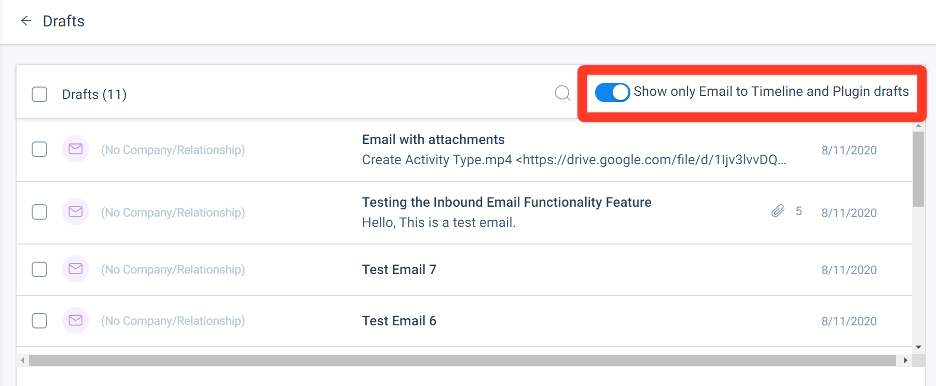
You can search Activity drafts based on Content similar to the search filter in Timeline. Enable the Show only Email to Timeline and Plugin drafts toggle switch to view the emails added to Timeline using the Unique Inbound Email Address.

For more information on Drafts, refer to Activity Drafts in the Additional Resources section at the end of this article.
Edit Activity
You can edit activities that you own (have created earlier) or if you have the applicable permissions. You can also change the activity type while editing an existing activity. To edit an activity:
- On an existing activity, click Edit from the context menu. The Activity Editor window appears.
- Make the necessary modifications in the activity editor.
- (Optional) Change the Activity type, if required. A confirmation message is displayed.
- Click OK to proceed changing the Activity type.
Note: While changing the activity type, data in the fields which is common to the previous and current activity types is retained and the rest of the data is discarded. - Click Update Activity, to save the changes.
Note:
- Only the user who creates the activity or has the applicable permission can edit/delete the activity.
- The activities created from the CTA, Customer 360, Relationship 360, Scorecard and Renewal Center are displayed as CTA, C, R, SC, OPP respectively.
For more information on Logging Activities, refer to Create/Log an Activity in the Additional Resources section at the end of this article.
View Audit Log
Gainsight maintains a comprehensive audit logging system that tracks all changes made to Timeline activities. This ensures transparency and accountability for activity modifications.
The Last Modified By option in both Timeline and Customer Journey Widget displays key details about activity edits including:
- Modified On: Timestamp of the latest modification
- Modified By: User who made the latest edit.
- Modified Fields: Specific fields that were changed.
Note: The Last Modified information is not included in the following actions:
- Share via Email
- Copy to Clipboard
- @Mention notifications

To ensure content integrity, especially when multiple users are involved in editing, Gainsight applies the following logic:
- Only the activity owners can create and save drafts.
- If a non-owner edits an activity:
- The system does not auto-save their changes.
- If the user closes or discards the composer, all changes are lost.
Note: Adding or modifying tasks is not tracked in the Activity History Log.
Update Company or Relationship Context of an Activity
Customer Success Managers (CSMs) can modify the Company/Relationship of an existing activity using the Edit feature. To change the context of an activity:
- On an existing activity, click Edit from the context menu. The Activity Editor window appears.

- To update the context, select the required company or relationship in the Company/Relationship field. A confirmation message is displayed.

Note:
- While changing the Company/Relationship field, data common to both previous and current activity type is retained, while any data not shared between them is discarded. The activity type is reflected based on the admin configuration with respect to the selected Company/Relationship.
- Summary, notes, and internal recipients/attendees remain unchanged, while external recipients/attendees, relationships, CTAs, and cases may be removed based on the new context.
- (Optional) Select the Do not show this message again checkbox if you prefer not to see this pop-up in the future.
- Click OK to confirm the changes.

- Select an activity type from the Activity Type dropdown in the Activity Editor. The Activity Type defaults to the previous context or remains blank if the activity type is disabled for the new context.

- Update the required fields as needed.
- To save the changes, click Update Activity. Your updates are applied to the timeline activity with the new context.
Note: If the composer is closed using the X button, the draft is automatically saved in its last edited state. To delete the draft, click Discard.
Limitations:
- Only the author of the activity can change the context of a timeline activity.
- Activities logged with CTA, Success Plan or Scorecards cannot have their context changed.
- In-line tasks linked to a timeline activity prevent context changes.
Share Activities
You can share activities with Gainsight users and People in your organization. To view the activity using the link, users must have a Gainsight License. You can share activities through one of the three methods.
Share Via Email
This option comes handy when you want to share an activity details quickly through an email. You can share activity details through an email with the people who are recorded as either users or people in Gainsight.
To share activity through the Share Via Email option:
- On an existing activity, click Share Via Email in the context menu. The Send Email window appears.
- Search and select the users in the To field.
Note: The External Attendees names appear in the To field if you have added them while creating the activity. - Click Remove External Attendees, if you wish to remove them from the To field.
- (Optional) Search and select the users in the Cc field.
- Edit any required changes in the Subject or body of the Email.
- Click SEND EMAIL.
When an email is sent using the Share Via Email option, an Email icon appears on that particular activity, as shown below.

Note: Only the Gainsight users can be added in the To and Cc fields.
For more information, refer to Share Email from Timeline using Email Assist in the Additional Resources section at the end of this article.
Copy Link
Some people in your organization might not be configured by the Admins (not recorded in Gainsight) to share activities through the Share Via Email option. With the Copy Link option, you can copy the Gainsight link of the activity, share it with the required users through email or any other medium. To view activity details shared through the link, recipients must have Gainsight license.
To copy link of an activity:
- On an existing activity, click Copy Link from the context menu. The link is copied to the clipboard.
- Paste the link in an email, or any other medium and share it with the required users.

Copy To Clipboard
Using this option, you can copy the entire details of an activity and paste it into an email or any other medium to share it with the people in your organization. For example, when an external attendee is not configured by your admin in Gainsight, you can share the activity details using this option.
To share an activity, click the Copy To Clipboard option. The entire activity details get copied to clipboard. This option copies all of the content in Notes, Tasks, and other fields available in the Activity Editor. You can now paste the copied details in an email or any other medium, make necessary modifications to it like adding or removing data if required and share it with the people across your organization.

Keyboard Shortcuts
Gainsight provides you the following keyboard shortcuts which can be used while drafting content for the Note section or other sections.
- Bold - Ctrl + B / Command + B
- Italic - Ctrl + I / Command + I
- Underline - Ctrl + U / Command + U
Tag Internal GS Users With @ Symbol in Activity Notes
CSMs can tag their colleagues or executives in the activity notes and comments which triggers an email notification to the @ mentioned individual. This allows CSMs to request help from, or share important updates with teammates who may not otherwise visit or have easy access to the customer's Timeline. CSMs can tag active users just by typing '@' in the notes, and a list of all internal GS users will be displayed. The search list will auto-suggest users based on the characters typed. An email notification containing the activity details is sent to the tagged user with the name of the activity in the subject line. When an activity is updated, a notification will not be sent to the user who is already tagged. Users can configure if they receive these notifications on the My Settings page. For more information on configuring notification settings, refer to Setup User Notifications under Additional Resources.
If the CSM deletes the activity, it will show that the activity does not exist anymore if management tries to access the particular account in Timeline > Activity.
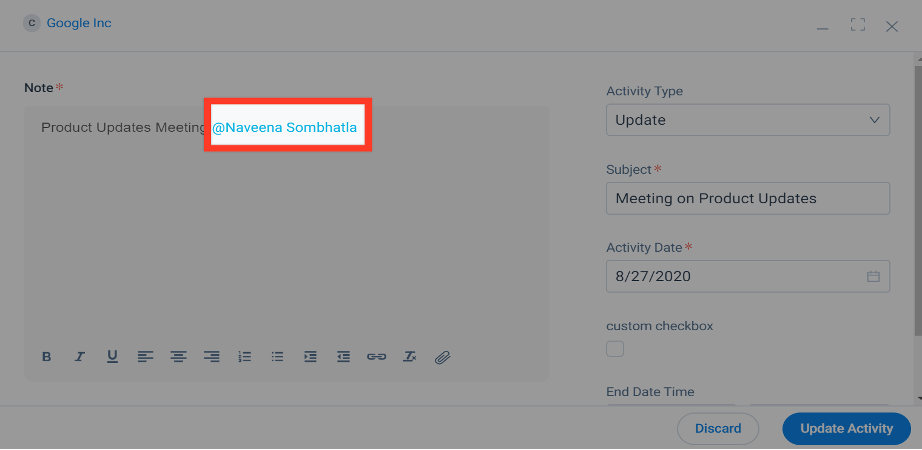
There’s no minimum character limit when the search starts. When you successfully select the user, the tagged user-name becomes a hyperlink. On hover, it shows a few attributes of the user such as username and email.
To tag people in the activity notes:
- Click the vertical ellipsis of an existing activity and select Edit, to edit an existing activity. The Activity Editor window appears.
- Tag the users as per your choice in the Note section.
- Click Update Activity, to save it.

When you tag a person in an activity, the tagged person receives an email notification containing the detailed status of the specific activity. This reduces the task of the management to manually login to Gainsight to see the individual status and every details of your account.
Intended Users:
- Internal active users.
- Admins can create, view, and manage Gainsight users.
Limitations:
- Users should have their records in the GS User object. For more information, refer to Gainsight User Object under Additional Resources.
- You can only tag internal users but not people.
- Users with the Internal Collaborator license type can be tagged in an activity as normal, and will receive the corresponding email notifications, but the Gainsight links within those notifications will not work for them as they cannot login to the system.
- Maximum 10 unique users can be tagged in an activity.
- Existing tagged users don't receive email notifications if the activity is updated. When you edit an activity that contains tagged users, you need to delete the existing tagged users and tag them again, then it will send fresh email notifications about the recent changes made to the activity.
- If you create an activity and tag yourself in the activity, you will not receive any email notification.
Additional Resources
- For more general information on Timeline, refer to Timeline Overview
- For more information on managing drafts, refer to Activity Drafts
- For more information on configuring activities, refer to Create/Log an Activity
- For more information on email assist, refer to Share Email from Timeline using Email Assist
- For more information on configuring notifications, refer to Setup User Notifications
- For more information on managing user records, refer to Gainsight User Object
- For more information about Gainsight license types, refer to User License Management.