Configure Automatic Milestone Types
Gainsight NXT
This article explains how admins can configure Automatic Milestone Types.
Overview
Automatic milestones are Activities of the type Milestone, that are created automatically as per the criteria defined by the admins. These milestones help track and log important events in the customer’s timeline. Once configured, the milestones can be added to the Customer Journey widget where changes in the milestone will be tracked and displayed (as per the configuration). There are eight system-defined Automatic milestones that can be activated by the admins with minimal configuration. Admins also have the option to create custom automatic milestone types.
For more information on adding and configuring Customer Journey widget in the Summary section of the C360 page, refer to Configure Summary Section article.
Note: Field Level permissions are not applicable to Automatic Milestone Types.
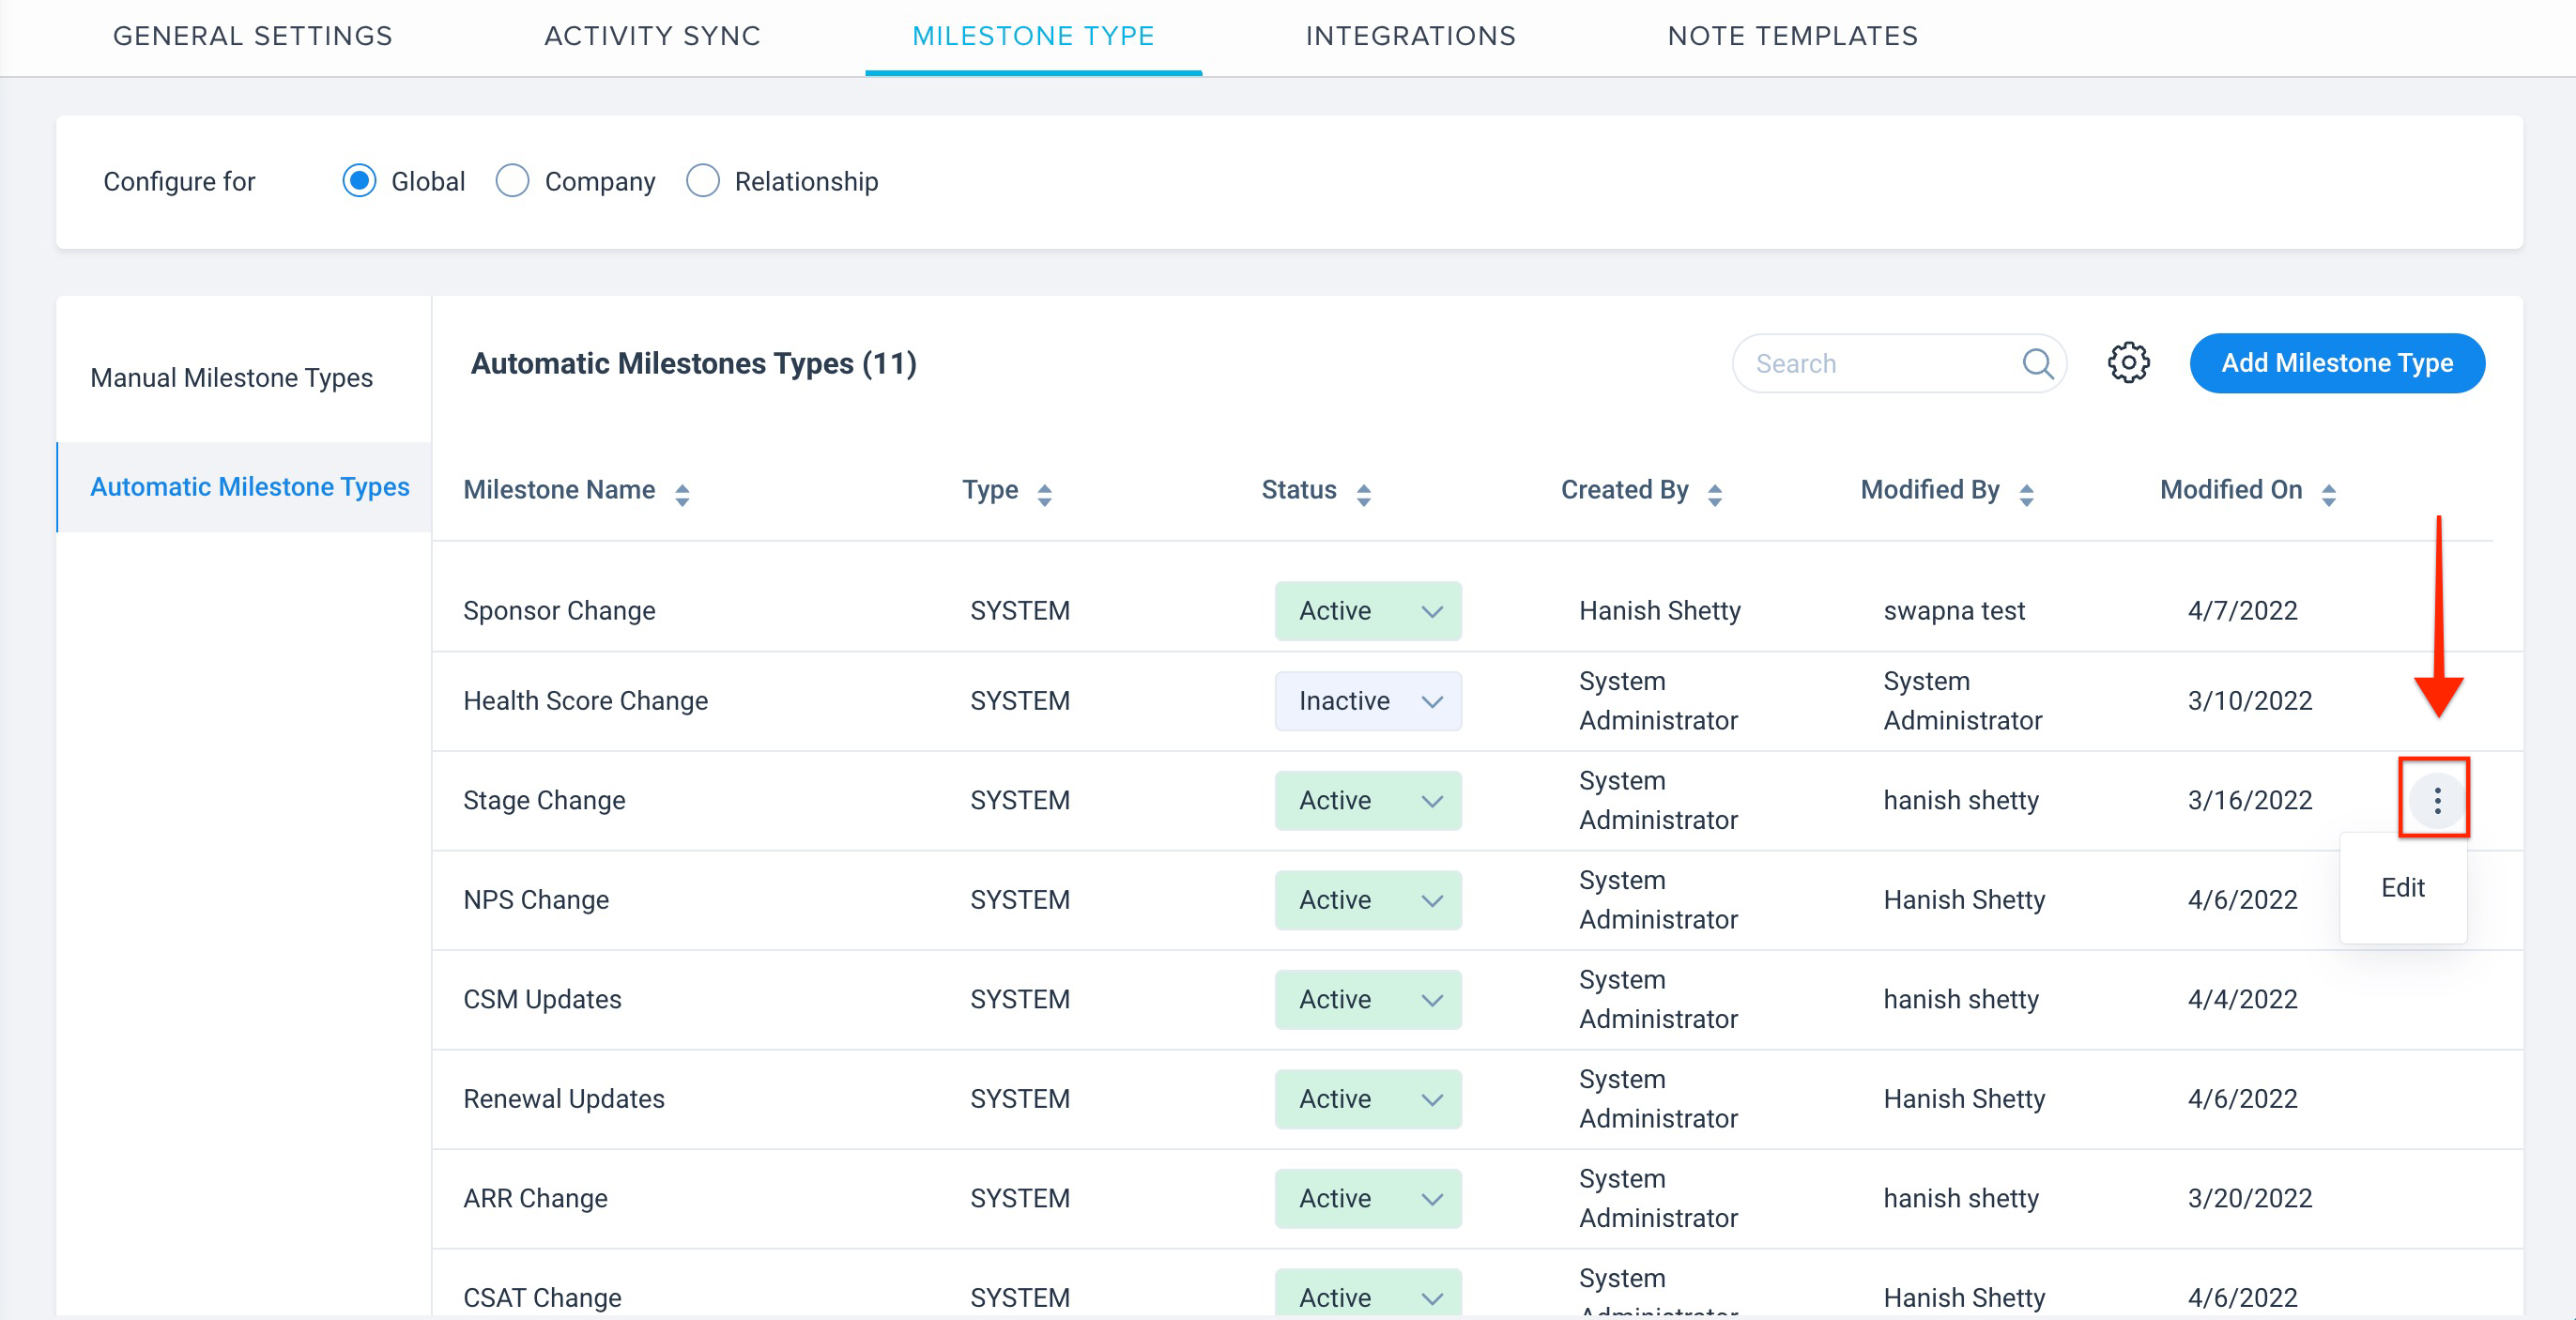
System Defined Automatic Milestone Types
There are eight system-defined Automatic Milestone Types. These cannot be deleted but can be edited or made inactive by the admins. Each of these is explained below in detail.
Note: A new automatic milestone can be generated using LOOKUP, CURRENCY, PICKLIST, and NUMBER data types.
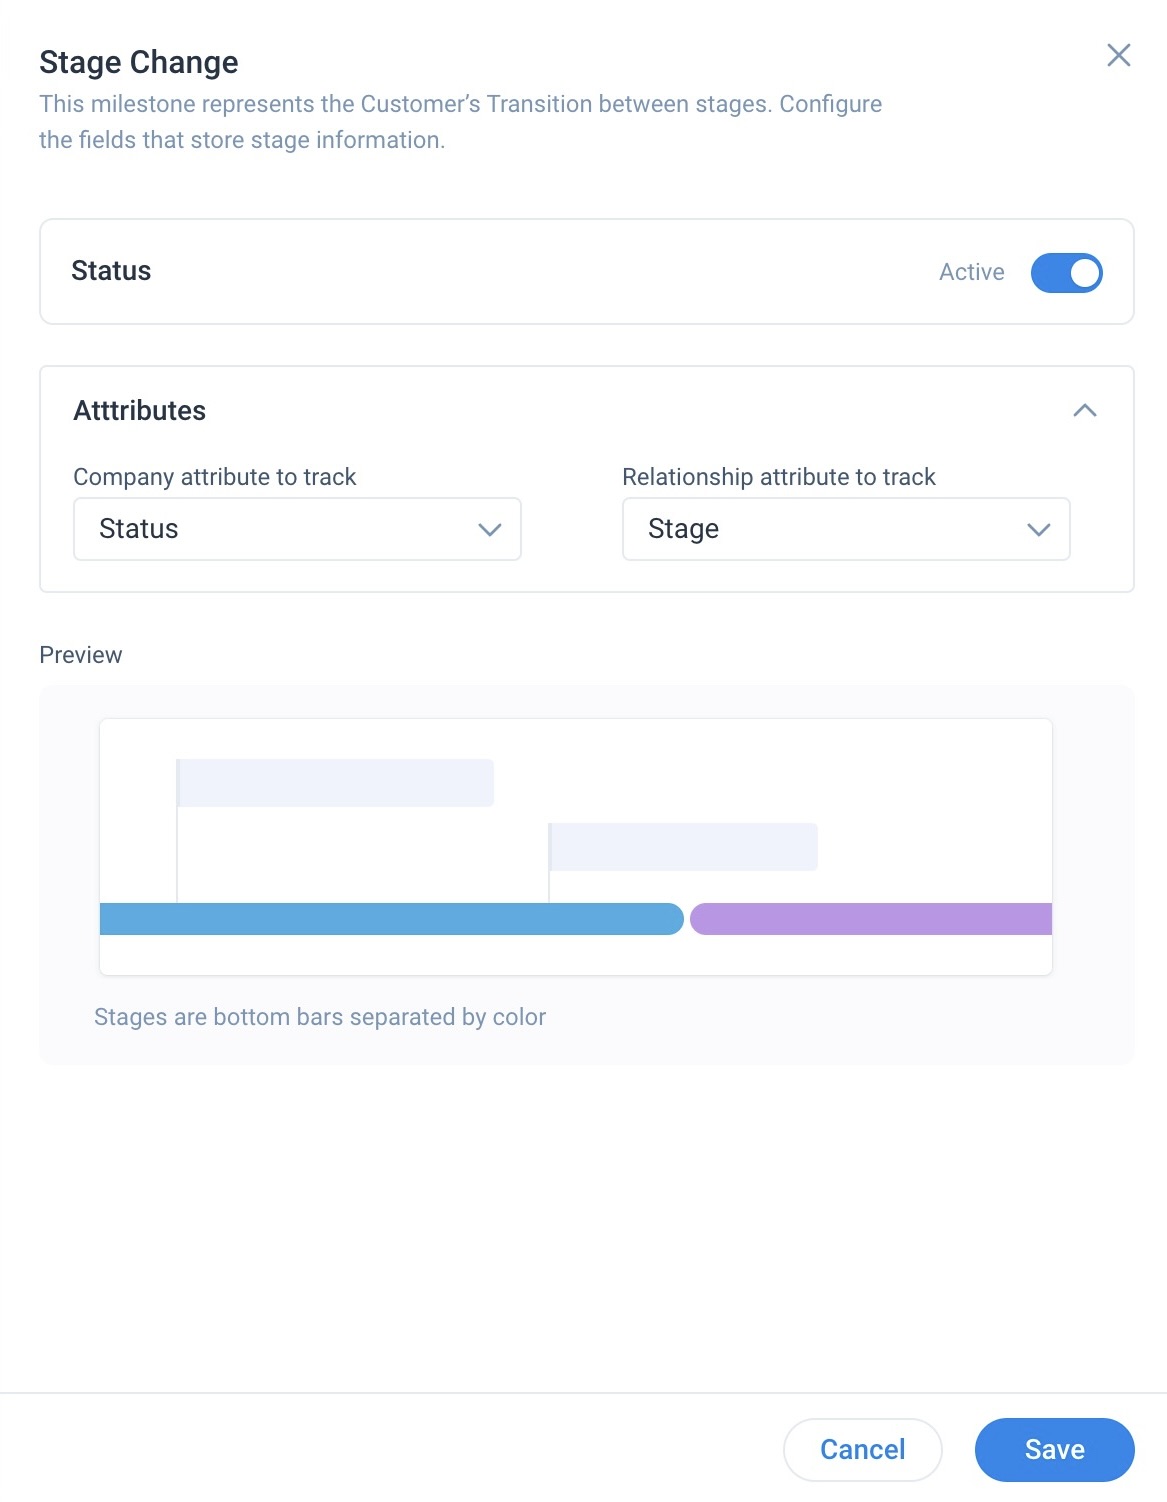
Stage Change
The changes in this milestone are displayed in the bottom bar of the Customer Journey Widget. A stage change milestone is logged when a change occurs in the value of the field that stores stage information. Admins can select the field that store stage information while configuring the milestone. The color of the stages (as displayed on the widget) is as per the color assigned to the dropdown values on the Data Management page.
You can configure the Stage Change milestone as follows:
- Navigate to Administration > Timeline > Integrations > Milestone Types > Automatic Milestone Types.
- Hover over the Stage Change milestone and click the three vertical dots. Select Edit.
- Turn ON the Status toggle.
- Select the attributes to track from the dropdown fields.
- Click Save
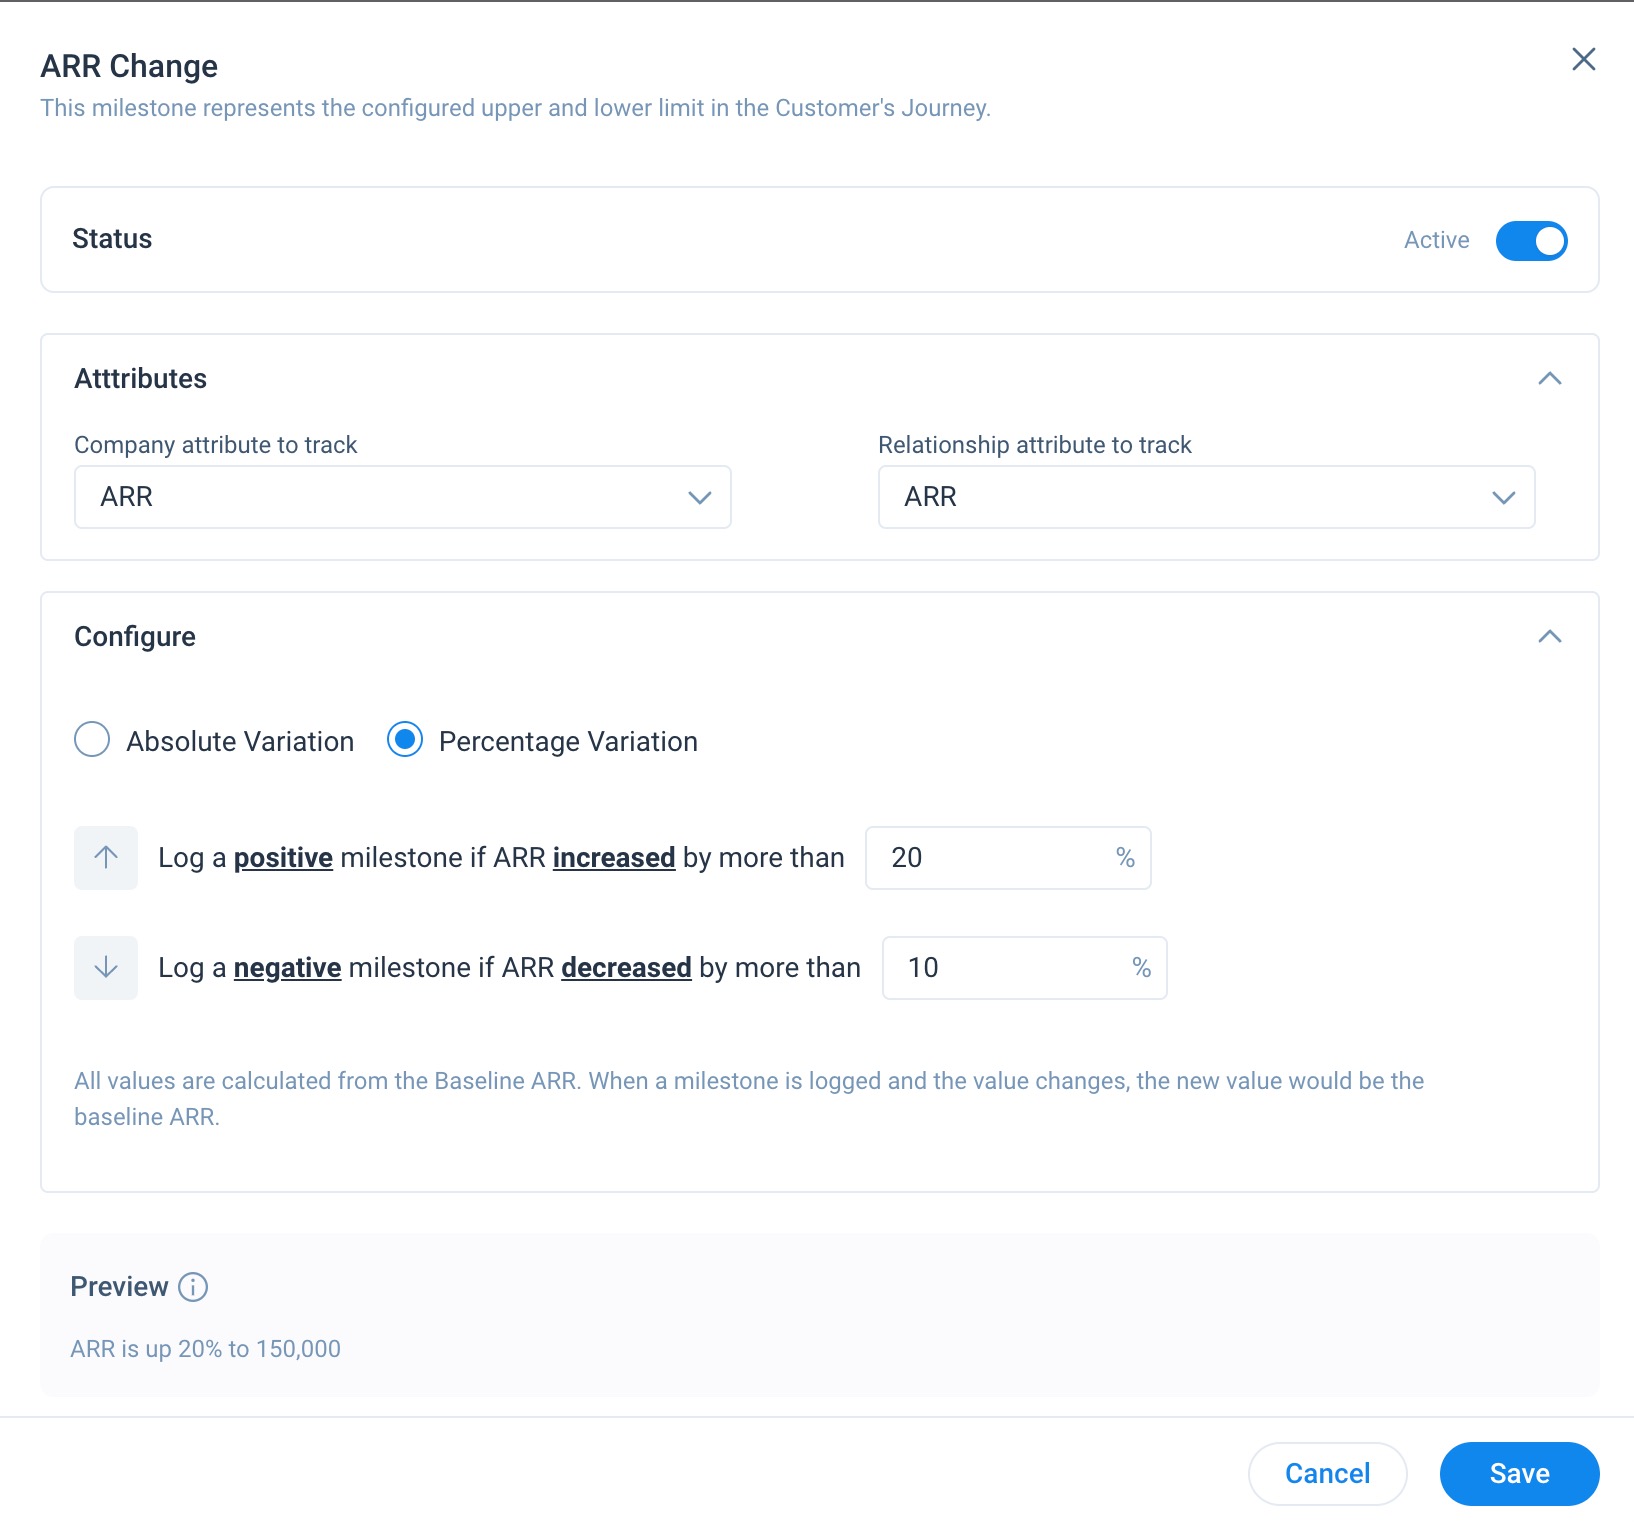
ARR Change
This milestone tracks the change in company’s ARR. Admins can edit this milestone type to configure the rules for logging an ARR milestone automatically.
- Navigate to Administration > Timeline > Integrations > Milestone Types > Automatic Milestone Types.
- Hover over the ARR Change milestone and click the three vertical dots. Select Edit.
- Select if you would like to measure the progress of the Attribute as:
- Absolute Variation
A positive or negative sentiment milestone will be logged onto the widget whenever the value of the attribute (selected in the previous step) increases or decreases by the value specified below:- Enter the increase in absolute value for which a positive milestone should be logged.
- Enter the decrease in absolute value for which a negative milestone should be logged.
- Percentage Variation
A positive or negative sentiment milestone will be logged onto the widget whenever the value of the selected attribute increases or decreases by the percentage specified below:- Enter the increase in percentage value for which a positive milestone should be logged
- Enter the decrease in percentage value for which a negative milestone should be logged
- Preview the milestone type.
- Click Save.
Health Score Change
This milestone type tracks changes in the company’s Health Score. It is mandatory to activate the Snapshots feature of Scorecards to configure this milestone-type as follows.
- Navigate to Administration > Timeline > Integrations > Milestone Types > Automatic Milestone Types.
- Hover over the Health Score Change milestone and click the three vertical dots. Select Edit.
- Turn ON the Status toggle.
- Select the schedule of Snapshot Comparison. You can set it either to Weekly or Monthly.
- A positive sentiment milestone will be logged in the Customer Journey widget, if the Health Score moves Up into the next bucket. A negative sentiment milestone will be logged, if Health Score moves down into the next bucket.
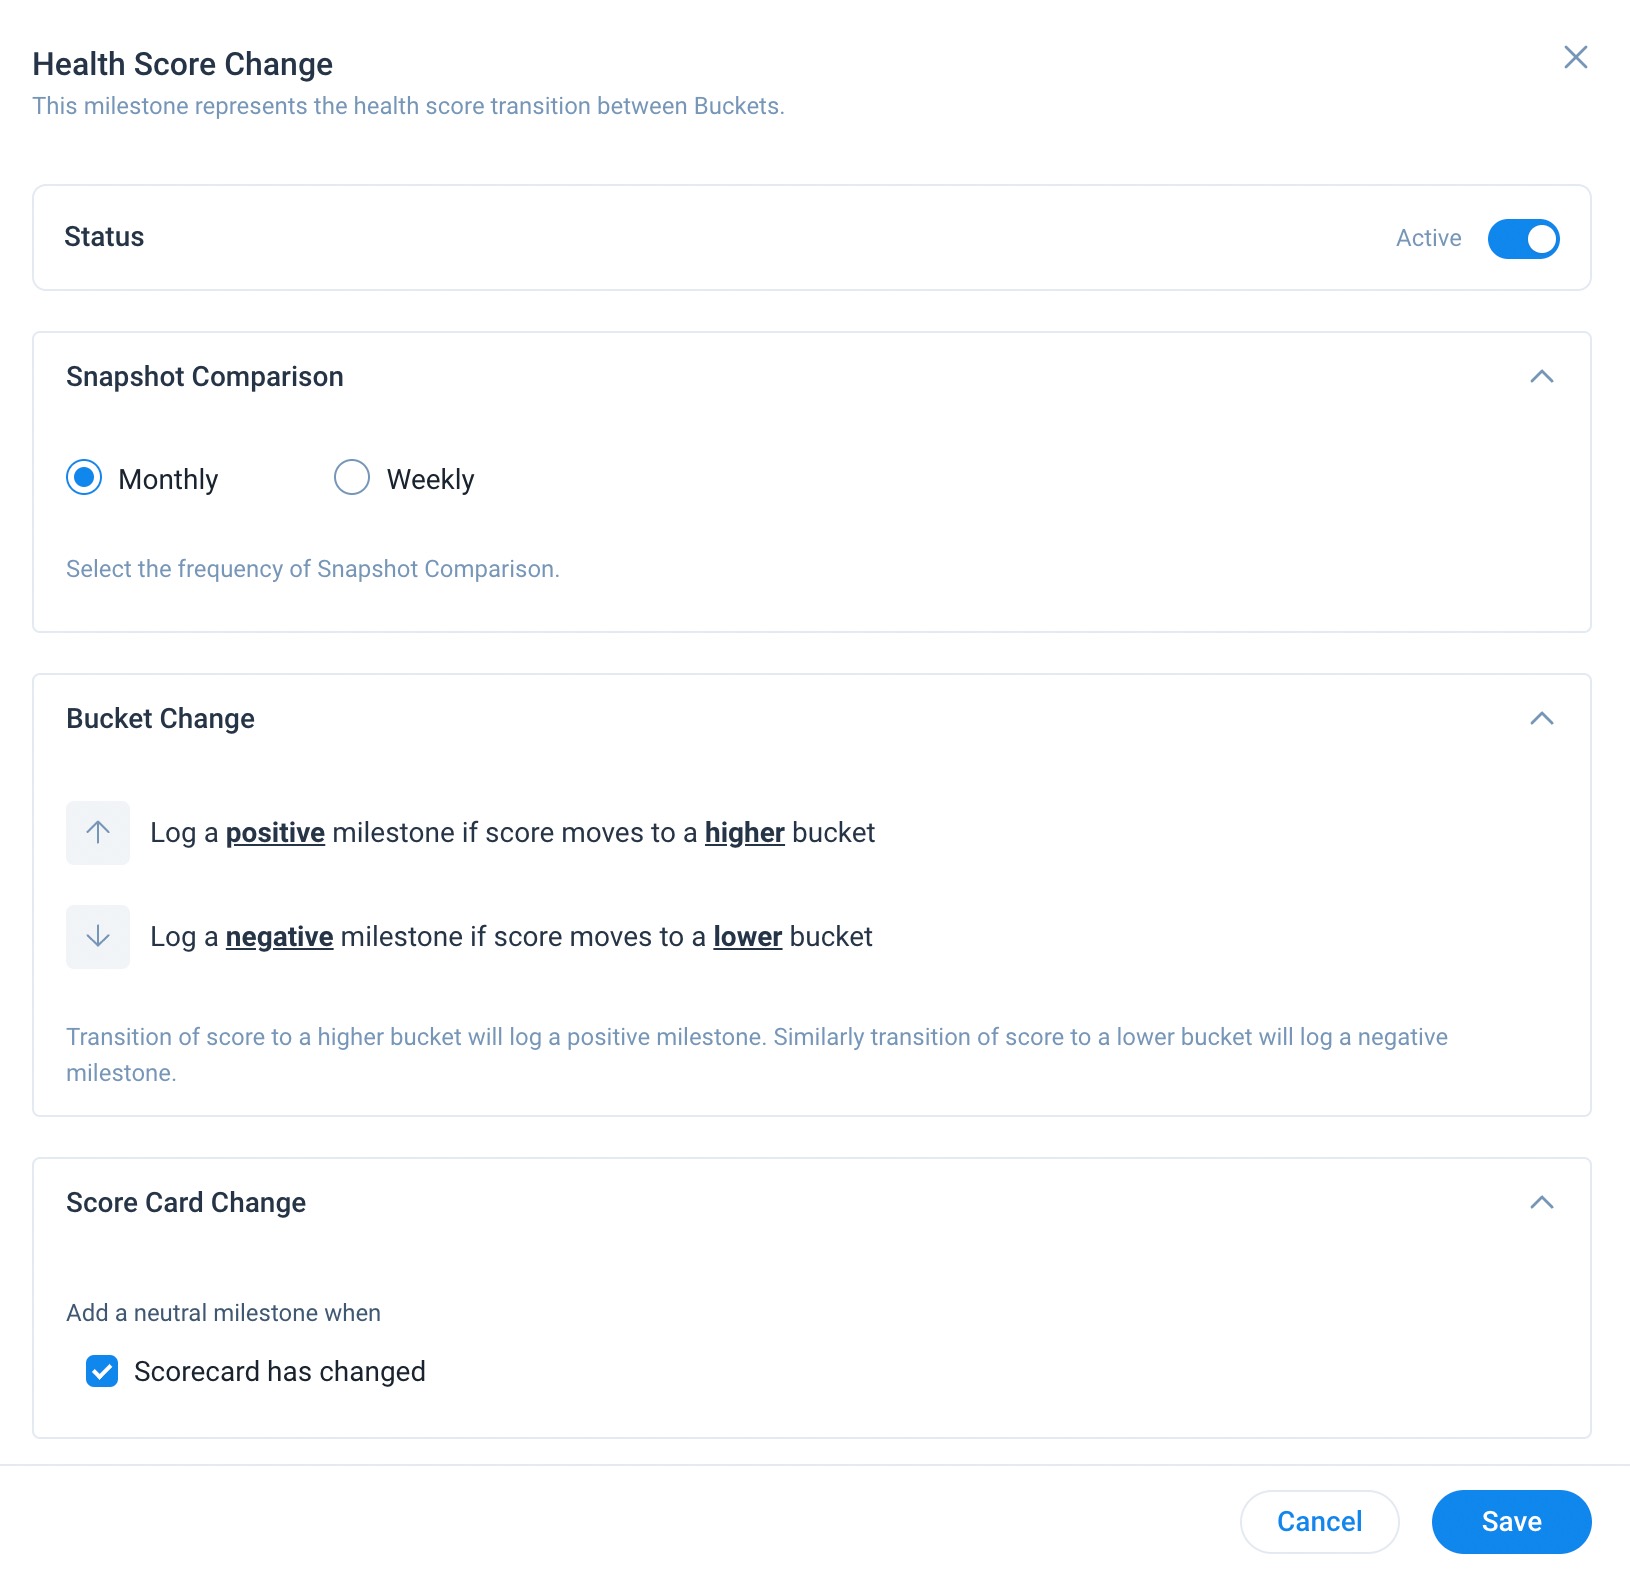
- (Optional) Select the Scorecard has changed checkbox under Score Card Change to log a neutral sentiment milestone when the Scorecard for the company changes.
- Click Save.
Sponsor Change
This milestone-type lets you track the following Sponsor updates.
- Addition of a new Sponsor to the customer’s organization
- Change in role of an existing sponsor at the customer’s organization
- Change in location of an existing sponsor
- Departure of an existing sponsor from the customer’s organization
You can configure this milestone-type as follows:
- Navigate to Administration > Timeline > Integrations > Milestone Types > Automatic Milestone Types.
- Hover over the Sponsor Change milestone and click the three vertical dots. Select Edit.
- Turn ON the Status toggle.
- Select the updates that you would like to track.
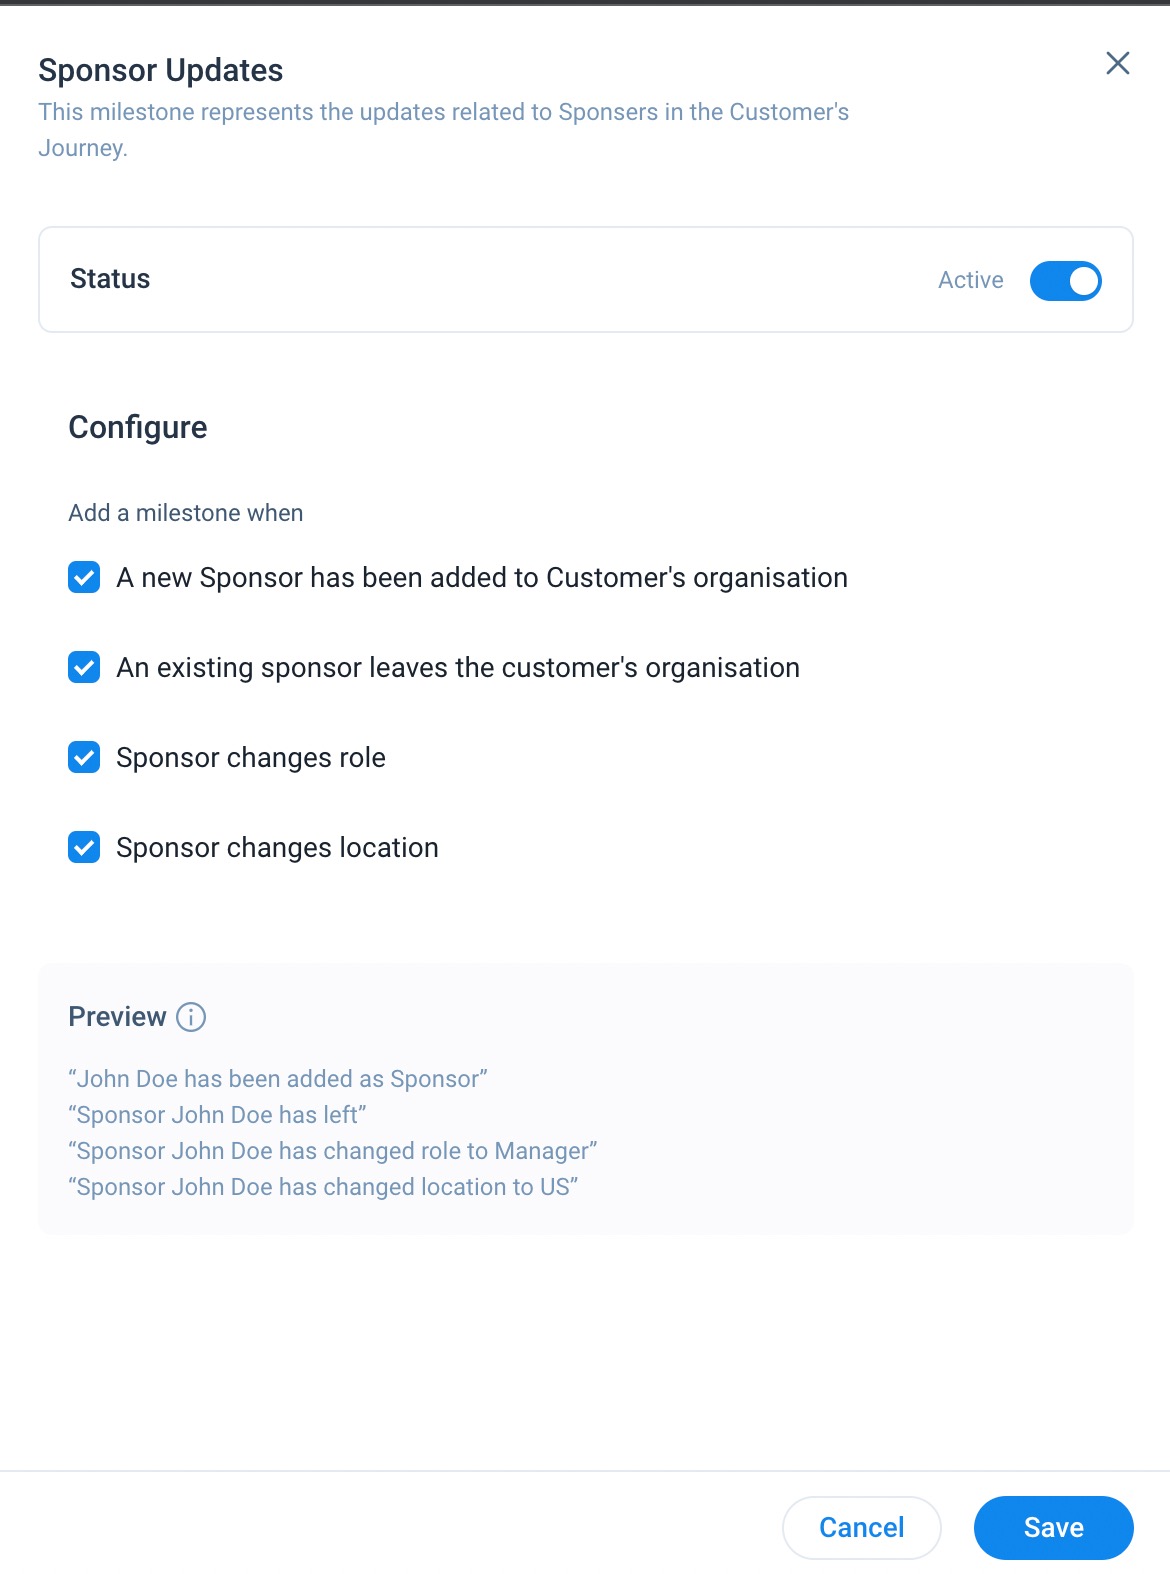
- Preview your configured rules.
- Click Save.
Renewal Updates
This milestone seeks to capture Renewal, upsell and downsell opportunities. For example, if a renewal opportunity is won, a positive milestone is logged. If the renewal opportunity is lost, a negative milestone is logged. Similarly, when an upsell opportunity is won, a positive milestone is logged. When an upsell opportunity is lost, a negative milestone is logged and so on.
Note: The Renewal Updates milestone requires the Renewal Center to be configured.
You can configure this milestone as follows:
- Navigate to Administration > Timeline > Integrations > Milestone Types > Automatic Milestone Types.
- Hover over the Renewal Updates milestone and click the three vertical dots. Select Edit.
- Turn ON the Status toggle.
- Select the scenarios in which you want to automatically log milestones in the Customer Journey widget.
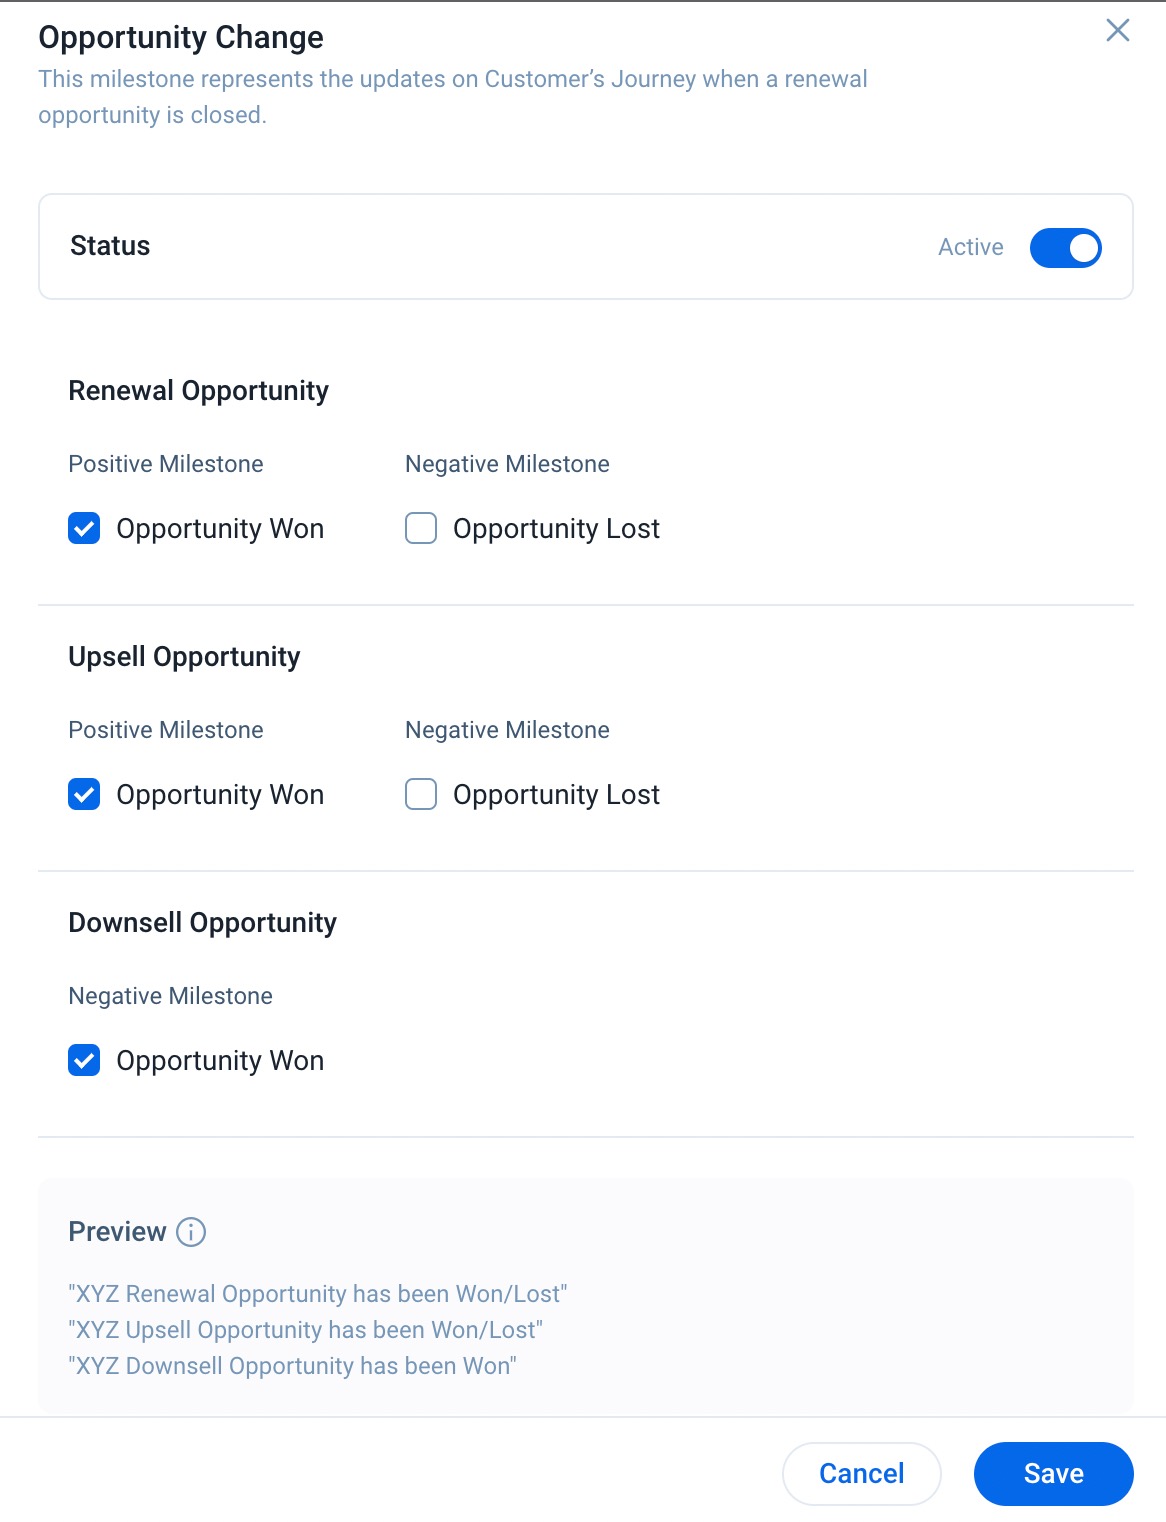
-
Click Save.
CSM Updates
This milestone-type lets you track updates on the selected CSM attribute. Admins can select any field from the dropdown menu that stores CSM information in Company and Relationship objects. Changes in the selected CSM field will be logged as milestones on the Customer Journey widget.
To configure this milestone-type:
- Navigate to Administration > Timeline > Integrations > Milestone Types > Automatic Milestone Types.
- Hover over the CSM Updates milestone and click the three vertical dots. Select Edit.
- Turn ON the Status toggle.
- Select the CSM attribute from the Company and Relationship object to be tracked.
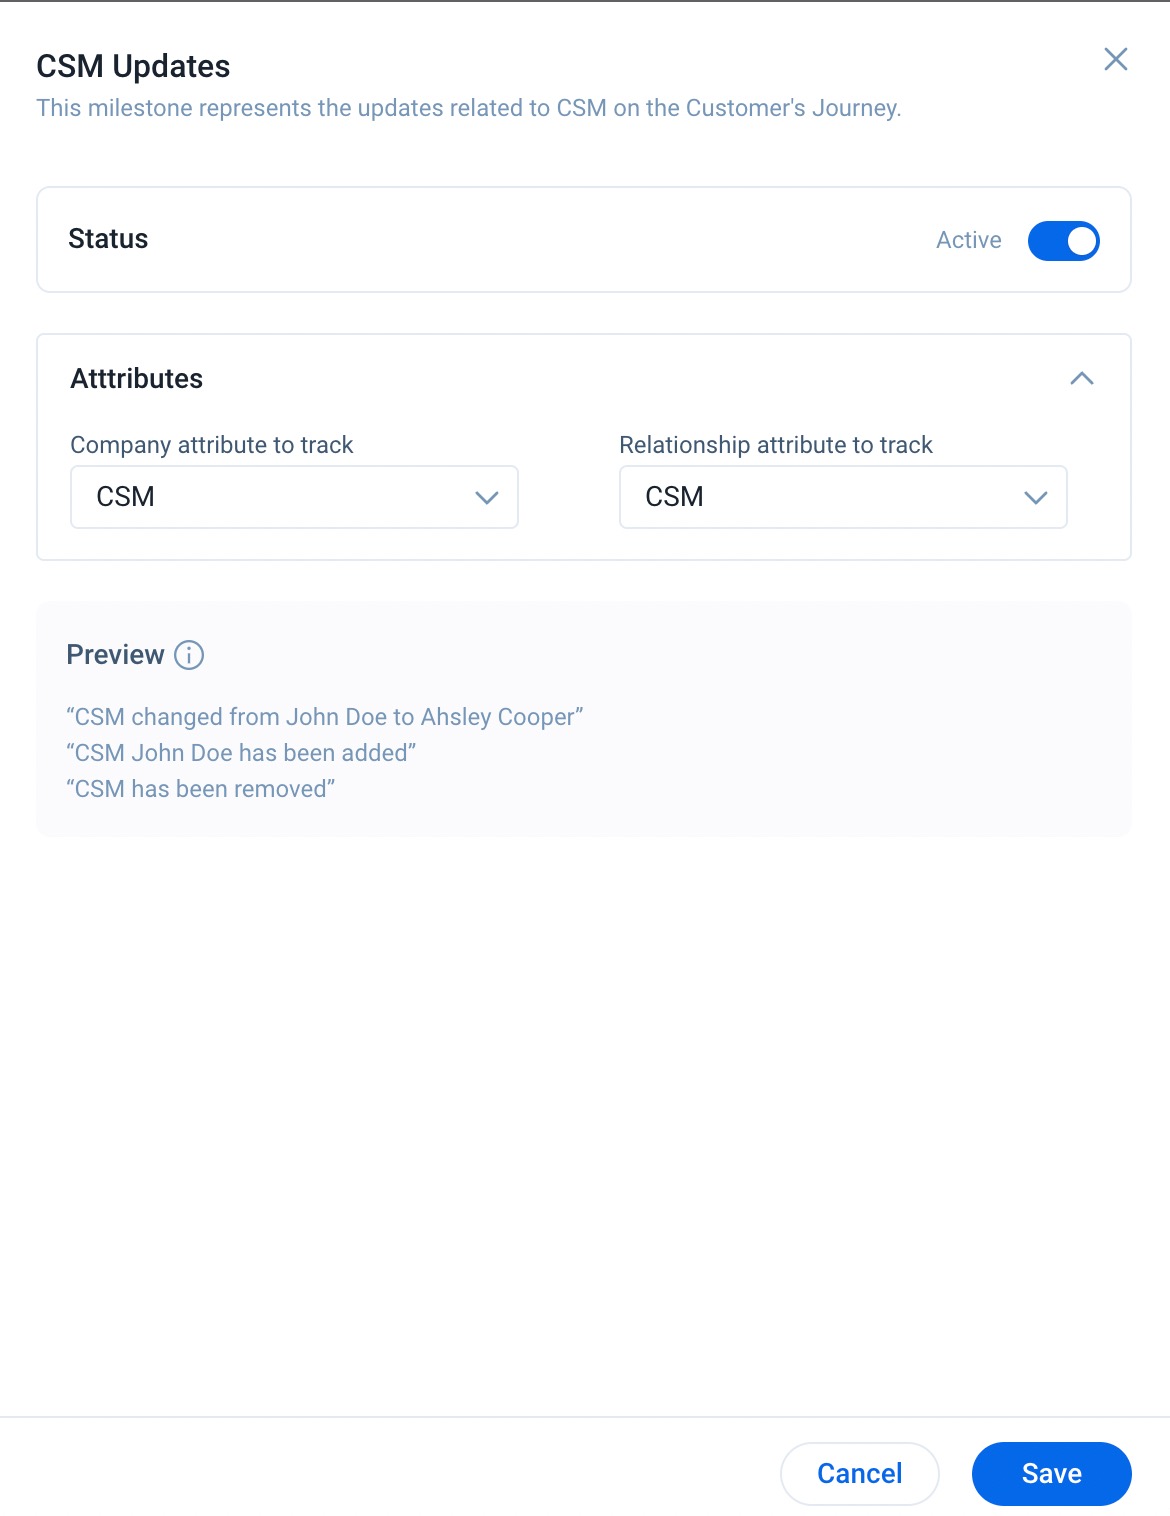
-
Click Save.
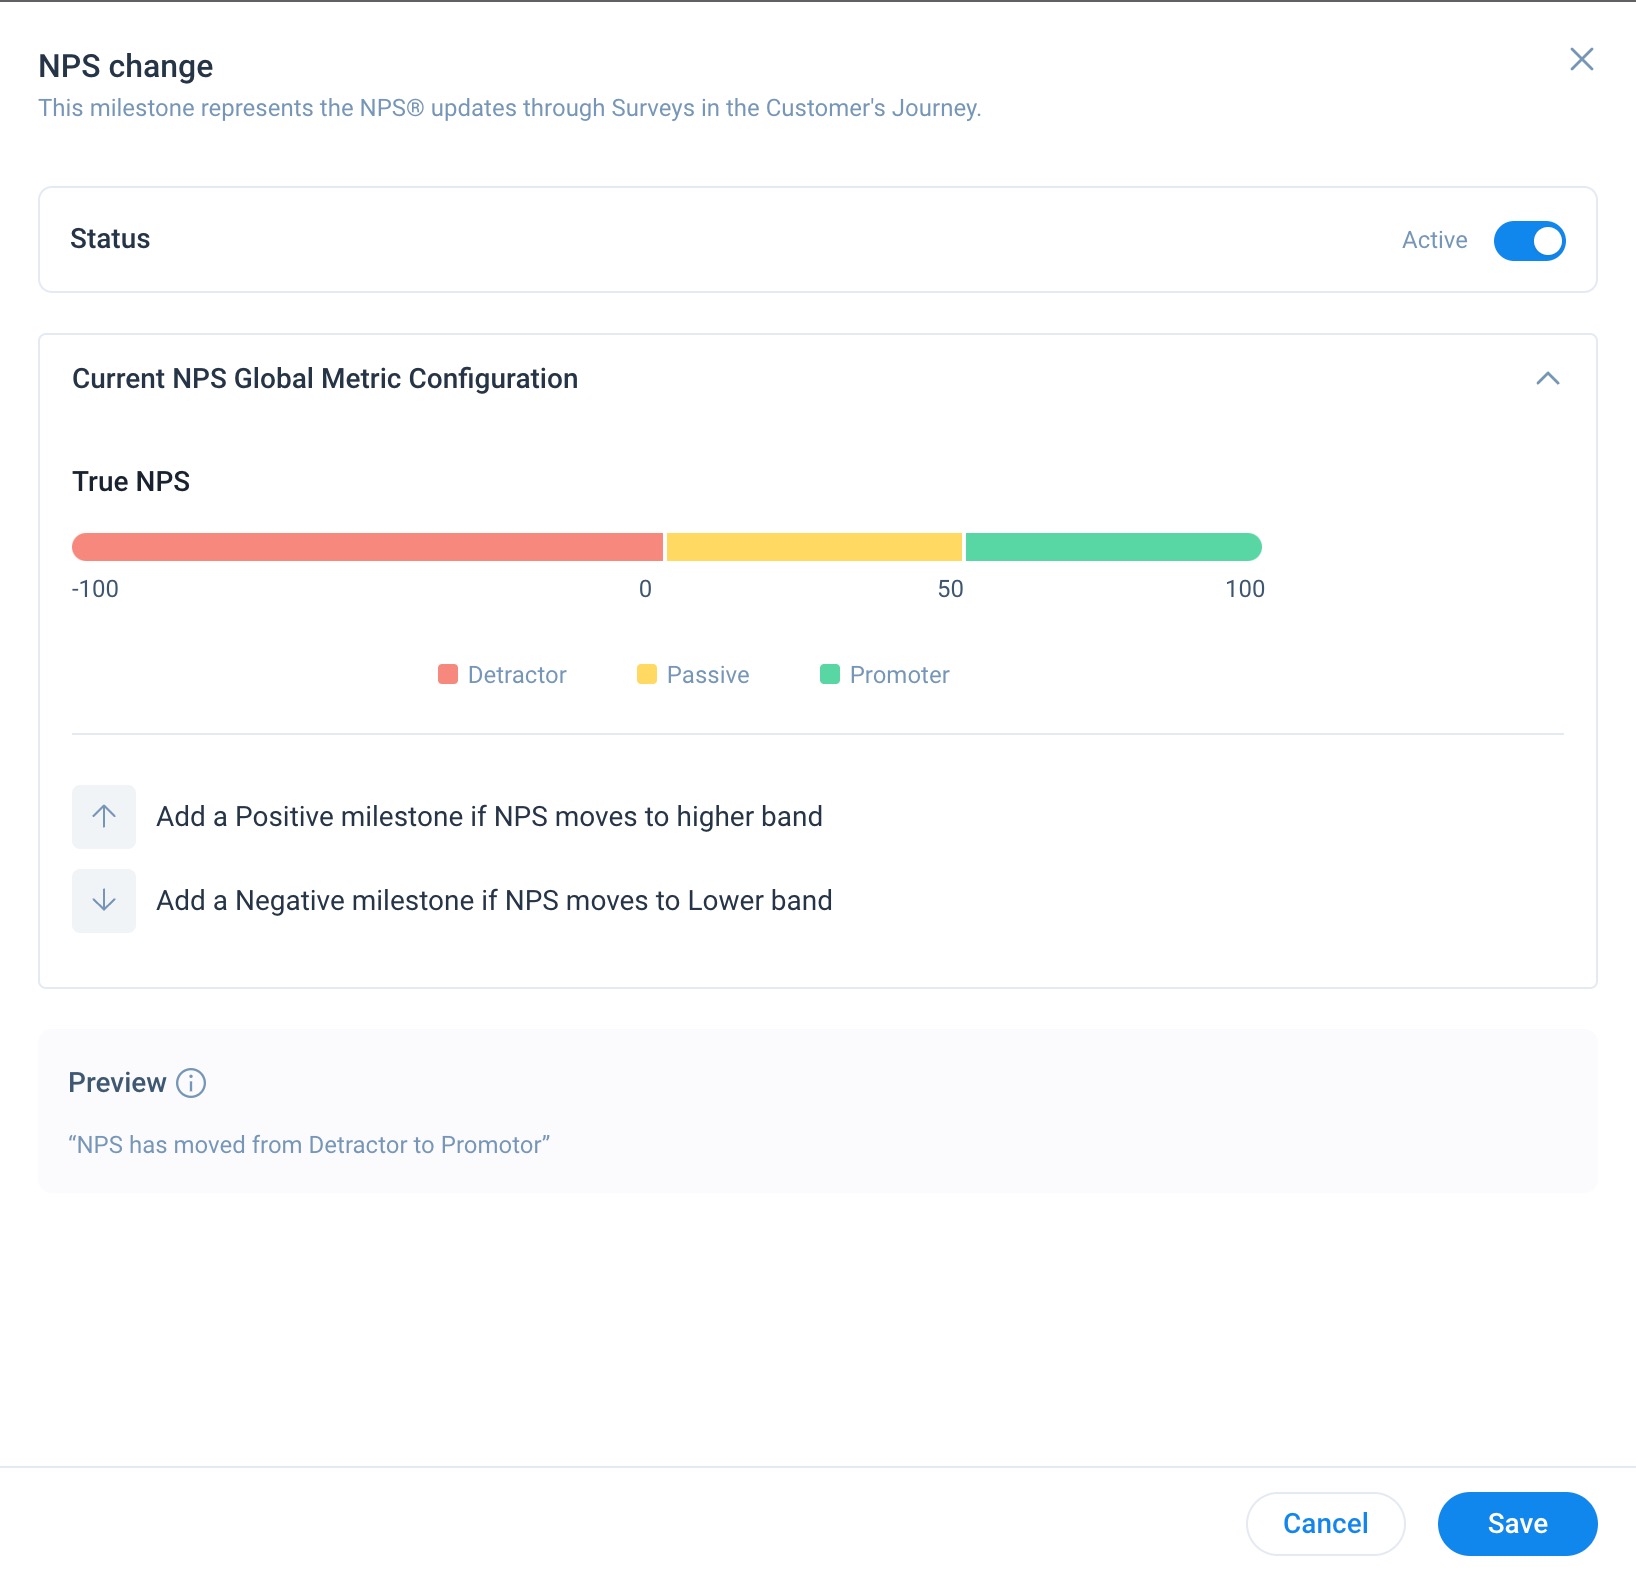
NPS Change
It tracks changes in the NPS score of a company. A positive sentiment milestone is logged if the NPS moves to a higher band and a negative sentiment milestone is logged when it moves to a lower band. Once this milestone is activated, the current/upcoming NPS value is compared with the last stored NPS value and so on. For example, if the NPS Change milestone was activated on 18th Oct, then the first comparison occurs between the NPS value as stored on 31st october with the last stored value i.e. on the 30th Sept.
IMPORTANT: NPS settings at the Text Analytics Admin level will apply. For example, if NPS (last quarter) is selected at tenant level, Milestone will compare it with previous value of NPS (last quarter). If the setting changes, the comparison will be with the previous value of the same NPS.
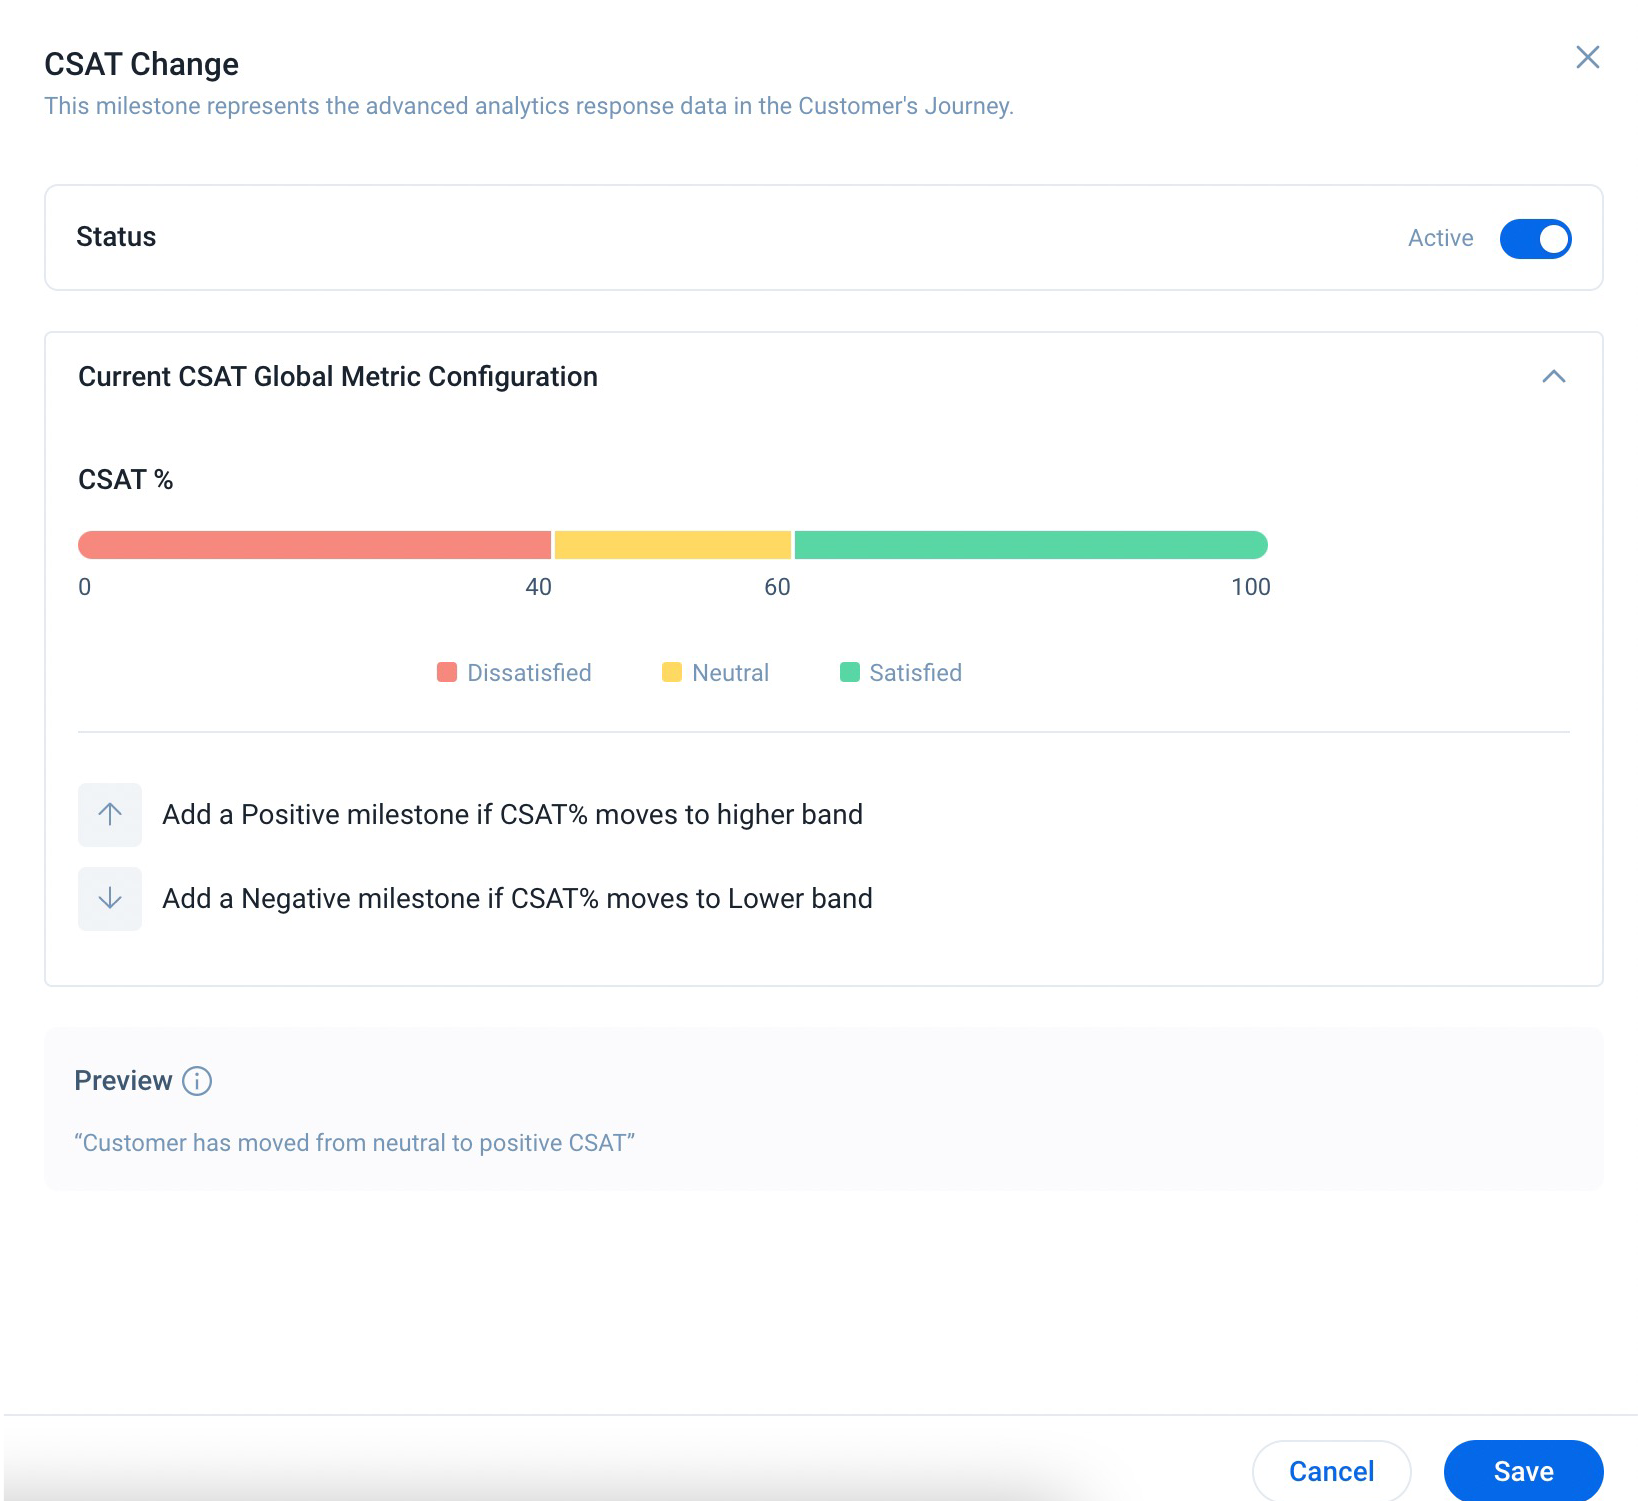
CSAT Change
It tracks changes in the CSAT score of a company. A positive sentiment milestone is logged if the CSAT score moves to a higher band and a negative sentiment milestone is logged when it moves to a lower band. Once this milestone is activated, the current/upcoming CSAT value is compared with the last captured CSAT value and so on. For example, if the CSAT Change milestone was activated on 18th Oct, then the first comparison occurs between the CSAT value as captured on 31st october with the last captured value i.e. on the 30th Sept.
IMPORTANT: CSAT settings at the Text Analytics Admin level will apply. For example, if CSAT (last quarter) is selected at tenant level, Milestone will compare it with previous value of CSAT (last quarter). If the setting changes, the comparison will be with the previous value of the same CSAT.
Custom-Defined Automatic Milestone-Types
You can create custom milestones that track the changes in your selected Attribute.
To create a custom milestone:
- Navigate to Administration > Timeline > Integrations > Milestone Types > Automatic Milestone Types.
- Click Create Add Milestone Type.
- In the form that opens, set the status (Active/ Inactive) using the toggle switch.
- Enter the Milestone Name.
- Select an Attribute to track from the dropdown menu
- Select if you would like to measure the progress of the Attribute as:
- Absolute Variation
- A positive or negative sentiment milestone will be logged onto the widget whenever the value of the attribute (selected in the previous step) increases or decreases by the value specified below.
- Enter the increase in absolute value for which a positive milestone should be logged.
- Enter the decrease in absolute value for which a negative milestone should be logged.
- Percentage Variation
- A positive or negative sentiment milestone will be logged onto the widget whenever the value of the selected attribute increases or decreases by the percentage specified below.
- Enter the increase in percentage value for which a positive milestone should be logged.
- Enter the decrease in percentage value for which a negative milestone should be logged
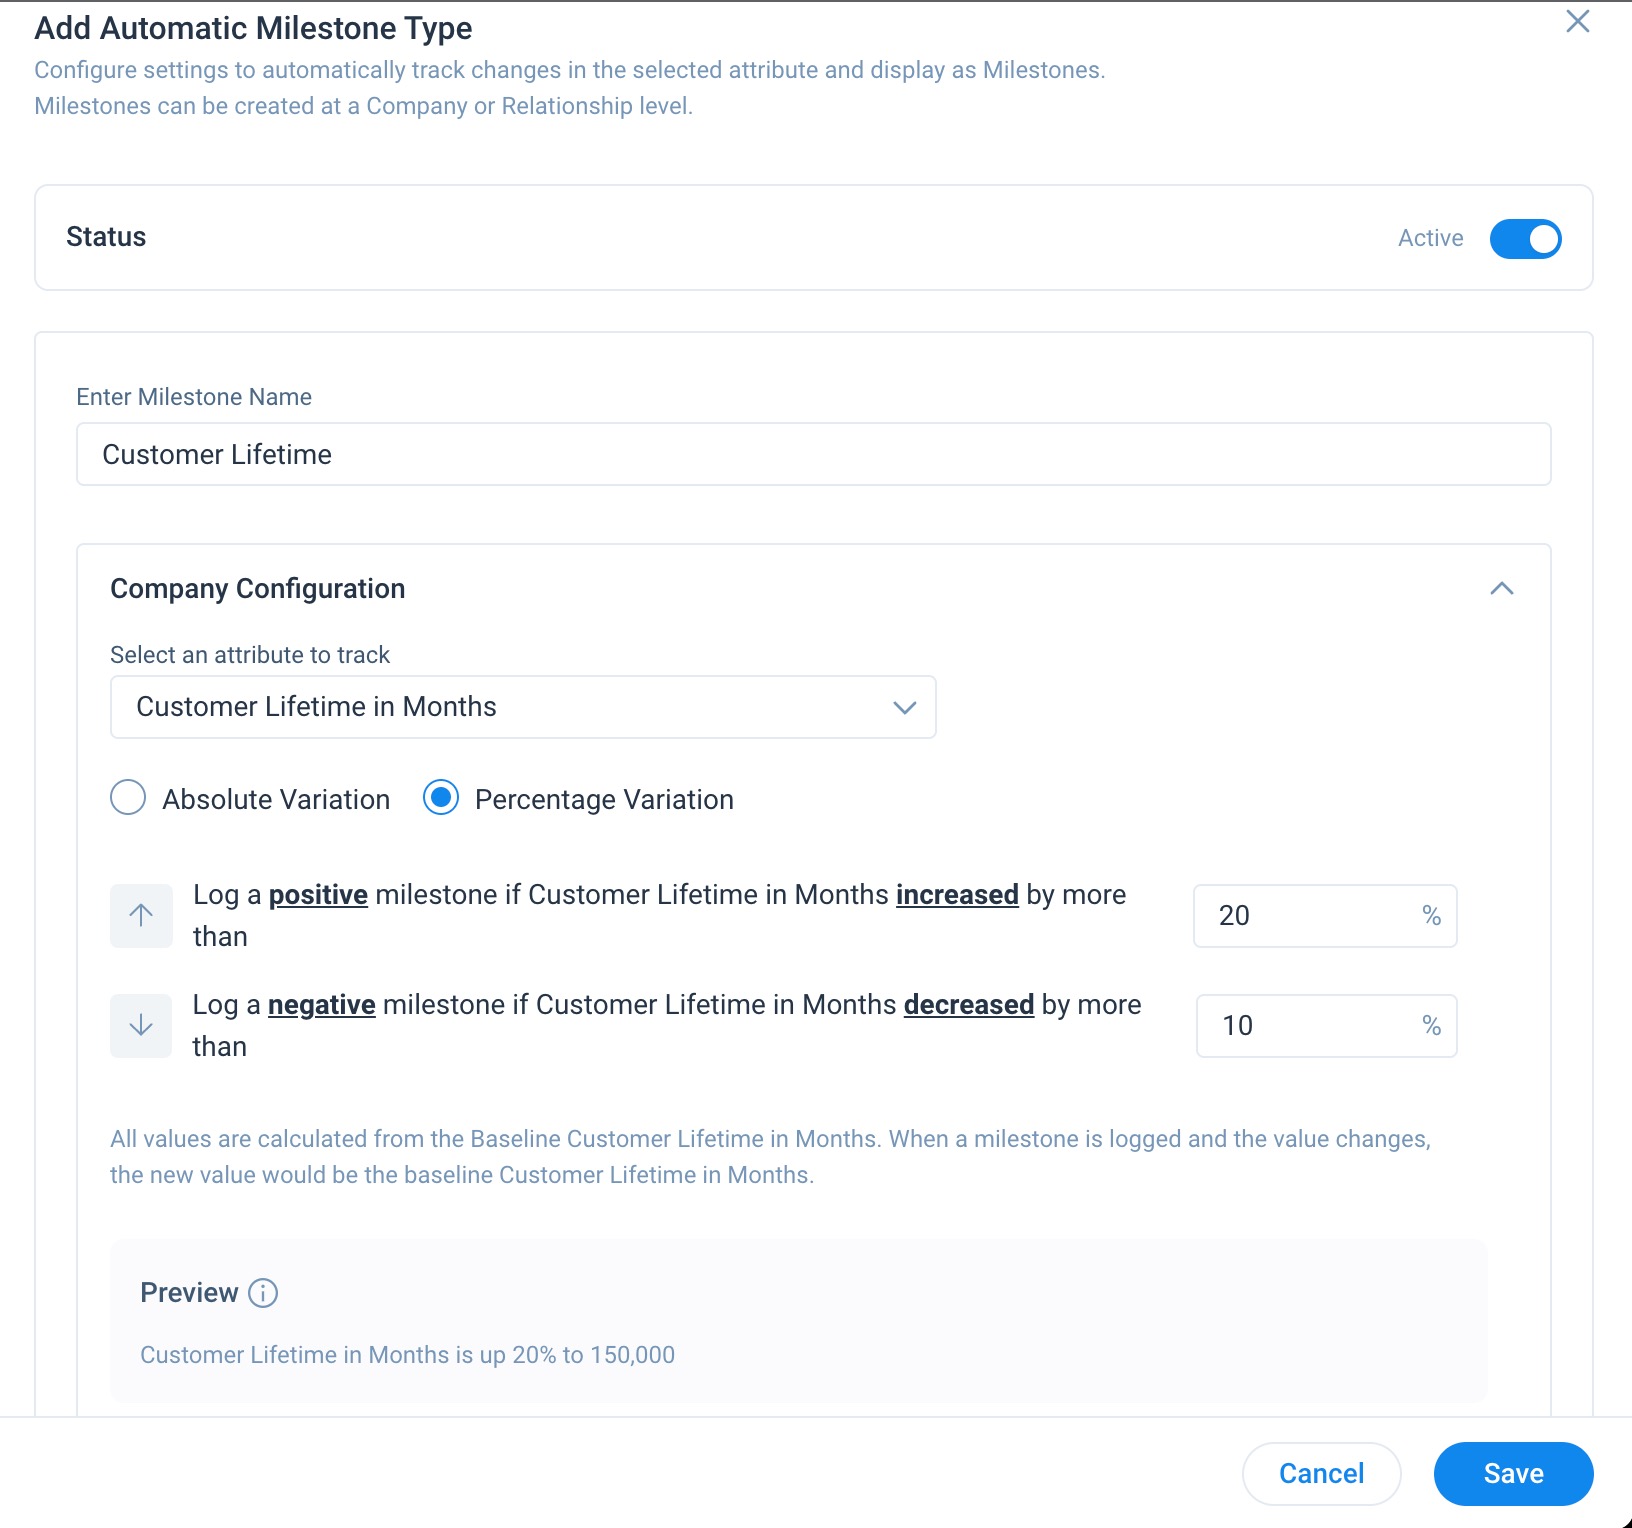
- You can Preview.
- You can also create a Relationship Attribute to track.
Note: Only one milestone can be created per attribute.
Configure Sentiment Colors
The changes in the sentiment milestones are monitored and displayed, as per the configuration, in the Customer Journey widget. Automatic milestones changes can be visualized with different colors on the widget and categorized as positive when the value has increased or negative when the value has decreased.
For example, a positive sentiment milestone is recorded in the Customer Journey widget, if the Health Score moves up into the next bucket. A negative sentiment milestone is recorded when the Health Score moves down into the next bucket.
You can pick the custom colors to represent the positive, negative and neutral milestones as follows:
- Navigate to Administration > Timeline > Milestone Types > Automatic Milestone Types.
- Click the Settings icon. The Configure Sentiment Color window appears.
- Hover over the color block and click to customize it accordingly.
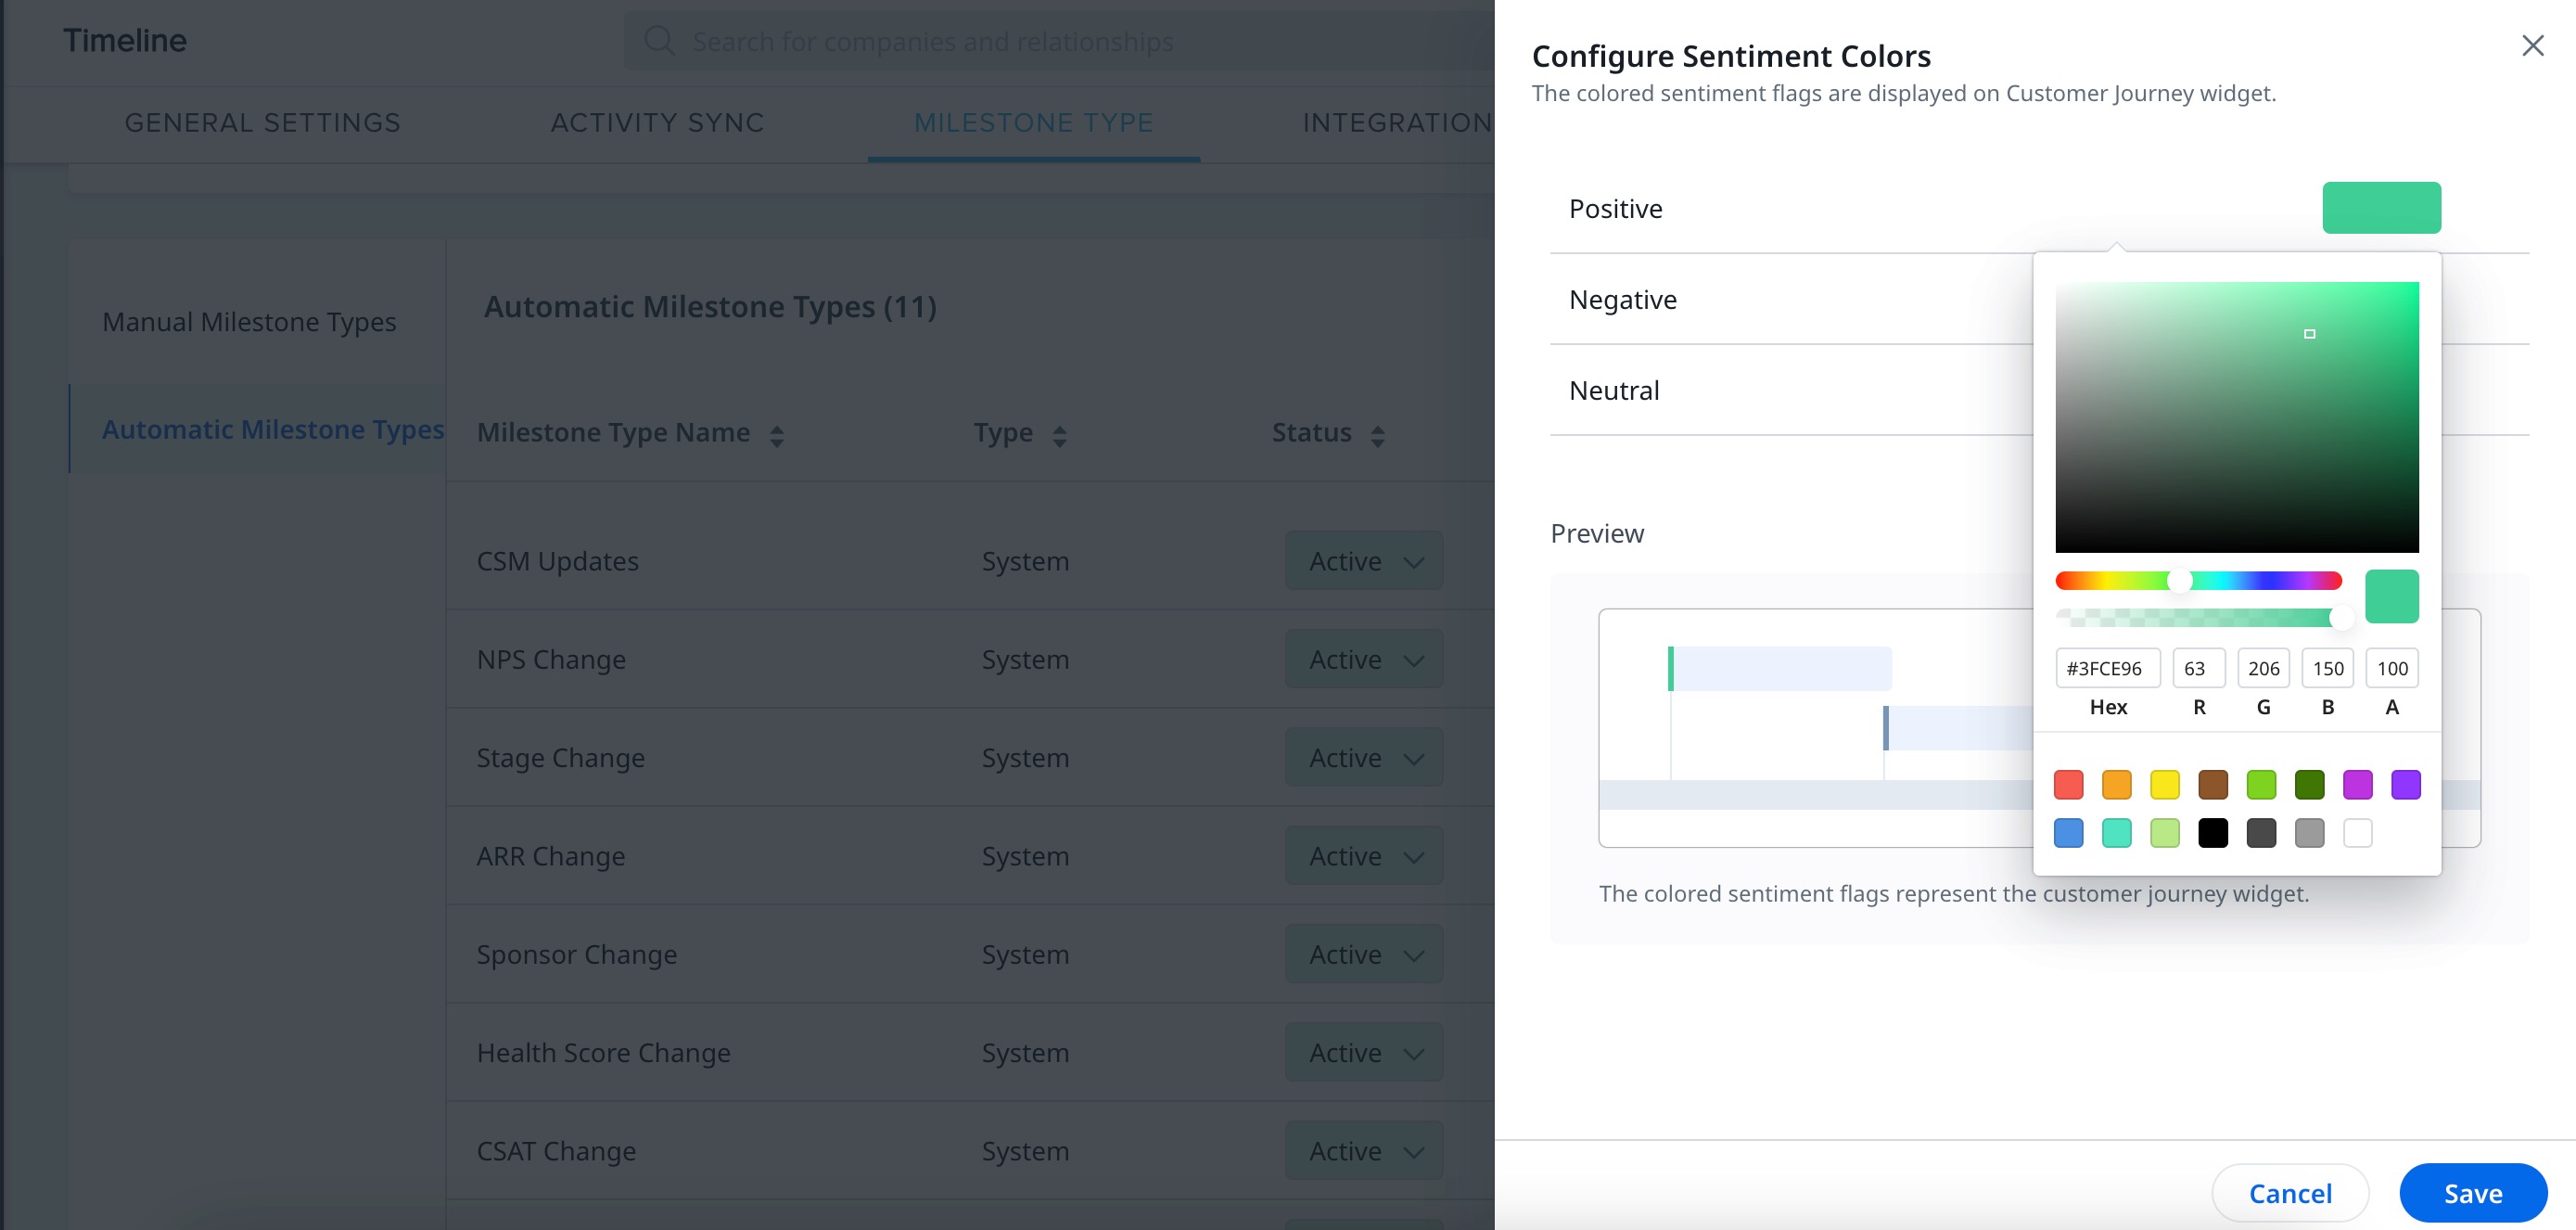
-
Click Save.
Note: All the manual milestones are predominantly shown in neutral color.
Configure Stage Color
The color of the stages, as displayed on the widget, correspond to the colors assigned to the dropdown values on the Data Management page.
To change the color assigned to the dropdown value:
- Navigate to Administration > Customer Data > Data Management > Dropdowns.
- From the dropdown picklist, search for the attributes in the dropdown name.
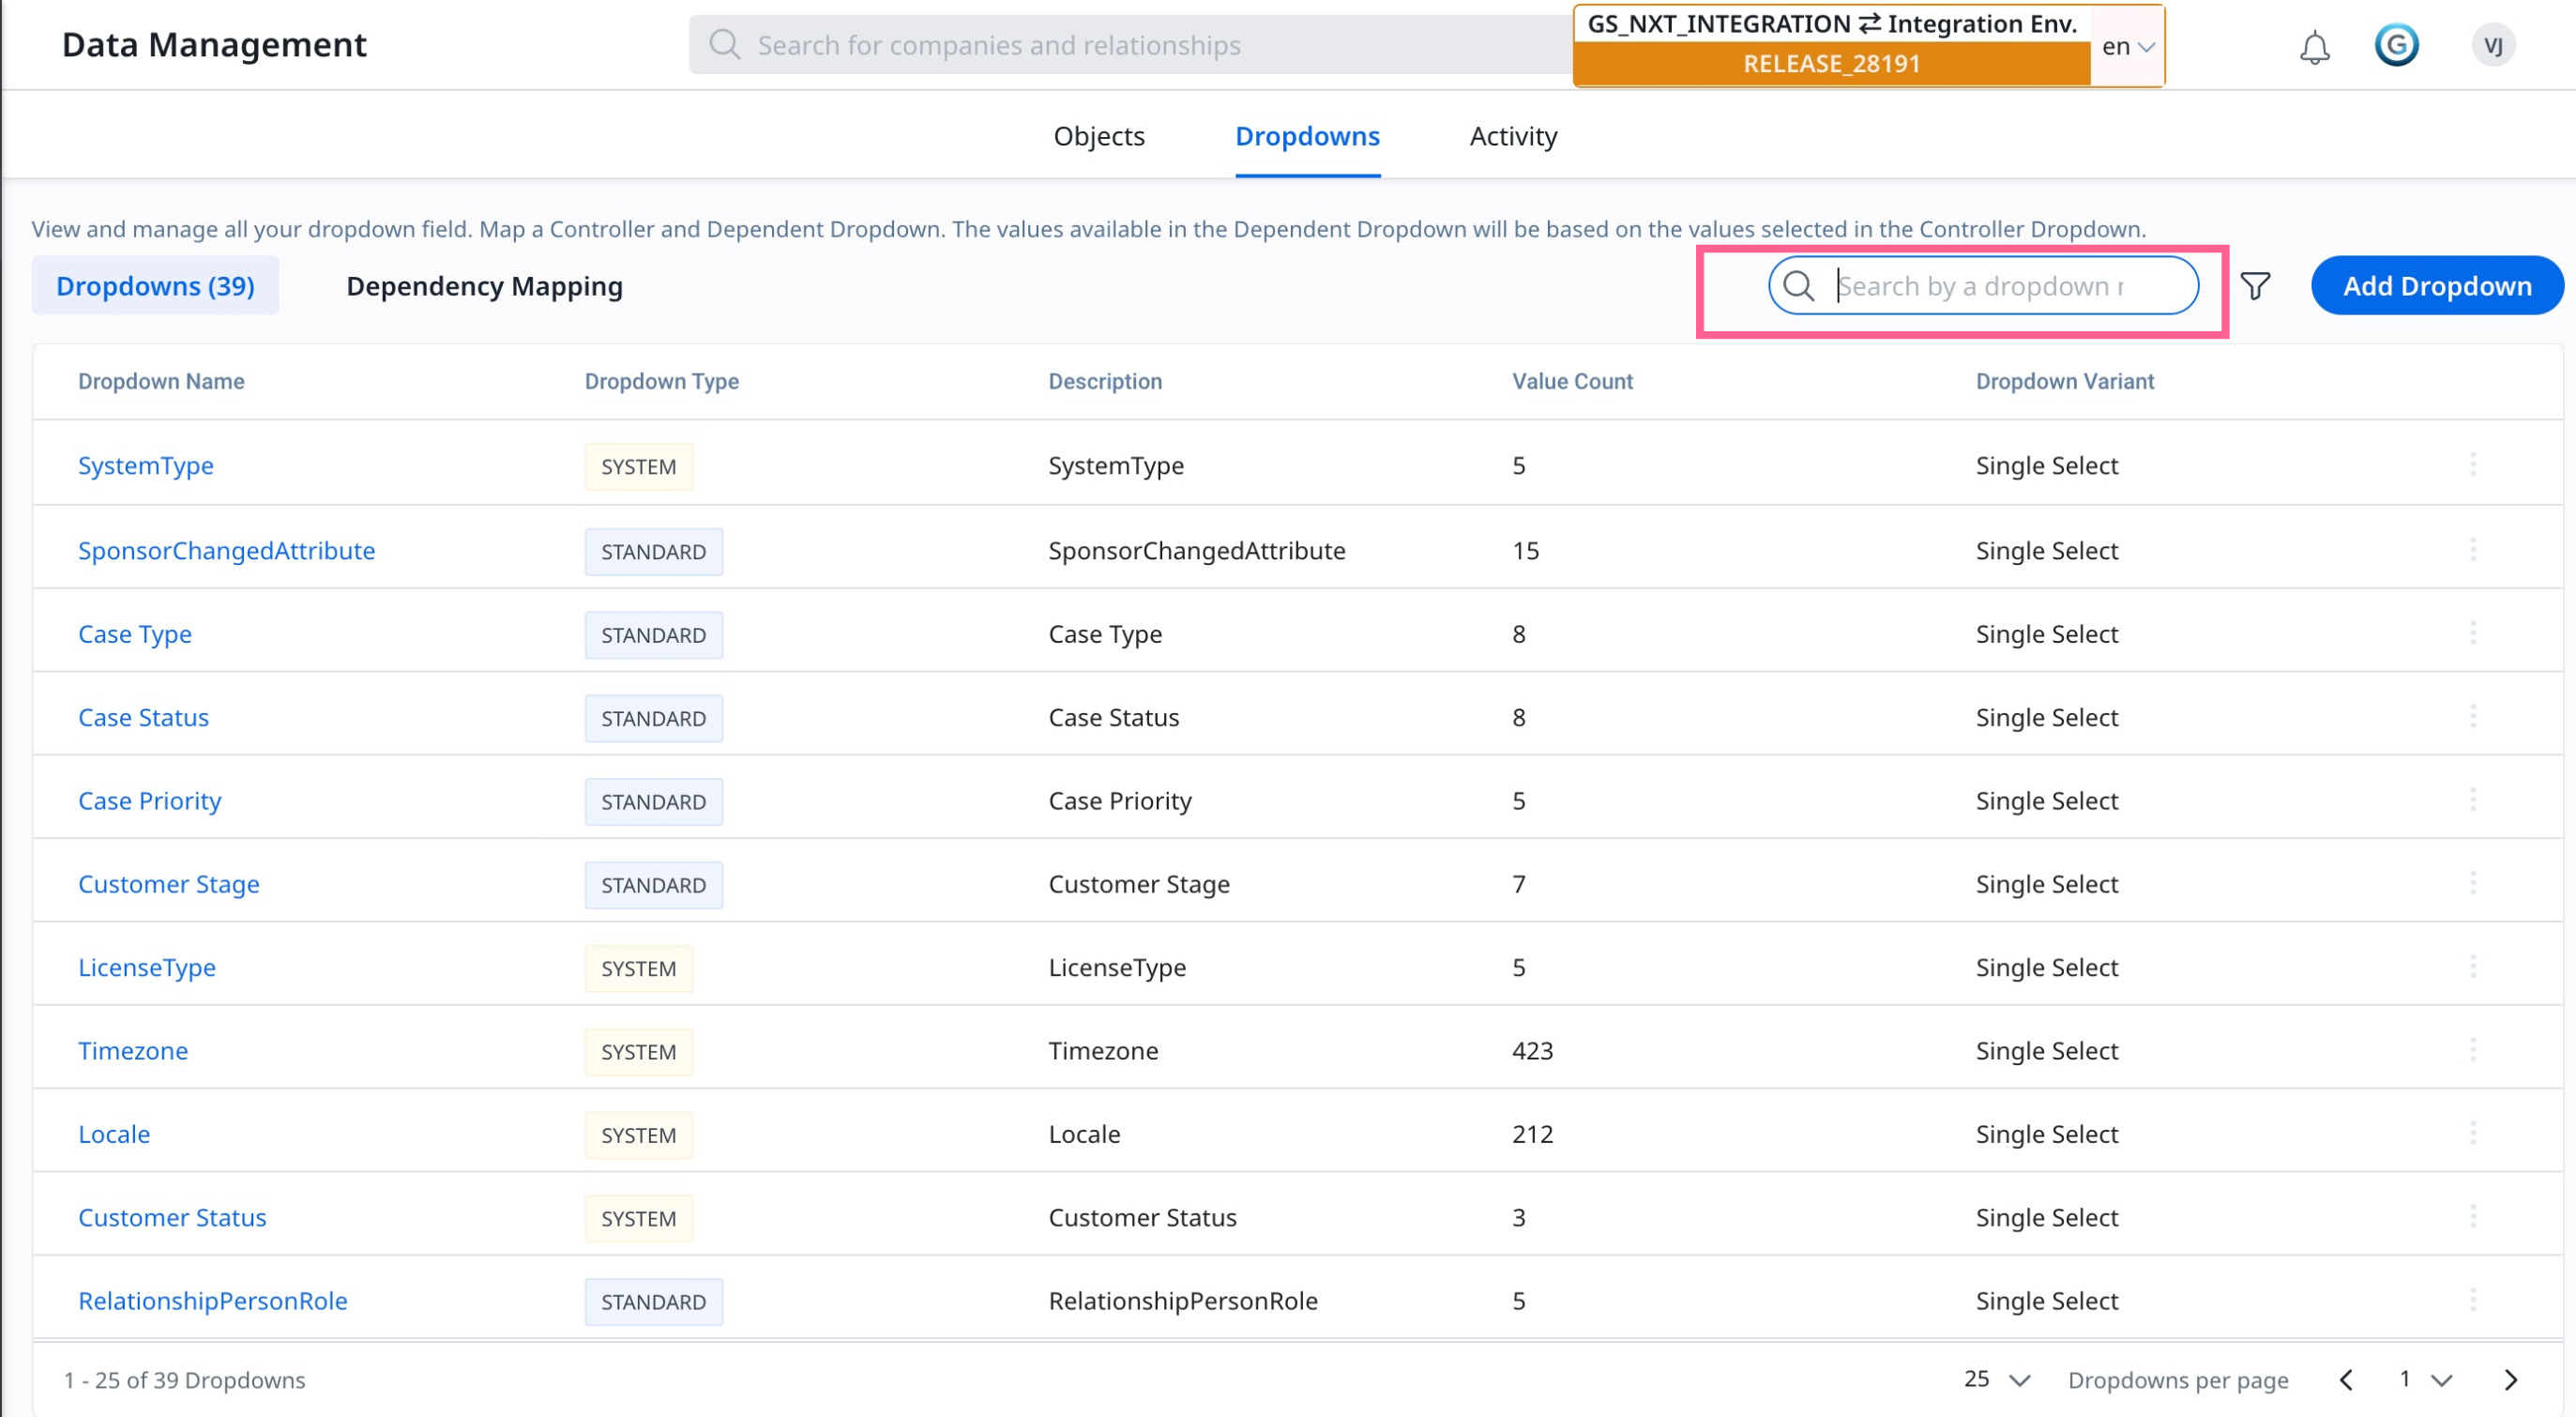
- The picklist value is assigned to a specific color. Hover over the color to customize it.

- Click Save.
Backfill Milestone Data