P360 User Guide (BETA)
Note - BETA Article
Please note that this is a BETA document. You might notice changes in the final version of this document.
If you have any feedback, feel free to share with us at docs@gainsight.com.
This article provides insights understand the P360 layouts and helps CSMs to effectively use P360 capabilities.
Overview
Person 360 (P360) is designed to consolidate and organize person-related data from various product areas within Gainsight. It serves as a valuable tool for CSMs to streamline operations, enhance customer engagement, and make data-driven decisions. P360 empowers users to analyze person data comprehensively, enabling a deeper understanding of product usage, user sentiment, journeys, community engagements, and so on. This feature helps CSMs in enhancing the ability to build strong networks for productive business conversations. CSMs can leverage P360 to prepare for discussions, handle cases, and ensure successful meetings with contacts, ultimately leading to improved customer satisfaction and retention.
Key Benefits:
- Helps to minimize the time spent on gathering information, allowing for more focus on customer interaction and relationship building.
- Ability to instantly access all relevant pre-meeting information, such as engagement notes and survey responses from one location.
- Help customer-facing teams come to each meeting well-informed and prepared.
Navigate to P360
There is no custom configuration for Person Search available for now. To navigate to the P360 of a Contact/Person using the global search in Gainsight, follow these steps:
-
Locate the global search bar at the top of the Gainsight interface.
Note: The global search includes the Email and Name fields by default. Changes made in the Search Configuration will not alter the default fields in the global search. -
Type the name or email of the Contact/Person into the search bar. A dropdown with search results appears as you type.
-
Look for the relevant contact or person in the list of results.
-
Click on the person’s name from the search results.
-
After selecting the contact or person, you will be directed to the P360 page to view detailed information about the person’s portfolio.

Alternative Ways to Navigate to P360:
-
People Section in C/R360: The Name field is hyperlinked, redirecting the user to P360.
-
Associated Person in CTA (Cockpit): If an Associated Person is mentioned in a CTA.
-
External Attendees in Timeline Entries: Hyperlinks in timeline entries for external attendees redirect to P360.
View Layout Options
In Gainsight, contacts that are also known as person records, can exist independently or be associated with a company and/or a relationship. This association allows for the differentiation of data facets based on the entity type, either as an individual contact, a contact associated with a company, or a contact linked to a specific relationship. P360 provides a global switcher in the layout for each facet of person data, such as person, Company Person, and Relationship Person. CSMs can use the global Context Switcher dropdown menu to select different layout options. This switcher streamlines access to specific data, making it easier for users to obtain relevant information with each option.
Note: You will be navigated to the P360 page of any person/contact when you click on the person name from other product areas.
| Context | Significance |
|---|---|
| Overview |
Provides a snapshot of the person information across all companies that the person has created footprints on. |
| Company View | Provides company-related information for the person in the Summary widgets. |
| Relationship View | Provides relationship-related information within each company for the selected person record in the Summary widgets. |
Overview Layout
The Overview layout provides CSMs with a comprehensive snapshot of a person, which includes recent Timeline activities, product usage, community engagement, essential attributes, and other important details. CSMs are then encouraged to delve deeper, accessing more nuanced, context-specific information about the person’s association with specific companies or relationships, thereby enriching their understanding of the person’s role and activities within those particular entities.

Company-specific Layout
When the CSM switches to the Company context from the Context Switcher, all the widgets in the layout display the person information in the context of the selected company.
Notes:
- If the person is not associated to any company, the widgets do not display data.
- For People Maps, the Company context needs to be selected to view the organizational maps
Relationship-specific Layout
When the CSM switches to the Relationship context for a company from the Context Switcher, all the widgets in the layout display the person information in the context of the selected relationship.
Note: Widgets cannot display data if the relationship context is not applicable to the person.
Navigate to C360 and R360 from P360
You can click the company name in the Highlights widget to navigate directly to the corresponding C360 page.

Similarly, when you switch the P360 context to a Relationship context, you can click the relationship name in the Highlights widget to navigate directly to the corresponding R360 page.
The navigation behavior for both depends on the status of the Turn on 360 in the Sidebar for end users toggle in Administration > C360 Layouts:
- If the toggle is turned on, the page opens in the sidebar.
- If the toggle is turned off, the page opens in a new browser tab.
- For persons associated with multiple companies, only the first company name displayed in the Highlights widget is clickable in the Overview context.
- In the Company context, the company name displayed is clickable.
- In the Relationship context, the relationship name displayed in the Highlights widget is clickable.
Actions in P360 Layout
CSMs can perform the following actions from P360.
Create Activity
The Timeline tab in P360 is similar to the global Timeline page. It lets you create, edit, and view Timeline Activities. Users can click the filter icon to add filters and streamline the Activities displayed on the screen or filter out the Activities by selecting the preferred Activity Type and the Activity Date.
Note: The External Attendee field is auto-populated with the person of that context.

Create Email
The Email feature enables you to send emails directly from P360 to customers for various scenarios, such as determining a suitable time to conduct an Executive Business Review (EBR), gathering more details about a negative response to a Net Promoter Score (NPS®) Survey, and more.
Prerequisites
- Permission to send email must be enabled from Administration > Communication > Email Configuration.
- Email templates to be used for email must be created in Digital Journey > Email Templates.
To send emails from P360:
- Navigate to the P360 page.
- Select the required P360 Context.
IMPORTANT:
- If Overview is selected from the P360 context drop-down, then User and Person records will appear when searching for the recipient on the Send Email page.
- If any company is selected from the P360 context drop-down, then User, Person, and Company Person records will appear when searching for the recipient on the Send Email page.
- If any relationship is selected from the P360 context drop-down, then User, Person, and Relationship Person records will appear when searching for the recipient on the Send Email page.
-
Hover over Create and click the Email option. The Send Email window appears.

- In the To field, search for the contact to whom the email has to be sent.
- From the Template field, select the required email template.
- From the Version field, select the required email template version.
Notes:
- The version of the template selected applies to all the recipients.
- Once the version is selected, it cannot be changed if the email is saved as a draft.
- (Optional) Click the CC link to add a recipient for sending the email copy.
- Edit or remove any unmapped tokens in the template.
Note: Tokens appear based on the P360 context selected. - Click Preview. The Email Preview window appears.
- Click Send to send the email.
For more information on sending emails from P360, refer to the Send Emails from P360 article.
Sections in P360
The following sections can be added to the P360 layout.
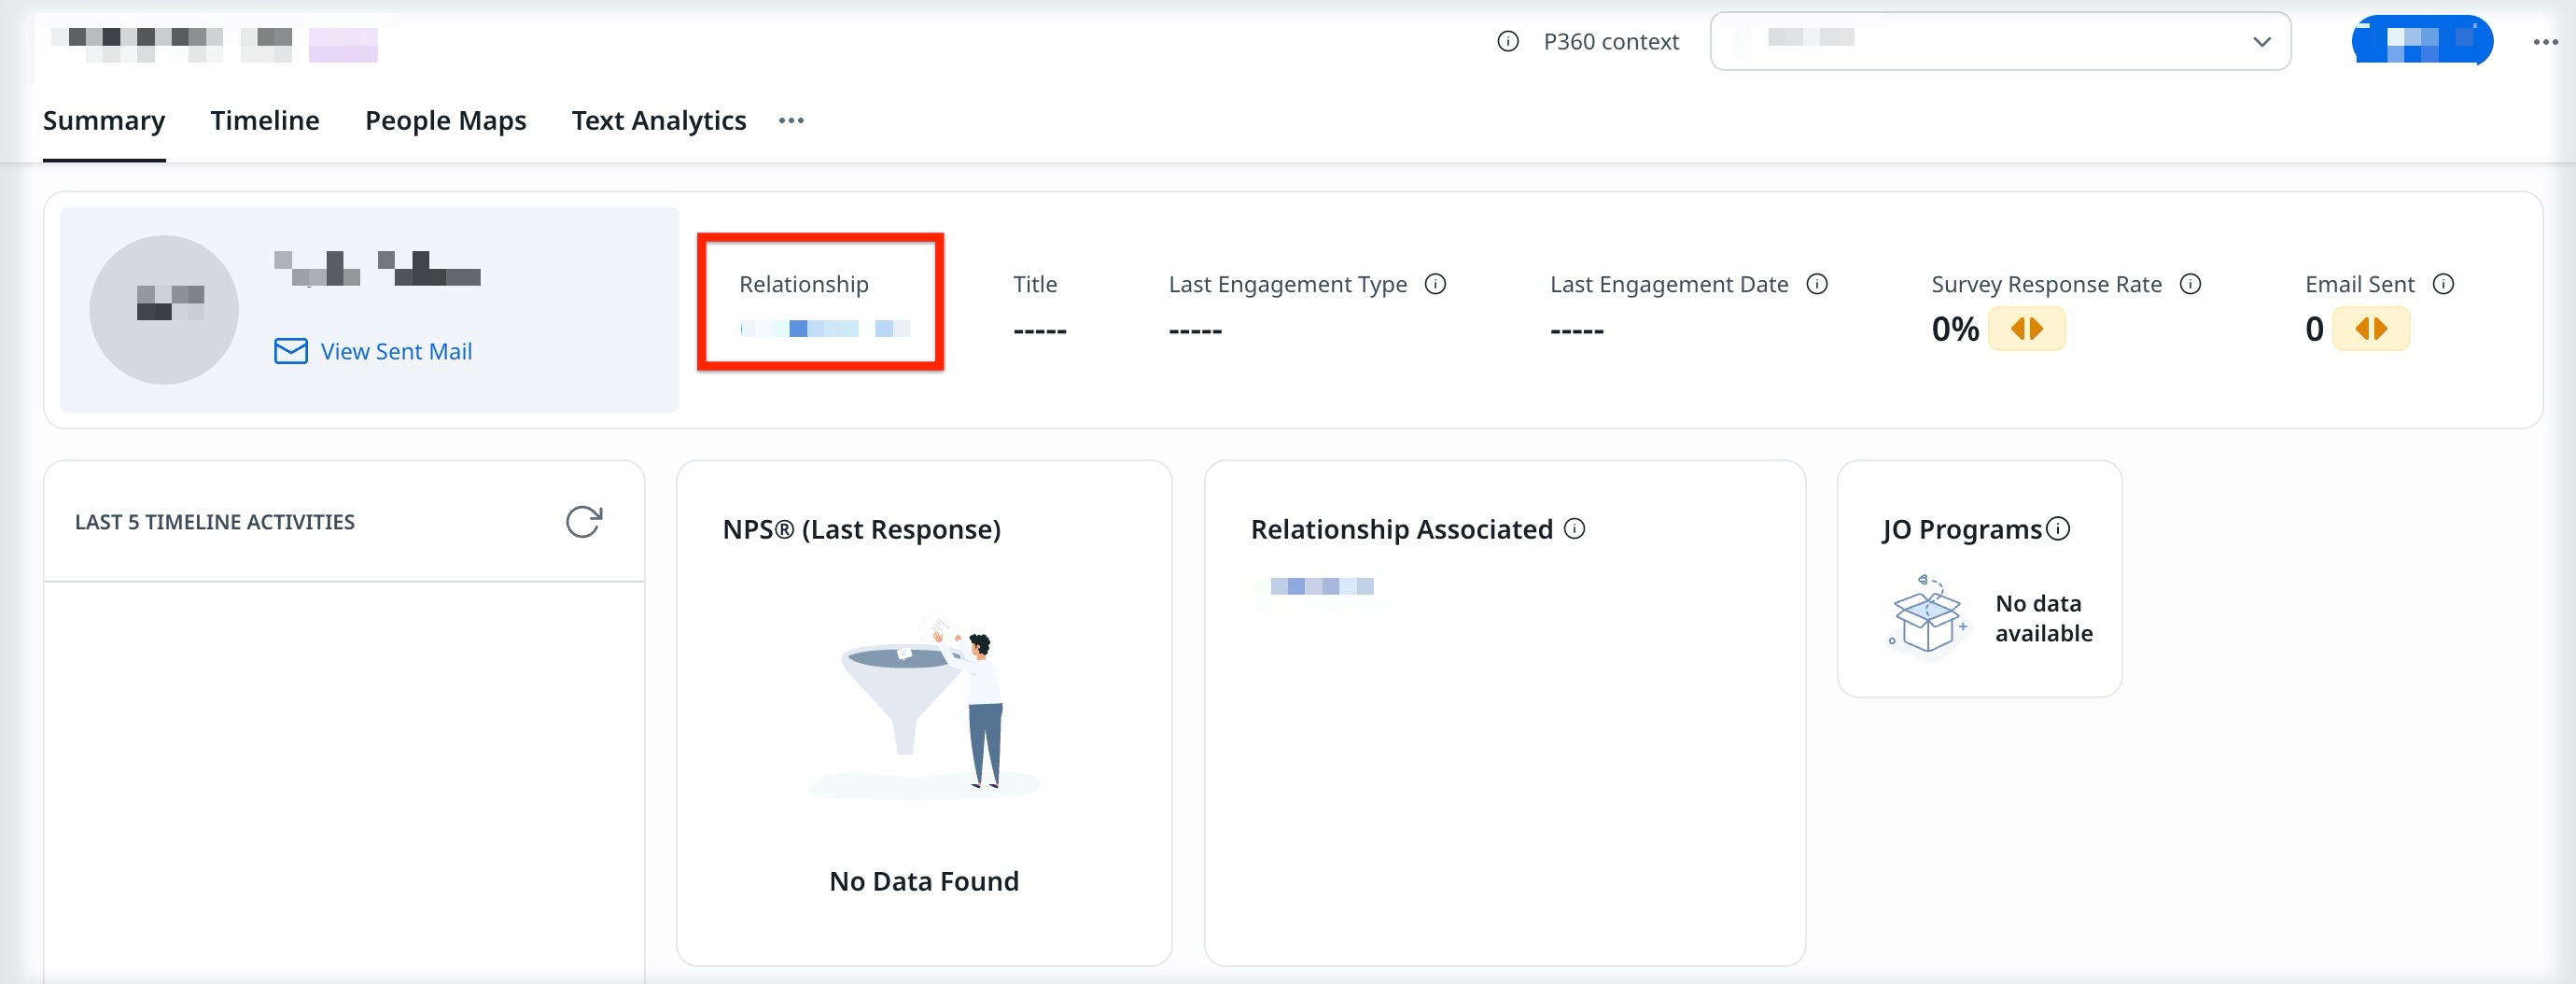
Summary
The Summary section consists of the Highlights widget and a group of standard widgets that display the person data from various product areas of Gainsight.
When a widget is added into the Summary section and configured to represent a key parameter, you can effortlessly assess these parameters. As a CSM, you must configure the Summary section widget after adding it to a layout, so that it displays the relevant information in your layout. Gainsight offers 18 Standard Widgets and 18 Report Widgets out of which 10-12 can be added in the Summary section.
For more information on the widgets, refer to the Widgets in P360 section.
Timeline
The Timeline widget in the Summary section displays the five latest timeline activities in the Timeline P360
The Timeline widget in the Summary section displays the five latest timeline activities in the Timeline P360 widget. These listed activities are filtered based on the external attendees. Only the activities involving an external attendee are displayed in the widget. The external attendees are hyperlinked, and when clicked, redirect you to the corresponding attendee’s P360 page.
In the Timeline page, users can log Activities, such as Updates, Calls, Meetings, and Emails, along with notes from their customer interactions.
Save Drafts
When a user is linked to multiple companies, such as Company A and Company B, and attempts to log an activity under one company, for example, Company A, the application gives an option to save this activity as a draft. Before switching to another company instance, Company B, the user can utilize this feature for better workflow management.
To access these saved drafts, you should first select the initial company instance where the activity was initiated (in this example, Company A).
To view all the drafts:
- Select Company A, as a company instance from the Overview drop-down.
- Click Drafts. All the activity drafts that were previously saved under the Company A instance are listed.
This process ensures that all activities initiated under one company can be securely and conveniently accessed even after switching to a different company instance.
People Maps
The People Maps section helps CSMs with visual insights into company hierarchies and relationships. A visual representation provides a clear understanding of organizational structures and decision influencers.
People Maps is available at the company level which is designed to show users the variety of maps a particular company possesses and the individuals present within those maps.
Prerequisite: Before building the map, you must ensure that all of the Person records are created and associated with the Company.
| Context | Significance |
|---|
|
Overview |
Provides a snapshot a list of all the People maps person is involved with to help explore their position in the org hierarchy. |
|
Company |
Provides details about the person’s direct reportee and manager. |
Person Hierarchy Actions from P360
This section explains different actions:
View Person in Map
View person in map provides a visual context to understand a person’s position and connections within the org hierarchy.
To view Person in the map:
- Navigate to P360 > People Maps.
- From the P360 Context dropdown, select Overview.
- Click Organization Map.
- To view the company hierarchy, click Switch to Company.This allows you to view the person's hierarchy, including direct reports and managers.
- (Optional) You can change from Overview to Company within the P360 Context dropdown.

Add Person in Map
If the person needs to be added in the company in a certain hierarchy, Person can be manually added as Influencer or Direct Report.
To add a person to the map:
- Navigate to P360 > People Maps.
- From the P360 Context dropdown, select Company.
- Click Add Person to the map.

-
To add Person to the map, select one of the following options:
- Direct Report - This person directly reports to the individual at the starting point of the map.
- Influencer - An Influencer can impact the decision maker in an organization. This impact (known as Sentiment in People Maps) can be negative, positive, or neutral.
-
Click Confirm. The person is added to the map successfully.

Remove Person from the Map
If the person’s role within the company hierarchy changes or they no longer belong in the map, People Maps allows for the removal of the person to ensure the org hierarchy remains accurate.
To remove person from the map:
- Navigate to P360 > People Maps.
- From the P360 Context dropdown, select Company.
- Select the Person. Click the three-horizontal dots menu icon of the person and select Remove.

-
Click Confirm in the Remove Association pop up box. after selecting the required options. The person is successfully removed from the map.
Replace Person in a Map
If the person's role within the company hierarchy changes or no longer aligns with the current map, People Maps allows the replacement of person to ensure the org hierarchy remains accurate.
To replace person from the map:
- Navigate to P360 > People Maps.
- From the P360 Context dropdown, select Company.
- Select the Person. Click the three-horizontal dots menu icon of the person and select Replace.

-
Search for the name of the person you want to replace. Select the person, and the replacement is successfully completed in the map.
Product Usage
The Usage section lets you view the data from a default Dashboard built in Adoption Explorer for P360. The widgets in this section provide a detailed view of how customers engage with your products and offer a deep dive into product interaction. These widgets help in understanding customer behavior, identifying popular features, and recognizing areas that need more engagement or development.
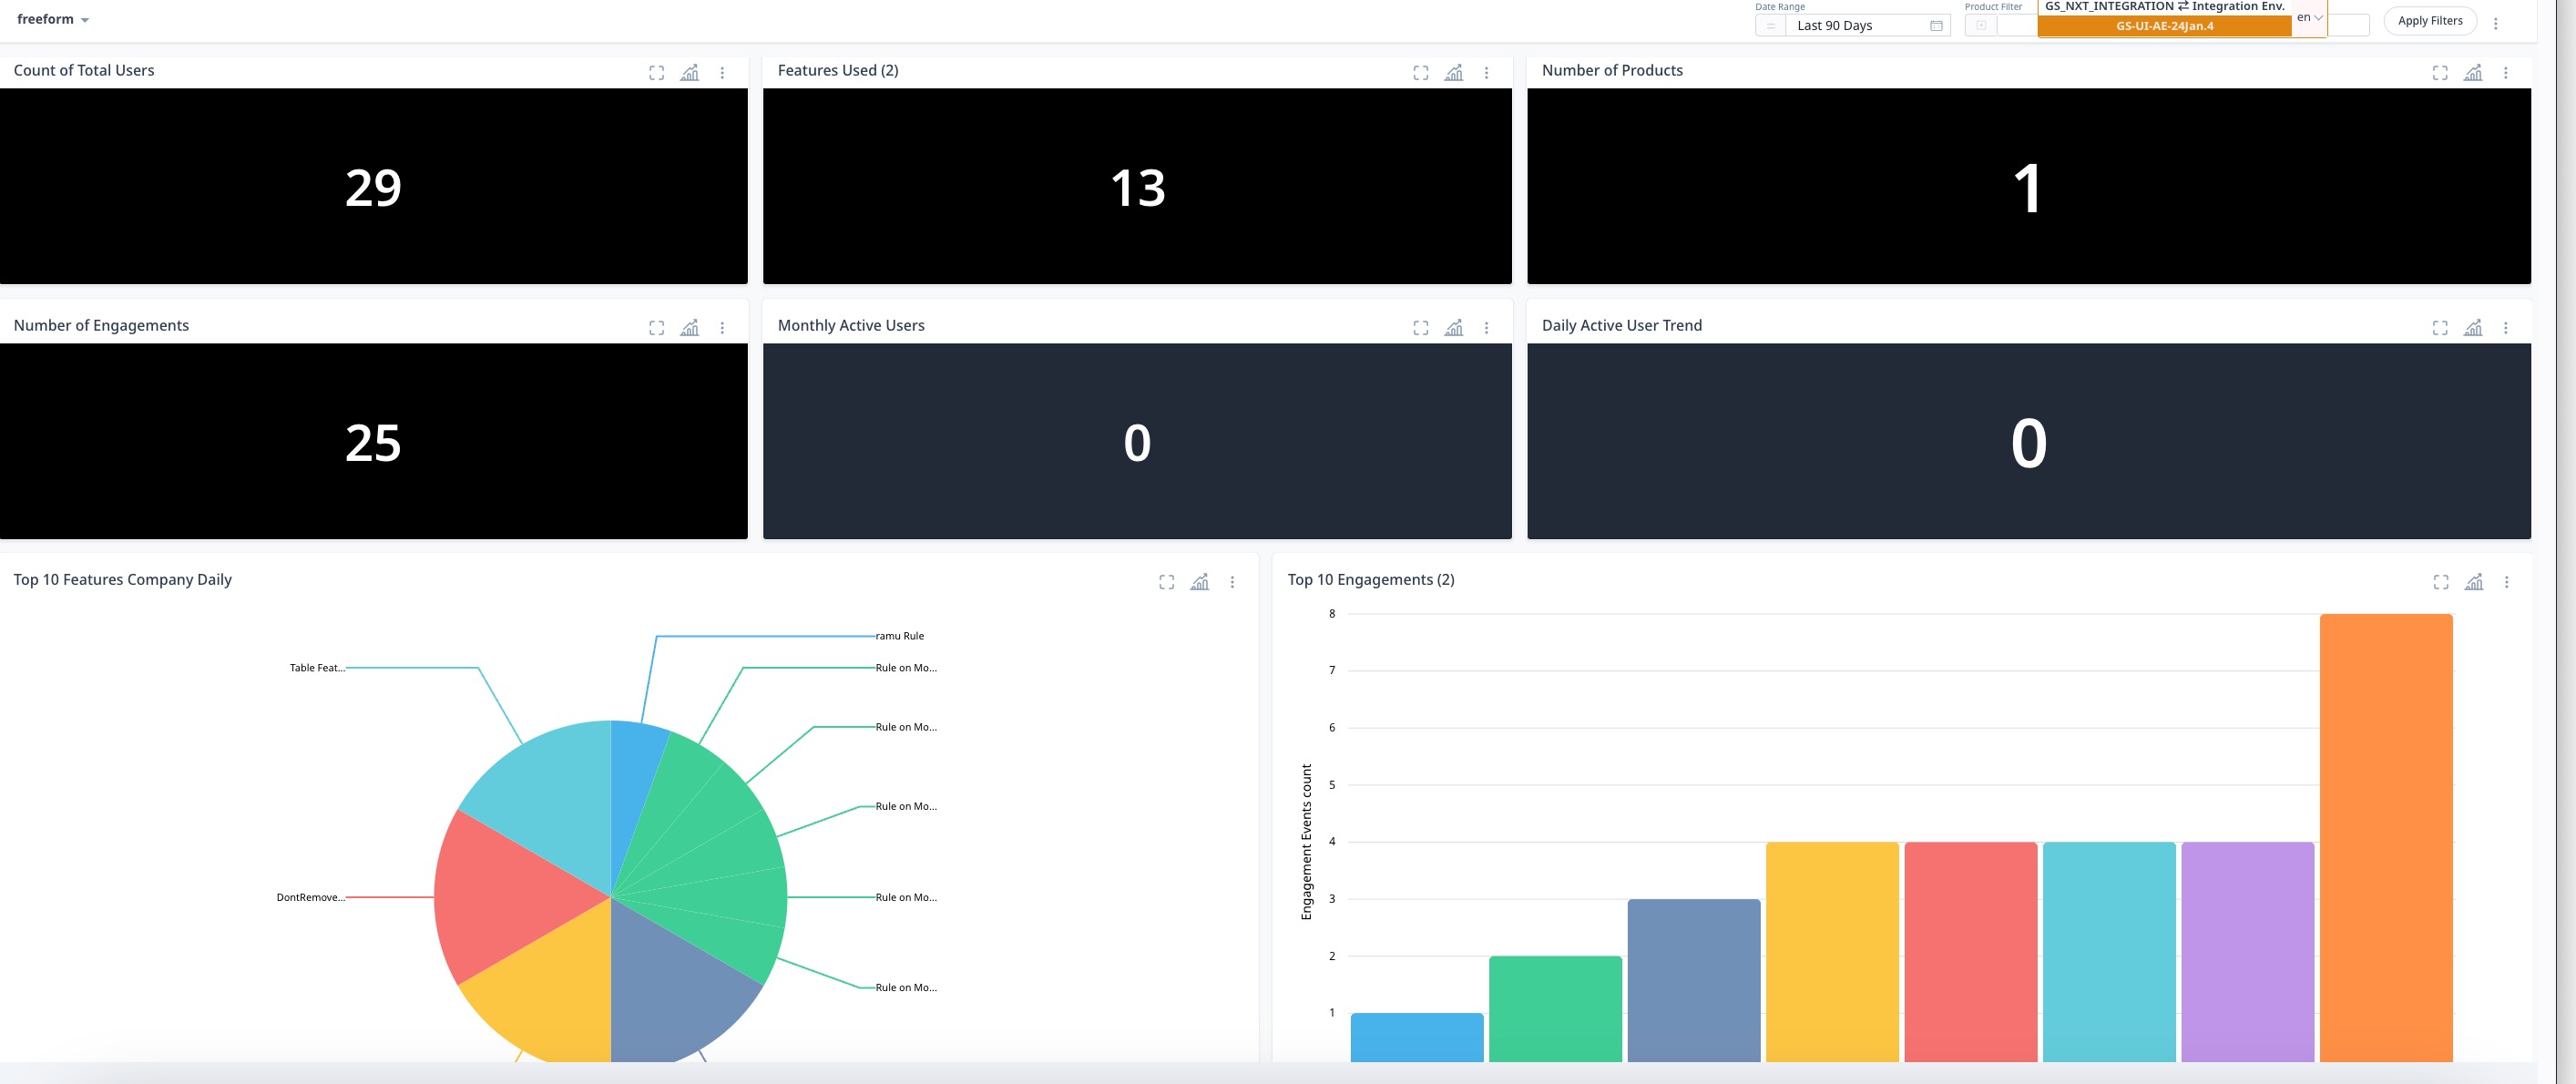
Each widgets provides you the following options in the context menu:
- Toggle Legends: View map key legends (chart axis details).
- Custom Drill Down: Click on elements of a chart to view more detailed data related to that element.
- Export: Export the dashboard as an image, or in a PDF or CSV format.
Note: You can also enlarge the reports on the dashboards, and change their visualization type.
For more information on usage reports, refer to the Create Usage Report in a Dashboard - Gainsight Inc article.
Text Analytics
The Text Analytics section displays the detailed CX metrics covering NPS, CSAT, and Sentiment. The CX metric values are contextual and vary based on the context of how these are visualised. It differs when viewed in the context of a Company Person, Relationship Person, or General Person Overview. In the drill-down view, you can view the following options:
| Context | Significance of value displays in NPS metric |
|---|
|
Overview |
Displays the last NPS or CSAT response by the person regardless of whether it belongs to Company or Relationship. |
|
Company Person |
Displays the last NPS or CSAT response by the Company Person tied to a specific Company. |
|
Relationship Person |
Displays the last NPS or CSAT response by the Relationship Person tied to a specific Relationship. |

- Sources: The source drop-down menu allows you to filter the data based on specific surveys.
- Time Frame: The Time Frame drop-down menu allows you to filter data based on specific periods.
- Sentiment: Displays the person’s aggregated sentiment score.
- NPS®: Displays the last NPS response by the person.
- CSAT: Displays the last CSAT response by the person.
- Topics: Displays a list of key topics that were derived from the textual inputs.
- Surveys: Displays all the surveys and their response.
Report Section
The Reports section in P360 displays reports created in Report Builder. The reports to be displayed are selected by admins while configuring this section. Reports created on the same object can be displayed in groups if admins have grouped them while adding the reports to the P360 layout.
You can also refresh the report, change the visualization type, and maximize the report by clicking the corresponding icons at the top of the report.
Users can click the vertical three dots for any report to perform the following functions:
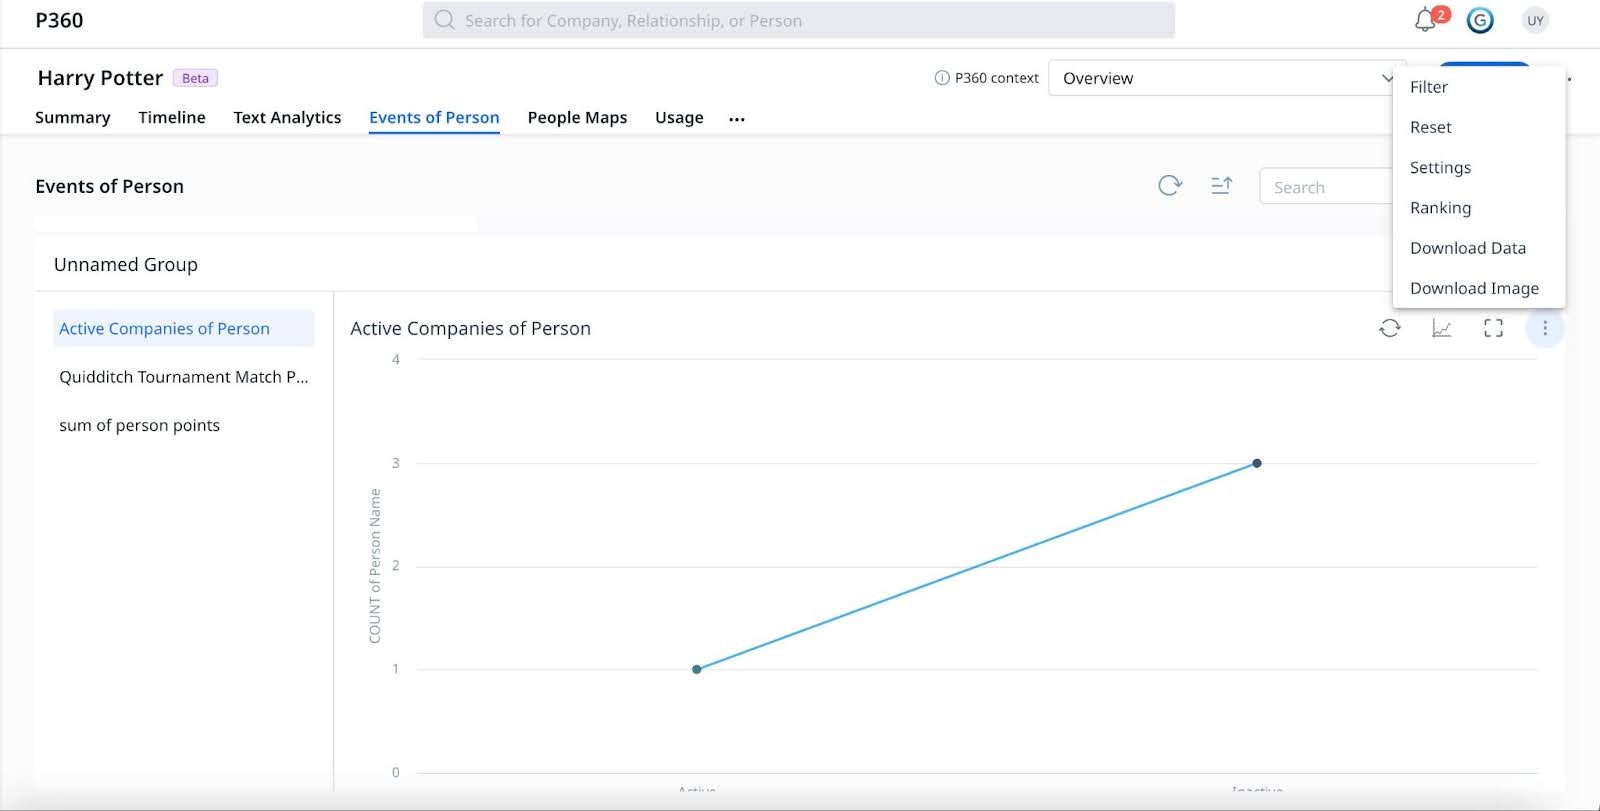
-
Add Filters

-
Change the order of Ranking for report fields by selecting them from the dropdown menu as follows:

- Reset the report to its original state
- Download the report in “.xls” format
Note: P360 supports state preservation, ensuring that changes to filters, settings, ranking, and row height persist even when you navigate away from the page.
Reports Created on Low Volume Objects
Reports that are created on low-volume custom objects can be edited in the P360 Reports tab. You can add records to such reports, edit existing records, and preview the record data as follows.
To add a new record:
- Click the Add Records button at the top of the report.
- In the slide-out Add Record panel, enter the details required to create the record.
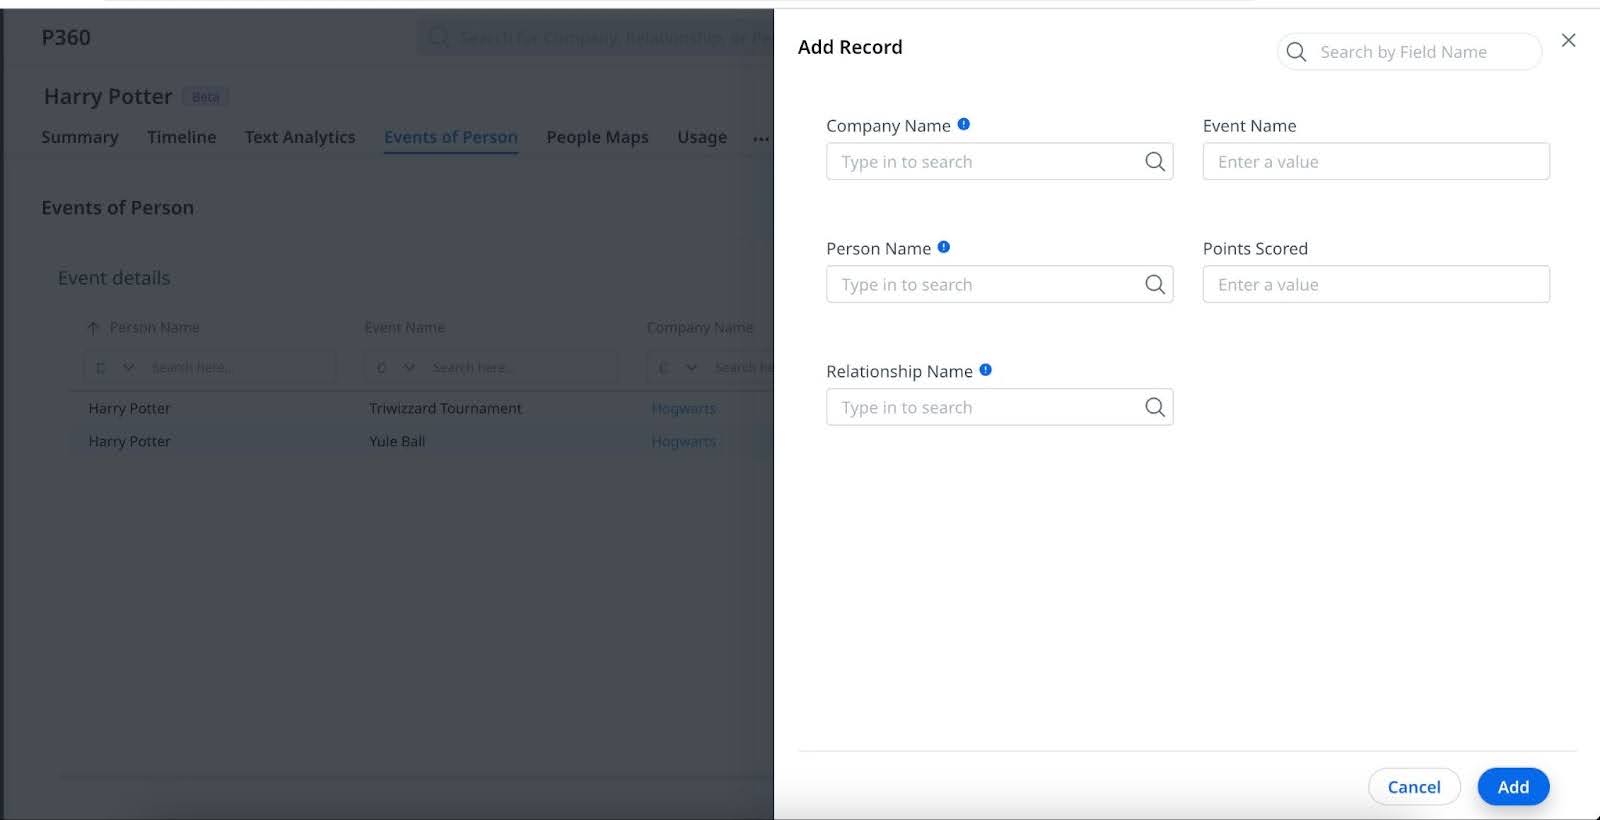
-
Click Add to add the new record.
To edit an existing record:
- Navigate to the record you wish to edit and click the three dots. Select Edit.
- In the slide-out panel, enter the new details.
- Click Save.

To preview an existing record:
-
Navigate to the record you wish to edit and click the three dots. Select Preview. A preview of the record is displayed.

Widgets in P360
Following standard and report widgets are available in P360:
Standard Widgets
| Widget Name | Description |
|---|
|
Highlights |
The highlight section gives a snapshot of a person’s profile. This section comprises of standard fields and optional fields that can be added by admin. |
|
Company Associated |
This widget displays the company details associated with the selected person |
|
Relationship Associated |
This widget displays the relationship details associated with the selected person |
|
Attributes |
This widget displays the key person attributes from the Person Object. IMPORTANT: Fields that are set as Match Criteria (in the People Admin screen) cannot be edited directly within the Attributes widget. This change is intended to ensure data integrity and consistency across the application. For more information on Match Criteria, refer to the People Management article. |
|
Last 5 Timeline Activities |
This widget displays the five latest Timeline activities in the Timeline P360 widget. These listed activities are filtered based on the external attendees. |
|
Community Metrics |
This widget aggregates key engagement indicators from the Customer Communities platform. It helps visualize metrics such as Page Views, Posts, Topics, and Replies. |
|
Last 5 Community Activities |
This widget presents the five most recent actions or engagements of a user within the Customer Communities platform over a chosen period. It provides a quick snapshot of the user's latest interactions, offering valuable context for understanding their current interests and participation levels in the community. |
|
NPS® (Last Response) |
Displays the last response received for the NPS question. This CX metric helps you gauge the customer’s loyalty and likelihood for recommendation. For a deeper insight into NPS survey responses, click the NPS widget for a drill-down view of complete NPS survey responses from the person. Additionally, use the All drop-down menu to refine the survey results using the NPS filter (Promoter, Passive, and Detractor). |
|
CSAT (Last Response) |
Displays the last response received for the CSAT question. For a deeper insight into CSAT survey responses, click the CSAT widget to get a drill-down view of CSAT survey responses from the person. Additionally, use the All drop-down menu to refine the survey results using the CSAT filter (Dissatisfied, Neutral, and Satisfied. |
| Survey Response Rate | The Survey Response Rate widget displays updates received from contacts tracked as sponsors. |
|
Journeys |
This widget displays the count and names of programs in which a person has participated in the past six months, highlighting their current status (Review, New, Active, Completed, Knock-off, or Dropped) against each program. Additionally, the widget provides an activity log of the person's interactions with each program. Note: The duration for which this widget displays data is fixed at six months and cannot be adjusted by the admin. |
|
Overall Product Usage |
This widget provides information on how extensively the person uses the product. It shows the usage in terms of feature count during the selected time frame. |
|
Top 5 Features Used |
This widget displays the most frequently utilized features of a product by the person. It ranks the top five features based on usage metrics, providing a clear, concise view of user preferences and engagement. |
|
Least 5 Features Used |
This widget showcases the five least engaged features within a product during a specified timeframe. It offers insights into user behavior by highlighting areas of potential improvement or opportunities for targeted customer education. |
| Net Promoter®, NPS®, NPS Prism®, and the NPS-related emoticons are registered trademarks of Bain & Company, Inc., NICE Systems, Inc., and Fred Reichheld. Net Promoter ScoreSM and Net Promoter SystemSM are service marks of Bain & Company, Inc., NICE Systems, Inc., and Fred Reichheld. |