Email Template Builder
Gainsight NXT
This article explains how admin can build and manage email templates in JO.
Overview
Journey Orchestrator includes a robust email template designer with a variety of configuration options to help you create attractive and actionable email communications for your end-users.
Email Template List View
The email template list view displays each template as a separate line item. Each entry displays the email template's name, number of versions, Version number, last modified user details, last modified time, and the number of outreaches using the template.
You can perform the following actions from the list view:
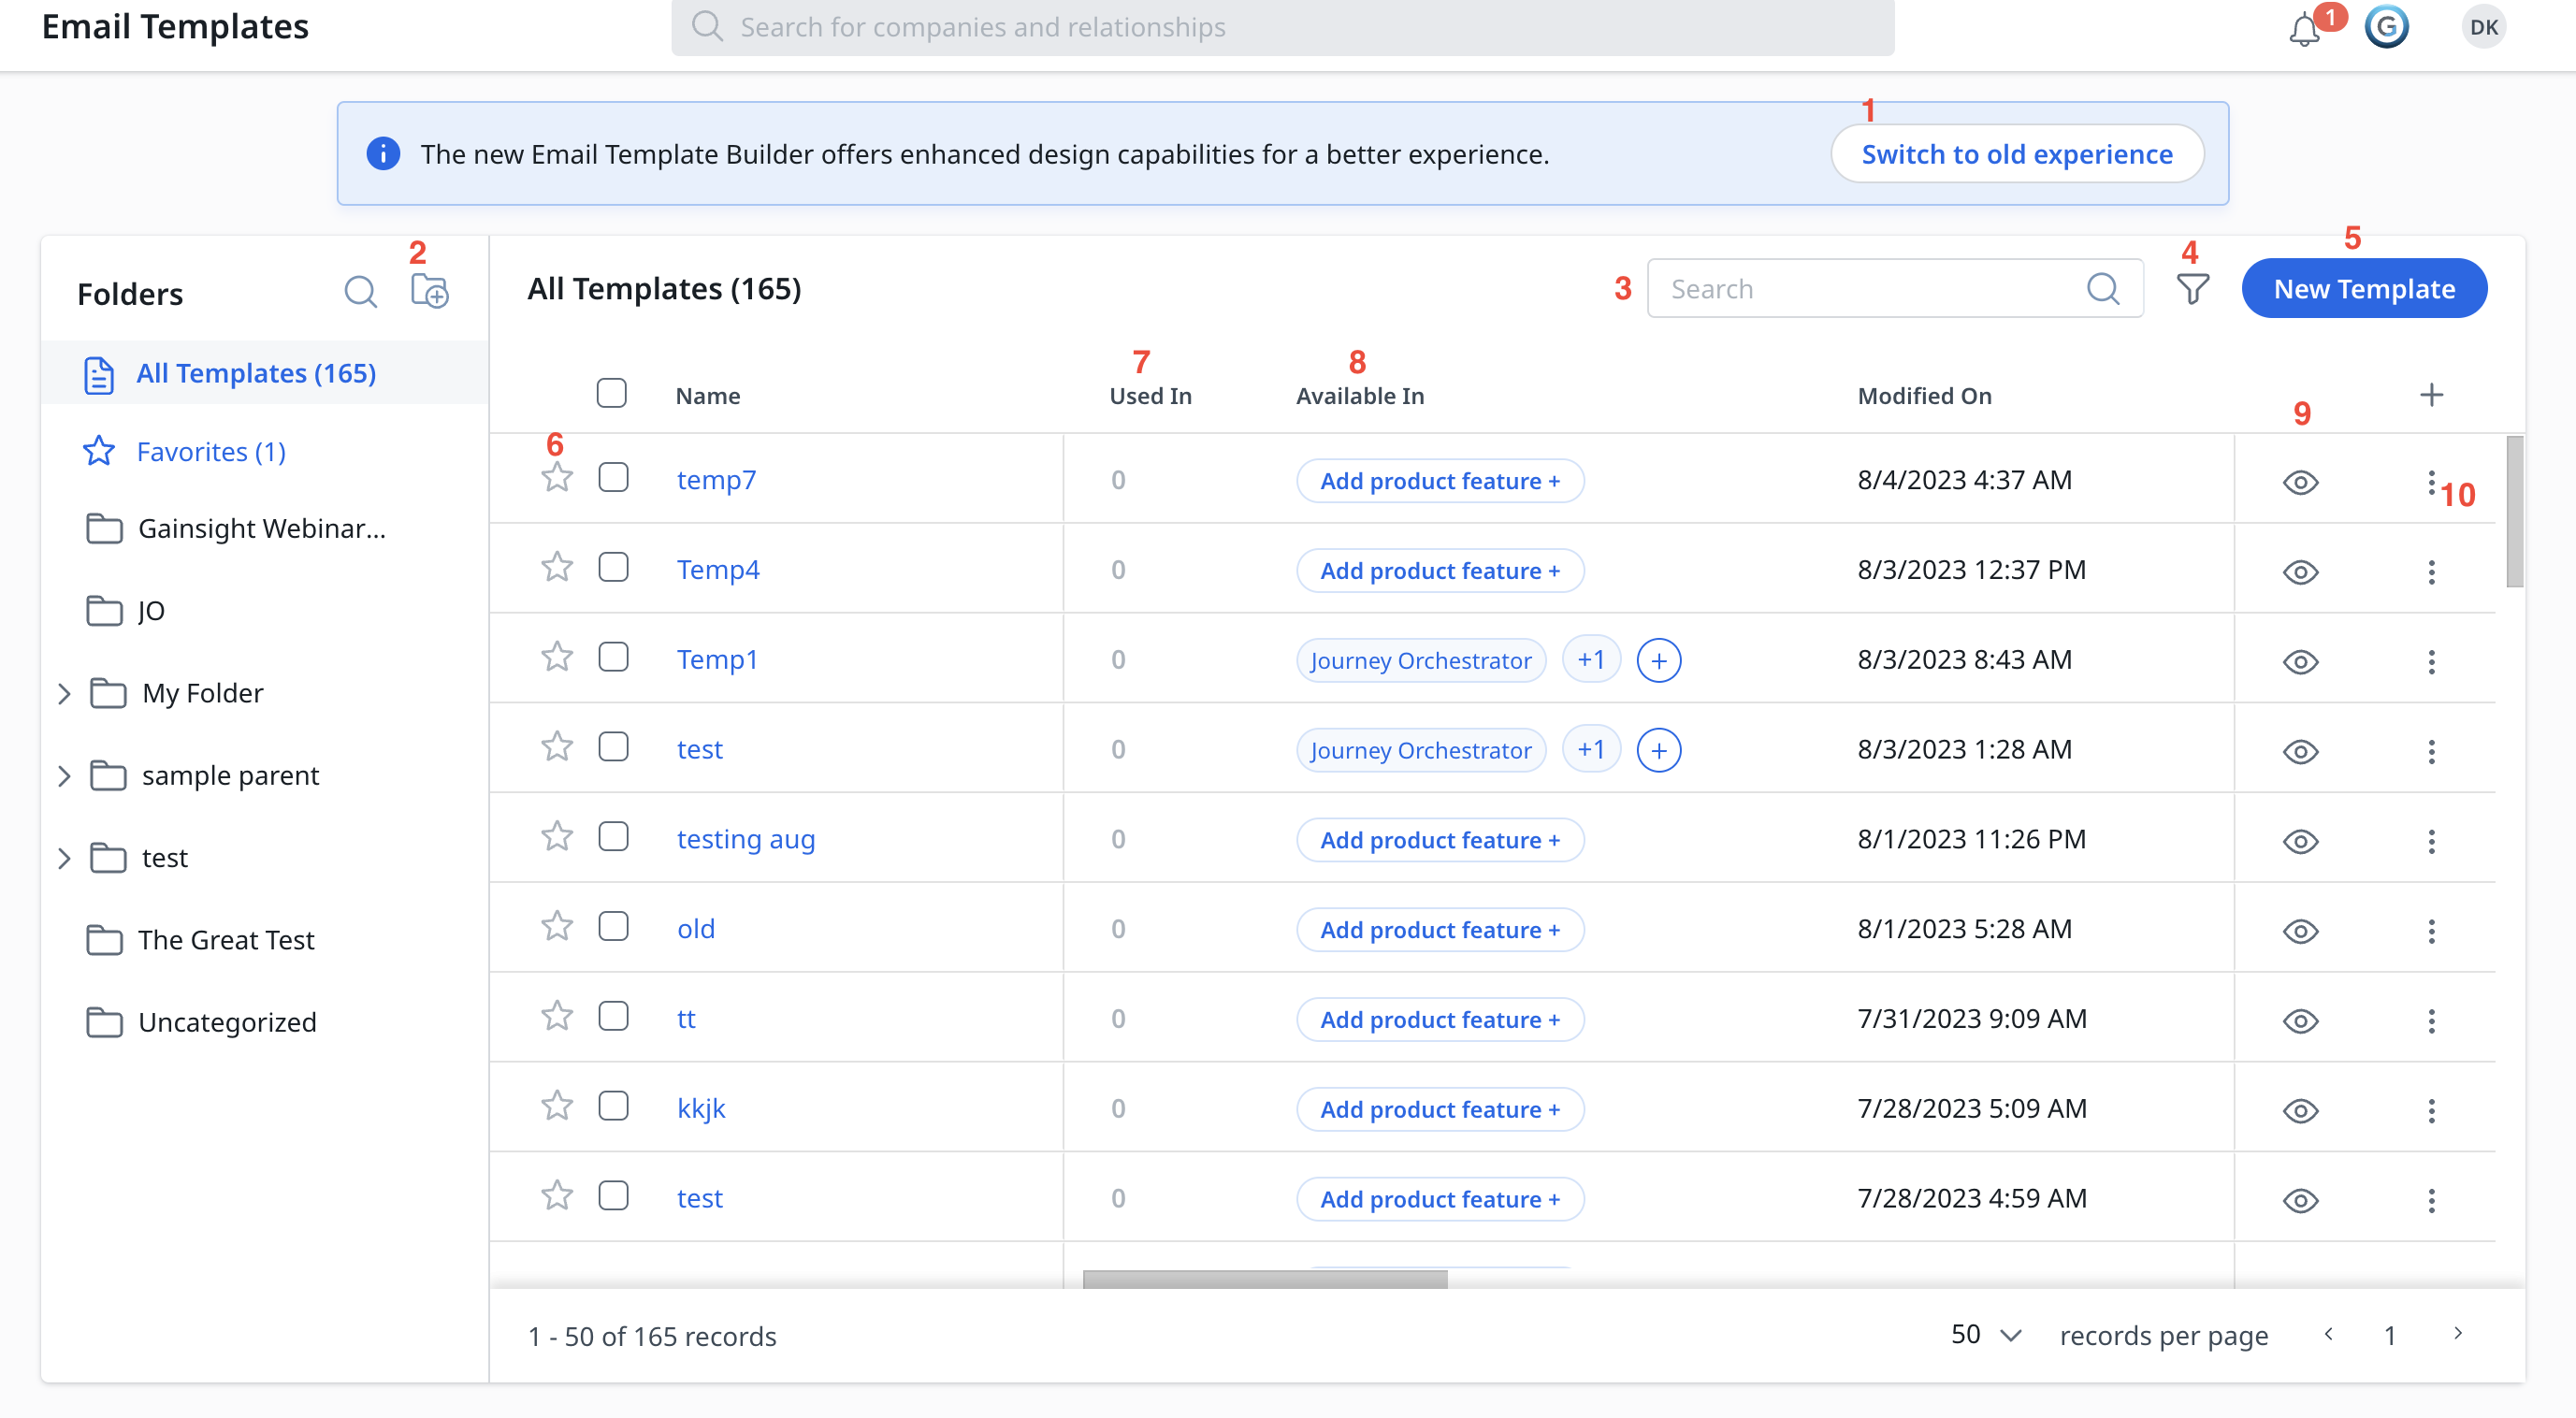
- Switch to old experience: Enables you to switch to old email template builder experience.
Notes:
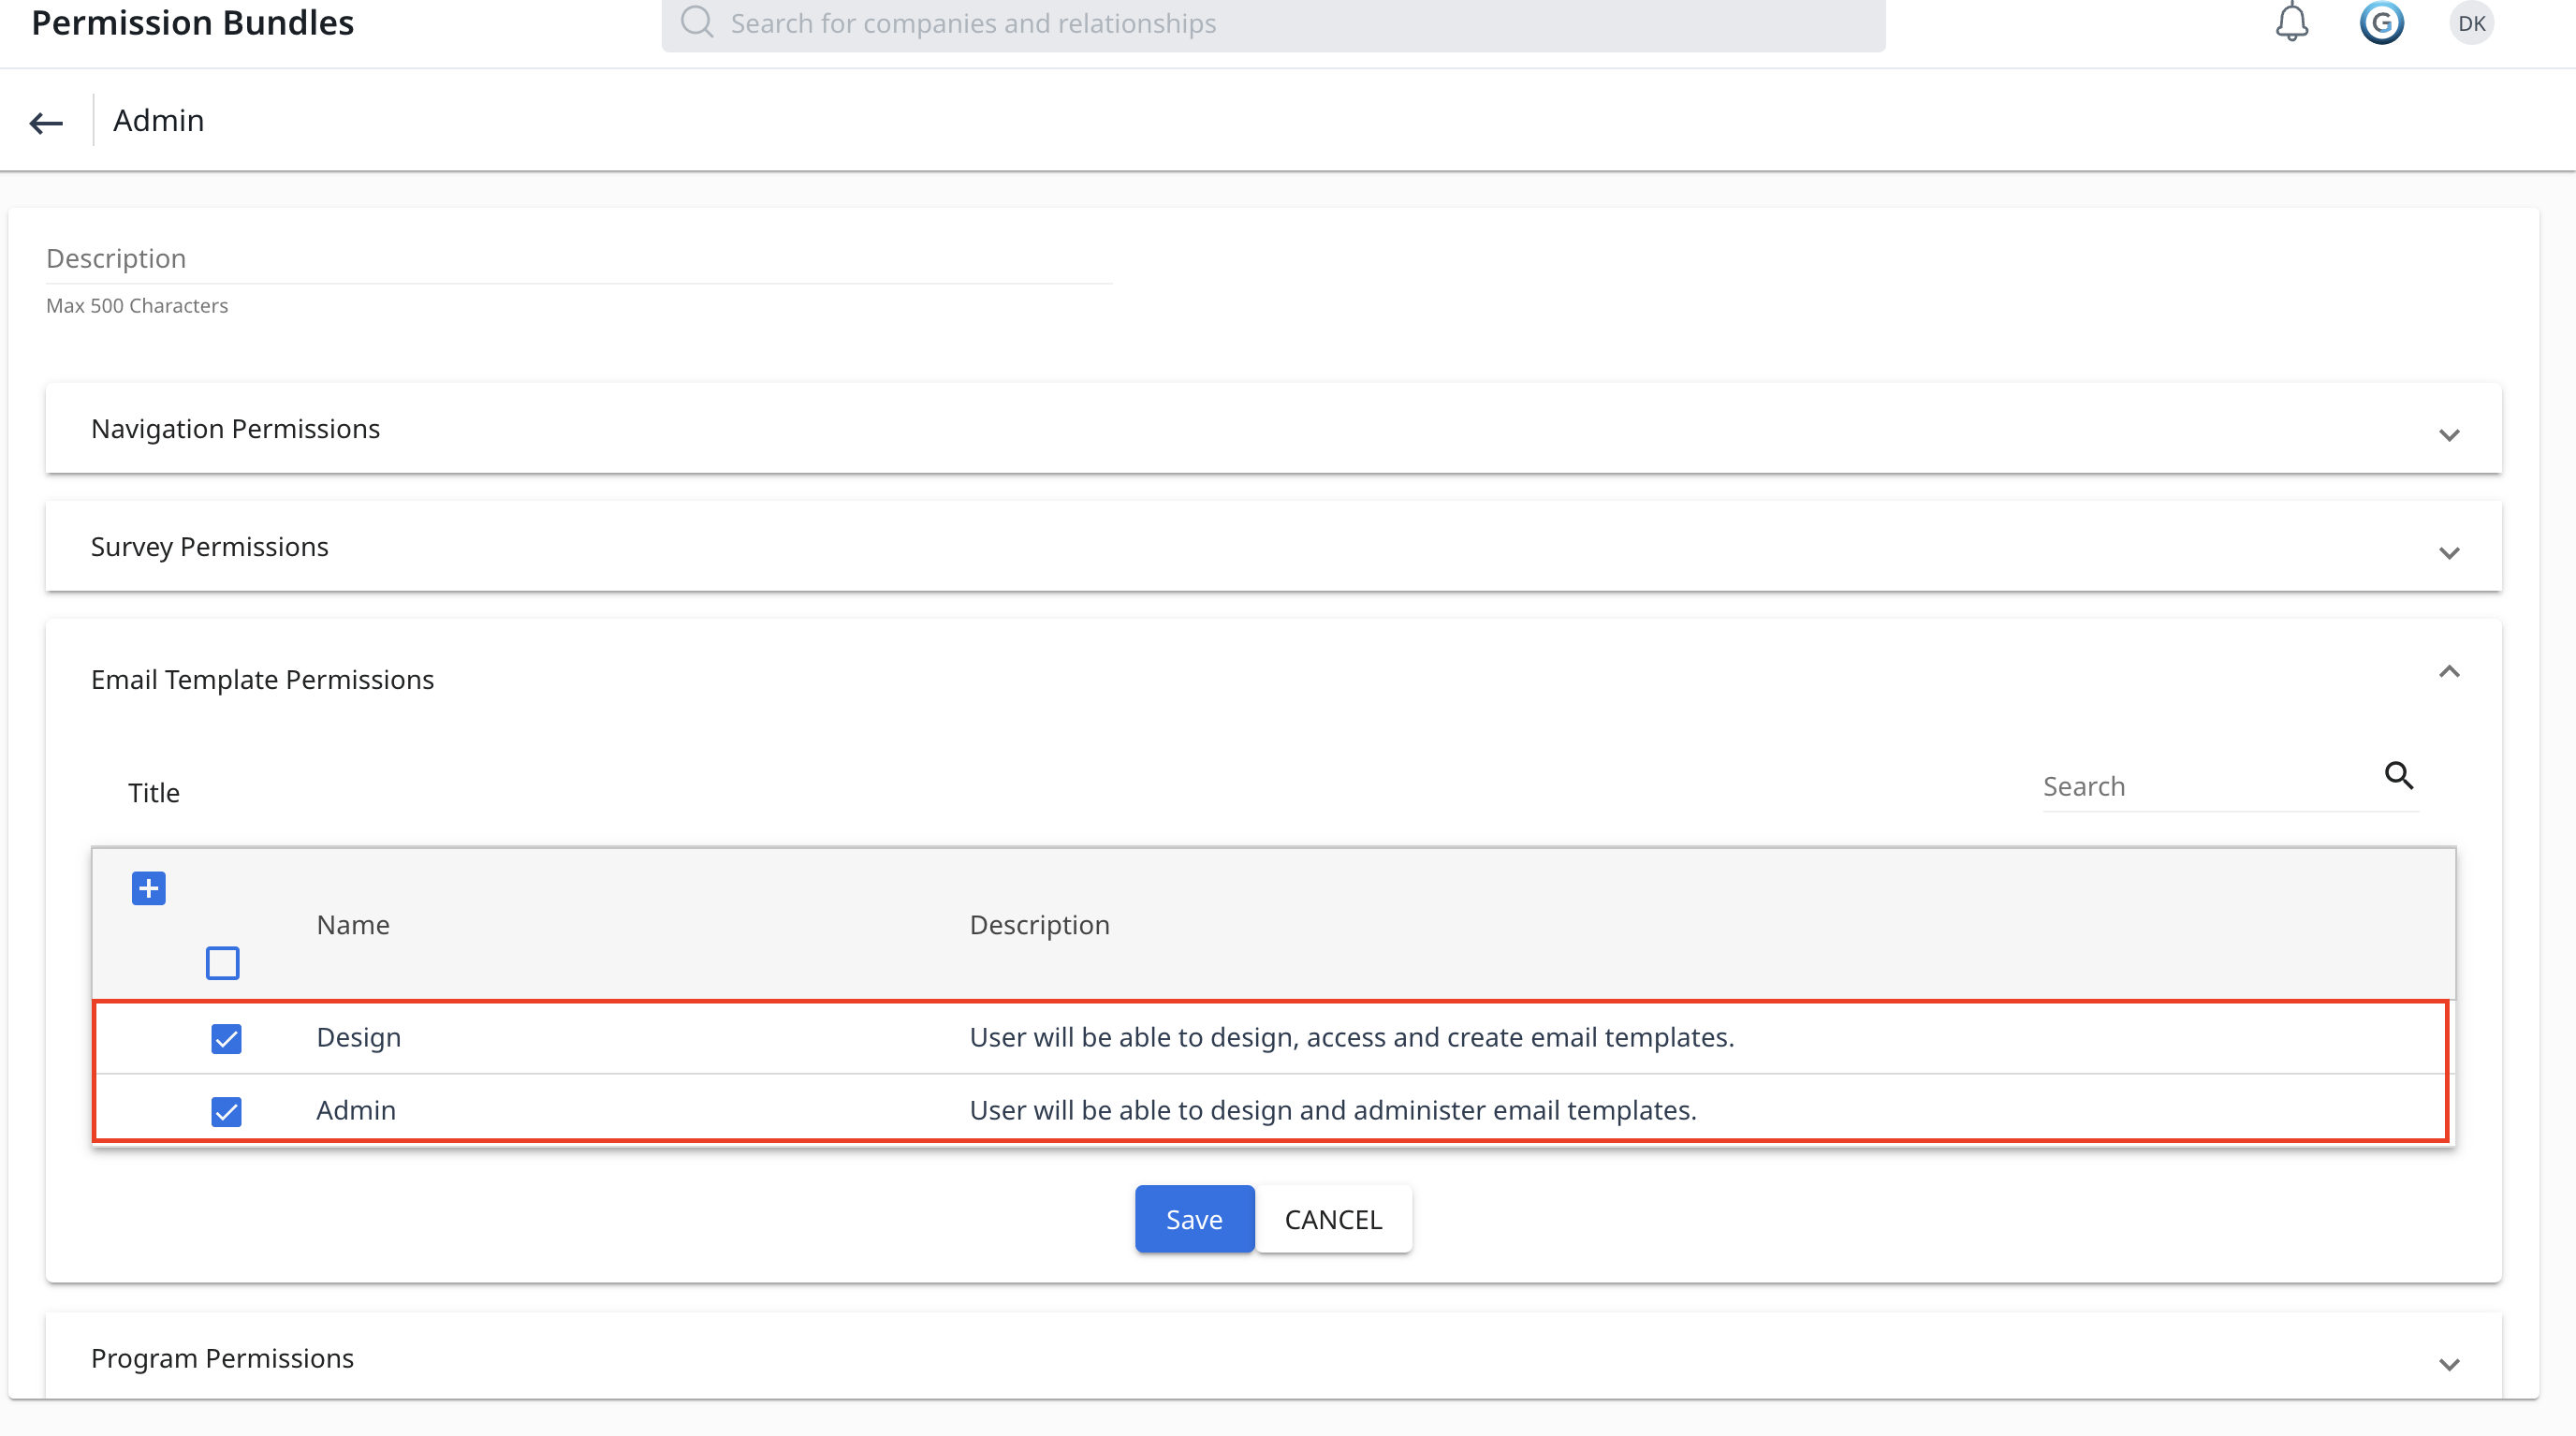
- The Switch to old experience toggle switch is available for existing customers only who are onboarded before August 4, 2023.
- It is a tenant-level toggle switch and available only to users with either Design or Admin permissions for Email Templates.
- Create Folders: You can create folders on the Email Templates page to organize their templates. For more information on Folders, refer to Organize Email Templates using Folders section.
Note: You can move the folders to a particular folder by using a drag and drop.
- Search: Search for existing email templates by entering the email template name.
- Filter: Filter the email templates based on following Fields:
-
Template Type: Select the template type to view the corresponding templates.
- Layout Template: The email template contains a layout link or button.
- Report Template: The email template contains a report placeholder.
- Standard Template: The default email template type.
- Survey Template: The email template contains a survey link, button, or question.
- Templates Without Plain Text: The email template that does not contain Plain Text format.
-
Email Type: It can be Operational or Non-operational. For more information on Email Type, refer to the Configure Opt-out section.
- Modified On: Filter the list to show only the templates modified on the date or duration that you select from the drop-down option.
- Modified By: Filter the list to show only the templates modified by the admin name that you select from the drop-down option.
- No. of Versions: Filter the list to show only the templates of a particular version number.
- Template Name: Filter the list by the email template name.
- Created by: Filter the list to show only the templates created by the user that you select from the drop-down option.
- Created On: Filter the list to show only the templates created on the date or duration that you select from the drop-down option.
- Available In: Filter the list to show the templates available in the selected feature area.
-
New Template: Click the New Template to begin creating a new Email Template. For more information on creating templates, refer to the Create Email Template section.
- Favorite: Select the star icon to mark the email template as favorite.
- Used In: You can view the feature area the email templates are used in. To view the list of dependencies of a particular email template: In the Used In column of the Email templates list panel, click on the number adjacent to a particular email template. The Dependencies screen of the selected email template appears. You can view a list of all the Email Templates that are used in Programs.
Note: From the Search field, you can search a required Email Template.

-
Available In: Click the Plus icon and choose the feature areas where you want this template to be visible.
Note: The greyed-out feature area indicates that the template contains elements not supported in that specific feature area. Additionally, for multi-version templates, if a non-supported element is present in any version, the feature area will be greyed out for all versions in the template.
For more information on which elements are supported in various feature area, refer to the Supported Elements List in Feature Area section.
- Preview: Enables you to preview the Email Templates.
- Three-Vertical Dots: You can access the following options by clicking on it:
- Edit: To open the Journey Orchestrator Email Builder and make changes to the template.
- Clone: To create a clone or copy of the existing template.
- Delete: To delete an existing template.
Create Email Template
When you select to edit or create an email template, the email designer page opens automatically. On the designer page, you can enter text into the subject line and email body.
Note: If you copy and paste text from another source, the formatting will be lost.
A new page called New Template is introduced to provide details such as template name & description, selection of template type, opt-out categories & page, layout, and folders.
To create a new email template:
-
Navigate to Journey Orchestrator > Email Templates.
-
Click Create Template dropdown.
-
Select from the following options:
-
Choose a Template: To get started quickly with ready-to-use email templates.
-
Blank Canvas: To get started with the new email template creation.
-
- (For the Templates option) Select the required template.
- In the Template Name field, enter the name of the template.
- (Optional) In the Description field, enter the description for the template.
-
In the Available in field, select the product area where you want this template to be available.
- In the Email Type field, select either Operational or Non-Operational. For more information, refer to the Operational Emails section.
-
Select an Opt-Out Category and Opt-Out Page values, if the Non-Operational option is selected in the Email Type field. For more information, refer to the Opt-Out Settings section.
Note: Opt-Out Category and Opt-Out Page fields are available only when you select non-operational Email Type.
-
From the Folder Selection drop down, select the required folder name to place the template. For more information, refer to the Organize Email Templates using Folders section.

- In Choose a Layout section, select the required type of email template layout.
-
Predefined layouts: These are ready to use layout options available for quick access. Following are the options available in Predefined layouts:
- 1
- 1-3-1
- 1-2-1
Note: Predefined layouts are not fixed layouts, you can add or delete the layout containers as per the requirement in the next step.
- Basic Text Layout: These are customizable blank templates.
- Upload HTML: Select this layout to upload HTML file.
- Click Save.

Design
The Design view enables you to build email templates easily and quickly using drag and drop method.
Notes:
- The Revert icon enables you to revert back to the previously saved version of email template.
- Revert icon is disabled if the Autosave toggle button is turned on.

- The Email Template Builder automatically adjusts the height of the email based on the content, and eliminates excess white space between the email body and footer, regardless of the email content's height.
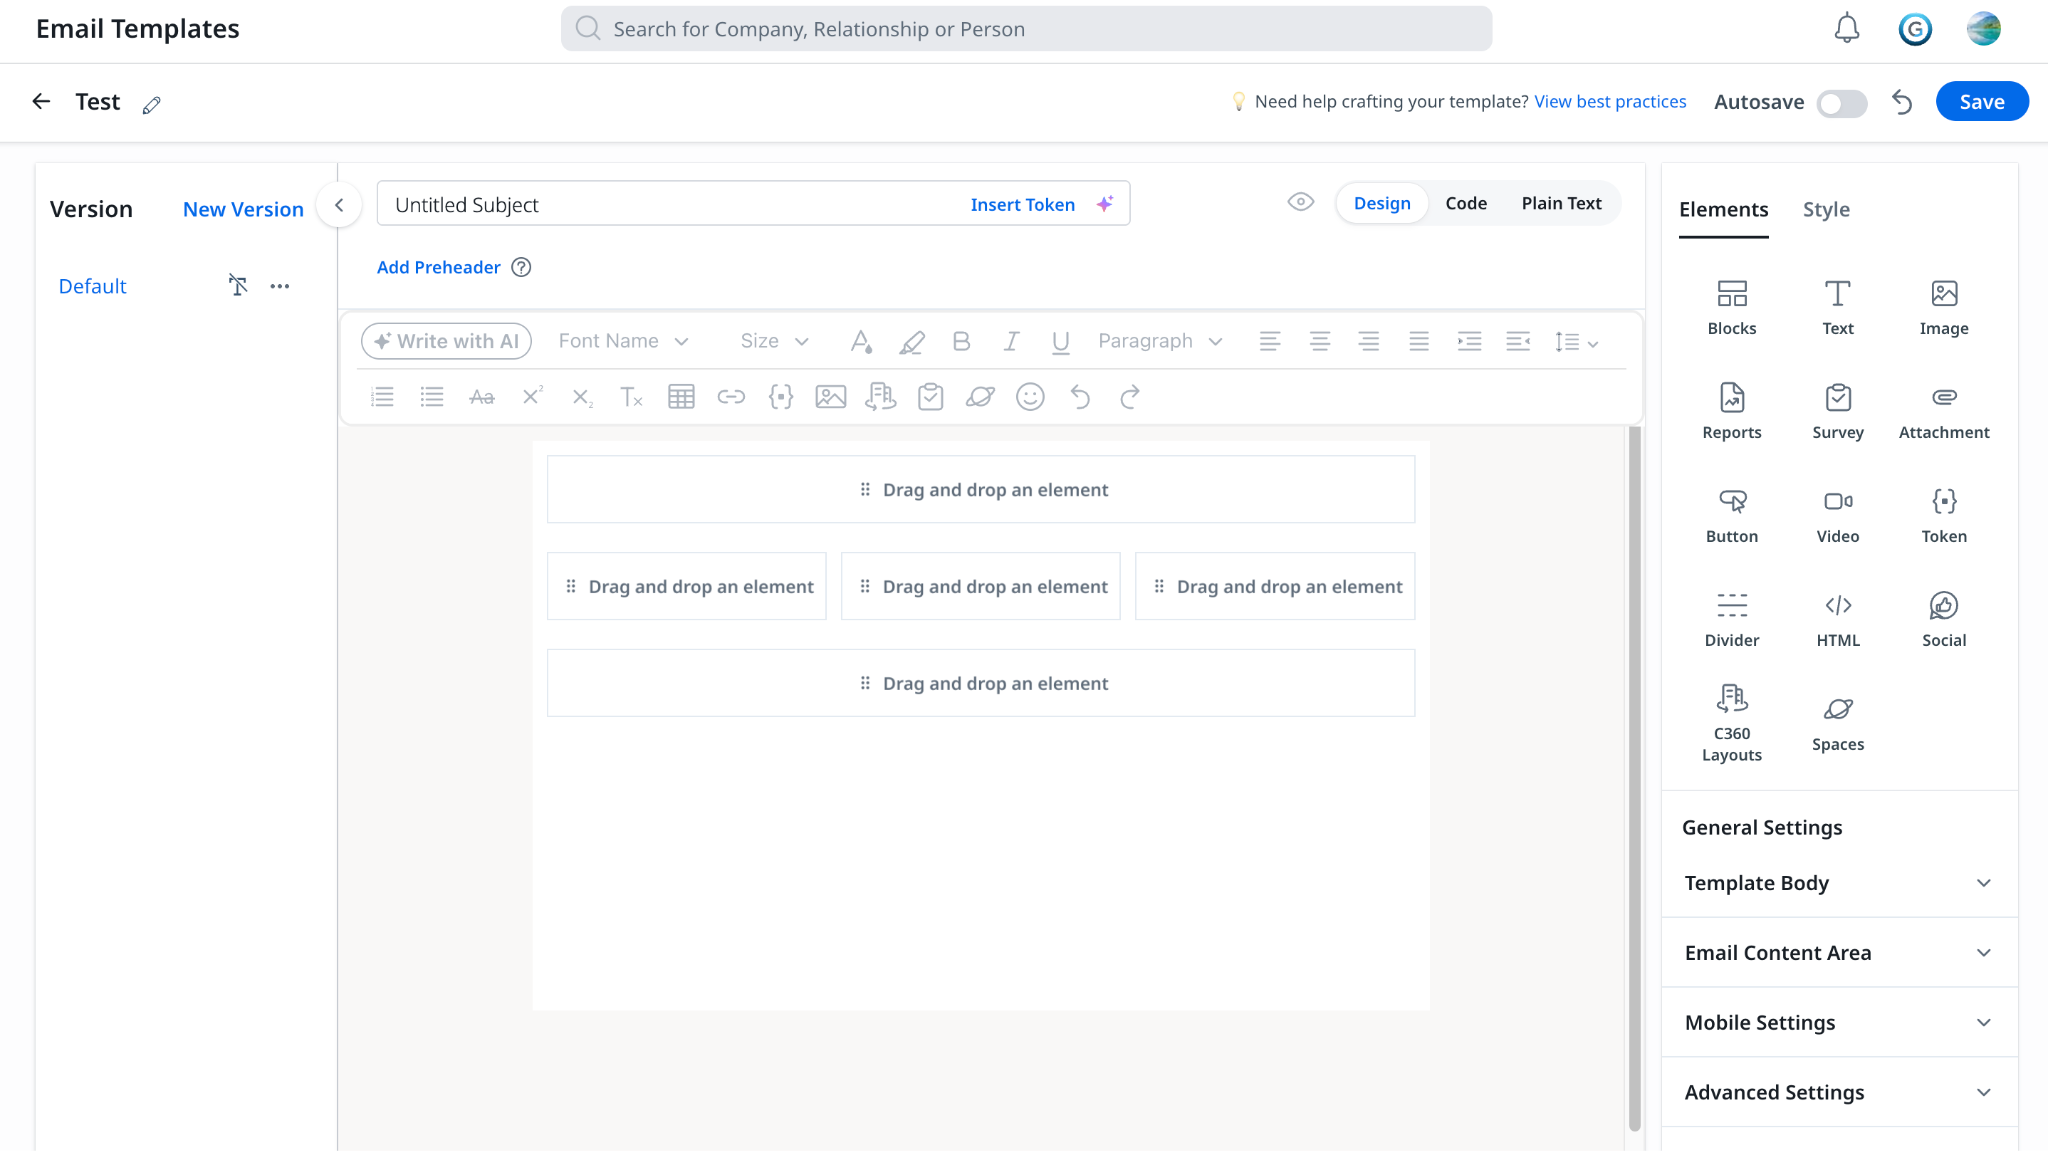
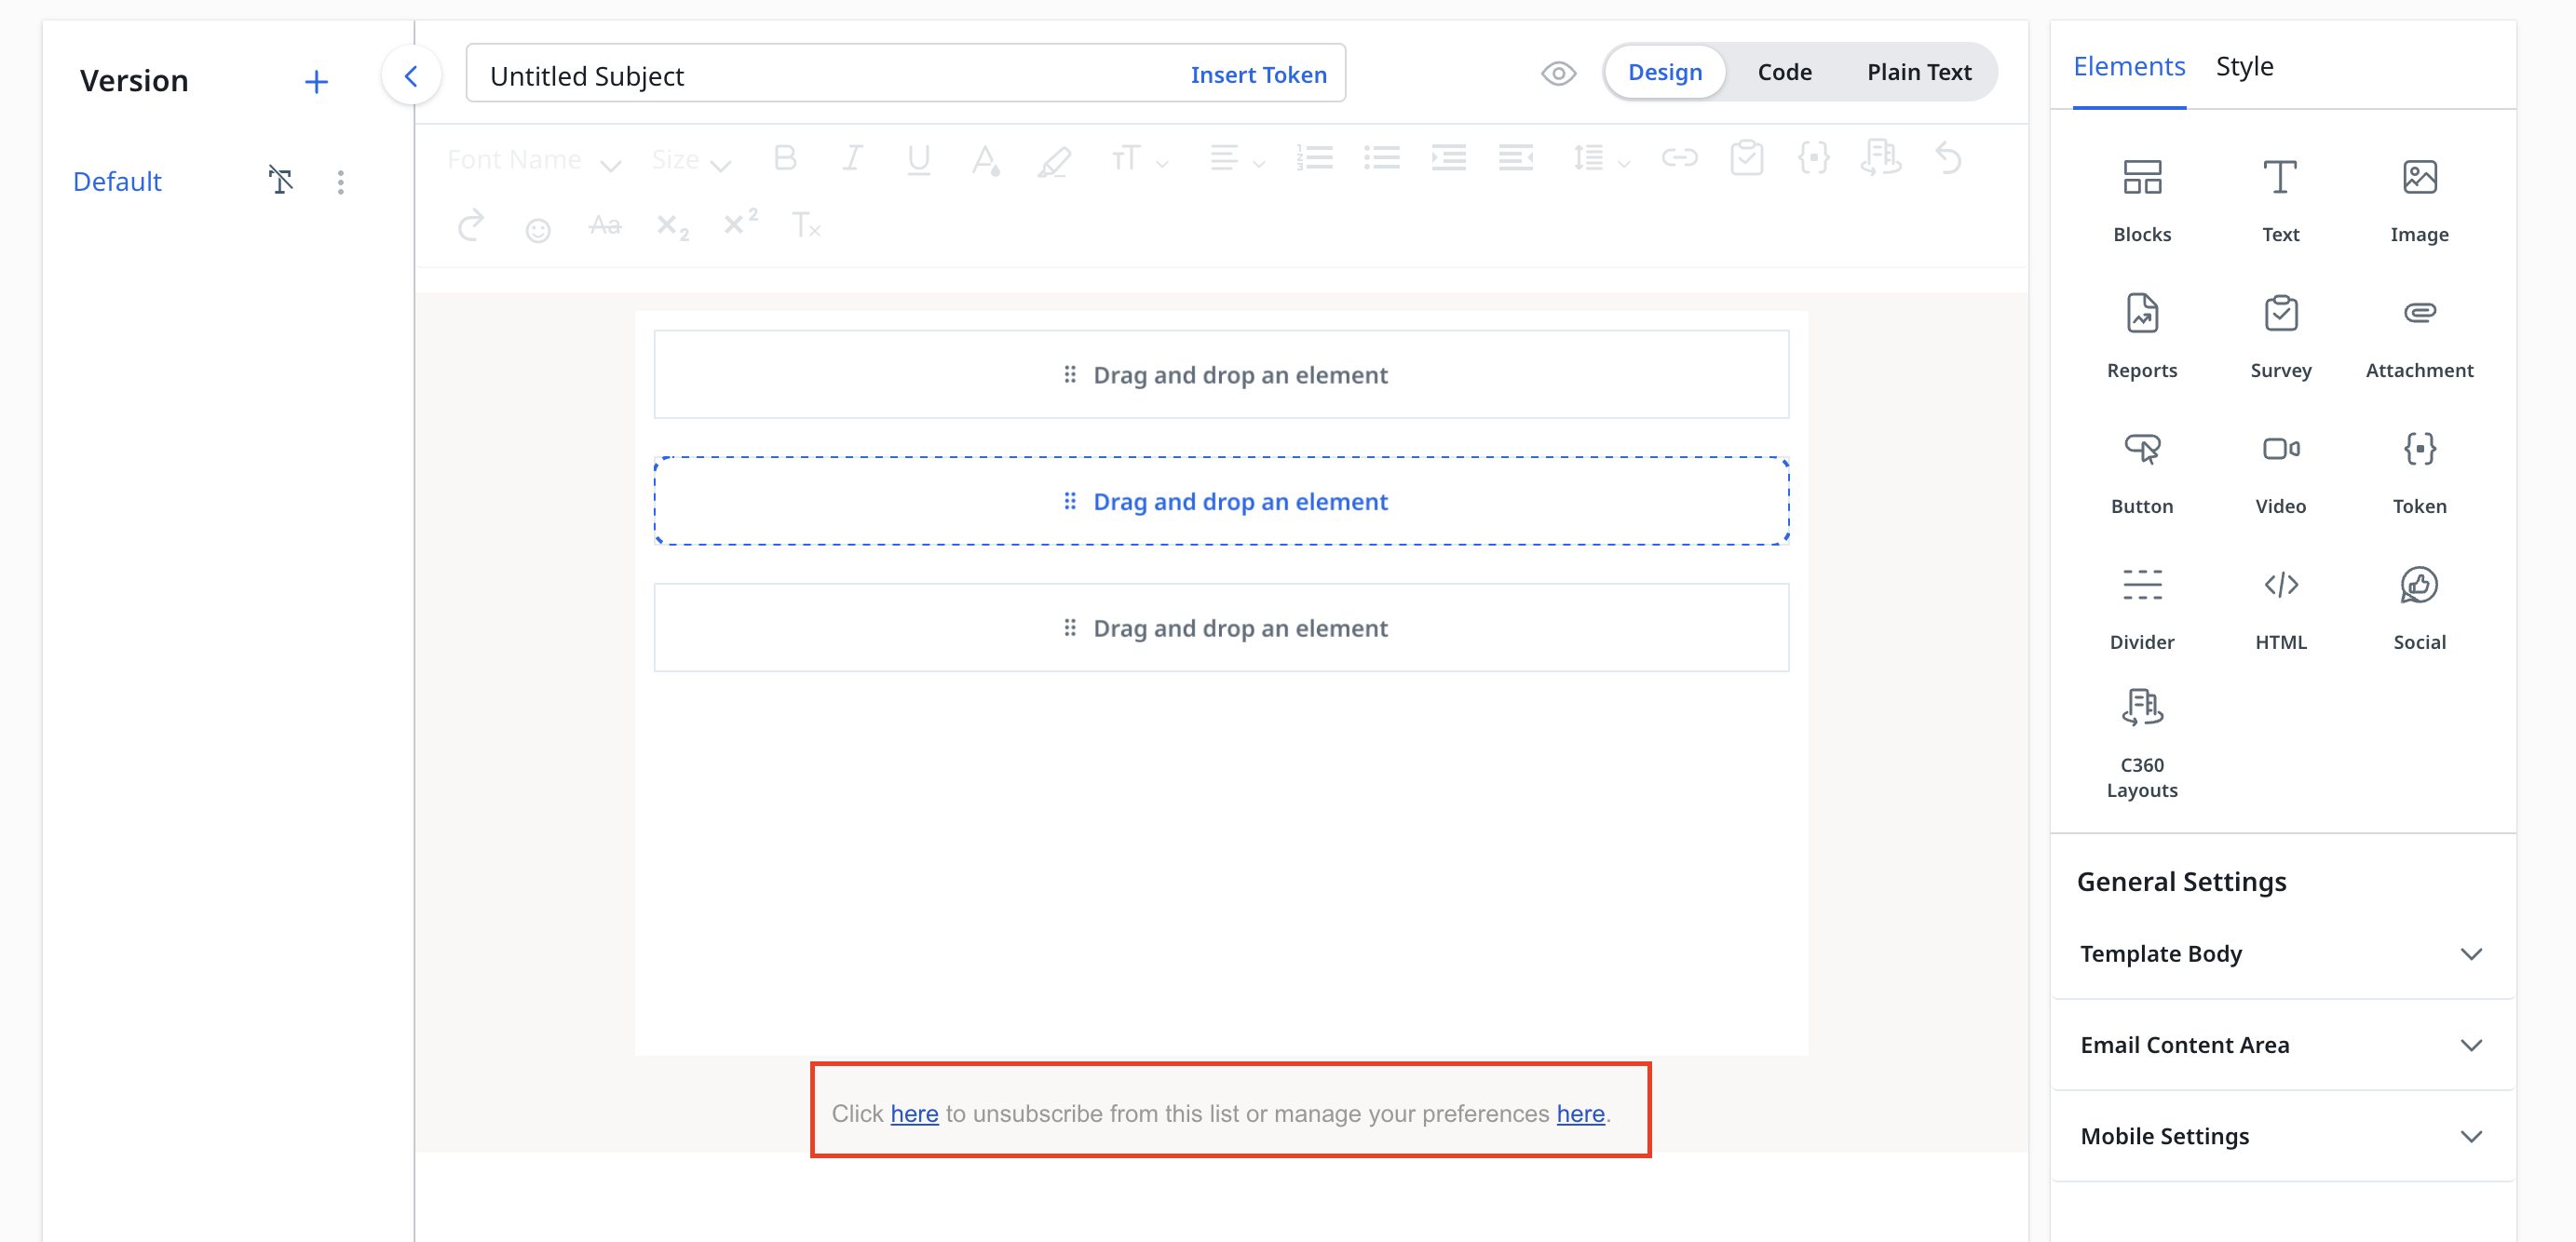
Elements
Drag and drop to add one or more of the following elements into the email template layout:
- Blocks
- Text
- Preheader
- Image
- Table
- Reports
- Survey
- Attachment
- Button
- Video
- Token
- Divider
- HTML
- Socials
- C360 Layout
- Spaces
Work with Elements
- Select the required Element. The element is highlighted and more options appear.
- You can perform following actions:
- Select Parent: To navigate to the element parent, click the Up Arrow icon and select required parent option.
- Move: To move the element to another container or block, click the Move icon.
- Delete: To delete the element, click the Delete icon.
- Edit: To delete the saved details of element, click the Edit icon.
- Style: To apply styles to elements, click the Style tab and apply one or more format options.
Add Blocks
Users can select any container option from the Blocks library when creating email layouts. Each selected block displays a predefined number of Containers. Gainsight has restricted adding additional containers in a block, however you can select from available block-container options or choose to remove containers. This standardizes the email template design process, ensuring consistency, reducing layout errors, and simplifying email creation.
.png?revision=1)
To add blocks and containers in the email template layout:
- Drag and drop the Blocks element to the email template layout.
- Select a container type.
.png?revision=1)
Work with Containers
- Select the required Container. The container is highlighted and more options appear.
- You can perform following actions:
- Select Parent: To navigate to the block present, click the Up Arrow icon and select required parent option.
- Move: To move the entire container and its element to another container or block, click the Move icon.
- Clone: To make a identical copy of container, click the Clone icon.
- Delete: To delete the container, click the Delete icon.
- Style: To apply styles to containers, click the Style tab and apply one or more format options.
Note: The style applied to a container is applied to all the elements in that container.

Add Text
To add texts in the email template layout:
- Drag and drop the Text element to the email template layout.
- Delete the default text ‘Insert your text here’.
- Enter the required text.
- Select the text.
- Select one or more options from the formatting section such as font, increase font size, decrease font size, font color, bold, italic, underline, link, so on.
- (Optional) To apply style to Text:
- Select the text element.
- Click the Style tab.
- Apply one or more format options.

Note
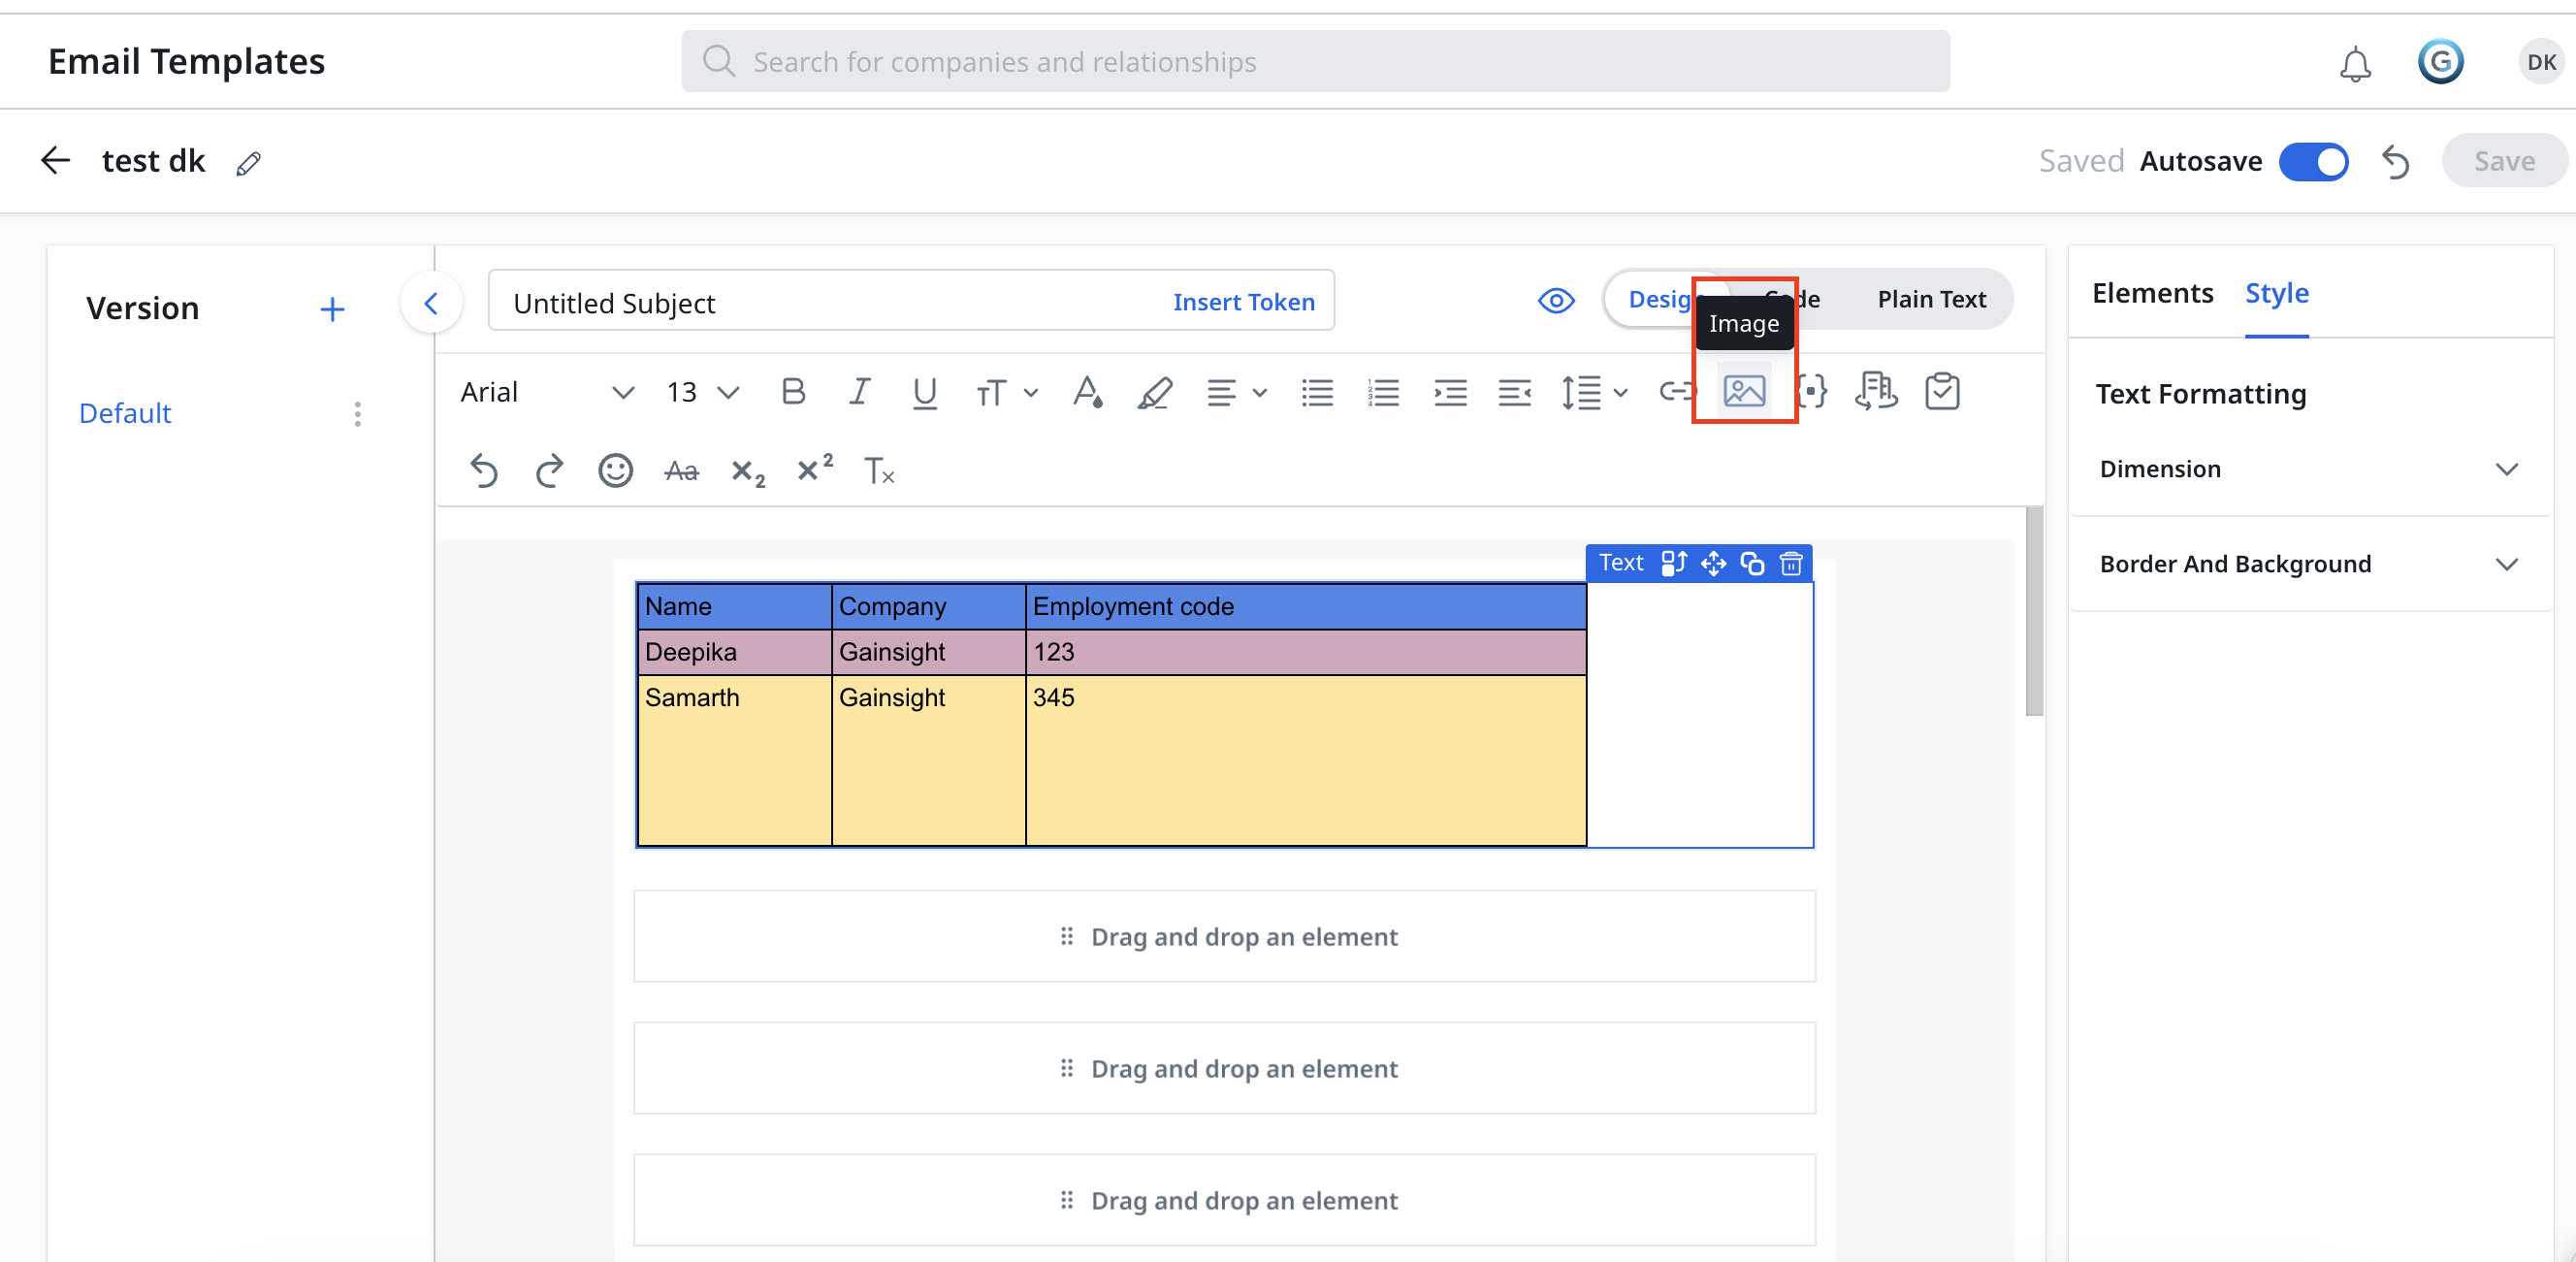
- You can easily paste tables and inline images from various sources, such as Google Sheets or Microsoft Excel, directly into the Text element.
- Furthermore, you can add images in the Text element directly using the Rich Text Editor Toolbar.
- Text alignment is determined at the container level, not for the selected portion. To align a specific portion of text, place it in a separate text element to customize the alignment.
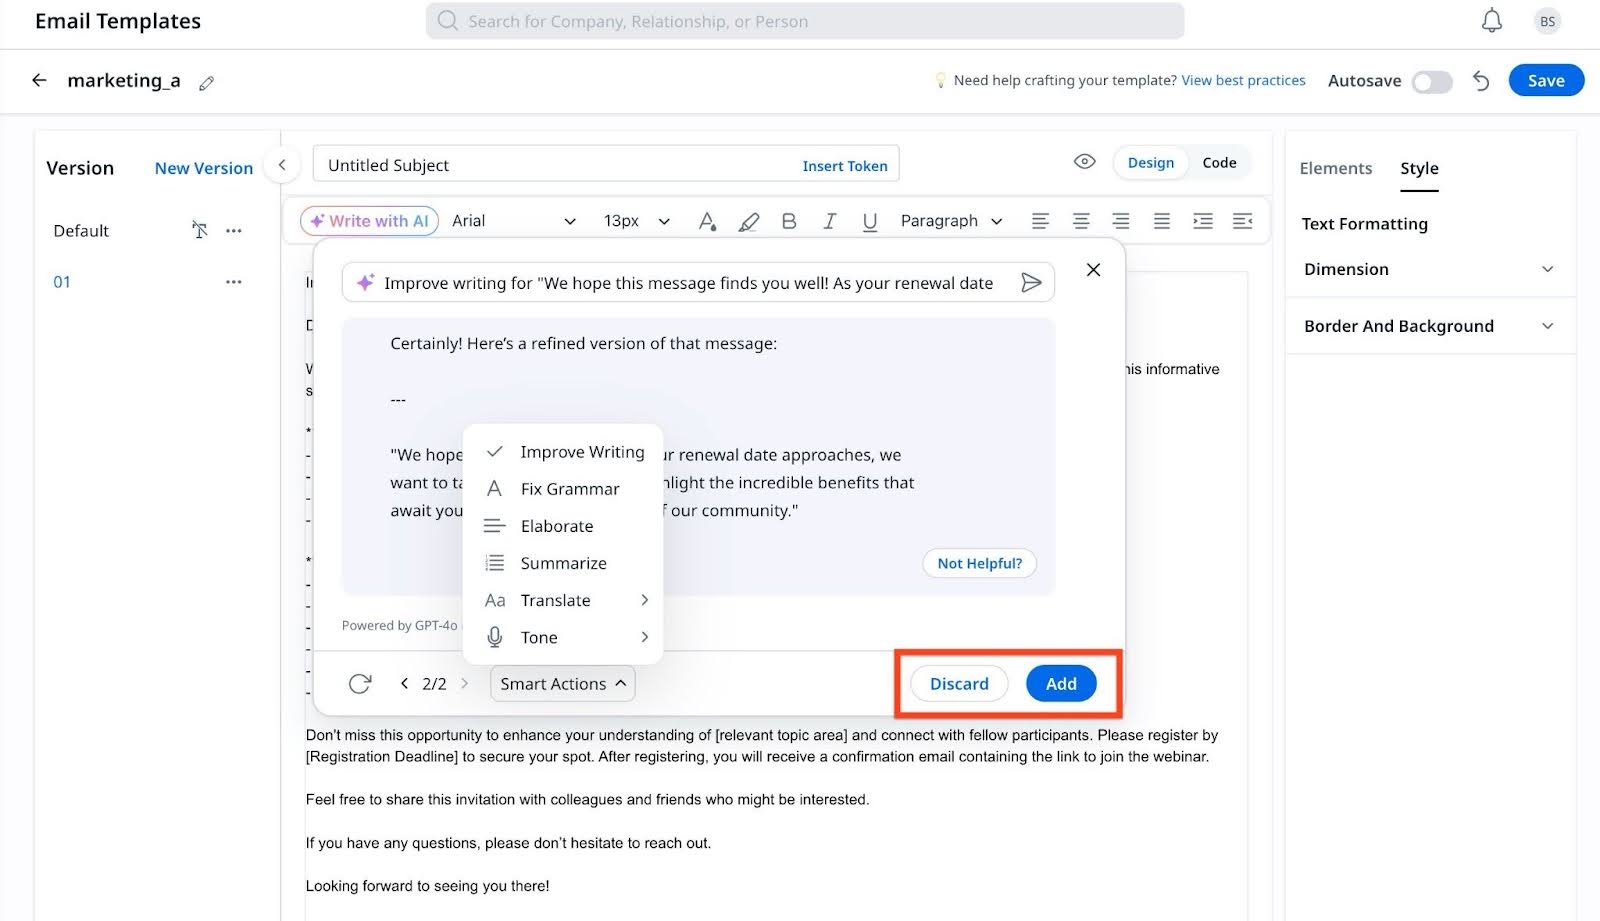
Write with AI
The Write with AI feature helps in drafting email content. It uses AI to automatically generate text for your email templates based on user prompts. It elevates your email experience by leveraging AI to boost efficiency and personalization in your email communications.
To add texts to the email template using AI:
- Drag and drop the Text element to the email template layout.
- Click Write with AI. A list of available prompts appears.
- Select the required prompt. The suggested AI-generated text appears.
- (Optional) Select a different prompt from the dropdown to make further edits to the suggested text.
- (Optional) Click the Regenerate icon to revise the suggested text.
- (Optional) Click Type prompt or Edit to add a different prompt that is not listed. You can type the required prompt directly into the text bar.
- Click Add to insert or substitute the original text with the AI-suggested text.
Note
- Ensure the following key points regarding the use of AI model in Gainsight:
- All responses are generated solely by the AI model and may include inaccuracies or hallucinations. We advise users to exercise discretion and verify all information as needed.
- Gainsight does not apply any additional intelligence or modifications to the responses generated by the GPT model. Our platform simply facilitates the delivery of these AI-generated responses.
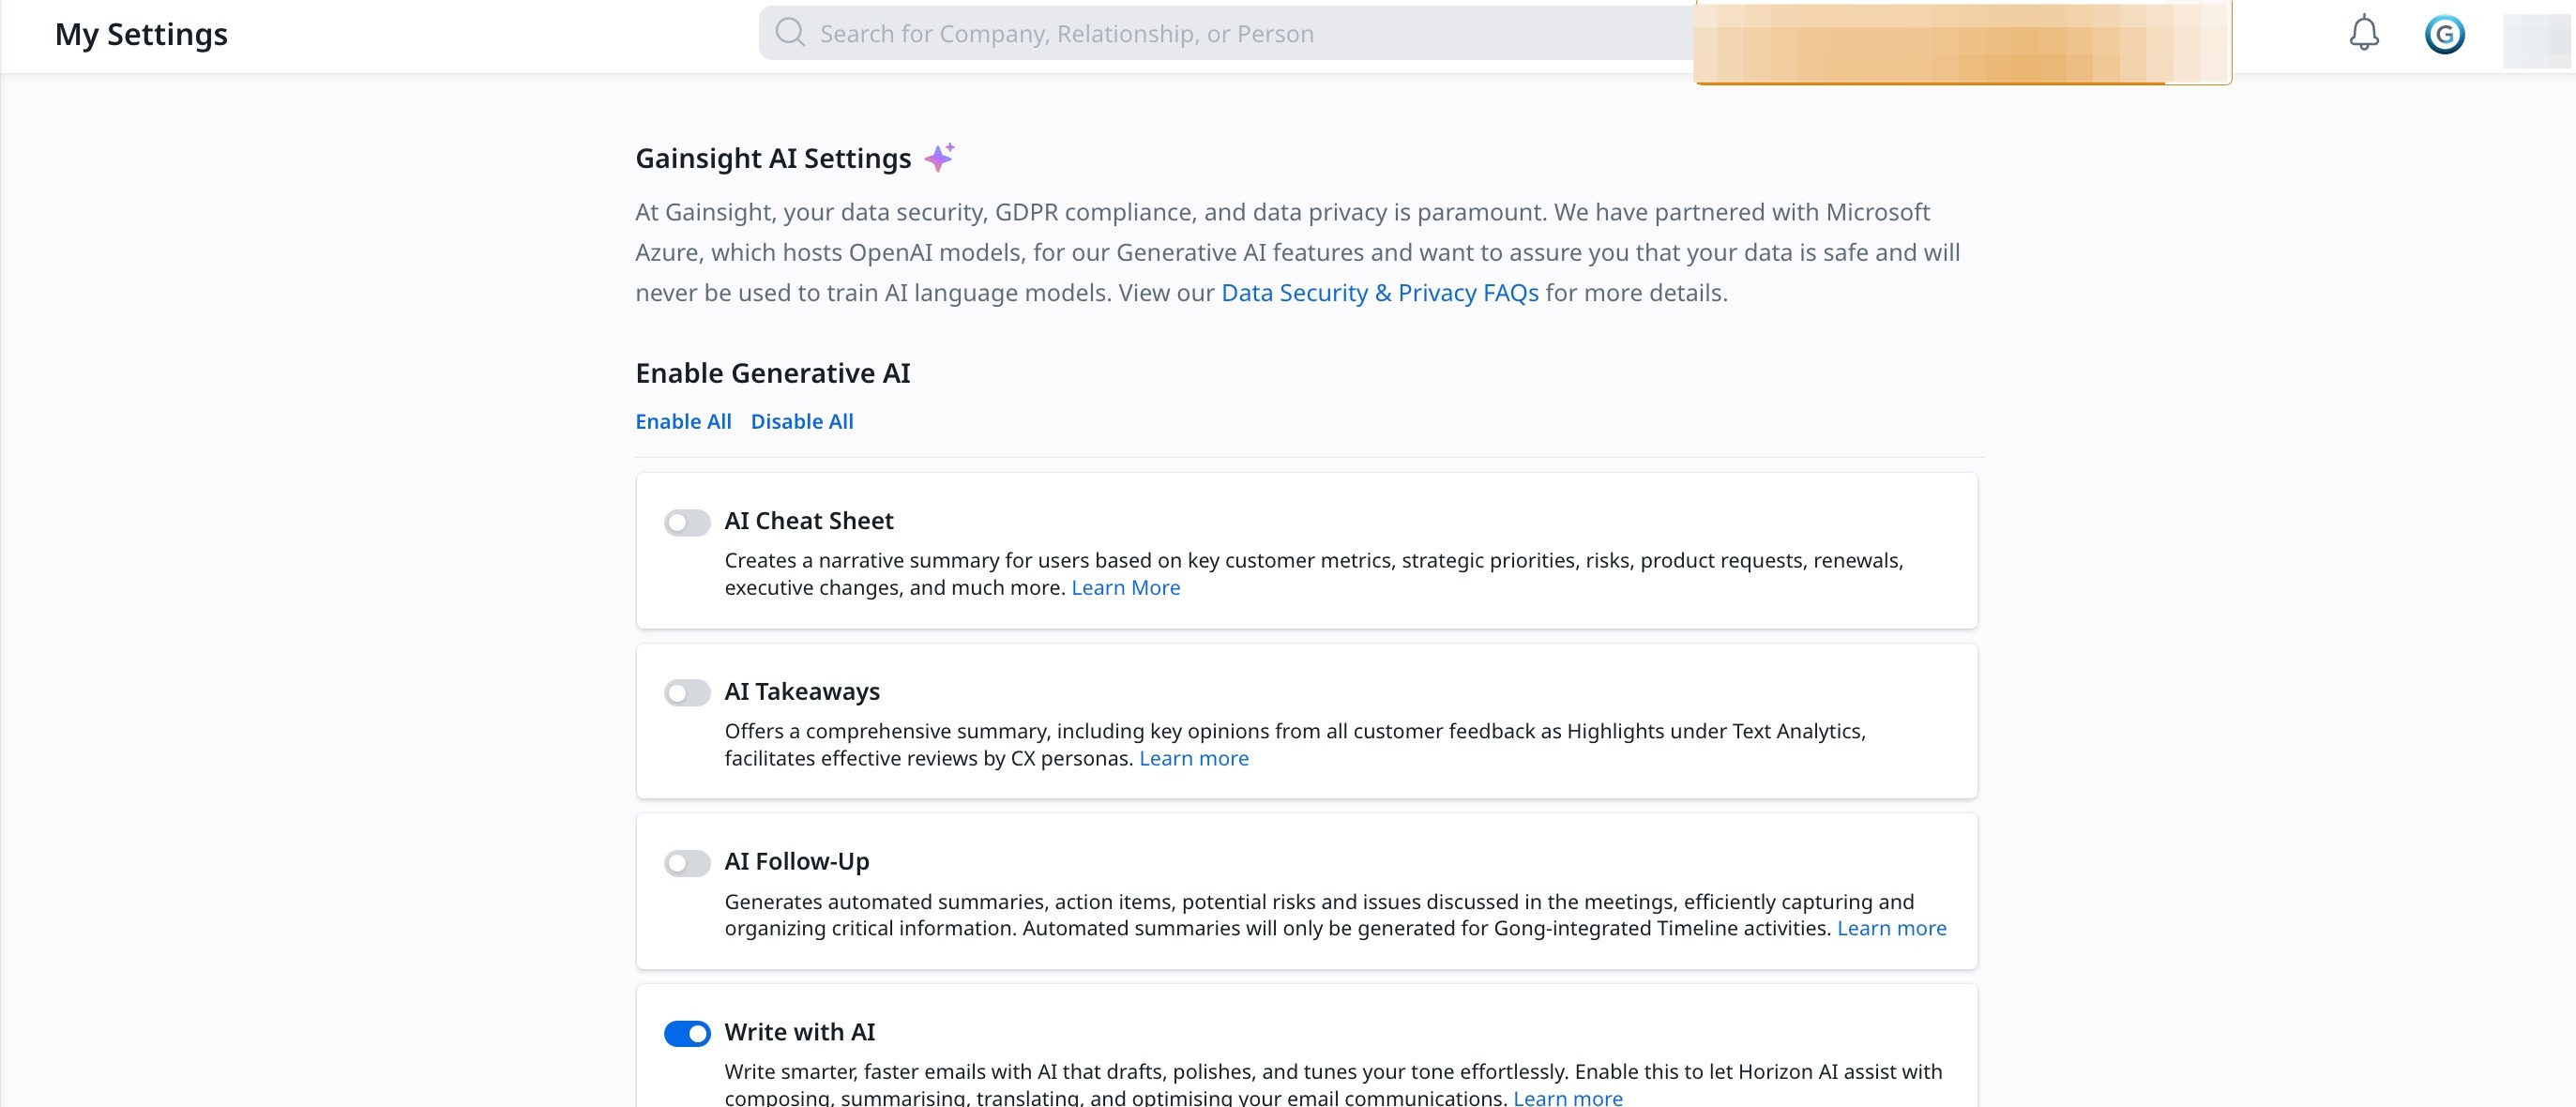
- To enable the Write with AI feature, ensure to Turn ON the toggle switch for Write with AI option from Administration > Gainsight AI > AI Settings.
.jpg?revision=1)
Copy-Paste Guidelines for Email Templates
Gainsight’s Email Template Builder uses an upgraded version of GrapeJS integrated with the TinyMCE rich text editor. This setup provides a stable editing environment and supports smart copy-paste functionality from external tools such as Microsoft Word and Google Docs. It applies to:
- All areas where end users can draft emails, including Email Assist (Send Email in Cockpit, Timeline, P360) and Group Send.
- Email Template Builder, in both the admin editor and the end-user template editor within Group Send.

The Copy-Paste functionality in Email Template gives users greater control over how formatted content is pasted from external sources such as Microsoft Word, Google Docs, or web pages. This helps ensure a cleaner, more consistent appearance of content in Email Template editors while preserving important formatting when needed.
To get started:
- Navigate to Digital Journey > Email Templates.
- To create a template, click New Template. To edit an existing one, select Edit from the three-dots horizontal menu.

- Create or edit your template as per requirement.
Note: If you are pasting a template content, select the appropriate paste formatting option:- Remove Source Formatting: Preserves the structure of the content such as headings, tables, and lists.
- Keep Source Formatting: Retains the original formatting from the source.
Click on each formatting option to explore more.

Remove Source Formatting
The Remove Source Formatting mode (also referred to as Clean Mode) removes unnecessary inline styles, classes, and proprietary tags added by tools such as Microsoft Word or Google Docs. This option produces cleaner, web-safe HTML and ensures consistent display across browsers and devices. This is recommended if you want to ensure a consistent, professional format that follows your organization’s default styling (CSS).
Example
Before Paste:
<p class="MsoNormal" style="margin:0cm; font-size:12pt; font-family:'Calibri',sans-serif; color:#1F497D;">
  <b><i><u>This is a formatted text</u></i></b>
  <span style="color:red; background:yellow;">with inline styles</span>.
</p>
After Paste with PowerPaste:
<p><strong><em><u>This is a formatted text</u></em></strong> with inline styles.</p>
What Happens
Removes:
- Microsoft Word-specific classes such as MsoNormal.
- Inline CSS styles (font family, colors, background, and so on).
Preserves:
- Semantic formatting (for instance, <strong>, <em>, <u>).
- Structural tags (for instance, <div>,<p> and so on).
Keep Source Formatting
The Keep Source Formatting mode retains as much of the original look as possible. It keeps inline styles, colors, fonts, and spacing from the copied content. This is recommended if you want to preserve the visual design or branding of externally created documents.
Example
Before Paste:
<p class="MsoNormal" style="margin:0cm; font-size:12pt; font-family:'Calibri',sans-serif; color:#1F497D;">
  <b><i><u>This is a formatted text</u></i></b>
  <span style="color:red; background:yellow;">with inline styles</span>.
</p>
After Paste with PowerPaste:
<p class="MsoNormal" style="margin:0cm; font-size:12pt; font-family:'Calibri',sans-serif; color:#1F497D;">
  <b><i><u>This is a formatted text</u></i></b>
  <span style="color:red; background:yellow;">with inline styles</span>.
</p>
What Happens
Retains:
- Inline styles such as font, color, and background.
- Formatting tags (<strong>, <em>, <u>).
- Structural tags (<p>, <span>).
Note
- The Paste Formatting Options dialog box appears when you paste text from external sources such as Google Docs or Microsoft Word.
- When pasting within templates, the Paste Formatting Options dialog box may not appear and the system automatically determines the paste behavior. If the popup does not appear, the paste action defaults to the Keep Source Formatting mode.
- Only web-safe fonts are supported during copy-paste operations.
- All existing (older) templates remain compatible and editable in the improved builder. You can open and update your older templates directly in the new editor.
- If you notice any formatting issues or deviations, open the affected template in the improved builder, make the necessary adjustments, and save the changes. Some minor deviations may occur during the first edit:
- If your template includes <font> tags with attributes such as name, size, weight, or color, the new editor automatically converts the HTML to a more semantic, W3C-compliant format. This may cause slight visual changes, which you can manually correct. Once updated, this adjustment does not occur again.
- If bulleted (<ul>) or numbered (<ol>) lists contain invalid child elements such as <div>, similar formatting corrections may occur. We recommend removing and reapplying the list from the toolbar.
- If the Remove Formatting button in the toolbar does not remove any specific formatting, especially in case of older templates, use this workaround:
- Cut the affected content.
- Paste it into a plain text editor (such as Notepad or TextEdit).
- Copy the cleaned text back into the template using the Remove Source Formatting option.
- Reapply the desired styles as needed.
For more information on best practices for creating email templates and best practices for importing email HTML, refer to the Best Practices for Using Email Templates article.
Limitations
While the editor aims to preserve original formatting during copy and paste, certain limitations may occur:
- When using Keep Source Formatting, additional spaces may occasionally appear after pasting formatted content.
- If pasted lists do not render correctly, select the affected content and reapply the numbered or bulleted list formatting using the toolbar.
- In some cases, header tags may not transfer properly when pasting from external sources. To resolve this, remove the formatting using the toolbar, and reapply the appropriate Header style within the editor.
- If a hyperlink appears at the beginning or end of a line, selecting it by dragging with a mouse or trackpad may not work as expected. Use the keyboard arrow keys to navigate instead.
- Text may occasionally overflow in a block or container when viewed in Yahoo Mail or AOL Mail due to the way these clients render email content.
- Blockquote elements are not supported when pasting content into the editor.
- Content copied from predefined templates in Microsoft Word or Google Docs may not render correctly in the editor.

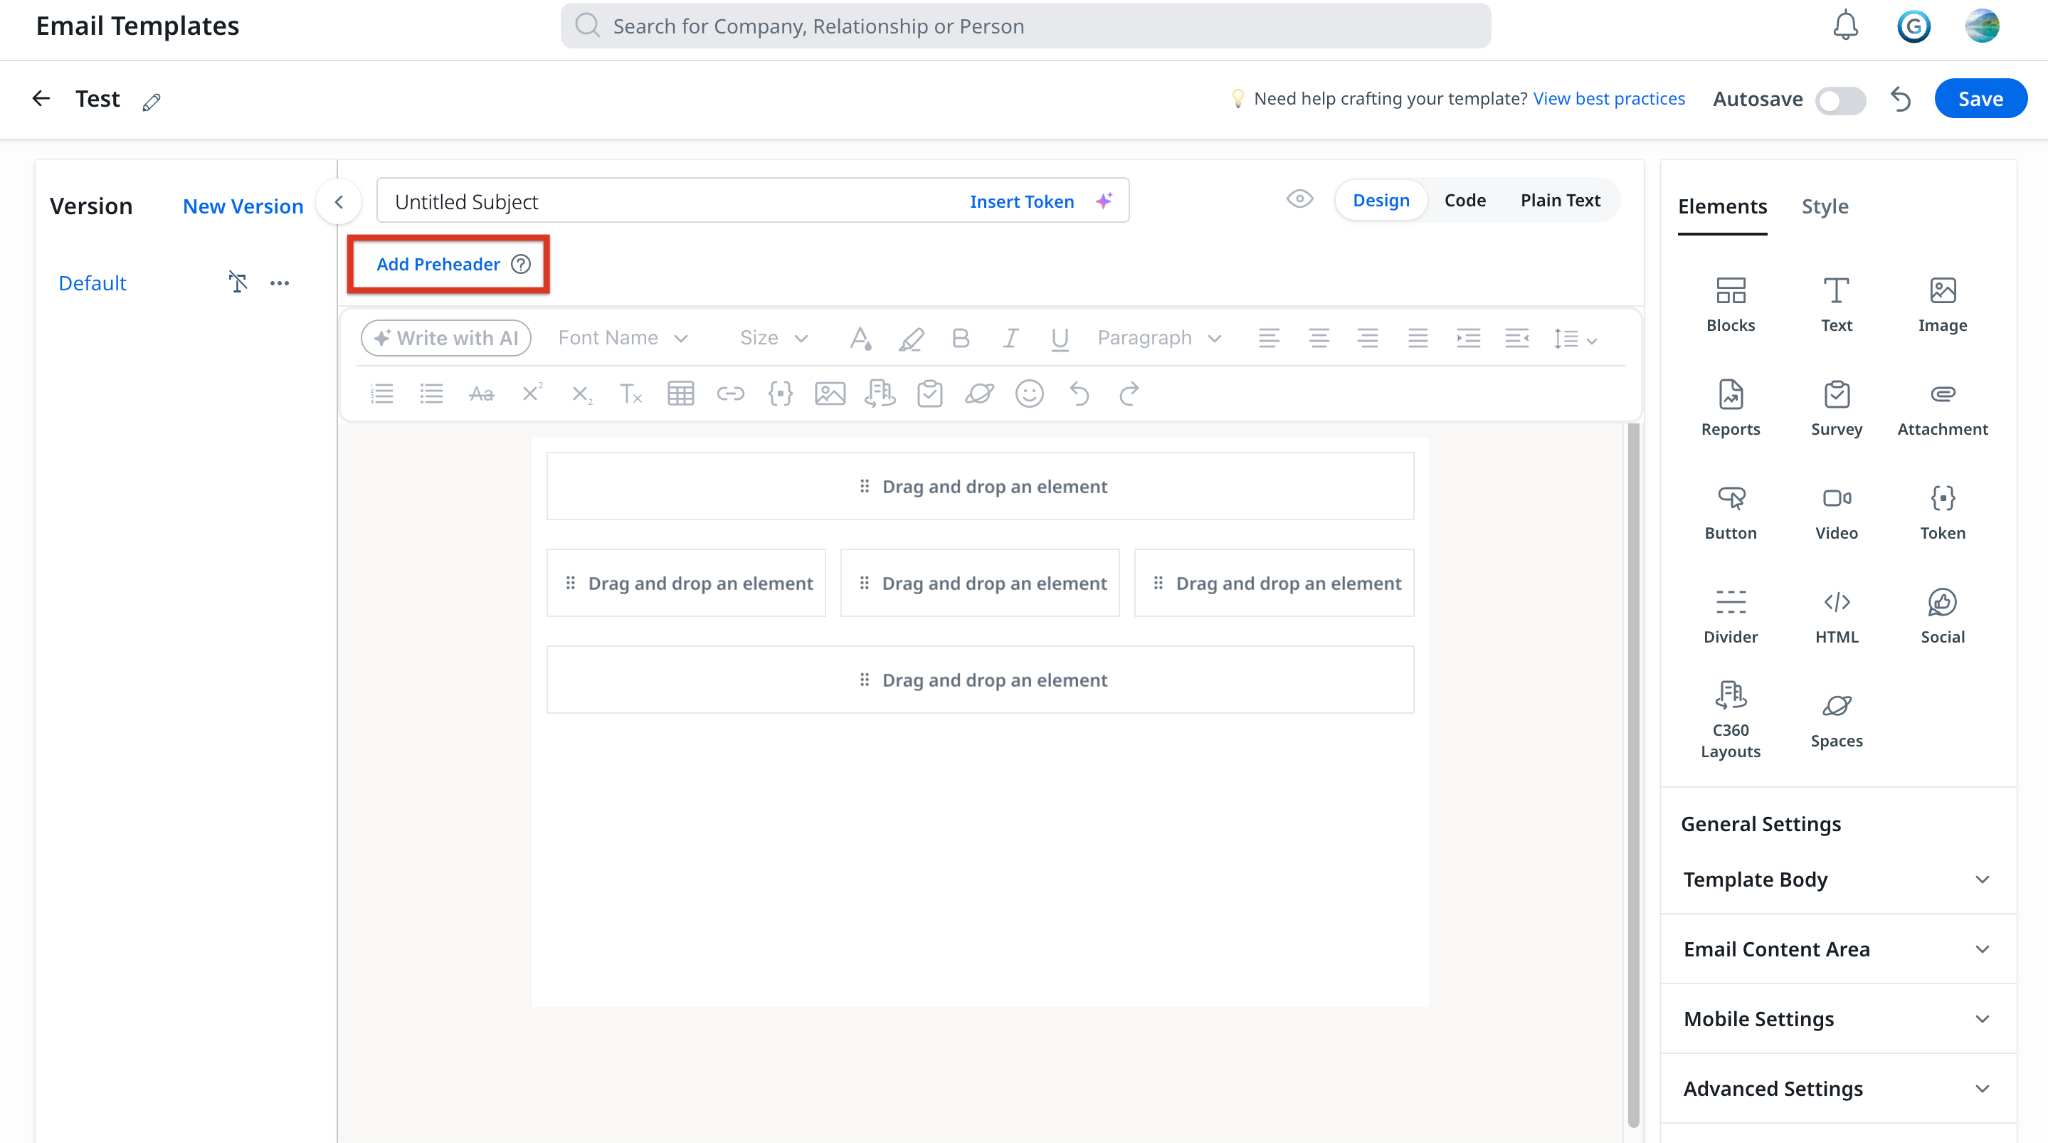
Add Preheader
You can define a Preheader in addition to the email subject. The preheader appears in email clients as preview text, similar to standard marketing emails. The preheader is separate from the email body and is not displayed within the email content.
- If a Preheader is configured in the email template, it is honored.
- If the Preheader is empty but present in the existing template code, it is honored.
- If the Preheader is empty and not present in the existing template code, the first line of the email is used.
To add preheader:
- Click Add Preheader.
.png?revision=1)
- Add a preheader text.
- (Optional) Click Insert Token to add a token.

Define Token Properties. For more information on token properties, refer to the Add Token section. - Click Update.

Generate Subject Lines and Preheaders
You can generate subject lines and preheaders directly inside the Email Template Builder using AI. Instead of writing subject lines manually, AI can help you generate subject lines and preheader texts from the email body content.
To generate AI-powered subject lines and preheaders, complete the following steps:
- Open or create an email template in the Email Template Builder.
- Complete the email body content before generating AI-powered subject lines and preheaders. The AI uses the body to produce relevant suggestions.
- In the Subject field, click the AI Suggestions icon. The AI generates three variations: Conversational, Direct, and Outcome-focused subject lines.
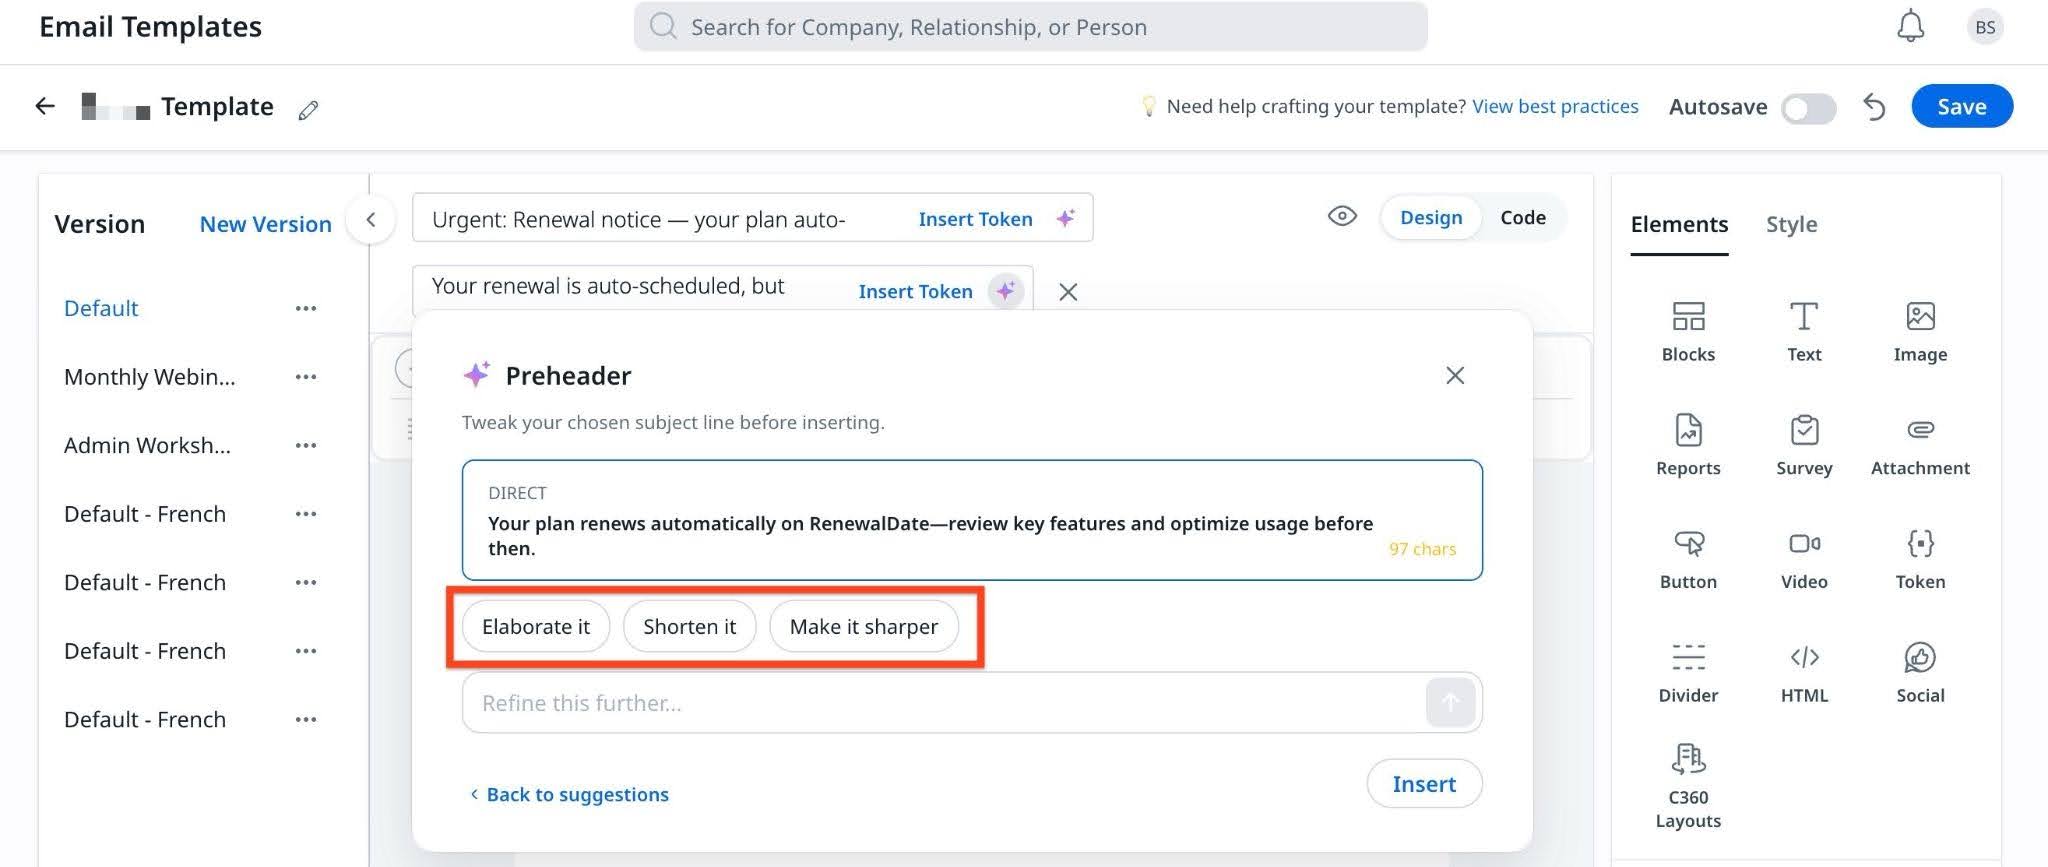
- Review the three labelled variations and select the one that fits your communication goal.
- (Optional) Refine the selected variation using one of the following options:
- Elaborate it: Expands the subject line with more context.
- Shorten it: Reduces the subject line to a more concise form.
- Make it sharper: Adjusts the tone for higher impact.
- Refine this further: Enter free-text guidance to direct the AI toward a specific angle or voice.

- Repeat the same steps in the Preheader field if needed.
- Confirm your selections. Merge tokens in the subject line and preheader are preserved through generation and refinement.
Note
- If generation fails, an inline error message appears. Select Retry to attempt generation again. Your draft content is not affected by a failed generation attempt.
- AI generation requires the email body to contain sufficient content. Subject line generation from an empty or near-empty body may produce generic output.
- Custom instructions are free-text and do not guarantee a specific output format. Review all AI-generated content before sending.
Add Image
To add images in the email template layout:
-
Drag and drop the Image element to the email template layout.
-
To upload image:
-
From Upload tab, click Choose an Image to upload.
-
Select image from the system.
-
-
To add image web address:
- From the Web Address tab, enter image URL.
-
- Add Alternate text for the image.
- (Optional) You can upload images once and reuse them across multiple templates without re-uploading using the Choose from Library option.This is ideal for frequently used assets such as logos, signatures or brand images. To add images in image library:
- Click Choose from Library. The Image Library dialog box appears.

- Click Upload Image to add a new image, or select an existing image from the uploaded list.
- Click Insert.

- Click Choose from Library. The Image Library dialog box appears.
- Click Link.
- Place the cursor in the Insert Token container.
- Enter the redirection link.
- (Optional) Click Add link description for screen readers to read aloud to add a description.

- (Optional) Turn on the Link Tracking toggle button.
Note: Link Tracking enables Gainsight to track the user clicks on the link.
- Click Update.
- (Optional) To apply styles to Image:
-
Select the image element you added.
-
Click the Style tab.
-
Apply one or more options from the Dimension and Decorations sections.
- Image size must be less than or equal to 2MB.
- Image must be in one of the following formats:
- PNG, JPG, JPEG or GIF
Add Table
Tables inserted natively through the toolbar support full table operations, including adding and removing rows and columns.
Tables that are copied and pasted from external sources into the editor do not support table operations.
To add table in email template layout:
- Click Insert Table. The Configure Table dialog box appears.

- Enter the value for Rows and Columns.
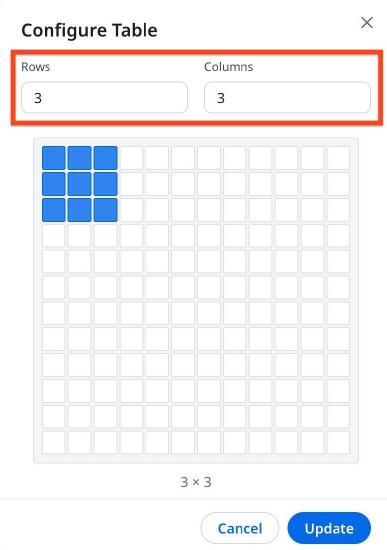
- Click Update.
- Use the available options to customize the table according to your preferred style.

Add Reports
To add reports in the email template layout:
- Drag the Reports element to the email template layout.
- Select one of the following Report Type:
- Inline
- Attachment
-
For Attachment Report Type:
- Select Attachment Report Type option.
- Enter Report Attachment Name.
- Click Update.
- For Inline Report Type:
- Select Inline Report Type option.
- Click Update.
- Double click the report that you add. The Edit Report window appears.
- From the Edit Report dropdown list, select a report.
- Click Edit. The Edit Report window is displayed.
- From the Report dropdown list, select the report to be added.
- (Optional) Click the Add Filter icon to add filters.
Note: Consistent with the previous version, the new widget does not support Filter on Measure.
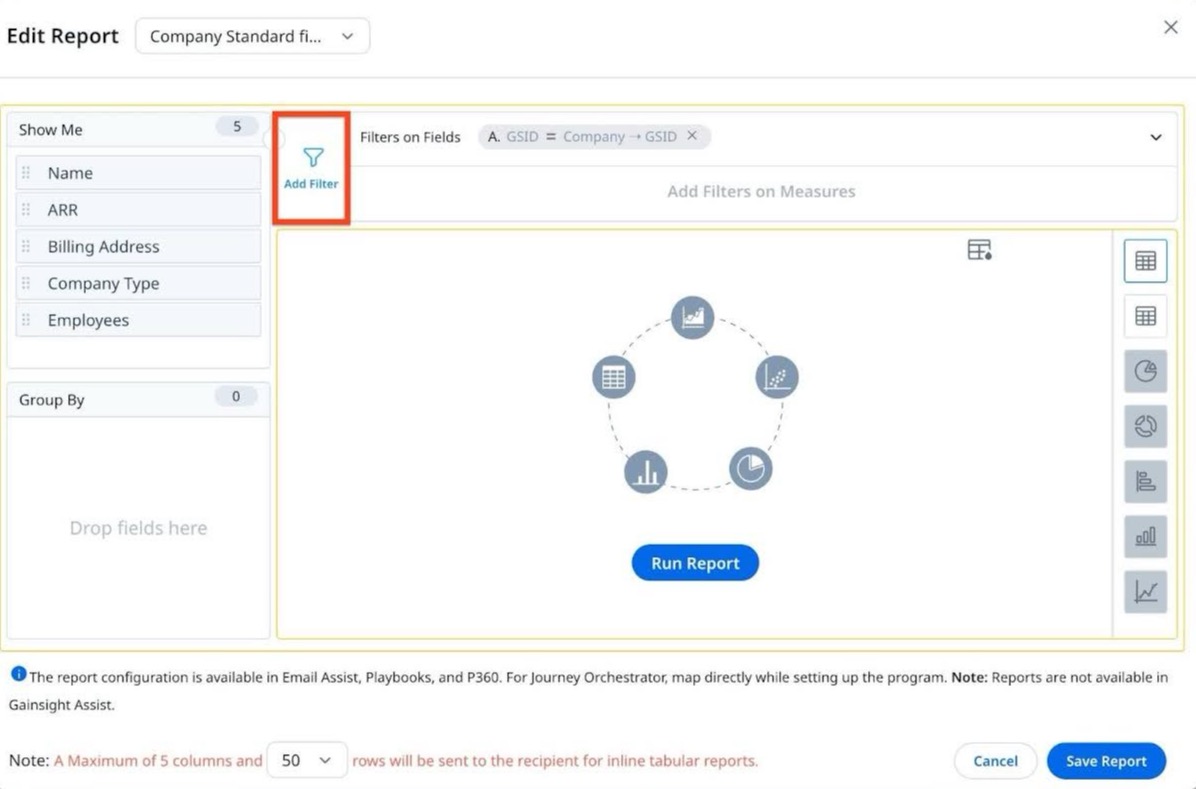
- From the Field dropdown, select a field.
- From the Value dropdown list, select one of the following fields to fetch the data.
- ‘To’ Recipients > Person
- Company > GSID
- Relationship > GSID
- Relationship Type > GSID
- Click Apply.

Note: To ensure accurate mapping when using Add Filter, select the specific field from the lookup dropdown list, not the parent lookup field. Data validation is not applied to SFDC reports, so users must manually ensure that data types match to avoid errors.
- (Optional) Click the Change visualization icon to select the required visualization type of the report.
Note:- CSMs can change the visualization of any report to a Tabular report if required.
- Tabular Report displays a table of only five columns and 20 rows.
- Click Run Report.
- (Optional) Click the Settings icon to select one of the following:

- Grid Options: Use grid options to freeze the first column and wrap text.
- Ranking and Sorting: Use ranking if you want to include Top (ASC) x or Bottom (DESC) x records based on a particular field in the report. For more information on how to use Ranking, refer to the Advanced Report Settings article.
Note: Currently, the configured Row Height for a report is not applied in emails sent from Cockpit, P360, or Journey Orchestrator.

- Click Save Report.
Add Survey
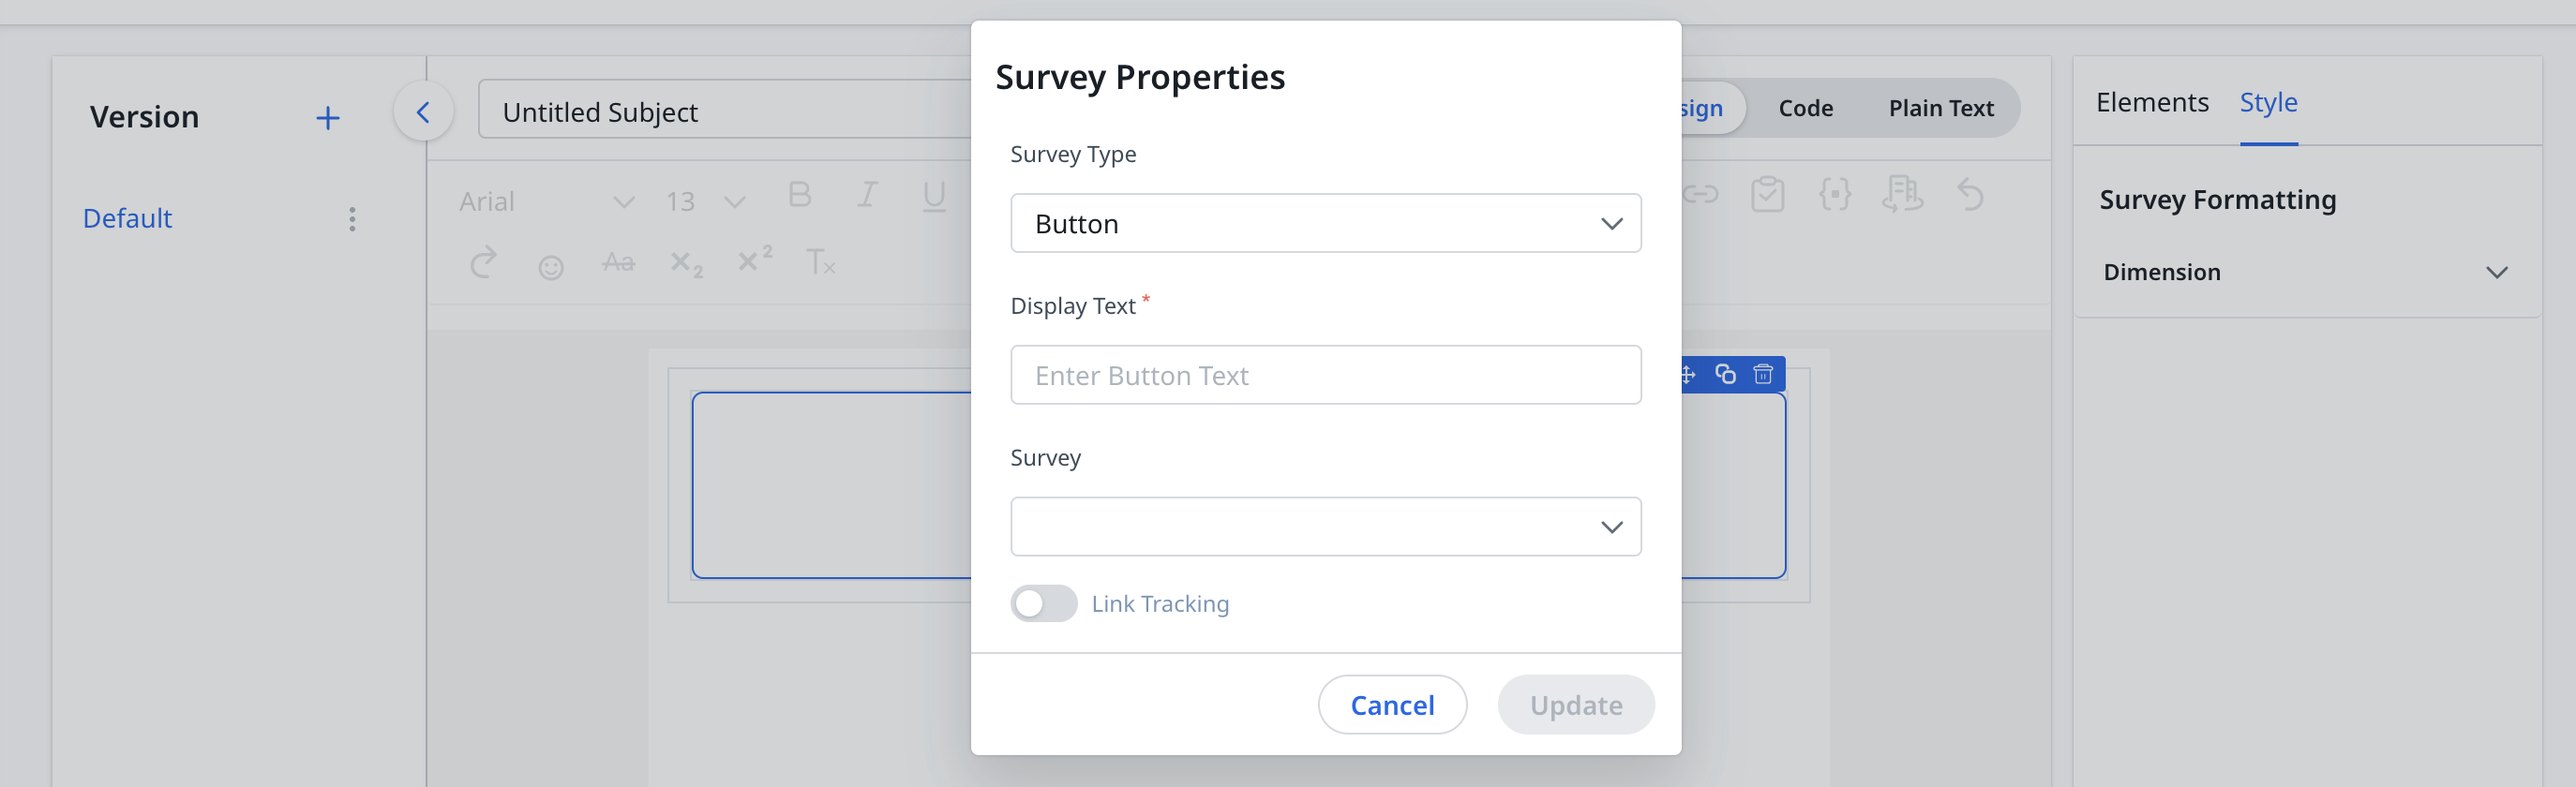
To add survey in the email template layout:
- Drag and drop the Survey element to the email template layout.
- Select one of the following Survey Type.
- Button
- Link
- Question
- For Button or Link Survey Type:
- Enter Display Text.
- From Choose a Survey dropdown, select the required survey.
- (Optional) Turn on Enable Link Tracking toggle button.
- Click Update.
- (Optional) To apply style to the Survey:
- Select the added survey element.
- Click the Style tab.
- Apply one or more format options.
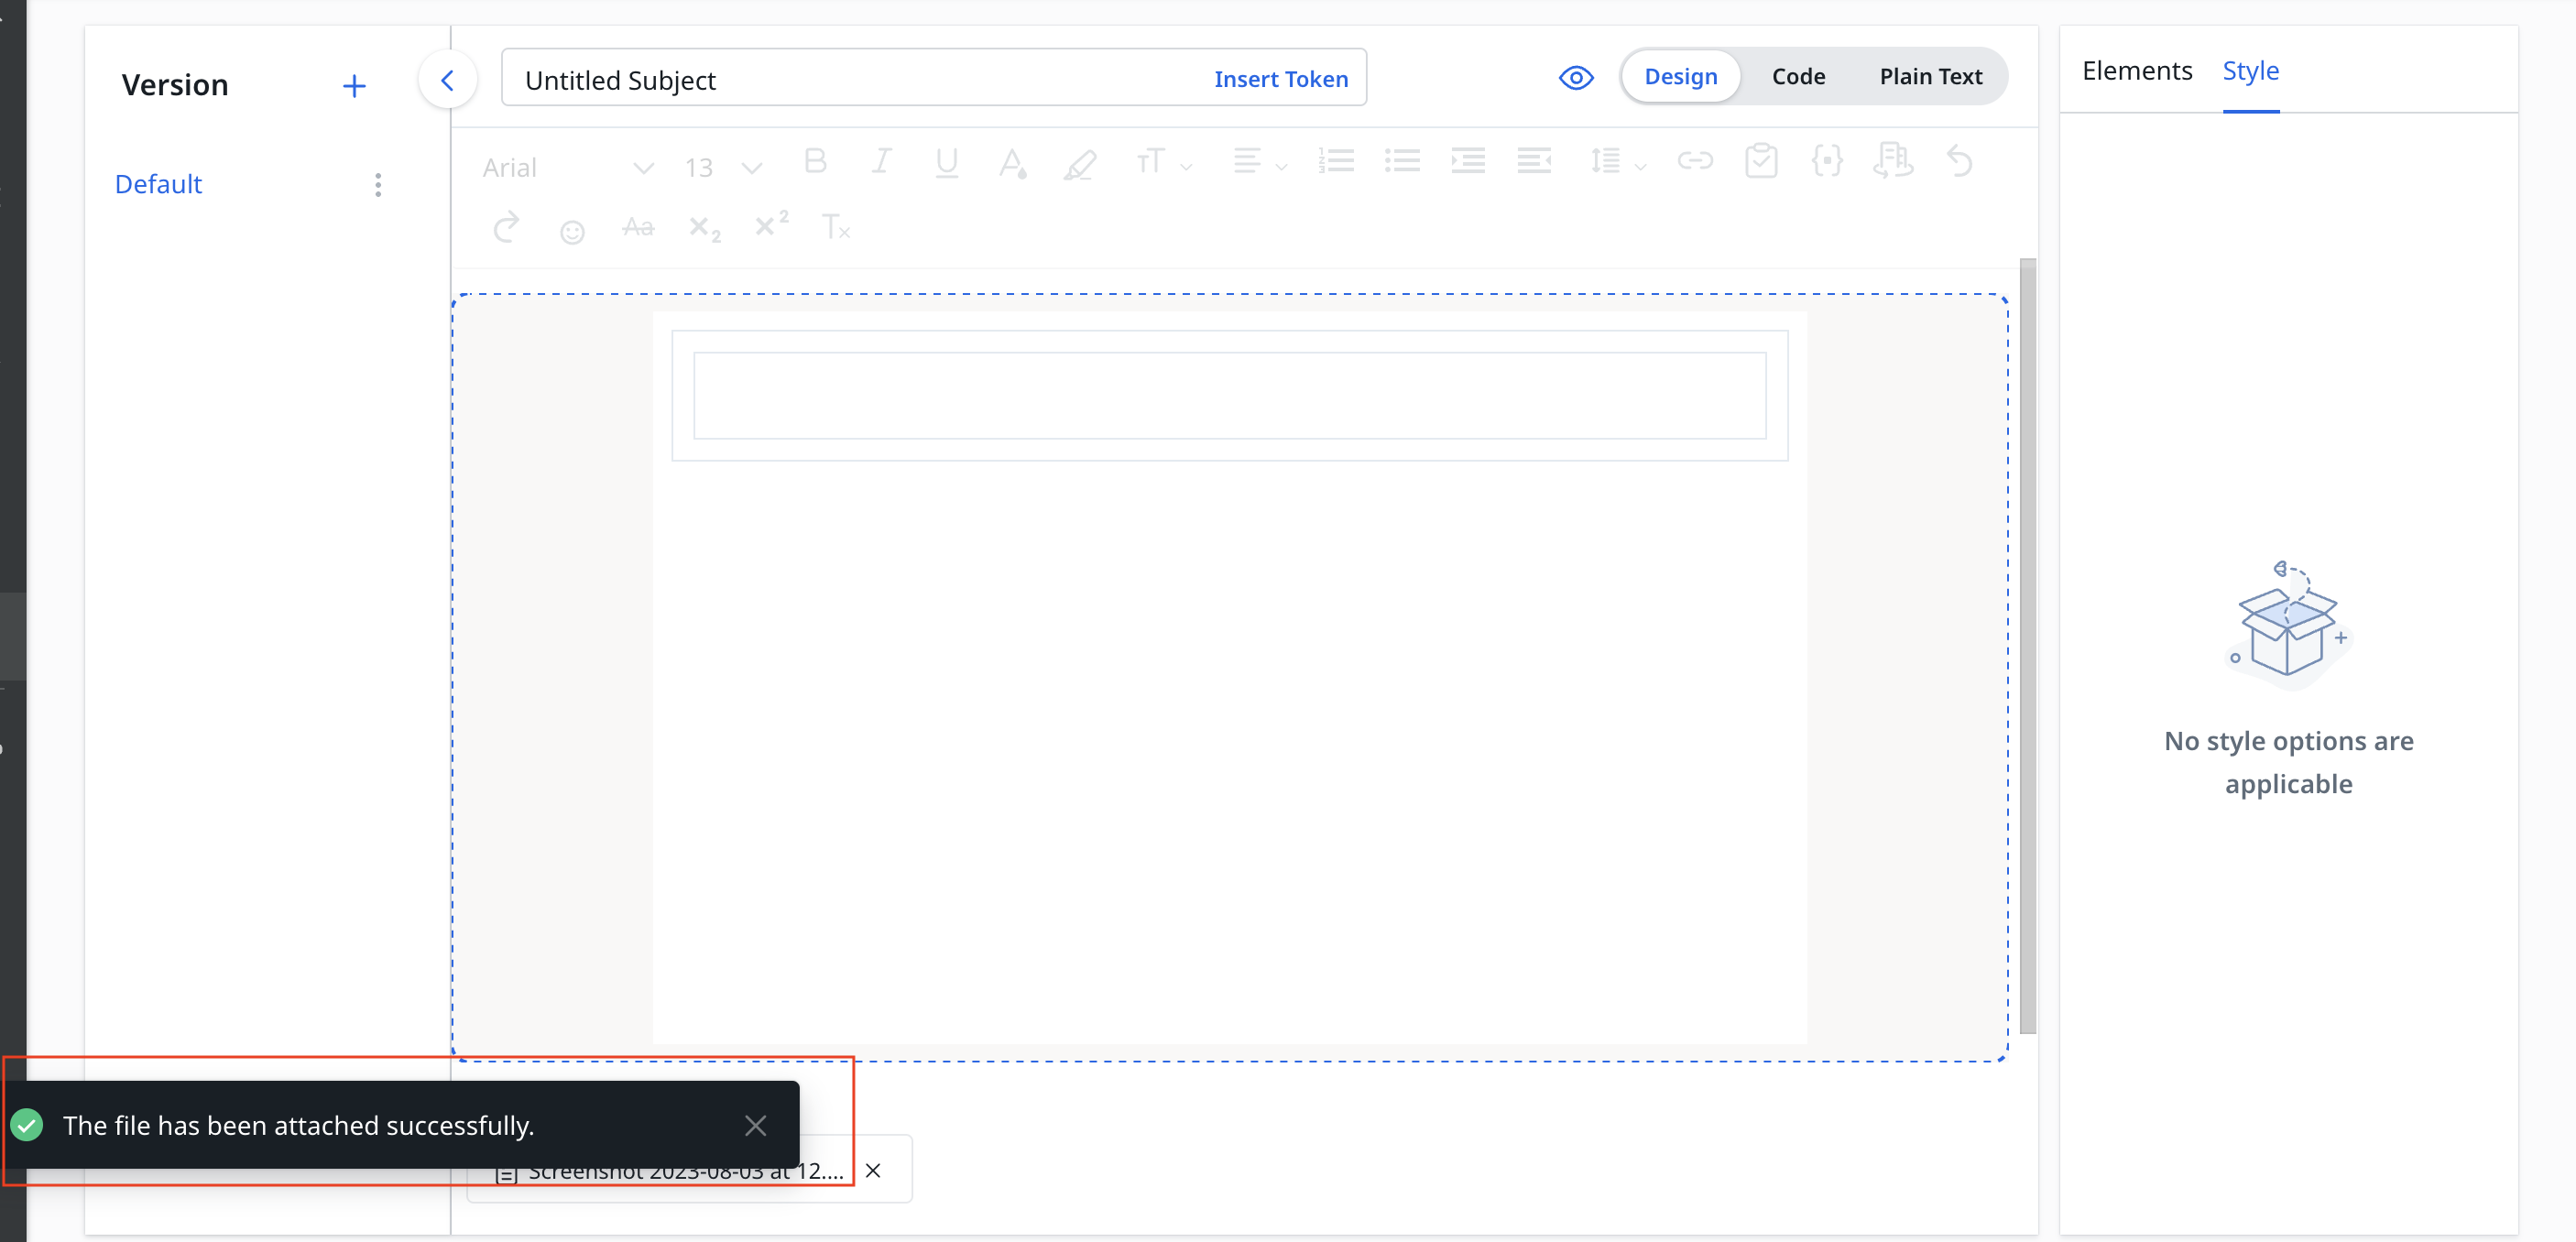
Add Attachment
To add attachments in the email template layout:
- Drag and drop the Attachment element to the email template layout.
- Select a file from the system.
IMPORTANT:
File size must be less than or equal to 5MB.
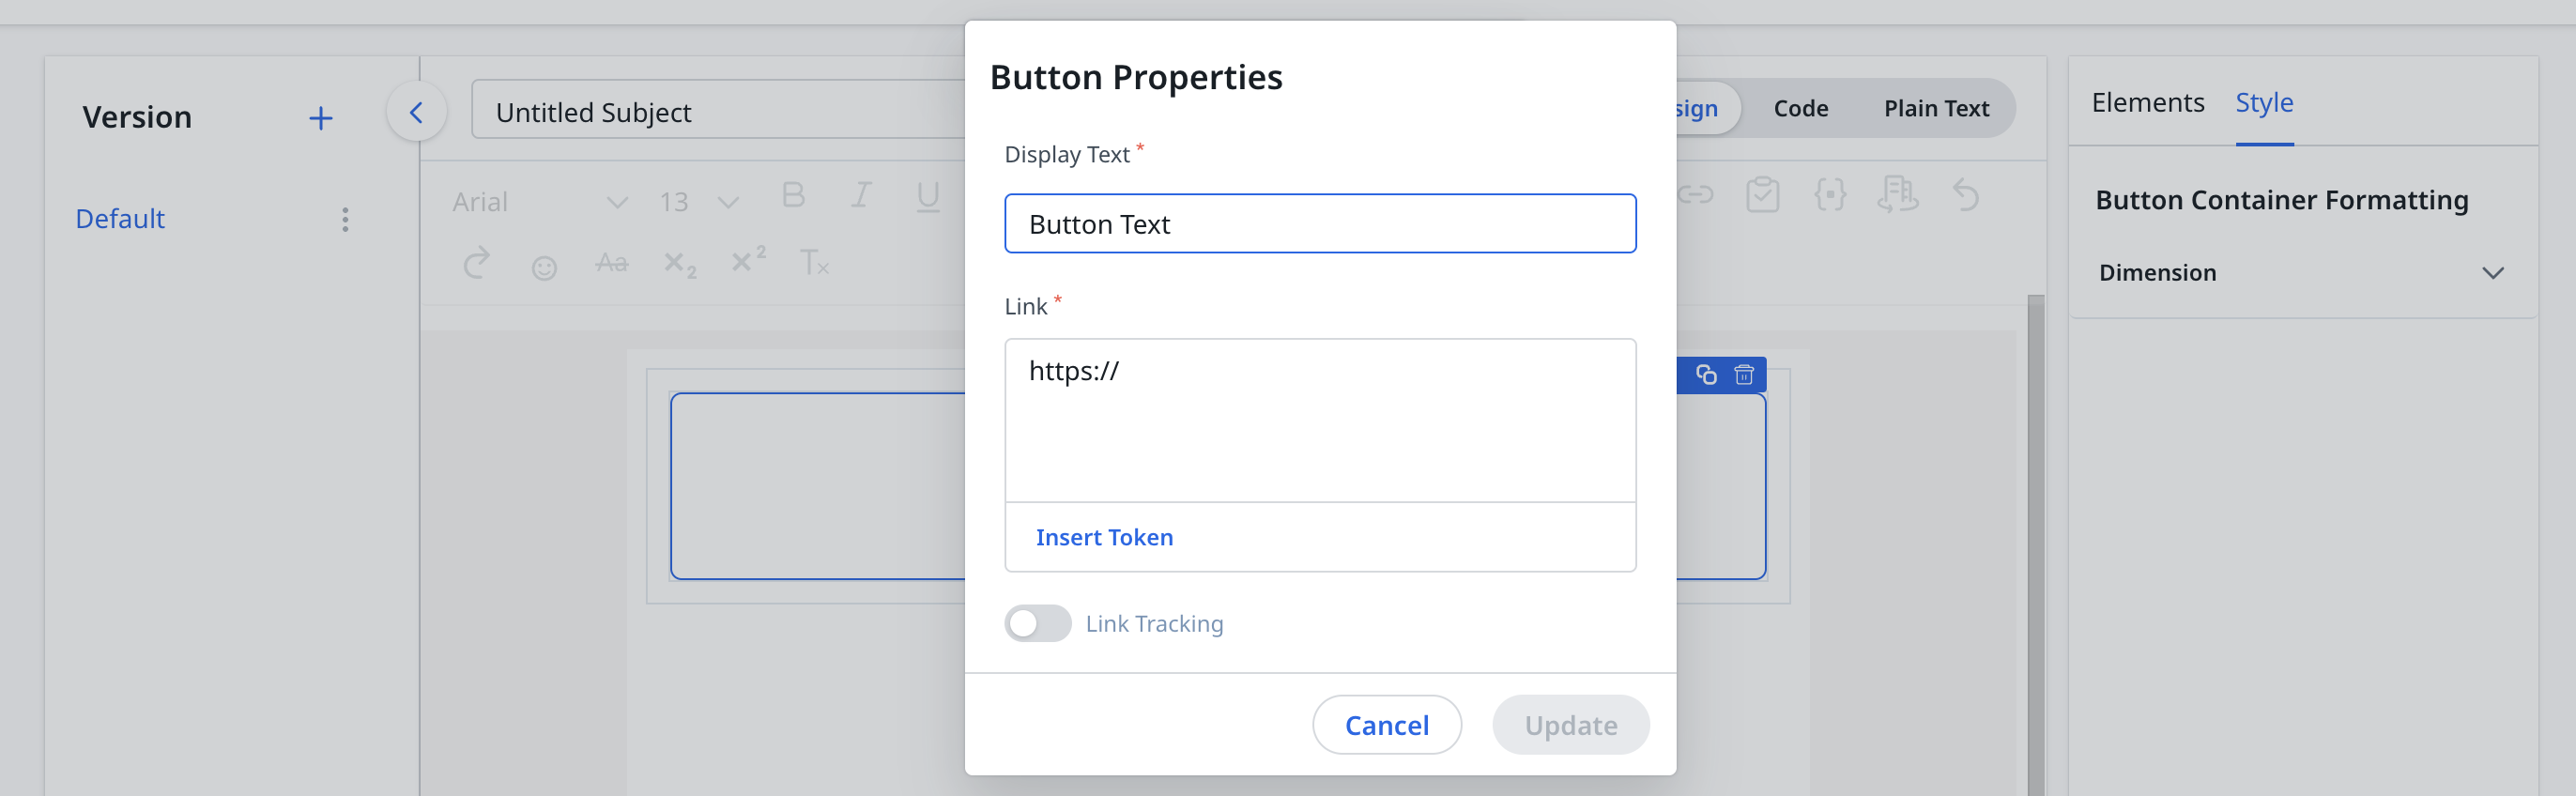
Add Button
To add buttons in the email template layout:
- Drag and drop the Button element to the email template layout.
- In the Button Text field, enter the text to be displayed on the button.
- Place the cursor in the Insert Token container.
- Enter the redirection link.
- (Optional) Turn on Enable Link Tracking toggle button.
Note: Link Tracking enables Gainsight to track the user clicks on a button. This information is recorded in Journey Orchestrator Analytics. -
(Optional) From the Adjust Corner Radius option, set the button corner radius.
Note: The maximum corner rounding radius is limited to half the button's height. - Click Update.
- (Optional) To apply style to Button:
- Select the added button element.
- Click the Style tab.
- Apply one or more format options.
Note: To edit a token properties, click the added token and modify the required information.
For more information on token properties, refer to the Token section.
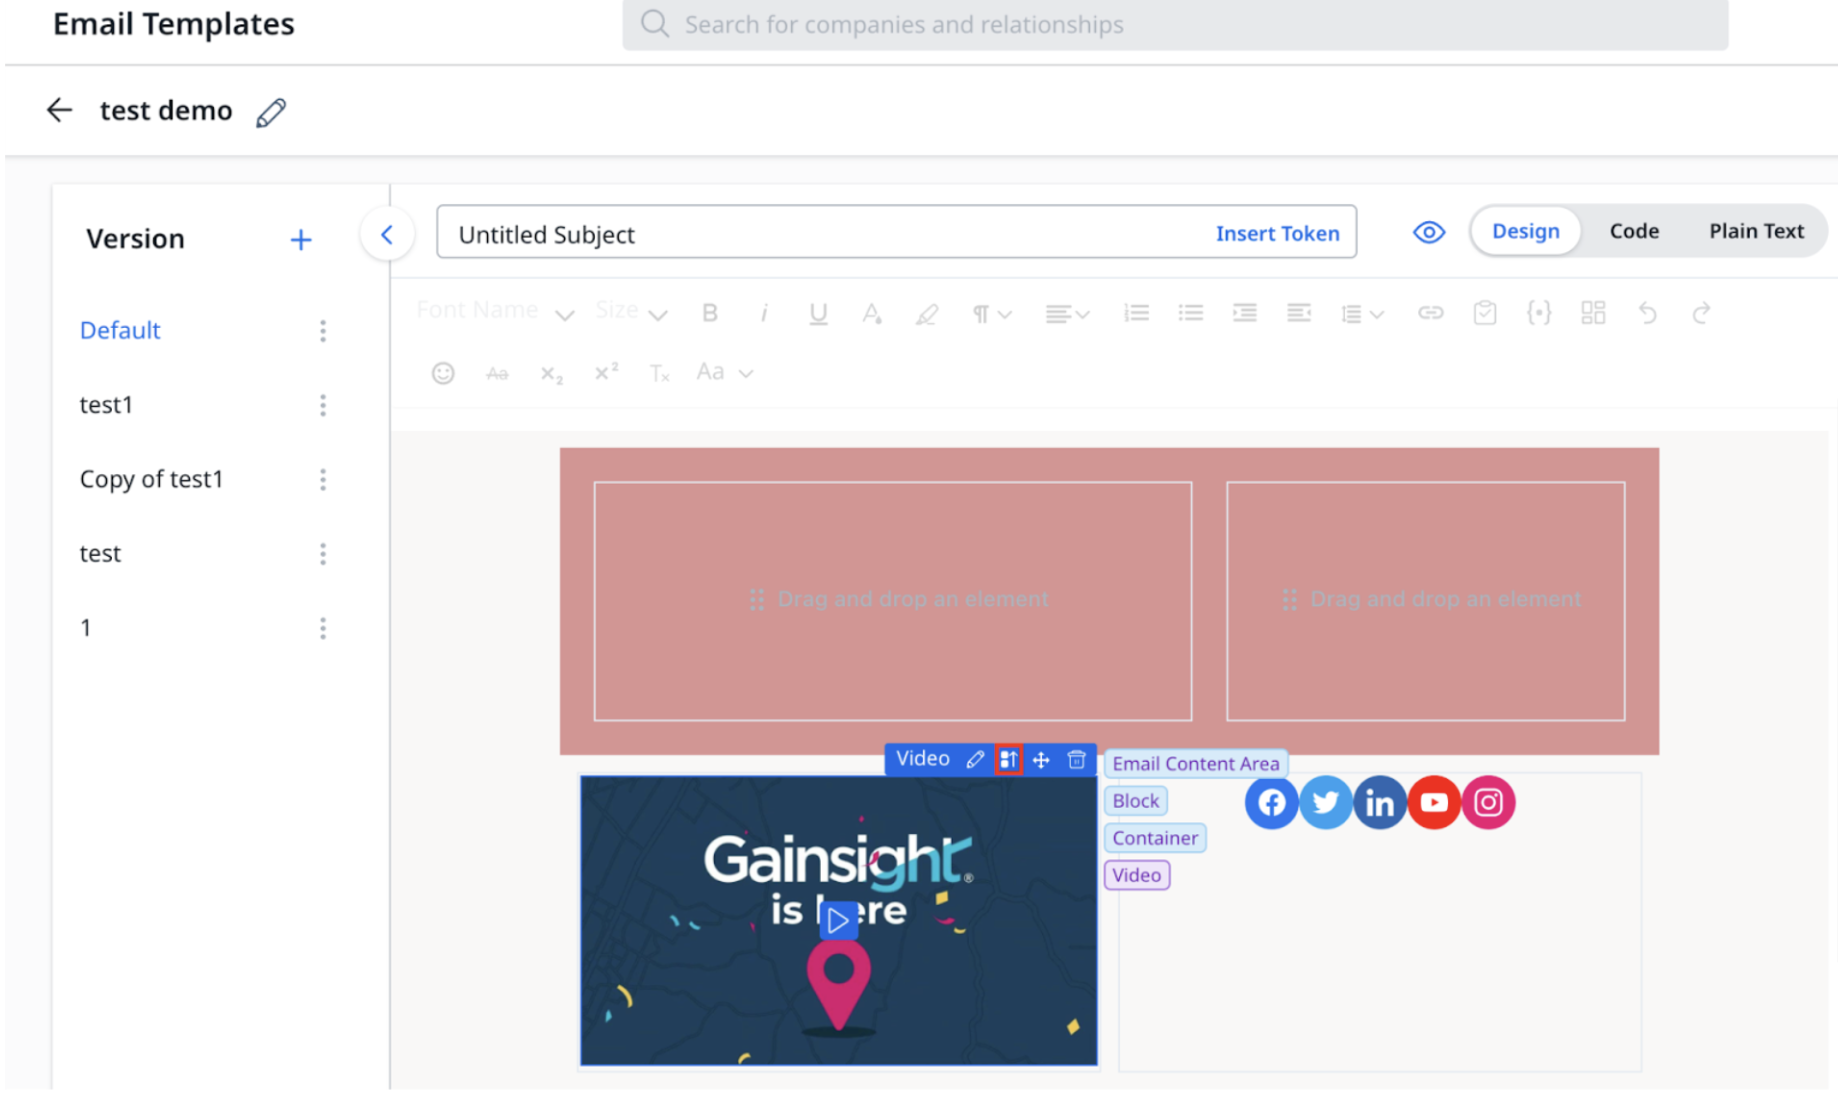
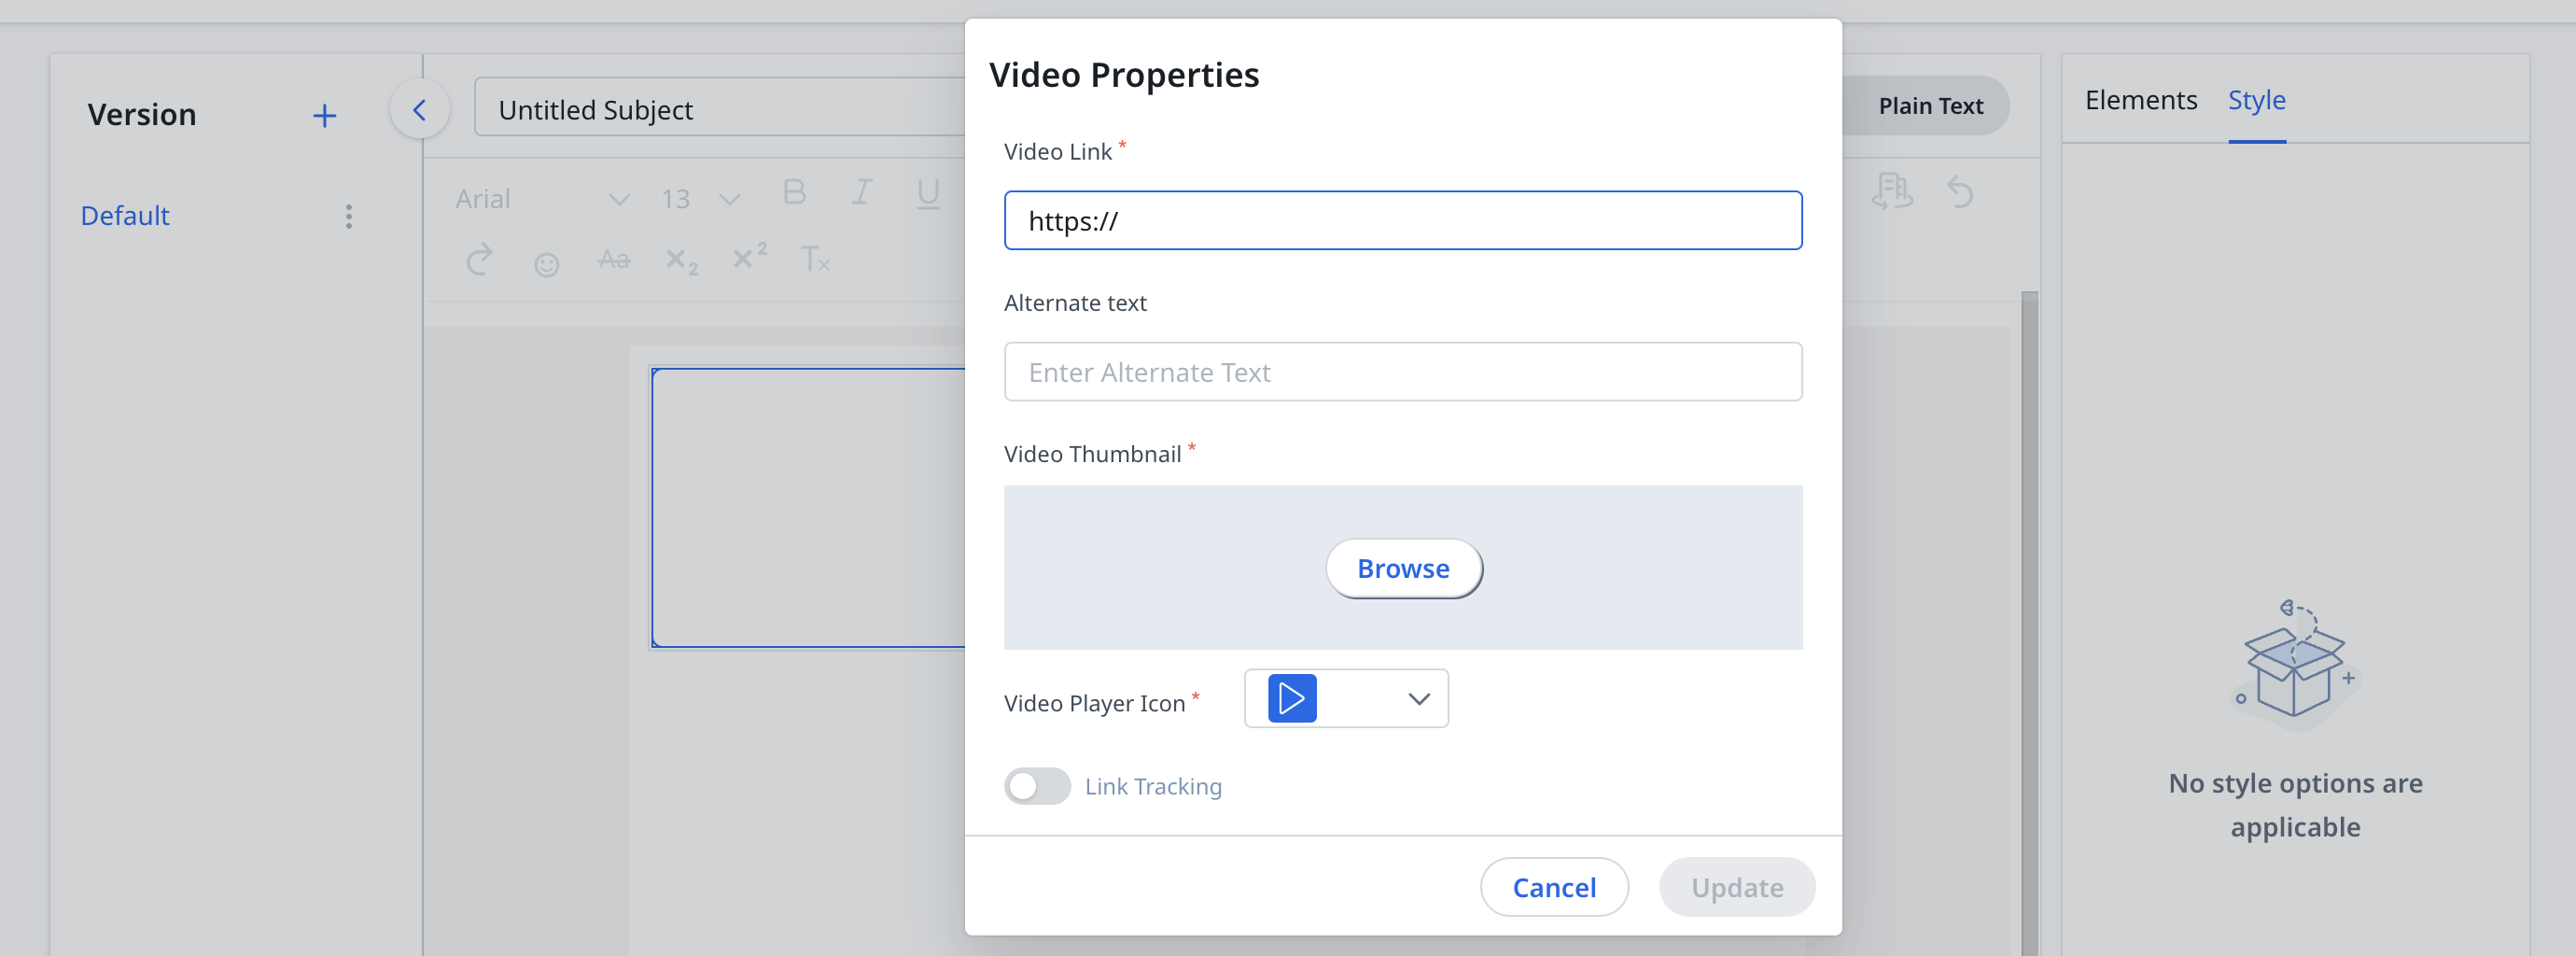
Add Video
To add videos in the email template layout:
- Drag and drop the Video element to the email template layout.
- Enter a video link.
- Enter the Alternative Text.
- In Video Thumbnail, click Browse and select an image from the system.
- Select the Video Player Icon.
- Click Update.
- (Optional) To apply style to Video:
- Select the added video element.
- Click the Style tab.
- Apply one or more options from the Dimension and Decorations sections.
The following Youtube Video URL formats are supported for video embedding:
- https://youtu.be/VIDEO_ID
- https://youtu.be/VIDEO_ID?t=123
- https://www.youtube.com/watch?v=VIDEO_ID
- https://youtube.com/shorts/VIDEO_ID
- https://www.youtube.com/embed/VIDEO_ID
Gainsight does not support short links.
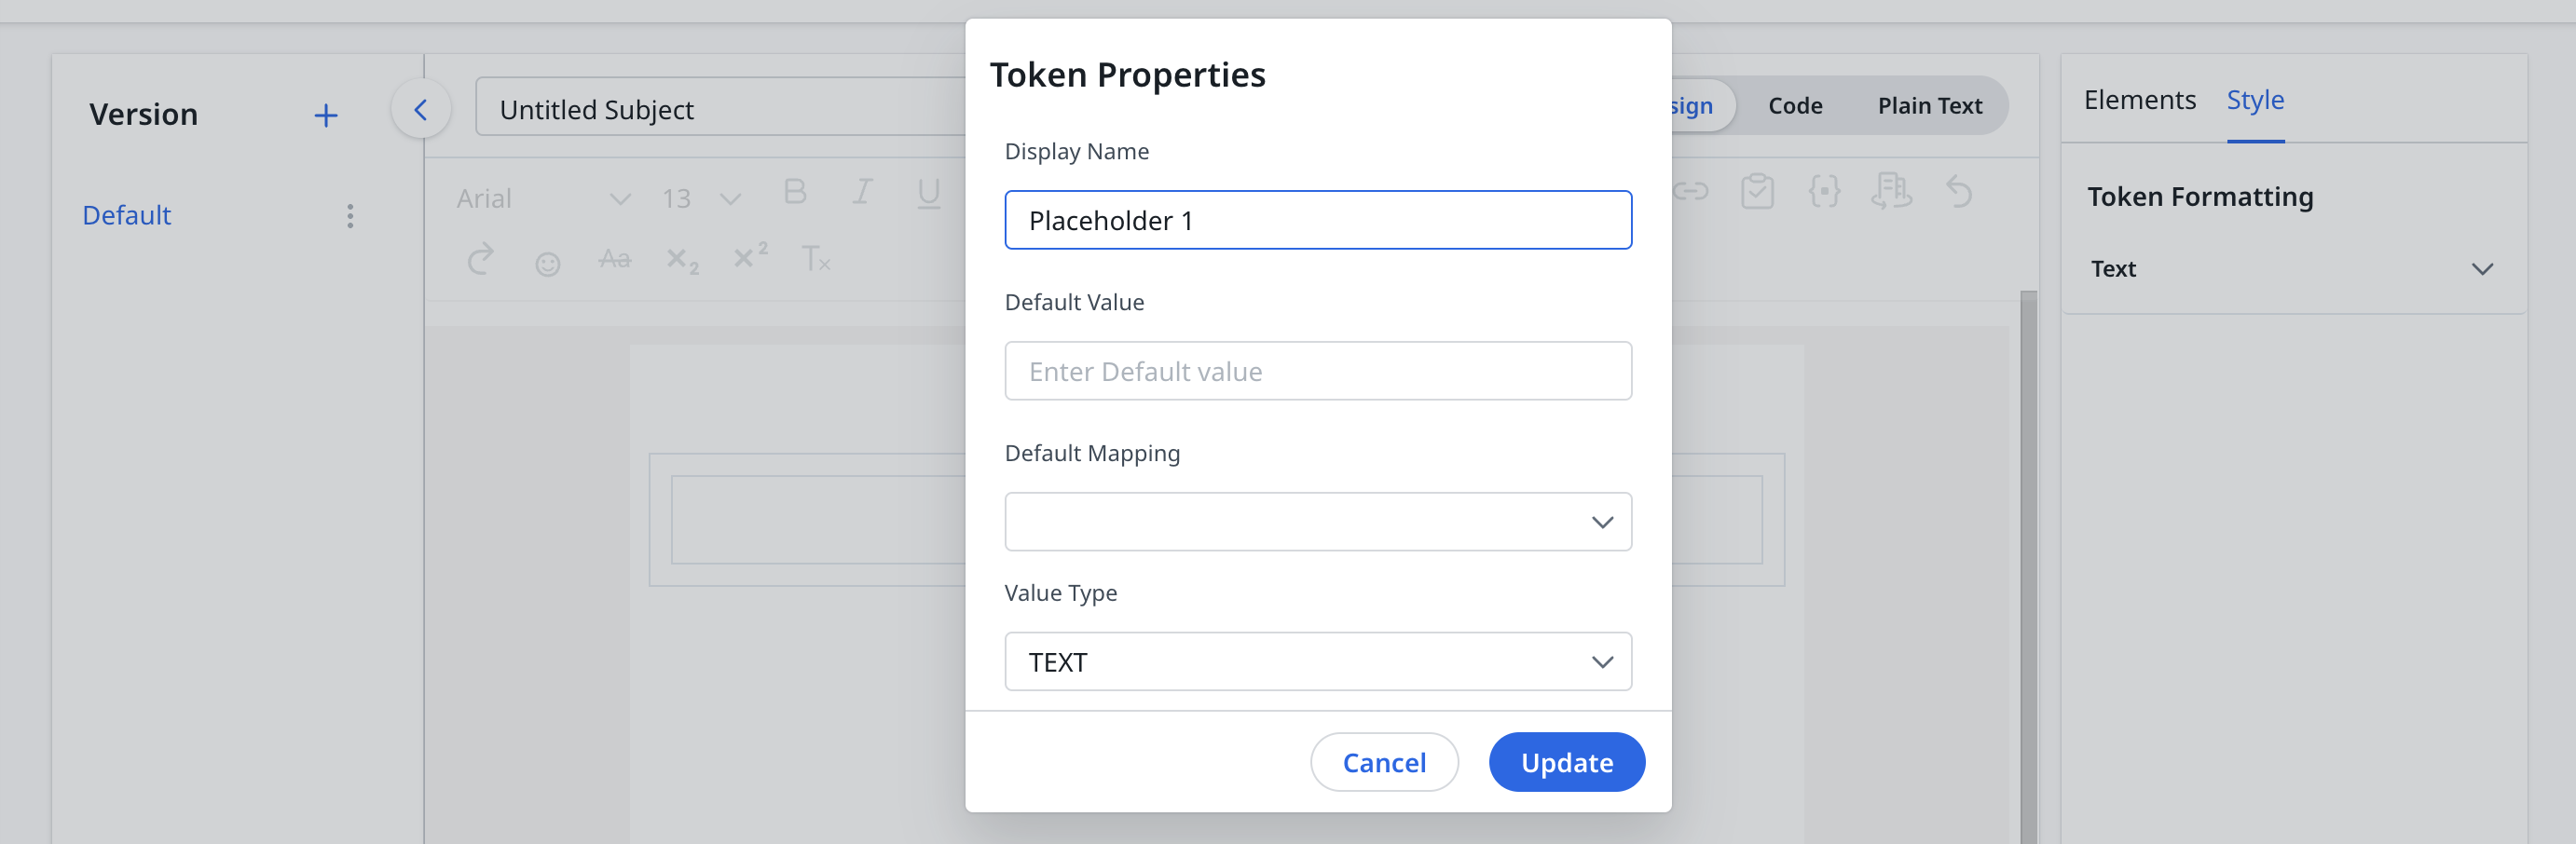
Add Token
To add tokens in the email template layout:
- Drag and drop the Token element to the email template layout.
- Double click the token placeholder. The Token Properties window appears.
- In Display Name field, enter a label for the tokenized field.
- In the Default Value field, enter the text that is added if the token value is missing.
For Example: For a First Name field that is blank, the default could be Customer.
- Select required value from the Default Mapping drop-down menu.
- Select required value from the Value Type drop-down menu.
- CURRENCY
- DATE
- NUMBER
- TEXT
- Click Update.
- (Optional) To apply style to Token:
- Select the added token element.
- Click the Style tab.
- Apply one or more format options.
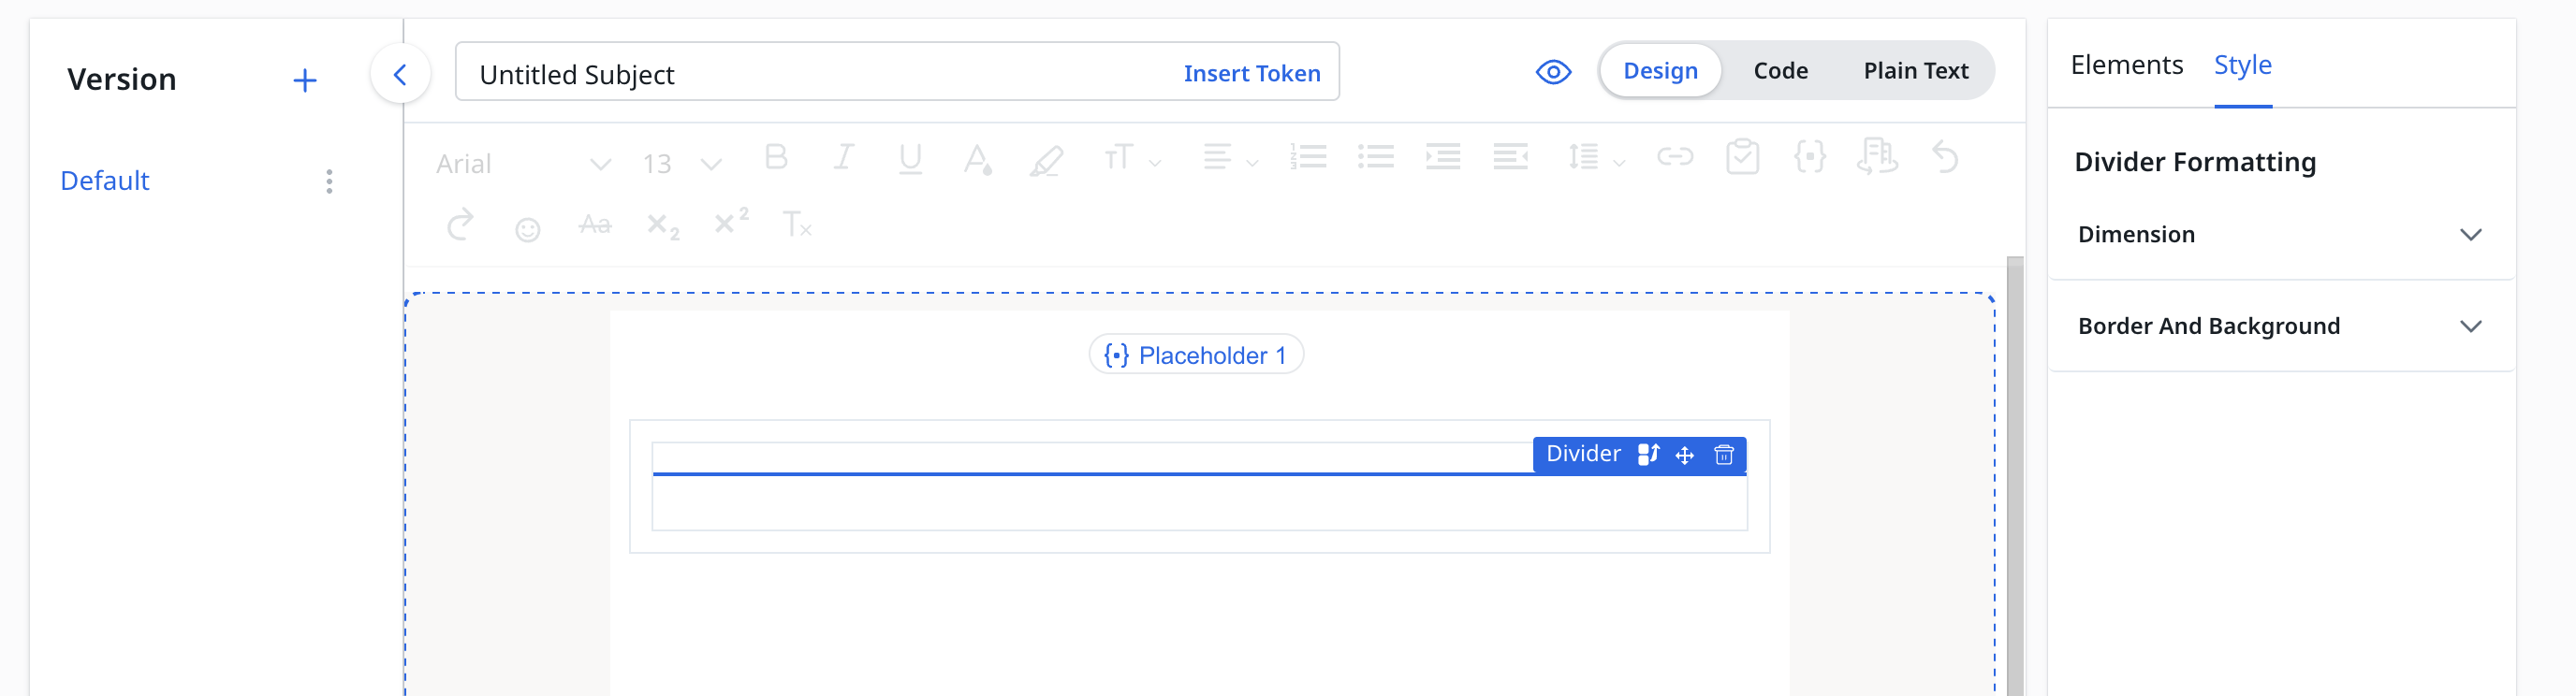
Add Divider
The Divider element is used to add a dividing line between the containers.
The divider line can be of following types:
- Dotted
- Dashed
- Solid
- Double
- Groove
- Ridge
- Inset
- Outset
To add a divider:
- Drag and drop the Divider element to the email template layout.
- (Optional) To apply style to Divider:
- Select the added divider element.
- Click the Style tab.
- Apply one or more format options.
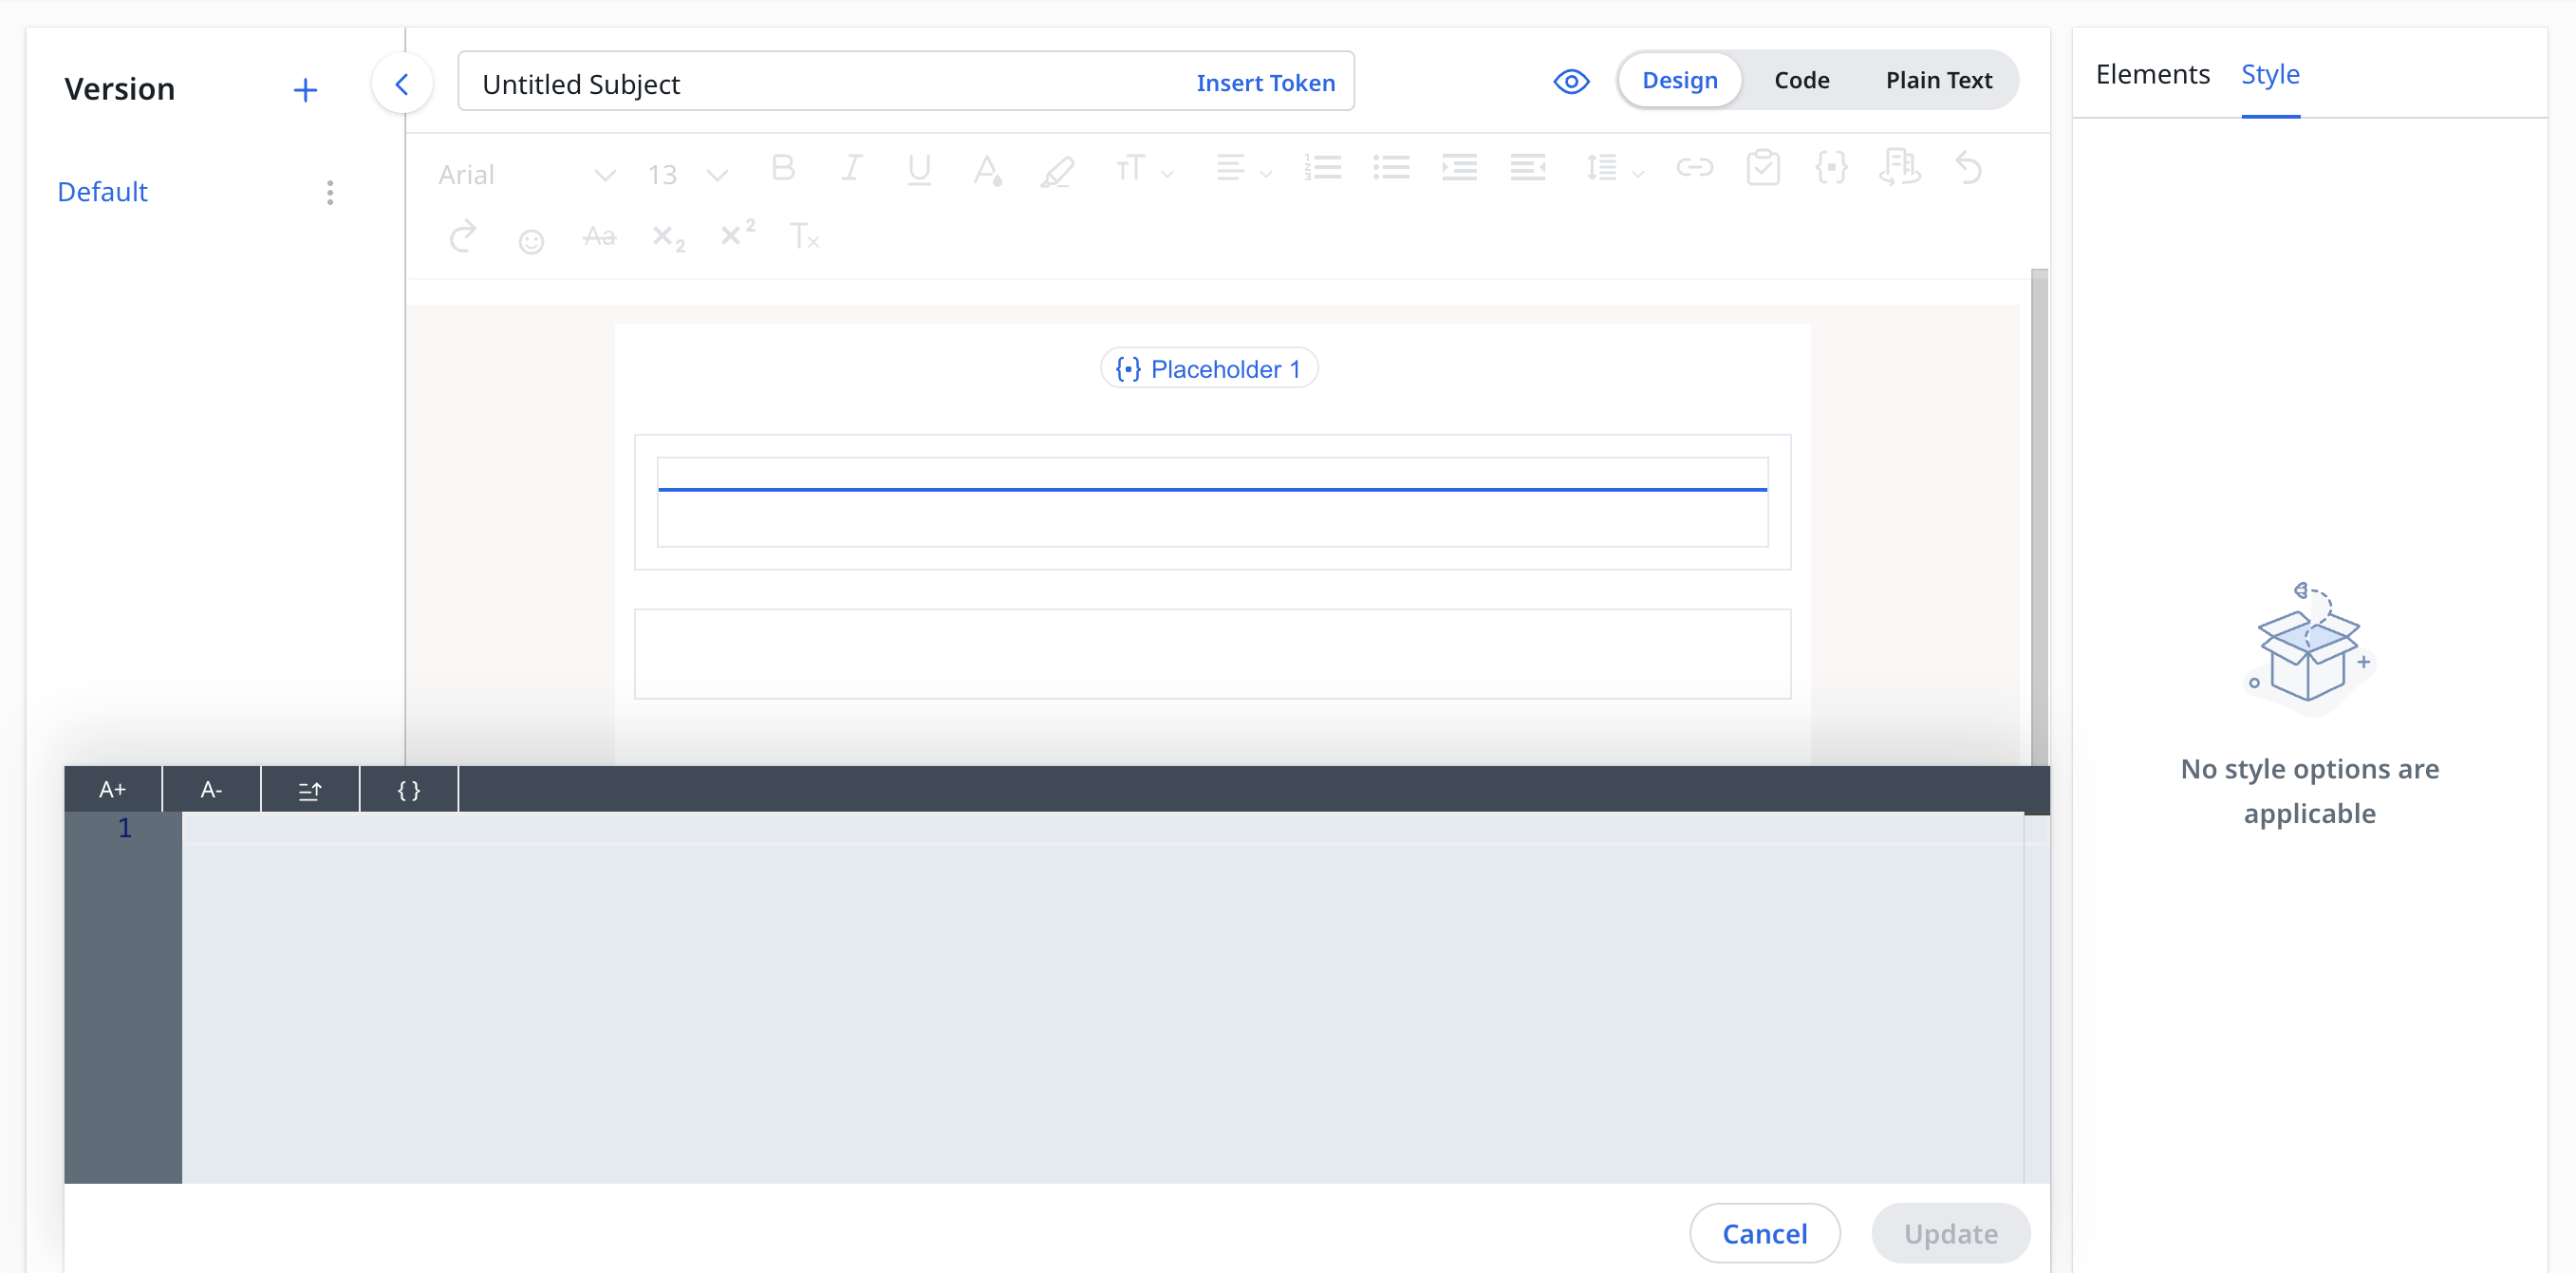
Add HTML
To add HTML:
- Drag and drop the HTML element to the email template layout. The HTML editor appears.
- Type the HTML code in the editor.
- Click Update.
Add Socials
Admins can now choose from a variety of social media icons available in the Social Element. They can select up to five icons at a time.
To add Socials:
- Drag and drop the Socials element to the email template layout.
- Double click the socials element you added. The Socials Properties window appears.
- In the Link field, enter the redirection link of the social network site.
- Enter Alternate Text.
- Click Update.
- (Optional) Click Close icon, to remove the respective social network option.
- (Optional) To apply style to Socials:
- Select the added socials element.
- Click the Style tab.
- Apply one or more format options.

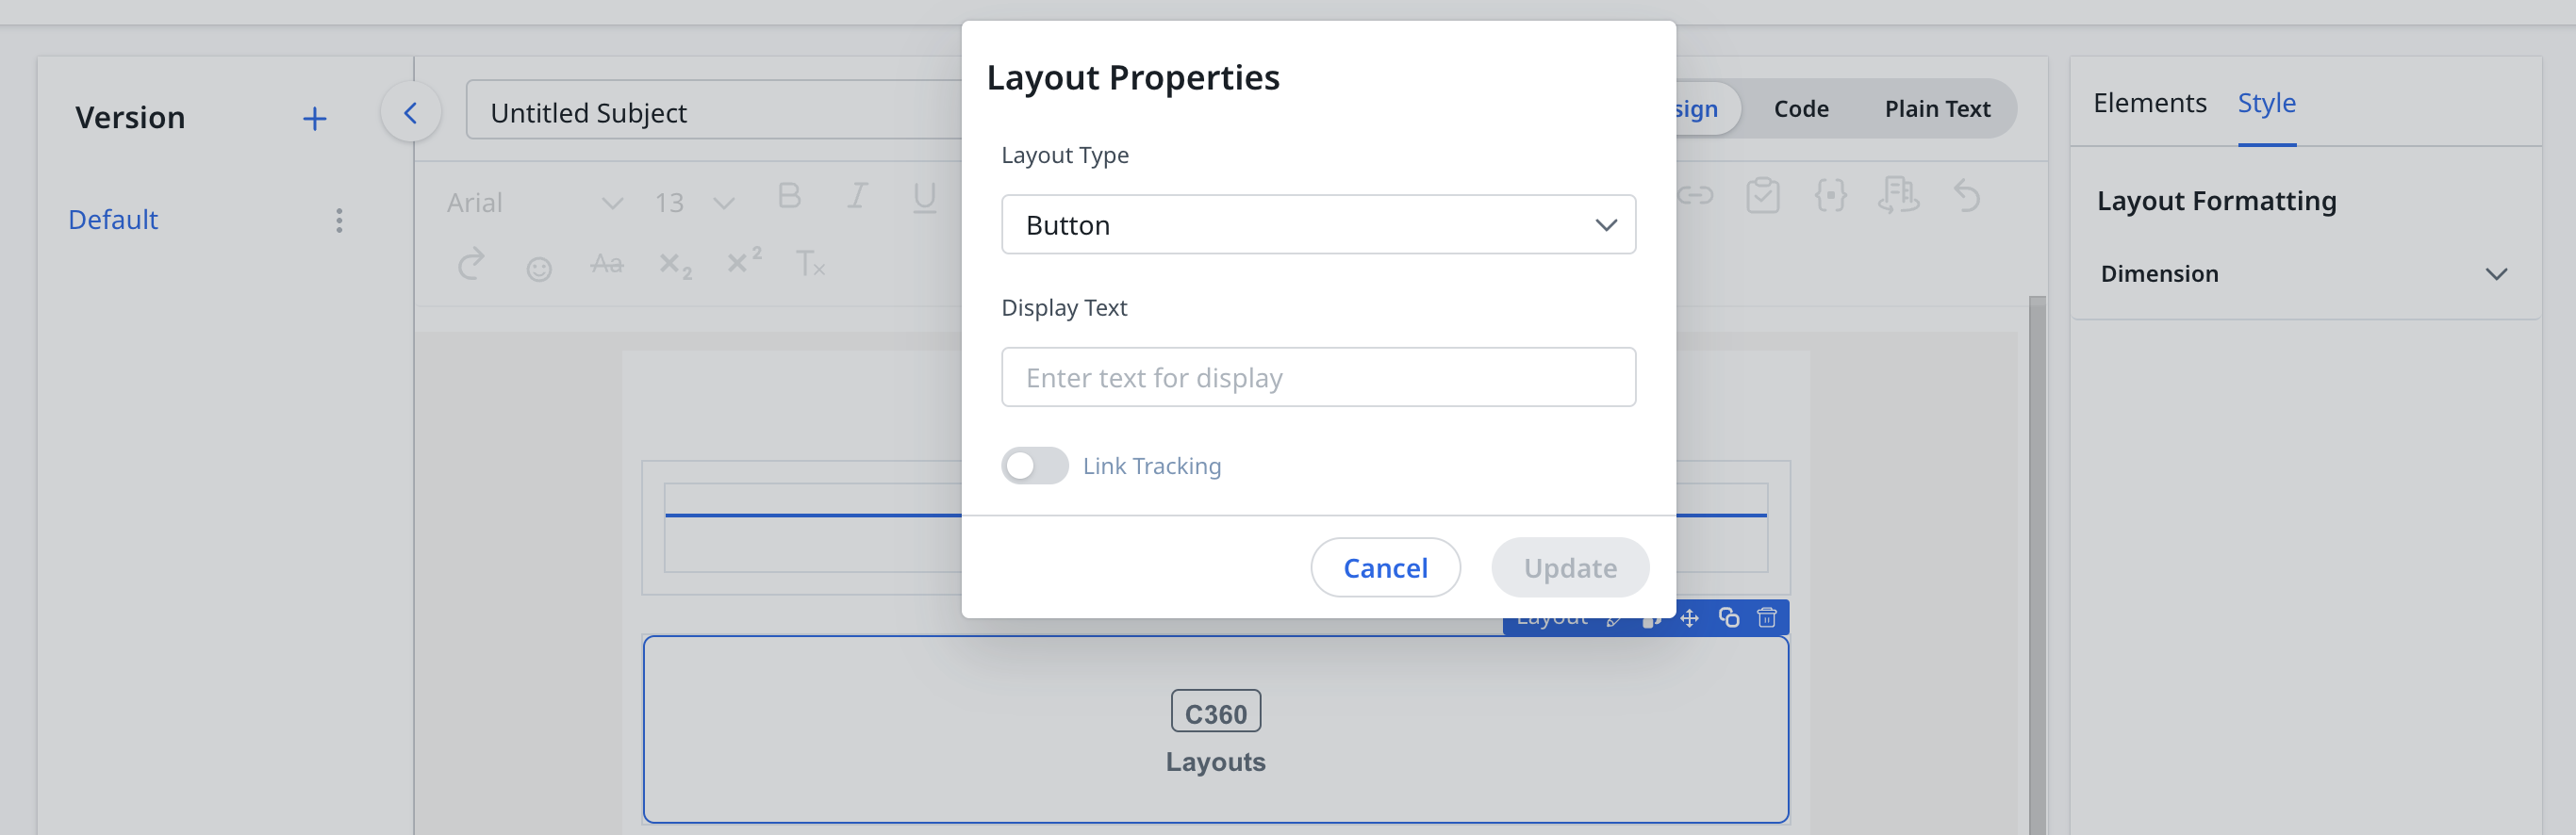
Add C360 Layouts
To add C360 Layouts:
- Drag and drop the C360 Layouts element to the email template layout.
- Select Layout Type from the drop down menu.
- Enter the Display Text.
- (Optional) Turn on the Enable Link Tracking toggle button.
- Click Update.
- (Optional) To apply style to C360 Layout Button:
- Select the added C360 Layouts element.
- Click the Style tab.
- Apply one or more format options.
Note: If you are unable to create or edit Email Templates, you may not have the required Journey Orchestrator permissions.
Add Spaces
To add Spaces:
-
Drag and drop the Spaces element to the email template layout. The Spaces Properties dialog box appears.
-
Select the Spaces Invitation Type from the drop-down.
.png?revision=1)
-
Select the following details:
- Display Text
- User Permission
- Link expires in
- (Optional) Link Tracking
- (Optional) Show rounded Corner
.png?revision=1)
You can also add the Space invite through the toolbar. For more information, refer to the Design Email Templates for Group Send article.
Button Appearance in Outlook with Active Link Tracking
When emails are sent through SendGrid with Link Tracking turned on, button styles may appear differently in Outlook for Windows (versions 2007–2019 and Office 365 desktop).
The variation occurs because Outlook does not support border-radius CSS property on standard HTML <a> tags, which are used when link tracking is active. As a result, buttons may appear with square corners when Link Tracking is turned on, and rounded corners when it is off in these Outlook versions.
![]()
This behavior is applicable for regular email button, Survey button and C360 layout button.
Note: Button rendering is consistent in Gmail and the Email Template Preview, regardless of whether Link Tracking is turned on or off.
Style
The Style tab allows you to apply different styles and formats to the elements to personalize your emails. For more information on available styles and formatting options for each element, refer to the following table.
| Element | Text Settings | Dimensions | Border and Background |
|---|---|---|---|
|
Image |
NA |
Width (px, %) Height (px) Alignment - left,right,center
|
Border Style Border width (px) Border Colour |
|
Image Container |
NA |
Width (px, %) Padding- Left,right,top,bottom (px) |
NA |
|
Report |
NA |
Width (px, %) |
NA |
|
Button (Standalone, Survey, C360) |
Font Font size(px) Font Color Font Weight (Bold, Normal) Font Style (Normal,Italic) Text Transform |
Width (px) Height (px) Alignment - left,right,center Note: Button Alignment is honored only on new email template builder |
Border Style Border width (px) Border Colour Background Colour Adjust Corner Radius |
|
Button Container (Standalone, Survey, C360) |
NA |
Width (px, %) Padding- Left,right,top,bottom (px) |
NA |
|
Link (Survey , C360) |
Font Font size(px) Font Color Font Weight (Bold,Normal) Font Syle (Normal,Italic) Text Transform |
NA |
NA |
|
Video |
NA |
Width (px, %) Height (px) Alignment - left,right,center
|
Border Style Border width Border Colour |
|
Video Container |
NA |
Width (px, %) Padding- Left,right,top,bottom (px) |
NA |
|
Token |
Font Font size(px) Font Color Font Weight (Bold,Normal) Font Syle (Normal,Italic) Text Transform |
NA |
NA |
|
Divider |
NA |
Alignment - left,right,center Width (px,%) |
Color Height (px) Dash |
|
HTML |
NA |
NA |
NA |
|
Social |
NA |
Alignment - left,right,center Width (px, %) Padding- Left,right,top,bottom (px) Indent Spacing (px) |
Icon Set Icon Color Icon Size Border Style Border width (px) Border Colour Background Color |
|
Social Container |
Width (px, %) |
- |
|
|
Attachment |
NA |
NA |
NA |
|
Text |
Rich Text Editor Toolbar |
Padding- Left,right,top,bottom (px) |
Border Style Border width (px) Border Colour Background Colour |
|
Container |
NA |
Width (%) Padding- Left,right,top,bottom (px) |
Border Style Border width (px) Border Colour Background Colour |
|
Block |
NA |
Width (px, %) Height (px) Indent Spacing (px) Rounding (px) |
Border Style Border width (px) Border Colour Background Colour Show rounded corners |
Supported Elements List in Feature Areas
The table below outlines which email template builder elements are supported in various feature areas. This information assists admins in creating email templates effectively.
| Elements | Email Assist | P360 | Playbooks | Gainsight Assist | Journey Orchestrator |
|---|---|---|---|---|---|
|
Survey (Button , Link) |
Yes |
Yes |
Yes |
No |
Yes |
|
Inline Survey Question |
No |
No |
No |
No |
Yes |
|
Report - Inline |
Yes |
Yes |
Yes |
No |
Yes |
|
Report - Attachment |
No |
No |
No |
No |
Yes |
|
C360 layout |
No |
No |
No |
No |
Yes |
|
Text |
Yes |
Yes |
Yes |
Yes |
Yes |
|
Image |
Yes |
Yes |
Yes |
Yes |
Yes |
|
Video |
Yes |
Yes |
Yes |
Yes |
Yes |
|
Social |
Yes |
Yes |
Yes |
Yes |
Yes |
|
Button |
Yes |
Yes |
Yes |
Yes |
Yes |
|
Token |
Yes |
Yes |
Yes |
Yes |
Yes |
|
Blocks |
Yes |
Yes |
Yes |
Yes |
Yes |
|
Divider |
Yes |
Yes |
Yes |
Yes |
Yes |
|
HTML |
Yes |
Yes |
Yes |
Yes |
Yes |
Default Mapping Support
| Elements | Email Assist | P360 | Playbooks | Journey Orchestrator |
|---|---|---|---|---|
|
Survey (Button , Link) |
Yes |
Yes |
Yes |
No |
|
Report - Inline |
Yes | Yes | Yes | No |
General Settings
General Settings enables you to configure settings for Template Body, Email Content Area, and mobile responsiveness of elements.
Template Body
The Template Body section allows you to configure padding for the Template Body and change its background color.
To configure padding and background color for Template body:
- Navigate to General Settings.
- Click Template Body.
For Background:
- Click the filled color box besides Background. The color palette appears.
- Select a required color.
- Click outside color palette to apply changes.
For Internal Padding:
-
Enter the required value to the Top, Bottom, Left and Right sides to apply padding between the template body and email content area.
Note: You can apply maximum 40px padding for all the sides.

Email Content Area
You can configure settings such as padding, width, background color and more for Email Content Area.
To configure settings for Email Content Area:
- Navigate to General Settings.
- Click Email Content Area.
- Provide the following details:
- Fluid Width: Select the Fluid Width toggle to make the email width dynamically adapt to the screen size of the device in which it is viewed.
- Width: Enter the required width (630px is the recommended width).
Note: Clicking the Close icon beside the Width field makes the email width fluid. - Background: Select the required background color.
- Font: Select the required font.
- Font Size: Select the required font size.
- Font Color: Select the required font color.
- Internal Padding: Enter the required value to the Top, Bottom, Left and Right sides to apply padding between the email content area and containers.
Note: You can apply a maximum 40px padding for all the sides.

Mobile Settings
You can turn ON the Mobile Responsive toggle switch to ensure that all the elements in the selected container or email content area are clearly visible on mobile devices for an optimal user experience.

Note: You can also manually turn OFF the Mobile Responsive toggle switch from the Style tab for specific image or video thumbnail, if required.
Advanced Settings
Advanced Settings option (in the Elements tab) is available for large or complex templates that may cause sluggish scrolling or delayed edits. You can use this setting when:
- The template is very large or highly styled.
- The editor UI freezing, lagging, or scrolling slowly.
- You are importing HTML (pasting code) and notice a performance degradation.
Note: This mode is optional and should be enabled only when you experience performance issues.

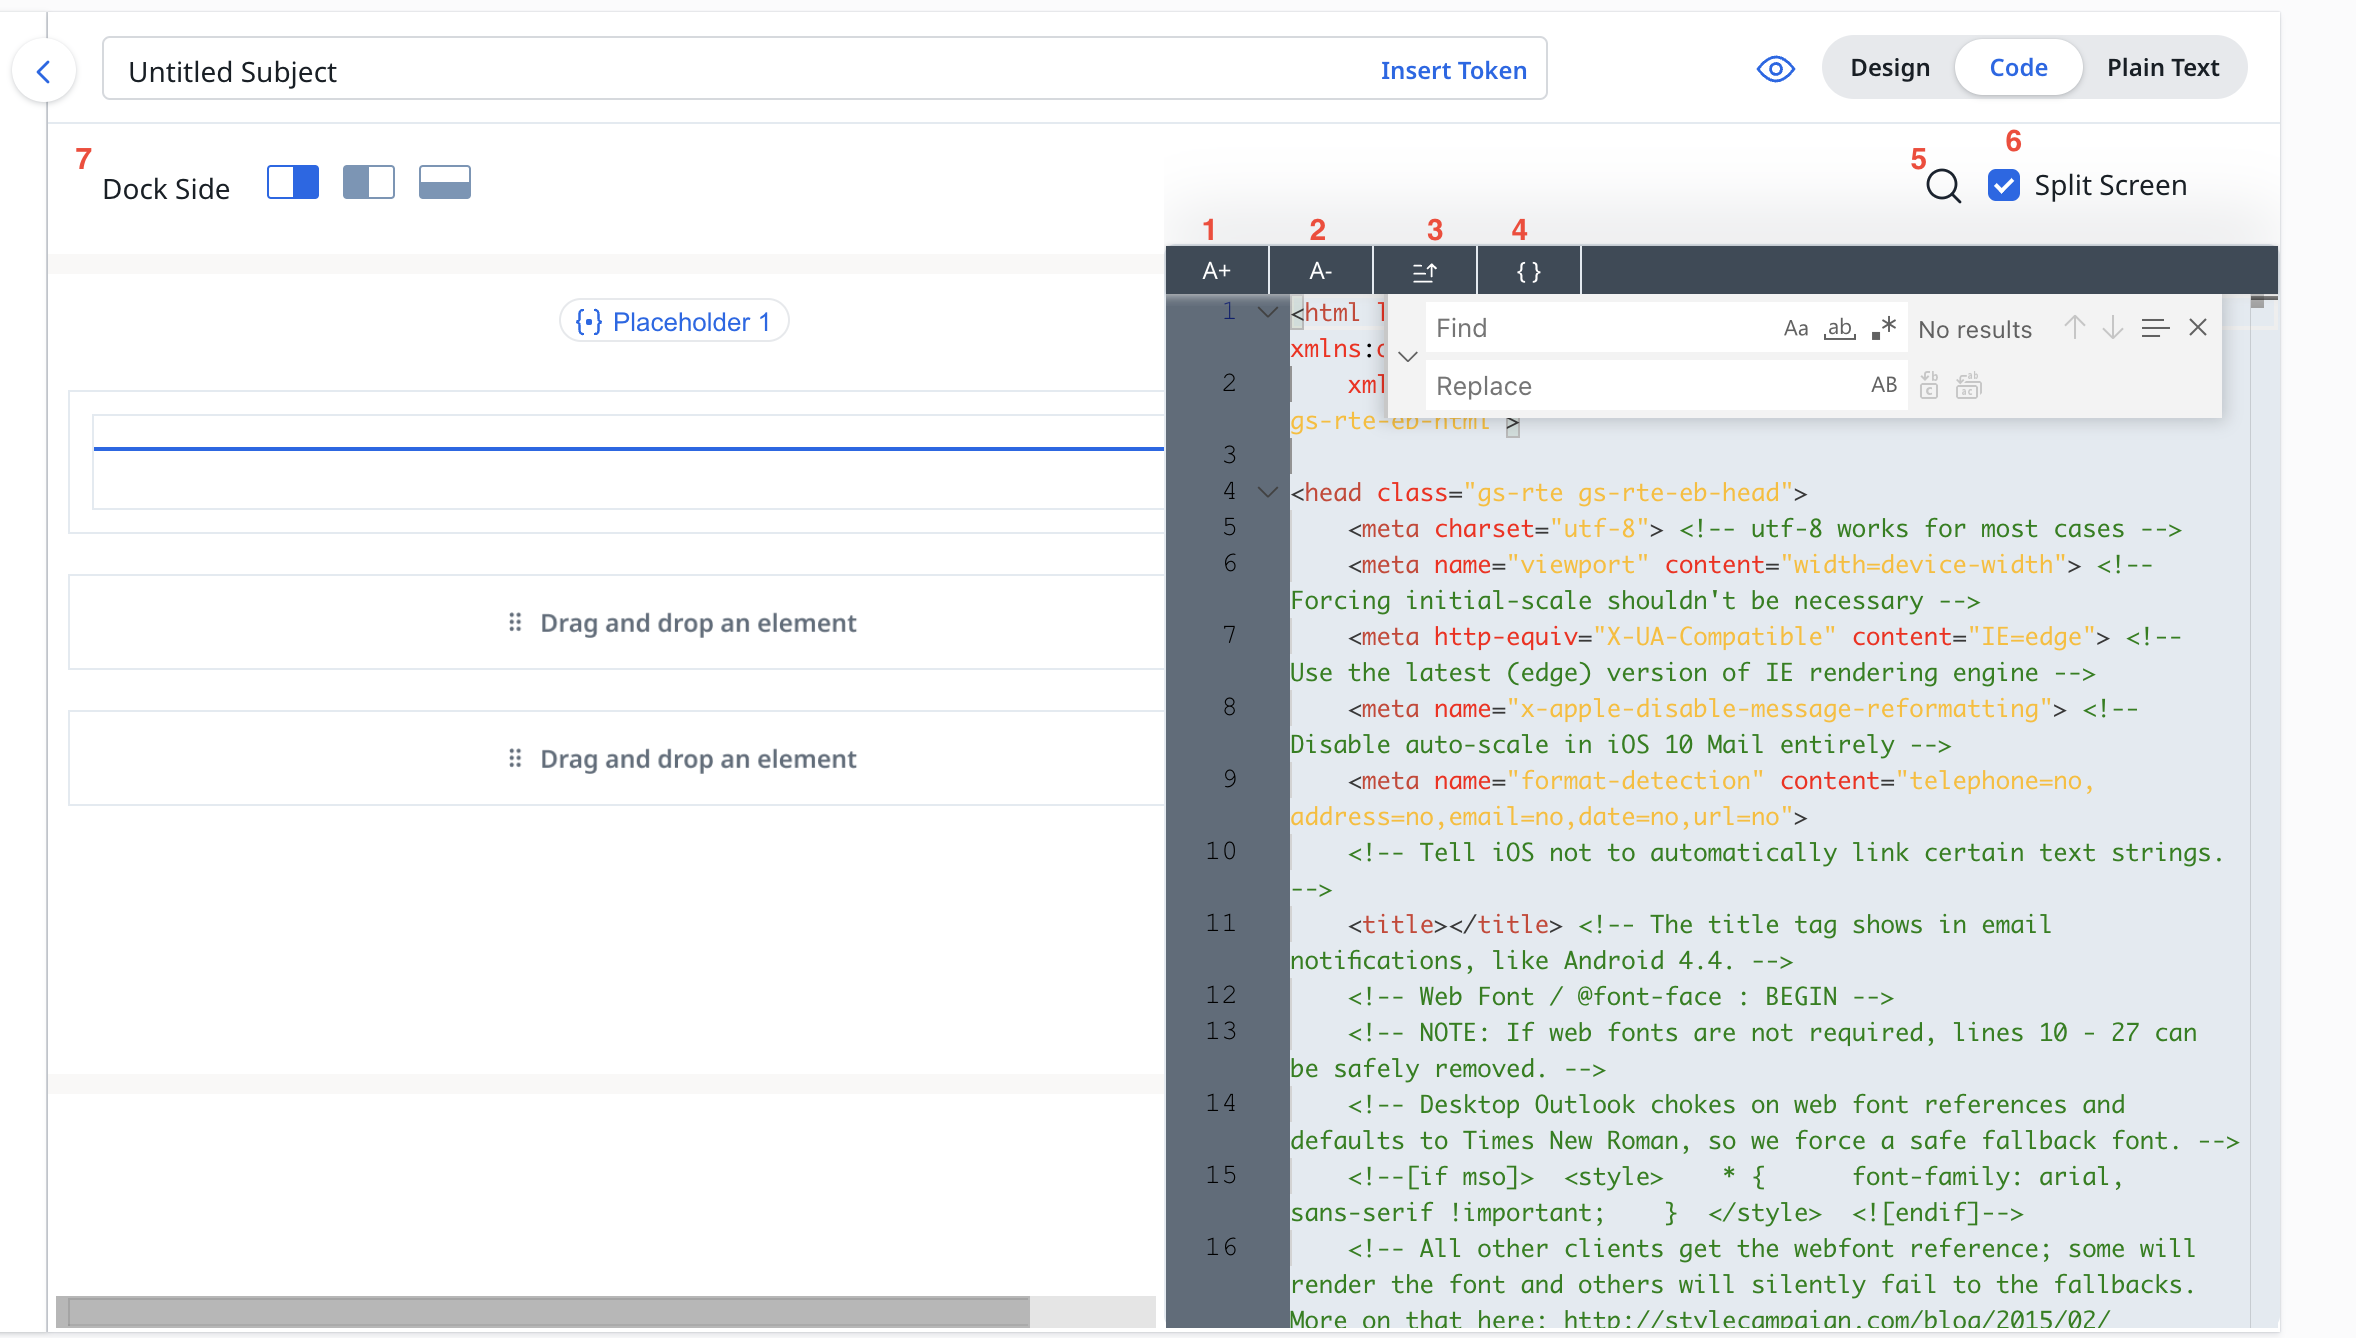
Code Editor
The Code Editor option enables you to write or edit HTML code for building email templates. Following editing options are available in the HTML editor:
- Increase Font Size: Click the A+ icon to increase the font size of HTML code.
- Decrease Font Size: Click the A- icon to decrease the font size of HTML code.
- Fold/ Unfold Code: Click the Fold/ Unfold Code icon to collapse or rewind the Code Editor section.
- Format Code: Click the Format Code icon to arrange the existing code in HTML editor and remove any formatting errors such as extra space.
- Find and Replace: To find and replace text:
- Click the Search icon.
- In the Find field, enter the search term.
- Click the Toggle Replace icon. The Replace field appears.
- In the Replace field, enter the replace term.
- Click the enter key.
- Enable Split View: Select Split View checkbox to split the existing window into Code view and Design view.
- Dock Side: Enables to select preferable arrangement of split view.
Note: The Dock Side option becomes available only when Enable Split View is checked.
Plain Text Editor
You can format plain text emails in JO using the Plain Text Editor option. A plain text email is an email that includes only the text without any formatting, images, or graphics.
Some of the benefits of using Plain Text feature in Email templates are:
- Increase in email delivery.
- Increase in customer interactions(email read rates).
- Increase in CTA response (link/survey click rates).
The following are the features of the Plain Text format:
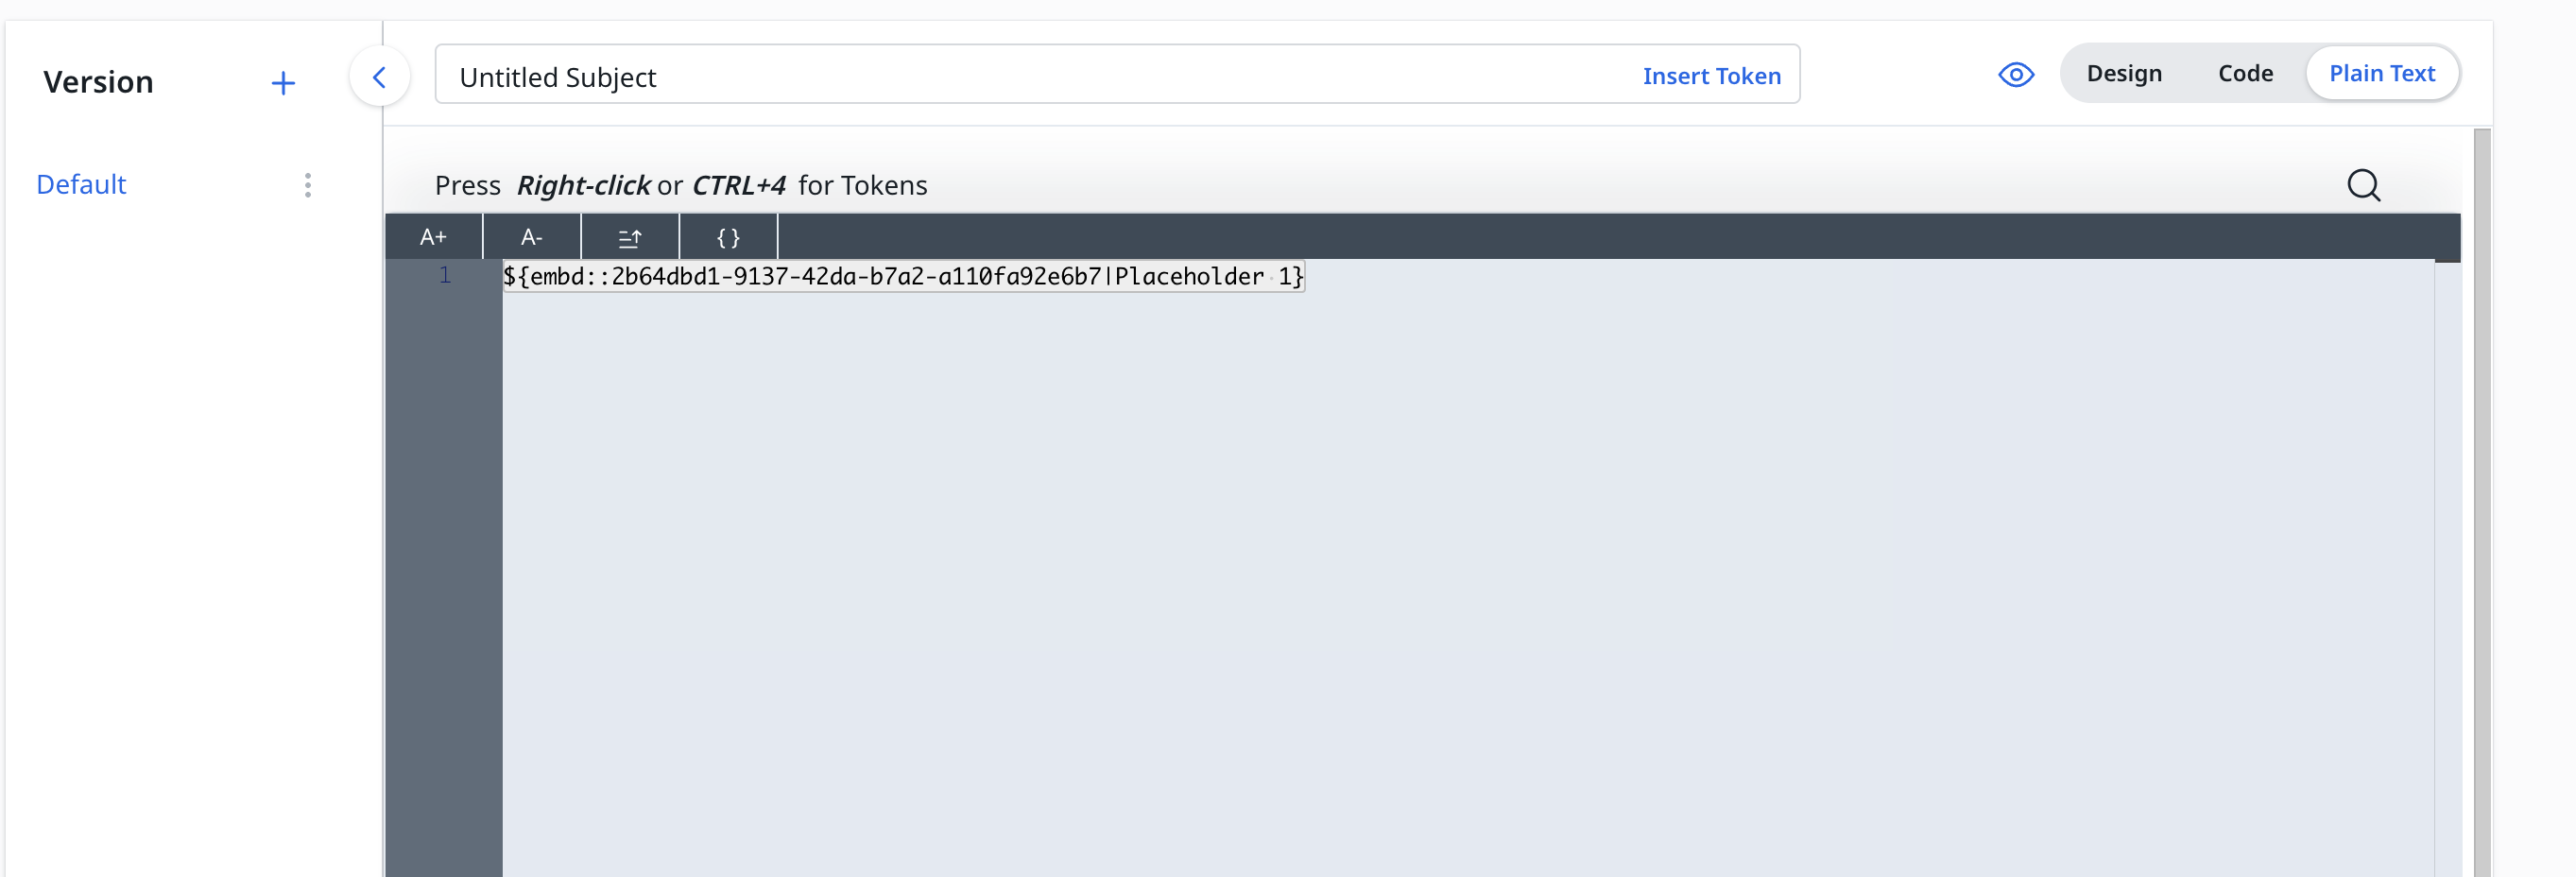
- All rich text (including attachments) is converted .
- Tokens are converted and are highlighted in grey color in Plain text format along with token IDs. Users can click Ctrl + 4 to add or view the list of available tokens used in the existing template.
- Links (including image links) are converted along with the link text.
Notes:
- Images without links are not converted to plain text format. But, images with links are converted to plain text with the name of the image and link.
- The following options are not supported in Plain Text format:
- Inline Images
- Inline Reports
- Inline Surveys
- Inline Tabular reports
Preview
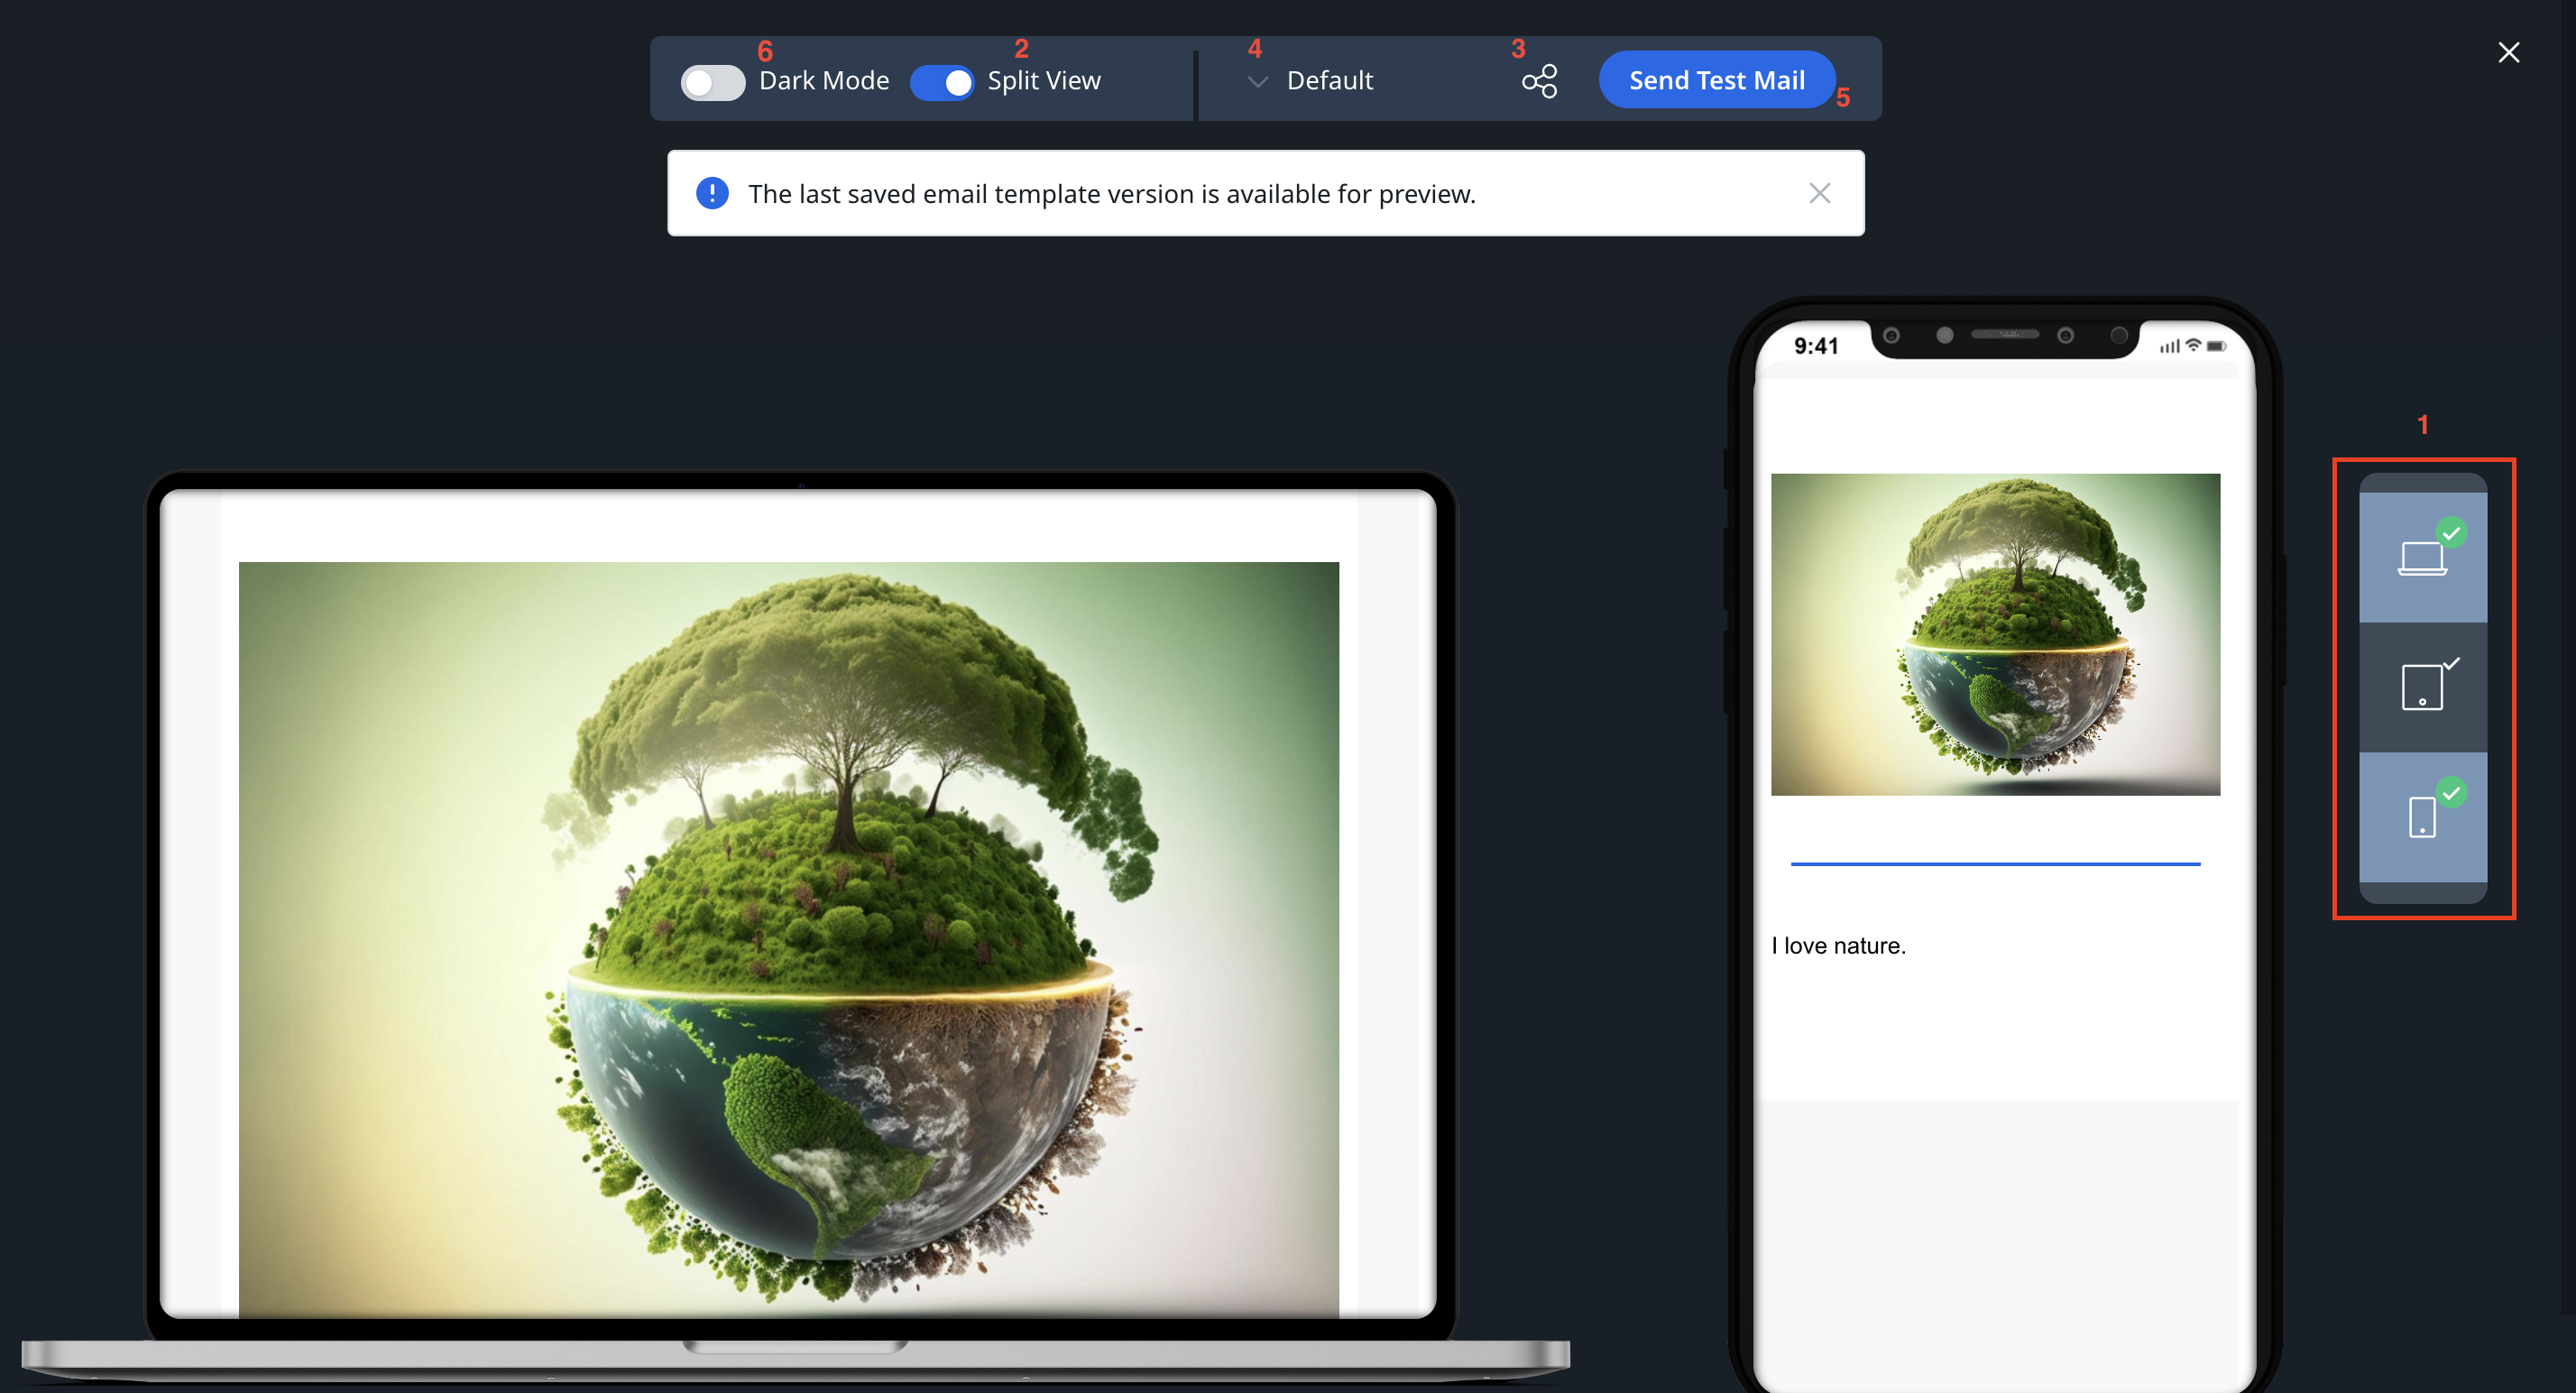
The Preview option enables you to view the designed email template before using it in a program or outreach. The following options are available in Preview:
- View: The preview is available in the following view:
- Desktop view
- Tab view
- Mobile view
- Split View: The Split View option enables you to select two views among the Desktop view, Tab view and Mobile view simultaneously. Using Split View admin can compare the look and feel of the added elements in the email template.
- Share: The share option enables you to copy the shareable link of the email template preview page.
Note: Recipient needs to have following permission access from Permission Bundle page:
Navigation Permissions > Digital Journey-> Email Template Preview - Version: This dropdown displays the available versions of the email template. You can select the required version of the email template to preview. For more information on the email template version, refer to the Versions section.
- Send Test Mail: Send Test Mail option enables you to enter one or more email addresses to whom the test mail is to be sent. A test mail is sent to test the formatting related issues and to confirm the overall accuracy of the email.
Note- When you send a test email from a template that contains a survey link, survey button, or inline report, these elements act as placeholders only. They do not generate or return actual data. To test the full functionality of these elements, send a test directly from the program.
- The Send Test Mail option from the Email Template will only send the email without attachments, if there are any.
- Dark Mode: Dark mode option enables the display setting that uses dark colors for the background and lighter colors for text, reducing eye strain and enhancing readability in low-light conditions.
Versions
The Version option is used to create modified versions of the email template. Versions are multiple forms of the same email, contained within a single email template.
For Example, a program can be sent to a different segment of customers.
Example Business Use Case: Versions help you to create the same email template in multiple versions.
Note: The Default version of the email template cannot be deleted from Versions.
Create Email Template Versions
To add versions to an email template:
-
Click New Version. The dropdown menu appears.
Note: You can create a maximum of 20 versions. -
Select the required option:
- Blank Canvas: If you want to start designing your template from a clean state.
- Choose a Template: Select a template from the ready-to-use layouts to quickly create your mail.

-
In the Create Version dialog box, enter the following details in the Blank Version tab:
- In the Version Name field, enter the name of the version.
- In the Choose an Opt-Out Language dropdown, select an opt-out language.
- From Choose a Layout field, select a layout of the version.

- Click Create.
-
Click the Translate tab if you want to translate the email template including email body, subject line, and preheader, while preserving the HTML structure, inline CSS, and merge tokens throughout. Enter the following details in the Translate tab:
- Select a Source Version for translation.

- Select a Target Language for translation.
- Enter a Version Name.
- Click Translate & Create. The new translated version is created.

- Select a Source Version for translation.
Note: You can Edit, Clone, and Delete versions by clicking the three-vertical dots adjacent to each Version.
Organize Email Templates using Folders
You can create folders on the Email Templates list page to organize templates. When you click the folder name, all the templates included in that folder are displayed in the right pane.
Gainsight provides a default folder called Uncategorized where email templates that are not added to folders are stored. You cannot modify the name of this folder or delete it.
The System folder contains predefined email templates for Journey Orchestrator. These templates are read-only, and the folder itself cannot be edited. However, you can clone the templates and make edits to the cloned versions.

Create a Folder
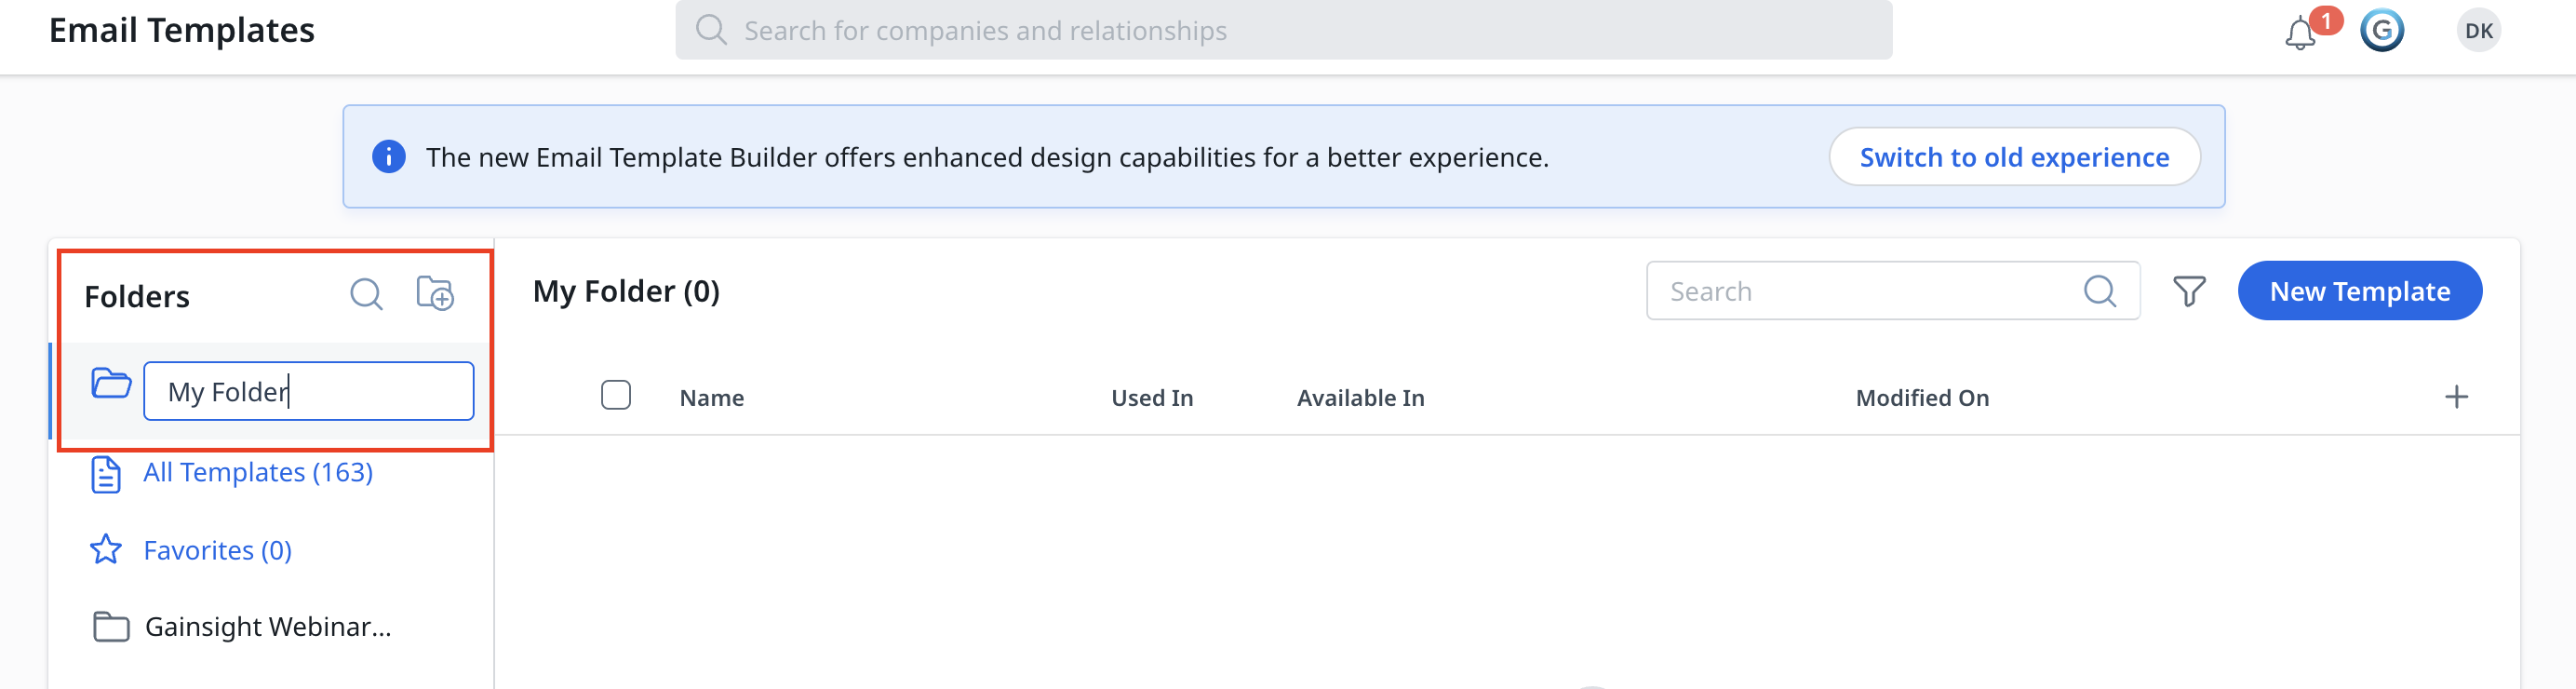
To create a new folder:
- Click the plus icon in the Folders section.
- Enter name for the folder.
- Click the enter key. The folder is created.
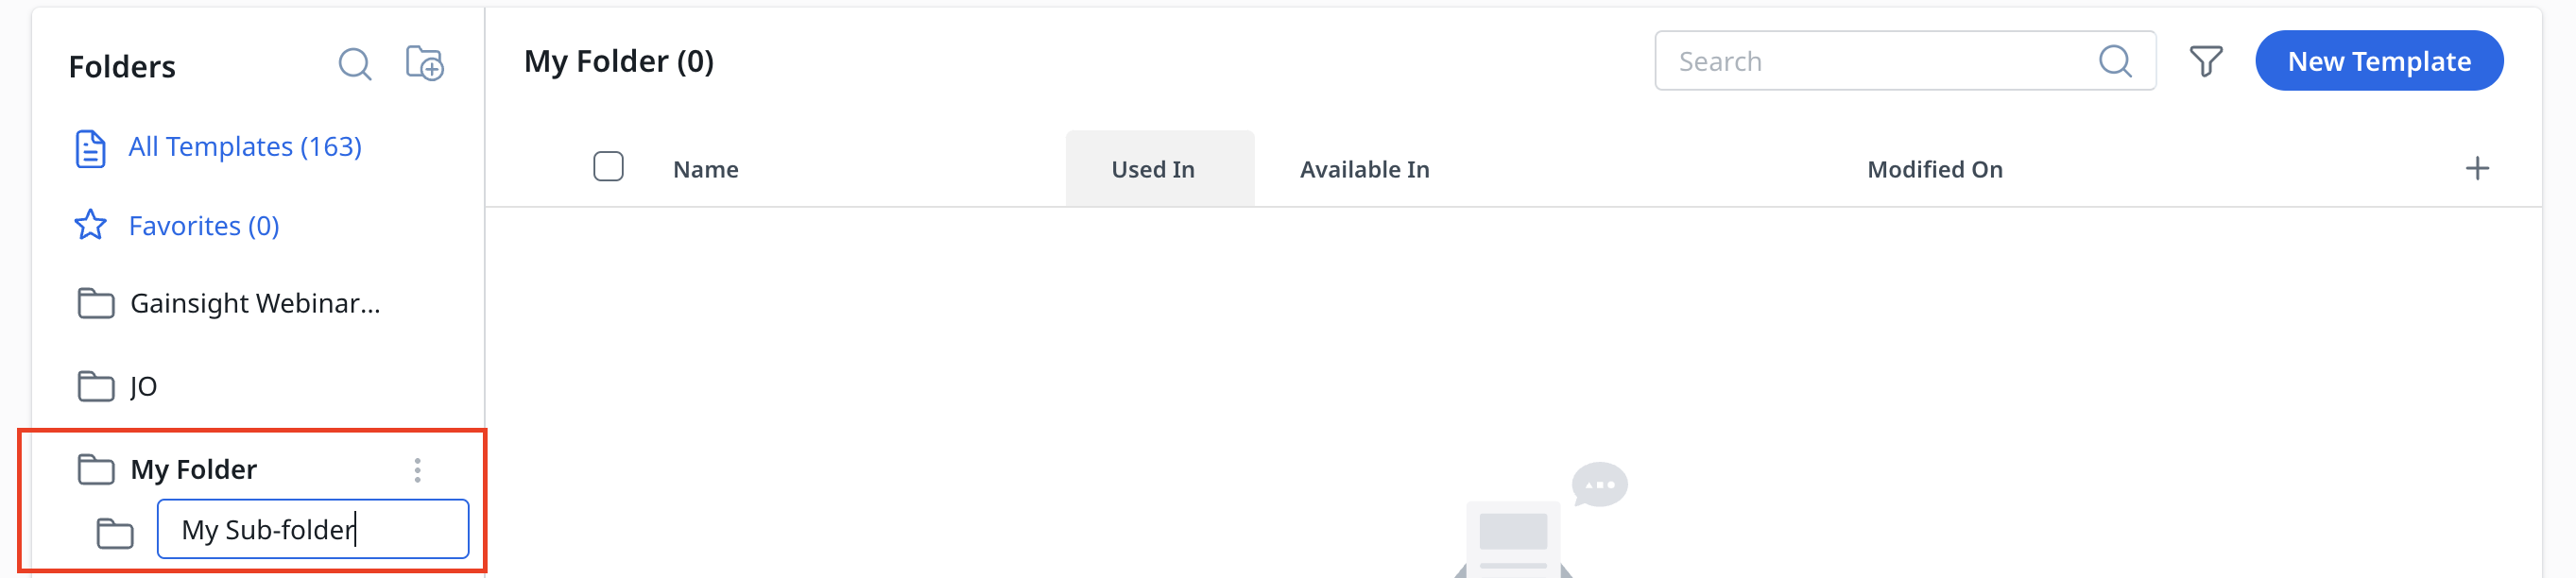
Create a Sub-folder:
To create a sub-folder:
- Select the folder under which sub-folder is to be created.
- Hover over the three-vertical dots besides the selected folder.
- Click Create Sub-folder.
- Enter name for the sub-folder.
- Click the enter key. The sub-folder is created.
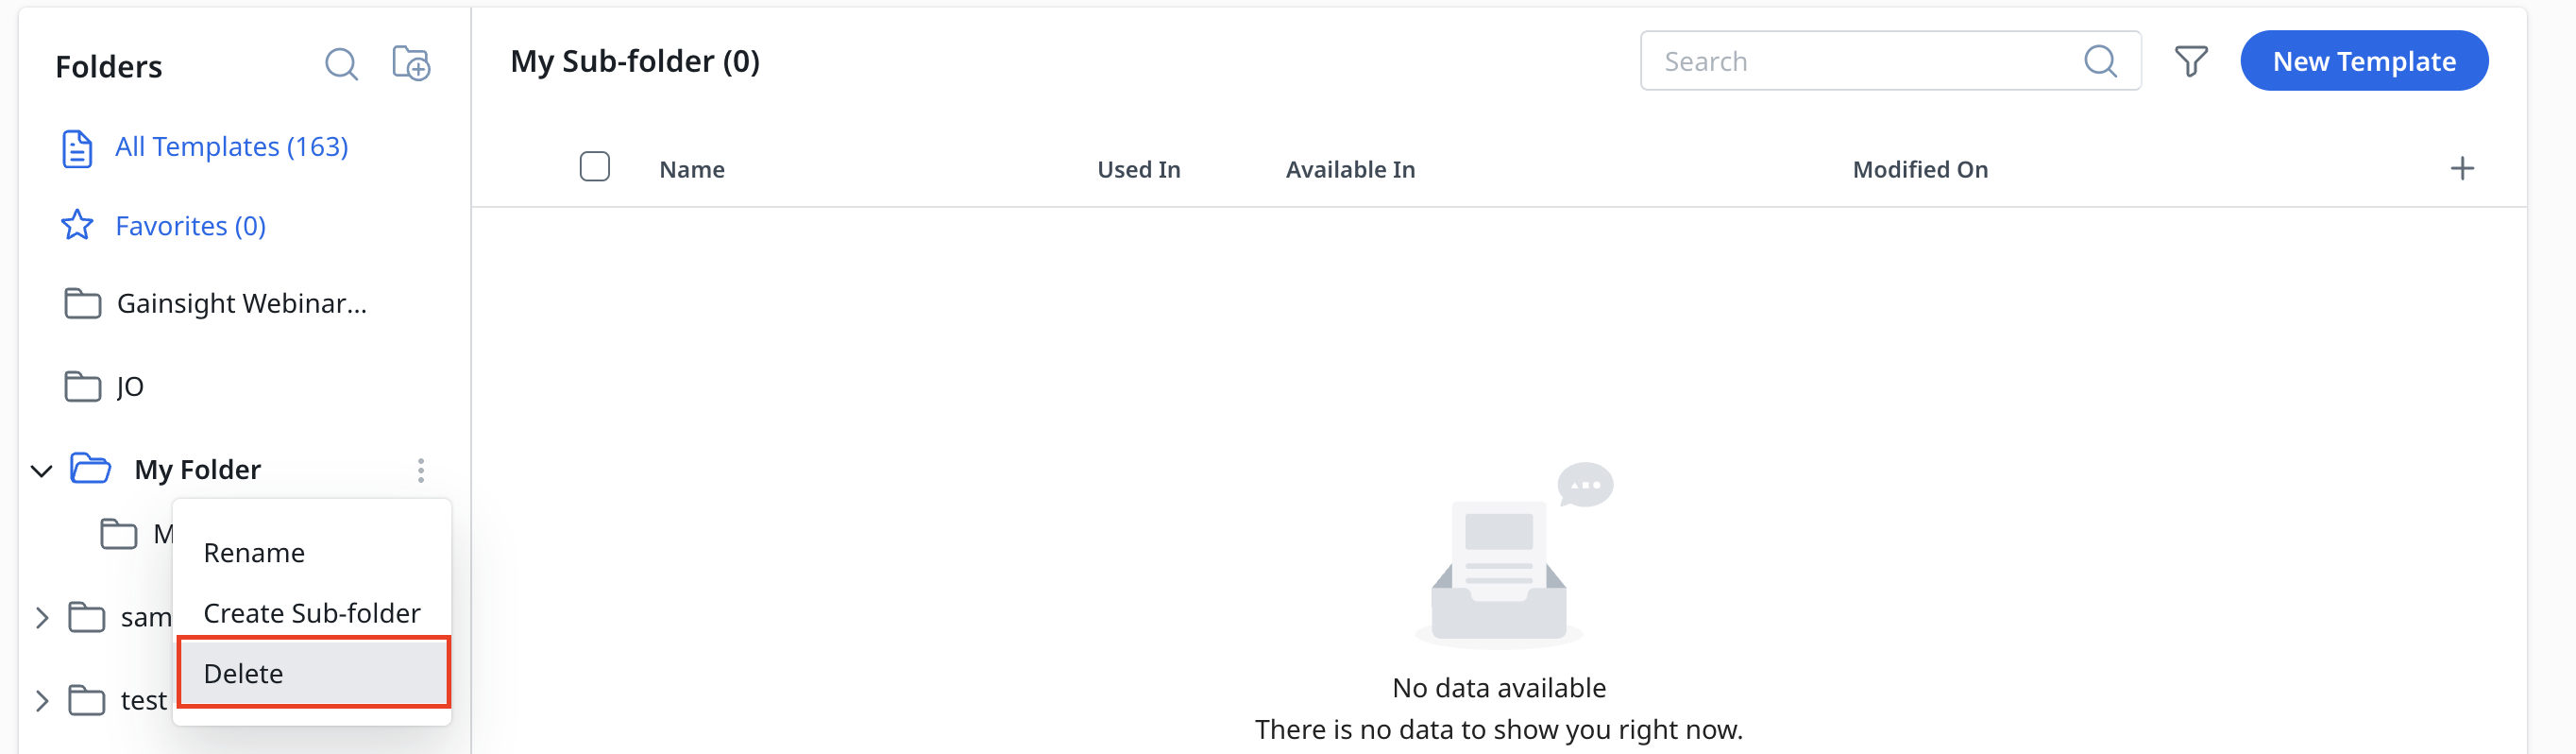
Delete Folders
A folder can be deleted when it has no sub-folders and it does not contain any email templates.
To delete a folder:
- Select a folder to be deleted.
- Hover over the three-vertical dots besides the selected folder.
- Click Delete.
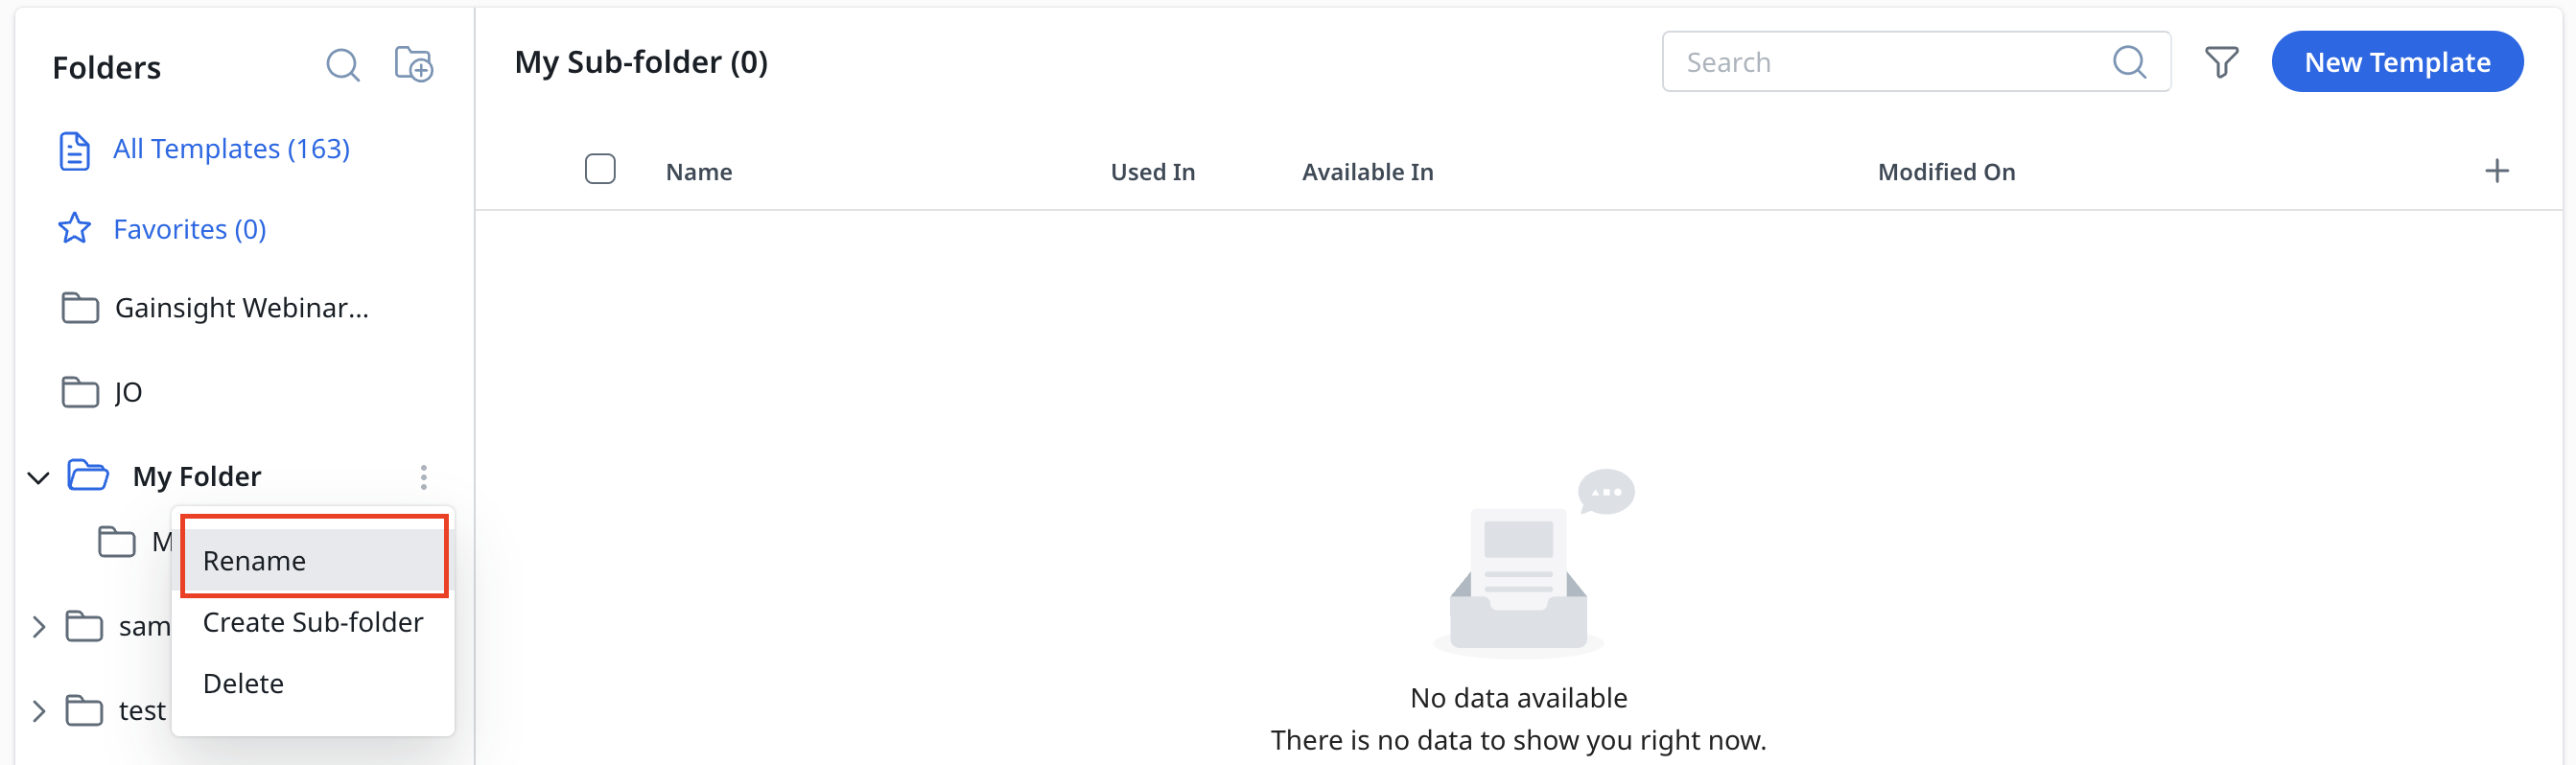
Rename Folder
To rename a folder:
- Select a folder to be renamed.
- Hover over the three-vertical dots besides the selected folder.
- Click Rename.
- Enter name for the folder.
- Click the enter key. The sub-folder is created.
Move Sub-Folders
To move the sub-folder drag a required sub-folder and drop it to the required folder.
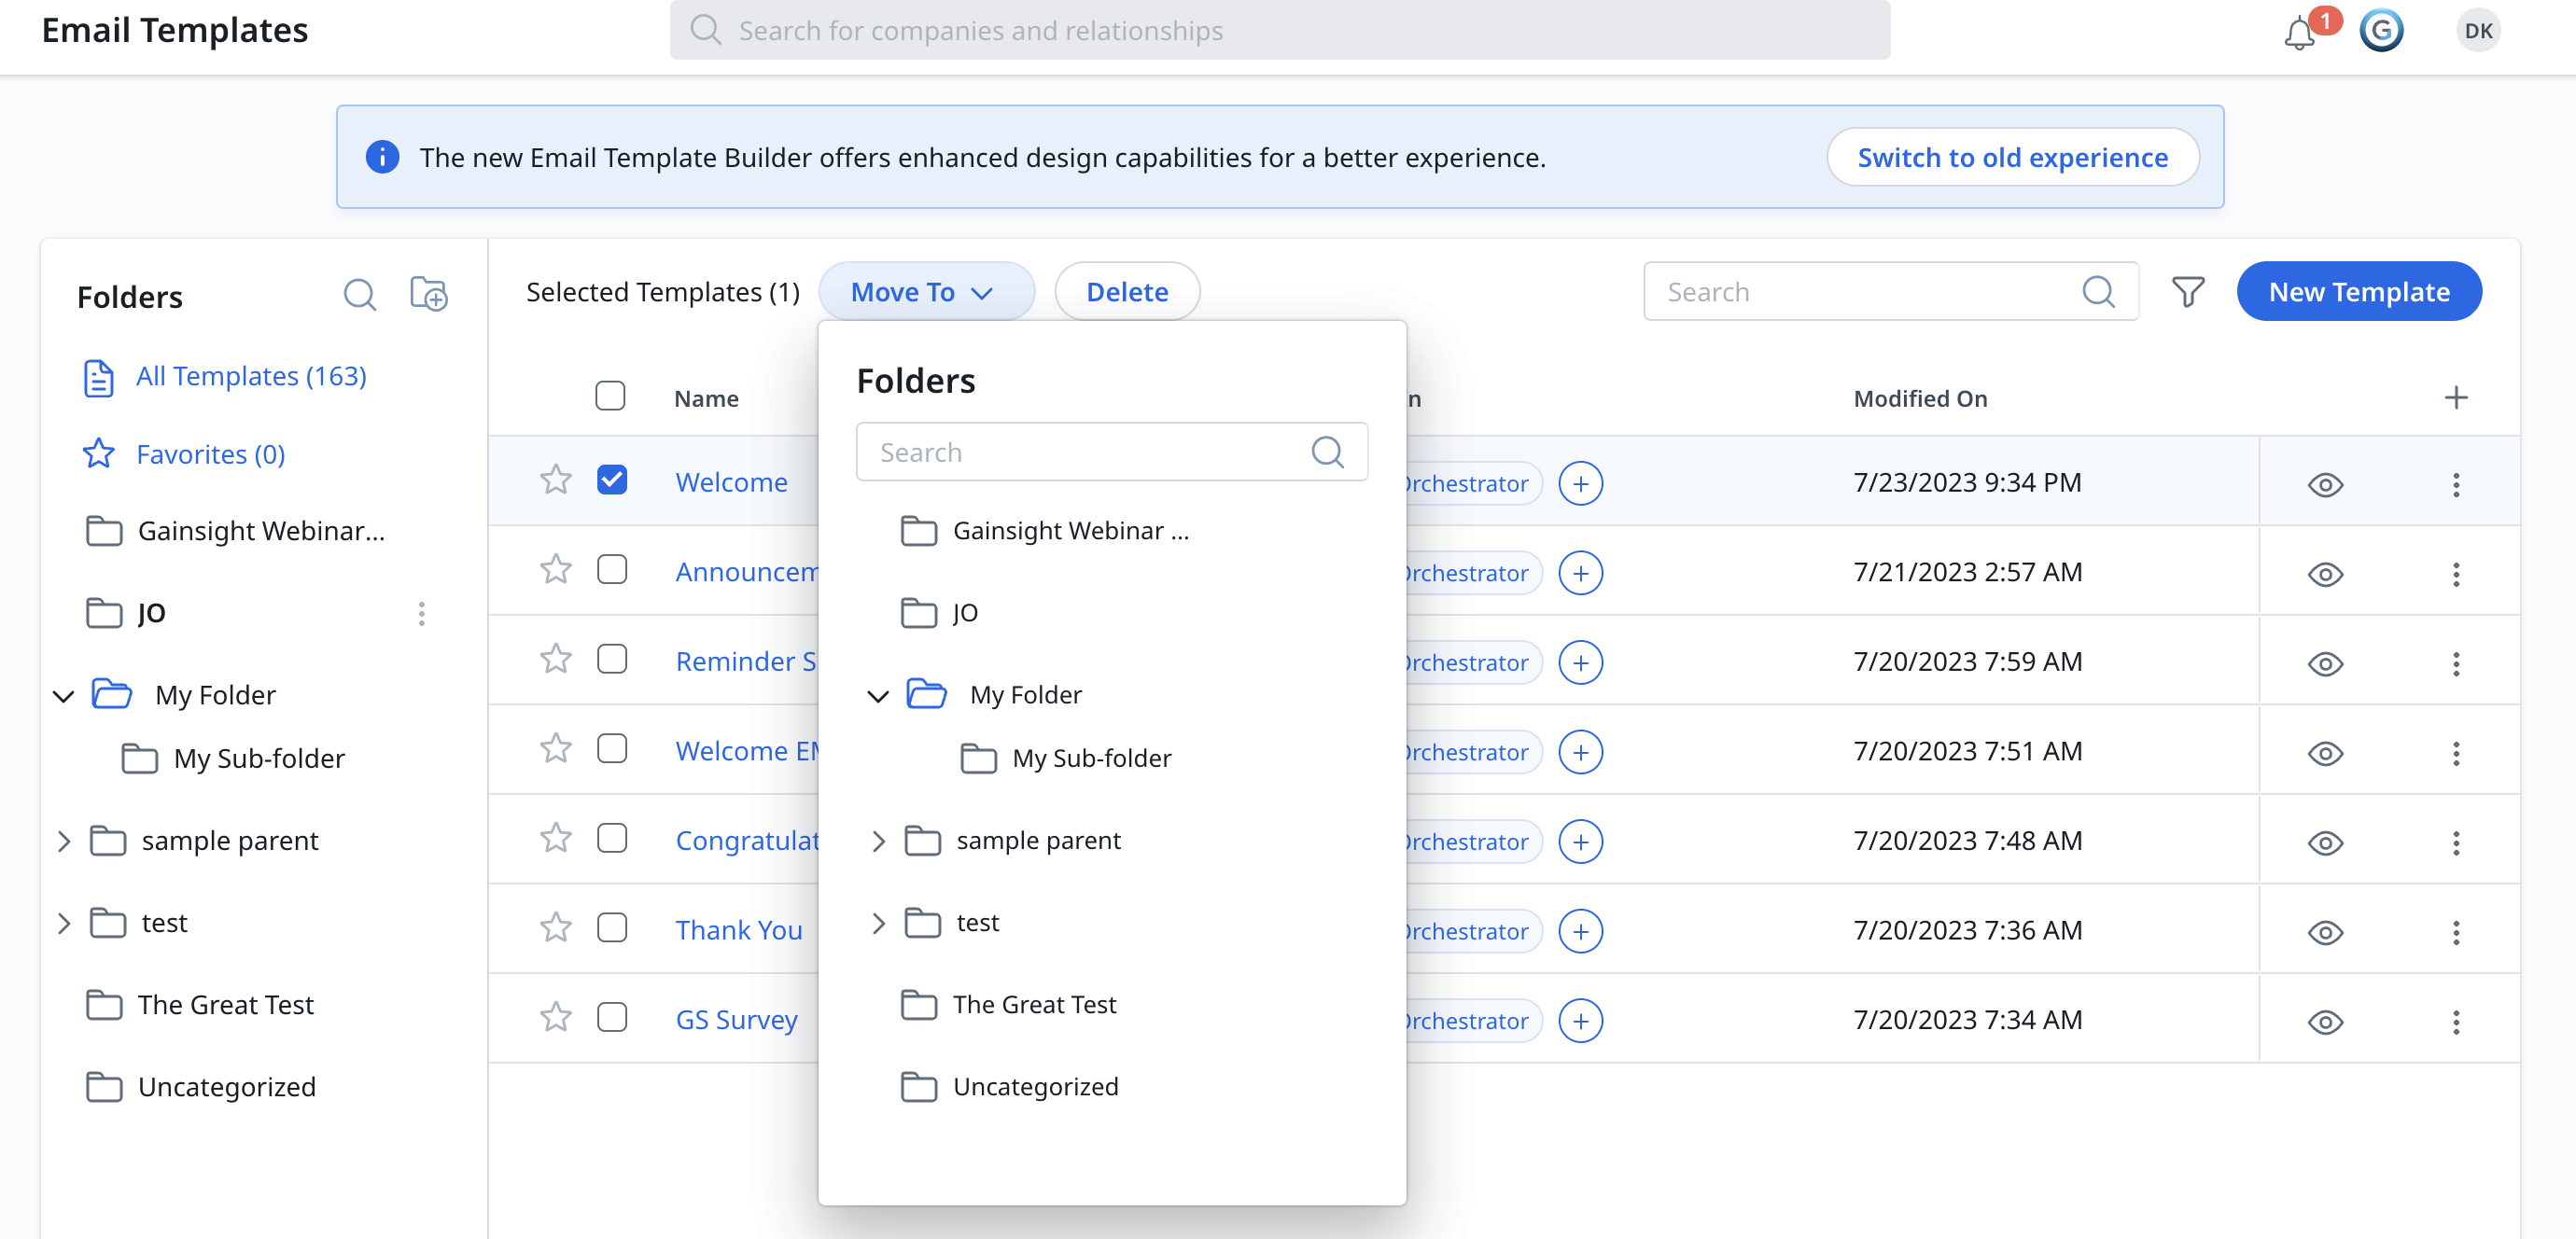
Move Email Templates to Folder
To move the email templates to a folder:
- Select the checkbox email template(s) that needs to be moved.
- Click the Move To dropdown list. The Folders window appears.
- Click the required folder or sub-folder.
Configure Opt-Out Options
You have several configuration options to control the opt-out experience for email recipients.
Opt-Out Settings
The following are opt-out configuration options:
- Email Type: Select if the email template is Non-operational or Operational. For more information on operational emails, refer to Operational Emails article from Additional Resources.
- Select Categories: Select Opt-Out Categories for your email template. You must select at least one category to save the email template. Opt-out categories are configured under the Email Preferences page. For more information on adding categories, refer to Email Opt-Out Configurations article from Additional Resources.
- Select Page: Select an Opt-Out Page for your email template. The pages available for this field are determined by the opt-out categories selected. If no category is selected, then no page will be available. You must select an opt-out page to save the email template. Opt-out pages are configured under the Email Preferences page. For more information on configuring opt-out pages, refer to Email Opt-Out Configurations article from Additional Resources.
IMPORTANT: According to new regulatory changes, a one-click opt-out footer is now mandatory for non-operational emails. If the footer lacks a one-click unsubscribe link, an error will occur, and administrators will need to make the necessary adjustments.
For the old editor, create the link by selecting text in the footer and clicking on the link option in the toolbar. In the new editor, select text in the footer, click on the link option in the toolbar, and then click on the footer to apply the link.
Operational Emails
Operational emails are intended for sharing important information specific to a customer or based on a specific customer's activity.
You can send operational emails without including an opt-out message with the Manage your subscription preference settings link in the footer. To mark an email as operational, you have to select the Operational option while creating a template.
Contacts who have unsubscribed to regular emails from Journey Orchestrator will receive operational emails regardless of the categories they have unsubscribed from. For operational emails, the Power List size must not exceed 5,000 contacts.
Notes:
- You should only use this option when you are sending operational or transactional emails such as reminders for an upcoming renewal, or welcoming a new customer.
- You can schedule an Operational email any number of times in a day.
Opt-Out Message
At the bottom of the email template, the opt-out message appears for all non-operational emails.
You can click to edit the text of the opt-out message. By default, the message will include two links:
- Clicking the first link automatically unsubscribes the user from all the emails within the same category as the email they unsubscribed from.
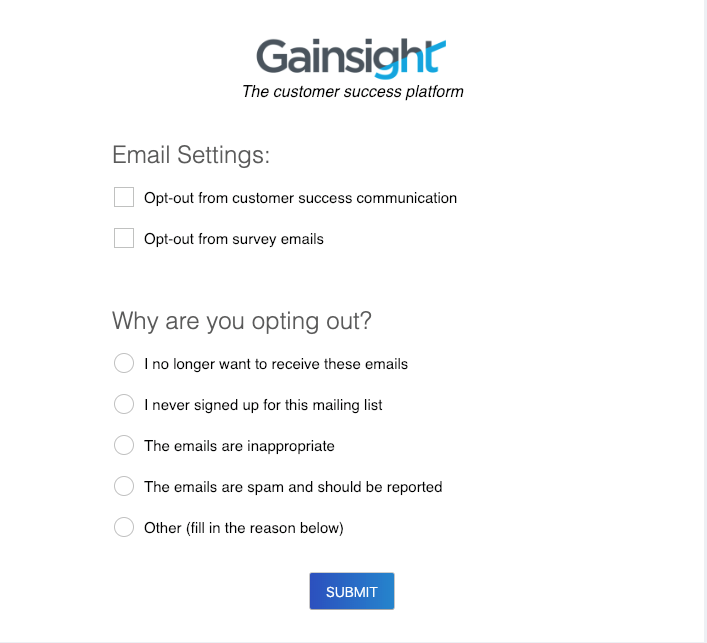
- Clicking the second link the Manage Preferences page in a new tab. On this page recipients can select specific categories to opt-out from, and provide a reason for why they are opting out. You can select the page to be displayed under Opt-Out Settings section. By default, the Manage Preferences page displays as shown in the image below:
Note: The opt-out message links does not work for test/preview emails.
For more information on how to send emails without the opt-out message, refer to the Operational Emails section.
The Email Template List View includes the Category Names, Opt Out Setting, and Page Name columns. These columns are optional and can be added or removed using the column picker.

Additionally, the Filter includes the Category Names, Opt Out Setting, and Page Name fields, allowing you to better tailor your email templates list view.
