Survey Design
Gainsight NXT
Overview
After a new Survey is created, Admins can add and configure Sections, Pages, and Questions for the Survey in the Design page. For more information on how to Create Surveys, refer to the Create a Survey article.
In the Design page, the following list is displayed under Pages & Questions on the left pane:
You can move Sections and Questions between the pages in this area and change their order. You can also edit Pages and Sections names and delete them.
These items are considered as nested, where Questions are under Sections and Sections are under survey Pages.
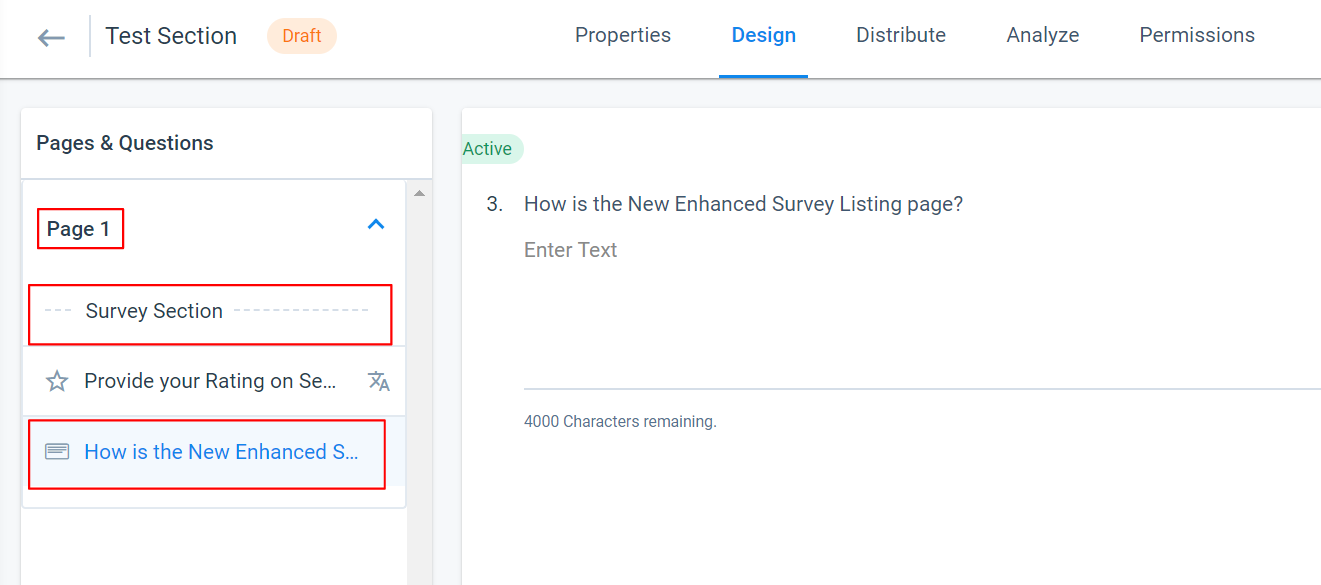
Survey Pages
Pages are useful to help divide the survey into different areas of focus. A survey should always have at least one page. Survey participants can only view one page at a time.
To add a survey Page:
- Navigate to Surveys > Survey List > [Select the required survey] > [Click the Design tab]. Survey Design page appears.
- Click + on the bottom-right of the Design page.
- Select the Page option. A new page appears in the left panel of the Design page under Pages & Questions.
- Click the edit icon of the newly added page to name it.
Survey Sections
Sections are useful to help divide the Page into different areas of focus. Having different sections can help direct survey participant’s thoughts to a specific idea or topic. It can also help you to organize related questions in one area.
Note: Survey Section is visible in the Survey Preview or Survey Landing page only if it has at least one question after it.
To add a survey Section:
- Click + on the bottom-right of the Design page.
- Select the Section option. A new section appears in the left panel of the Design page under Pages & Questions.
- Enter the required Section name in the Section Label text box.
- Enter the required Description/Content in the Section Content text box.
Note: You can also perform Rich Text Editing on the text you have entered and the same is applicable for section Translate. - Click ✓ at the bottom-right of the page to save the section.
Survey Questions
Gainsight recommends developing your survey questions and deciding which question types to use before you set them up in Gainsight. The following types of questions are available:
- Multiple Choice
- Net Promoter Score (NPS®)
- Customer Satisfaction (CSAT)
- Star Rating
- Ranking
- Matrix
- Text
Questions are nested within survey sections. If no sections have been added, questions appear directly in a survey page.
Note: It is not possible to edit the question type once the question is created.
To add a survey Question:
- Click + in the bottom-right of the Design page.
- Select the Question option.
- Select the type of question you would like to add. You can also import a saved question from the Question Library. For more information, refer to the Survey Question Library article.
- Enter the Question title, text of the actual question.
- Complete configuring the question based on the type. Configurations in each Question type explained in the next section.
- Click ✓ at the bottom-right of the page to save the question and its configuration or click X to abort.
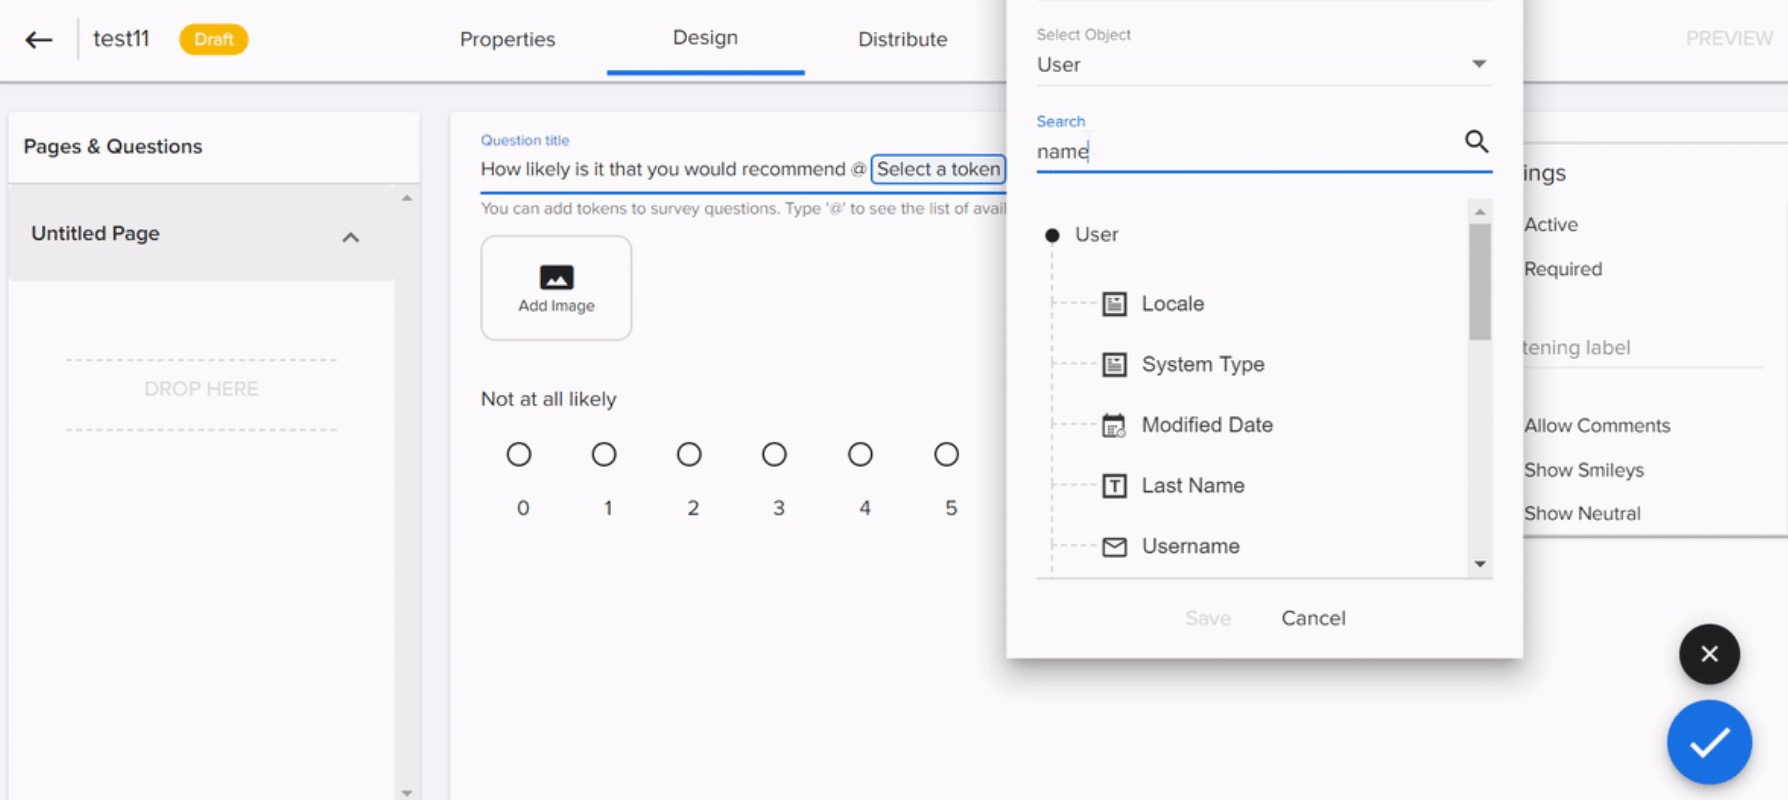
Question Tokenization
Tokens are placeholder fields derived from the Survey Participant object such as attributes from Company, Company Person, Relationship, Relationship Person and Associated Object (CSAT case). You can add tokenized fields in survey questions.
To add a token to survey question:
- Enter @ in the question title.
- Select a token option appears. Enter the following details:
- Default Value: Enter default value in the text box. If there are Null values or values of the Token are missing, the default value will be populated in the Token field.
- Select Object: If the Survey entity type is Company, you can select Company or Company Person Object. If the Survey entity type is Relationship, you can select Relationship or Relationship Person.
- Search: You can search the field or select it from the list.
- Click Save.
- Click the ✓ icon at the bottom-right of the Design page to save.
If the survey type is Transactional, you can select Associated Object and can select a token on Associated Field.
You can view which Object and Field is associated with the Token when you hover on the Token.
You can build reports on the Survey flattened objects and you can view the Tokenized questions as fields. These Tokenized question fields are labelled as Token_XX_. For more information on Survey Flattening, refer to the Surveys Flattening Overview article.
Limitations:
- Tokenized questions are only available for non-anonymous surveys in order to accurately populate the token field with correct data.
- You cannot add a Question with token fields to the question library.
- Tokenization in Survey Questions is not supported for translated questions. Translation needs to be performed on the default value only. For more information, refer to the Question Translation section.
Question Types
Multiple Choice
The Multiple Choice question allows you to add a list of multiple answers as options. This enables participants to select one answer from the list of multiple answers added in the survey Design page.

To add a Multiple Choice question type:
- Click + in the bottom-right of the Design page.
- Select the Question option.
- Select Multiple Choice as a question type.
- Enter the following in the question:
- Question Title: Type the title of a question visible to the survey participants.
- Add Image (Optional): Add an image to be displayed as part of the question.
- Enter the Option Here: Type the list of the answers as options.
- Click + to add another blank answer option.
- Click X to remove an added option.
- Click and hold 6 dots icon right to an answer option to move it to another position to arrange/rearrange them in a specific order.
- Select the following options as required:
- Mark as Internal: Enables you to add internal questions for internal teams to respond to. These questions are not visible in the survey for the participants. Selecting this option disables the Answer Required checkbox. Internal responses can be used in situations where a participant is unable to complete the survey, such as when an employee conducts a survey over the phone.
- Active: On selecting this, the question is displayed in the survey to the participants.
- Required: On selecting this, participants must answer the question to submit survey.
- Control Type: You can select one of the control types for the answer options. Available options include:
- Radio: Participants can select only one option as their answer. The list of options appear below the question.
- Checkbox: Participants can select more than one option as their answer. The list of options appear below the question.
- Drop Down Single Select: Participants can select one option from a list that appears when they click the answer field.
- Drop Down Multi Select: Participants can select multiple options from a list that appears when they click the answer field.
- Answer Scoring: This is to assign each answer a weighted score. This is only available with the Radio Control Type.
- Add “Other” Option: Enables participants to select “Other” as their answer.
- Other Label: You can change the display name of the “Other” option.
- Layout: Vertical or Horizontal can be selected to display the answers to participants accordingly.
- Flattening Label: You can enter the display label for this question that can be used for the Survey Flattening feature.
- Allow Comments: Enables participants to include free form text with their answer.
- Comment Label: Display name in the comments box.
- Make Comment Mandatory: Select this to make a comment mandatory.
Note: If you enable this option, the respective question also becomes mandatory to answer.
- Click PREVIEW to see preview of the question and its configuration in a new tab. You have three options to see previews in the Desktop, Tablet, and Mobile modes. For more information, refer to the Preview section.
- Click ✓ at the bottom-right of the page to save the question and its configuration.
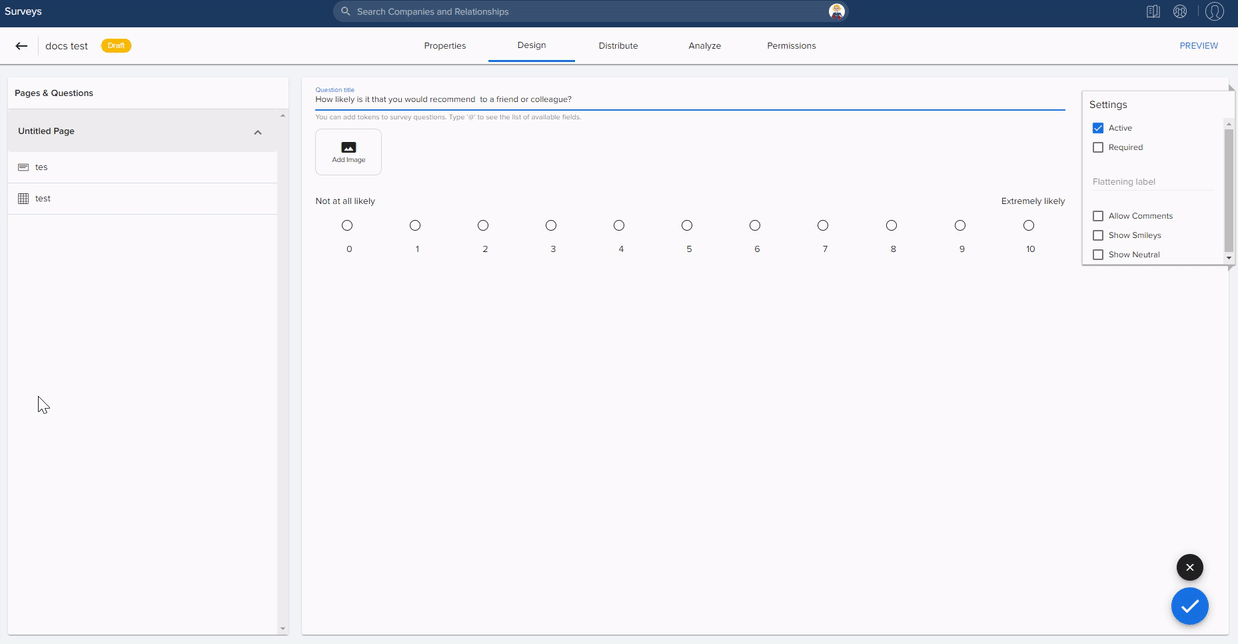
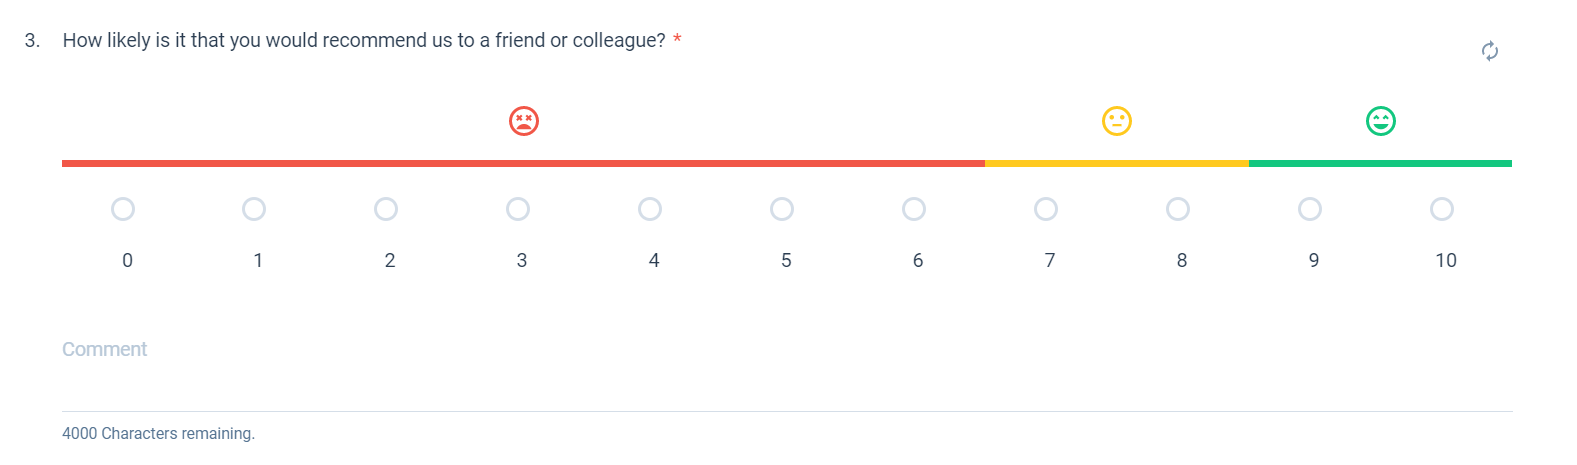
NPS®
The Net Promoter Score® (NPS®) question type is a scoring model for measuring customer satisfaction. This type of question asks respondents to rate the product or service on a scale of 0 to 10, and then divides respondents into Promoters, Passive, and Detractors. Only 1 NPS® question can be added to a survey.
To add a NPS® question type:
- Click + at the bottom-right of the Design page.
- Select the Question option.
- Select NPS® as a question type.
- Enter the following in the question:
- Question Title: Type the title of the question visible to survey participants. By default, the question is “How likely is it that you would recommend us to a friend or colleague?” You can edit the text while configuring the question.
- Add Image (Optional): Add an image to be displayed as part of the question.
- Select the following options as required:
- Active: On selecting this, the question is displayed in the survey to the participants.
- Required: On selecting this, participants must answer the question to submit survey.
- Flattening Label: Display label can be entered for this question to be used as part of the Survey Flattening feature.
- Allow Comments: Enables participants to include free form text with their answer.
- Comment Label: Display name in the comments box.
- Make Comment Mandatory: Select this to make a comment mandatory.
Note: If you enable this option, the respective question also becomes mandatory to answer. - Show Smileys: On selecting this, it displays a color scale and smiling/frowning faces with the NPS® scale. This option disables the Show Neutral option.
- Show Neutral: On selecting this, it displays a “Neutral” label above the middle of the NPS® scale.
- Click PREVIEW to see preview of the question and its configuration in a new tab. You have three options to see previews in the Desktop, Tablet, and Mobile modes. For more information, refer to the Preview section.
- Click ✓ at the bottom-right of the page to save the question and its configuration.
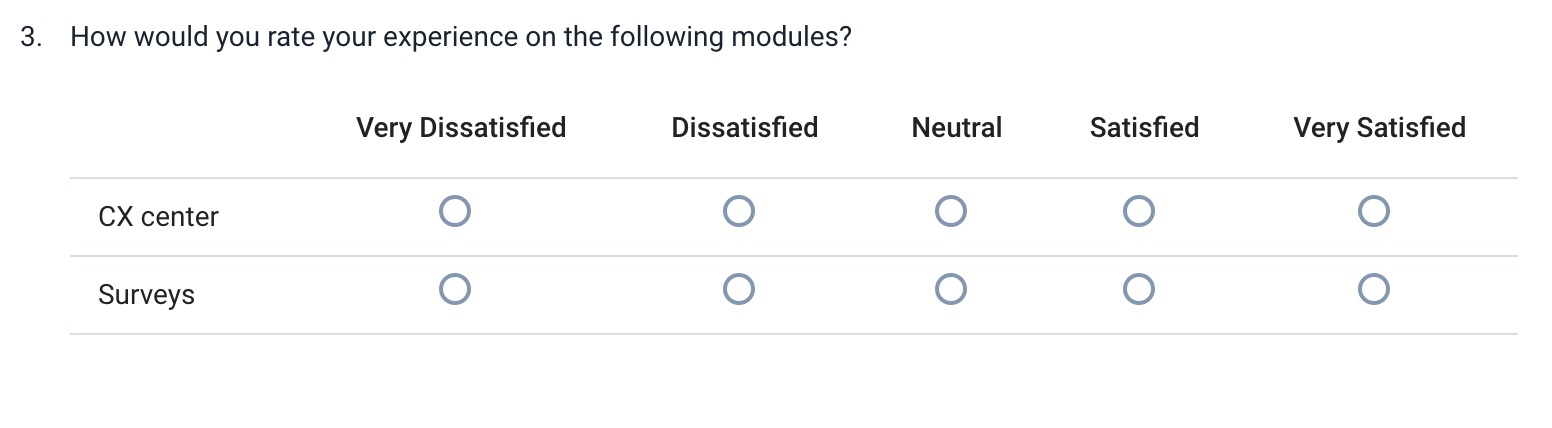
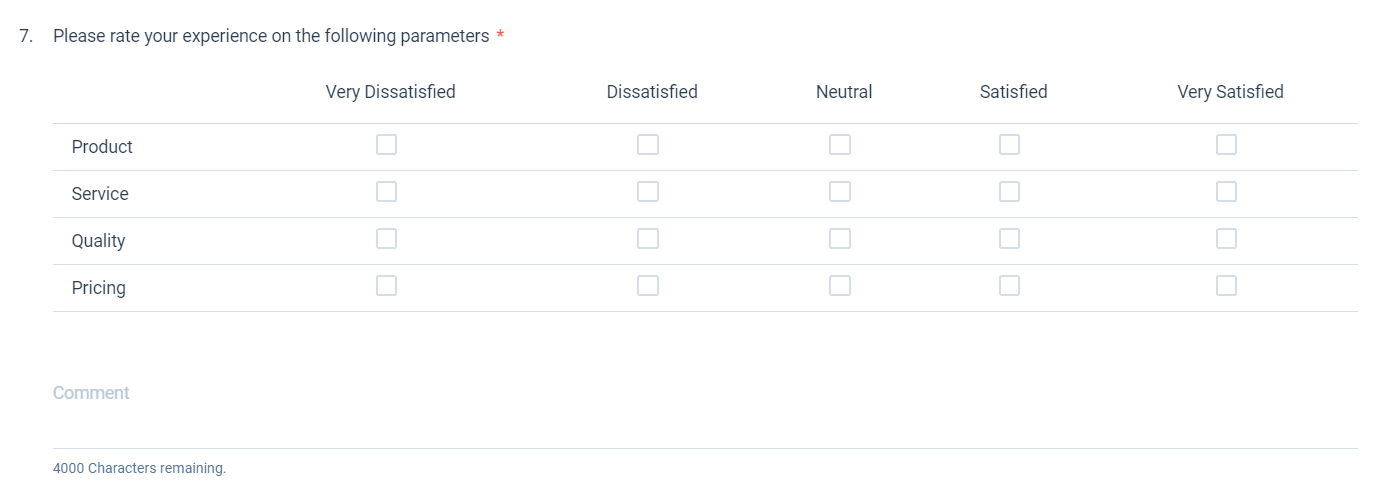
CSAT
The CSAT is a direct question to measure Customer Satisfaction. It asks respondents to rate a product, process, or service by selecting the labels on a scale of 1 to 5, and divides the respondents into Promoters, Passive, and Detractors.
The default labels and scores are as follows:
- Very Dissatisfied (1)
- Dissatisfied (2)
- Neutral (3)
- Satisfied (4)
- Very Satisfied (5)
Notes:
- You can change the labels as required.
- You can add multiple CSAT questions to a survey.
To add CSAT questions to the survey:
- Click + at the bottom-right of the Design tab.
- Select the Question option.
- Select CSAT as the question type.
- In the Question title field, enter the question that is displayed in the survey.
- (Optional) In the Add Image option, upload an image to be displayed with the question.
- In the Settings section, select the following options as required:
- Active: When checked, displays the question in the survey.
- Required: Marks the question as mandatory to submit the survey.
- Matrix Question: Select to add a subquestion to the CSAT question.
Note: Once you select the Matrix Question option and save it, this action cannot be reversed.-
Subquestions: Enter a subquestion or item for participants to rate. You can also perform the following actions to a subquestion:
- Click the plus icon to add another subquestion.
- Click the X icon to remove the subquestion.
- Click and drag the six-dots icon to reorder the subquestion.
-
- Layouts: Select the format for the labels - Radio(Score), Radio(Text), or Star.
- Reverse Order: Select to display labels in reverse order. This option is visible only when you select Default or Radio(Text) layout.
- Flattening Labelb Enter the Flattening display label for this question. For more information on Survey Flattening, refer to the Survey Flattening article.
- Allow Comments: Select to allow participants the option to include free form text with the answer.
- Comment Label: Change the display name of the Comments field.
- Make Comment Mandatory: Select to make a comment mandatory.
Note: Enabling this option marks the respective question also as mandatory.
- Once the questions and subquestions are configured, you are can perform the following actions:
- Click PREVIEW to view a preview of the question and its configuration in a new tab. You can preview the question in three modes - Desktop, Tablet, and Mobile. For more information, refer to the Preview section.
- Click ✓ from the bottom-right of the page to save the question and its configuration.
- Click + from the bottom-right to add another question.
Star Rating
You can add a Star Rating question. This enables respondents to rate a response to your question with number of Stars. You can configure the question in a scale of either 3, 5, 7, or 10 stars.

To add a Star Rating question type:
- Click + at the bottom-right of the Design page.
- Select the Question option.
- Select Star Rating as question type.
- Enter the following in the question:
- Question Title: Type the title of the question visible to survey participants.
- Add Image (Optional): Add an image to be displayed as part of the question.
- Select the following options as required:
- Mark as Internal: Enables you to add internal questions for internal teams to respond to. These questions are not visible in the survey for the participants. Selecting this option disables the Answer Required check box. Internal responses can be used in situations where a participant is unable to complete the survey, such as when an employee conducts a survey over the phone.
- Active: On selecting this, the question is displayed in the survey to the participants.
- Required: On selecting this, participants must answer the question to submit survey.
- Number of Stars: You can select a 3, 5, 7, or 10 stars scale. 3, 5, 7, and 10 stars enable participants to select 1 out of 3, 5, 7, 10 scale respectively.
- Flattening Label: Display label can be entered for this question to be used as part of the Survey Flattening feature.
- Allow Comments: Enables participants to include free form text with their answer.
- Comment Label: Display name in the comments box.
- Make Comment Mandatory: Select this to make a comment mandatory.
Note: If you enable this option, the respective question also becomes mandatory to answer.
- Click PREVIEW to see preview of the question and its configuration in a new tab. You have three options to see previews in the Desktop, Tablet, and Mobile modes. For more information, refer to the Preview section.
- Click ✓ at the bottom-right of the page to save the question and its configuration.
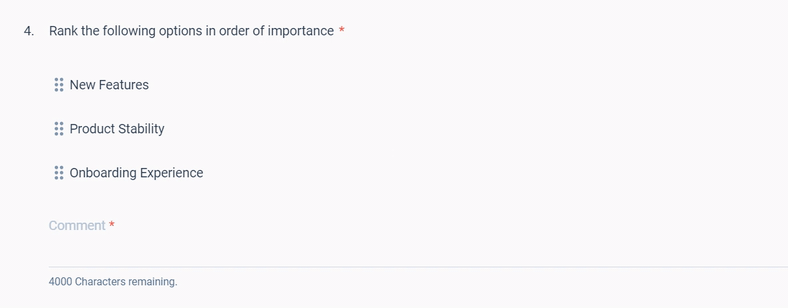
Ranking
The Ranking question type asks respondents to compare items to each other by dragging and dropping them in order of preference. The following image shows a ranking question from the survey participant’s view.
To add a Ranking question type:
- Click + at the bottom-right of the Design page.
- Select the Question option.
- Select Ranking as a question type.
- Enter the following for the question:
- Question Title: Type the title of the question visible to survey participants.
- Add Image (Optional): Add an image to be displayed as part of the question.
- Enter the Option Here: Type the list of the answers as options.
- Click + to add another blank answer option.
- Click X to remove an added option.
- Click and hold 6 dots icon right to an answer option to move it to another position to arrange them in a specific order.
- Select the following options as required:
- Mark as Internal: Enables you to add internal questions for internal teams to respond to. These questions are not visible in the survey for the participants. Selecting this option disables the Answer Required check box. Internal responses can be used in situations where a participant is unable to complete the survey, such as when an employee conducts a survey over the phone.
- Active: On selecting this, the question is displayed in the survey to the participants.
- Required: On selecting this, participants must answer the question to submit the survey.
- Flattening Label: You can enter the display label for this question for the Survey Flattening feature.
- Allow Comments: Enables participants to include free form text with their answer.
- Comment Label: Display name for the comments box.
- Make Comment Mandatory: Select this to make a comment mandatory.
Note: If you enable this option, the respective question also becomes mandatory to answer.
- Click PREVIEW to see preview of the question and its configuration in a new tab. You have three options to see previews in the Desktop, Tablet, and Mobile modes. For more information, refer to the Preview section.
- Click ✓ at the bottom-right of the page to save the question and its configuration.
Matrix
The Matrix question type is a 2-dimensional version of the Multiple Choice question type. This type of question is arranged like a table, where the questions are listed on the left and answer choices across the top. This question type enables participants to collect answers to multiple questions in a single frame.
To add a Matrix question type:
- Click + at the bottom-right of the Design page.
- Select the Question option.
- Select Matrix as a question type.
- Enter the following in the question:
- Question Title: Type the title of the question visible to the survey participants.
- Add Image (Optional): Add an image to be displayed as part of the question.
- Subquestions: Enter a subquestion or item for participants to rate.
- Click + to add another subquestion.
- Click X to remove the subquestion.
- Click and hold the 6 dots icon right to an answer option to move it to another position to arrange them in a specific order.
- Answers: Write answers for each subquestion.
- Click + to add another subquestion.
- Click X to remove the subquestion.
- Click and hold the 6 dots icon right to an answer option to move it to another position to arrange them in a specific order.
- Select the following options as required:
- Mark as Internal: Enables you to add internal questions for internal teams to respond to. These questions will not be visible in the survey for participants. Selecting this option disables the Answer Required check box. Internal responses can be used in situations where a participant is unable to complete the survey, such as when an employee conducts a survey over the phone.
- Active: On selecting this, the question is displayed in the survey to the participants.
- Required: On selecting this, participants must answer the question to submit survey
- Control Type: You can select one of the control types for the answer options. Available options include:
- Radio: Participants can select only one option as their answer. The list of options appear below the question.
- Checkbox: Participants can select more than one option as their answer. The list of options appear below the question.
- Answer Scoring: This is to assign each answer a weighted score. This is only available for the Radio Control Type.
- Flattening Label: You can enter the display label to this question that can be used for the Survey Flattening feature.
- Allow Comments: Enables participants to include free form text with their answer.
- Comment Label: Display name of the comments box.
- Make Comment Mandatory: Select this to make a comment mandatory.
Note: If you enable this option, the respective question also becomes mandatory to answer.
- Use Matrix Single answer per row (radio): when a grouping of questions use the same choices and a single answer can be chosen for each question. The rows are the questions and the columns are the possible answers.
- Use Matrix Multiple answers per row (checkboxes): when a grouping of questions use the same choices and multiple answers can be chosen for each question. The rows are the questions and the columns are the possible answers.
- Click PREVIEW to see preview of the question and its configuration in a new tab. You have three options to see previews in the Desktop, Tablet, and Mobile modes. For more information, refer to the Preview section.
- Click ✓ at the bottom-right of the page to save the question and its configuration.
Text
You can add Text question type for open ended questions. This enables participants to write an answer in free form text to the question in the answer text box.

To add a Question of type Text:
- Click + at the bottom-right of the Design page.
- Select the Question option.
- Select Text as a question type.
- Enter the following in the question:
- Question Title: Type the title of question visible to the survey participants.
- Add Image (Optional): Add an image to be displayed as part of the question.
- Select the following options as required:
- Mark as Internal: Enables you to add internal questions for internal teams to respond to. These questions are not visible in the survey for the participants. Selecting this option disables the Answer Required check box. Internal responses can be used in situations where a participant is unable to complete the survey, such as when an employee conducts a survey over the phone.
- Active: On selecting this, the question is displayed in the survey to the participants.
- Required: On selecting this, participants must answer the question to submit survey.
- Control Type: You can select one of the control types for the answer options. Available options include:
- Short Text: The default character limit is 50 but you can select an option to configure 30-130 characters.
- Character Limit: You can select the maximum number of characters, a participant can input their answer. This option is only available for the Short Text Control Type.
- Long Text: You can configure the number of rows and columns available. The character limit is 4000.
- Rows: You can select the number of rows, a participant can use for their answer. This option is only available for the Long Text Control Type.
- Integer: Only whole numbers can be used to answer this question. The character limit is 10.
- Number: Only numbers can be used to answer this question. The character limit is 10.
- Short Text: The default character limit is 50 but you can select an option to configure 30-130 characters.
- Flattening Label: You can enter the display label to this question that can be used for the Survey Flattening feature.
- Text Label: You can enter the required text label. In the following image Description is used as example.
- Click PREVIEW to see preview of the question and its configuration in a new tab. You have three options to see previews in the Desktop, Tablet, and Mobile modes. For more information, refer to the Preview section.
- Click ✓ at the bottom-right of the page to save the question and its configuration.
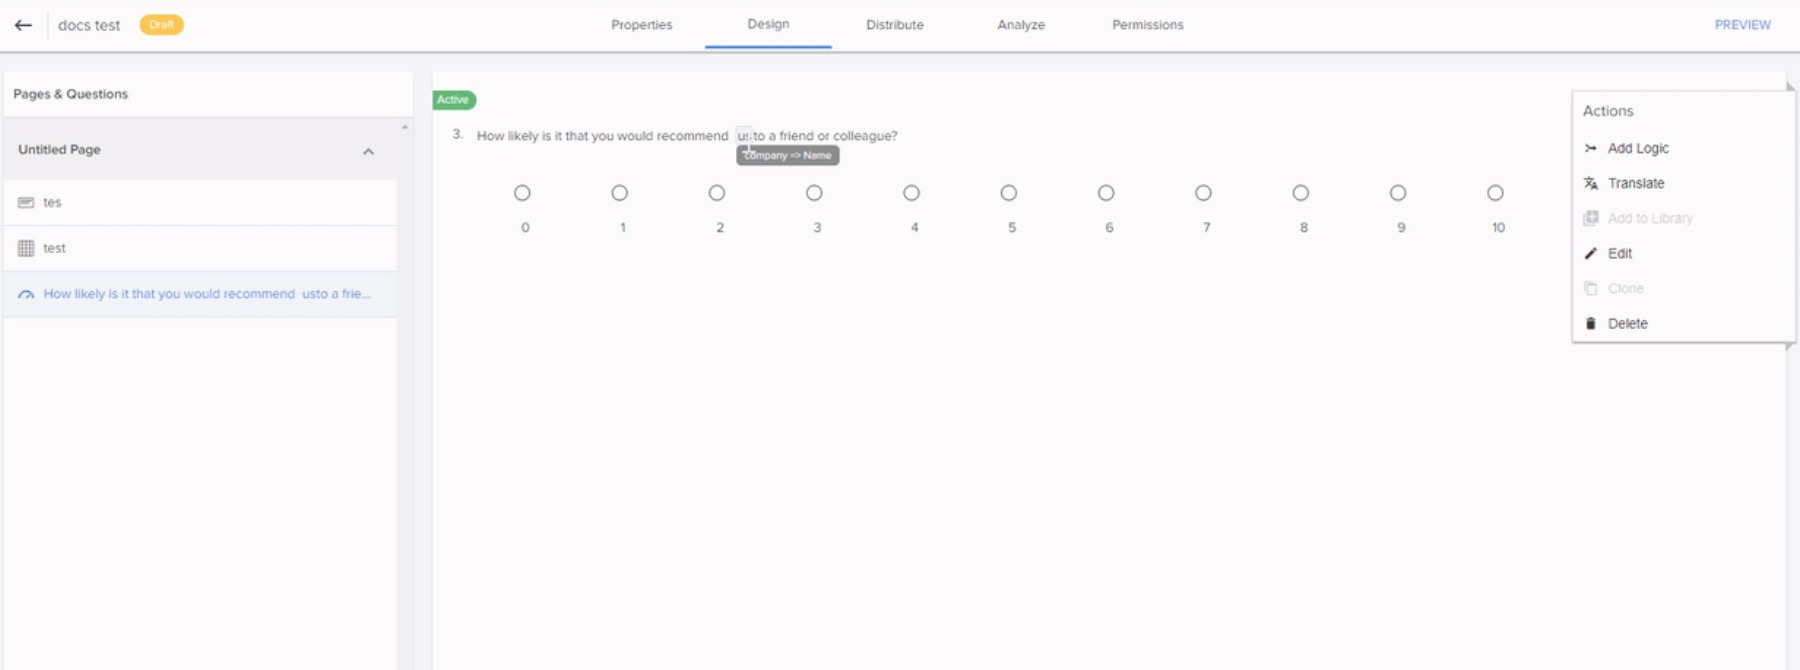
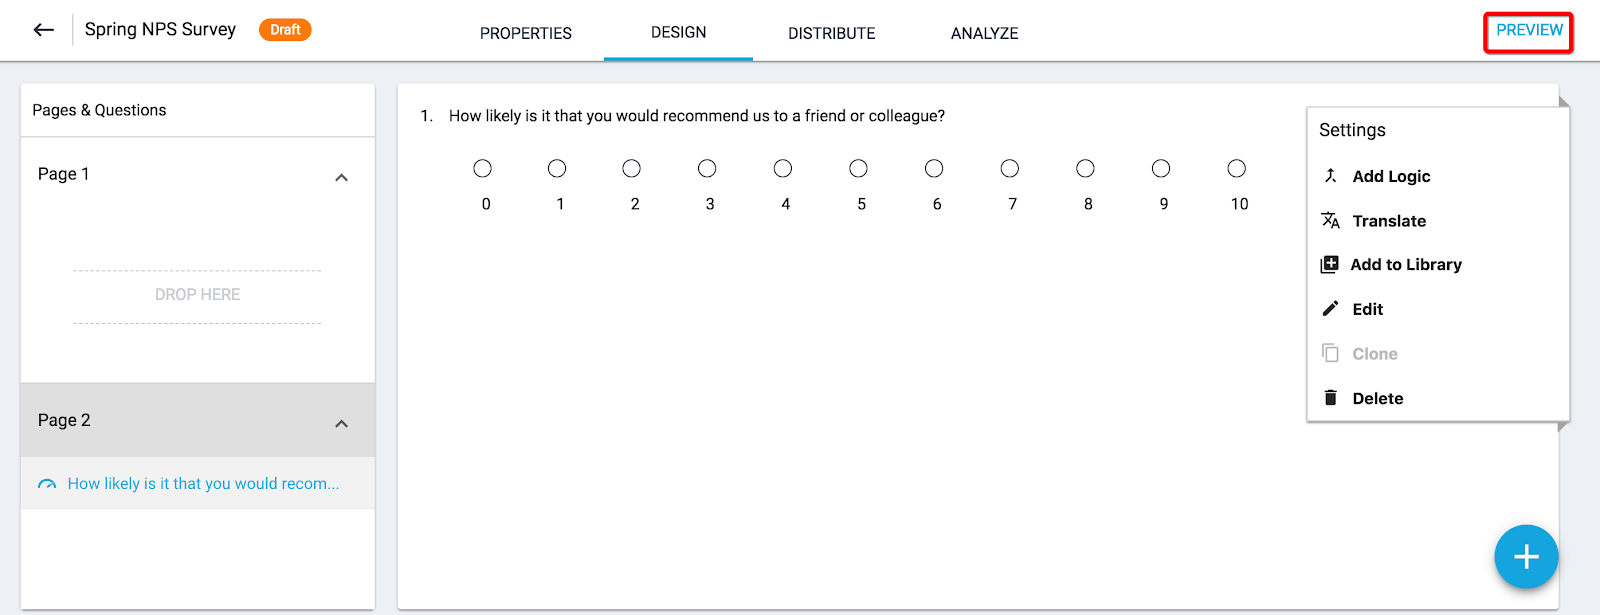
Actions
After a question is created, additional setting options available at right of the page when the question is selected. Following is the list of additional settings:
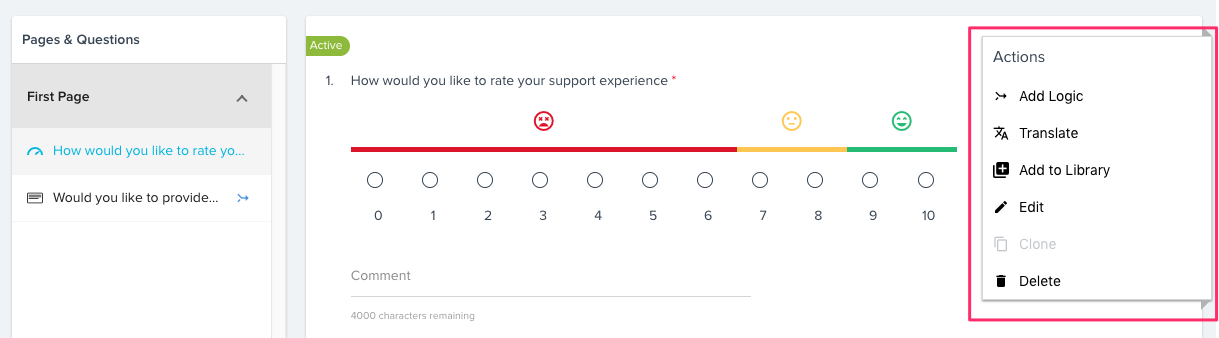
- Add Logic: You can add Display and Skip logic rules to the question. For more information, refer to the Logic Options section.
- Translate: If the survey only has one language currently configured, click this option to add more languages on the Properties page. If multiple languages have been added to the survey, click this option to navigate to the Question Translation page.
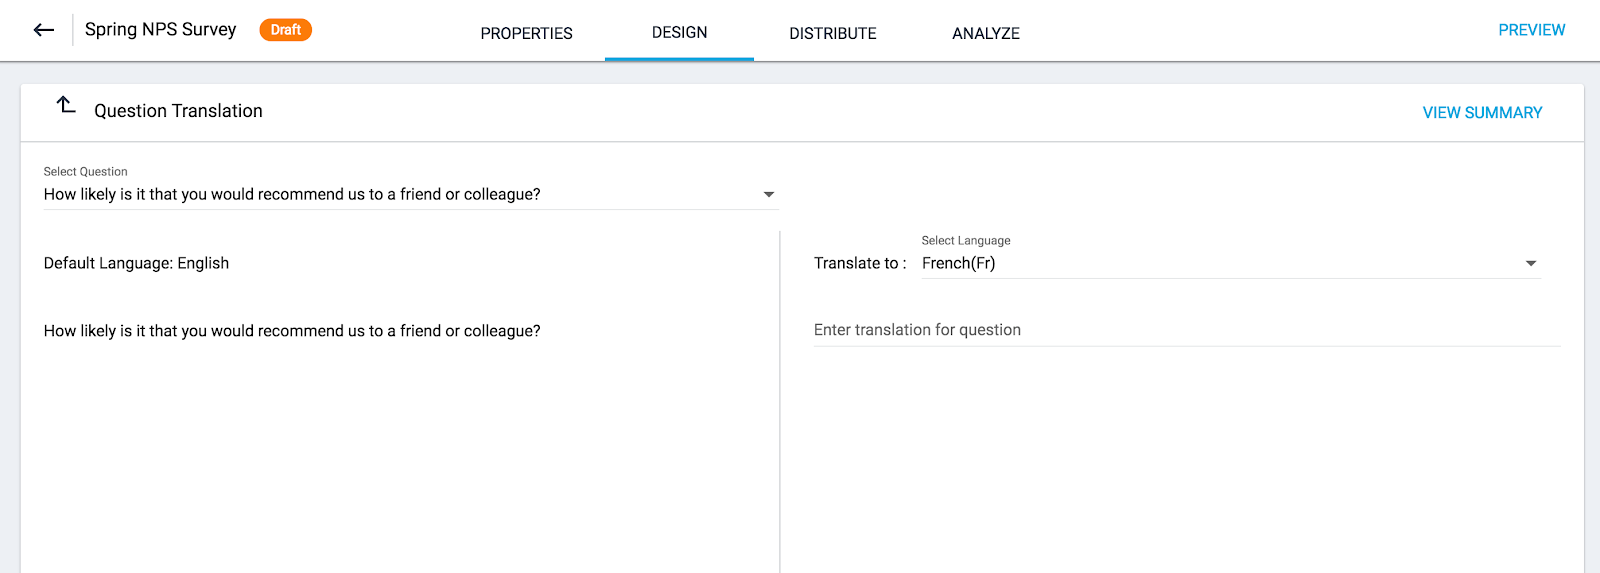
You can select a language that you would like to translate the question into and then add translations for each text element of the question. Clicking VIEW SUMMARY displays the percentage of translation completed for each question in the Translation Summary dialog. This percentage is shown for each language used by the survey.
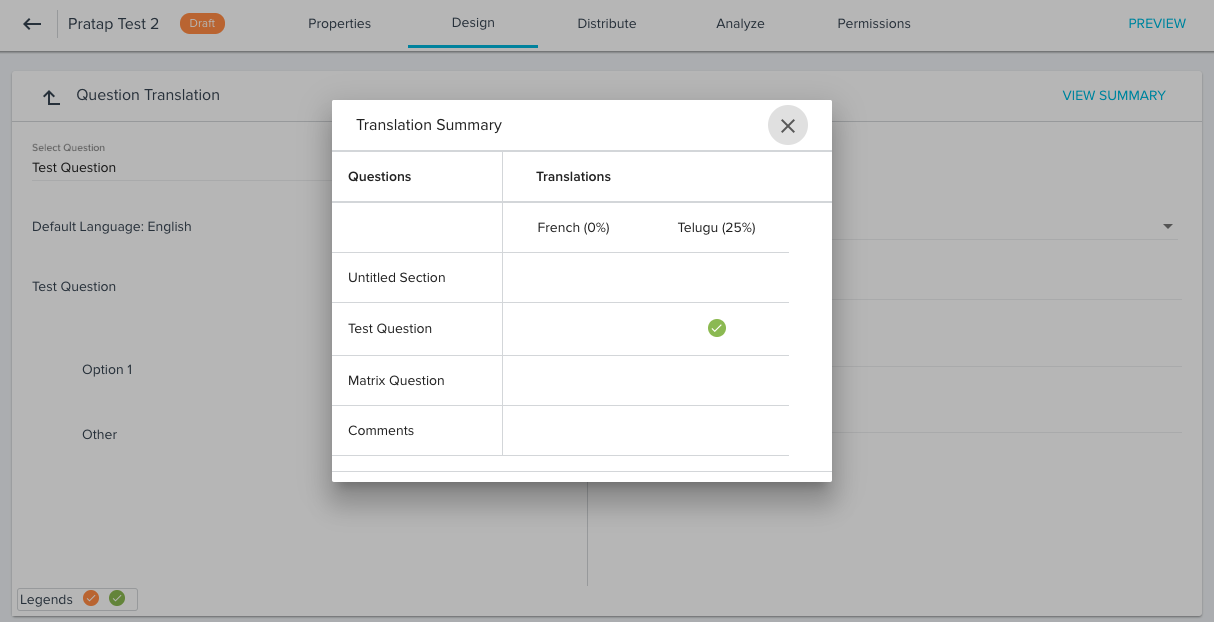
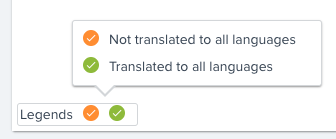
Note: You can hover your mouse pointer over Legends information at Left bottom of the page and read more information about the legends used in the Translation Summary.
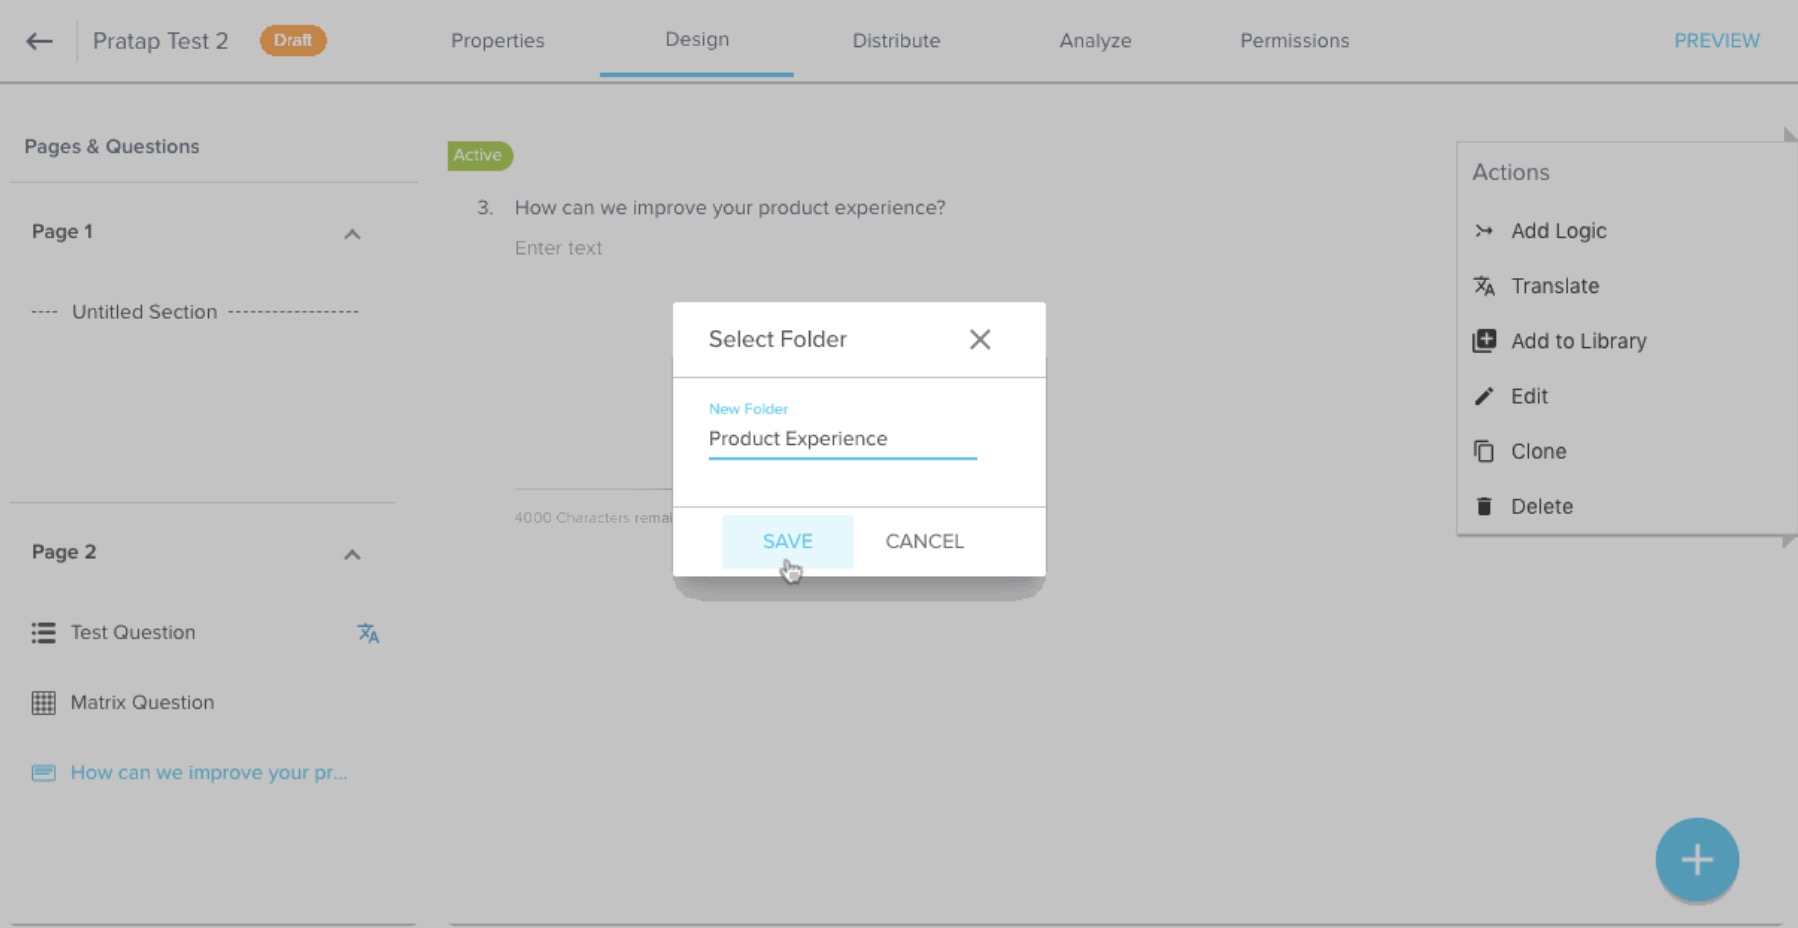
- Add to Library: You can add any question to the Question Library using this option. When you click this option, Question Library Folder dialog appears. You can select a required folder in the Question Library and click SAVE. For more information on the Question Library, refer to the Surveys Question Library article.
You can also create a new folder in the Question Library from this dialog as shown below:
- Edit: You can edit a question and its answers, and change the question’s configurations using this option.
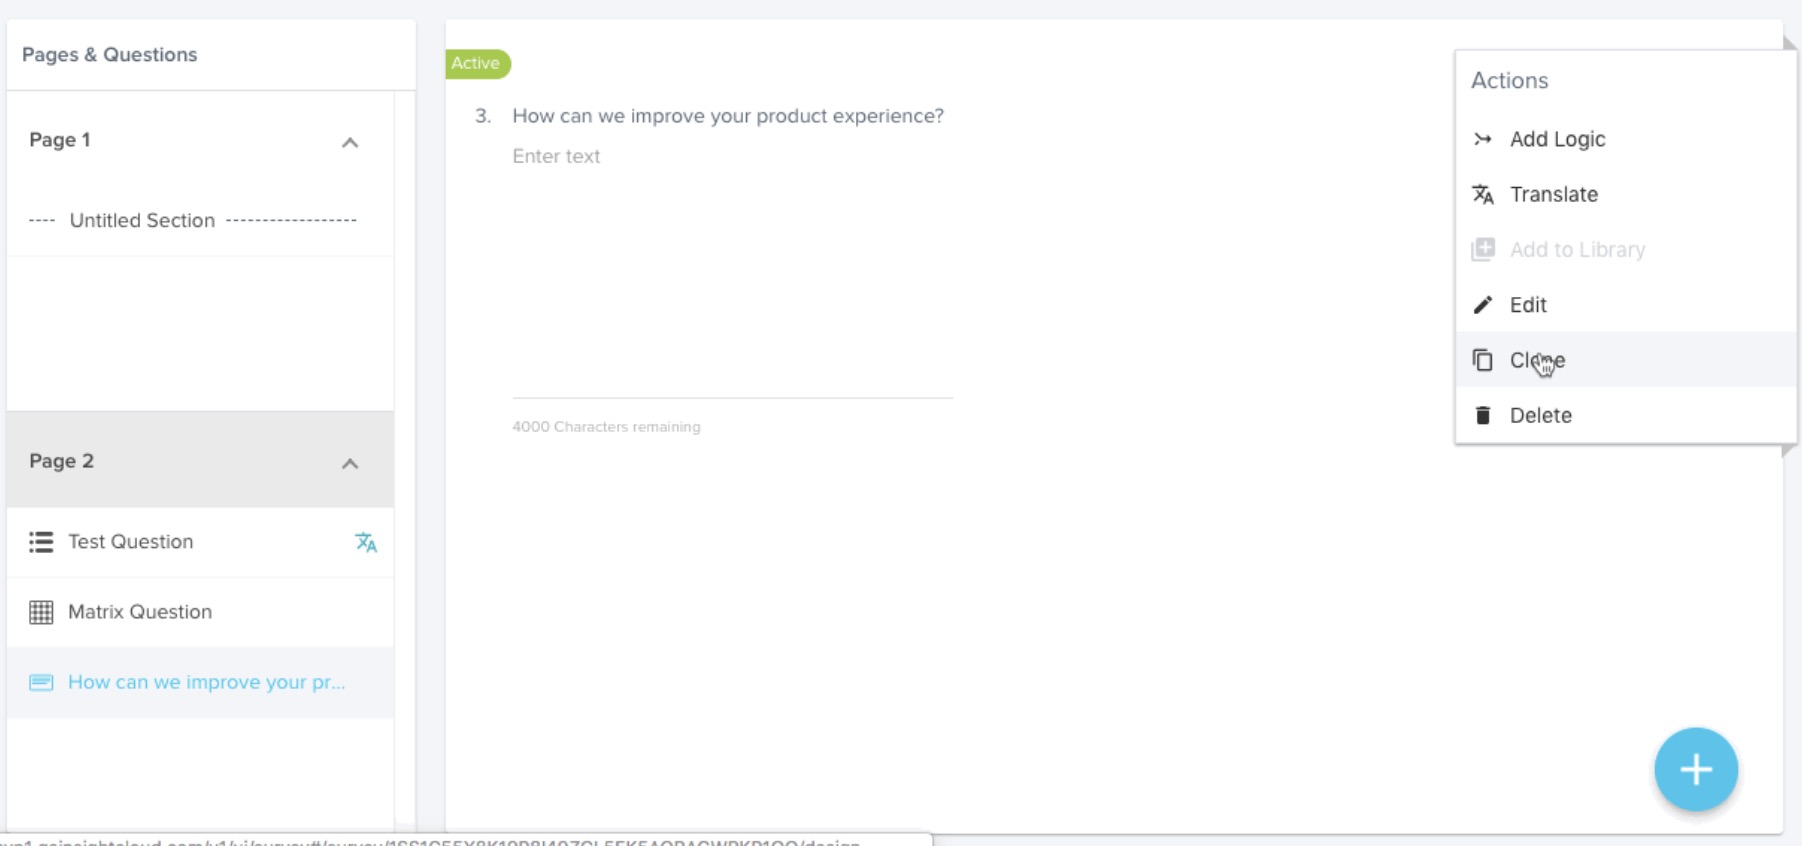
- Clone: You can click this option and clone any question within the survey. A new cloned question is added to the same Page as the source question as shown below:
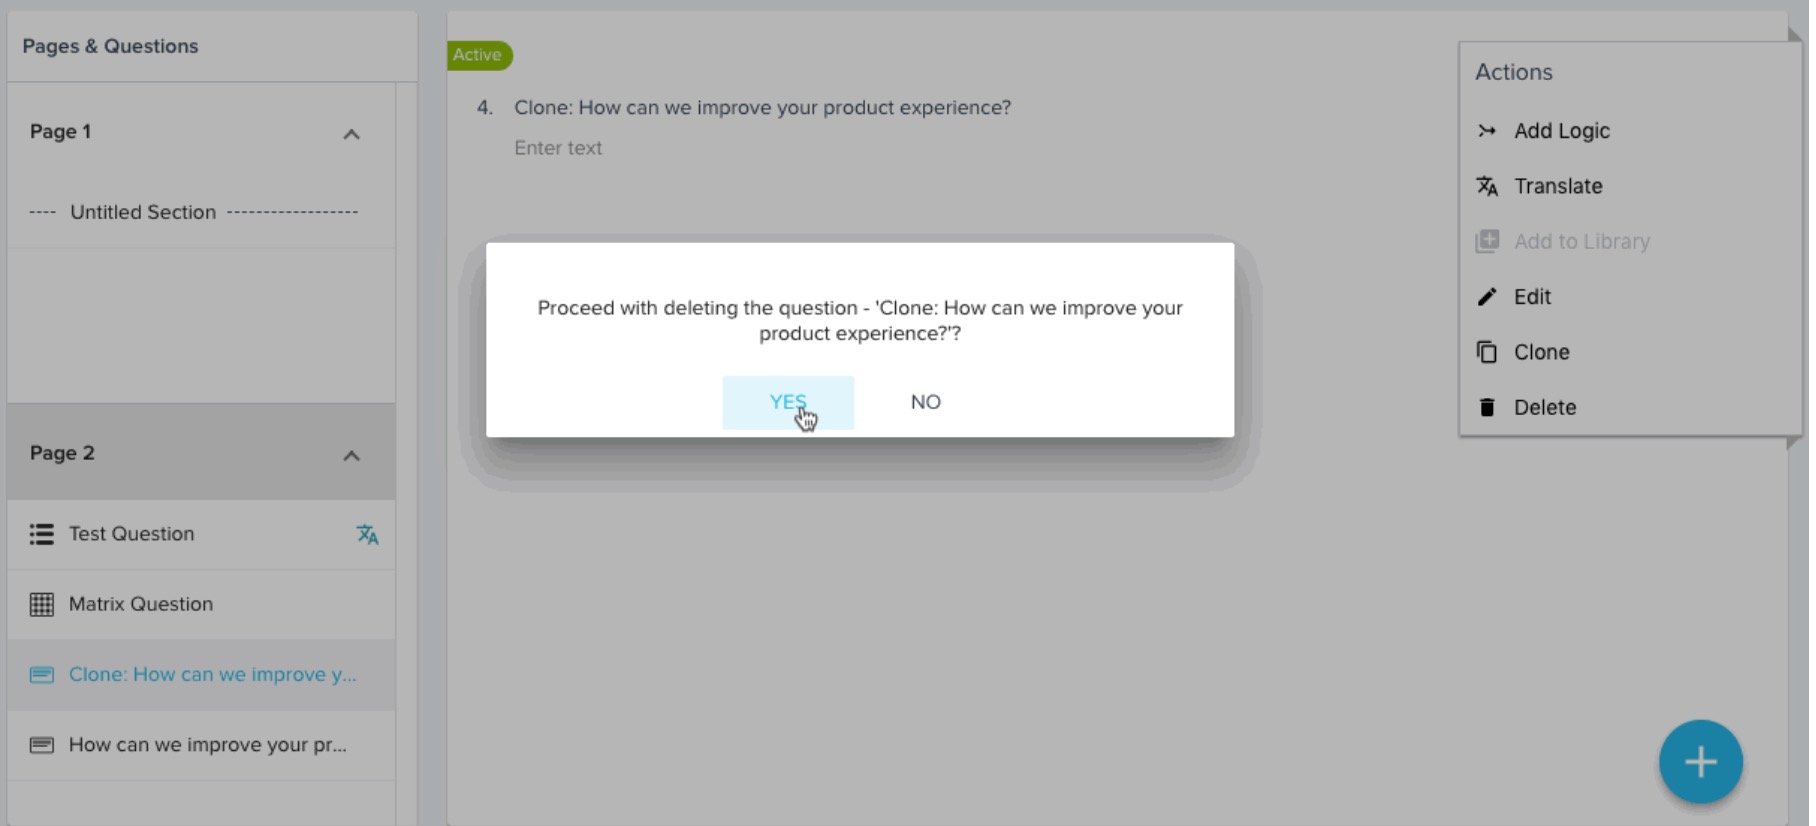
- Delete: You can delete the question using this option. After clicking this option, a confirmation message displays to confirm deleting the question.
Importing Questions from Question Library
While adding new questions to a survey, you have the option to import an existing question from the Question Library using the following steps:
- Navigate to Surveys and open an existing survey, or create a new survey to add the imported question. For more information on how to Create Surveys, refer to the Create a Survey article.
- Click + in the bottom-right of the Design page.
- Select the option Question.
- Select Import from Library as Question option. Folders in the Question Library appear.
- In the library menu, select the folder (on the left pane) to open and select the question and answer options to be imported. Select the checkbox to add any question to your survey. You can add more than one question and you may edit the question or answer options after import.
- Click ✓ at the bottom-right of the page.
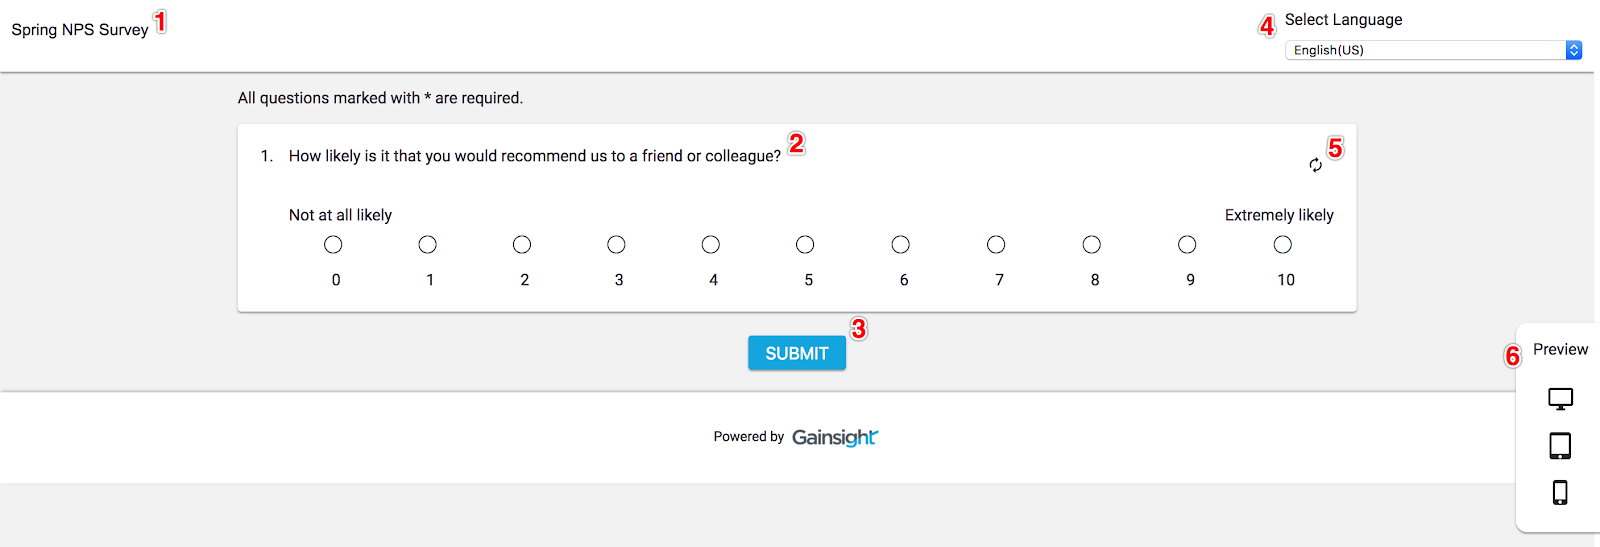
Preview
To preview your survey at any time, click the PREVIEW option in the upper-right of the Design page.
This opens your survey in a new tab and shows you what the survey looks like for participants. Following are the options that you can see in a Survey Preview:
- Survey Title: The title of the survey being previewed.
- Survey Question Preview: You can Preview the survey questions and test the answer options.
- SUBMIT: You can Test submitting answers to the survey. If you click this button, preview answers will not be recorded or tracked as part of analytics.
- Select Language: You can change the language of the survey preview. Language options that you have configured in the survey Properties page are available here.
- Refresh Answers: Clicking this button resets the answers of the preview questions to blank.
- Preview Style: You can change the layout of the preview to desktop, tablet, or mobile.
Logic Options
When you design your survey, you can apply the following logic features to control the behavior of your survey and enhance the quality of your data.
Display Logic
When you select Display Logic for a question, the question will be shown only when the conditions set by you are met. There are five potential display types are available to apply display logic to a question as listed below:
- Question
- Company
- Company Person
- Relationship
- Relationship Person
Note: The survey’s entity type determines which display types are available. You can select the Company and Company Person display types for Company surveys, and Relationship and Relationship Person display types for Relationship surveys.
Question: If you select this option, Display Logic allows you to show/hide a survey question, displaying it only to participants when they select a particular answer option (condition/rule) to an earlier question. This Logic is useful for follow-up questions and can be included on a single page.
For example, you have added the following two questions:
- Please rate on below scale, How was your product Experience? (Answer scale is 0 to 10)
- How can we improve your product experience?
You can apply Display Logic to the second question mentioned above. It should now be displayed only to the participants who selected any one of 0 thru 6 answer options in the scale. This configuration is shown in the steps below.
Following are the steps to set this feature for your survey questions:
- In the Design page, create a survey or select an existing survey to edit.
- Ensure that you have added all questions, and finalized their order, before applying Display Logic.
- Select a Question on which you want to apply display logic.
- Click Add Logic. Add/Edit logic dialog appears.
- Apply Display Logic configuration to the above use case as shown below:
- Select Type as Question.
- Select the required previous question on which you want to apply a rule.
- Select the answer options of the previous question to make sure that the current question is displayed to the participants who have answered with one of the selected answer options of previous question.
- Click + to add multiple rules. Each rule is identified with an alphabet letter.
- Change logic between multiple rules in the Expression option. You can see AND logic by default but you can change to OR logic between rules as required.
- Click SAVE. The current Survey Question will be displayed to the participants as per the above logic.

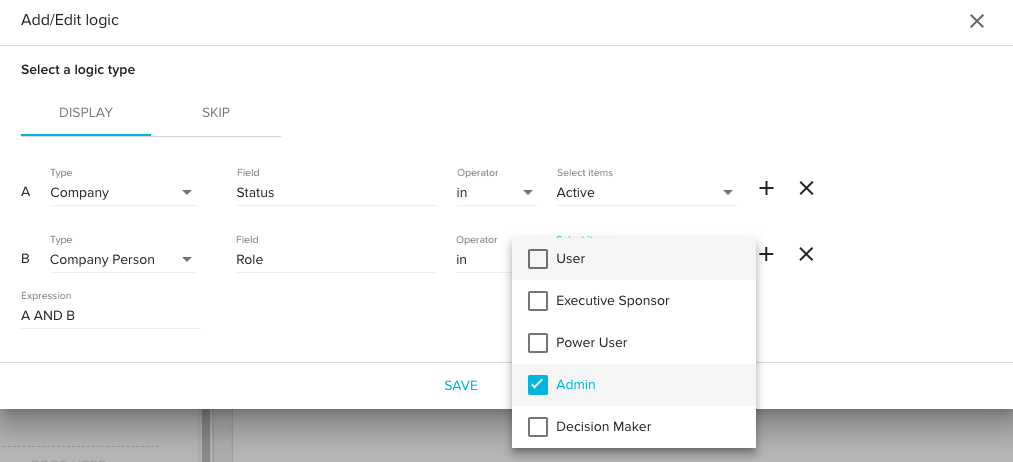
Company: If you select this option, Display Logic allows you to show a question to the list of participants that match with the rule filter criteria applied on fields in the Company object.
Example: You can display the current question to the participants that are part of all your company records with Status Active.
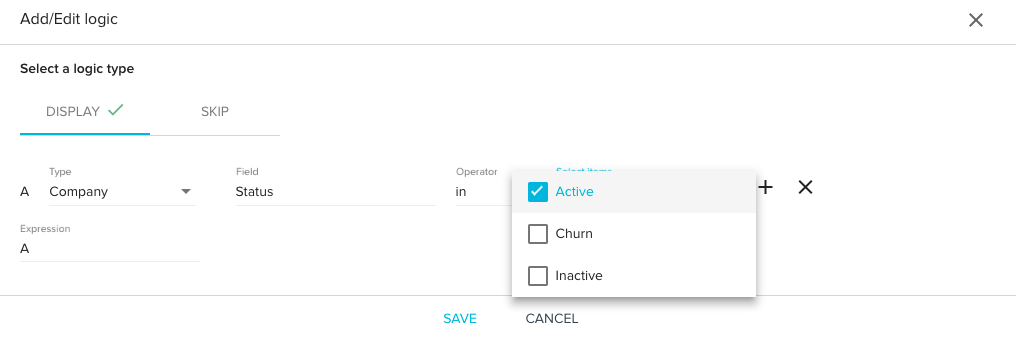
Company Person: If you select this option, Display Logic allows you to show a question to the list of participants that match with the rule filter criteria applied on fields in the Company Person object.
Example: You can display the current question to the participants that are part of all the people records in the Company Person object with Role Admin AND associated to active company records only.
Relationship: If you select this option, Display Logic allows you to show a question to the list of participants that match with the rule filter criteria applied on fields in the Relationship object.
Example 1: You can display the current question to the participants that are part of all your Relationship records with Status Active.
Example 2: You can display the current question to the participants that are part of a specific Relationship name.

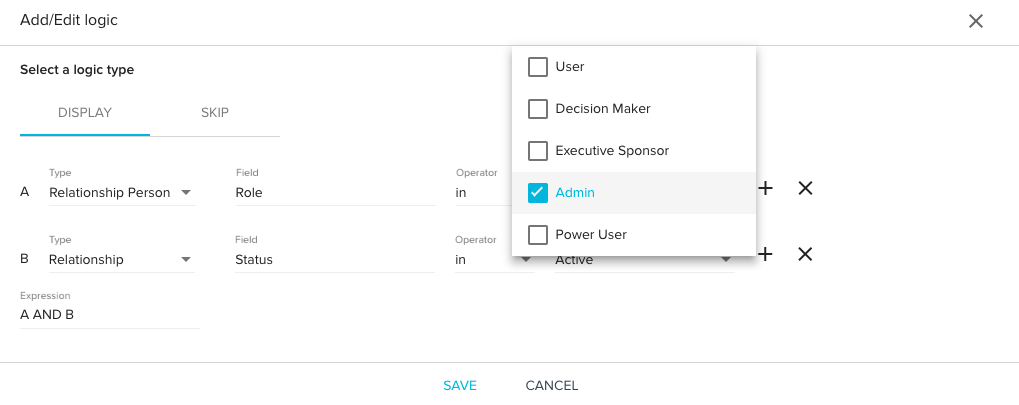
Relationship Person: If you select this option, Display Logic allows you to show a question to the list of participants that match with the rule filter criteria applied on fields in the Relationship Person object.
Example: You can display the current question to the participants that are part of all the people records in the Relationship Person object with Role Admin AND associated to active relationship records only.
Limitations/Conditions
- This is not applicable to the first question.
- If preceding question is internal or inactive type, display logic doesn’t work for the later questions.
- This is applicable for all question types.
- If a header is selected, no rule is allowed.
- A rule cannot be added if selected question is used in a Program.
Skip Logic
When you apply Skip Logic, it improves the survey experience. After you create your survey questions, you can add Skip Logic on multiple questions to customize them. Based on the respondent’s answer to a question, the respondents can skip over a section containing remaining questions that are not relevant to them.
You can add Skip Logic once you complete adding, ordering, and editing your survey questions. Later you can make changes only after removing Skip Logic. Skip Logic makes the survey process quicker and smoother for your selected respondents.
For example, you have added three Questions named:
- Please rate on below scale, How was your product Experience? (Answer scale is 0 to 10)
- How can we improve your product experience?
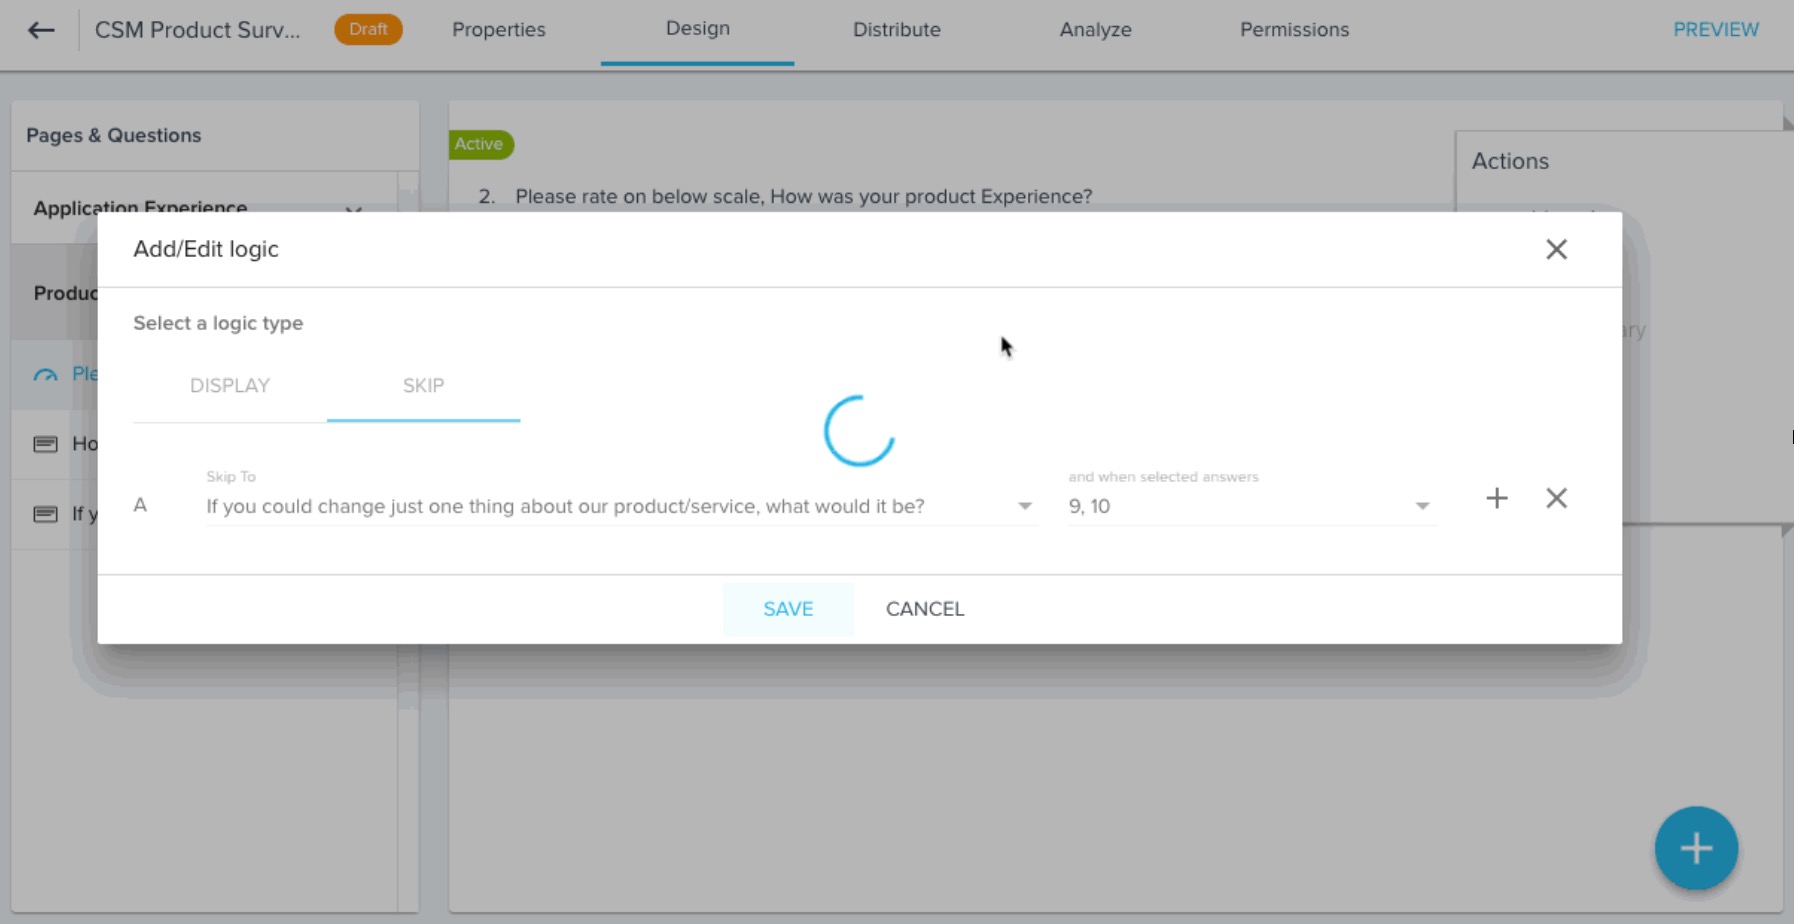
- If you could change just one thing about our product/service, what would it be?
You can apply Skip Logic on the first Question to skip second Question for the respondents who will answer with either 9 or 10. Configuration for this use case is shown in the steps below:
- In the Design page, create a survey or select an existing survey to edit.
- Ensure that you have added all questions and finalized their order, before applying Skip Logic.
- Select a Question on which you want to apply skip logic.
- Click Add Logic. Add/Edit logic dialog appears.
- Select the tab SKIP to apply the Skip Logic configuration:
- Select any successive Question in the order. You cannot select immediate next Question. You can directly select END OF SURVEY to end survey after answering the current Question with configured answers.
- Select the answer options of the current question to make sure that the question selected in the previous step is skipped for the respondents.
- Click + to add multiple independent skip logics. Each skip logic is identified with an alphabet letter.
- Click SAVE.
Limitations/Conditions
- This is applicable on all question types except Text and Ranking.
- This is not applicable to inactive or internal questions.
- This is not applicable to the last survey question added.
- When Skip Logic is selected, mandatory questions are not considered while jumping pages.
- This skip pattern varies based on the rules that you define for the respondent.
- Skip logic cannot be applied if the selected question is used in a Program.
| NPS, Net Promoter, and Net Promoter Score are registered trademarks of Satmetrix Systems, Inc., Bain & Company and Fred Reichheld. |