Federated Customer Management
This article talks about Federated customer management that refers to the capability to manage CTA configurations for each Relationship Type within your organization. The functionality enables Admins to optimize customer operations for each business line while maintaining one unified system.
Overview
Federated customer management refers to the capability of managing Call to Action (CTA) configurations for each Relationship Type within your organization. The functionality enables Admins to optimize customer operations for each business line while maintaining one unified system. Admins can configure CTAs for the whole organization, as well as specific to Relationship types. Federated customer management and the associated configuration is only applicable to customers who use Relationships in Gainsight. For more information on Relationships, refer to the Relationships Overview article.
Example uses on Relationships:
- A company sells both an on-premise product and a SAAS product. Each product has markedly different requirements for data, configuration, health scores, CTAs etc and even different hierarchy and Relationship structure. Federated Customer Management allows each product team to configure and use Gainsight for its purposes without being bogged down by other teams’ configuration and data.
- A company sells healthcare products and is set up for regional customer deployment. In order to protect PII and comply with HIPPA data security guidelines, each region is walled off from viewing the configuration and data of other regions.
Admins can manage CTA configurations at three levels:
- Global: Default CTA configurations are created at this level. Global configurations are applicable to both the Companies and Relationships. You can edit or delete the Global CTA elements at the Global level only.
- Company: If you have CTA types that you only want to use with Companies, then configure them at the Company level. Global configuration options are also available at the Company level but cannot be edited or deleted.
- Relationship: Configure Calls to Action settings at the Relationship level for each of your Relationship types. Global configuration options are also available at the Relationship level but cannot be edited or deleted.
Depending on these CTA configurations, end users can see the CTA elements specific to the Company or Relationship type in Rules engine and while creating or editing CTAs in Cockpit. For example, end-users do not see a long list of CTA reasons that do not apply to the Relationship type, they are working on. They can only see a shortlist of CTA reasons specific to that Relationship type.
Admins can configure CTA elements specific to the CTA type and for ‘All’ CTA types. Depending on the configuration, each CTA type can have a different set of CTA elements.
The character limits of below so that we can get that updated in Do
Following are the maximum character limit allowed while creating and updating the CTA Picklists:
- CTA Type - 15
- CTA Picklists (Snooze Reason/Priority/Status/Reason) - 40
- CTA Reporting Category - 40
Configure Calls to Action
You can navigate to Administration > Calls to Action (CTA) to configure Calls to Action.
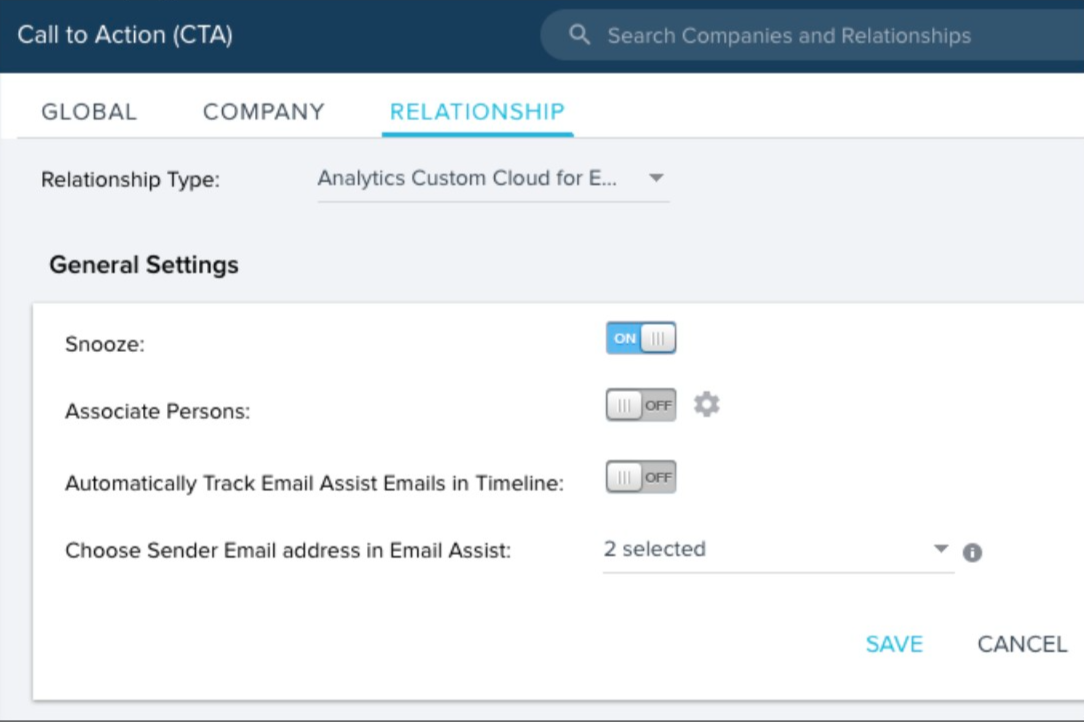
If you have Relationships enabled in your org, Admins can see three tabs: Global, Company, and Relationship. On the Relationship tab, before you perform CTA configurations, select a Relationship type, to configure settings specific to that Relationship type.
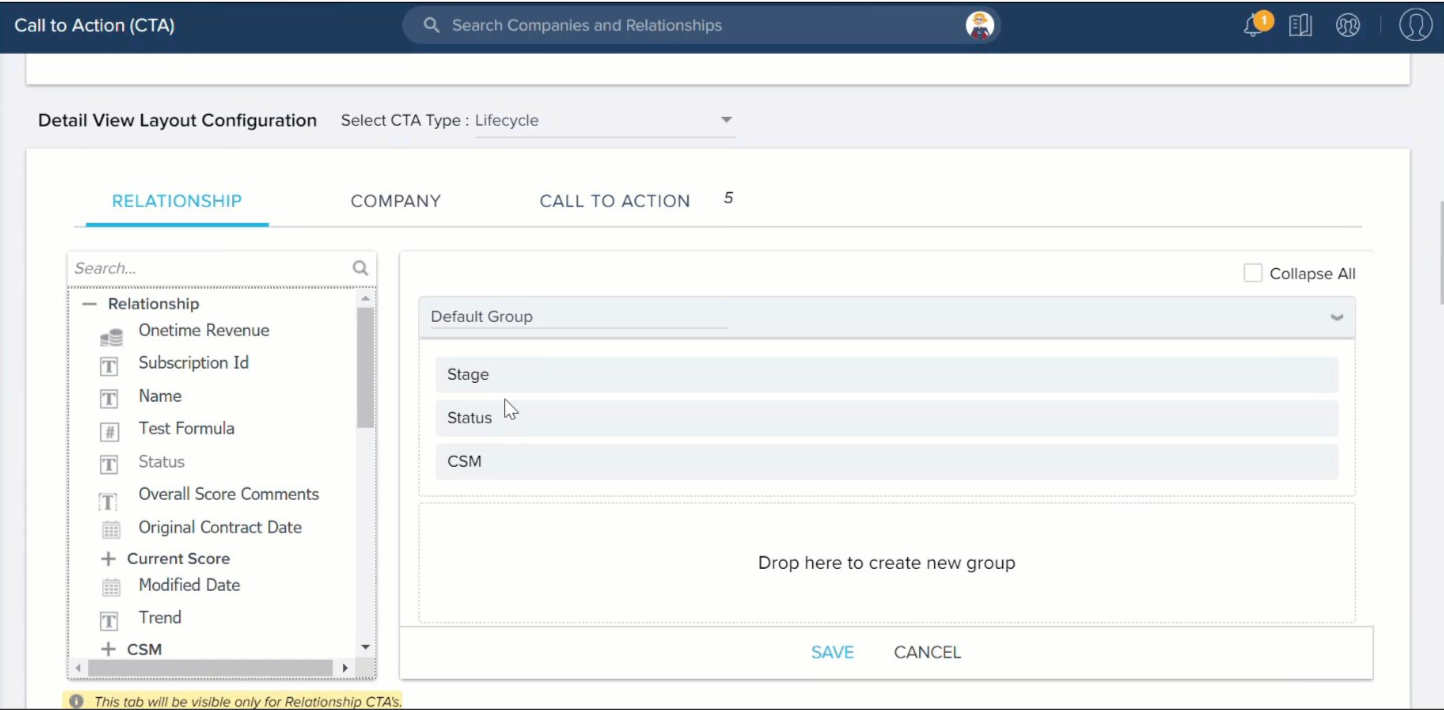
The RELATIONSHIP sub-tab on the Detail View Layout Configuration section allows you to search and add available fields from the Relationship object and its lookup fields from other objects.
Common CTA options
Admins can see the following CTA options in the configuration page:

-
Reorder: This option is available in CTA type, reason, status, priority, and snooze reason sections at Global, Company, and Relationship levels. At the Company and Relationship levels, Admins can reorder the local CTA elements only. Global CTA elements are frozen after the local CTA elements. When CSMs add/edit a CTA in the Cockpit, Company or Relationship level CTA elements display first, followed by Global CTA elements.
-
Save: After editing, click the Save icon to save changes.
-
Delete: Click the trash icon to delete a CTA element. You cannot delete items that are currently in use. At the Global level, you cannot delete the Risk and Objective CTA types. At the Company and Relationship levels, you cannot delete the Global CTA elements.
-
Edit: Inline editing is available by clicking to update Name, Color, Plural label, and Active checkbox. You can also double-click on Reporting Category to access the drop-down menu.
-
Name: This displays the name of the CTA Type, Reason, Status, Priority, and Snooze Reason.
-
Plural Label: This option is available in the CTA type section. It is the label you assign to a CTA type that appears in the Cockpit as a list view header when the CTAs are sorted by type.
-
Color: You can assign a color from the color list box in the Add element dialog while adding a CTA element. The selected color will be assigned to the new CTA element for ease of identification in the CTA element section.
-
Reporting categories: This column displays the Reporting Category of a CTA element. Reporting category enables reporting on the CTA elements across Relationship types. CTA type, priority, reason, status, or snooze reason, each have different reporting categories. When Admins create a new CTA element, it can be mapped to a common CTA element category. For example, if you have multiple Risk CTA types across Relationship types, you can create a report with just 1 condition CTA Type reporting category = 'Risk.'
-
Recurring: This option allows you to select if a CTA element is recurring or not.
- Active: Active option is available in all the CTA elements section at the Global, Company, and Relationship levels. When you select the Active checkbox at the Global level, the specific CTA element appears at the Company and Relationship levels. When you select the checkbox at the Company or Relationship level, the specific CTA element will be available in the Cockpit while adding either a Company or Relationship CTA. This option is disabled for the Risk and Objective CTA types in the CTA type section.
- Select CTA Type: This list is available in the CTA reason, priority, status, and snooze reason sections at all of the levels. Select the CTA type (All, or a specific CTA type) to configure the CTA element for the respective CTA type.
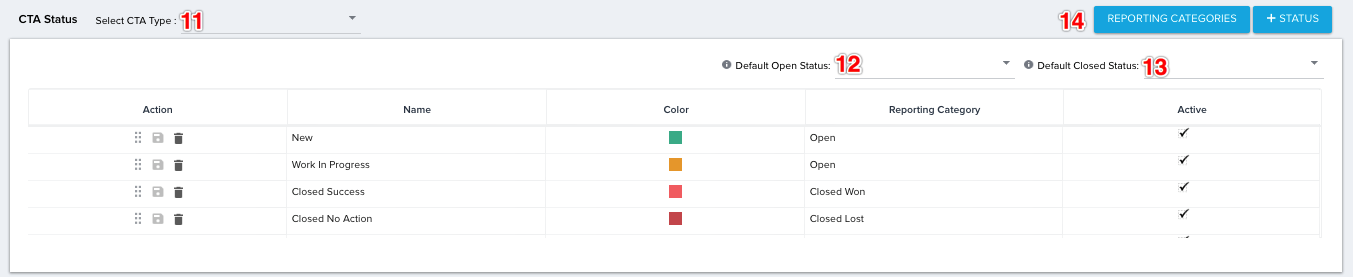
- Default Open Status: This option is available in the CTA status section. While adding a new CTA in the Cockpit, this will be the default status.
- Default Closed Status: This option is available in the CTA status section. It is used for the quick-close (checkbox) feature in Cockpit. This is also the status of a CTA when it is marked as closed in the main interface.
- Reporting Categories: You can add or delete the specific CTA element reporting categories using this option at the Global level. Reporting category enables reporting on the CTA elements across Relationship types. CTA type, priority, reason, status, or snooze reason may each have different reporting categories. When Admins create a new CTA element, it can be mapped to a common CTA element category. For example, if you have multiple Risk CTA types across Relationship types, you can create a report with just 1 condition CTA Type reporting category = 'Risk'.
Configure General Settings
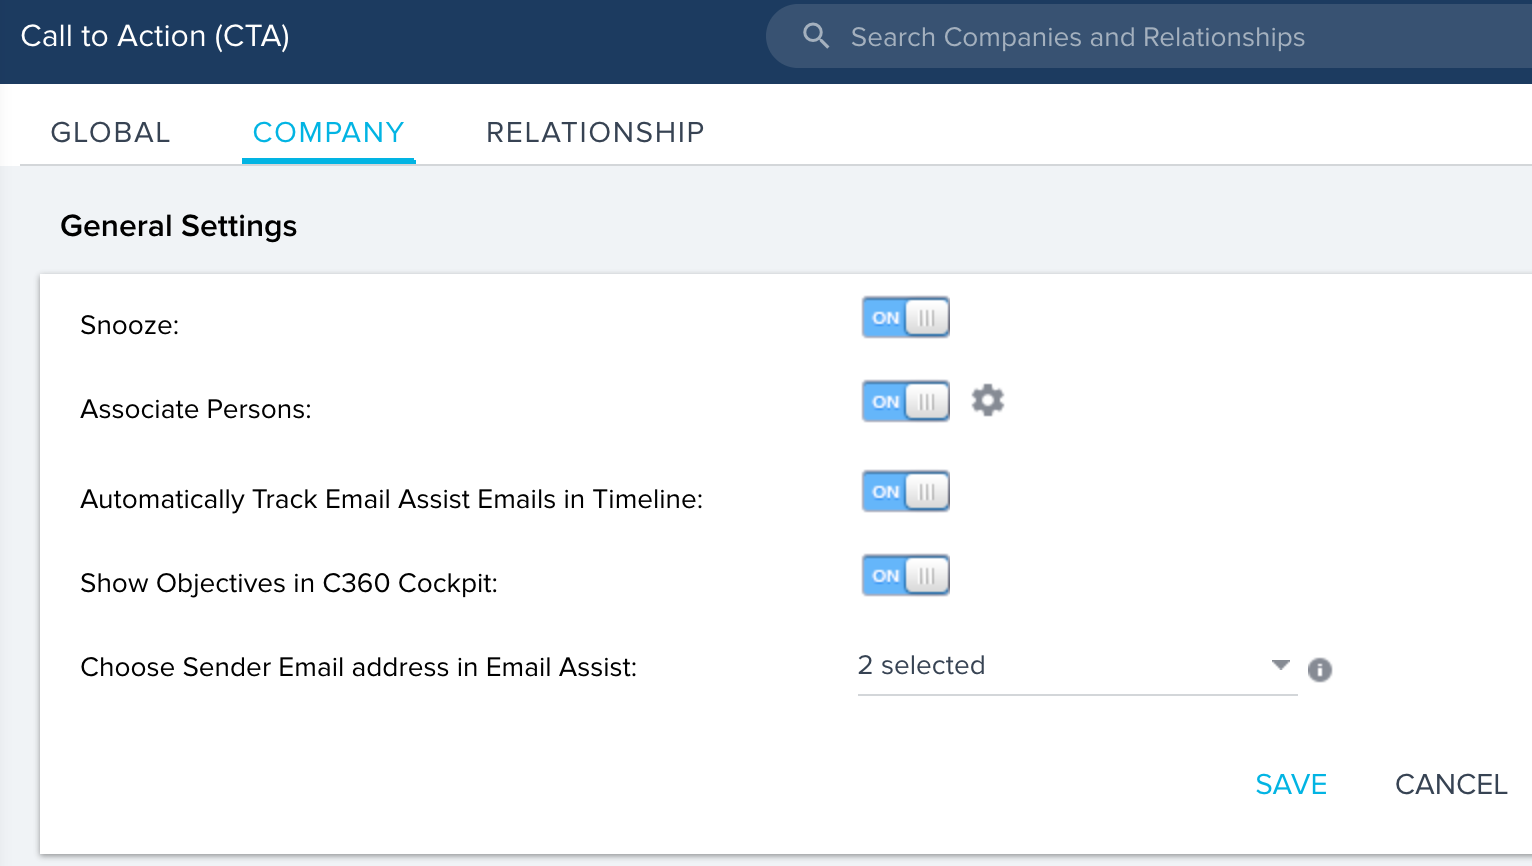
The General settings section is available at the Company and Relationship levels. In this section, you can configure the following options:
- Snooze: Turn on to allow the option to snooze CTAs, when the CSM knows that they cannot take any action.
- Associate Persons: Turn on to allow CTAs to be associated with a particular person record on the company or Relationship, including option to select Company ID field for associated person records. When Admins select a Company lookup field, all the associated person records from the lookup field can be selected in the Company and Relationship CTA detail view. This option lets the users select the associated person records applicable only to the specific Company or Relationship in the CTA detail view.
- Automatically Track Email Assist Emails in Timeline: When Admins switch this toggle On, Emails sent from Email Assist tasks are tracked as an activity in CTA detail view > Timeline. This toggle button is available at both the Company and Relationship levels to enable this feature for the Company and Relationship CTAs respectively.
- Show objectives in C360/R360 Cockpit: At the Company level, Admins can see a toggle button Show objectives in C360 Cockpit. At the Relationship level, Admins can see a toggle button Show objectives in R360 Cockpit. By switching this toggle On, users can see objective type CTAs tied to Success Plans in C360/R360 > Cockpit.
- Choose Sender Email address in Email Assist: You can select one or multiple Sender Email Address domains for Email Tasks, from the dropdown. These Email Address domains are configured at Administration > Email Configurations > Compliance. The default sender email address is Logged-In User, this is selected by default if any other domain is not selected from the dropdown. For more information, refer to Domains and Default Domain.
Gainsight NXT in Salesforce CRMContent in this section supports Gainsight NXT accessing through Salesforce Login. To learn more about Gainsight NXT in Salesforce, click here.
- Click here to expand for more information about Auto-sync tasks to SFDC
-
Auto-sync tasks to SFDC: When turned on, tasks are synced to Salesforce and will live in both locations. Gainsight recommends you to turn this toggle ON for non-Gainsight users to have visibility from the SFDC Account page.
When you complete the settings in this section, click SAVE.
Configure the Reporting Categories
There are specific default reporting categories configured for each CTA element. Admins can edit the default reporting categories and add new categories. Admins can also delete the existing reporting categories, provided the specific reporting category is not consumed any other CTA element, otherwise the system does not allow you to delete. When Admins create or edit a CTA element, it can be mapped to any CTA element reporting category. To configure the reporting categories in the CTA type section:
1. Navigate to Administration > Calls to Action (CTA) > Call to action type section.

2. Click REPORTING CATEGORIES button. CTA Type Categories dialog appears.
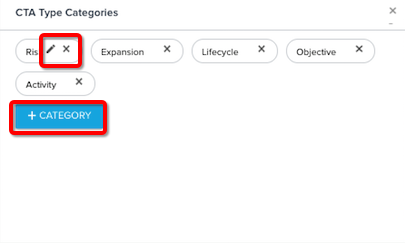
-
Click the X button to delete a default category. Click the pencil (Edit) icon to edit the Reporting Category Name.
-
Click +CATEGORY to add a new category. You can see the specific categories while creating or editing a CTA element.
Notes:
- Configuration of reporting categories for other CTA elements is similar to the CTA type.
- If a reporting category is mapped to any CTA element which is used in the Cockpit, it cannot be deleted from the CTA configuration.
- Using the Reporting Categories button, Admins cannot add, edit, or delete a CTA status reporting category. This button is provided just to view the default reporting categories.
Configure CTA Types
Five CTA types are available out-of-the-box in Gainsight:
- Risk: Represents negative trends with customers. Examples include loss of exec. sponsor, or low NPS® score, or low # of licenses in use.
- Event/Lifecycle: Lifecycle-based and typically scheduled events. Examples include training events, EBR/QBR, and renewal meeting.
- Opportunity/Expansion: Positive trends with customers. Examples include high NPS® score, high page views or product usage.
- Objectives: Tied to Success Plans and can only be created in C360 > Success Plans section.
- Activity: Tied to 360 Timeline Activities. Activity is generally used as the default CTA type for CTAs created from the Timeline feature automatically. Users can also create CTAs of this type from the Cockpit page.
Notes:
- Risk and Objective CTA types cannot be edited.
- Events/Lifecycle, Opportunity/Expansion, and Activity CTA types can be re-named/re-purposed.
In addition, admins can create a maximum of 20 custom CTA types per entity. For Global CTAs, admins can add 15 CTA types, apart from the five pre-configured Gainsight CTA types. Custom CTA types may be necessary when you want to collect/track unique information for that particular CTA type.
CTA types at the Global level are available to configure at the Company or Relationship level as Global CTA types. Global CTA types at the Company or Relationship levels cannot be edited or deleted. While adding or editing a CTA in the Cockpit, CSMs can see Local and Global CTA types specific to the Company or Relationship type.
Create Custom CTA Types
To create a custom CTA type:
-
Click +TYPE in the CTA type section. Add CTA Type dialog appears.
-
Enter the following details:
-
Name: Enter the new CTA type name. This CTA type name appears to the end-users while adding or editing a CTA in the Cockpit.
-
Plural Label: Enter a plural label for this CTA type. This plural label appears in the Cockpit as a list view header when the CTAs are sorted by type.
-
Color: Assign a Color. The selected color will be assigned to this new CTA type for ease of identification in the CTA type section.
Note: Gainsight has updated the color palette options in the CTA Admin page based on the new Horizon Experience guidelines. The new colors defined are also reflected in Reporting if no custom colors have been defined in Reporting. -
Category: Select a CTA type reporting category from the dropdown list. The selected CTA type reporting category will be mapped to this new CTA type to enable reporting across the Relationship Types.
-
Recurring: Select the checkbox to mark a CTA as a recurring event. For example, if you have bi-weekly or monthly check-ins with a customer, and you want a CTA to automatically remind you to prepare for the check-in, this might be useful.
-
-
Click SAVE.
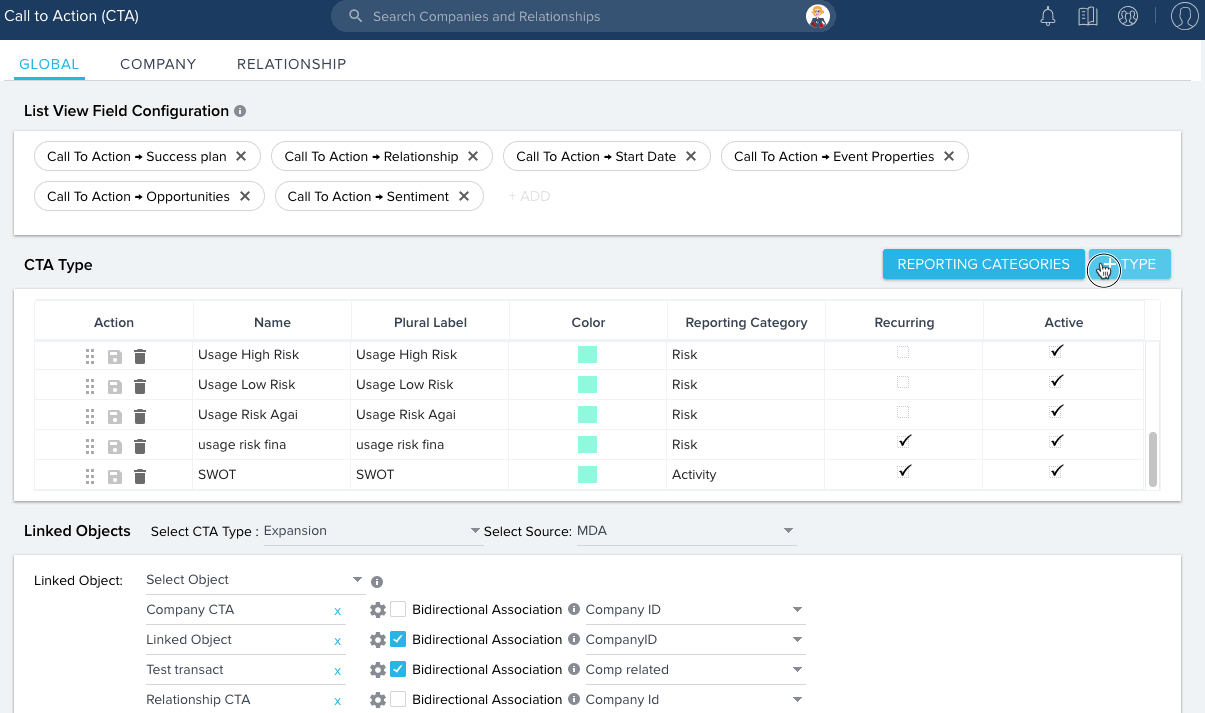
Configure Linked Objects
Admins can link one or more objects to each CTA type. Linking allows end-users to perform additional actions within the CTA detail view. For example, if you link a custom object to a CTA, the end-user can link the CTA to a record in the custom object and can edit values in the record directly from the CTA detail view. Admins can link different CTA types with one or more Gainsight Transactional objects that are Related to any Company or Relationship.
If you configure Linked Objects from the Company tab, you can see all the objects that have lookup to Company object. Similarly, if you configure Linked Objects from the Relationship tab, you can link all the objects that are associated with the specific Relationship type.
Gainsight NXT in Salesforce CRMContent in this section supports Gainsight NXT accessing through Salesforce Login. To learn more about Gainsight NXT in Salesforce, click here.
- Click here to expand for more information on how to configure Linked objects from CTAs to SFDC objects for each CTA type
-
If your Gainsight org is connected to Salesforce through Salesforce Connector, you can configure Linked objects from CTAs to SFDC objects for each CTA type.
Admins can link one or more objects to each CTA type. Linking allows end-users to perform additional actions within the CTA detail view. For example, if you link Contacts or SFDC Opportunities to a CTA, the end-user can link the CTA to an existing Contact or Opportunity, or create new ones in SFDC. Admins can also link the Case object to CTAs, along with other objects. Linking the Case object allows end-users to connect a CTA to an existing case, or to create a case directly from the CTA detail view.
To Configure Linked Objects:
- Select CTA Type from the list. At the Global level, Global CTA types and at the Company or Relationship level, respective local CTA types are available to configure the linked objects.
- Select source as MDA as you can only select MDA transactional objects.
- Select the Linked object from the list which you want to link to the CTA type.
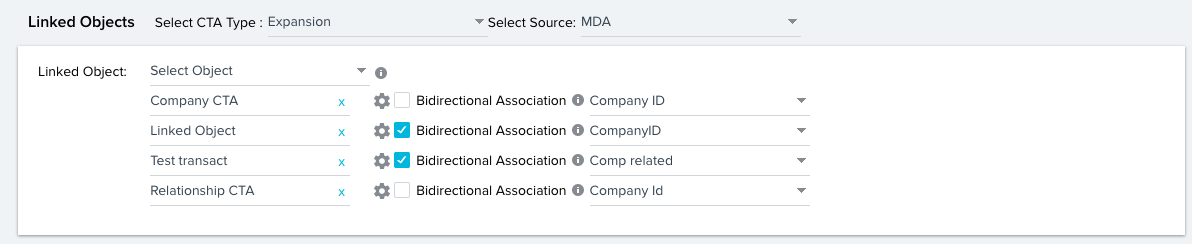
For more information on the Linked Object configuration, refer to the Configure CTA Linked Objects article.
Gainsight NXT in Salesforce CRMContent in this section supports Gainsight NXT accessing through Salesforce Login. To learn more about Gainsight NXT in Salesforce, click here.
- Click here to expand for more information on how to configure the Linked Objects
-
If your Gainsight org is connected to Salesforce through Salesforce Connector, you can select SFDC as a source while configuring the Linked Objects in step 2 as shown above. Once SFDC source is selected, all of the SFDC objects are available to configure linked objects from CTAs.
Note: To configure linked objects, ensure that you have required permissions, otherwise you may see an error upon saving. Navigate to Setup > Profiles > edit your profile > [enable modify all data] or contact your Salesforce Admin to enable this.
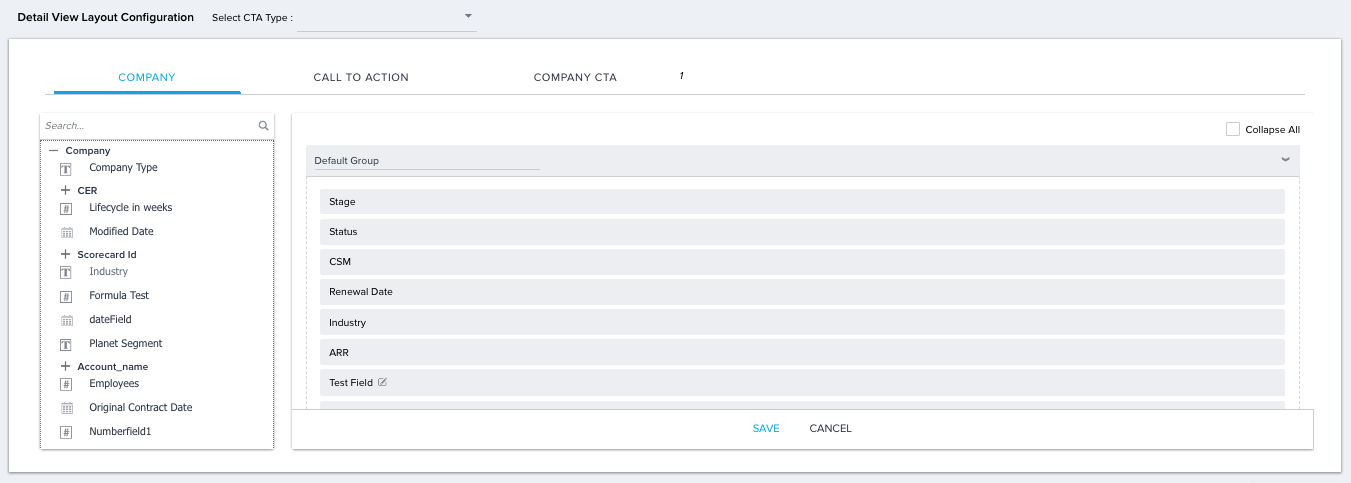
Configure CTA Detail View Layout
When you add an object from the Linked Objects section, the same objects appear in the Detail View Layout Configuration section as tabs. By default, you can see CALL TO ACTION and COMPANY or RELATIONSHIP tabs (on selecting the respective configuration tab). Company and Relationship tabs appear in the CTA detail view in the respective CTAs. You can add fields in the respective detail views (object) that should be displayed in the CTA detail view. For more information on the configuration, refer to the Configure CTA Detail View Layouts article.
Gainsight NXT in Salesforce CRMContent in this section supports Gainsight NXT accessing through Salesforce Login. To learn more about Gainsight NXT in Salesforce, click here.
- Click here to expand for more information on how to configure detail view for each SFDC Linked object
-
If your Gainsight org is connected to Salesforce through Salesforce Connector, if you have added SFDC objects in the Linked Objects section, you can configure detail view for each SFDC Linked object from the Detail View Layout Configuration section.
Configure CTA Reasons
Admins can configure the CTA reasons specific to the CTA type or for ‘All’ CTA types at the Global, Company, and Relationship levels. CTA reasons created at the Global level are available to configure at the Company or Relationship level as Global CTA reasons. Global CTA reasons at the Company or Relationship levels cannot be edited or deleted. While adding or editing a CTA in the Cockpit, CSMs can see the Local and Global CTA reasons specific to the Company or Relationship type.
To add a new CTA reason:
-
Select a specific CTA Type or ‘All’ from the dropdown.
-
Click +REASON. Add CTA Reason dialog appears.
-
Enter the following details:
-
CTA Type: Select ‘All’ or a specific CTA type from the Select CTA Type list. The new CTA reason will be mapped to the selected CTA type.
-
Name: Enter the new CTA reason name. This CTA reason name appears to the end-users while adding or editing a CTA in the Cockpit.
-
Color: Assign a Color. The selected color is assigned to this new CTA reason for the ease of identification in the CTA reason section.
Note: Gainsight has updated the color palette options in the CTA Admin page based on the new Horizon Experience guidelines. The new colors defined are also reflected in Reporting if no custom colors have been defined in Reporting. -
Category: Select a CTA reason reporting category from the dropdown list. The selected CTA reason reporting category will be mapped to this new CTA reason to enable reporting across the organization.
-
-
Click SAVE.
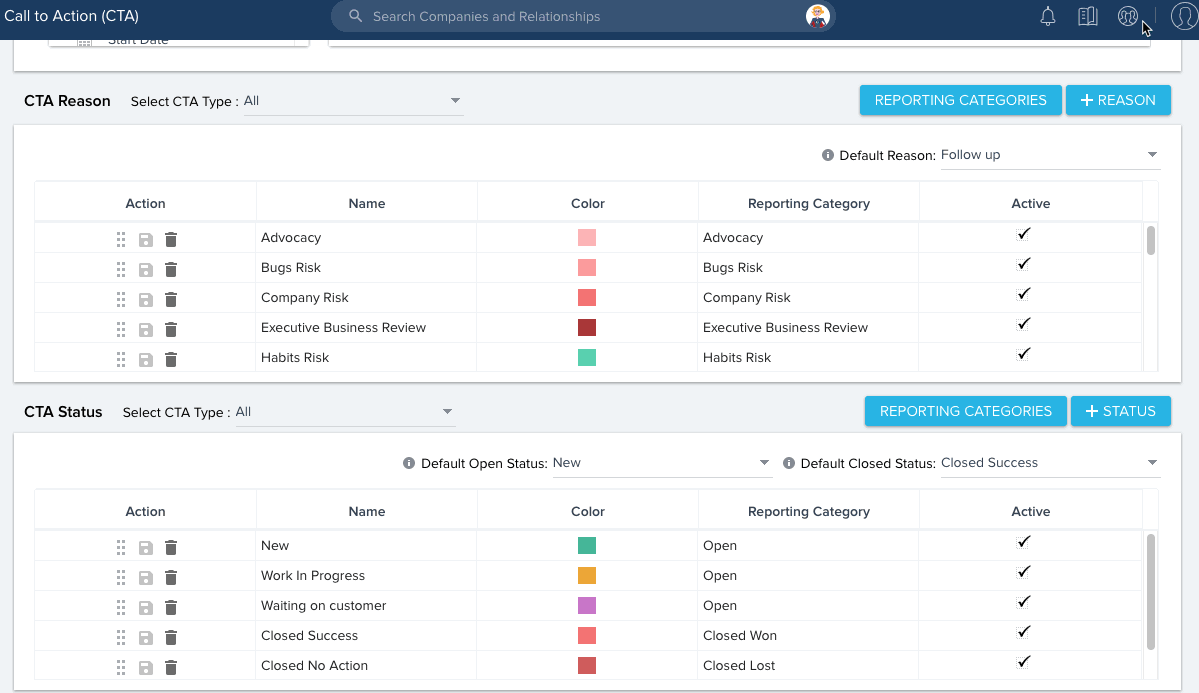
Configure CTA Status
Admins can configure the CTA status specific to the CTA type or for ‘All’ CTA types at the Global, Company, and Relationship levels. CTA status created at the Global level is available to configure at the Company or Relationship level as Global CTA status. Global CTA status at the Company or Relationship levels cannot be edited or deleted. While adding or editing a CTA in the Cockpit, CSMs can see Local and Global CTA status specific to the Company or Relationship type.
To add a new CTA status:
-
Select a specific CTA Type or ‘All’ from the dropdown.
-
Click +STATUS. Add CTA Status dialog appears.
-
Enter the following details:
-
CTA Type: Select ‘All’ or a specific CTA type from the Select CTA Type list. The new CTA status will be mapped to the selected CTA type.
-
Name: Enter the new CTA status name. This CTA status name appears to the CSMs while adding or editing a CTA in the Cockpit.
-
Color: Assign a Color. The selected color is assigned to this new CTA status for the ease of identification in the CTA status section.
Note: Gainsight has updated the color palette options in the CTA Admin page based on the new Horizon Experience guidelines. The new colors defined are also reflected in Reporting if no custom colors have been defined in Reporting. -
Category: Select a CTA status reporting category from the dropdown list. The selected CTA status reporting category is mapped to this new CTA status to enable reporting across the organization.
-
-
Click SAVE.
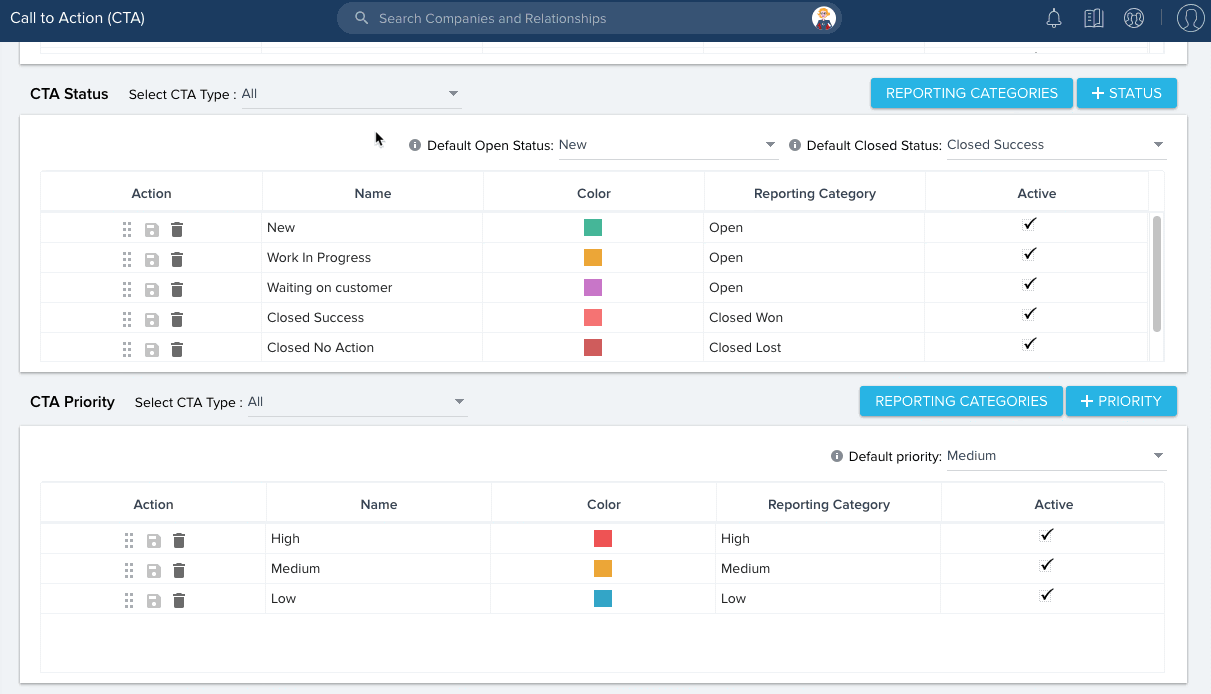
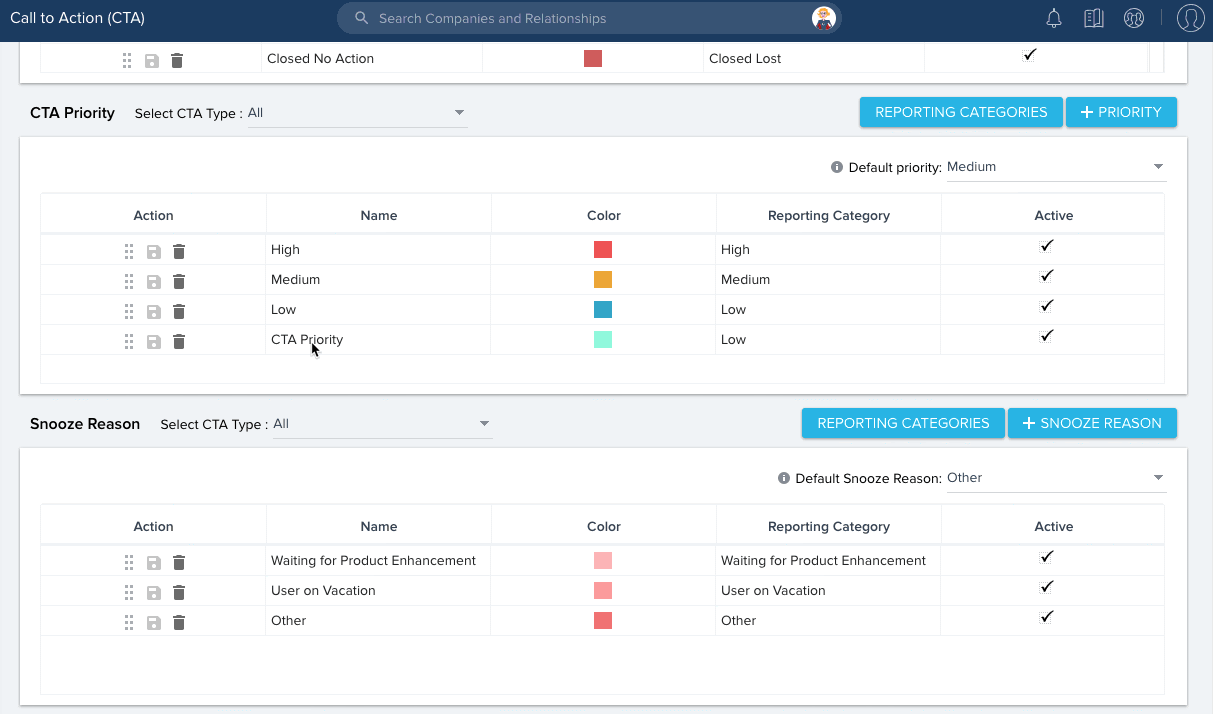
Configure CTA Priorities
Admins can configure the CTA priorities to ‘All’ or specific to CTA type at the Global, Company, and Relationship levels. CTA priorities created at the Global level are available to configure at the Company or Relationship level as Global CTA priorities. Global CTA priorities at the Company or Relationship levels cannot be edited or deleted. While adding or editing a CTA in the Cockpit, CSMs can see Local and Global CTA priorities specific to the Company or Relationship type.
To add a new CTA priority:
-
Select a specific CTA Type or ‘All’ from the dropdown.
-
Click +PRIORITY. Add CTA Priority dialog appears.
-
Enter the following details:
-
CTA Type: Select ‘All’ or a specific CTA type from the Select CTA Type list. The new CTA priority is mapped to the selected CTA type.
-
Name: Enter a new CTA priority name. This CTA priority name appears to the end-users while adding or editing a CTA in the Cockpit.
-
Color: Assign a Color. The selected color is assigned to this new CTA priority for ease of identification in the CTA priority section.
Note: Gainsight has updated the color palette options in the CTA Admin page based on the new Horizon Experience guidelines. The new colors defined are also reflected in Reporting if no custom colors have been defined in Reporting. -
Category: Select a CTA priority reporting category from the dropdown list. The selected CTA priority reporting category is mapped to this new CTA priority to enable reporting across the Relationship Types.
-
-
Click SAVE.
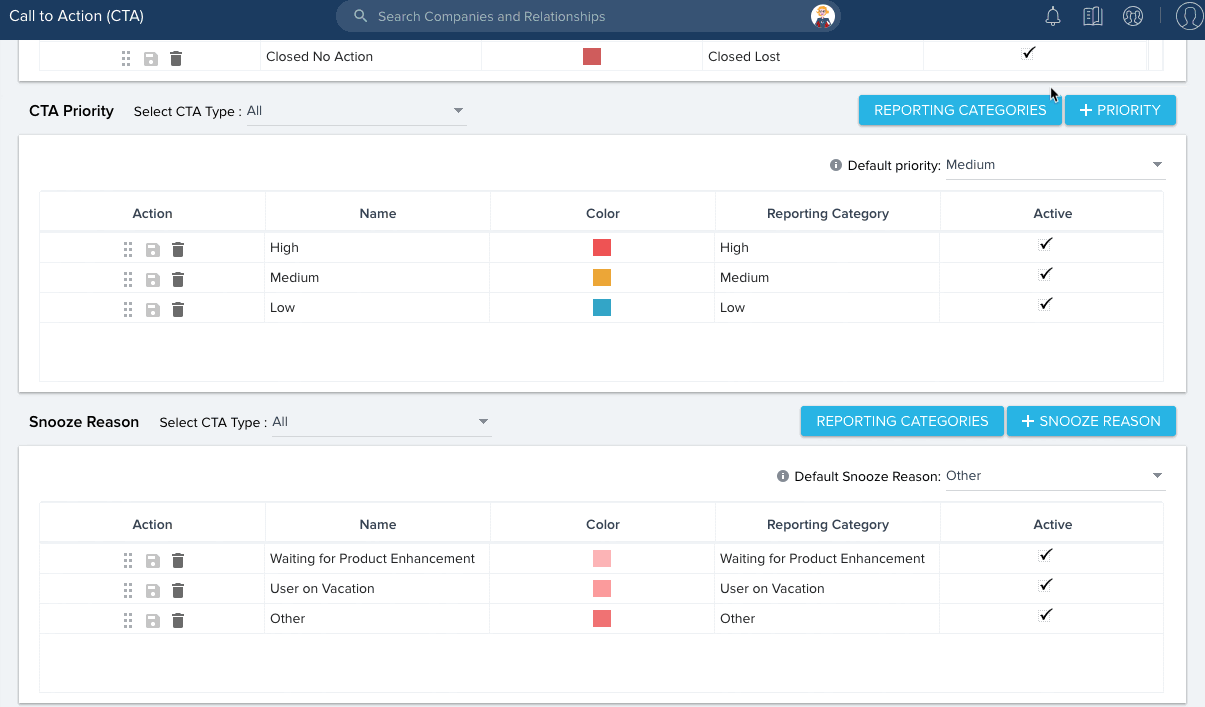
Configure Snooze Reasons
Admins can configure the snooze reasons specific to the CTA type or for ‘All’ CTA types at the Global, Company, and Relationship levels. Snooze reasons created at the Global level are available to configure at the Company or Relationship level as Global snooze reasons. Global snooze reasons at the Company or Relationship levels cannot be edited or deleted. While adding or editing a CTA in the Cockpit, CSMs can see Local and Global snooze reasons specific to the Company or Relationship type.
To add a new snooze reason:
-
Select a specific CTA Type or ‘All’ from the dropdown.
-
Click +SNOOZE REASON. Add CTA Snooze Reason dialog appears.
-
Enter the following details:
-
CTA Type: Select ‘All’ or a specific CTA type from the Select CTA Type list. The new CTA snooze reason will be mapped to the selected CTA type.
-
Name: Enter a new snooze reason name. This snooze reason name appears to the CSMs while adding or editing a CTA in the cockpit.
-
Color: Assign a Color. The selected color is assigned to this new snooze reason for ease of identification in the snooze reason section.
Note: Gainsight has updated the color palette options in the CTA Admin page based on the new Horizon Experience guidelines. The new colors defined are also reflected in Reporting if no custom colors have been defined in Reporting. -
Category: Select a snooze reason reporting category from the dropdown list. The selected snooze reason reporting category is mapped to this new snooze reason to enable reporting across the Relationship types.
-
-
Click SAVE.
Configure Custom Views
Admins can configure custom views for Cockpit views based on Reason, Priority, etc.using the Custom Views section in the Call to Action (CTA) page. The option to create Custom Views is only available in the Global tab.
Admins can also make edits to the existing custom views or even delete them based on the requirement. If admins edit the view, the changes made are immediately reflected for all of the users for whom the view is available. End-users must refresh the page to view the required modifications done to the view by admins if they are already using the view. If deleted, the view is no longer available to users and the users are notified through in-app notifications.
The admin can select the user(s) or user-groups for whom the view must be available. The admin can choose:
- All users - Available to all users.
- User Groups - Available to all users in that user group.
- Individual users - Individually add users for whom this view must be available.
IMPORTANT:
-
The end-user cannot make changes to the admin defined custom views. However, they can make changes to the filters/columns of the admin defined view to create a new custom view.
-
If the custom view that is being used by the CSM is deleted or made inactive by Admin, then that view is not visible in the list and the default view is displayed for the CSM in Cockpit.
For more information on how to configure Cockpit Custom Views, refer to the Configure Cockpit Custom Views article.
Configure Fields on Call To Action
Admins can directly create custom fields on Call to Action object from the Fields on Call To Action section. This section also displays the existing fields used in the CTA Object, in a tabular format.
Note: You can only create Custom Fields and view Fields on Call To Action section only on the GLOBAL tab of the Call To Action (CTA) page.
For more information on how to create custom fields, refer to the Create Custom Fields on Call to Action Object article.
| NPS, Net Promoter, and Net Promoter Score are registered trademarks of Satmetrix Systems, Inc., Bain & Company and Fred Reichheld. |