Configure CTA Detail View Layouts
This article explains about how Admins can modify the CTA and Task detail view layouts (for each CTA type) to include custom fields from the Call to Action, Account, Customer Info, and Relationship objects. Similar to using linked objects, this allows you to essentially create miniature forms that can display or collect information from the CSM directly in Cockpit.
Overview
Admins can modify the CTA detail view layouts (for each CTA type) to include custom fields from the Call to Action, Company and Relationship objects. Similar to using linked objects, this allows you to essentially create miniature forms that can display or collect information from the CSM directly in Cockpit.
You can bring in fields from the following objects and their lookup objects into the CTA detail view:
- Company object into the COMPANY sub tab
- Call To Action object into the CALL TO ACTION sub tab
- Relationship object into the RELATIONSHIP sub tab (For customers who enable Relationships in Gainsight)
- Linked objects into the linked objects sub tab
In the example screenshot below, we added fields from the Company object, such as Employees, Original Contract Date, Users, NPS® and MRR, to the CTA detail view configuration (on the COMPANY sub tab).

Admins can define how each field behaves in the CTA lifecycle to ensure consistent data entry and control field visibility for CSMs.
They can configure fields to be:
- Mandatory, Read-only, or Editable only during creation.
- Mandatory to close to require values before closure.
CTA Detail View Layout Configuration
To access the CTA Detail view layout configuration, navigate to Administration > Cockpit.
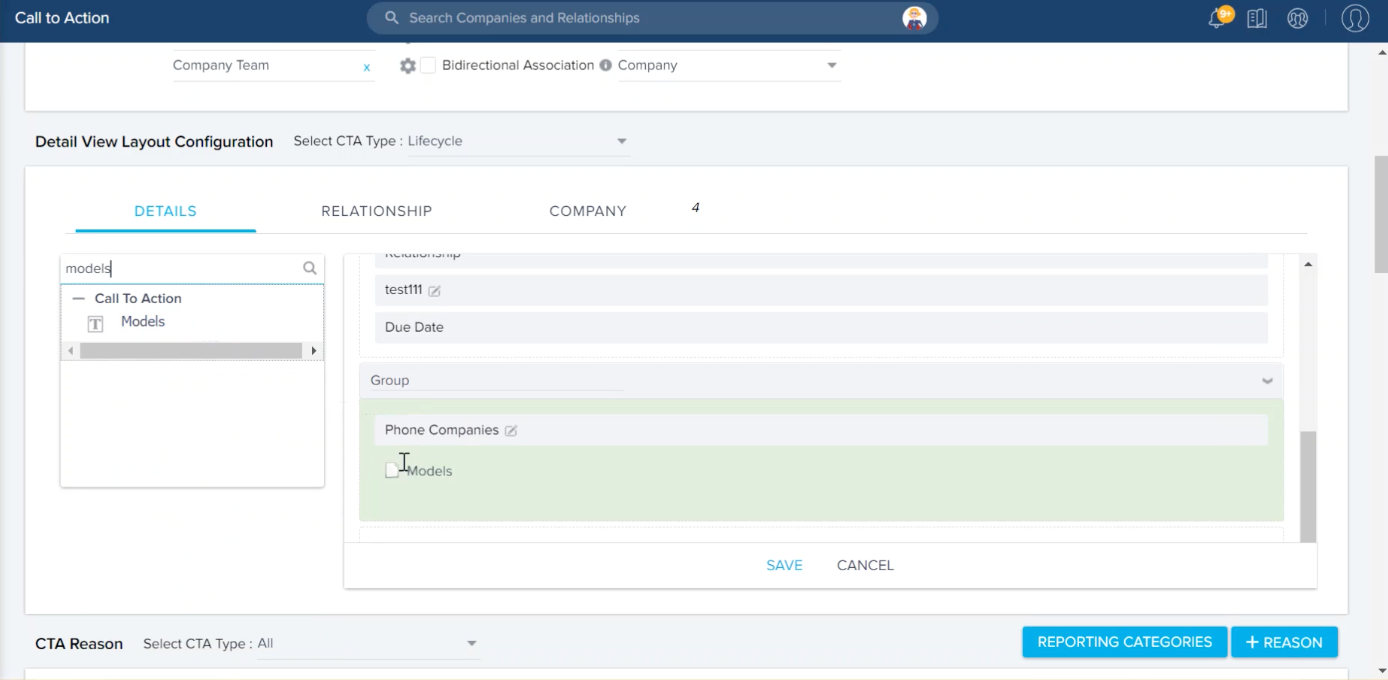
In the CTA Type configuration , you can view Details, Relationship, Company and any linked object tabs.

You may add fields from an object to the sub-tab views based on what information you believe will be helpful for your CSMs to view or edit as they work through their CTAs. You can also group the fields. A default group is already added to these sections which cannot be deleted.
- Select the CTA Type. (This configuration is per CTA type.)
- Click the sub tab (eg. COMPANY) and search for the required fields in the search bar on the left pane, and now drag-and-drop the required fields to the new Group or existing Default Group (change the name by clicking it once).
- For the Details sub tab: allows you to search and add available fields from the Call To Action object and its lookup fields from other objects.
- Company sub tab: allows you to search and add available fields from the Company object and its lookup fields from other objects.
- Relationship sub tab: allows you to search and add available fields from the Relationship object and its lookup fields from other objects.
Note: In CTA Detail View, CSMs/Users cannot see Company and Relationship tabs when their respective tabs do not have any field in its layout.
- Click the gear icon next to the field in the layout editor. The configuration panel opens.
- In the Display Label field, enter the name you want end users to see in the CTA Detail View.
- Under Editing Options, choose how the field should behave:
- Editable: Users can modify this field at any time.
- Read-Only: The field is permanently locked and cannot be edited.
- Editable Only During Creation: Users can modify the field only when the CTA is being created. After saving, it becomes read-only.
- Under Mandatory Options, choose one of the following:
- Non-Mandatory: Users can leave the field blank.
- Mandatory: Users must fill in the field before saving or submitting.
- Mandatory to close: The field is only required when the CTA is being closed.

Note
- The Mandatory to close option is only available for editable fields.
- It is not supported for fields set as Read-Only, Editable Only During Creation, or those already marked as Mandatory.
- In these cases, consider setting a default value instead.
- The closure requirement setting is not supported for fields from SFDC-linked objects.
- In the Filters section, click +FILTER to add search filters, as required.
Using Filter options, admins can now define the filter criteria on the fields added to the Search Fields section, using the fields with a lookup to the Company object.
Note
- Filters added here are not applicable while creating CTAs or Tasks because the record has not been created yet. Company ID filter is an exception in this case and is applicable while creating CTAs and Tasks, if added.
- Filters configured on linked object fields, such as the Opportunity object, are not applied during CTA creation. As a result, all records from the linked object appear in the search results, regardless of the filter criteria defined.
- Select the desired field from the Select a Field dropdown list, and define the Value based on your business requirements.
Note: Admins can add any number of filters and can use the Advanced Logic option to set the filter logic.

- Click Save.
Configure Mandatory Fields
To make a field mandatory in a CTA layout:
- Navigate to Administration > Cockpit > Call to Action tab > CTA Detail View Layouts.
- Select the CTA Type you want to edit.

-
In the Mandatory Option section, select the Mandatory checkbox for the desired field.

-
(Optional) Enter a Default Value if you want it pre-filled in CTA creation flows.

-
Click Save.
IMPORTANT
- If a field is both mandatory and read-only, a default value is required.
- The mandatory to close option applies only to editable fields.
- Default values automatically populate in Rules Engine, Success Plan Templates, and Timeline CTA creation.
- If no default is provided, automated flows continue, but users must provide a value on the next edit or save.
- Mandatory fields apply to both manual and automated CTA creation.
- Gainsight automatically prevents invalid combinations and displays an error message when you try to save unsupported configurations.
Field Behavior and Validation Rules
Admins can combine Editing Options and Mandatory Options to control how a field behaves in the CTA lifecycle. Once you choose the field’s editing and mandatory settings, the following combinations determine how these options interact.
| Editing Option | Mandatory Option | Configuration Support | Description |
|---|---|---|---|
| Read-Only | Non-Mandatory | Supported | The field is optional and not editable. Use this for system-generated or reference fields such as Age or Created Date. |
| Read-Only | Mandatory | Supported with Default Value | The field must have a default value, since users cannot enter or edit it. Admins must define a default to avoid validation errors during CTA creation. |
| Read-Only | Mandatory to close | Not Supported | This combination is not supported because users cannot enter data into read-only fields at closure. |
| Editable | Non-Mandatory | Supported | The field is optional. Users can leave it blank while creating or editing a CTA. |
| Editable | Mandatory | Supported | The field is required. Users must fill in a value before saving or updating the CTA. |
| Editable | Mandatory to close | Supported | The field is optional when creating or editing the CTA, but it must be completed before closing it. |
| Editable only during creation | Non-Mandatory | Supported | The field can be filled only during CTA creation. Users can leave it blank, but it becomes locked once the CTA is created. |
| Editable only during creation | Mandatory | Supported | The field must be completed at the time of creation. After the CTA is saved, the field is locked and cannot be changed. |
| Editable only during creation | Mandatory to close | Not Supported | This combination is invalid because the field is locked after creation and cannot be updated during closure. |
Example Business Use Cases
| Scenario | Recommended Setup |
|---|---|
| You want a system-generated field like Company Name to display but not be editable. | Read-only + Non-Mandatory |
| You want a key field like Opportunity ID that must be entered once and never changed. | Editable Only During Creation + Mandatory |
| You want to collect closing comments when a CTA is completed. | Editable + Mandatory to Close |
| You want an optional Note field for context. | Editable + Non-Mandatory |
Fields Required at CTA Closure
Admins can configure specific fields to be mandatory only when closing a CTA.
Note
- This setting applies only to editable fields.
- It cannot be combined with read-only, editable only during creation, or fields already marked as mandatory.
- If a field should always contain a value, add a default value instead.
Example: Use this configuration for Closure Comments fields to ensure key closure information is recorded before closing a CTA.
Automation Behavior
Field settings like default values and editability behave differently when CTAs are created or updated automatically through Rules Engine, Success Plans, Timeline, or APIs.
- Automated Creation through Rules Engine, Success Plan, or Timeline: When CTAs are created automatically, any configured default values are applied to mandatory fields. Existing rules do not automatically populate these default values. If a mandatory field does not have a default value, the CTA is still created, but users must fill in the required value the next time they save or edit the CTA.
- Automated Updates through APIs: The field editability settings - Read-only, Editable, or Editable only during creation, apply only within the Gainsight user interface. API-based updates can modify these fields when necessary.
Sticky Fields and Fields with Fixed Behavior
While admins can configure most field behaviors, some fields in CTA layouts have predefined behavior and cannot be modified in configuration. These are referred to as Sticky and Fixed fields.
Sticky Fields
- Name and Type: Always mandatory and read-only.
- Owner and Status: Always mandatory and editable.
- Sticky fields cannot be removed from the layout.
Fixed System Fields
- Age, Modified Date, Company, and Relationship: Always read-only.
- These are system-defined and cannot be edited or overridden in layouts.
Note: Admins can reorder configurable fields but not sticky or system-defined fields.
Reorder Fields
Admins can drag and drop fields within or across groups to control how they appear to CSMs.
- The field order in the layout determines the sequence in which fields display on the CTA creation page.
- Sticky and system-defined fields retain their default positions and cannot be moved.
Configure Layout Visibility
Admins can choose how CTA fields appear to users during creation:
- Show All Fields on CTA Creation Page (Expanded View): When this setting is turned on, all fields are displayed upfront on the CTA creation page, eliminating the need to Add more details.
- Cropped View (Toggle Off): When this setting is turned off, only key fields are displayed initially. Additional fields are grouped under Add more details.
To configure:
- Navigate to Administration > Cockpit > General tab.
- Locate the Show All Fields on CTA Creation Page toggle.
- Turn the toggle on or off based on your preferred layout style.

-
Click Save. The change is applied immediately, and CSMs see fields displayed as per the selected layout when creating new CTAs.
Limitations
Consider the following limitations when configuring CTA Detail View layouts:
- Layout changes such as marking a field mandatory or read-only apply immediately to all CTAs of that type.
- Existing CTAs retain their previous values until edited or saved again.
- Fields Required at CTA Closure is not supported for lookup fields or SFDC-linked objects.
- If a field is read-only and mandatory, a default value must be provided.
- Sticky fields cannot be deleted or modified.
- System fields from the Company or Relationship objects are not editable in the CTA list view or the CTA detail view.
- Custom lookup fields added to the CTA list view cannot be edited directly in the list. To update these fields, open the CTA and make changes in the Detail view or the relevant sub-section.
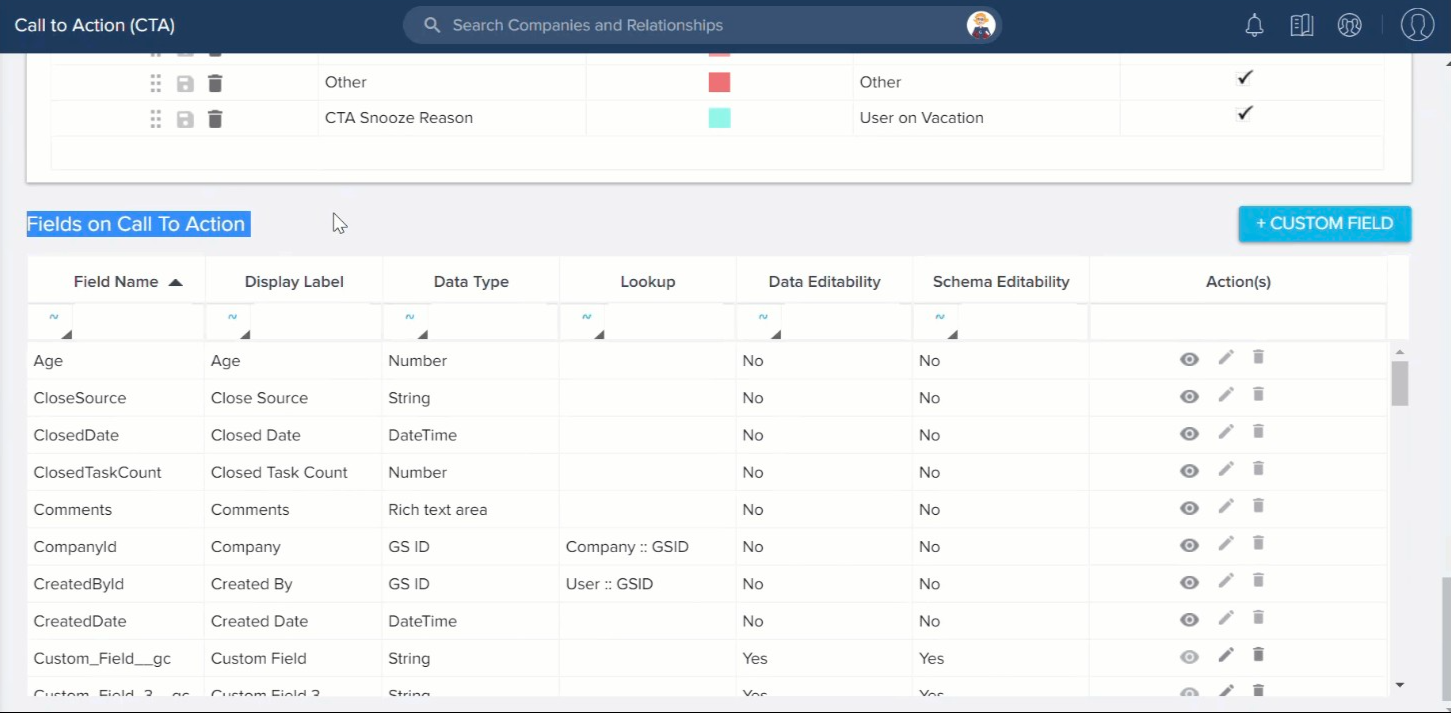
Fields on Call To Action
Admins can directly create custom fields on Call to Action object from the Fields on Call To Action section. This section also displays the existing fields used in the CTA Object, in a tabular format.
Note: You can only create Custom Fields and view Fields on Call To Action section only on the GLOBAL tab of the Call To Action (CTA) page.
Create Custom Fields on Call to Action Object
To create custom fields:
- Click +CUSTOM FIELD.
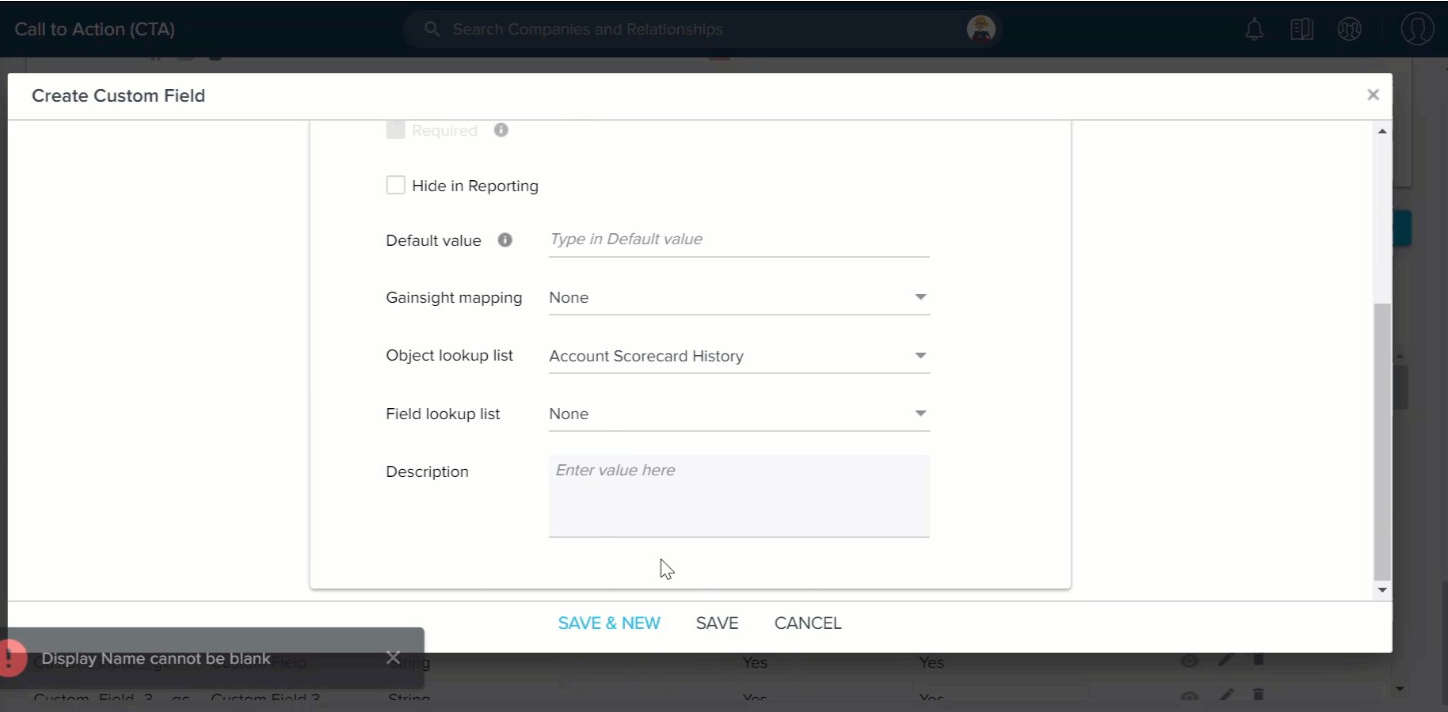
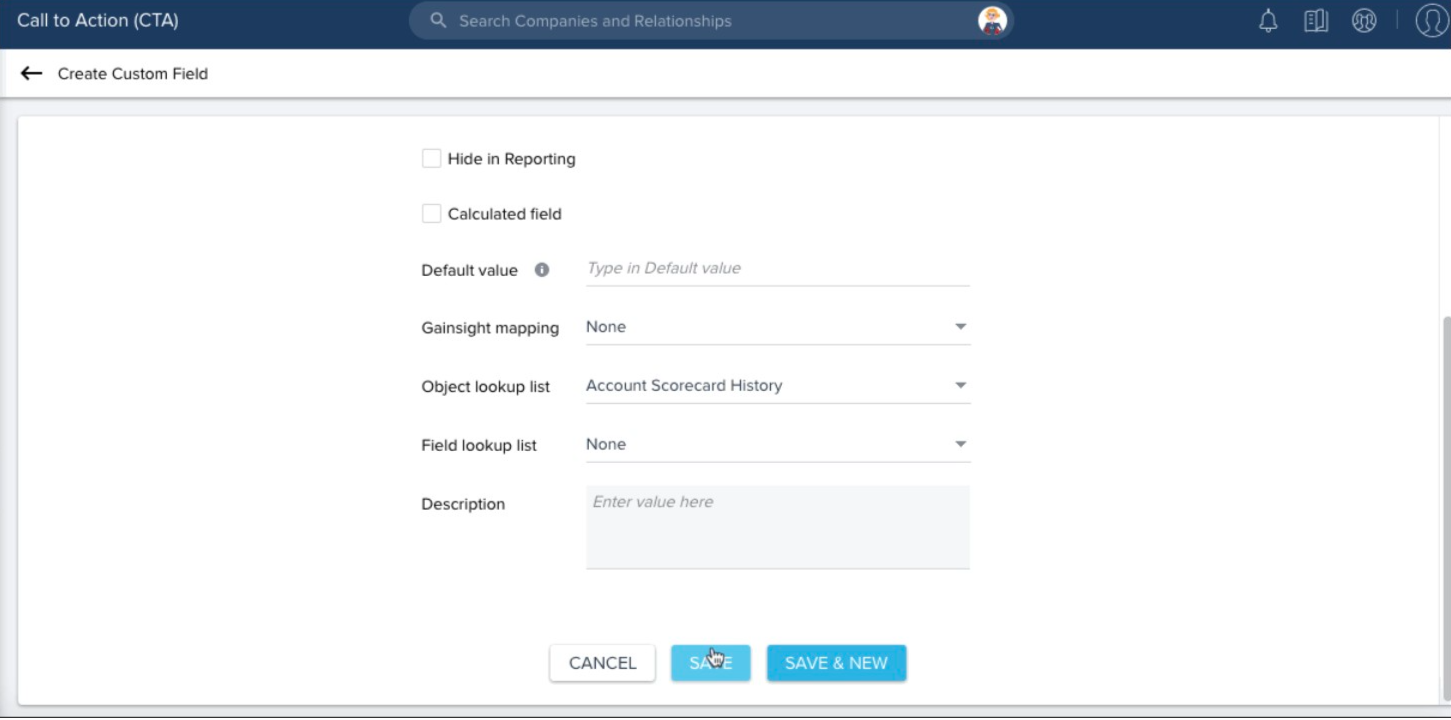
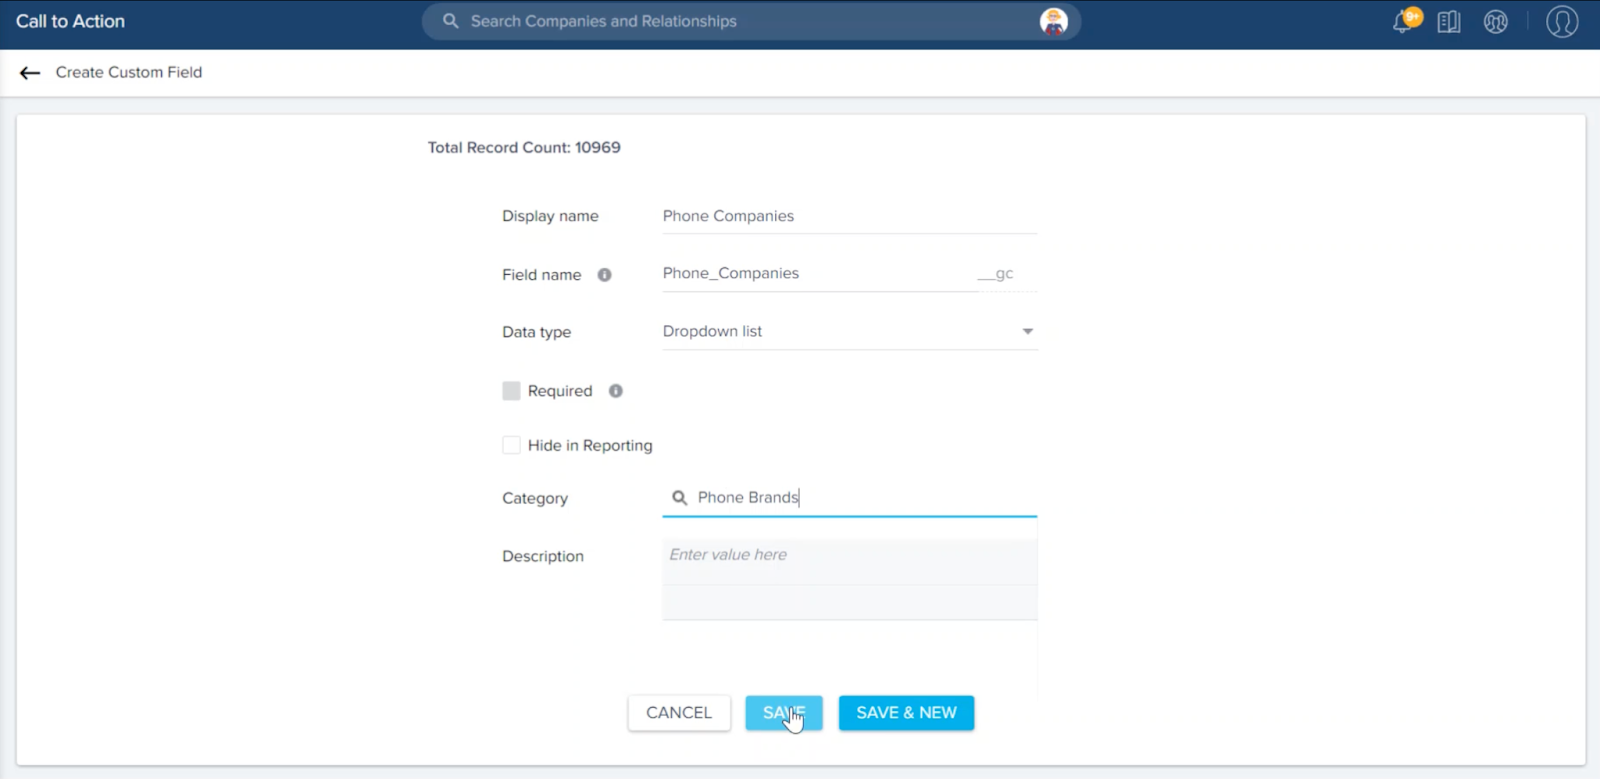
- Enter the following details in the Create Custom Field screen:
- Display Name: The easily understandable display name.
- Field Name: The system defined field name with a suffix of __gc.
- Data type: The data type of the field being created.
- Required: By setting this constraint, the field is not allowed to ingest a null value record while importing data. You can select this option only when you are adding a custom field into an object that does not have any existing data.
- Hide in reporting: If you select this, the field is hidden in the Reporting functionality.
- Calculated field: Enabling Calculated field checkbox allows you to instantly create a formula field on CTA, Task and Success Plan objects, based on your business requirements. For detailed instructions on how to create Formula Fields, refer Create Formula Fields in CTA, Task and Success Plan Objects article.
- Default Value: Set a default value that you would like to insert in the field when the source field is NULL or Empty.
- Gainsight Mapping: Map the field being created with a Gainsight object, if required.
- Object lookup list: Select the object to which lookup is required from the current field.
- Field lookup list: Once you select an object, its corresponding fields are displayed in this drop down list. Select the field to which lookup is required from the current field.
- Description: (Optional) A description for the object being created.
Note: The Default value field is not supported for Cockpit and the values entered in this field will not reflect while creating CTAs.
- Click SAVE & NEW to add a custom field to the Call To Action object and create another field or click SAVE; then a custom field is created and added to the Call To Action object.
Admins can review, modify, and delete the existing fields used in the Call To Action Object by using these options:
- View field: To view the information of the existing fields.
- Edit field: To update the existing fields information.
Note: Admins cannot update the Field name and Data type fields for the existing fields. - Delete field: To delete the existing fields used in CTA Object.
Note: Admins cannot delete the fields that are already used in any layouts, reports, or rules. - You can create and edit Custom Fields on Call To Action/Success Plan/Task objects, only from the CTA/Success Plan/Task admin pages respectively. You cannot create/edit the these fields from Data Management page.
Add Dependent Picklist Values
Admins can define a custom category of the dropdown list in the Administration > Data Management page. For more information on how to create a custom category of either dropdown list or multi-select dropdown list, refer to the Dropdown List and Multi Select Dropdown List article. Once the dropdown lists are added, admins must create a Dropdown list for dependent categories. For more information, refer to the Create a Dropdown list for Dependent Categories section in the Dropdown List and Multi-Select Dropdown List article.
After completion of the above process, admins can add dependent picklist values in the Fields on Call To Action section.
Notes:
- Only Custom fields can be created as controlling fields. Standard and System CTA fields cannot be used as controlling fields.
- Multipicklists can be added as dependent picklist values.
To add dependent picklist values as Custom Fields in the Fields on Call to Action Object:
- Navigate to Administration > Call to Action page.
- Click +CUSTOM FIELD in the Fields on Call To Action section.
- In the Display Name field, enter the name for the picklist value.
- In the Data Type dropdown option, select Dropdown list. For multi-select dropdown, select the Multi Select Dropdown List option.
- In the Category field Search for the dropdown list category defined in the Data Management page.
- Click SAVE. The dependent picklist field is added.
- Repeat steps from 2 to 6 to add the controller picklist field.
After adding the dependent and controller custom fields, admins must add these fields in the CTA Detail View Layout Configuration section to access them in the CTA Detail view. For more information, refer to the CTA Detail View Layout Configuration section.
For more information on how CSMs add the dependent picklist values, refer to the Call to Action (CTA) Detail View (Horizon Experience) article.
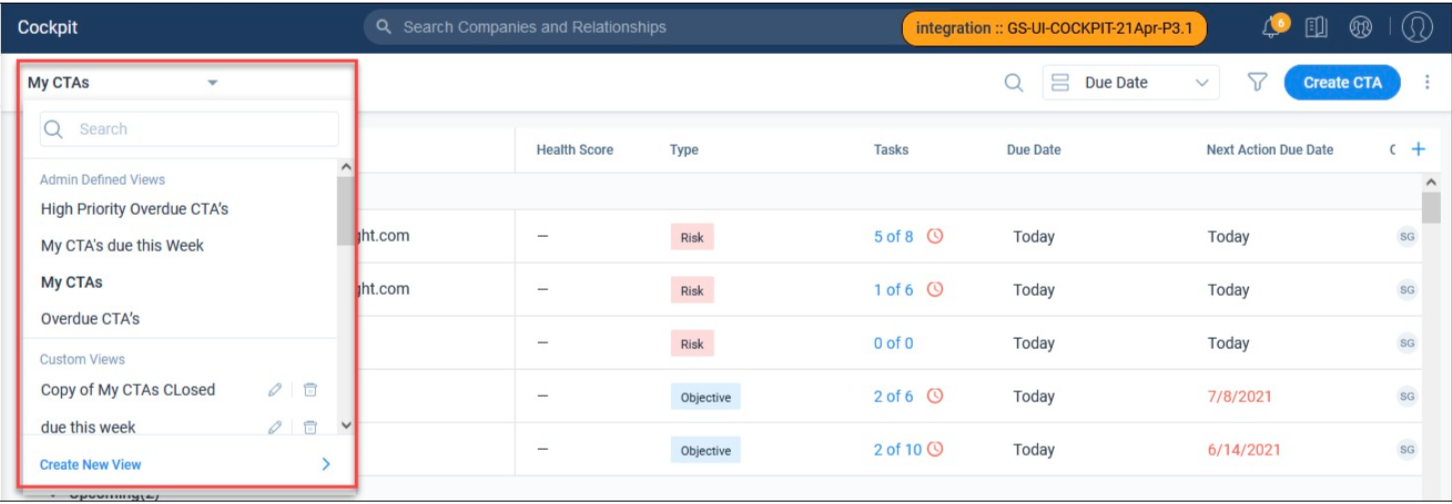
Custom Views
Admins can configure custom views for Cockpit views based on Reason, Priority, etc. using the Custom Views section in the Call to Action (CTA) page. The option to create Custom Views is only available in the Global tab.
Admins can also make edits to the existing custom views or even delete them based on the requirement. If admins edit the view, the changes made are immediately reflected for all of the users for whom the view is available. End users must refresh the page to view the required modifications done to the view by admins, if they are already using the view. If deleted, the view is no longer available to users and the users are notified through in-app notifications.
The admin can select the user(s) or user-groups for whom the view must be available. The admin can choose:
- All users - Available to all users.
- User Groups - Available to all users in that user group.
- Individual users - Individually add users for whom this view must be available.
IMPORTANT:
- The end user cannot make changes to the admin defined custom views. However, they can make changes to the filters/columns of the admin defined view to create a new custom view.
- If the custom view that is being used by the CSM is deleted or made inactive by Admin, then that view is not visible in the list and the default view is displayed for the CSM in Cockpit.
Use Case: For instance, assume that each CSM has a high number of CTAs assigned to them. With a big list, CSMs may not see the CTAs which are in a Risk state or CTAs in which the renewal date is due in the next 2 weeks. Admins can now create separate custom views for CSMs to ensure that they prioritize the most important CTAs.
Configure Cockpit Custom Views
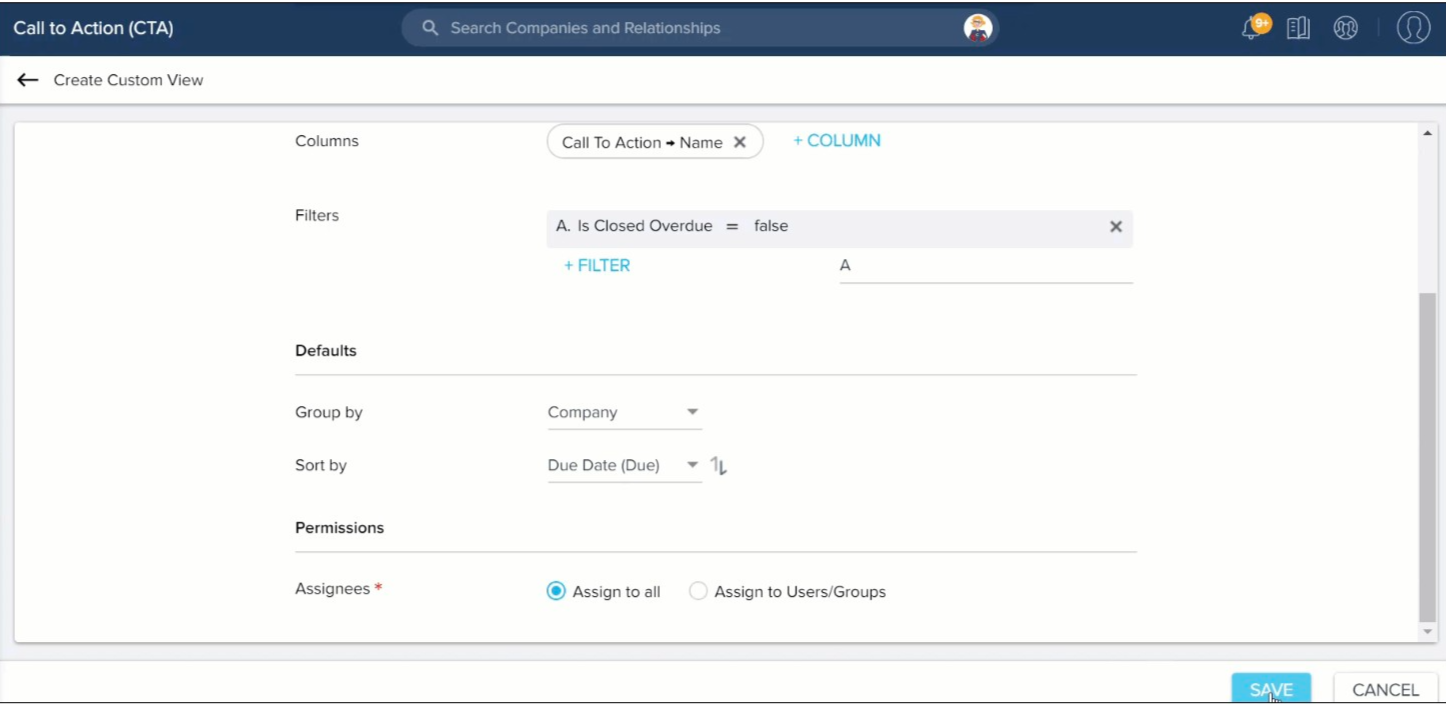
To configure Custom Cockpit Views:
- Navigate to Administration > Call to Action (CTA) page.
- In the Custom Views section, Click +VIEW. The Create Custom View page appears.
- Enter the Name of the view in the Name field.
- Click +COLUMN to add the List view fields for the view.
- Click +FILTER to define the filters of the view.
- In the Defaults section, select the default sorting and grouping status.
- In the Permissions section, select Assign to All option to enable this Custom View to all users.
- Click SAVE.
The Custom View is saved and it is displayed in the CTA views list in the Cockpit page for CSMs.
Edit Default Cockpit Views
Admins can make changes to the All CTAs, My CTAs, and Closed CTAs default views. These views are listed in the Custom Views section in the Call To Action (CTA) page. The Delete, Save, and Active checkbox options are disabled for the My CTAs view in the Custom Views section since it’s the default view in case no other view is available.
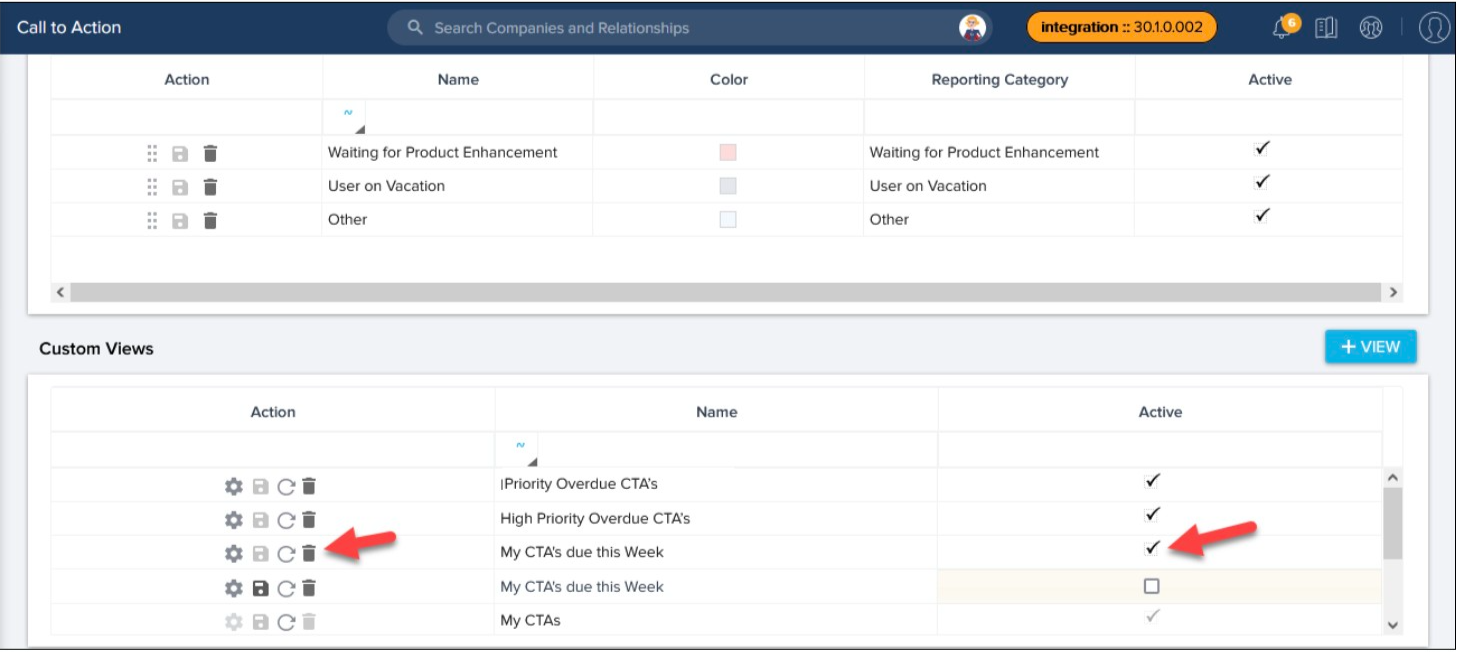
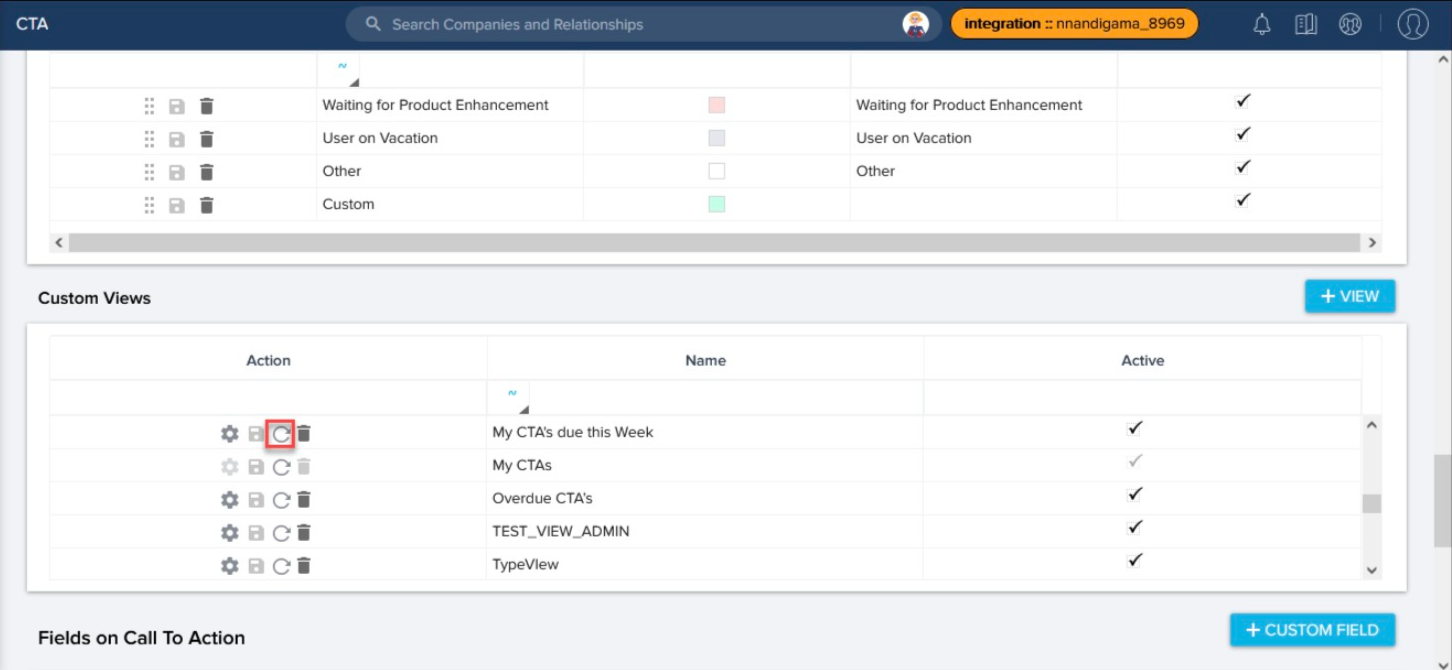
Reset Cockpit Views
Admins can reset the modified Admin View by a user back to what they had configured for all users, by clicking Reset icon in the Administration > Cockpit > CTA page.
| Net Promoter®, NPS®, NPS Prism®, and the NPS-related emoticons are registered trademarks of Bain & Company, Inc., NICE Systems, Inc., and Fred Reichheld. Net Promoter ScoreSM and Net Promoter SystemSM are service marks of Bain & Company, Inc., NICE Systems, Inc., and Fred Reichheld. |