Custom Views in Cockpit
Gainsight NXT
This article explains how the custom views are created in the Cockpit.
Overview
Cockpit Views provide the primary workspace for Customer Success Manager (CSM) teams to manage their Calls to Action (CTAs) and Tasks. You can use Views to view only a particular set of CTAs.
Following are the five types of Views available by default:
- High Priority Overdue CTAs: Displays the list of CTAs whose status is marked High and are past the due date.
- My CTAs Due This Week: Displays the CTAs with a due date this week, considering today as the start of the week.
- My CTAs: Consists of CTAs assigned to a logged-in user, along with the CTAs in which the logged-in user owns a task by default. However, CTAs are automatically removed from the view when the task owned is closed from the CTA that is not owned by the logged-in user. Users can change this view to display CTAs assigned to any user and save it as a new view. For more information on this process, refer to Modify Existing View. This view can display CTAs for only one user at a time and will fail if multiple users are selected.
- Overdue CTAs: Displays the list of CTAs which are past the due date.
CSMs can save Cockpit filter conditions as a Custom View, and the view can be modified, as well as re-named. The CTAs are displayed based on the view selected.
Example Business Use Case: For instance, you want to present a view with CTAs based on some criteria and do not want to modify or make any changes to an existing view. Using Custom Views, you can customize it the way you want and apply filters to view CTAs that best suit your requirement. This makes your job easier and saves lots of effort.
Note: Admins can also configure Custom Views for Cockpit based on Reason, Priority, etc. using the Custom Views section in the Administration > Call to Action (CTA) page. The option to create Custom Views is only available in the Global tab. For more information on how admins can configure custom views, refer to the Custom Views section in the Configure CTA Detail View Layouts article.
For more information about commonly used filters, refer to the Cockpit List View: Commonly Used Filters article.
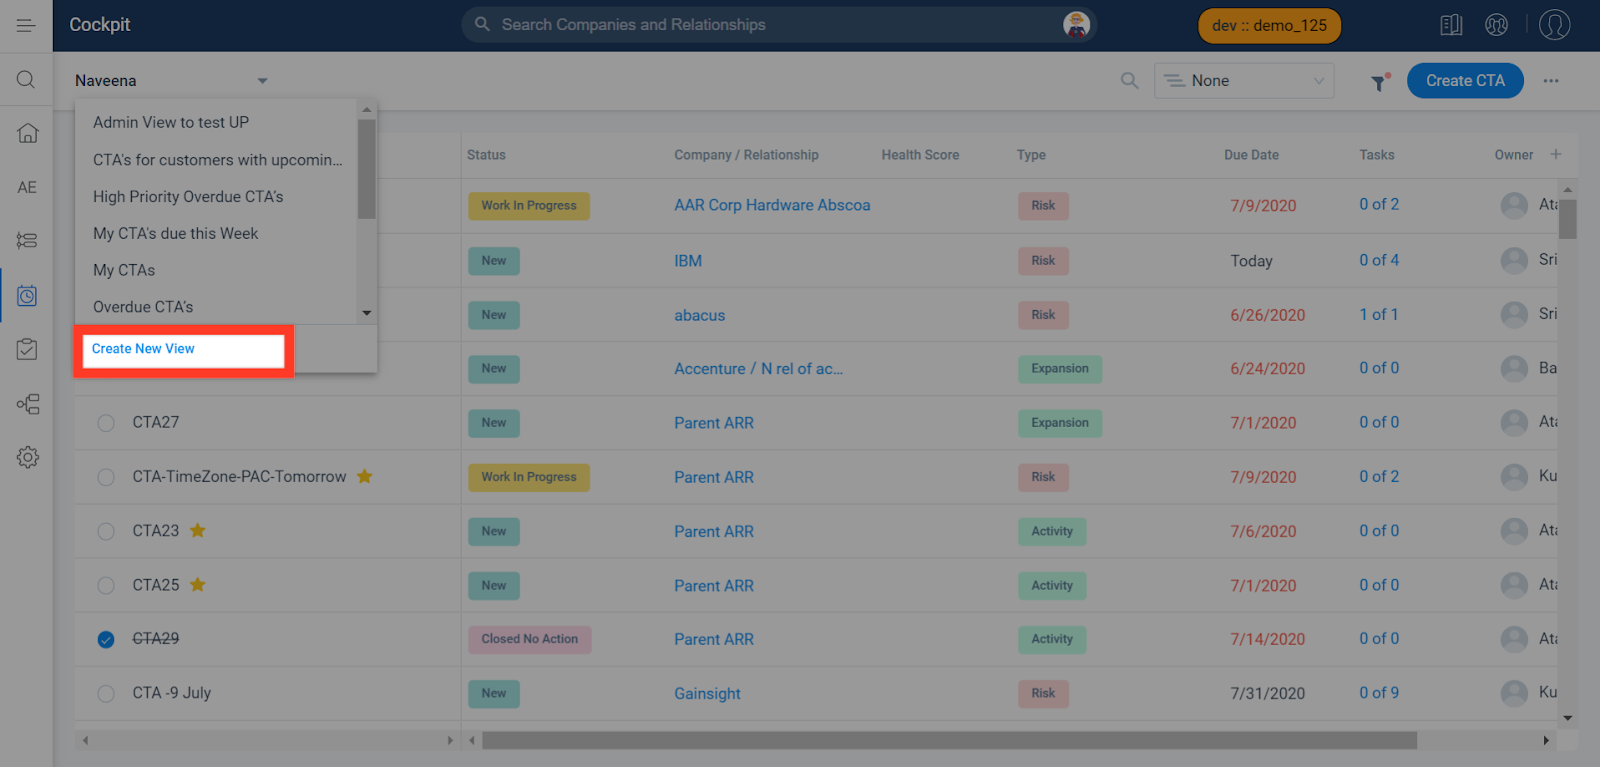
Create Custom View
You can create custom views to enhance visibility and filter critical CTAs and Tasks, as per your requirement. CSMs who focus primarily on Tasks, and often have a portfolio of similar tasks across multiple customers can opt for Task Views. Task Views are a type of custom view and can be created by selecting Only Tasks while creating a new view.
To create a new custom view:
- Navigate to Cockpit.
- From the Cockpit List View dropdown list, click Create New View. The Create New View page is displayed.
- In the Name field, enter a name for the new view.
- Select whether you want to create a CTA view or a Task View:
- Select Only CTAs to create a CTA view.
- Select Only Tasks to create a Task view.
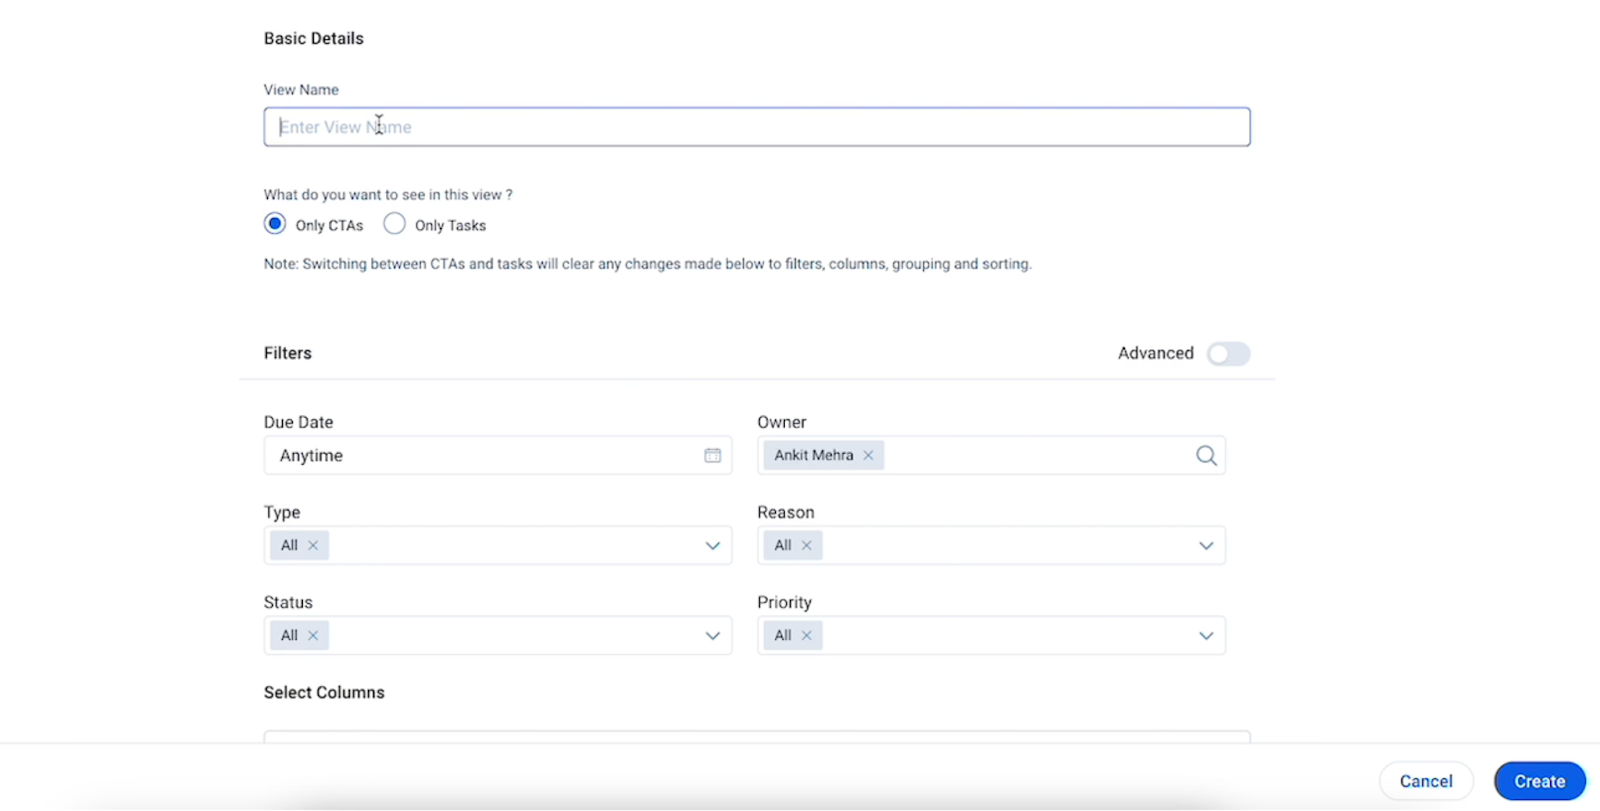
- (Optional) You can apply filters to narrow down required CTAs or Tasks by selecting the value in the following filter attributes:
- Due Date: Select a time range from the dropdown menu or enter a custom range by selecting the Start and End Date
- Owner: Type and search for the owner
- Type: Select the CTA-type from the dropdown list (applicable only if Only CTAs option is selected in Step-4)
- Reason: Select the appropriate reason from the dropdown list (applicable only if Only CTAs option is selected in Step-4)
- Status: Select the appropriate status of the CTA or Task from the dropdown list
- Priority: Select the appropriate priority from the dropdown list
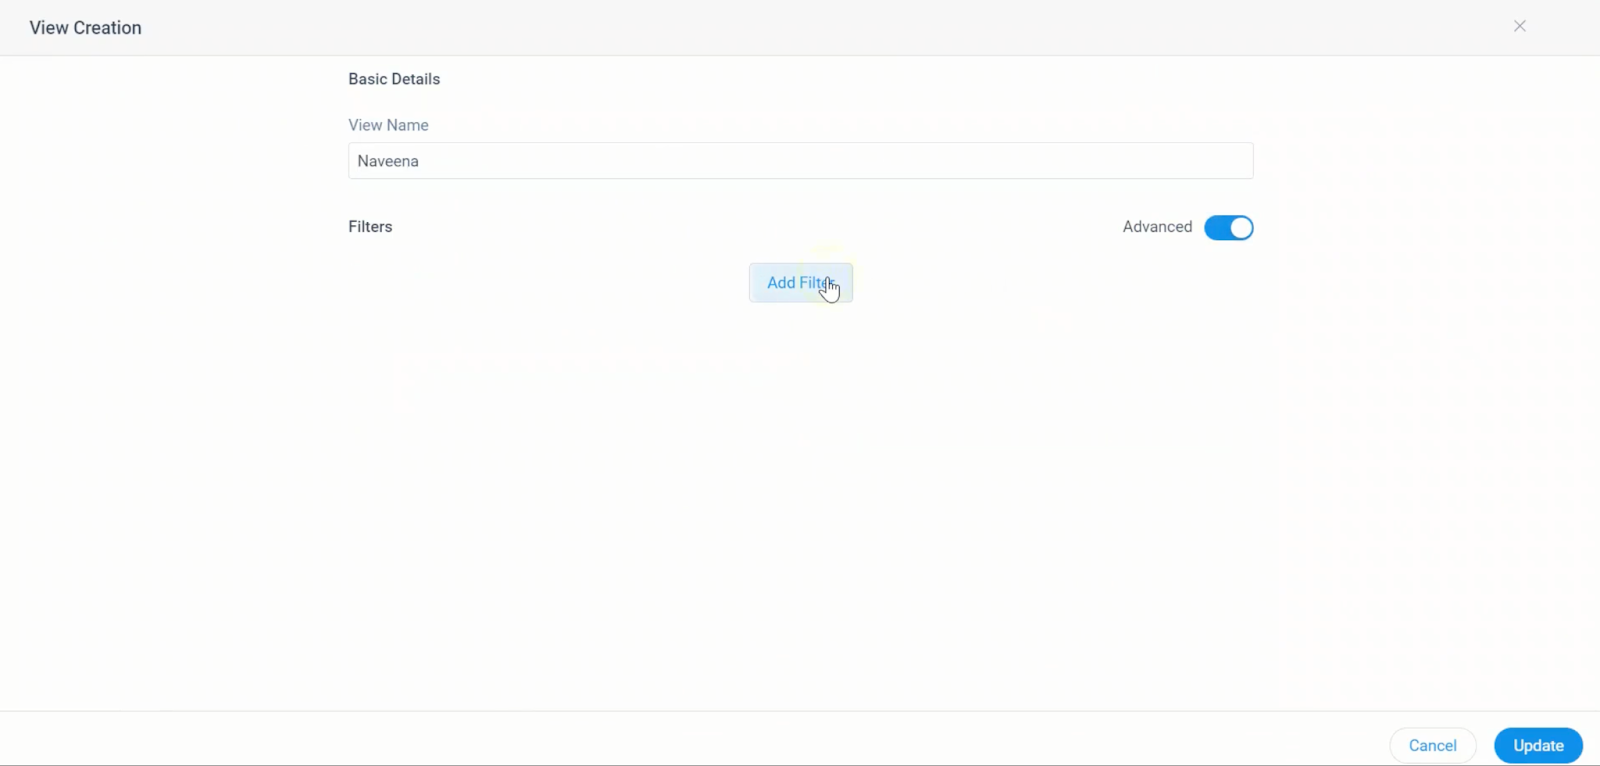
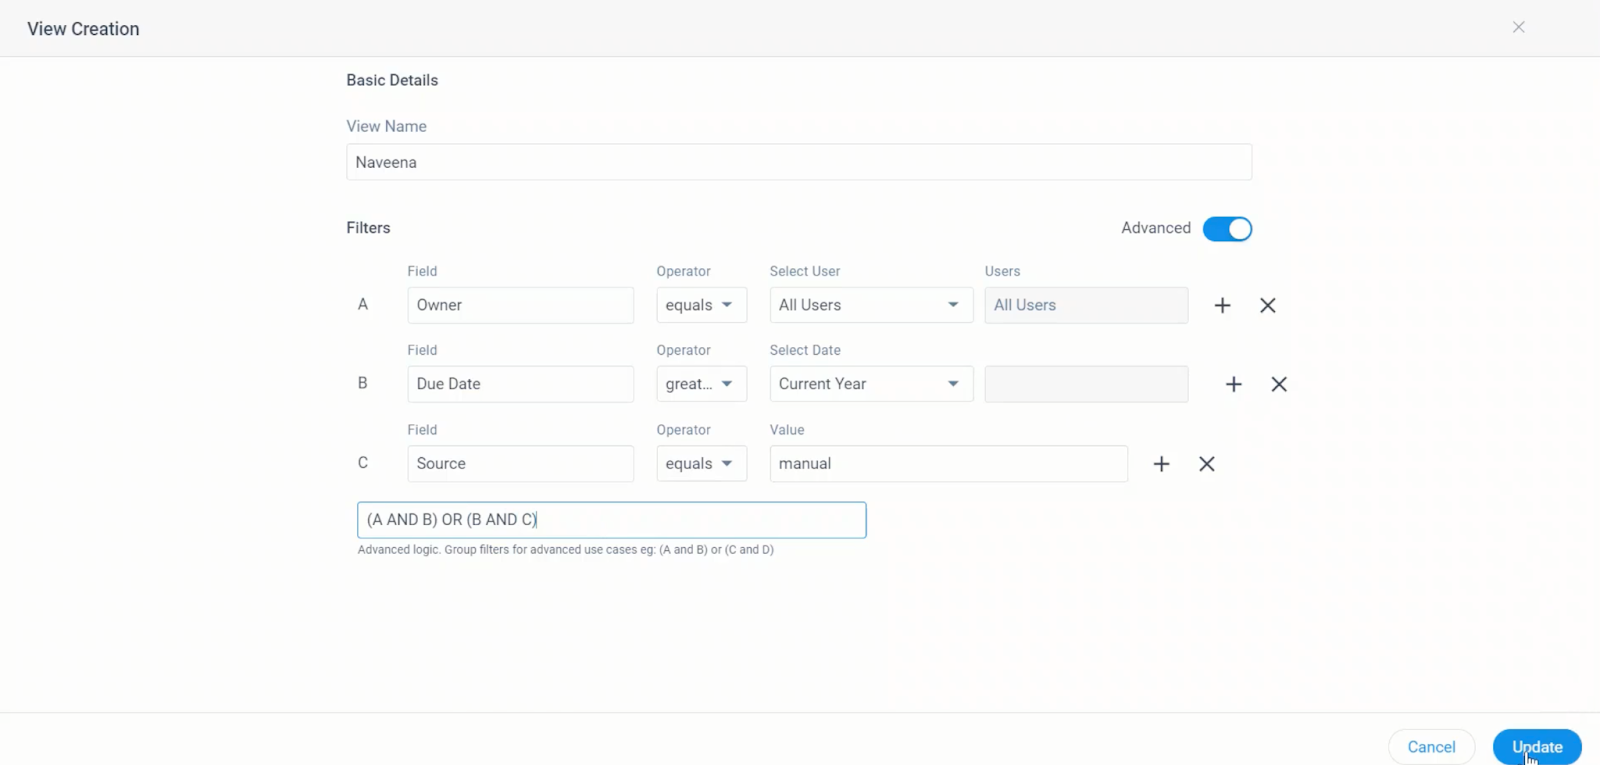
- (Optional) For applying additional filters, enable the Advanced toggle switch.
- Click Add Filter.
- Select the required field and operator, and enter the desired value.
Note: You can also add multiple filters and use the advanced logic (AND/OR). For more information, refer to the Advanced Filters section.
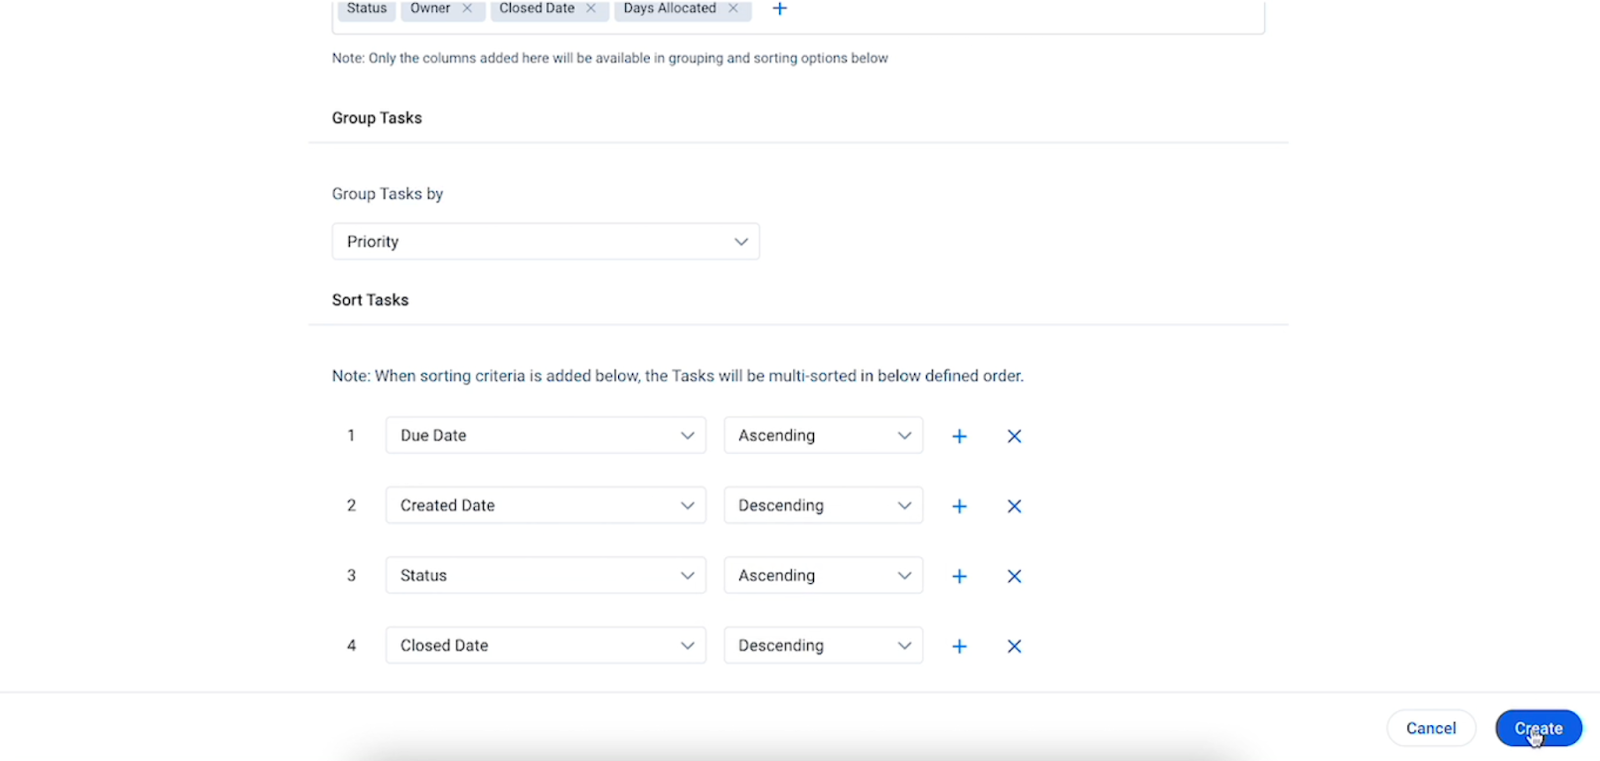
- (Optional) Click the + icon to add or remove columns from the view.
- (Optional) From the Group CTAs by dropdown, select an appropriate option.
- (Optional) Under the Sort section, you can select columns from the dropdown menu and sort them in ascending or descending order. You can include up to six columns by clicking the + icon.
- Click Create.
Advanced Filters
The Advanced filters allow you to further narrow in on the specific data you are looking for. When you apply the advanced filters, the basic filters are carried forward.
To apply advanced filters:
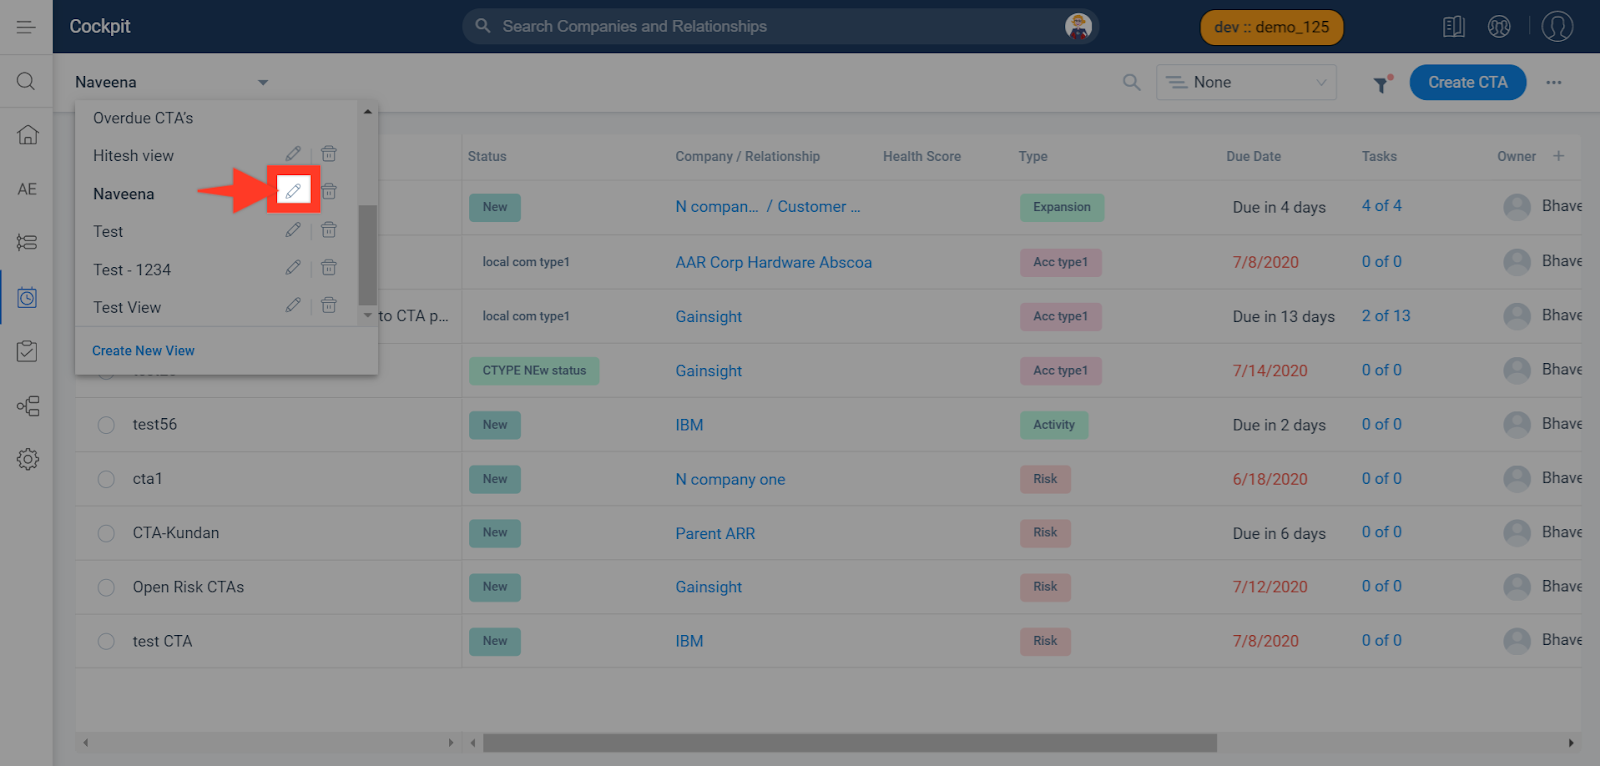
- Navigate to the Cockpit List View page and select a view from the dropdown list.
- Click the Edit icon on the view. The Update View page appears.
- In the Filters section, enable the Advanced toggle switch for adding additional filters.
- Click Add Filter.
- Select the required fields, operators, and enter the desired values.
- Click the + icon at the end of the filter to add more filters.
- Click the x icon at the end of the filter to delete that particular filter.
Note: You can apply multiple filters simultaneously using Advanced Logic (AND/OR). -
Click Update.
Modify Existing View
To modify an existing view, follow the steps as explained below:
- Navigate to the Cockpit List View page.
- From the Cockpit List View dropdown list, select a view and click the Edit icon. The Update View page appears.
- Modify the details of the filters as per your requirement.
- Click Update.
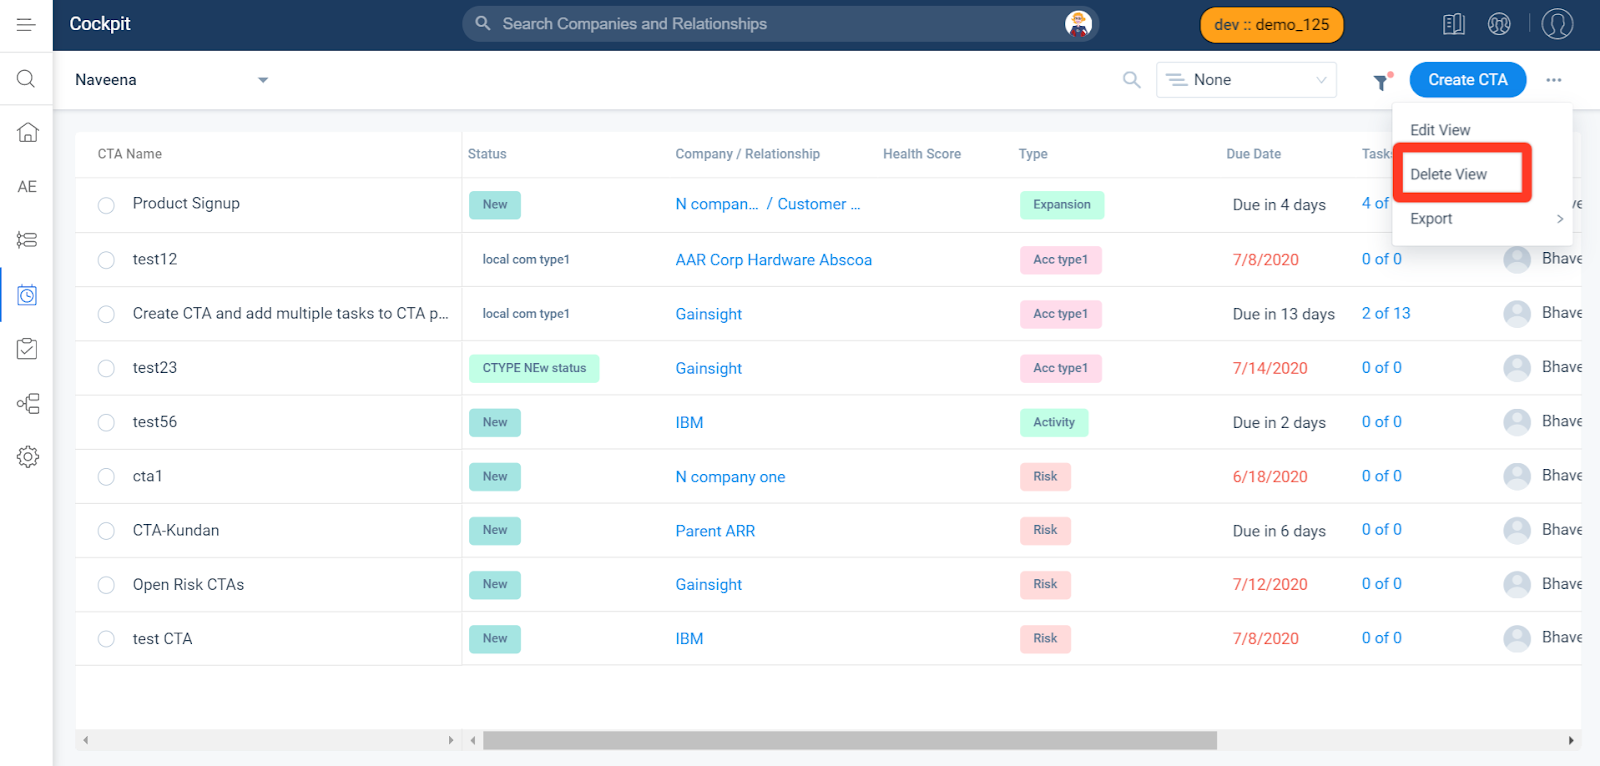
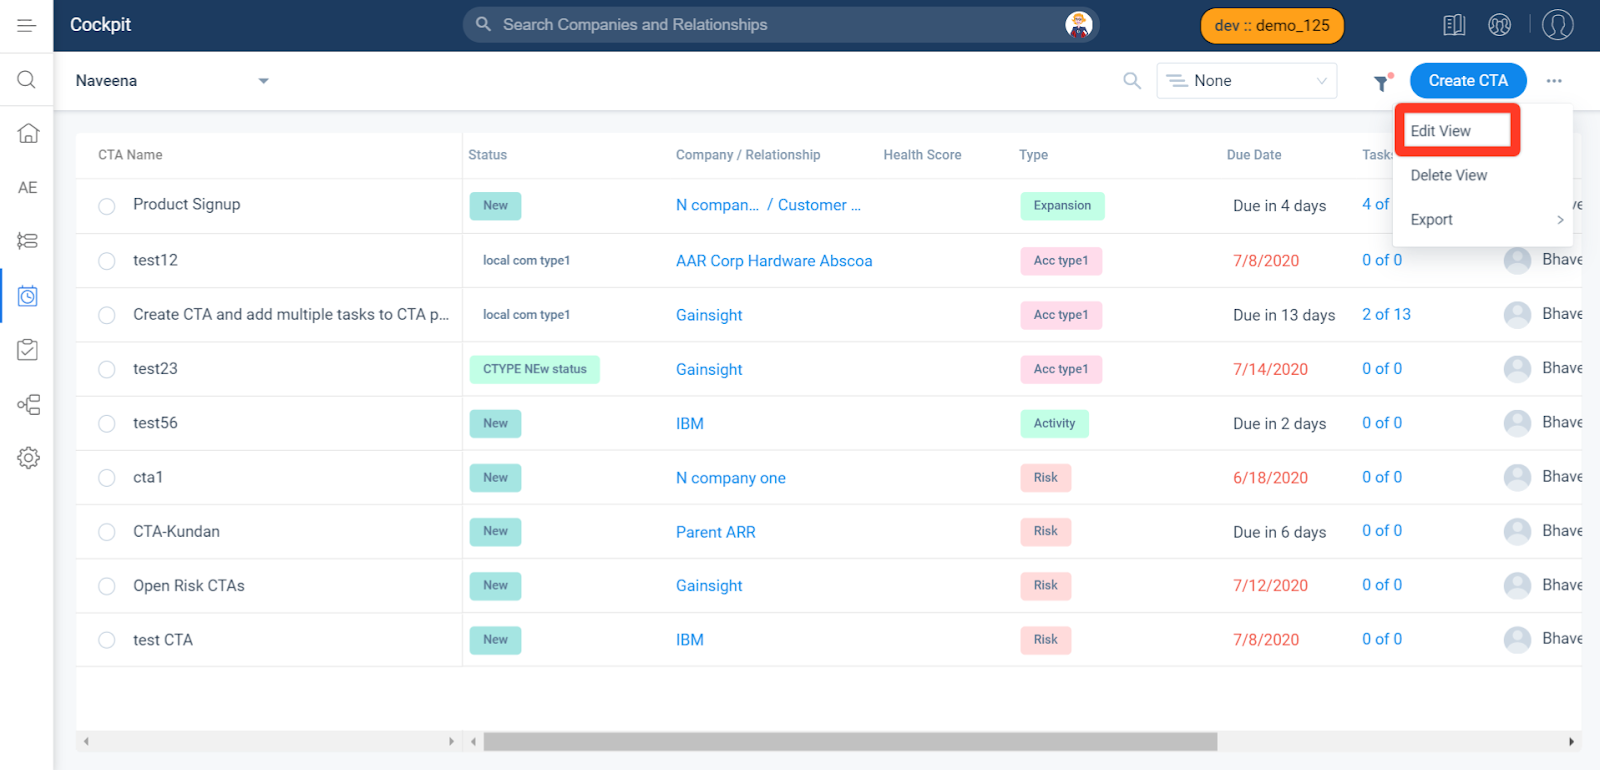
You can also Edit the view by clicking the three dots icon at the top right corner.
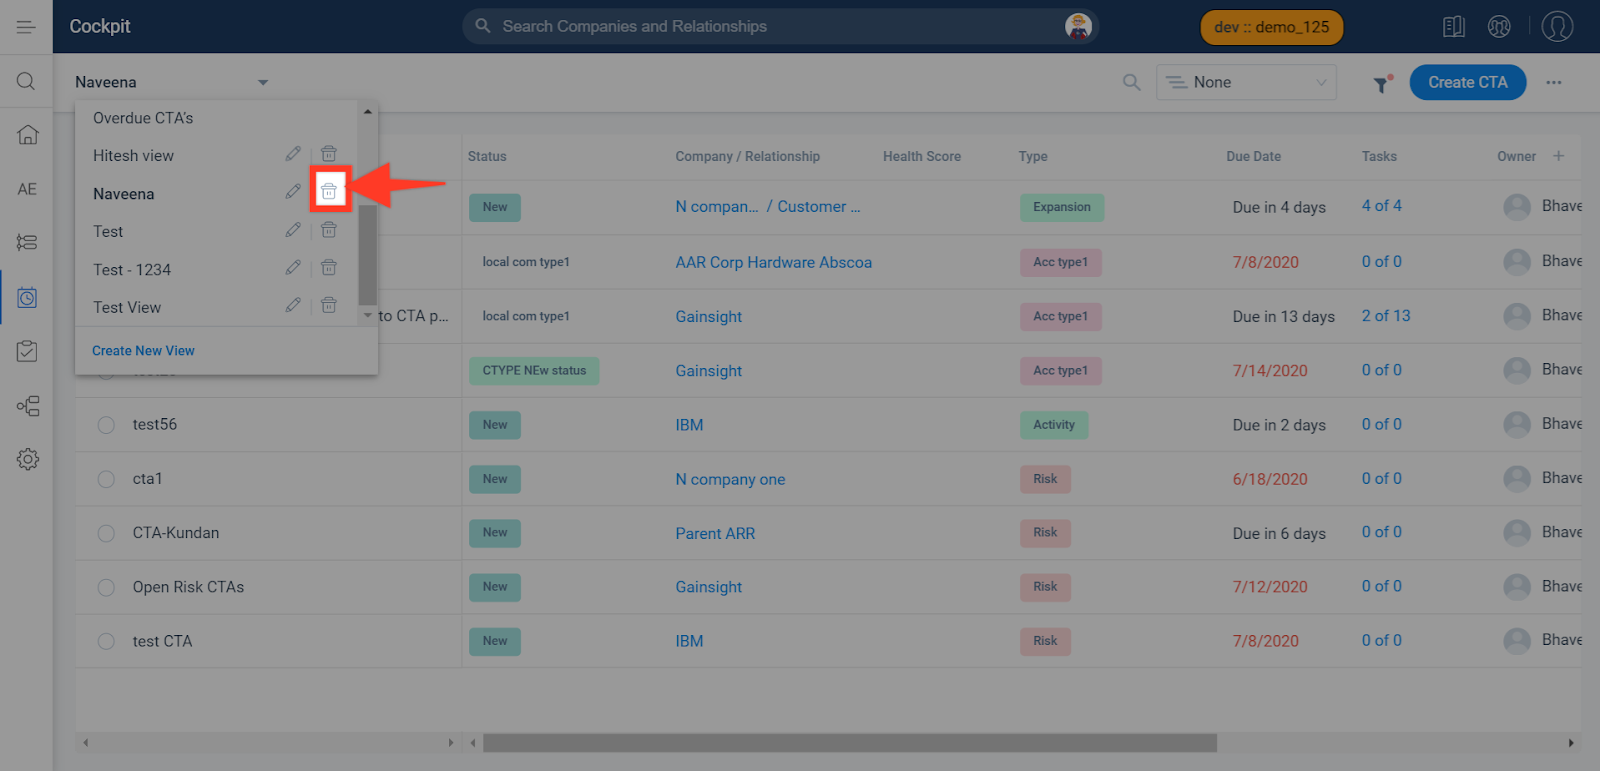
Delete View
To delete a view:
- Navigate to the Cockpit List View page.
- Select a view from the dropdown list and click the Delete icon. The confirmation message appears.
- Click Yes.
You can also Delete the view by clicking the three dots icon in the top right corner.