Configure General Settings and Activity Type
This article explains how to configure different Timeline settings from the Timeline Administration page.
Overview
Timeline is an official record of your customers. It allows users to log information on customer interactions in a way that enables you to quickly gather insights and drive action. For more information, refer to the Timeline Overview article.
Configure General Settings
The General Settings section on the Timeline Administration page includes configurations such as enabling Timeline in Cockpit for Company or Relationship Types, enabling the Global Timeline, displaying Relationship activities in the Customer Timeline, and configuring Associated Records.
To configure the Timeline general settings, navigate to Administration > Timeline > General.

Enable Timeline
You can enable Timeline in various modules at various levels using General settings. The Settings has the following options:
- Enable Timeline in Cockpit: Use Enable Timeline in Cockpit to allow end users to view the Timeline tab on all of the Relationship or Company CTA detail views.

- Show Relationship Activities in Customer Timeline: Turn on the Show Relationship Activities in Customer Timeline (Relationship Rollup) toggle to display Relationship level activities in Timeline.

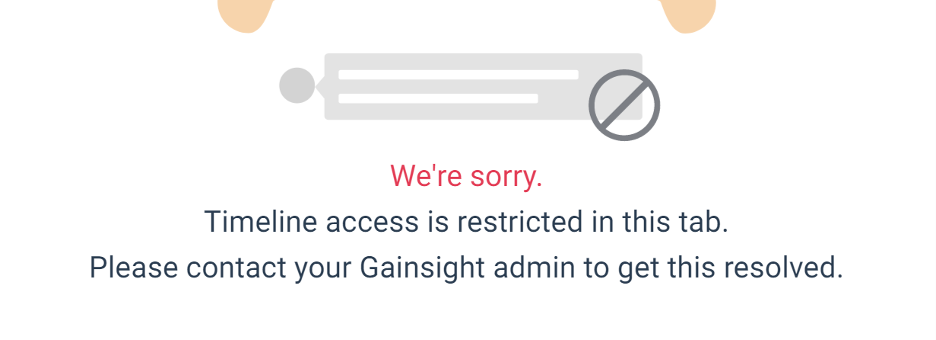
- Enable Global Timeline: At the Global level, you must turn on the Enable Global Timeline toggle. This ensures that the global Timeline is displayed to end users.
If this toggle is not turned on, end users receive the following error message on the global Timeline page.
- Associated Records: Associated Records, if enabled, are configurable per Activity Type. For more information on how to configure records, refer to the Configure Associated Records to Timeline article.
Configure Activity Types
This section explains how to configure Activity Types. An activity is a task that can be logged on the Timeline page by end users. Each Activity is associated with an Activity Type. If you are adding Activity Types at the Relationship level, you must also select a Relationship type.
Create Activity Type
This section explains the process of creating new Activity Types. Gainsight offers five default Activity Types: Update, Call, Meeting, Email, and Milestone. You cannot delete these Activity types. However, you can modify the icon, Company and Relationship Type assignment, Reporting Category, and add custom fields to these Activity Types. You can create new Activity Types at the Company, or Relationship Type level.
To create an Activity Type:
- Navigate to Administration > Timeline > Activity Types.

- Click Create Activity Type. The Create Activity Type page appears.

- Enter the following details:
- Activity Type Name: Name of the activity.
- Activity Icon: Select the icon from the dropdown menu, which closest represents the activity type.
- Reporting Category: Select a category for the activity type from the dropdown menu. If required, you can create a separate reporting category of your choice. For more information on creating reporting categories, refer to the Reporting Category section.
- Configure Fields for your activity. For more information refer to the Configure Fields section.
- Click SAVE.
Configure Fields
This section allows you to add fields to the Activity Type. CSMs can add values to each field. By default, Subject, Activity Date, and Note are added as mandatory fields. You can modify the names of these fields but cannot delete and mark them non-mandatory.
To configure Layout:
- In the Create Activity Type page, click Add Fields. The Add Fields to Layout slide-out panel appears.
- Select the applicable fields and click Add to Layout.

- (Optional) To rename the field, click the Edit icon next to the field. You can also mark the field as mandatory, if required.
Note: You can change the default field names but cannot make them non-mandatory.

Create Custom Fields
You can also create custom fields in addition to the available default fields. To create a custom field:
- Click Add Fields. The Add Fields to Layout slide-out panel appears.
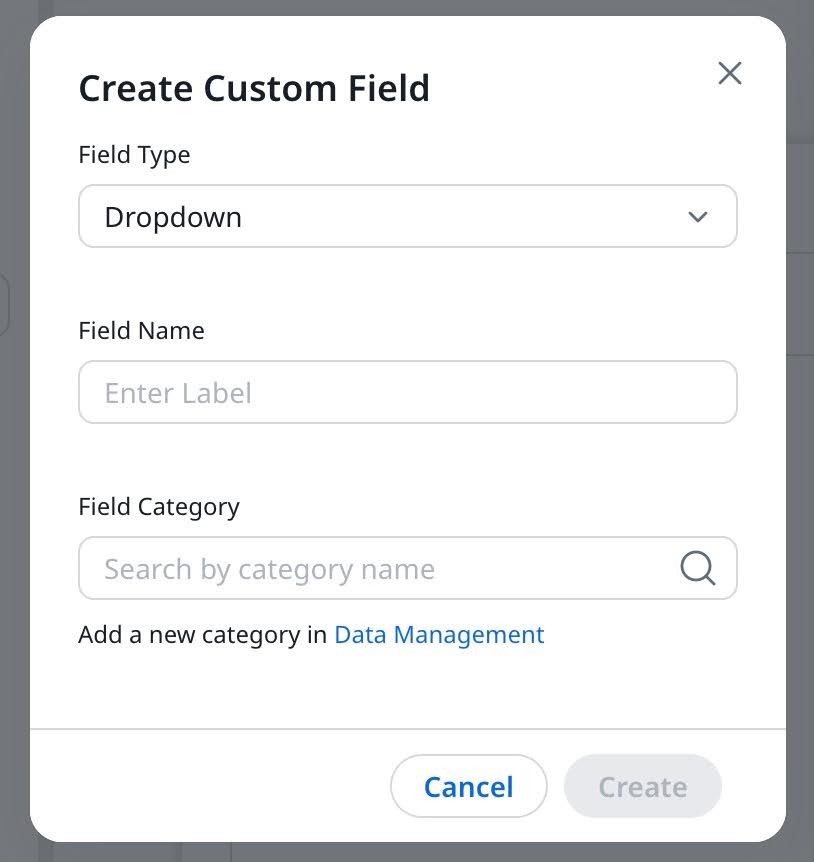
- Click Create Custom Field. The Create Custom Field dialog box appears.

- Enter the following details:
- Field type: Select a data type from the field type dropdown menu.
- Select Multi Select Dropdown to enable end-users to add more than one value to the respective field.
- (Applicable only if the Number data type is selected) From the Decimal places drop-down menu select the number of floating point values to be used.
- (Applicable only if the Dropdown data type is selected) Start typing the name of the drop-down category. Start typing the category name and select the appropriate one. If required, click the Data Management hyperlink to create a new Category from the Data Management page. For more information on creating dropdown lists, refer to the Dropdown List article.

- Field Name
- Click Create
- Field type: Select a data type from the field type dropdown menu.
- Click Create, to save the activity type.
- If you create an Activity type at the Company level, end users can view it only while creating Activities for Companies.
- If you create an Activity type at the Relationship level, end users can view it only while creating Activities for Relationships. While creating Activity types for Relationships, you must first select the Relationship type. The new Activity types are applicable only to the Relationships under the selected Relationship Types.
Configure From and To Fields for Email Activity Type
Admins can capture sender and recipient information directly within Email activities.
To configure the From and To fields for the Email activity type:
- Navigate to Administration > Timeline > Activity Types.
- For an Email activity type, click Edit from the three-dots horizontal menu.

When configuring email activity type for the first time, admins receive suggestions to select relevant participant fields, such as internal and external recipients. This prompt appears only once and does not repeat after saving the configuration.

- Click Manage Presets. The Manage Presets slide-out panel appears.
Note: For activity types other than Email, the From and To fields are available in the Other Fields section and can be added using Add Fields.

- Select at least one Recipient Fields (From, To / Internal Attendees, External Attendees).
- Click Save.
- The From and To fields support both Internal Attendees (GS Users) and External Attendees (Company Persons).
- If Auto Email Capture is enabled, participants from the To and From fields are automatically populated in email activities logged through Auto Email Capture. Participants in the BCC field are not captured.
When configured, the From and To fields identify internal (GS Users) and external (Company Persons) attendees on an email activity. These fields are also available in other activity types where email communication needs to be captured.
The From and To fields are available in the Activity Timeline and Attendee objects to support reporting on email participants.

Actions on the Activity Types
You can perform different actions on the Activity Types as explained below.
Edit Activity Type
To edit an activity type:
- Click the three-dots horizontal menu beside an activity type, select Edit. The edit window appears.

- After making the required changes, click Update.

- You cannot edit the Activity Types at the Company and Relationship level.
- You can modify the Icons, Fields and Reporting Categories but cannot modify the Activity Type Name for the default activity types.
Delete Activity Type
Performs the steps explained below to delete an activity type:
- Click the three-dots horizontal menu beside an activity type, and select Confirm Deletion. The Delete Activity Type dialog box appears.

- Click Confirm Deletion. The confirmation message is displayed.
- You cannot delete the default activity types.
- You cannot delete an activity type which is already being used in activities.
The following error message is displayed when you attempt to delete an activity type which has already been in use.

Sort Activity Type
Use the Drag icon to sort the Activity Types in the required order that you want to display to the CSMs while creating a new activity.

Enable or Turn Off an Activity Type
If you wish to remove any activity type instead of deleting it, turn off the respective Active checkbox. Once an activity type is created, it is enabled by default.

You cannot enable/disable the Email Activity Type and it appears greyed out by default, since all the emails from the Email to Timeline/Plugin are pushed as email type.
Reporting Category
When you have multiple similar activity types, you can group them under one Reporting Category. Grouping similar Activity Types allows you to build reports and rules easily.
For instance, you have Activity Types called One on One Meeting, Team Meeting, Kickoff Meeting, Quarterly Meeting, add these Activity Types to the Reporting Category Meeting or you can create a new category.
You can also use the Reporting Category to group activities across entities. You can create a Report or a rule and filter with the Meeting reporting Category to view all Activities of type Meeting.
Create Reporting Category
You can add a reporting category while editing an existing activity type or when creating a new activity type.
To create a reporting category:
- From the Select Reporting Category dropdown list, select Add Category. The Add Category dialog box appears.

- Enter a name for the category.
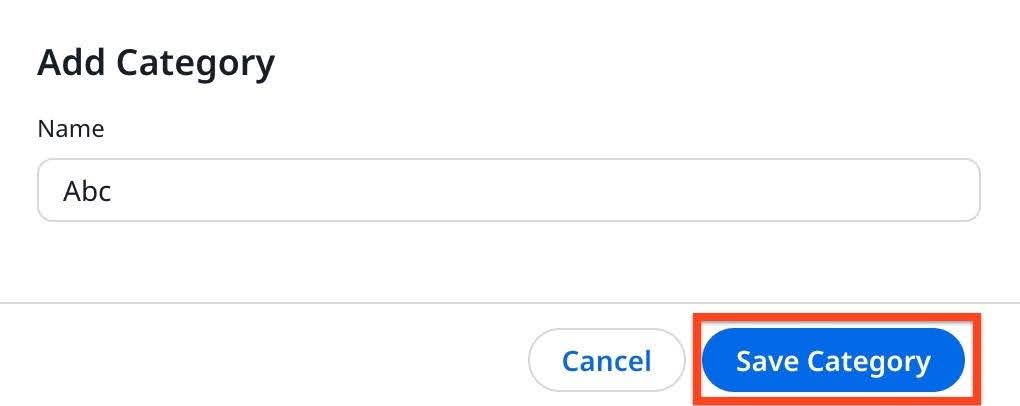
- Click Save Category.
- (Optional) To edit a reporting category, click the Edit icon beside the reporting category.

- (Optional) To delete a reporting category, click the Delete icon beside the reporting category.
You cannot delete a category, if an activity type is grouped under it. You must first ungroup the activity type from the reporting category, to delete it.
Record Deletion in Timeline
When you delete a Company record, all its corresponding Timeline records are deleted. If the Company has Relationships, the Timeline records for the relationships are also deleted.
When you delete a Relationship record, its associated Timeline records are automatically deleted. However, the Activities of the Company to which the Relationship belonged to, continue to exist.
Limitations
- You can configure a maximum of 50 Activity Types each for
- Company and Relationship level. Five of these are default Activity Types (Update, Call, Meeting, Email, and Milestone) that cannot be deleted.
- The combined overall field limit for
- Company and Relationship level is 200.
- Each Activity Type can have a maximum of 15 fields.