Configure Success Snapshots
Gainsight NXT
This article explains admins how to configure Success Snapshot templates.
Overview
Success Snapshot helps you to upload your customized PowerPoint presentations or Google Slides that need to be configured with dynamic data points from Gainsight. You can further insert the data from Gainsight into the presentation to suit your business requirements. Success Snapshot honors all formatting and customizations of the Parent Deck. For more information on Parent Deck, refer to the Overview of Success Snapshot article available in the Additional Resources section.
Create a Success Snapshot Template
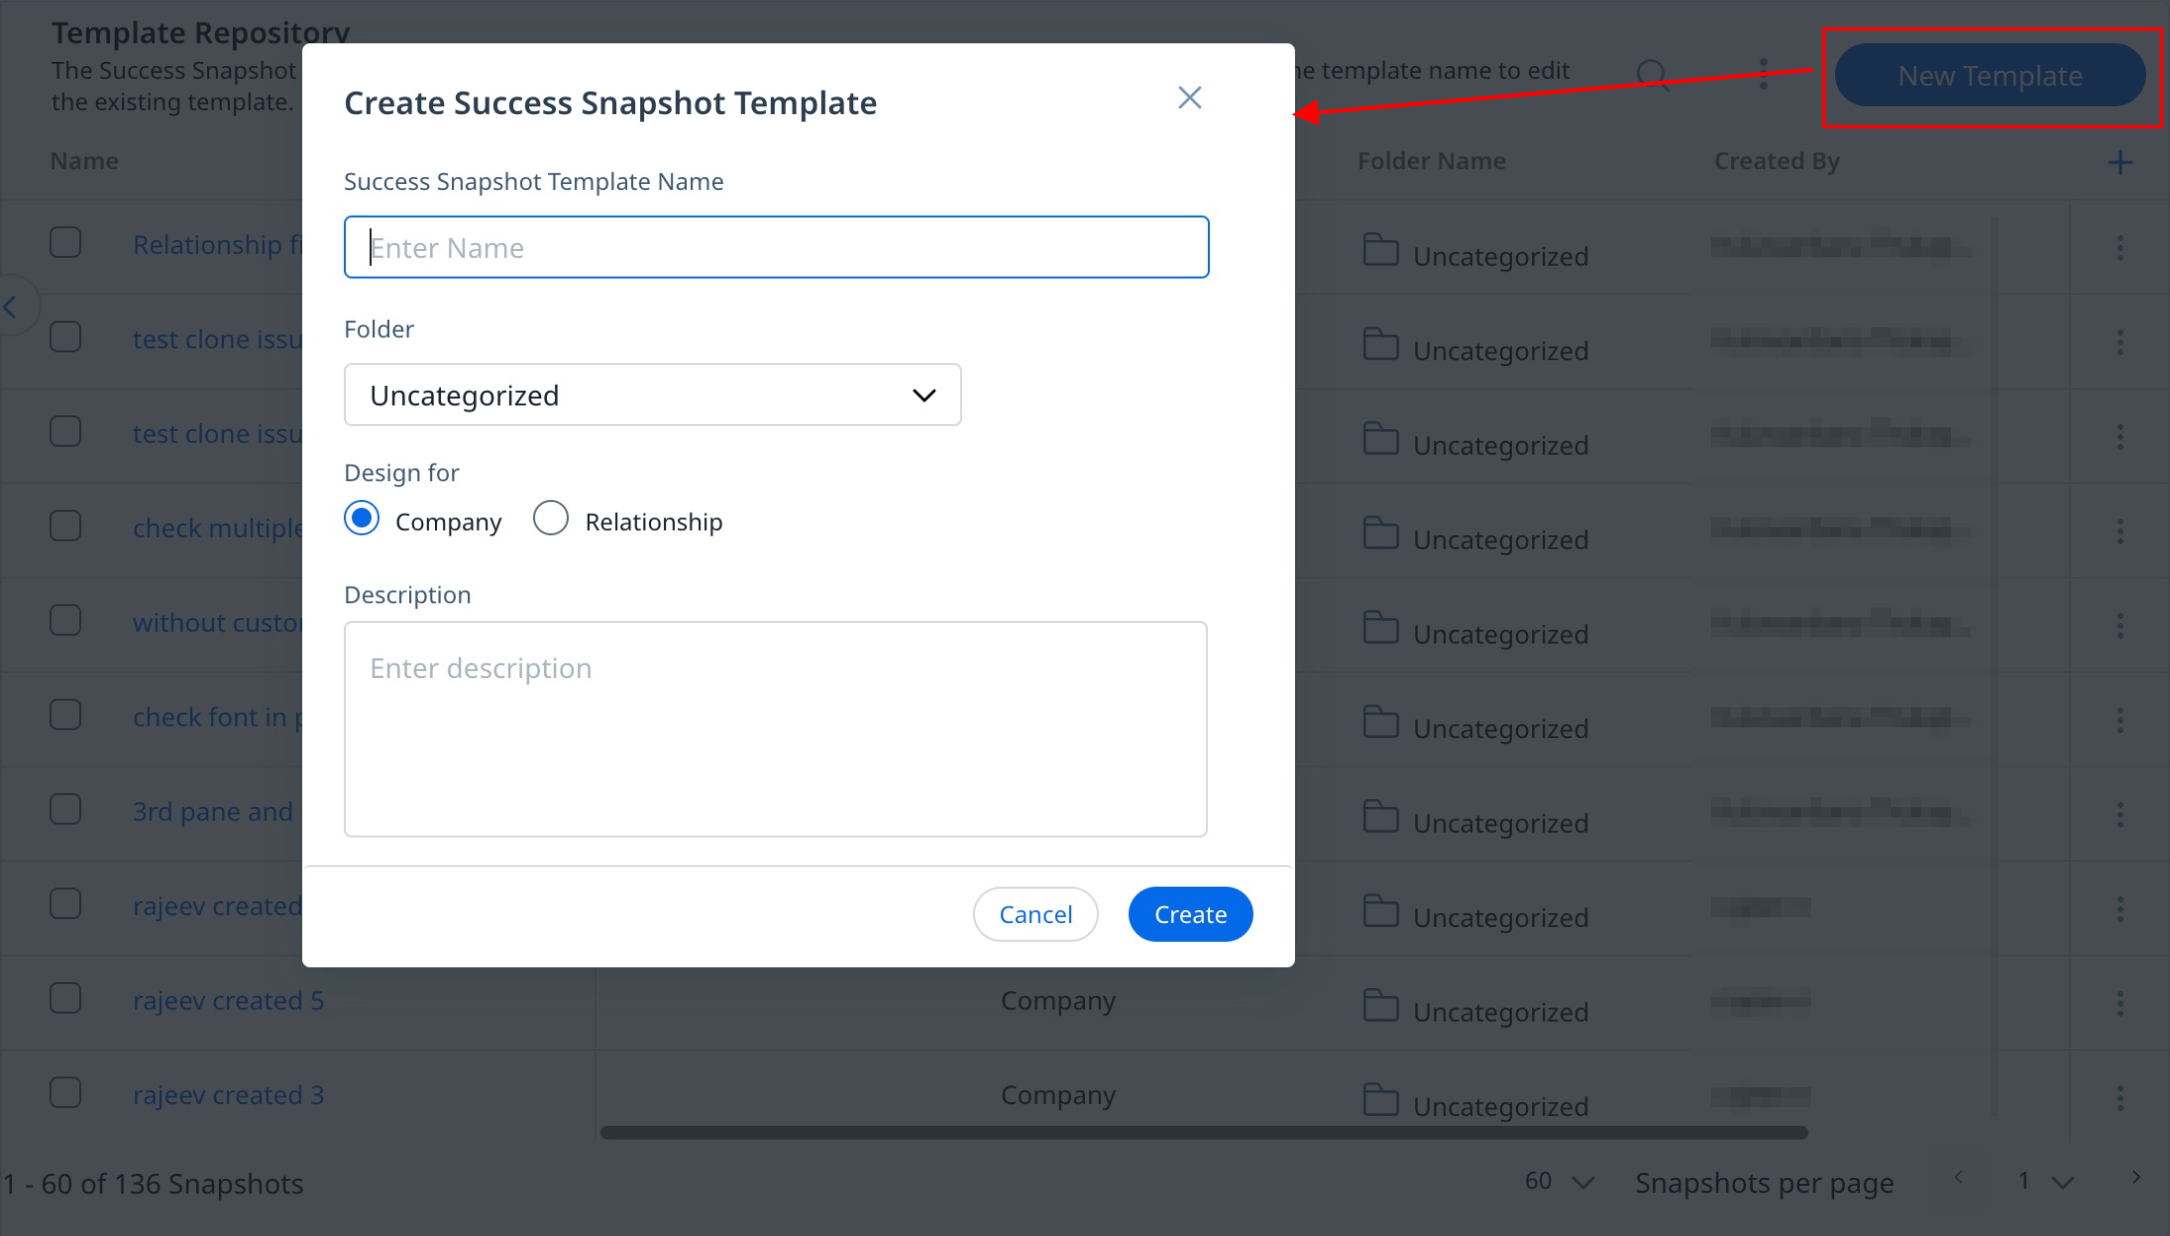
To create a Success Snapshot Template:
- Navigate to Administration > External Sharing > Success Snapshot Builder.
- Click New Template. The Create Success Snapshot Template window appears.
- Enter the following details:
- Success Snapshot Template Name: Enter a name for the template.
- Folder: Select a folder to save template.
- Design for: Select Company or Relationship to create the Success Snapshot Template at a Company or Relationship level respectively.
- (Optional) Description: Enter a description of the template.
- Click Create. The New Template window appears.
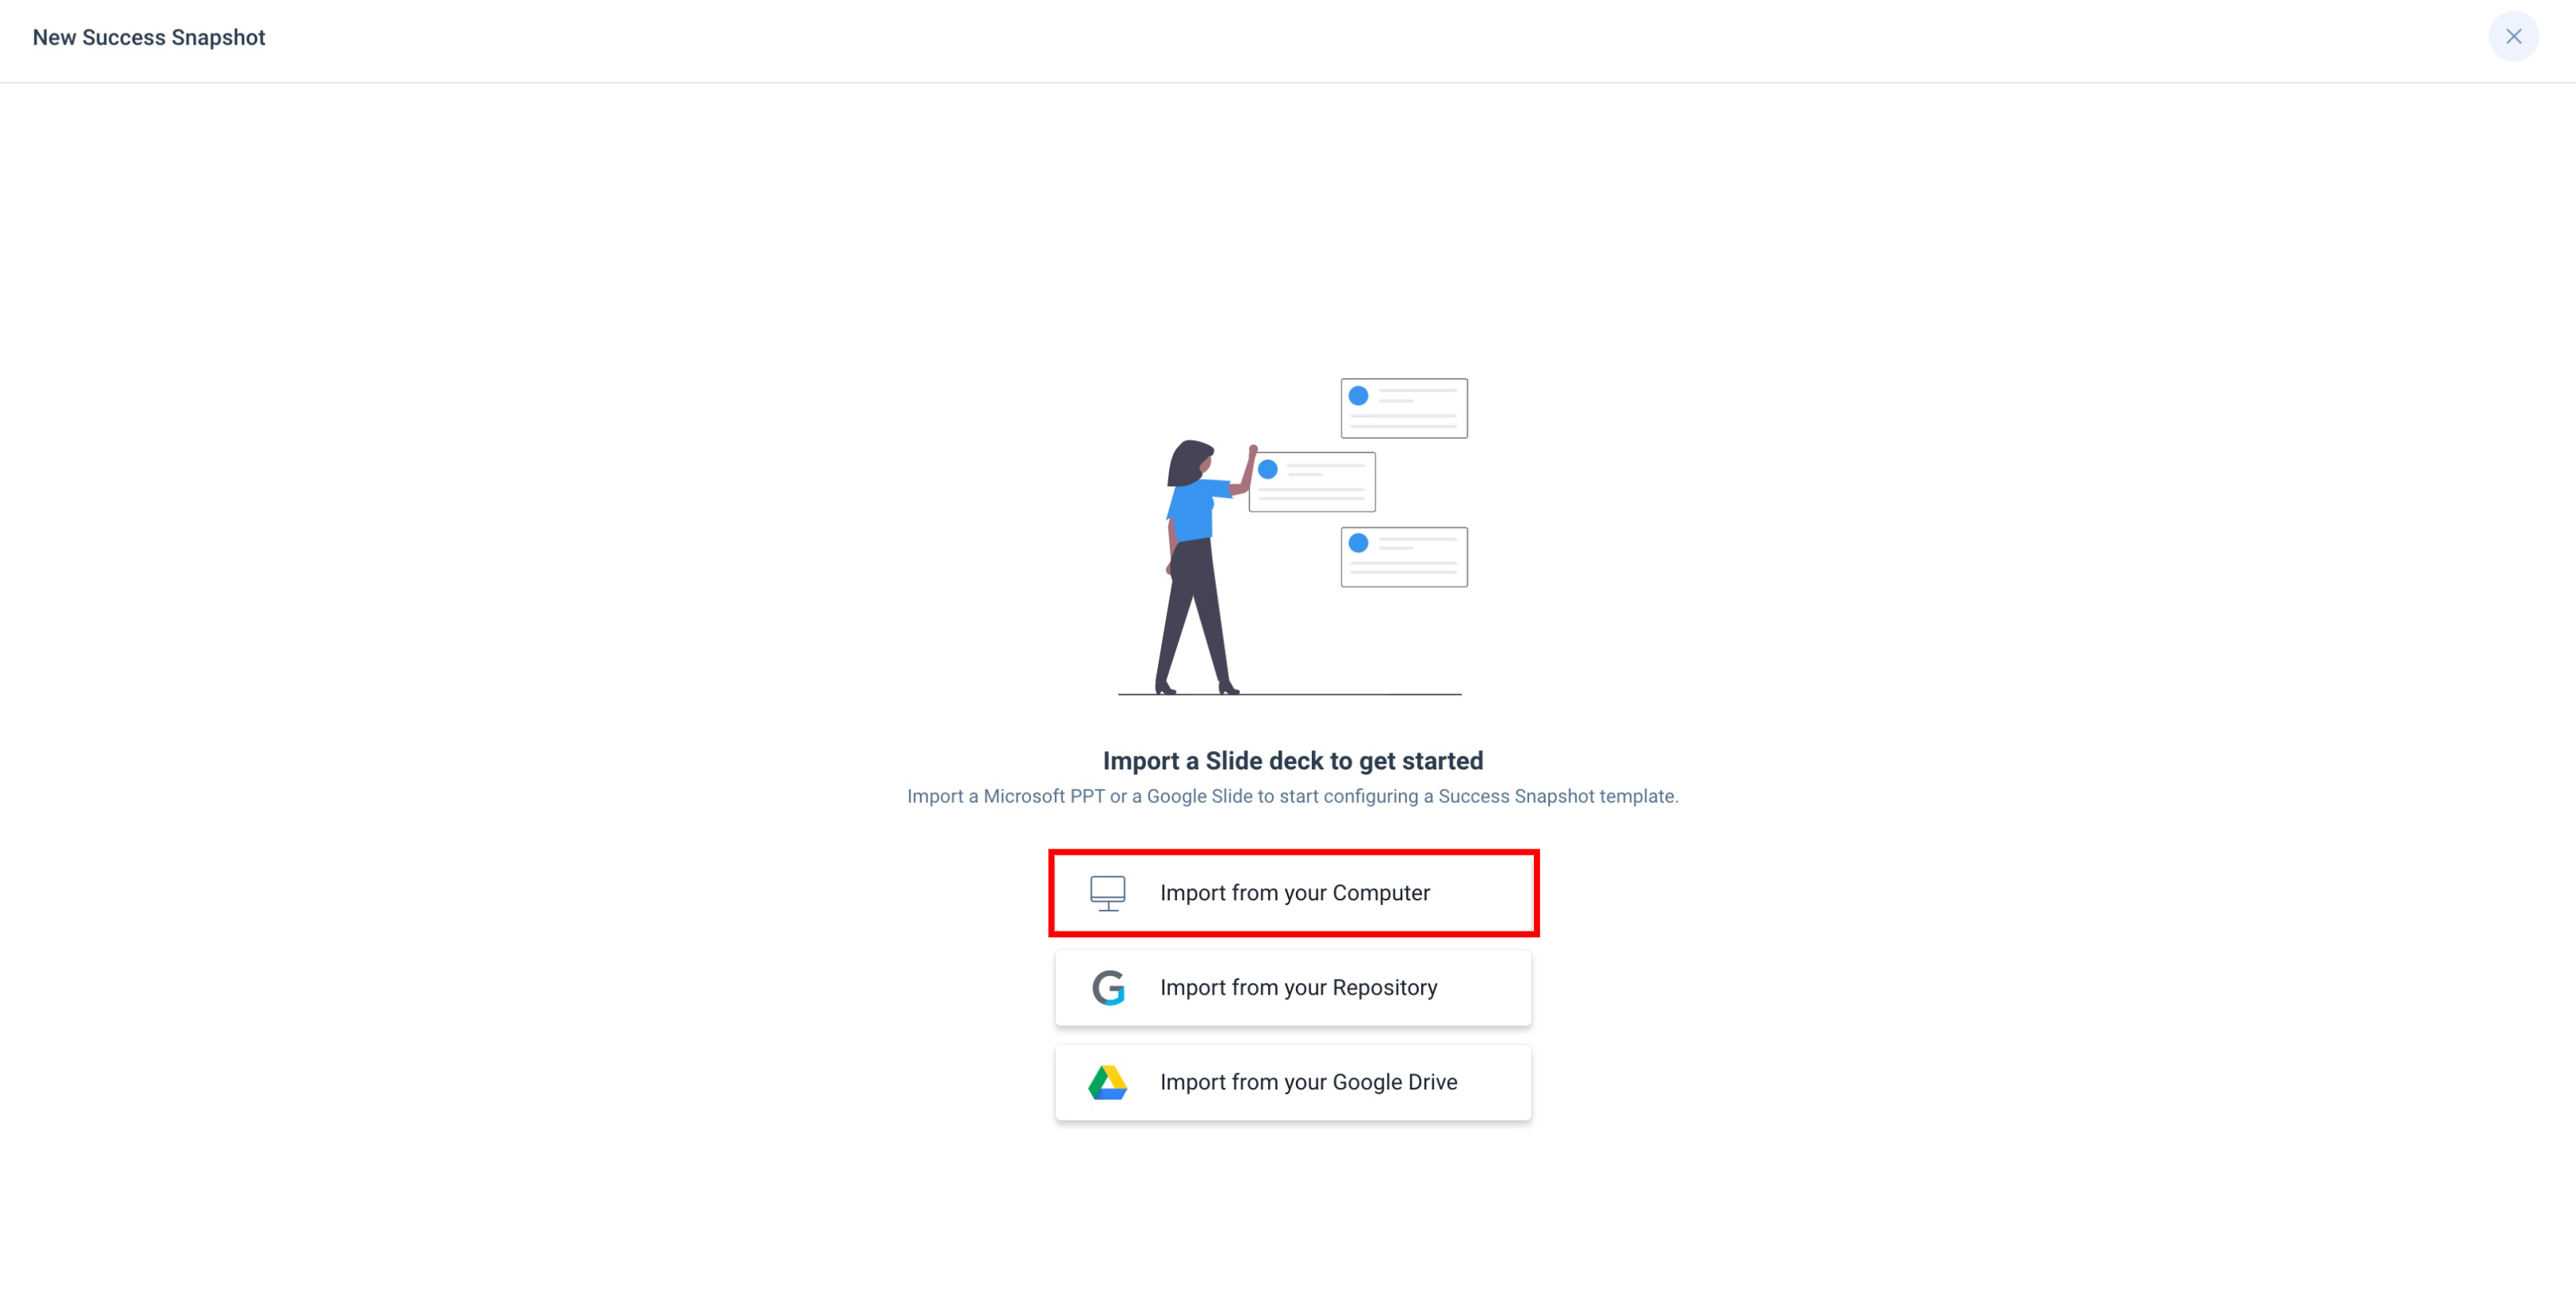
- Import a Parent Deck from the computer, repository, or Google Drive. For more information on how to import a Parent Deck, refer to the Import Parent Deck section of this article.
Import Parent Deck
Use one of the following options to import a Parent Deck.
Import from your Computer
The Import from your Computer option lets you choose the PPTX file from your computer.
To upload a PPTX file:
- Click Import from your Computer.
- Select the PPTX file from your computer.
- Click Open. Wait for a few seconds while your business deck gets prepared and analyzed for you to make the changes.
Note: The maximum allowed size of the PPTX file for upload is 50 MB.
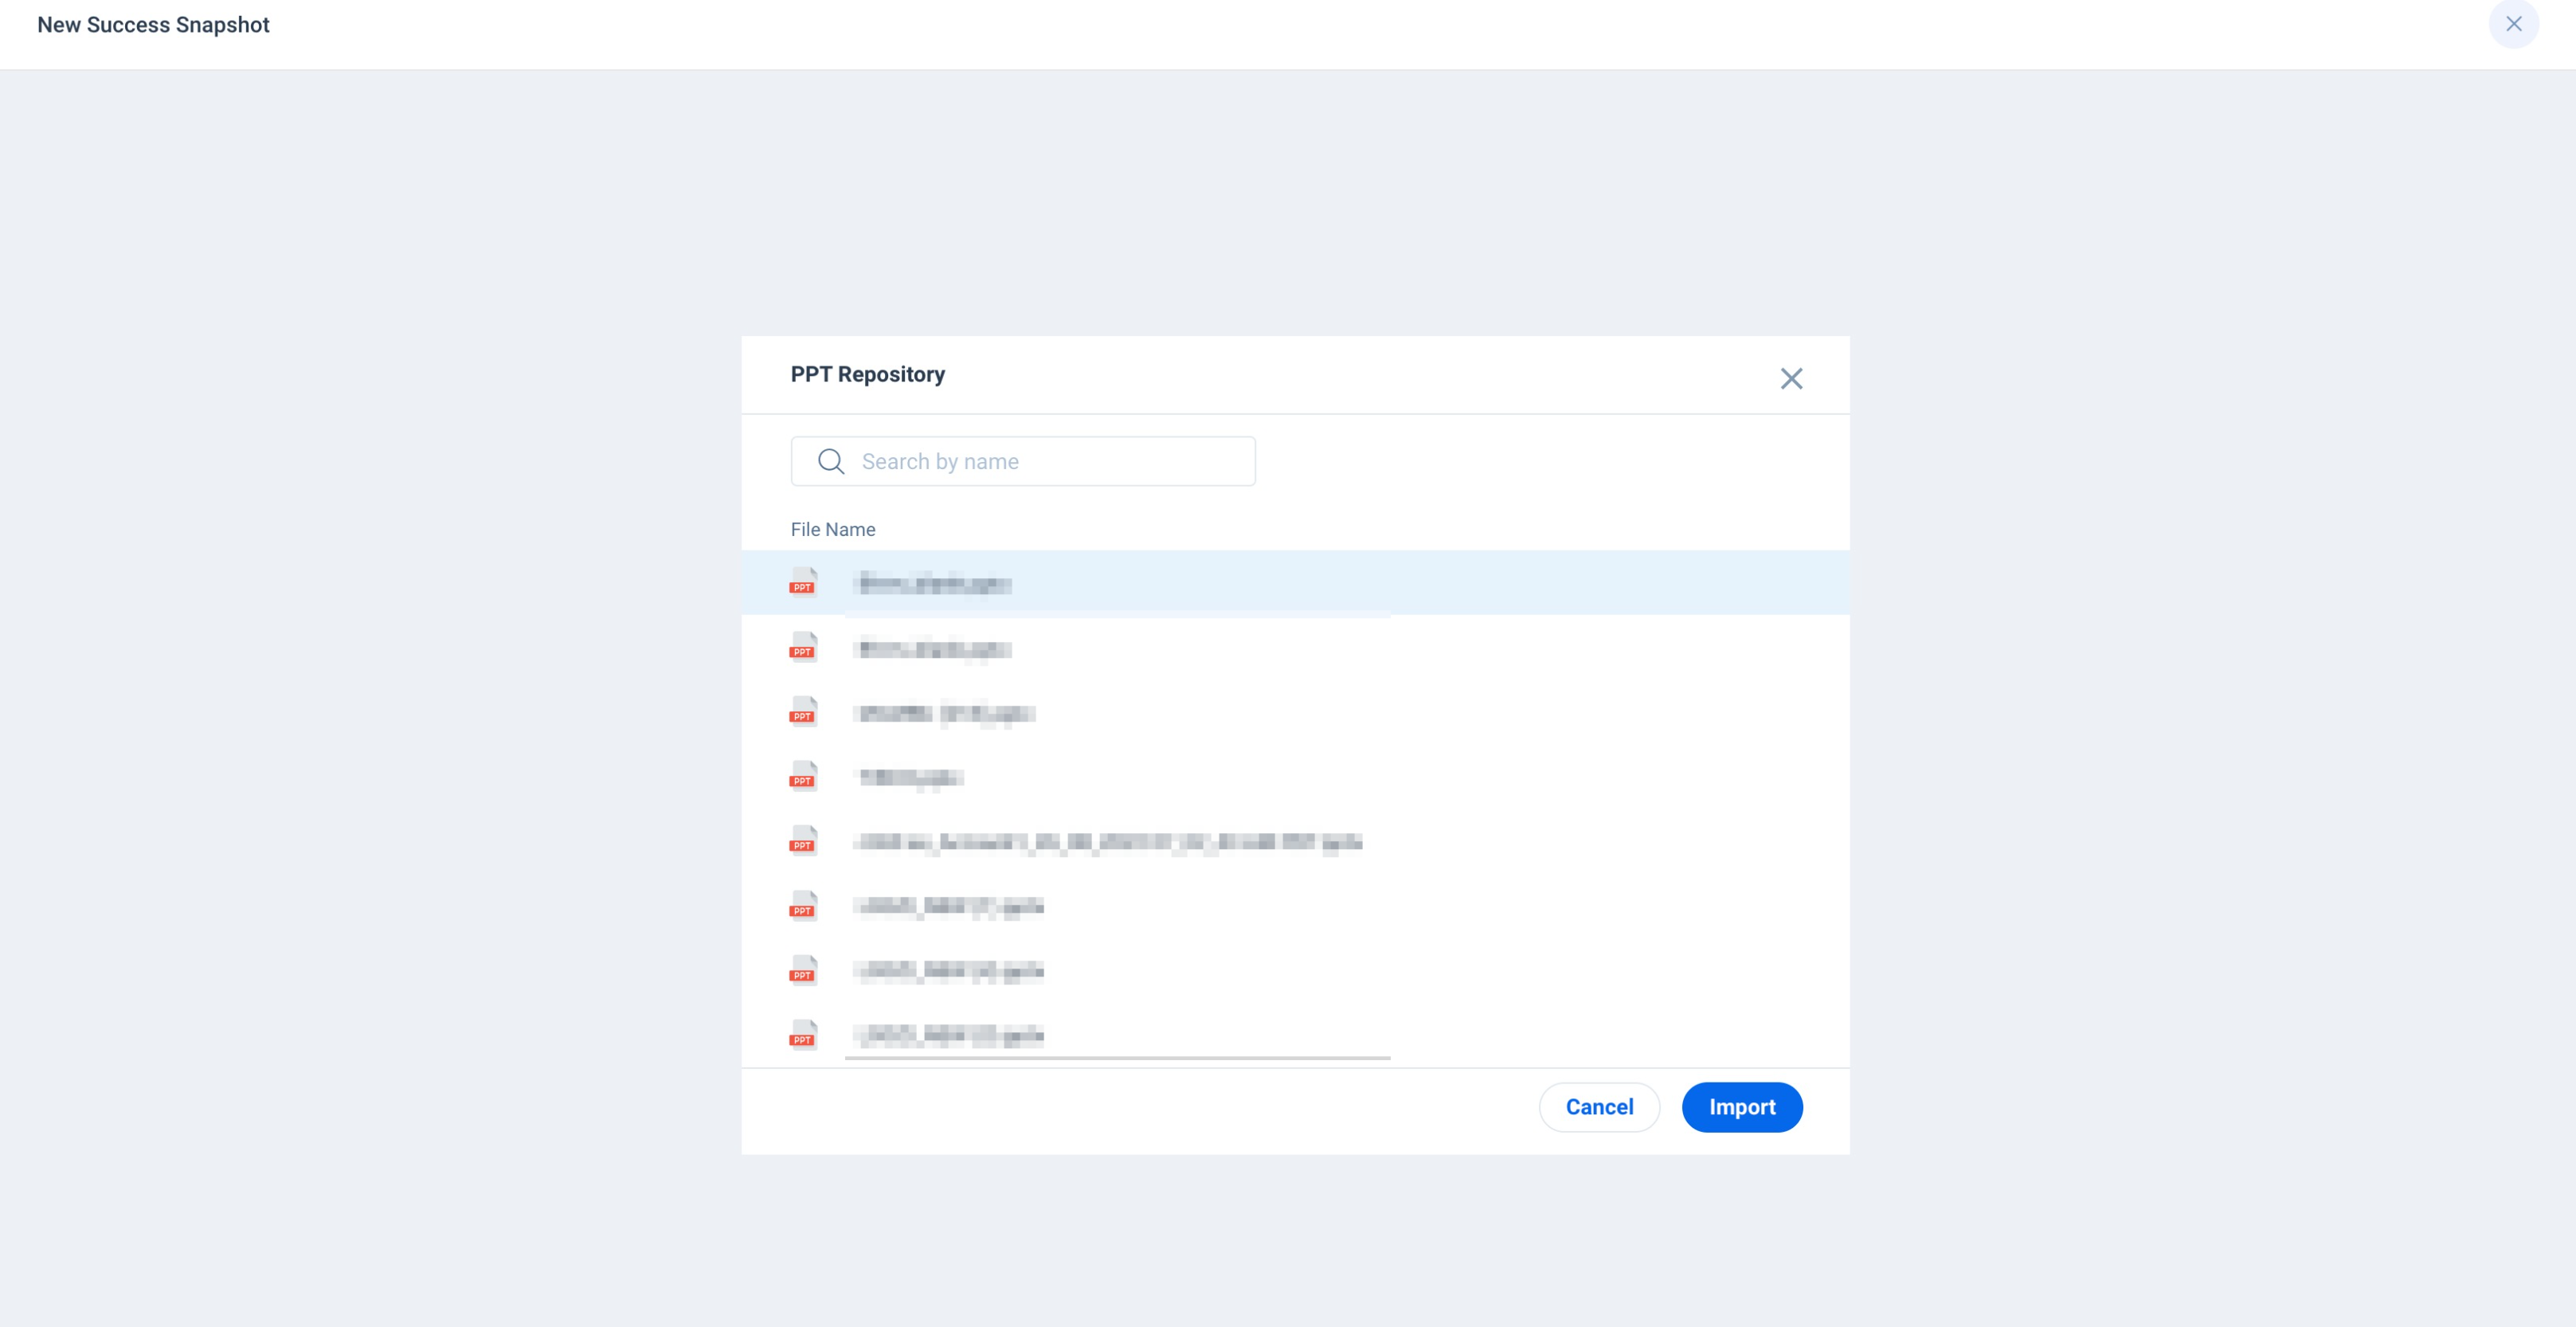
Import from your Repository
The Import from your Repository option lets you search or select a PPTX file from a list of uploaded templates in the repository.
To select a PPTX file:
- Click Import from your Repository. The PPT Repository window appears.
- Search or select a PPTX file from the repository.
- Click Import. The presentation is uploaded.
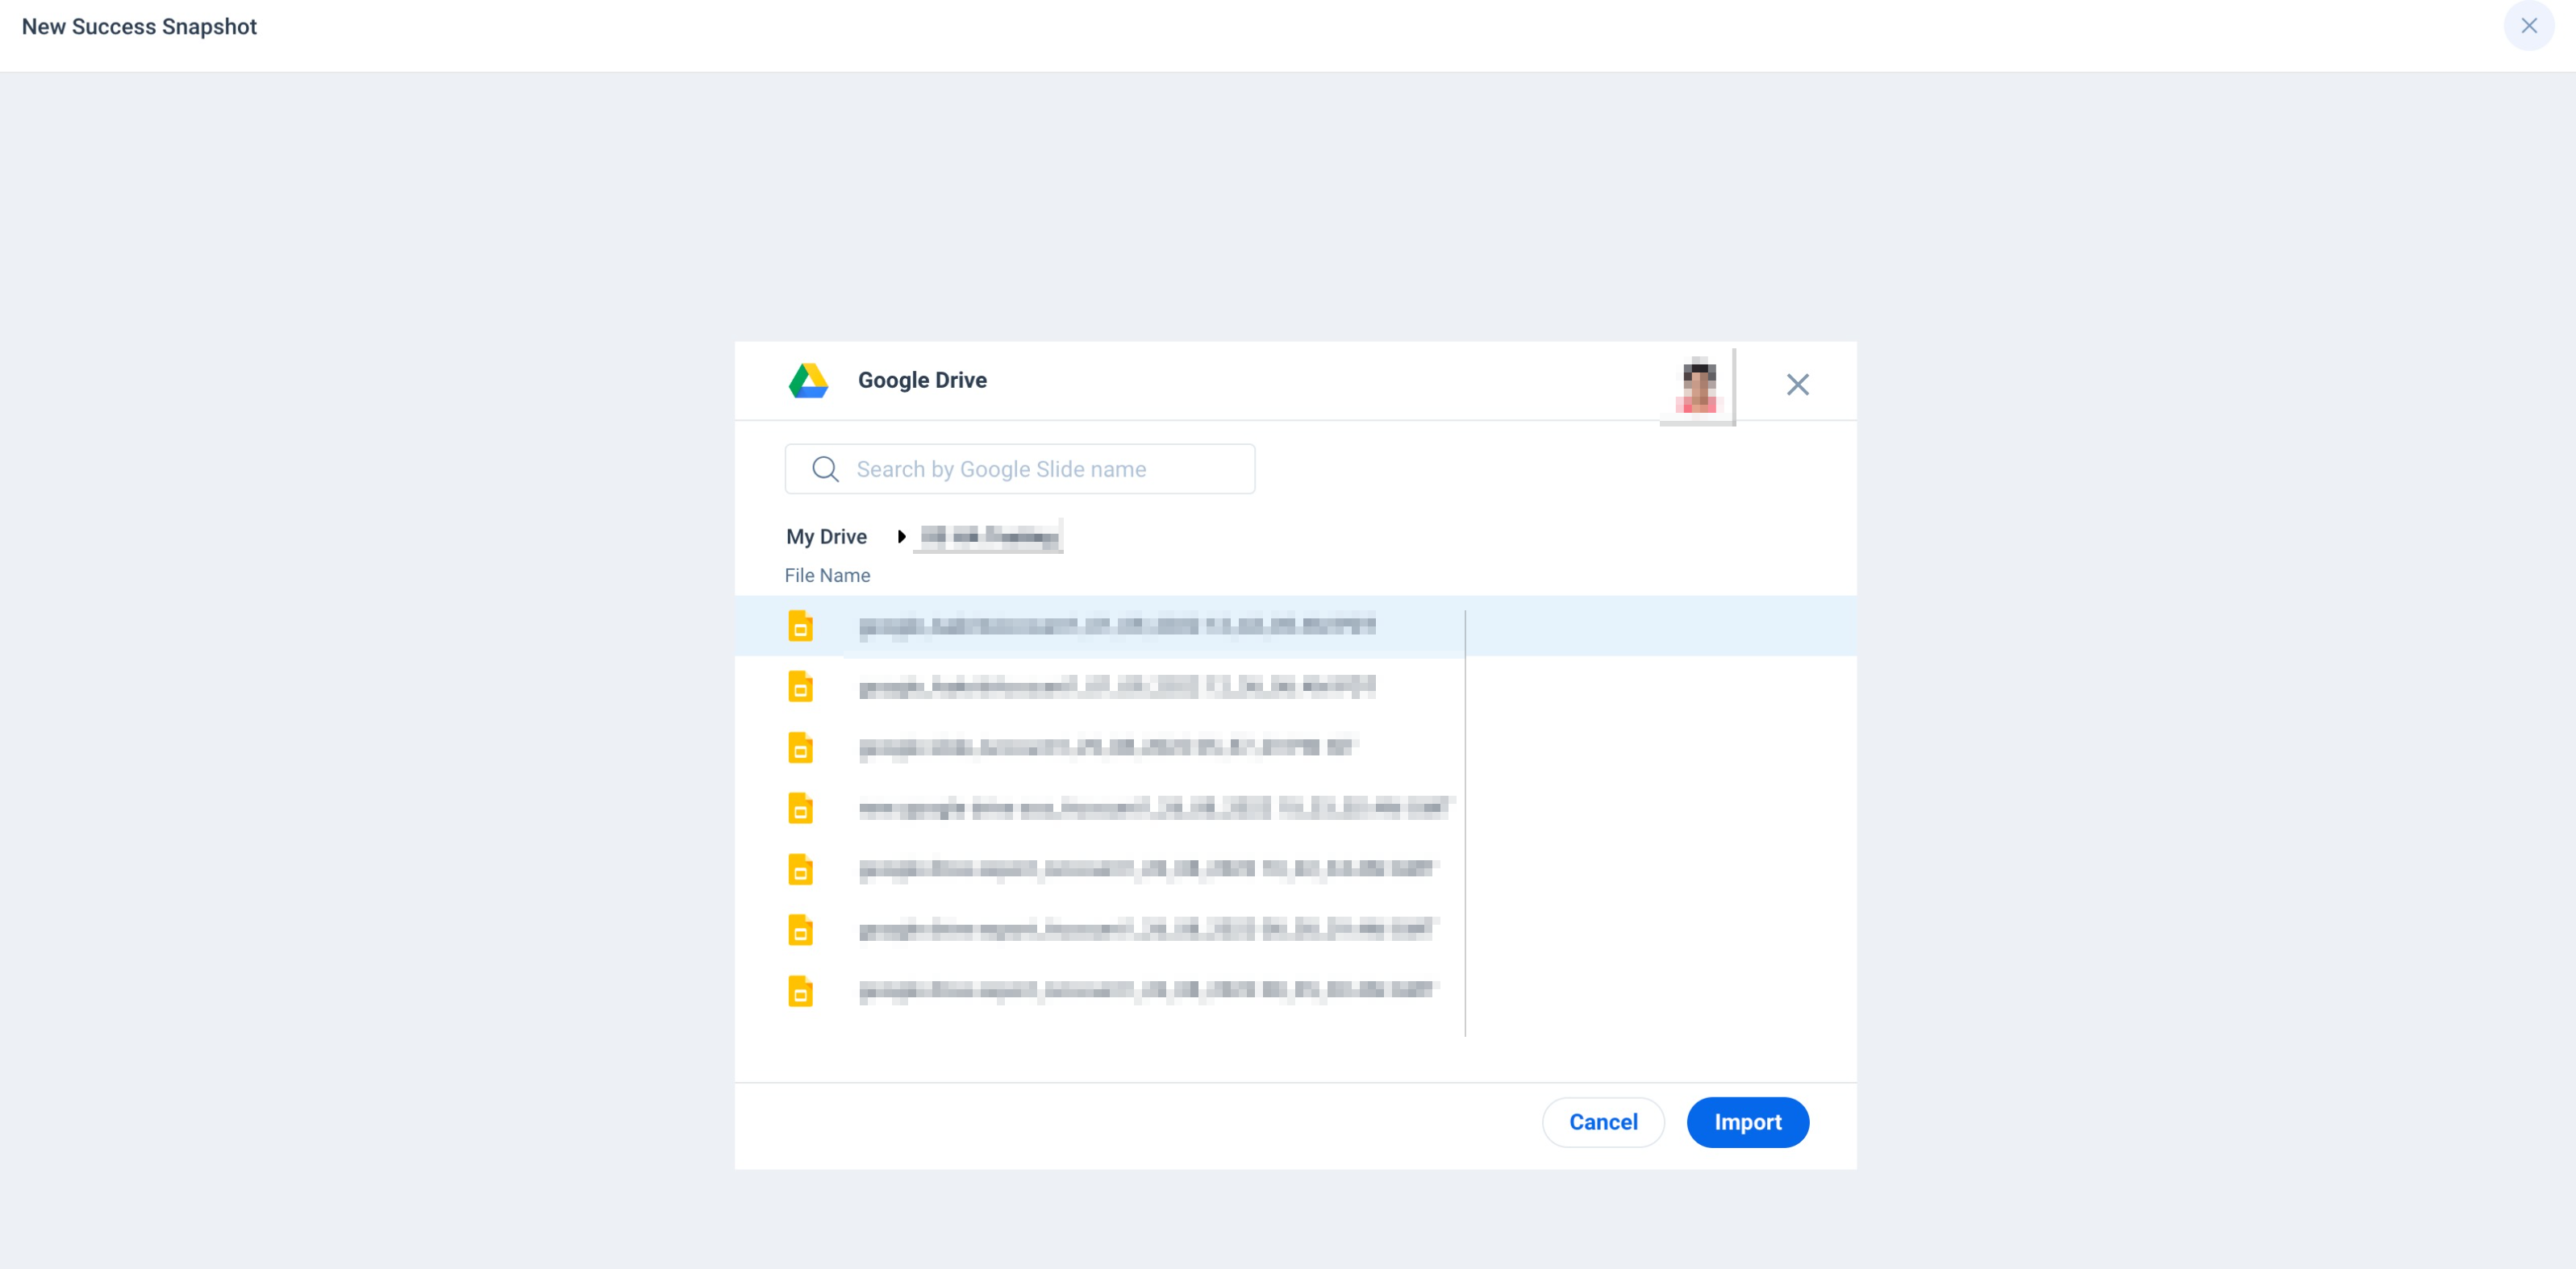
Import from your Google Drive
The Import from you Google Drive option lets you import Google Slides from your Google Account. To import the slides, you must grant permission to Gainsight to access your Google Account.
To import Google Slides:
- Click Import from your Google Drive. If you are importing for the first time, the Choose an Account window appears.
- Select the required Google Account to authorize.
- Click Allow.
- From the Google Drive page, select the required Slide.
- Click Import. Google Slides are uploaded.
Configure Success Snapshot Template
The new user-friendly and scalable editor provides you the flexibility to design your presentations more seamlessly. The editor is available on top of the application with advanced editing options. You can add text boxes that act as a building block in configuring Success Snapshot Template.
Add a Text Box
Text box is the basic formatting option in your slide. You can add multiple text boxes anywhere in the slide to organize and present your content better.
Key Benefits:
- Insert text, images, tokens, and reports anywhere on the slide.
- Move content anywhere around in your slide.
- Highlight content in your slide to grab attention of your audience.
To add a text box:
- Click the Add Text Box option in the Editor pane. A default size text box is added to the slide.
- (Optional) Click and drag any corner of the text box to resize.
- (Optional) Click the top border of the text box to move it around anywhere in the slide.

Delete Text Box
Two types of text boxes are available in a template, namely system text box and custom text box. The system text box is the text box available in the uploaded parent deck. The custom text box is a new text box added by the admin/user.
You can only delete the custom text box. In the system text box, only the data available in the text box can be deleted.
Delete Custom Text Box
To delete a custom text box:
- Select the required text box.
- Click the Delete Selected Text icon in the editor pane. A confirmation box appears.
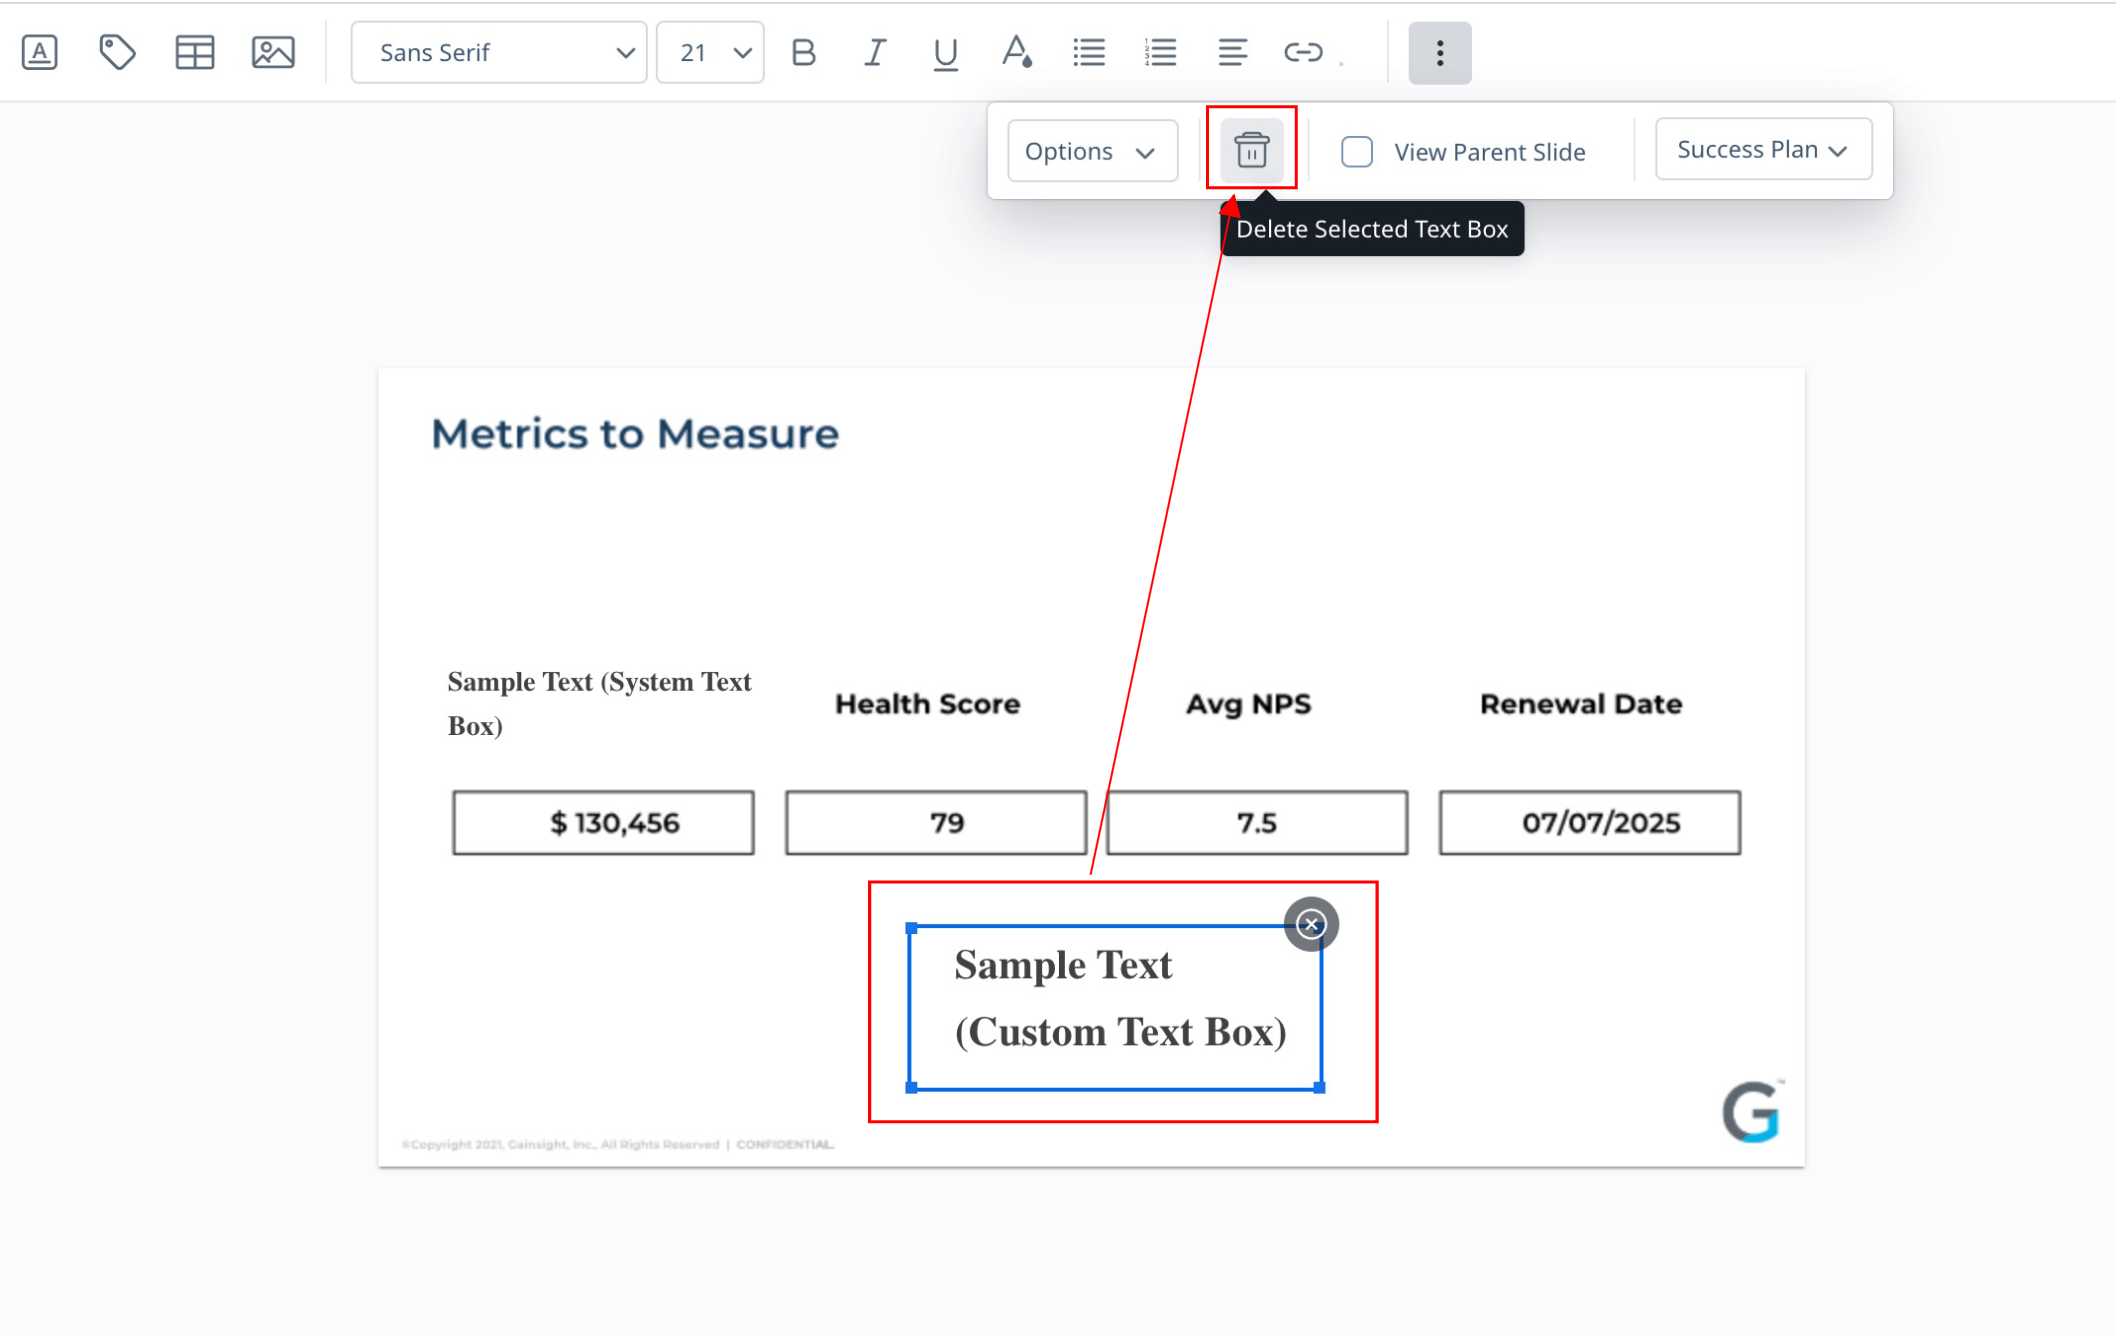
- Click Yes.
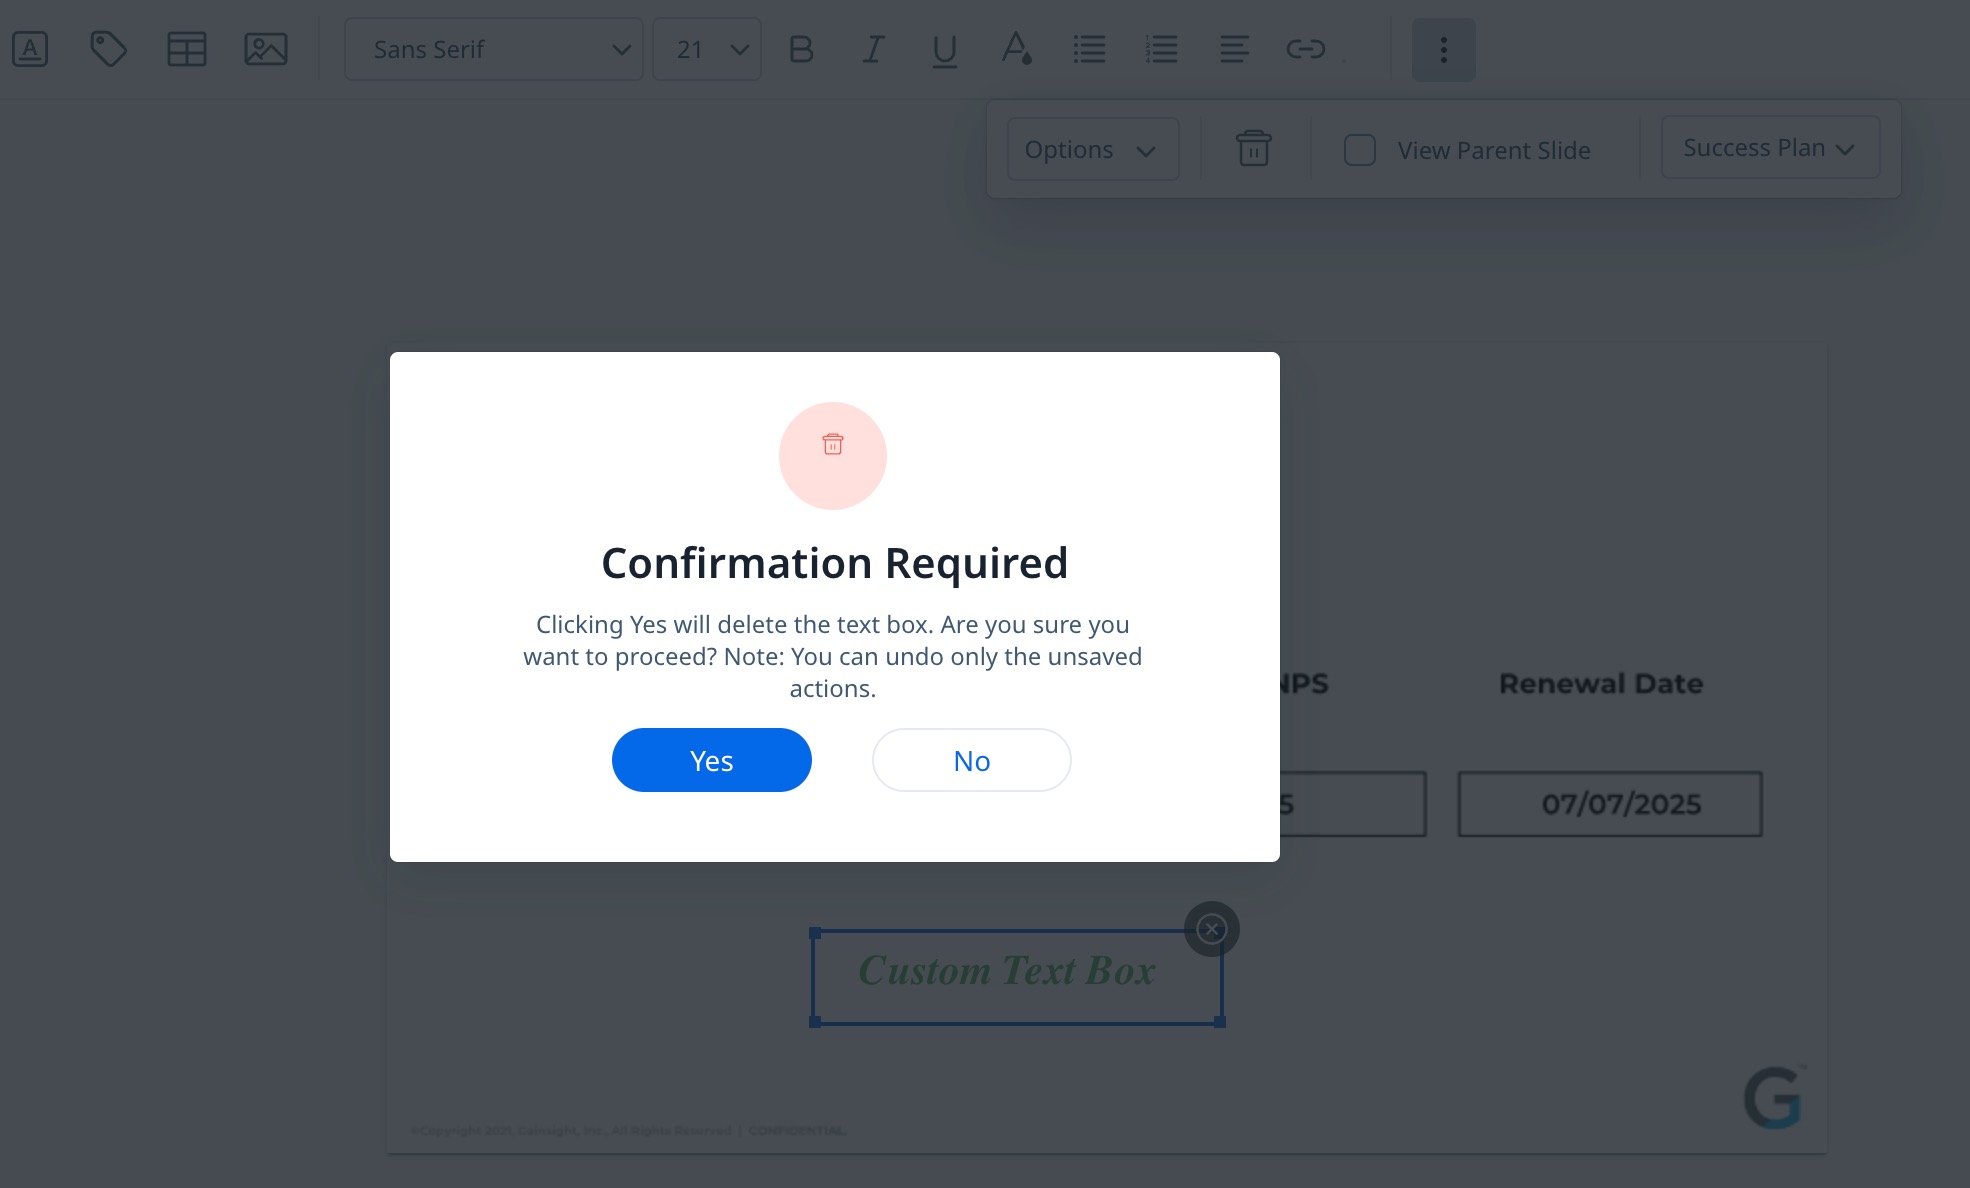
Alternatively, you can click the cross icon to only delete the data in the text box.
Delete System Text Box
To delete the data available in the system text box:
- Select the required text box.
- Click the cross icon. A confirmation message appears.
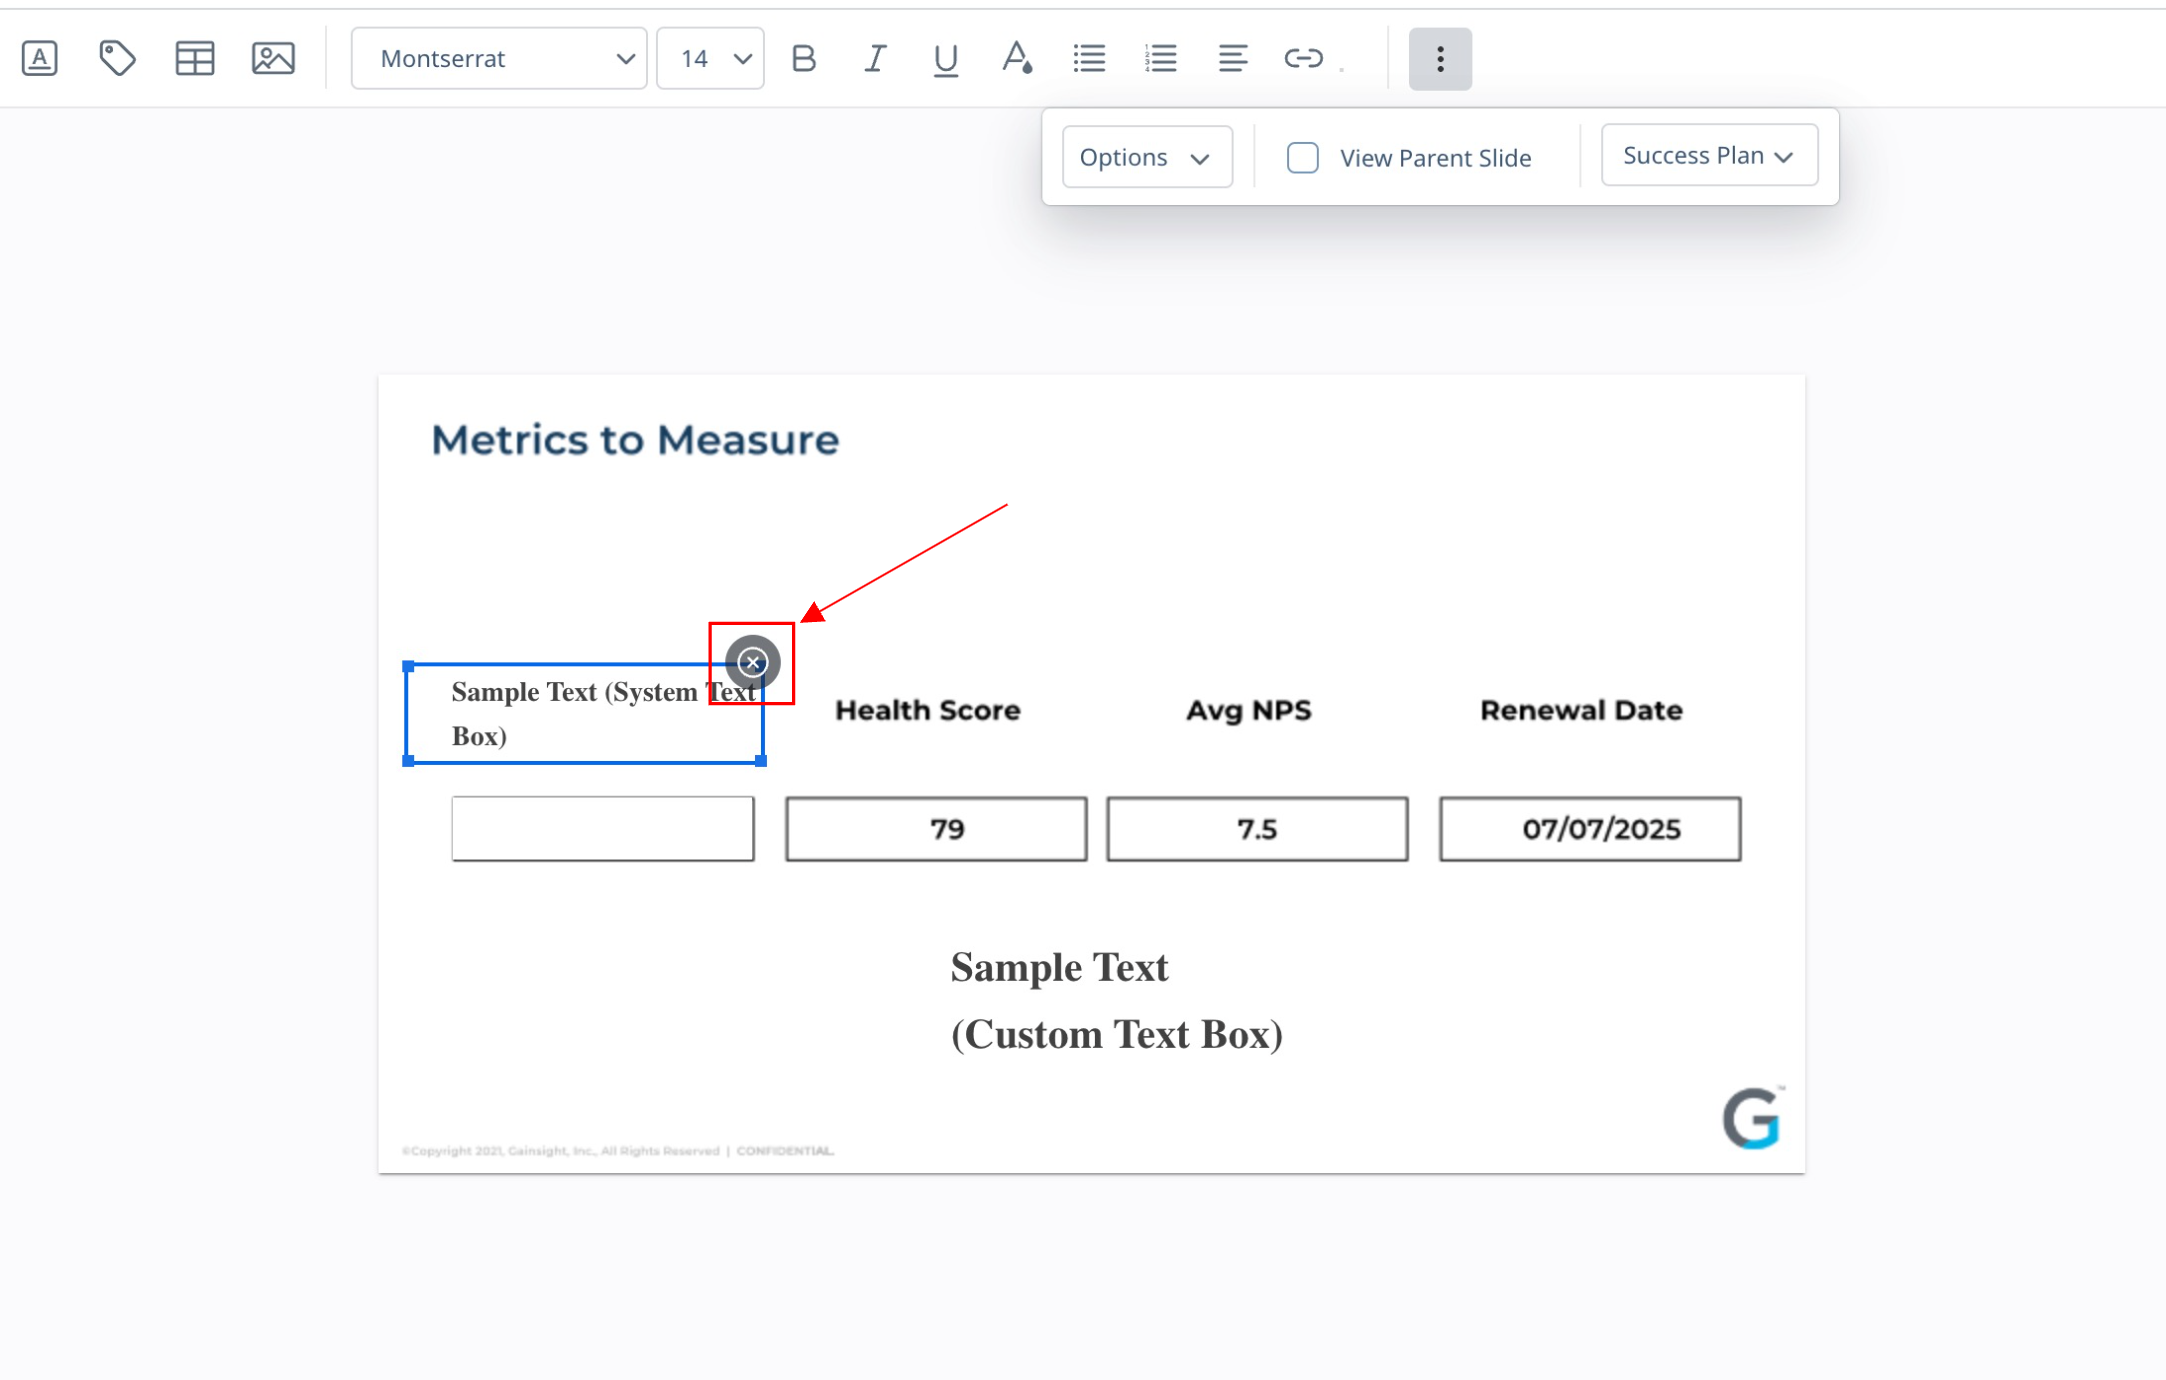
- Click Yes.
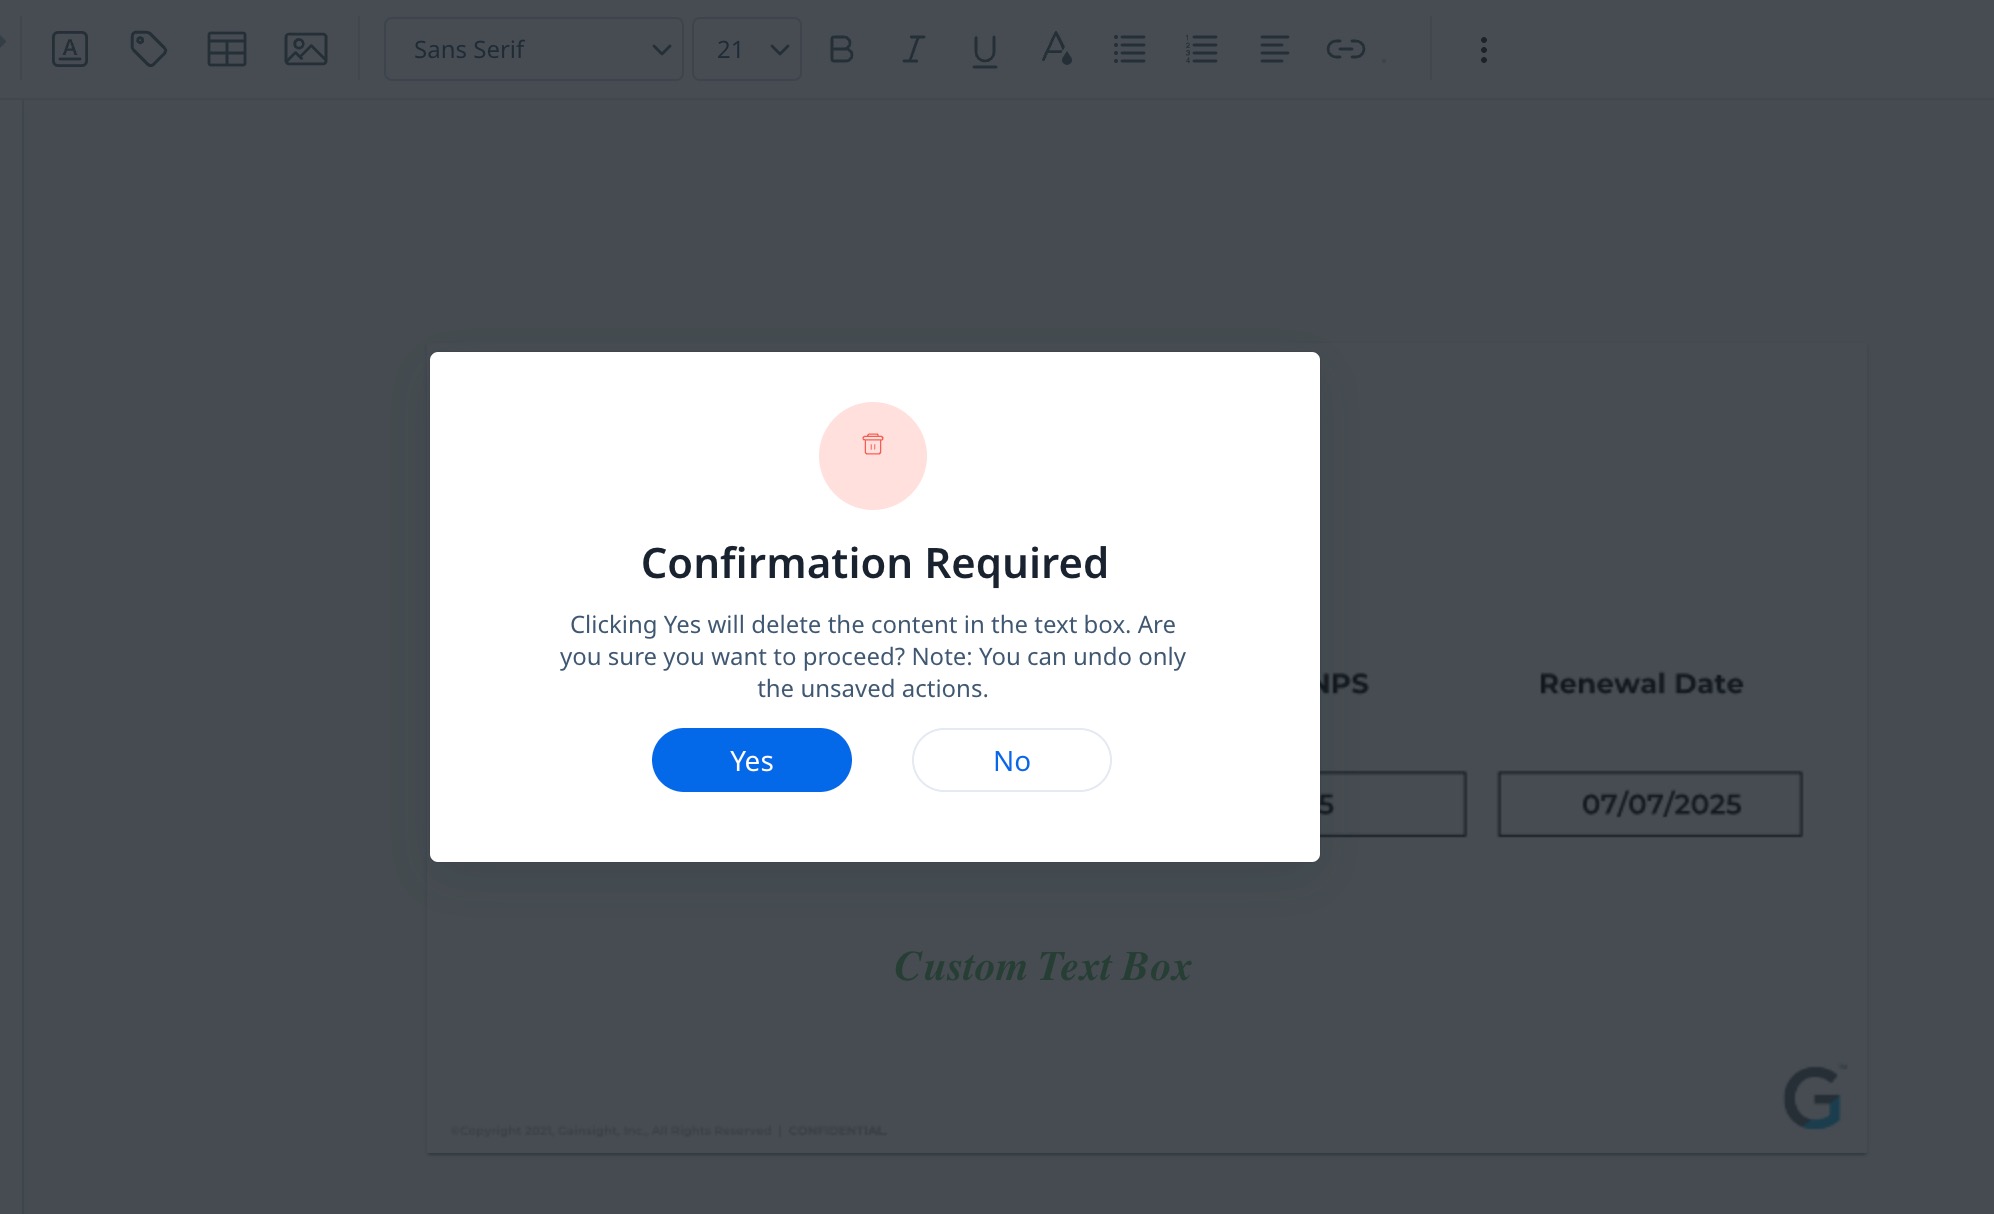
Note: The close icon deletes the custom data (image, report, token, text) available in the text box. It does not delete the text box.
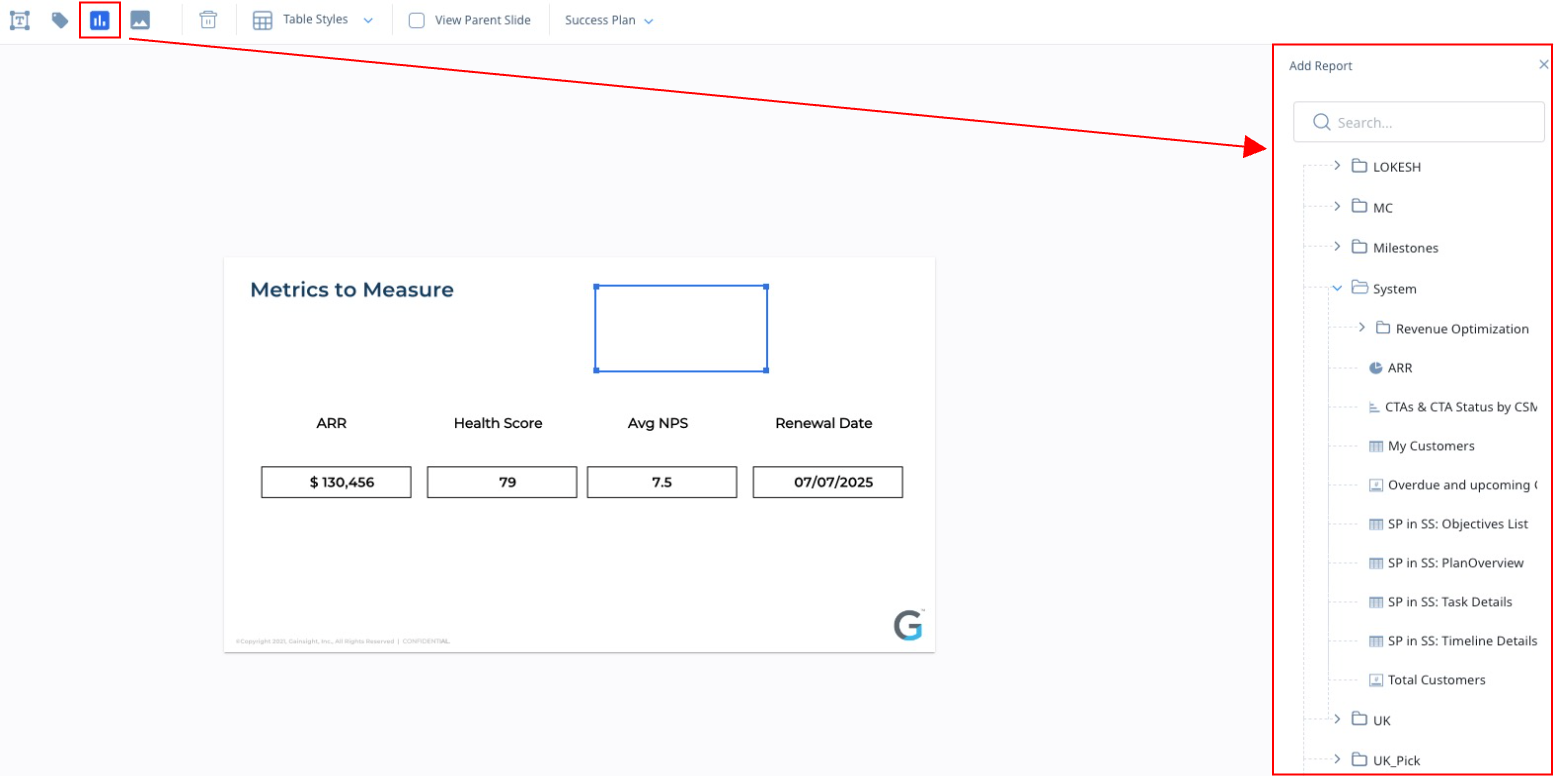
Add a Report
Embed reports to ingest customer data from Report Builder.
To add a Report within the text box:
- Select the required text box in the slide.
- Click the Add Report icon in the editor pane. The Add Report slide-out panel appears.
- Select the required report.
- Customize the Report Properties.
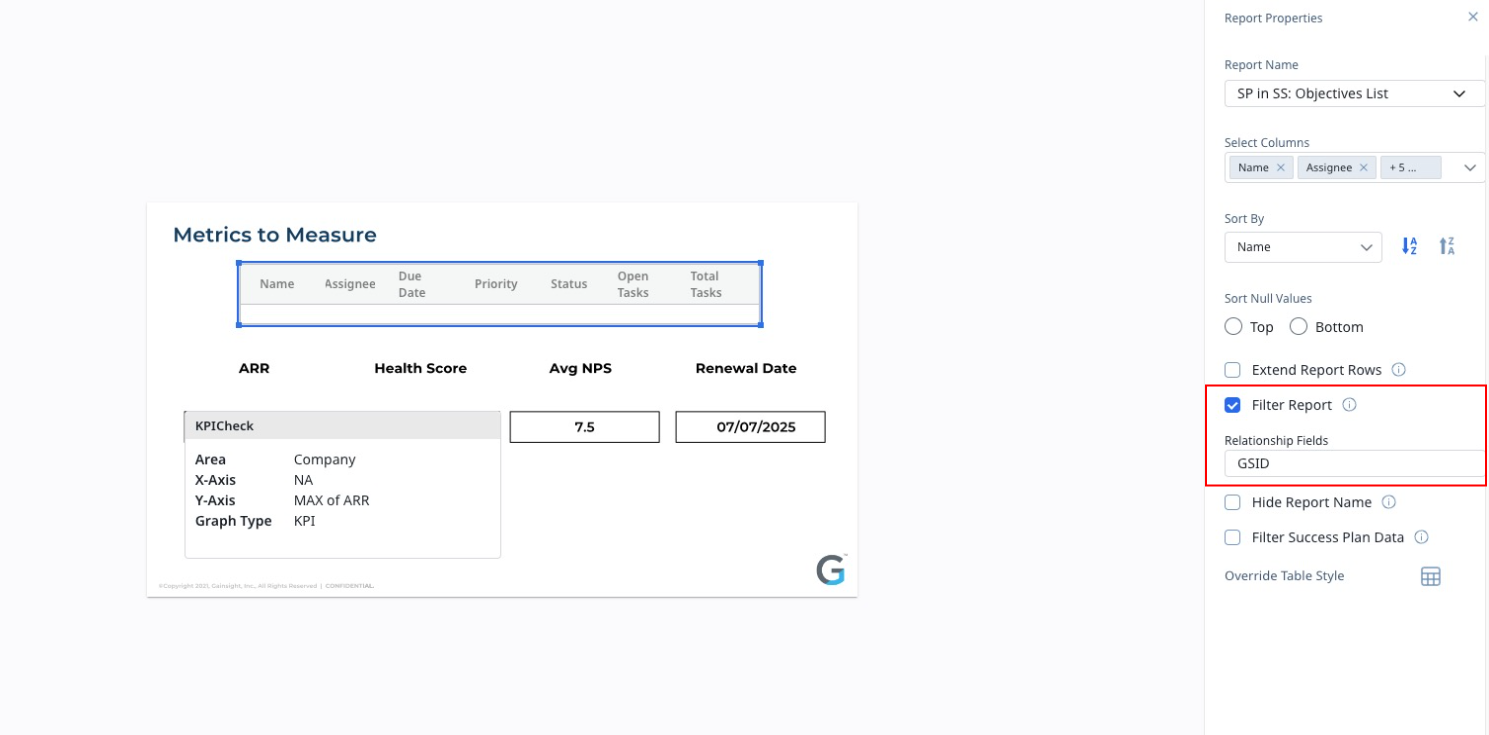
Report Properties in Success Snapshot Templates
To embed a Gainsight Report into your Success Snapshot Template:
- Select a placeholder in the slide and click on Add Reports icon.
- From the Add Report slide-out panel, select a report. The Report Properties slide-out panel appears.
- Select the Filter Report check box.
- Select the Relationship Fields from the dropdown list. This filters report data for selected customers.
- When you embed a report that includes Rich Text fields in a Success Snapshot, the rich text formatting is not preserved in the exported Snapshot. Content such as bullet lists, numbered lists, and hyperlinks is displayed as plain text.
- When Rich Text fields are added as tokens, the text formatting is preserved; however, hyperlinks are not supported.
- If the Rich Text content is lengthy, some of the content may be trimmed in the exported Snapshot and does not automatically continue onto the next slide.
Tabular Reports
To customize Report Properties for Tabular Reports:
- Select the required columns from the Choose columns dropdown list.
- Select the Extend Report Rows check box to let the records flow onto the subsequent slides.
- Select the Hide Report Name checkbox to conceal the report name in the slide.
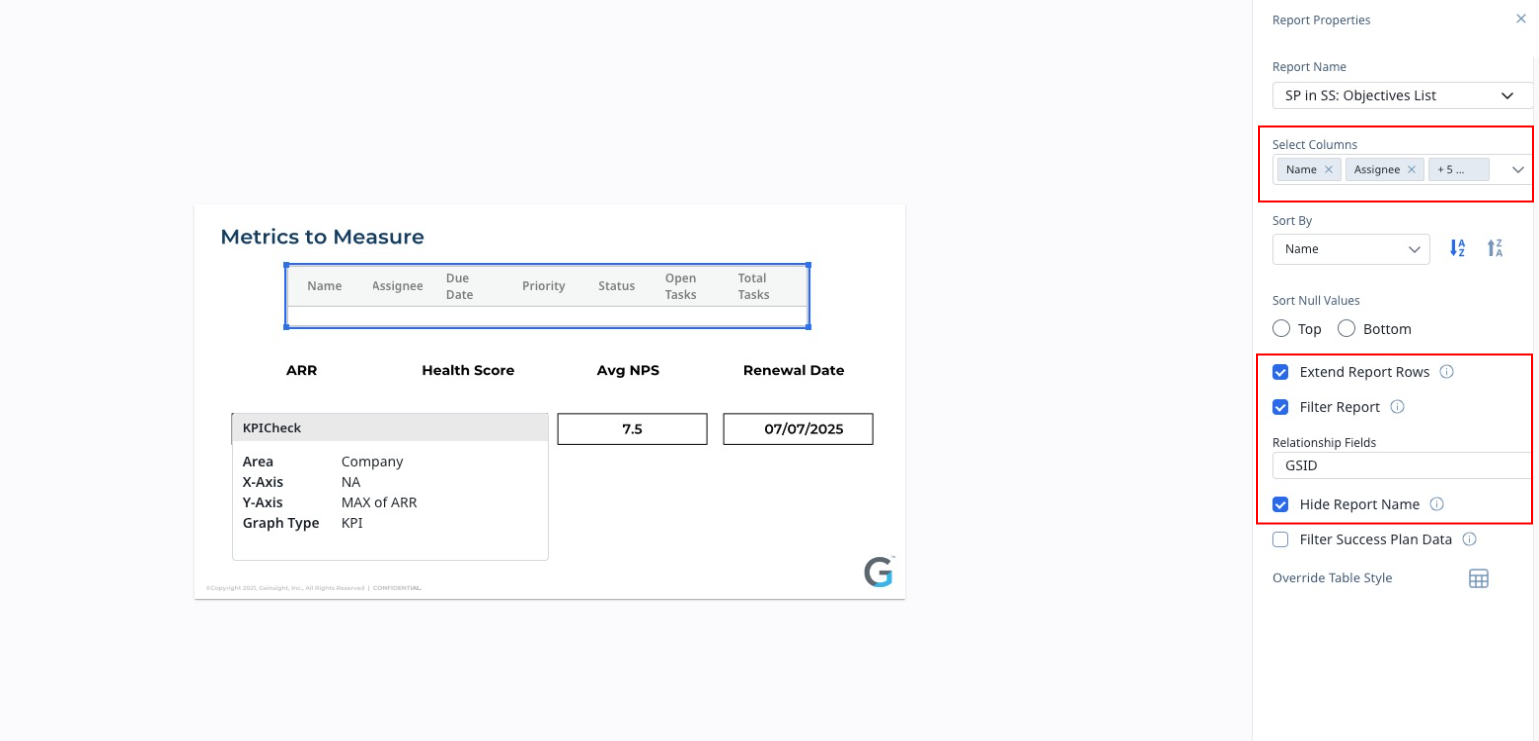
Note: If there is rich text in any of the columns, you can resize/adjust the width of the columns. To resize a column width, click the header between the columns you want to resize and drag the mouse to the left or right to adjust the size.
KPI Reports
Select the Display as token checkbox to convert the KPI report as a token in Success Snapshot.

Success Plan Data
Select the Filter Success Plan Data checkbox to filter data based on the Success Plan. The CSMs can select the required Success Plan while exporting a Success Snapshot.
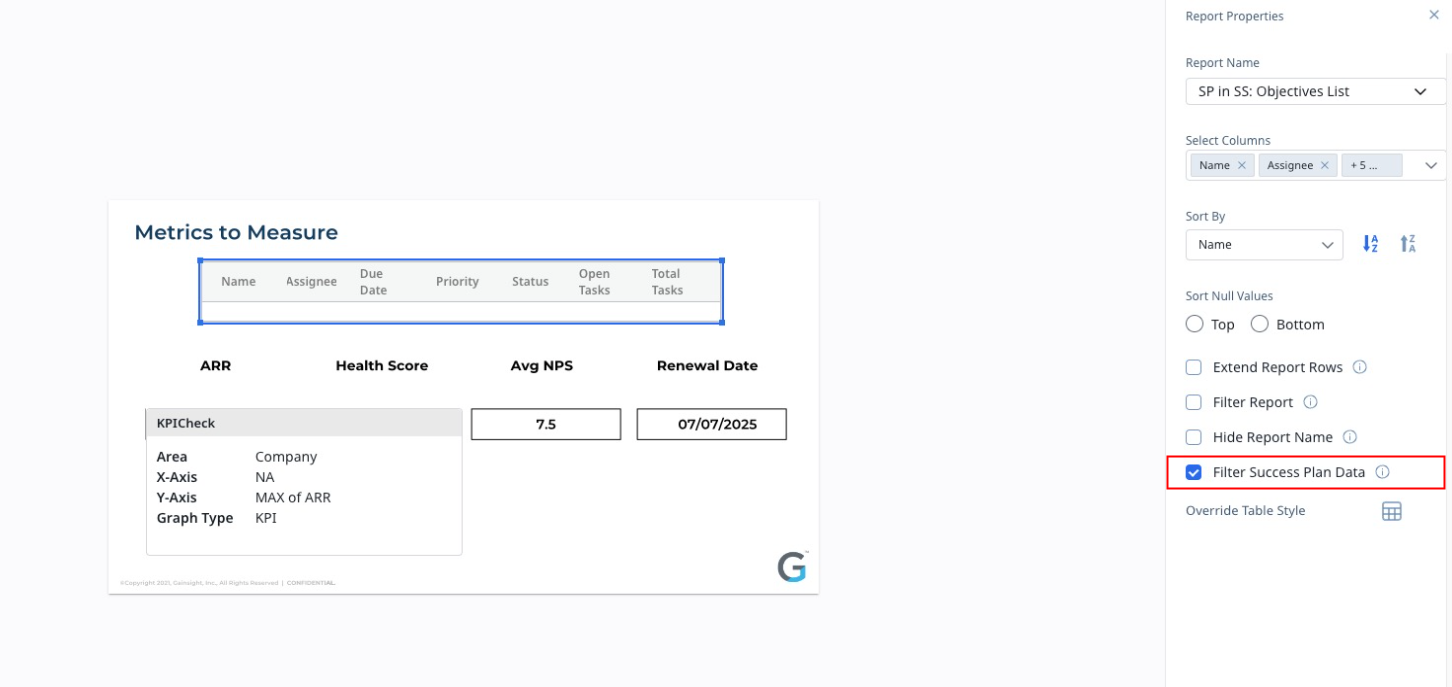
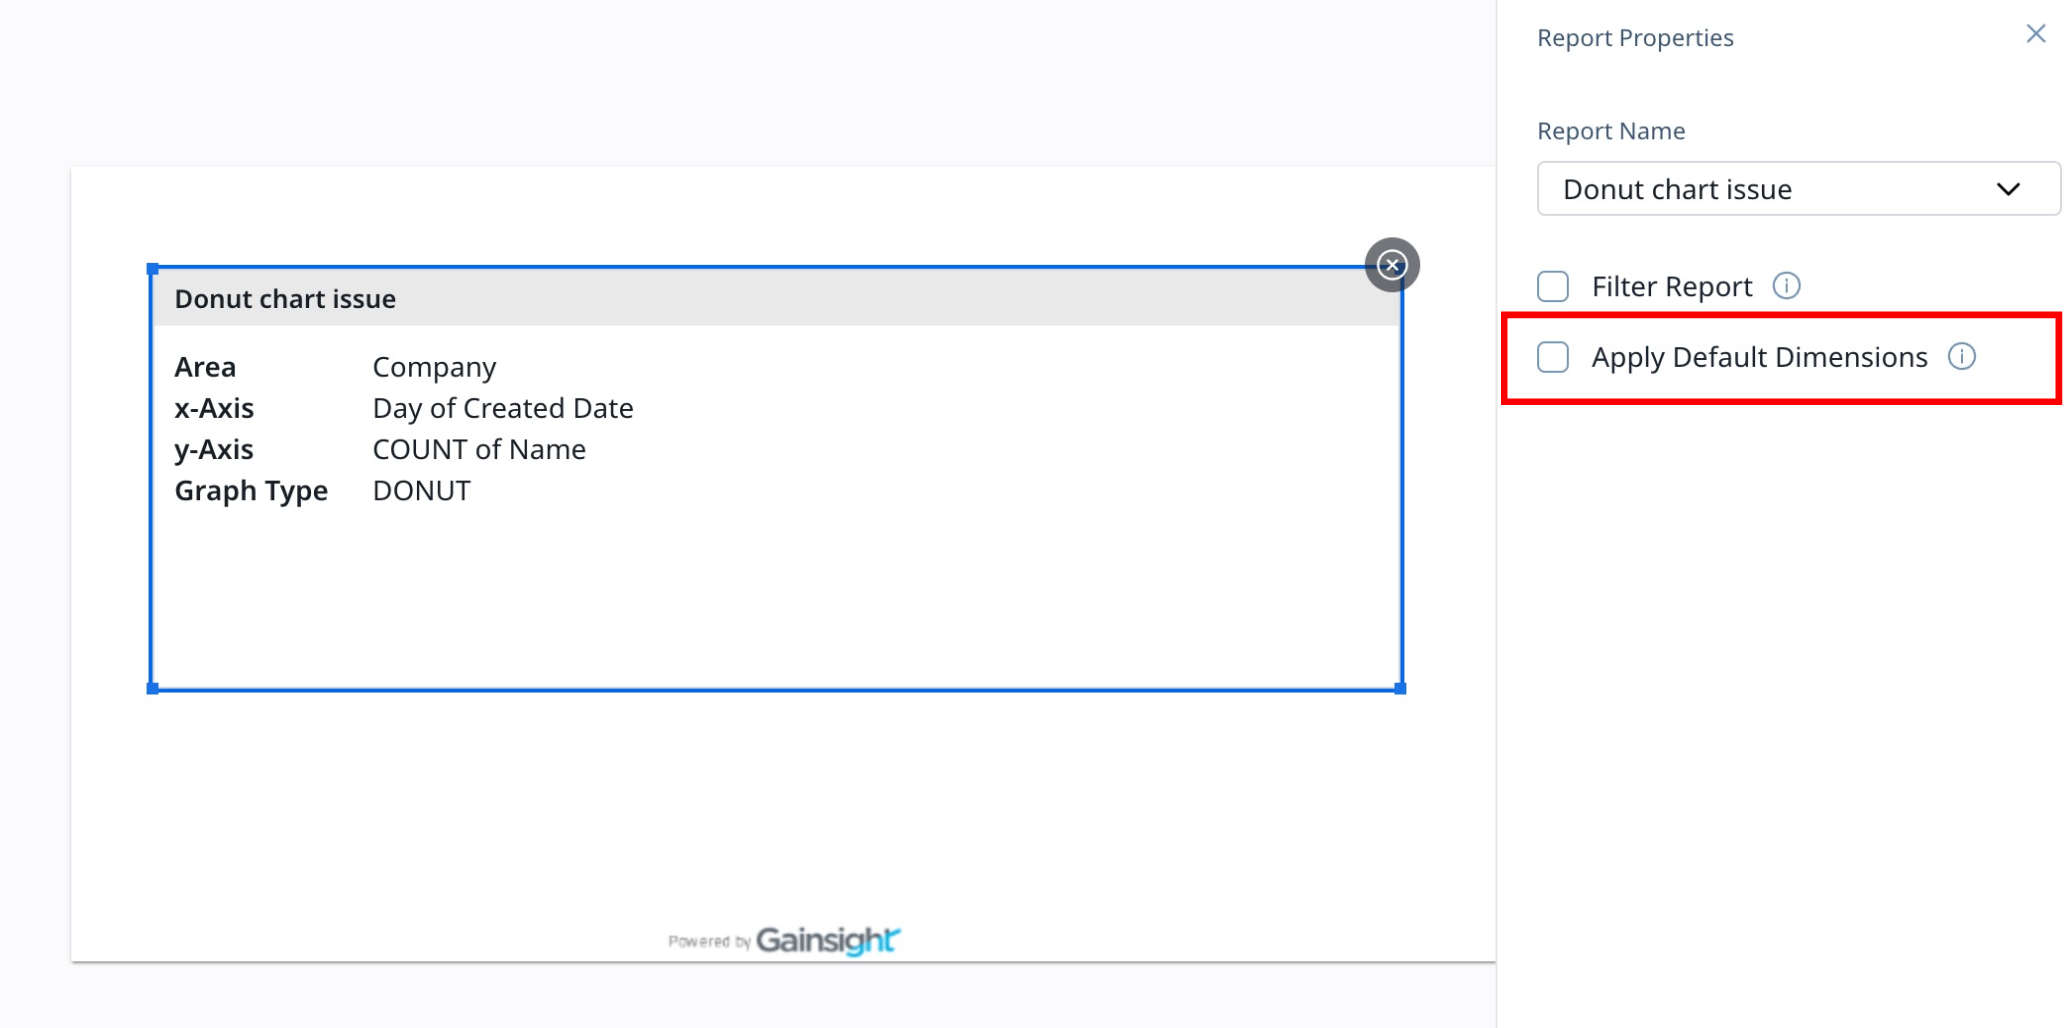
Chart Reports
Select the Apply Default Dimensions checkbox to take a snapshot of the chart report in the 1080 x 1920 dimensions. The snapshot is inserted in the text box in the exported template. This option helps to avoid any loss of data in chart reports containing legend-rich information.
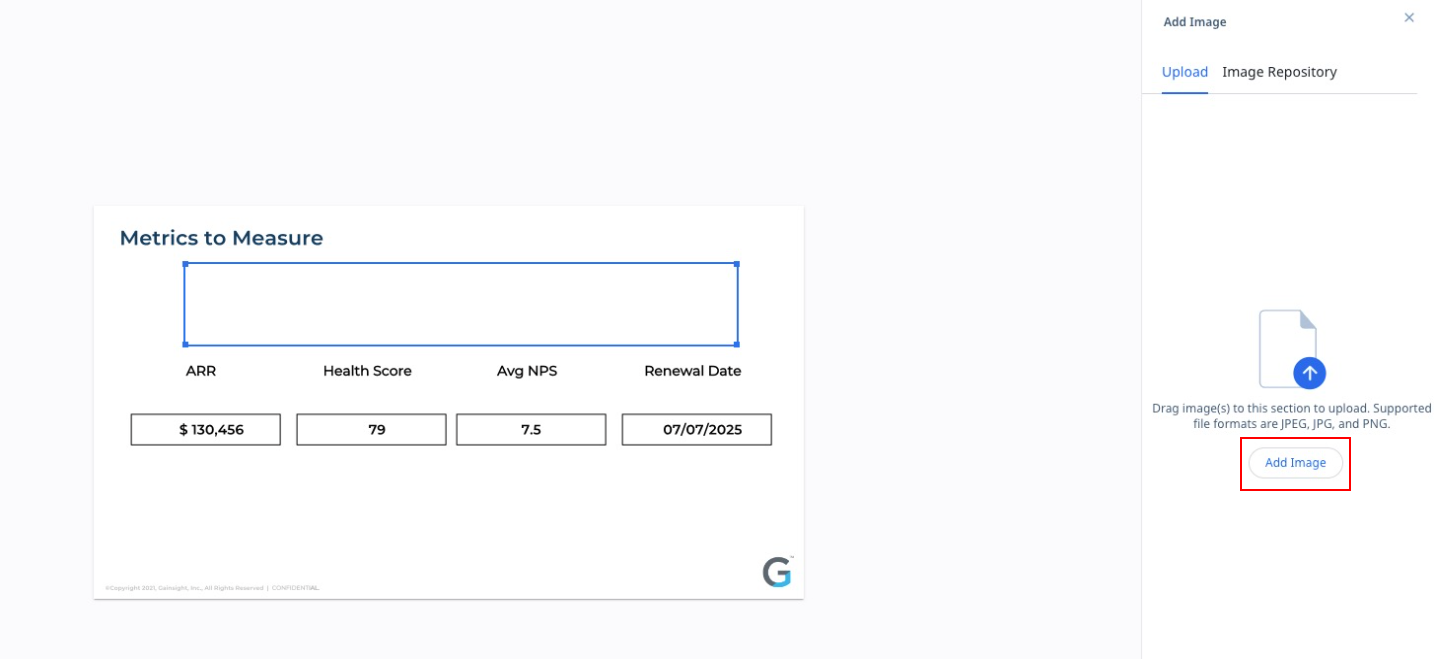
Add an Image
To add an image:
- Select the text box and place it where you want to add the image.
- Click the Add Image icon.
- In the Add Image slide-out panel, click Add Image.
- Select an image from your system. The image is added to the text box.
Note: The Image Repository option is available to add an image from the images previously uploaded from your system.
Add a Token
Embed Tokens to visually represent dynamic data.
Note: Gainsight supports tokens from Company, Relationship, and Success Plan objects only.
To add a token:
- Select the text box.
- Click on the Add Token option in the editor pane. The Add Token slide-out panel is displayed.
- Select the required field you want to tokenize.
- (Optional) Click General Properties icon in the editor pane and select the following:
- Select the Text can overflow check box to allow the text to overflow out of the textbox within the slide.
- Select the Reduce font size check box to allow the font size to be reduced to fit the entire text in the textbox and retain the font type. The minimum supported font size is 6px.

Notes:
- If you do not select the above mentioned check boxes, the font size and font type of the token text are retained and the sentence trails off with ellipses.
- If no data or value is available in the token, then the following values are shown in the exported template:
- 0, if the data type is numeric.
- 0%, if the data type is percentage.
- NA, if the data type is anything other than numeric or percentage.
- The special characters < > & cannot be used as a token name in the Token Display Name text box.
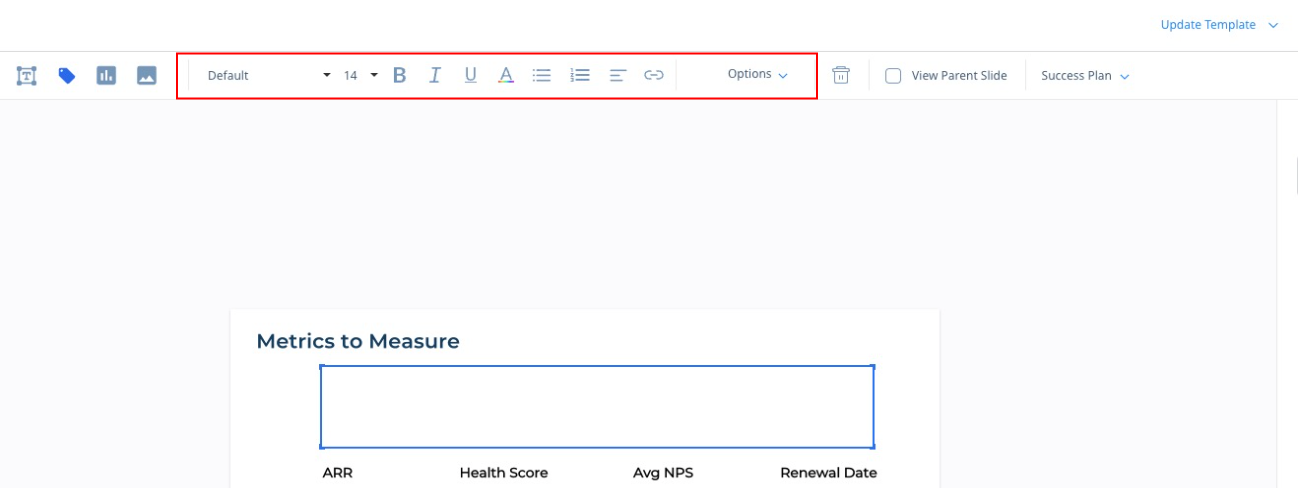
Format Tokens and Text
You can also format the tokens/text entered in the slides. Success Snapshot has the following formatting options:
- Font Family: From the Font Family dropdown list, select the required font.
- Font-size: From the font-size dropdown list, select the required font-size.
- Styles: Apply the styles available under Styling section. For example, you can Bold, Underline, apply Bullets, apply Numbered List, and configure Font Color.
- Alignment: Align the token/text using the alignment patterns available under Alignment section.
- Link: Hyperlink the text using the Link option. Select the required text and click the Link icon to insert the URL. Click Save.
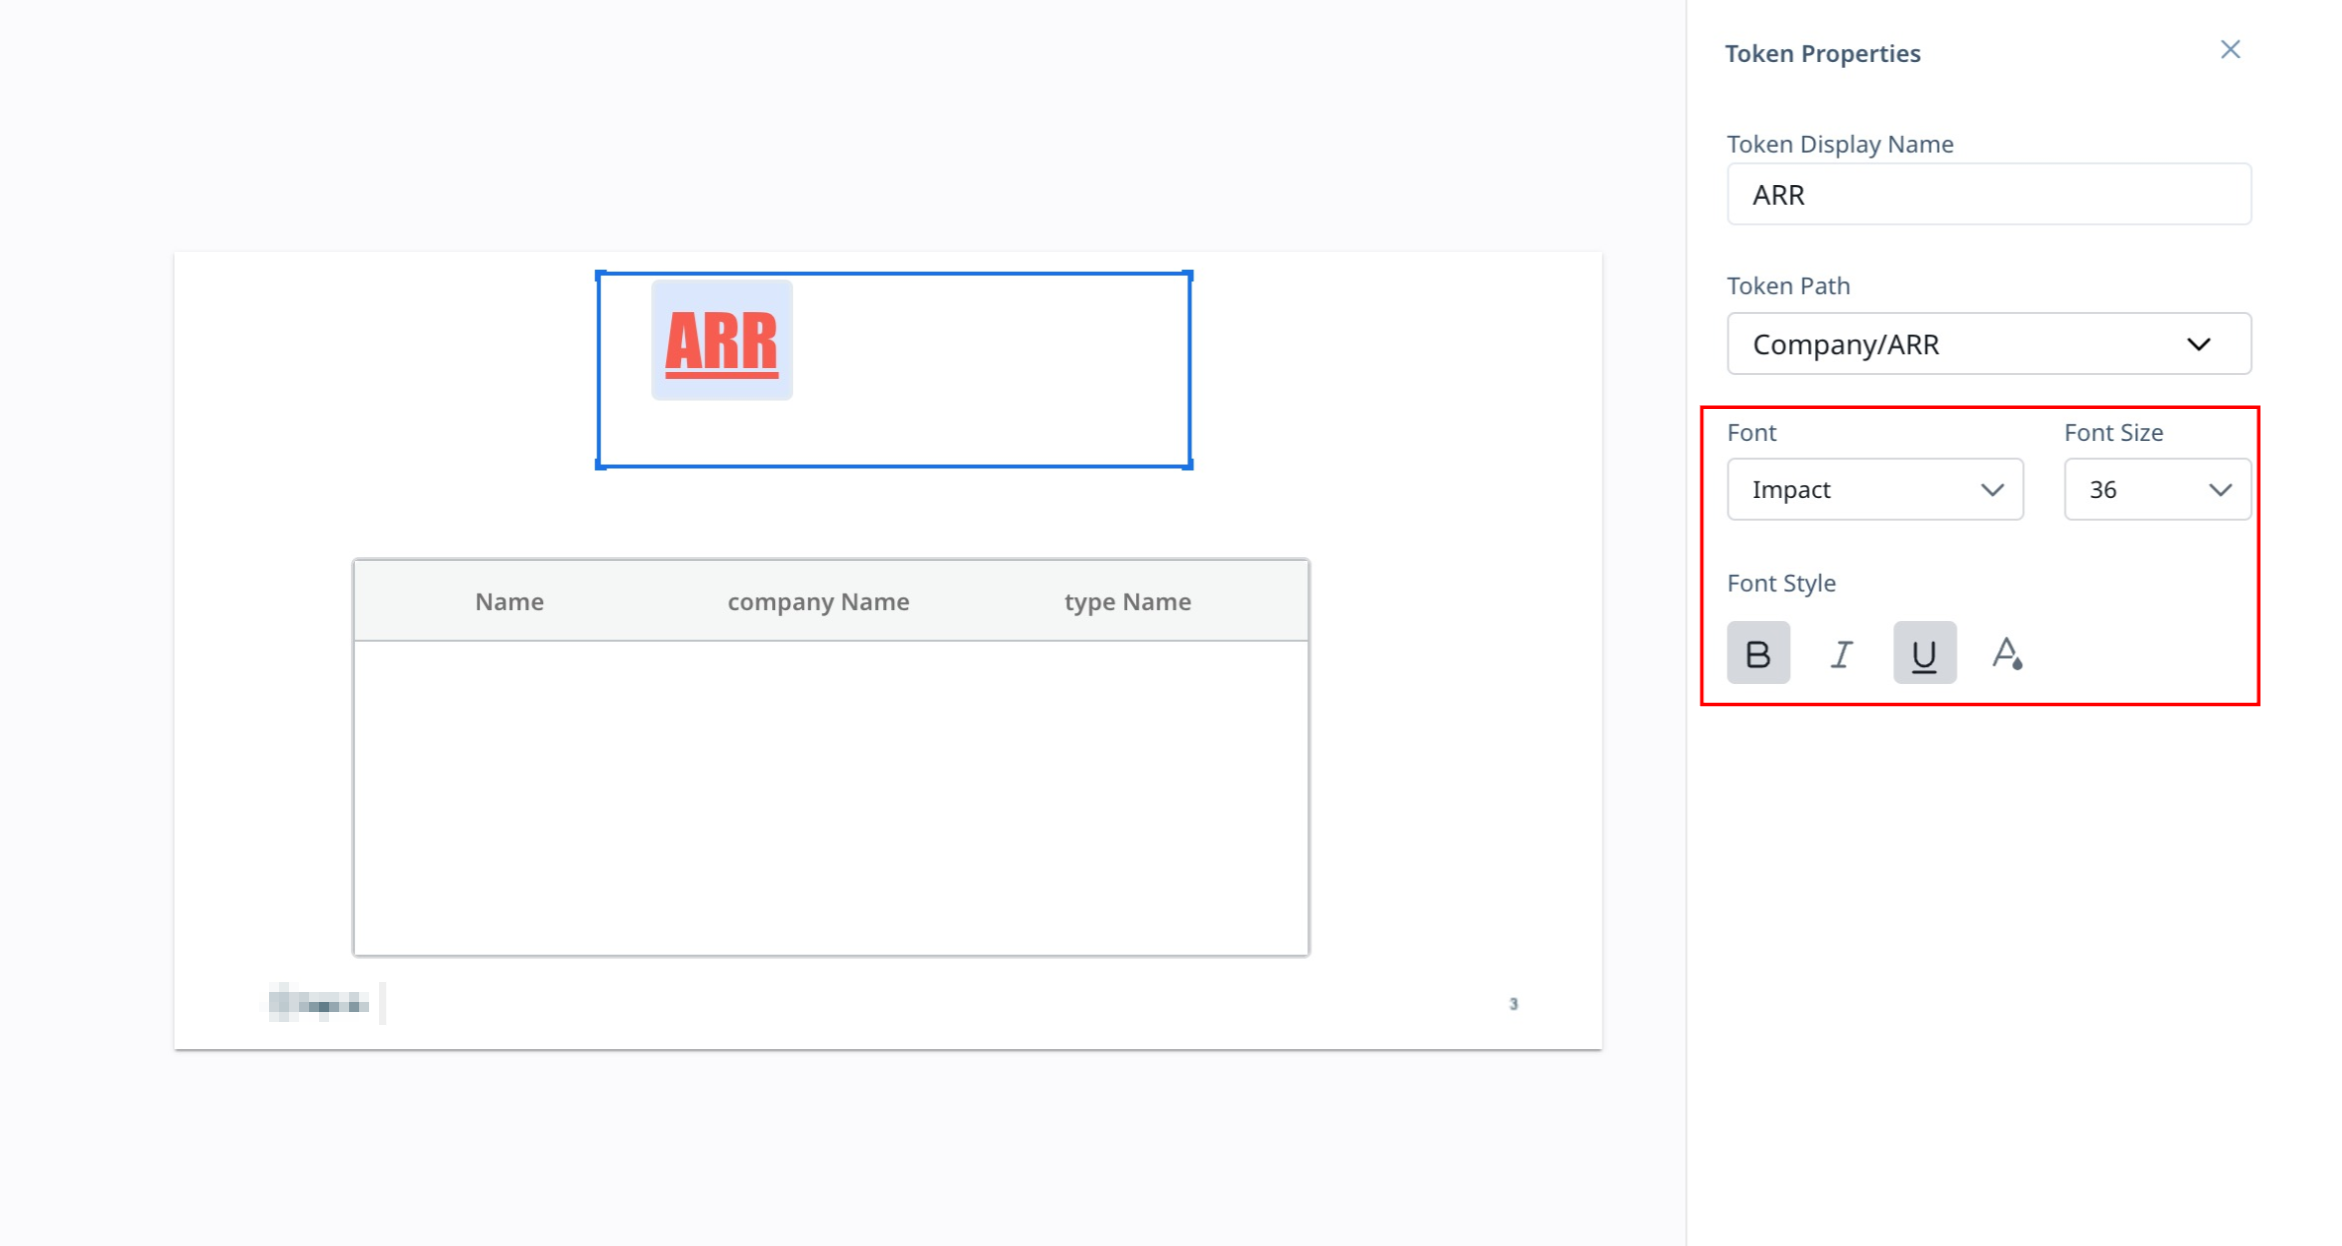
You can also format the token or text from the Token Properties slide-out panel. Formatting options like font type, size, and styles are available.
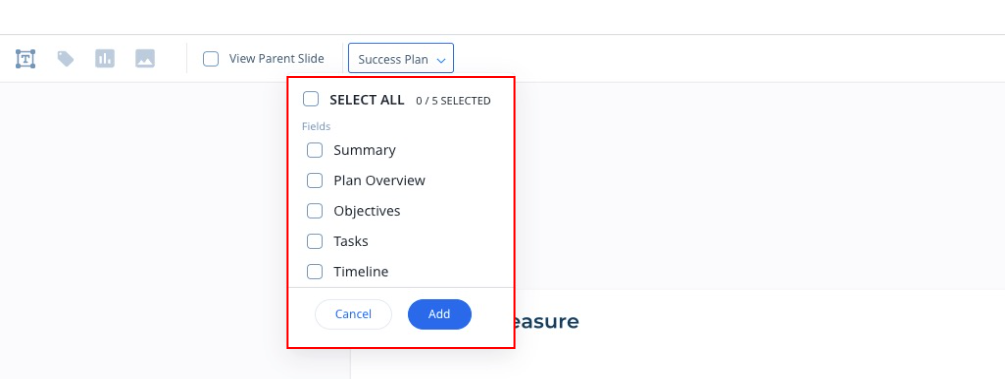
Add Success Plan Slides
Success Plan information is categorized into five sections, namely Summary, Plan Overview, Objectives, Tasks, and Timeline. Select the required section based on your business needs. The Summary slide honors the parent slide properties such as font, font color, font size, and theme.
To add Success Plan slides:
- Select the slide after which you want to add the Success Plan slides.
- Click Success Plan dropdown.
- Select the fields required.
- Click Add.
Edit Success Plan Slides
You can customize the success plan Summary slide, using the tokens from Company and Success Plan Group objects.
After you add a Success Plan to Success Snapshot Template and enable the Objectives, Timeline and Task check boxes, the Objective List, Tasks Details and Timeline Details Success Plan reports are created in the Report Builder > System Folder. To customize (add filters, fields, remove fields, etc.) the Objectives, Tasks and Timeline slides in Success Snapshot, edit the reports in Report Builder.
IMPORTANT: Do not rename the Success Plan reports from the Report Builder. If you rename the report, you may encounter an error with configured Success Snapshots that are already configured.
Once you configure the Success Snapshot template, you can clone or delete and reorder slides. Click the Save button on the upper right corner of the screen after all the configurations are done.
Apply Table Styles
Configure Success Snapshot templates for CSMs to use for their business review meetings. Import a parent template and configure the slides by adding text, images, tokens, and reports. While configuring the templates, admins can create, customize, and apply table styles to Tabular Reports.
For more information on how to apply Table Styles, refer to the Table Styles in Success Snapshot article available in the Additional Resources section.
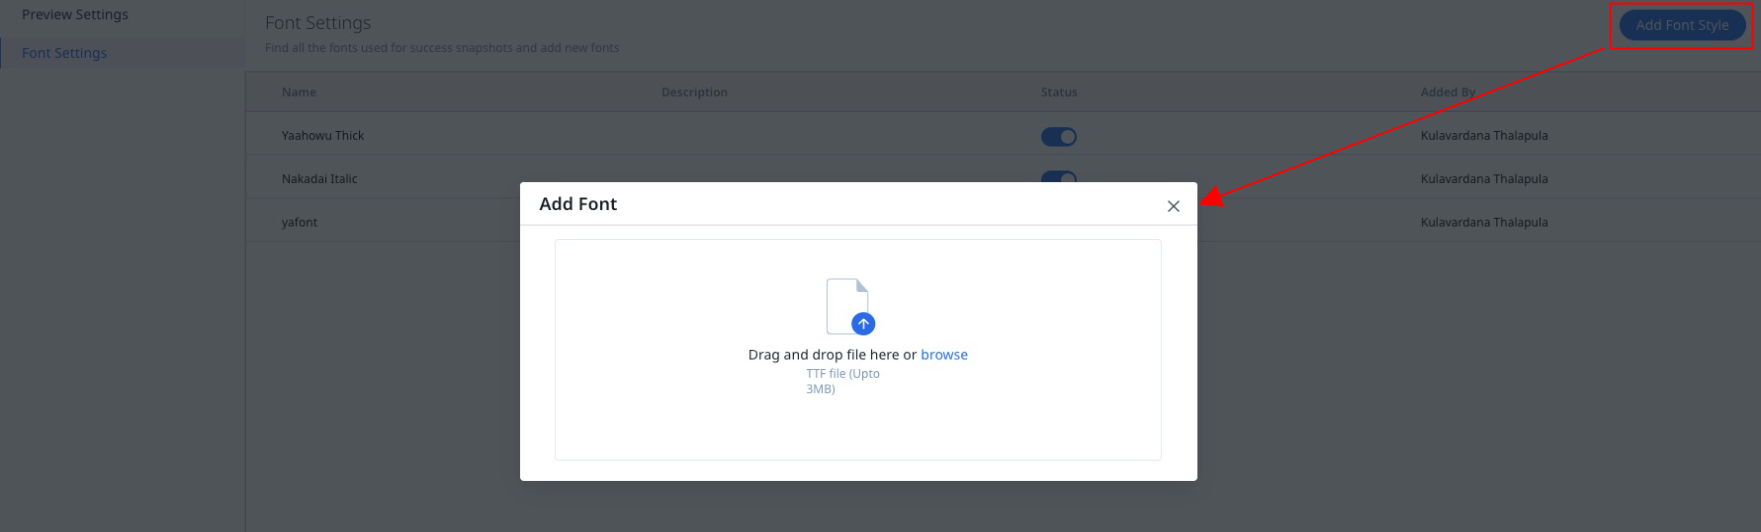
Add Custom Fonts
You can add and apply custom fonts to your text in Success Snapshot Templates.
To add a custom font:
- Navigate to Administration > Success Snapshot Builder > Settings tab.
- In the Settings page, click Font Settings.
- Click Add Font Style.
- In the Add Font window, drag and drop a TTF font file.
Note: The maximum number of custom fonts that can be added is 10.
View Parent Slide Data
Select the View Parent Slide check box to view the pre-configured data and compare with the configured slide data. This option removes the dependency on the original slide.
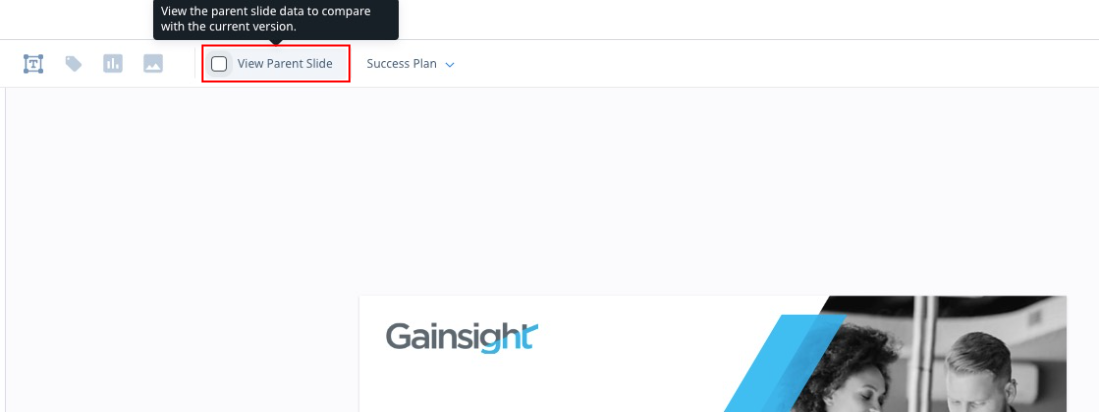
IMPORTANT: You need to clear the View Parent Slide Data check box to perform any configuration changes in the configure Success Snapshot Template.
Retain Configurations in Existing Snapshot
The associated PPTX/Google Slides is updated with new content, uploading the slide deck to Success Snapshots can still retain the existing/previous configurations.
To update the Snapshot template:
- Navigate to Administration > Success Snapshot Builder. The list of existing Success Snapshot Templates appears.
- Hover on the Success Snapshot Template you wish to update and click Edit. The Success Snapshot Template appears.
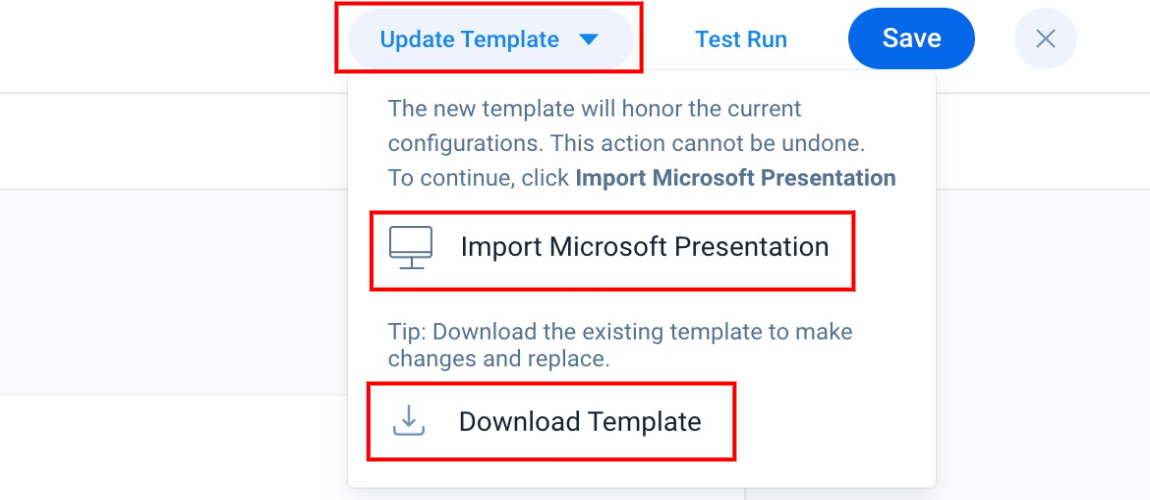
Note: The Update Template option is displayed if the snapshot is configured with PPTX template.- Click Update Template. You can select either of the following options:
- Import Microsoft Presentation: This lets you to upload the updated PPTX file from your Computer.
- Download Template: This lets you to download the existing PPTX from Success Snapshot and make changes in your local folder, and upload the PPTX back to Success Snapshot.
- Click Update Template. You can select either of the following options:
- Click Save. The retained configuration is saved successfully.
IMPORTANT: Assume, a CSM has downloaded a 20 slide Success Snapshot Template and deleted two slides and added one slide and then uploaded back to Success Snapshots using Update Snapshot feature. The 18 already configured slides retains the configuration and only the one new slide needs configuration.
Preview Slides
To preview a slide:
- Click on the Preview Slide icon. A Preview Slide slide-out panel is displayed.
- In the Preview Slide slide-out panel, enter the following details:
- Select the Company/Relationship Name.
- (Optional) Select a Success Plan Name/Relationship Success Plan Data.
- Select the Save this choice for future checkbox to set the selected Company/Relationship and Success Plan as default preview settings.
- Click Confirm. The slide preview is displayed as a lightbox.
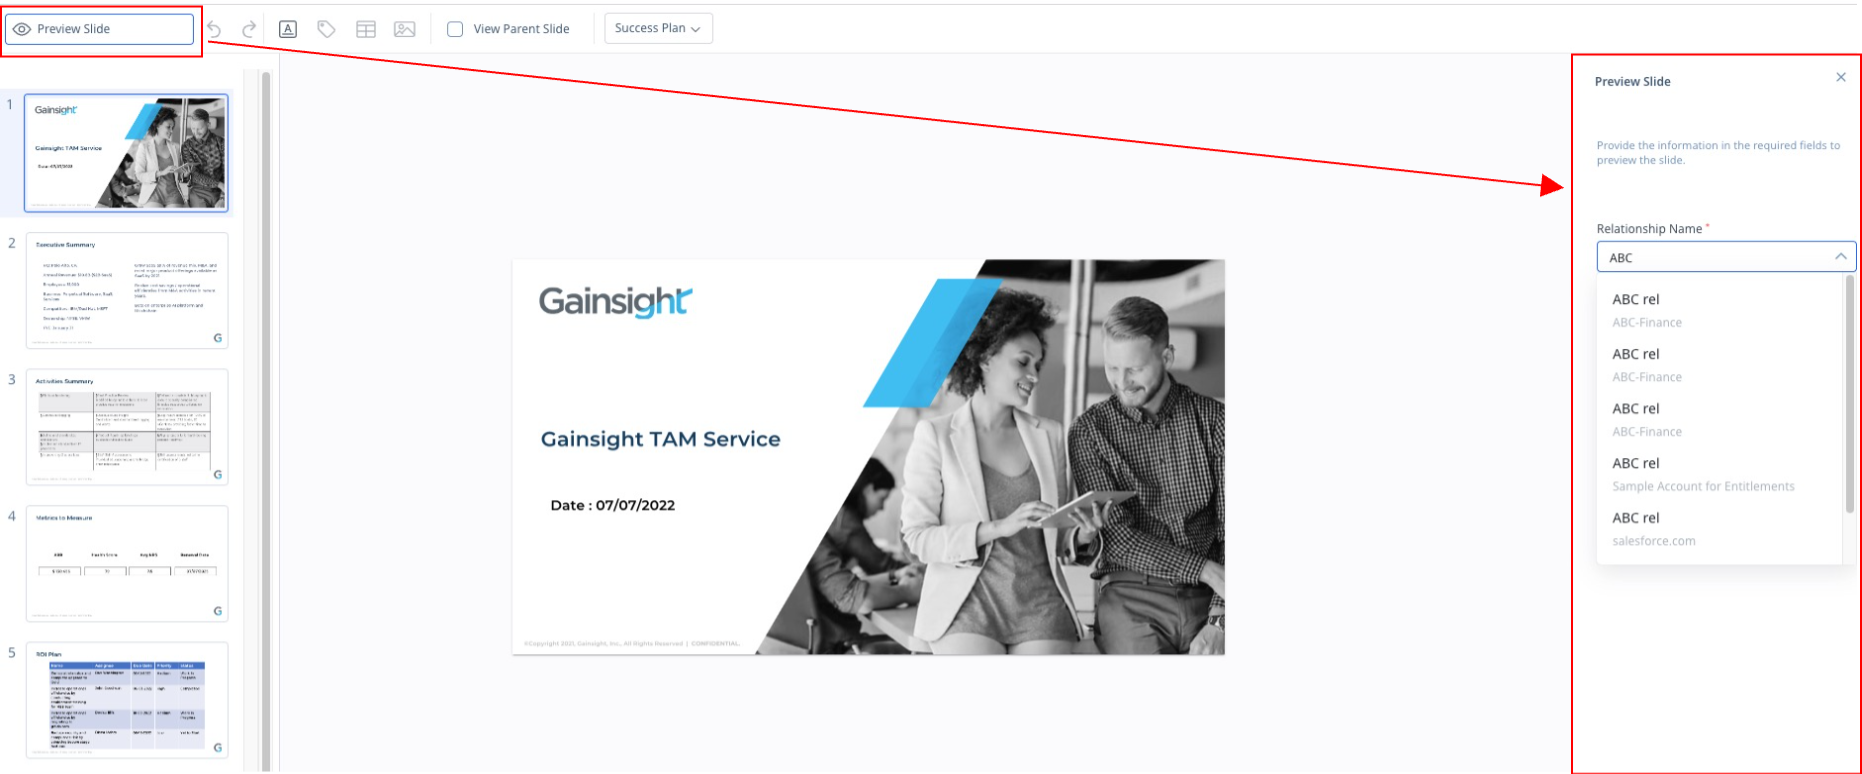
Notes:
- Click anywhere on the screen to exit the preview.
- In case of a Relationship type template, the Company name is visible along with the Relationship name in the search results.
Test Run
You can download/export the Snapshot and preview it before sharing the template with your end users.
To perform the Snapshot Test Run:
- Click Test Run.
- In the Snapshot Test Run window, select the following:
- Search a Company/Relationship from the dropdown list for whom you want to download the Success Snapshot.
- Select a Success Plan from the dropdown list.
Note: This option needs to be selected when there are Success Plan related tokens or reports in the configuration.
- Click Download. The Success Snapshot will be downloaded successfully.
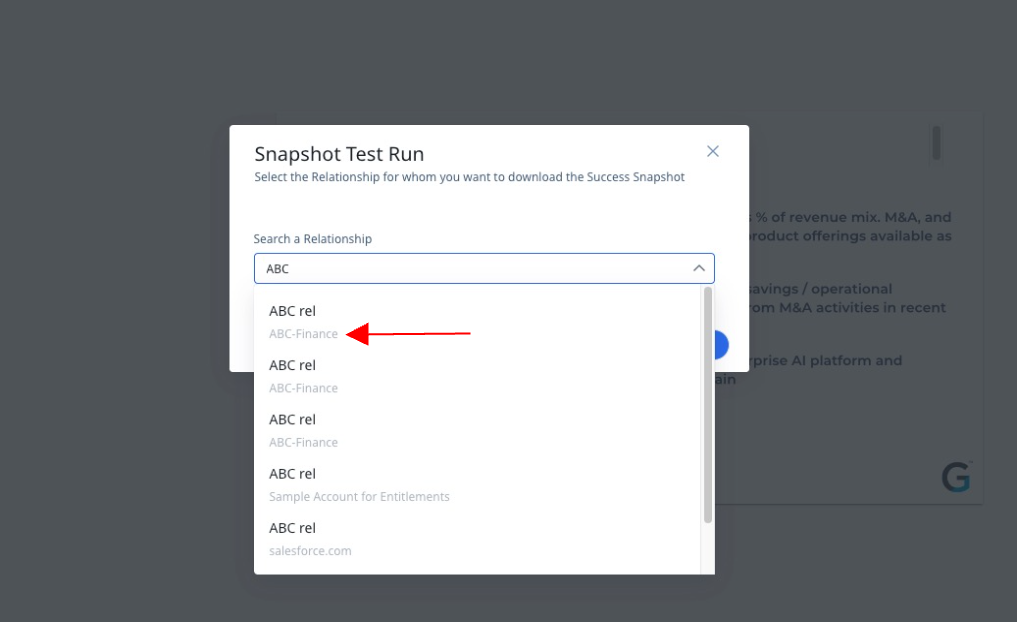
Note: In case of a Relationship type template, the Company name is visible along with the Relationship name in the search results.
Limitation
The Sync with Drive button is not available in the template editor of Success Snapshot Templates that have been created using the Import from your Google Drive option. Admins will no longer be able to restore configurations of the Google Slide Parent Deck into the Success Snapshot Template. This feature is withdrawn due to technical limitations and will be available soon.