Share Success Plan
Success Plan [old version] documents will be archived soon...Documents related to the old Success Plan feature will be archived soon and will no longer be available as all the NXT customers now have Success Plan Horizon Experience in their orgs. Learn about the improved version of Success Plan on Horizon Experience through documents which can be accessed from here.
Gainsight NXT
This article explains CSMs how to share a Success Plan with internal users and/or People (External) through email.
Overview
Using Success Plans, CSMs can collaborate directly with internal users and people (external), like: assign objectives/tasks, share the plan and assign permissions to the users/people so that they can directly make changes in the Success Plan using the shared link.
To share a Success Plan, admins must first configure it, with optional security settings. For more information on how admins can configure a Success Plan for sharing, refer to the Configure Success Plan for Sharing article.
Note: People (External) here means the person records stored in the Person object model.
IMPORTANT:
- Viewer and Viewer + Analytics licensed users can only see the Success Plans in the C360 page (even if the plans are shared in edit mode).
- For the newly added Person in Gainsight, it might take upto 24 hours before Success Plans can be shared with them.
Business Use Cases:
- In the Onboarding process, Success Plans can be used to track all the tasks that need to be completed. Some of the tasks during onboarding might be owned by your customers such as conducting a training session or collecting feedback from the CSM team.
- With the Success Plans, you can review and finalize a Project Plan (created by you) with your customers, who can provide their feedback or details such as Due Date of the tasks they own.
Use Cases
- For instance, you are using Success Plans for Onboarding i.e to track all the tasks that need to be completed for successfully completing the onboarding of your customer. Some of the tasks during onboarding might be owned by your customers Ex: Conducting a training session, Collecting feedback from CSM team, etc.
- For instance, you might have created a Project Plan and may want to review and finalize with your customers who can provide their feedback or provide details (such as Due Date) of the tasks they own.
Prerequisites
- For sharing a Success Plan with Users (internal users), the recipient must be added into the User object and must have a Viewer, Viewer+ Analytics, or Full license type with Gainsight. Internal Collaborator licensed users are not permitted for sharing. By default, all the newly created Success Plans are marked external. For more information on how a user can be added, refer to the Gainsight User Object article.
- When you share a Success Plan with People (External), the recipients are automatically added a as a Person into the GS Person object model.
- To collaborate with customers using Success Plans, admins must first enable the below toggles from Administration > Workflow > Success Plan > Sharing and Security Settings:
- Enable Allow editing of Success Plans when shared, to share a Success Plan in Edit mode.
- Enable Allow Persons to own objectives, to assign Objectives/Tasks in a Success Plan to People (External).
- To assign an Objective to people (external), ensure that the person record has First Name, Last Name and Email ID.
For more information on how admins can enable these toggles, refer to the Configure Success Plan for Sharing article.
Assign Objectives/Tasks
Perform the following steps to assign Objectives/Tasks to Users or People (External):
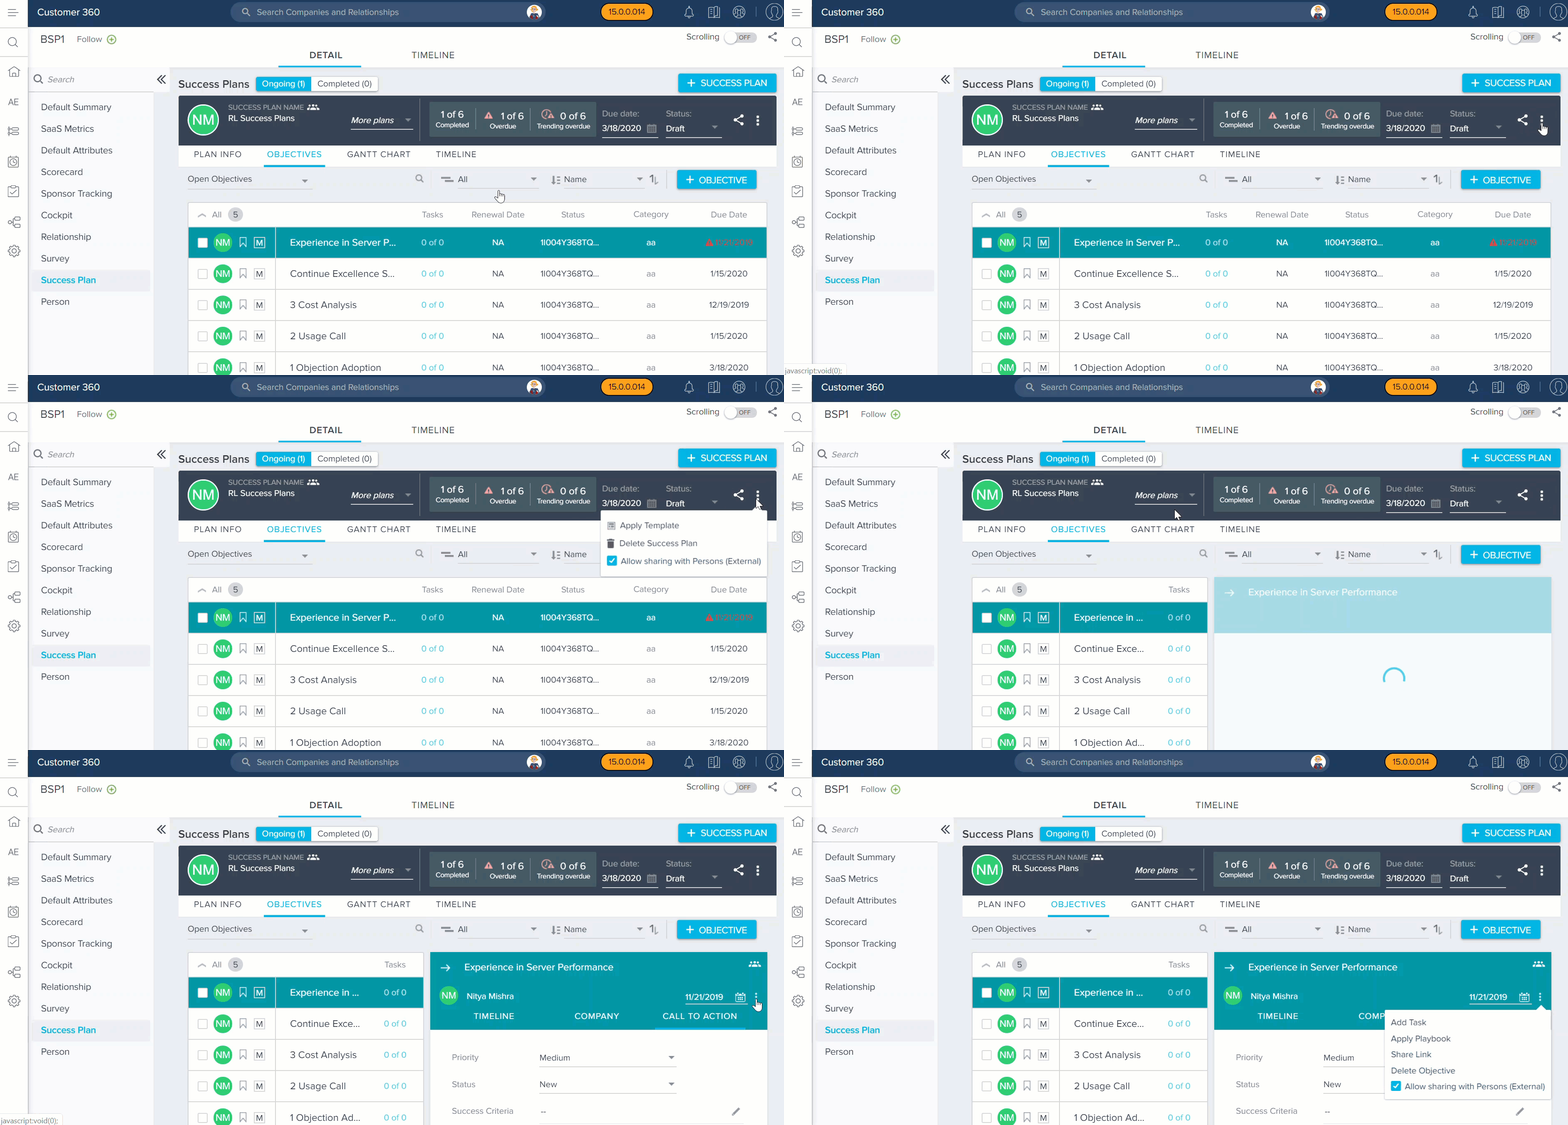
- Navigate to C360 page of a customer > Success Plans.
- Click the required Objective/Task. Detail View of the objective/task appears.
- Click the User/People (External) Name logo on the top left corner of the detail view.
- In the Search menu, type in the User/People (External) name and click the name to assign the objective/task.
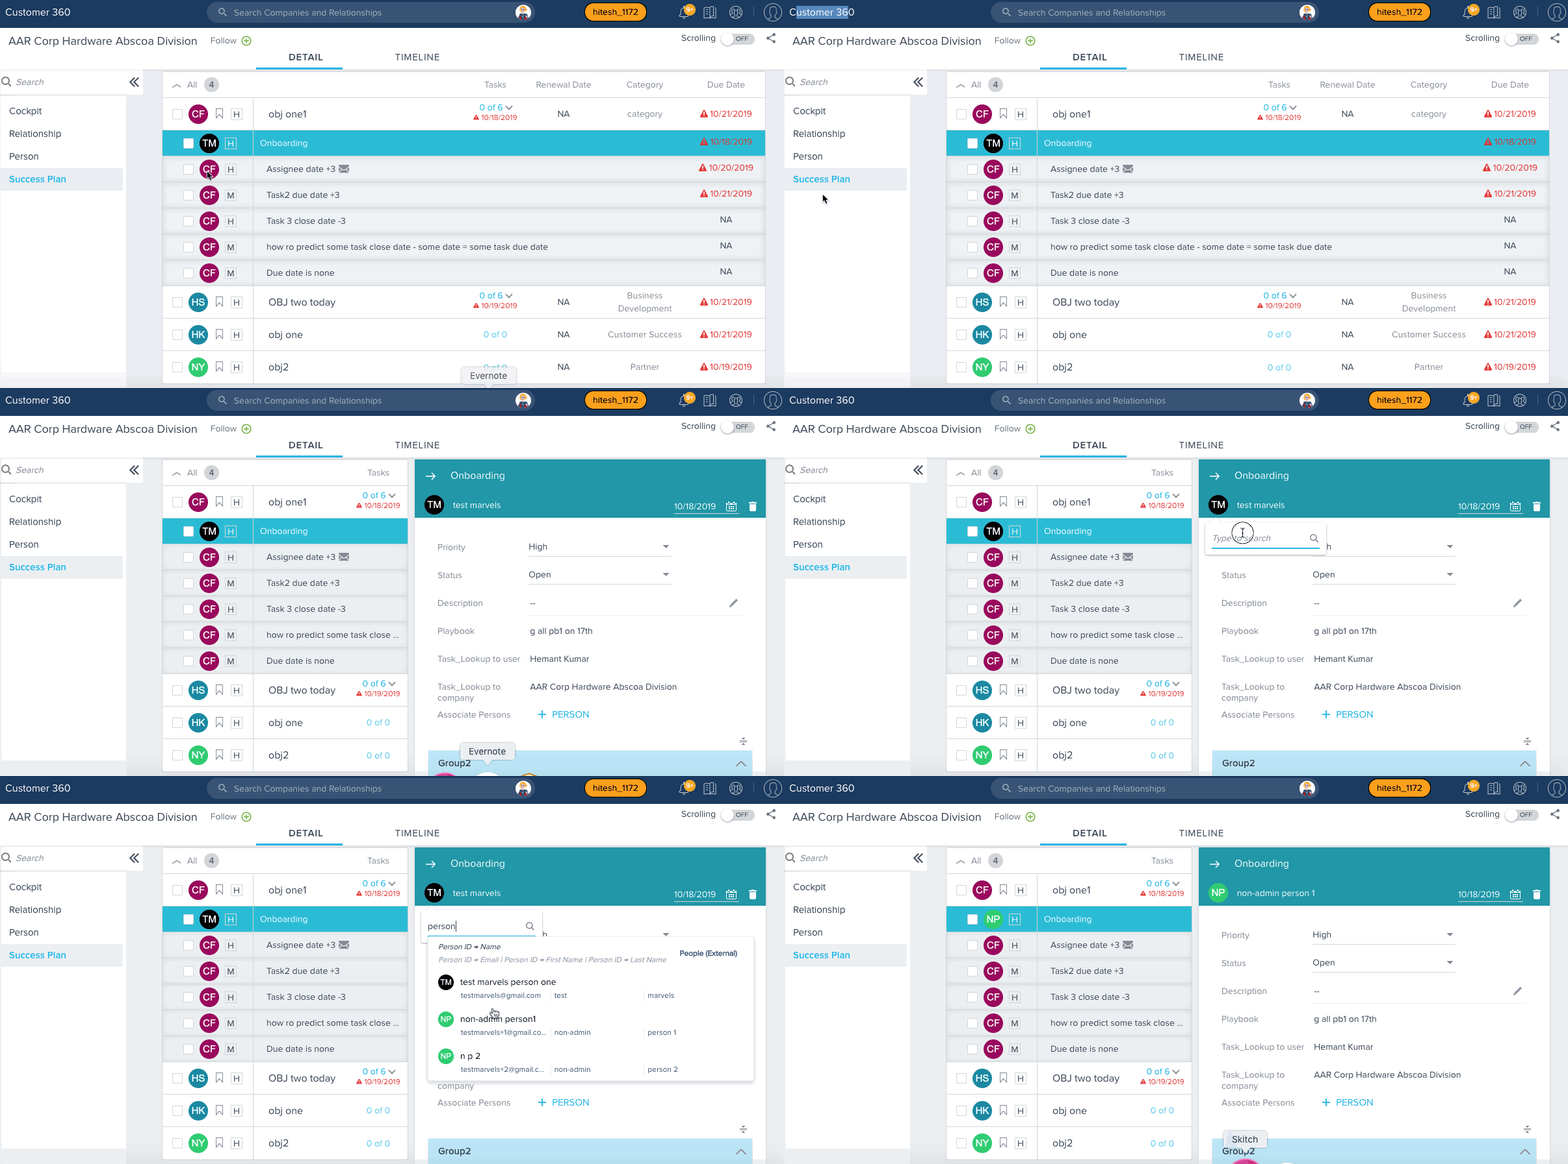
Notes: You can assign Objectives/Tasks to a People (External) only from the Success Plan, and not from the Cockpit list view page.
Share the Success Plan
Perform the following steps to share a Success Plan:
- Click the Share icon near the options. The Share Plan window appears.
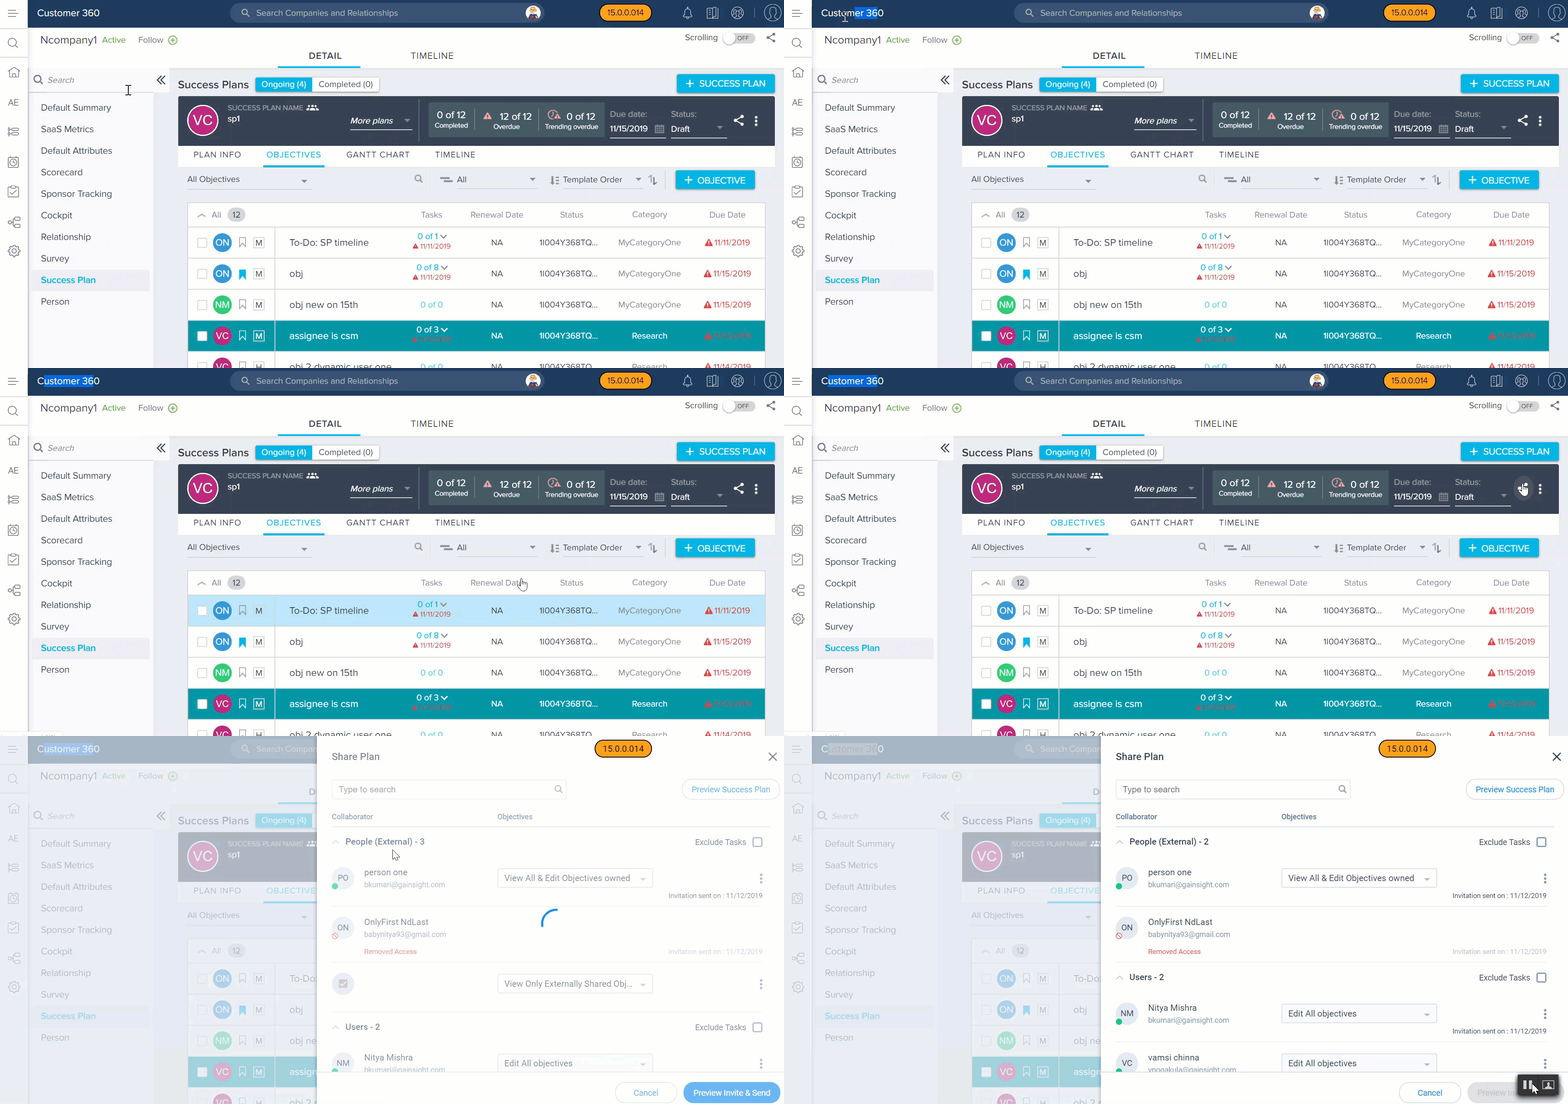
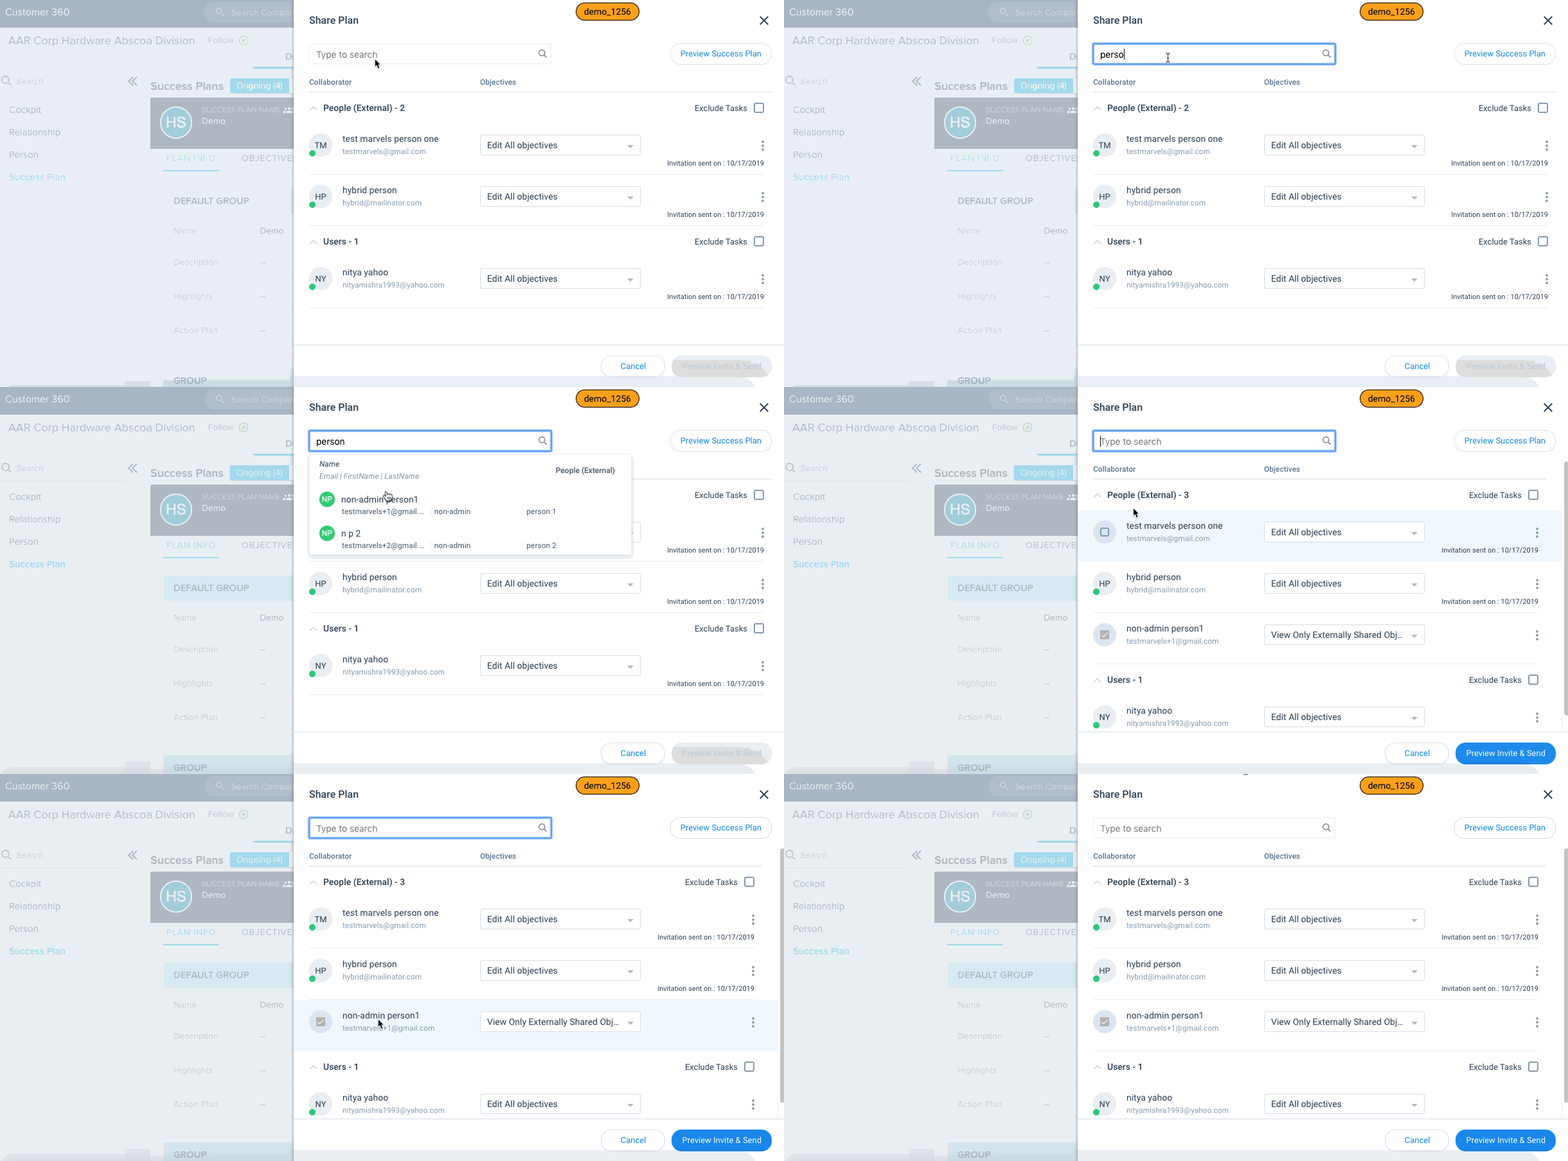
- In the Type to search search box, type in the People(External)/User name to whom you want to share the plan, and click the name to add them to the recipient list.
Notes:
- Once you add people/users, the list of people and users whom you want to share the plan are shown under the People (External) and Users sections.
- Click the dropdown to collapse and expand the People (External) and Users list.
.gif?revision=1)
-
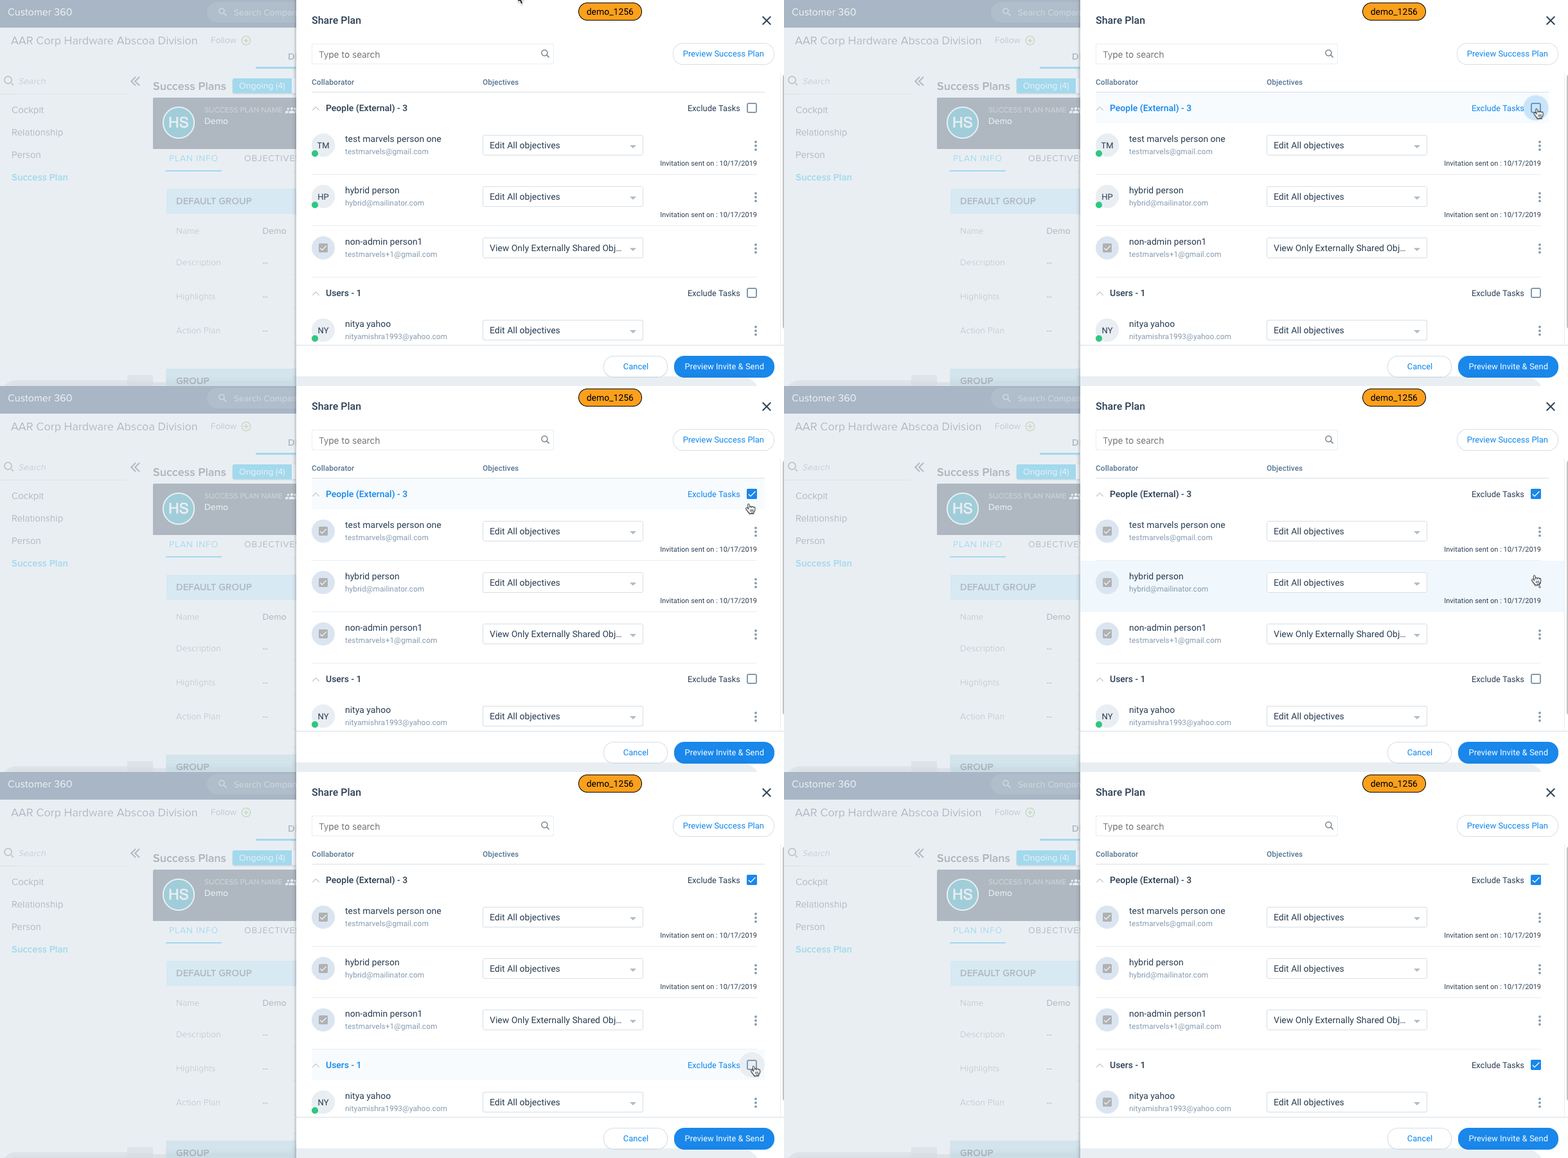
Select the Exclude Tasks checkbox, if you want to exclude the tasks in the objectives, in the shared output. Exclude Tasks checkbox is available for both Users and People list separately, you can choose based on your requirement.
Notes:
- If the Exclude Tasks checkbox near the People (External) list is selected, all the persons in the people (external) list cannot see the tasks in the objectives. The same functionality applies to Users as well.
- If you assign a Task to people (external), the Objective to which the task belongs to is also shown.
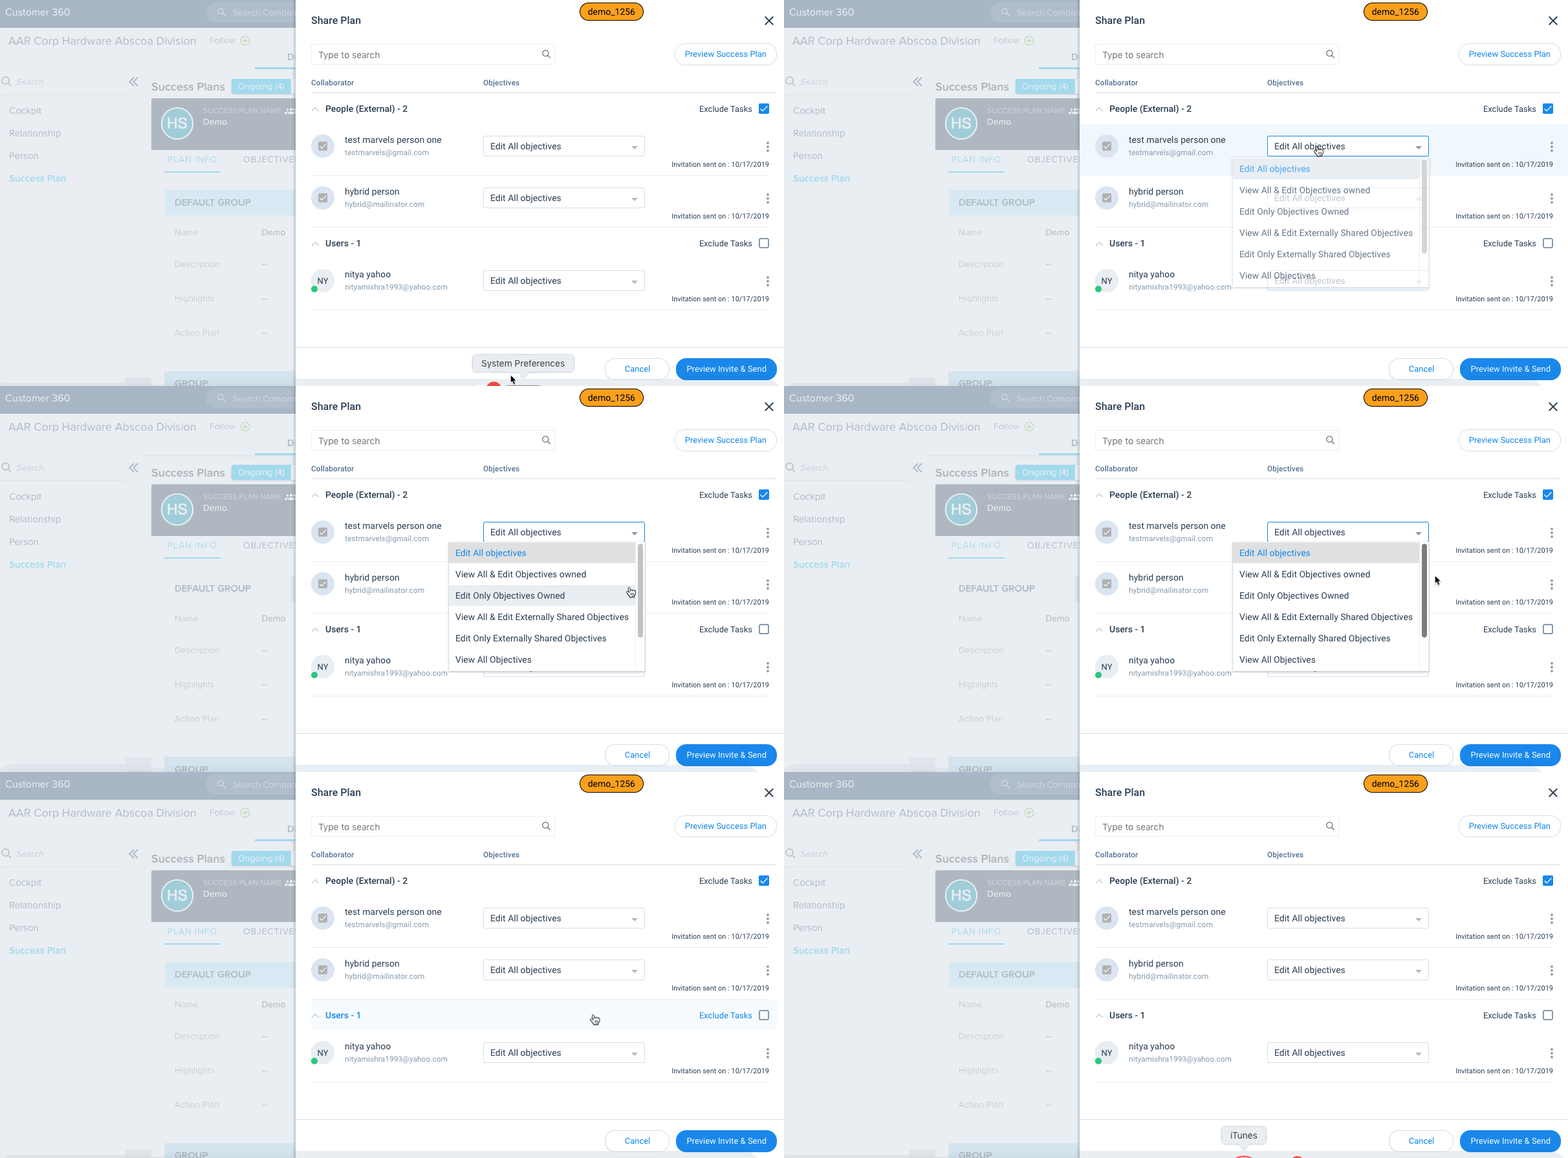
- You can set permissions on the Success Plan you want to share with People (External). Select the required option from the Permissions dropdown list. Following are the multiple permission options available:
- Edit All Objectives: People can edit all the objectives in the success plan
- View All & Edit Objectives owned: people can view all the objectives and edit the objectives they own.
- Edit Only Objectives Owned: people can edit the objectives they own.
- View All & Edit Externally Shared Objectives: people can view all the objectives and edit only the objectives that are externally shared.
- Edit Only Externally Shared Objectives: people can edit only the objectives that are externally shared.
- View All Objectives: people can only view all the objectives.
- View Only Externally Shared Objectives: people can only view the objectives that are externally shared.
- View Only Owned Objectives: people can only view the objectives they own.
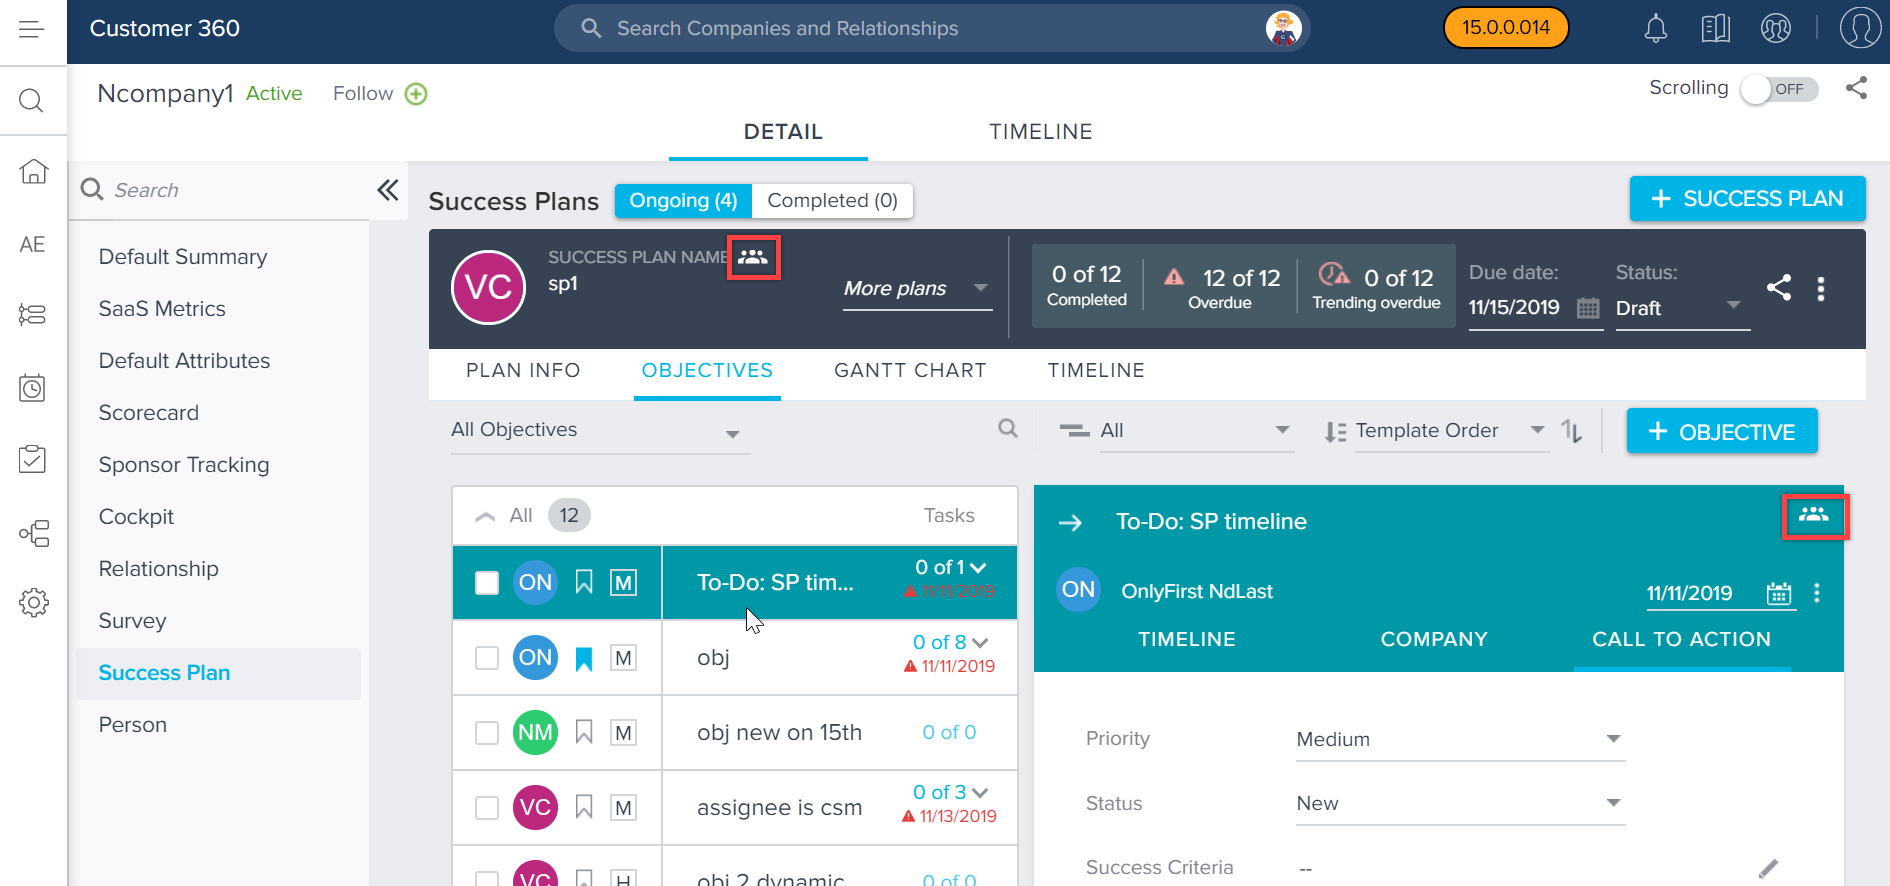
Externally Shared Objectives: For sharing with people (external), the Allow Sharing with Persons (External) checkbox must be enabled in the Success Plan. When a plan is marked for external sharing, all the corresponding Objectives are also marked for external sharing. However, you can uncheck this option in the individual Objectives to mark those Objectives for internal sharing only. By default, all the newly created success plans are marked for external sharing.
Whenever a Success Plan is shared with internal users, by default, all the objectives are displayed to the recipient (user), with Edit All Objectives permissions set.
Once marked for external sharing, the global sharing icon appears next to the Success Plan name and objective detail view. Once the external sharing is enabled, Success Plan can be shared with people (external) as well.
IMPORTANT:
- Users who have viewer license can only see the plans, even if the plans are shared in edit mode.
- For the newly added persons (people), it might take upto 24hrs before success plans can be shared with them.
Preview Success Plan
To Preview the Success Plan you want to share:
-
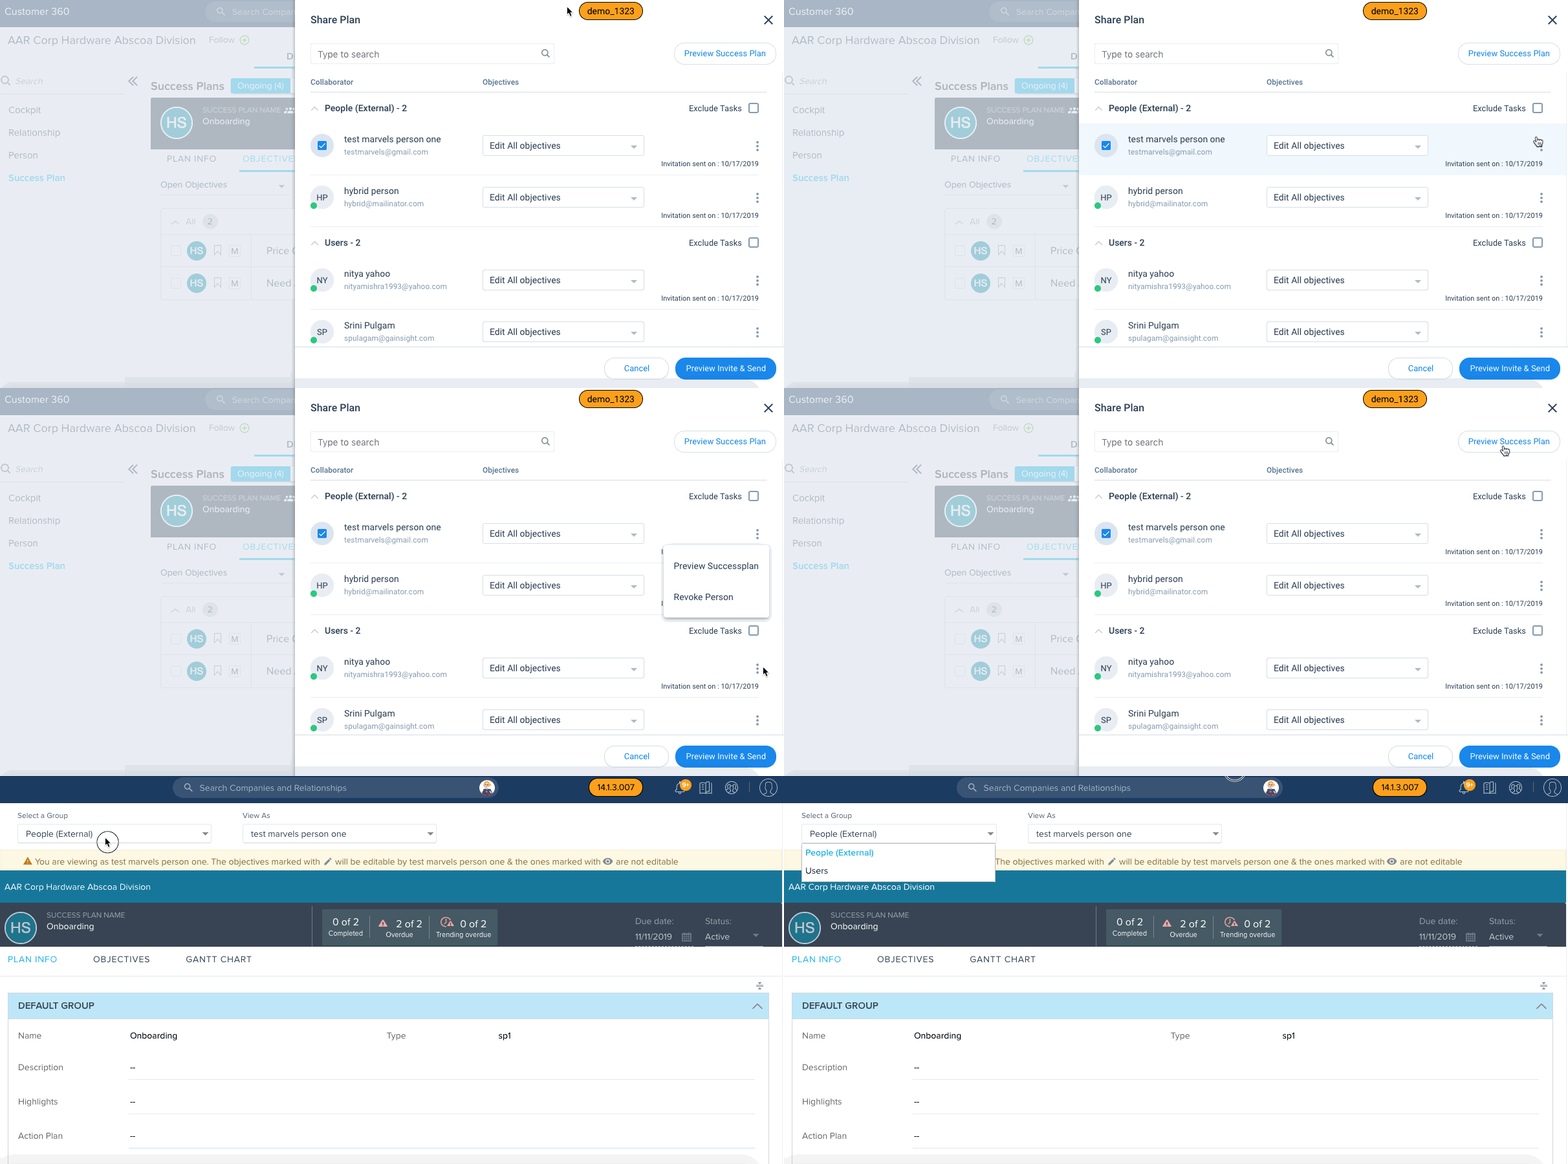
Click Preview Success Plan. Shared Success Plan layout is displayed in another tab, here you can see how a success plan appears to the users/people after it is shared.
Note: You can also see the preview option for each of the objectives in the Success Plan.
-
Select a Group from the Group dropdown list, either People (External)/Users, and then select the required Name from the View As dropdown list.
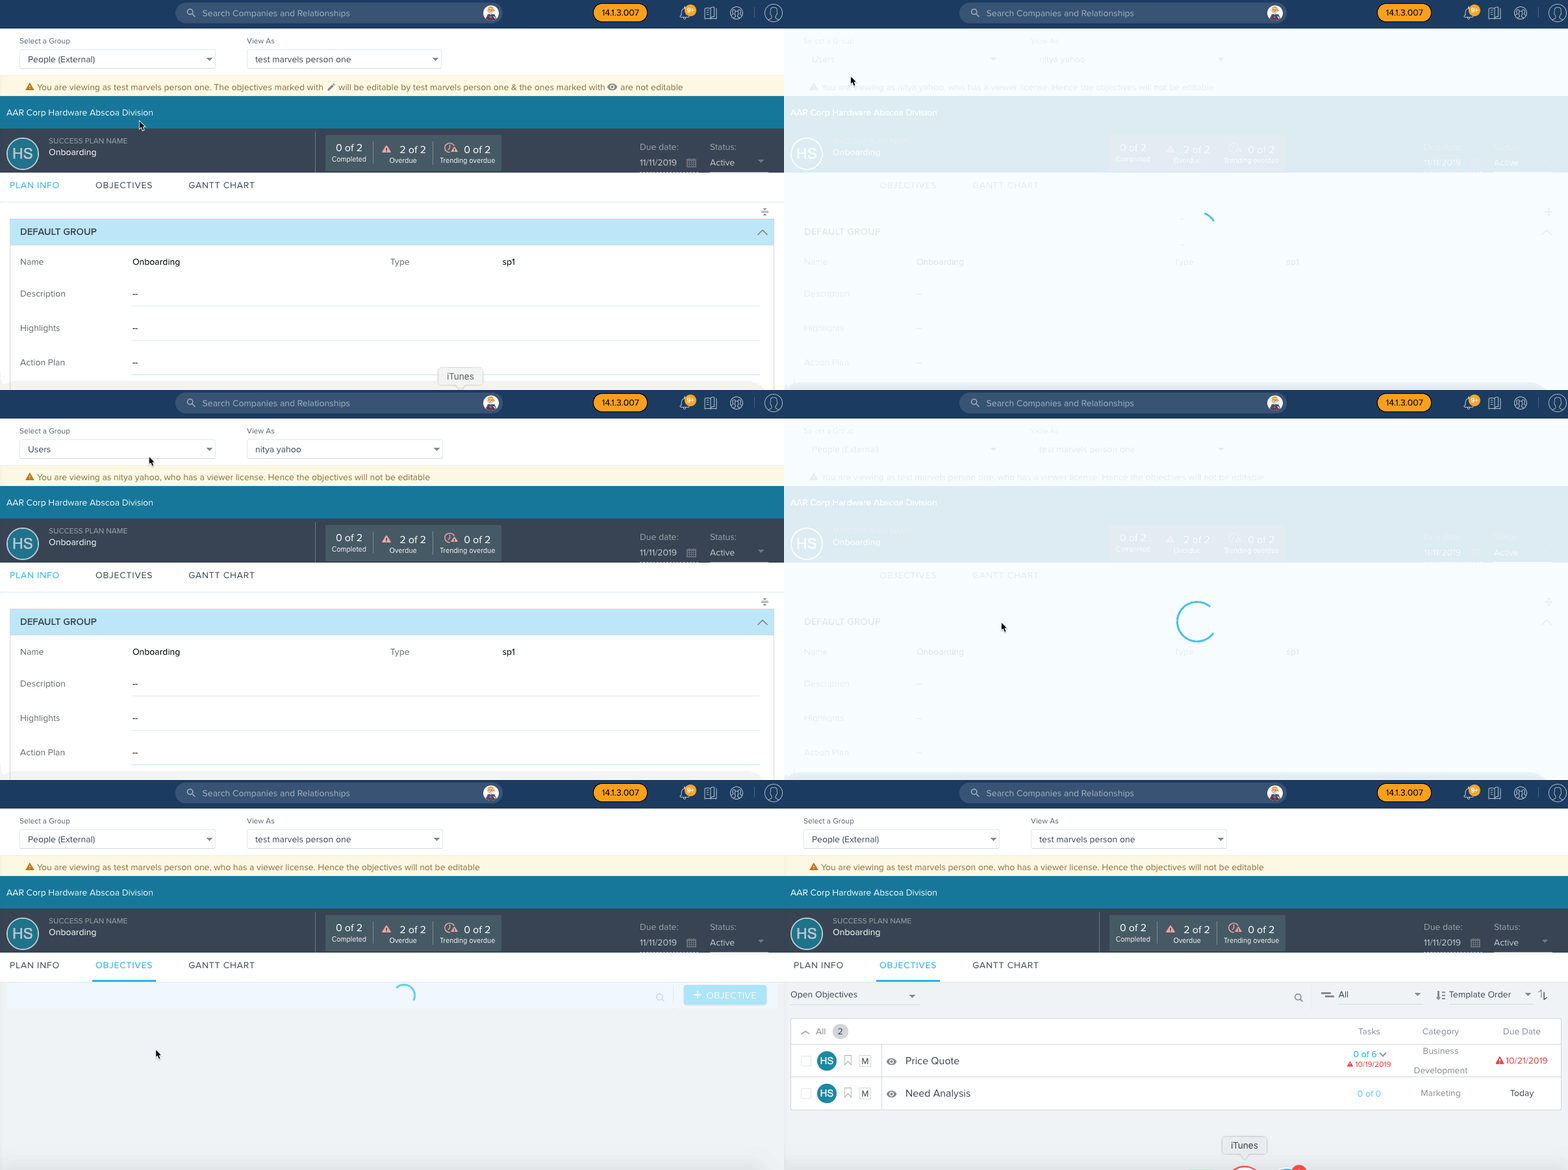
-
Click Objectives and verify if the permissions assigned are correct. You can see the eye icon/pencil icon, based on the permissions set.
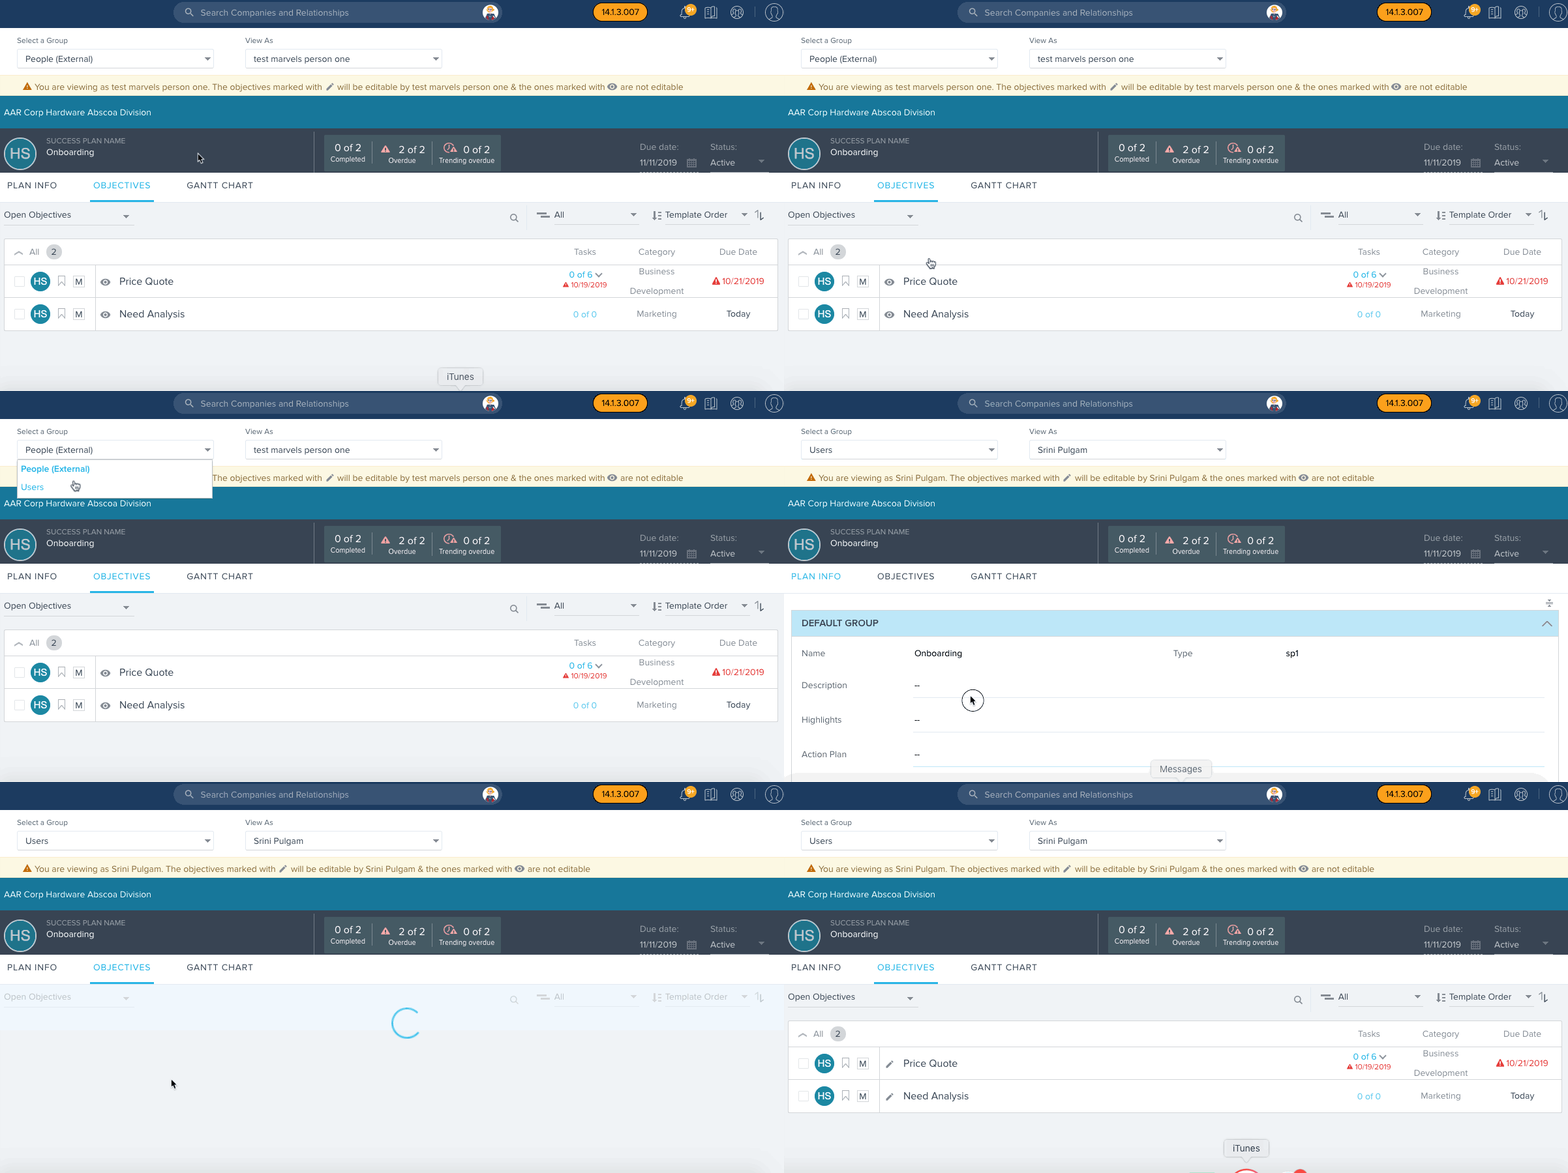
Note: The TIMELINE tab is not available for externally shared Success Plans.
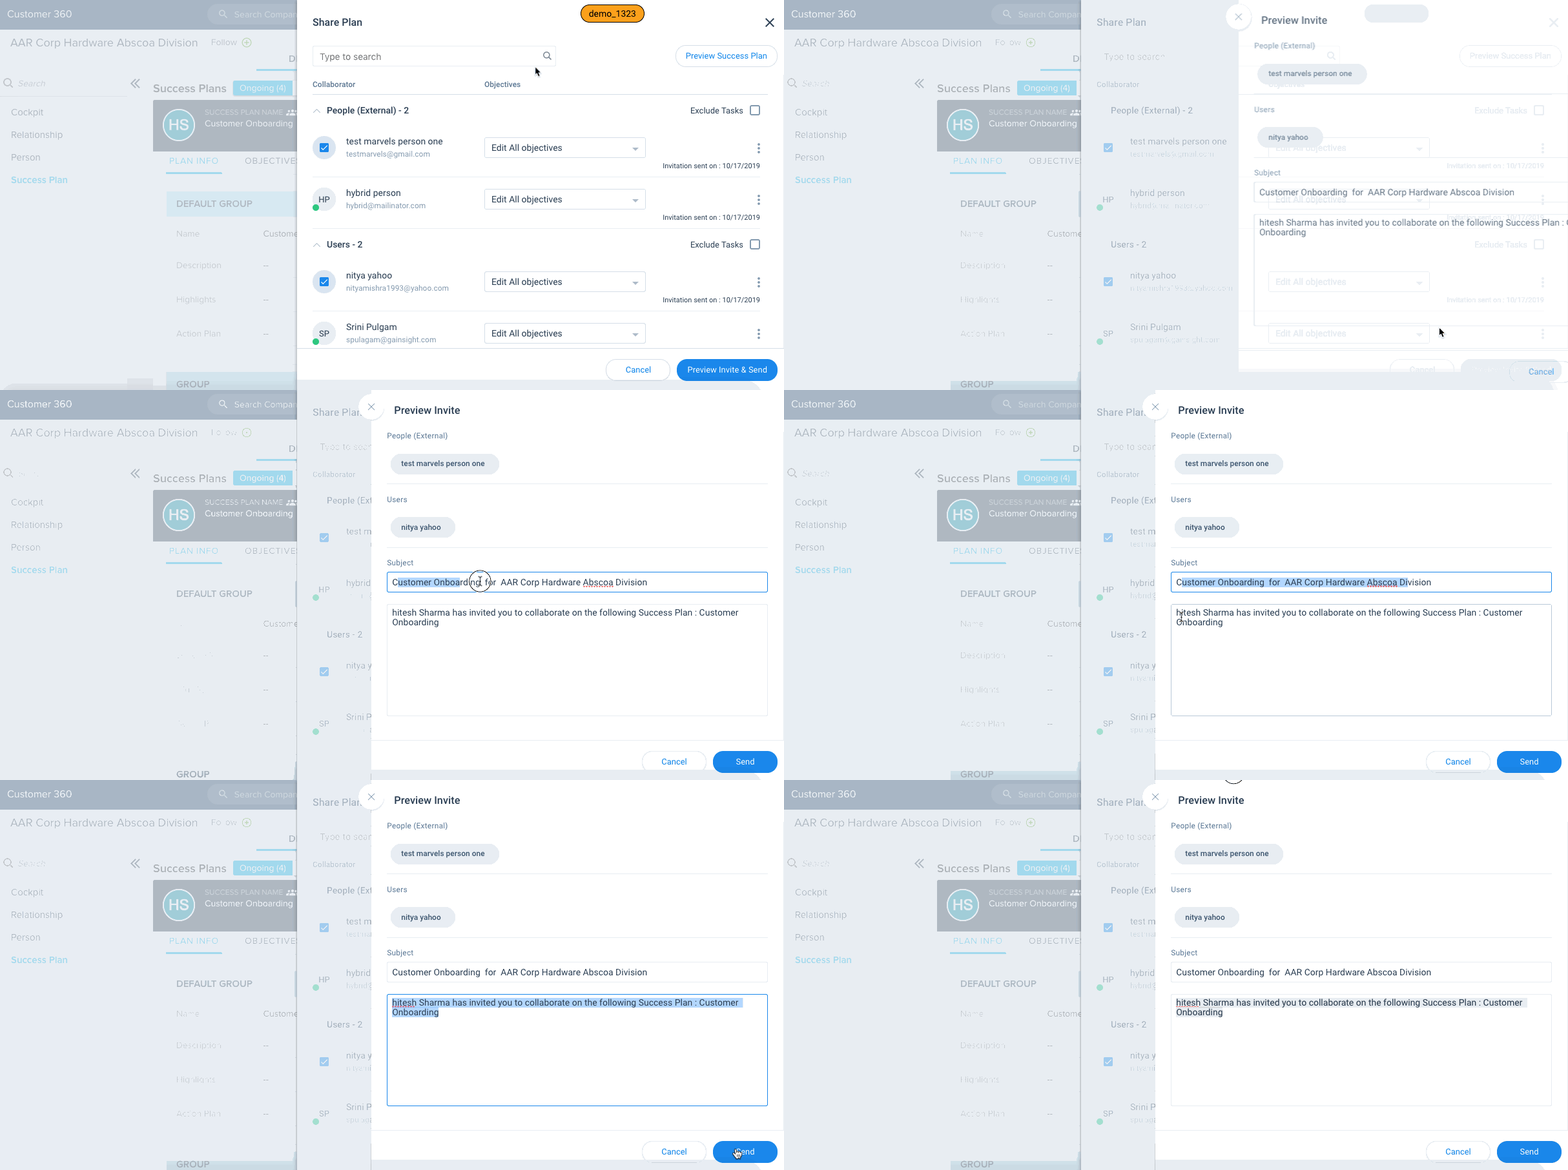
- Now, go back to the Share Plan window and click Preview Invite. The Preview Invite window appears.
- You can edit the subject and the body of the email, if required.
Note: By default, the format of the Subject Name is: <Success Plan Name> for <Company Name>. - Click Send, and an email will be sent to the users/people whom you have shared the plan.
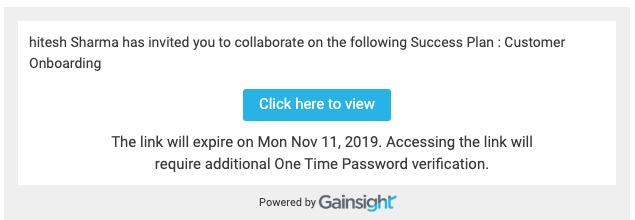
When a Success Plan is shared with a people (external)/user, a notification is sent to the recipient's email address. The following images show how the email notification appears to the people (external)/user, in OTP Enabled and Disabled mode.
Email Notification for OTP enabled
Email Notification for OTP disabled

Icons and Descriptions
|
Icons |
Description |
|---|---|
|
|
Indicates that sharing has been enabled for people (external) (in addition to internal users) |
|
|
Indicates that sharing has been enabled only for internal users |
|
|
Enables you to share plan with users or contacts |
View Success Plan
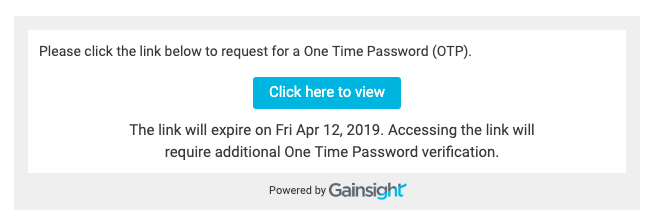
When the Success Plan is shared, a notification is sent to the recipient's email address. The email notification includes a link expiration date and One Time Password (OTP) verification. Recipients must perform the following steps to access the Success Plan:
- Click the Click here to view button in the email notification.
Notes:
- When recipients click the Click here to view button to access a link that has been revoked, they are asked to contact the people who shared the link to request a valid link.
- In case the link is expired or OTP access is invalid, the same message is displayed.
- In both the cases mentioned above, recipients must contact the person (CSM/AM) who shared the link.
- If your admin did not enable the OTP option, you can share the Success Plan as a link. You can either forward the email that you have received or you can also copy the URL and send it through email and email assist.
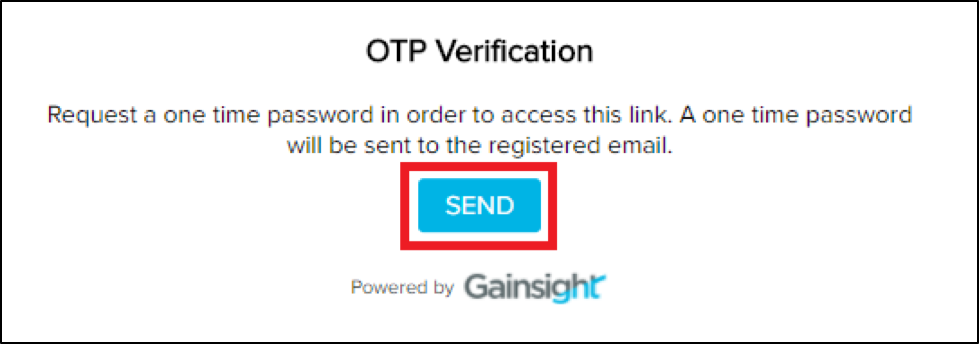
- Click SEND to request an OTP to be sent to the registered email ids.
-
Check the mail inbox. Recipients receive an email that contains OTP.
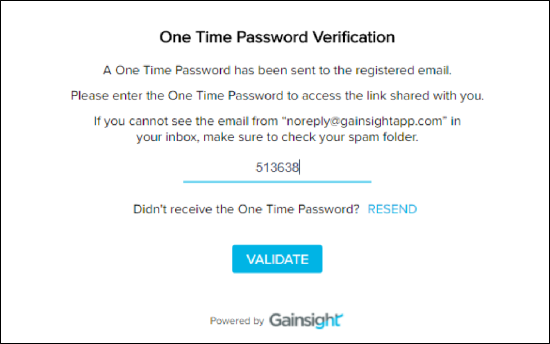
IMPORTANT: This OTP is time sensitive and expires in case of repeated unsuccessful attempts. Recipients should re-initiate the access request in case the OTP is expired. - Enter OTP to access the link.

-
If recipients do not receive the OTP, they should click RESEND.
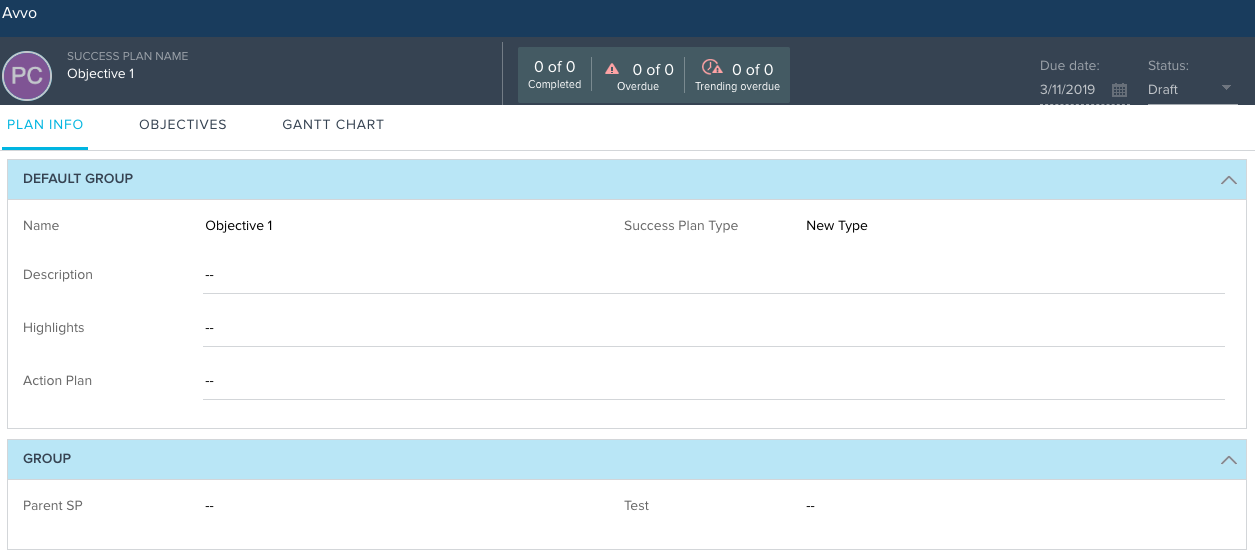
Note: The OTP is valid for 5 minutes. If it expires, the recipients must send a request to the CSM/AM to share the Success Plan again. - Click VALIDATE. The shared Success Plan is displayed.
Additional Details
-
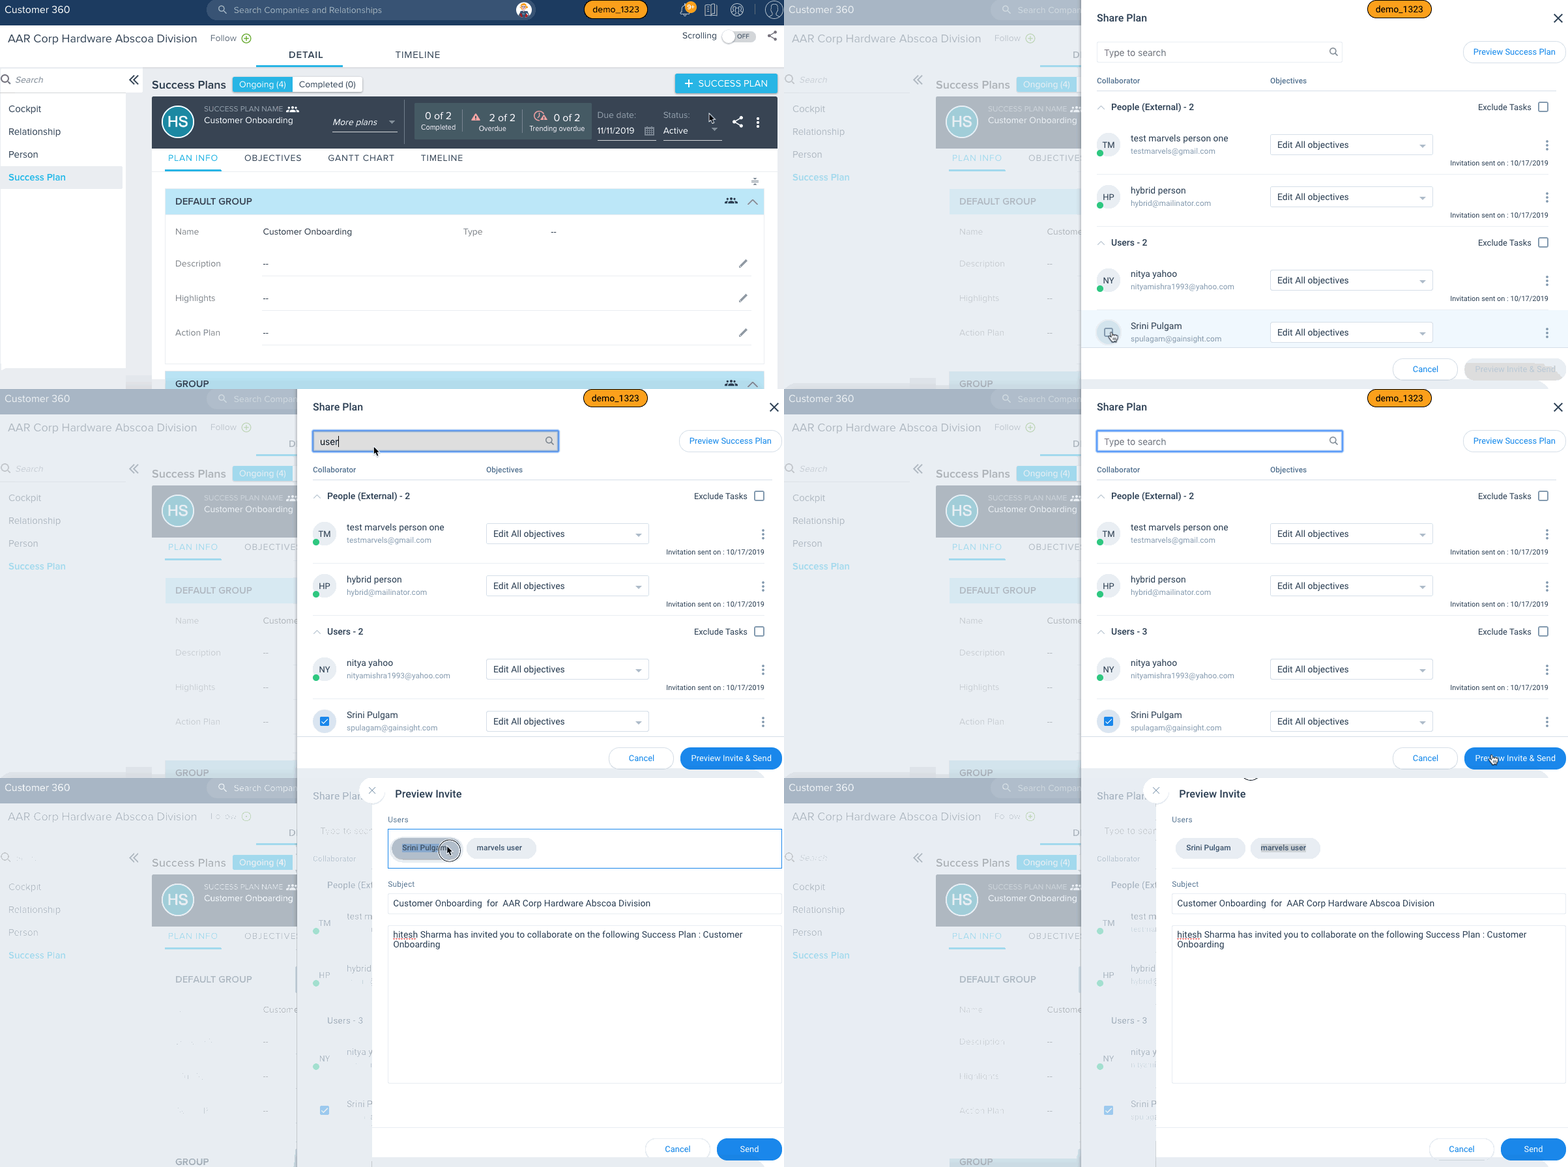
For instance, assume that you have already shared a success plan with a user, and after a few days for some reason, you may want to share the same plan again with the same user and other users as well. To do this, navigate to the Share Plan page, select the required user from the Users list to whom you have already shared, and search for the new user's name and add them to the Users list, and then send the invite. This functionality is applicable to both Users and People (External).
-
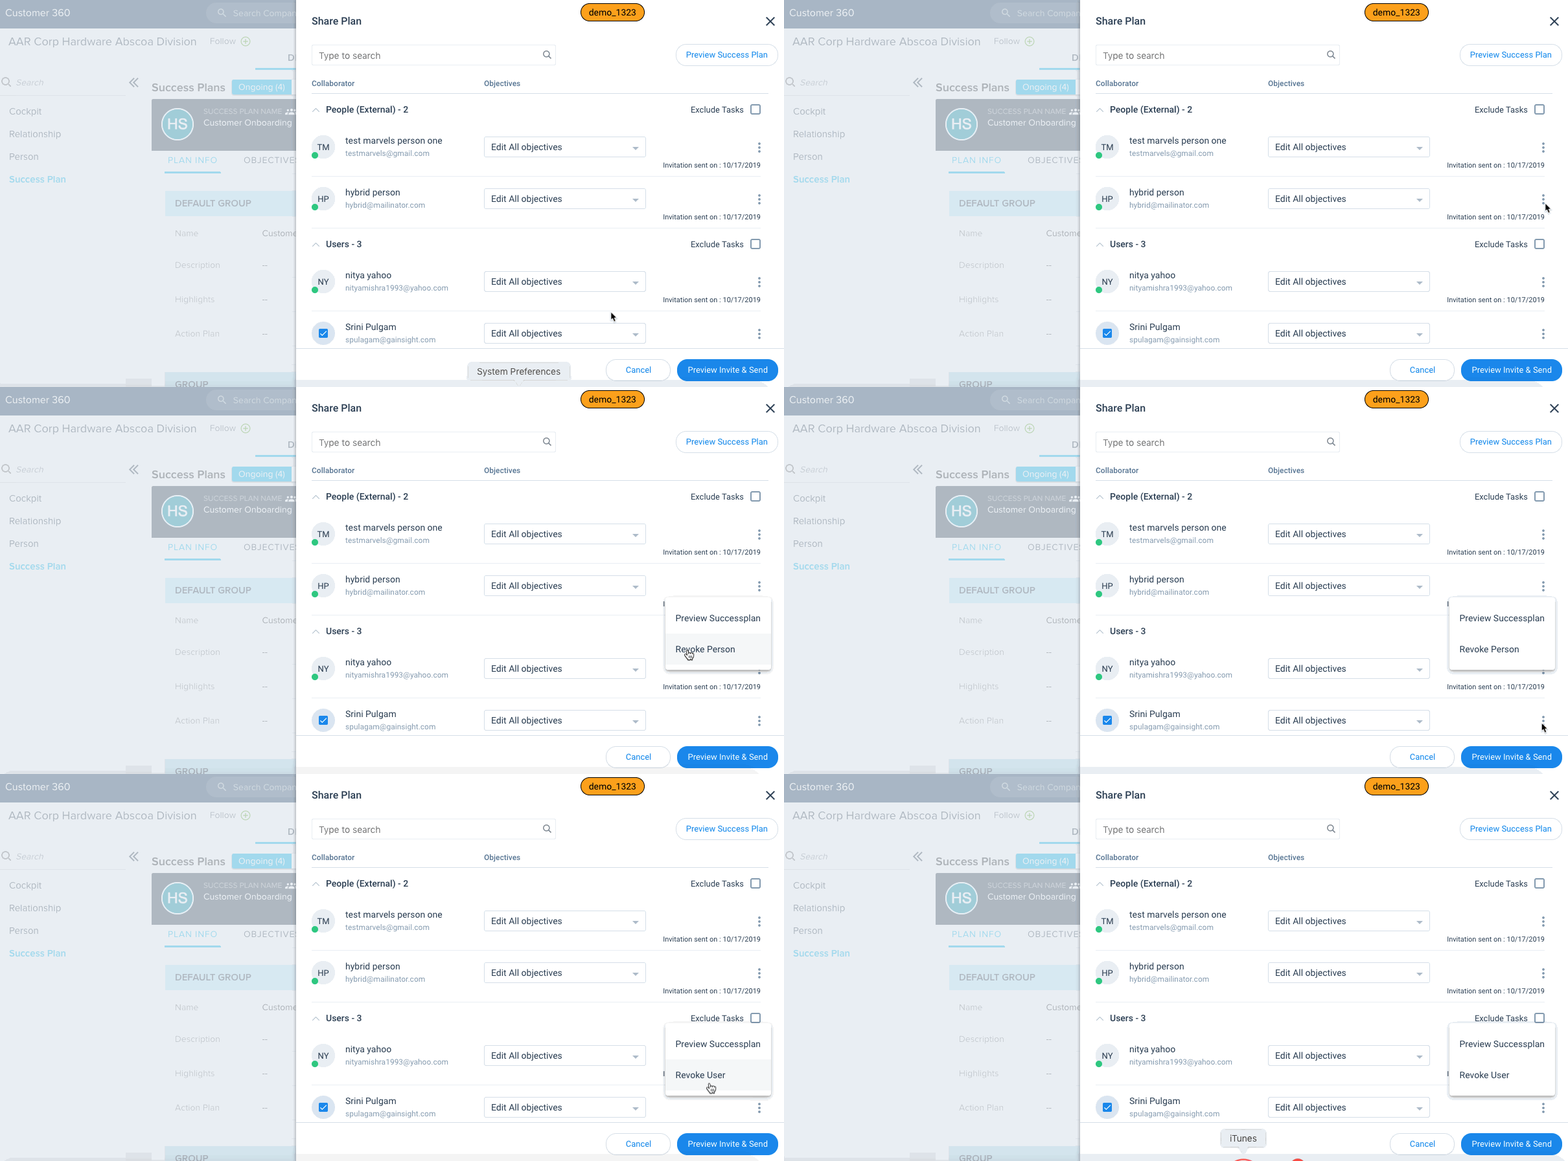
You can also revoke the access of a user/people to the Success Plan that has already been shared. To do this, navigate to the Share Plan page, click the three dots icon (Options) and click Revoke Person/User.
.gif?revision=1)
-
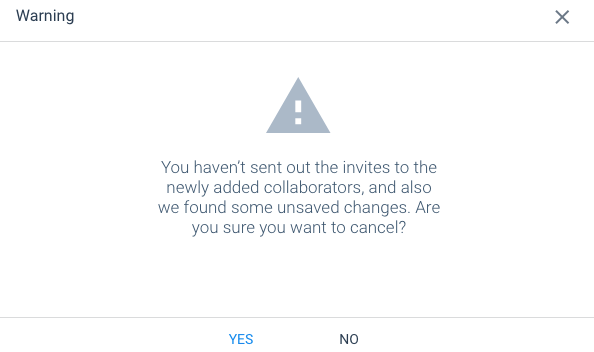
The following warning error messages are displayed on the UI, when there are unsaved changes on the Share Plan screen.
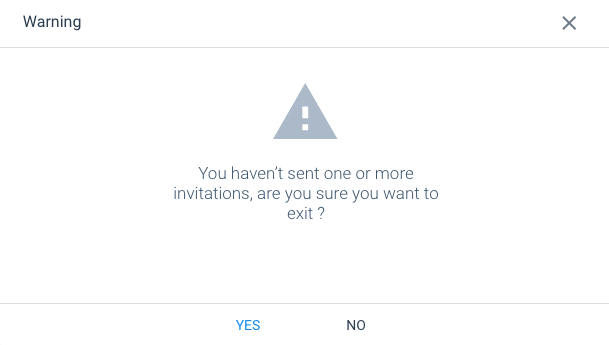
- Assume, while sharing a success plan, you might have added few users/people (external) and missed out to send the invitations and closed the window. In this scenario, you will see the following message on the screen.
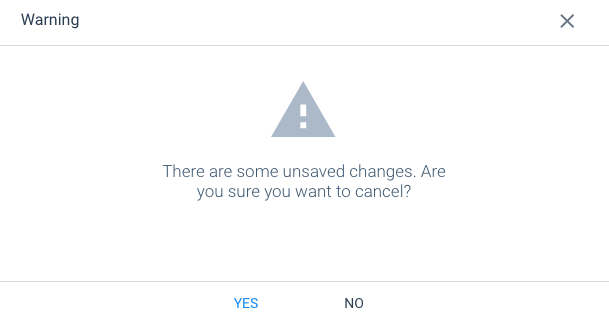
- Assume you have already shared a plan with few users/people (external) and later modified the permissions of an objective and missed out to send the new invitations and closed the window. In this scenario, you will see the following message on the screen.
- Assume you have already shared a plan with few users/people (external), and now you may want to share the same plan with other users and have added the users to the users list, and also modified the permissions of an objective for a specific user to whom you have already shared. In this scenario, you will see the following message on the screen.
Additional Resources
- For information on how admins can configure a Success Plan for sharing, refer to the Configure Success Plan for Sharing article.
- For information on the most frequently asked questions on Share Success Plan, refer to the Share Success Plan FAQs article.