Custom Opt-Out Setting for Opt-Out Categories
This document explains how to configure and manage Custom Opt-Out Preferences and Footers in Gainsight’s Journey Orchestrator. It provides step-by-step instructions for admins to set up custom opt-out for Opt-Out Categories and for users to create or edit non-operational email templates, ensuring compliance with email preference management.
Overview
Custom Opt-Out Settings allow you to configure branded email footers and opt-out experiences that align with your organization’s compliance and communication standards. You can choose between Opt-Out Categories and Global Opt-Out modes, connect your own hosted preference pages using API, and manage unsubscribe behavior across dynamic Journey Orchestrator (JO) programs. This setup supports localization, List-Unsubscribe headers, and analytics tracking that ensures a consistent and regulation-ready email experience.
Prerequisites
To create Opt-Out Setting for Opt-Out Categories, you can use your own hosted page while leveraging Gainsight's opt-out categories. Gainsight recommends this approach because it integrates seamlessly with Journey Orchestrator (JO). Any recipient who opts out no longer receives emails associated with the same opt-out category.
To activate this functionality, ensure that:
- You have Gainsight categories set up. If you do not already have categories configured, you need to create them first. For more information on creating a category, refer to the Email Opt-Out Configuration article.
- Your system must call the Update Preference API to push opt-out data back to Gainsight whenever a user updates their email preferences on your hosted page. This data is reflected in the Opt-Out Emails object in Reports. For more information on the fields available in Opt-Out Emails object, refer to the Journey Orchestrator Objects article.
Explore Opt-Out Settings Page
To access the settings, navigate to Administration > Communication > Opt-out Configuration > Opt-Out Settings.

The Opt-Out Settings page provides two options for managing opt-out preferences: Gainsight Managed Opt-Out and Custom Opt-Out. Select one of these options to continue.
- Gainsight Managed Opt-Out uses predefined categories and opt-out pages managed by Gainsight
- Custom Opt-Out allows you to configure your own footer and integrate with a self-hosted unsubscribe experience.
By default, the Gainsight Managed Opt-Out option is selected as the Opt-Out Preference.
If you select Gainsight Managed Opt-Out, refer to the Gainsight Managed Opt-Out Settings article for further instructions.
If you select Custom Opt-Out, continue with the instructions in the Custom Opt-Out section below.
Custom Opt-Out
Custom Opt-Out has two options for managing opt-out preferences: Opt-Out Categories and Global Opt-Out. Select Opt out Categories option from the popup.

Note: The Pages tab is not applicable in this scenario and is deactivated for Custom Opt-Out settings.
You can switch from Custom Opt-Out to Gainsight Managed Opt-Out settings at any time by clicking the Gainsight Managed Opt-Out option. A confirmation dialog box appears to complete the change.

Note: Custom footers are not supported in Advanced or Simple Programs. Make sure to select this option only if you are using Dynamic JO programs.
If you select Opt-Out Categories settings, refer to the Create Opt-Out Categories in Opt-Out Setting section for further instructions. The Pages section is not applicable for Opt-Out Categories and only Categories section is applicable.
If you select Global Opt-Out setting, refer to the Custom Opt-Out Setting for Global Opt-Out article for further instructions.
You can also switch between these two options using the Change Custom Opt-Out Type option.

Create Opt-Out Setting for Opt-Out Categories
Follow the steps below to get started with creating an opt-out setting:
- Click Create New to create an opt-out setting. The New Opt-Out Setting page appears.

- Enter the Name and Description.
Note: Mandatory fields are marked with an asterisk. By default, the original Gainsight footer text is available.
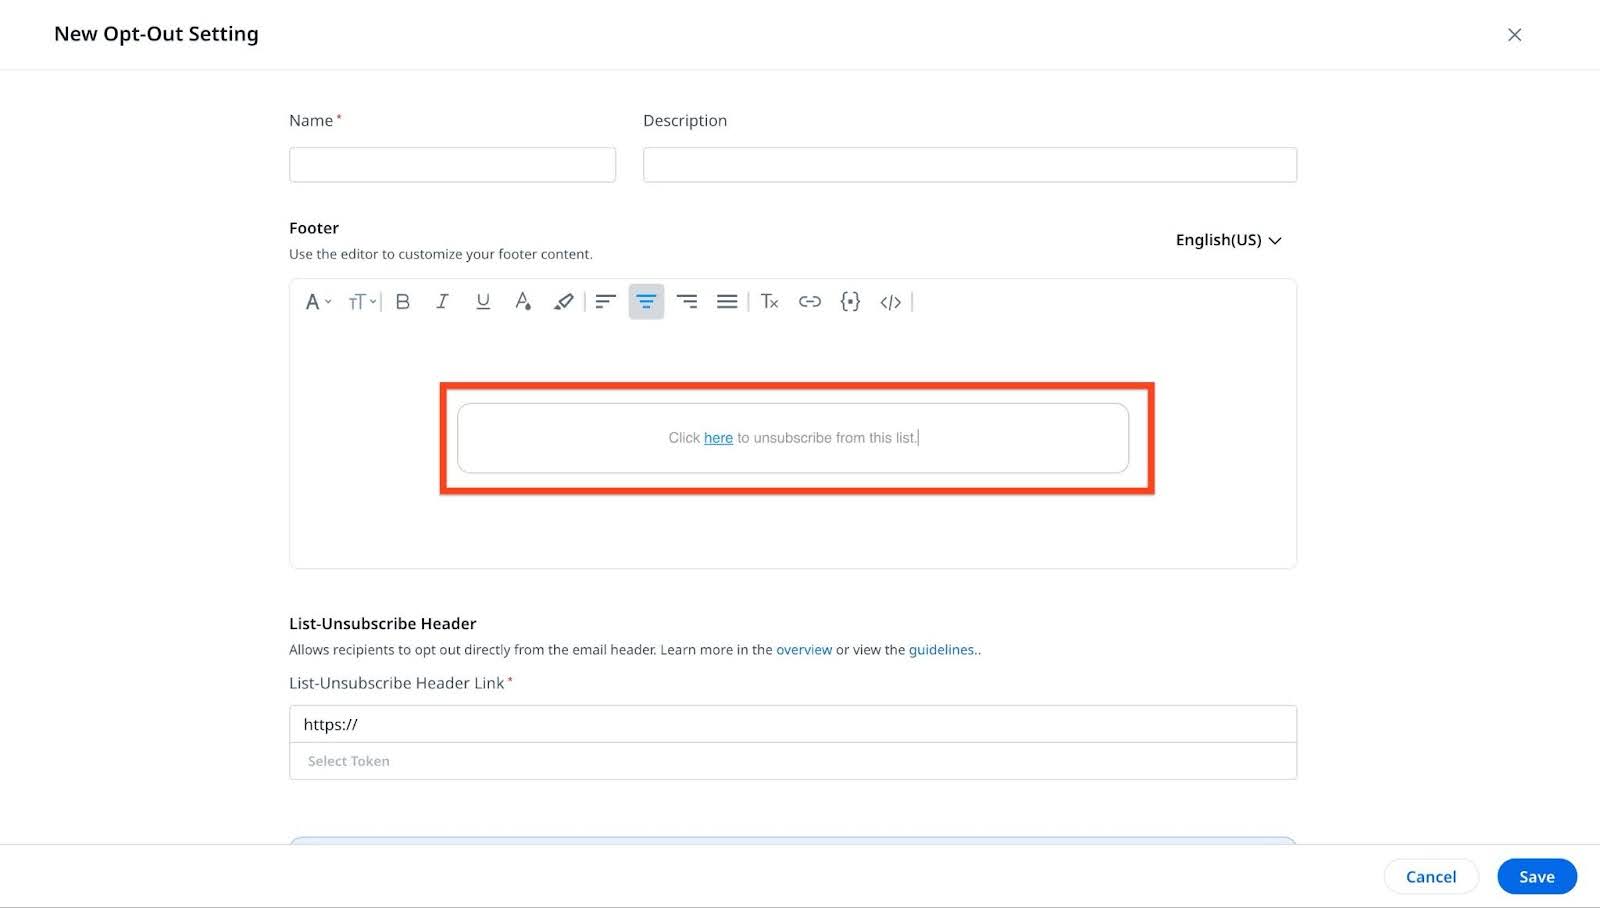
- In the Footer section, modify the content directly, or click Insert HTML to customize the footer using HTML code.

- Click Save to apply the changes.

Insert a Token
Follow the steps below to add a token in the custom footer:
- Click Insert Token to add a token in the footer.

- Enter the following details:
- Display Name : Enter a user-friendly label for the tokenized field.
- Default Value : Enter a text that appears if the token value is unavailable.
- Default Mapping : Select a fallback source field to ensure the token is populated even when the primary value is missing.
- Value Type : Choose the data type that matches the selected default mapping field.
- Click Update.

Insert a Link
Follow the steps below to add a link in the custom footer:
- Click Insert Link to add a link in the footer.

- Enter the following details:
- Link Text
- Link Type from the dropdown list

- Link URL in the Link textbox.
- (Recommended) Add Insert Opt-Out Identifiers beside the link.
Note: This token passes the email's opt-out category, recipient ID and email Id. No setup is required, but your system must call the Update Email Opt-Out Preferences API to send this data back to Gainsight. This is necessary to accurately reflect the email opt-out status, including the Unsubscribe metric in JO Analytics.

- Click Save.
Use Language Variants
You can create opt-out settings for different languages using the default (English) opt out settings. Translations for different languages are not generated automatically, and admins have to manually enter the content for each language. This setting ensures that language-specific content is displayed appropriately. For example, changes made while Irish is selected, only appear when Irish is active, and not when English is selected.
To use language variants:
- Click Manage Variants to add language for opt-out footer. The Manage Variants dialog box appears.
Note: You must save the default (English) variant to activate Manage Variants option.

- From the Available Languages list, select the checkboxes next to the languages you want to add to the Selected Languages list.
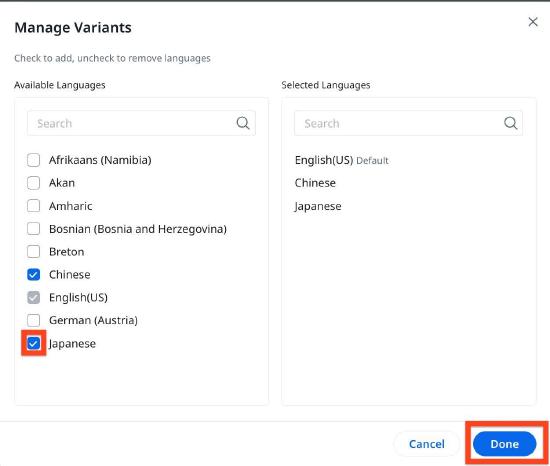
Note: To add more languages in the Available Languages list, navigate to Administration > Communication > Languages and click Add Language.

- Click Done. The added language(s) is reflected in the dropdown list.
- Select a language from the dropdown list to modify the footer content for that specific language.

- Modify the footer text as per the requirements.
Note: The Name, Description, and List-Unsubscribe Header Link fields are not editable in variant languages other than the default (English).

- Click Save to keep the changes.
Unsubscribe Header and Link
The List-Unsubscribe header is an email header field that allows recipients to easily opt out of future emails without searching for an unsubscribe link in the email body. The visible unsubscribe option appears next to the sender’s email address.

To dive deeper into creating and understanding the Unsubscribe Header and Unsubscribe Link, refer to the below points:
- Create a List-Unsubscribe API
- Email Clients and Compliance
- List Unsubscribe Link in Gainsight
- Add Opt-Out Identifiers
- What is Sent in the Email Header?
- External References
Create a List-Unsubscribe API
To create a list-unsubscribe API:
- Set Up an Unsubscribe Endpoint
- POST - Create an HTTP(S) endpoint on your server to handle POST requests for single-click unsubscribe. When a user clicks the Unsubscribe button in the email header popup, the API immediately unsubscribes the user upon receiving the POST request—no additional user action is needed. This request is typically triggered by email clients like Gmail or Yahoo!.
- GET - The API must return an HTML page that enables users to manage their email preferences. If the user clicks the Unsubscribe link again (for example, from the same email header), the link opens the same endpoint in a browser, allowing the user to update their preferences further.

Email Clients and Compliance
To comply with standards from providers like Gmail and Yahoo!, include the following headers in non-operational emails:
List-Unsubscribe: <Your POST endpoint URL>
List-Unsubscribe-Post: List-Unsubscribe=One-Click
This header signals that unsubscribing is supported through a POST request. To avoid accidental unsubscribes triggered by anti-spam bots (which may use GET requests), Gainsight uses a POST-only header.
List Unsubscribe Link in Gainsight
Configure your unsubscribe POST endpoint as explained in the Email Clients and Compliance section.

Typically, admin needs to ensure that opt-out Identifiers token is configured as this helps identify the recipient and the email opt out category system automatically applies the opt-out categories configured in the email template being used. For a detailed step by step process refer to the Configure the List-Unsubscribe Header in Gainsight section.
Add Opt-Out Identifiers
Gainsight auto-generates a system token called Opt-Out Identifiers, which ensures accurate opt-out tracking and analytics.
- For Opt-Out Categories, the token includes:
- Opt-Out Category
- Recipient ID
- Email ID
- For Global Opt-Out, only the recipient’s email address is included.
The identifiers are encoded using Base64 and embedded in the unsubscribe link.
Example URL with Encoded Token
https://www.example.com/header-unsub...FtcGxlLmNvbSJ9
Decoded optOutIdentifier Value
{
  "optOutCodes": [
    "Customer Success Communication",
    "Marketing"
  ],
  "recipientId": "1I0075IFDBO3399ELQ24TGP312RO2ERG9BLE",
  "emailId": "person1@example.com"
}
What is Sent in the Email Header?
Gainsight includes these headers in emails:
| Header Key | Description | Example Value |
|---|---|---|
| List-Unsubscribe | URL to your List unsubscribe endpoint configured at Gainsight Custom Opt Out Settings | https://www.example.com/header-unsubscribe?optOutIdentifier=eyJvcHRPdXRDb2RlcyI6WyJDdXN0b21lciBTdWNjZXNzIENvbW11bmljYXRpb24iLCJNYXJrZXRpbmciXSwicmVjaXBpZW50SWQiOiIxSTAwNzVJRkRCTzMzOTlFTFEyNFRHUDMxMlJPMkVSRzlCTEUiLCJlbWFpbElkIjoicGVyc29uMUBleGFtcGxlLmNvbSJ9 |
| List-Unsubscribe-Post | Indicates POST method for one-click unsubscribe | List-Unsubscribe=One-Click |
Configure the List-Unsubscribe Header in Gainsight
To configure your List-Unsubscribe header in Gainsight:
- In the List-Unsubscribe Header section, add the unsubscribe URL in the List-Unsubscribe Header Link field.

- Click Select Token.
Note: The token inserted in unsubscribe link is available for use in List-Unsubscribe Header Link. - From the Select Mappings dropdown list, choose the appropriate mapping.
- Click Save.

Note- Tokens are retrieved from the footer section of the email template.
- Selecting a token embeds the corresponding footer value into the link.
- Use Opt-Out Identifiers especially when leveraging Gainsight categories.
The Opt-Out Identifiers system token is automatically resolved by the system and populated with the following attributes:- Opt-out categories: The opt-out categories defined in the email template used to send the email.
- Recipient ID: The Gainsight-generated identifier that uniquely represents the specific participant/recipient for the current email.
- Email ID: The recipient’s email address to which the email was delivered.
- Click Save to apply the changes.
IMPORTANT
- Only the tokens used in the default opt-out setting are available for use in other language variants. You cannot add new tokens in non-default language variants.
- If the default language variant uses a specific token in the List-Unsubscribe Header Link, that token must remain in the footer and cannot be removed from non-default language variants.
- To add a new token in the List-Unsubscribe Header Link of the default language variant, you must first include that token in the footer of the non-default language variant(s). This step is required to save the changes in the default variant and reflect a consistent List-Unsubscribe Header Link across all variants.
More Options for Managing Opt-Out Settings
From the three-vertical dots menu, you can:
- Edit: Modify any custom opt-out settings.
- Delete: Remove any custom opt-out settings.
- Set as Default: Marks a custom opt-out setting as the default selection for non-operational email templates.
- Apply To All: The setting is applied to all non-operational templates, except those linked to an active or scheduled Journey Orchestrator (JO) program.

Note: These settings are applicable only to active templates.
Create a Non-Operational Email Template
Users can follow the steps below to create and configure a non-operational email template in Journey Orchestrator:
- Navigate to Digital Journey > Email Templates.
- Click New Template to create a new email template.

- In the Create a New Template form:
- Enter a Template Name and Description.
- From the Folder Selection dropdown list, select a location where you want to save the template.
- Select Non-Operational as the Email Type.
- From the Select an Opt-Out Category dropdown list, choose a category.
- From the Select an Opt-Out Setting dropdown list, choose an opt-out setting.
Note: The default setting defined on the Custom Opt-Out Settings page is selected automatically.

- Click Next.
- Under Create a New Template, select a layout.
- Click Save.

The Email Template List View includes the Category Names, Opt Out Setting, and Page Name columns. These columns are optional and can be added or removed using the column picker.

Additionally, the Filter includes the Category Names, Opt Out Setting, and Page Name fields, allowing you to better tailor your email templates list view.

Customize the Admin-Configured Footer
The footer configured by the admin appears automatically in the template. Users can modify the footer content as needed.

You can modify existing tokens in the opt-out settings and add new tokens, but only from the set of tokens used in the default variant of the email footer’s unsubscribe link.

Note
- The Email Manager > Email Templates show the same behavior when creating or editing a new template using Group Send.
- If the footer is modified, the template is unlinked from the admin-defined opt-out setting, and the changes are saved directly within the email template.
Revert Footer Changes
To revert footer changes:
- In the Email Templates page, click the Reset icon. A confirmation dialog box appears.

- Click Reset.
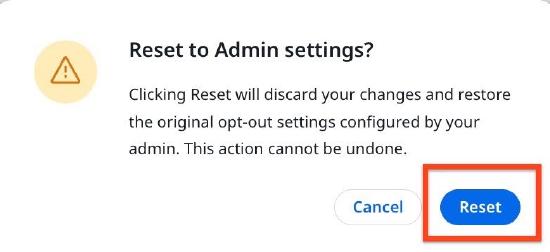
- Click Save to apply the reverted admin settings.
Create a New Email Template Version
Use the New Version option in Email Templates to create multiple versions of an email template to support different opt-out settings for various audiences. This flexibility empowers you to tailor unsubscribe behavior, footer content, and compliance messaging based on region, language, or audience type, without duplicating templates.
To create a new version:
- Click New Version. The Create Version dialog box appears.

- Enter the following details:
- Enter the Version Name
- Choose an Opt-Out Language from the dropdown list
- Choose a Layout
- Click Create. The new version gets created.

- You can modify existing tokens in the opt-out settings and add new tokens, but only from the set of tokens used in the default variant of the email footer’s unsubscribe link.

- Click Save to keep the changes.
- (Optional) To revert footer changes, click Reset icon.
Note- The Send Test Mail option in Preview sends a test email with an actual unsubscribe link and if the recipient clicks on the link they are unsubscribed from receiving any emails.
- Users can view opt-out analytics from Digital Journey > Programs > Analytics in Unsubscribe metrics.
Important
- The custom footer token is configurable in Journey Orchestration (JO) only for Dynamic Programs.
- This feature is not supported in either Simple or Advanced Journey Orchestrator (JO).
- Removing or altering an admin-configured token disables the unsubscribe functionality.
- Using and editing custom link is only supported in new email template builder
- No action is required for the opt-out identifier It is automatically populated based on the email template configuration.
- When sending emails using the Compose Email option in Group Send, editing the footer content is not supported. You can only modify the token mappings.