Configure Customer Goals
Gainsight NXT
This article provides an overview of the Customer Goals and links to admin and end-users articles.
Overview
Customer Goals provides a shared space to capture all of your customer’s goals from a specific page in C/R360.
Key Benefits
- Capture, plan and prioritize the goals with your customer, using Cockpit CTAs and Success Plans.
- Present the business goals achieved by the customers using your products and services.
- Provide visibility on prioritized and associated work, across multiple teams.
Admins can create a library of widely used goals making it easier for the CSMs to capture goals. They can configure the detail view layout for goals, customize the status options, create new fields, and display goals created on Relationships in C/R360 and Opportunity in Salesforce .
License Specifications
Customer Goals is available for all the pricing and packaging plans. Permissions associated with each License-Type are as follows:
|
License Type |
Permissions |
|---|---|
|
Viewer |
|
|
Viewer Analytics |
|
|
Full License |
|
Customer Goals Types
Admin can define a set of Goal Types to categorize customer objectives. Admin can then create the Goal and map metric to it from the metrics associated in this goal type.
Key Features
- Customizable Goal Types: You can create various goal types having its own unique layouts, adding custom fields, and organizing them to suit organizational needs.
- Default Groups and Fields: Each goal type comes with a default group of fields.
- Custom Groups: New groups and fields can be created, rearranged, reorder, organized using drag-and-drop, and deleted if necessary for customization.
- Enable or Disable Goal Types: You can use the Active toggle to enable or disable goal types. Enabled goal types are available for use, while disabled ones are hidden but retain their data for future reactivation.
Create a Goal Type
Create a Goal Type to organize and customize customer goals for easier tracking.
To create a new goal type:
- Navigate to Administration > Customer Goal > Types tab.
- Click Create Goal Type.

- In the Create Goal Type dialog box:
- Enter the Name of the goal.
- Select the Company & Relationship Type by choosing from available options or creating a new relationship type.
- (Optional) Assign a Color to distinguish the goal visually in reports and lists.
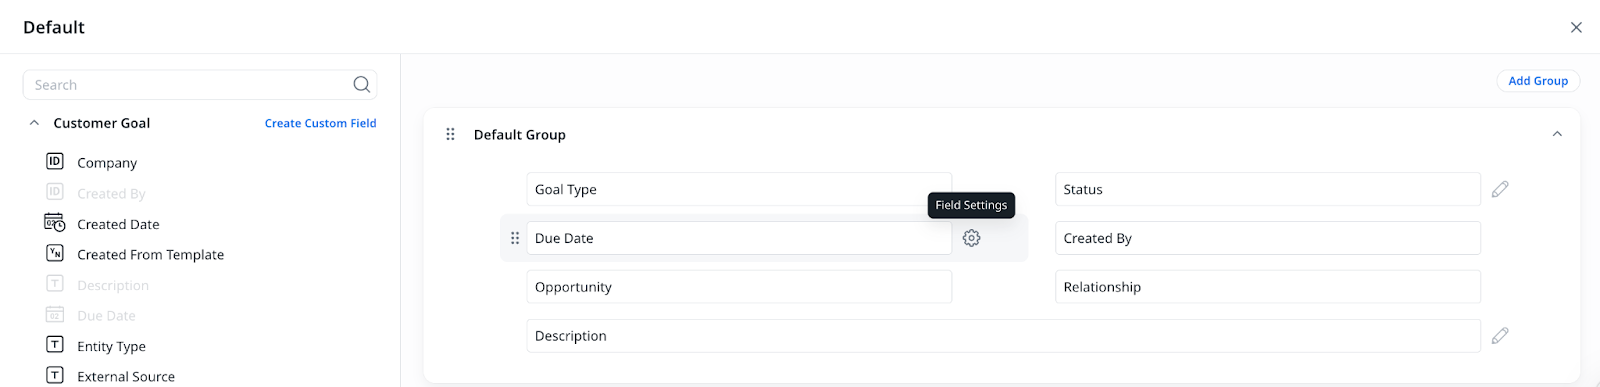
- Click Continue to open the layout page, where you can view and adjust fields and settings in the Default Group.
- (Optional) Create custom groups and add custom fields. For more information on how to create a group and add custom fields, refer to the Create a Group and Add Custom Fields section.
Note
- Fields added to the Default Group appear under Add More Details when creating a goal. Initially, only the customer goal name, status, due date, and description are visible. To display all configured fields without expanding Add More Details, enable Show All Fields on Goal Creation Page in Attributes & Settings > Other Settings.
- To display all configured fields without clicking Add More Details when creating a goal, enable Show All Fields on Goal Creation Page in Attributes & Settings > Other Settings.
- Click Add Metrics to associate relevant metrics with the goal type.
- Click Save Goal Type to finalize your configuration.

Note: Additional goal types are read-only by default when created.
Edit Existing Goal Type Layout
Edit an existing Goal Type layout to update fields, groups, or settings as needed.
To edit an existing Goal Type:
- Navigate to Administration > Customer Goal > Types tab.
- Click the three-horizontal dots menu next to the goal type and click Edit to navigate to the layout page of the goal type you want to edit.
Note: The Default Group is static, so its fields cannot be modified. However, you can create new groups and customize them by dragging and dropping additional fields.

- To add metrics, in the Metrics section, click the Add Metrics button.
- (Optional) Add custom fields to groups. For more information on how to create a group and add custom fields, refer to the Create a Group and Add Custom Fields section.
Note: To display all configured fields without clicking Add More Details when creating a goal, enable Show All Fields on Goal Creation Page in Attributes & Settings > Other Settings. - Once your changes are complete, click Save Goal Type to finalize.
Create a Group and Add Custom Fields
Create a group and add custom fields to organize and capture specific goal details.
To create a group and add custom fields:
- Navigate to the Goal Types layout.
- To add a new group, click Add Group.

-
In the group settings, you can:
- Add custom fields.
- Drag and drop fields to reorder them.
- (Optional) Edit the names of the fields.
-
Once the group is created and fields are arranged, click Save Goal Type.

-
(Optional) You can delete a group by selecting the group and click Delete.
Note
- Mandatory Fields: Setting a field as mandatory may cause issues if the same field is marked as read-only at the layout level.
- Lookups on Field Updates: It is recommended to block lookups during field updates because adding or changing a lookup alters the field type, which can impact its functionality.
Add Metrics
Metrics can be added to each Goal Type and then associated with the individual goals created under that Goal Type to track performance.
- Navigate to Goal Types layout.
- Click Add Metrics. A list of available metrics.
- Select the relevant metrics.
- Click Add Metrics to add the metrics.
- Click Save Goal Type to save the changes.
Note
- These metrics are available to CSMs for tracking and monitoring goals.
- If a Goal Type includes multiple unique metrics, all of them are available for selection when creating a goal. While you can choose from this list to limit which metrics are used, you cannot add new metrics during goal creation. To add or modify metrics, you need to update the Goal Type settings.
- Only the metrics associated with the selected Goal Type are available during goal creation. This improves relevance, reduces manual filtering, and ensures consistency in how metrics are applied across goals.

Delete Metrics
If you remove a metric from a goal type, it unlinks from all associated goals, which may result in it being automatically removed from those goals.
To remove a metric from a goal type:
- Navigate to Administration > Customer Goal > Types tab.
- Click the three-horizontal dots menu next to the goal type and click Edit to navigate to the layout page of the goal type you want to delete the metric.
- In the goal type layout, locate the Metrics section.

- To delete a metric, click the X icon next to the metric which you want to unlink. A confirmation dialog box appears.
- Click Delete to confirm.
Note: Removing a metric from the goal type also removes it from any goals that use the metric, but does not delete the metric. This operation does not affect existing metrics used by individual CSMs, but they cannot assign the metric to new goals.
Customer Goals Library
Goal Library allows you to create a set of standard goals that CSMs can import directly. These pre-created goals come with important fields, like metrics, already pre-filled, making it easier for CSMs to adjust and use them as needed.
View Goals Library
The Goals Library consists of all the goals added by the admins.
To view the Goals Library:
- Navigate to Administration > Customer Goal > Goals Library. A list of goals added to the library is displayed.
- To add more columns to the view, click the Column Selector icon and choose the required columns from the menu.Use the columns to sort the goals in the library.

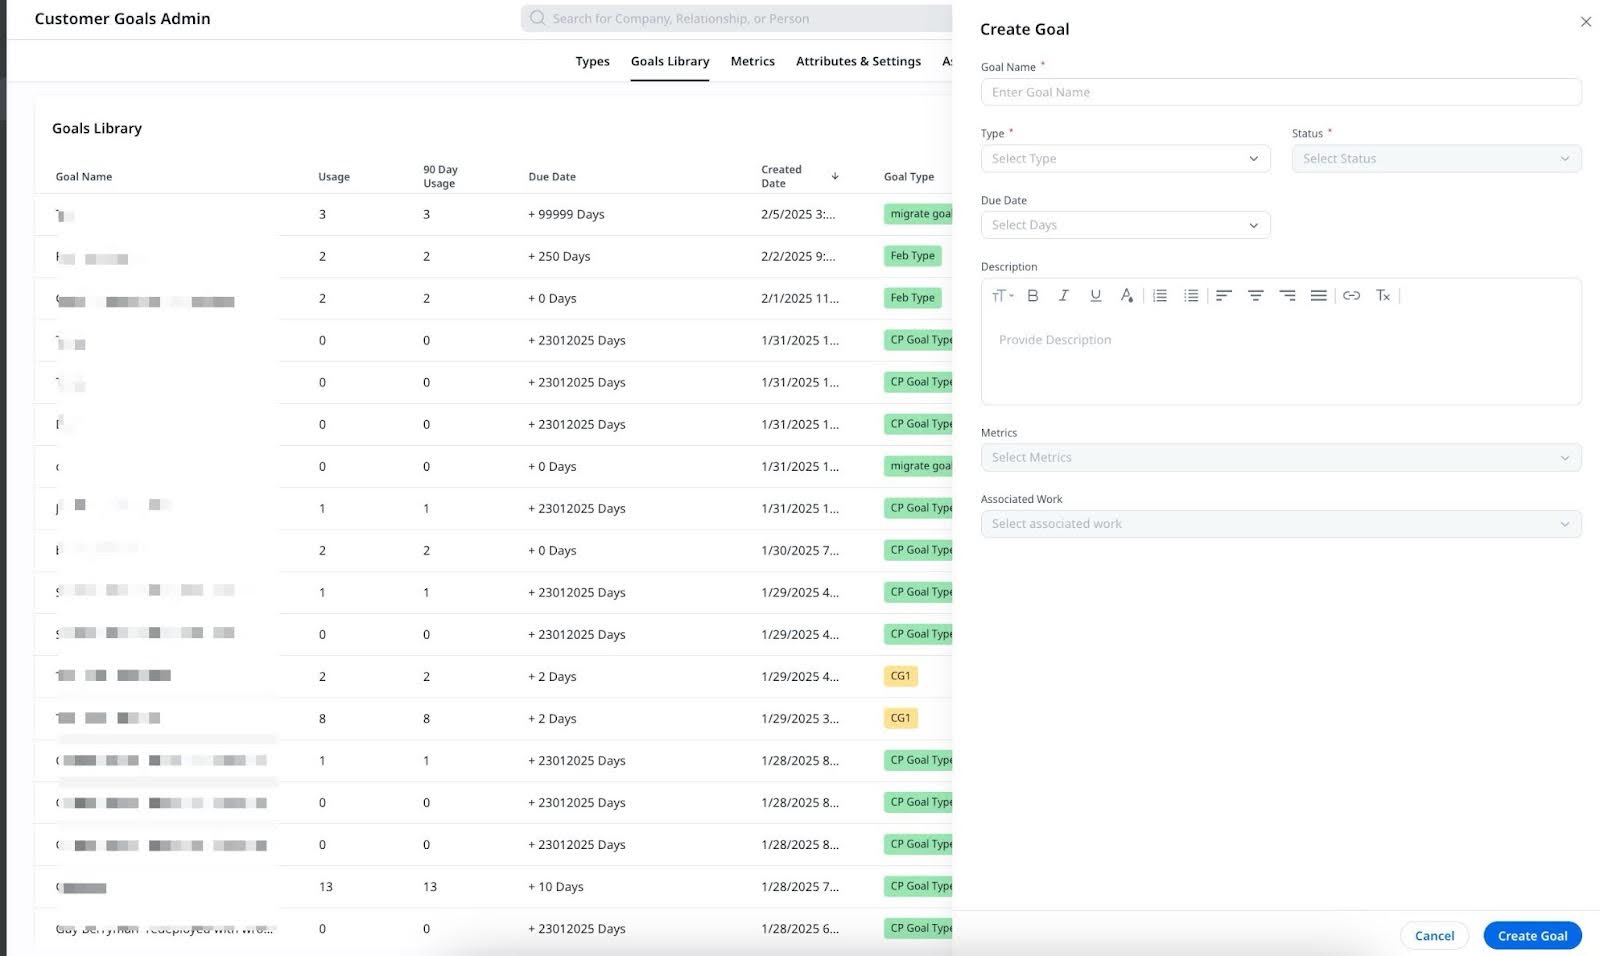
Add Goal to the Library
Add a goal to the library to help CSMs save time and maintain consistency.
To create and add goals to the library:
- Navigate to Administration > Customer Goal > Goals Library tab.
- Click Add Goal.
- Once you click Add Goal, you see two options:

Create Goal
Create a goal to capture specific customer objectives and track their progress effectively.
To create goals to the library:
- Navigate to Administration > Customer Goal > Goals Library tab.
- Click Add Goal > Create Goal.
- In the Create Goal slide-out panel, enter the following details.
- Goal Name
- Type
- Status
- Due Date
- Description
- From the Metrics dropdown list, select the relevant metrics to associate with the goal type, and add them to the goal.
- To add the goal to the library, click Create Goal.
Note: Fields marked as Editable Only During Goal Creation can be modified only at the time of goal creation. Admins can set default values for these fields at the layout (Type) level, and override them in the Goal Library template if needed. When a goal is imported from the library, the overridden value is pre-filled and can only be edited during creation.
Upload Goals
You can bulk-upload goals using a CSV file, making it easier to add multiple goals at once.
Key Features
- Upload CSV File: You can upload a CSV file containing multiple goals eliminating the need for manual entry.
Note: Both Date and DateTime fields can be mapped, but only one format is supported for each:- Date: yyyy-MM-dd
- DateTime: yyyy-MM-dd HH:mm:ss
The format of the file should be:

-
Track Execution History: After uploading, the execution history page shows the upload status, whether each metric was successfully added or if any errors occurred.

- Re-upload Failed Entries: If some metrics fail to upload, you can download a report, fix the issues, and re-upload only the failed entries without affecting the successful ones.
- Download Reports: You can download success and failure reports for easy troubleshooting.
Customer Goals Metrics
You can configure various metrics to effectively track and assess customer goals. These metrics also serve as templates, allowing CSMs to customize and track progress towards new customer goals.
Note
- Ensure that all metrics are pre-created in the Metrics section before associating them to a goal type.
- Apply this rule when creating goals or performing bulk uploads.
- For bulk uploads, if any metric in the file is not pre-created in the Metrics section, the corresponding goal fails to upload, resulting in partial success. Only goals with existing metrics upload successfully.
Add Metrics
Add metrics to goals to measure performance and track progress accurately.
To add metrics:
- Navigate to Administration > Customer Goal > Metrics tab.
- Click Add Metrics.
- Once you click Add Metrics, you see two options:

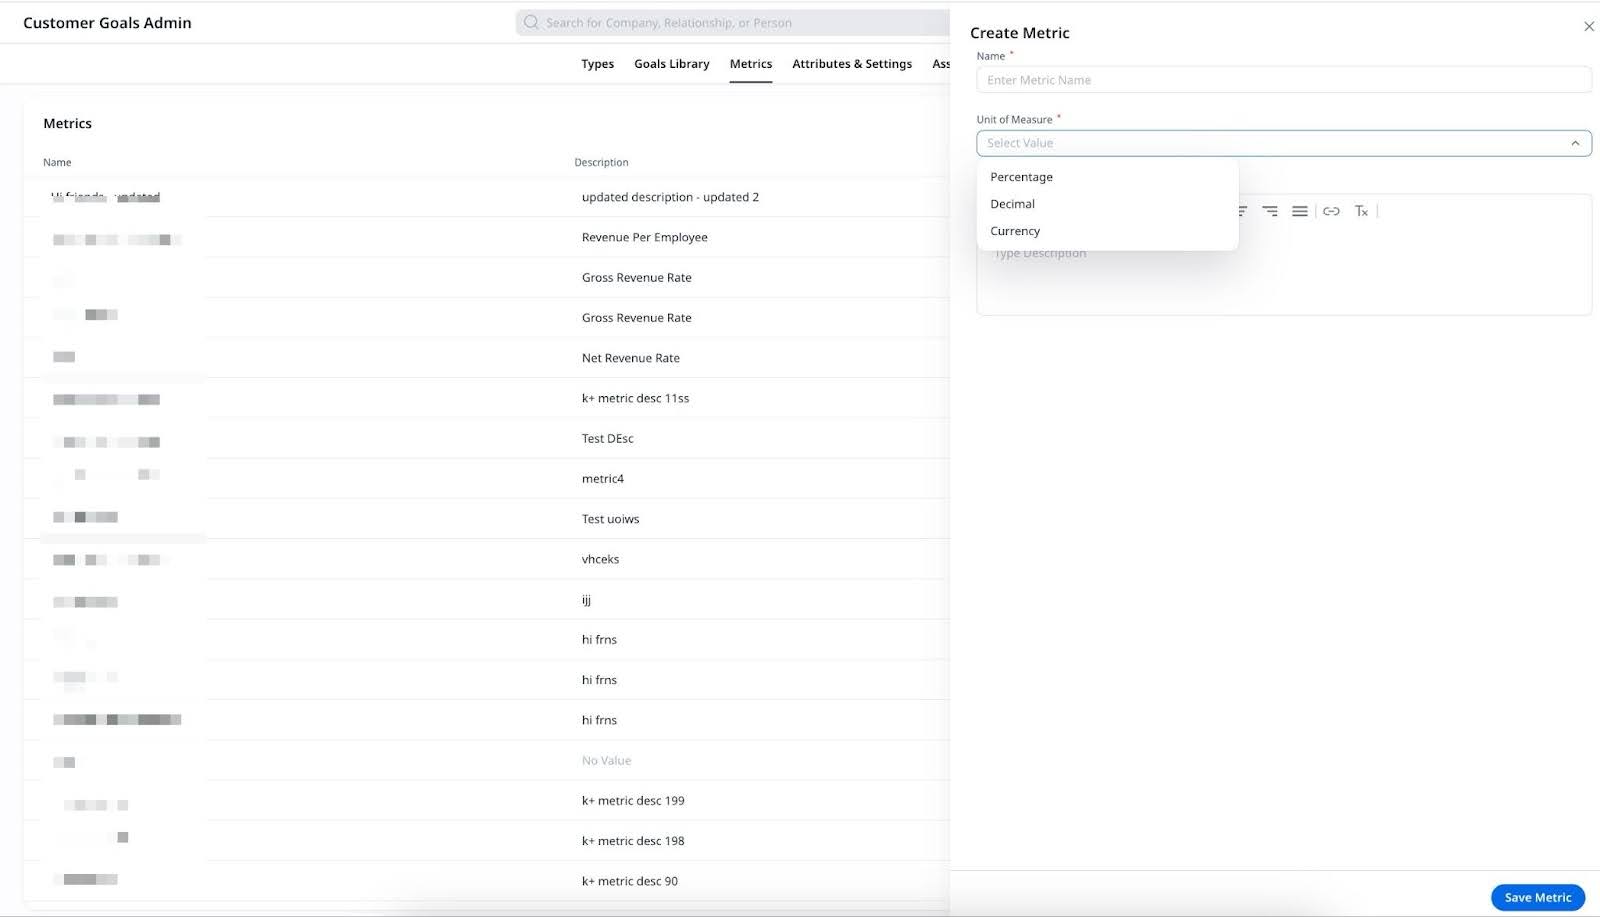
Create Metric
Create a metric to define measurable values for tracking customer goal outcomes.
To create a new metric:
- Navigate to Administration > Customer Goal > Metrics tab.
- Click Add Metrics > Create Metric.
- In the Create Metric dialog, enter the following details:
- Metric Name: Provide the name of the metric.
- Unit of Measure: Select one of the following options:
- Percentage
- Decimal
- Currency
- Description (optional): Add a brief description of the metric.
- To save any changes, click Save Metric. The configured metrics are available for CSMs to use.
Tip: Clone metrics for reuse, and delete metrics when they are no longer needed.
Note: You can now directly edit a metric by clicking on its fields. This allows you to:
- Edit the name of the metric.
- Update the description of the metric.
- Change the unit of measure by selecting a new option from the dropdown.

Define Metric Limits
Admins can set validation limits on a metric to control the range of values CSMs can enter. When a CSM enters a value outside the defined range, an error message displays and the value cannot be saved.
To define metric limits:
- Navigate to Administration > Customer Goal > Metrics.
- Click Add Metrics > Create Metric to create a new metric, or click an existing metric to edit it.
- Turn on the Define Metric Limits toggle. The Min Value, Max Value, and Decimal Places fields appear.

- Enter the required values:
- Min Value: The minimum value a CSM can enter for this metric.
- Max Value: The maximum value a CSM can enter for this metric.
- Decimal Places: The number of decimal places allowed.
- Click Save Metric to apply the limits.
Metric limits apply to new values entered after the limits are configured. Existing metric values are not affected.
Upload Metric
Upload metrics to track and measure goal performance effectively.
To upload metrics in bulk:
- Navigate to Administration > Customer Goal > Metrics tab.
- Click Add Metrics > Upload Metric.
- In the Upload Metric dialog, perform the following actions:
- Upload CSV: Drag and drop a CSV file or click Browse to select a file (maximum size: 10 MB).
Download Templates: Use the links to download a Sample Data or Existing Data CSV file for reference.
- Review the CSV Properties:
- Upload CSV: Drag and drop a CSV file or click Browse to select a file (maximum size: 10 MB).
- Character Encoding: Select the encoding format.
- Field Separator: Choose the field separator.
- Escape Character: Specify the escape character, such as Backslash.
- Quote Character: Choose the character for enclosing field values.
- Header Line: Define the starting line for header information.
- Multi-Select Separator: Specify the separator for multi-select fields.
- Click Continue to proceed to the Field Mapping step.

-
Field Mapping: Match the columns from the uploaded CSV file to the corresponding fields in your system to ensure data accuracy.
- Select Source: Choose a column from the uploaded CSV file to map as the source.
- Select Target Field: Select the corresponding field where the data is mapped such as Name, Unit of Measure.
- Add Mapping: Click to add additional field mappings for other columns in the CSV.
- Remove Mapping: Use the delete icon to delete an incorrect mapping.
- Map all fields, then click Upload Metric to finalize the process.
-
Check the Execution History to ensure the upload was successful or resolve any errors.
IMPORTANT: To learn more about key features, refer to the Key Features section under Upload Goals.
Delete Metrics
Delete a metric is a permanent action and can only be done if the metric is no longer associated with any goal type or customer goals.
To delete a metric:
- Navigate to Administration > Customer Goal > Metrics.
- Check the metric you want to delete.
- Click the three-horizontal dots menu next to the metric.
- Click Delete and confirm the action in the dialog box.
- If the metric is associated with a goal type or any existing goals, an error message appears.
Note: To proceed with deletion, remove the metric from all associated goal types and goals before retrying. - Repeat the deletion process after disassociating the metric.
Note
- After confirming deletion, the metric is removed from the list.
- A confirmation message appears stating Metric deleted successfully.
IMPORTANT: Deleting a metric is irreversible. Ensure that the metric is no longer needed and has been fully disassociated from all goal types and customer goals before proceeding. Once deleted, the metric cannot be recovered or reassigned.
Deactivate Metrics
Metrics in Customer Goals can be disabled if they are no longer in use. Ensure that the metric is not associated with any goal types or customer goals before disabling it.
To disable a metric:
- Navigate to Administration > Customer Goal > Metrics.
- Click the metric you want to deactivate.
- Use the toggle switch next to the metric to deactivate it.
Note: If the metric is associated with any goal types a message dialog box appears. - Remove the metric from all associated goal types and goals. For more information on how to remove metric from goal type, refer to the Delete Metrics section.
- Once the metric is no longer associated with any goal type, repeat the process to disable it using the toggle switch.
Note: A confirmation message appears stating Metric is disabled.
IMPORTANT: If the metric is still in use by any goal, the system prevents it from being disabled until all associations are removed. Disabling a metric does not delete it and can be reversed by toggling it back to active.
Attributes & Settings
Attributes & Settings allow you to define relationships, manage goal status, and organize fields for Goal Types.
Status
Status options provide an insight into the current state of the goal. These appear as options in the Status dropdown menu. There are five out-of-the-box status options available in the Status dropdown menu:
- New
- On track
- Off track
- Achieved
- On hold
IMPORTANT: All out-of-the-box status options can be deactivated, but deletion is not allowed.
Create Status Options
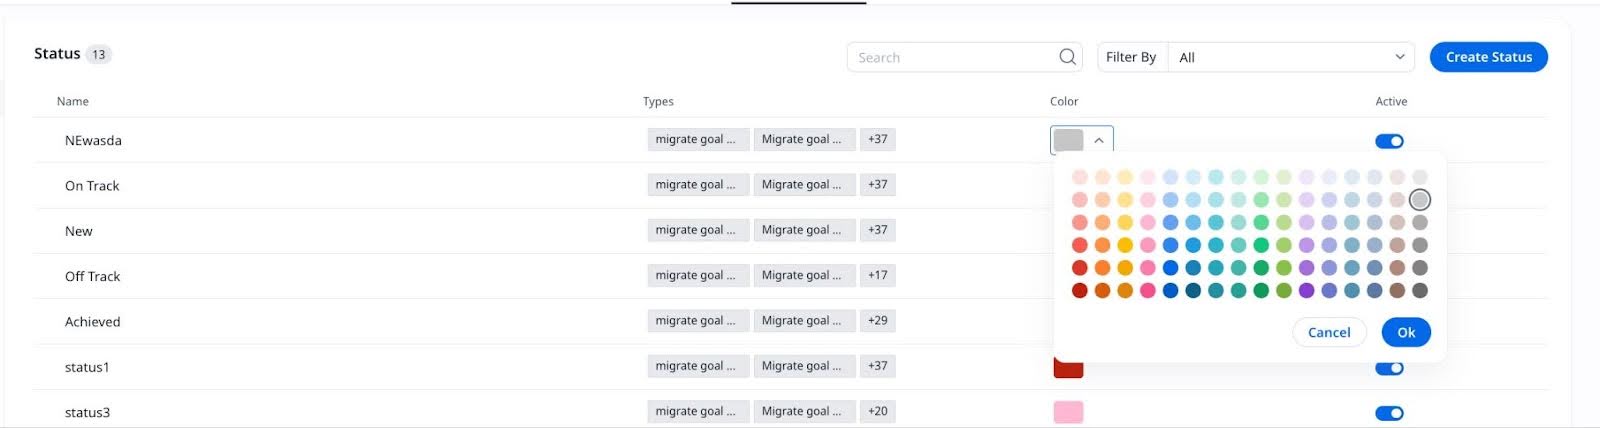
To create custom status options:
- Navigate to Attributes & Settings > Status.
- In the Status section, click Create Status.

- Enter a Name for the status.
- Select the Types from the Select Goal Type dropdown.
- (Optional) Select a Color.
- From the Reporting Category dropdown, select Open or Closed.
- Click Continue to save the status.
Reorder Status Options
Reorder status options to customize the sequence based on your preferences.
To reorder status option:
- Navigate to Attributes & Settings > Status.
- Use the drag-and-drop method to change the order of the statuses in the dropdown menu.
Customize Status Options
Customize the name or the color associated with existing status options.
To edit the name:
- Navigate to Attributes & Settings > Status.
- In the Status section, hover over the status option that you wish to edit.
- Enter the new name in the text field that appears.
- Your changes automatically save, and the updated status reflects in the list.

To change the color:
- Hover over the status option.
- Click the Color dropdown menu.
- Select a color.
- Click Ok.
To change the Reporting Category:
- Hover over the status option you want to update.
- Click the Reporting Category dropdown.
- Select Open or Closed.

Your changes automatically save and the updated category reflects in the status list.
Activate/Deactivate Status Options
Activate or deactivate status options to manage their availability.
To activate/deactivate status options:
- Select the status you want to update.
- Use the toggle switch to activate or deactivate the status.
- Active: The status is available in the dropdown menu.
- Inactive: The status is hidden from dropdown options.
Note: Deactivating a status does not affect existing goals using that status, but it cannot be assigned to new goals.
Delete Status Options
To delete a status:
- Check the status in the list.
- Click the delete icon next to it.
Confirm the deletion in the dialog box.Deleting a status option removes it permanently from the system i.e. once deleted, the status options cannot be recovered.
IMPORTANT: Before deleting a status, update the status of all associated goals. Once deleted, a status cannot be recovered.
Fields
Customizable data entry sections that capture and organize key information within a form or layout.
Configure and Organize Fields
To configure and organize fields for customer goals:
- Navigate Attributes & Settings > Fields.
- Add custom fields or modify existing ones to capture necessary goal information.
- Arrange fields using drag-and-drop to determine their display order.
Default Goal Library View
The Default Goal Library View is a key configuration that allows you to define how goals are organized and displayed for CSMs. Once filter is applied, CSMs only see the goals relevant to their assigned responsibilities, which is a subset of the overall goals created in the Goal Library.
Note: The Default Goal Library View uses relationship-level filters to show CSMs only the goals relevant to their assigned accounts. Filters are based on relationship attributes such as account type, ownership, allowing CSMs to select goals that match the specific context of the customer relationship.
Filter Goals by Relationship Attributes and Purchased Products
Relationship attributes like Solutions and Subsolutions act as relationship filters that control which goals are visible to CSMs based on their specific areas of responsibility. These filters are essential for tailoring the goal library view to match the unique structure of your teams and goals.
To configure default global library view:
- Navigate to Attributes & Settings > Default Goal Library View.
- You can filter goals based on relationship attributes, ensuring that the displayed goals are relevant.
- Apply filters using the defined relationships to ensure only relevant goals are displayed to CSMs. This ensures that CSMs focus on a specific area.
Note: This filter is currently applicable only at the relationship level.

- The system automatically maps and filters goals based on the Relationship attributes in the relationship object, ensuring CSMs see only goals relevant to their assigned areas.
Note- Select the Include Null Values checkbox to compare null values.
- If the checkbox is unchecked, only exact (non-null) values are compared, and all empty fields are excluded.
- The filter behavior changes based on whether null values are included.
- Check the Enable filter by product checkbox to apply an additional layer of filtering.
Note: When enabled, goals are filtered not just only by relationship attributes but also by the products the customer has purchased. - Click Save to apply the filters.
Apply Filters for CSMs
Filters allow Customer Success Managers (CSMs) to view only the goals relevant to their assigned relationships.
- Navigate to Administration > Customer Goal > Goals Library.
- Click Apply Filter at the top of the Goal Library.
- In the Apply Filter > Add Filter, complete the following:
- Field: Select the field to use as the filter criterion.
- Operator: Define the condition like, Equals, Contains.
- Value: Enter the value to match.

- Use Advanced Logic to group filters for complex use cases with logical operators.
- Click Apply to save the filter. CSMs now see only the goals relevant to their assigned relationships.
Other Settings
Adjust visibility settings for goals created on Relationship and Opportunity in C360.
To adjust settings:
- Navigate to Attributes & Settings > Other Settings.
- (Optional) Select the checkboxes to:
- View goals created on Relationship in C360.
- View goals created on Opportunity in C360.
- Enable Metrics and Associated Work at the Goal Level - Toggle the option to allow goal-level assignments.
- Select Restrict Actions on Closed Goals to restrict CSMs from editing or reopening closed goals. When enabled, all fields, metrics, and associated work on a closed goal become read-only and cannot be edited from the application.
- Select Limit Active Goals to limit the number of active goals a user can track at the relationship or company level.
- Select Restrict Duplicate Rule to prevent CSMs from creating a goal with the same name and type for the same company or relationship. Once the existing goal is closed or deleted, CSMs can create a new goal with the same name and type.
- Select Show All Fields on Goal Creation Page to configure all fields on the goal creation page as visible upfront, eliminating the need to expand Add More Details.
Note: You can enable metrics and associated work like CTAs, Success Plans either at the Goal Type level or the individual Goal level. This provides flexibility for CSMs to tailor goals per account while using structured guidance.
.png_2026-07-23_at_7.37.58_PM.jpg?revision=1)
Associated Work
Configure Success Plans and Cockpit CTAs here. Associate them with Goal Types to effectively guide your team's tasks.
To configure associated work for Customer Goals:
- Navigate to Administration > Customer Goal > Associated Work.
- Click the Add Associated Work button.
- Enter the details:
- Enter a Name.
- Select Goal Types from the dropdown.
- (Optional) Add a Description.
- Click Continue to save the associated work and proceed.

- After saving, the Associated Work appears in the list on the left panel.
- Select the newly created Associated Work from the list to open its detailed configuration page.
- Click Add Success Plan to configure the success plan.
- Configure the Success Plan:
- Name: Enter a unique name for the Success Plan.
- Include in Identifiers:Check this option to link identifiers (optional). If checked, Name is used as an additional identifier along with Type and Status. Add details such as the Objective Category to enhance categorization.
- Success Plans Type: Select the type from the dropdown (example, Strategic).
- Owner: Assign the individual responsible for the plan. Include owner reservation to maintain ownership.
- Default Owner: Optionally specify a fallback owner, ensuring ownership consistency.
- Status: Select the initial status for the plan.
Note
- Use Name Tokenization for dynamic names. Utilize the Goal Token to automatically populate name fields, following the format demonstrated in the demo for consistency.
- If the Relationship Owner is selected as the owner, it may not work when creating a goal at the company level. Use the same associated work bundle to avoid issues.
-
Set the Due Date:
- Define the Due Date by entering the number of days after the goal creation.
- (Optional) Select how weekends are handled:
- Skip weekend if due on a weekend: Adjust the due date to the next business day if it falls on a weekend.
- Skip all weekends: Exclude weekends from the calculation entirely.
- Do not skip weekend: Include weekends in the calculation without adjustments.
- (Optional) Select template: Choose one or more predefined CTA templates from the list. These will apply automatically when a goal that includes this associated work is created or imported.
Note: When a Success Plan is created using an associated work, it first looks for an existing Success Plan based on identifiers (name, type, and status).- If no matching Success Plan exists, a new one is created and the selected templates from the associated work are applied.
- If a matching Success Plan exists:
- If it has no templates, the templates from the associated work are applied.
- If it already has templates, templates from the Associated Work is not applied, and changes to the Associated Work’s template selection are ignored.

- Click Save Associated Work to apply the configuration.

Limitations
- Associated work such as CTAs or Success Plans set at the goal type level cannot be customized for individual goals.
- Using dynamic ownership, such as Relationship Owner, may not resolve correctly for company-level goals.
Configure Field Behavior and Validation Rules
You can define how each field behaves when creating or editing a goal. Fields can be editable at all times, editable only during goal creation, or read-only. You can also decide whether a field should be mandatory or optional. This improves data consistency by ensuring important information is captured during goal creation and protected from changes later.
To configure field behavior and mandatory settings:
- Navigate to Administration > Customer Goal > Types tab.
- Select the Goal Type you want to edit.
- On the layout page, locate the field you want to configure.
- Click the gear icon on the field to open Field Settings.
- In the Field Behavior section, select Read-Only, Editable, or Editable Only During Goal Creation, the field can be edited while creating the goal but becomes read-only after the goal is saved.

- (Optional) Enter a Default Value if you want it pre-filled during goal creation.
- Under Mandatory Options, select one of the following:
- Mandatory: Users must enter a value before saving the goal.
- Non-Mandatory: Users can leave the field blank.
- If the field is set to Mandatory and no default is provided, users must enter a value during goal creation to proceed.
- Click Save Goal Type to apply your changes.
Note
- After a goal is created, the field becomes read-only on the goal detail view. Field values can still be updated through Rules Engine or API.
- If this option is applied to an existing Goal Type, the selected field becomes read-only in all previously created goals that use the same layout.
Editing Options
Select whether the field is editable at any time, only during goal creation, or read-only.
| Option | Behavior |
|---|---|
| Read-Only | Field cannot be edited by users. It can only be updated through APIs or Rules Engine. |
| Editable | Field can be updated at any time. |
| Editable Only During Creation | Field is editable only while creating the goal. After saving, it becomes read-only in the goal detail view. |
Mandatory Options
Decide whether the field needs to be filled before saving or can be left blank.
| Option | Behavior |
|---|---|
| Mandatory | Users must enter a value before saving or submitting the goal. |
| Non-Mandatory | Field is optional and can be left blank. |
Note
- If a field is both mandatory and editable only during creation, users must enter a value during goal creation.
- If a field is mandatory and also read-only, a default value is required. Without it, users will not be able to save the goal.
Enable Customer Goals in C360/R360
To view the Customer Goals tab in your C360/R360, use the drag-and-drop method to add the Customer Goals widget to your C360/R360 layout. For more information refer to the Configure 360 Layouts article.
Create Reports on Customer Goals
Navigate to Analytics > Reports in Gainsight to create reports on Customer Goals. Reports can be created on the following Customer Goals objects:
- Customer Goals
- Customer Goal Template
- Customer Goal Association
For more information on the Customer Goals objects, refer to the Customer Goals Objects article.
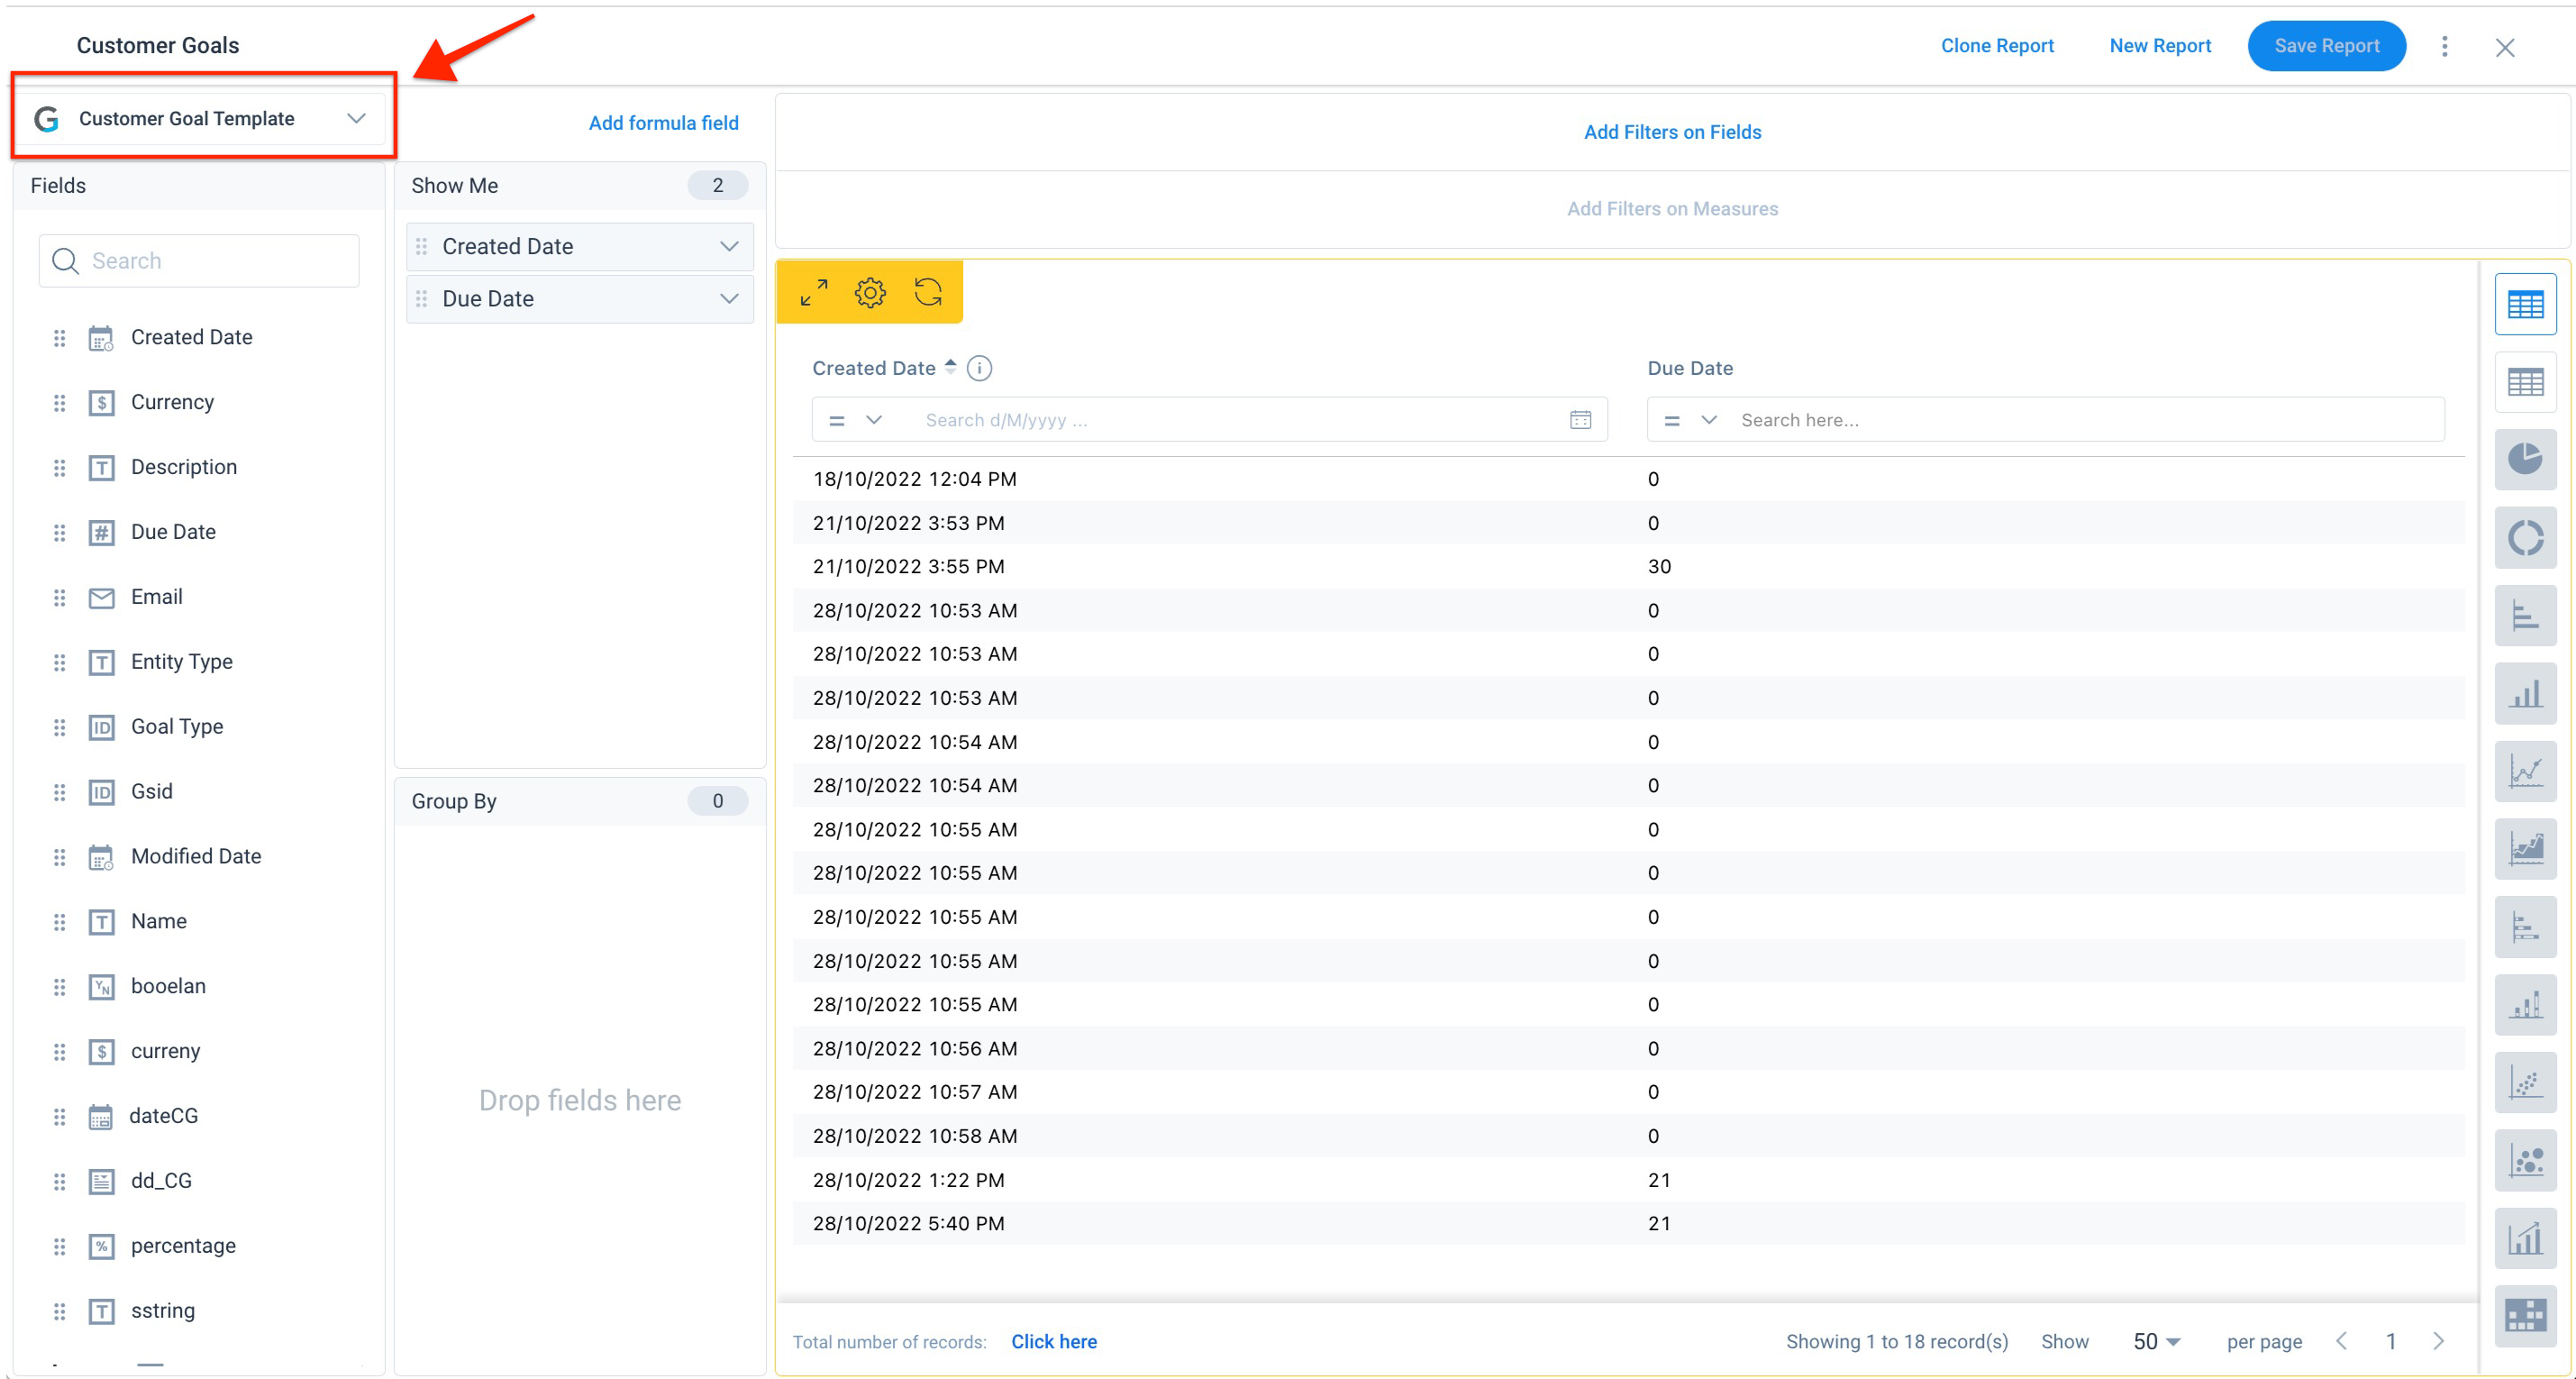
For more information on how to create and share reports, refer to the Create and Share Reports article.